
Words beginning with up. This UP words reference page contains a list of words beginning with UP, organized by word length. The below online list of words that begin with up might be useful for people who are taking classes in school leading to a degree, those who play word games, and visitors who enjoy education and learning or teaching about language and like to incorporate new words into their vocabulary.
2 letter words beginning with up:
up
4 letter words beginning with up:
upas updo upon
5 letter words beginning with up:
upend upget upper uppop uprip upset upwax
6 letter words beginning with up:
upbear upbeat upbend upbore upcast update upfurl upgrew uphale upheal upheld uphill uphold uphroe upkeep upland uplift uploop upmost uppile uppish uppity uppour uprear uprise uproar uproot uprush upshot upside upslip uptake uptide uptown upturn upwaft upward upwhir upwind
7 letter words beginning with up:
upalong upbelch upbraid upbreed upbuild upcasts upcheer updraft updress upfling upgazes upglean upgrade upheaps upheave upperch upraise uprates upreach uprests upright uprolls upshear upshoot upsilon upslope upsring upstage upstart upstate upsurge upsweep upswell upswing uptable uptalks upthrow uptower uptrend uptruss upwards
8 letter words beginning with up:
upbearer upbuilds upclimbs upclosed upcoming upfolded upgrowth upheaval upmaking uppercut upraisal uprising uproused upsiloid upspring upstairs upstream upstroke upsurged upswells upthrust uptrends upturned upvalued upwafted
9 letter words beginning with up:
upbinding upbreathe upbuilder upbulging upchariot upchaunce upcountry updraught upfurling upgirding upgraders upgushing uphearted upholders upholster uphoorded uplocking uppermost uprestore upscaling upsetting upstagers upstaring upstretch upswelled upthunder uptilting uptossing upwinding
10 letter words beginning with up:
upbraiding upbringing upcatching upfingered upgathered uphillward upholdings upholstery uphoording uplinkings upperparts uppropping upreaching uproarious upstanding upstirring upstreamed upswarming
11 letter words beginning with up:
upbraidings upfollowing upholsterer uppercutted upstretched
12 letter words beginning with up:
uppercutting upstandingly
13 letter words beginning with up:
upperclassman uprightnesses
Glad you visited this webpage containing UP words that begin with up, and hopefully it helped you find the right 3 letter, 4 letter, 5 letters, 6, 7, 8, 9, and even longer word beginning with UP.
Update Fields in Your Microsoft Word Documents Manually or Automatically
by Avantix Learning Team | Updated April 6, 2021
Applies to: Microsoft® Word® 2010, 2013, 2016, 2019 or 365 (Windows)
If you have inserted fields in your Microsoft Word document, you can choose to update them manually or have them update automatically. For fields you update manually, you can update just one field or update all the fields in your Word document at once. Some fields, such as page numbers, will automatically update when you preview your document. Many fields are set by default to update when you open a document but you can also set an option in Microsoft Word to update fields when you preview your file.
You can insert fields in several ways in Word. Some fields are created when you use Word’s built-in features (such as inserting a table of contents, a cross-reference, a bookmark or a page number). Other fields can be inserted using the Field dialog box or can be entered using keyboard shortcuts.
Recommended article: How to Insert Built-in and Custom Fields in Microsoft Word
Updating a single field
You can update a single field manually in two ways:
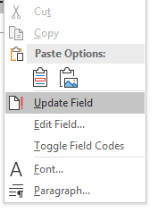
- Right-click the field and select Update Field. Depending on the type of field, another dialog box may appear where you can select other options (this occurs for example, with a tables of contents).
- Click the field and press F9.
Update field appears in the drop-down menu when you right-click a field:
Updating all fields in the body of a Word document
To manually update all fields in the body of a Word document:
- Click in the body of the Word document.
- Press Ctrl + A.
- Press F9.
Updating fields in headers, footers or text boxes
Some fields in headers, footers or text boxes must be updated separately.
To update fields in headers, footers or text boxes:
- Click in the header, footer or text box.
- Pess Ctrl + A to select all.
- Press F9.
Page fields do not need to be updated manually.
Updating a table of contents field
If you update a table of contents, another dialog box appears. In the Update Table of Contents dialog box, select Update page numbers only if no content has changed. Select Update entire table to update page numbers and content.
Updating fields before printing or previewing
You can set an option in Microsoft Word to ensure that all fields are updated automatically before previewing (to preview, click the File tab in the Ribbon and then click Print):
- Click the File tab in the Ribbon and click Options at the bottom. A dialog box appears.
- Click Display in the categories on the left.
- Scroll down to the Printing options area in the panel on the right.
- Ensure the check box for Update fields before printing is checked.
- Click OK.
The Word Options dialog box where Update field before printing has been checked appears as follows:

Preventing field updating
You can prevent fields from updating by locking them.
To lock a field so that it is not updated, click the field, and then press Ctrl + F11. To unlock a field so that it can be updated, click the field, and then press Ctrl + Shift + F11.
Displaying fields with grey shading
You can change your options in Microsoft Word so that all fields are displayed with grey shading (the shading does not print). This can be helpful to determine where you have fields in your document.
To display fields with grey shading:
- Click the File tab in the Ribbon and click Options at the bottom. A dialog box appears.
- Click Advanced in the categories on the left.
- Scroll down to Show document content area in the panel on the right.
- Select Always from the drop-down menu for Field shading.
- Click OK.
The Word Options dialog box with Field shading set to Always appears as follows:

You may not want to display field shading permanently. The default setting is Field shading when selected.
Fields are a very powerful way of using variable content in Microsoft Word documents. However, if fields do not update, your document can display errors or inaccurate content.
Subscribe to get more articles like this one
Did you find this article helpful? If you would like to receive new articles, join our email list.
More resources
How to Insert a Watermark in Word (like DRAFT)
14+ Word Selection Shortcuts to Quickly Select Text
How to Find and Replace in Word (and use Wildcards)
How to Superscipt or Subscript in Word (with Shortcuts)
How to Keep Text Together in Microsoft Word (Words, Lines or Paragraphs)
Related courses
Microsoft Word: Intermediate / Advanced
Microsoft Word: Designing Dynamic Word Documents Using Fields
Microsoft Word: Long Documents Master Class
Microsoft PowerPoint: Intermediate / Advanced
VIEW MORE COURSES >
Our instructor-led courses are delivered in virtual classroom format or at our downtown Toronto location at 18 King Street East, Suite 1400, Toronto, Ontario, Canada (some in-person classroom courses may also be delivered at an alternate downtown Toronto location). Contact us at info@avantixlearning.ca if you’d like to arrange custom instructor-led virtual classroom or onsite training on a date that’s convenient for you.
Copyright 2023 Avantix® Learning
Microsoft, the Microsoft logo, Microsoft Office and related Microsoft applications and logos are registered trademarks of Microsoft Corporation in Canada, US and other countries. All other trademarks are the property of the registered owners.
Avantix Learning |18 King Street East, Suite 1400, Toronto, Ontario, Canada M5C 1C4 | Contact us at info@avantixlearning.ca
На основании Вашего запроса эти примеры могут содержать грубую лексику.
На основании Вашего запроса эти примеры могут содержать разговорную лексику.
Competitive, content, and I’m sure most Gooners can think of another word beginning with ‘c‘ for me!
Соперничающий, довольный и, уверен, что у «канониров» найдется еще один эпитет, начинающийся на «с»!
Now, words beginning with «A».
To see all the English words beginning with a certain letter in the English-Esperanto dictionary select the letter below.
Чтобы увидеть все английские слова, начинающиеся с определенной буквы в английско-эсперанто словаре, выберите букву.
Ask child to think of some other words beginning with‘S’.
Результатов: 7524. Точных совпадений: 0. Затраченное время: 265 мс
Documents
Корпоративные решения
Спряжение
Синонимы
Корректор
Справка и о нас
Индекс слова: 1-300, 301-600, 601-900
Индекс выражения: 1-400, 401-800, 801-1200
Индекс фразы: 1-400, 401-800, 801-1200
 Please Note:
This article is written for users of the following Microsoft Word versions: 97, 2000, 2002, and 2003. If you are using a later version (Word 2007 or later), this tip may not work for you. For a version of this tip written specifically for later versions of Word, click here: Automatically Updating Fields and Links.
![]()
Written by Allen Wyatt (last updated November 3, 2021)
This tip applies to Word 97, 2000, 2002, and 2003
Stephanie wondered if there is a way in Word to force the updating of all fields and links in a document when either opening or saving (closing) the file. She knows that she can force updates prior to printing, but she was looking, specifically, for the open or close method of updating.
You can automatically update both fields and links when you print a document, but Word treats the two items differently when you are opening a file. Word provides a way to always update your links when opening a document. You can do this by following these steps:
- Choose Options from the Tools tab. Word displays the Options dialog box.
- Make sure the General tab is selected. (See Figure 1.)
- Click the Update Automatic Links at Open check box.
- Click on OK.
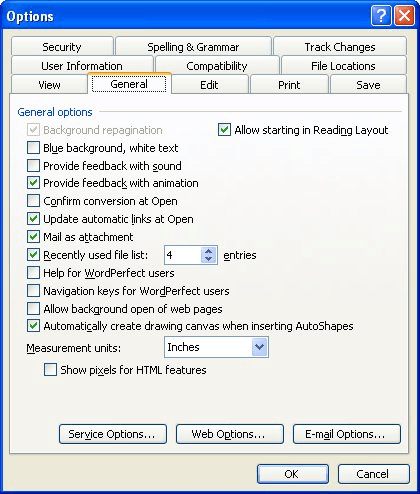
Figure 1. The General tab of the Options dialog box.
That setting should make sure that all your links are always up to date. If you want to update the fields when the document is opened, you’ll need to use a macro to accomplish the task. Specifically, you’ll need to use either an AutoOpen or AutoClose macro, depending on whether you want to update the fields when the document opens or closes. The following is an example of an AutoOpen macro you can use.
Sub AutoOpen()
    With Options
        .UpdateFieldsAtPrint = True
        .UpdateLinksAtPrint = True
    End With
    ActiveDocument.Fields.Update
End Sub
Note that the macro makes sure that the options are set to force updating the fields and links when printing occurs, then it updates all the members of the Fields collection in the document. If you, instead, wanted to update the fields at closing, you could use this macro:
Sub AutoClose()
    ActiveDocument.Fields.Update
End Sub
This macro is much shorter because there is no need to set the update-on-print options when you are exiting the document.
If you would like to know how to use the macros described on this page (or on any other page on the WordTips sites), I’ve prepared a special page that includes helpful information. Click here to open that special page in a new browser tab.
WordTips is your source for cost-effective Microsoft Word training.
(Microsoft Word is the most popular word processing software in the world.)
This tip (422) applies to Microsoft Word 97, 2000, 2002, and 2003. You can find a version of this tip for the ribbon interface of Word (Word 2007 and later) here: Automatically Updating Fields and Links.
Author Bio
With more than 50 non-fiction books and numerous magazine articles to his credit, Allen Wyatt is an internationally recognized author. He is president of Sharon Parq Associates, a computer and publishing services company. Learn more about Allen…
MORE FROM ALLEN
Setting Limit Line Spacing in the Equation Editor
The Equation Editor is a great way to add a professional-looking equation to your document. It allows you to modify many …
Discover More
Understanding DATE Field Formatting
One of the most commonly used fields is the DATE field. You can specify how the DATE field displays the current date by …
Discover More
Determining a Random Value
If you need to determine a random value in a macro, you can do so using the Rnd function. This tip presents the syntax …
Discover More
Multilevel numbering in Word is the #1 headache for many people working with large documents.
Believe it or not, it’s not complicated. It just takes somebody to lead the way and point out the pitfalls you need to avoid.
Today that pleasure falls to me!
Before I start, grab your free multilevel numbering troubleshooting guide that shows you the steps to get multilevel numbering working properly first time, every time, together with answers to over 20 FAQs and plenty of real client examples constructed step by step to help you fix what isn’t working with your numbering.

1. What Multi-level Numbering Looks Like
Often used in the legal profession or in large corporate documents, multilevel numbering creates a logical hierarchy and easy navigation within the document. The headings can also be summarised later on in a table of contents. Here is a simple example:

2. How to Set Up Multilevel Numbering
Here is the correct process:
1. Select the text that you want to number (this can be a section of text or the whole document).

2. Select the Home tab.
3. Click the multilevel numbering icon in the Paragraph group.
![]()
4. You can either select an existing layout from the list to use as a starting point, or you can create a new numbering system from scratch. As you hover over each thumbnail image, Word provides a larger image of the numbering system.
5. Choose Define New Multilevel List to display the control dialog.

The dialog box can be broken down as follows:
Step #1 Click level to modify
In the top left is a list of levels. As you select each level, the settings in the rest of the dialog box changes.
Level 1 is the highest level, i.e. the main headings such as chapter or section titles.
Level 2 is subordinate to level 1.
Level 3 is subordinate to level 2.

Step #2 Enter formatting for number
This is where the level number is constructed. If you include a previous level number, it will be displayed with a grey background, as will the number for the current level.
Type anything you wish to put in between the numbers such as dots, dashes, brackets etc.
Clear any text in the ‘Enter formatting for this number’ box.
Step #3 Include level number from
When creating a subordinate level (or child level), you can first specify the level number of the parent.
For example, for section 3.2
- ‘3’ is the parent level (level 1) and
- ‘2’ is the child level (level 2)

Step #4 Number style for this level
Each level can have its own number style. It may be a standalone style, e.g. 1, 2, 3 or a, b, c or continue on from a higher level, e.g. 1.1.1 or 1.a.i.
- When creating 1.1 numbering, this option is 1, 2, 3.
- When creating 1.a numbering, this option is a, b, c

Step #5 Font
Set the font formatting for the selected level, if you want.

Step #6 Position
What position from the left margin do you want items for each level of numbering. For example, level 1 items may be 0cm from the left margin, level 2, 1cm from the left margin and level 3, 2cm from the left margin.
Here’s what they mean:
- The Aligned At determines how far from the left margin the number appears.
- The Text indent at figure determines how far from the left margin the text following the number is.

6. Click OK to save all the settings and close the dialog box.
The text you selected in step 1 now looks like this.

The next part is where the magic happens …
3. How to Apply Multilevel Numbering
Once you have created your numbering system:
1. Position the cursor at the beginning of a line.

2. Press the TAB key to move the text down a level (demote).

3. Press the SHIFT and TAB keys together to move the text up a level (promote).

If you prefer, you can also click the indent icon to demote and the outdent icon to promote between levels.
![]()
4. How to Change Multilevel Settings
Once you have created your numbering system:
1. Reselect all text that is using the multilevel numbering.
2. Click the multilevel numbering icon and select Define New Multilevel List (yes, you choose this option even if you are modifying an existing multilevel list).

The original settings that you defined are redisplayed.
3. In the top-left box select the level that you wish to change, then change your settings.
4. Repeat for the other settings.
5. Click OK to save the settings. Your numbered list should now reflect your new settings.
5. Linking Multilevel Numbering to Styles
Each level of a multilevel numbering system can be linked to a style. This means that as you apply styles throughout the document, the numbering is applied appropriately and automatically. You can either use the built-in Heading 1, Heading 2, Heading 3 styles or use your own custom styles.
1. In the Numbering dialog box, click the MORE button in the bottom-left corner to expand the dialog box.
2. Select level to modify in the top-left box.
3. Open the Link level to style drop-down list and choose the style you wish to connect to the numbering level.

4. Click OK.
5. In the document, apply the Heading 1, Heading 2, Heading 3 styles where needed.
It’s a good idea to create a body text style and apply that where appropriate, so that the body text does not inadvertently get caught up in the multi-level numbering.
6. Select the whole document (or the portion of the document where you want to apply your numbered sections).
7. Click the icon in the Paragraph group (Home tab).
8. Select your custom numbering style from the gallery. The thumbnail image should show the linked styles.

6. How to Use Styles to Set Number Levels
1. Select all the text that you wish to apply the same number level to. Alternatively, if you wish to go line by line, you can place the cursor anywhere in a line of text.
2. In the Styles gallery, click the style that corresponds to the number level you wish to apply. For example, to apply the top level numbering click Heading 1 and for the third level numbering click Heading 3 (assuming those are the styles you assigned).
The numbering and all the numbering settings will be applied to the selected text or the paragraph in which the cursor was positioned.

And that, my friend, is how you do multilevel numbering in Word with no loose ends.
How to set up a dual-multilevel numbering system in Word
7. Two resources to help you
1. Grab your free multilevel numbering troubleshooting guide.

2. Watch over my shoulder as I set up multilevel numbering from scratch.

8. What next?
I hope you found plenty of value in this post. I’d love to hear your biggest takeaway in the comments below together with any questions you may have.
Have a fantastic day.


About the author
Jason Morrell
Jason loves to simplify the hard stuff, cut the fluff and share what actually works. Things that make a difference. Things that slash hours from your daily work tasks. He runs a software training business in Queensland, Australia, lives on the Gold Coast with his wife and 4 kids and often talks about himself in the third person!
SHARE