
Word 2016 is designed to help you create professional-quality documents. Word can also help you organize and write documents more efficiently.
When you create a document in Word, you can choose to start from a blank document or let a template do much of the work for you. From then on, the basic steps in creating and sharing documents are the same. And Word’s powerful editing and reviewing tools can help you work with others to make your document great.
Start a document
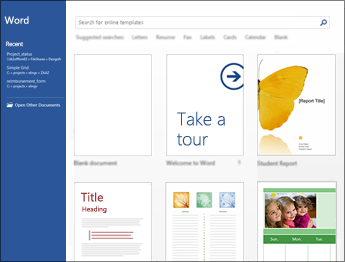
It’s often easier to create a new document using a template instead of starting with a blank page. Word templates come ready-to-use with pre-set themes and styles. All you need to do is add your content.
Each time you start Word, you can choose a template from the gallery, click a category to see more templates, or search for more templates online.
For a closer look at any template, click it to open a large preview.
If you’d rather not use a template, click Blank document.
Open a document
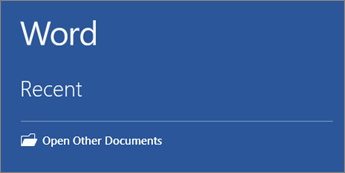
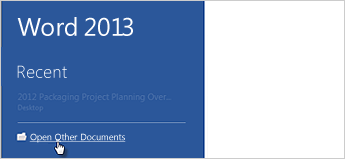
Every time you start Word, you’ll see a list of your most recently used documents in the left column. If the document you’re looking for isn’t there, click Open Other Documents.
If you’re already in Word, click File > Open and then browse to the file’s location.
When you open a document that was created in earlier versions of Word, you see Compatibility Mode in the title bar of the document window. You can work in compatibility more or you can upgrade the document to use Word 2016.
Save a document
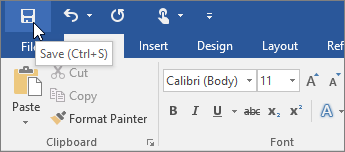
To save a document for the first time, do the following:
-
On the File tab, click Save As.
-
Browse to the location where you’d like to save your document.
Note: To save the document on your computer, choose a folder under This PC or click Browse. To save your document online, choose an online location under Save As or click Add a Place. When your files are online, you can share, give feedback and work together on them in real time.
-
Click Save.
Note: Word automatically saves files in the .docx file format. To save your document in a format other than .docx, click the Save as type list, and then select the file format that you want.
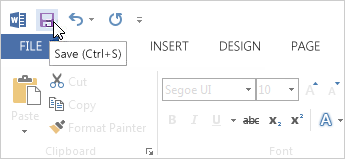
To save your document as you continue to work on it, click Save in the Quick Access Toolbar.
Read documents
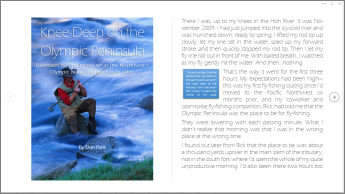
Open your document in Read Mode to hide most of the buttons and tools so you can get absorbed in your reading without distractions.
-
Open the document you want to read.
Note: Some documents open in Read Mode automatically, such as protected documents or attachments.
-
Click View > Read Mode.
-
To move from page to page in a document, do one of the following:
-
Click the arrows on the left and right sides of the pages.
-
Press page down and page up or the spacebar and backspace on the keyboard. You can also use the arrow keys or the scroll wheel on your mouse.
-
If you’re on a touch device, swipe left or right with your finger.
Tip: Click View > Edit Document to edit the document again.
-
Track changes
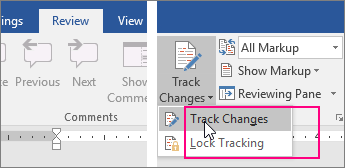
When you’re working on a document with other people or editing a document yourself, turn on Track Changes to see every change. Word marks all additions, deletions, moves, and formatting changes.
-
Open the document to be reviewed.
-
Click Review and then on the Track Changes button, select Track Changes.

Read Track changes to learn more.
Print your document
All in one place, you can see how your document will look when printed, set your print options, and print the file.
-
On the File tab, click Print.
-
Do the following:
-
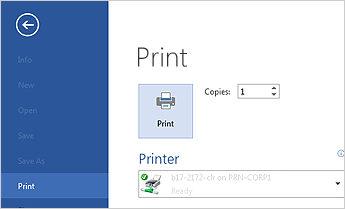
Under Print, in the Copies box, enter the number of copies you want.
-
Under Printer, make sure the printer you want is selected.
-
Under Settings, the default print settings for your printer are selected for you. If you want to change a setting, just click the setting you want to change and then select a new setting.
-
-
When you’re satisfied with the settings, click Print.
For details, see Print a document.
Beyond the basics
For more on the fundamentals of using Word, see What’s new in Word 2016.
Top of Page
With Word for the web, you use your web browser to create, view, and edit the personal documents that you store on OneDrive. If your organization or college has a Microsoft 365 plan or SharePoint site, start using Word for the web by creating or storing documents in libraries on your site.Save changes
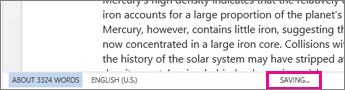
Word saves your changes automatically. Look on the status bar at the bottom left corner of Word for the web. It will either show Saved or Saving.
Share documents online
Because your document is online, you can share it by sending a link instead of an email attachment. People can read it in their web browser or mobile device.
Click File > Share > Share with People.

Comment in the browser
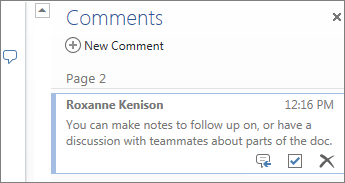
A comment balloon shows where comments have been made in the doc.

Reply to comments, and check off items you’ve addressed.
Edit in the browser
If you try to type in the document and nothing happens, you’re probably in Reading view. Switch to Editing view: click Edit Document > Edit in Word for the web.

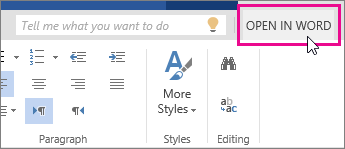
Type and format text, add pictures, adjust the layout of the page, and more. For more advanced editing, click Open in Word.
Work together on the same doc
To work together in Word for the web, you edit a document as you normally would. If others are also editing it, Word for the web alerts you to their presence. You can see everyone who is currently working in the document by clicking in the ribbon.

Clicking on an author’s name jumps you to where they’re working in the doc. And you’ll see the changes they make as they’re happening. They can be working in Word for the web, Word 2010 or later, or Word for Mac 2011.
Add a header or footer
Go to Insert > Header & Footer to add headers and footers to your document.
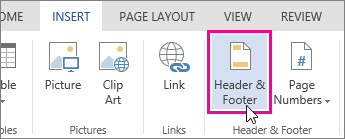
Click Options to choose how you’d like them to appear.

Add page numbers
Click Insert > Page Numbers and then choose from the gallery where you’d like the page numbers to appear.
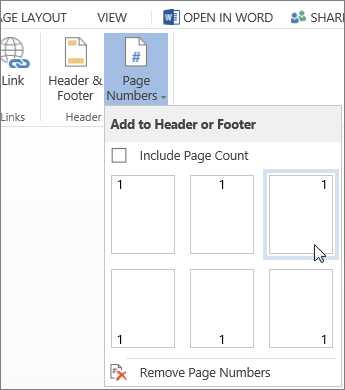
Select Include Page Count to show the current page number along with the total number of pages (page X of Y).
Find and replace text
Quickly search for every occurrence of a specific word or phrase in your document by clicking Home > Find (or type Ctrl+F). Results appear next to your document so you can see the term in context. Clicking on a search result jumps you to that occurrence.
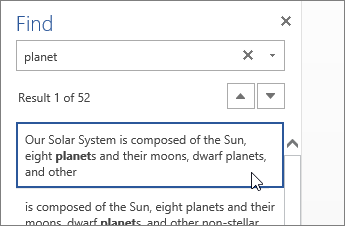
Click Replace (or type Ctrl+H) to find and replace text.
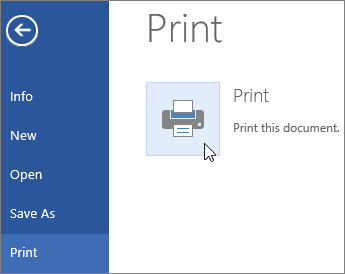
Print in Word for the web
Go to File > Print. Word for the web creates a PDF preview of your document that keeps all the layout and formatting of your document. Send the PDF to your printer and it will print the way you expect.
Microsoft Word 2013 is a word-processing program designed to help you create professional-quality documents. Word helps you organize and write your documents more efficiently.
Your first step in creating a document in Word 2013 is to choose whether to start from a blank document or to let a template do much of the work for you. From then on, the basic steps in creating and sharing documents are the same. Powerful editing and reviewing tools help you work with others to make your document perfect.
Choose a template
It’s often easier to create a new document using a template instead of starting with a blank page. Word templates are ready to use with themes and styles. All you need to do is add your content.
Each time you start Word 2013, you can choose a template from the gallery, click a category to see the templates it contains, or search for more templates online. (If you’d rather not use a template, just click the Blank document.)
For a closer look at any template, just click it to open a large preview.
Top of Page
Open a document
Every time you start Word, you’ll see a list of your most recently used documents in the left column. If the document you’re looking for isn’t there, click Open Other Documents.
If you’re already in Word, click File > Open and then browse to the file’s location.
When you open a document that was created in earlier versions of Word, you see Compatibility Mode in the title bar of the document window. You can work in compatibility more or you can upgrade the document to use features that are new or enhanced in Word 2013.
Top of Page
Save a document
To save a document for the first time, do the following:
-
Click the File tab.
-
Click Save As.
-
Browse to the location where you’d like to save your document.
Note: To save the document on your computer, choose a folder under Computer or click Browse. To save your document online, choose a location under Places or Add a Location. When your files are online, you can share, give feedback and work together on them in real time.
-
Click Save.
Note: Word automatically saves files in the .docx file format. To save your document in a format other than .docx, click the Save as type list, and then select the file format that you want.
To save your document as you continue to work on it, click Save in the Quick Access Toolbar.
Top of Page
Read documents
Open your document in Read Mode to hide most of the buttons and tools so you can get absorbed in your reading without distractions.
-
Open the document you want to read.
Note: Some documents open in Read Mode automatically, such as protected documents or attachments.
-
Click View > Read Mode.
-
To move from page to page in a document, do one of the following:
-
Click the arrows on the left and right sides of the pages.
-
Press page down and page up or the spacebar and backspace on the keyboard. You can also use the arrow keys or the scroll wheel on your mouse.
-
If you’re on a touch device, swipe left or right with your finger.
Tip: Click View > Edit Document to edit the document again.
-
Top of Page
Track changes
When you’re working on a document with other people or editing a document yourself, turn on Track Changes to see every change. Word marks all additions, deletions, moves, and formatting changes.
-
Open the document to be reviewed.
-
Click Review and then on the Track Changes button, select Track Changes.

Read Track changes to learn more.
Top of Page
Print your document
All in one place, you can see how your document will look when printed, set your print options, and print the file.
-
Click the File tab and then click Print.
-
Do the following:
-
Under Print, in the Copies box, enter the number of copies you want.
-
Under Printer, make sure the printer you want is selected.
-
Under Settings, the default print settings for your printer are selected for you. If you want to change a setting, just click the setting you want to change and then select a new setting.
-
-
When you’re satisfied with the settings, click Print.
For details, see Print and preview documents.
Beyond the basics
Go beyond the basics with your documents by creating a table of contents or saving a document as a template.
Top of Page
Important:
Office 2010 is no longer supported. Upgrade to Microsoft 365 to work anywhere from any device and continue to receive support.
Upgrade now
In this article
-
What is Word?
-
Find and apply a template
-
Create a new document
-
Open a document
-
Save a document
-
Read documents
-
Track changes and insert comments
-
Print your document
What is Word?
Microsoft Word 2010 is a word-processing program, designed to help you create professional-quality documents. With the finest document-formatting tools, Word helps you organize and write your documents more efficiently. Word also includes powerful editing and revising tools so that you can collaborate with others easily.
Top of Page
Find and apply a template
Word 2010 allows you to apply built-in templates, to apply your own custom templates, and to search from a variety of templates available on the web.
To find and apply a template in Word, do the following:
-
On the File tab, click New.
-
Under Available Templates, do one of the following:
-
To use one of the built-in templates, click Sample Templates, click the template that you want, and then click Create.
-
To reuse a template that you’ve recently used, click Recent Templates, click the template that you want, and then click Create.
-
To use your own template that you previously created, click My Templates, click the template that you want, and then click OK.
-
To find a template on Office.com, under Office.com Templates, click the template category that you want, click the template that you want, and click Download to download the template from Office.com to your computer.
-
Note: You can also search for templates on Office.com from within Word. In the Search Office.com for templates box, type one or more search terms, and then click the arrow button to search.
Top of Page
Create a new document
-
Click the File tab and then click New.
-
Under Available Templates, click Blank Document.
-
Click Create.
For more information about how to create a new document, see Create a document.
Top of Page
Open a document
-
Click the File tab, and then click Open.
-
In the left pane of the Open dialog box, click the drive or folder that contains the document.
-
In the right pane of the Open dialog box, open the folder that contains the drawing that you want.
-
Click the document and then click Open.
Top of Page
Save a document
To save a document in the format used by Word 2010 and Word 2007, do the following:
-
Click the File tab.
-
Click Save As.
-
In the File name box, enter a name for your document.
-
Click Save.
To save a document so that it is compatible with Word 2003 or earlier, do the following:
-
Open the document that you want to be used in Word 2003 or earlier.
-
Click the File tab.
-
Click Save As.
-
In the Save as type list, click Word 97-2003 Document. This changes the file format to .doc.
-
In the File name box, type a name for the document.
-
Click Save.
For more information about how to create a document that is compatible with Word 2003 or earlier versions, see Create a document to be used by previous versions of Word.
Top of Page
Read documents
-
Open the document that you want to read.
-
On the View tab, in the Document Views group, click Full Screen Reading
-
To move from page to page in a document, do one of the following:
-
Click the arrows in the lower corners of the pages.
-
Press PAGE DOWN and PAGE UP or SPACEBAR and BACKSPACE on the keyboard.
-
Click the navigation arrows at the top center of the screen.
Tip: Click View Options, and then click Show Two Pages
to view two pages, or screens, at a time.
-
 to view two pages, or screens, at a time.
For more information about how to view documents, see Read documents in Word.
Top of Page
Track changes and insert comments
-
To turn on change tracking, on the Review tab, in the Tracking group, click Track Changes.
-
To insert a comment, on the Review tab, in the Comments group, click New Comment.
For more information about how to track changes made while revising, see Track changes and insert comments.
Top of Page
Print your document
-
Click the File tab and then click Print.
-
Do the following:
-
Under Print, in the Copies box, enter the number of copies that you want to print.
-
Under Printer, make sure that the printer that you want is selected.
-
Under Settings, the default print settings for your printer are selected for you. If you want to change a setting, click the setting you want to change and then select the setting that you want.
-
-
When you are satisfied with the settings, click Print.
For more information about how to print a file, see Preview and print a file.
Top of Page
One of the most widely used programs of Microsoft Office suite, MS Word is a word processor developed by Microsoft.
An introduction to MS Word, its features and its uses, have all been discussed in detail, in this article. Also, a few sample questions based on this MS Office program have been given further below for the reference of candidates preparing for competitive exams.
To know further about the MS Office suite and the various programs included in it, visit the linked article.
Since MS Word is one of the most used programs of the Office Suite, some basic information regarding its creation and development has been given below:
- Charles Simonyi, a developer and Richard Brodie, a software engineer, were the two creators of MS Word
- This program was initially named “Multi-Tool Word” but later, was renamed as MS Word
- It was introduced in 1983
- Word for Windows is available standalone or as a part of MS Office suite
- MS Word for Mac was introduced by Microsoft as Word 1.0 in 1985
- The extension for any word file is “.doc or .docx.”
Moving forward, details about the features and applications of Word have been discussed. To read more about the other Computer Knowledge topics, check the links given below:

Let us first understand some basic aspects of Microsoft Word.
What is MS Word?
Used to make professional-quality documents, letters, reports, etc., MS Word is a word processor developed by Microsoft. It has advanced features which allow you to format and edit your files and documents in the best possible way.
Where to find MS Word on your personal computer?
Follow these simple steps to open MS Word on your personal computer:
Start → All Programs → MS Office → MS Word.
What are the uses of MS Word?
MS Word enables users to do write-ups, create documents, resumes, contracts, etc. This is one of the most commonly used programs under the Office suite.
How to create an MS Word document?
To create an MS Word doc, follow the steps mentioned above to open Microsoft Word. Then once the program is open, click on “File” followed by “New”. This opens a new doc where something new can be created.
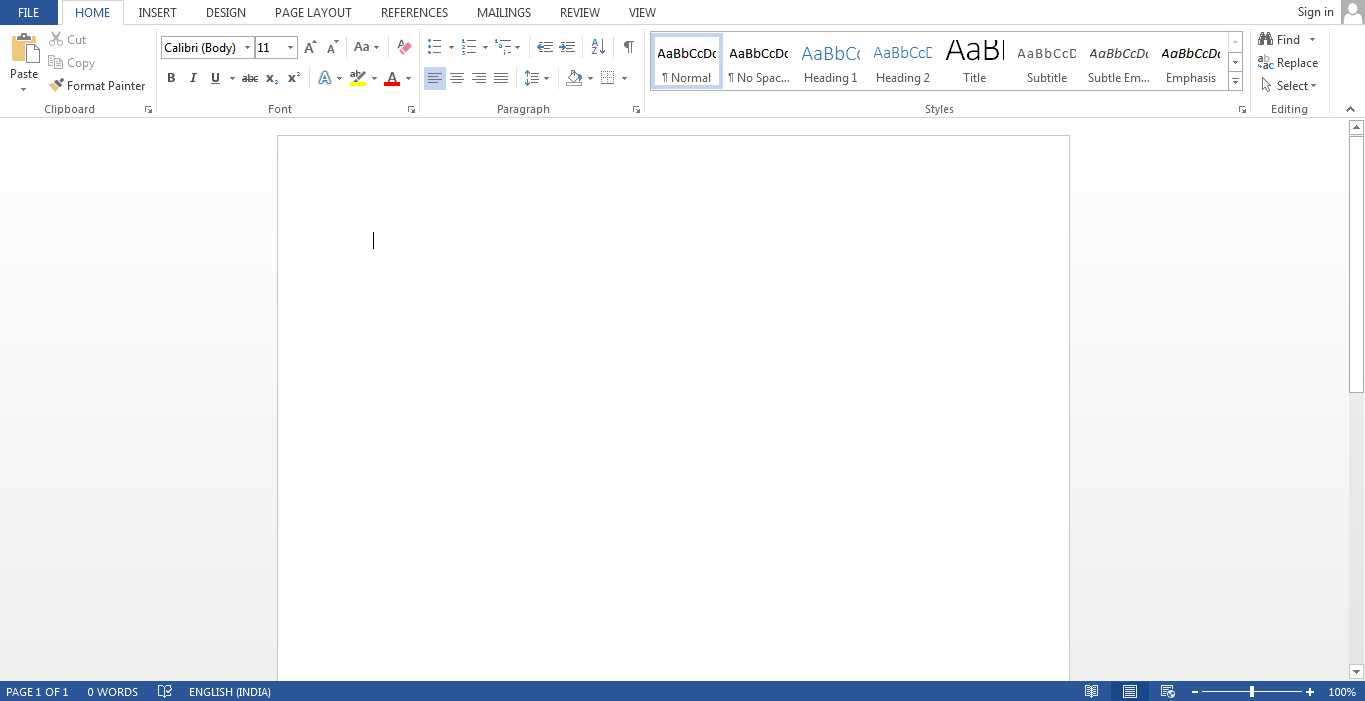
Since it is used by people of all age groups, in schools, in colleges and for official purposes, having proper knowledge of Microsoft Word is a must. The preview of the MS Doc file once it is opened is given below:
Also, from a competitive exam perspective, one must be well aware of this topic. To get the list of all major Government exams conducted in the country, aspirants can visit the linked article.
For a better understanding of how MS Word works and the features that are included in it, you can refer to the video given below and analyse its functioning easily.

Features of MS Word
Now let us read more about the features and components of an MS Word doc file in detail.
The image given below shows the different elements and categories which are available in MS Word doc:

- Home
This has options like font colour, font size, font style, alignment, bullets, line spacing, etc. All the basic elements which one may need to edit their document is available under the Home option.
- Insert
Tables, shapes, images, charts, graphs, header, footer, page number, etc. can all be entered in the document. They are included in the “Insert” category.
- Design
The template or the design in which you want your document to be created can be selected under the Design tab. Choosing an appropriate tab will enhance the appearance of your document.
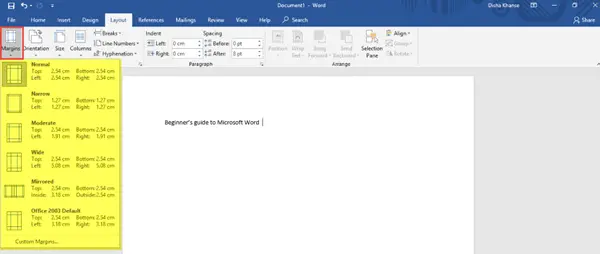
- Page Layout
Under the Page Layout tab comes options like margins, orientation, columns, lines, indentation, spacing, etc.
- References
This tab is the most useful for those who are creating a thesis or writing books or lengthy documents. Options like citation, footnote, table of contents, caption, bibliography, etc. can be found under this tab.
- Review
Spell check, grammar, Thesaurus, word count, language, translation, comments, etc. can all be tracked under the review tab. This acts as an advantage for those who get their documents reviewed on MS Word.
Apart from all the above-mentioned features, the page can be set in different views and layouts, which can be added and optimised using the View tab on the Word document. Margins and scales are also available for the benefit of the users.
When compared with MS PowerPoint, MS Word is more of reading while PPT is more of visual and graphical representation of data.
To know more about Microsoft Windows, visit the linked article.
For Govt exam aspirants, given below are links to the other subjects which are a part of the competitive exam syllabus:
Uses of MS Word
Given below are the different fields in which MS Word is used and simplifies the work of an individual:
- In Education: It is considered as one of the simplest tools which can be used by both teachers and students. Creating notes is easier using MS Word as they can be made more interactive by adding shapes and images. It is also convenient to make assignments on MS Word and submitting them online
- In Workplace: Submitting letters, bills, creating reports, letterheads, sample documents, can all easily be done using MS Word
- Creating & Updating Resume: One of the best tools to create your resumes and is easy to edit and make changes in it as per your experience
- For Authors: Since separate options are available for bibliography, table of contents, etc., it is the best tool which can be used by authors for writing books and adjusting it as per the layout and alignment of your choice
Also, creating a Doc file and converting it into PDF is a more suitable option, so it is highly recommended.
For competitive exam aspirants, given below are links which may help you prepare yourself for the upcoming exams:
Sample MS Word Question and Answers
Some sample questions and answers with the competitive exam perspective have been given below. Refer to these for assistance.
Q 1. How can you open the column dialogue box?
- Alt+O+C
- Alt+A+C
- Alt+R+C
- Alt+C
- Alt+ctrl+C
Answer: (1) Alt+O+C
Q 2. Which is the default alignment in MS Word?
- Right
- Centre
- Left
- Justify
- None of the Above
Answer: (3) Left
Q 3. “Ctrl + =” is used for _________
- Change Alignment
- Subscript
- Superscript
- Change font to Bold
- None of the above
Answer: (2) Subscript
Q 4. A combination of which shortcut keys to use to split a table?
- Ctrl+shift+enter
- Ctrl+enter
- Shift+enter
- ctrl+alt+S
- alt+S
Answer: (1) Ctrl+shift+enter
Furthermore, to get the best tips to ace the upcoming Government exams, candidates can check the Preparation Strategy for Competitive Exams at the linked article.
Get the best study material and the latest exam information at BYJU’S.

Frequently Asked Questions on Microsoft Word
Q1
Q 1. Which formatting features can be added to the MS Word document?
Ans. The common formatting features which are available on MS Word include:
-
- Font Style, Size and Colour</li
- Header and Footer
- Insert Images
- Add tables and bulleted lists
- Set a page layout
- Add Word Art
The basic feature of why people choose MS Word over any other text editor is that it makes the document more visually interactive and appealing.
Q2
Q 2. What is Microsoft Word used for??
Ans. MS Word can also help you organize and write documents more efficiently. When the document is created in Word, the user can choose to start from a blank document or let a template do much of the work for the user. From then on, the basic steps in creating and sharing documents are the same.
Q3
Q 3. What are the basic functions of MS Word?
Ans. Given below are the basic functions of Microsoft Word:
- Creating text documents
- Editing and Formatting the existing documents
- Making a text document interactive with different features and tools
- Graphical documents, comprising images
- Used by Authors and Researchers
- Detect grammatical errors in a text document
Q4
Q 4. What is the extension of an MS Word file?
Ans. An MS Word file is always saved with the extension of .doc or .docx.
.
Q5
Q 5. What are the five basic fields of application for MS Word?
Ans. Using Microsoft Word, one can create resumes, reports, and write letters. Authors can use it to write their books and researchers for writing a thesis. Apart from this, it can be used as a simple text editor.
A Beginner’s Guide to Microsoft Office
Microsoft Word is a word processing program that was first made public by Microsoft in the early 1980s. It allows users to type and manipulate text in a graphic environment that resembles a page of paper. Extra features, such as tables, images and advanced formatting give users more options to customize their documents. Over the past three decades, there have been a number of updates and additions to Microsoft Word. Today it is one of the most widely used word processors available for Macs and PCs. It is often taught to students in schools and required as part of the basic computer requirements for many office jobs. In this guide, new users will learn the basic functions of Microsoft Word and how to use them.
Alignment – The alignment options dictate whether the left and right edges of the text in a document adhere to the right side, left, center or justified. Alignment can be set from the formatting toolbar at the top of the window or under by choosing “Paragraph” under the Format menu.
Bullets/Numbering – When creating a list of text items, users can choose from several bullet or numbering system to add a small graphic icon or series of numbers before each item. To add bullets or numbering to a series of text, click on the corresponding buttons in the formatting toolbar or choose “Bullets and Numbering” from the Format menu.
Clipboard – The clipboard acts as a type of storage area when a piece of text is temporarily removed and stored for later use within the same session. Using the Cut or Copy commands will place the text in the clipboard. Click on “Clipboard” under the Edit menu to view any text that may be temporarily stored in it.
Copy – Copying text simply means making a replica of any text that is currently selecting and saving it to the clipboard. Pressing the Control and C keys in Windows or Command and C on a Mac will copy the text. Alternatively, users can also select the text and then click the “Copy” option under the Edit menu or in the main toolbar.
Cut – Cutting text removes the text entirely from the viewable document and stores it in the clipboard. Control-X or Command-X are the keyboard shortcuts for the Cut function on Windows and Mac respectively. The Cut function can also be found under the Edit menu or the toolbar.
Document – Each document in Microsoft Word is essentially a new file. Each document can be several pages long. A new document can be created by hitting Control-N or Command-N, or by choosing the “New Blank Document” option from the File menu or the standard toolbar.
Edit – The edit menu or toolbar in Microsoft Word allows users to perform basic editing functions in their document such as copying, cutting and pasting. It also contains options for the Undo and Find/Replace functions.
Font – A font is a type of design for text and typically incorporates this design into each letter, number and symbol found on a keyboard. Fonts can range from formal to whimsical. Microsoft Word comes with a series of provided fonts and additional ones can also be downloaded if needed. To change the font used in a document, select the text and either click on the main Font menu, the Font drop-down menu in the formatting toolbar or hit Control-D or Command D.
Footer – The footer is the text that consistently appears on every page of a document, at the bottom of each page. Footers normally include details such as the page number, or a company’s name and contact details in formal documents. Add or edit a footer by choosing “Header and Footer” under the View menu.
Format – The Format menu (or toolbar) goes one step further than the Edit menu. Users can make stylistic changes by changing the look of the text itself, paragraphs, lists and more.
Header – The header is similar to a footer except that it sits at the very top of every page in a document. Headers often contain page numbers, the document name or sub-titles within a document. The header can be edited by clicking on “Header and Footer” within the View menu.
Justify, left justified, right justified – Justification is a type of alignment for text in a word processor. Justify ensures that both the left and right sides of the text in every paragraph run in a straight line. Left justify makes only the left side of the text aligned, while the right side remains ragged. Right justified does the complete opposite, with only the right side of the text aligned. Users can apply justification to their text by clicking on the corresponding buttons in the formatting toolbar or by selecting the text and clicking on “Paragraph” under the Format menu.
Open – The Open command opens an existing document in Microsoft Word. Command or Control plus O, or choosing “Open…” from the File menu will provide a pop-up window for users to select the document they wish to open.
Paste – The paste command takes any previously copied or cut text and lays it down within the document where the cursor is pointing. Control or Command plus V, or “Paste” from the Edit menu or standard toolbar will run the paste function.
Print – The print command first opens a window where users can specify parameters of the paper, printer and ink they wish to print with and it provides a preview of what the physical print will look like. Control or Command plus P, or clicking on “Print” in the File menu or standard toolbar lets users access the print window.
Quick access tool bar – The quick access toolbar is a small and moveable toolbar at the top of the document window. It usually contains buttons to save, undo, redo and print. This toolbar can also be customized to include or remove other commands.
Ribbon – The Ribbon is a type of toolbar found in versions of Microsoft Office 2007. It contains graphic buttons for commands and similar commands are shown in groups for easy access.
Save – The save command is one of the most important ones. It saves all of the work done to date within a document. The save command enables users to return to the same document later and continue writing, editing or printing. Control or Command plus S, or clicking “Save” under the File menu or standard toolbar will save the document. The “Save As” option is slightly different; it allows users to save the document as a different version by adding a different file name.
Text – Text is any of the words and paragraphs that a user types within a document.
Standard tool bar – The standard tool bar is the row of icons at the top of the document. Each of these buttons are used for basic functions such as saving, opening or printing documents, among other commands.
Undo – The undo feature keeps track of each command that a user issues while working on their document. Issuing the undo command allows the user to go back one step and restore the document as it was before their latest editing command. Related to the Undo command is Redo, which lets the user redo the same formatting command again. Control or Command plus Z, or “Undo” under the Edit menu is used to undo a command, while Control or Command plus Y or “Redo” under Edit is to redo a command.
Additional Resources
1. The Microsoft Word Toolbar Quiz
2. Test Your Knowledge of Microsoft Word Basic Functions
3. Print Microsoft Word Vocabulary Flash Cards
4. How Well do You Know Microsoft Word? (PDF)
5. Try This Online Microsoft Word Test
Hello guys, Today I’m going to show you Full Form of MS Word.
In this post, I will explain the MS Word full form, what is MS Word and its features, uses, basic function in detailed.
This Article is Best on the whole internet.
If you read this article carefully, all your doubts related to Microsoft Word will be cleared.
I Guaranteed you, after reading this article you will not need to read any other Articles. In fact, our reader’s satisfy in this blog post.
What is the Full Form of MS Word in computer?
The full form of MS word is Microsoft Word.
To understand you, the complete full form of each word of the MS is given in the table below.
The full form of MS Office is Microsoft Office.
What is MS Word?

Logo of MS Word
Introduction — Microsoft Word is a word processor and application software which is developed by Microsoft Corporation.
With the help of MS word, we can create a great word document.
From MS word, we can create many types of word documents like — bio data, resumes, applications forms and much more.
If you want to create any kind of document, you’ll definitely think about Microsoft Word. You can create any type of document using Microsoft Word.
Microsoft Word is a very popular word processor software created by Microsoft company. There are various examples of word processor.
Read Also — What is RAM in computer?
What is Microsoft Word used for?
MS word is used for many types of office work. You can also edit a word file in MS Word.
There are many features in MS Word that we will tell you further.
Read Also — Classifications of computer
What are the features of Microsoft Word?
There are many features and components of MS word. These all are Tap features of Microsoft word 2013.
In this post explain the features of MS Word.
You can see the image, Features of MS word are given below.
Read Also — MS Word is an example of?

- File
- Home
- Insert
- Design
- Page Layout
- References
- Mailing
- Review
- View
Read Also — What are the Generations of computer?
- File — If you click on the file then you will see a lot of word file, if you have to create a new file then you will click on the new word file.
- Home — Inside the home tab, you get a lot of options like — font colour, font size, font style, alignment, bullets, line spacing, paragraph etc.
We use all these options while creating our Word file.
- Insert — Inside the Insert tab, you get many options like — Tables, Draw table, shapes, images, charts, graphs, header, footer, page number, etc.
We use all these options when creating our Word file.
- Design — Inside the Design tab, you get several options like — Page Theme, Page Color, Page Border End etc. We use all these options when creating our Word file.
- Page Layout — Inside the page layout tab, you get many options like — page margins, page orientation, columns, lines, page break indentation, spacing, etc.
We use all these options when creating our Word file.
- References — Under the References tab, you get several options like — Table of Contents, Footnotes, Captions, Index etc.
- The References tab is often used to write large document files such as writing a book.
We use all these options when writing a book.
- Mailing — Under the Mailing tab, you get several options like — Create, Start Mail Merge, write and insert fields, preview results etc.
We use all these options when creating our Word file.
- Review — Under the Review tab, you get several options like — spelling & Grammar check, word count, define, language, translation, comments, protect the document etc.
We use all these options when creating our Word file.
- View — Under the view tab, you get several options like — Read mode, web layout, ruler, gridlines, page zoom etc. We use all these options when creating our Word file.
What are the uses of Microsoft Word?
Microsoft word is used in many fields such as.
- School — Today MS Word is used in every school. In school, children are taught to work on MS Word and all the school work such as creating school admission forms, a creating question for the children’s exam and much more are done with the help of Microsoft Word.
- College — College students also use Microsoft Word to create job resumes.
- College Employees also use Microsoft Word to create a college admission form, to write applications, to create a bonafide certificate.
- Universities — Universities also use Microsoft Word extensively such as creating registration forms, exam forms, results, migration certificates and much more with the help of MS Word.
- Office — In the office too, work is done with the help of Microsoft Word, writing letters, making business reports, and many other types of documents are made using Microsoft Word.
- Book Writers — Book writers use Microsoft Word to write books.
Read Also — How to shut down laptop?
What type of documents can be created in Microsoft Word?
There are many types of extension document can be created in Microsoft word such as.
- doc
- docm
- docx
- dot
- dotm
- dotx
- xml
- txt
- htm
- html
- odt
- rtf
- wps
- xps
Read Also — What are the characteristics of computer?
What are the basic functions of MS Word?
Five basic functions of Microsoft Word.
- You Can Create a text document with many documents extension.
- You Can edit any types of word document.
- MS word gives the suggestion to correct your wrong spelling.
- You can check your document preview and print your document.
- you can insert your photo, insert online pictures, insert shapes, graphs etc in Microsoft word.
What are the Types & version of Microsoft Word?
Microsoft Word has different versions & types. That you can still use it.
- Word 2000, released in 1999
- Word 2002, released in 2001
- Word 2003, released in 2003
- Word 2007, released in 2006
- Word 2010, released in 2010
- Word 2013, released in 2013
- Word 2016, released in 2016
- Word 2019, released in 2018
FAQ Related to Microsoft Word
What is the latest version of MS word?
The latest version of Microsoft word is Word 2019 released in 2018 and 16.0 version.
What is the extension of MS Word 2010, 2013, 2016?
The extension of Microsoft Word 2010, 2013, 2016 is .docx.
What are MS Office skills?
In today’s time, it is very important to have the skill of MS Word because today in every office the work related to the document is done with MS Word only.
With the help of MS Word, you can create many types of documents like —
- Creating spreadsheet.
- Creating tables.
- Creating pivot tables.
- Running and creating macros.
- Data analysis.
- Data visualization.
- Validating data.
- Creating documents.
Who introduced MS Office?
Bill Gates and Paul G. Allen introduce the MS Office.
What is the function of MS Word?
The main function of MS Word is to create many types of documents.
What are the five features of MS Word?
The five features of MS Word is given below.
- Convert a List to a Table.
- Convert a Bulleted List to SmartArt.
- Create a Custom Tab.
- Quick Selection Methods.
- Add Placeholder Text.
I know my readers love this article.
If you any doubts in this article please check out contact us page.
I Hope you Understand What is MS Word and its features. Share this post and mention your comment.
Появление “окон” Windows произвело настоящую революцию среди пользователей компьютеров. Помню, как сложно было освоить использование мышки. И насколько удобно после Лексикона на DOS стало работать с текстами и таблицами в офисных приложениях Microsoft. С тех пор вышло много релизов операционной системы. Ключевые редакторы MS Office, Word и Excel, претерпели немало модификаций. С каждым новым выпуском усложнялся функционал, менялся интерфейс. Работа с Microsoft Word в чем-то стала более удобной. С другой стороны, освоить инструментарий текстового редактора становится все сложнее. Например, изменение расширения с .doc на .docx в свое время создало проблему открытия файлов в разных сборках приложения. В статье рассмотрим основные инструменты MS Word, которые помогут сделать работу с текстами в этом приложении более понятной и, главное, удобной.
Смотрите также: Не работает Word в Windows 10 — причины и решение.
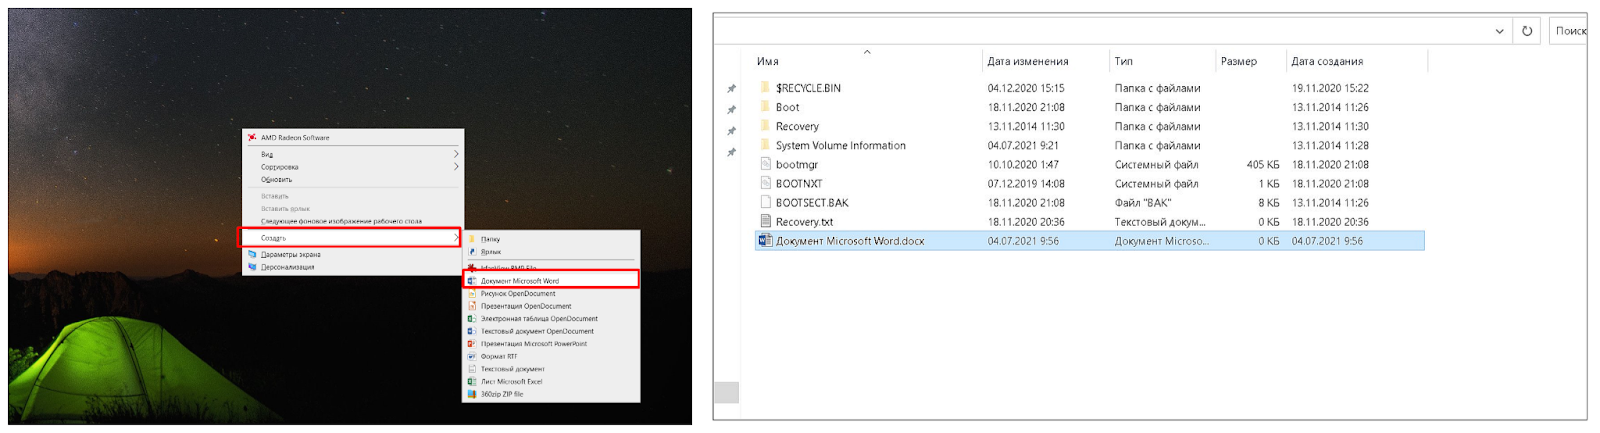
Для того чтобы сразу создать вордовский документ с нуля, достаточно кликнуть правой кнопкой мышки по Рабочему столу или свободному месту в Проводнике. В открывшемся меню выбрать “Создать” и “Документ Microsoft Word”. Вновь созданному пустому файлу можно присвоить свое имя и сразу начать работать в редакторе.
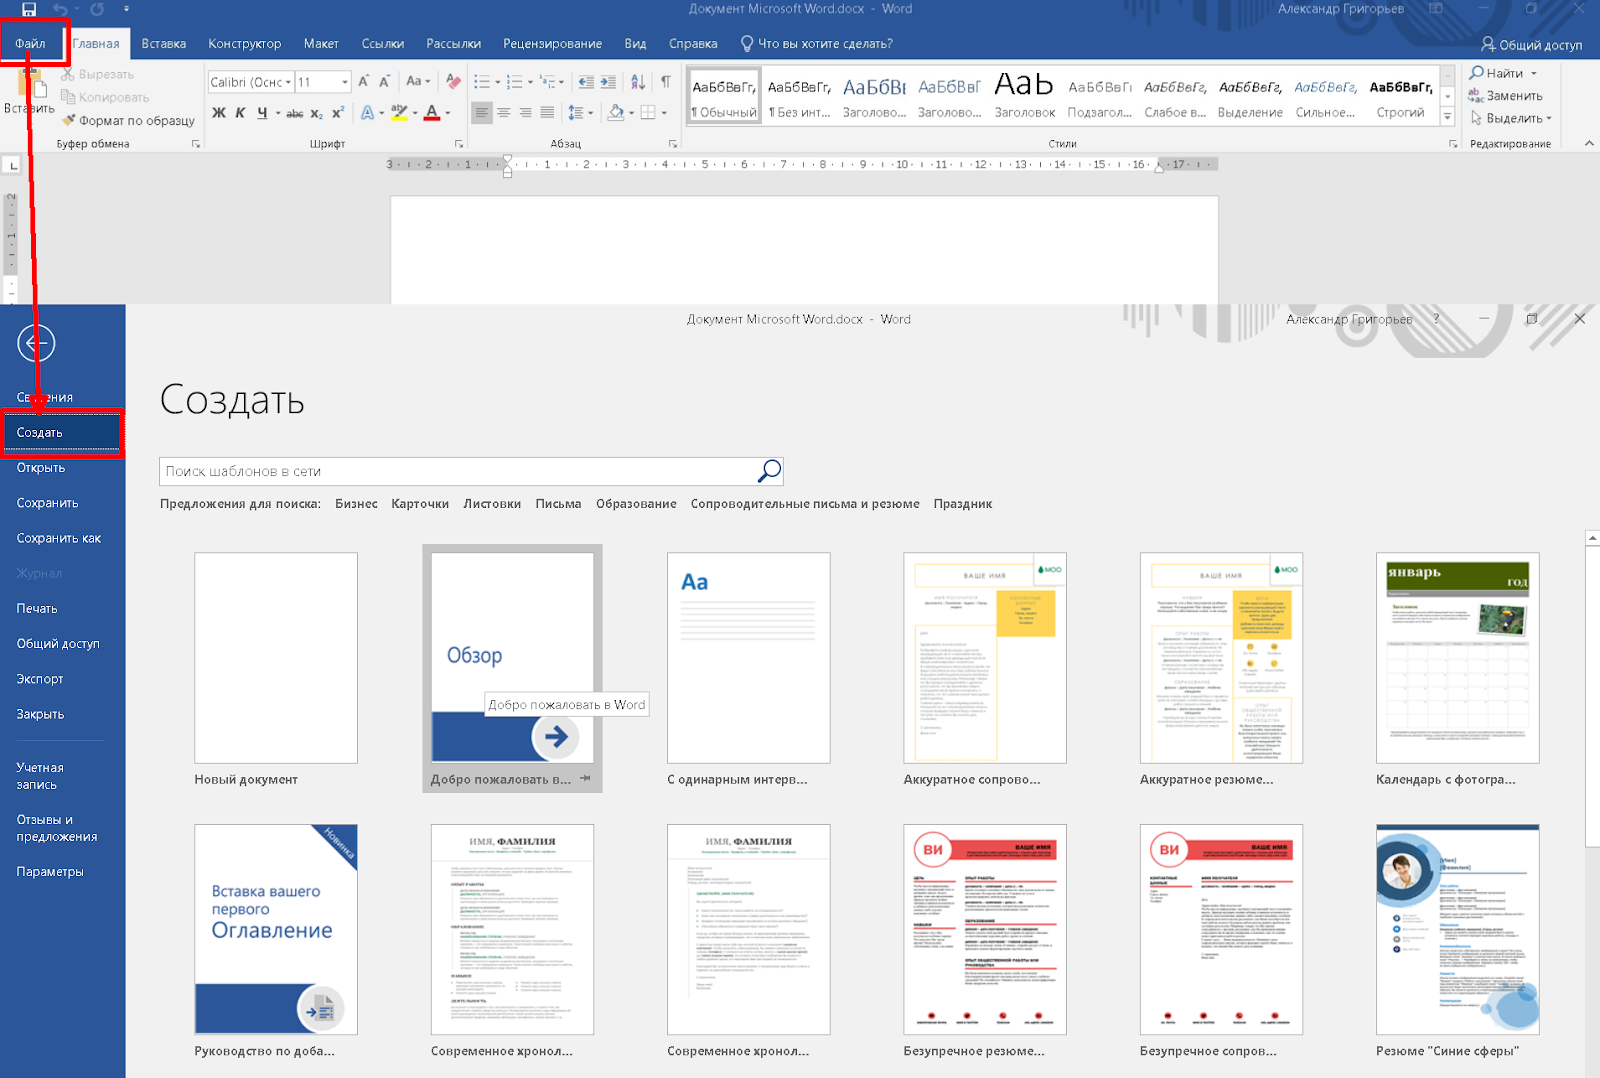
Чтобы сформировать новый документ в самом приложении, в верхнем меню выберете “Файл” — “Создать”. Откроется окно с готовыми шаблонами Word. Подведя указатель мыши к предустановленному варианту, вы увидите подсказку. Кликаете два раза левой кнопкой мыши (ЛКМ) и выберите нужный шаблон нового документа.
В подменю “Файл” доступны операции с существующими документами. Можно сохранить текущий файл в новом месте компьютера, выбрав при этом другие приложения, например .pdf или XML-документ, веб-страницу. Для поиска по ключевым словам добавьте теги. Можно также присвоить общее название похожим файлам, что также помогает при сортировке большого количества документов.

Вкладка “Последние” предоставит выборочный доступ к недавно открытым файлам. Здесь же вы можете поместить интернет-версию документа в папку OneDrive на диске компьютера для последующей синхронизации с облачным хранилищем. Либо сразу выгрузить файл в облако Microsoft через “Добавление места”. Для выполнения этой операции требуется Учетная запись Microsoft

Активировав вкладку “Печать”, вы получите доступ к настройкам печати документа. Данное меню можно быстро вызвать из самого документа при помощи “горячих клавиш” Ctrl+P.

Если необходимо настроить общий доступ к документу в облаке, отправить по электронной почте, опубликовать в блоге либо преобразовать в онлайн-презентацию, воспользуйтесь функционалом “Общий доступ”.

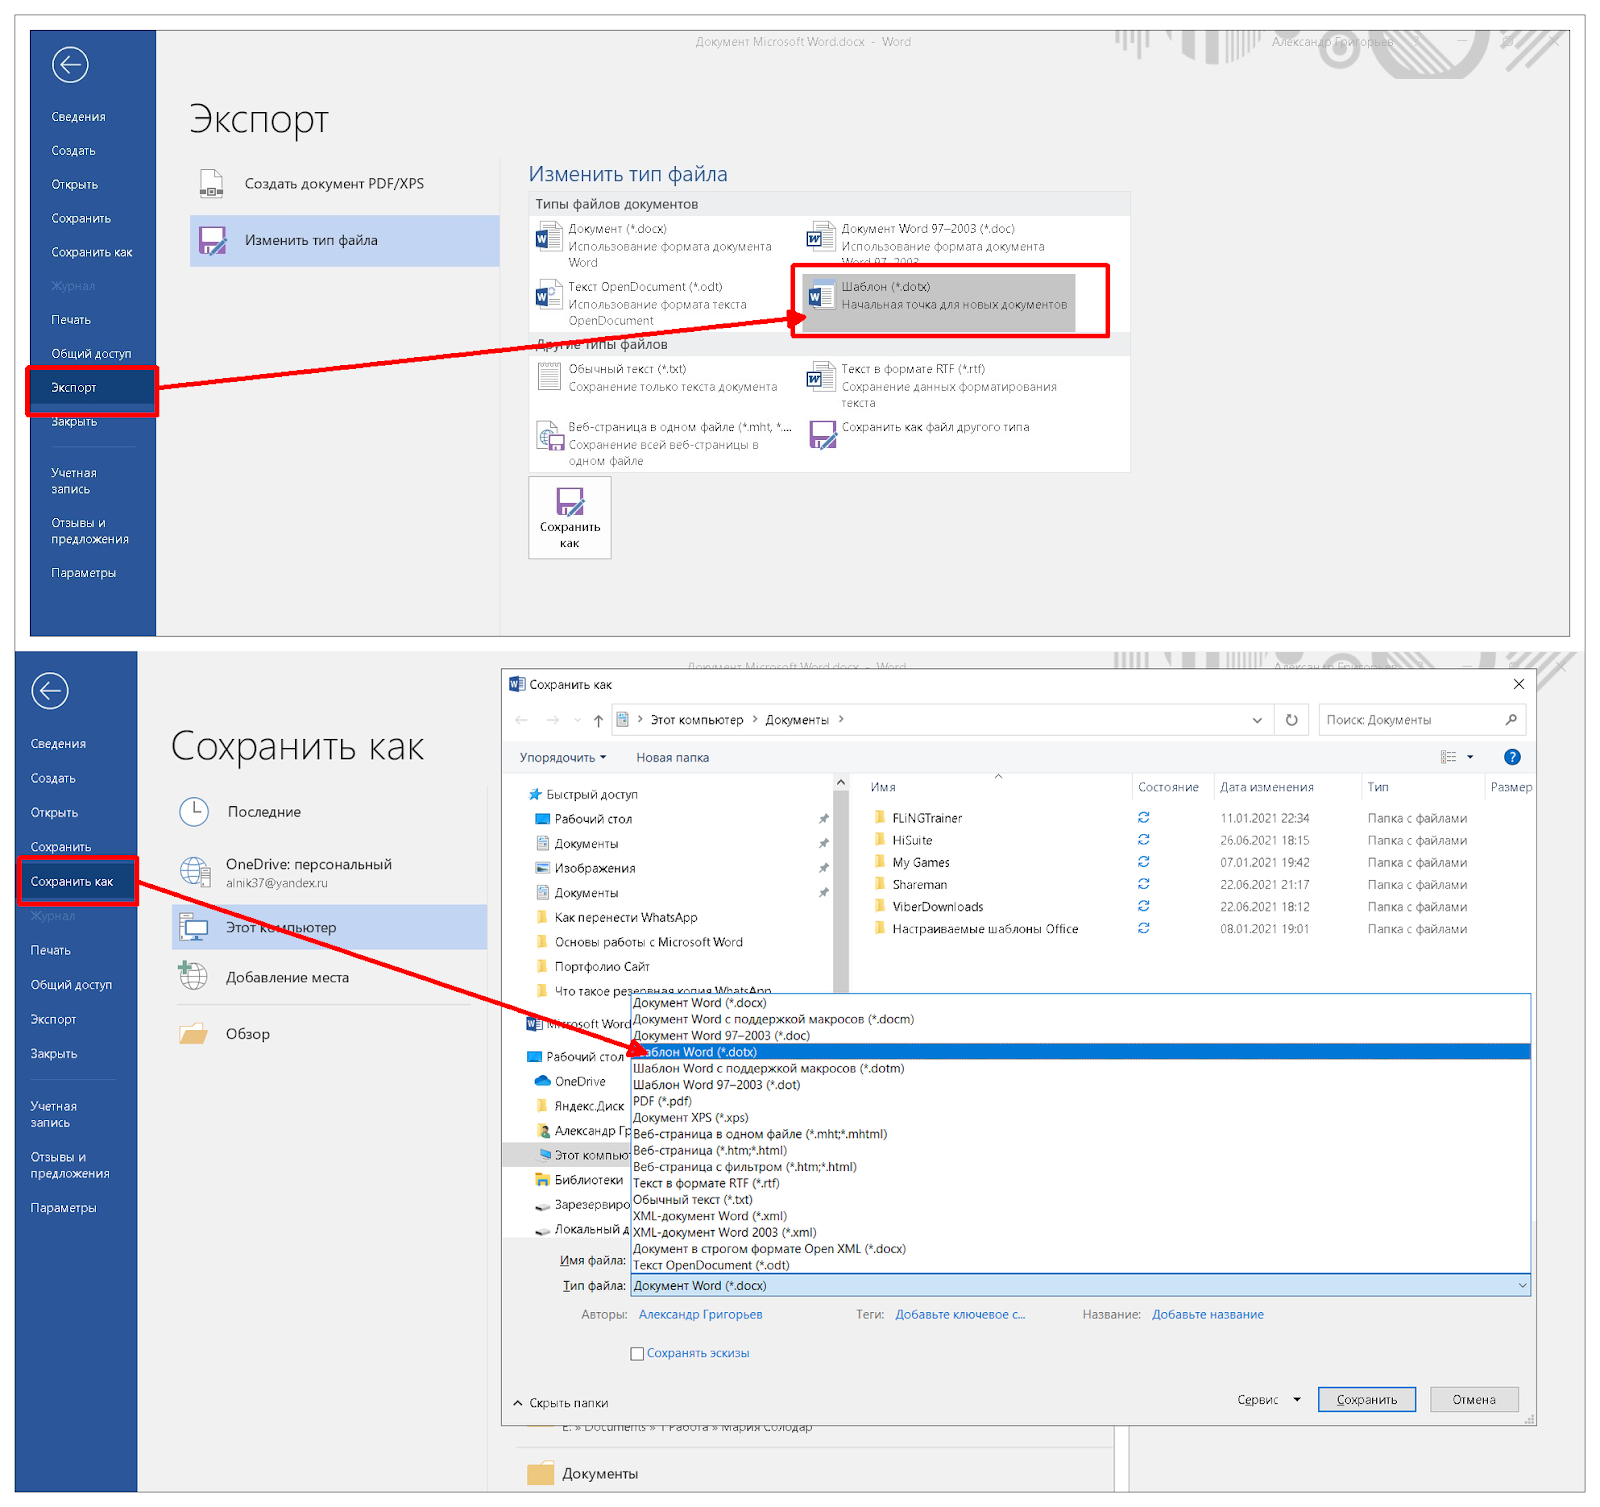
Инструмент “Экспорт” дает возможность преобразовать файл в документ PDF/XPS, изменить тип файла на альтернативный. Данная операция в чем-то аналогична функционалу “Сохранить как” с выбором расширений, но производит более корректную конвертацию из одного приложения в другое.

Вкладка “Параметры” предоставляет доступ к более сложным настройкам, которые могут быть применены во всех документах приложения Word, либо только в существующем. Поэтому менять некоторые из них следует с определенной осторожностью. Здесь вы можете настроить язык по умолчанию, проверку правописания, режим автосохранения и многое другое.

Важный пользовательский функционал, доступный в “Параметрах” — настройка команд и иконок графического интерфейса “Лента”. Добавляйте полезные функции в меню быстрого доступа и удаляйте ненужные, чтобы ускорить и упростить работу с документами в MS Word.

Создание собственного шаблона документа
Предположим, у вас есть фирменный бланк, либо запланирована массовая рассылка стандартного письма. Чтобы каждый раз не копировать документ, достаточно создать собственный Шаблон.
- >Создайте документ-шаблон для дальнейшего использования в виде исходника.
- Войдите в меню “Файл”, выберете “Сохранить как” или “Экспорт”. Затем кликнете два раза ЛКМ по кнопке “Шаблон (*dotx)”, либо выберете тип файла с таким же расширением. Сохраните документ в удобном месте.

Теперь каждый раз при открытии файла *dotx у вас будет стандартный шаблон под названием “Документ” с порядковым номером 1 / 2 / 3 и т.д., в который можно вносить необходимые изменения. Далее документ сохраняете под новым названием уже с обычным префиксом *docx.
Набор текста, форматирование и редактирование
Печатание текста в редакторе не вызывает сложностей. Прежде всего для удобства работы выбираем масштаб отображения страниц. Для этого в правом нижнем углу экрана передвигаем ползунок между знаками “-” и “+”.

Изначально параметры текста, размер и стиль шрифта устанавливаются разработчиком. Пользователь легко может изменить их несколькими способами — через верхнее меню, либо с помощью правой кнопки мыши при работе с выделенными фрагментами текста. Создание своего шаблона документа сохранит личные настройки. В Windows 10 меню настроек форматирования появляется автоматически при выделении текста.

Здесь выбираем варианты начертания и стиля текста:
- доступный шрифт из списка;
- верхний либо нижний регистр;
- начертание курсивом, полужирным, зачеркнутый или подчеркнутый текст;
- дополнительные эффекты.

Вкладка “Дополнительные” расширяет возможности работы со шрифтами. Чтобы откатить изменения к начальным, достаточно нажать кнопку “По умолчанию” либо “Очистить все форматирование”.

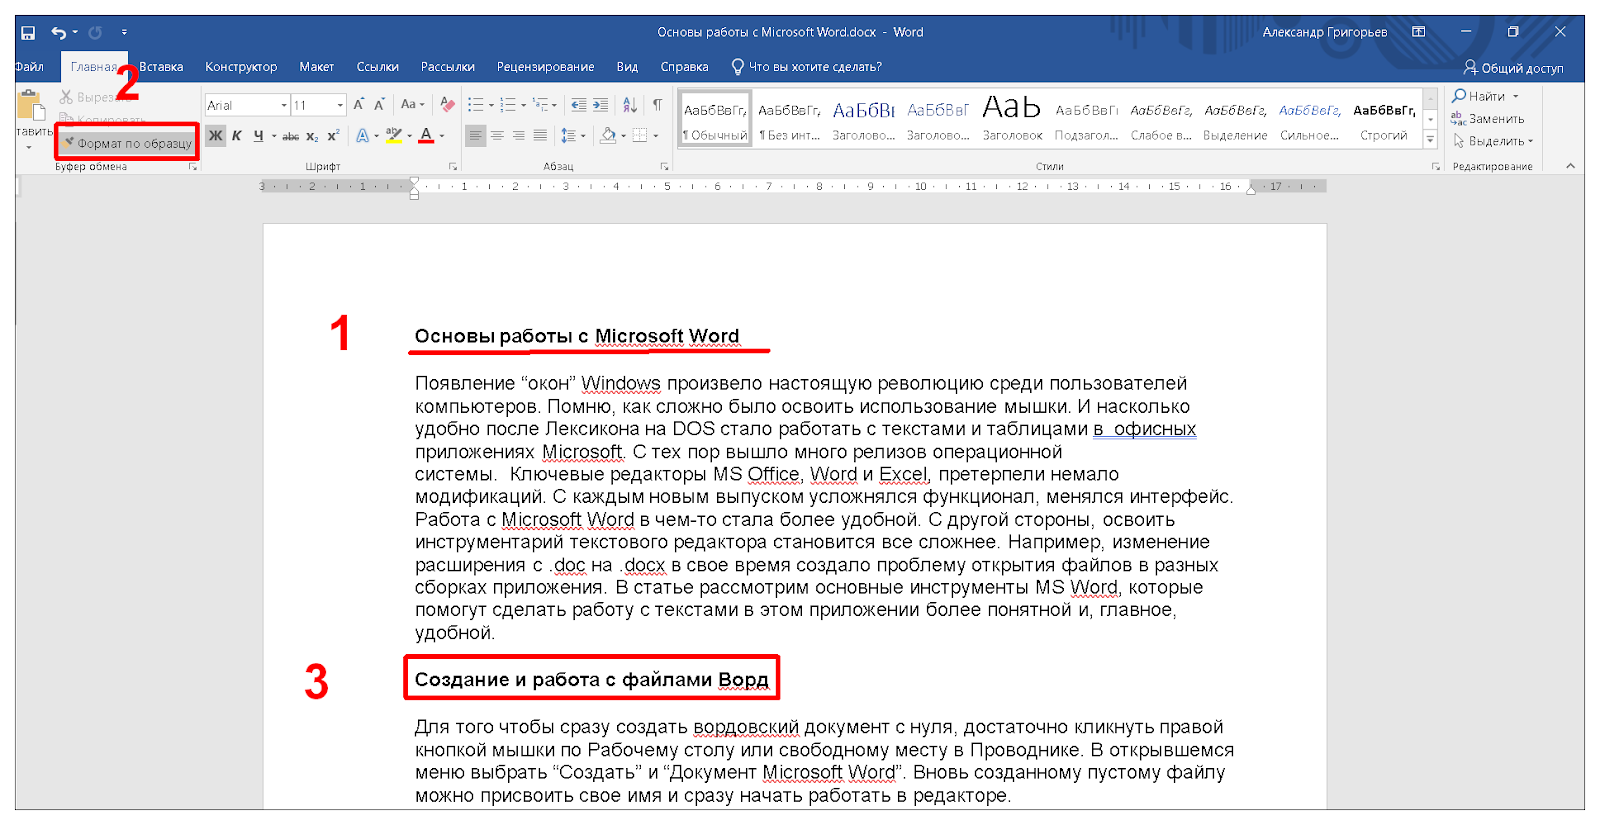
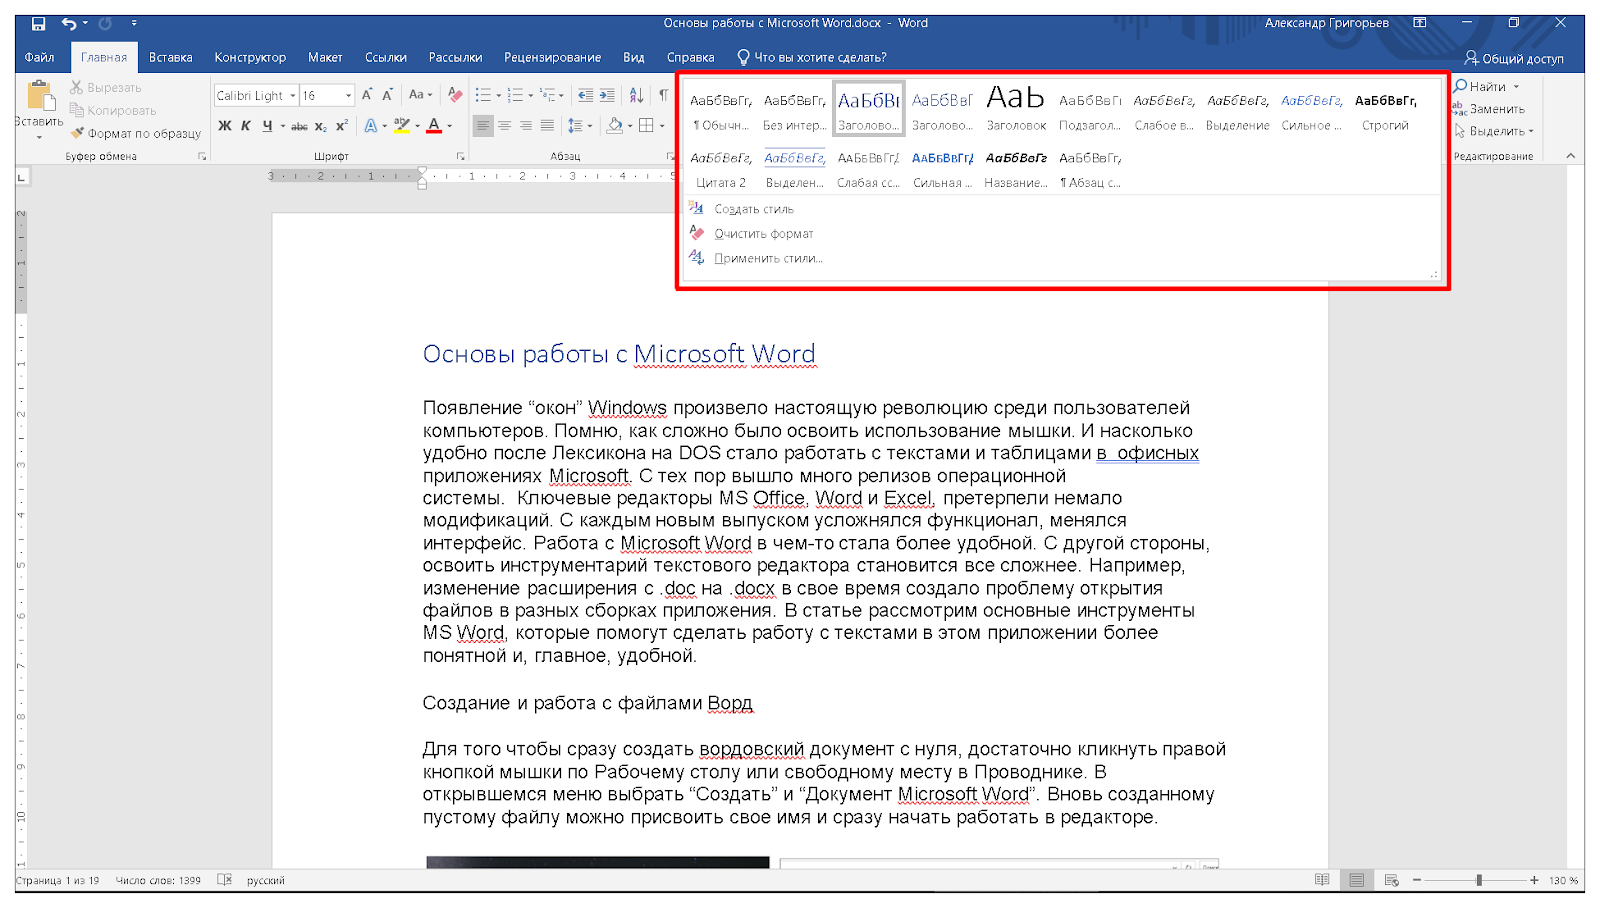
В верхнем меню есть кнопка “Формат по образцу”, которая позволяет быстро переносить стили текста внутри документа и между разными файлами:
- поставьте курсор в то место документа, стиль текста которого вы хотите скопировать;
- нажмите кнопку с кистью;
- выделите фрагмент текста, к которому хотите применить копируемый формат.
Например, я хочу в данном документе применить стиль Заголовка первого уровня к Заголовку 2. Для этого я ставлю курсор на “Основы работы с Microsoft Word”, нажимаю на “кисточку” в верхнем меню, она становится активной, далее выделяю предложение “Создание и работа с файлами Ворд”. Все настройки форматирования первого фрагмента текста автоматически применяются ко второму.
Параметры страницы и форматирование абзацев
Выполняем предварительные настройки параметров станицы:
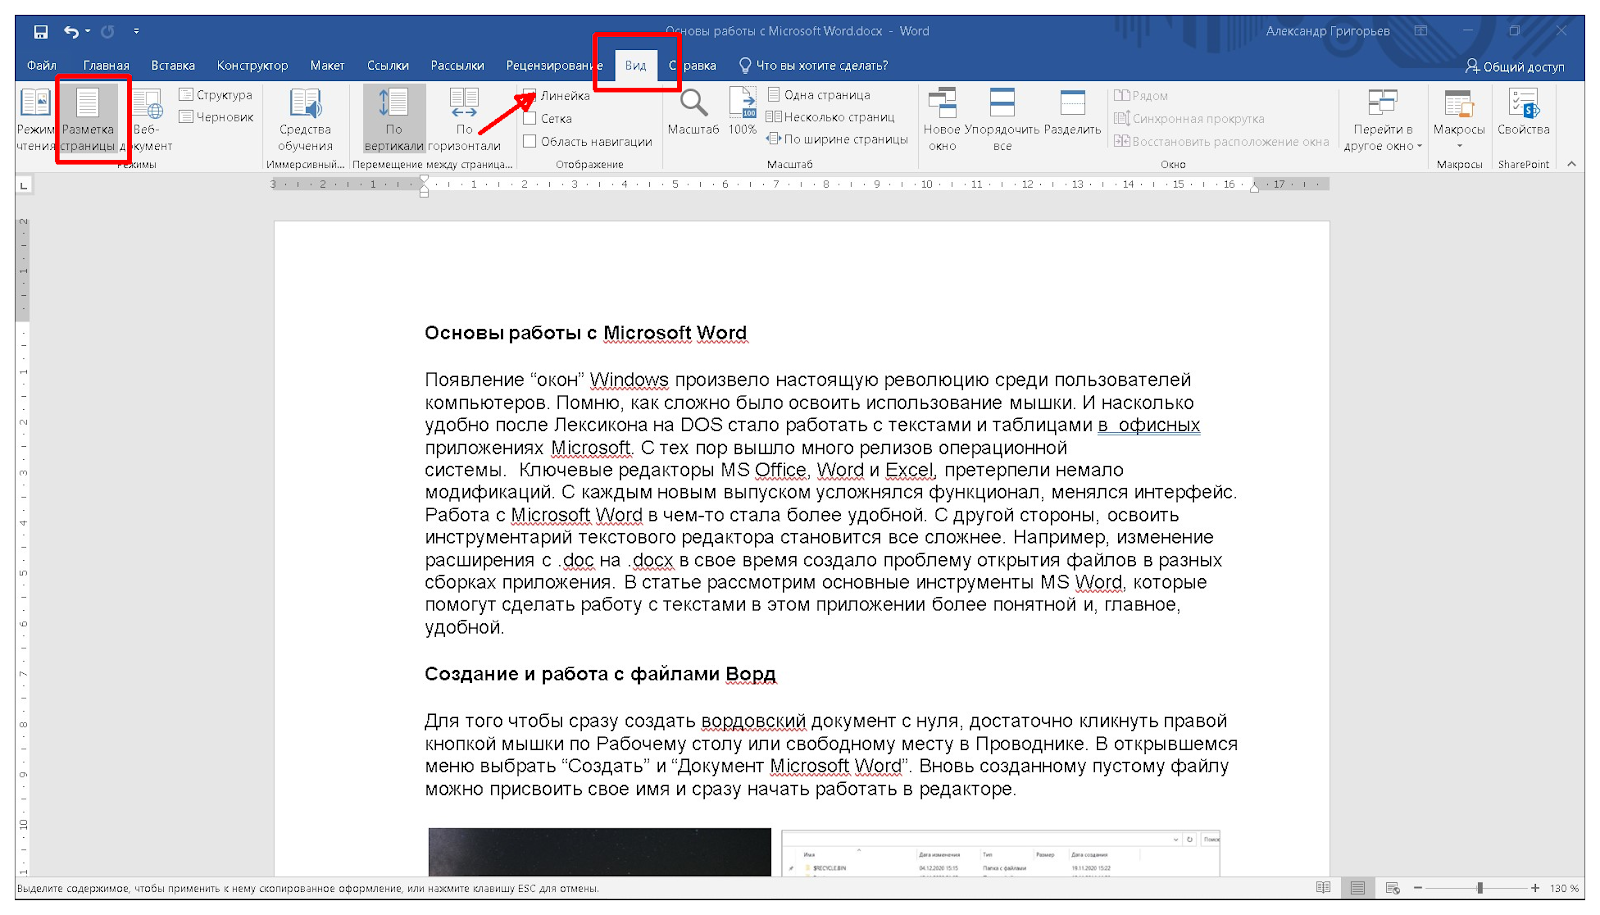
- В основном Меню открываем вкладку “Вид” и устанавливаем режим “Разметка страницы”. Ставим галочку в окошко напротив надписи “Линейка”.
- Щелкаем два раза ЛКМ по левому или верхнему полю страницы с цифрами (“Линейка”). В открывшемся меню настраиваем базовые параметры страницы:
- книжная или альбомная;
- размер полей, переплет;
- режим отображения страниц;
- размер и источник бумаги.
Настройки могут быть применены ко всему документу, либо к выбранному фрагменту. Во втором случае выделенный текст отобразится на отдельной странице.

Настроить размер полей можно при помощи мышки. Для этого поймайте на боковой или верхней “Линейке” край поля и передвиньте его на нужное расстояние.

Настройка абзацев
В Ворд можно создать индивидуальные настройки для разных абзацев, либо поменять отступы для всего документа:
- выделите отдельный фрагмент;
- на “Линейке” при помощи мышки перемещайте указатели правого и левого отступа;
- так же меняйте “Отступ первой строки” для создания “красной строки”;
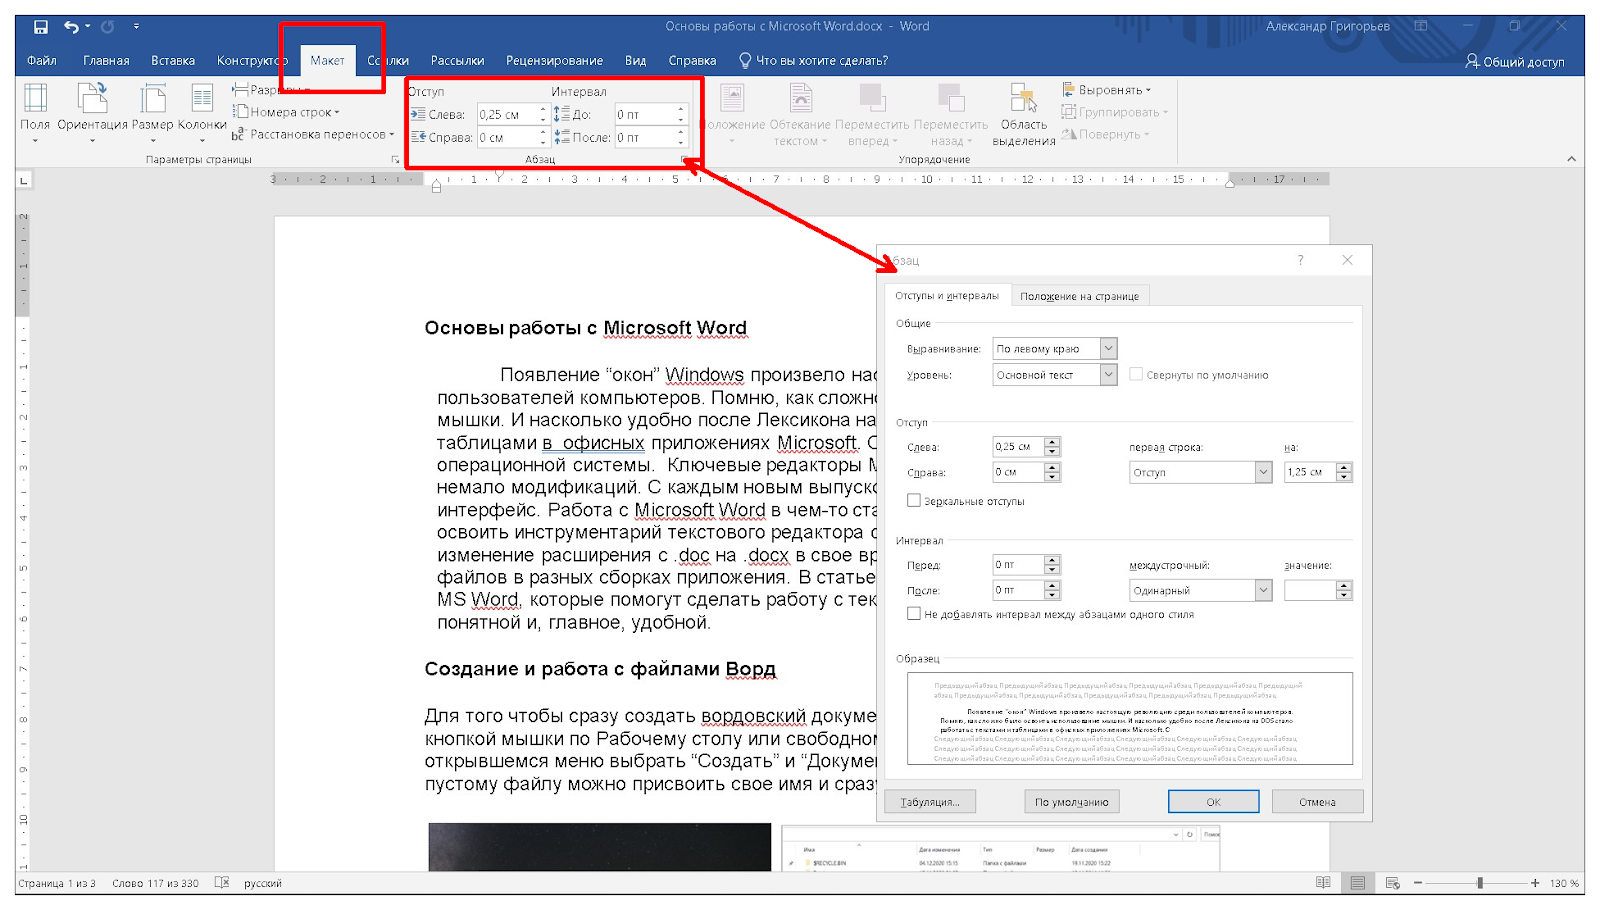
- в верхнем Меню откройте вкладку “Макет” и настройте отступы;
- откройте меню “Абзац”, установите нужные параметры.
Чтобы изменить “Отступ первой строки” и “Выступ” для всего текста в файле, выделите его при помощи клавиш Ctrl+A. Быстро применить настройки одного абзаца к другому можно при помощи уже знакомой кнопки “Формат по образцу”.
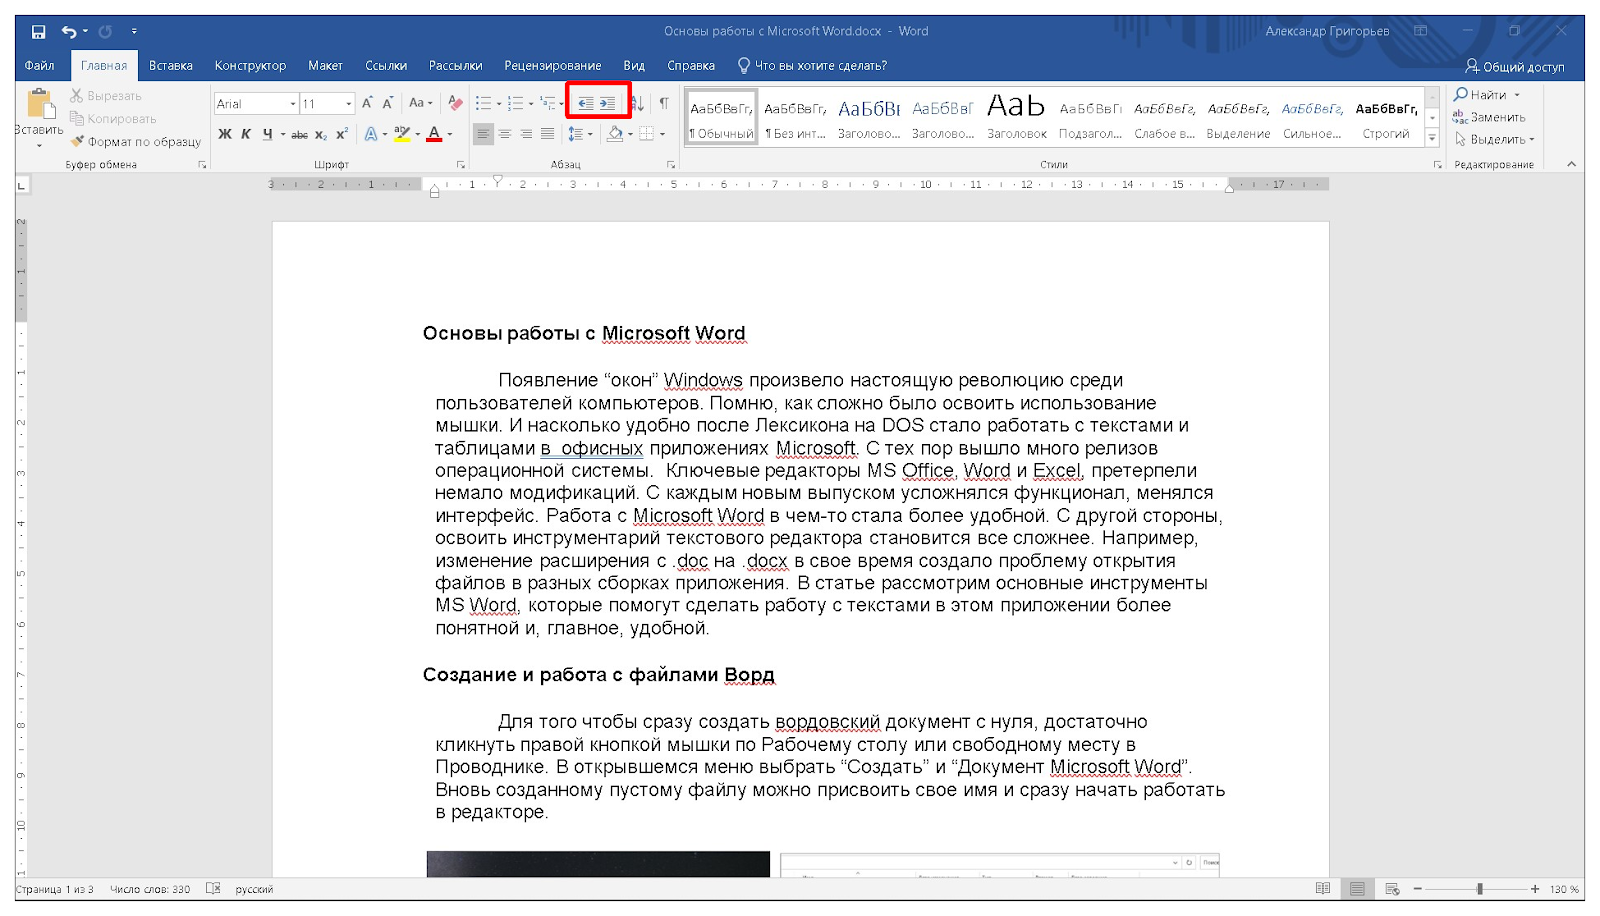
Также быстро изменить отступ на фиксированный интервал можно кнопками Основного меню “Уменьшить отступ” и “Увеличить отступ”.
Выравнивание текста
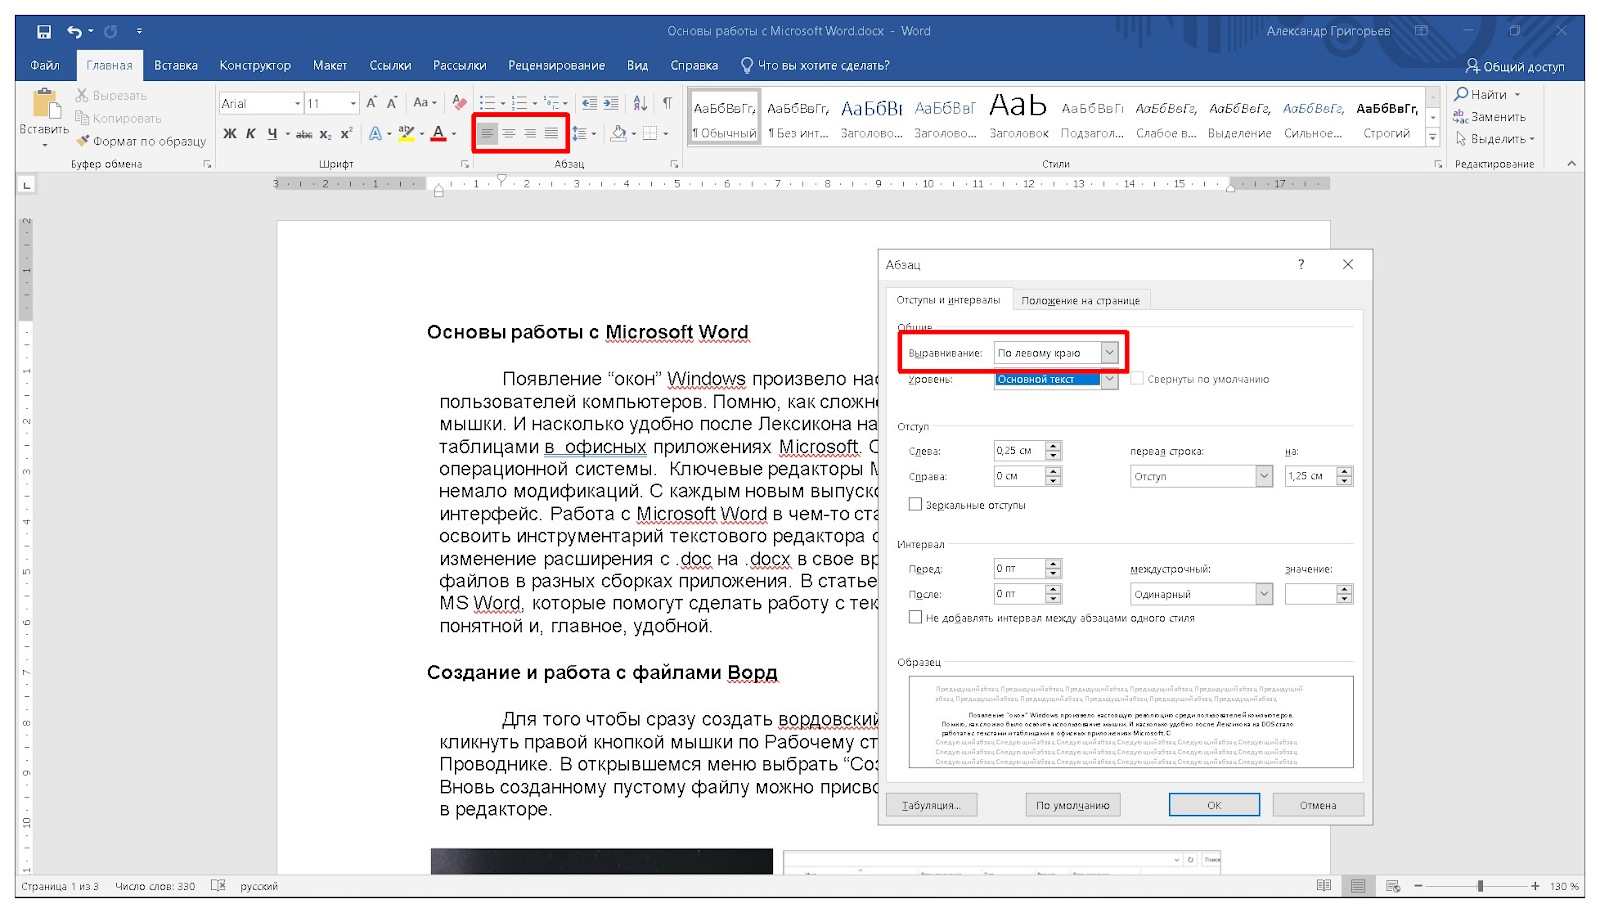
В редакторе Word существует четыре варианта горизонтального выравнивания всего текста, либо отдельных абзацев: по левому и правому краю, по центру и ширине. Для этого используйте кнопки Верхнего меню или окно “Абзац”.
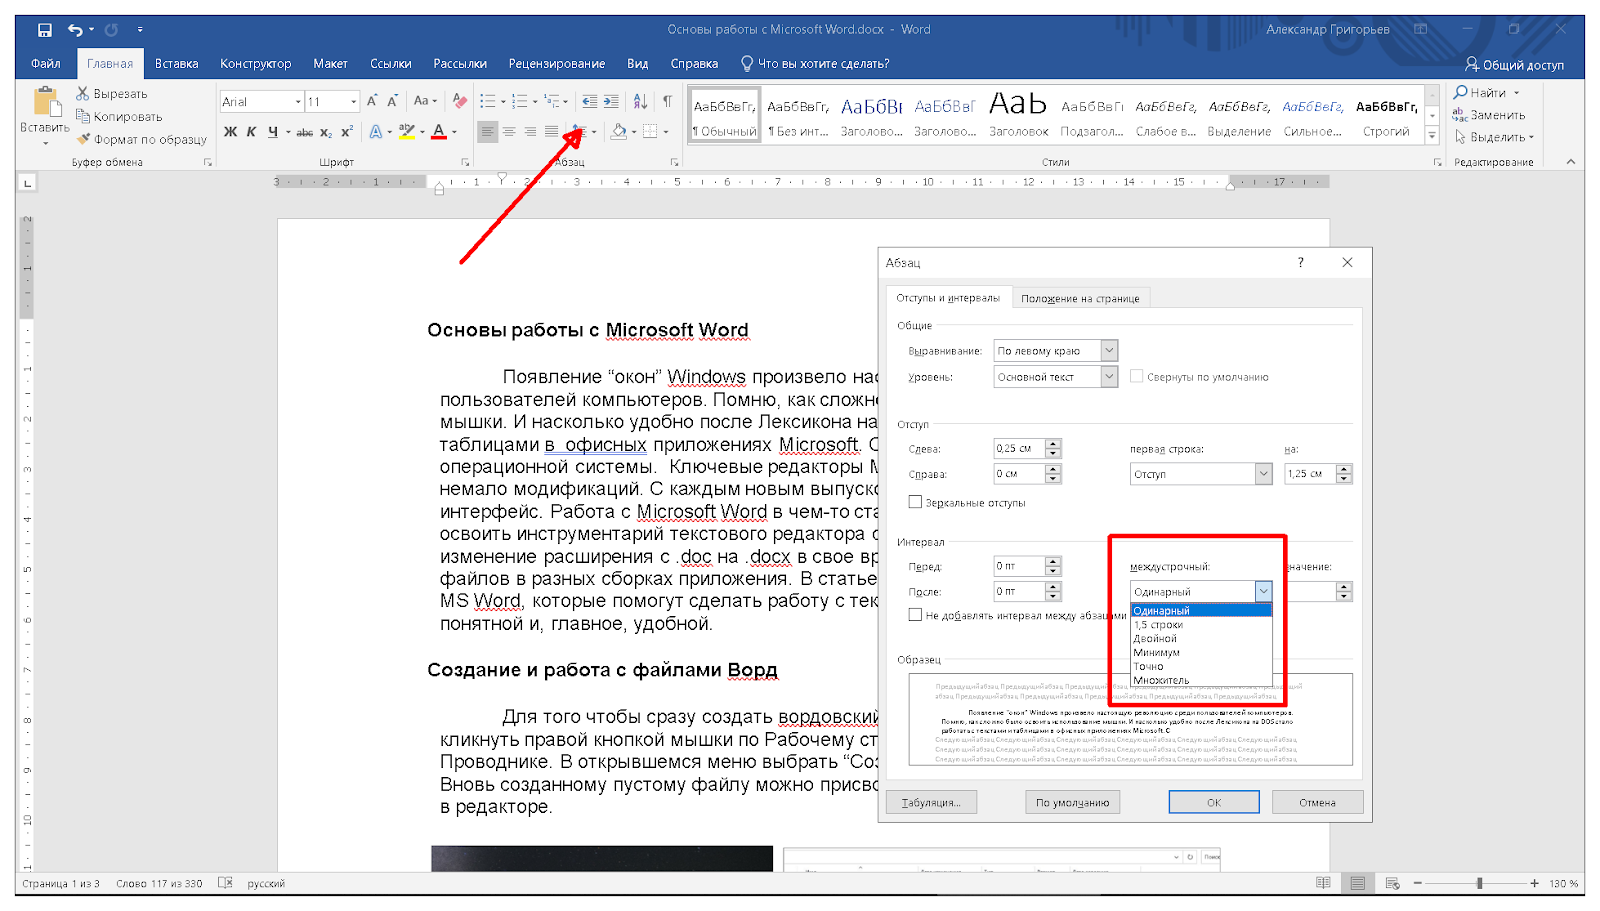
Регулирование межстрочного интервала
Выделите весь текст или фрагмент. Воспользуйтесь кнопкой Интерфейсного меню или расширенными настройками в окне “Абзац”, выбрав вариант преднастроек или пользовательский.
Использование инструмента “Вставка”
Для работы с объектами, не относящимися к текстовому контенту, в редакторе Microsoft Word присутствует функционал вставки. Получите к нему доступ, открыв соответствующую вкладку в Интерфейсном меню.
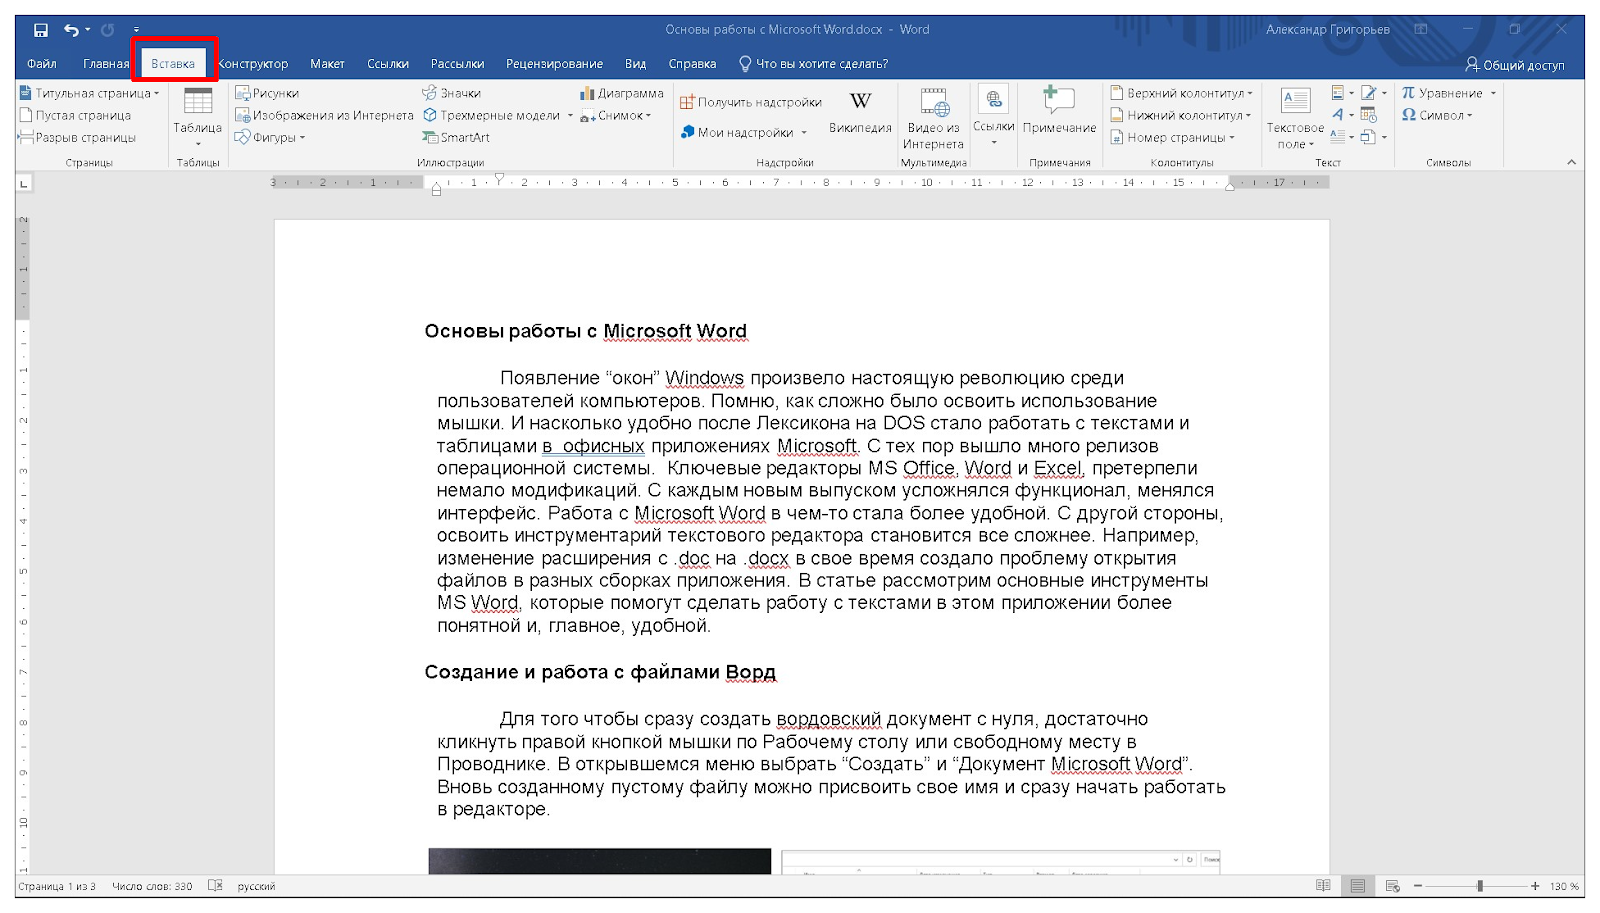
Здесь доступно создание и импорт различных объектов. Рассмотрим некоторые из них подробнее.
- “Титульная страница” предоставит доступ к набору шаблонов-обложек для быстрого создания заглавных страниц с предустановленными полями и готовым оформлением.

- “Пустая страница” создает новый чистый лист в месте нахождения курсора.
- Для разделения на страницы в произвольном месте документа используйте “Разрыв страницы”.
- Для графического оформления данных предусмотрена вставка “Диаграммы”. Одновременно с выбором типа откроется окно приложения Excel для внесения данных и меню “Конструктора Диаграмм”.

В меню “Вставка” предусмотрено большое количество вставки сторонних объектов и интеграции с внешними приложениями, импорт из интернета и с локального компьютера. По сути, его функционал требует написания отдельной методички. Остановимся на трех наиболее популярных и востребованных объектах, используемых в Microsoft Word.
Читайте также: Как в MS Word сделать картинки одного размера.
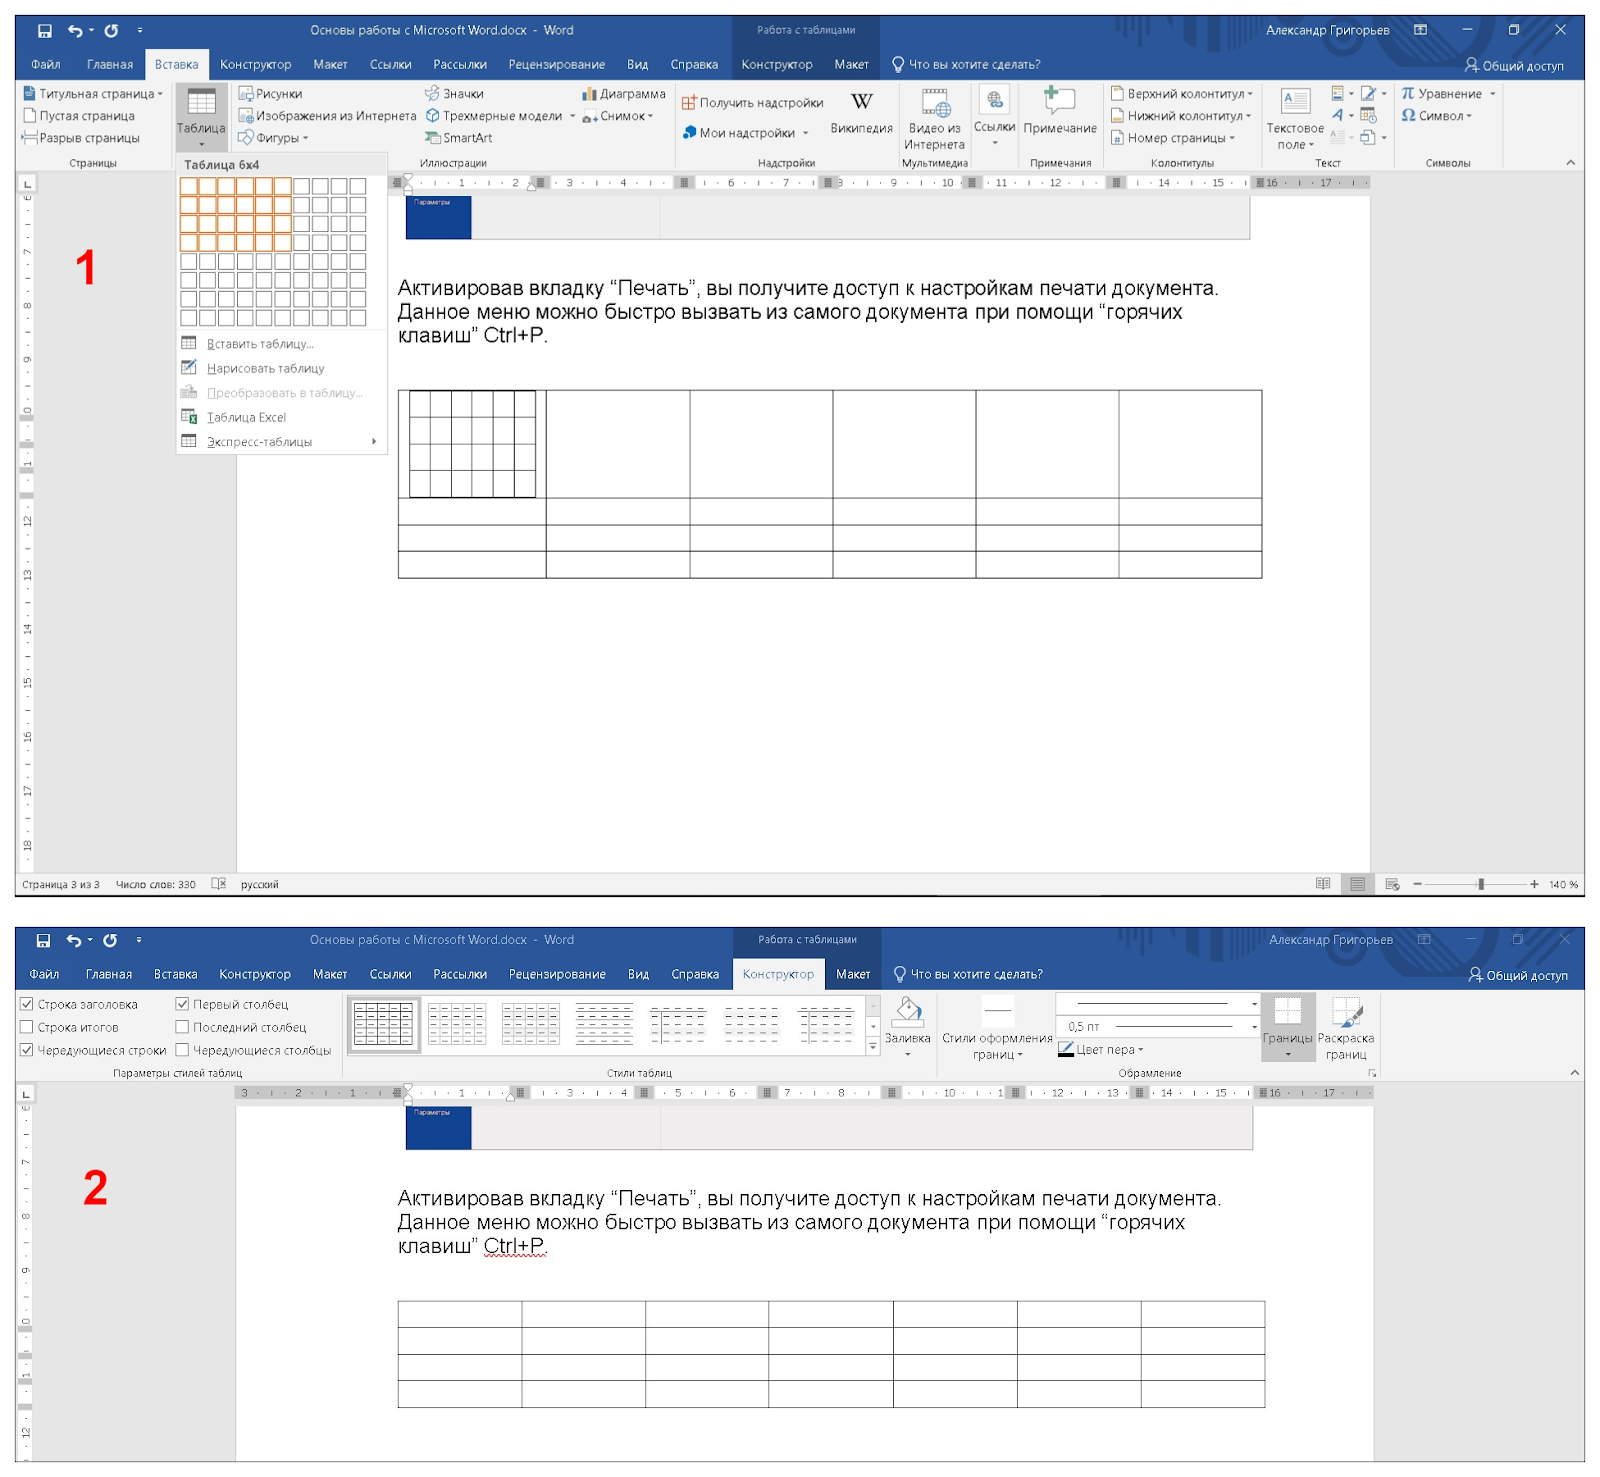
Таблица
Чтобы добавить таблицу, разверните соответствующее подменю и выберите количество строк и колонок. Произойдет автоматический переход в меню “Конструктор” с расширенными возможностями настройки таблицы.
Несколько полезных советов, как упростить работу с таблицами в Ворд.
- Чтобы выделить всю таблицу, кликните ЛКМ по квадратику со стрелками рядом с левым верхним углом таблицы.

- Для быстрого перехода в следующую ячейку воспользуйтесь клавишей Tab.
- Чтобы создать новую строку внизу таблицы, установите курсор в последнюю ячейку и нажмите Tab.
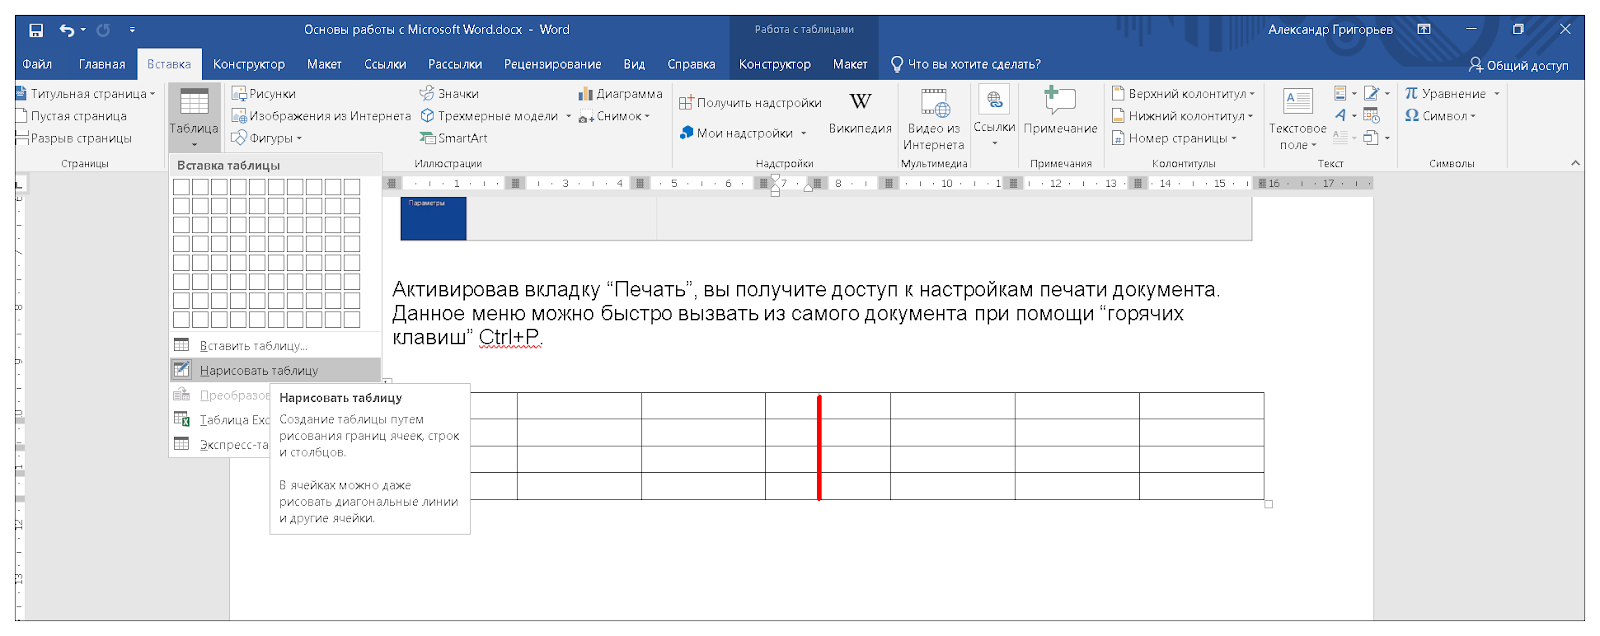
- Для произвольного добавления разделительных линий воспользуйтесь инструментом “Нарисовать таблицу”.
- Инструмент “Таблица Excel” в меню “Вставка” — “Таблица” дает возможность создать внутри документа внедренный объект таблицы Excel с возможностью использования функционала соответствующего приложения.

- Для дополнительной работы с таблицей удобнее всего использовать всплывающее меню, которые вызывается правой кнопкой мыши.
- Чтобы выделить отдельные ячейки с текстом, разные строки, используйте мышку, одновременно удерживая Ctrl.

Фигуры
Еще один популярный инструмент создания и редактирования встроенных объектов в Ворд, используемый в качестве дополнительного оформления документа.
- Откройте “Фигуры” в меню “Вставки”. В коллекции выберите подходящий объект.

- Внедрите фигуру и в открывшемся подменю “Формат” отредактируйте параметры объекта. Добавьте дополнительные фигуры, взяв их из готовых шаблонов.

- Дополнительное меню редактирования объекта вызывается правой кнопкой мышки.

Работать с фигурами достаточно просто. Они легко меняют размер, перемещаются по страницам. Их можно совмещать с текстом, поворачивать, менять цветовую палитру и линии.
Колонтитулы
Бывает, что в документах необходимо создать статичный контент, повторяющийся на всех страницах. Это могут быть реквизиты, логотип, иная информация или объект. Для этого воспользуйтесь инструментом создания и редактирования колонтитулов.
- Войдите в меню “Конструктор” и выберите нижний или верхний колонтитул, либо номер страницы. Доступны варианты форматирования колонтитулов.

- Заполните соответствующее поле колонтитула текстом, вставьте рисунок, либо задействуйте нумерацию страниц. Теперь контент будет автоматически отображаться на всех страницах документа.

Для быстрого входа в колонтитул достаточно два раза щелкнуть мышкой внизу страницы. Редактирование в колонтитулах выполняется так же, как и в обычном тексте Ворд.
Создание оглавления
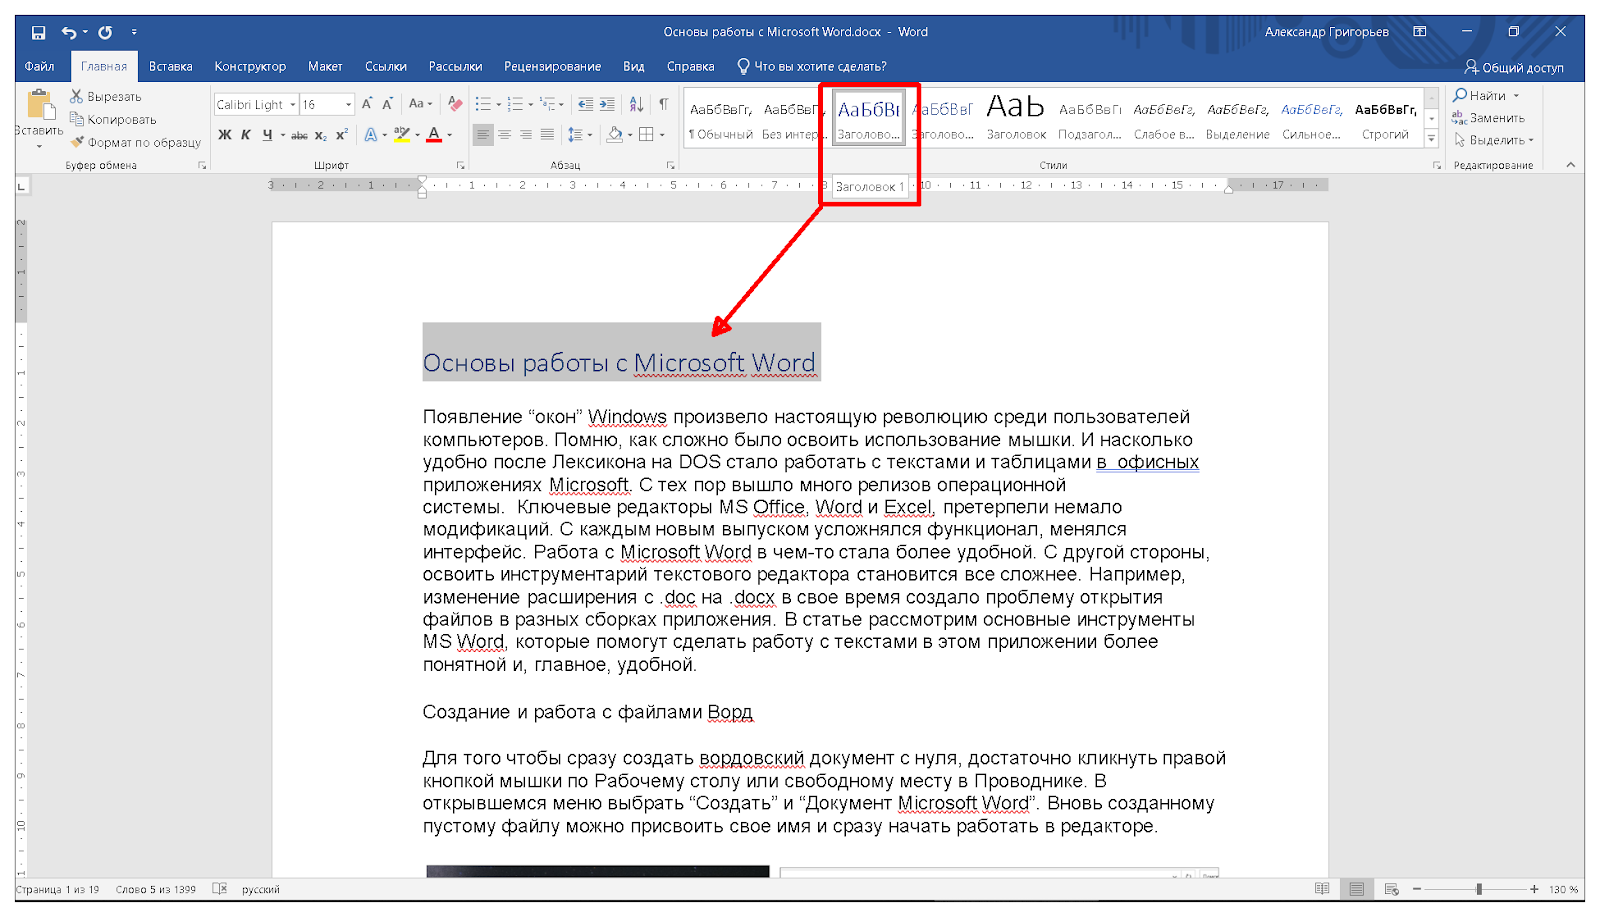
Для быстрой навигации по многостраничному документу используйте “Содержание”. Прежде всего в документе необходимо создать заголовки различного уровня. С этой целью проще всего воспользоваться выбором стилей в Верхнем меню интерфейса.
- Установите курсор на главный Заголовок документа, либо выделите его. В меню “Стили” активируйте вкладку “Заголовок” или “Заголовок 1”.
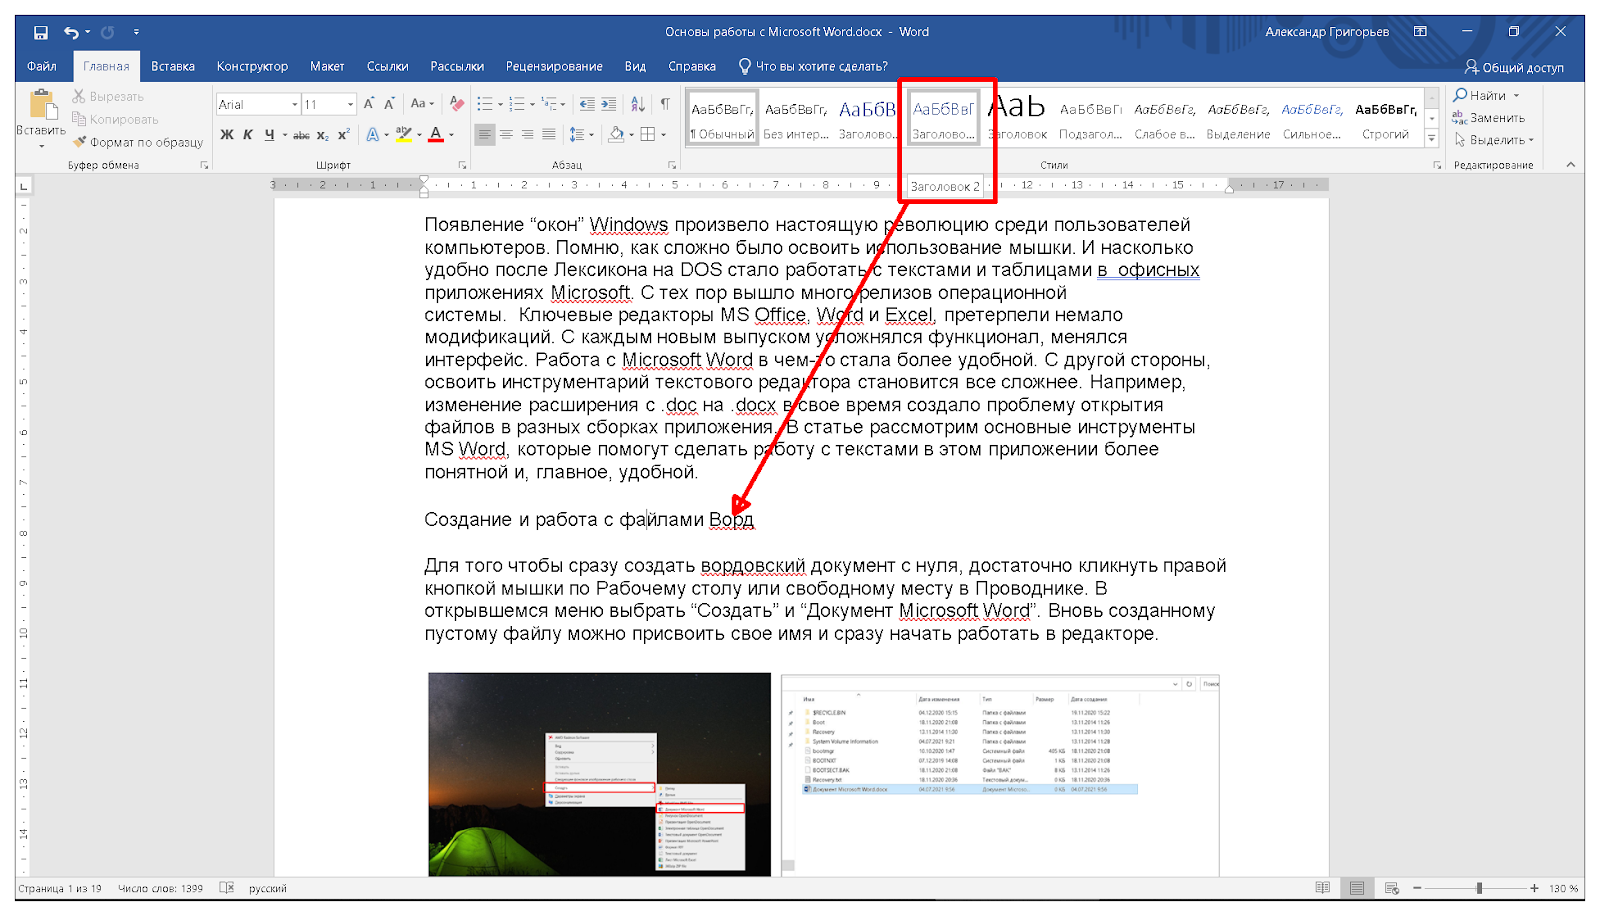
- Далее в иерархическом порядке создайте стили форматирования для тайтлов следующего уровня: “Заголовок 2”, “Заголовок 3” и т.д.
- Установите курсор в место документа, где будет находиться навигационный список. Откройте вкладку “Ссылки” и выберите “Оглавление”, определившись с вариантом компоновки Содержания. Список заголовков будет сформирован автоматически. Для перехода к нужному разделу удерживайте клавишу Ctrl и щелкните мышкой по ссылке.

Использование макросов
Инструментарий макросов в Microsoft Word используется для упрощения работы с индивидуальными настройками часто повторяющихся действий. Это функционал внутреннего программирования логики решения задач, которая не предусмотрена в стандартном наборе управления приложением. Для создания алгоритма используется вкладка “Макросы” в контекстном меню “Вид”.

Заключение
Возможности текстового редактора Microsoft Word очень обширны, описать их все в одной статье невозможно. К тому же, применение функционала программы зависит от задач конкретного пользователя при работе с текстами. Я привел примеры использования некоторых инструментов приложения, которые помогают упростить и ускорить работу в редакторе. Часть из них доступна начинающим юзерам, другие инструменты требуют более глубокого погружения в свойства программы. Главное, экспериментируя с Ворд, не забывайте создавать бэкапы важных документов. Настройте автоархивирование или почаще пользуйтесь “волшебной дискеткой” в левом верхнем углу графического интерфейса.
Post Views: 305
This Microsoft Word beginner guide provides free & basic lessons, tutorials & fundamentals for learning MS Office Word software. Microsoft Word is everyone’s favorite text editor. With so many features, it can meet all your requirements. It may look complicated to use initially, but once you get the hang of it, things start falling in place. This blog post is for those who want to learn the basic functions and features and know more about Microsoft Word.
To start the Microsoft Word application, click on the START button > Microsoft Office > Word or simply search for ‘Word’ in the search box and then click on the result. Once it is opened, select New document.
This is how the opened blank Microsoft Word document will look like.

Now let us take a look at the features that it has to offer.
1] Title and the Quick Access Toolbar
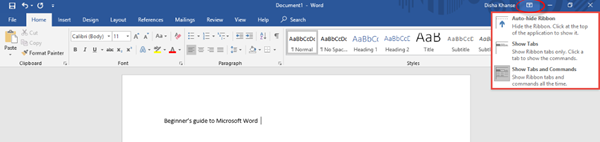
At the top, you have the Title of the document, the Quick Access Toolbar and a few other functions such as Minimize, Restore Down / Maximize, Close and Ribbon Display Options.
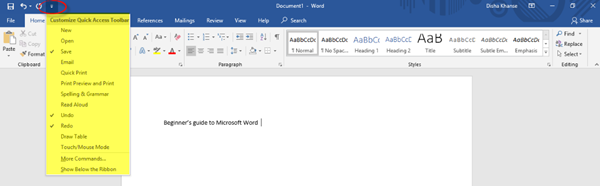
In the Quick Access Toolbar to the left of the Title Bar, you will find the Save button (Ctrl+S), wherein you can save the document in the desired folder; the Undo Typing button (Ctrl+Z); the Repeat Typing button (Ctrl+Y); and the Customize Quick Access Toolbar, wherein you have the various commands as shown in the image below.
In the Ribbon Display Options, it is possible to Auto-hide the ribbon, show the ribbon tabs only or show the tabs and commands all the time. Refer to the image below.
Below the Title Bar, you will see what is called the Ribbon which consists of various tabs such as File, Home, Insert, Design, Layout, References, Mailings, Review, View, Help, Search. Now let us go through every Tab and its commands.
2] Home
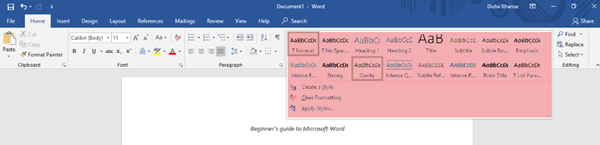
The Home tab is the default tab in Microsoft Word. This tab comprises of features related to the clipboard, font, paragraph, styles, and editing.
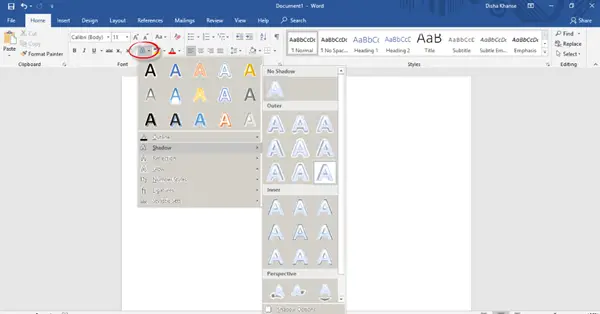
In the Clipboard section, you will find commands such as copy, cut and paste. Next, we have the Font section. Here you can change the font and the font size for your text, change the case, apply bold or italic formatting, underline, change the font color and highlight text and also add various text effects and typography. Go ahead and explore all the different options to make your text look great and innovative!

The Paragraph section includes the alignment options where you can choose to align your text in the center, left, right or justify it (that is, evenly distribute the text between the margins).
You can add or remove borders, increase or decrease indent, adjust the line and paragraph spacing, and also add bullets and numbers from the bullets and numbering libraries.
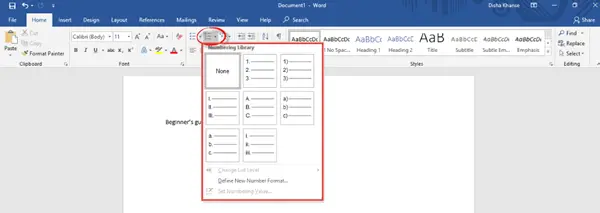
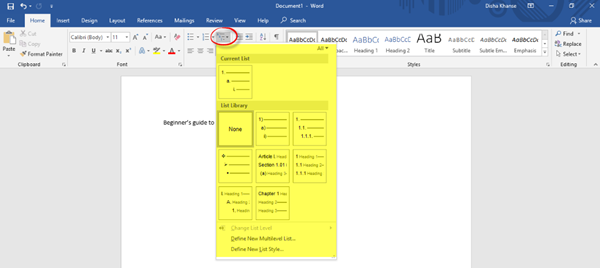
You can also create a multilevel list to organize items or create an outline.
From the Styles section, you can select any style of your choice to change the way your document looks. In the Editing section, you can find text or any content in the document and also replace a specific word or text with something else.
3] Insert
The next tab is the Insert tab.

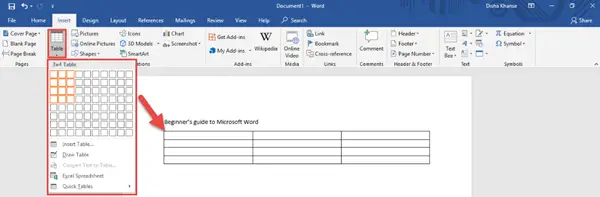
You can add a stylish cover page from the numerous styles available to make your document look more professional and also add a blank page from the Pages section. Another important feature is inserting a table, a picture from your picture gallery, an online picture from the web, shapes, 3D models, charts, SmartArt and screenshots from the Tables and the Illustrations section. Refer to the images below for guidance.
You can insert Tables.
You can insert Shapes.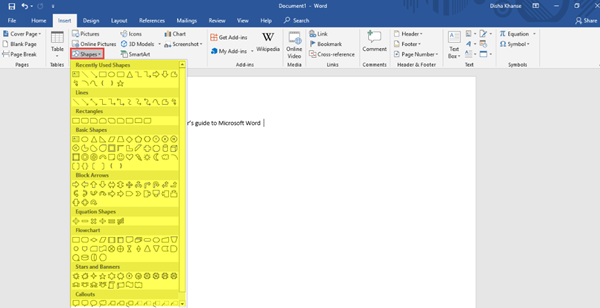
You can insert SmartArt – and more!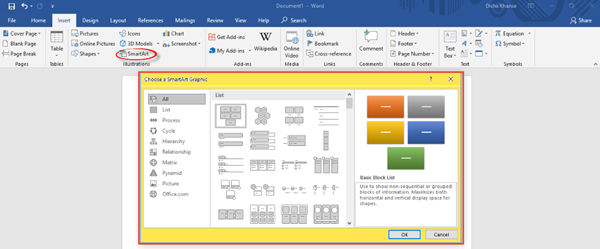
In the Header & Footer section, you can add a built-in header and a footer or from online sources. You can also add page numbers to your document.
Similarly, there are a lot of other features and commands in the Add-ins, Media, Links, Comments, Text and Symbols sections.
4] Design
The Design tab comprises of commands related to Document Formatting and Page Background. To make your document look more consistent and classy, choose the right theme of your liking from the various options available. Additional features include colors, fonts, effects, and paragraph spacing.
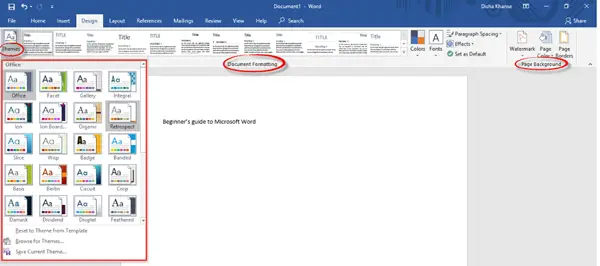
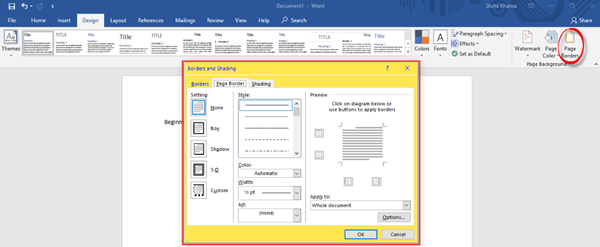
If you wish to go for a splash of color for the document background, you can change the page color as well, add Watermark and page borders.
5] Layout
In this tab, in the Page Setup section, you can adjust margins for the entire document or for a particular section; and also customize it. You can change the Page Orientation to Landscape or Portrait; choose the page size for your document, and add or remove columns.
You can also decide the Size for the document.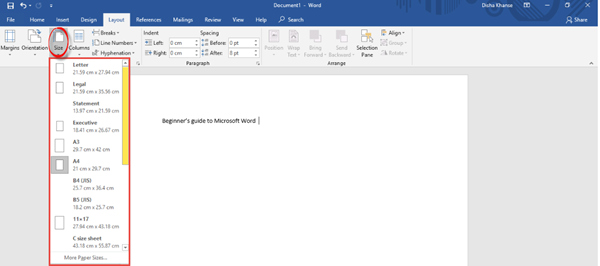
Find the settings to increase or decrease the Indent and Spacing in the Paragraph section.
Other features related to the placement of text and pictures, grouping multiple images and rotation options will be found in the Arrange section.
6] References
In the References tab, you will find different commands related to the table of contents, footnotes, research, citations and bibliography, captions, index and table of authorities.

7] Mailings
Here, you will find settings that will help you to create envelopes and labels, start the mail merge wherein you can send it to multiple recipients, write and insert fields, preview results and finish mail merge.

8] Review
The Review tab includes various functions related to proofing, speech, accessibility, language, comments, tracking, changes, compare, protect and ink. Out of all these, the Spelling and Grammar function (F7) is of utmost importance. Do check for spelling and grammatical errors after you are done writing your document.

9] View
In the View tab, you can change the views such as Read Mode, Print Layout, Web Layout, etc. Feel free to explore the additional features from the immersive, page movement, show, zoom, window, macros, and SharePoint sections.

10] Help
In the Help tab, you can contact an office support agent and give feedback.

11] Search
In the Search tab, you can type any feature that you are looking for and get help.
12] File
In the File tab, you can save the document, print and share the document, and also publish it.

In this post, I have tried to cover all the basic and useful features and functions of Microsoft Word.
This is my first blog post and I hope it was helpful to you. Your suggestions are most welcome.
Do try out all these features in order to make your MS Word document absolutely presentable and perfect!
Next, you might want to take a look at our Microsoft Word Tips And Tricks post.
Learn more advanced basic features of Microsoft Word. Full explanations of Microsoft Word use and features.
In this article, I am writing about detailed features and uses of the Microsoft word application. These features help you to learn the basics of MS Word 2007, 2013, and 2016 versions.
Microsoft Word is the most important word-processing office application used by students, teachers, IT professionals, and companies, etc. around the world. Microsoft Word is used to create and edit professional-looking documents such as resumes, books, admission forms, letters, papers, reports and booklets, cover pages, notes, assignments, brochures, and even web pages.
Features and uses of Microsoft Word 2007,2010 … and Microsoft 365
1. Microsoft Word Templates Features and uses
- Templates: – In MS Word are a pre-defined professional design for users. In which all the page layout, fonts, colors, graphics, outline, text boxes, etc. word processor user gets by default. To insert the template you need to go to File Menu -> New then you can see available templates and the office.com template. MS word application contains so many templates such as business cards, educational layouts and graphics, event planner documents and event management templates, flyers, invoice templates, invitations templates, many types of forms, resume templates, etc. This is the most beneficial feature of the Microsoft Word Application. Because of even less Microsoft word, literate users can use Microsoft word without the knowledge of other menus and functions.
The benefit of Templates in MS word technically is that any student or professional only needs to replace the existing text and their document is ready to print.
If anyone wants to create a resume but don’t how to do it then they have to go into the file menu->new->template they only need to search for a resume under the office.com template option. But to access these all features of MS word templates it is required users that they’re already connected to the Internet.
If the user wants to send an invitation card but doesn’t know how to create it in MS word then again they need to search for the invitation card template in MS Word, select the design and edit the pre-defined text.
This is the easiest way to use Microsoft Word and it saves lots of time for the users. This is how Microsoft Word use can be productive if anyone uses it smartly.
Related: Importance of MS Word in Education
2. Microsoft Word Home Menu Features and its Uses
Microsoft word home menu contains all the basic standard formatting options such as font settings, paragraphs, styles, and editing. The home menu is very important to practice for MS Word processor students.
- Clipboard: – In Microsoft Word Home Menu Clipboard is the first category menu that is used to store copied material temporarily. Such as text and pictures or any object in Microsoft Word. The uses of the clipboard function are that users can copy, replace, and place the text from one section to another section of the page. Also, the uses can be extended to this function such as copied texts remaining saved temporarily until not deleted. You can see your copied text and image in Clipboard when you click on the bottom right corner (little arrow sign-in box). And if you want to Copy then use CTRL+C and for paste use CTRL+V’
- Font: – In which the user can set the font style according to the nature of the document. For example, if someone is writing an application or resume then the font can be Calibri or any professional font. If anyone is writing a fancy paragraph or poem then the font can be Freestyle Script. You can also type in Hindi, and Punjabi in Microsoft Word by downloading Hindi or Punjabi fonts and then installing those fonts. Such as AGRA, Kruti Deve, Kundli, etc. Hindi fonts are common in use. MS word provides more advantages for users other than any word processor. In MS word, home menu users can set and change font sizes easily. They can fill the color background behind the text, and users can set text transformation to uppercase, lowercase and in Title case, etc. any line can be underlined and italic based on the document style. If you want to use all font options from one place then press Ctrl+Shift+F on the keyboard. This is a shortcut key to open Font options.
- Paragraph: – The paragraph sub-menu is another great feature in MS-word that can be used to align paragraphs, and highlight features and important points by using bullets and numbers. MS Word users can also set the line spacing to improve the readability of the document.
- Style: – If users don’t know anything about the font, or paragraph formatting then they can use the style category menu under the home menu. In which any text can be highlighted according to the predefined style. E.g. heading size, subheading size, etc. confusion can be easily solved in the styles category. Such as if you’re using various headings in your essay or document but don’t know how to set the font size, then you don’t need to worry, just select the text you want to make a heading and then click on Heading 1. In the styles category, there are 6 types of heading such as Heading1, Heading 2, Heading 3, Heading 4, Heading 5, and Heading 6. Such options are very useful in education or educational material. Books and study materials can be designed professionally by using these options in Microsoft Word.
- Change styles: – Users can set any style for their document in Microsoft Word. This is another very useful option in which document style can be edited or created according to the reader of the document. In the change style menu, you can set your document style to distinctive, elegant, fancy, formal, modern, newsprint, perspective, modern, simple and traditional, etc. Also, you can set paragraph spacing to tight, compact, relaxed, etc. based on the user’s demand or according to the reader’s point of view.
- Editing: – Another use of the home menu in Microsoft word by using the Editing Category Menu. The user can find any word or line in between documents. They only need to press F5 or Ctrl+F and then they can find and replace any text in the document. They can select, and replace any object in the document. They can visit any page or section in the document by pressing Ctrl+G from the keyboard then they can put the page number and click on Go To. These wonderful features are not available in one place in such an easy style in other word-processing applications.
Such technical users of the Microsoft word Home menu are very beneficial for all kinds of users such as students to create assignments and notes. Teachers can use these options to highlight the main topic of the document. A business professional can use these options to create professional-looking letters. E-book writers can design their books according to this. Bloggers can write their posts amazingly with the use of these options.
3. Insert Menu Features in Microsoft Word and Uses
- Insert means in MS Word to insert something from outside into the page. Such as pages (cover pages, blank pages, and page breaks), Tables, pictures, clip art, shapes, smart art, hyperlink, header and footer, and text boxes symbols) All are great features of the Insert menu in Microsoft Word. These functions provide exceptional uses for the word user. Let’s understand these features and uses below:
- Pages (Cover Page, Blank Page, and Page Break): – In MS Word, the Page sub-menu contains three main features.
- The cover page feature can be utilized at the start of the document or it will be used on the first page of the document. Such as students, teachers, professionals, and writers can insert cover pages in stories, assignments, notes, articles, etc. to highlight the title of the written story, notes, description, and author name. There are so many pre-defined cover page templates that can be used to get the attention of readers while they will receive your printed or pdf copy. Also if you’re not satisfied with these templates then there is another option called more cover pages from office.com. According to Google translator cover is a thing that lies on, around something, and conceals. The magazine’s front page is also a cover page it can be edited photographs or designed text. Books front page, and greeting cards’ first page are examples of the cover page. I think you got this.
- The blank page option provides the user for inserting any blank page after the cursor. For example, if you want a blank page after writing the first paragraph on one page then you can click on this option. You can also use Ctrl + Enter to insert a blank page after the cursor. The use of the blank page function is mostly found outs in book publishing or eBook designing. People also can use their notes and documents. The benefits of using this function are that it will consume less memory of a computer or it will help to create fewer .docx (extension of MS word file) file word or .pdf(Portable document file extension) files.
- Page break is similar to the blank page option (You can use the same key: Ctrl+Enter) but it will start a new page after the click. But the difference between a blank page and a page feature is that you can insert the blank page at the cursor position, where the page break starts the next page at the current position. No big difference.
- Tables Menu uses in Microsoft Word: – The use of the table menu is that you can insert or draw a table in the document. You can insert a table, draw the table, convert text into a table, and insert a quick table (pre-designed tables). This is the most important function in the Insert menu that is mostly used to design or draw calendars, reports, and invoices and is used while creating forms, labels, and newsletters.
- illustrations: – Illustrations menu is used to insert the picture, clip art, shapes, smart art, chart, and screenshots. The use of the illustrations menu in Microsoft word will help users to visualize the document’s view to readers. Such as by inserting an image, adding clips, smart art, etc. The purpose of using these visually appealing options is to explore the creativity in readers’ minds while reading printed word files or pdf documents.
- The picture menu is used to insert a picture from your computer hard drives or from the desktop to the current position of your cursor. You can also insert pictures anywhere in the text box, word art and smart art, etc. Whenever you have to insert the image inside any object in Microsoft word then click on Picture Option under Illustration Menu.
- Clip Art uses MS word to insert Art clips such as drawings, movie clips, and sounds that illustrate the concept written in the document. These features help students to understand the concept by seeing clips. Also good to use in all kinds of educational and study materials.
- The shapes feature is used to insert rectangular, circles, arrows, charts, lines, and symbols based on the demand of the document. For example, while giving examples of something such as water consumption or electricity consummation in a document then we can use these shapes in MS word. We can also highlight, colorize, decorate or insert text and images inside the shapes. This is also a great feature of presenting reports in meaningful and professional methods.
- Smart Art is one of my favorite options in MS word. The uses of this option are great especially while educating. You can visually communicate information by using process diagrams, hierarchy diagrams, list diagrams, and relationship diagrams such diagrams is very important and we can use them to display organizational structure, and processes such as (Input->Processor->Output). SmartArt is easy to understand and teaches any complex problem. The option is also available in Microsoft PowerPoint.
- Charts are used to illustrate and compare data in MS word by using Bar, Pie, Line, Area, and surface mostly used charts in MS word. We can insert an excel chart into MS word. When you click on the chart it will open a Microsoft Excel spreadsheet that we can use to write figures. The uses of a chart are very beneficial to display data comparison and data analytics. You can find such options mostly in math or economics books and newspaper economics pages. Publishers are using such kinds of charts to display facts and figures.
Related: Top 5 Microsoft Word Courses Online to become master in document writing and editing
- A screenshot is a great option in MS word and it is used to take a screenshots of opened programs or applications on the computer and on the internet. You can insert the same captured clip in an MS word document in real time. It’s like a web camera in MS word. The use of illustration options for teachers and students in Microsoft word is great. Students and teachers can use these options to explain data organization, story maps, cause and effect, topic building, and clocks to teach about time. Also, entrepreneurs or managers can use these options to highlight decision trees, pros, and cons, and brainstorming exercises. English tutors can use these options to enhance students’ English vocabulary etc. There are so many uses but tough to share them in one post. But I hope you got the ideas about the uses of Illustrations in Microsoft Word.
- Links: –Insert menu category contains a hyperlink, bookmark, and cross-reference function. What users use to link any internal or external file, picture, the web page from the document. Also, the bookmark can be inserted anywhere on the page, and then we can create the hyperlink to visit that position on the same document without scrolling.
- The hyperlink is used to create the link from text to any file, picture, video, or website. For example, if you want your reader to find more information about certain causes or solutions then you can link that source using the hyperlink option. Such as when you search on Google for something then all the list of search results is also hyperlinked.
- Cross-reference is similar to the Hyperlink option that is used to refer the user to headings, and tables. You can find such an option in E-books in which the table of content of the eBook is connected to the pages and figures. To insert a hyperlink on the selected document text from the keyword press Ctrl+K on the keyboard.
Here you can read the complete tutorial about hyperlinks: Hyperlink Example within Microsoft Word Document
- Header & Footer: – Microsoft Word users can use the header and footer option to insert text, image, and symbol that is important to appear at the top and bottom of each printed page. After adding content such as graphics, page number, author of the book, title of book, date, and time. Microsoft Word automatically inserts the same text with the correct page number and other graphics on the next pages or on each printed page. Such as if you want to highlight or want to print page numbers on each page you’re writing you can insert and align page numbers on the right or left or center of the document and after adding the page numbers, it will automatically appear on the next pages with number 2, 3,4. Word process users can also use a pre-designed header and footer and can edit too. If you want to insert only a page number then just click on the page number and select the desired position.
- Text: – Text category in Microsoft word under the home menu is used to insert TextBoxes, Quick Parts, Word Art, Drop Cap, Date &Time, and any kind of object. Uses of Text are very great for book writers, students and for teachers to insert preformatted text boxes anywhere in the document to highlight important words, sayings or main points of written paragraphs. The user can also draw text boxes from their own anywhere in the document such as forms, books, invitation cards, and invoices. Also if they don’t know how to format text boxes, then they can download more pre-formatted text boxes from office.com.
- Quick parts are used to insert a reusable piece of content including fields, document properties such as author name, the title of a document, comments, company name, etc. such options are mostly used by news editors, books, and magazine editors.
- WordArt is a good option to create and decorate a slogan, and quotes in documents in Microsoft Word. To use this you only need to select the piece of text and then select the appropriate color style or decorative text. WordArt is also useful to insert decorative text in invitation cards, happy birthday greetings and other kinds of funny or less professional documents.
- Drop Cap is used in books, letters, notes and new stories or newsletters to display the first letter larger at the beginning of the paragraph.
- Signature line: – The signature link is used mostly in the legalities of the document. Such as in government notification PDF files and legal notices signed with a stamp at the end of the page. This is similar to Microsoft Word in that government notification letters can use a signature line or they can add a digital signature on the spot. Also, any word user can insert a signature line at the end of the document or paragraph which specifies the individual who must sign or sign. Also, a digital signature is used in mostly Income tax returns, company audits, and company registration numbers and can be used in related legal documents.
- Date & Time: The date and time are easy-to-use features that can be inserted anywhere in the document. In Microsoft Word, there are so many dates and time formats (such as Saturday, December 31, 2016, or 31-Dec-16) that are two different formats that can be used according to the nature of the document.
Related: Top 5 Microsoft Word Courses Online to become master in document writing and editing
- Object: – Object is an advanced feature of Microsoft Word that is used to insert any object into the document and also by creating in real-time. Such as you can insert paint program functionality by creating a bitmap image in real-time, excel spreadsheets, videos, and PowerPoint presentations mean you can insert the embedded object.
- Symbols: – In this option, you can insert mathematical equations and can do plus, minus by using a table. Also, there is a symbol option that is used to insert a special character or symbol that is not commonly available on the keyboard. For example, you can insert a trademark symbol (™), copyright (©) and Unicode characters to display the ownership or authentication of the document that other people cannot use without permission.
This option in Microsoft word is mostly used in legal, marketing, and promotional documents. Also, you can find such symbols in the company’s logo, website footer, and Wikipedia contents footer.
4. Features and uses of Page Layout Menu in Microsoft Word
- Page layout menu in Microsoft word gives various uses for the user to set themes, page setup, page background, paragraph and arrangement in the document. Page layout features in Microsoft word is very useful for eBook publisher and document printing business and also for common word users.
- Themes: – In Microsoft Word, a theme is a set of pre-designed document designs fonts, headings, and effects. By the use of the theme option in Microsoft word, the user can change the overall design of the page such as fonts, effects, and colors.
- Page Setup: – Page setup is the most important option and the users start after creating a new document. I always recommend to all my students that before writing, creating, designing or doing anything in Microsoft you should first do the page setup. Why because all the page margins, page orientation and size create problems later when you print the document or do the arrangement of objects.
- The margins option is used to set blank spaces from edges toward the inside from outside. Margins are page edges that are outside the main content of the document. The margin will help us to define the paragraph’s starting point and ending point. By doing click on the margin option there are various pre-defined margins such as narrow in which margins are 0.5 from the top, bottom, left and right. Where normal is 1” from all four sides. If the physical paper is the A4 size it means its width is 8.27” and height is 11.69” then you can set 0.5” margin from all corners recommended. Because the fewer margins on the edges will use less paper for your document. Else if you set 1” then it will use more printouts for the same document.
- The orientation used is to set the page layout from Vertical to Horizontal or Portrait to Horizontal. A simple way to understand the uses of orientation in Microsoft Word is that it will allow the users to switch the page layout according to the text writing flow. Portrait means layout style from left to right and landscape means the right to left. This will be a best-used example, if you’re printing your document on the A4 size and your text in the document goes outside the page from the right and uses less space towards the bottom then you can set landscape. For example Exam Date Sheets, Marriage cards, and Diploma certificates. are printed in the Landscape layout. Where mark sheets and admission forms are printed in portrait. The best way to switch to one option then sees the document samples that you want to print or check if the page sizes or margins are not meeting your design criteria. Most 90% of the time we use a portrait layout in page setup. So, if you find your document text is not getting proper arrangement on the printed page then you can do the experiment to switch the portrait layout to the landscape in the Page setup option in Microsoft Word.
- Page size as I discussed above that it depends on the kind of document you’re printing. If you’re printing your document on the A4 paper size that you purchased in the market then set A4. Because you can’t set A5 in this condition because then some text will not be printed in the document. You can vary the page sizes according to the section. In Microsoft word, there are Letter sizes for letter documents, Tabloid, executive sizes and envelope sizes available. But if you want to become an expert in Microsoft Word or want to be proficient in printing documents then I will suggest you print the same text in various page sizes on A4 paper. It will give you practical knowledge about page setup settings and other things too.
- The columns option in Page Setup is used to split the text into two or more columns. Generally, this option is a classical text formatting style that is very beneficial in news printing, newsletter, and nobles. For example, see the newspaper in which they adjusted the text in small line width and paragraph and at the same time they converted the long paragraph into columns. So it will increase readership interest in particular news. Else you can see English and Hindi in which one page is divided into columns.
Breaks, lines, numbers, and hyphenation options are similar as we discussed in the Insert Menu options.
- Page Background: – The use of page background in Microsoft Word is to give extra effects or protection effects to the document such as the watermark, page color, and page borders.
- Watermark is used to insert ghosted text behind the text in the middle of the document. This is a very beneficial option that indicates that the document is confidential, and urgent and needs to be treated carefully. Watermarks are used in text documents, images, and PDF files. You can see the example in Google images or stock image which is protected by the website or company watermark so that no one can reuse the images. Also, you find watermarks in legal documents, letterheads, and bank passbooks or in checks. There is a pre-defined watermark in Microsoft Word such as Confidential, and urgent. You can change these into your company name, personal name or related to the document, you can also insert your company logo, school logo, or any other image that will indicate to the reader or finder that this document is important.
Related: Top 10 Basic and Advanced Microsoft Word skills
- The page Color option is used in Microsoft Word to set the color background of the page. Microsoft word document default color is white with black text color. So, official documents with page background colors you can’t see often. But it is used mostly in eBook or PDF files. Also, it depends on the document’s goal. You can also use the fill effects option in which you can set gradient colors, textures, patterns and picture backgrounds to your page. Setting page color will not print a document in colors it’s just for visual appeal.
Related: Top 5 Microsoft Word Courses Online to become master in document writing and editing
- The page Borders feature is very beneficial to add border styles with colors and art around the page. Also, it is used to add text color background by using shading options that will come in printout too.
- The paragraph option in the page layout is used to set left, and right text indents. This is used to set paragraph beginning and ending points. Similar to what I discussed above in Home Menu. This option is also in the home menu but the difference is that you can set the left indent by using figures.
For example, if you want to give more space to a paragraph from left in the current cursor positions then type 1.22” in the box and hit enter. This will move your paragraph toward the right. The use of this feature is to design the document style in which the reader will find it interesting or information is easy to read.
Also, there is the spacing option used for spaces between paragraphs. You can also use the TAB key on the keyboard to use Indent or paragraph margin functionality in Microsoft Word to set indents and spacing.
- Arrange: – The use of an arrange feature in Microsoft Word is to arrange document text professionally and efficiently. The most important option is the Wrap Text. I saw many students learning computers find it difficult to arrange the image or text objects correctly.
- Wrap text is used to align inserted images, and word Art correctly with text. For that, if you want to insert text around the inserted image then you can select a square option in Wrap Text. Also, you can set your image in Front of the Text or Behind the Text. You can also drag and adjust the object over text to align it.
But by default when you insert an image it will not move because it is “In Line with Text” by default then right-click or double-click on the image and choose Wrap Text and select the square or in front of text option then you can adjust the image according to your style by the use of the mouse.
You can find such text arrangement skills in newspapers, magazines, and book-style layouts. There are other options too which can work similarly to arrange the document such as position, bring forward, and send backward. But you can also use the option by right-clicking on the object. You can also use the drag-and-drop style to arrange different kinds of objects in the document.
The best way to learn Microsoft word is to use these options or click on these features after the selected text and you will find a result practically that is learnable.
5. Features of Reference Menu in Microsoft Word and Its Uses
Reference menu and options mean mentioning, or referring to the source of information. In this I will define the Footnotes feature:
- Footnote: – Footnote in Microsoft Word is used to add the special text or written text reference in the document at the end of the page. This is not the footer, this will come before the footer. For example, if you’re writing in a document, book page any figure or fact that is published in the newspaper then you can mention in the footnote the source of information that it is published in abcd newspaper.
- But the endnote is different and the output is similar. The endnote will come at the end of the paragraph. The endnote is used after the paragraph but the footnote is used at the end of the document. The font size of the endnote and footnote is small than other written text.
You can see footnote and EndNote examples in the dictionary’s bottom page, old English literate books, and in English nobles and magazines.
6. Microsoft Word Mailings Menu Features and Its Uses
In Microsoft Word Mailings Menu Mail Merge is the most powerful feature that is used to send bulk emails and printouts letters, and documents for thousands of people or print out thousands of copies with different names, addresses, and email fields but with same subject or company name.
This option is very beneficial to send a newsletter, reports, notifications, and updates. to team members by the Manager, to customers from banks to readers, from bloggers and to students from Teachers. Also, the mail merge is used by the printing press to print envelopes with the same subject line but with a different name on each printed page.
7. Microsoft Word Review Menu Features and Uses
Review functions and features used are to examine, test, and proofing of the written document in Microsoft Word. You can compare the two documents and also you can add a comment to certain lines or words.
- Proofing: – Use of the proofing feature is to check the spelling and grammatical mistakes in the document. You can also research any word and its meaning word thesaurus. For example, you can check spelling mistakes, and count the total written words, and paragraphs in the document. If you want to check your spelling mistakes then you can press the short key F7 then it will automatically highlight spacing mistakes with green color and spelling errors with Red color.
Related: Top 5 Microsoft Word Courses Online to become master in document writing and editing
- Comments: – Comments option output is similar to ToolTip. For example when you move your mouse to the “Window Button” it notifies the user with the text “Start Button” this is similar to comments. If you want to add more expression or more thoughts behind any used word in the document you can use the comment option.
8. View Menu Features and Uses MS Word
View menu uses are related to document views such as full screen, web layout, print layout, zoom, windows arrangement, and macros.
- Document view: – Document view menu features are used to view the documents in various styles. The printout is by default view to see the document while you’re writing the text. Also if you’re printing or creating something for printing purposes then use a print layout view.
- Full-screen reading view: used for reader and document designer to view the document in reading view in which all the pages are looking like you’re reading a book. Also, the full-screen reading view is helpful to design and see the page’s settings and visibility of text clearly.
Related: Top 11 Most important Computer Skills to learn for career development
- Web layout is used to see the document as a web page. The uses are for students and designers to view the text in a web layout. Also selecting a web layout view and then saving the document as a web page will save the file in HTML format and when you open the saved file, it will use the internet browser to view the document text instead of Microsoft Word.
- Outline: is used to see the document heading, and body text in levels. You can use this menu to edit the heading, body text, and document structure. You can also add control for sub-headings. Such as if you’re using H1 for the main heading and h2, h3, h4 for other headings then you place such subheadings under the H1 heading. Mostly this option is used in tutorials, support pages, and application or software documentation.
- Draft: is used to edit the text quickly.
Related: Top 5 Microsoft Word Courses Online to become master in document writing and editing
- The show feature is used to show gridlines to see the document text spacing and word spacing.
- Navigation is useful for eBooks and you can see such an option by default in Google Docs. The navigation option is used to view the document by heading when you checkmark on the navigation pane it will highlight the heading in the left sidebar in Microsoft word after that you can navigate the document by heading instead of scrolling down.
- The ruler or Ruler Bar is most useful and very important for document margins. Indents are important to align correctly with the use of the ruler bar. The ruler option in ms word is similar to the scale that we used for drawing in schools etc. You can see the first-line indent, hanging indent or left indent in the ruler bar. You can also use the rule bar to set the left, and center tab positions by a click on the ruler bar in Microsoft Word. This is beneficial to view the document correctly and align paragraph spacing correctly.
- Window: – The window feature used is to create a new document in New Window. For example, if you’re current file name is Microsoft Word Tutorials then the new windows file name will be Microsoft Word Tutorials 2.
- The split feature is used to split the page with a ruler bar in between the text. Not that common to use. Just feature users are while you’re creating the document in which spacing or margin detail is important.
- Arrange all will arrange multiple application windows in the current view. Such as we can shrink the window size towards the left and then we can arrange another application window on the right side.
- A switch window is used to switch between two application windows. But you can also use the Alt + Tab to switch between more than 2-3 applications without using the switch window option.
- Macros are used in Microsoft Word to automate repeated tasks such as font size, color size or series of commands and instructions in a group. You can run macros that will automate the formatting of other text in the document.
9. Format Menu Features and Uses MS Word
The format menu is used to edit font size, and color and to present object appearance with extra effects. Such as when you insert an image on the document format option will be highlighted on the Menu Bar. This indicates to the user that they can adjust color, brightness, border style, and other image effects such as picture shadow, cropping, and wrapping in Microsoft Word.
This option is very important for Microsoft Word students, and word operators to learn this practice as much as possible because it will be used in assignments, newsletters, and notes.
The format feature is also visible when you insert shapes or text boxes in the document. You can edit shape outlines, background colors, and text styles from the format menu.
After getting the basic knowledge of or Microsoft Word uses written in this article now it is really important that you can do as many as possible practical exercises. Such the above-discussed features of Microsoft Word are very important for every word processor user. School students should learn such features so they can create professional-looking notes. Professionals or people working in a government office and documenting related works in their daily life can learn such features.
If you study all the above features in the best possible way then you can understand if we all can are educated enough about Microsoft Word then we can get various benefits.
As you can see today there are various government and private documents you receive from offices that are not that professional technically. Even school question papers and books are printed with low-quality text formatting such things are not good even when someone is paying for the services.
If students learn these Microsoft word features in schools I will be sure that they will be great professionals in the future especially in documenting writing and editing related works.
Jobseeker also learns Microsoft Word features that help them in their job and also creates resumes professionally in Microsoft Word.
Because of the robust uses of Microsoft word, it is essential to learn Microsoft Word. There are various tutorials that you can use to learn Microsoft Word for free on the Internet. The best way to learn Microsoft word is that you can practice your skills by creating different kinds of admission forms, reports, tables, and advertisements in Microsoft Word.
You can also use Google Docs for Word Processing. Google Docs is available on Google Drive. You can also use MS word online by creating a Microsoft account on live.com or with an outlook account in OneDrive. A little advance but very beneficial if want to upgrade your MS office skills.
So, friends, I hope this article about the features and uses of Microsoft Word helps you to learn and understand the various uses of Microsoft word. And its features are important in our daily official life and career.
Some of the functions of word processing software include:
- Creating, editing, saving and printing documents.
- Copying, pasting, moving and deleting text within a document.
- Formatting text, such as font type, bolding, underlining or italicizing.
- Creating and editing tables.
What is word processing and its features?
A word processor is software or a device that allows users to create, edit, and print documents. It enables you to write text, store it electronically, display it on a screen, modify it by entering commands and characters from the keyboard, and print it. Of all computer applications, word processing is the most common.
What are the four features of word processor?
List four important feature of a word processor ? Name any two word processor
- – Creating, editing, saving and printing documents.
- – Copying, pasting, moving and deleting text within a document.
- – Formatting text, such as font type, bolding, underlining or italicizing.
- – Creating and editing tables.
What are the features and advantages of word processing?
Advantages of Word Processing
- Quality : It produces error free documents.
- Storage of Text : We can take any number of copies with word processor.
- Time Saving : We can get any number of copies of document in future without retyping.
- Security : We can protect the documents in word processing by giving passwords.
What is the importance of word processing?
Furthermore, word processing benefits the environment by reducing the amount of paperwork needed to perform daily tasks (e.g., archiving, sending out letters, sending meeting agendas). By sending documents via a secured email, the cost of postage and paper waste are reduced significantly.
What are the benefits of word processing in education?
With word processing software, students can easily review and revise their compositions, highlight key ideas, rearrange sentences or paragraphs to flow more logically, and try out alternative sentences or words to communicate their ideas better.
What are the basic elements of Microsoft Word?
MS- Word Window Elements:
- Title bar.
- Menu Bar.
- Toolbars.
- Workspace.
- Status Bar.
- Scroll Bars.
- Scroll Box.
- Task Pane.
How do you describe computer skills?
Computer skills are abilities and knowledge which allow you to use computers and related technology. They let you use word processing software, access the Internet, manage files, or create presentations. Advanced computer skills would let you access databases, use spreadsheets, and even code.
What are some common word processing applications?
Two of the most widely used examples of word processing software are Microsoft Word and Google Docs. Both Word and Google Docs provide the business writer with the formatting tools needed to create professional documents.
What are examples of word processing?
- Adobe InCopy.
- Corel WordPerfect (up to v. 9.0)
- Hangul.
- Ichitaro.
- Kingsoft Writer.
- Microsoft Word.
- Scrivener.
- StarOffice Writer.
What are the word processing tools?
5 Great Word Processing Tools For Writing Your Novel
- Microsoft Office. Microsoft Word is pretty much the standard in the traditional business world, and for good reason – it’s fairly easy to use, compatible across a wide range of platforms (there’s even an iphone app currently in the works!), and great customer service.
- Apache OpenOffice.
- Google Drive.
- iWork Pages.
- Scrivener.
How many types of word processing are there?
3 types
Which software is best for word processing?
- LibreOffice Writer. All-singing, all-dancing word processors for any text-based work.
- WPS Office Free Writer. A word processor with cloud storage and support for all text files.
- FocusWriter. The ideal word processor for first drafts, with no fussy formatting.
- FreeOffice TextMaker.
- Writemonkey.
What are Microsoft Word functions?
Given below are the basic functions of Microsoft Word:
- Creating text documents.
- Editing and Formatting the existing documents.
- Making a text document interactive with different features and tools.
- Graphical documents, comprising images.
- Used by Authors and Researchers.
- Detect grammatical errors in a text document.
Which one is not a function in MS Word?
The NOT function is a built-in function in Excel that is categorized as a Logical Function. It can be used as a worksheet function (WS) in Excel. As a worksheet function, the NOT function can be entered as part of a formula in a cell of a worksheet.
What are the basic functions of Microsoft Excel?
You may be familiar with common functions like sum, average, product, and count, but there are hundreds of functions in Excel, even for things like formatting text, referencing cells, calculating financial rates, and analyzing statistics.
What is MS Word and Excel?
Microsoft Word is a word processing program used for writing letters, memos, reports and paper presentations. Microsoft Excel is a spreadsheet program used for calculations, making charts and recording data about all sorts of business processes.
What is the full form of MS Excel?
Microsoft Excel is a spreadsheet developed by Microsoft for Windows, macOS, Android and iOS. It features calculation, graphing tools, pivot tables, and a macro programming language called Visual Basic for Applications (VBA). Excel forms part of the Microsoft Office suite of software.
What is the use of MS Office?
Microsoft Office has become a leading platform to drive productivity at home and in the workplace. Whether it’s managing email in Outlook, or building analysis spreadsheets in Excel, Office has made carrying out many computer based tasks easier for all of us.