
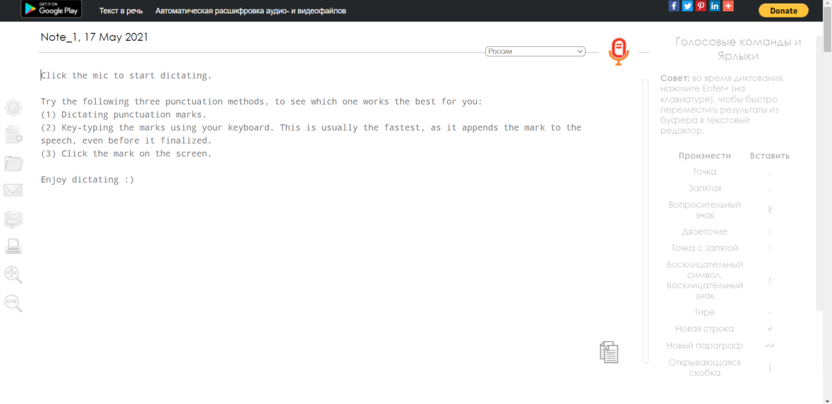
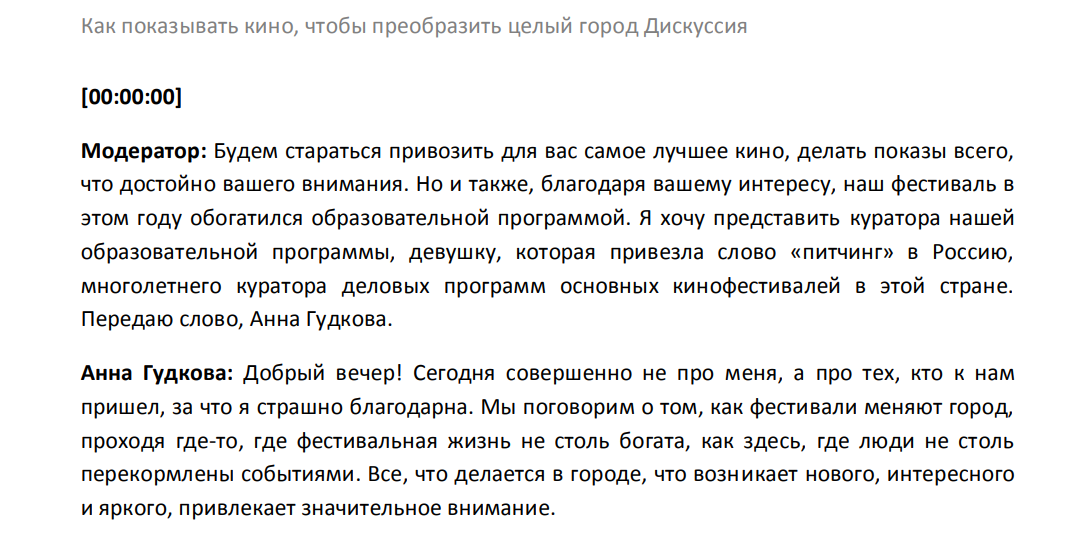
Транскрибация (расшифровка) – это метод перевода информации из аудио или видео в текстовый формат. Такой подход актуален для слабослышащих, при расшифровке интервью и создании субтитров (для тех, кому нужно посмотреть видеоролик или прослушать аудио без звука). Цель транскрибации – перевести речь в текстовый формат, который будет понятен любому человеку.
Для расшифровки аудио в текст сегодня используется профессиональный софт. О лучших программах для расшифровки аудио мы и поговорим в данной статье.
Google Docs
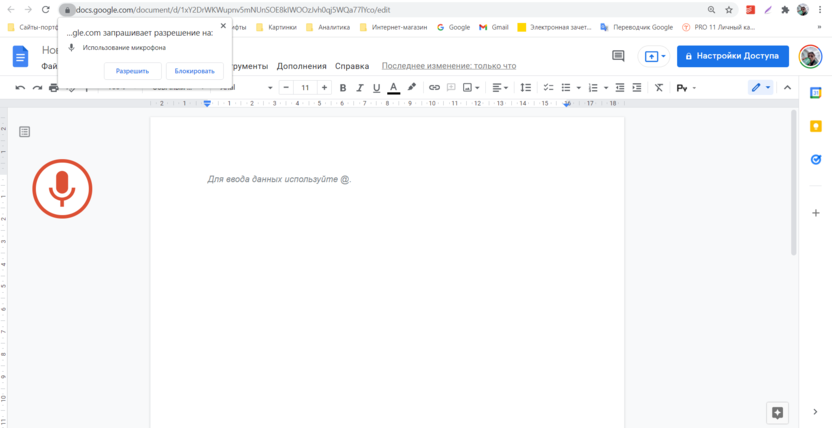
Google Docs – онлайн-сервис для работы с текстом и данными. Внутри платформы можно включить микрофон, который поможет перевести речь в письменный формат. Для его активации следует воспользоваться комбинацией клавиш Ctrl+Shift+S, затем выбрать язык и нажать на значок микрофона.
Увы, но сервис очень плохо справляется с тихой и шумной диктофонной записью, но отлично с диктовкой в микрофон. Главный недостаток – работает только в активном окне Google Docs, то есть наговорить что-то с другой вкладки или включить запись на компьютере не получится.
Плюсы:
- бесплатный продукт;
- автоматическое сохранение текста;
- возможность сразу же отредактировать материал.
Минусы:
- медленная расшифровка;
- распознает не все слова: требуется хорошая диктовка, чтобы получить качественный текст;
- не сможет распознать запись из другой вкладки браузера или плеера.
Операционная система: Web
Ссылка на сервис: Google Docs
Комьюнити теперь в Телеграм
Подпишитесь и будьте в курсе последних IT-новостей
Подписаться
Google Keep
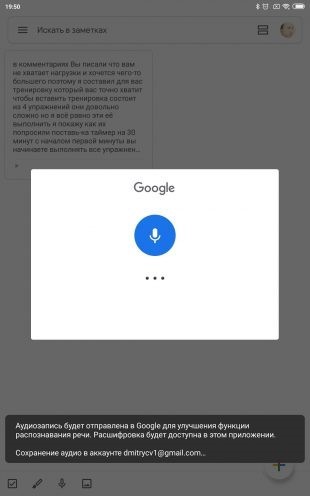
Google Keep – это мобильное приложение для заметок, с помощью которого можно также переводить голосовые записи в текст. Для этого нужно нажать на значок микрофона на панели инструментов. Разговор в аудиоформате будет сохранен вместе с расшифрованным текстом.
Для длительных записей Google Keep, к сожалению, не подойдет, потому что останавливает запись после коротких пауз в диалоге. Но его можно использовать, чтобы расшифровывать уже готовые записи по кускам.
По какой‑то причине распознавание голоса в Keep работает лучше, чем в Гугл-документах: приложение даже угадывает начало новой фразы и помечает его заглавной буквой.
Плюсы:
- легко перевести голосовую запись через микрофон;
- достаточно точно расшифровывает аудио.
Минусы:
- нельзя записывать голосовые аудио с паузами;
- работает только с микрофоном.
Операционная система: Android, iOS, Web
Ссылка на скачивание: Google Keep
Speechpad
Speechpad – бесплатный онлайн-инструмент, с помощью которого можно расшифровать голосовую запись. Работает исключительно со звуком из микрофона, поэтому следует позаботиться о качестве оборудования.
Поддерживается Google Chrome, но есть приложения для iOS и Android. Также возможна интеграция в Windows, Mac и Linux, чтобы обеспечить голосовой ввод в любом текстовом поле. Четкий звук понимает достаточно хорошо, плохой – крайне посредственно.
Плюсы:
- бесплатная программа на русском языке;
- можно отредактировать текст;
- есть инструкции по работе с сервисом;
- воспринимает звуки с соседних вкладок браузера – можно работать с одного устройства.
Минусы:
- транскрибация из файла требует хорошего качества звука, в ином случае расшифровка будет неполной.
Операционная система: Web
Ссылка на сервис: Speechpad
RealSpeaker
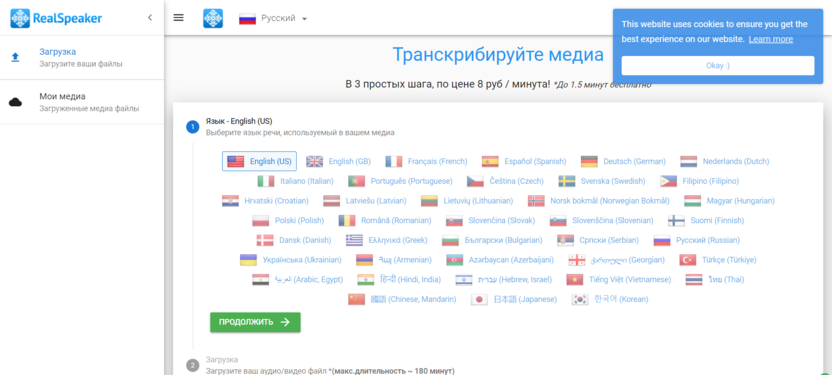
RealSpeaker – платный сервис для перевода аудиофайлов в текстовый контент. Работает исключительно с готовыми файлами, поэтому использовать микрофон, как в предыдущих случаях, не получится.
Перевод аудио в текст бесплатен только в том случае, если запись длится не более 1.5 минут. Далее – 8 руб. за минуту, максимальная продолжительность аудио – 180 мин. Поддерживается более 40 языков, включая русский.
Для работы с сервисом достаточно выбрать язык озвучки, загрузить файл, рассчитать время расшифровки и оплатить услугу.
Плюсы:
- есть возможность работать с файлами;
- простой в использовании сервис.
Минусы:
- платный сервис;
- не позволяет надиктовать текст в микрофон;
- в течение 24 часов файл доступен всем, и его нельзя скрыть.
Операционная система: Web
Ссылка на сервис: RealSpeaker
Dictation
Dictation – бесплатный онлайн-сервис, позволяющий распознавать запись с микрофона. Понимает не только русские слова, но и десятки команд: тире, новую строку и так далее.
Из особенностей – это встроенный редактор, позволяющий форматировать текст, оформлять списки и делать много всего другого. Готовый текст можно отправить на почту, в социальные сети или просто сохранить на компьютере.
Из недостатков – распознает только качественную речь. Если запись была сделана на слабенький микрофон, то получить хороший результат не получится.
Плюсы:
- быстрая отправка результата на почту и в социальные сети;
- есть встроенный редактор;
- отлично и максимально точно справляется с хорошо записанной речью.
Минусы:
- плохо воспринимает некачественную запись.
Операционная система: Web
Ссылка на сервис: Dictation
oTranscribe
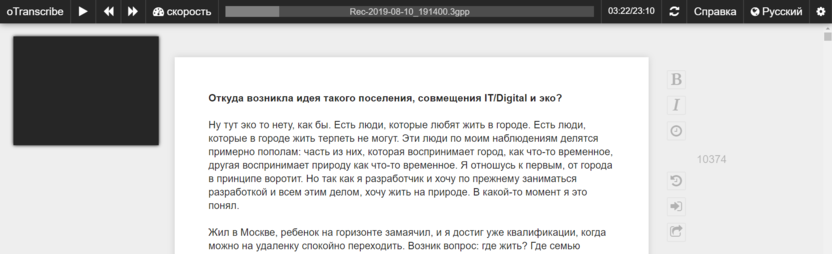
Бесплатный веб-сервис для ручной транскрибации текста. Работает как с аудио, так и видео, в том числе с YouTube-роликами. Открывает множество форматов: WAV, MP3, MPEG, WEBM и другие. Можно назначить горячие клавиши для управления воспроизведением. Есть автосохранение, простой текстовый редактор, интерактивные метки, упрощающие навигацию.
Плюсы:
- минималистичный редактор текста;
- автоматически сохраняет документ в формате HTML;
- для удобства пользования можно настроить горячие клавиши.
Минусы:
- нет автоматизации процесса, все нужно делать вручную.
Операционная система: Web
Ссылка на сервис: oTranscribe
Transcribe
Transcribe – это универсальный сервис, в котором можно расшифровать файл или самостоятельно надиктовать текст. Подписка стоит 20 долларов в год. Есть тестовый период на 7 дней, в течение которого можно безлимитно использовать ручную расшифровку и 30 минут пользоваться автоматической транскрибацией.
В редакторе готового текста можно расставить временные метки, а также прослушать интервью на замедленной скорости и исправить неправильно распознанные сервисом места.
Из особенностей можно отметить поддержку множества форматов – 3GP, AAC, AIF, AIFF, AMR, CAF, DSS, FLAC, M4A, MOV, MP3, MP4, OGG, WAV, WEBM, WMA, WMV. Максимальный размер файла – 6 Гб или 420 минут.
Плюсы:
- простой в управлении сервис;
- есть редактор текста в самостоятельной расшифровке;
- поддерживает ссылки с YouTube;
- есть таймкоды;
- файлы можно загрузить как с ПК, так и с облачных сервисов;
- есть подробная инструкция;
- поддерживает большое количество языков и диалектов;
- есть горячие клавиши для быстрой работы.
Минусы:
- платный функционал.
Операционная система: Web
Ссылка на сервис: Transcribe
Dragon Dictation
Dragon Dictation – платная программа для iOS-устройств, способная распознавать продиктованный текст с микрофона. Есть тестовый период на неделю, далее необходимо оформить подписку – $14.99 в месяц или $149 единоразово.
Плюсы:
- позволяет только диктовать текст;
Минусы:
- нельзя расшифровать файлы или ссылки из YouTube;
- платное приложение.
Операционная система: iOS
Ссылка на скачивание: Dragon Dictation
Speechnotes
Speechnotes – онлайн-сервис для браузеров и приложение для Android. В онлайн-версии расшифровка файлов платная – $0.1 за минуту. В приложении же есть бесплатный тестовый период, после его окончания нужно приобрести подписку за 69 рублей в месяц. Также в нем можно сохранять файлы в облако, отправлять их в соцсети и по почте. Онлайн-сервис воспринимает знаки препинания, а приложение распознает еще и смайлики.
Плюсы:
- сохраняет документ в форматах doc и txt, позволяет работать с PDF;
- простой интерфейс;
- есть редактор текста;
- более 50 языков.
Минусы:
- платный сервис.
Операционная система: Web, Android
Ссылка на сервис: Speechnotes, на Android: Speechnotes
Otter
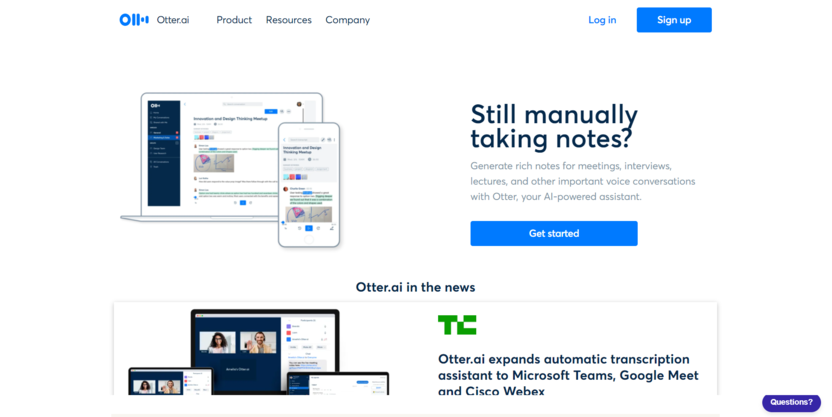
Последний в нашем списке инструмент для расшифровки аудио в текст – это Otter. Работает только с английским языком, но у сервиса есть отличительная особенность: он может запоминать голос диктора – такая возможность позволяет разделять реплики в записях с несколькими собеседниками.
Также можно загрузить аудио или видео с английской речью, в результате чего сервис выведет текст. Некоторые спорные моменты из-за произношения могут расшифровываться неправильно.
Программа будет полезна, если вы работаете с англоязычными источниками.
Плюсы:
- есть функция запоминания голоса;
- бесплатный функционал;
- легко распознает аудио или видео на английском языке.
Минусы:
- работает только с английским языком.
Операционная система: Web, iOS
Ссылка на сервис: Otter
Заключение
Сегодня мы поговорили о лучших сервисах для расшифровки аудио. Каждый из них позволяет буквально в несколько кликов получить желаемый результат, но только в том случае, если исходный файл был в хорошем качестве. Если же запись была записана нечетко, то не все инструменты могут с этим хорошо справиться, особенно те, что доступны бесплатно.
В маркетинге нужно постоянно работать с текстом: описывать концепции и тезисы, составлять брифы, придумывать вовлекающие и продающие формулировки. Это часто приходится делать прямо на ходу, когда под рукой нет ноутбука. В таких случаях свежую идею удобно наговорить голосом.
Расскажу про инструменты, которые делают работу с устным текстом проще. Программы для преобразования речи в текст позволяют надиктовать короткую заметку или объёмную статью. А функция транскрибации аудио и видеофайлов помогает в расшифровке длинных интервью и переговоров.
| Что нужно сделать | Какой инструмент подойдёт |
| Надиктовать текст в браузере | Google Документы, Speech to Text BOT, Speechpad, Dictation |
| Надиктовать текст на смартфон | Google Keep, Dictation для iOS, Speechnotes для Android |
| Транскрибировать аудио и видео | Speechlogger, Vocalmatic, RealSpeaker, Google Документы, Speechpad, Dictation |
| Расшифровать аудио- и видеозапись вручную | Zapisano |
Для онлайн-конвертации голоса в текст
Онлайн-конвертеры помогают записывать текст голосом. Принцип таких сервисов примерно одинаков: вы чётко проговариваете слова, а система преобразует их в текст и записывает. Полученный результат, скорее всего, придётся отредактировать: проставить знаки препинания, проверить правильность написания сложных слов. Чтобы сократить объём редактуры, используйте высокочувствительный микрофон, медленно и разборчиво произносите слова.
Google Документы
Сервис Google Документы позволяет переводить устную речь в записанный текст. Это встроенная функция с поддержкой разных языков.
Для активации голосового ввода перейдите в раздел «Инструменты» и кликните на «Голосовой ввод».
Для использования голосового ввода в Google Документах не требуется установка плагинов
Затем нажмите на кнопку и говорите. Постарайтесь произносить слова медленно и чётко. Система умеет распознавать знаки препинания — просто говорите в нужных местах «Точка», «Запятая» и так далее. Также на русском языке можно использовать команды «Новая строка» и «Новый абзац». На английском языке перечень голосовых команд более обширный, полный список можно посмотреть в Справке.
Так выглядит результат голосового ввода от в Google Документах
Сервис неплохо конвертирует голос в текст при условии чёткого и правильного произношения. Но корректура всё равно может понадобиться — поправить регистр, проверить расстановку знаков препинаний и написание сложных слов.
Также в Google Документах можно транскрибировать аудио- и видеофайлы. Для этого включите воспроизведение файла на другом устройстве рядом с основным микрофоном. Способ работает, если речь в записи чёткая, разборчивая и не слишком быстрая. Для лучшего распознавания можно использовать замедленное воспроизведение.
Speech to Text BOT
Онлайн-сервис работает через браузер Chrome на десктопе и некоторых мобильных устройствах. Интерфейс интуитивно понятен: есть окно ввода текста, кнопка с микрофоном для запуска записи и список поддерживаемых команд.
Speech to Text BOT различает знаки препинания и заглавные буквы
Сервис поддерживает десятки разных языков. В настройках доступно форматирование текста: разные типа и размеры шрифта, написание предложений с заглавной буквы. Записанный текст можно редактировать, скачивать, отправлять в печать, копировать. Сервис неплохо переводит речь в текст при надиктовке, но не транскрибирует аудио- и видеофайлы, даже при их хорошем качестве.
Speechpad
Speechpad — удобный онлайн-блокнот для речевого ввода. Здесь можно надиктовывать текст на одном из пятнадцати доступных языков. Доступно параллельное форматирование текста: замена регистра, добавление знаков пунктуации и тегов. Запись речи включается и выключается по необходимости.
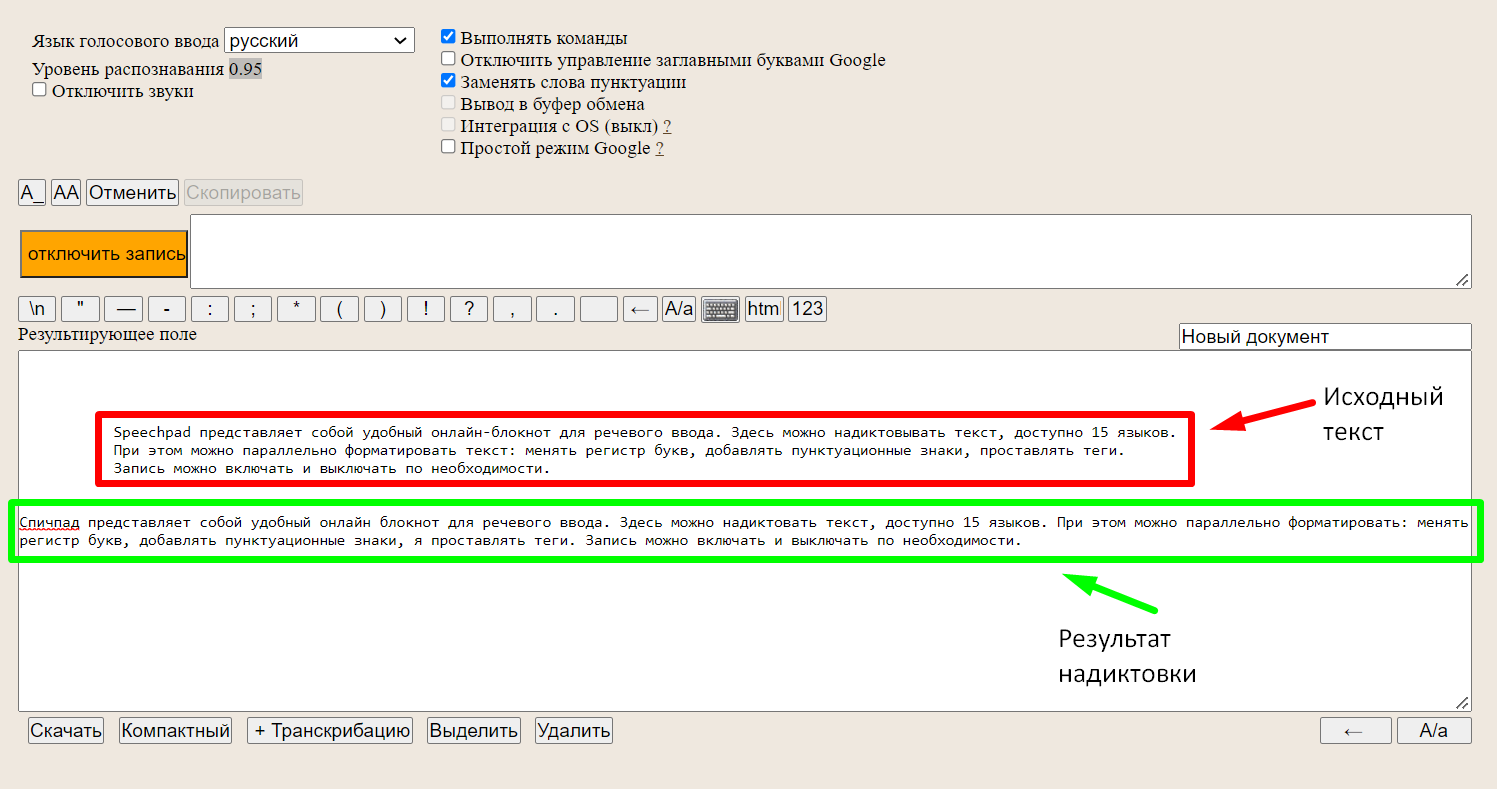
После диктовки в Speechpad получился почти точный текст
Speechpad поддерживает преобразование в текст аудио- и видеозаписей. Для этого кликните на кнопку «+Транскрибацию» под полем ввода. После обновления страницы загрузите нужный файл, укажите ссылку или ID видео с YouTube. При необходимости настройте параметры: качество и скорость воспроизведения, указание временных меток, защиту от шумов. После этого можно включать запись. Результат преобразования в текстовом формате появится в окошке блокнота на этой же странице.

При конвертации записи в текст можно настраивать скорость воспроизведения, чтобы результат был более точным
Можно установить расширение, чтобы использовать голосовой ввод в любом текстовом поле браузера. Также есть модуль интеграции с Windows, Mac или Linux.
Dictation
Индийский сервис Dictation поддерживает более 100 языков, включая русский. Принцип работы схож с Google Документами, но скорость распознавания выше. При надиктовке используйте команды «Новая строка» и «Новый абзац». Указание знаков препинания учитывается не всегда, но их можно проставить вручную при редактуре полученного текста.
При надиктовке в Dictation могут не распознаваться или неверно преобразовываться отдельные слова
Результат можно отформатировать и отредактировать, скопировать, сохранить, опубликовать, твитнуть, отправить по email или распечатать. Качество распознавания в Dictation позволяет транскрибировать аудио- и видеофайлы. Для этого нужно включить их воспроизведение рядом с микрофоном. Готовый текст потребует редактуры.
Для преобразования речи в текст на мобильных устройствах
Если нужно записать какую-то мысль или идею вдалеке от рабочего стола, используйте мобильные сервисы. С их помощью можно надиктовать текст, сохранить его или отправить в другое приложение.
Google Keep
Google Keep позволяет надиктовывать заметки голосом. Сервис преобразует речь в текст, который при необходимости можно отредактировать. Созданные заметки синхронизируются на разных устройствах одного аккаунта. Их можно открыть на телефоне или компьютере, через приложение или веб-версию, в Google Документах или в Gmail.

При записи текста голосом в Google Keep можно делать паузы
Заметки из Google Keep можно копировать в Google Документы и отправлять через email или в соцсети.
Dictation для iOS
Плюс этого приложения для iOS — в отсутствии ограничений по времени диктовки. Dictation поддерживает 40 языков, а надиктованный текст можно быстро перевести на другой язык.
В Dictation можно быстро писать заметки для соцсетей
Также приложение позволяет транскрибировать аудиофайлы. Все записи синхронизируются на разных устройствах при включенном iCloud. Надиктованными текстами можно делиться: отправлять в мессенджеры или по email.
Speechnotes для Android
Приложение Speechnotes работает на основе распознавания речи Google. Для начала записи достаточно кликнуть по кнопке микрофона и начать говорить. Некоторые знаки пунктуации можно озвучивать голосом, для других доступна встроенная клавиатура, которой можно пользоваться прямо в процессе надиктовки.
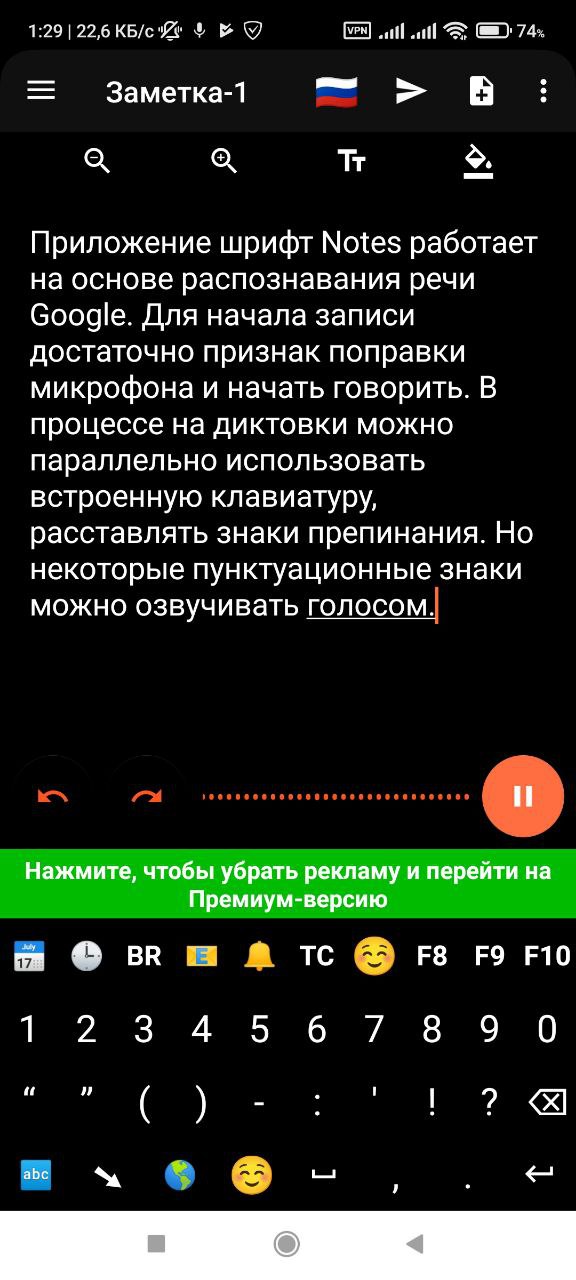
Результат надиктовки в Speechnotes требует совсем незначительной редактуры
Готовый текст можно отредактировать, сохранить, переслать, распечатать. В премиум-версии (от 1,5$) доступно создание клавиш для вставки самых используемых фраз.
Для автоматической транскрибации аудио и видео
Ручная расшифровка аудио- и видеофайлов, как правило, занимает много времени. Надо прослушать небольшую часть записи, сделать паузу, записать, снова включить запись — и так много раз. Если доверить расшифровку специализированным сервисам, получение результата займёт столько же времени, сколько длится запись, или даже меньше.
Speechlogger
Speechlogger преобразовывает голос в текст. Также его можно использовать как блокнот. В сервисе есть функция расшифровки аудио- и видеофайлов в форматах .aac, .m4a, .avi, .mp3, .mp4, .mpeg, .ogg, .raw, .flac, .wav.
Speechlogger работает с применением технологий искусственного интеллекта. При транскрибации автоматически проставляется пунктуация и временные метки. Для начала работы нужна авторизация через Google аккаунт.
В Speechlogger можно включить или отключить временные метки
Стоимость расшифровки — $0,1/минута. Минимальная сумма для пополнения баланса — $4,5. Время обработки соответствует длительности записи. Уведомление о готовности приходит на email. Точность расшифровки варьируется от 100 до 84% и зависит от качества записи.
Vocalmatic
В этом сервисе можно конвертировать в текст аудио- и видеофайлы. Vocalmatic поддерживает 100+ языков, в том числе и русский. Готовый текст можно подправить в онлайн-редакторе и сохранить в Word или Блокнот.
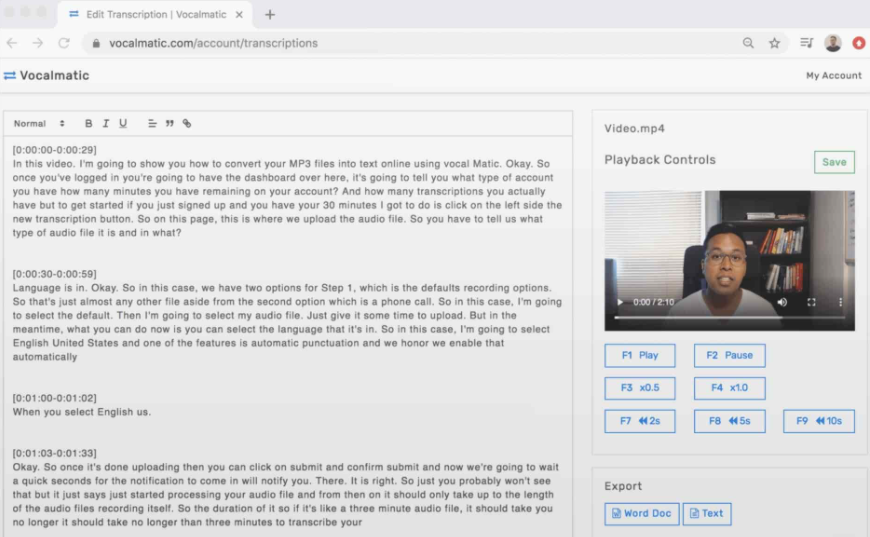
В редакторе Vocalmatic можно сразу отредактировать текст
Для новой учётной записи доступно 30 минут бесплатной расшифровки. Этого хватает, чтобы проверить качество готового текста. Час транскрипции стоит $15, но чем больше часов покупаешь единовременно, тем ниже цена.
RealSpeaker
Сервис позволяет транскрибировать аудио- и видеофайлы длительностью до 180 минут. Для запуска расшифровки нужно выбрать язык записи, загрузить файл и запустить процесс. Транскрибация платная — 8 руб./минута. Есть возможность потестировать сервис, поскольку 1,5 минуты расшифровки доступны бесплатно.
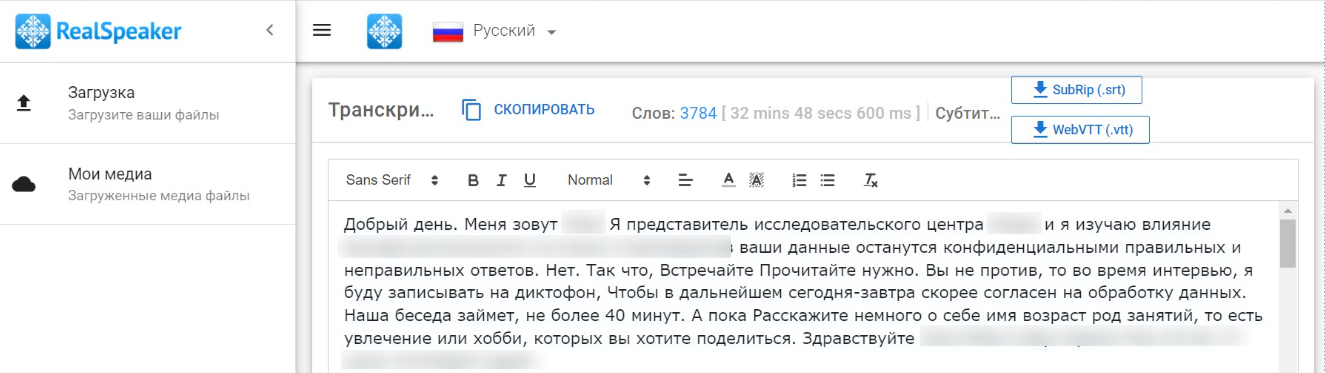
При транскрибации в RealSpeaker автоматически проставляются знаки препинания
Готовый текст можно подкорректировать в онлайн-редакторе, а затем скопировать или скачать в формате SRT или WebVTT. Стоит учитывать, что все результаты попадают в общее хранилище. Если в процессе загрузки файла оставить галочку «Сделать файл неудаляемым в течение 24 часов», то результат расшифровки нельзя удалить в течение суток. Если галочку убрать, то результат расшифровки можно удалить сразу после его копирования.
Для ручной расшифровки аудио- и видеозаписей
Результат автоматической расшифровки почти всегда требует доработки — проставить знаки препинания, подправить термины, заменить неверное написание отдельных слов. Если времени на доработку материала нет и нужна идеальная расшифровка, лучше доверить преобразование записей живым людям. Можно поискать частного специалиста или воспользоваться услугами специализированного сервиса.
Zapisano
Zapisano — сервис профессиональной ручной расшифровки аудио и видео: транскрибацией занимаются не машины, а люди. Это обеспечивает качественный результат, отсутствие «мусора» и верную пунктуацию. Помимо русского сервис поддерживает и некоторые иностранные языки.
При расшифровке файлов в Zapisano тексты сразу редактируют
Стоимость расшифровки зависит от сложности документа и временного периода. Так в категории «Стандарт» обработка файла стоит от 19 до 50 рублей за минуту, а длительность расшифровки варьируется от пяти до одного дня. Чем сложнее материал и выше срочность, тем дороже услуга. Можно самостоятельно просчитать стоимость при помощи тарифного калькулятора.
Ни один сервис с автоматическим преобразованием речи в текст не заменяет качественной ручной транскрибации. В большинстве случаев результат придётся редактировать. Но инструменты для перевода голоса в текст могут пригодиться при создании быстрых заметок, надиктовке объёмных материалов или черновой расшифровке записей.
ЭКСКЛЮЗИВЫ ⚡️
Читайте только в блоге
Unisender
Поделиться
СВЕЖИЕ СТАТЬИ
Другие материалы из этой рубрики
![]()
![]()
Не пропускайте новые статьи
Подписывайтесь на соцсети
Делимся новостями и свежими статьями, рассказываем о новинках сервиса
«Честно» — авторская рассылка от редакции Unisender
Искренние письма о работе и жизни. Свежие статьи из блога. Эксклюзивные кейсы
и интервью с экспертами диджитала.

Note: This feature is currently only available on Word for the web.
The transcribe feature converts speech to a text transcript with each speaker individually separated. After your conversation, interview, or meeting, you can revisit parts of the recording by playing back the timestamped audio and edit the transcription to make corrections. You can save the full transcript as a Word document or insert snippets of it into existing documents.
You can transcribe speech in two ways:
-
Record directly in Word
-
Upload an audio file
Important: Users with Microsoft 365 subscriptions can transcribe unlimited minutes of uploaded audio using the transcribe feature. For more information, refer to Unlock unlimited upload minutes.
Note: Transcribe is not available for GCC/GCC-H/DOD customers.
You can record directly in Word while taking notes in the canvas and then transcribe the recording. Word transcribes in the background as you record; you won’t see text on the page as you would when dictating. You’ll see the transcript after you save and transcribe the recording.
-
Make sure you’re signed into Microsoft 365, using the new Microsoft Edge or Chrome.
-
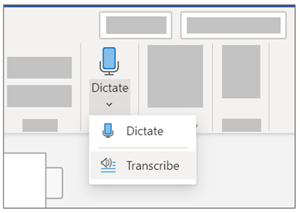
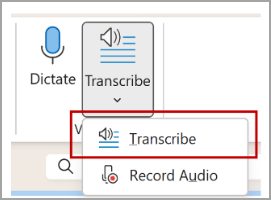
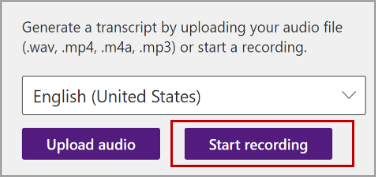
Go to Home > Dictate > Transcribe.

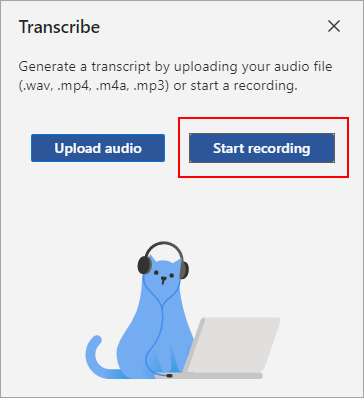
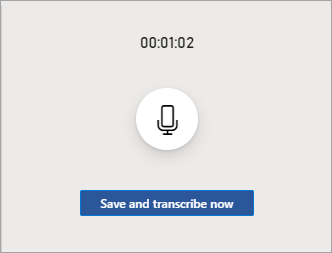
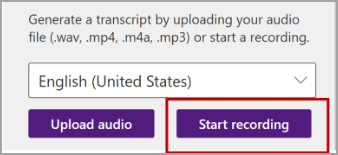
-
In the Transcribe pane, select Start recording.
-
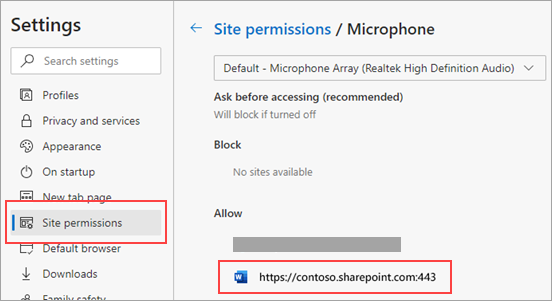
If it’s your first time to transcribe, give the browser permission to use your mic. There might be a dialog that pops up in the browser or you may have to go to the browser settings.
-
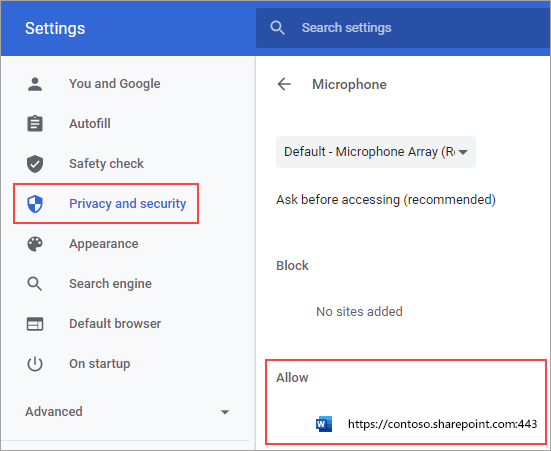
In the new Microsoft Edge: … > Settings > Site permissions > Microphone > Allow “https://[your company URL]…sharepoint.com”
-
In Chrome: … > Settings > Privacy and security > Site settings > Microphone > Allow “https://[your company URL]…sharepoint.com”
Tips:
-
Be careful to set the correct microphone input on your device, otherwise results may be disappointing. For example, if your computer’s microphone input is set to your headset mic based on the last time you used it, it won’t work well for picking up an in-person meeting.
-
If you want to record and transcribe a virtual call, don’t use your headset. That way, the recording can pick up the sound coming out of your device.
-
-
-
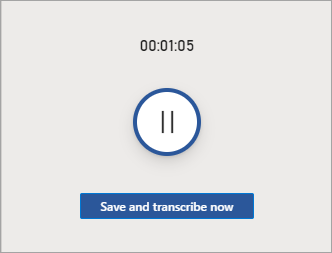
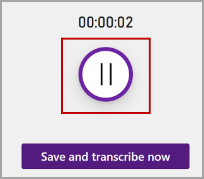
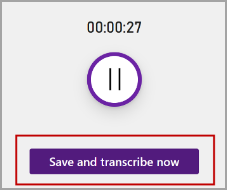
Wait for the pause icon to be outlined in blue and the timestamp to start incrementing to let you know that recording has begun.
-
Start talking or begin a conversation with another person. Speak clearly.
-
Leave the Transcribe pane open while recording.
-
Pause recording by selecting the pause icon.
-
Resume recording by selecting the microphone icon.
-
When finished, select Save and transcribe now to save your recording to OneDrive and start the transcription process.
-
Transcription may take a while depending on your internet speed. Keep the Transcribe pane open while the transcription is being made. Feel free to do other work or switch browser tabs or applications and come back later.
You can upload a pre-recorded audio file and then transcribe the recording.
-
Make sure you’re signed into Microsoft 365, using the new Microsoft Edge or Chrome.
-
Go to Home > Dictate dropdown > Transcribe.
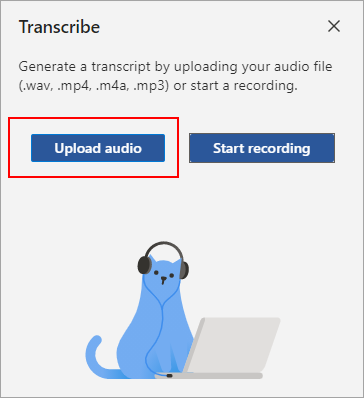
-
In the Transcribe pane, select Upload audio.
-
Choose an audio file from the file picker. Transcribe currently supports .wav, .mp4, .m4a, .mp3 formats.
-
Transcription may take a while depending on your internet speed, up to about the length of the audio file. Be sure to keep the Transcribe pane open while the transcription is happening, but feel free to do other work or switch browser tabs or applications and come back later.
Your transcript is associated with the document it’s attached to until you remove it. If you close and reopen the pane or close and reopen the document, the transcript remains saved with the document.
You can interact with the transcript in a few different ways.
Access the audio file
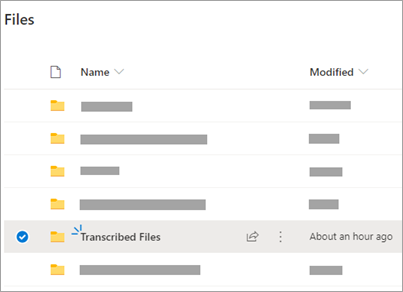
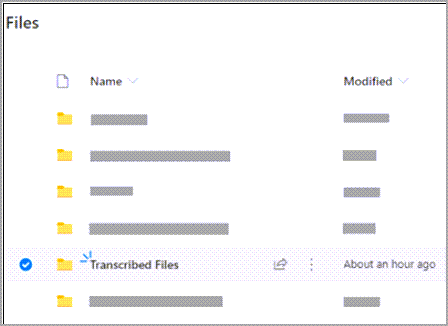
The audio file, whether recorded or uploaded, is saved to the Transcribed Files folder in OneDrive.
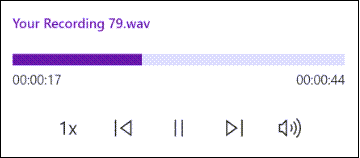
Play back the audio
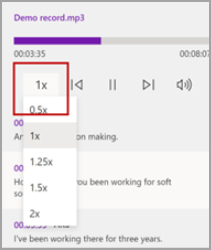
Use the controls at the top of the Transcribe pane to play back your audio. The relevant transcript section highlights as it plays.
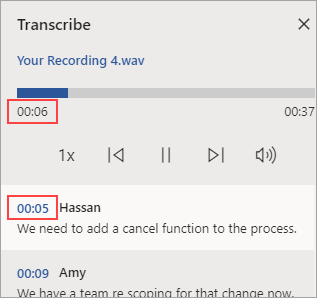
-
Select the timestamp of any transcript section to play that portion of audio.
-
Change the playback speed up to 2x.
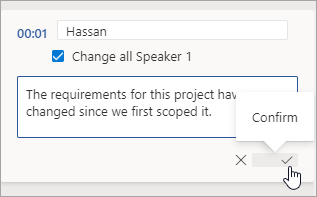
Relabel a speaker or edit a section
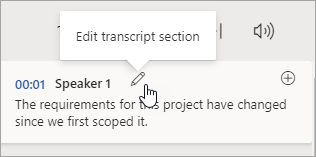
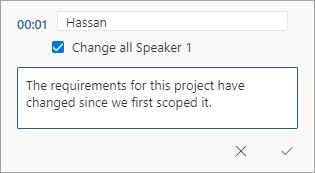
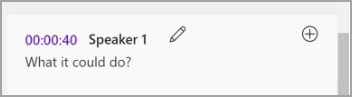
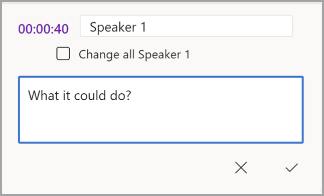
The transcription service identifies and separates different speakers and labels them «Speaker 1,» «Speaker 2,» etc. You can edit the speaker label and change all occurrences of it to something else. You can also edit the content of a section to correct any issues in transcription.
-
In the Transcribe pane, hover over a section you want to edit.
-
Select the Edit transcript section icon.
-
Edit the content or change the label. To change all instances of a label, select Change all Speaker [x].
-
To save your changes, select the Confirm icon.
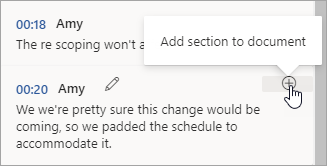
Add a transcript to the document
Unlike Dictate, Transcribe doesn’t automatically add the audio to the document. Instead, from the Transcribe pane, you can add the entire transcript, or specific sections of it, to the document.
-
To add a specific transcript section, hover over the section and select the Add section to document icon.
-
To add the entire transcript to the document, select Add all to document.
-
To delete the transcript or create a new one, select New transcription. You can only store one transcript per document; if you create a new transcript for the document, the current transcript will be deleted. However, any transcript sections you’ve added to the document remain in the document, but not in the Transcribe pane.

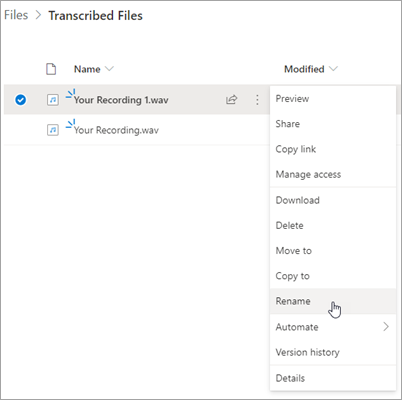
Rename a recorded audio file
You can rename an audio file that has been recorded.
-
Go to the Transcribed Files folder in OneDrive, or at the top of the Transcribe pane, click the name of the recording. When the audio player interface appears, close it to return to the Transcribed Files folder.
-
Find your recording, then select Actions > Rename and rename the recording file.
Note: TheTranscribed Files folder looks different depending on whether your OneDrive account is for a business or personal.
-
Close the Transcribe pane in Word and then reopen it to see the name update.
You can share the transcript with someone in two ways:
-
Select Add all to document to add the entire transcript to your document, then share the Word document as usual. The transcript will appear as regular text in the document and there will be a hyperlink to the audio file in the document.
-
Share the Word document as usual. The recipient can open the Transcribe pane to interact with the transcript. To protect your privacy, playback of the audio file is by default not available in the Transcribe pane for anyone that you share the Word document with.
You can also share the transcript and enable playback of the audio file in the Transcribe pane:
-
On your version of the Word document, click the filename at the top of the Transcribe pane to go to where the audio file is saved in OneDrive.
-
The Transcribed Files folder in OneDrive opens.
-
Find your recording, then select Actions > Share and add the email address of the person you want to share the recording with.
-
Share the Word document as usual.
-
The person that you shared both the Word document and audio file with will be able to open the Word document, open the Transcribe pane, and interact with both the transcript and audio file.
Now users with a Microsoft 365 subscription can transcribe unlimited minutes of uploaded audio using the transcribe feature. Previously, the limit was 300 minutes per month per user. There’s been no change for live recordings, and you can still transcribe unlimited minutes of live recordings.
Note: Unlimited transcription for uploaded audio is available to enterprise customers upon request.
How this change affects your organization
If you request access for your organization, unlimited transcription for uploaded audio is available to everyone in your organization as a preview experience. A limit for uploaded audio may be reintroduced in the future, with the option to purchase additional minutes based on your usage.
How to prepare
Fill out this uncapping upload minutes request form to enable the feature for your tenant. To learn more, email VoiceTransFC@microsoft.com.
Notes:
-
This is a preview experience and does not require any additional costs or technical changes and doesn’t have any negative performance impact for the end users.
-
After the preview period, there may be a cap for uploaded audio with the option to purchase additional minutes based on your usage. You will be notified well in advance of any pricing provisions so that you understand the implications and associated monetary costs and can make an informed decision.
-
As of now, this preview experience is not for individual users; it is only available at the tenant level. Everyone in the tenant will have access to it if it has been enabled.
System requirements are:
-
Transcribe only works on the new Microsoft Edge and Chrome.
-
Transcribe requires an Internet connection.
Transcribe experience works with 80+ locales:
-
Arabic (Bahrain), modern standard
-
Arabic (Egypt)
-
Arabic (Iraq)
-
Arabic (Jordan)
-
Arabic (Kuwait)
-
Arabic (Lebanon)
-
Arabic (Oman)
-
Arabic (Qatar)
-
Arabic (Saudi Arabia)
-
Arabic (Syria)
-
Arabic (United Arab Emirates)
-
Bulgarian (Bulgaria)
-
Catalan
-
Chinese (Cantonese, Traditional)
-
Chinese (Mandarin, Simplified)
-
Chinese (Taiwanese Mandarin)
-
Croatian (Croatia)
-
Czech (Czech Republic)
-
Danish (Denmark)
-
Dutch (Netherlands)
-
English (Australia)
-
English (Canada)
-
English (Hong Kong SAR)
-
English (India)
-
English (Ireland)
-
English (New Zealand)
-
English (Philippines)
-
English (Singapore)
-
English (South Africa)
-
English (United Kingdom)
-
English (United States)
-
Estonian (Estonia)
-
Finnish (Finland)
-
French (Canada)
-
French (France)
-
German (Germany)
-
Greek (Greece)
-
Gujarati (Indian)
-
Hindi (India)
-
Hungarian (Hungary)
-
Irish (Ireland)
-
Italian (Italy)
-
Japanese (Japan)
-
Korean (Korea)
-
Latvian (Latvia)
-
Lithuanian (Lithuania)
-
Maltese (Malta)
-
Marathi (India)
-
Norwegian (Bokmål, Norway)
-
Polish (Poland)
-
Portuguese (Brazil)
-
Portuguese (Portugal)
-
Romanian (Romania)
-
Russian (Russia)
-
Slovak (Slovakia)
-
Slovenian (Slovenia)
-
Spanish (Argentina)
-
Spanish (Bolivia)
-
Spanish (Chile)
-
Spanish (Colombia)
-
Spanish (Costa Rica)
-
Spanish (Cuba)
-
Spanish (Dominican Republic)
-
Spanish (Ecuador)
-
Spanish (El Salvador)
-
Spanish (Guatemala)
-
Spanish (Honduras)
-
Spanish (Mexico)
-
Spanish (Nicaragua)
-
Spanish (Panama)
-
Spanish (Paraguay)
-
Spanish (Peru)
-
Spanish (Puerto Rico)
-
Spanish (Spain)
-
Spanish (Uruguay)
-
Spanish (USA)
-
Spanish (Venezuela)
-
Swedish (Sweden)
-
Tamil (India)
-
Telugu (India)
-
Thai (Thailand)
-
Turkish (Turkey)
Note: This feature is currently available only on the Windows platform in OneNote for Microsoft 365.
Voice and Ink are a powerful combination. Together for the first time in Office, transcription and ink makes it easier than ever to take notes, focus on what’s important, and review your content later. With transcription on, you can record what you hear. You’re free to annotate, write notes, or highlight what’s important. When you’re ready to review, your ink will play back in lockstep with the recording. You can easily jump to a specific moment by tapping on any annotation to recall more context.
Note: Transcribe is not available for GCC/GCC-H/DoD customers.
You can transcribe speech in two ways:
-
Record directly in OneNote.
-
Upload an audio file.
Note: When you play back the audio, you can see the ink strokes that you made during the recording.
Important: Users with Microsoft 365 subscriptions can transcribe unlimited minutes of uploaded audio using the transcribe feature. For more information, refer to Unlock unlimited upload minutes.
You can record directly in OneNote while taking notes in the canvas and then transcribe the recording. OneNote transcribes in the background as you record; you won’t see text on the page as you would when dictating. You’ll see the transcript after you save and transcribe the recording. The ink strokes you make while recording it will be captured and replayed.
Make sure you’re signed into Microsoft 365 and using the latest version on OneNote.
Tips:
-
Be careful to set the correct microphone input on your device for the best result. For example, if your computer’s microphone input is set to your headset mic based on the last time you used it, it won’t work well for picking up an in-person meeting.
-
If you want to record and transcribe a virtual call, don’t use your headset. That way, the recording can pick up the sound coming out of your device.
Record
-
Go to Home > Transcribe > Transcribe.
-
In the Transcribe pane, select Start recording.
-
If it’s your first-time transcribing, give the OneNote app permission to use your mic: How to set up and test microphones in Windows (microsoft.com).
Tip: When the pause icon is outlined in purple and the timestamp starts to change, the recording has started and you can speak, have a conversation, or record a lecture. Speak clearly or make sure the incoming audio is clear.
-
Start talking or begin a conversation with another person. Speak clearly.
-
Leave the Transcribe pane open while recording.
-
Pause and resume recording as you need.
Pause the recording by selecting the pause icon.
Resume recording by selecting the microphone icon.
-
When finished, select Save and transcribe now to save your recording to OneDrive and start the transcription process.
-
Transcription may take a while depending on your internet speed. Keep the Transcribe pane open while the transcription is being made. Feel free to do other work or switch browser tabs or applications and come back later.

You can upload a pre-recorded audio file and then transcribe the recording. Make sure you’re signed into Microsoft 365 and using the latest version on OneNote.
-
Go to Home > Transcribe > Transcribe.
-
In the Transcribe pane, select Upload audio.
-
Choose an audio file from the file picker. Transcribe currently supports .wav, .mp4, .m4a, .mp3 formats.
Notes:
-
Transcription may take a while depending on your internet speed, up to the length of the audio file. Be certain to keep the Transcribe pane open while the transcription is happening, but feel free to do other work, switch browser tabs or applications, and come back later.
-
You can delete stored recordings in the Transcribed Files folder on OneDrive. Learn more about privacy at Microsoft.

You can do the inking on the canvas while the recording continues. Each movement is captured and played back in sync with the audio during playback.
Note: Inking strokes made during the paused state replay at the same time.
Your transcript is associated with the OneNote page it’s attached to, until you remove it from that document. If you close and reopen the pane or the document, the transcript remains saved with the document.
You can interact with the transcript these different ways.
Access the audio file
The audio file, whether it is recorded or uploaded, is stored in the Transcribed Files folder in OneDrive.
Play back the audio
Use the controls at the top of the Transcribe pane to play back your audio. The relevant transcript section highlights as it plays.
-
Select the timestamp of any transcript section to play that portion of audio.
-
Change the playback speed up to 2x.
Relabel a speaker or edit a section
The transcription service identifies and separates different speakers and labels them «Speaker 1,» «Speaker 2,» etc. You can edit the speaker label and change all occurrences of it to something else. You can also edit the content of a section to correct any issues in transcription.
-
In the Transcribe pane, hover over a section you want to edit.
-
Select the Edit transcript section icon.
-
Edit the content or change the label. To change all instances of a label, select Change all Speaker [x].
-
To save your changes, select the Confirm icon.

Add a transcript to the document
Unlike Dictate, Transcribe doesn’t automatically add audio to the document. Instead, from the Transcribe pane, you can add the entire transcript, or specific sections of it, to the document.
-
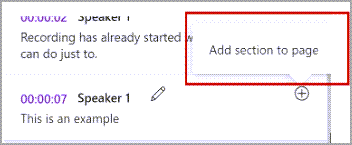
To add a specific transcript section, hover over the section and select the Add section to page icon.
-
To add the entire transcript to the document, select Add to page.
-
To delete the transcript or create a new one, select New transcription.
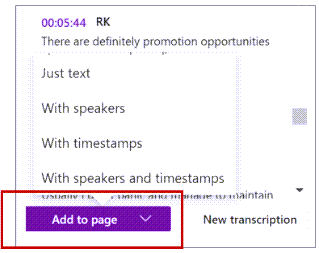
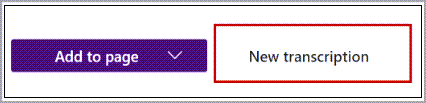
Note: You can only store one transcript per document; if you create a new transcript for the document, the current transcript will be deleted. However, any transcript sections you’ve added to the document remain in the document, but not in the Transcribe pane.
Rename a recorded audio file
You can rename an audio file that has been recorded.
-
Go to the Transcribed Files folder in OneDrive, or at the top of the Transcribe pane. Select the name of the recording. When the audio player interface appears, close it to return to the Transcribed Files folder.
-
Find your recording, then select Actions > Rename and rename the recording file.
-
Close the Transcribe pane in OneNote and then reopen it to see the name update.
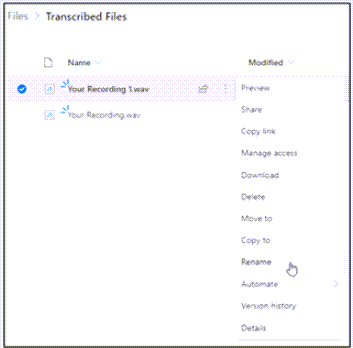
Note: The Transcribed Files folder looks different depending on whether your OneDrive account is for a business or personal.
You can share the transcript with someone in two ways:
-
Select the Add all to document button to add the entire transcript to your OneNote page, then share the OneNote page as usual. The transcript displays as regular text in the page with a hyperlink to the audio file in the document.
-
Share the OneNote page as usual. The recipient can open the Transcribe pane to interact with the transcript. To protect your privacy, playback of the audio file is, by default, not available in the Transcribe pane for anyone that you share the OneNote page with.
You can also share the transcript and enable playback of the audio file in the Transcribe pane:
-
On your version of the OneNote page, click the filename at the top of the Transcribe pane to go to where the audio file is saved in OneDrive.
-
The Transcribed Files folder in OneDrive opens.
-
Find your recording, then select Actions > Share and add the email address of the person you want to share the recording with.
-
Also share the OneNote page as usual.
-
The person that you shared both the OneNote page and the audio file with will be able to open the OneNote page, open the Transcribe pane, and interact with both the transcript and audio file.
Now users with a Microsoft 365 subscription can transcribe unlimited minutes of uploaded audio using the transcribe feature. Previously, the limit was 300 minutes per month per user. There’s been no change for live recordings, and you can still transcribe unlimited minutes of live recordings.
Note: Unlimited transcription for uploaded audio is available to enterprise customers upon request.
How this change affects your organization
If you request access for your organization, unlimited transcription for uploaded audio is available to everyone in your organization as a preview experience. A limit for uploaded audio may be reintroduced in the future, with the option to purchase additional minutes based on your usage.
How to prepare
Fill out this uncapping upload minutes request form to enable the feature for your tenant. To learn more, email VoiceTransFC@microsoft.com.
Notes:
-
This is a preview experience and does not require any additional costs or technical changes and doesn’t have any negative performance impact for the end users.
-
After the preview period, there may be a cap for uploaded audio with the option to purchase additional minutes based on your usage. You will be notified well in advance of any pricing provisions so that you understand the implications and associated monetary costs and can make an informed decision.
-
As of now, this preview experience is not for individual users; it is only available at the tenant level. Everyone in the tenant will have access to it if it has been enabled.
System requirements are:
-
Transcribe + Ink only works on version 2211 Build 16.0.15819.20000 or later.
-
Transcribe + Ink requires an Internet connection.
Transcribe + Ink experience works with 80+ locales:
-
Arabic (Bahrain), modern standard
-
Arabic (Egypt)
-
Arabic (Iraq)
-
Arabic (Jordan)
-
Arabic (Kuwait)
-
Arabic (Lebanon)
-
Arabic (Oman)
-
Arabic (Qatar)
-
Arabic (Saudi Arabia)
-
Arabic (Syria)
-
Arabic (United Arab Emirates)
-
Bulgarian (Bulgaria)
-
Catalan
-
Chinese (Cantonese, Traditional)
-
Chinese (Mandarin, Simplified)
-
Chinese (Taiwanese Mandarin)
-
Croatian (Croatia)
-
Czech (Czech Republic)
-
Danish (Denmark)
-
Dutch (Netherlands)
-
English (Australia)
-
English (Canada)
-
English (Hong Kong SAR)
-
English (India)
-
English (Ireland)
-
English (New Zealand)
-
English (Philippines)
-
English (Singapore)
-
English (South Africa)
-
English (United Kingdom)
-
English (United States)
-
Estonian (Estonia)
-
Finnish (Finland)
-
French (Canada)
-
French (France)
-
German (Germany)
-
Greek (Greece)
-
Gujarati (Indian)
-
Hindi (India)
-
Hungarian (Hungary)
-
Irish (Ireland)
-
Italian (Italy)
-
Japanese (Japan)
-
Korean (Korea)
-
Latvian (Latvia)
-
Lithuanian (Lithuania)
-
Maltese (Malta)
-
Marathi (India)
-
Norwegian (Bokmål, Norway)
-
Polish (Poland)
-
Portuguese (Brazil)
-
Portuguese (Portugal)
-
Romanian (Romania)
-
Russian (Russia)
-
Slovak (Slovakia)
-
Slovenian (Slovenia)
-
Spanish (Argentina)
-
Spanish (Bolivia)
-
Spanish (Chile)
-
Spanish (Colombia)
-
Spanish (Costa Rica)
-
Spanish (Cuba)
-
Spanish (Dominican Republic)
-
Spanish (Ecuador)
-
Spanish (El Salvador)
-
Spanish (Guatemala)
-
Spanish (Honduras)
-
Spanish (Mexico)
-
Spanish (Nicaragua)
-
Spanish (Panama)
-
Spanish (Paraguay)
-
Spanish (Peru)
-
Spanish (Puerto Rico)
-
Spanish (Spain)
-
Spanish (Uruguay)
-
Spanish (USA)
-
Spanish (Venezuela)
-
Swedish (Sweden)
-
Tamil (India)
-
Telugu (India)
-
Thai (Thailand)
-
Turkish (Turkey)
Can’t find the Transcribe button
If you can’t see the button to start Transcription, make sure you’re signed in with an active Microsoft 365 subscription.
Switch accounts
Note: If you see the message “Switch account to transcribe on this notebook”, you need to switch your active account to the identity that has the required edit permissions. This message displays when you try to transcribe a page of the notebook where you don’t have the edit permission.
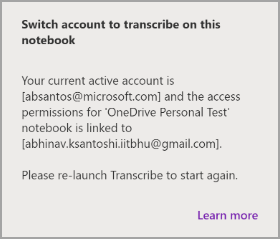
-
Select the user profile currently displayed on the top right corner.
-
Select the user profile that has edit permissions for that page.
About Transcribe
Transcribe is one of the Office Intelligent Services, bringing the power of the cloud to Office apps to help save you time and produce better results.
Your audio files are sent to Microsoft and used only to provide you with this service. When the transcription is done your audio and transcription results are not stored by our service. For more information see Connected Experiences in Office.
There are so many uses out there for text-to-speech software and speech-to-text software. Whether you want to narrate stories, give dictation or use voice search, these apps help. You may also need to convert an audio file to text. It; could be about documenting the text notes of an interview or transcribing a video for uploading on YouTube.
Here are several options to help you achieve audio-to-text conversion in quick and easy steps.
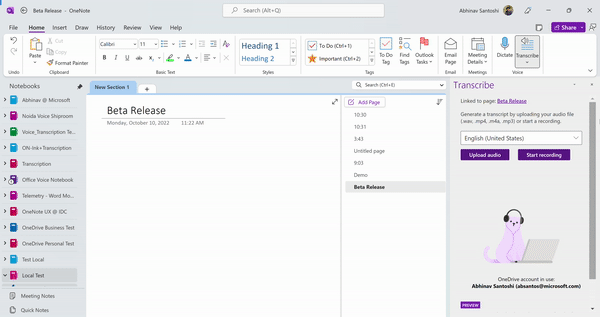
1. Office 365/Word
Microsoft Word has some handy built-in functions for transcribing audio files. Instead of holding a speaker up to your PC microphone and playing it that way, Word can directly transcribe straight from your audio files.

Of course, you need an Office 365 or Office subscription for this to work (though there are some workarounds to get Office working for free, even if temporarily). Of all the options on this list, this is the cleanest, and from our experience, the most accurate way to transcribe audio on your PC.
To transcribe using Word, sign in to Office 365 on your browser and open a new Word document.
Click Home, then the drop-down icon next to ‘”Dictate” (or the microphone icon) and “Transcribe.”

Click “Upload audio,” then select the file you want to transcribe and wait for the process to finish.
You can then click “Add to document” at the bottom and choose the desired format for the transcription in your Word document.

2. Google Docs
Alternatively, you can convert audio to text using Google’s free cloud-based word processing software, Google Docs, which can also convert audio to text. Again, have your audio files playing loud and clear either on your PC or nearby device.

In Google Docs, go to “Tools -> Voice typing” to turn on dictation. For Microsoft Word you need to turn on dictation/online speech recognition on macOS or Windows 10, then press the keyboard shortcut you set to turn on dictation (Win + H in Windows 10, Command key twice in Mac) and open Word.
Once you’ve set up dictation or voice typing, turn it on, open your word-processing software, then play the audio file into your PC microphone (or just play it on your PC so your mic picks it up).
3. Bear File Converter

If you want a simple audio-to-text conversion for brief notes, Bear File Converter has a decent option. Based on the Baidu recognition engine, it can do a proper job converting a clear audio with few distracting noises. However, the online software is not very accurate in converting MP3 song files to text. Also, the online software does not record for longer than three minutes.
4. 360Converter

If you’re looking for slightly better results online in audio-to-text conversion, 360converter offers a simple dashboard tool. It supports both audio and video. The results can be downloaded as a word file or PDF. There are limitations for the freeware, however. While the software is good enough to transcribe conversations and prerecorded speeches, you won’t get professional results.
5. Sobolsoft

If you’re aiming for professional results in MP3-to-text conversion, Sobolsoft offers better output. There are no time limits in terms of output and intuitive options which allow you to convert multiple files and split the timelines. The results are far better than previous options. However, you need to make a purchase beforehand, although a free trial is available.
6. InqScribe
Although it does not directly convert audio to text, InqScribe is an intuitive digital transcription tool which makes the manual entry as easy as possible. With this software, you can quickly insert timecodes anywhere in the transcript and work the rest just like a word processor. You can assign keyboard shortcuts and insert snippet variables to drop frequently-used text with a single keystroke. A complete product user guide is available at this link.

InqScribe is not free, but a 14-day free trial is available without the need to enter payment methods.
Converting audio to text is still a manual job in the music industry, and studios hire professional transcribers for accurate results. YouTubers usually add subtitles and captions on a video-editing software. However, the above solutions enable a degree of automation.
For more acoustic tips on Windows, see our guide for fixing your headphones when they’re not working. We also have a great list of software to help you manage your writing projects. If you want to switch between other file formats on Windows, we have guides to help you convert from VCE to PDF from HEIC to JPG.

Robert Zak
Content Manager at Make Tech Easier. Enjoys Android, Windows, and tinkering with retro console emulation to breaking point.
Subscribe to our newsletter!
Our latest tutorials delivered straight to your inbox
Audio to Text Converter
Transcribe your audio, convert your audio to text in easy way. No account required for free usage.
I grant 360converter to use my data for future ASR system accuracy improvement
If this checkbox is checked, we might retain your data file in future ASR training purpose, which is a process to improve accuracy of speech recognition. >>>
Select your audio
Choose where your file is. It could be local file, cloud storage file, internet file with URL, even your can record audio with 360Converter online recorder. For cloud storage file, from Google Drive and Dropbox, login first then select file.
Specify language in audio
Specify language in audio. What if I chose wrong language? The anwser is, our engine still try to transcribe, but transcript will be totally irrelavant.
Indicate segment of the audio you are interested in
Set start and end time of the audio. Make sure the end time you specified not exceeds the length of the audio. For paid customer of 360Converter, you can transcribe entire audio file.
Get your transcript
Your transcript will be progressively displayed on screen. When it is finished, you may either directly copy your transcript to wherever you want, or send transcript to your email. You can also download transcript in TXT, DOC, PDF and SRT file. You may want to listen and check each word recognized by listening it online and show timestamp of each word by mouse over the word.
Offline Version
You may consider our offline version Offline Transcriber which benefits you upon facts that,
- no time limitation. You are able to transcribe entire file( licensed version ).
- no need uploading your file to anywhere.
- no need wait in queue for your transcript.
- proofread transcript.
- search in transcript.
- free edit transcript like what you usually do in Word Doc.
- batch processs.
- record audio then transcribe.
- real-time transcribing.
Audio Supported
We support following audio formats,