
Note: This feature is currently available in Word for the web for all users. In Word for Windows and MacOS, it’s available in Beta Channel and rolling out to Current Channel (Preview) and Production.
The modern comments experience in Word sets the stage for richer collaboration by your team and enables features such as @mention notifications. Modern comments aligns the commenting experience across Word platforms and other Office apps, especially Word, Excel, and PowerPoint.
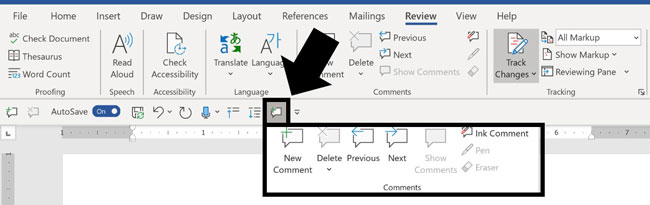
Two ways to view comments
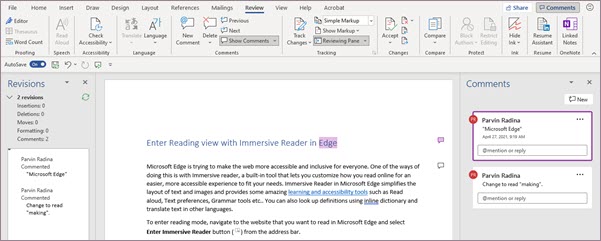
When you add a comment in Word, you’ll see it appear in the right margin as close to the insertion point in the text as possible. In this view, all active comments are visible in context. When you select a comment, a border appears around it and its position is closer to the page.
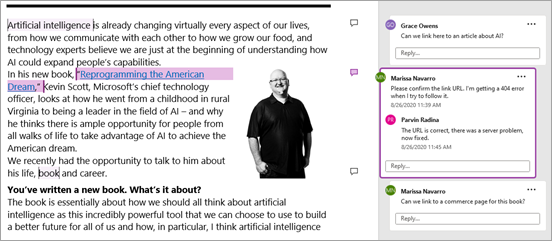
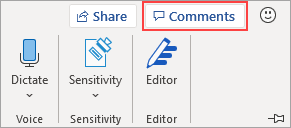
This contextual view hides all resolved comments so you can focus on active comments. To view all comments, including all resolved comments, open the Comments pane by clicking Comments in the ribbon.
You can interact with comments in the Comments pane the same as you would in the contextual view. If you reopen a resolved comment, it will be visible again in the contextual view.
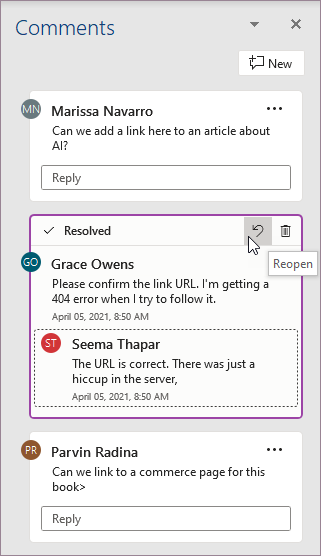
You can switch between the different views anytime by clicking Comments in the right corner of the ribbon.
Posting comments
One of the first thing you’ll notice about modern comments is that there’s now a Post comment button that you tap or click to commit the comment.

You can also press Ctrl + Enter (or Cmd + Enter in MacOS) to post the comment. While it may take getting used to, this feature gives you better control of what you post. In the previous behavior, comments were committed as you typed. This meant that any collaborators on a shared document could see your comment before it was complete. With modern comments, you can review and edit your comments before committing them.
Using comments
Adding a comment is simple:
-
Select the text you want to comment on, or click an insertion point in the text, and then do one of the following to make a new comment appear in the right margin:
-
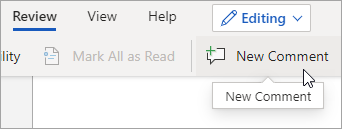
On the Review tab, click New Comment.

-
In the Comments pane, click New.
-
Press Ctrl + Alt + M.
-
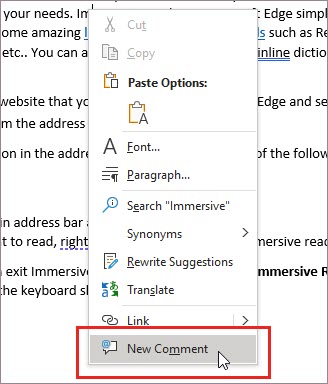
Right-click any text and select New comment in the context menu.
-
-
Select the Post comment button or press Ctrl + Enter.
Modern comments continue to work like comments did before. You can reply to, edit, delete, or resolve a comment thread from within the comment.
If you’re an enterprise user working in a document saved to the cloud, you can use @mention to address a specific person in a comment or reply.
For more information about using @mentions, see the article Use @mention in comments to tag someone for feedback.
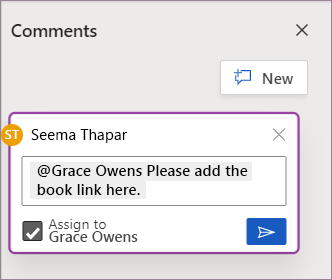
Assigning tasks
If you’re working in Word for the web, you can also use comments and @mention to assign a task. Just @mention someone, and then select the Assign to checkbox to assign the comment as a task.
FAQs
Yes. Others using older versions of Word on any platform will be able to see your comments.
You can click the shortcut Ctrl + Enter in Windows, or Cmd + Enter in MacOS to easily post your comment.
The new post model aligns with how comments work across Office and gives you confident control over what you share. If you @mention someone, Word notifies that person.
Modern comments currently supports the following formatting:
-
Bold, italic, and underline
-
Font colors (not yet available on MacOS or Word for the web)
-
Highlighting (not yet available on Word for the web)
-
Strikethrough
However, modern comments cards do not currently support:
-
Editing font color
-
Showing or editing font size
-
Bullets and numbering
To view or add unsupported formatting in existing comments, use the Reviewing pane.
If viewing and adding these formatting options in the default comment cards is essential to your workflow, let us know using the in-app feedback so we can prioritize future improvements to modern comments.
You can now view existing images and add new images in modern comments on Windows.
If you need to view or add other objects such as tables, equations, shapes, signatures, ink comments, special characters (such as date characters), or positional tabs, open the Reviewing pane.
Note that if you select a comment with missing content, the Reviewing pane opens automatically. Word will also let you know which comments might have content that doesn’t yet display in modern comments via a Missing content message.
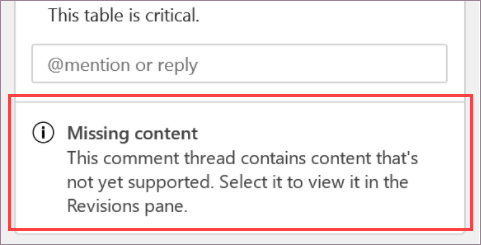
If viewing and adding these other content types in the default comment cards is essential to your workflow, let us know using the in-app feedback so we can prioritize future improvements to modern comments.
Modern comments on Windows supports most AutoCorrect functionality, however there are some capabilities that are not yet fully supported. These include AutoFormat and Math AutoCorrect. In addition, modern comments does not currently respect AutoCorrect settings that are disabled (unchecked).
If AutoFormat or Math AutoCorrect features are essential to your workflow, let us know using the in-app feedback so we can prioritize future improvements to modern comments.
Modern comments checks spelling, but doesn’t support other advanced proofing tools, such as grammar suggestions, at this time. We’re considering this feature for a future update.
With modern comments we’ve made anchoring the comment to the content easier to understand and we no longer use the dotted lines you’re familiar with from classic comments. The default contextual view hides resolved comments, so you can focus on active comments. If you want to see all comments, open the Comments pane.
Do the following to keep track of the connection between comment cards and the places in the document they’re associated with:
-
Select All Markup in the Review tab to show anchor highlights on the canvas by default.
-
Hover on the anchor highlight in the document to see added emphasis to the relevant comment card. Similarly, you can hover on or select the comment card to see added emphasis to the relevant anchor highlight.
-
Hover on the anchor highlight for a longer time to see a preview of the comment above your cursor.
-
Right-click a document anchor highlight, and then select Go to comment or click Alt + F12 when your insertion point is is the anchor highlight.
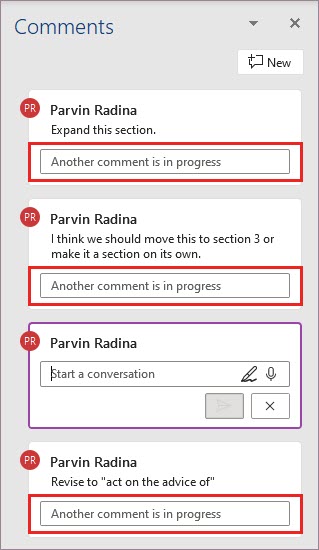
When you’re drafting a comment, your comment can’t be seen by others. After you post, others will be able to see your comment. Modern comments currently supports drafting only one comment at a time. If drafting more than one comment at a time is important to you, let us know using the in-app feedback so we can prioritize future improvements to modern comments.
When you’re drafting a comment, other comment text boxes will show the message Another comment is in progress. You can click this message to return to your active draft.
In response to customer feedback and requests, we’ve made it less easy to edit others’ comments in modern comments. If you need to, you can still edit others’ comments in the Reviewing pane.
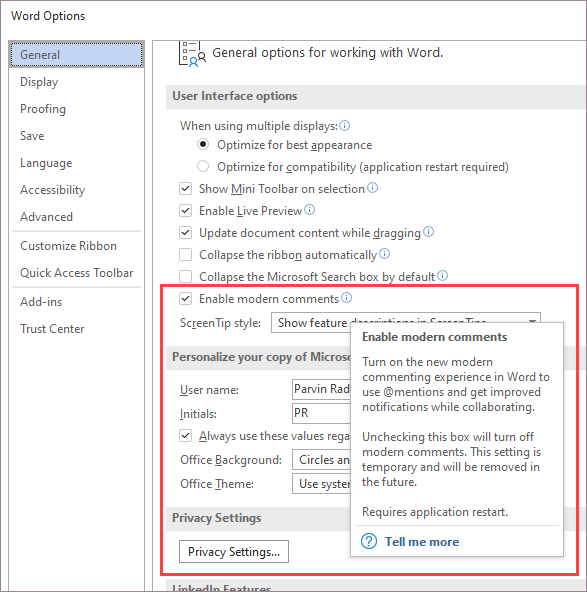
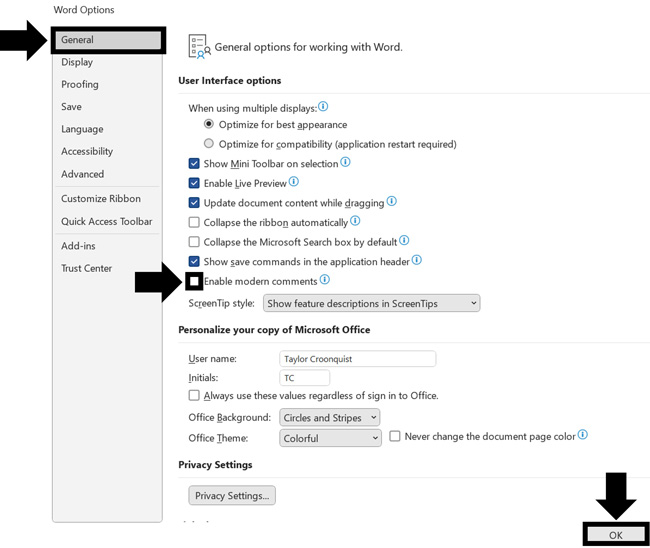
To turn off modern comments on Windows and MacOS, go to File > Options > General, then clear the checkbox next to Enable modern comments. This allows you to temporarily revert the comments experience to the legacy comments model as the new experience continues to improve and evolve. This setting is temporary and will be removed in the future.
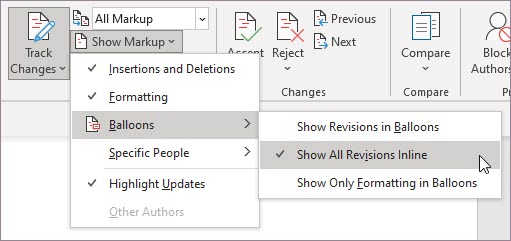
Try viewing all markup inline, so it doesn’t show in the margin. Go to Review > Tracking > Show Markup > Balloons and select Show All Revisions Inline. Let us know how this works for you. We’re continuing to explore the best options for using comments and tracked changes together.
How comments in Word work
Learn how to add comments in Word, how to remove comments in Word, print without comments, change font size of comments, etc.
In Word, you can use comments to add notes to the document content. Comments are saved with the document and travel with the document if you share it with others. Comments are especially useful in the editing and reviewing process of a Word document. Different people can add comments and reply to other people’s comments. When finished, all comments can easily be deleted.
Word has a number of built-in tools dedicated to comments. In this article, you will learn how comments in Word work and how to use the comment tools. The basic information about comments applies to both the built-in comment functionality and the functionality of the DocTools CommentManager add-in.
The information in this article applies to Word 2013, Word 2016, Word 2019, Word 2021, and Word for Microsoft 365 on PC/Windows. Part of the information in this article also applies to Word 2010 and earlier versions but the comment tools and the ways to access them differ. In case of Word for Microsoft 365, see the notes below about Modern Comments.
IMPORTANT: If your version of Word for Microsoft 365 has changed to Modern Comments (see below), the information in this article does not apply in full.
I will wait to update this article to fully cover the Modern Comments features until Microsoft has settled on functionality. So far, the functionality is changing too often.
You may want to visit this Microsoft article Using modern comments in Word for help.
About Microsoft’s change to Modern Comments in Microsoft 365
If you have been using comment in Word for years, and if you are using Word for Microsoft 365, you may have experienced that the comment features in Word have changed. Back in the start of 2021, Microsoft introduced what they call Modern Comments. Modern Comments work quite differently than comments in Word have been working for years. Microsoft now refers to the old comments as Classic Comments.
As of July 2022, Microsoft may still not have rolled out Modern Comments to all users. The rollout has been quite slow. Mid 2021, I had to install the Insider Beta version of Office on a computer to get access to Modern Comments so I could test it. I did not see Modern Comments in my version of Microsoft 365, Current Channel, until in the spring 2022.
The switch to Modern Comments has frustrated many users and made many users angry. I agree with those users. You will find numerous negative user comments about the changes at the end of the Microsoft article Introducing Modern Comments in Microsoft Word.
Microsoft has listened and some improvements have been made. However, I still find Modern Comments extremely inefficient to work with compared to Classic Comments. Also, Modern Comments still have lack of functionality compared to Classic Comments.
How to get the old comment features back
Many users have requested a way to revert to the old comment features, Classic Comments. Microsoft has introduced a temporary option in Word that lets you turn off Modern Comments and revert to Classic Comments. Unfortunately, we must expect that the option will disappear some day.
To get the old comment features back:
- Select File > Options > General > turn OFF the Enable modern comments check box. Click OK.
This will revert to the old comment features. The change of the setting does not take effect until you have restarted Word.
About the DocTools CommentManager add-in and Modern Comments
In this article, I link to my DocTools CommentManager add-in in relation to specific features. Unfortunately, I experienced that many features in the add-in didn’t work with Modern Comments. As of 20-Jun-2021, I released version 3.0 of DocTools CommentManager that works with both classic comments and Modern Comments.
The DocTools CommentManager add-in makes it faster and easier to manage comments in Word. In addition, the add-in lets you review comments in Word from one place, rank comments by importance, extract all comments to either Word or Excel, create inline comments for instructions and help, etc. DocTools CommentManager add-in is completely compatible with Word’s own comment features.
Where to find the comment tools in Word
You will find the dedicated comment tools on the Review tab in the Ribbon.
- The Comments group on the Review tab includes tools that are dedicated to comments.
- The Tracking group on the Review tab includes tools that are used both in relation to comments and tracked changed. In this group, you will find tools to use for changing how comments are displayed.

Figure 1. The built-in comment tools in Word are found on the Review tab.
Word lets you add two levels of comments. First-level comments and replies to first-level comments.
You can add first-level comments in Word either via commands in the Ribbon or by using a keyboard shortcut. To can add a reply to a comment directly from the comment. Read on below.
How to insert a comment in Word
Word lets you view documents in a number of ways. In relation to comments, Print Layout view gives you the best overview. You can, for example, switch view from View tab in the Ribbon > Views group. You can also press Alt+Ctrl+P to switch to Print Layout view.
The built-in functionality in Word lets you add/insert comments from two different places. To insert a comment in Word:
- Select the text you want to comment.
The selected text will be marked as the comment scope. If no text is selected, Word will mark the preceding word, if any, as the comment scope.
To make it as easy for other users to understand your comment, make sure to select precisely the text that the comment refers to instead of, for example, selecting entire paragraphs.
- Follow step 2a, 2b, or 2c:
a. Select the Review tab in the Ribbon > Comments group > New Comment
OR
b. Select the Insert tab in the Ribbon > Comments group > Comment
OR
c. Press the keyboard shortcut Alt+Ctrl+M.The inserted comment appears in the markup area (or balloon area) in the margin or in the Reviewing Pane depending on your settings for display of comments. See How to show comments in Word below. See Figure 2 below.
- In the inserted comment, type the comment text.
- When finished, press the Esc key to return to the document text or click in the document.
Note that pressing Esc will select the text you marked in step 1 above. If you have DocTools CommentManager, pressing Esc will position the insertion point after the scope you selected, ready for you to continue typing without first deselecting the comment scope.
If you are using the DocTools CommentManager add-in, you can insert comments via DocTools tab > CommentManager group > Insert Comment.
NOTE: Comments in Word are stored in the documents. A comment can be edited by anyone who has access to edit the document and not only by the original author who inserted the comment.
Figure 2. A new comment has just been added, ready for typing comment text. Note that if Simple Markup is selected in the Tracking group on the Review tab, the commented text (comment scope) will only be marked by a color when you have selected the comment in the markup area. If your document is in Draft view instead of Print Layout view, the comment will appear in the Reviewing Pane.
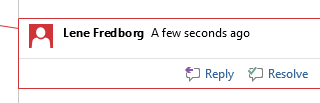
Figure 3. By default, Word shows pictures by comments. You can turn off the pictures.
NOTE: By default, Word shows pictures by comments in the balloon area. You can toggle off/on the pictures by right-clicking in a comment and selecting Hide Pictures by Comments (will change the label to Show Pictures by Comments).
Pictures are turned off in all the following illustrations in this article. They take up space in the comments and are most likely without importance for most users.
How to add a comment as a reply to another comment
Word lets you add two levels of comments. First-level comments and replies to first-level comments.
To add a reply to an existing comment:
- Click in the comment text of the comment you are going to reply to.
- Click the Reply icon below the comment text (See Figure 5 below).
OR
Right-click in the comment and select Reply to Comment. - In the inserted comment reply, type the comment text.
- When finished, press the Esc key to return to the document text or click in the document.
Replies to comments are indented below the comment to which they belong. You can add more replies to the same comment. All replies will appear on the same level – they will all be shown as replies to the first-level comment even if a reply is actually written as a reply to another reply.
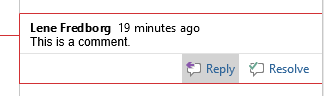
Figure 5A. Click the Reply icon to add a reply to an existing comment.
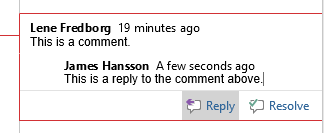
Figure 5B. A new comment has been added as a reply to an existing comment.
If a page has too many comments for Word to have room for all the comment text, the comments will be collapsed. A comment will expand when you click the comment.
Note that Word 2013 and later versions do not number comments when shown in the balloon area/Comments pane. Only if you view comments and revisions inline or in the Reviewing pane, or if you switch to Draft view or Outline view, numbers are shown together with the author initials. Syntax for comments numbers shown inline: NN#, where NN are the initials and # the index number of the comment, counted from the start of the document. Example: LF5. You will not be able to see on the number whether a comment is a first-level comment or a reply to another comment.
The DocTools CommentManager add-in shows the actual comment number and total number of comments in the Status Bar when you use the Previous Comment or Next Comment commands.
How to edit a comment in Word
To edit an existing comment in Word:
- Make sure the comment is shown. See How to show comments in Word.
- Click in the comment and add, delete, or modify the comment text.
How to resolve a comment in Word
Word lets you mark a comment as resolved. This will change the font color(s) of the comments to a pale look. Marking comments as resolved may help you keep track of which comments still need attention.
To mark a comment as resolved:
- Click in the comment text of the comment you are going to mark as resolved.
- Click the Resolve icon below the comment text (see Figure 5 above).
OR
Right-click in the comment and select Resolve Comment.
The Resolve icon changes to Reopen. If needed, you can turn off the resolved status again by clicking Reopen or by right-clicking in the comment and selecting Reopen Comment.
Why can’t I resolve comments in Word?
You may experience that the Resolve icon and the Resolve Comment command are grayed out, indicating that the commands are disabled and cannot be used. To find out why this happens and how to solve it, read on below.
What to do if the Resolve icon is grayed out – and what causes the problem?
The Resolve feature was introduced in Word 2013. The Resolve feature is grayed out under the following conditions:
- The document was created in or last saved in Word 2010 or an earlier version.
- The document is in compatibility mode.
If the document is in compatibility mode, newer Word features cannot be used. You will see the text (Compatibility Mode) after the file name in the Title bar of the Word window.
How to solve the problem
You can convert the document to allow all features in you Word version to be available. Use one of the following methods to update the document to your version of Word. This will enable the Resolve feature:
- METHOD 1: Select File > Info > click Convert. Save the document.
- METHOD 2: Select Save As (F12). In the Save As dialog box, turn off the option Maintain compatibility with previous versions of Word. Click Save. See the illustration below.
IMPORTANT: Conversion of a document may result in changes to the formatting of the document, depending how it was set up. For examples, the widths of tables created in Word 2010 and earlier may change when converted to Word 2013 format or later (due to changes of how cell margins are handled).

Bottom-left part of Save As dialog box — turn off Maintain compatibility with previous versions of Word to convert the document to your version of Word. This allows newer features to be used.
How to remove resolved comments in Word
Word does not have a built-in feature for removing all resolved comments in one operation. You need to go through all the resolved comments and delete them one by one.
Note that the DocTools CommentManager add-in lets you delete all resolved comments with the click of a button. For details, see How to delete resolved comments in Word.
Where does the name in an inserted Word comment come from?
The author name shown in an inserted comment is the name currently specified for the user in File > Options > General > User Name. See Figure 4B below.
If you have selected to show comments and revisions inline in the document, Word shows initials in the comment reference. The initials are the ones currently specified for the user in File > Options > General > Initials. See Figure 4B below.
You can also get access to the user name and initials via the Track Changes Options dialog box. To open that dialog box, click the small arrow (dialog box launcher) in the bottom-right corner of Review tab > Tracking group.

Figure 4A. You can get access to the user name and initials settings via the Change User Name button in the Track Changes Options dialog box. See the illustration below.
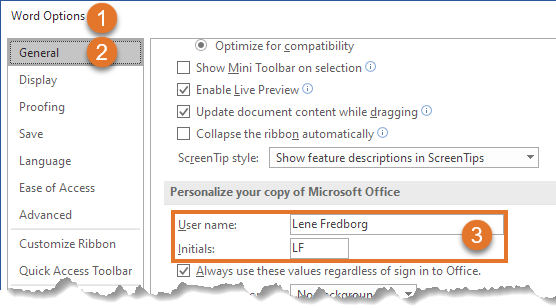
Figure 4B. The User Name and Initials settings in Word Options > General.
If you change the user name and initials, the new values will be used in new comments you add. It will not change the name and initials in existing comments.
The currently defined user name and initials are also used in insertions, deletions, and formatting changes made while track changes is turned on.
How to remove name from comments in word
Word’s comment functionality does not include functionality for changing the author name of existing comments. However, Word lets you remove personal information which will set the author name of all comments to «Author». See How to remove personal information from comments. See also the macro solution later in this article.
Note that the DocTools CommentManager add-in lets you easily change the user name and initials, also in existing comments. The command Change Author Names in Existing Comments lets you change all names or only a specific name of your choice. For example, this feature can be used to change author names to the company name before sharing a document with external people or to correct a misspelled or otherwise wrong user name. If you want to remove the name from comments, you can use the command to set the name to e.g. a non-breaking space (Ctrl+Shift+Spacebar), a hyphen or an En dash. See also the information below about a feature in the DocTools ExtractChanges Pro add-in that lets you do even more and that handles both tracked changes and comments.
The DocTools ExtractChanges Pro add-in (from version 6.0) includes a command, Change Author & Date, that lets you change the name in existing tracked changes and comments. In addition, the command lets you remove or change the date of the tracked changes and comments. You can select whether the name and/or date changes are to be applied to all tracked changes and comments or only tracked changes and comments added by a specific author. The changes are made in copy of the document so that the original document remains unchanged.
TIP: If you want to remove the name from tracked changes and comments, you can type e.g. a non-breaking space (Ctrl+Shift+Spacebar), a hyphen or an En dash as both the author name and initials in the Change Author & Date dialog box in DocTools ExtractChanges Pro.
How do dates in Word comments work?
Word shows date and time information on a comment in the following situations:
- When a comment is selected in the balloon area
- When you hover the mouse over a comment in the balloon area
- When you hover the mouse over a comment mark on a page if no balloons are shown
- Above each comment in the Reviewing Pane
The date and time tell when the comment was added.
Is it possible to change the date of a comment in Word?
The date assigned to a comment in Word cannot be changed. Also, you cannot change the way that date and time information is shown. See below for details.
Language of date and time information in comments
The language used for date and time information in balloons is determined by the current language of the user interface in Word, i.e. the language used in Ribbon, dialog boxes, etc. This also means that weekdays and month names are written in the language of the user interface. If you change that language, the date and time information will automatically change too.
The date format shown in balloons seems to always follow English (US) syntax no matter the language and even if it is not a normal date syntax in the actual language:
- [month name] [day], [year]
Example: March 21, 2018
About comment date and time information shown in the balloon area
The date and time information for comments in the balloons is not always given as date and time – you will see text descriptions instead. As time goes, the date and time information for a comment in the balloon area will change. The information shown follows the order described below – text shown as you will see it in English versions of Word:
First 24 hours
A few seconds ago
2 minutes ago
3 minutes ago
…
59 minutes ago
60 minutes ago
1 hour ago
2 hours ago
…
23 hours ago
24 hours ago
Next six days
Yesterday
The next days, until 1 week after adding the comment: the actual weekday, e.g. Wednesday, Thursday. Weekday names seem to be shown in the language set in the regional settings in Windows.
After a week
After a week, the information will change to showing date and time in the following format:
[month name] [day], [year] hh:mm:ss
where:
hh = hours
mm = minutes
ss = seconds
You may see time given with AM/PM values.
As explained above, the month name will be in the language of the user interface and the syntax follows English (US) rules even if not in English:
Examples:
- English user interface: March 21, 2019 14:55:35
- German user interface: März 21, 2019 14:55:35
- Danish user interface: marts 21, 2019 14:55:35
The CommentManager add-in makes it fast and easy to get an overview of all comments in a Word document, using the Review Comments command. This also includes date and time information.
How to show comments in Word
Comments in Word can be displayed in different ways:
- In balloons (see OPTION 1 below)
- In the Reviewing Pane (see OPTION 2 below)
- In screen tips only (see OPTION 3 below)
OPTION 1 – How to show comments in balloons
The document must be in Print Layout view (Alt+Ctrl+P) to show comments in balloons.
- Select the Review tab in the Ribbon.
- In the Tracking group, click Show Markup > Balloons and select Show Revisions in Balloons or Show Only Comments and Formatting in Balloons as desired. See Figure 6 below.
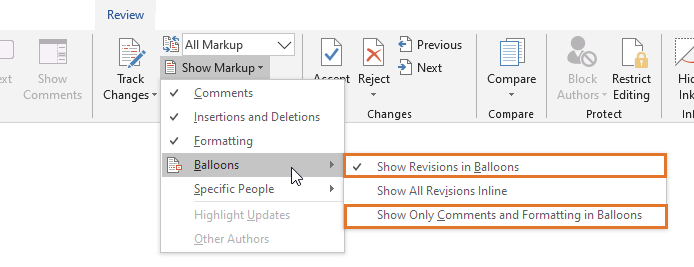
Figure 6. How to show comments in balloons in Word. Select one of the options marked by colored frame.
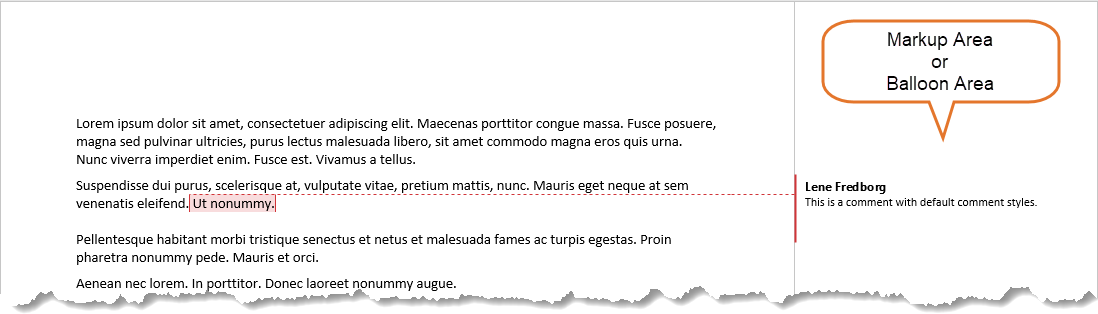
Figure 7. The Markup Area or Balloon Area is shown in the left or right margin depending on your settings. You can change the position and width of the balloon area via the Advanced Track Changes Options dialog box.
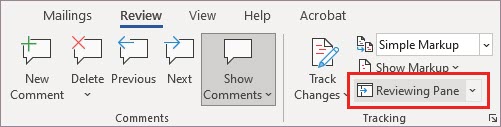
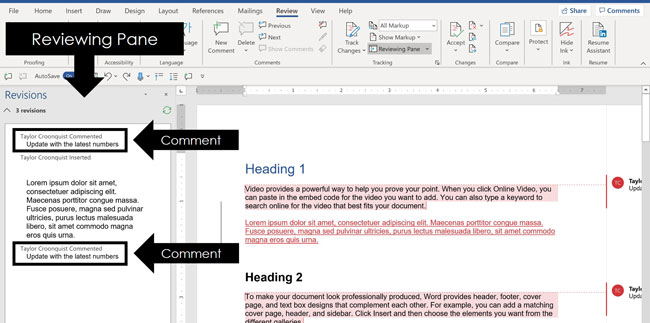
OPTION 2 – How to show comments in the Reviewing Pane
You can show the Reviewing Pane in any view except Read Mode.
- Select the Review tab in the Ribbon.
- In the Tracking group, click Reviewing Pane.
- From the menu, select Reviewing Pane Vertical or Reviewing Pane Horizontal depending on how you want the pane to be shown.
You can close the Reviewing Pane again by clicking the X in top-right corner of the pane.
OPTION 3 – How to show comments in screen tips
To use this method, all revisions must be shown inline. This means that the following option must be selected: Review tab > Tracking group > Show Markup > Balloons > Show All Revisions Inline. See the second option in Figure 6 above.
- Hover the mouse over a comment reference, i.e. the initials and number shown where a comment has been inserted.
- A screen tip will appear, showing the comment text. See Figure 8 below.
NOTE: If no screen tip appears when you hover the mouse over the comment reference, try to move the mouse a bit. If the screen tip does not appear, the problem is most likely that display of screen tips is turned off. To turn it on, select File > Options > Display > turn on Show document tooltips on hover.
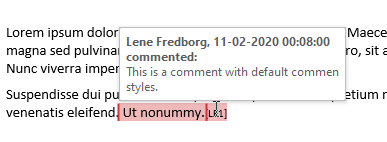
Figure 8. Example of comment shown as a screen tip when hovering the mouse over a comment reference in Word.
The DocTools CommentManager add-in includes special tools that make it faster to work with comments. For example, the Review Comments command opens a dialog box that works as a control center from where you can view, edit, delete, search comments and more.
How to show only specific comments in Word
Show comments by a specific author only
In Word documents with many comments, it may sometimes be helpful to see only a subset of the comments. Word lets you show/hide comments by author.
To show only comments added by a specific author:
- Select Review tab > Tracking group > Show Markup > Specific People: Deselect all authors except the author(s) whose comments you want to see.
This does not remove any comments – it only hides some comments temporarily.
How to hide resolved comments in Word
When you use Word’s Resolve feature in a comment, the comment is marked as resolved and shown dimmed. However, the comment remains in the document until you delete it.
You may be interested in keeping the resolved comments in the document until all comments have been handled. However, you may want to hide the resolved comments, so they do not distract you while resolving the rest of the comments.
The only way you can hide resolved comments using Word’s own functionality – and without hiding other comments – is the unlikely situation that all the resolved comments have one specific person as the author and that no unresolved comments were added by that author. In that situation, you could deselect that author in Review > Tracking group: Show Markup > Specific People. Except from that, you are out of luck.
If you are using Word for Microsoft 365 and if your version has switched to «modern comments» functionality instead of «classic comments», resolved comments will not appear in the margin but they are still shown in the Comments pane.
Note that the DocTools CommentManager add-in provides methods to quickly hide all resolved comments. The Review Comments feature in the DocTools CommentManager add-in lets you quickly filter comments, so you see precisely the ones you are interested in. This way, you can quickly hide all resolved comments. In addition, the add-in lets you export all comments to Excel where they will be listed with all metadata and with filter applied to every column, making it easy to filter so you see only unresolved comments.
What to do if you cannot see the comments
Comments can be set to not be displayed. The same is true for revisions made using track changes. If you know the document contains comments but you can’t see them, follow CHECK 1, CHECK 2, and CHECK 3 below.
CHECK 1 – Check that markup is selected to be shown
- Select the Review tab in the Ribbon.
- In the Tracking group, make sure that Display for Review has been set to All Markup or Simple Markup. See the illustration below.
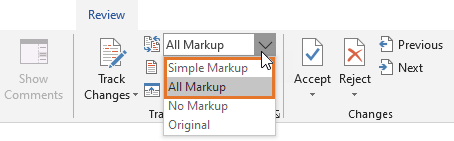
Figure 9. To see comments, make sure that All Markup or Simple Markup is selected.
CHECK 2 – Check that comments are selected to be shown
If comments are not shown after you followed CHECK 1:
- Select the Review tab in the Ribbon.
- In the Tracking group, make sure that Comments is checked in the Show Markup menu. See Figure 10 below.
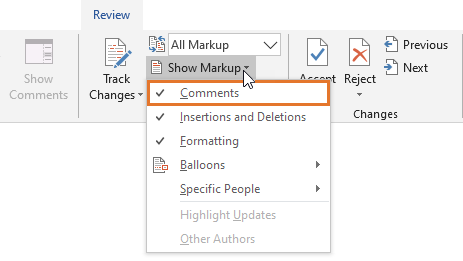
Figure 10. To see comments, make sure that Comments is checked in the Show Markup menu.
CHECK 3 – What to do if you only see comment icons in the balloon area – or how the Show Comments command works
Read on if you have followed CHECK 1 and CHECK 2 above and still can’t see comments, or if you only see small comment icons in the balloon area instead of the comment content.
You may have noticed that the Comments group in the Review tab includes a command named Show Comments. You may also have noticed that the command is not always enabled so you can use it – in some situations, the Show Comments is grayed out/disabled. Here is the reason why:
- The Show Comments command is only enabled when Simple Markup is selected. Also, Comments must be checked in the Show Markup menu. See Figures 11A and 11B below.
- If Display for Review is set to show Simple Markup, the Show Comments command toggles between two states:
State 1: Comment icons are shown in the margin (see Figure 12 below)
State 2: Full comments are shown in the balloon area
NOTE: If comments are not shown beforehand, the first click on Show Comments will switch to state 1, i.e. showing comment icons.
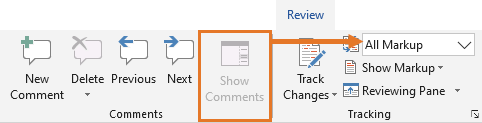
Figure 11A. The Show Comments command grayed out. To enable it, you must select Simple Markup instead of any other Display for Review option.
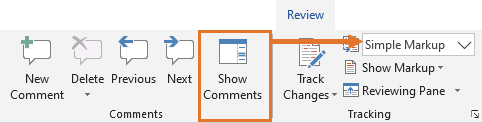
Figure 11B. The Show Comments command is only enabled when Simple Markup is selected.
![]()
Figure 12. Comment icons are shown in the margin if Simple Markup is selected.
![]()
Figure 13. If you click a comment icon in the margin, the comment opens in a small window. You can drag the comment window to the position you want. You can also resize the window by dragging an edge or corner. To close it, click the X or simply click anywhere outside the comment window.
TIP: If comment icons are shown as illustrated in Figure 12 above, the commented text in the document is not marked in any way. This means that you cannot see precisely what the comment refers to. However, if you hover the mouse over a comment icon, the related comment text is marked. If you happen to hover the mouse over commented text, that text will be colored and a screen tip with comment information is shown in the same way as illustrated in Figure 8 above.
A comment plus all replies to the comment, if any, will appear as only one comment icon in the margin. When you click a comment icon, the first-level comment and all replies to it, if any, will appear in the small comment window that opens.
What happens if you copy and paste content that contains comments?
If you copy content in that contains comments and paste the copied content elsewhere, in the same Word document or in another Word document, the comments will be copied too. The pasted comments will not be linked to the original comments – they keep the author names, time stamps and content from the original comments but they are independent comments.
If you paste the copied content as plain text, without formatting, the comments will not be included.
How to remove comments in Word
You can remove individual comments, one at a time, or remove all comments from a Word document in one operation. In Word, the term «delete» is used instead of «remove». Therefore, I have used «delete» in the following.
If you delete a comment that has replies, all replies to the comment will be deleted too.
If you delete a reply to a comment, only that reply will be deleted.
How to delete a single comment
- Make sure the comment is displayed. Click in the comment text of the comment to be deleted.
- On the Review tab in the Ribbon, in the Comments group, click Delete > Delete.
Note that the command is disabled if only comment icons are shown. - Repeat steps 1-2 to delete more comments, if relevant.
How to delete all comments from the document
- On the Review tab in the Ribbon, in the Comments group, click Delete > Delete all Comments in Document.
How to delete all comments that are currently visible
Via the Review tab > Tracking group > Show Markup > Specific People, you can turn off the display of comments and revisions made by specific people. Thereby, only comments and revisions made by the people checked in the list will be shown in the document.
To delete all comments added by the people currently checked in the Specific People list:
- On the Review tab in the Ribbon, in the Comments group, click Delete > Delete all Comments Shown.
When you delete comments in Word, the commented text (comment scope) is preserved. Only the comment(s) are removed. This means that the text in the document that the comment(s) referred to, i.e. the text that was selected when the comment(s) were inserted, is still in the document.
Note that the DocTools CommentManager add-in lets you move a comment, i.e. change which text the comment is related to. DocTools CommentManager also lets you select text in the document and convert it to a comment. This will remove the selection from the document and insert it in a new comment instead. This is practical in a number of situations. The feature is practical if some comments were originally written as part of the document text. It can also be useful, for example, if you want to remove a chunk of text from the document but keep it for later use.
How to delete resolved comments
As mentioned previously, Word doesn’t have a tool specifically for deleting resolved comments. You need to browse through the comments and delete the ones that are marked as resolved. Make sure comments are shown in balloons. You can use the Next or Previous commands on the Review tab to browse through the comments and delete individual comments as needed.
How to delete all resolved comments in Word
As opposed to Word’s own functionality, the DocTools CommentManager add-in lets you delete all resolved comments with the click of a button. You will find a command, Delete All Resolved Comments, for getting rid of all comments that have been marked as resolved.
If you want to review the resolved comments before deleting them, DocTools CommentManager offers another practical feature. You can use the filter feature in the Review Comments dialog box to show only resolved comments (type » yes » in the filter field). You can then quickly step through the resolved comments and use the Delete Comment button to remove the ones you want to get rid of.
How to hide comments in Word
There may be situations where you want comments to remain in a Word document but to be temporarily hidden. To hide comments (without deleting them), follow one of the methods below.
METHOD 1 – Hide comments only but keep any changes marked as tracked changes visible
- Select the Review tab in the Ribbon.
- In the Tracking group, remove the check mark from Show Markup > Comments.
METHOD 2 – Hide comments and any tracked changes
- Select the Review tab in the Ribbon.
- In the Tracking group, select Display for Review > No Markup.
This will show the document as if all comments have been deleted and all revisions accepted.
The comments and revisions are still in the document but hidden.
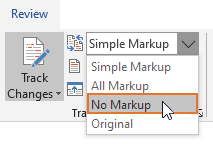
Figure 14. Select No Markup to show the document without comments and tracked changes.
Note that in relation to comments, you may select Original instead of No Markup since this will also hide comments. However, in relation to tracked changes, there is a big difference between the two options: No Markup will show the document as if all tracked changes have been accepted whereas Original will show the document as if all tracked changes have been rejected.
Note that hiding comments and tracked changes only determines how your document is shown right now. The display settings are not stored in the document. If you send the document to another user, it is that user’s settings that apply.
How to print without comments in Word
If you are going to print a document that has comments, you may want to leave out the comments in the print. To obtain this, you can follow METHOD 1 or METHOD 2 below.
METHOD 1
- Select the Review tab in the Ribbon.
- In the Tracking group > Show Markup, turn off
Comments.If the document also includes tracked changes and if you want to avoid printing those changes, turn off Insertions and Deletions and Formatting too.
- Select the desired printer and click Print.
- If you want, turn on Review tab > Tracking group > Show Markup > Comments again.
METHOD 2
- Select File > Print.
- Under Settings, click on the arrow next to Print All Pages (see (1) in Figure 15 below).
- Turn off Print Markup (see (2) in Figure 15 below).
- Click the Print button.
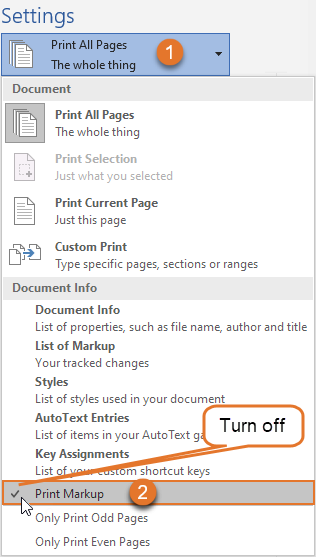
Figure 15. Part of the Print dialog box. To print without comments and other markup, turn off Print Markup.
How to print only the comments in Word
If you want to print comments only, without the content of the document, follow these steps:
- Select the Review tab in the Ribbon.
- In the Tracking group > Show Markup menu, turn on Comments.
If the document includes tracked changes, turn off Insertions and Deletions and Formatting unless you want to also print those changes. - Select File > Print.
- Under Settings, click the topmost menu (shows Print All Pages by default), select List of Markup.
- Select the desired printer and click Print.
Note that the DocTools CommentManager add-in lets you extract comments to either Word or Excel. A printout of an extract document will give you a far better overview of the comments.
How to browse comments in Word
You can step through the comments in a Word document.
- Select the Review tab in the Ribbon.
- To go to the next comment, click Next in the Comments group
To go to the previous comment, click Previous in the Comments group.
Alternative methods for browsing comments
- You can browse comments from the Navigation Pane (View tab > Navigation Pane > click the search icon > select Comments).
- You can browse comments using the Go To tab in the Find and Replace dialog box. Press Ctrl+G to open the dialog box. In the Go to what list, select Comment. Then use the buttons in the dialog box to browse comments.
How to get an overview of all comments in a Word document
Word does not include a tool that gives you a good overview of all comments. You can browse comments but you cannot see all comments at a time.
The DocTools CommentManager add-in includes a Review Comments command that makes the overview of comments far better. The command opens a dialog box from where you can manage all comments in the document. The dialog box also lets you rank comments by importance.
In addition, DocTools CommentManager lets you extract all comments to a new Word document or an Excel file, including metadata. You will also find tools to quickly find a specific comment in the original source document.
How to change the formatting of comments in Word?
In Word, styles are used to manage the formatting of text. A style in Word is a set of formatting characteristics that determine font and font size, color, alignment, spacing, etc. In relation to comments, Word uses a set of styles dedicated to comments. You can modify the comment styles to change the formatting of comments. Read on below to learn about the comment styles and how they work.
Comment styles in Word
When it comes to comments, Word uses a set of special styles to format different parts of comments. Word has four built-in styles related to comments:
- Comment Text
- Comment Reference
- Comment Subject
- Balloon Text
See how to find the comment styles names in your version of Word if it is not English.
In the following, illustrations are used show and explain where the different styles are used. Note that there are some oddities in relation to the comment styles – as you will see, not everything works as expected if modifying the comment styles.
Where are the different comment styles used?
Used for the comment text typed by users. The style is used both for comments shown in balloons and comments shown in the Reviewing Pane. See Figure 16 and Figure 17 below (red text).
Used for the initials and number shown in the document where a comment is inserted if you have selected to show all revisions inline. See Figure 16 and Figure 18 below (green text).
This style can be used for a heading in comments and may be intended for that. Note that the style is not automatically applied by Word anywhere.
Used for e.g. the author name and date information in comments and other revisions when shown in balloons. The style is also used for showing text like Deleted and Formatted + formatting info in relation to tracked changes.
This style is only used in balloons and not in the Revision Pane. See Figure 16 and Figure 17 below (red text).
How to find the names of comment styles in non-English versions of Word
The names of comment styles and other built-in styles in Word are language-specific. The styles are named in the language of the user-interface of your version of Word.
For help on finding the comment style names in the language of your version of Word, see my articles:
- Create List of Local Built-in Style Names
- Word Style Names in English, Danish, German, French
Below, you will find the four comment styles listed with names in English, Danish, German, and French.
|
English |
Danish |
German |
French |
|
Comment Text |
Kommentartekst |
Kommentartext |
Commentaire |
|
Comment Reference |
Kommentarhenvisning |
Kommentarzeichen |
Marque de commentaire |
|
Comment Subject |
Kommentaremne |
Kommentarthema |
Object du commentaire |
|
Balloon Text |
Markeringsbobletekst |
Sprechblasentext |
Texte de bulles |
To make it easy to see where the different comment styles are used by Word, I have modified the comment styles as follows before making the illustrations below:

Figure 16. Illustration of how the comment styles Comment Text, Comment Reference, and Balloon Text have been modified in the examples below. The style Comment Subject is not used by Word and therefore not included in the illustrations.
In Figure 17 below, comments and revisions have been added and re shown in the balloon area:

Figure 17. Balloon area with examples of comment and revisions. Note that the style Balloon Text is used for name, date/time info, and revision info. If you compare with Figure 16, you can see that name and revision info is bold even it the style Balloon Text is not defined as bold.
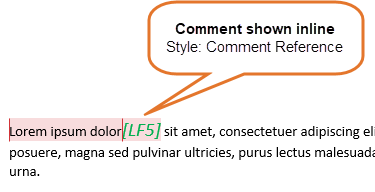
Figure 18. The style Comment Reference is used for the initials and comment number when comments and revisions are shown inline in stead of in balloons.
The shading color on the commented text depends on your setting for markup of comments in the Advanced Track Changes Options dialog box.
Learn more about the Advanced Track Changes Options dialog box.
Oddities in relation to comment styles in Word
Normally, you can modify styles in Word to make them look precisely as you want. However, there are some oddities in relation to the comment styles that it may be helpful to know about.
You may experience that some types of modifications you make to a comment style don’t have any effect when comments are shown in balloons. This is most likely a result of what Microsoft refers to as “by design”. The behavior isn’t always logical.
If you examine Figures 17-18 above and compare them with Figure 16, you will see that:
- If you apply another font or font color to the comment styles, the changes will take effect in comments (i.e. normal style behavior).
- The name and revision information (blue text in Figures 16-18 above) seem to always be bold even if the style Balloon Text is not defined as bold. On the other hand, time information and formatting information appear with the Balloon Text style in the way it is defined (see style information in Figure 16 above).
- As opposed to the Balloon Text style, adding bold to the Comment Text style works «normally», i.e. it the comment text appears bold or not bold according to the style definition.
- Adding italic or underline to the style definitions of Balloon Text and Comment Text also works «normally», i.e. it makes the corresponding text appear italic/not italic and underlined/not underlined.
- The comment text (red in Figures 16-18 above) appear with the font and color defined in the Comment Text style. However, the font size of the comment text is determined by the font size defined for the Balloon Text style. Changing the font size of the Comment Text style has no effect. You can see that the comment text in Figure 17 is larger than in Figure 16 – the font size is inherited from the Balloon Text style. This means that you must modify the style Balloon Text instead of the style Comment Text if you want to make the comment text larger or smaller.
- If you click in the comment text of a comment and check which font size is shown, e.g. in the Font group of the Home tab in the Ribbon, you will see that it shows the font size defined in the Comment Text style and not the actual font size.
- Most of the settings you can apply to styles via the Paragraph dialog box have no effect on the Balloon Text and Comment Text styles. Word does not prevent you from applying indentation, space before, space after, etc. However, it does not change the way the comments look. Note, however, that some paragraph settings applied to the style Comment Text will take effect if comments are shown in the Reviewing Pane and not in balloons.
- Adding bold, italic or underline to the style definition of Balloon Text and Comment Text does change the way the comments look.
How to change the font size of comments in Word by modifying the Balloon Text style
As already mentioned above, the steps to change the font size of comments in Word are not logical. Since it may be one of the changes most users want to make in relation to the display of comments, I have included the steps with some extra tips here.
As explained above, the style Comment Text is used for comment text entered by users. Normally, you can change the font size of text by modifying the font size of the style in use. However, this does not work for the Comment Text style.
- To change the font size of comments in Word via styles, you must change the font size in the style Balloon Text! Changing the font size of the style Comment Text has no effect.
I suggest the following steps as an easy way to get access to modify the Balloon Text style:
- Press Ctrl+Shift+S to open the Apply Styles window.
- In the Style Name field, type «Balloon Text» (without the quotation marks).
IMPORTANT: In case of a non-English version of Word, you must type the localized style name used in your version of Word instead of «Balloon Text». See the help above.
- Click Modify to open the Modify Style dialog box, showing the current definition of the Balloon Text style,
- Change the font size and make other modifications as desired. Click OK when finished.
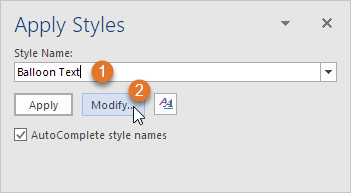
Figure 19. Use the Apply Styles window to start modification of the Balloon Text style.
The DocTools CommentManager add-in gives you easy access to modify any of the comment styles. DocTools CommentManager lets you do everything you can using Word’s own comment features plus a lot more.
How are the comment styles defined by default?

Figure 20. Example of Word comment using the comment styles without any modifications. For details about the default comment style settings, see below.
Style: Comment Text
Style type:
Style based on:
Font:
Font size:
Alignment:
Indentation:
Spacing:
Line Spacing:
Linked (paragraph and character)
Normal
Calibri
10 pt
Left
Left 0, Right 0
Before 0 pt, After 8 pt (NOTE: the spading has no effect)
Single
Style: Comment Reference
Style type:
Font:
Font size:
Character
Default Paragraph Font, i.e. the font in use where the reference is inserted
8 pt
Style: Comment Subject
Style type:
Style based on:
Font:
Font size:
Alignment:
Indentation:
Spacing:
Line Spacing:
Linked (paragraph and character)
Comment Text
Calibri, Bold
10 pt
Left
Left 0, Right 0
Before 0 pt, After 0 pt
Single
Style: Balloon Text
Style type:
Style based on:
Font:
Font size:
Alignment:
Indentation:
Spacing:
Line Spacing:
Linked (paragraph and character)
Normal
Segoe UI – the font used by default in the user interface of Word
9 pt
Left
Left 0, Right 0
Before 0 pt, After 0 pt
Single
How to remove personal information from comments
There may be situations where you want to remove personal information like author name(s) from comments in a Word document. For example, this may be the case if the Word document is to be shared with external people. Below, you will find two methods.
METHOD 1 – How to remove personal information using the Document Inspector
Word has a built-in feature you may use. However, the method may remove more information than you like. See the warning below before you use this method.
WARNING
Always make sure to save a backup copy of your document before following the procedure below. The procedure may remove data that cannot be restored.
The method removes all custom document properties and empties the built-in properties (Title, Author, Company, etc.). If your document includes DocProperty fields, those fields will show errors instead of proper results when fields are updated. However, if you lock or unlink the DocProperty fields beforehand, you can preserve the field results.
If you have the DocTools DocPropertyManager add-in, you can export custom document properties before removing personal information. You can re-import the properties again afterwards, if needed. You can also import the custom document properties directly from your backup copy of the original document. Learn more about DocTools DocPropertyManager.
To remove personal information from a document:
- Select File > Info.
- Click Check for Issues > Inspect Document. See Figure 21 below.
- In the Document Inspector dialog box, turn off all options except Document Properties and Personal Information. See Figure 22 below.
- Click Inspect.
- In the next dialog box that opens, click Remove All. See Figure 23 below.
- Click Close.
- Save the document.
Once the document has been saved, the author name in all comments will be changed to «Author» and the initials to «A» if comments are shown inline.
If you insert new comments, you will first see the actual user name but as soon as you save the document, it will be replaced by «Author». On the other hand, new property values or custom document properties you add will remain in the document unless you repeat the steps above.
Note that the terms used for author and initials are language-specific and will match the language of your Word. For example, «Forfatter» and «F» will be used in case of Danish.
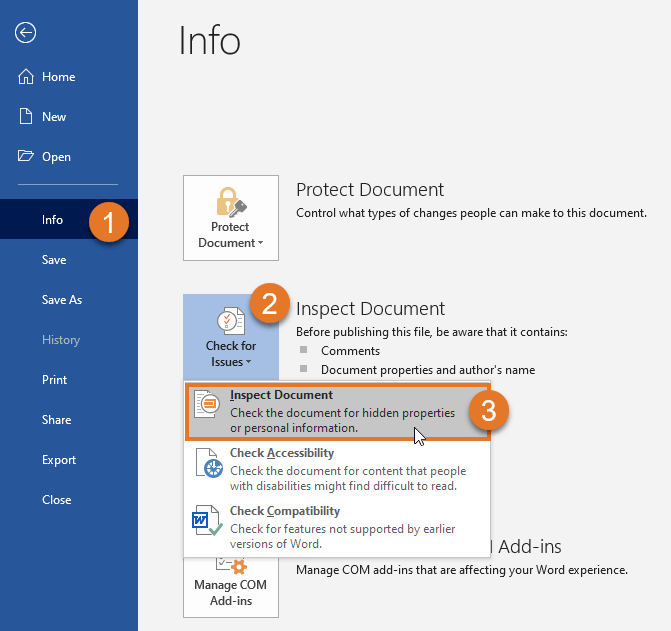
Figure 21. Select File > Info > Check for Issues > Select File > Info > Check for Issues > Inspect Document to open the Document Inspector dialog box.
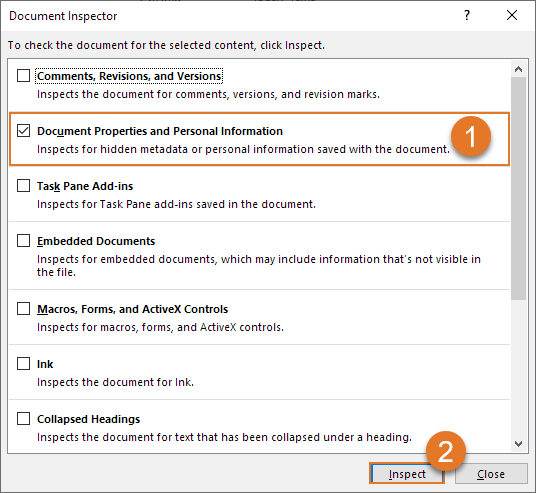
Figure 22. The Document Inspector dialog box. Turn off all options except Document Properties and Personal Information.
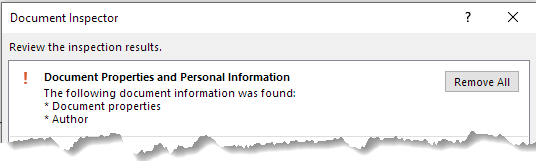
Figure 23. Click Remove All in the Document Inspector dialog box to remove the information. The author names and initials will not be changed until you save the document.
METHOD 2 – How to remove personal information from comments using a macro (VBA)
You can use a macro (VBA) to change the author name(s) and initials in comments to other values. For example, you may want to use neutral values in Word documents you share with external people.
The macro below will handle all comments in the active document. The macro:
- changes the author name in all comments to «Neutral Name»
- changes the initials in all comments to «NN»
Change the values in the macro as desired before running the macro.
If you add new comments, you will have to run the macro again to change them too.
Always make sure to save a backup copy of your document before you change the author names.
Sub WordComments_ChangeAuthorNames_AllComments()
    Dim oComment As Comment

    'Iterate through comments
    'Replace author name and initials with "Neutral Name" and "NN"
    '=========================
    'NOTE: Replace the names below with relevant values
    '=========================

    For Each oComment In ActiveDocument.Comments
        With oComment
            .Author = "Neutral Name"
            .Initial = "NN"
        End With
    Next oComment

    'Show message
    MsgBox "Finished changing author name and initials in " & _
        ActiveDocument.Comments.Count & " comments.", _
        vbOKOnly, "Change Author Names in All Comments"
End Sub
The DocTools CommentManager add-in lets you easily change author names and initials in all comments or in only comment by a specific author. For example, you can quickly change all author names to the company name if you are going to share a document with external people.
How to stop Word from changing the author of comments to «Author»
You may experience that the author name of comments in a specific document automatically changes to «Author».
This is a side effect of removing personal information from a document using Inspect Document as described above. Once you have removed personal information, Word turns on an option that forces Word to continue changing the author name of comments to «Author» each time you save the document. To stop Word from changing the author name to «Author», please refer to the detailed description about this issue in my article «Track Changes in Word – how it works».
Numbering of comments in Word
In Word 2010 and earlier versions, comments shown in the balloon area are numbered sequentially. It is practical to be able to refer to comment numbers, especially in documents with many comments.
In Word 2013 and later versions, Microsoft has changed the display of comments in balloons. The comments are no longer numbered when shown in balloons. As explained above, the style Comment Text is automatically applied to the comment text you enter. As a workaround, you may modify the style Comment Text to be numbered (for help on setting up numbering, see Shauna Kelly’s article). However, if you add numbers to the Comment Text and write comments with more than one paragraph, each paragraph will be numbered and thereby result is misleading numbering.
You can have sequential comment numbers displayed in the comment references if to display revisions inline in the document. Apply the following settings:
- Review tab > Tracking group > Display for Review: All Markup
- Review tab > Tracking group > Show Markup > Balloons > Show All Revisions Inline
More options for managing the display in balloons
In the Advanced Track Changes Options dialog box, you can make further settings for balloons. The dialog box has options for both comments and revisions, i.e. insertions, deletions and formatting changes marked as tracked changes.
How to open the Advanced Track Changes Options dialog box
To open the Advanced Track Changes Options dialog box:
- Select the Review tab in the Ribbon.
- Click the dialog box launcher in the Tracking group. See Figure 24 below.
This opens the Track Changes Options dialog box. - Click the Advanced Options button to open the Advanced
Track Changes Options dialog box. See Figure 25 below.
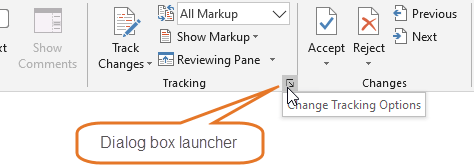
Figure 24. On the Review tab, click the dialog box launcher in the Tracking group to open the Track Changes Options dialog box.
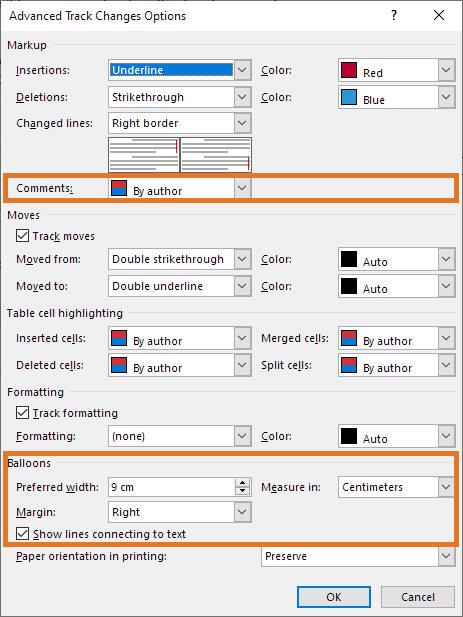
Figure 25. The Advanced Track Changes Options dialog box. The colored frames mark the options related to comments. See the descriptions below for details about how the options work.
The DocTools CommentManager add-in lets you opens the Advanced Track Changes Options more easily. In general, you can do everything in relation to comments faster and easier with DocTools CommentManager than you can using Word’s own comment tools. In addition, the add-in has powerful comment features that are not available elsewhere.
Comments and colors in balloons
See Figure 25 above, first colored frame.
In the Markup group, the Comments drop-down list lets you select the color to use for comments. Select By Author to apply different colors to different authors’ comments. The colors will be selected by Word and cannot be defined by you. Up to 20 different colors can be in use. Note that the same author may not always be applied the same color. Select a specific color to use that color for all comments regardless of the author.
Balloon area location and width
See Figure 25 above, second colored frame.
In the Balloons group, you can define the width of the balloon area in the Preferred width field and associated Measure in field. The width seems to be measured from the position of the vertical bars that are added and to the edge of the page. The vertical bars are shown in the left or right side of the page, next to lines that contain tracked changes.
The Margin option lets you position the balloons in the left or right side of pages.
The Show lines connecting to text check box lets you turn on/off lines that go from a comment to the commented text (comment scope) in the document. Comment lines are dotted but if the selection is in a comment, the related comment connection line will be a fully drawn line.
Related information
My Word add-in DocTools CommentManager provides a lot of tools that can help you work more efficiently with comments in Word.
This article has explained how add comments in Word, how to remove comments in Word, print without comments, change font size of comments and a lot more. I hope this article helps you in your future work with comments in Word.
-
1
Double-click a Word document you wish to change. Doing so will open the document in Microsoft Word.
-
2
Click and drag your cursor across some text. This will highlight the text. You’ll want to highlight everything on which you wish to leave a comment (e.g., an entire sentence or paragraph).
Advertisement
-
3
Right-click or two-finger click the selected text. Doing this will prompt a drop-down menu.
-
4
Click New Comment. It’s at the bottom of the right-click menu.
-
5
Type your comment. It will appear on the right side of the Microsoft Word window.
-
6
Click anywhere on the document. Doing so will cement your comment, allowing you to move on to the next section of text that needs commenting.
- Be sure to save your document before closing, or your comments won’t be saved.


Advertisement
-
1
Double-click a Word document you wish to change. Doing so will open the document in Microsoft Word.
-
2
Click the Review tab. It’s in the blue section at the top of the document’s page. Doing so will open a new set of options related to editing your document.
-
3
Click Track Changes. This option is at the top of the Word page, near the middle of the screen. Clicking it will enable Microsoft Word’s «Track Changes» feature.
-
4
Click the drop-down box next to Track Changes. Doing so will present you with the following editing options:
- Simple Markup — Draws a vertical red line on the far left side of any added or deleted text, but shows no other edits.
- All Markup — Displays all changes you make to your document in red text and comment boxes on the left side of the page.
- No Markup — Displays your changes in addition to the original document, but no red text or comment boxes appear.
- Original — Displays the original document without your changes.
-
5
Click All Markup. This option allows you to leave comments for other users to review if need be.
-
6
Click and drag your cursor across some text. This will highlight the text. You’ll want to highlight everything on which you wish to leave a comment (e.g., an entire sentence or paragraph).
-
7
Click the New Comment button. It’s near the center of the «Review» row of tools at the top of the Word window.
-
8
Type in your comment. It will appear on the right side of the Microsoft Word window.
-
9
Click anywhere on the document. Doing so will cement your comment, allowing you to move on to the next section of text that needs commenting.
- Be sure to save your document before closing to make sure that your comments are preserved.


Advertisement
-
1
Double-click a Word document you wish to change. Doing so will open the document in Microsoft Word.
-
2
Click the Review tab. It’s in the blue section at the top of the document’s page. Doing so will open a new set of options related to editing your document.
-
3
Click Track Changes. This option is at the top of the Word page, near the middle of the screen. Clicking it will enable Microsoft Word’s «Track Changes» feature.
-
4
Click the drop-down box next to Track Changes. Doing so will present you with the following editing options:
- Simple Markup — Draws a vertical red line on the far left side of any added or deleted text, but shows no other edits.
- All Markup — Displays all changes you make to your document in red text and comment boxes on the left side of the page.
- No Markup — Displays your changes in addition to the original document, but no red text or comment boxes appear.
- Original — Displays the original document without your changes.
-
5
Click All Markup. This option allows you to leave comments for other users to review if need be.
-
6
Click Ink Comment. It’s in the top-right corner of the «Comments» section of the toolbar at the top of the page.
-
7
Write your comment. You’ll do so in the pane on the right side of the page.
- If your computer doesn’t have a touchscreen, you can click and drag the mouse to draw.
- The horizontal lines in the pane will disappear when you submit your comment.
-
8
Click or tap anywhere on the document. Doing so will cement your comment, allowing you to move on to the next section of text that needs commenting.
- Be sure to save your document before closing to make sure that your comments are preserved.


Advertisement
-
1
Double-click an edited Word document. Doing so will open the document in Microsoft Word.
-
2
Hover the cursor over a comment. You’ll see a couple of options appear below the comment.
-
3
Click Reply. It’s the leftmost option below your selected comment.
-
4
Type in your reply. It will appear indented below the original comment.
-
5
Click anywhere on the document. Doing so will cement your reply to the comment.


Advertisement
Ask a Question
200 characters left
Include your email address to get a message when this question is answered.
Submit
Advertisement
-
You can click Resolve below a comment to remove it from the right-hand editing pane.
Thanks for submitting a tip for review!
Advertisement
About This Article
Article SummaryX
1. Open a Word document.
2. Highlight text on which you wish to comment.
3. Right-click the highlighted text.
4. Click New Comment.
5. Type in your comment.
6. Click anywhere in the document.
Did this summary help you?
Thanks to all authors for creating a page that has been read 510,153 times.
Is this article up to date?
In this article, you’ll learn how to add comments in Word, as well as two ways to quickly navigate your comments.

Adding comments in Word is a fantastic way to mark up your documents without having to directly edit the contents of your document. It’s like adding sticky note reminders for yourself (or your colleagues) without messing up your content.
If you frequently work with lots of comments in Word, I recommend adding the Comments Group to your Quick Access Toolbar, as pictured below. That way you can quickly get at the commenting commands, without having to dig through your Ribbon, which I will show you how to do below.
Once you are done adding comments, you can learn how to remove all comments in Word here.
[Update] How to turn off modern comments in Word
Microsoft has introduced a new comment system in Word, giving you two options to choose from:
- Classic Comments (as described in this blog post)
- Modern Comments
To follow along with this blog post, you will first need to disable the modern comments system using the Word options dialog box, as I only cover the classic comments system here.
To disable modern comments in Word, simply:
- Click the File tab in Word
- Select Options (at the bottom left of your screen)
- In the Word options dialog box, find the General tab
- Unselect Enable modern comments
- Click OK
Alternatively, if you want to use the modern comment system, you can follow the same steps listed above to enable (instead of disabling) modern comments.
Please double-check that you have disabled the modern comment system before following the steps described below.
[Watch] Adding Comments in Word
1. Microsoft Ribbon (Adding Comments)
To add a comment to something in Word, simply:
- Select the text (or object) you want to comment on
- Navigate to the Review tab
- Click New Comment
- Write your comment
You can add comments to anything in Word, including text, images, charts, tables, etc. Simply place your cursor next to (or highlight) what you want to comment on and click on New Comment.
Comment Writing Tip: Make sure that the comments you add to Word are actionable and constructive.
There’s nothing worse than trying to update a document based on vague comments that don’t make much sense.
2. Right-Click Menu (Adding Comments)
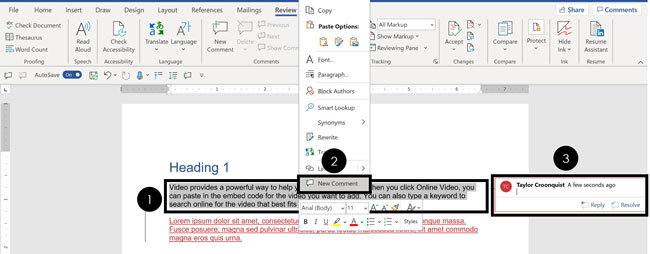
To add a comment using the right-click menu, simply:
- Select and Right-Click what you want to comment on
- Select New Comment
- Write your comment
This is the fastest way to add comments in Word, as you don’t have to continually navigate back and forth between the contents of your document and the Review tab.
Delete Comment shortcut: You can also right-click any comment within your document and use a shortcut to quickly delete them. To learn how to do that (and a variety of other ways to remove comments in Word), read our guide here.
3. Quick Access Toolbar (Adding Comments)
If you want add, remove and navigate between lots of comments in Microsoft Word, I recommend adding the Comments group to your Quick Access Toolbar (which is super easy to do)
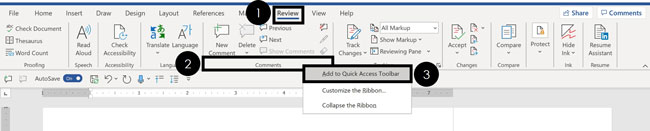
To add the Comments group to your Quick Access Toolbar, simply:
- Navigate to the Review tab
- Right-click the Comments group (anywhere along the bottom)
- Select Add to Quick Access Toolbar
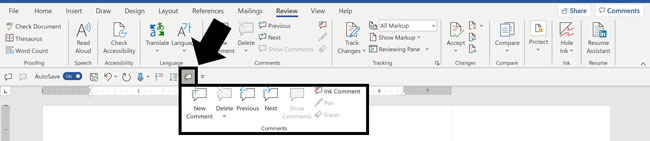
With the Comments group added to your Quick Access Toolbar, you can now get at all the comment commands (add, next, previous, etc.) by simply clicking it with your mouse, as pictured below.
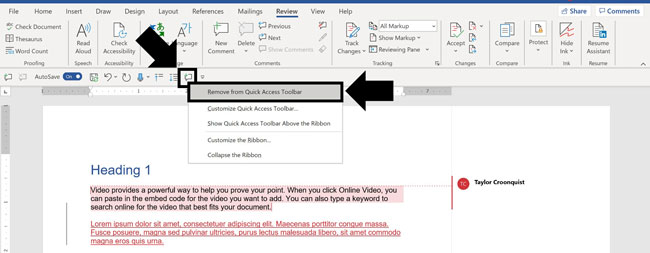
If you later want to remove the Comments group from your Quick Access Toolbar, simply right-click the command and select Remove from Quick Access Toolbar, as pictured below.
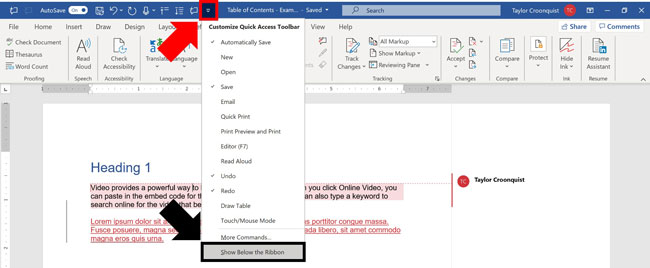
Note: If your Quick Access Toolbar is above your Ribbon, I recommend moving it below your Ribbon.
To do that, simply click the Customize Quick Access Toolbar command and select Show below the Ribbon.
4. Microsoft Ribbon (Navigating Comments)

To use the Previous and Next comment commands, simply:
- Navigate to the Review tab
- Click Previous or Next
Previous takes to you the preceding comment from where you are currently active in your Word document.
Next takes you to the next comment from where you are currently active in your document.
If you have a lot of comments to review, you can also navigate your comments using the Reviewing Pane, discussed below.
Hidden Comments: The cool thing about the Previous and Next commands is that they work even if your comments are hidden. To learn how to hide comments in Word, read our guide here.
5. Reviewing Pane (Navigating Comments)

To open the Reviewing Pane in Word to review and navigate your comments, simply:
- Navigate to the Review tab
- Open the Reviewing Pane dropdown menu (click the downward facing arrow at the end)
- Choose either Reviewing Pane Vertical or Reviewing Pane Horizontal
Inside of the Reviewing Pane you can see and click through comments and other tracked revisions, as shown below.
Conclusion
So those are the basics of adding comments in Word, and two separate ways you can navigate them within your document.
Adding comments is a fantastic way to mark up your documents without editing the underlying content. In this way you can quickly scan through your document and easily remember what you need to change in the future.
If you enjoyed this tutorial and want to learn more ways to improve your Microsoft Office skills, visit us here.

Whether you work alone or collaborate with others in your organization, you probably rely on comments when working in Microsoft Word documents. In Word, you can leave reminders about something you need to research or ask questions of others. Thanks to collaboration, Microsoft Word comments have seen a lot of improvements. In this Word tutorial, I’ll show you how to use these new options.
I’m using Microsoft 365 and comment improvements are available only in Microsoft 365 and Word Online. There’s no demonstration file; you won’t need one. I’m using Word, but comments are also available in Excel and PowerPoint.
SEE: Microsoft 365: A cheat sheet (free PDF) (TechRepublic)
How to comment in Microsoft Word
If you don’t use comments in Microsoft Word, you might want to consider adding them to your toolbox – comments are easy to use and allow you, the author, to continue working while “in the groove.” Simply add a comment as a reminder that you can resolve later.
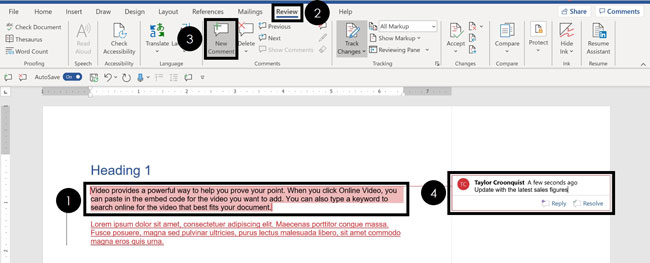
To enter a comment in Word, place the insertion point into the text or content you want to annotate. Then, do one of the following:
- Click the Review tab and then click New Comment in the Comments group.
- Press Ctrl + Alt + M.
- Right-click in the content and choose New Comment from the resulting submenu.
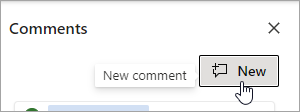
- If you’re working in the contextual Comments pane, click New (Figure A).
Figure A
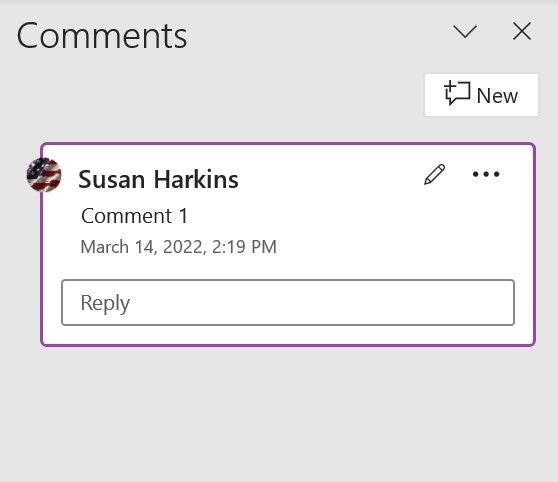
Once you’ve entered the Word comment’s text, press Ctrl + Enter or click the Post Comment button to commit the comment (so collaborators can see it).
How to view comments in Microsoft Word
It’s easy to view Word comments when working alone. Comments appear at the right margin on the same line as the insertion point. All active comments are visible. If you select a comment, Word displays a border around it and moves the comment closer to the page (Figure B). Notice that I’m not working in the Comments pane (more about that later).
Figure B

The Post Comment button (circled in Figure B) is new. Collaborators won’t see comments until you click this button or press Ctrl + Enter. Direct feedback to Microsoft suggested that users found seeing comments live was confusing. Now, commenters can review and edit a comment before committing it, and collaborators aren’t distracted by the live-action commenting.
How to assign tasks in Microsoft Word
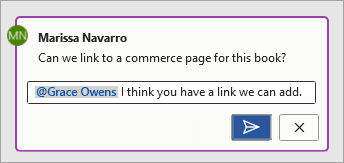
Collaborators using Word Online with an Enterprise license can assign tasks by prefacing the person’s name with the @ symbol (Figure C). Simply enter the @ character and the first few letters of the person’s name, and Word will provide an AutoComplete list. Once you commit the task, the assignee will receive an email with a link to the task. If that person doesn’t have permission to view the document, you will receive an email asking to provide permission for the assignee. The assignee can even reassign the task. Unfortunately, if you add a task in Word Online, you won’t see it when you open the document in the desktop.
Figure C

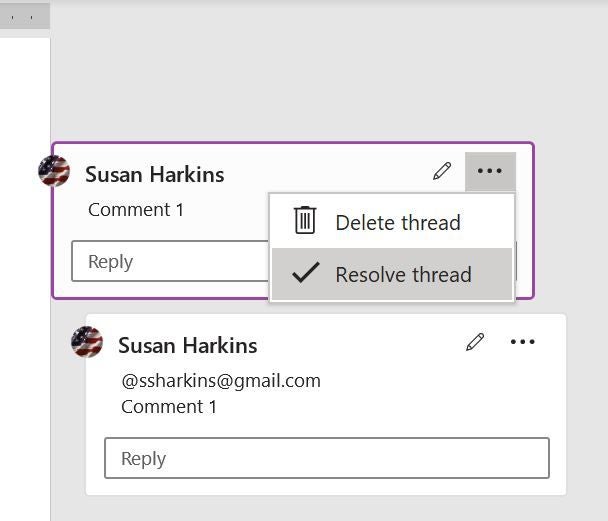
How to resolve a comment in Microsoft Word
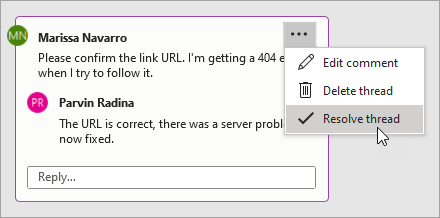
Each comment is visible in the contextual pane (Figure B) until you resolve it. That means you have dealt with the comment, and it is no longer needed. In a short document that only you are working on, you might not bother, but when collaborating, resolving comments is important, especially when assigning a task. First, you’ll declutter things a bit. Second, collaborators won’t be confused by issues they know have been resolved. To resolve a comment, simply click the three-button icon in the top-right corner and choose Resolve Thread (Figure D).
Figure D
How to use the Comments pane in Microsoft Word
Earlier, I mentioned Word’s Comments pane, which shows all comments, including those previously resolved. To see this pane, click Comments in the top-right corner of the Word window. For the most part, you want to work in the contextual pane because it displays only the active comments. However, the Comments pane lets you access resolved comments and reopen them.
SEE: 83 Excel tips every user should master (TechRepublic)
How to add formatting to comments in Microsoft Word
Comments now support limited formatting: bold, italics, underline, font colors, highlight and strikethrough. For now, not every format is supported in the contextual pane. Apply formats in the Reviewing pane (Figure E) and the other panes will display them. The Reviewing pane isn’t available online yet. Nor is the formatting displayed in the online version.
Figure E

How to add graphics to comments in Microsoft Word
You can now add a graphic file to a comment, but it won’t be displayed online. You may see a notice that mentions content can’t be displayed or an empty comment — you’ll know something’s there, but you won’t see the graphic. Insert a graphic file into a comment the same way you would anywhere else. Create a new comment and click inside the comment control. Then, click the Insert tab and continue as you normally would. Figure F shows a sticker from the stock images. You can’t insert graphics in the online version.
Figure F

Additional notes about using comments in Microsoft Word
If you have collaborators using older versions of Microsoft Word, everyone can still see comments. Features not currently available in comments are:
- AutoFormat or Math AutoCorrect
- AutoText or Quick Parts
- You can edit other’s comments only in the Reviewing pane.
The author and all participants in a particular thread will receive notifications when that comment is changed. If you’re working on a complex document with lots of commenting, you can temporarily turn off notifications as follows:
- In OneDrive (where you’re collaborating), click App Launcher (the square consisting of dots to the left) and choose OneDrive.
- Click Settings — the gear icon in the top-right — and click Options.
- In the left pane, choose Notifications.
- Disable the People Make Changes To Files We Are Sharing option (Figure G) and click Save.
Figure G
The one problem I see with turning notifications off is that it’s all or nothing. You might have other documents for which you still want to receive notifications, and if you disable this option, you won’t get them.
If security is a concern, note that comments are stored only on your end. Microsoft doesn’t have access to comments.
-
02-10-2017, 12:57 AM
#1
Replies to comments in Word
Hi
I just registered, with the hope of finding an answer to this. Unfortunately, searching for «reply» and «comment» is not very practical, since it gives endless amounts of hits (both here and on the internet in general)…so I try asking explicitly. Sorry if there is an answer alread,y that I should have found.
in a documents.comments collection there is a list of item1, item2 etc, seemingly representing the individual comment objects. Each comment has a «replies» property, which is a collection of comments. However, it seems to be pointing back to the full comments collection (I.e. each individual commment has a pointer to the full set of comments in its «replies» property). This goes on in level after level, until I have no energy to look further. I think it is indeed just a looping reference. I.e. see the same object over and over..
As a result, I cannot figure out the actual hierarchy of comments and replies, that I see in the Word document when browsing it It all appears as a flat list, to me?
Am I missing something here? I must be…
Regards E
-
02-10-2017, 07:09 AM
#2
Not exactly sure what your are trying to do. Yes, all comments and all replies are part of one big comments collection. However, .Replies returns a collection of comments (replies) to a parent comment. So maybe this will help:
Sub ScratchMacro()
'A basic Word macro coded by Greg Maxey
Dim oComments As Comments
Dim oComment As Comment
Dim lngIndex As Long
  Set oComments = ActiveDocument.Comments
  For Each oComment In oComments
    If oComment.Replies.Count > 0 Then
      For lngIndex = 1 To oComment.Replies.Count
        MsgBox oComment.Replies(lngIndex).Range.Text
      Next
    End If
  Next
lbl_Exit:
  Exit Sub
End Sub
-
02-10-2017, 08:58 AM
#3
Originally Posted by gmaxey
Not exactly sure what your are trying to do. Yes, all comments and all replies are part of one big comments collection.
I am extracting all comments and creating a list of them. And want to indicate which ones are replies to others.
They all show up in the right order so basically just indenting the ones which are replies is what I want.I inspect the datastructure, and the replies to each and every comment actually leads me to the full list of comments, in an endless recursion. Which does not help me at all.
However I note now that there is an ancestor to every comment, and that one is ‘nothing’ for those on the top level but actually point at the one a reply is a reply to. So that works, even though it is a little more backwards…
Do you sctually know that replies has the expected values, or do you just read the documentation which states UT should have them? What I see in the environment us not matching the documentation, as I interpret it.
Regards E
-
08-03-2021, 11:03 AM
#4
macro to get the list of ms word comments and it�s replies in different column
Originally Posted by edrake
Hi
I just registered, with the hope of finding an answer to this. Unfortunately, searching for «reply» and «comment» is not very practical, since it gives endless amounts of hits (both here and on the internet in general)…so I try asking explicitly. Sorry if there is an answer alread,y that I should have found.
in a documents.comments collection there is a list of item1, item2 etc, seemingly representing the individual comment objects. Each comment has a «replies» property, which is a collection of comments. However, it seems to be pointing back to the full comments collection (I.e. each individual commment has a pointer to the full set of comments in its «replies» property). This goes on in level after level, until I have no energy to look further. I think it is indeed just a looping reference. I.e. see the same object over and over..
As a result, I cannot figure out the actual hierarchy of comments and replies, that I see in the Word document when browsing it It all appears as a flat list, to me?
Am I missing something here? I must be…
Regards E
-
08-03-2021, 11:05 AM
#5
Hello team, please help to get the macro to capture the list of MS word original comments and their replies in different column.

| does not seem likely, but there is a workaround | Mar 5, 2012 |
Hi!
If you want to make these Word-based comments visible in MemoQ, you can use Add document as, select Import as docx, and check the «import comments» in the mid-section on this importing preference page. Then when you open the file in MemoQ for translation, you will see that any text that has a comment will have a preceding tag and a subsequent tag called «cmt», and the segment that follows will be the comment itself. Unfortunately the comment now becomes part of the «translatab
… See more
Hi!
If you want to make these Word-based comments visible in MemoQ, you can use Add document as, select Import as docx, and check the «import comments» in the mid-section on this importing preference page. Then when you open the file in MemoQ for translation, you will see that any text that has a comment will have a preceding tag and a subsequent tag called «cmt», and the segment that follows will be the comment itself. Unfortunately the comment now becomes part of the «translatable text», but you can use Crtl+Shift+S to copy the source to target and keep it as is.
I don’t think you will be able to convert these comments in Word to MemoQ comments, but I would be happy to stand corrected.
HTH,
Chun-yi
[Edited at 2012-03-05 19:15 GMT]
[Edited at 2012-03-05 19:16 GMT]
▲ Collapse
![]()
Сообщение от Busine2009

.Range(Start:=.Range.End — 1, End:=.Range.End — 1).Text = Примечание.Range.Text
Хорошо, но здесь только текст, а в примечании м.б. и ссылки и таблицы и вставленные картинки и др. объекты, т.е. надо тупо копировать примечание в буфер с сохранением форматирования и последующей вставкой всего этого в конец документа!
И еще: добавление примечаний производится макросом, кол-во и имена авторов фиксированы (например, VOVA, KOLYA, PETYA, VANYA, SASHA … + плюс еще инициалы, которые могут совпадать с именем автора) и их надо выбрать из выпадающего списка, и соответственно потом так же выбрать из списка галочками, как это сделать?
Добавлено через 3 часа 17 минут
Вот такой код почему-то глючит:
| Visual Basic | ||
|
у автора VOVA — 2 примечания, так вот, он вставляет почему-то 2 первых примечания и 4 вторых, хотя надо всего лишь два — первое и втрое, в чем тут дело?
Добавлено через 1 час 57 минут
Так, кажется срослось! Зря я отказался от кода Busine2009:
| Visual Basic | ||
|
Теперь — как бы еще выбирать автора из списка и с птичками?
- Remove From My Forums

Word 2013 — Track Changes — Not showing comment author’s name
-
Question
-
Hey folks,
When I use the Track Changes feature in Word 2013 (running on Windows 8.1), and I create a new
Comment, my name temporarily appears as the Author, but when I close and re-open the document, it switches the
Author name to «Author» instead of my name. Also, my picture disappears in favor of a generic icon.What is going on here? FYI, I’m logged into Windows 8.1 using my Microsoft Account. I’m not sure if that matters. It seems to be pulling my name and account picture correctly, until I close and re-open the document.
See the following screenshot: I changed some formatting, closed and re-opened the document, then inserted a new comment. My name shows up correctly when I make a new change, but disappears after closing the document.
Cheers,
Trevor Sullivan
If this post was helpful, please click the little «Vote as Helpful» button
Trevor Sullivan
Trevor Sullivan’s Tech Room
Twitter Profile


Answers
-
Try the following: Open the affected document. Click File tab | Options | Trust Center | Trust Center Settings | Privacy Options. Clear the check box next to «Remove personal information from file properties on save» and click OK.
Stefan Blom, Microsoft Word MVP
-
Marked as answer by
Monday, November 18, 2013 1:53 PM
-
Marked as answer by

You can add comments and annotations to Microsoft Word documents, allowing you to collaborate with others. Here’s how.
They say that writing is mostly rewriting. Whether you use Microsoft work for work or for creative writing, if you have a document you need to edit, annotating the text can be an effective way of keeping track of the changes you need to make.
Thankfully, Microsoft Word comes with annotation tools built-in. These allow you to quickly and easily add notes to your document and keep track of changes.
Adding Comments
Annotations in Word are done by adding comments. This creates a highlighted area of text that you can hover over to read the attached comment. You can also view the comments in a panel at the side of the page. Each comment includes the author of the comment and the time it was created or edited.
There are several ways you can insert comments into your Microsoft Word document.
Using the Ribbon Bar
First of all, highlight the text you want to annotate in your Word document.
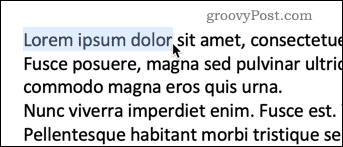
Under the Review tab on the ribbon bar, press on the Comments button and click New Comment.

Your text will now have a colored background, and the cursor will move to the comments pane, ready for you to start typing your annotation.
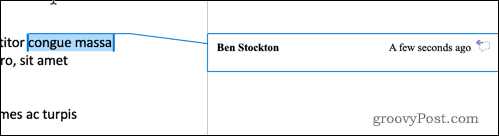
Type in your annotation and it will be visible in the comments pane. You can also hover over the highlighted text to bring up a pop-up box with your comment.
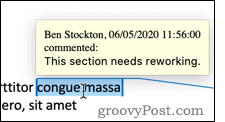
There are four other options under the Comments section, allowing you to make changes to your comments, as well as switch between them.
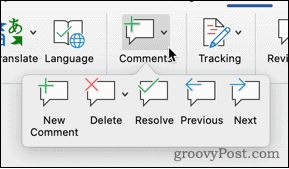
The Delete option gives you the option to remove the current comment, all comments, or just comments by the currently visible author.
Previous and Next allow you to navigate through the document from one annotation to the next, rather than having to search through the content for the next highlighted section.
Resolve allows you to mark an annotation as completed. For example, if the annotation suggested rephrasing a sentence, you could mark it as resolved once you’ve made the change. The comment is then grayed out, but will otherwise remain visible on your document.

The highlighted text also changes to a paler color so you can differentiate between resolved and unresolved annotations. You can’t mark a comment as resolved until you’ve made a change to the highlighted text.
Right Click to Add Comments
If you just want to add a new comment rather than resolving, deleting, or navigating through them, then you can quickly do this through the context menu.
Highlight the text you want to annotate, and right-click. Choose New Comment and your comment is created in the same way as before.
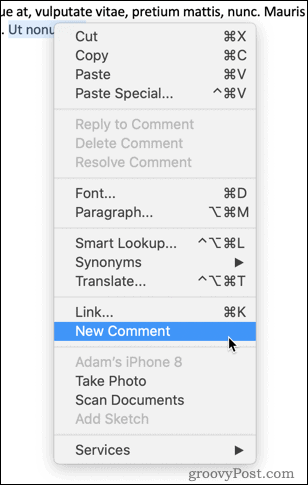
Using the Comments Button
There’s also a dedicated comments button in the top-right corner of the Word window.

Clicking on this button brings up the option to create a new comment, or to navigate to the previous or next comment in the document.

With all of these methods, if you don’t highlight any text before creating a new comment, Word will automatically select the single word at the cursor position.
If you want to annotate more than a single word, you must highlight the entire section before creating your comment.
Changing Author Name
Word automatically uses the name associated with your Word application as the author’s name for all of your comments. You may prefer to use a different name, however.
For an individual document, you can change this by clicking on File > Info.
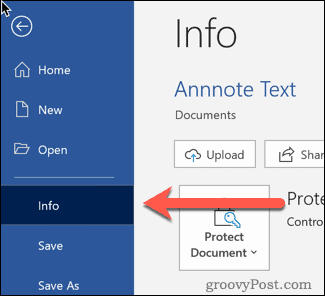
To the right of the page towards the bottom you will see a section labeled Related People.
Right-click on your author name and choose Edit Property.

You can then type in the author’s name of your choosing.

If you want to change this permanently across all of your Word documents, then click File > Options.

In the Personalize your copy of Microsoft Office section, type in the User Name you want to use.

Check the Always use these values regardless of sign in to Office box to ensure that the author name you set takes precedence over your sign-in credentials.
Other Annotation Methods
Comments are a simple and effective way of annotating your Word documents. There are other options you could try too, such as inserting footnotes and endnotes into Word.
Using these techniques can help you minimize the time spent editing Word documents. Other tips such as creating a table of contents in Word or rearranging pages in your Word documents can also help to boost your productivity.
![]()