
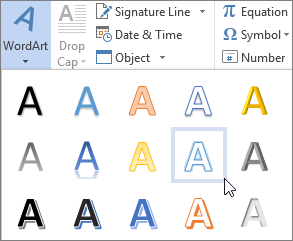
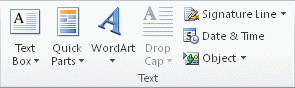
Add WordArt
- On the Insert tab, in the Text group, click WordArt, and then click the WordArt style that you want.
- Type your text in the Text box. You can add a fill or effect to a shape or text box as well as the text in the WordArt.
Contents
- 1 How do you get word art on word?
- 2 What is word art examples?
- 3 What is considered word art?
- 4 What are the two ways to create WordArt?
- 5 Is WordArt free?
- 6 What is art with text called?
- 7 Who invented word art?
- 8 What is contemporary word art?
- 9 What is use of WordArt?
- 10 How do you make rainbow WordArt?
- 11 How do you make WordArt Classic?
- 12 How do you make word art curve?
- 13 How do I convert WordArt to Word?
- 14 Does Google Docs have word art?
- 15 How do I make a Word picture?
- 16 How do I make words into a shape?
- 17 What artists use words?
- 18 How would you describe graffiti?
- 19 How do you make text art?
- 20 What are the 7 elements of art?
How do you get word art on word?
Find WordArt Tools in Word
- Click or tap where you want WordArt.
- Select Insert > WordArt.
- Pick a style, and type your text.
What is word art examples?
Word Art: Text-based Painting, Prints, Sculpture. Word Art. Painting, Sculpture or Photolithography Using Words and Phrases.
What is considered word art?
1. WordArt is a program that allows you to treat text as a graphic. You can use the program to add special effects and flourishes to text, and then insert the text in your document. It is useful for creating special text elements such as logos, mastheads, or titles.
What are the two ways to create WordArt?
What are the two ways to create WordArt? From new or by convert existing text.
Is WordArt free?
WordArt offers a freemium model but you’ll need to upgrade to the paid version of the word cloud generator if you want to download high-quality word art, which might be useful if you are planning to print your word cloud.
What is art with text called?
Text art, also called ASCII art or keyboard art is a copy-pasteable digital age art form. It’s about making text pictures with text symbols.
Who invented word art?
Etymology. The term “art” is related to the Latin word “ars” meaning, art, skill, or craft. The first known use of the word comes from 13th-century manuscripts. However, the word art and its many variants (artem, eart, etc.) have probably existed since the founding of Rome.
What is contemporary word art?
A reference to Contemporary Art meaning “the art of today,” more broadly includes artwork produced during the late 20th and early 21st centuries. It generally defines art produced after the Modern Art movement to the present day.
What is use of WordArt?
You can use WordArt to add special text effects to your document. For example, you can stretch a title, skew text, make text fit a preset shape, or apply a gradient fill. This WordArt becomes an object that you can move or position in your document to add decoration or emphasis.
How do you make rainbow WordArt?
To get the rainbow effect, do the following:
- Select the font you want changed.
- Using the other mouse button, choose Font from menu.
- Click the Text Effects button at the bottom of the window.
- Choose Text Fill.
- Choose Gradient Fill.
- Now you need to fiddle with Gradient Stops and Colour to get the effect you want.
How do you make WordArt Classic?
If you have not installed Classic Menu for Office on your computer, you can access the WordArt command in Ribbon with following steps:
- Click the Insert Tab;
- Go to Text group;
- Then you will see the WordArt button. See screen shot (Figure 2):
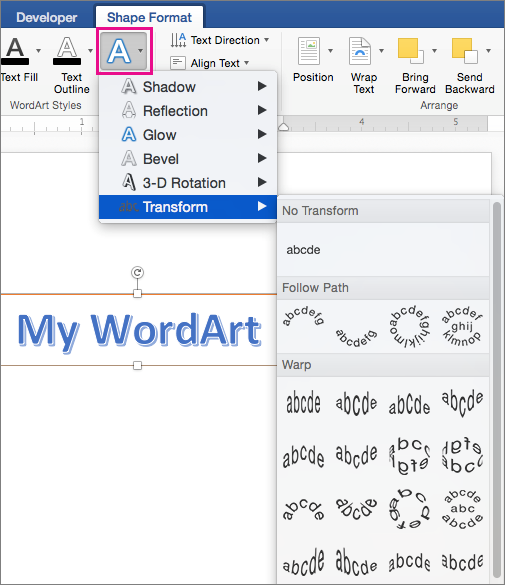
How do you make word art curve?
Create curved or circular WordArt
- Go to Insert > WordArt.
- Pick the WordArt style you want.
- Type your text.
- Select the WordArt.
- Go to Shape Format > Text Effects > Transform and pick the effect you want.
How do I convert WordArt to Word?
To convert regular text into WordArt:
Select the text you want to convert, then click the Insert tab. Click the WordArt drop-down arrow in the Text group. A drop-down menu of WordArt styles will appear. Select the style you want to use.
Does Google Docs have word art?
To insert word art into a Docs document, open your document and go to Insert > Drawing > New. When the drawing panel opens, go to Actions > Word art and create what you need. When you are done, press the blue Save and Close button to put the word art in your document.
How do I make a Word picture?
Open up a new image in a picture editor such as Paint or Photoshop. Press Ctrl and V at the same time, or click edit and then select paste from the drop-down menu to insert the screen capture of your Word document from your clipboard into the new image file [source: Microsoft Windows].
How do I make words into a shape?
Use WordArt to shape text
- On the Insert tab, in the Text group, click WordArt, and then click the WordArt style that you want.
- Type the text that you want.
- Change the font size, if needed, and then click OK.
What artists use words?
In honour of Word Week on AnOthermag.com, we take a look at some of the 20th century’s most influential word artists
- Marcel Duchamp.
- Lawrence Weiner.
- Hamish Fulton.
- Barbara Kruger.
- Jenny Holzer.
- The Guerrilla Girls.
- Ed Ruscha.
- Martin Creed.
How would you describe graffiti?
graffiti, form of visual communication, usually illegal, involving the unauthorized marking of public space by an individual or group. Although the common image of graffiti is a stylistic symbol or phrase spray-painted on a wall by a member of a street gang, some graffiti is not gang-related.
How do you make text art?
ASCII-Art
- Step 1: Choose a Picture. Choose any image from the internet or from your desktop.
- Step 2: Copy the Picture Into Word. Open a new Word-document and paste the picture into it.
- Step 3: Set the Image Properties.
- Step 4: Set the Font and Begin to ‘paint’
- Step 5: Finish.
What are the 7 elements of art?
ELEMENTS OF ART: The visual components of color, form, line, shape, space, texture, and value.
Содержание
- Добавление поверх рисунка надписи в стиле WordArt
- Добавление поверх рисунка обычного текста
- Добавление подписи к рисунку
- Вопросы и ответы
Помимо работы с текстом, программа MS Word также позволяет работать и с графическими файлами, которые в ней можно изменять (хоть и по минимуму). Так, нередко добавленную в документ картинку требуется как-нибудь подписать или дополнить, причем, сделать это необходимо так, чтобы сам текст находился поверх изображения. Именно о том, как наложить текст на картинку в Ворде, мы и расскажем ниже.
Существует два метода, с помощью которых можно наложить текст поверх картинки — это использование стилей WordArt и добавление текстового поля. В первом случае надпись будет красивая, но шаблонная, во втором — вы имеете свободу выбора шрифтов, типа написания и форматирования.
Microsoft Word заслужено считается одним из лучших текстовых редакторов, но для работы с графическими элементами, даже элементарной, он подходит с большой натяжкой. Поэтому для наложения надписи на картинку целесообразнее будет воспользоваться не этой программой, а более специализированным средством – онлайн-сервисом Canva, где данная задача решается буквально в несколько кликов, а доступные во встроенном редакторе шаблоны помогут качественно улучшить подобный проект.
Урок: Как в Word изменить шрифт
Добавление поверх рисунка надписи в стиле WordArt
1. Откройте вкладку “Вставка” и в группе “Текст” нажмите на пункт “WordArt”.
2. Из развернувшегося меню выберите подходящий стиль для надписи.
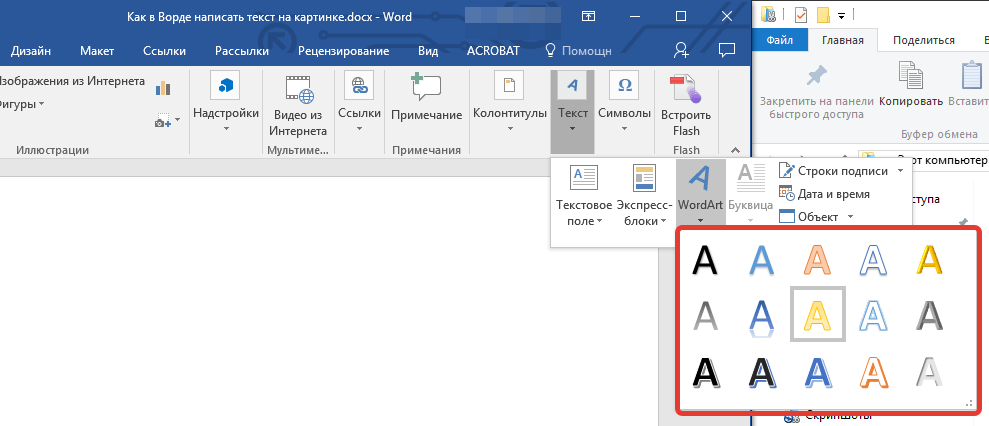
3. После того, как вы кликните по выбранному стилю, он будет добавлен на страницу документа. Введите необходимую надпись.
Примечание: После добавления надписи WordArt появится вкладка “Формат”, в которой можно выполнить дополнительные настройки. Кроме того, вы можете изменить размер надписи, потянув за границы поля, в котором она находится.

4. Добавьте в документ изображение, воспользовавшись инструкцией по ссылке ниже.


Урок: Как в Word вставить картинку
5. Переместите надпись WordArt, расположив ее поверх изображения так, как вам это необходимо. Кроме того, вы можете выровнять положение текста, воспользовавшись нашей инструкцией.
Урок: Как в Ворде выровнять текст
6. Готово, вы наложили надпись в стиле WordArt поверх изображения.
Добавление поверх рисунка обычного текста
1. Откройте вкладку “Вставка” и в разделе “Текстовое поле” выберите пункт “Простая надпись”.

2. Введите необходимый текст в появившееся текстовое поле. Выровняйте размеры поля, если это необходимо.

3. Во вкладке “Формат”, которая появляется после добавления текстового поля, выполните необходимые настройки. Также, вы можете изменить внешний вид текста в поле стандартным способом (вкладка “Главная”, группа “Шрифт”).

Урок: Как в Word повернуть текст
4. Добавьте изображение в документ.

5. Переместите текстовое поле на картинку, если это необходимо, выровняйте положение объектов, воспользовавшись инструментами в группе “Абзац” (вкладка “Главная”).

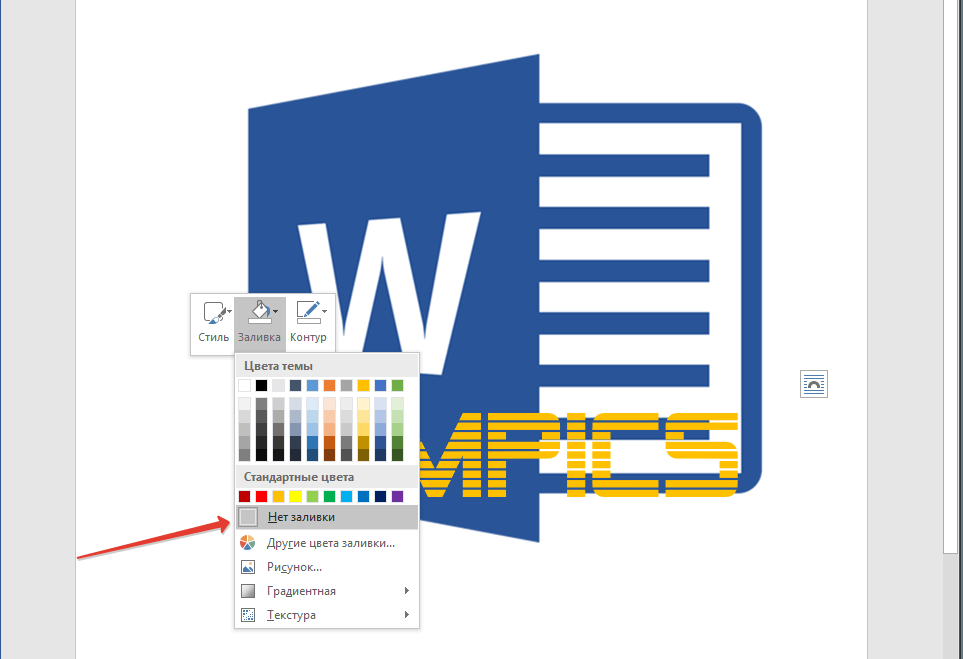
- Совет: Если текстовое поле отображается в виде надписи на белом фоне, перекрывая таким образом изображение, кликните по его краю правой кнопкой мышки и в разделе “Заливка” выберите пункт “Нет заливки”.
Добавление подписи к рисунку
Кроме наложения надписи поверх изображения, вы также можете добавить к нему подпись (название).
1. Добавьте изображение в документ Word и кликните по нему правой кнопкой мышки.

2. Выберите пункт “Вставить название”.
3. В открывшемся окне введите необходимый текст после слова “Рисунок 1” (остается неизменным в этом окне). Если это необходимо, выберите положение подписи (над или под изображением), развернув меню соответствующего раздела. Нажмите кнопку “ОК”.
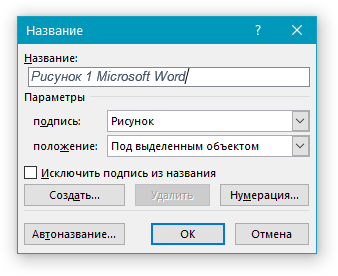
4. Подпись будет добавлена к графическому файлу, надпись “Рисунок 1” можно будет удалить, оставив только введенный вами текст.

На этом все, теперь вы знаете, как сделать надпись на картинке в Ворде, а также о том, как подписывать рисунки в этой программе. Желаем вам успехов в дальнейшем освоении этого офисного продукта.
![]()
Download Article
![]()
Download Article
Most people who use Microsoft Word for designing creative printouts know about the WordArt feature and it’s many features. If you don’t know about it yet, follow the directions in this article to help you achieve these same techniques to make your printouts look spectacular.
Steps
-

1
Open your Microsoft Word document, with whatever method you prefer to open the program with.
-
2
Decide in which document, you’d like to start adding/using the WordArt feature in. You can either start a new document, or open an existing document, depending on where you would like to add the WordArt to.
Advertisement
-
3
Locate the place that you’d like to insert your first WordArt piece of text on your page.
- Type the previous text.
- You can either continue on that line (rarely used), or press enter to start a new line.
-
4
Open your menu toolbar. For quick access if this toolbar isn’t available, press and release Alt on your keyboard.
-
5
Click the «Insert» option from this toolbar.
-
6
Click the «Picture» button.This should open a drop-down list.
-
7
Click the «WordArt» option from the drop-down that results. This should open a new window, along with adding a toolbar to the display window, that you can later move into a position on the screen near all the toolbars at the top of the screen. For now, you’ll be concentrated on the dialog box that Microsoft Word brought up when you clicked the option to Insert a new piece of WordArt.
-
8
Click to select the WordArt style that looks the best to you.
-
9
Click the «OK» button. This will open a new dialog box that will help you type the text you want to be inserted to become a piece of WordArt.
-
10
Type your text using proper formatting (such as correct capitalization, grammar, etc.). The text «Your text here» is automatically selected, which means as soon as you start typing, the former pre-filled text will be removed in place for the text you will type.
-
11
Select alternate formatting (bold, italic, font size, font type) from the buttons above the box you type your stuff in.
-
12
Learn how to move your WordArt text. This can be achieved for most viewers by clicking to select and either centering the text like most centering of any other text, or, for some versions (2007 and up) by right-clicking and dragging the text to a new location.
-
13
Learn how to color your WordArt text. Use the same styles to color other text, as you would for this WordArt text. Just be sure the WordArt piece has been selected, before you begin to select your color. If you do end up selecting your color, you’ll be selecting a font color for any additional text near the insertion «I» point on the screen.
- Learn how to copy the piece of WordArt to an alternate location, if you’d like. Use the Copy and Paste technique to copy and paste the item from one area to another, through the use of Windows clipboard (which is where all copy and pasted items are temporarily stored).


Advertisement
Add New Question
-
Question
What is Microsoft Word insert?

Microsoft Word «insert» is used to insert any element or object into a document.
Ask a Question
200 characters left
Include your email address to get a message when this question is answered.
Submit
Advertisement
Video
-
The steps in this article are based on the 2003 version of Microsoft Word.
-
You can also select the text in the original page. You then can select the style, and it will pre-fill the words for you into the boxes.
Show More Tips
Thanks for submitting a tip for review!
Advertisement
Things You’ll Need
- Microsoft Word program
- computer mouse and keyboard
About This Article
Thanks to all authors for creating a page that has been read 115,502 times.
Reader Success Stories
-

«What helped me was the ‘Create Word Art’ video was graphic/demonstrative. It put ‘here/now’ words and directions…» more
Is this article up to date?
WordArt is a quick way to make text stand out with special effects. You begin by picking a WordArt style from the WordArt gallery on the Insert tab, and then customize the text as you wish.


Try it!
-
Click Insert > WordArt, and pick the WordArt style you want.
In the WordArt gallery, the letter A represents the different designs that are applied to all text you type.
Note: The WordArt icon is located in the Text group, and it may appear different depending on the program you’re using and the size of your screen. Look for one of these icons:
-
The placeholder text «Your text here» appears, with the text highlighted.
Enter your own text to replace the placeholder text.


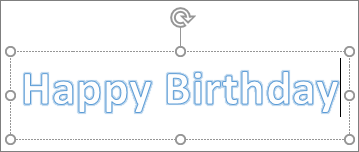
Tips:
-
You can enter entire sentences, and even paragraphs, as WordArt. (You may have to change the font size for longer text.) And in Word, you can also convert existing text to WordArt in Word.
-
You can include symbols as WordArt text. Click the location for the symbol, and on the Insert tab, click Symbol, and pick the symbol you want.
Do more things with WordArt
Select a heading below to open it and see the detailed instructions.
You might have tried using shape styles to change the shape of WordArt and then were puzzled that the text didn’t change. Use the text options in the WordArt Styles group instead. Shape styles and effects apply to the box and background surrounding your WordArt, not to the WordArt text. So, to add effects to your WordArt, such as shadows, rotation, curves, and fill and outline colors, you use the options in the WordArt Styles group, including Text Fill, Text Outline, and Text Effects.
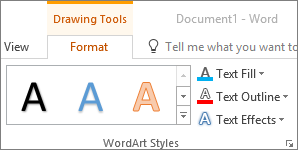
Note: Depending on your screen size, you might only see the icons for WordArt Styles.

-
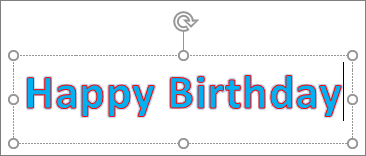
Select the WordArt text or letters to change.
The Drawing Tools Format tab appears.
-
On the Drawing Tools Format tab, click Text Fill or Text Outline, and pick the color you want.
-
Click outside of your text box to see the effect.
In this example, a light blue text fill and a red text outline were applied.

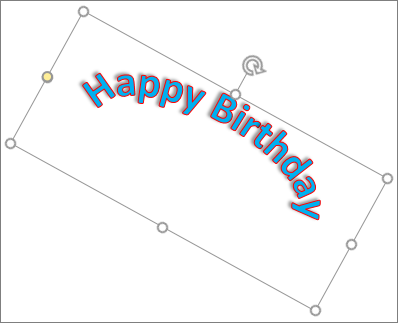
You can curve text around a circular object.
90 seconds
-
Select the WordArt text or letters to change.
The Drawing Tools Format tab appears.
-
To create a curved effect, on the Drawing Tools Format tab, click Text Effects >Transform and pick the one you want.
Important: The Text Effects
menu is not the same as the Shape Effects menu. If you don’t see Transform at the bottom of the menu, make sure you’ve clicked the Text Effects menu.In this example, the first curved transform effect is selected.
-
Click outside of your text box to see the effect.
Use the Text Effects menu to create other effects, such as shadow, reflection, glow, bevels, and 3-D rotation. This example shows WordArt with a curved transform effect and a shadow applied.
 menu is not the same as the Shape Effects
  menu. If you don’t see Transform at the bottom of the menu, make sure you’ve clicked the Text Effects menu.

-
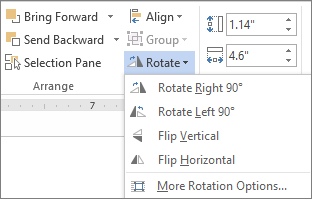
To rotate WordArt text to any angle, select it, and then drag the circular rotation handle at the top of the box.
-
To flip WordArt or rotate it 90 degrees, click the Drawing Tools Format tab, click Rotate in the Arrange group, and then select an option.
To change the font size or style of your WordArt text:
-
Select the WordArt text or letters to change.
-
On the Home tab, select options in the Font group, such as font style, font size, or underline.
-
In your Word document, select the text to convert to WordArt.
-
On the Insert tab, click WordArt, and then pick the WordArt you want.
Double-click the WordArt that you want to remove, and then press Delete.
Insert WordArt
-
Click where you want to insert decorative text in a document.
-
On the Insert tab, in the Text group, click WordArt.
-
Click any WordArt style, and start to type.
Do more things with WordArt
Select a heading below to open it and see the detailed instructions.
-
Click anywhere in the WordArt text that you want to change.
-
Under Drawing Tools, on the Format tab, click any option.
For example, you can change the direction of the WordArt text by clicking Text Direction in the Text group and choosing a new direction for the text.
Double-click the WordArt that you want to remove, and then press Delete.
Add WordArt
Excel
-
On the Insert tab, in the Text group, click WordArt, and then click the WordArt style that you want.
-
Enter your text.
-
You can add a fill or effect to a shape or text box as well as the text in the WordArt.
-
If you have a chart in your 2007 Office release document, you can replace the chart title with WordArt to give the title additional emphasis.
-
Outlook
-
On the Insert tab, in the Text group, click WordArt, and then click the WordArt style that you want.
-
Type your text in the Text box.
You can add a fill or effect to a shape or text box as well as the text in the WordArt.
PowerPoint
-
On the Insert tab, in the Text group, click WordArt, and then click the WordArt style that you want.
-
Enter your text.
-
You can add a fill or effect to a shape or text box as well as the text in the WordArt.
-
If you have a chart in your 2007 Office release document, you can replace the chart title with WordArt to give the title additional emphasis.
-
Publisher
-
On the Objectstoolbar, click Insert WordArt
. -
In the WordArt Gallery, click the WordArt that you want, and then click OK.
-
Type your text in the Text box.
If you want to change the text in the WordArt, double-click the WordArt that you want to change, and then type the new text in the Text box.
 .
.Word
-
On the Insert tab, in the Text group, click WordArt, and then click the WordArt style that you want.
-
Type your text in the Text box.
You can add a fill or effect to a shape or text boxas well as the text in the WordArt.
Do more things with WordArt
Select a heading below to open it and see the detailed instructions.
Excel
Do one or more of the following:
-
To change the text, select it, and then make the changes that you want.
-
To change the font, see Change the font or font size in Excel or Change the color of text in a worksheet.
-
To add an effect to WordArt, see Add or delete a fill, outline, or effect for text or WordArt.
-
To rotate the WordArt, see Rotate or flip a picture, shape, text box, or WordArt in Excel 2007.
-
To resize the WordArt, see Change the size of a picture, shape, text box, or WordArt.
-
To align the WordArt, see Align or arrange a picture, shape, text box, or WordArt.
-
To move the WordArt, see Move a picture, shape, text box, or WordArt.
For more information about selecting WordArt, see Select a shape or other object.
Outlook
Do one or more of the following:
-
To change the text, select it, and then make the changes that you want.
-
To change the font, see Change the size or formatting of text.
-
To add an effect to WordArt, see Add or delete a fill, outline, or effect for text or WordArt.
-
To rotate the WordArt, see Rotate or flip a picture, shape, text box, or WordArt in Outlook 2007.
-
To resize the WordArt, see Change the size of a picture, shape, text box, or WordArt.
-
To align the WordArt, see Align or arrange a picture, shape, text box, or WordArt.
-
To move the WordArt, see Move a picture, shape, text box, or WordArt.
For more information about selecting WordArt, see Select a shape or other object.
PowerPoint
Do one or more of the following:
-
To change the text, select it, and then make the changes that you want.
-
To add an effect to WordArt, see Add or delete a fill, outline, or effect for text or WordArt.
-
To rotate the WordArt, see Rotate or flip a picture, shape, text box, or WordArt in PowerPoint 2007.
-
To resize the WordArt, see Change the size of a picture, shape, text box, or WordArt.
-
To align the WordArt, see Align or arrange a picture, shape, text box, or WordArt.
-
To move the WordArt, see Move a picture, shape, text box, or WordArt.
For more information about selecting WordArt, see Select a shape or other object.
Publisher
Do one or more of the following:
-
To change the text, select it, and then make the changes that you want.
-
To change the font, see Change the font size or Change the color of text.
-
To add an effect to WordArt, see Add or delete a fill, outline, or effect for text or WordArt.
-
To resize the WordArt, see Change the size of a picture, shape, text box, or WordArt.
-
To align the WordArt, see Align or arrange a picture, shape, text box, or WordArt.
-
To move the WordArt, see Move a picture, shape, text box, or WordArt.
For more information about selecting WordArt, see Select a shape or other object.
Word
Do one or more of the following:
-
To change the text, select it, and then make the changes that you want.
-
To change the font, see Change the font size.
-
To add an effect to WordArt, see Add or delete a fill, outline, or effect for text or WordArt.
-
To rotate the WordArt, see Rotate or flip a picture, shape, or WordArt.
-
To resize the WordArt, see Change the size of a picture, shape, text box, or WordArt.
-
To align the WordArt, see Align or arrange a picture, shape, text box, or WordArt.
-
To move the WordArt, see Move a picture, shape, text box, or WordArt.
For more information about selecting WordArt, see Select a shape or other object.
Excel
When you remove the WordArt style from your text, the text remains and changes to plain text.
-
Select the WordArt text that you want to remove the WordArt style from.
-
Under Drawing Tools, on the Format tab, in the WordArt Styles group, click the More button
, and then click Clear WordArt.To remove the WordArt style from part of your text, select the text that you want to remove the WordArt style from, and then follow the steps above.
 , and then click Clear WordArt.
PowerPoint
When you remove the WordArt style from your text, the text remains and changes to plain text.
-
Select the WordArt text that you want to remove the WordArt style from.
-
Under Drawing Tools, on the Format tab, in the WordArt Styles group, click the More button
, and then click Clear WordArt.To remove the WordArt style from part of your text, select the text that you want to remove the WordArt style from, and then follow the steps above.
Do the following for all programs listed in the Applies To at the top of the article.
-
Double-click the WordArt that you want to remove to select it, and then press Delete.
-
In Office for Mac 2016 or later, select the Insert tab on the Ribbon.
or
In Office for Mac 2011, select Insert on the toolbar.
-
Select WordArt, and pick the WordArt style you want.
In the WordArt gallery, the letter A represents the different designs that are applied to all text you type.
-
Enter your text.

Tip: You can also include symbols as WordArt text. To do so, click the location in your document for the symbol, and on the Insert tab, click Advanced Symbol, and pick the symbol you want.
Do more things with WordArt
Select a heading below to open it and see the detailed instructions.
To create curved or circular WordArt text, you add a Transform text effect.
-
Select the WordArt.
When you do that, the Shape Format tab appears.
-
Click Text Effects > Transform and pick the effect you want.

To change the color of the WordArt text, you change the Text Fill.
-
Select the WordArt text or letters to change.
When you do that, the Shape Format tab appears.
-
Click Text Fill, and pick the color you want.
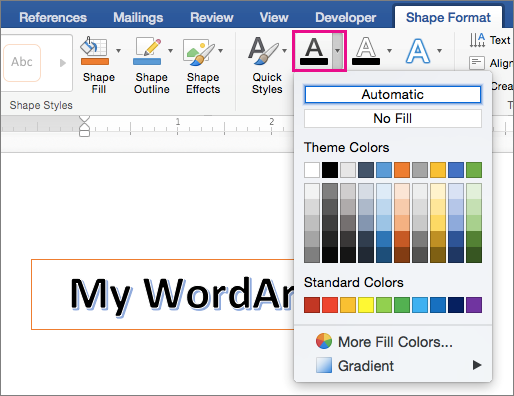
Tip: To change the outline of the WordArt text, on the Shape Format tab, click Text Outline.
-
Select the text to convert to WordArt.
-
On the Insert tab, click WordArt, and then pick the WordArt style you want.
In Microsoft 365 for the web you can see WordArt that’s already in your document, presentation, or worksheet, but to add more WordArt you need to open or edit the doc in the desktop version of Word, PowerPoint, or Excel.
In Microsoft 365 for the web, you can use the Font features on the Home tab to change the font color and size, and apply bolding, italics, or underlines to your text.
If you don’t have the desktop version of Word or PowerPoint, you can try it or buy it in the latest version of Office now.
Содержание
- 1 Накладываем текст на картинку, используя WordArt
- 2 Делаем текст на картинке с помощью надписи
- 2.1 Добавление поверх рисунка надписи в стиле WordArt
- 2.2 Добавление поверх рисунка обычного текста
- 2.3 Добавление подписи к рисунку
- 2.4 Помогла ли вам эта статья?
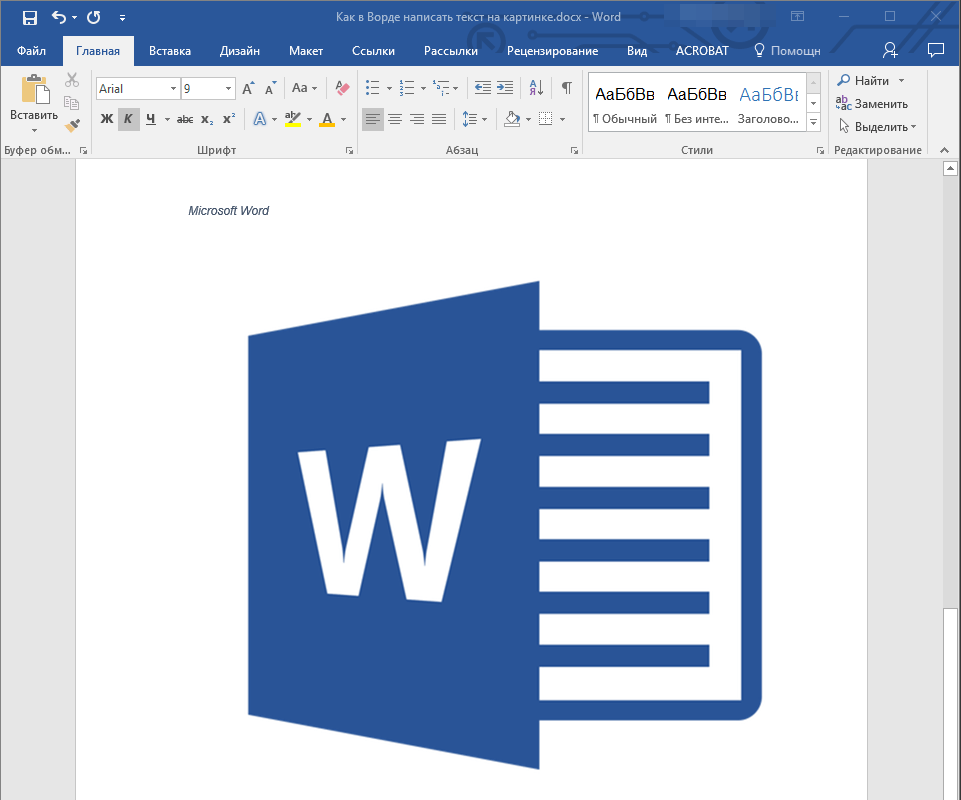
Если, работая с документом, в текстовом редакторе MS Word Вы хотите что-нибудь написать на рисунке, например, объяснить некоторые фрагменты изображения, или просто сделать красивую надпись, то в данной статье мы это с Вами и рассмотрим.
Печатать слова поверх рисунка или картинки можно, или используя фигуры WordArt, или сделав обычную надпись. Теперь давайте расскажу про эти два способа подробнее.
Если Вам нужно сделать изображение в качестве фона в Ворд, тогда перейдите по ссылке, и прочтите подробную статью на данную тему.
Накладываем текст на картинку, используя WordArt
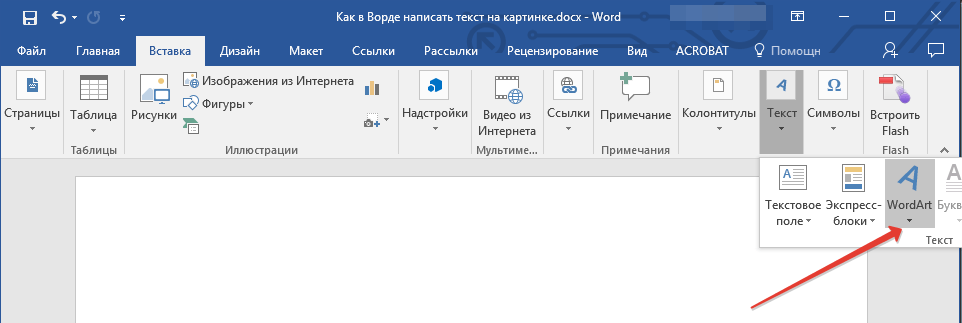
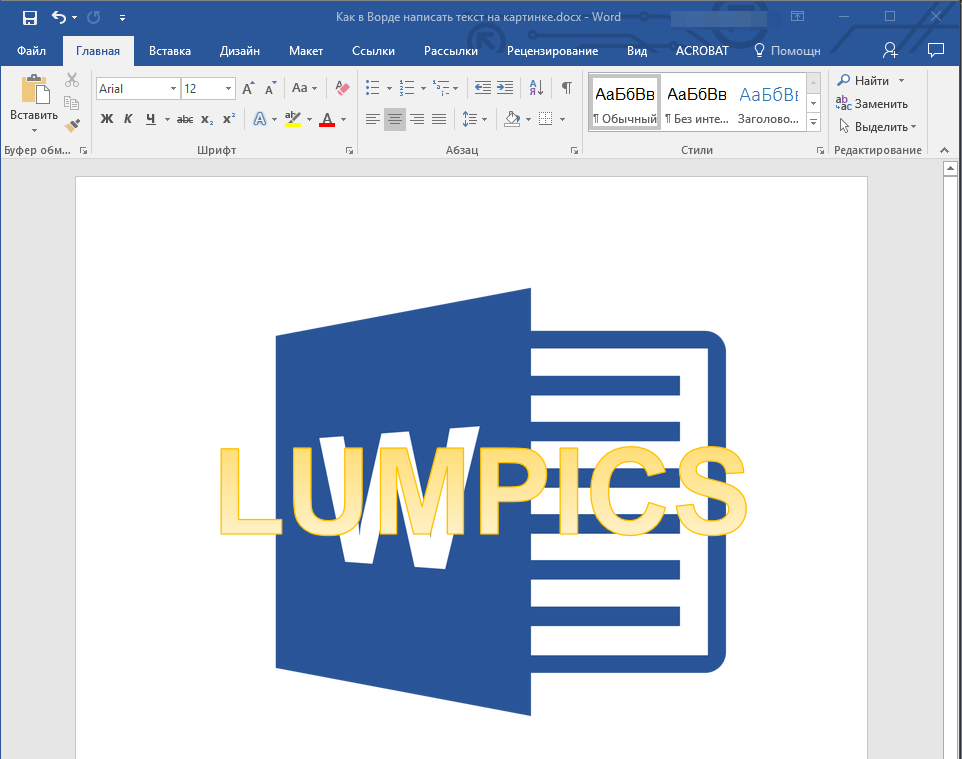
Сначала напишем на картинке, с помощью WordArt. Это уже готовый стиль, определенного цвета, размера, формы, с тенью, выдавливанием и прочим. Разумеется, Вы можете все эти параметры немного изменить под себя. Например, сам стиль нравится, а цвет можно изменить, вместо синего выбрать желтый.
Вставьте изображение в открытый документ Word, перейдите на вкладку «Вставка» и в разделе «Текст» нажмите на кнопку «WordArt». Откроется выпадающий список, из которого выберите подходящий для Вас стиль и кликните по нему.
Статья про то, как вставить изображение в Ворд, уже есть на сайте.

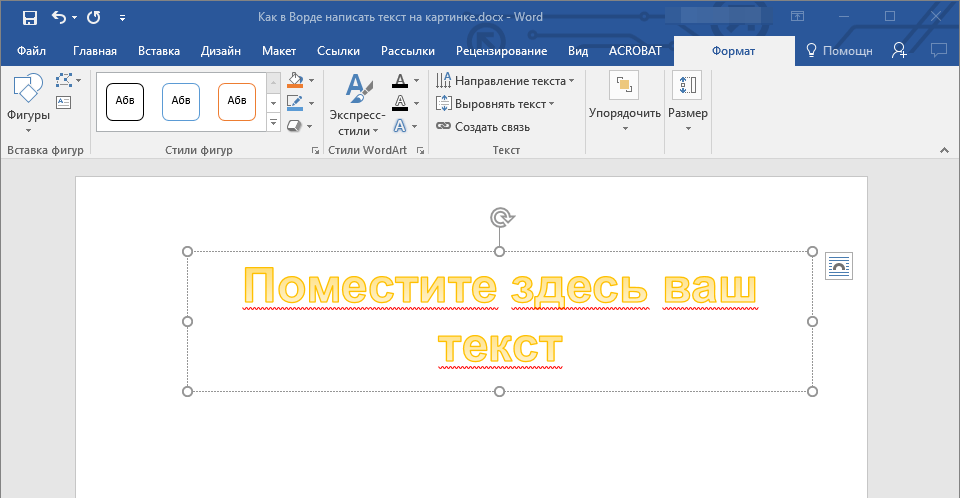
На рисунке появится вот такая область. Текст примера будет выделен. Нажмите кнопку «Delete», чтобы его удалить, и напишите то, что нужно Вам.

Теперь кликните мышкой по границе надписи – пунктирная линия, и, не отпуская левой кнопки мышки, перетащите блок на изображение.

Вот так получилось у меня.

Если хотите немного изменить добавленный в стиле WordArt текст, тогда кликните по нему, чтобы выделить. Затем открывайте «Средства рисования» – «Формат». Здесь можно или полностью изменить стиль WordArt, или добавить фон, границы, нужный эффект.

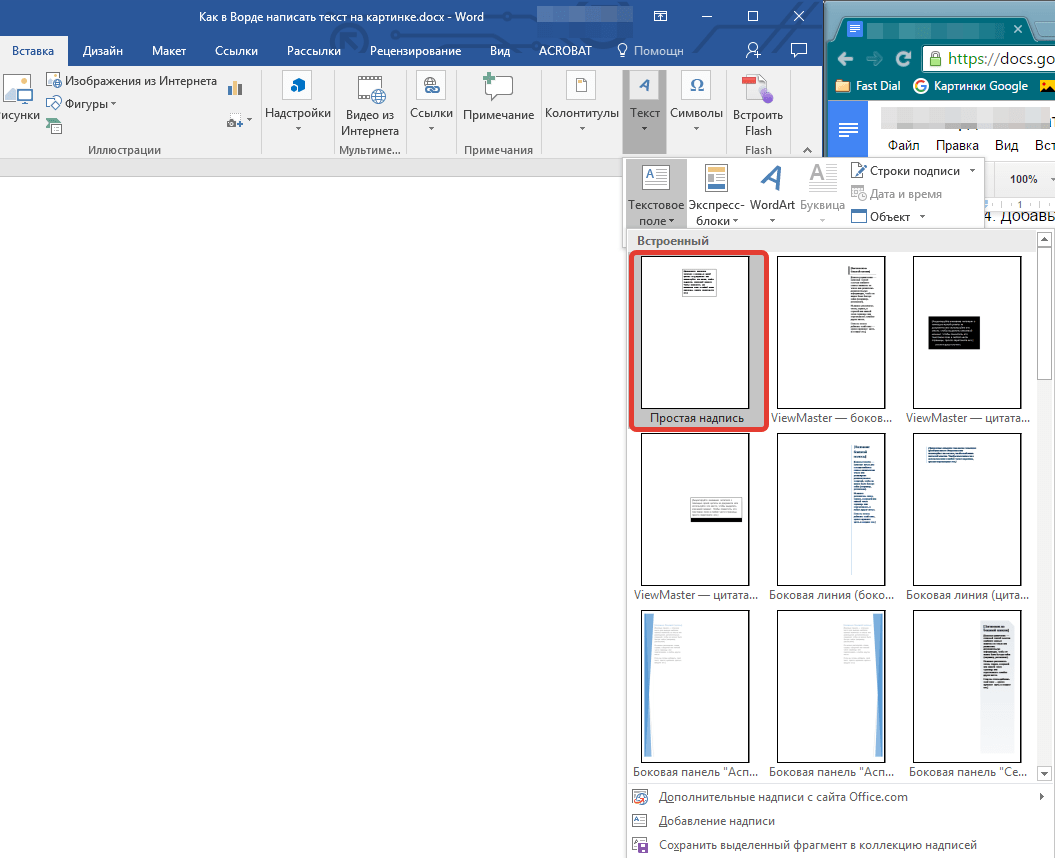
Делаем текст на картинке с помощью надписи
Вставить необходимые слова поверх картинки можно и с помощью создания обычной надписи. Откройте документ и добавьте в него изображение. Потом на вкладке «Вставка», жмите по кнопке «Фигуры» и выберите из списка «Надпись» – прямоугольник с буквой А вверху.

Курсор примет вид крестика. Нажмите в нужном месте картинки левую кнопку мышки и, не отпуская кнопки, нарисуйте прямоугольную область. Введите в созданной области нужный текст.
Чтобы текст выглядел необычно, можно перевернуть текст в Ворд на 30, 90 градусов или выбрать любой другой угол поворота.

Если Вам не подходит белый фон прямоугольника и наличие границ, выберите «Средства рисования» – «Формат». Нажмите на кнопки «Заливка фигуры» и «Контур фигуры», затем кликайте из списка «Нет заливки», «Нет контура» – соответственно.

Чтобы изменить внешний вид написанного, перейдите на вкладку «Текст» и в разделе «Шрифт» выберите нужный размер и сам шрифт. Можно изменить цвет букв, добавить тень, сделать текст курсивом или жирным.
Подробнее про форматирование и редактирование в Ворд, можно прочесть в статье по ссылке.

Используя один из описанных способов, у Вас точно получится написать на рисунке или картинке в MS Word нужное слово или фразу. А чтобы это выглядело красиво, увеличьте шрифт, выберите цвет для букв, добавьте тень к надписи, или просто воспользуйтесь одним из предложенных стилей WordArt.
Поделитесь статьёй с друзьями:
Денис, выберите для картинки другое Обтекание текстом.

Помимо работы с текстом, программа MS Word также позволяет работать и с графическими файлами, которые в ней можно изменять (хоть и по минимуму). Так, нередко добавленную в документ картинку требуется как-нибудь подписать или дополнить, причем, сделать это необходимо так, чтобы сам текст находился поверх изображения. Именно о том, как наложить текст на картинку в Ворде, мы и расскажем ниже.
Существует два метода, с помощью которых можно наложить текст поверх картинки — это использование стилей WordArt и добавление текстового поля. В первом случае надпись будет красивая, но шаблонная, во втором — вы имеете свободу выбора шрифтов, типа написания и форматирования.
Урок: Как в Word изменить шрифт
Добавление поверх рисунка надписи в стиле WordArt
1. Откройте вкладку “Вставка” и в группе “Текст” нажмите на пункт “WordArt”.

2. Из развернувшегося меню выберите подходящий стиль для надписи.

3. После того, как вы кликните по выбранному стилю, он будет добавлен на страницу документа. Введите необходимую надпись.

Примечание: После добавления надписи WordArt появится вкладка “Формат”, в которой можно выполнить дополнительные настройки. Кроме того, вы можете изменить размер надписи, потянув за границы поля, в котором она находится.

4. Добавьте в документ изображение, воспользовавшись инструкцией по ссылке ниже.

Урок: Как в Word вставить картинку
5. Переместите надпись WordArt, расположив ее поверх изображения так, как вам это необходимо. Кроме того, вы можете выровнять положение текста, воспользовавшись нашей инструкцией.

Урок: Как в Ворде выровнять текст
6. Готово, вы наложили надпись в стиле WordArt поверх изображения.
Добавление поверх рисунка обычного текста

1. Откройте вкладку “Вставка” и в разделе “Текстовое поле” выберите пункт “Простая надпись”.

2. Введите необходимый текст в появившееся текстовое поле. Выровняйте размеры поля, если это необходимо.

3. Во вкладке “Формат”, которая появляется после добавления текстового поля, выполните необходимые настройки. Также, вы можете изменить внешний вид текста в поле стандартным способом (вкладка “Главная”, группа “Шрифт”).

Урок: Как в Word повернуть текст
4. Добавьте изображение в документ.

5. Переместите текстовое поле на картинку, если это необходимо, выровняйте положение объектов, воспользовавшись инструментами в группе “Абзац” (вкладка “Главная”).


Добавление подписи к рисунку
Кроме наложения надписи поверх изображения, вы также можете добавить к нему подпись (название).
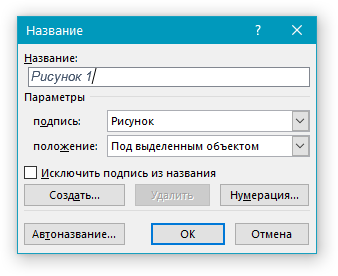
1. Добавьте изображение в документ Word и кликните по нему правой кнопкой мышки.

2. Выберите пункт “Вставить название”.

3. В открывшемся окне введите необходимый текст после слова “Рисунок 1” (остается неизменным в этом окне). Если это необходимо, выберите положение подписи (над или под изображением), развернув меню соответствующего раздела. Нажмите кнопку “ОК”.
4. Подпись будет добавлена к графическому файлу, надпись “Рисунок 1” можно будет удалить, оставив только введенный вами текст.
На этом все, теперь вы знаете, как сделать надпись на картинке в Ворде, а также о том, как подписывать рисунки в этой программе. Желаем вам успехов в дальнейшем освоении этого офисного продукта.
Мы рады, что смогли помочь Вам в решении проблемы.
Задайте свой вопрос в комментариях, подробно расписав суть проблемы. Наши специалисты постараются ответить максимально быстро.
Помогла ли вам эта статья?
Да Нет
Рубрика Word
Также статьи о работе с текстом в Ворде:
- Как скопировать картинку в Ворд?
- Как создать рисунок в Ворде?
- Как из Ворда вытащить картинку?
- Как в Корде обрезать фотографию?
Вставленный в Word рисунок иногда необходимо как-то обозначить или подписать, и как сделать надпись на картинке в Ворде мы дальше и рассмотрим.
Есть несколько способов размещения текста поверх картинки в Ворде. Если необходимо разместить на рисунке красиво оформленный текст, то лучше всего использовать надписи WordArt, а если достаточно обычного текста, то следует воспользоваться текстовым полем.
Для вставки надписи WordArt переходим на вкладку «Вставка», находим объект WordArt и выбираем понравившийся стиль оформления. После этого на листе появится специальное поле для ввода текста. С помощью меню на появившейся вкладке «Формат» можно произвести дополнительные настройки надписи. После всех настроек и окончательного расположения текста на картинке лучше всего их сгруппировать, чтобы при перемещении картинки сразу с ней перемещалась и надпись.
Для вставки обычного текста поверх рисунка в Ворде выбираем пункт меню «Текстовое поле» на вкладке «Вставка», в котором выбираем вариант «Простая надпись». В появившемся поле вводим необходимый текст, производим дополнительные настройки с помощью меню на вкладке «Формат», в том числе удаляем заливку и контур фигуры, а также при необходимости меняем цвет и размер текста стандартным способом. После всех настроек также желательно сгруппировать текст и картинку.
Есть еще один не совсем правильный, но все же иногда используемый способ. Заключается он в размещении картинки под обычным текстом, набранным на листе. Минус данного способа связан в отсутствии связи между текстом и картинкой, и при перемещении одного из них вся настроенная конструкция рушится.
Обучение Ворду видео