
| title | description | ms.date | ms.topic | dev_langs | helpviewer_keywords | author | ms.author | manager | ms.technology | ms.workload | ||||||||
|---|---|---|---|---|---|---|---|---|---|---|---|---|---|---|---|---|---|---|
|
Word object model overview |
The Word object model consists of classes and interfaces that are provided in the primary interop assembly for Word and are defined in the Word namespace. |
02/02/2017 |
conceptual |
|
|
John-Hart |
johnhart |
jmartens |
office-development |
office |
Word object model overview
[!INCLUDE Visual Studio]
When you develop Word solutions in Visual Studio, you interact with the Word object model. This object model consists of classes and interfaces that are provided in the primary interop assembly for Word, and are defined in the xref:Microsoft.Office.Interop.Word namespace.
[!INCLUDEappliesto_wdalldocapp]
This topic provides a brief overview of the Word object model. For resources where you can learn more about the entire Word object model, see Use the Word object model documentation.
For information about using the Word object model to perform specific tasks, see the following topics:
-
Work with documents
-
Work with text in documents
-
Work with tables
Understand the Word object model
Word provides hundreds of objects with which you can interact. These objects are organized in a hierarchy that closely follows the user interface. At the top of the hierarchy is the xref:Microsoft.Office.Interop.Word.Application object. This object represents the current instance of Word. The xref:Microsoft.Office.Interop.Word.Application object contains the xref:Microsoft.Office.Interop.Word.Document, xref:Microsoft.Office.Interop.Word.Selection, xref:Microsoft.Office.Interop.Word.Bookmark, and xref:Microsoft.Office.Interop.Word.Range objects. Each of these objects has many methods and properties that you can access to manipulate and interact with the object.
The following illustration shows one view of these objects in the hierarchy of the Word object model.

At first glance, objects appear to overlap. For example, the xref:Microsoft.Office.Interop.Word.Document and xref:Microsoft.Office.Interop.Word.Selection objects are both members of the xref:Microsoft.Office.Interop.Word.Application object, but the xref:Microsoft.Office.Interop.Word.Document object is also a member of the xref:Microsoft.Office.Interop.Word.Selection object. Both the xref:Microsoft.Office.Interop.Word.Document and xref:Microsoft.Office.Interop.Word.Selection objects contain xref:Microsoft.Office.Interop.Word.Bookmark and xref:Microsoft.Office.Interop.Word.Range objects. The overlap exists because there are multiple ways you can access the same type of object. For example, you apply formatting to a xref:Microsoft.Office.Interop.Word.Range object; but you may want to access the range of the current selection, of a particular paragraph, of a section, or of the entire document.
The following sections briefly describe the top-level objects and how they interact with each other. These objects include the following five:
-
Application object
-
Document object
-
Selection object
-
Range object
-
Bookmark object
In addition to the Word object model, Office projects in Visual Studio provide host items and host controls that extend some objects in the Word object model. Host items and host controls behave like the Word objects they extend, but they also have additional functionality such as data-binding capabilities and extra events. For more information, see Automate Word by using extended objects and Host items and host controls overview.
Application object
The xref:Microsoft.Office.Interop.Word.Application object represents the Word application, and is the parent of all of the other objects. Its members usually apply to Word as a whole. You can use its properties and methods to control the Word environment.
In VSTO Add-in projects, you can access the xref:Microsoft.Office.Interop.Word.Application object by using the Application field of the ThisAddIn class. For more information, see Program VSTO Add-ins.
In document-level projects, you can access the xref:Microsoft.Office.Interop.Word.Application object by using the xref:Microsoft.Office.Tools.Word.Document.Application%2A property of the ThisDocument class.
Document object
The xref:Microsoft.Office.Interop.Word.Document object is central to programming Word. It represents a document and all of its contents. When you open a document or create a new document, you create a new xref:Microsoft.Office.Interop.Word.Document object, which is added to the xref:Microsoft.Office.Interop.Word.Documents collection of the xref:Microsoft.Office.Interop.Word.Application object. The document that has the focus is called the active document. It is represented by the xref:Microsoft.Office.Interop.Word._Application.ActiveDocument%2A property of the xref:Microsoft.Office.Interop.Word.Application object.
The Office development tools in Visual Studio extend the xref:Microsoft.Office.Interop.Word.Document object by providing the xref:Microsoft.Office.Tools.Word.Document type. This type is a host item that gives you access to all features of a xref:Microsoft.Office.Interop.Word.Document object, and adds additional events and the ability to add managed controls.
When you create a document-level project, you can access xref:Microsoft.Office.Tools.Word.Document members by using the generated ThisDocument class in your project. You can access members of the xref:Microsoft.Office.Tools.Word.Document host item by using the Me or this keywords from code in the ThisDocument class, or by using Globals.ThisDocument from code outside the ThisDocument class. For more information, see Program document-level customizations. For example, to select the first paragraph in the document, use the following code.
C#
:::code language=»csharp» source=»../vsto/codesnippet/CSharp/Trin_VstcoreWordAutomationCS/ThisDocument.cs» id=»Snippet120″:::
VB
:::code language=»vb» source=»../vsto/codesnippet/VisualBasic/Trin_VstcoreWordAutomationVB/ThisDocument.vb» id=»Snippet120″:::
In VSTO Add-in projects, you can generate xref:Microsoft.Office.Tools.Word.Document host items at run time. You can use the generated host item to add controls to the associated document. For more information, see Extend Word documents and Excel workbooks in VSTO Add-ins at run time.
Selection object
The xref:Microsoft.Office.Interop.Word.Selection object represents the area that is currently selected. When you perform an operation in the Word user interface, such as bolding text, you select, or highlight the text and then apply the formatting. The xref:Microsoft.Office.Interop.Word.Selection object is always present in a document. If nothing is selected, then it represents the insertion point. In addition, a selection can encompass multiple blocks of text that are not contiguous.
Range object
The xref:Microsoft.Office.Interop.Word.Range object represents a contiguous area in a document, and is defined by a starting character position and an ending character position. You are not limited to a single xref:Microsoft.Office.Interop.Word.Range object. You can define multiple xref:Microsoft.Office.Interop.Word.Range objects in the same document. A xref:Microsoft.Office.Interop.Word.Range object has the following characteristics:
-
It can consist of the insertion point alone, a range of text, or the entire document.
-
It includes non-printing characters such as spaces, tab characters, and paragraph marks.
-
It can be the area represented by the current selection, or it can represent an area different from the current selection.
-
It is not visible in a document, unlike a selection, which is always visible.
-
It is not saved with a document and exists only while the code is running.
When you insert text at the end of a range, Word automatically expands the range to include the inserted text.
Content control objects
A xref:Microsoft.Office.Interop.Word.ContentControl provides a way for you to control the input and presentation of text and other types of content in Word documents. A xref:Microsoft.Office.Interop.Word.ContentControl can display several different types of UI that are optimized for use in Word documents, such as a rich text control, a date picker, or a combo box. You can also use a xref:Microsoft.Office.Interop.Word.ContentControl to prevent users from editing sections of the document or template.
Visual Studio extends the xref:Microsoft.Office.Interop.Word.ContentControl object into several different host controls. Whereas the xref:Microsoft.Office.Interop.Word.ContentControl object can display any of the different types of UI that are available for content controls, Visual Studio provides a different type for each content control. For example, you can use a xref:Microsoft.Office.Tools.Word.RichTextContentControl to create a rich text control, or you can use a xref:Microsoft.Office.Tools.Word.DatePickerContentControl to create a date picker. These host controls behave like the native xref:Microsoft.Office.Interop.Word.ContentControl, but they have additional events and data-binding capabilities. For more information, see Content controls.
Bookmark object
The xref:Microsoft.Office.Interop.Word.Bookmark object represents a contiguous area in a document, with both a starting position and an ending position. You can use bookmarks to mark a location in a document, or as a container for text in a document. A xref:Microsoft.Office.Interop.Word.Bookmark object can consist of the insertion point, or be as large as the entire document. A xref:Microsoft.Office.Interop.Word.Bookmark has the following characteristics that set it apart from the xref:Microsoft.Office.Interop.Word.Range object:
-
You can name the bookmark at design time.
-
xref:Microsoft.Office.Interop.Word.Bookmark objects are saved with the document, and thus are not deleted when the code stops running or your document is closed.
-
Bookmarks can be hidden or made visible by setting the xref:Microsoft.Office.Interop.Word.View.ShowBookmarks%2A property of the xref:Microsoft.Office.Interop.Word.View object to false or true.
Visual Studio extends the xref:Microsoft.Office.Interop.Word.Bookmark object by providing the xref:Microsoft.Office.Tools.Word.Bookmark host control. The xref:Microsoft.Office.Tools.Word.Bookmark host control behaves like a native xref:Microsoft.Office.Interop.Word.Bookmark, but has additional events and data-binding capabilities. You can bind data to a bookmark control on a document in the same way that you bind data to a text box control on a Windows Form. For more information, see Bookmark control.
Use the Word object model documentation
For complete information about the Word object model, you can refer to the Word primary interop assembly (PIA) reference and the Visual Basic for Applications (VBA) object model reference.
Primary interop assembly reference
The Word PIA reference documentation describes the types in the primary interop assembly for Word. This documentation is available from the following location: Word 2010 primary interop assembly reference.
For more information about the design of the Word PIA, such as the differences between classes and interfaces in the PIA and how events in the PIA are implemented, see Overview of classes and interfaces in the Office primary interop assemblies.
VBA object model reference
The VBA object model reference documents the Word object model as it is exposed to VBA code. For more information, see Word 2010 object model reference.
All of the objects and members in the VBA object model reference correspond to types and members in the Word PIA. For example, the Document object in the VBA object model reference corresponds to the xref:Microsoft.Office.Interop.Word.Document object in the Word PIA. Although the VBA object model reference provides code examples for most properties, methods, and events, you must translate the VBA code in this reference to Visual Basic or Visual C# if you want to use them in a Word project that you create by using Visual Studio.
See also
- Office primary interop assemblies
- Automate Word by using extended objects
- Work with documents
- Work with text in documents
- Work with tables
- Host items and host controls overview
- Programmatic limitations of host items and host controls
- Optional parameters in Office solutions

Word add-in development in Visual Studio: Application and base objects
Posted on Monday, July 8th, 2013 at 7:08 am by .
Microsoft Word has tons of objects and is a bit underrated when it comes to building Office solutions. My opinion is this is due to the attention Outlook and Excel receive… and rightfully so. But Word is just as powerful as its siblings, if not more so.
In this article (the first in a series of Word development topics), I’ll cover Microsoft Word application and base objects. And, as is our tradition, I’ll provide relevant code samples for Word 2013 – 2000 you can copy and paste into your solutions. You have my permission (otherwise it would be stealing).
- Word base objects
- Accessing base objects with code
- Useful events
Word’s base objects

- Application – The Word application itself. The mother ship… without her we don’t have Word.
- Document – A Word document… I know, almost needs no explanation.
- Selection – The currently selected content in a document. This one is tricky because it can also be the insertion point.
As you can see in the diagram to the right (which I lifted straight off MSDN), everything else resides beneath these three guys.
Today, we will focus on these three and save all the other hangers-on for another day.
Accessing base objects with code
Learning to work with the base objects is the 20% that empowers you to do 80% of what’s needed to make things happen. I’m going to do this in alphabetical order today. Let’s get to the code samples.
The Application object
This sample shows how to change some Word application-level settings. Add-in Express provides the WordApp within our AddinModule for easy access to the Word application.
Public Sub SetMyWordApplicationPreferences()
    WordApp.DisplayRecentFiles = True
    WordApp.RecentFiles.Maximum = 1
    WordApp.DisplayScreenTips = False
    WordApp.DisplayScrollBars = True
    WordApp.DisplayAlerts = Word.WdAlertLevel.wdAlertsNone
    WordApp.WindowState = Word.WdWindowState.wdWindowStateMaximize
    WordApp.ActiveWindow.View.ReadingLayout = False
End Sub
This routine clears Word just a little bit of distractions and prepares the serious writer for some serious writing. It reduces the recent files list to a single file, turns off screen tips and alerts. It also maximizes the Word window and turns off the reading layout. Ahh… now I’m ready to… ready to do some serious writing.
The Document object
Microsoft Word exists for users to author documents. It stands to reason, therefore, that the majority of the samples today are document focused.
Enumerate documents
Word has a documents collection that provides access to all open documents. Using the documents collection, you can do what you want with them (assuming the API supports it that is).
Public Sub EnumerateDocumentsAndCloseWithoutSaving()
    Dim docs As Word.Documents = Nothing
    docs = WordApp.Documents

    For i As Integer = docs.Count To 1 Step -1
        docs(i).Close(Word.WdSaveOptions.wdDoNotSaveChanges)
    Next

    Marshal.ReleaseComObject(docs)

End Sub
Here, I wanted to close all the documents and not save them.
Create a new Word document
To create a new word document, you need to add a new document to the Documents collection.
Public Sub CreateNewDocument(docName As String)
    Dim newDoc As Word.Document = Nothing
    newDoc = WordApp.Documents.Add()
    newDoc.SaveAs2(docName)

    Marshal.ReleaseComObject(newDoc)
End Sub
In the above sample, I go the extra trouble of saving the document using the passed docName.
Create a new document from a template
To create new document based on a template, you do the same thing as we just did except you provide the path to the document template.
Public Sub CreateNewDocumentFromTemplate(templatePath As String)
    Dim newDoc As Word.Document = Nothing
    newDoc = WordApp.Documents.Add(templatePath)

    Marshal.ReleaseComObject(newDoc)
End Sub
It’s easy but your users will believe it to be magic. And it is.
Open an existing document
To open a document you can call the Open method of the Documents collection and specify the path to the file you want to open.
Public Sub OpenDocument(docPath As String)
    Dim doc As Word.Document = Nothing
    doc = WordApp.Documents.Open(docPath)
     'or
    'doc = WordApp.Documents.Add(docPath)

    Marshal.ReleaseComObject(doc)
End Sub
You can also just add it to the documents collection.
The Selection object
There is always a selection in Word. Either there is selected content or there is an insertion point (meaning, no content is selected and we are ready to add content. This object provides quick access to the content that is the current focus of the user’s attention.
Private Sub ChangeSelectionFontAndCountWords()
    Dim selection As Word.Selection = Nothing

    selection = WordApp.Selection
    selection.Font.Name = "Arial"
    selection.Font.Size = 16
    MessageBox.Show( _
        selection.Words.Count, "Selection Word Count", _
        MessageBoxButtons.OK, MessageBoxIcon.Information)

    Marshal.ReleaseComObject(selection)
End Sub
This method changes the font and size of the text in the Selection object. It then displays the Word count in a message box.
Useful events
Working with the base objects and bending them to your will is one thing. Responding to events when they try to sneak away is another. When you combine the two, well, you are close to building some useful solutions.
NewDocument event
Don’t let the name of this event fool you. This event is a Word application event that executes when Microsoft Word creates a new document. It is the place for any setup logic you want to execute against a new document.
Private Sub adxWordEvents_NewDocument(sender As Object, hostObj As Object) _
    Handles adxWordEvents.NewDocument

    Dim doc As Word.Document = Nothing
    doc = TryCast(hostObj, Word.Document)
    doc.BuiltInDocumentProperties("Author") = "Me"
End Sub
This hostObj is the newly created document. By casting to a Document, I then access the built-in properties and set the Author property.
DocumentOpen event
I really like to see the Navigation Pane when I work with documents. If it is not visible, I immediately click the View tab and enable it. But that’s silly. Why not have some code to do it for me?
Private Sub adxWordEvents_DocumentOpen(sender As Object, hostObj As Object) _
    Handles adxWordEvents.DocumentOpen

    WordApp.ActiveWindow.DocumentMap = True
End Sub
This DocumentOpen event executes anytime Word opens a document. Thus, it is the event to respond to and automatically display the navigation pane (aka the DocumentMap)
DocumentBeforePrint event
Does anyone besides accountants and lawyers print documents these days? Heck, anytime I think about printing a document I receive, I feel guilty because lots of people have email signatures that include the phrase “Think before you print.” The DocumentBeforePrint is a good event for doing some last minute checking with the user as it executes right before sending the document to the printer.
Private Sub adxWordEvents_DocumentBeforePrint(sender As Object, _
    e As ADXHostBeforeActionEventArgs) _
    Handles adxWordEvents.DocumentBeforePrint

    'At least think about being green before printing
    If MessageBox.Show( _
        "Do you really want to print the document and contribute to the killing of a few _
         trees?", "Think Before You Print", MessageBoxButtons.YesNo) = DialogResult.No Then
        e.Cancel = True
    End If
End Sub
If the user clicks No, the method sets Cancel=True to cancel the print job. Otherwise, the print continues and a few trees are killed. Oh well, they’ll grow back I suppose. Another good use of this event is to automatically route print jobs to different printers depending on the logic of your choosing.
DocumentBeforeClose event
This event executes right before Word closes the document. It’s a good event for cleaning up the document.
Private Sub adxWordEvents_DocumentBeforeClose(sender As Object, _
    e As ADXHostBeforeActionEventArgs) Handles adxWordEvents.DocumentBeforeClose

    Dim doc As Word.Document = Nothing
    doc = TryCast(e.HostObject, Word.Document)

    If doc.Comments.Count > 1 Then
        If MessageBox.Show( _
            "This documents contains comments, do you really want to close it?", _
            "Respond to Comments?", MessageBoxButtons.YesNo) = DialogResult.No Then
            e.Cancel = True
        End If
    End If
End Sub
In this example, I reference the HostObject of the passed ADXHostBeforeActionEventArgs object. I do it because HostObject is the document that’s closing. After I recast it as a Document, I check for comments and alert the user to them and give them a chance to reconsider.
Application.Quit event
The Quit event is the place for doing some clean-up.
Private Sub adxWordEvents_Quit(sender As Object, e As EventArgs) _
    Handles adxWordEvents.Quit

    'Clear the recent docs list
    While WordApp.RecentFiles.Count > 0
        WordApp.RecentFiles.Item(1).Delete()
    End While
 End Sub
Continuing my theme of removing distractions, this sample removes all recent files. The NSA can’t track this! Notice that I do not up the count in the loop and always access WordApp.RecentFiles.Item(1). The reason is that each Delete action lowers the count in the RecentFiles collection. Thus, by calling Item(1) each time, I can safely delete each item.
***
Okay, there you go… that’s Word Application and Base Objects 101. This is enough information and samples to get you started. But, it’s also enough to make you thirst for more. You will not thirst for long as we have a whole series of Beginning Word Development topics set for this month.
Available downloads:
This sample Outlook add-in was developed using Add-in Express for Office and .net:
VB.NET sample Word add-in
You may also be interested in:
- Creating add-ins for Microsoft Word and Excel(C#, VB.NET)
- Sample Word addin (C#, VB.NET) with source code
Word add-in development in Visual Studio for beginners:
- Part 2: Customizing Word UI – What is and isn’t customizable
- Part 3: Customizing Word main menu, context menus and Backstage view
- Part 4: Creating custom Word ribbons and toolbars
- Part 5: Building custom task panes for Word 2013 – 2003
- Part 6: Working with Word document content objects
- Part 7: Working with Word document designs, styles and printing
- Part 8: Working with multiple Microsoft Word documents
- Part 9: Using custom XML parts in Word add-ins
- Part 10: Working with Word document properties, bookmarks, content controls and quick parts
- Part 11: Populating Word documents with data from external sources
- Part 12: Working with Microsoft Word templates
The C# programming language includes capabilities that make working with Microsoft Office API objects easier. With the advent of named and optional arguments, introduction of the dynamic type in .NET, and the ability to pass arguments to the reference parameters in COM methods, C# 4.0 quickly became the language of choice for working with COM and Interop objects.
This article talks about office interop objects in C# and how you can use them to interact with Microsoft Word and Microsoft Excel. Code examples are also provided to illustrate the concepts covered.
Prerequisites for working with Interop Objects
Visual Studio 2019 or Visual Studio 2022 must be installed on your computer to work with the code samples demonstrated in this C# tutorial. In this example, we will be using Visual Studio 2022. If you don’t have it installed in your computer, you can download it from here.
As of this writing, Visual Studio 2022 RC 2 has been released. You should also have Microsoft Office Excel 2007 or Microsoft Office Word 2007 (or their later versions) installed on your computer.
Read: Code Refactoring Tips for C#.
How to Create a New Console Application in Visual Studio
In this section we will examine how we can create a new console application project in Visual Studio 2022. Assuming Visual Studio 2022 is installed on your system, adhere to the steps given below to create a new Console Application project:
- Start the Visual Studio 2022 IDE.
- Click on “Create new project.”
- In the “Create new project” page, select C# in the language drop down list, Windows from the Platforms list and Console from the “Project types” list.
- Select Console App (.NET Framework) from the project templates displayed.
- Click Next.
- In the “Configure your new project” screen, specify the project’s name and the location where you would want the project to be created.
- Before you move on to the next screen, you can optionally select the “Place solution and project in the same directory” checkbox.
- Click Next.
- In the Additional Information screen, specify the Framework version you would like to use. We will use .NET Framework 4.8 in this example.
- Click Create to complete the process.
This will create a new .NET Framework Console application project in Visual Studio 2022. We will use this project in the sections that follow.
Install NuGet Packages
Install the following libraries from NuGet using the NuGet Package Manager or from the NuGet Package Manager Console:
Microsoft.Office.Interop.Word
Microsoft.Office.Interop.Excel
Read: Working with C# Math Operators.
How to Program Office Interop Objects in C#
In this section we will examine how to work with Office Interop objects and use them to connect to Microsoft Word and Excel and read/write data.
You must add the following using directives in your program for working with Word and Excel respectively when using Office interop objects:
using Microsoft.Office.Interop.Excel;
using Microsoft.Office.Interop.Word;
Working with Excel Interop Objects in C#
To begin, create a new Excel document named Test.xslx as a sample Excel file present in the root directory of the D:> drive. We will use this file in the following example.
You should create an instance of the Application class pertaining to the Microsoft.Office.Interop.Excel library for communicating with Excel. To do this, write the following C# code:
Application excelApplication = new Application();
The next step is to create an instance of the Workbook class to access a Workbook in Excel. You can create an instance of Workbook using the following code:
Workbook excelWorkBook = excel.Workbooks.Open(@"D:Test.xslx");
To read the name of the workbook, you can use the Name property of the workbook instance as shown in the code snippet given below:
string workbookName = excelWorkBook.Name;
The following code listing illustrates how you can display the value of the first cell of the first worksheet of the Excel document:
int worksheetcount = excelWorkBook.Worksheets.Count;
if (worksheetcount > 0) {
  Worksheet worksheet = (Worksheet) excelWorkBook.Worksheets[1];
  string worksheetName = worksheet.Name;
  var data = ((Range) worksheet.Cells[row, column]).Value;
  Console.WriteLine(data);
} else {
  Console.WriteLine("No worksheets available");
}
Here’s the complete code listing for your reference:
using Microsoft.Office.Interop.Excel;
using Microsoft.Office.Interop.Word;
using System;
using System.Runtime.InteropServices;

namespace OfficeInteropDemoApp
{
    class Program
    {
        static void Main(string[] args)
        {
            string filename = @"D:Test.xlsx";
            DisplayExcelCellValue(filename, 1, 1);
            Console.Read();
        }

        static void DisplayExcelCellValue(string filename,
        int row, int column)
        {
            Microsoft.Office.Interop.Excel.Application
            excelApplication = null;
            try
            {
                excelApplication = new
                Microsoft.Office.Interop.Excel.Application();
                Workbook excelWorkBook =
                excelApplication.Workbooks.Open(filename);
                string workbookName = excelWorkBook.Name;
                int worksheetcount = excelWorkBook.Worksheets.Count;

                if (worksheetcount > 0)
                {
                    Worksheet worksheet =
                   (Worksheet)excelWorkBook.Worksheets[1];
                    string firstworksheetname = worksheet.Name;
                    var data = ((Microsoft.Office.Interop.Excel.Range)
                    worksheet.Cells[row, column]).Value;
                    Console.WriteLine(data);
                }
                else
                {
                    Console.WriteLine("No worksheets available");
                }
            }
            catch (Exception ex)
            {
                Console.WriteLine(ex.Message);
            }
            finally
            {
                if (excelApplication != null)
                {
                    excelApplication.Quit();
                    Marshal.FinalReleaseComObject(excelApplication);
                }
            }
        }
    }
}
Refer to the code listing given above. Note, the finally block of the DisplayExcelCellValue method. The Quit method is called on the Excel application instance to stop the application. Finally, a call to Marshall.FinalReleaseComObject sets the reference counter of the Excel application instance to 0.
The following code listing illustrates how you can create a new Excel document using Office Interop in C#. Note how a new workbook has been created:
static void CreateExcelDocument()
{
	Microsoft.Office.Interop.Excel.Application excelApplication = null;

	try {
		excelApplication = new
            Microsoft.Office.Interop.Excel.Application();
		Workbook excelWorkBook = excelApplication.Workbooks.Add();
		Worksheet worksheet = (Worksheet) excelWorkBook.Worksheets[1];
		worksheet.Cells[1, 1] = "Product Id";
		worksheet.Cells[1, 2] = "Product Name";
		worksheet.Cells[2, 1] = "1";
		worksheet.Cells[2, 2] = "Lenovo Laptop";
		worksheet.Cells[3, 1] = "2";
		worksheet.Cells[3, 2] = "DELL Laptop";
		excelWorkBook.SaveAs(@"D:Test.xls");
	}
	catch(Exception ex) {
		Console.WriteLine(ex.Message);
	}
	finally {
		if (excelApplication != null) {
			excelApplication.Quit();
			Marshal.FinalReleaseComObject(excelApplication);
		}
	}
}
When you run this code, a new Excel document will be created at the path specified with the following content inside:
Read: Working with Strings in C#.
Working with Word Interop Objects in C#
To work with Microsoft Word, you would need to create an instance of Microsoft.Office.Interop.Word.Application. Like Excel, this instance would be used to communicate with a Word document.
Microsoft.Office.Interop.Word.Application wordApplication = new Microsoft.Office.Interop.Word.Application();
The next step is to create a document instance using the Documents property of the Microsoft.Office.Interop.Word.Application instance we just created, as shown in the C# code snippet given below:
wordApplication.Documents.Add();
Next, you can create a paragraph and add some text to it using the as shown in the code snippet shown below:
var paragraph = document.Paragraphs.Add();
paragraph.Range.Text = "This is a sample text to demonstrate how Interop works...";
Then you can save the Word document using this code:
wordApplication.ActiveDocument.SaveAs(@"D:Test.doc", WdSaveFormat.wdFormatDocument);
Here is the complete code listing showing how to work with Microsoft Word Interop Objects in C# for your reference:
using Microsoft.Office.Interop.Excel;
using Microsoft.Office.Interop.Word;
using System;
using System.Runtime.InteropServices;

namespace OfficeInteropDemoApp
{
    class Program
    {
        static void Main(string[] args)
        {
            string filename = @"D:Test.doc";
            CreateWordDocument(filename);
            Console.Read();
        }

        static void CreateWordDocument(string filename)
        {
            Microsoft.Office.Interop.Word.Application
            wordApplication = null;
            try
            {
                wordApplication = new
                Microsoft.Office.Interop.Word.Application();
                var document = wordApplication.Documents.Add();
                var paragraph = document.Paragraphs.Add();
                paragraph.Range.Text = "This is a sample text to
                demonstrate how Interop works...";
                wordApplication.ActiveDocument.SaveAs(filename,
                WdSaveFormat.wdFormatDocument);
                document.Close();

            }
            finally
            {
                if (wordApplication != null)
                {
                    wordApplication.Quit();
                    Marshal.FinalReleaseComObject(wordApplication);
                }
            }
        }
    }
}
To read a Word document and display each word of the document you can use the following C# code:
static void ReadWordDocument(string filename)
        {
            Microsoft.Office.Interop.Word.Application
            wordApplication = null;
            try
            {
                wordApplication = new
                Microsoft.Office.Interop.Word.Application();
                Document document =
                wordApplication.Documents.Open(filename);

                int count = document.Words.Count;
                for (int i = 1; i <= count; i++)
                {
                    string text = document.Words[i].Text;
                    Console.WriteLine(text);
                }
            }
            catch(Exception ex)
            {
                Console.Write(ex.Message);
            }
            finally
            {
                if (wordApplication != null)
                {
                    wordApplication.Quit();
                    Marshal.FinalReleaseComObject(wordApplication);
                }
            }
        }
Note how the Words property of the Word application instance has been used to retrieve the words contained in the document.
C# Interop Objects Tutorial
In this article we have examined how we can access Microsoft Office Interop objects using C#. Since there is still no support for working with Interop objects in .NET Core, we have created a .NET Framework Console Application in this example.
Microsoft Office is heavily used in most organizations, and Microsoft has provided several ways to extend and customize Office applications. In this article, Darko Martinovic demonstrates how to use C# to create several automation solutions, including custom add-ins.
Office components such as Excel or Word, have a powerful GUI, with many options to automate everyday tasks. In addition, there are a lot of excellent Add-Ins such as Power BI. With such functionality and the ability to use VBA, you may ask yourself why we need Office extensions.
Of course, there are many situations in which you might like to extend Office functionality. For example, to create a routine that:
- exports data from SQL Server into Excel with custom formatting
- imports data from Excel into the dataset
- automatizes Pivot Table creation in Excel
- customizes writing documents in Word
- customizes writing e-mail messages in Outlook
- more…
Microsoft provides a mechanism to accomplish all of these tasks. Office developer tools in Visual Studio let you create .NET Framework applications that extend Office. These applications are also named Office solutions. This article talks about how to develop and distribute such solutions.
In order to start developing you have to set up the environment.
Configure a Computer for Developing Office Solutions
The Office Developer Tools are installed by default as part of Visual Studio.
NOTE: In order to follow examples in the article, you can use any edition, including Visual Studio 2017 Community Edition.
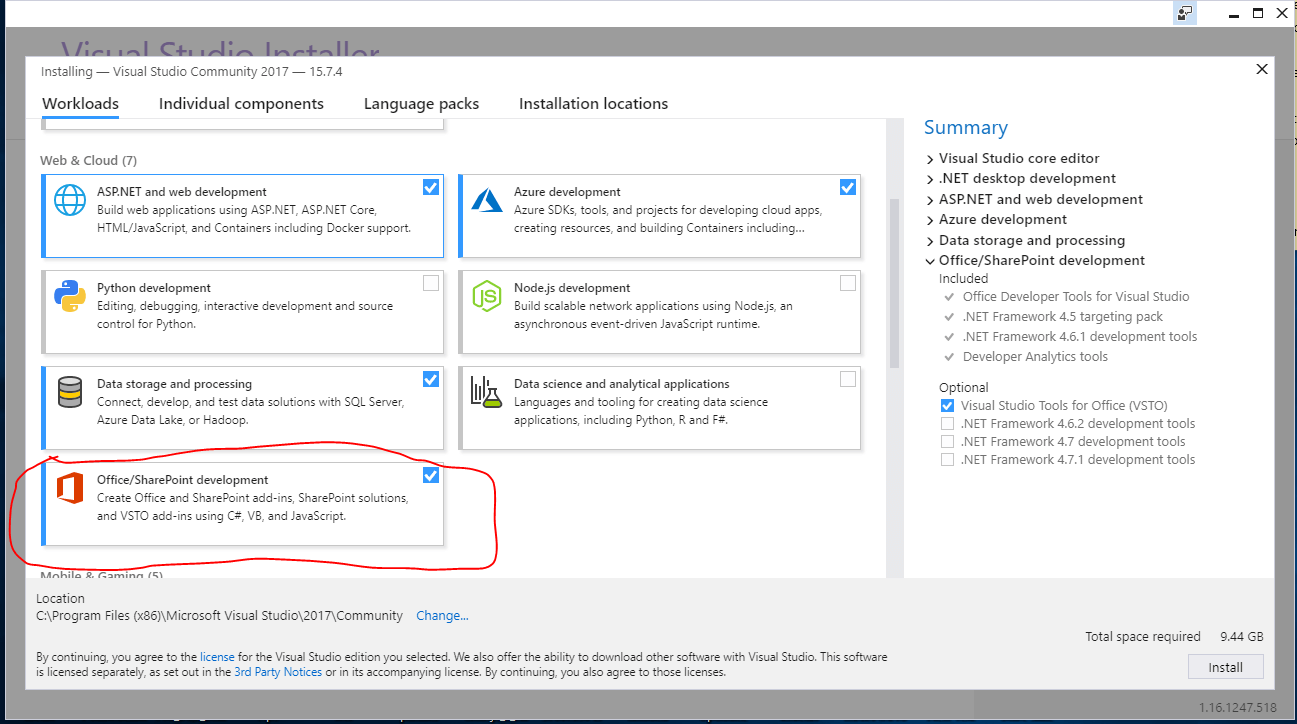
If you customize the Visual Studio installation by selecting which features to install, make sure that Microsoft Office Developer Tools is selected during setup. Alternatively, you can start Visual Studio Installer and select the Office/SharePoint development workload, as shown in the image below.
In addition, you have to Install a version of Office that is supported by the Office developer tools in Visual Studio. Examples in the article are tested with Office 2013/2016. Make sure that you also install the PIAs (Primary Interop Assemblies) for the version of Office that you install. The PIAs are installed with Office by default. If you modify the Office setup, make sure that the .NET Programmability Support feature is selected for the applications you want to target.
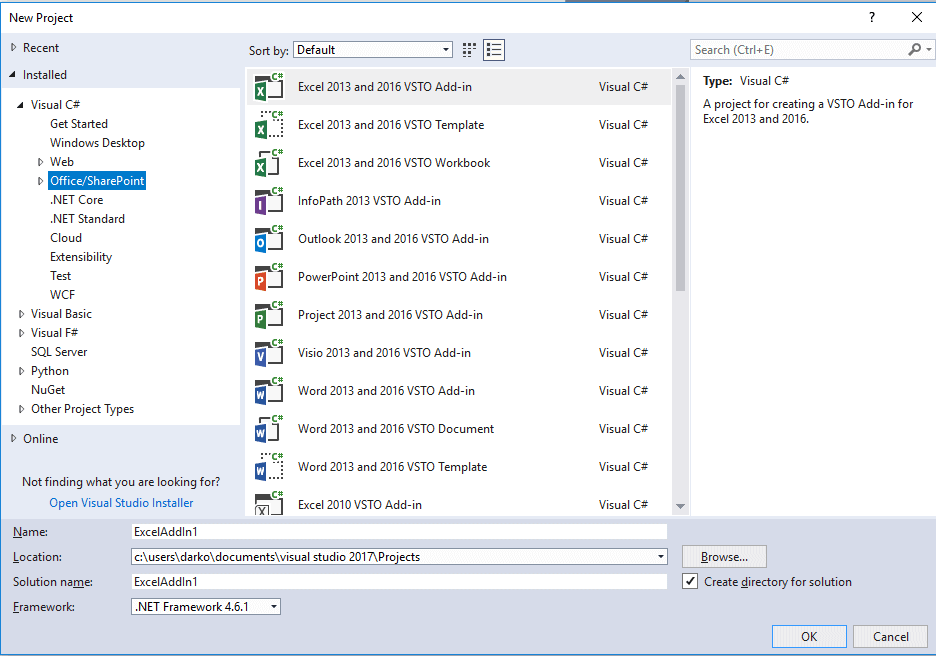
To check the installation, start Visual Studio, create a new project and be sure that Office templates are present as shown in the image below.
Choose an Office project type
Office projects are divided into Office and COM Add-ins. The first one usually is marked as ‘new development’, uses WEB templates and JavaScript, requires Office 2016, and targets mainly Office 365. In my opinion, both are worth exploring. This article covers the second one, which is usually divided based on the template you choose. There are Document-level customizations and VSTO Add-ins. VSTO Add-ins are associated with the application itself and Document-level customizations, as the name implies, are associated with a particular document.
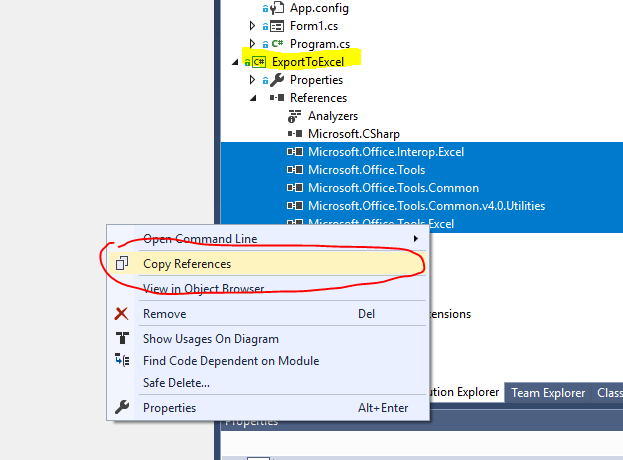
Besides that, there is the possibility to include the Office object model in your application by referencing PIA assemblies. The PIA enables the managed code in your solution to interact with the Office application’s COM-based object model. That would be the first example in which we will browsing source code in a Console application. If you would like to create your own startup project, choose C# console application from the list of available templates. After that you can use Visual Studio productivity tool Power Commands to copy references as shown in the image below and paste them in your project.
NOTE: You can add references by choosing Add Reference command from References context menu.
Exporting Data into Excel
Download this solution and then open it in Visual Studio. Make sure that ExportToExcel is selected as the startup project. The purpose of the first demo is to introduce the Excel object model by accomplishing one common task, exporting data from SQL Server tables into Excel. In order to follow the demo, you have to change the application configuration file app.config. In the file enter your instance name where you have restored the AdventureWorks2016 database.
The most important objects in Excel are:
- Application
- Workbook
- Worksheet
- Range
Microsoft documentation states: “The Application object represents the Excel application. The Application object exposes a great deal of information about the running application, the options applied to that instance, and the current user objects open within the instance.”
NOTE: The source code is located in the ExportToExcel.cs file inside the ExportToExcel project. There is no need to copy the code from the article.
In order to instantiate an application object, you have to include the Microsoft.Office.Interop.Excel namespace. An application object is created by using the following code snippet.
|
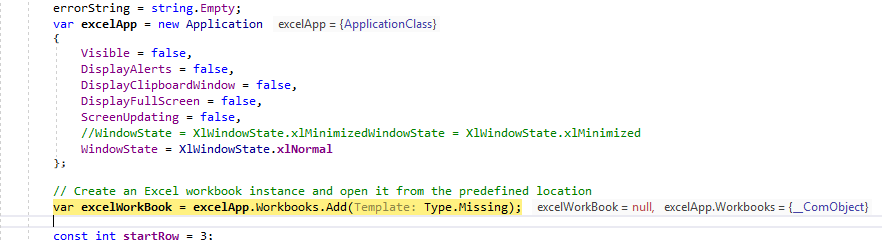
var excelApp = new Application { Visible = false, DisplayAlerts = false, DisplayClipboardWindow = false, DisplayFullScreen = false, ScreenUpdating = false, WindowState = XlWindowState.xlNormal }; |
If you add a breakpoint on a line after an application object is created (see the image below) and press F5 to start debugging the project, you will notice that nothing changes. The application is started as hidden because the Visible property is set to false.
In order to prove that the Excel application has started, start Task Manager, and find the Excel application on the list, as shown in the image below.

The Workbook object represents a single workbook within the Excel application. The following snippet is used to create the object:
|
// Create an Excel workbook instance var workbooks = excelApp.Workbooks; var excelWorkBook = workbooks.Add(Template: Type.Missing); |
The Worksheet object is a member of the Worksheets collection. Many of the properties, methods, and events of the Worksheet are identical or similar to members provided by the Application or Workbook objects. Excel provides a Sheets collection as a property of a Workbook object. Each member of the Sheets collection is either a Worksheet or a Chart object. The following snippet is used to create the Worksheet.
|
var wst = excelWorkBook.Worksheets; Worksheet excelWorkSheet = null; // Add a new worksheet to workbook with the Data table name excelWorkSheet = (Worksheet)wst.Add(); |
A range object represents a cell, a row, a column, or any kind of selection that contains at least one cell. In order to create Range object, you have to use a snippet like this one
|
var newRng = excelWorkSheet.Range[excelWorkSheet.Cells[startRow + 1, i], excelWorkSheet.Cells[endIndex, i]]; |
The purpose of the first example is to take T-SQL query results as an object of type DataSet and transform that object into an Excel workbook. The T-SQL query, as well as the connection string, are found in the application configuration file app.config. The example uses two tables of the AdventureWorks2016 database, both located in the schema Sales: The SalesOrderHeader table which contains 31K rows and SalesOrderDetail which contains 121K rows. On my machine, the Excel file is created in 25 sec. In order to shorten the example, I reduced number of records in both tables to 1000 by applying SELECT TOP in the app.config file.
Generating an object of the DataSet type is quite a common thing, and I will skip describing this part. In the project, the source code to accomplish that task is located in DataAccess.cs.
After getting an object of the DataSet type, Excel Workbook creation is invoked. This is accomplished in the Export method that is part of static class ExportToExcel. The workbook Is exported to C:TMPFirstTest.xlsx. The workbook looks similar to that shown in the image below.
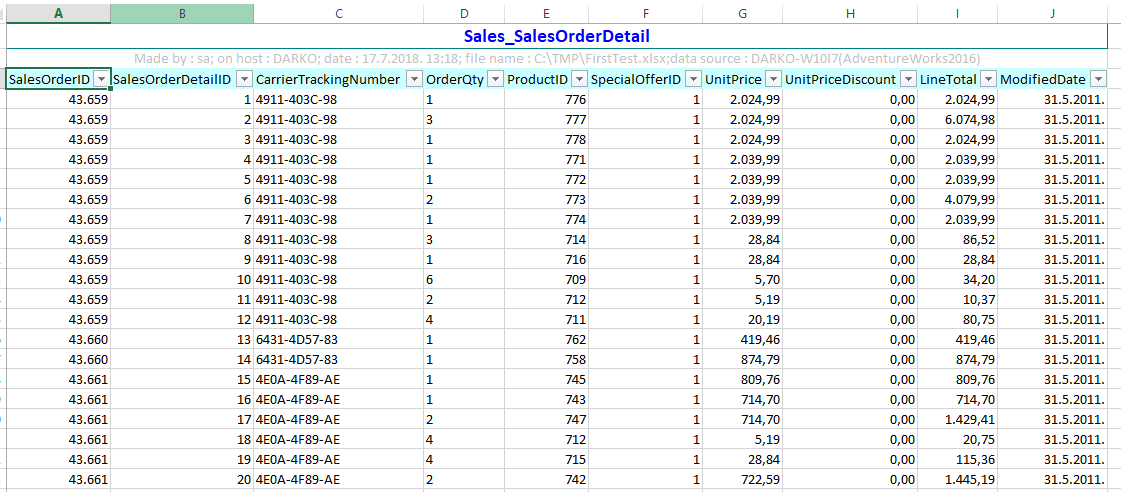
Every table that is part of the DataSet collection becomes an Excel sheet. The first and the second rows contain some information about the data. The third row contains the column names as well as something called ‘auto-filter’ which I will explain in detail later in the article.
When working with the object of type Range, you may find yourself confused by the Range property names that sound very similar, like Value, Value2, and Text.
Besides that, there is a big difference in performance. Text and Value are much slower than Value2. Value2 represents the cells underlying value, unlike Text which gives you the string representation of the cell. Value differs from Value2 when the cell is formatted as date or currency.
In the Export method, there is a parameter named pasteRange used to test performance. Its default value is true which means that the two-dimensional object based on a DataTable is set as the value of the Excel sheet range.
|
1 2 3 4 5 6 7 8 9 10 11 12 13 14 15 16 17 |
if (pasteRange == false) { // slow! do not use like this for (var j = 0; j <= table.Rows.Count — 1; j++) { for (var k = 0; k <= table.Columns.Count — 1; k++) { excelWorkSheet.Cells[j + startRow + 1, k + 1] = table.Rows[j][k]; } } } else { // using Value2 excelWorkSheet.Range[excelWorkSheet.Cells[startRow + 1, 1], excelWorkSheet.Cells[endIndex, table.Columns.Count]].Value2 = General.Convert(table); } |
You can change the method call by setting pasteRange to false as shown in the snippet below.
|
Excel.ExportToExcel.Export(pasteRange: false, ds: dataSet, mFileName: fileName, title: name, errorString: out var error2); |
When the value false is passed, it iterates through all columns and rows, setting the values by each cell. It’s is slow and should not be used.
Before setting the range’s property Value2, some formatting is made. This is accomplished by processing the Columns collection of the DataTable object and setting the property to NumberFormat.
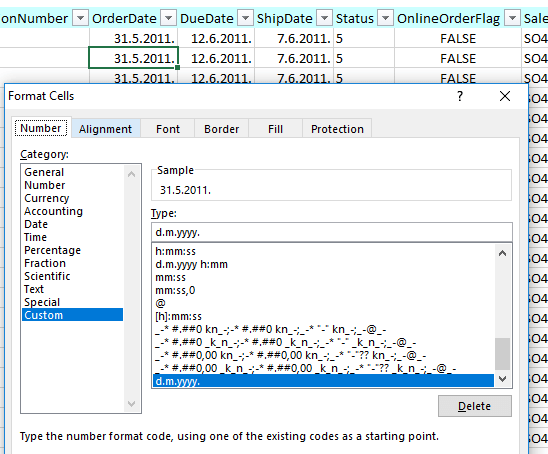
DateTime columns are formatted as shown in the snippet below
|
newRng.NumberFormat = Thread.CurrentThread.CurrentCulture.DateTimeFormat.ShortDatePattern; |
So, it depends on the CurrentCulture, and on my machine looks similar to the image below:
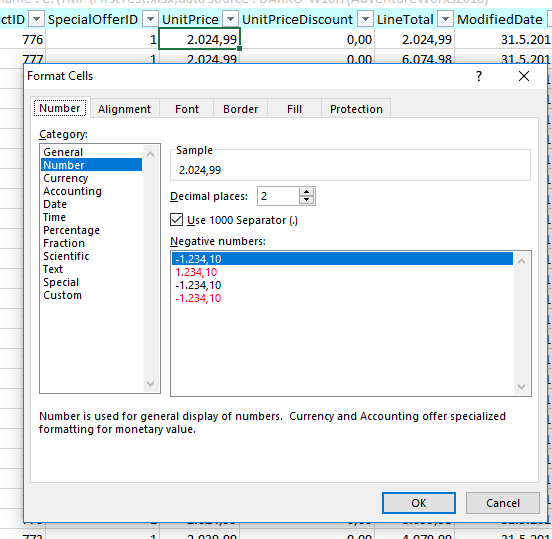
You can also format numbers. For columns that are System.Decimal type, formatting is accomplished like the snippet below.
|
newRng.NumberFormat = «#» + Thread.CurrentThread.CurrentCulture.NumberFormat.NumberGroupSeparator + «##0» + Thread.CurrentThread.CurrentCulture.NumberFormat.NumberDecimalSeparator + «00»; |
On my machine, it looks similar to the image shown below:
One feature that I love when working with Excel is to put columns into the auto-filter mode. That means that all discrete values for one particular column are bound to the combo box that represents the column name.
This is accomplished by referencing the row in which the column names are and by calling the AutoFilter method as shown in the snippet below.
|
// apply auto filter var firstRow = (Range)excelWorkSheet.Rows[<strong>startRow</strong>]; firstRow.AutoFilter(fRow, Criteria1: Type.Missing, Operator: XlAutoFilterOperator.<strong>xlAnd</strong>, Criteria2: Type.Missing, VisibleDropDown: true); |
Finally, to conclude the first example, a sentence about disposing of objects. The proper way to dispose objects is to call Marchal.RelaseComObject. This method is used to explicitly control the lifetime of a COM object used from managed code. You should use this method to free the underlying COM object that holds references to resources in a timely manner or when objects must be freed in a specific order.
COM disposing is a very huge and painful topic and one article is not enough to cover it. Talking about COM disposal is out of scope of the article.
Close the console application if still running and remove the first two rows in the Excel workbook created in the example. This is preparation for the second example.
Importing Data from Excel
The source code for this example is located in the ImportFromExcel project. Set up this project as the Startup Project. This example opens the Excel file generated in the first example, but it can be a different Excel file as well. After opening the file, the code tries to determine how many sheets are in the workbook and the name of every sheet.
This example needs a driver installed, microsoft.ace.oledb.12.0. The driver could be downloaded from the link.
After that, by using the OLEDB provider, every sheet is queried and, as a result, an object of type DataSet is formed. When you have a DataSet object, it is easy to update the database or do whatever else you need to do.
The source code that creates an object of type DataSet is displayed in the snippet below.
|
1 2 3 4 5 6 7 8 9 10 11 12 13 14 15 16 17 |
using (var myConnection = new OleDbConnection($@»Provider=Microsoft.Ace.OLEDB.12.0;Data Source={fileToRead};Extended Properties=’Excel 12.0 Xml;HDR = YES;'»)) { using (var dtSet = new DataSet()) { foreach (var s in dic) { Console.WriteLine($» Processing {s} table»); var myCommand = new OleDbDataAdapter($@»select * from {s};», myConnection); myCommand.TableMappings.Add(«Table», s); myCommand.Fill(dtSet); } foreach (DataTable t in dtSet.Tables) { Console.WriteLine($» Table {t.TableName} has {t.Rows.Count} records»); } } } |
It is important that the sheet name is put in parenthesis and that dollar sign is appended at the end. For example, you could query the first sheet by issuing select * from [Sales_SalesOrderDetail$];. As a result, the console window displays the number of records for each table.
Now, is time to make a real Add-in for Excel and that is the third example.
Creating an Excel VSTO Add-In
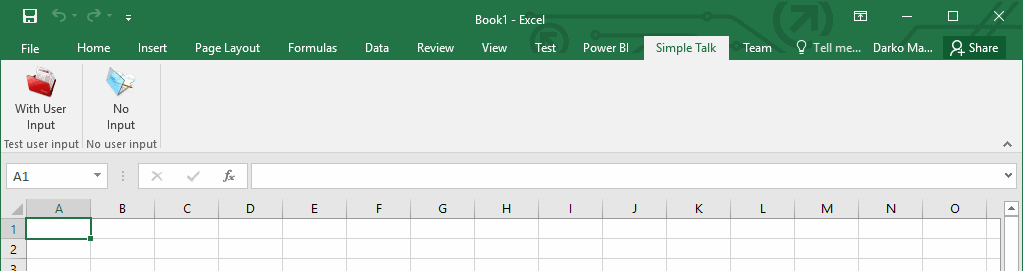
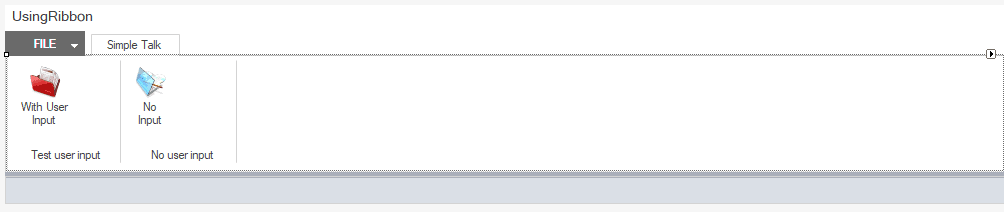
The third example extends Excel functionality by adding a custom tab with two buttons on the Excel Ribbon, as shown in the image below.
Set SimpleTalkExcelAddIn as the Startup project in the solution. This project has the type of Excel VSTO Add-In. When you create such a project for the first time, a class named ThisAddIn is created and two events are raised. Usually, the generated code looks similar to what is shown in the image below.
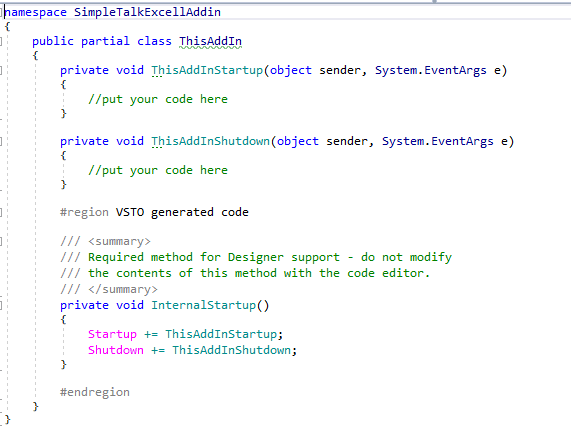
The Startup event is raised after the VSTO Add-in is loaded and all the initialization code in the assembly has been run. The event is handled by the ThisAddInStartup method in the generated code file named ThisAddin.cs. The code in the ThisAddInStartup event handler is the first user code to run unless your VSTO Add-in overrides the RequestComAddInAutomationService method. In this case, the ThisAddInStartup event handler is called after RequestComAddInAutomationService.
Similar to the Startup event, there is a ShutDown event. The event is raised when the application domain that your code is loaded in is about to be unloaded. Usually, it means when you close the Excel application.
Accessing the application, workbook and worksheet objects is accomplished slightly different from earlier examples, as shown in the code below.
|
Excel.Worksheet oSheet; Excel.Workbook oBook; Excel.Application oApp; oApp = Globals.ThisAddIn.Application; oBook = Globals.ThisAddIn.Application.ActiveWorkbook; oSheet = Globals.ThisAddIn.Application.ActiveSheet; |
You can interact with the Excel application by adding two types of Ribbon as shown in the image below.

In the example, the Ribbon of type Visual Designer is already added and named UsingRibbon. In design mode, the Ribbon looks similar to the image below.
The ribbon control has its own set of properties and events. The control looks similar to any tabbed control and exposes a tabs collection.
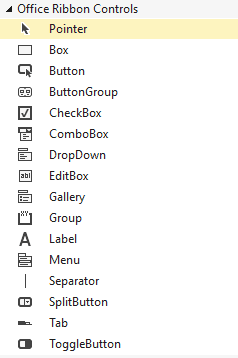
When working with Excel VSTO Add-in’s, on the Visual Studio Toolbar there is a special tab in Visual Studio Toolbox. You can access the toolbox, called Office Ribbon Controls, through the View->Toolbox menu. It’s shown in the image below.
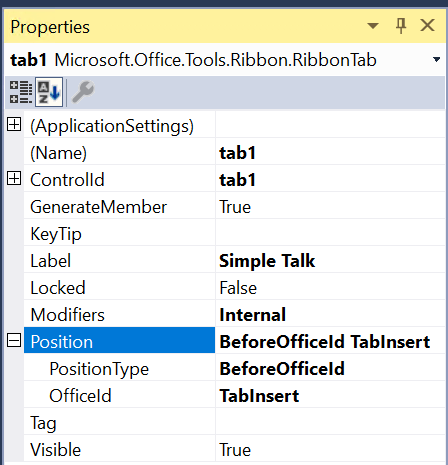
In the example, a few controls are already added. Ribbon Tab is a part of Ribbon Control collection. In this example it’s labeled as Simple Talk. After the Label property, the most commonly used property is Position. The property is the type of RibbonPosition which is an interface that holds a string called OfficeId and an enumerator with three possible values:
- Default
- BeforeOfficeId
- AfterOfficeId
If you choose something other than Default, you have to specify the OfficeId as a string value. Usually, this ID is formed from the word ‘Tab’ plus the ‘Label’ shown on Excel main ribbon. For example, if you would like to position the tab before the ‘Insert’ tab, put ‘TabInsert’ as the OfficeId property. Here is an example from this ribbon.
The Group control is a classic container that could hold another control. It also exposes the Position property. In this example, every group control has a button on it. The Button control responds to only one event – the click event. The most important code in this example is in buttons event handlers.
However, before writing anything about what the handler does, I have to make a digression. If you create a brand new Excel VSTO Add-In using Visual Studio template, your first build will fail. Visual Studio will report to you that you have to sign the ClickOnce manifest.
In the example, signing is already accomplished and in the next few sentences, I will explain how.
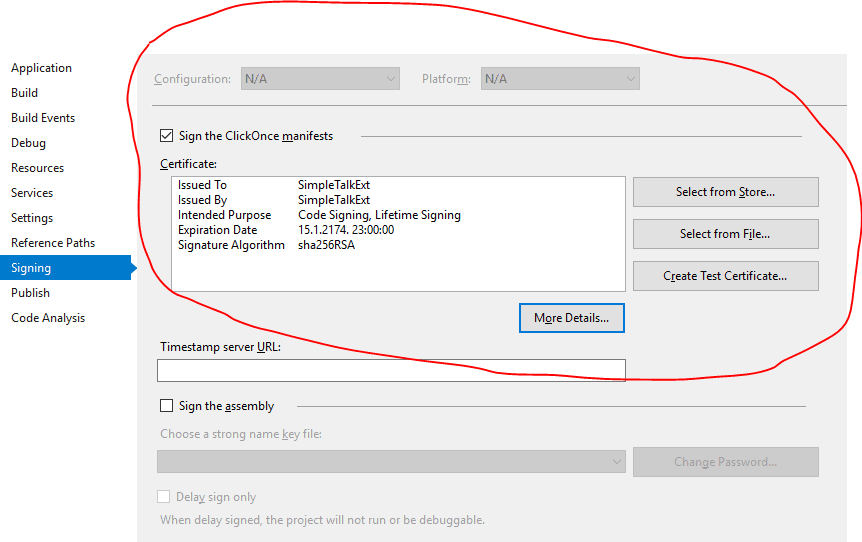
The project is signed by using the Personal Information Exchange (.pfx) file, although it’s possible to select a certificate from the Store. In order to create a .pfx file, first, you have to create a certificate. This is accomplished by using the Windows SDK utility MakeCert.exe as shown in the snippet below.
|
MakeCert /n «CN=SimpleTalkExt» /r /h 0 /eku «1.3.6.1.5.5.7.3.3,1.3.6.1.4.1.311.10.3.13» /e «01/16/2174» /sv SimpleTalkExt.pvk SimpleTalkExt.cer /a sha256 |
After that, another Windows SDK tool named Pvk2Pfx is used. Pvk2Pfx (Pvk2Pfx.exe) is a command-line tool that copies public key and private key information contained in .spc, .cer, and .pvk files to a Personal Information Exchange file. The file is created by issuing following command
|
pvk2pfx —pvk SimpleTalkExt.pvk —spc SimpleTalkExt.cer —pfx SimpleTalkExt.pfx –f |
After the file is created, on the project property Signing tab, choose Select from File and select the newly created pfx file. Your build will work correctly. So, time to go back to the main topic.
NOTE: Just like the previous examples, you can see this add-in in action by running the project. Be sure to modify the App.Config file first.
The event handlers for both buttons in the example produce the same result. The result is an Excel workbook. The workbook contains three sheets. The first one a contains data that represents the result of the T-SQL query, the second one is a Pivot table based on data in the first sheet. And the last sheet contains a chart that represents Pivot on the second sheet.
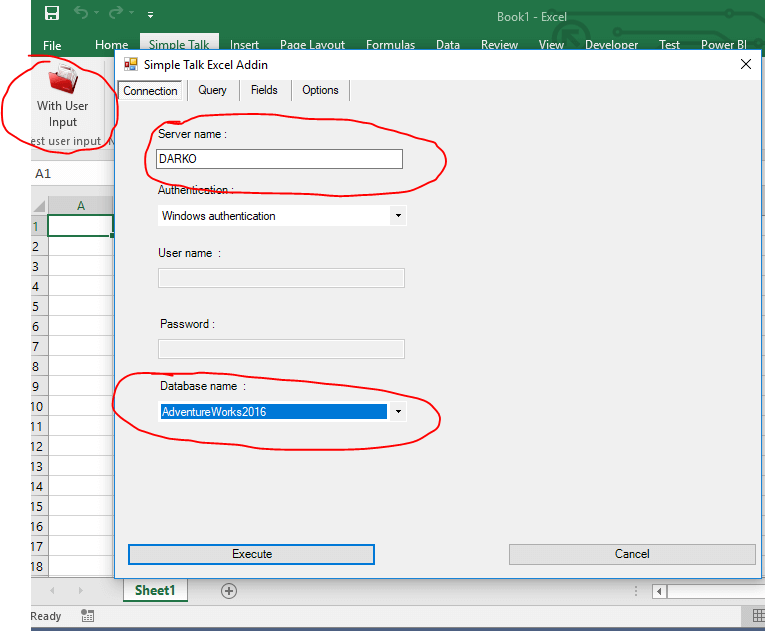
The difference between these two handlers is that the first one shows a form in which the user can specify a connection to SQL Server, T-SQL query, some Pivot options. The form looks similar to that shown in the image below. On the first tab named Connection, you have to specify the instance name and select a database from the list box. This example uses the AdventureWorks2016 database.
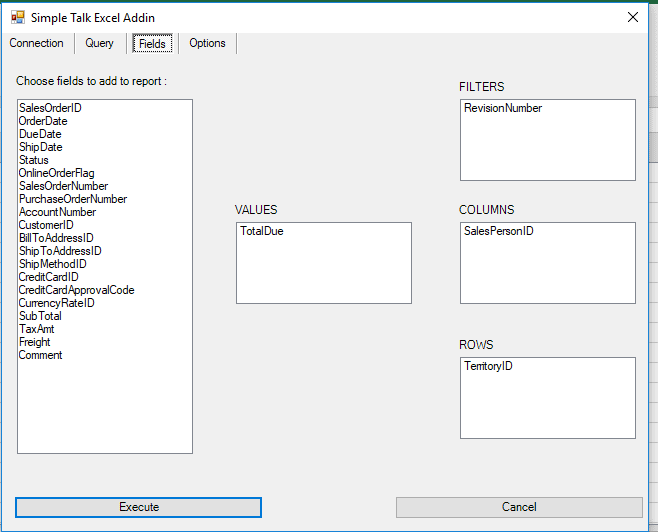
On the second tab named Query, you have to specify a T-SQL statement. This example, queries the Sales.SalesHeader table. On the third tab named Fields, you have to specify some Pivot options, like Columns, Rows, Values and so on, as shown in the image below.
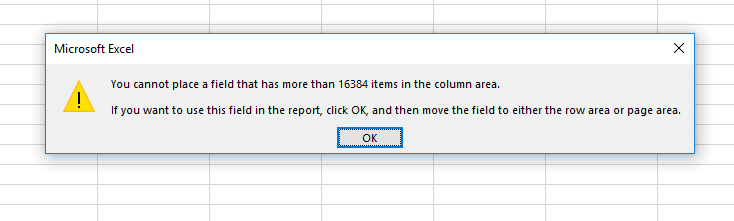
Several values are already added to the list boxes, as you see in the image above. Using drag & drop, it is possible to move fields between list boxes similar to Excel. Every table or every query result is not suitable to be pivoted. Furthermore, there is a restriction on the Columns list box. For example, when you try to put SalesOrderID in the Columns list box in Excel, you will receive an Excel message like the one shown in the image below.
Finally, on the Options tab, there are possibilities to define Chart Types, Table Styles and Pivot styles as shown in the image below.
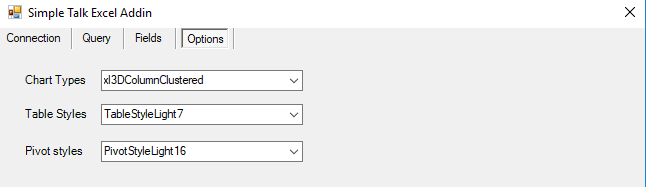
The chart type is an enumerator named xlChartType defined in Microsoft.Office.Core. During loading of the custom user form, the enumerator is set as a data source of the form’s combo box labeled Chart Types, so the user can initially set up the type of chart to see.
NOTE:In Excel it’s possible to change the chart type as well, but the purpose of this example is to show the Excel object model.
Excel exposes 21 ‘Light’ styles, 28 ‘Medium’ styles, and 11 ‘Dark’ styles by default, and you can define your own styles for the table and pivot. When the user has filled everything on the form, and clicks Execute in the current Excel workbook, three sheets are added.
In the first one, the result of the T-SQL query, is displayed very similarly to in the first example, as shown in the image below.
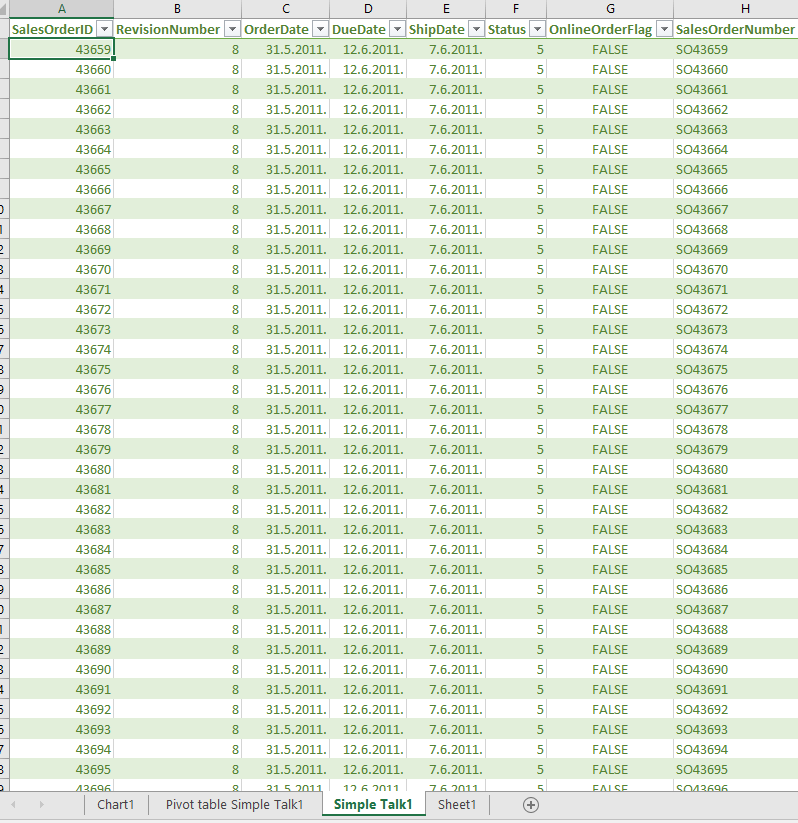
The only difference is that the result is formatted as a table rather than range. This is accomplished by calling function FormatAsTable that is implemented in the project’s General.cs class. The function is implemented as shown in the snippet below.
|
public static void FormatAsTable( Excel.Range sourceRange, string tableName, string tableStyleName, bool isSelected ) { sourceRange.Worksheet.ListObjects.Add(SourceType: Excel.XlListObjectSourceType.xlSrcRange,Source: sourceRange, LinkSource: Type.Missing, XlListObjectHasHeaders: Excel.XlYesNoGuess.xlYes,Destination: Type.Missing).Name = tableName; if (isSelected) sourceRange.Select(); sourceRange.Worksheet.ListObjects[tableName].TableStyle = tableStyleName; } |
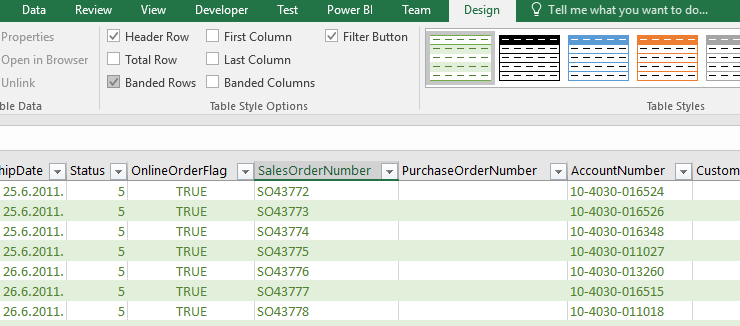
The benefits of formatting ‘as table’ are that column names are frozen in the first row with applied auto-filtering, and there are extra functionalities such as adding Total row by clicking on checkbox, as shown in the image below.
The second sheet contains a pivot table with a slicer object.
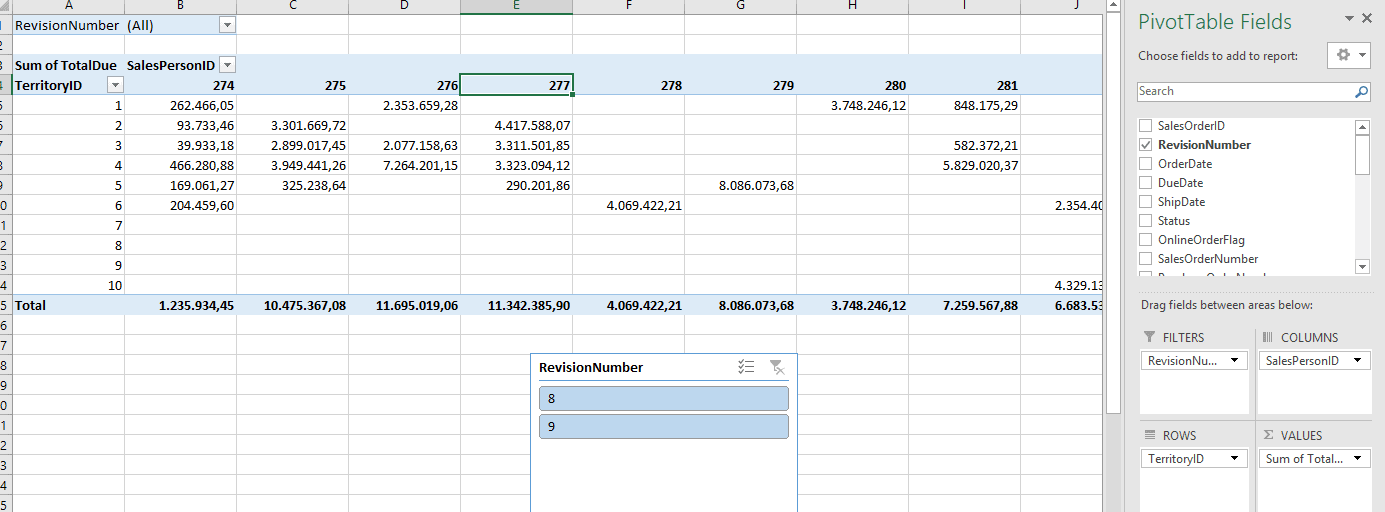
You can manipulate fields, applied a filter, and so on. One cool thing is a slicer object, introduced with Excel 2010, which makes it easy to apply a filter.
The pivot table is added by calling the AddPivot function defined in the General.cs static class. The signature of the function looks similar to that shown in the image below.
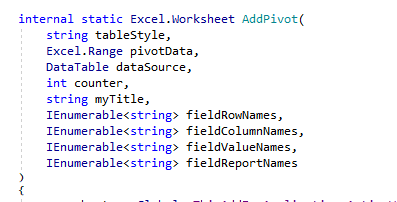
The AddPivot function uses the PivotTableWizard function which is part of the _Worksheet interface defined in the Microsoft.Office.Interop.Excel namespace. The function call is accomplished as in the snippet below.
|
//Add a PivotTable to the worksheet. pivotWorkSheet.PivotTableWizard( SourceType: Excel.XlPivotTableSourceType.xlDatabase, SourceData: pivotData, TableDestination: pivotWorkSheet.Cells[1, 1], // first cell of the pivot table TableName: pivotTableName ); |
Finally, on the third tab, there is a pivot-chart, which is basically the pivot table represented as a chart.
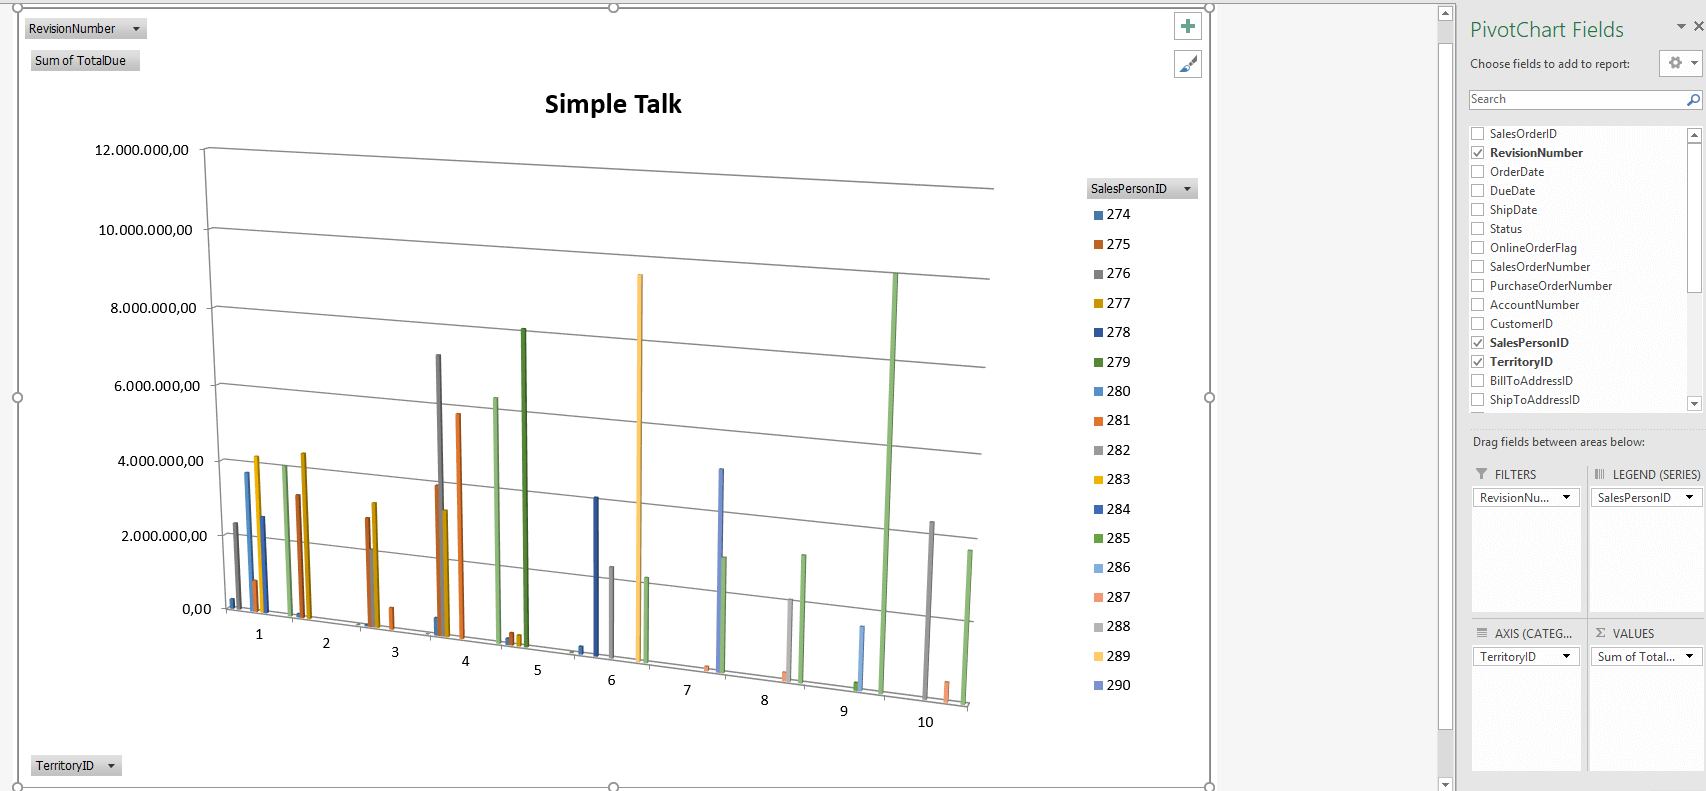
The pivot-chart is added to the workbook by using a wrapper method AddChart defined in the static class General. The most important part of this method is calling the ChartWizard method, which is part of the Chart interface defined in Microsoft.Office.Interop.Excel namespace.
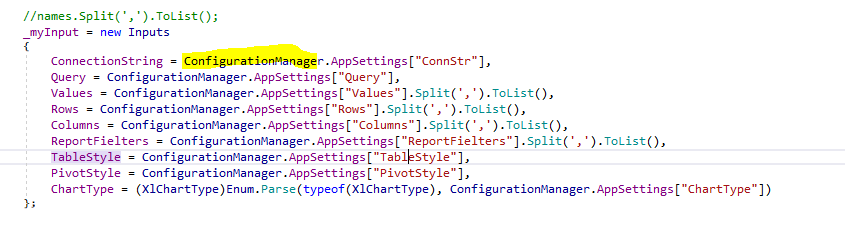
In the introduction of the section I mentioned that there are two buttons on the ribbon form. Both do the same thing. The difference is that information needed to accomplish the task in the second event handler is read from the application configuration file app.config shown in the image below.
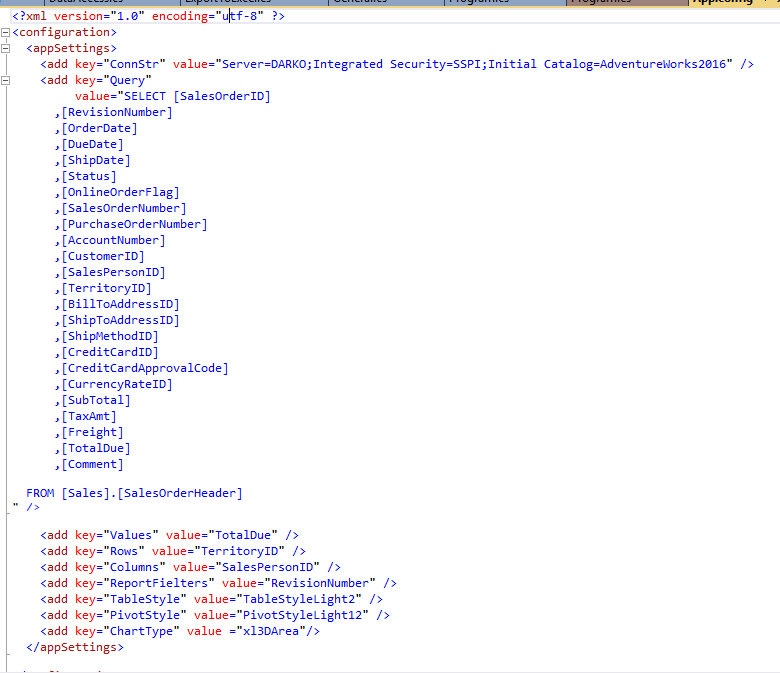
Reading from app.config is quite common, and it is accomplished by using ConfigurationManager defined in System.Configuration as shown in the image below.
Changing the values in app.config before and after publishing the result is a little bit different. In order to explain how to achieve this, I have to explain how to publish the result of the project VSTO.
Publishing the project result could be accomplished by using ClickOnce or by creating a Setup project. On the project properties, there is a tab named Publish as shown in the image below.
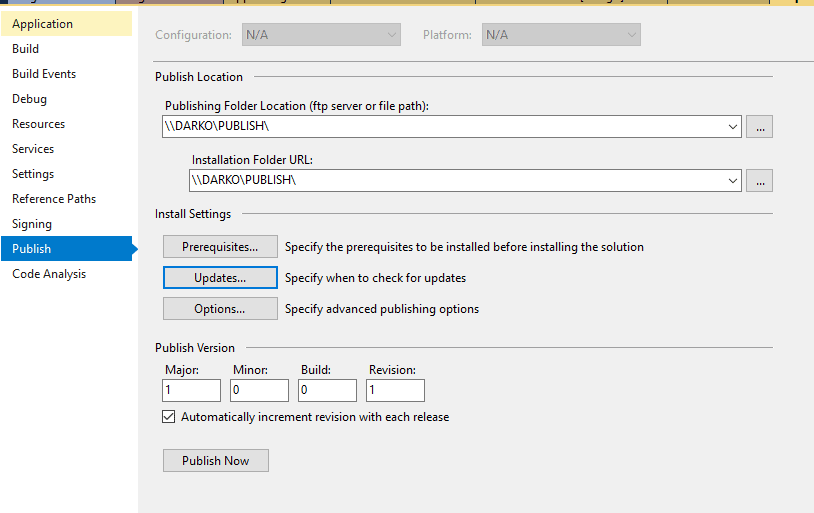
In addition to specifying the publish and installation folders, you can also specify Prerequisites, Updates, and Options.
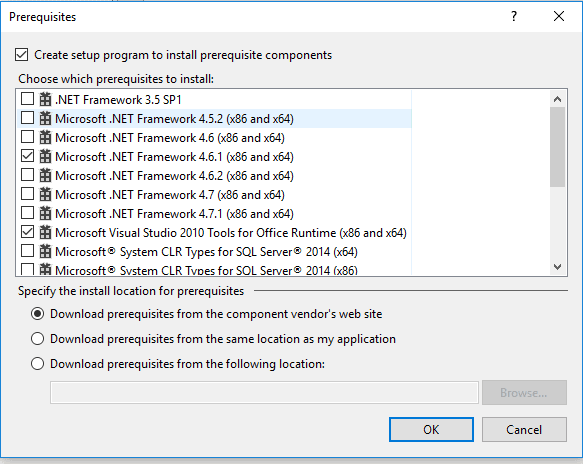
When you click on the Prerequisites button, you see a set of options similar to the image below.
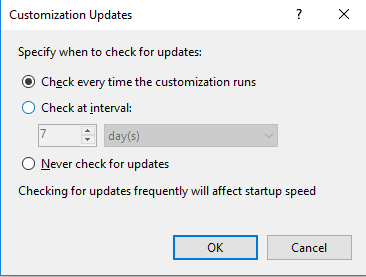
When you click on the Update button, you can see a set of options for updates as shown in the image below.
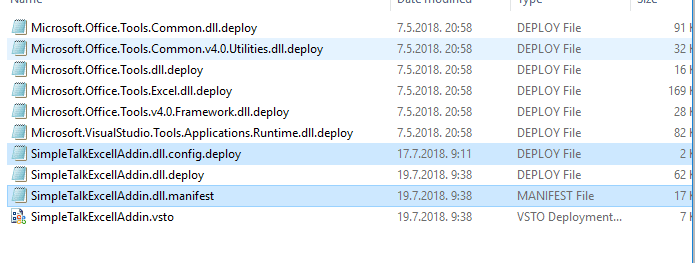
Depending on the options you choose, and after choosing the Publish command from the project context menu, your publishing/installation folder will look to that shown in the image below.
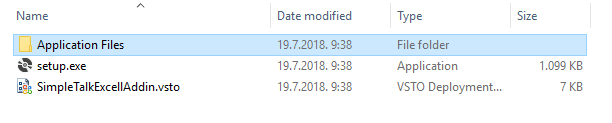
When you browse Application Files, you will notice that the files are separated by the version number. One common thing that you will need to do is to change configuration values, e.g. to change the connection string. This could be done, but after that, you should update the manifest file. On the image below configuration file and manifest file are highlighted.
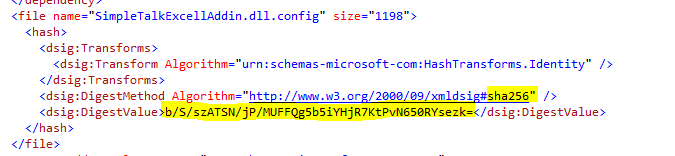
When you explore the manifest file by using Visual Studio, you will notice that the file is basically an XML file. Part of that file is a description of the configuration file, as shown in the image below.
The result files are protected by hashing. In order to change some values in the configuration file, you have to determine a new hash value. This might be accomplished by using ComputeHashGUI that is part of the article solution. If you set the project as a startup, you will see a simple GUI as shown in the image below.
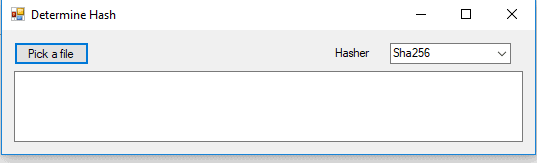
Usage is easy, first, you have to pick a file and that will be the configuration file. After that, the hash value is calculated by using the hash algorithm selected in the combo box. That hash value is then pasted in the manifest file. And there are a just a few more steps.
First, you have to copy the pfx file to the installation folder as well as the Windows SDK utility called mage.exe. Then you have to sign the manifest file located in the last installation folder by executing
|
d:publishmage —sign d:publishApplication FilesSimpleTalkExcellAddin_1_0_0_0SimpleTalkExcellAddin.dll.manifest —certfile «d:publishSimpleTalkExt.pfx» |
After that, you have to update the application VSTO file by executing the following command
|
mage —update SimpleTalkExcellAddin.vsto —appmanifest «d:publishApplication FilesSimpleTalkExcellAddin_1_0_0_0SimpleTalkExcellAddin.dll.manifest» —certfile «D:PUBLISHSimpleTalkExt.pfx» |
As a final step, you have to copy the VSTO file to the last installation folder, in this example SimpleTalExcelAddin_1_0_0_0. Of course, all these steps could be automated, but it is out of the scope of the article.
In the solution, there are two other projects. One to define a Word add-in by using the XML Ribbon control, and the other by using Outlook Add-in.
Set TestWordAddIn as the Startup project in Visual Studio. That is the next example.
Working with Word Add-ins
Unlike the previous example in which a Ribbon Designer Control is used, in this section, I will take another approach by utilizing Ribbon XML. So, what is the difference? The Ribbon Designer does not incorporate all facets provided by the OfficeFluentUI model. For example, the Ribbon Designer provides no way to re-purpose built-in commands or work with the BackStage. These things can only be done using Ribbon XML.
When you add a Ribbon (XML) item to a VSTO project from the Add New Item dialog box, Visual Studio automatically adds
- A Ribbon XML file. This file is used to defined UI elements
- A Ribbon code file. This file contains the Ribbon class.
In the solution, these two files are named as MyRibbon.xml and MyRibbon.cs.
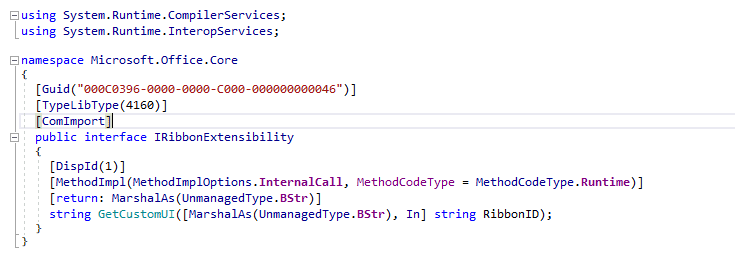
If you open the MyRibbon.cs file, you will notice that, unlike the previous example in which a Ribbon Designer Control is used, here the class implements an interface called IRibbonExtensibility. The interface is defined as shown in the image below. The interface contains only one method named GetCustomUI. (NOTE : The image is NOT from the project code, it is generated(displayed) with a help of R#-Resharper).
The interface implementation is in the code file and looks similar shown in the following snippet
|
#region IRibbonExtensibility Members public string GetCustomUI(string ribbonId) { return GetResourceText(«TestWordAddIn.MyRibbon.xml»); #endregion |
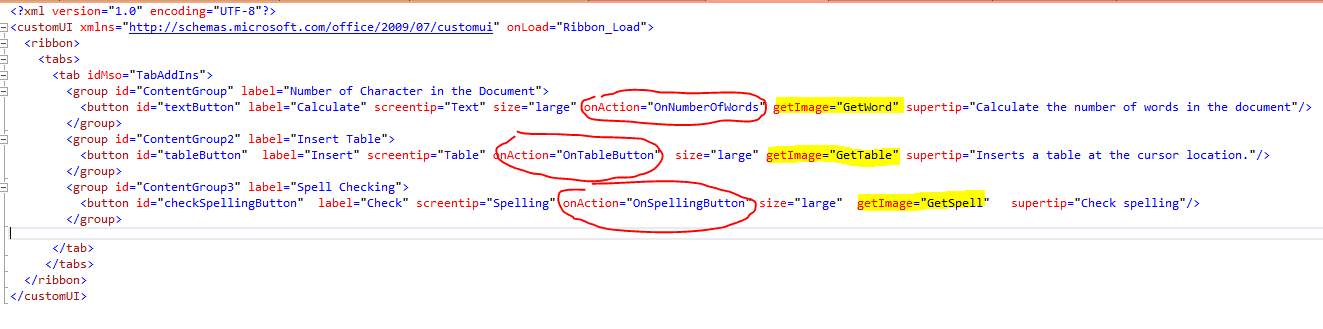
The content of the XML file, returned by GetCustomUI, is used to construct a GUI representation of the ribbon control. You can respond to user actions, such as clicking a button on the ribbon, by creating callback methods. Callback methods resemble events in Windows Forms controls, but they are identified by an attribute in the XML of the UI element and displayed surrounded with red in the image below. You might define an image for a button, as shown highlighted in yellow.
Before exploring the Word Add-in’s functionality, take a look at the Word object model. Similar to Excel, at the top of the object hierarchy, is the Application object. It represents a current instance of Word.
Next in the hierarchy is the Document object, which is basically the most frequently used object. Application objects have a collection named Documents of currently open or created documents.
The Selection object represents the area that is currently selected. When you perform an operation in the Word user interface, such as bolding text, you select, or highlight the text and then apply the formatting.
The Range object represents a contiguous area in a document and is defined by a starting character position and an ending character position. It is not visible, unlike Selection, which is always visible.
Now it is time to start exploring the Add-in functionality. By pressing F5, Word will launch. On the Add-ins tab, there are three buttons, as shown in the image below.
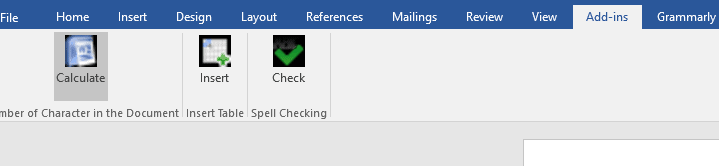
The first button, labeled with Calculate, calculates the number of characters (including hidden) in the current document.
The second button, with the Insert label, inserts a table at the current cursor position. This is accomplished by adding a new table in the ActivDocument.Tables collection, as shown in the snippet below.
|
var <strong>missing</strong> = Type.Missing; var currentRange = Globals.ThisAddIn.Application.Selection.Range; var newTable = Globals.ThisAddIn.Application.ActiveDocument.Tables.Add(Range: currentRange, NumRows: 3, NumColumns: 4, DefaultTableBehavior: ref <strong>missing</strong>, AutoFitBehavior: ref <strong>missing</strong>); |
The third button performs spell checking and reports the result by showing a MessageBox dialog. Most of the things that I write about Excel VSTO could be applied to Word VSTO or Outlook VSTO as well.
Now it is time to review the last example. In order to do that set OutLookAddIn as the startup project.
Working with Outlook Add-ins
Most things we are talking about Office VSTO could be applied to Outlook VSTO’s as well. It means that signing the project, then working with ThisAddIn class is almost the same as with Excel or Word VSTO’s.
However, unlike Word or Excel VSTO’s, Outlook VSTO does not raise a ShutDown event. When you create a new Outlook VSTO project, the generated code tells you exactly that.

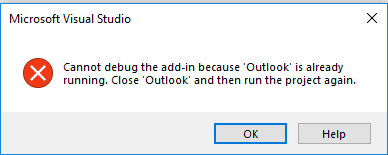
There is another difference, unlike Excel or Word VSTO’s which allows you to have running instances when you try to debug an OutLook VSTO by running the Outlook client, you receive a message like shown in the image below
At the top of Outlook’s object model hierarchy is the Application object. It represents the Outlook application. The application object has two collection properties, Explorers, and Inspectors. Part of the Explorers collection is the object of type Explorer.
The Explorer object represents a window that displays the contents of a folder that contains items such as e-mail messages, tasks, or appointments. The Inspector object represents a window that displays a single item such as an e-mail message, task, or appointment.
In this example, the Inspector object is used. In the VSTO StartUp event-handler, the following snippet is added in order to respond to the creation of the new e-mail message.
|
private void ThisAddInStartup(object sender, System.EventArgs e) { _inspectors = Application.Inspectors; _inspectors.NewInspector += InspectorsNewInspector; } |
When you create a new task, meeting, contact or e-mail or view existing once, the event is fired. In the event, handler following code is added.
|
Private void InspectorsNewInspector(Outlook.Inspector inspector) { If (!(inspector.CurrentItem is Outlook.MailItem mailItem)) return; if (mailItem.EntryID != null) return; mailItem.Subject = @»Mail subject added by using Outlook add-in»; mailItem.Body = @»Mail body added by using Outlook add-in»; } |
If the item is a newly created e-mail, then a text is added to e-mail subject and e-mail body.
Finally few words about cleaning up the environment. By choosing File->Options from the main menu, and choosing Add-ins from tabbed menu, you can get the form like shown in the image below.
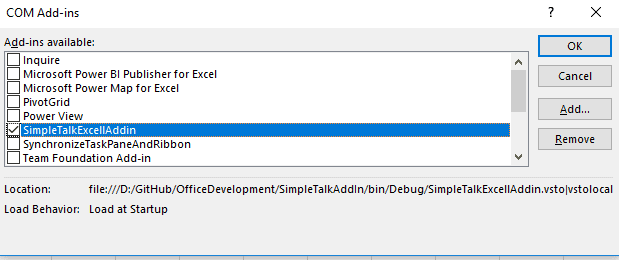
If you would like to disable an Add-in, just uncheck checkbox that is with Add-ins name. If you would like to remove the Add-in, choose Remove button.
Summary
Browsing Microsoft documentation about Office solutions is a tedious task. There are no pictures and a lot of mistakes. My aim was in writing this article is to provide a set of practical examples that could be easy to follow. The Office solution is a huge topic. In the article, I cover a small part, but I hope quite enough to encourage readers to start exploring the topic.
The solution source code can be found on GitHub here.
Introduction
For a long time, businesses have relied on Microsoft’s
Office applications to help running their daily routines.
Word is used to write e-mails and letters, Excel does the
calculations, and Outlook communicates. Everyone has seen a
slideshow made with PowerPoint. During the years, Office has
grown, and today the number of applications part of the
suite has grown to over ten.
Although many businesses can run their business with
stock versions of these products, it is common to repeat the
same steps again and again. For instance, sales people might
copy and paste information from their sales system to a Word
document, write their offer, send it out, and then return to
the sales system to mark their offer as done. And then they
start all over again.
As with many other Microsoft products, Office
applications are also highly customizable. In the past few
releases, extending these applications has become easier,
and you as a developer are not anymore limited to writing
COM DLLs with complex interfaces. Today, .NET
developers can also easily get started.
In this article, you are going to learn how you can use
Visual Studio 2008 and .NET to write custom add-ins for
Word. Along the way, you will explore the possibilities for
writing such applications. For instance, you can integrate
databases, web services and even blogs to your add-ins.
Say hello to VSTO
Developing applications for the Office products, and
especially for Office 2003 and 2007, is best done using
Visual Studio Tools for Office, or VSTO. With VSTO in Visual
Studio 2008, you can create different types of applications
that utilize the Office products as a platform. For
instance, you can create application-level add-ins,
document-level customizations, templates, workflows, and so
on. And as you might guess, you can develop your
applications from the convenience of the Visual Studio
IDE.
Love or hate it, the Office 2007 release bought
developers the Ribbon (Figure 1). With VSTO, you can also
create your own customizations to the ribbon, for example by
adding buttons or creating new groups of commands. Although
ribbon customizations are not the focus of this article, it
is important to realize that this kind of user interface is
getting more and more common. Windows 7 also contains a
ribbon interface in many of the built-in applications such
as Paint and Wordpad.
Office applications have had a user interface element
called a task panel for a long time already (Figure 2). With
VSTO, you can create your custom task panels, and for the
purpose of this article, they are a great way to expose the
add-in’s user interface, but more on that shortly.
If you have studied Office application development
before, you might have the impression that such development
work is hard. With previous versions of Visual Studio, this
arguably was the case, as you had to fiddle with different
COM interfaces, primary interoperability assemblies (PIAs),
and so on. But if you are using Visual Studio 2008 and are
targeting Office 2007 applications, things have gotten much
easier.
Installing VSTO usually happens along with Visual Studio.
When selecting the features to be installed, you will also
have the chance to select VSTO components (Figure 3). Note
however, that VSTO is only available from Visual Studio
Professional upwards. It is not available in the Visual
Studio Standard or Expression editions, nor can it be
purchased separately.
Figure 3. VSTO components are part of Visual Studio 2008
Professional and Team editions.
Creating a custom solution for Word
A technology like VSTO is best demonstrated with the help
of a sample application. To demonstrate the possibilities of
expanding Office applications with a custom solution, this
article walks you through in creating an add-in for Word
with VSTO in Visual Studio 2008.
The add-in itself contains a custom task panel. The
purpose of this panel is to let a sales person send quotes
to customers more efficiently. The sales person can simply
enter a customer ID, and automatically fetch customer’s
basic information into the active Word document. The panel
also contains a little utility to convert U.S. dollar amount
to euros using a web service. Finally, once the document is
saved, the add-in posts an update to a public blog. This
way, other sales persons are aware of the updated quote.
To begin developing your custom task panel, you first
need to fire up Visual Studio 2008. Choose to create a new
project (with the File/New/Project menu command), and in the
subsequent New Project dialog box, navigate to the
Office/2007 project type node on the left (Figure 4). From
there, select a Word Add-in, enter a name for your project
(such as WordSalesToolsAddIn), and click OK.
Once Visual Studio has finished creating your project
from the template, you should see a project with several
files and references (Figure 5). For instance, under the
Word folder, you should see a file named ThisAddIn.cs. This
file acts like the Global.asax.cs file in ASP.NET web
applications: the code in the file is executed when the add-
in first loads, and also when add-in is unloaded, i.e. when
Word closes down.
If you run the project immediately after creating it,
Visual Studio will automatically register your add-in so
that Word can load it, and will then start Word. This makes
development and testing very easy. However, unless you have
written additional code to the project, you cannot actually
see anything in Word when you run your project. Even on the
Ribbon, the Add-ins tab (if visible) doesn’t contain any
hints about your creation.
Of course, creating a custom task panel will create
something that’s visible in Word. At this point, you might
be tempted to return to Visual Studio, open the Add New Item
dialog box (Project/Add New Item) and look for a custom task
panel object. Unfortunately, such an object does not exist.
Instead, to create custom task panels for Word and other
compatible Office applications, you need user controls.
Task panels as user controls
To create a new custom task panel for Word, you need to
add a Windows Forms user control to your project. To do
this, open the Add New Item dialog box and select the User
Control template from the Windows Forms group (Figure 6).
Alternatively, you can use the Project menu’s “Add User
Control” command.
Once added, the user control will show as a
blank, gray area in the Visual Studio designer. The next
step would be to add controls to the designer surface. You
will also need a small piece of code in the ThisAddIn.cs
file to register your task panel with Word, and make it
visible. The code is similar to the following:
  SalesToolsUserControl userControl =

    new SalesToolsUserControl();

  CustomTaskPane myCustomTaskPane =

    this.CustomTaskPanes.Add(

    userControl, “Sales Tools”);

  myCustomTaskPane.Visible = true;
This code is added to the ThisAddIn_Startup method in the
ThisAddIn.cs file. In the code, an instance of the user
control (here called SalesToolsUserControl) is created, and
then it is added to the list of custom task panes that Word
controls. Finally, the pane is shown on the screen.
Implementing the functionality for the add-in
Once you have the basic user control skeleton created for
your custom task pane, it is time to add some functionality.
You can easily design the user interface of your pane in
Visual Studio, as a full-blown form designer is already
there. By default, Word sets the pane’s width to equal 200
pixels, with a height dependent on the size of Word’s main
window. You might wish to set the width of your user control
to equal 200 pixels so that designing would be easier.
Figure 7 shows the designed user interface for the sample
user control. Overall, the user interface itself is very
basic, but it’s the underlying code that makes the add-in
useful. The first feature in the add-in allows the user to
type in a customer ID, and then the add-in will fetch that
customer’s details from the Northwind SQL Server sample
database, and add them to the active Word document.

Figure 7. The sample application’s task panel in Visual Studio designer.
The code to fetch the details is straightforward: an SQL
connection is opened, a command is executed, and finally a
SqlDataReader object is used to fetch the results of the
query: string connStr = Properties.Settings.
Default.DatabaseConnection;
SqlConnection conn = new SqlConnection(
connStr);
try
{
conn.Open();
string sql = “SELECT [companyname], “+
“[contactname], [address], [city], ” +
“[region], [postalcode] “+
“FROM [customers] ” +
“WHERE [customerid] = @custid”;
SqlCommand cmd = new SqlCommand(
sql, conn);
cmd.Parameters.AddWithValue(
“@custid”, customerId);
try
{
SqlDataReader reader =
cmd.ExecuteReader();
try
{
if (reader.Read())
{
CustomerDetails cust =
new CustomerDetails();
cust.CompanyName = reader.GetString(0);
cust.ContactName = reader.GetString(1);
cust.Address = reader.GetString(2);
cust.City = reader.GetString(3);
if (!reader.IsDBNull(4))
{
cust.Region = reader.GetString(4);
}
cust.ZipCode = reader.GetString(5);// finished
return cust;
}
}
…
Here, the connection string is read from the add-in’s XML
configuration file, and the given customer ID is passed as a
parameter to the SqlCommand object. The results are returned
in a custom class instance, which contains simple public
properties for each value.
Once the query has been executed, it is time to insert
the results into the active Word document.
This is done
with the following code:
  CustomerDetails cust =

    DataAccess.GetCustomerDetails(

    customerIdTextBox.Text);

  // format text

  StringBuilder buffer = new StringBuilder();

  buffer.AppendLine(cust.CompanyName);

  buffer.AppendLine(cust.ContactName);

  buffer.AppendLine(cust.Address);

  buffer.AppendLine(cust.City);

  buffer.AppendLine(cust.Region);

  buffer.AppendLine(cust.ZipCode);

  // insert text at the current cursor location

  Microsoft.Office.Interop.Word.Application

    word = Globals.ThisAddIn.Application;

  Word.Range selection = word.Selection.Range;

  selection.Text = buffer.ToString();
The main interaction with Word happens in the last three
lines of code. The Globals class is a designer-created class
that is part of every Word add-in project, and is created
automatically by Visual Studio when you start the project.
It lives in the hidden ThisAddIn.Designer.cs file. Through
the Globals object, you can access your add-in’s ThisAddIn
class. In turn, this class then contains the Application
reference, which points to Word’s automation interface
master object. The Word object is defined in the
Microsoft.Office.Interop.Word.Application namespace, which
has a rather lengthy name to type. Thus, you might wish to
use the following C# using statements to help you manage the
long names:
  using Word = Microsoft.Office.Interop.Word;

  using Office = Microsoft.Office.Core;

  using Microsoft.Office.Tools.Word;

  using Microsoft.Office.Tools.Word.Extensions;

  using Microsoft.Office.Tools;
These same using statements are available in
ThisAddIn.cs, from which you might wish to copy them to your
user control file.
Converting currency values
The next part of functionality in the sample add-in is
the ability to convert currencies. In this case, the sample
application can take a USD dollar amount, and convert it to
Euros (€). This is done with the help of a free currency
conversion service available at Nimacon.net.
To use this service, you will first need to add a service
reference to the project. This is done easily using the Add
Service Reference dialog box in Visual Studio, launched for
example using the similarly named command in the Project
menu. Once the reference has been added, the following code
can be used to convert a USD amount into Euros:
  float usdAmount = float.Parse(usdAmountTextBox.Text);

  CurrencyRateService.CurrencyRateServiceClient

    client = new CurrencyRateService.CurrencyRateServiceClient();

  float euroAmount = client.GetEuroAmount(

    “USD”, usdAmount);

  MessageBox.Show(“$” + usdAmount + ” is ” +

    euroAmount + ” €.”);
First, the code takes the USD amount the user has
entered, and converts the string to a float value. Then, an
instance of the web service client class is constructed
(Visual Studio automatically creates the
CurrencyRateServiceClient class when the service reference
is added). The next step is to make the actual web service
(SOAP) call using the GetEuroAmount method of the service.
This method takes in a currency amount in any supported
currency, and a string specifying which currency the value
is in. The return value is the amount in Euros with the
current exchange rate.
Publishing to a blog
In a corporate setting, sharing information is a
necessity. For instance, if a member of a sales team creates
or updates an important offer, the other members of the team
should know about it. However, letting other people know
that you’ve updated a document is an additional, often
manual step. Why couldn’t the system automatically send a
status update to colleagues whenever an important document
changes?
In the sample application, this need to inform others is
addressed via a blog. Whenever the user saves the offer
(i.e. commits the updates made), the add-in automatically
publishes a new entry on a Google Blogger blog, which is
available at www.blogspot.com (Figure 8). The Blogger
service uses a free HTTP based API, which is divided into
two major parts: authentication with the generic Google
authentication APIs, and the specific Blogger interfaces to
submit blog posts.
Since the focus of this article is in Word add-ins and
not the Google interfaces, only a short description follows.
As mentioned previously, the first part of using the Blogger
service is to authenticate properly. This is done by sending
a HTTP POST request to the authentication URL, and passing
in the username and password for the service. In exchange,
the service returns an authentication token, which must be
passed when submitting a post to the user’s blog with the
Blogger API.
The following is a snippet of the code to authenticate
with the service. The Google developer documentation for the
service is publicly available on the Internet; see the Links
section for details.
  WebClient web = new WebClient();

  try

  {

    NameValueCollection postParams =

      new NameValueCollection();

    postParams.Add(“accountType”, accountType);

    postParams.Add(“Email”, email);

    postParams.Add(“Passwd”, password);

    postParams.Add(“service”, service);

    postParams.Add(“source”, sourceApp);

    byte[] result = web.UploadValues(

      loginUrl, “POST”, postParams);

    string resultStr =

      Encoding.ASCII.GetString(result);

    string[] tokens = resultStr.Split();

    bloggerAuthToken = tokens[2].Substring(5);

  }

  finally

  {

    web.Dispose();

  }
With the authentication token available (the
bloggerAuthToken member at the end of the code snippet), the
next step is to call the actual posting function. This can
be done with code similar to the following:
  public static void SubmitBlogPost(

    string title, string body)

  {

    string xml;

    MemoryStream xmlStream =

      new MemoryStream();

    try

    {

      XmlWriterSettings settings =

        new XmlWriterSettings();

      settings.Indent = true;

      XmlWriter writer = XmlWriter.Create(

        xmlStream, settings);

      try

      {

        writer.WriteStartElement(

          “entry”, “http://www.w3.org/2005/Atom”);

        …

        writer.WriteEndElement();

      }

      finally

      {

        writer.Close();

      }

      xml = Encoding.ASCII.GetString(xmlStream.ToArray());

    }

    finally

    {

      xmlStream.Dispose();

    }

    WebClient web = new WebClient();

    try

    {

      web.Headers.Add(“Content-Type”, “application/atom+xml”);

      web.Headers.Add(“Authorization”, “GoogleLogin auth=” +

        bloggerAuthToken);

      web.Headers.Add(“GData-Version”, “2”);

      web.Encoding = Encoding.UTF8;

      string response = web.UploadString(submitUrl, “POST”, xml);

    }

    finally

    {

      web.Dispose();

    }

  }
Here, the code first constructs an XML based Atom entry
that the Blogger service accepts (the actual lines are
omitted for brevity), and then uses a WebClient to connect
to the HTTP service. Note how several custom headers have to
be added to the HTTP request for the Google API to accept
it.
Now that the code to submit a blog entry is in place,
next you need to notice when the Word document is being
saved. The Word object model supports a set of events, and
one of them is called DocumentBeforeSave. You can hook into
this event, and then execute the necessary code to update
the blog whenever the document has been saved.
The logical place to hook into this event is in
ThisAddIn.cs’ ThisAddIn_Startup method. Here is the code to
hook and handle the event:
private void ThisAddIn_Startup(
object sender, System.EventArgs e)
{
userControl = new SalesToolsUserControl();
…
ApplicationEvents4_DocumentBeforeSaveEventHandler
handler = new ApplicationEvents4_
DocumentBeforeSaveEventHandler(
Application_DocumentBeforeSave);
this.Application.DocumentBeforeSave += handler;
}private void Application_DocumentBeforeSave(
Microsoft.Office.Interop.Word.Document Doc,
ref bool SaveAsUI, ref bool Cancel)
{
// the document is about to be saved
if (!SaveAsUI)
{
// not saving with a new name
// or for the first time
userControl.PublishSaveToBlog(Doc.FullName);
}
}
Once the event handler has been assigned to the event,
the Application_DocumentBeforeSave method is called each
time the user saves the document. Notice how a presentation
of the active document is passed to the event handler as the
Doc parameter. This object contains a property called
FullName, which is used when creating the blog entry text.
The code in the user control’s PublishSaveToBlog method
looks like the following:
  public void PublishSaveToBlog(string filename)

  {

    if (publishToBlogCheckBox.Checked)

    {

      BloggerClient.SubmitBlogPost(“Offer updated”,

        “The offer “” + filename +

        “” has been updated.”);

      MessageBox.Show(“Blog entry published!”);

    }

  }
The end result is a blog entry similar to the one in
Figure 9.

Figure 9. A submitted blog entry by the sample application.
Conclusion
In this article, you saw how you can use Visual Studio
2008 to create add-in applications for the Office 2007 suite
of products, and more specifically Word 2007. Visual Studio
2008 provides ready-made templates for developing such add-
ins, and this gives you a head start. Creating for example a
custom task panel is easy as adding a new user control to
the project, and then registering it with Word.
The sample application (Figure 10) showed you how you can
easily extend Word to transform it to a powerful application
platform: you can access SQL databases, call web services,
and even associate your code with events in Word. From this
perspective, the rule of thumb is that if you can do it
from .NET code, you can also do it from an Office add-in.
If you are looking to build your custom solutions to help
businesses run more efficiently, think about whether you
could integrate the needed functionality into Office
applications like Word, Excel, PowerPoint or Outlook. The
possibilities in both business and personal settings are
many. And once Visual Studio 2010 and Office 2010 become
available, the story will get even better. In the mean time,
let’s empower the office!
Resource Links
Office Development with Visual Studio
Office Developer Center
Word 2007 Developer Reference
Word Object Model Reference
Google Data APIs Overview
About the Author
Jani Järvinen is a software development trainer and
consultant in Finland. He is a Microsoft C# MVP and a
frequent author and has published three books about software
development. He is the group leader of a Finnish software
development expert group at ITpro.fi and a board member of
the Finnish Visual Studio Team System User Group. His blog
can be found at http://www
.saunalahti.fi/janij/. You can send him mail by clicking
on his name at the top of the article.