Find and replace text
-
Go to Home > Replace.
-
Enter the word or phrase you want to replace in Find what.
-
Enter your new text in Replace with.
-
Choose Replace All to change all occurrences of the word or phrase. Or, select Find Next until you find the one you want to update, and then choose Replace.
-
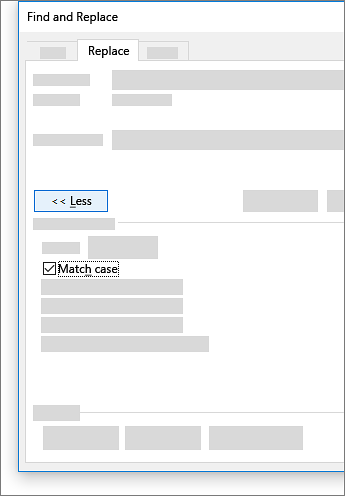
To specify only upper or lowercase in your search, select More > Match case. There are several other ways to search in this menu.
For other options, see Find and replace text
Find and replace basic text
In the upper-right corner of the document, in the search box 
To replace found text:
-
Select the magnifying glass, and then select Replace.
-
In the Replace With box, type the replacement text.
-
Select Replace All or Replace.
Tips:
-
You can also open the basic Find and Replace pane with the keyboard shortcut CONTROL + H.
-
When you replace text, it’s a good idea to select Replace instead of Replace All. That way you can review each item before replacing it.
-
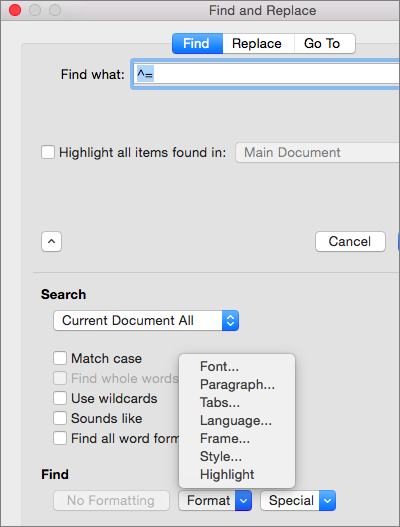
You can find text with special formatting, such as bold or highlight, by using the Format menu.
-
Select View > Navigation Pane.
-
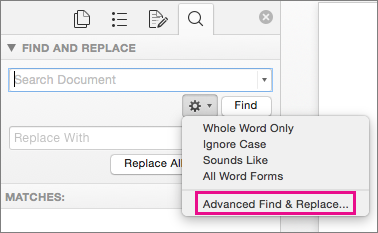
In the Navigation Pane, select the magnifying glass.
-
Select Settings
, and then select Advanced Find & Replace.
Notes:
-
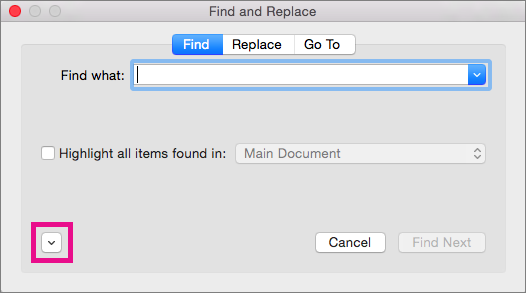
Select the arrow at the bottom of the Find and Replace dialog box to show all options.
-
-
-
On the Format menu, select the option that you want.
If a second dialog box opens, select the options that you want, and then select OK.
-
In the Find and Replace dialog box, select Find Next or Find All.
You can find and replace text with special formatting, such as bold or highlight, by using the Format menu.
-
Select View > Navigation Pane.
-
In the Navigation Pane, select the magnifying glass.
-
Select Settings
, and then select Advanced Find & Replace.
-
At the top of the dialog box, select Replace.
Notes:
-
Select the arrow at the bottom of the Find and Replace dialog box to show all options.
-
-
-
On the Find what box, type the text that you want to find.
-
On the Format menu, select the formatting that you want to find.
If a second dialog box opens, select the options that you want, and then select OK.
-
Select in the box next to Replace with.
-
On the Format menu, select the replacement formatting. If a second dialog box appears, select the formats that you want, and then select OK.
-
Select Replace, Replace All, or Find Next.
-
Select View > Navigation Pane.
-
In the Navigation Pane, select the magnifying glass.
-
Select Settings
, and then select Advanced Find & Replace.
Notes:
-
Select the arrow at the bottom of the Find and Replace dialog box to show all options.
-
-
-
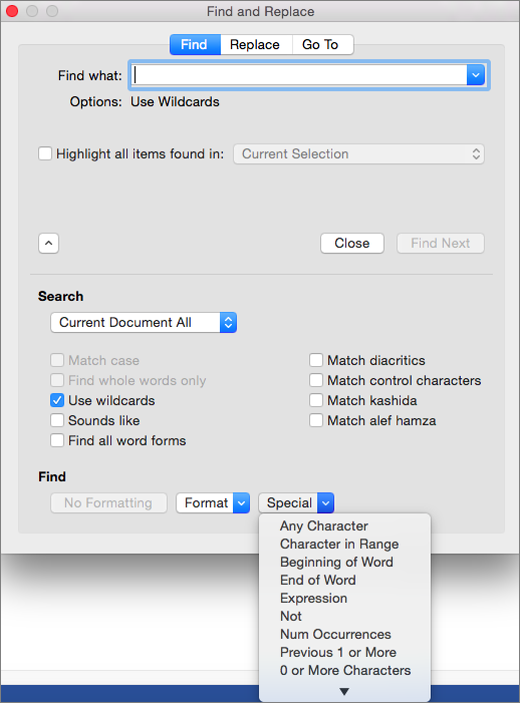
On the Special menu, select the special character that you want to find.
-
Select Find Next.
-
Select View > Navigation Pane.
-
In the Navigation Pane, select the magnifying glass.
-
Select Settings
, and then select Advanced Find & Replace.
Notes:
-
Select the arrow at the bottom of the Find and Replace dialog box to show all options.
-
-
-
At the top of the Find and Replace dialog box, select Replace and then select in the Find What box, but don’t type anything there. Later, when you select a special character, Word will automatically put the character code in the box for you.
Note: Select the arrow at the bottom of the Find and Replace dialog box to show all options.
-
On the Special menu, select the special character that you want to find.
-
Select in the Replace with box.
-
On the Special menu, select the special character that you want to use as a replacement.
-
Select Replace or Find Next.
-
Select View > Navigation Pane.
-
In the Navigation Pane, select the magnifying glass.
-
Select Settings
, and then select Advanced Find & Replace.
-
Select the Use wildcards check box.
If you don’t see the Use wildcards check box, select
.
-
Select the Special menu, select a wildcard character, and then type any additional text in the Find what box.
-
Select Find Next.
Tips:
-
To cancel a search in progress, press
+ PERIOD.
-
You can also enter a wildcard character directly in the Find what box instead of selecting an item from the Special pop-up menu.
-
To search for a character that’s defined as a wildcard character, type a backslash () before the character. For example, type ? to find a question mark.
-
You can use parentheses to group the wildcard characters and text and to indicate the order of evaluation. For example, search for <(pre)*(ed)> to find «presorted» and «prevented.»
-
You can search for an expression and use the n wildcard character to replace the search string with the rearranged expression. For example, type (Newman) (Belinda) in the Find what box and 2 1 in the Replace with box. Word will find «Newman Belinda» and replace it with «Belinda Newman.»
-
-
To replace found text:
-
Select the Replace tab, and then select the Replace with box.
-
Select Special, select a wildcard character, and then type any additional text in the Replace with box.
-
Select Replace All, Replace, or Find Next.
Tip: When you replace text, it’s a good idea to select Replace instead of Replace All. That way you can confirm each replacement to make sure that it’s correct.
-
You can refine a search by using any of the following wildcard characters.
|
To find |
Use this |
For example |
|---|---|---|
|
Any single character |
? |
s?t finds «sat» and «set.» |
|
Any string of characters |
* |
s*d finds «sad» and «started.» |
|
One of the specified characters |
[ ] |
w[io]n finds «win» and «won.» |
|
Any single character in this range |
[-] |
[r-t]ight finds «right» and «sight» and «tight.» Ranges must be in ascending order. |
|
Any single character except the characters inside the brackets |
[!] |
m[!a]st finds «mist» and «most» but not «mast.» |
|
Any single character except characters in the range inside the brackets |
[!x-z] |
t[!a-m]ck finds «tock» and «tuck» but not «tack» or «tick.» Ranges must be in ascending order. |
|
Exactly n occurrences of a character or expression |
{ n} |
fe{2}d finds «feed» but not «fed.» |
|
At least n occurrences of a character or expression |
{ n,} |
fe{1,}d finds «fed» and «feed.» |
|
A range of occurrences of a character or expression |
{ n, n} |
10{1,3} finds «10,» «100,» and «1000.» |
|
One or more occurrences of a character or expression |
@ |
lo@t finds «lot» and «loot.» |
|
The beginning of a word |
< |
<(inter) finds «interesting» and «intercept» but not «splintered.» |
|
The end of a word |
> |
(in)> finds «in» and «within,» but not «interesting.» |
Word for the web lets you find and replace basic text. You can match case or fine whole words only. For more varied options, open your document in Word for the desktop.
Need more help?
Want more options?
Explore subscription benefits, browse training courses, learn how to secure your device, and more.
Communities help you ask and answer questions, give feedback, and hear from experts with rich knowledge.
1 2 3 4 5 6 7 8 9 10 11 12 13 14 15 16 17 18 19 20 21 22 23 24 25 26 27 28 29 30 31 32 33 34 35 36 37 38 39 40 41 42 43 44 45 46 47 48 49 50 51 52 53 54 55 56 57 58 59 60 61 62 63 64 65 66 67 68 69 70 71 72 73 74 75 76 77 78 79 80 81 82 83 84 85 86 87 88 89 90 91 92 93 94 95 96 97 98 99 100 101 102 103 104 105 106 107 108 109 110 111 112 113 114 115 116 117 118 119 120 121 122 123 124 125 126 127 128 129 130 131 132 133 134 135 136 137 138 139 140 141 142 143 144 145 146 147 148 149 150 151 152 153 154 155 156 157 158 159 160 161 162 163 164 165 166 167 168 169 170 171 172 173 174 175 176 177 178 179 180 181 182 183 184 185 186 187 188 189 190 191 192 193 194 195 196 197 198 199 200 201 202 203 204 205 206 207 208 209 210 211 212 213 214 215 216 217 218 219 220 221 222 223 224 225 226 227 228 229 230 231 232 233 234 235 236 237 238 239 240 241 242 243 244 245 246 247 248 249 250 251 252 253 254 255 256 257 258 259 260 261 262 263 264 265 266 267 268 269 270 271 272 273 274 275 276 277 278 279 280 281 282 283 284 285 286 287 288 289 290 291 292 293 294 |
using System; using System.Collections.Generic; using System.ComponentModel; using System.Data; using System.Data.OleDb; using System.Drawing; using System.Globalization; using System.Linq; using System.Text; using System.Windows.Forms; using Excel = Microsoft.Office.Interop.Excel; using Word = Microsoft.Office.Interop.Word; namespace sourse { class word { Object wordMissing = System.Reflection.Missing.Value; Object wordTrue = true; Object wordFalse = false; public Word.Table tables; //рабочие параметры // если использовать Word.Application и Word.Document получим предупреждение от компиллятора public Word._Application wordApplication; public Word._Document wordDocument; Object templatePathObj; // определяет поведение в случае ошибки при поиске и замене строки, по умолчанию открытый документ и приложенеи Word закрываются public bool CloseIFReplaceFailed = true; /// <summary> /// возвращает количество таблиц в документе /// </summary> /// <returns></returns> public int tableCount() { return wordDocument.Tables.Count; } public bool runMacros(string macros) { try { wordApplication.Run(macros); return true; } catch { MessageBox.Show(@"Ошибка макроса"); return false; } } // фиксированные параметры для передачи приложению Word public void copyToWord(ref word MainDoc, word secondDoc) { Word.Range wordrange = secondDoc.wordApplication.ActiveDocument.Range( secondDoc.wordApplication.ActiveDocument.Content.Start, secondDoc.wordApplication.ActiveDocument.Content.End); wordrange.Copy(); Word.Range w = MainDoc.wordApplication.ActiveDocument.Range( MainDoc.wordApplication.ActiveDocument.Content.End - 1, MainDoc.wordApplication.ActiveDocument.Content.End); w.Paste(); } public void GetFont(Font _font) { Word.Range w = wordApplication.ActiveDocument.Range( wordApplication.ActiveDocument.Content.Start, wordApplication.ActiveDocument.Content.End); w.Font.Name = _font.Name; w.Font.Size = _font.Size; } public bool Visible { get { if (documentClosed()) { throw new Exception("Ошибка при попытке изменить видимость Microsoft Word. Программа или документ уже закрыты."); } return wordApplication.Visible; } set { if (documentClosed()) { throw new Exception("Ошибка при попытке изменить видимость Microsoft Word. Программа или документ уже закрыты."); } wordApplication.Visible = value; } // завершение public bool Visible } // конструктор, создаем по шаблону, потом возможно расширение другими вариантами public word() { wordApplication = new Word.Application(); //создаем ноый документ методом приложения Word по поути к шаблону документа try { wordDocument = wordApplication.Documents.Add(ref wordMissing, ref wordMissing, ref wordMissing, ref wordMissing); } // если произошла ошибка, то приложение Word надо закрыть catch (Exception error) { wordApplication.Quit(ref wordMissing, ref wordMissing, ref wordMissing); wordApplication = null; throw new Exception("Ошибка. Не удалось открыть шаблон документа MS Word. " + error.Message); } // завершение createFromTemplate(string templatePath) } public word(string templatePath) { CreateFromTemplate(templatePath); } // создаем приложение Word и открывает новый документ по заданному файлу шаблона public void CreateFromTemplate(string templatePath) { //создаем обьект приложения word wordApplication = new Word.Application(); // создаем путь к файлу используя имя файла templatePathObj = templatePath; //создаем ноый документ методом приложения Word по поути к шаблону документа try { wordDocument = wordApplication.Documents.Add(ref templatePathObj, ref wordMissing, ref wordMissing, ref wordMissing); } // если произошла ошибка, то приложение Word надо закрыть catch (Exception error) { wordApplication.Quit(ref wordMissing, ref wordMissing, ref wordMissing); wordApplication = null; throw new Exception("Ошибка. Не удалось открыть шаблон документа MS Word. " + error.Message); } // завершение createFromTemplate(string templatePath) } public bool GetTable(int count) { try { var table = wordDocument.Tables[count]; tables = table; return true; } catch { MessageBox.Show(@"Не получилось выявить таблицу"); return false; } } public string Seath(string findStr) { string res = " "; object missing; missing = Type.Missing; object findText = findStr; wordApplication.Selection.Find.ClearFormatting(); if (wordApplication.Selection.Find.Execute(ref findText, ref missing, ref missing, ref missing, ref missing, ref missing, ref missing, ref missing, ref missing, ref missing, ref missing, ref missing, ref missing, ref missing, ref missing)) { // MessageBox.Show("Text found."); wordApplication.Selection.Expand(Word.WdUnits.wdLine); res = wordApplication.Selection.Text.Remove(wordApplication.Selection.Text.Length - 1, 1); } return res; } // ПОИСК И ЗАМЕНА ЗАДАННОЙ СТРОКИ public void ReplaceString(string strToFind, string replaceStr, string replaceTypeStr) { if (documentClosed()) { throw new Exception("Ошибка при выполнении поиска и замены в Microsoft Word. Программа или документ уже закрыты."); } // обьектные строки для Word object strToFindObj = strToFind; object replaceStrObj = replaceStr; // диапазон документа Word Word.Range wordRange; //тип поиска и замены object replaceTypeObj; if (replaceTypeStr == "all") { // заменять все найденные вхождения replaceTypeObj = Word.WdReplace.wdReplaceAll; } else if (replaceTypeStr == "one") { // заменять только первое найденное вхождение replaceTypeObj = Word.WdReplace.wdReplaceOne; } else { Close(); throw new Exception("Неизвестный тип поиска и замены в документе Word."); } try { // обходим все разделы документа for (int i = 1; i <= wordDocument.Sections.Count; i++) { // берем всю секцию диапазоном wordRange = wordDocument.Sections[i].Range; // выполняем метод поискаи замены обьекта диапазона ворд wordRange.Find.Execute(ref strToFindObj, ref wordMissing, ref wordMissing, ref wordMissing, ref wordMissing, ref wordMissing, ref wordMissing, ref wordMissing, ref wordMissing, ref replaceStrObj, ref replaceTypeObj, ref wordMissing, ref wordMissing, ref wordMissing, ref wordMissing); } } catch (Exception error) { if (CloseIFReplaceFailed) { this.Close(); } throw new Exception("Ошибка при выполнении поиска и замены в документе Word. " + error.Message); } // завершение функции поиска и замены SearchAndReplace } // тоже поиск и замена private void WordReplace(string old_str, string new_str) { foreach (Microsoft.Office.Interop.Word.Range tmpRange in wordDocument.StoryRanges) { // Set the text to find and replace tmpRange.Find.Text = old_str; tmpRange.Find.Replacement.Text = new_str; // Set the Find.Wrap property to continue (so it doesn't // prompt the user or stop when it hits the end of // the section) tmpRange.Find.Wrap = Microsoft.Office.Interop.Word.WdFindWrap.wdFindContinue; // Declare an object to pass as a parameter that sets // the Replace parameter to the "wdReplaceAll" enum object replaceAll = Microsoft.Office.Interop.Word.WdReplace.wdReplaceAll; object missing = System.Type.Missing; // Execute the Find and Replace -- notice that the // 11th parameter is the "replaceAll" enum object tmpRange.Find.Execute(ref missing, ref missing, ref missing, ref missing, ref missing, ref missing, ref missing, ref missing, ref missing, ref missing, ref replaceAll, ref missing, ref missing, ref missing, ref missing); } } // закрытие открытого документа и приложения public void Close() { if (documentClosed()) { throw new Exception("Ошибка при попытке закрыть Microsoft Word. Программа или документ уже закрыты."); } wordDocument.Close(ref wordFalse, ref wordMissing, ref wordMissing); wordApplication.Quit(ref wordMissing, ref wordMissing, ref wordMissing); wordDocument = null; wordApplication = null; } // если документ уже закрыт, true private bool documentClosed() { if (this.wordApplication == null || this.wordDocument == null) { return true; } else { return false; } } // завершение class WordDocument } } |
I use this function to find and replace. you can specify any of the options.
private void FindAndReplace(Microsoft.Office.Interop.Word.Application doc, object findText, object replaceWithText)
{
    //options
    object matchCase = false;
    object matchWholeWord = true;
    object matchWildCards = false;
    object matchSoundsLike = false;
    object matchAllWordForms = false;
    object forward = true;
    object format = false;
    object matchKashida = false;
    object matchDiacritics = false;
    object matchAlefHamza = false;
    object matchControl = false;
    object read_only = false;
    object visible = true;
    object replace = 2;
    object wrap = 1;
    //execute find and replace
    doc.Selection.Find.Execute(ref findText, ref matchCase, ref matchWholeWord,
        ref matchWildCards, ref matchSoundsLike, ref matchAllWordForms, ref forward, ref wrap, ref format, ref replaceWithText, ref replace,
        ref matchKashida ,ref matchDiacritics, ref matchAlefHamza, ref matchControl);
}
And usage would be :
object fileName = Path.Combine(System.Windows.Forms.Application.StartupPath, "document.docx");
Microsoft.Office.Interop.Word.Application wordApp = new Microsoft.Office.Interop.Word.Application { Visible = true };
Microsoft.Office.Interop.Word.Document aDoc = wordApp.Documents.Open(fileName, ReadOnly: false, Visible: true);
aDoc.Activate();
FindAndReplace(wordApp, "{id}", "12345");
And you can use the FindAndReplace function over and over….
Hope this helps.
MS-Word is a powerful word processing application, used to create documents, articles, assignments, etc. with the help of features and tools provided by it. It is used to perform many operations and creating or editing files and documents. MS Word is popular in the market because of its wide variety of features like Adding Visual Effects to your text, Turning your text data into graphs, Adding visual impact to your document.
Find and Replace
Sometimes it is difficult to look for a certain item from a list of different items from a document. It might be time taking to look for that word within each line of the document. To make this process easier, Microsoft provides its users with a tool called ‘Find’ to search for a specific word.
Example:
Teacher Mrs. Desai got a Word document from her school to verify and update her information in the document, which has enormous tabular data of more than 300 teachers. She found it very challenging to see her name. But then she remembered that it can be quickly done by using the “Find” function in Microsoft Word. Find function helped her find her information which was at row number 233.
She checked the data and found that everywhere her middle name was misspelled, the changes required at 7 places. She applied the “Replace” function from Microsoft Word. She quickly replaced the incorrect middle name with the correct one in a fraction of seconds. Great!!! Let us learn how did she do that?
Following are the steps to find and replace the word in Microsoft Word 2010:
Step 1: Go to the Home tab.
Step 2: Select the Replace option from the Editing category.
Step 3: After clicking on Replace following window will appear
Step 4: Click on the Find Tab
And enter the word or phrase to be searched and click on Find Next. Select Find Next until you come to the word you want to update.
Step 5: Select Replace. To find and replace the text. To update all instances at once, choose Replace All.
Step 6: To Exit from Find and Replace, click on the Cancel button or the close button available in the upper right corner.
Example:
Let us consider, there’s a need to search the word “Roy” in the Word document.
Step 1: Type the word “Roy” and click on Find Next. It will highlight all the occurrences of “Roy”. Click on Replace and enter the text with which the “Roy” is to be replaced. I want to replace it with “Rane” click on Replace All.
Step 2: After clicking on Replace All you will find the following message informing you about the replacements done.
And you can observe in the above image that the word Roy been replaced by Rane.
More Features:
There are some additional features provided to make our search more specific. You can select the options like Find all word forms, Match case, ignore punctuation characters, etc. which will help us to make our search more sophisticated.
Let’s assume you’re a paralegal and you just finished typing a lengthy legal document or a contract for your client, only to discover that you misspelled your client’s name or a wrong company’s name multiple times throughout your document. And don’t have time to manually locate and replace every instance of the text. What would you do? Don’t panic – you can easily fix that with MS Word’s Find and Replace feature.
Find and Replace is one of the most useful features in Microsoft Word that can be used to find a character, a word, or phrase in a document and replace them. You can also find and replace text in a specific section of text or a whole document.
Not only can you find a particular word and replace it with another word, but you can also find text based on its formatting, using wildcards, and with matching prefix or suffix. It also allows you to find and replace text with specific formatting, non-printing characters, or special characters. In this post, you will learn how to find and replace text in MS Word.
Find Text in Microsoft Word
To start with, let’s see how to Find text in Excel using the navigational pane or the Find and Replace tool. Then we’ll explore how to use the Find and Replace tool to replace text based on different options.
Find Text
You can use the Navigation pane to search for a character, a word, or a group of words. And you can access this navigation pane from the Ribbon or by pressing a hotkey Ctrl + F.
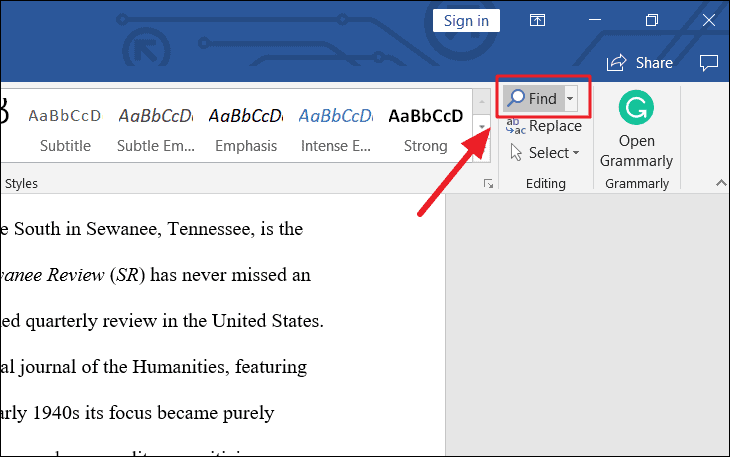
To access, the Navigation panel (Find Command), first, open the Word in which you want to search for text. Then, go to the ‘Home’ tab, and click the ‘Find’ button from the Editing group in the Ribbon. Or you can press the shortcut keys Ctrl + F in the keyboard.
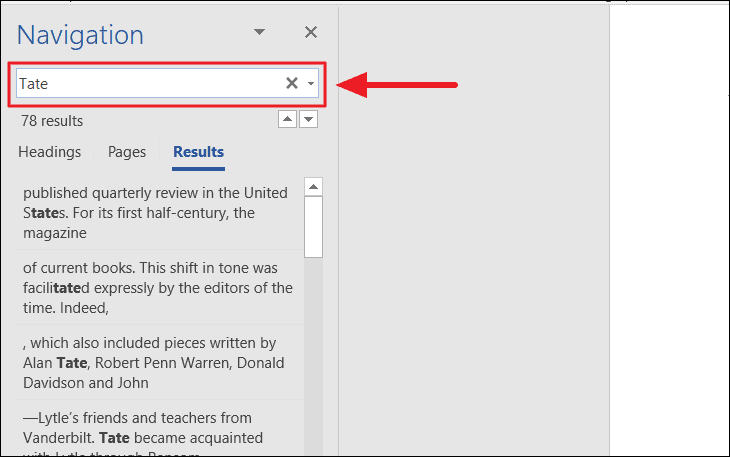
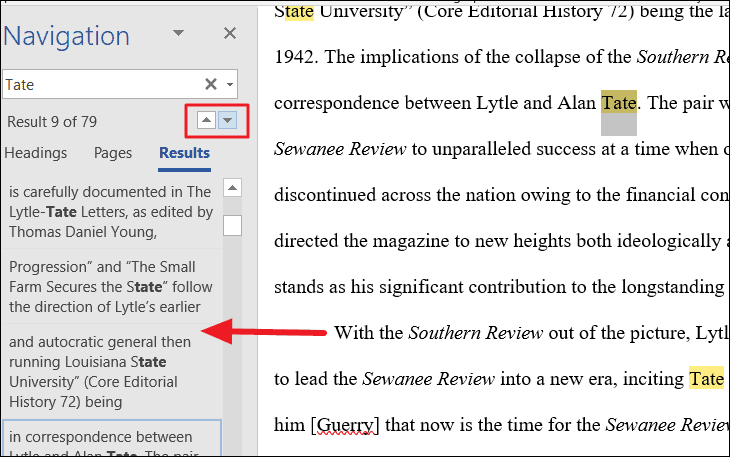
This will open up the Navigation pane on the left of the Window. Type the text or phrase you want to find in the ‘Search document’ text box in the Navigation pane and press ‘Enter’. As you type, the tool will show you all the related matches. In our example, we’ll type ‘Tate’.
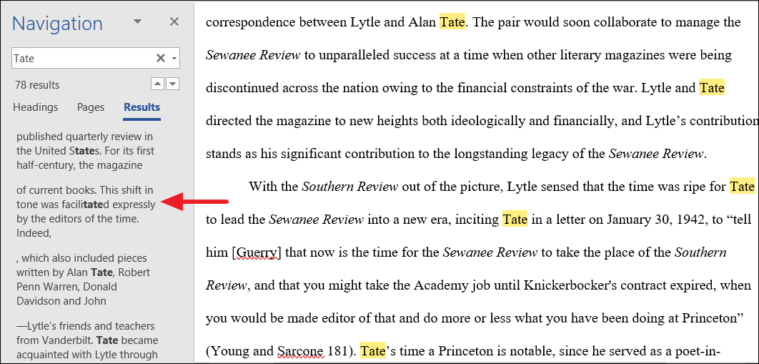
The Find command searches for all the matching text in the document and highlights them in yellow. The navigation pane shows all instances of the search word (Tate) as a preview of the results
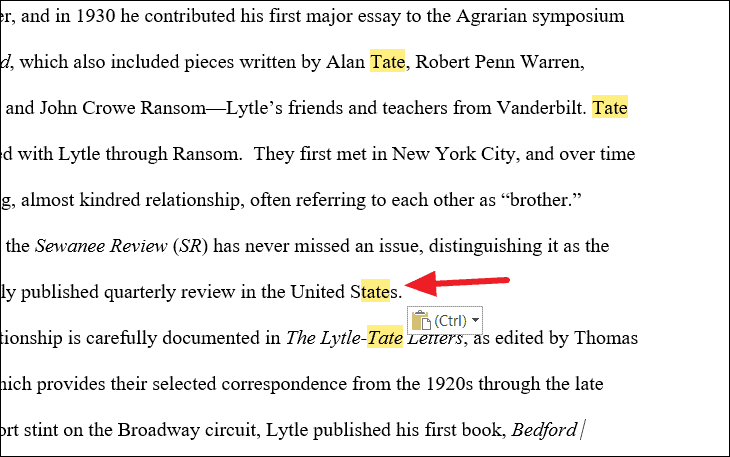
The tool not only highlights the exact words, it even highlights the partially matched words.
You can use the upward and downward arrows beside the text box to jump to the Previous or Next search result. Or you can click on one of the results below the search field to jump to it directly.
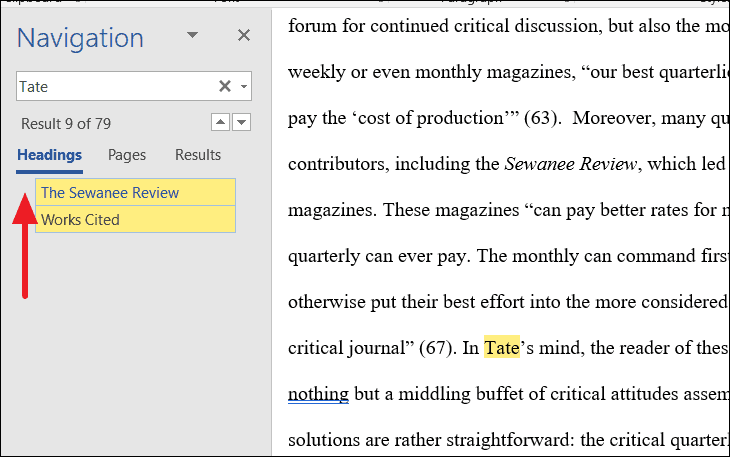
Instead of searching through an entire document for a text or phrase, you can also search a large document by headings. To do that, click the ‘Headings’ tab and select a heading in the Navigation pane to browse by headings in the document.
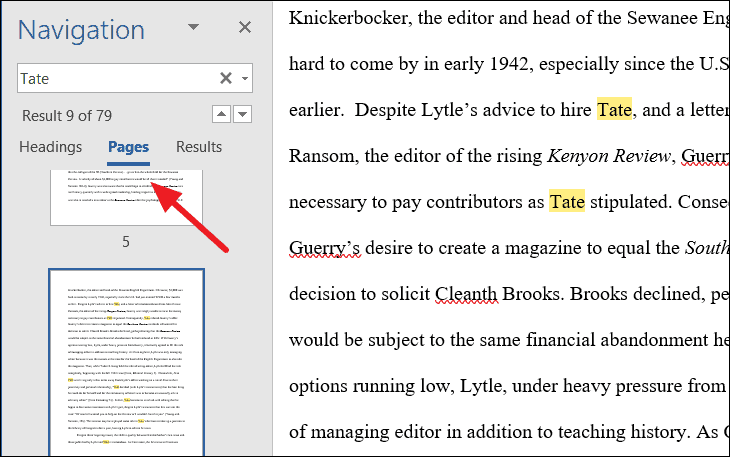
To search through pages in Word, click the ‘Pages’ tab in the Navigation pane and select one of the thumbnail images of all your pages that you want to see. Then, you can search for a specific text on that page.
Once you’re done editing the document, close the Navigation pane and the highlights will disappear.
Advanced Find
If you are looking for more specific words or phrases, for instance, words with a certain font or style, special characters, or only full words, you can use the Advanced Find feature to track them down. This tool lets you customize your search with various options. Here’s how:
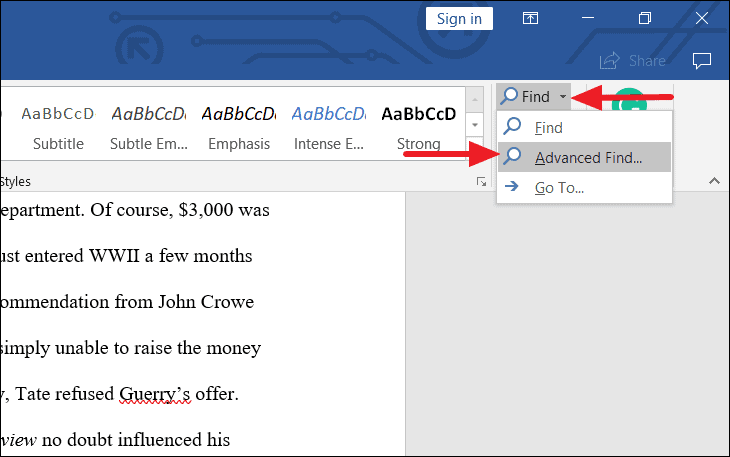
Go to the ‘Home’ tab, click the downward arrow next to the ‘Find’ icon in the Editing group, and select ‘Advanced Find’. Or press Ctrl + H shortcut keys to open the Find and Replace tool.
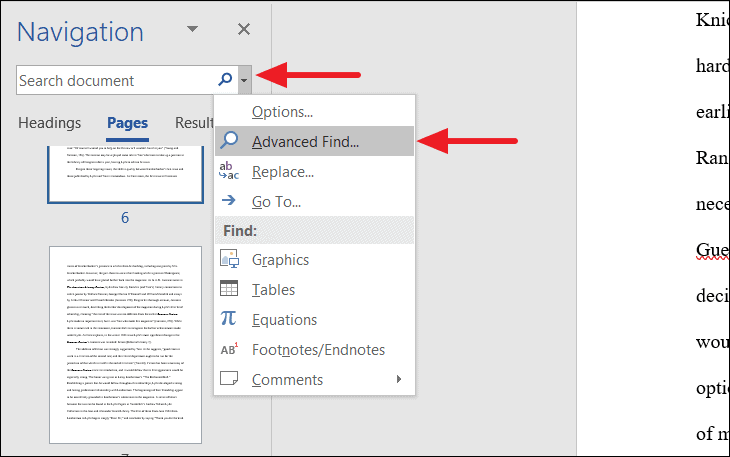
Or you can even launch the Find and Replace tool from the Navigation pane by clicking the magnifying glass icon in the Search Document text box and selecting the ‘Advanced Find’ option.
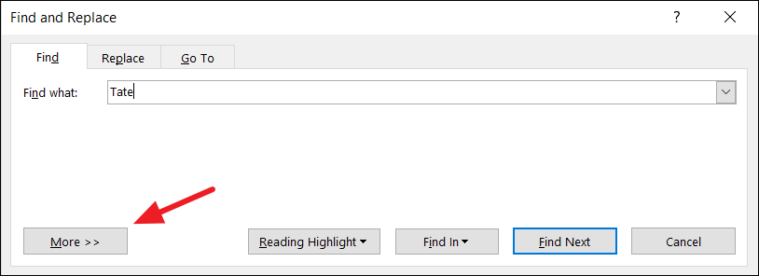
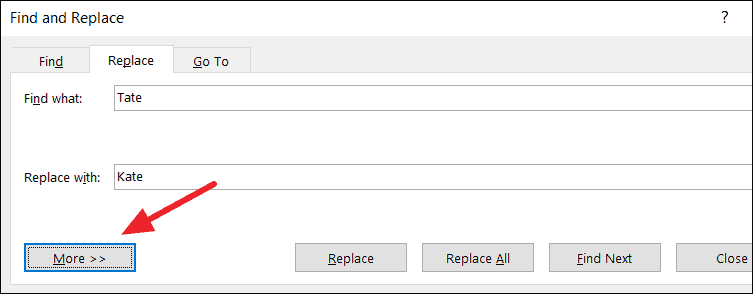
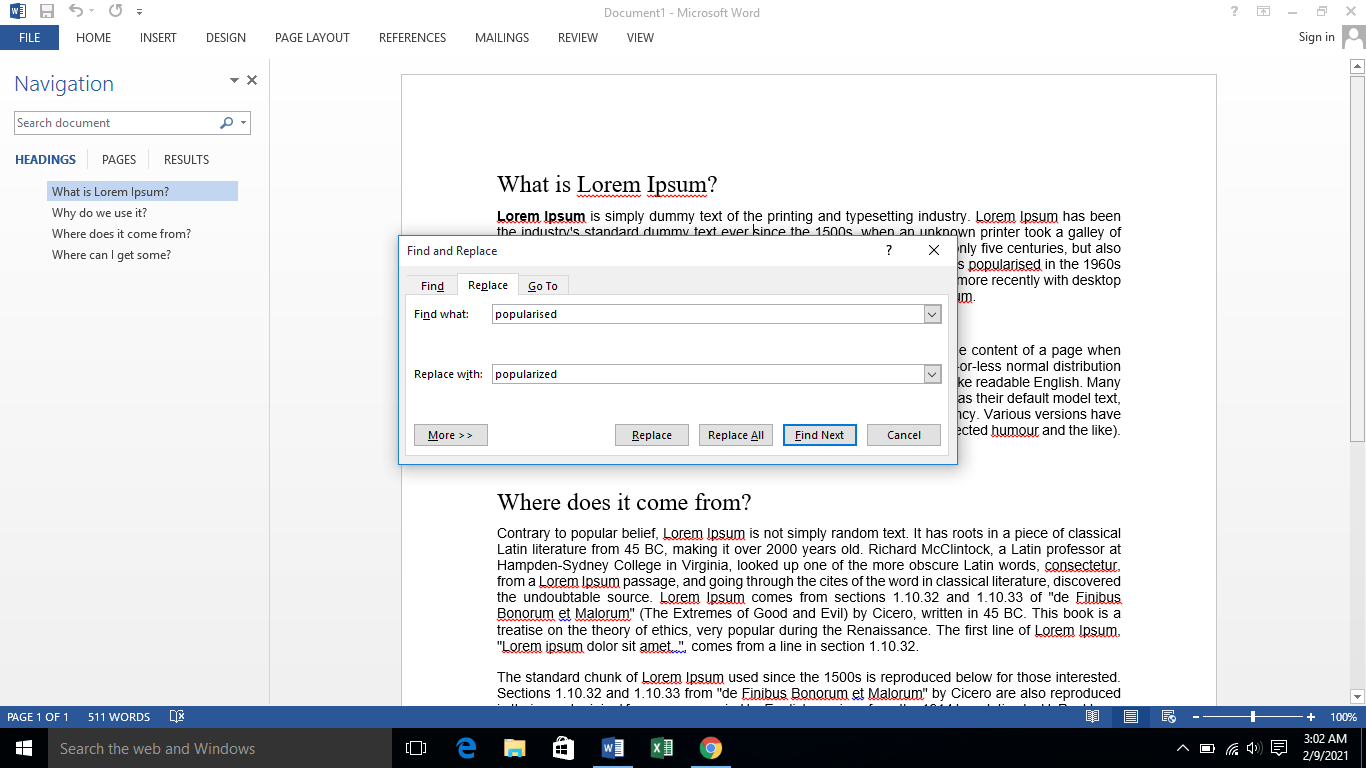
The Find and Replace dialog box will appear. Here, you can do a basic search, but if you want to customize your search with more options, Click the More >> button.
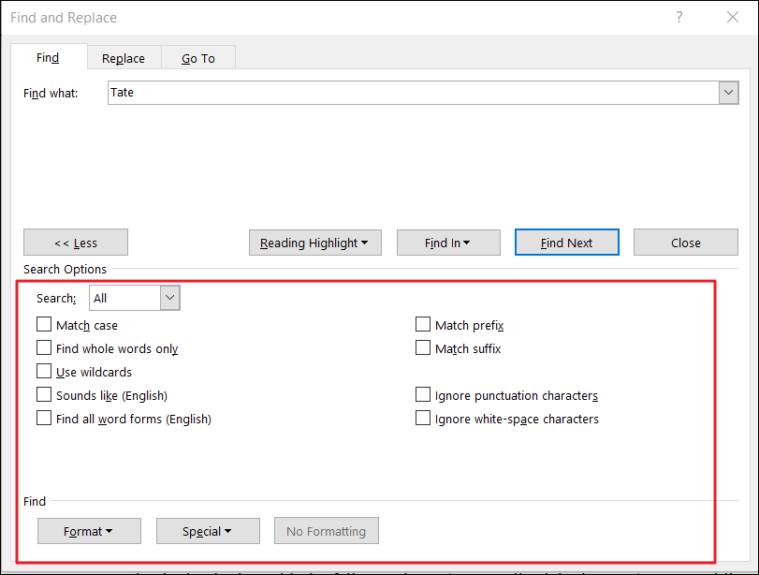
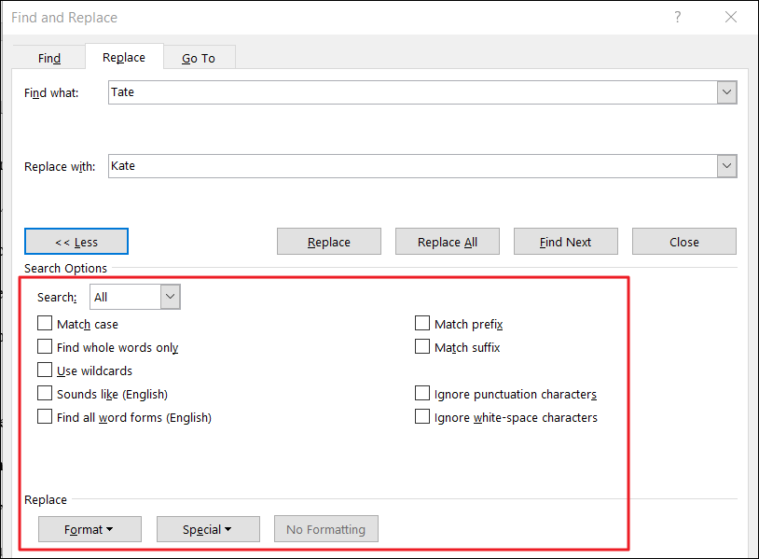
When you expand the More button, you would find more options with which you can do more advanced searches.
Select one or more options in the Search Options section and click ‘Find Next’ to view the result.
- Match Case: If the Match case box is checked, it searches for the text that exactly matches the uppercase and lowercase letters you type in the ‘Find what’ field.
- Find Whole Words Only: This option finds text that is not partial or part of another word, it only finds the whole words that are exactly matched.
- Use Wildcards: This option is the opposite of the ‘Find Whole Words only’ option. The wildcards you can use are single character (?) and multiple characters (*) wildcards. For example, when you are searching for “Wall*”, you’ll get Walls, Wallmart, or Wallpaper, etc.
- Sounds Like: This option finds words or phrases that sound phonetically similar such as ‘eyes’ when searching for ‘ice’ or ‘ant’ for ‘aunt’.
- Find All Word Forms: This option finds all variants of words (all verb forms). For example, when you search swim, you’ll get swim, swam, and swimming.
- Match Prefix: This searches for words with the same prefixes. For example, search for hype, and you may get hyperactive, hypersensitive, hypercritical.
- Match Suffix: This searches for words with the same suffixes. For example, search for less, and you may get endless, ageless, lawless, effortless.
- Ignore Punctuation Characters: This option lets you ignore punctuation characters in a text when searching. For instance, finding the word ‘Mrs. Jones’ when you searched for ‘Mrs Jones’.
- Ignore white-space characters: This option lets you ignore white spaces in between. For instance, finding the word ‘Days are good’ when you searched for ‘Daysaregood’.
We’ll apply few of these options and see how it works with an example.
Match Case
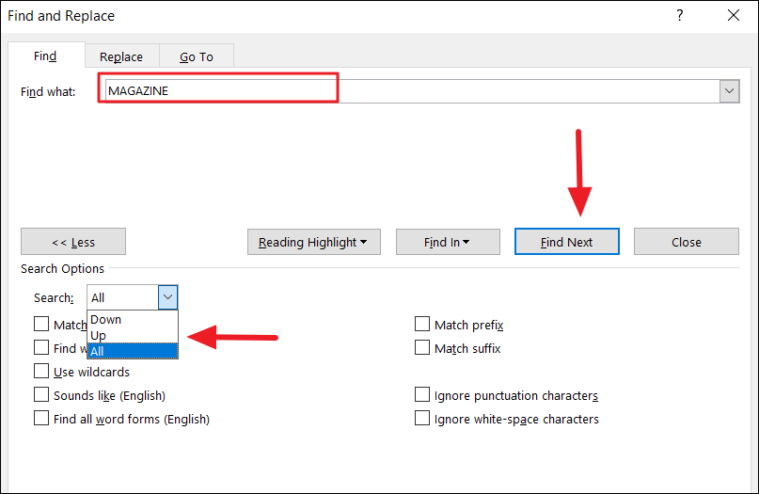
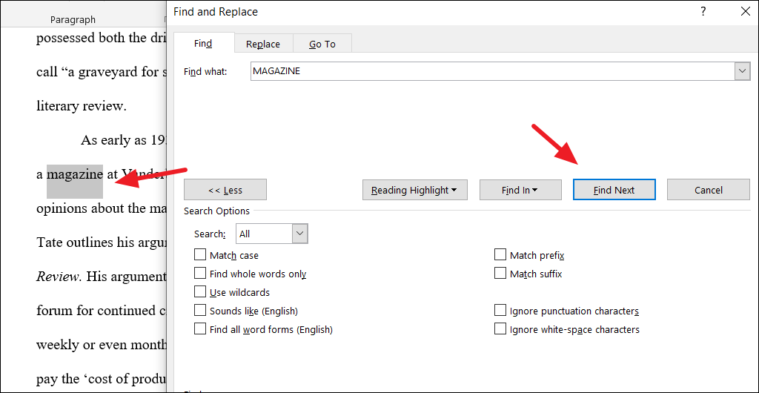
For example, let’s say we search the word ‘MAGAZINE’ in all caps without the match case option enabled. Type the word in the ‘Find what’ field and click the ‘Find Next’ button.
In the ‘Search’ drop-down under Search Options, you choose ‘Down’ to start looking from the top to bottom of the document, choose ‘down’ to start looking from the bottom to top of the document, or ‘All’ to search all over the document.
When you click ‘Find Next’, it will highlight the first instance of the word in grey. When you click ‘Find Next’ again, it will select the next instance of the word. As you click Find Next each time, it will highlight the matching word one at a time.
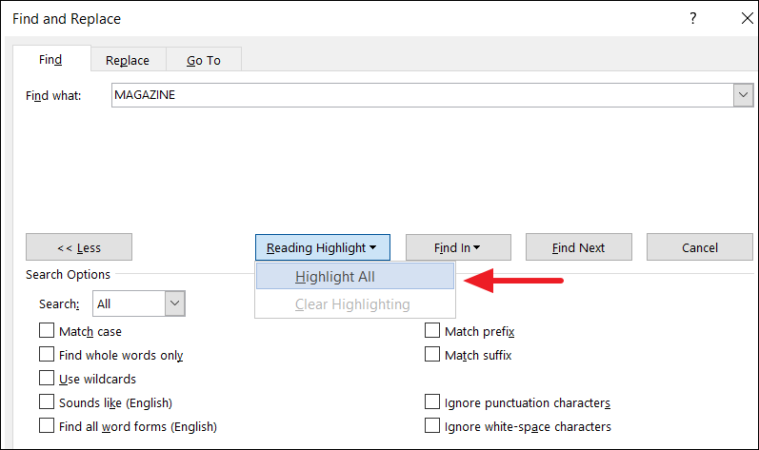
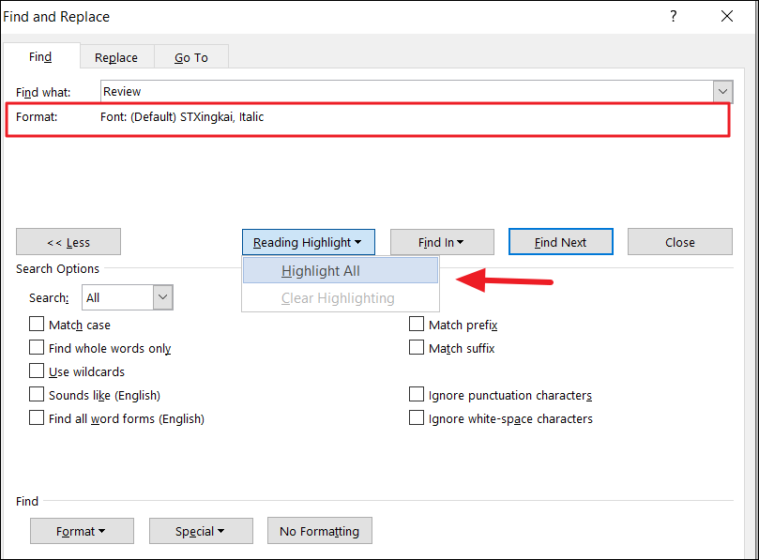
If you want to highlight all the instances of the word at once, click the ‘Reading Highlight’ button and select ‘Highlight All’.
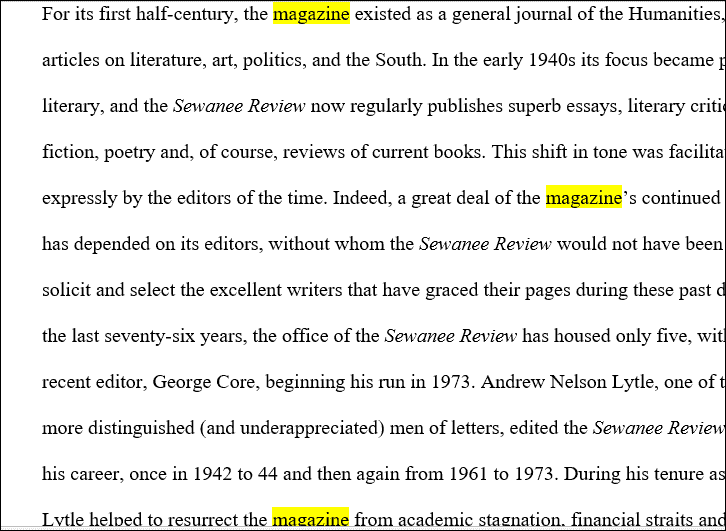
You would get several matches with the word all highlighted in yellow.
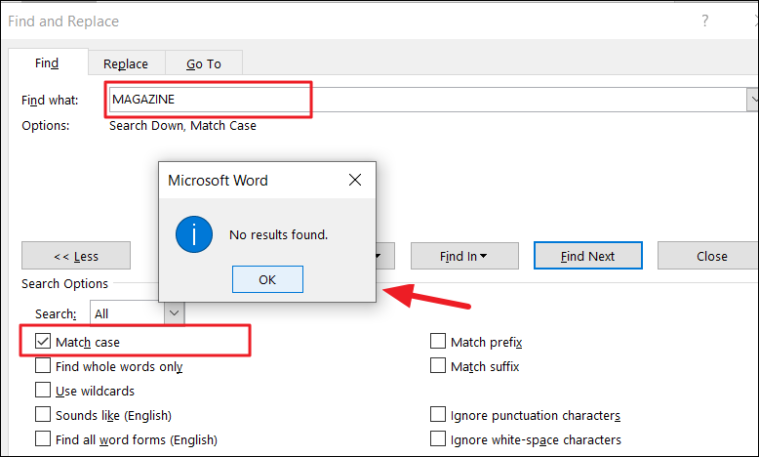
But if we searched the same word (capitalized) with match case enabled, we would get no results. Because the tool only looks for the word that exactly matches the uppercase letters we typed earlier.
Find All Word Forms
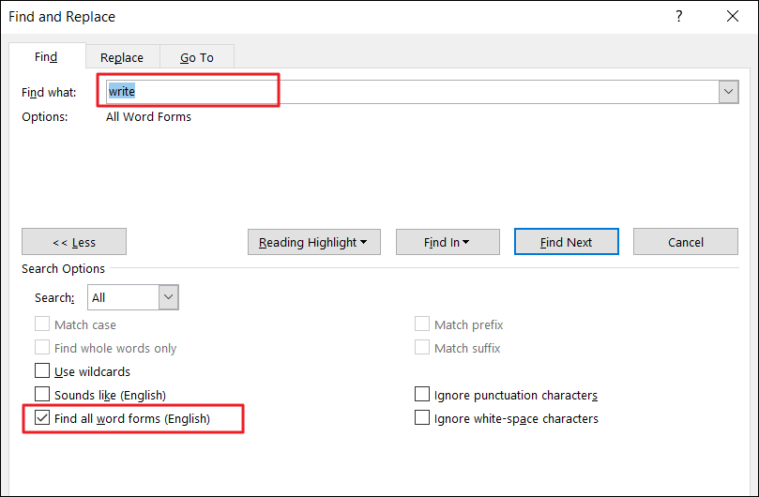
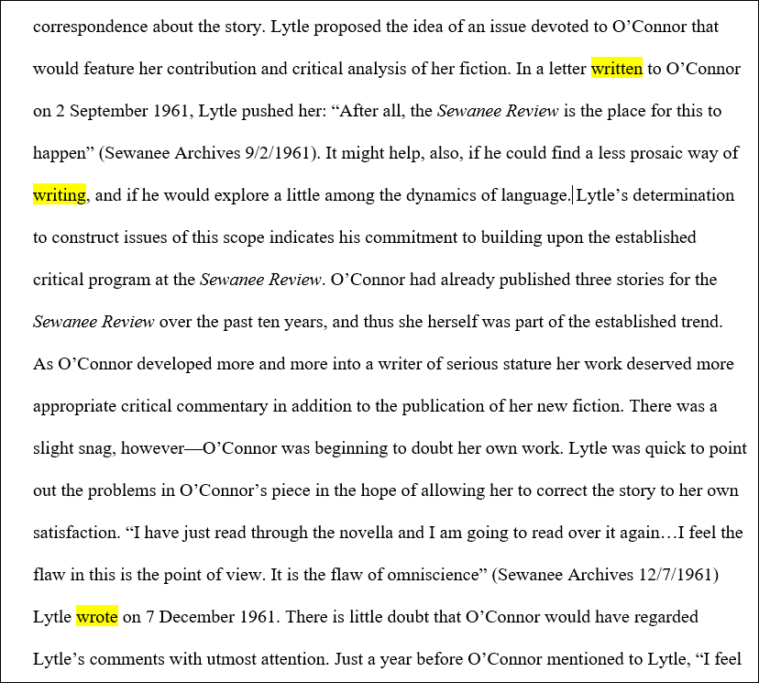
In another example, if we searched the word ‘write’ with the ‘Find all word forms (English)’ setting enabled, we would get all variants of the word.
Word will find all verb forms of the word as shown below.
Advanced Find with Formatting
You can also search for certain word or phrase with specific formatting applied.
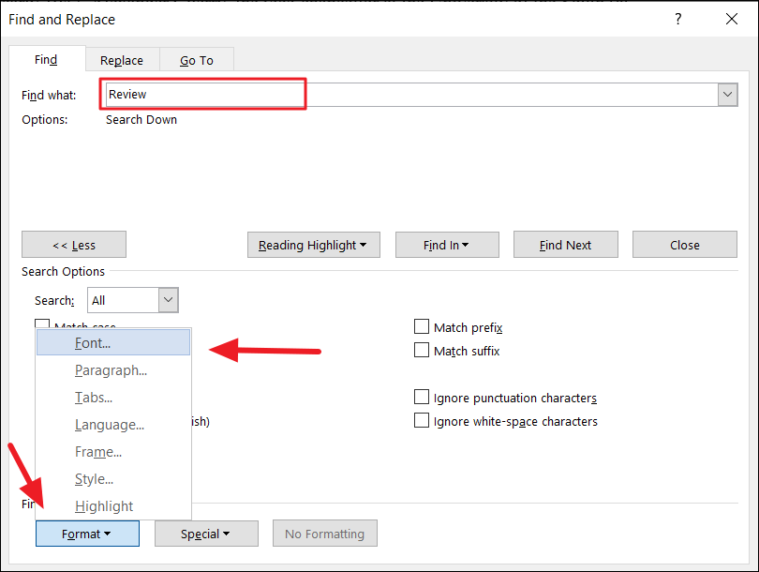
To find words with formatting, first, type the word in the ‘Find what’ box and click the ‘Format’ drop-down button at the bottom of the Find and Replace dialog box. Then choose the format in which you want to look for the word.
You can even find words with specific font format, paragraphs with specific alignment and format, tabs, words in a certain language, text frame, style, and highlight.
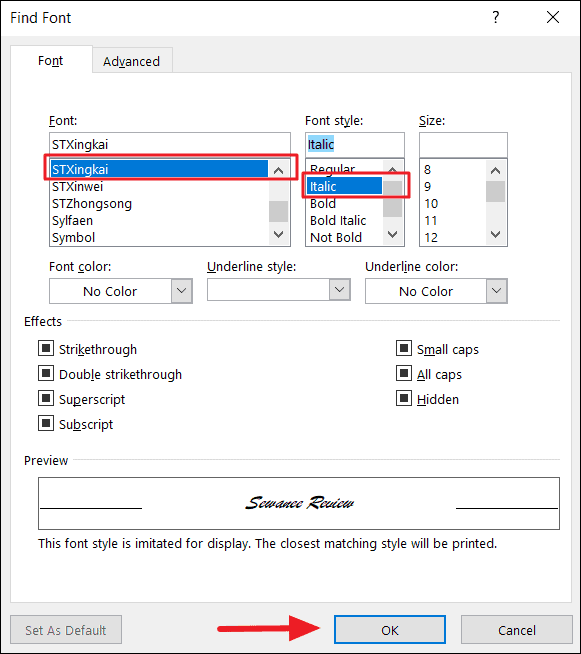
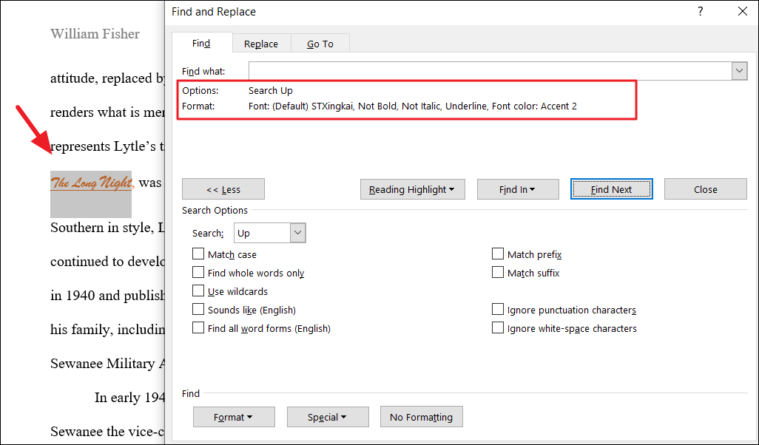
We are going to search for the word with a certain font format, so we are choosing ‘Font’. In the Find Font window, specify the format as shown below and click ‘OK’.
The chosen Format ‘Font: (Default) STXingkai, Italic’ will appear under the ‘Find What’ text box in the Find and Replace dialog box. Now click ‘Highlight All’ to find the matching words with that format.
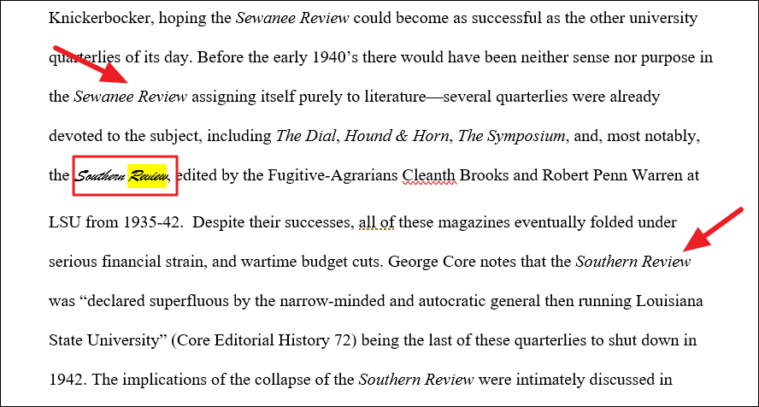
As you can see, the tool only highlights the words with that specific font format, while it doesn’t highlight the same matching word in a different font format.
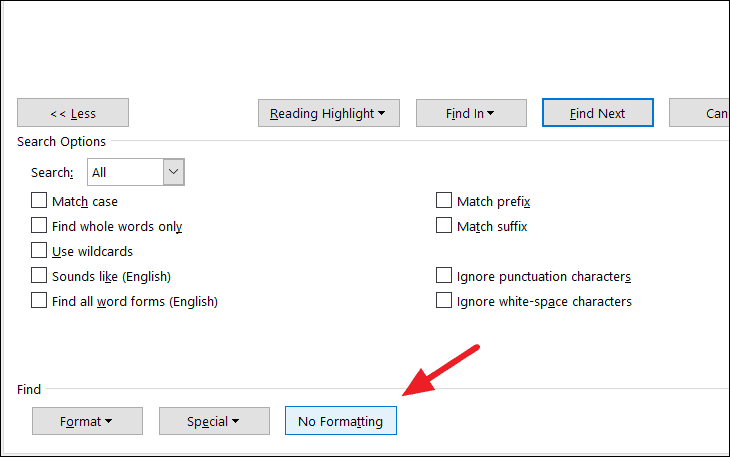
To clear the formatting for the search, click the ‘No Formatting’ button at the bottom of the Find and Replace dialog box.
Find Text with Only Formatting
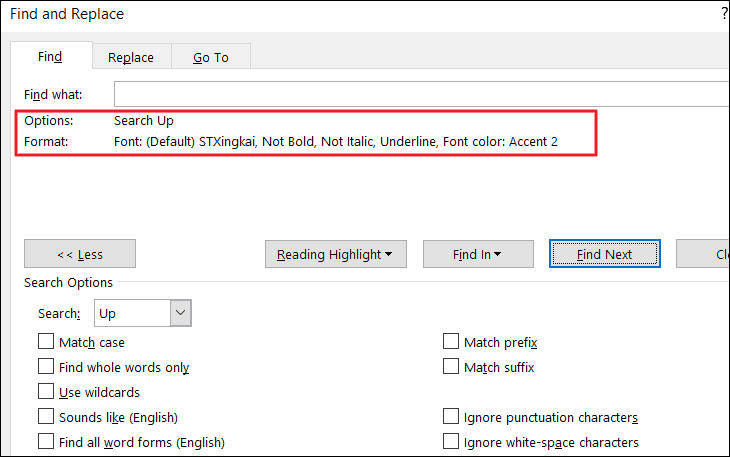
You can even find texts with formatting alone. You don’t even have to type a word or phrase, you can just specify the only format of the text.
And the tool will find you all the words or phrases with the matching format.
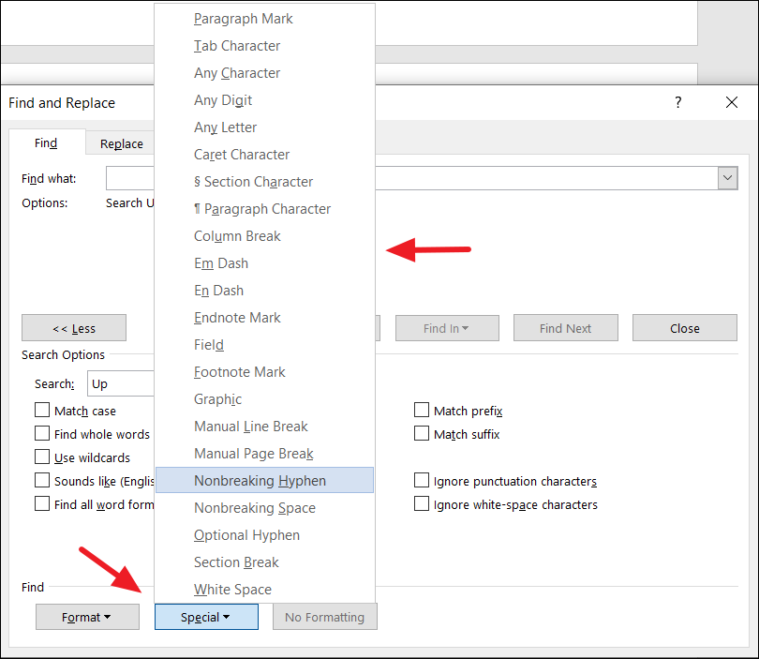
The Find and Replace tool also lets you find non-breaking characters/special characters or words with special characters by choosing the character(s) from the ‘Special’ drop-down button at the bottom of the Find and Replace dialog box.
Find and Replace Text in MS Word
So far, you have learned how to find text and how to find text with advanced options, now let us see how to replace the found text.
The Replace function allows you to find a word or a group of words and replace it with something else or find a word based on text formatting and replace it with other text, or find a specific word and replace its formatting, or find and replace characters with other special characters or words.
Find and Replace Text
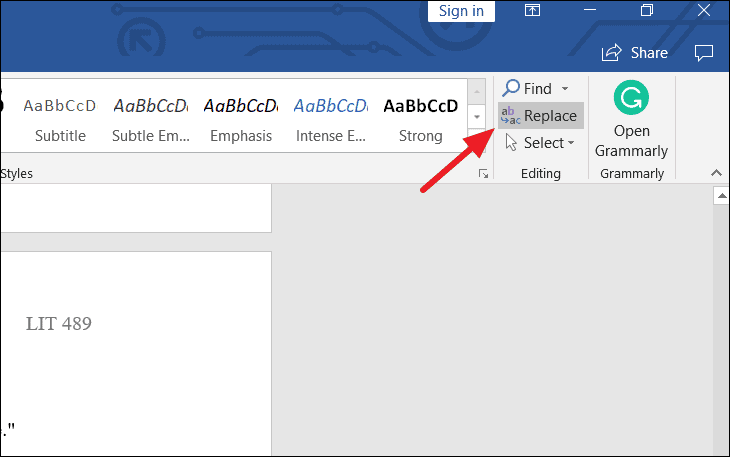
To find and replace a particular word or phrase for another, navigate to the Editing group in the ‘Home’ tab and click the ‘Replace’ command. Alternatively, you can also press the keyboard shortcut Ctrl + H.
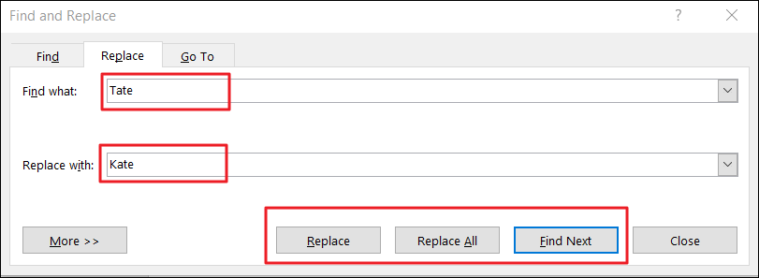
This will open the Find and Replace dialog box. In the Find and Replace dialog box, fill out the two fields:
- Type the text you want to search for in the ‘Find what:’ field.
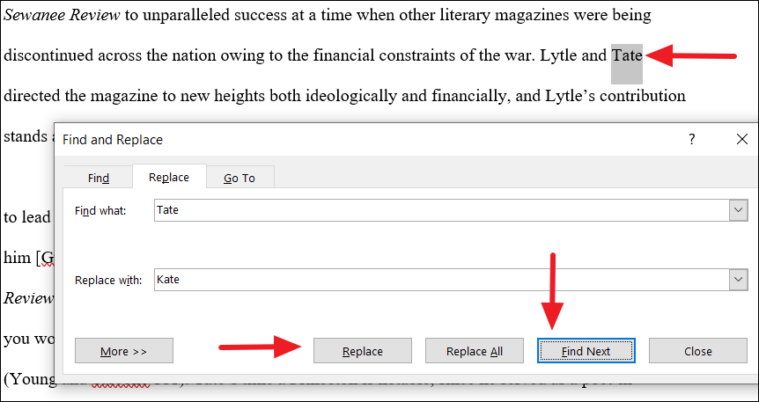
- Type the text you want to replace it with in the ‘Replace with:’ field.
Once you enter the necessary texts, you can either click the ‘Replace’ button to replace the text one by one or ‘Replace All’ to replace all the instances of the word at once.
Replacing all the text together may cause errors in your document if you are not cautious. For example, if you are replacing all the ‘He’ words with ‘She’, it may also replace the words Head with Shead, help with Shelp, heat with Sheat, and so on. So sometimes, it’s better to replace them one at a time.
Click the ‘Find Next’ to find the first instance of the text highlighted in gray and click ‘Find Next’ again to jump to the next instance. Review each instance and click ‘Replace’ to exchange the currently highlighted text.
You can click the title bar of the Find and Replace dialog box and drag it out the way to see the results behind it.
Once you’re done, click the ‘Close’ button to close the dialog box.
Note: If you leave the ‘Replace With’ field blank, the search text in the ‘Find What’ field will be deleted from the document.
Advanced Find and Replace Text
If you are looking to replace more specific words such as words with punctuation, capitalization, certain font or style, or even special characters, you can use the advanced search options of the Find and Replace tool.
To access the advanced options of Find and Replace, click the ‘More >>’ button at the bottom of the dialog.
Here, you have various search and replace options that you can use to narrow down your search.
As we discussed earlier in the Advanced Find section, you already know what each option under the Search Options is used for.
Select one or more options under the Search Options and click ‘Find Next’ to find the matching words or click ‘Replace’ to replace one instance at a time or click ‘Replace All’ to exchange every instance at once.
Example:
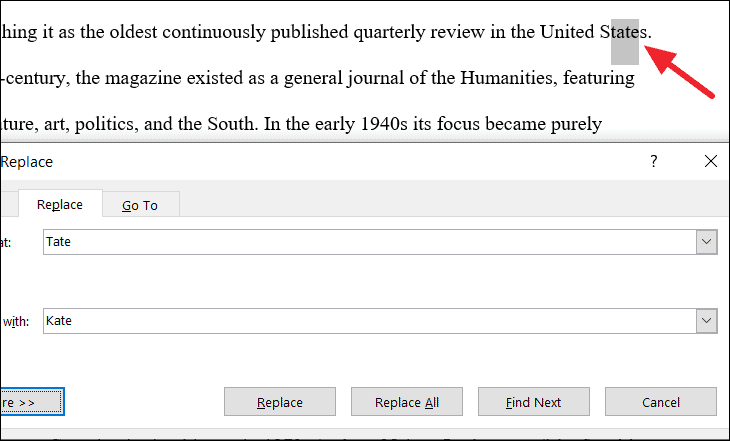
As we mentioned before, this tool finds the combinations of characters of the given word, even as part of other words.
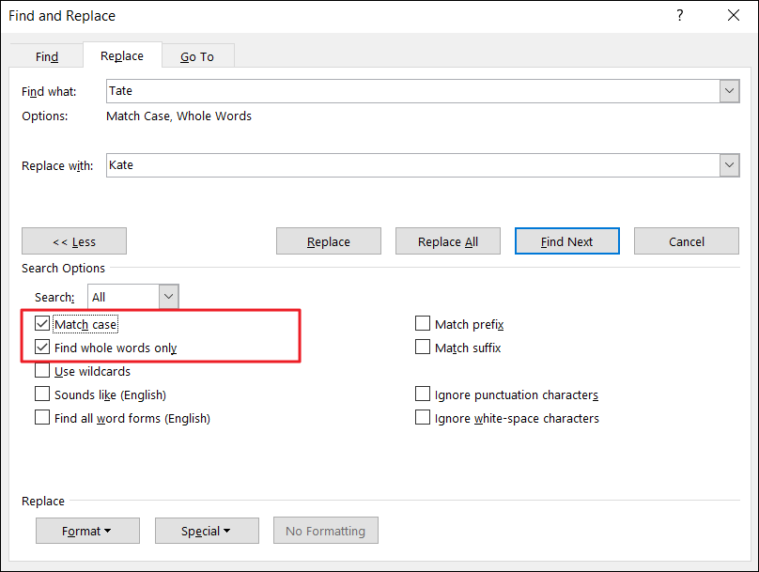
For example, when we search for the word ‘Tate’ in the document, it finds that combination of characters even as part of other words like ‘United States’.
And this is not ideal when we replace these words. Also if you hundreds of matches, it would take forever to replace words one by one.
To fix this, check the ‘Find whole words only’ option, to find the words that are not partial or part of other words, it only finds whole words that are exactly matched. Here, we also checked the ‘Match case’ option to make sure it matches the exact uppercase and lowercase letters too. Then, click ‘Replace’ or ‘Replace All’ to replace the words.
You can use the rest of the above options in a similar fashion to customize your search to find specific words.
Find Text and Replace Formatting
You can also find a particular word and replace it with the same word but with specific formatting or replace it with another word with formatting.
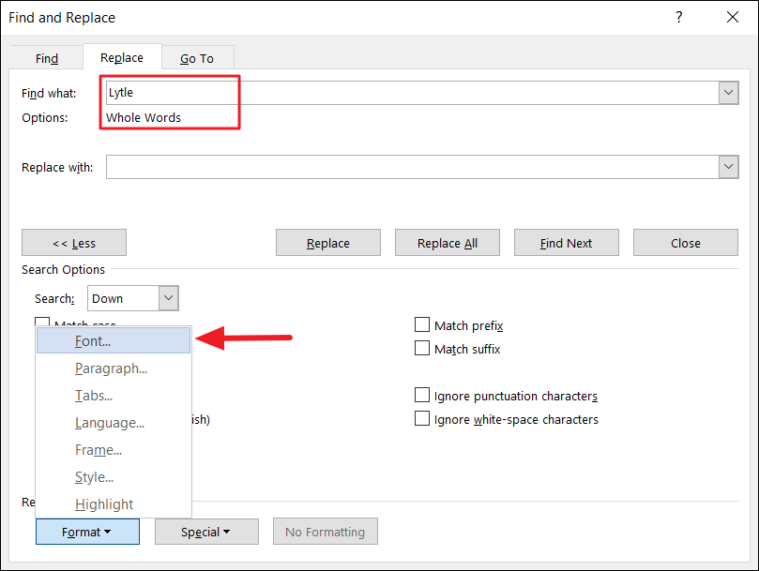
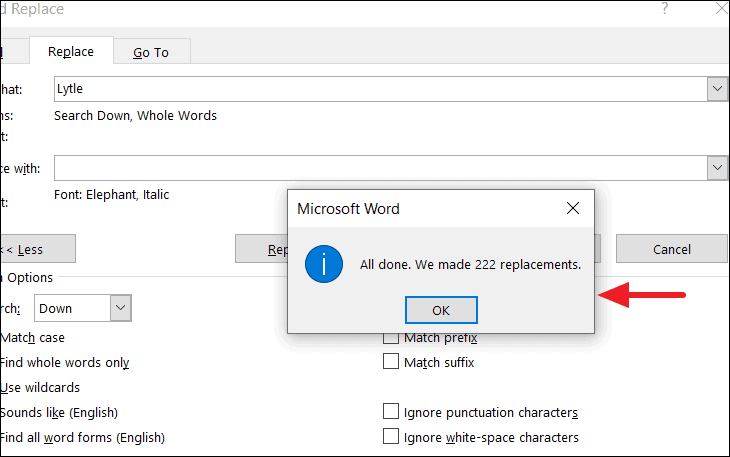
For example, we want to find and replace the whole word ‘Lytle’ with a specific font format. To replace formatting, type the word you want to find in the ‘Find what’ field and select the ‘Find whole words only’ option to search for only that whole word. Then, click the ‘Format’ button at the bottom of the dialog box and choose ‘Font’.
You can replace words with other formatting options such as Style, Paragraph, Frame, and so on.
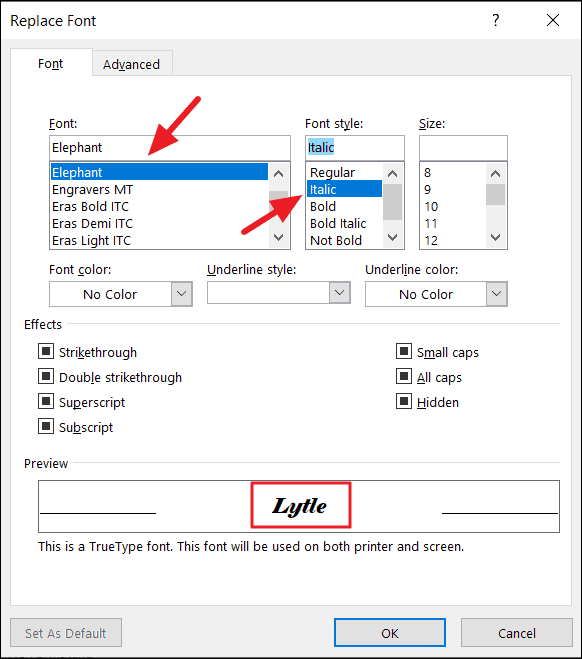
In the Replace Font dialog, choose your desired format style such as font, font style, font color, etc. In our case, we are choosing ‘Elephant’ font and ‘Italic’ style. Then, click ‘OK’ to apply.
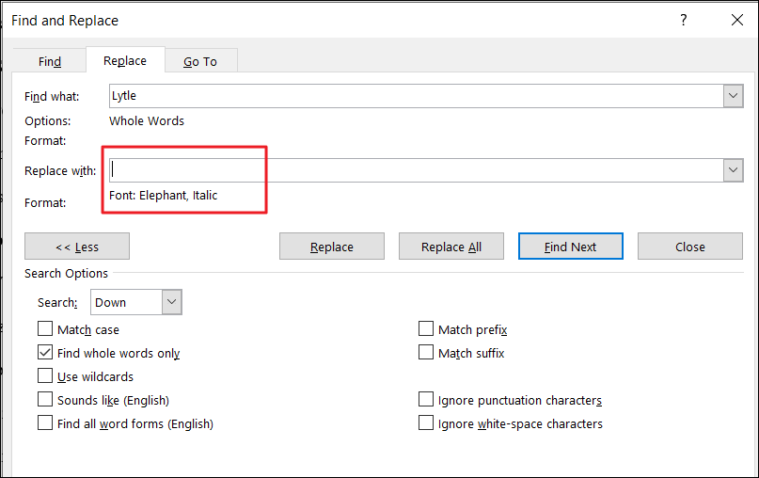
Back in the ‘Find and Replace’ dialog box, you can see the chosen formatting is set for the ‘Replace with:’. Since we are only replacing the formatting of the word, leave the ‘Replace with:’ field blank. Then, click either the ‘Replace’ or ‘Replace All’ button to replace the formatting.
Once you click the ‘Replace All’ button a message box will appear informing you how many replacements were made (In our case, 222).
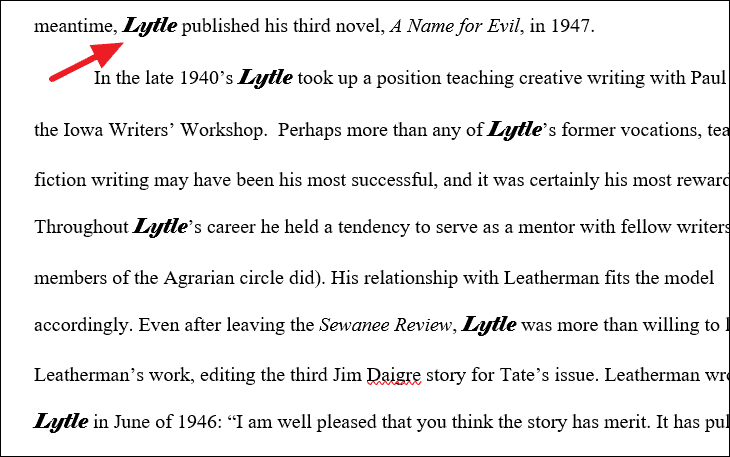
As you can see, all the instances of the word ‘Lytle’ is replaced with specified formatting.
Find Text with a Specific Formatting and Replace
If you want to find a text that has a certain formatting style and replace it with another text, without changing the formatting or with different formatting, you can do it by applying that formatting to the Find word. Here’ how you do this:
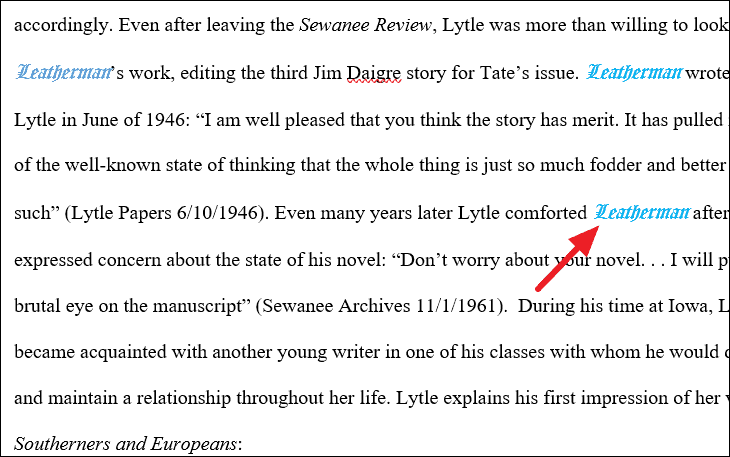
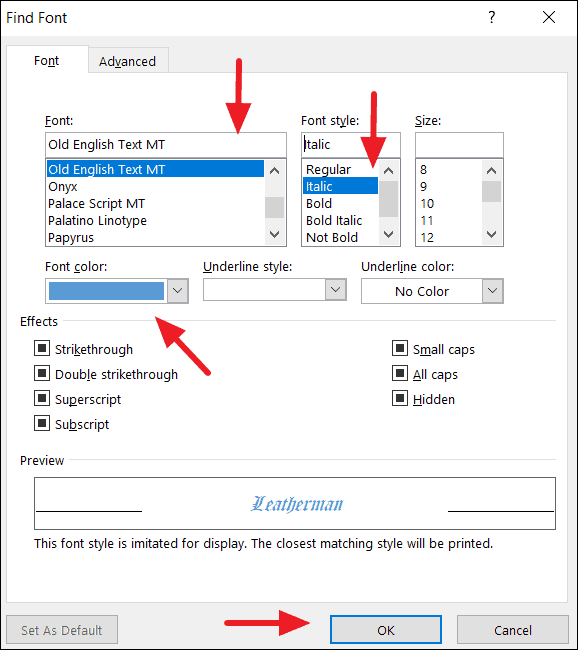
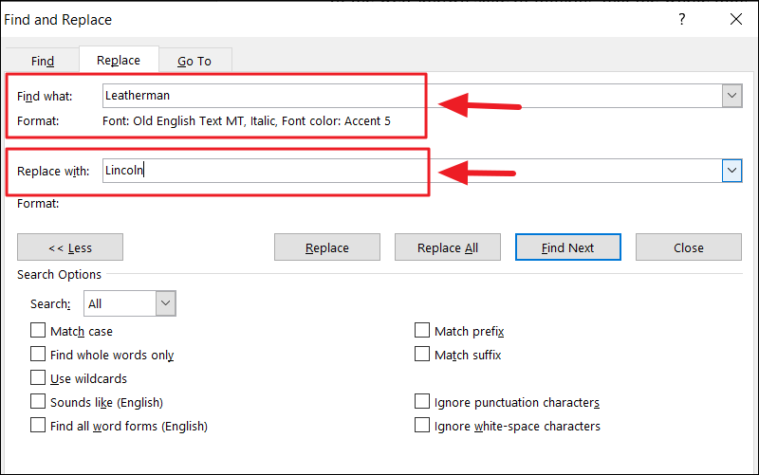
For example, we want to find and replace the text ‘Leatherman’, that has particular formatting (Font: Old English Text MT, Style: Italic, Color: Blue, Accent 5), with the text ‘Lincoln’ (without changing the formatting).
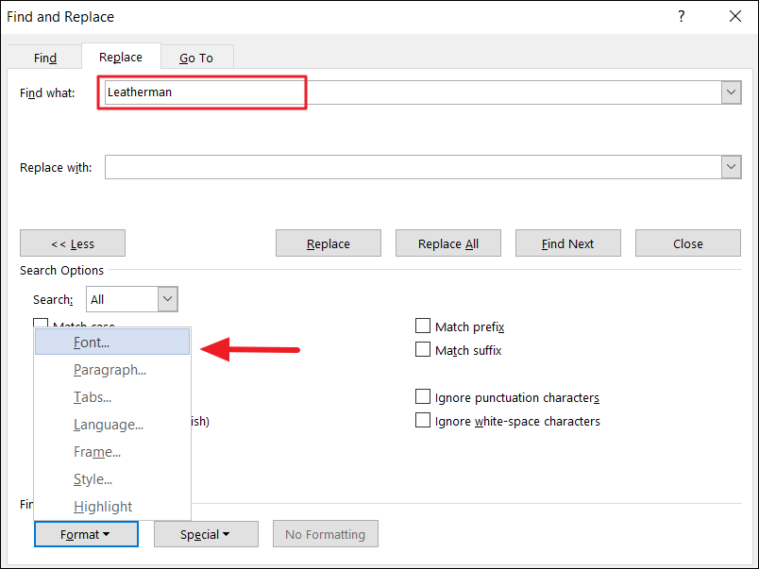
First, type the text you want to search for (in our case, Leatherman) in the ‘Find What’ field. Then, click on the ‘Format’ button and choose the options as required (Font).
In the Find Font, dialog box, select the required formatting with which we’re going to find text. In our example, the text ‘Leatherman’ is in ‘Font: Old English Text MT, Style: Italic, and Color: Blue, Accent 5’ formatting. Once the options are selected, click ‘OK’.
Now the selected formatting options should appear under the ‘Find What’ text field in the Find and Replace.
Next, type the text you want it to be replaced with (Lincon) in the ‘Replace with field:’ and click ‘Replace All’. You can also add formatting to the replacement text if you want.
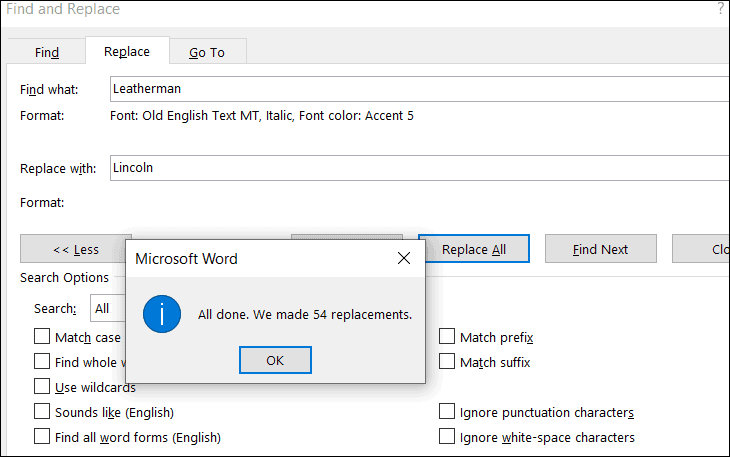
Once you click ‘Replace All’, all of the instances will be replaced and a prompt will show you how many replacements were made.
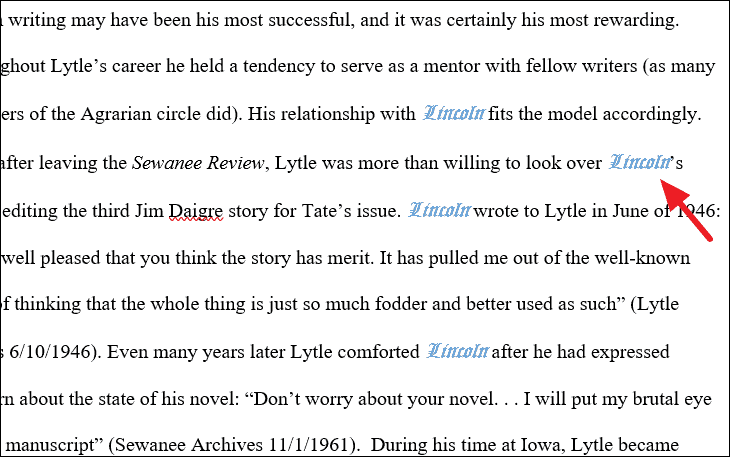
As you can see all the instances of the ‘Leatherman’ with formatting is replaced by the ‘Lincoln’ without changing the formatting.
Find and Replace Special Characters/Non-Printing Characters
The find and replace feature can also help you find special character characters and replace them with other special characters such as ®, é, ä, or any other character listed in the Symbol dialog. You can also find and replace non-printing characters such as manual line breaks, tab characters, paragraph marks, etc. You can even replace special characters with text and vice versa.
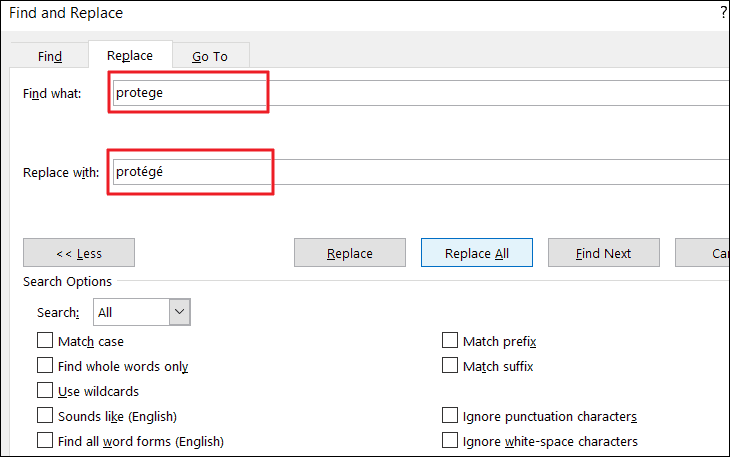
For example, if you want to find and replace the word ‘protege’ with ‘protégé’, type ‘protege’ in the Find what box and type ‘protégé’ in the ‘Replace with’ box. Then, click ‘Replace’ or ‘Replace All’ to replace them.
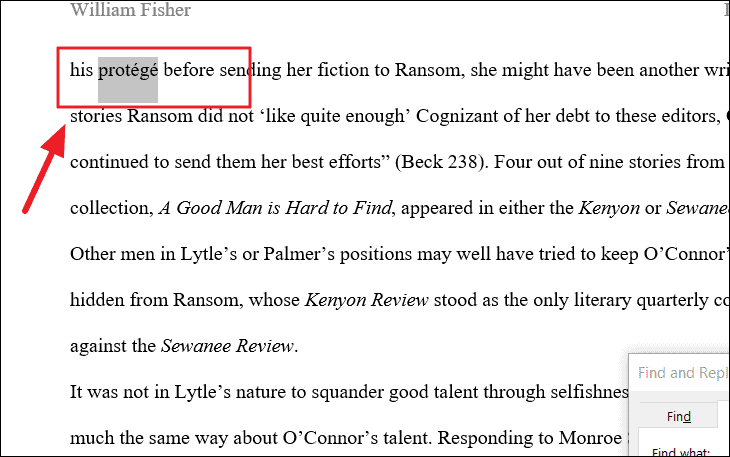
As you can see the found texts are replaced with replacement text with special characters.
Sometimes you want to replace manual line breaks (non-printing characters) with paragraph marks, in such cases, you need to insert respective character code in the ‘find what’ and ‘replace with’ boxes.
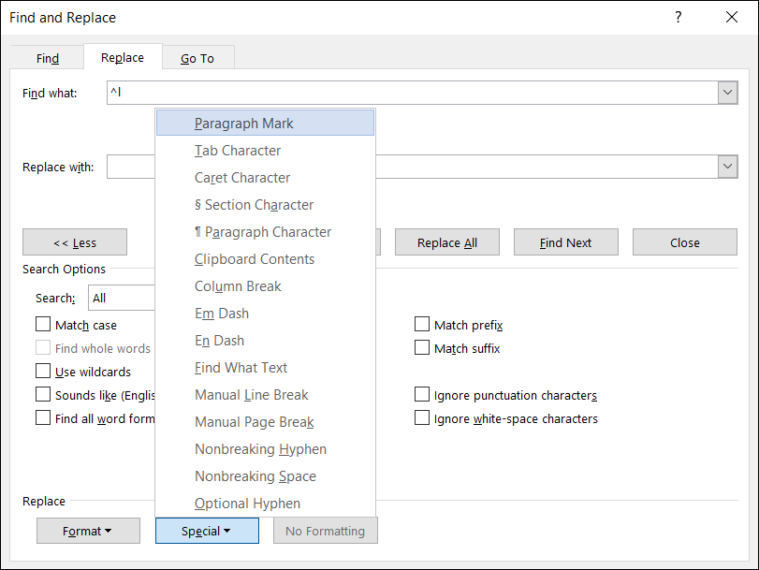
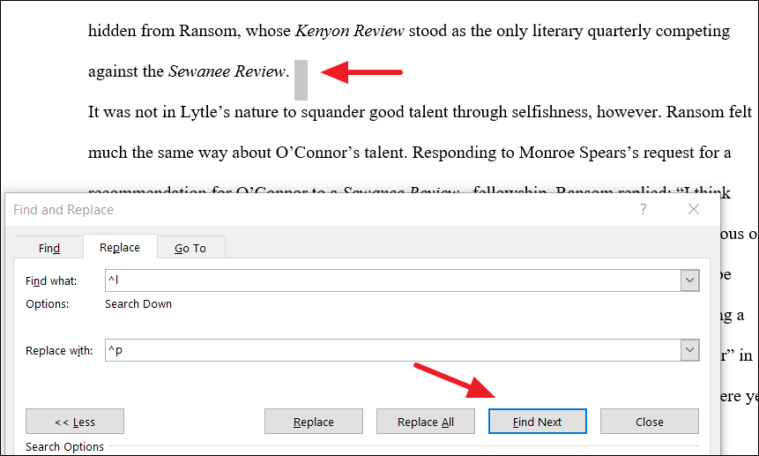
For example, we want to replace all manual line breaks in the documents with paragraph marks. The character code for a manual line break and paragraph mark is ‘^l’ and ‘^p’ respectively. You can either type the code or if you don’t know the code, use the ‘Special’ button to insert the code.
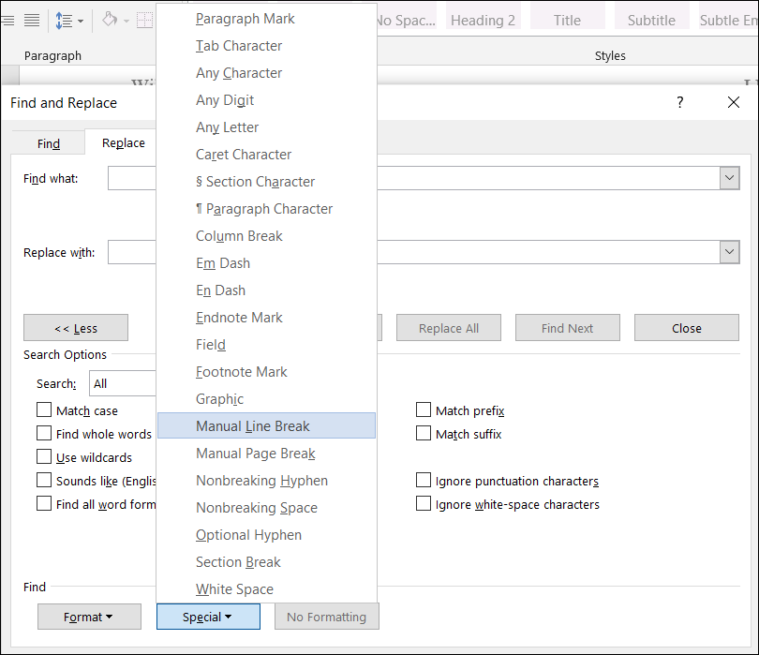
To insert non-breaking characters, first, select the text box where you want to insert. Then, click the ‘Special’ button at the bottom of the Find and Replace dialog box and select an item from the list. And the tool will automatically insert the respective character code in the text box.
In the example, we are choosing ‘Manual Line Break’ for the ‘Find what’ field.
And ‘Paragraph Mark’ for the ‘Replace with’.
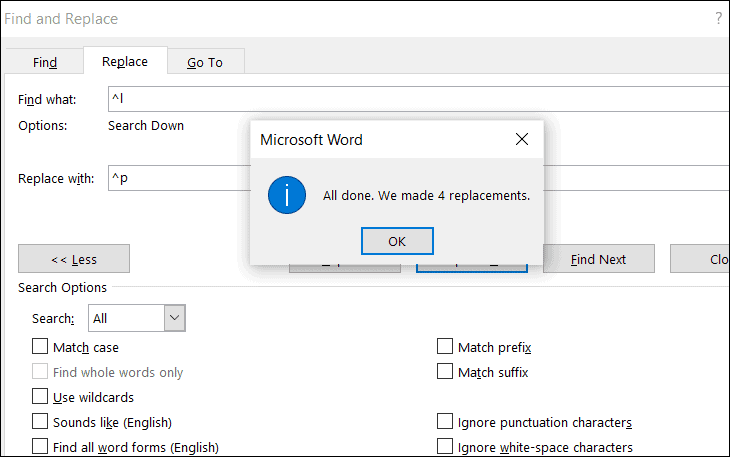
Then, click ‘Find Next’ to see where the line breaks are located. Now, click ‘Replace All’ to replace all the manual line breaks in the documents.
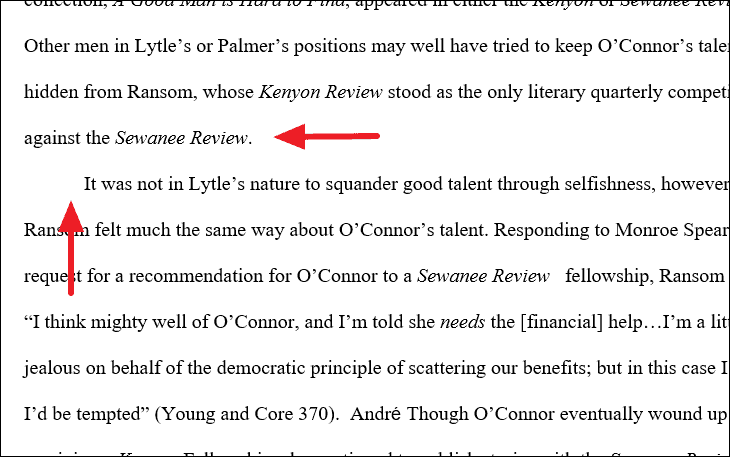
As you can see below, the manual line breaks are replaced with paragraph marks.
In the similar way, you can also replace non-breaking characters/special characters with text and vice versa.
That’s everything you need to know about finding and replacing text in Microsoft Word.
You’ve just finished typing a presentation that’s due in about 15 minutes. But before you can celebrate your moment of victory, you realize that you’ve spelled your client‘s name wrong and have missed the double Rs in their company name multiple times throughout your document.
Cue: An aggravated scream.
The good news is that changing these small errors is an easy fix on Office 365. You can replace as many words as you want within seconds on Microsoft Word using its super helpful Find and Replace functionality.
This article will guide you through the necessary steps to help you find and replace text in MS Word.
Ready? Let’s begin.
How to Use Microsoft Word’s Find and Replace Feature
Microsoft is one of the leading companies in the world. It’s because it prioritizes its customers and comes up with innovations that can make their lives easier and more convenient.
The Find and Replace feature on MS Word is a shining example of this effort.
You can use this feature to find specific words in your file and then replace them in case there are some last-minute changes. This can even be useful when you make mistakes in the doc while typing or want to accommodate those last-minute client changes.
We’ll show you how to replace text in Microsoft Word, depending on the computer device you use.
How to Change and Replace Text in MS Word on Windows
It’s no wonder that all Windows devices have built-in Microsoft programs considering it’s a product developed by the Microsoft company themselves. If you find yourself using the word processor often for making notes or presentations, you’ll be especially thankful for the Find and Replace functionality.
Here’s a short step-by-step guide to using the feature in MS Word on Windows devices:
Step #1 Open Microsoft Word on your Windows device.
Step #2 Click on the Home tab on your top menu bar. A secondary menu will appear on your screen.
Step #3 Select the Replace option located on the top-right-hand side of your screen. Alternatively, you can also press Ctrl + H. The Find and Replace pop-up box will appear immediately.
Step #4 Type in the phrase or word you want to locate in your Word doc in the Find what field under the Find tab.
Step #5 Click on the Replace tab on the top menu bar. Type in the word you want to update in the Replace with field.
On clicking on the Replace button, the changes you want will be made one by one in the Word doc. However, if you want to update all fitting instances at once, you can click on Replace All instead.
Microsoft Word will give you a confirmation of the replacements made in your Word doc. It’ll look something like this:
How to Change and Replace Text in MS Word on Mac
Now that we’ve covered Windows, let’s see how you can use the Find and Replace feature on a MacBook. Here’s how to proceed in MS Word when you’re using an iOS device:
Step #1 Open the Microsoft Word document on your Mac.
Step #2 Take your cursor towards the top of your screen until you see your Mac’s top toolbar. Click on the Edit tab. A dropdown menu will appear.
Step #3 Click on Find from the displayed menu options. You’ll typically see a Replace… option on your screen.
But if you don’t, simply press Shift + Command + H on your keyboard. A side navigation bar will appear on the left-hand side of your computer screen.
Step #4 Enter the word or phrase you want to replace in the doc in the Search for… field.
Once you’ve finished typing the incorrect word or phrase, type in the right word or phrase that you want to replace the incorrect one with in the Replace with… field.
Step #5 Click on the Find tab to locate the matches. Once you’re sure the match is right and highlighting the words you want to change, select Replace. This will replace every individual match one by one.
Again, if you click on the Replace All button, all the matching words and phrases will be changed at once.
After the changes are made, you’ll see an “All Done” message just below the Replace and Replace All buttons that indicate the replacement of the intended word or phrase.
Advanced Find and Replace Features: Everything You Need to Know
You can take this whole shebang of replacing words and phrases to the next level thanks to Microsoft Word’s Advanced Find and Replace option. In other words, you can use the Advanced settings to simplify the process further and make the results even more accurate.
Follow the previously stated steps to open the Find and Replace pop-up box. On it appears on your screen, click on More.
You’ll immediately see a slew of additional options like Match case, Use wildcards, Match prefix, Match suffix, and so on. Here’s how the Advanced Find and Replace settings look like:
Each one of these has its own unique functions. Let’s discuss them in more detail below:
Find whole words only
If you check on the Find whole words only box, MS Word will treat your search term as an entire word and won’t look for your search term within other words.
Example: If you’re searching for the word “stand,“ the search feature won’t show you the word “standard.”
Use wildcards
Use wildcards is one of the more advanced search options that allows you to use question marks, brackets, asterisks, and other similar symbols to modify your search.
You see, a wildcat is a short string of characters – or a character – that represents multiple characters in a search.
Example: <(int)*(net)>
Sounds like (English)
As the name suggests, the Sounds like option finds similar-sounding words to your search term. This is best for finding homonyms and words that have varying spellings.
Example: This is common for words that have both UK and US variants. For instance, you can have both “colours” and “colors” on a document.
Find all word forms (English)
This option allows you to look for the word you searched for, along with other instances that are either plural or in a different tense.
Example: If you search for the word “be” after enabling the Find all word forms option, you’ll also find the words “are“ and “is“ highlighted as they are the different tense forms of “be.”
Match prefix and Match suffix
Checking off the Match prefix or Match suffix fields will limit your search to words that have the same beginning or the same ending, respectively.
Example: Suppose you enable Match prefix. When you search for the word “love,” Microsoft Word will find the words “love“ and “lovely.“ However, you won’t find the word “beloved“ highlighted in the search results as it’s a suffix of love.
Ignore punctuation characters and Ignore white-space characters
Again, this search option is self-explanatory. It tells Microsoft Word not to take up spaces, periods, hyphens, and similar attitudes into consideration.
Example: After clicking on the search options, when you type in “color block”, you’ll also see “color-block.”
When to Use the Find and Replace Feature of Microsoft Word
The whole point of the Find and Replace function in Microsoft Word is to allow MS Word users to search for target text – whether it’s a specific word, a type of formatting, or a string of wildcard characters – and replace them with whatever you want.
Typically, here’s why you should use this feature:
- When you want to maintain absolute consistency in your document
- When you want to speed up typing and formatting tasks
- When you realize last-minute mistakes and want to find and then replace your errors
- When you’re writing a document that includes words with varying spellings. For instance, if you typically follow US English, and are typing a doc according to the rules of UK English, the Find and Replace feature would be super helpful to identify and change spelling errors.
- Adding special characters to words
- editing partial words and phrases
- Correcting words that you may have misspelled in a hurry. For instance, if you type “h?t” instead of “hat” and enable Use wildcards, you’ll find it highlighted in your search.
- Eliminating extra spaces
- Changing the separator character in numerals
- Reversing currency symbols
Concluding Thoughts
As you may have realized, the Find and Replace feature of Microsoft is a lifesaver, to say the least.
It can help you save tons of time, which would otherwise have been wasted in looking for errors and then replacing them. Whether you are a student, an intern, or the CEO of a company, this is a functionality that we all can be very thankful for.
Finding and replacing text in a Word document is an operation that saves a lot of manual work in modifying a document. In this article, we are going to learn how to find and replace text in Word documents programmatically in C# using Syncfusion’s .NET Word Library (Essential DocIO). This does not require Microsoft Word or Office interop dependencies.
Syncfusion’s Word Library provides comprehensive APIs to find and replace text in a Word document with any desired text, image, hyperlink, paragraph, table, part of a document, or entire document. It provides options to find text by matching case and whole words. You can find each occurrence one by one or all the occurrences of a text at once in a document.
This feature saves you effort and time by helping you automatically find and replace a pattern of text in a Word document using Regex.
You can save the resultant document as a Word document (DOCX, WordML, DOC), PDF, image, HTML, RTF, and more.
The seven ways to find and replace text in a Word document using C# are:
- Find and replace text with other text.
- Find and replace text with an image.
- Find and replace a pattern of text with a merge field.
- Find and replace text with a table.
- Find and replace text with another document.
- Find and replace text extending to several paragraphs.
- Find text in a document and highlight it.
Find and replace text in a Word document with other text using C#
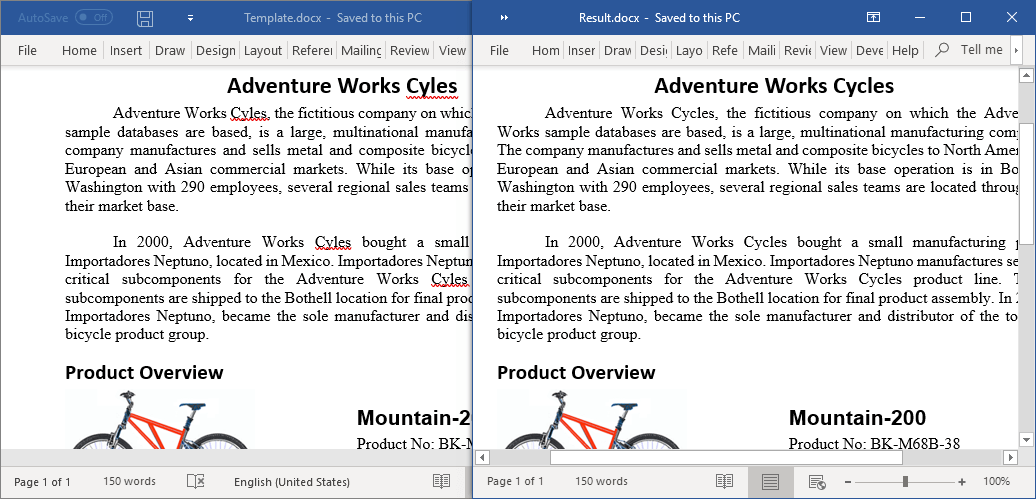
You can find text in a Word document and replace it with other text programmatically in C# using the Syncfusion Word Library. Unlike the Find method, the Replace method replaces all occurrences of the text. You can customize it to replace only the first occurrence of a text by setting the ReplaceFirst property of the WordDocument class to true.
The following code example illustrates how to replace all occurrences of a misspelled word with the correctly spelled word.
//Creates new Word document instance for word processing.
using (WordDocument document = new WordDocument())
{
    //Opens the input Word document.
    Stream docStream = File.OpenRead(Path.GetFullPath(@"../../../Template.docx"));
    document.Open(docStream, FormatType.Docx);
    docStream.Dispose();
    //Finds all occurrences of a misspelled word and replaces with properly spelled word.
    document.Replace("Cyles", "Cycles", true, true);
    //Saves the resultant file in the given path.
    docStream = File.Create(Path.GetFullPath(@"Result.docx"));
    document.Save(docStream, FormatType.Docx);
    docStream.Dispose();
}
The complete working example can be downloaded from this GitHub location.
Find and replace text in Word document with an image using C#
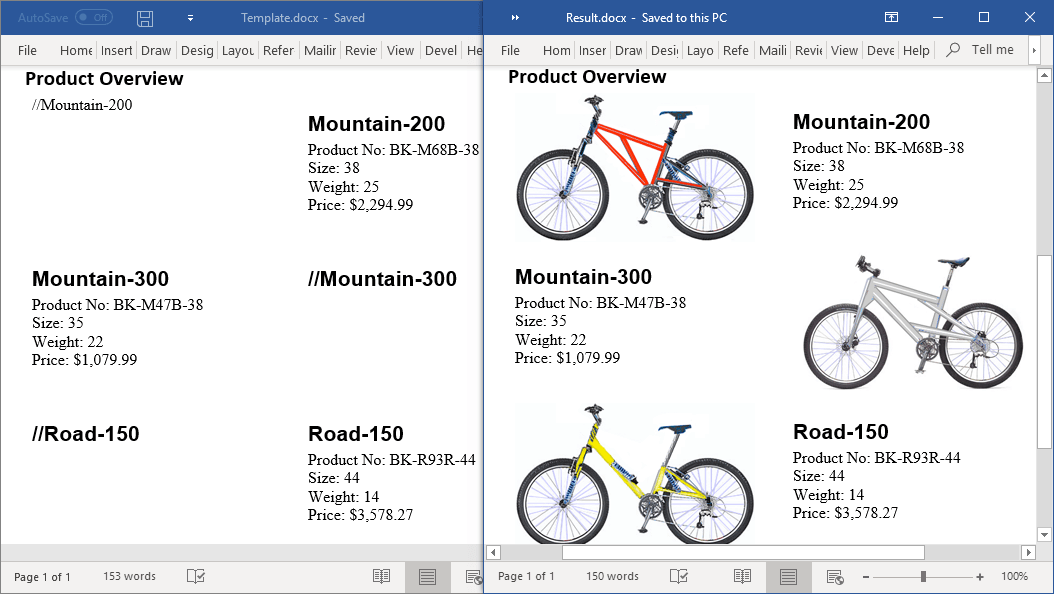
You can find placeholder text in a Word document and replace it with any desired image programmatically in C# using the Syncfusion Word Library.
The following code example illustrates how to do this.
//Creates new Word document instance for word processing.
using (WordDocument document = new WordDocument())
{
    //Opens the input Word document.
    Stream docStream = File.OpenRead(Path.GetFullPath(@"../../../Template.docx"));
    document.Open(docStream, FormatType.Docx);
    docStream.Dispose();
    //Finds all the image placeholder text in the Word document.
    TextSelection[] textSelections = document.FindAll(new Regex("^//(.*)"));
    for (int i = 0; i < textSelections.Length; i++)
    {
        //Replaces the image placeholder text with desired image.
        Stream imageStream = File.OpenRead(Path.GetFullPath(@"../../../" + textSelections[i].SelectedText + ".png"));
        WParagraph paragraph = new WParagraph(document);
        WPicture picture = paragraph.AppendPicture(imageStream) as WPicture;
        imageStream.Dispose();
        TextSelection newSelection = new TextSelection(paragraph, 0, 1);
        TextBodyPart bodyPart = new TextBodyPart(document);
        bodyPart.BodyItems.Add(paragraph);
        document.Replace(textSelections[i].SelectedText, bodyPart, true, true);
    }
    //Saves the resultant file in the given path.
    docStream = File.Create(Path.GetFullPath(@"Result.docx"));
    document.Save(docStream, FormatType.Docx);
    docStream.Dispose();
}
The complete working example can be downloaded from this GitHub location.
Find and replace a pattern of text with a merge field using C#
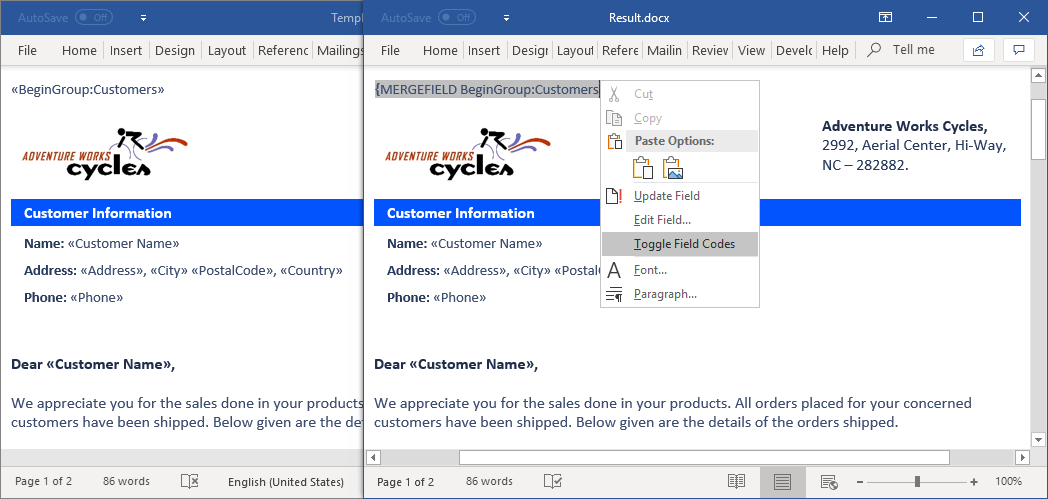
Syncfusion’s Word Library allows you to find and replace a pattern of text in a Word document with merge fields programmatically in C# using Regex.
The following code example illustrates how to create a mail merge template by replacing a pattern of text (enclosed within ‘«’ and ‘»’) in a Word document with the desired merge fields.
//Creates new Word document instance for word processing.
using (WordDocument document = new WordDocument())
{
    //Opens the input Word document.
    Stream docStream = File.OpenRead(Path.GetFullPath(@"../../../Template.docx"));
    document.Open(docStream, FormatType.Docx);
    docStream.Dispose();
    //Finds all the placeholder text enclosed within '«' and '»' in the Word document.
    TextSelection[] textSelections = document.FindAll(new Regex("«([(?i)image(?-i)]*:*[a-zA-Z0-9 ]*:*[a-zA-Z0-9 ]+)»"));
    string[] searchedPlaceholders = new string[textSelections.Length];
    for (int i = 0; i < textSelections.Length; i++)
    {
        searchedPlaceholders[i] = textSelections[i].SelectedText;
    }
    for (int i = 0; i < searchedPlaceholders.Length; i++)
    {
        //Replaces the placeholder text enclosed within '«' and '»' with desired merge field.
        WParagraph paragraph = new WParagraph(document);
        paragraph.AppendField(searchedPlaceholders[i].TrimStart('«').TrimEnd('»'), FieldType.FieldMergeField);
        TextSelection newSelection = new TextSelection(paragraph, 0, paragraph.Items.Count);
        TextBodyPart bodyPart = new TextBodyPart(document);
        bodyPart.BodyItems.Add(paragraph);
        document.Replace(searchedPlaceholders[i], bodyPart, true, true, true);
    }
    //Saves the resultant file in the given path.
    docStream = File.Create(Path.GetFullPath(@"Result.docx"));
    document.Save(docStream, FormatType.Docx);
    docStream.Dispose();
}
The complete working example can be downloaded from this GitHub location.
Find and replace text in a Word document with a table using C#
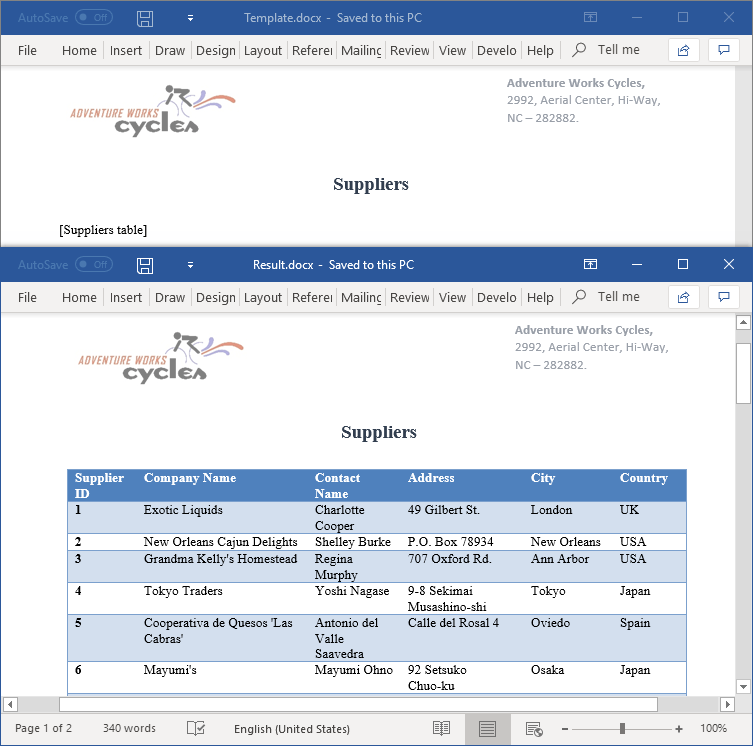
You can find placeholder text in a Word document and replace it with a table programmatically in C# using the Syncfusion Word Library.
The following code example illustrates how to do this.
//Creates new Word document instance for word processing.
using (WordDocument document = new WordDocument())
{
    //Opens the input Word document.
    Stream docStream = File.OpenRead(Path.GetFullPath(@"../../../Template.docx"));
    document.Open(docStream, FormatType.Docx);
    docStream.Dispose();
    //Creates a new table.
    WTable table = new WTable(document);
    table.ResetCells(1, 6);
    table[0, 0].Width = 52f;
    table[0, 0].AddParagraph().AppendText("Supplier ID");
    table[0, 1].Width = 128f;
    table[0, 1].AddParagraph().AppendText("Company Name");
    table[0, 2].Width = 70f;
    table[0, 2].AddParagraph().AppendText("Contact Name");
    table[0, 3].Width = 92f;
    table[0, 3].AddParagraph().AppendText("Address");
    table[0, 4].Width = 66.5f;
    table[0, 4].AddParagraph().AppendText("City");
    table[0, 5].Width = 56f;
    table[0, 5].AddParagraph().AppendText("Country");
    //Imports data to the table.
    ImportDataToTable(table);
    //Applies the built-in table style (Medium Shading 1 Accent 1) to the table.
    table.ApplyStyle(BuiltinTableStyle.MediumShading1Accent1);
    //Replaces the table placeholder text with a new table
    TextBodyPart bodyPart = new TextBodyPart(document);
    bodyPart.BodyItems.Add(table);
    document.Replace("[Suppliers table]", bodyPart, true, true, true);
    //Saves the resultant file in the given path.
    docStream = File.Create(Path.GetFullPath(@"Result.docx"));
    document.Save(docStream, FormatType.Docx);
    docStream.Dispose();
}
The complete working example can be downloaded from this GitHub location.
Find and replace text in Word document with another document using C#
The Syncfusion Word Library lets you find and replace text with another Word document programmatically in C#.
The following code example illustrates how to merge or combine Word documents by replacing text with another document (the content of a subheading).
//Creates new Word document instance for word processing.
using (WordDocument document = new WordDocument())
{
    //Opens the input Word document.
    Stream docStream = File.OpenRead(Path.GetFullPath(@"../../../Template.docx"));
    document.Open(docStream, FormatType.Docx);
    docStream.Dispose();
    //Finds all the content placeholder text in the Word document.
    TextSelection[] textSelections = document.FindAll(new Regex(@"[(.*)]"));
    for (int i = 0; i < textSelections.Length; i++)
    {
        //Replaces the content placeholder text with desired Word document.
        docStream = File.OpenRead(Path.GetFullPath(@"../../../" + textSelections[i].SelectedText.TrimStart('[').TrimEnd(']') + ".docx"));
        WordDocument subDocument = new WordDocument(docStream, FormatType.Docx);
        docStream.Dispose();
        document.Replace(textSelections[i].SelectedText, subDocument, true, true);
        subDocument.Dispose();
    }
    //Saves the resultant file in the given path.
    docStream = File.Create(Path.GetFullPath(@"Result.docx"));
    document.Save(docStream, FormatType.Docx);
    docStream.Dispose();
}
The complete working example can be downloaded from this GitHub location.
Find and replace text extending to several paragraphs in C#
Apart from finding text in a paragraph, you can also find and replace text that extends to several paragraphs in a Word document. You can find the first occurrence of the text that extends to several paragraphs by using the FindSingleLine method. Find the next occurrences of the text by using the FindNextSingleLine method. Similarly, you can replace text that extends to several paragraphs by using ReplaceSingleLine method.
The following code example illustrates how to replace text that extends to several paragraphs.
//Creates new Word document instance for word processing.
using (WordDocument document = new WordDocument())
{
    //Opens the input Word document.
    Stream docStream = File.OpenRead(Path.GetFullPath(@"../../../Template.docx"));
    document.Open(docStream, FormatType.Docx);
    docStream.Dispose();
    docStream = File.OpenRead(Path.GetFullPath(@"../../../Source.docx"));
    WordDocument subDocument = new WordDocument(docStream, FormatType.Docx);
    docStream.Dispose();
    //Gets the content from another Word document to replace with.
    TextBodyPart replacePart = new TextBodyPart(subDocument);
    foreach (TextBodyItem bodyItem in subDocument.LastSection.Body.ChildEntities)
    {
        replacePart.BodyItems.Add(bodyItem.Clone());
    }
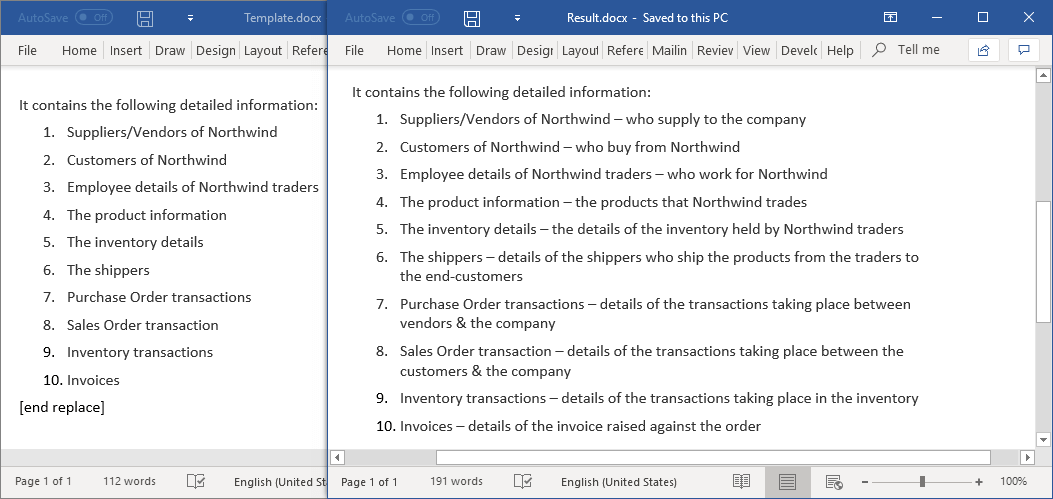
    string placeholderText = "Suppliers/Vendors of Northwind" + "Customers of Northwind"
        + "Employee details of Northwind traders" + "The product information"
        + "The inventory details" + "The shippers" + "Purchase Order transactions"
        + "Sales Order transaction" + "Inventory transactions" + "Invoices" + "[end replace]";
    //Finds the text that extends to several paragraphs and replaces it with desired content.
    document.ReplaceSingleLine(placeholderText, replacePart, false, false);
    subDocument.Dispose();
    //Saves the resultant file in the given path.
    docStream = File.Create(Path.GetFullPath(@"Result.docx"));
    document.Save(docStream, FormatType.Docx);
    docStream.Dispose();
}
The complete working example can be downloaded from this GitHub location.
Find text in a Word document and format it using C#
Using the Syncfusion Word Library, you can find text in a Word document and format or highlight it programmatically in C#. You can find the first occurrence of text using the Find method. Find the next occurrences of the text using the FindNext method.
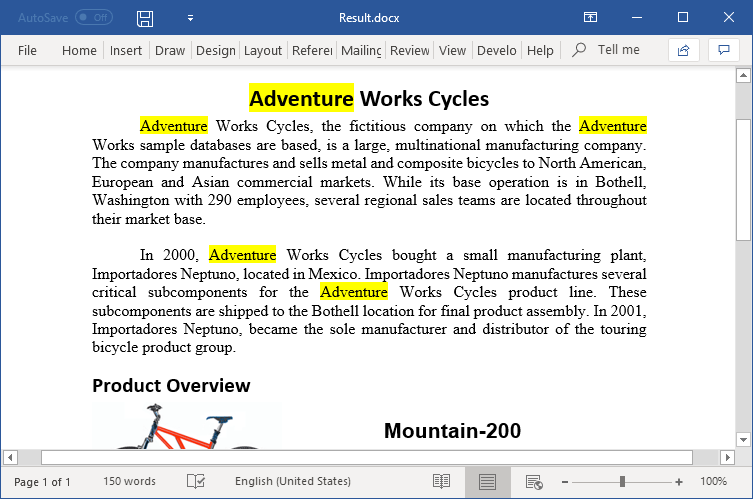
The following code example illustrates how to find all occurrences of a length of text and highlight it.
//Creates new Word document instance for word processing.
using (WordDocument document = new WordDocument())
{
    //Opens the input Word document.
    Stream docStream = File.OpenRead(Path.GetFullPath(@"../../../Template.docx"));
    document.Open(docStream, FormatType.Docx);
    docStream.Dispose();
    //Finds all occurrence of the text in the Word document.
    TextSelection[] textSelections = document.FindAll("Adventure", true, true);
    for (int i = 0; i < textSelections.Length; i++)
    {
        //Sets the highlight color for the searched text as Yellow.
        textSelections[i].GetAsOneRange().CharacterFormat.HighlightColor = Color.Yellow;
    }
    //Saves the resultant file in the given path.
    docStream = File.Create(Path.GetFullPath(@"Result.docx"));
    document.Save(docStream, FormatType.Docx);
    docStream.Dispose();
}
Similarly, you can automate the process of highlighting or underlining any misspelled words in a Word document without using Microsoft Word.
The complete working example can be downloaded from this GitHub location.
Summary
Thank you for taking the time to read this blog. I hope it may have clarified finding and replacing text in Word documents using the Syncfusion Word Library. Take a moment to peruse the documentation, where you’ll find other options and features, all with accompanying code examples. Using the Library, you can create, edit, and merge Word documents, as well as convert them to PDF, image, HTML, RTF, and other formats.
If you are new to our Word Library (Essential DocIO), it is highly recommended that you follow our Getting Started guide.
Are you already a Syncfusion user? You can download the product setup here. If you’re not yet a Syncfusion user, you can download a free, 30-day trial here.
If you have any questions about these features, please let us know in the comments below. You can also contact us through our support forum, Direct-Trac, or feedback portal. We are happy to assist you!
Have you ever finishing typing a letter, report or presentation only to discover that you misspelled a person’s name or had the wrong company listed multiple times throughout your document? No worries—it’s an easy fix. Using Word’s Find and Replace feature, you can quickly locate and replace text. Let’s see how it works.
Switch over to the “Home” tab on Word’s Ribbon and then click the “Replace” button.
This opens Word’s Find and Replace window. In the “Find What” box, type the word or phrase you want to locate. If you only want to find text in your document, you can go ahead and click the “Find Next” button to have Word jump to the next occurrence of that word. Keep clicking it to browse through all the results.
If you want to replace the text you find with something else, type the replacement text into the “Replace With” box. You can enter up to 255 characters in the both the “Find What” and “Replace With” boxes, by the way.
In this example, let’s say we want to replace the name “Williams” with the name “Billingsly”, so we’ve typed that text into the respective boxes. Next, we’d click the “Find Next” button to have Word locate the first instance of the text in the “Find What” box.
Word jumps the document to that point and highlights the result in gray, still keeping the Find and Replace window on top for you. Click the “Replace” button to replace the currently selected result with whatever text is in the “Replace With” box.
To replace all instances at once without stopping and reviewing each one, you can click the “Replace All” button.
Be careful when using “Replace All” because it will automatically replace all instances, including those you might not want to replace. In the example below, there are three more instances of “Williams,” but we only want to replace the next two. In this case, we would only click “Replace” for the second and third instance.
If there is a particular instance where you don’t want to replace the text, click “Find Next” as many times as needed until you come to an example where you need to replace text.
To exit from Find and Replace, click the “Cancel” button.
Of course, since it is Word we’re talking about here, there are also lots of other things you can do to make your searches more sophisticated:
- Use wildcards in your searches to narrow them down to more specific results.
- Search directly within Word’s Navigation pane to have Word show you which headings have your search terms included under them.
- Replace double spaces between sentences with single spaces.
- Search for specific formatting or special characters.
The basic of searching and replacing text in Word are pretty straightforward, but there’s a lot you can do with it once you start digging.
READ NEXT
- › How to Replace Any Character with Newlines in Notepad++
- › How to Search in Google Docs
- › How to Use Find and Replace in Google Docs
- › What Your Function Keys Do in Microsoft Word
- › How to Search for Text in Word
- › How to Find and Replace Formatting in Microsoft Word
- › How to Delete a Page in Microsoft Word
- › Spotify Is Shutting Down Its Free Online Game
How-To Geek is where you turn when you want experts to explain technology. Since we launched in 2006, our articles have been read billions of times. Want to know more?
Exchange one text string for another in any version of Word
Updated on October 29, 2021
What to Know
- Open the Find and Replace tool in Word with the keyboard shortcut CTRL+H.
- Find and Replace doesn’t take capitalization into account unless you specifically tell it to.
- To replace capitalization, select More in the Find and Replace box, then Match Case > Replace or Replace All > OK.
All editions of Microsoft Word offer a feature called Find and Replace. Use this tool to search for a specific word, number, or phrase in a document and replace it with something else. You can also make several replacements at once—like changing a name or fixing something you’ve consistently misspelled. Use it, also, to replace numbers or punctuation and cap or uncap words.
If you turn on Track Changes before you begin, you can reject the replacement or deletion of any unintended word.
Find and Replace a Word
The Microsoft Word Find and Replace dialog box, in its simplest form, prompts you to type the word you’re looking for and the word you want to replace it with. Then, click Replace, and either allow Word to change every entry for you or, go through them one at a time.
To open the tool, press Ctrl+H (Cmd+H on Mac).
Change Capitalization in Microsoft Word
The Find and Replace feature doesn’t take into account anything about capitalization unless you specifically tell it to. To get to that option you’ll need to click the More option in the Find and Replace dialog box:
- Open the Find and Replace dialog box using your favorite method. We prefer Ctrl+H.
- Click More.
- Type the appropriate entry in the Find What and Replace With lines.
- Click Match Case.
- Click Replace and Replace again, or, click Replace All.
- Click OK.
Advanced Options
When you select the More expander in the Search and Replace dialog box, you’ll encounter several customizations. The list of items varies according to which version of Word you’re running.
Search Options
Select the check boxes to include or exclude things like punctuation, white-space characters, or substrings. Plus, apply tools like word-form matching (i.e., walked also matches walking) and Soundex matching (Karin matches Karen).
Replace Options
Word supports more advanced substitutions, too. Use special characters to substitute text markup with symbols. For example, replace a character code like & with an ampersand. This approach is useful for de-cluttering pasted HTML text that uses HTML codes to render certain symbols.
Thanks for letting us know!
Get the Latest Tech News Delivered Every Day
Subscribe


 , and then select Advanced Find & Replace.

 .
.
 + PERIOD.


