
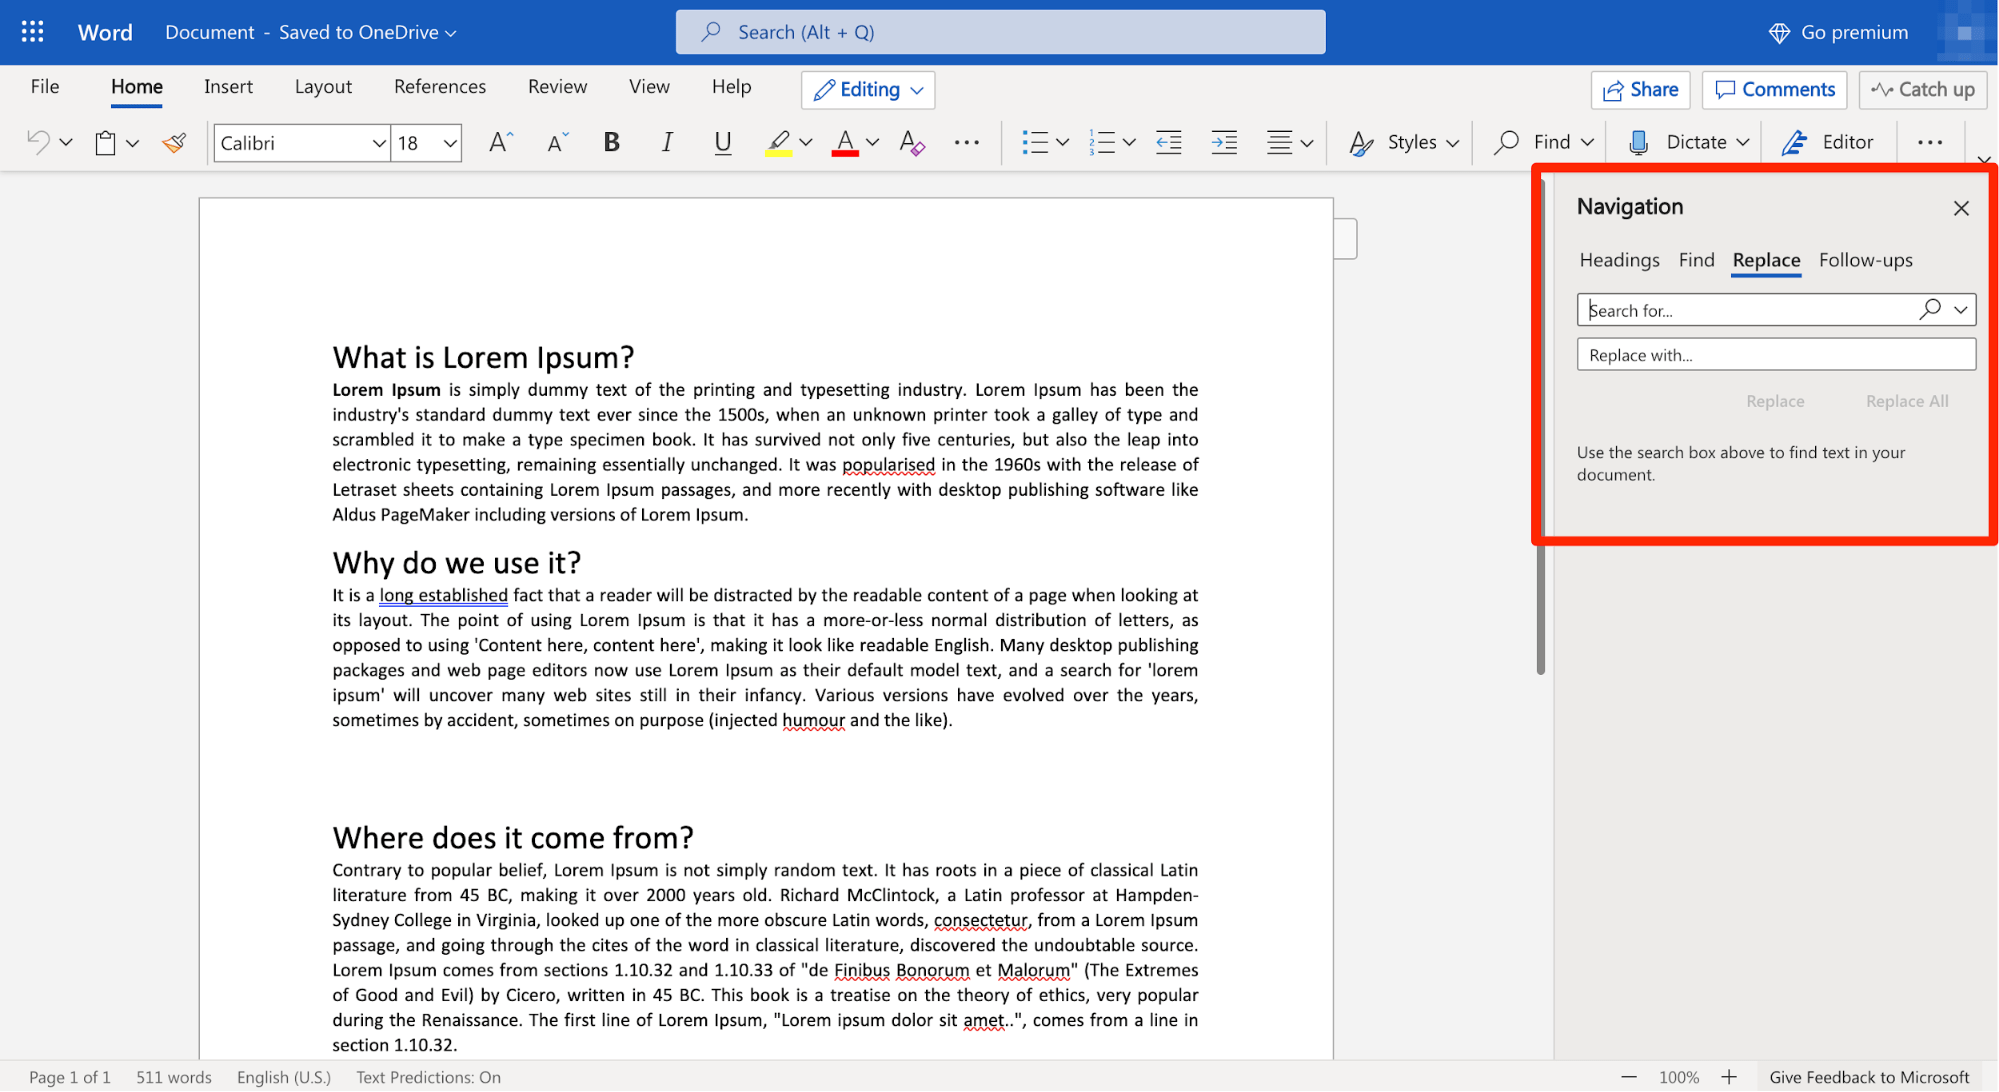
Use the word processor’s search function to locate text and more
Updated on December 15, 2020
What to Know
- Basic word search: Go to the Home tab. Select Find and enter the text for the search.
- Advanced search: Go to Home > Find. Choose the search drop-down arrow. Select Options and select your criteria.
This article explains how to search for text in Microsoft Word. The information applies to Word 2019, Word 2016, Word 2013, Word 2010, Word Online, and Word for Microsoft 365.
How to Do a Basic Word Search in MS Word
Microsoft Word includes a search function that makes it easy to search for different elements in a document, including text. Use the basic tool to look for instances of a specific word, or the advanced options to perform tasks such as replace all instances of a word with another one or search for equations.
To run a basic search for a specific word or phrase in Word:
-
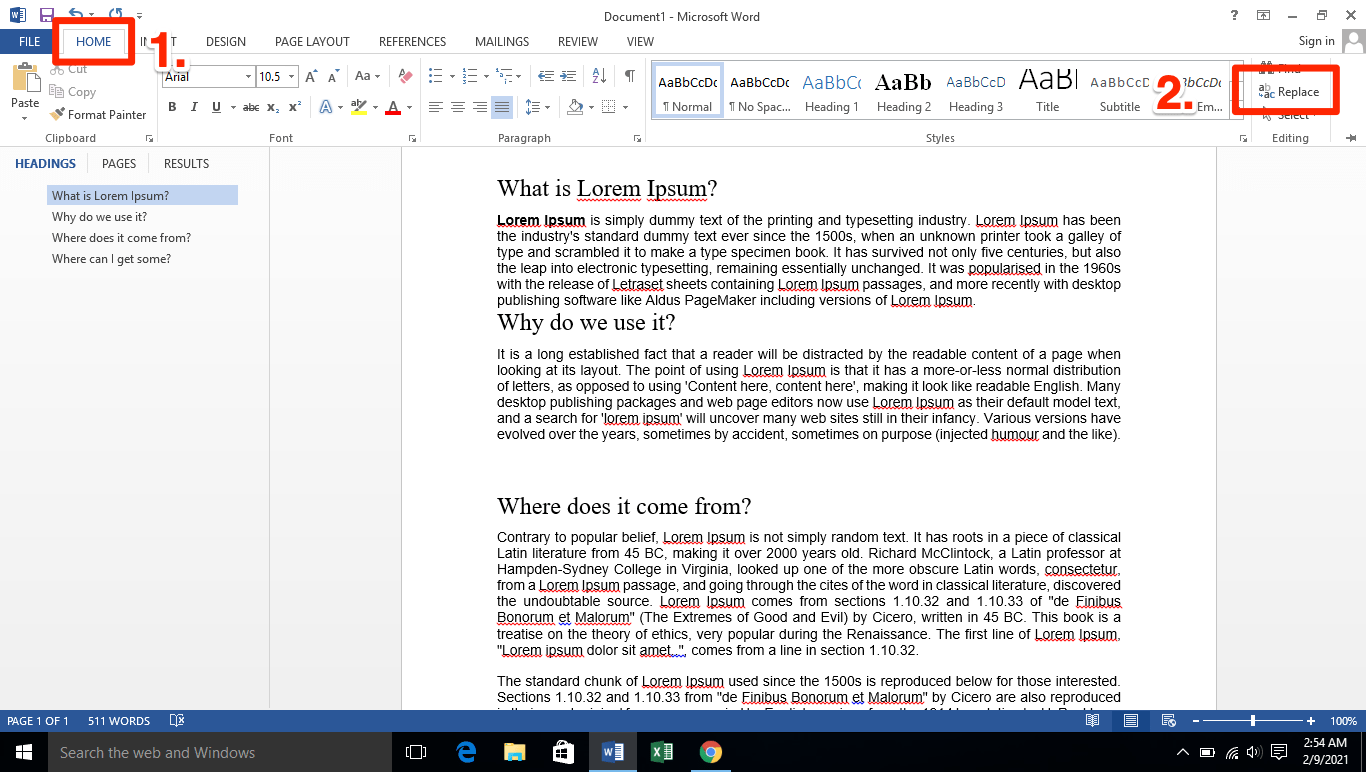
Go to the Home tab and select Find, or press Ctrl+F.
In older versions of Microsoft Word, select File > File Search.
-
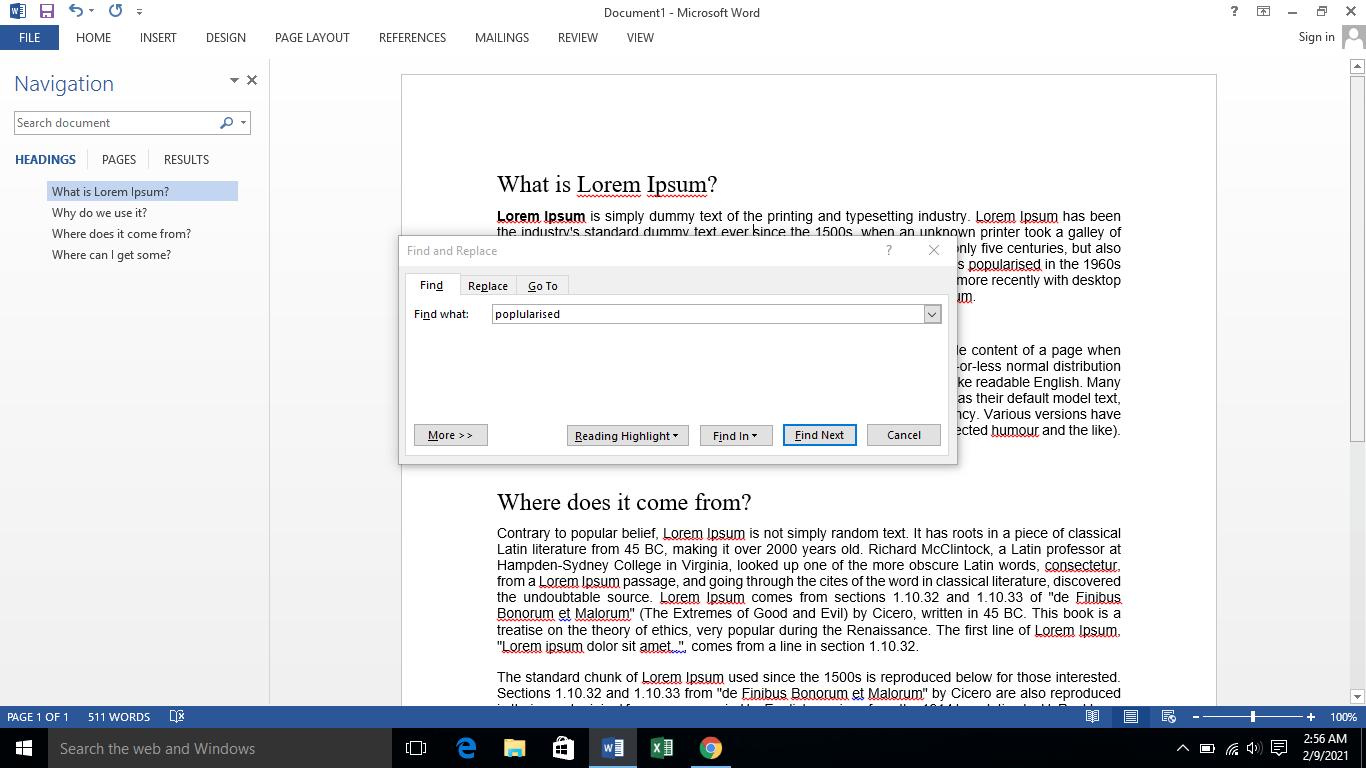
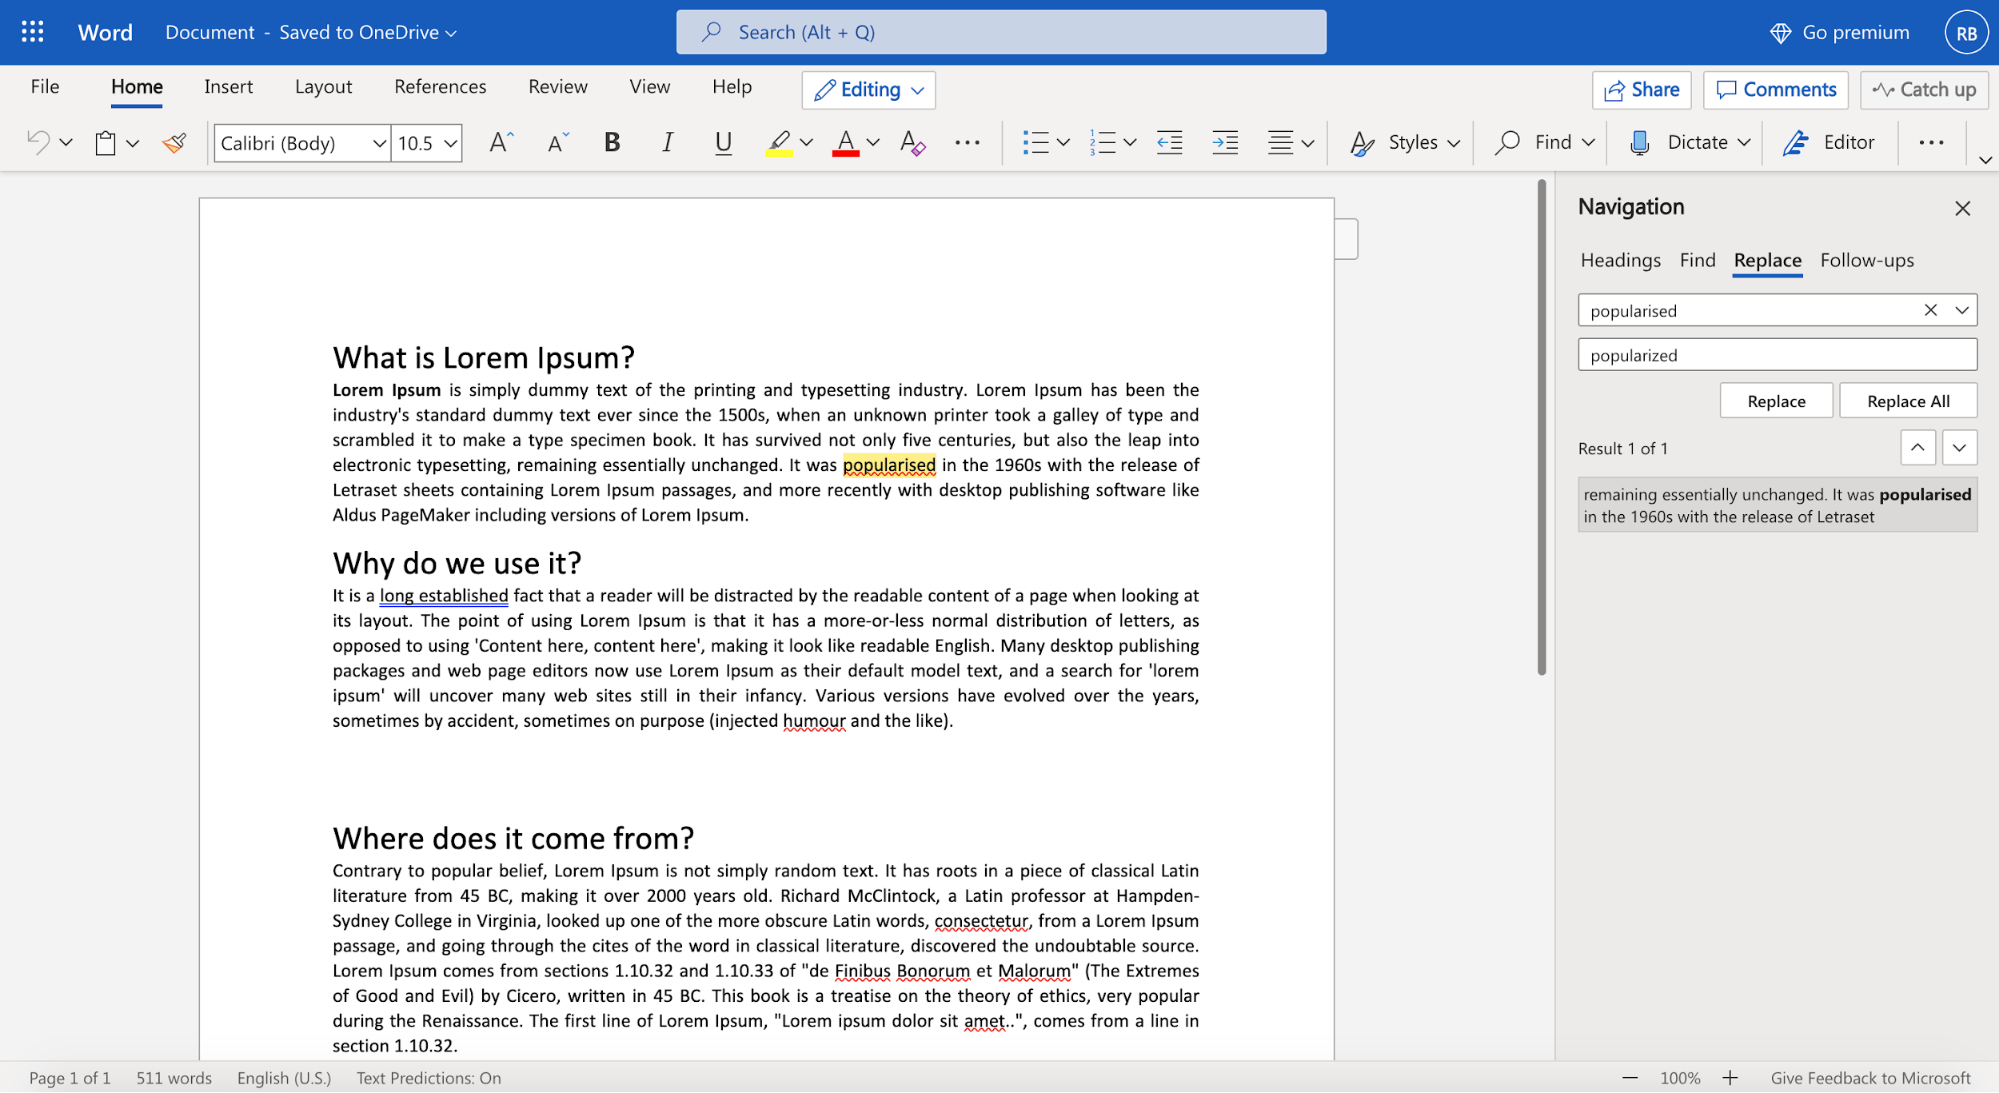
In the Navigation pane, enter the text you want to search for. A list of matching words displays in the Navigation pane and instances of the word are highlighted in the main document.
-
Cycle through the results in the Navigation pane in one of three ways:
- Press Enter to move to the next result.
- Select a result with the mouse.
- Select the Up and Down arrows to move to the previous or next result.
-
Make any changes or edits to the document as needed.
-
Select the Down arrow to move to the next instance of the word.
Match Case, Whole Words Only, and More
Beyond searching for every instance of a word, you can get more specific about what you want to find. For example, to find whole instances of a word and not every word that contains the letter combination or to find instances of a word that aren’t capitalized.
Here’s how to do an advanced search:
-
Select Home > Find.
-
In the Navigation pane, select the Search drop-down arrow.
-
Choose Options.
-
In the Find Options dialog box, choose the description that best fits what you’re trying to find. For example, to find instances of a word with the same capitalization, select Match case.
-
Select OK.
Use Advanced Find
Many of the choices available in the Find Options dialog box are also available in Advanced Find. Advanced Find includes the option to replace the text with something new. Based on your selection, Word replaces one instance or all instances at once. You can also replace the formatting, or change the language, paragraph, and tab settings.
Find Instances of Other Elements
Other options in the Navigation pane include searching for equations, tables, graphics, footnotes, endnotes, and comments.
Thanks for letting us know!
Get the Latest Tech News Delivered Every Day
Subscribe
ВикиЧтение
VBA для чайников
Каммингс Стив
Поиск и замена текста с помощью VBA в Word
Хотя это звучит и несколько необычно, но Find — это объект Word VBA. Объекты Find принадлежат диапазонам и выделенным областям. Для обнаружения или форматирования текста с помощью объекта Find вам потребуется выполнить следующие действия.
1. Получите доступ к объекту Find для определенного диапазона или выделенной области. Если вам необходимо просмотреть целый документ, используйте свойство Content объекта Document для получения доступа к соответствующему диапазону, как показано ниже:
ActiveDocument.Content.Find
2. Определить свойства объекта Find в соответствии с тем, что же вы ищете и как именно вы хотите проводить поиск.
3. Вызвать метод Execute объекта Find. Соответствующий пример приведен ниже:
With OpenRange.Find
.Clear Formatting
.Text = «pogosticks»
.Execute
End With
Для свойств, значения которых явно вы задать не можете, объект Find выбирает параметры, использованные последними или те, которые в настоящий момент заданы в диалоговом окне Найти и заменить программы Word. Именно по этой причине вам всегда следует включать метод Clear Formatting перед началом нового поиска- он позволяет убрать все ранее определенные для проведения поиска параметры форматирования.
Работа с найденным текстом
Основная работа метода Execute — обнаружение первого экземпляра искомого текста или форматирования в указанном диапазоне или выделенной области. После выполнения этого метода вам прежде всего следует определить, было ли найдено то, что вы ищете. Для подобной проверки используйте свойство Found объекта Find совместно с инструкцией If…Then, как показано на примере следующей заготовки программного кода:
If .Found = True Then
(выполнение определенных действий с найденным текстом)
Else
(отображение соответствующего сообщения)
End If
Если метол Execute нашел необходимый текст, исходный диапазон или выделенная область переопределяются таким образом, чтобы содержать найденный текст. Это очень важный момент, поскольку это означает, что вы можете работать с найденным текстом посредством свойств и методов исходного объекта. В следующем примере, представляющем собой расширенный вариант первого фрагмента кода из настоящего раздела, инструкция .Parent. Italic = True обращается к родительскому объекту по отношению к объекту Find, т.е. диапазону OpenRange. При выполнении этой инструкции диапазон OpenRange теперь содержит только найденный фрагмент текста, так как только в нем предусмотрено форматирование курсивом:
With OpenRange.Find
.СlearFormatting
.Text = «pogosticks»
If .Found = True Then
.Parent.Italic = True
Else
MsgBox «No pogosticks found.»
End If
End with
Объект Reolacement принадлежит (а значит, является его свойством) объекту Find. При написании кода для операции поиска и замены вам следует задать свойства и выполнить методы объекта Replacement.
Следующий фрагмент кода заменяет все экземпляры фразы pogosticks словом skateboards. Выделенная область изменяется при выполнении критерия поиска, поскольку доступ к объекту Find осуществляется через объект Selection:
With ActiveDocument.Content.Find
.ClearFormatting
.Text = «pogosticks»
With .Replacement
.ClearFormatting
.Text == «skateboards»
End With
.Execute Replace := wdReplaceAll
End With
Обратите внимание на то, что метод Execute может использовать аргумент Replace, предназначенный для контроля за тем, будут ли заменены все обнаруженные экземпляры обнаруженного фрагмента текста, или только первый.
Читайте также
Поиск и замена данных
Поиск и замена данных
В программе HtmlPad реализована возможность быстрого поиска данных. Этот механизм полезно использовать при работе с большими программными кодами или с большими объемами данных, поскольку поиск требуемой информации вручную (например, путем просмотра
Поиск и замена данных
Поиск и замена данных
В программе Extra Hide Studio имеется удобный механизм для быстрого поиска и замены данных. Эта возможность особенно актуальна при работе с большими исходными кодами, поскольку поиск данных путем просмотра всего кода может занять слишком много времени, и к
Глава 2 Подготовка текста в Microsoft Word
Глава 2 Подготовка текста в Microsoft Word
• Общие сведения о Word 2007• Основные правила форматирования• Вставка стандартных блоков в документ• Нумерация страниц и колонтитулы• Проверка правописания, поиск синонимов, перевод слов• Сноски и закладки• Настройка параметров
3.1. Поиск и замена фрагментов
3.1. Поиск и замена фрагментов
Текстовый редактор успешно справляется с поиском и заменой текста в отдельном файле. Однако, если это же нужно сделать сразу в нескольких файлах, лучше воспользоваться специальными программами, с помощью которых можно заменить фрагменты
Поиск и замена текста
Поиск и замена текста
В текстовом редакторе Adobe InDesign можно воспользоваться полезнейшей функцией поиска и замены фрагментов текста. Причем, раз мы имеем дело с программой верстки, найденные фрагменты можно не только заменить другими, но и оформить каким-то образом –
Поиск и замена форматирования
Поиск и замена форматирования
Для поиска текста с определенным форматированием используйте свойства объекта Find, касающиеся форматирования. Они идентичны свойствам, используемым при работе с форматированием диапазона или выделенной области, как я уже отмечал в разделе
Автоматический поиск и замена данных
Автоматический поиск и замена данных
В процессе работы иногда возникает необходимость быстро найти те или иные данные (слово, текстовый фрагмент и т. д.) либо заменить одни данные на другие. Для решения такой задачи в Publisher 2007 реализован механизм автоматического поиска и
Поиск и замена
Поиск и замена
В новой версии Excel был полностью изменен пользовательский интерфейс и расширены функциональные возможности средства Найти и заменить. Теперь можно с помощью одной операции производить поиск и замену по всем листам книги, повторно выполнять запросы поиска
Поиск и замена символов
Поиск и замена символов
Иногда при подготовке электронных документов возникает задача поиска определенных текстовых фрагментов. Например, вы забыли номер чертежа, но помните, что в его названии или дополнительной информации, размещенной на чертеже, содержится
Глава 2 Подготовка текста в Microsoft Word
Глава 2
Подготовка текста в Microsoft Word
Microsoft Word – пожалуй, самая популярная на сегодняшний день программа, предназначенная для работы с текстами. Продукт компании Microsoft обладает всеми необходимыми возможностями, связанными с набором и правкой текстов любой сложности.
5.7. Поиск и замена
5.7. Поиск и замена
В документе можно производить автоматический поиск текста и замену его другим.Поиск и замена ведется по введенному образцу. Если в качестве образца указано слово «ход», то компьютер найдет и слово «пароход», если предварительно не поставить условие, что
13.3.4. Поиск и замена текста
13.3.4. Поиск и замена текста
Как вы уже догадались, окно Найти и заменить используется не только для перехода на нужную страницу. Вкладка Найти используется для поиска текста. Для быстрого доступа к этой вкладке нажмите Ctrl+F или выберите команду меню Правка, Найти. Нажмите
Поиск и замена
Поиск и замена
Для поиска в тексте документа нужного слова или сочетания символов служит окно поиска и замены (рис. 9.19), которое открывается нажатием Ctrl+F. Если надо, чтобы оно сразу открылось как окно замены, используйте сочетание Ctrl+H.
Рис. 9.19. Окно поиска и замены.Для
Поиск и замена фрагментов фильма
Поиск и замена фрагментов фильма
Очень часто бывает нужно найти в изображении или фильме Flash какой-либо текст и, возможно, заменить его на другой. Специально для этого Flash, как и многие другие программы, работающие с документами, предлагает богатые возможности по поиску и
Поиск и замена текста
Поиск и замена текста
Поиск определенного слова или фразы в большом документе является довольно непростой задачей, но ее можно значительно упростить, если воспользоваться командой Главная ? Редактирование ? Найти. В появившемся окне (рис. 5.20) введите искомый текст и
Поиск и замена данных
Поиск и замена данных
По современным меркам таблица с несколькими тысячами записей считается небольшой, но даже в такой таблице ручной поиск или отбор нужной информации может занять продолжительное время. С помощью средств поиска, сортировки и фильтрации нужные данные
You’ve just finished typing a presentation that’s due in about 15 minutes. But before you can celebrate your moment of victory, you realize that you’ve spelled your client‘s name wrong and have missed the double Rs in their company name multiple times throughout your document.
Cue: An aggravated scream.
The good news is that changing these small errors is an easy fix on Office 365. You can replace as many words as you want within seconds on Microsoft Word using its super helpful Find and Replace functionality.
This article will guide you through the necessary steps to help you find and replace text in MS Word.
Ready? Let’s begin.
How to Use Microsoft Word’s Find and Replace Feature
Microsoft is one of the leading companies in the world. It’s because it prioritizes its customers and comes up with innovations that can make their lives easier and more convenient.
The Find and Replace feature on MS Word is a shining example of this effort.
You can use this feature to find specific words in your file and then replace them in case there are some last-minute changes. This can even be useful when you make mistakes in the doc while typing or want to accommodate those last-minute client changes.
We’ll show you how to replace text in Microsoft Word, depending on the computer device you use.
How to Change and Replace Text in MS Word on Windows
It’s no wonder that all Windows devices have built-in Microsoft programs considering it’s a product developed by the Microsoft company themselves. If you find yourself using the word processor often for making notes or presentations, you’ll be especially thankful for the Find and Replace functionality.
Here’s a short step-by-step guide to using the feature in MS Word on Windows devices:
Step #1 Open Microsoft Word on your Windows device.
Step #2 Click on the Home tab on your top menu bar. A secondary menu will appear on your screen.
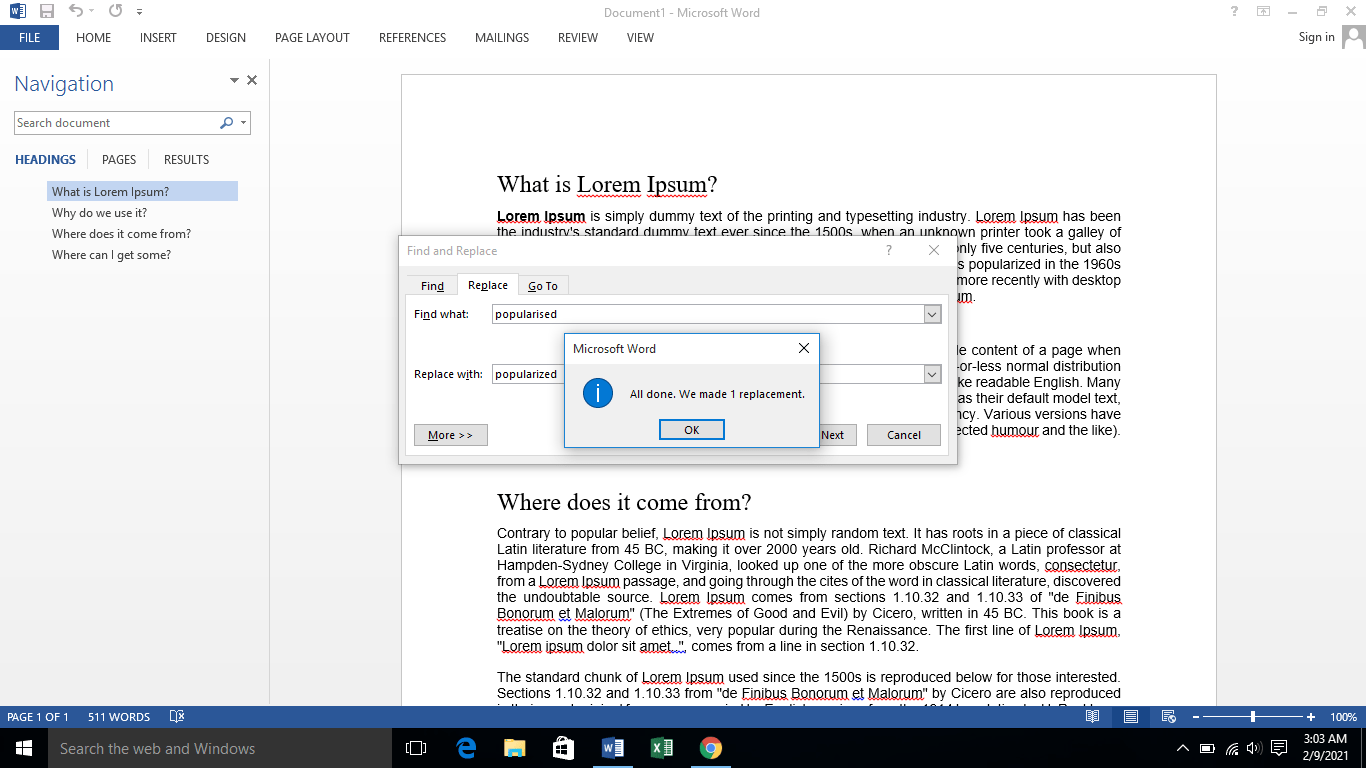
Step #3 Select the Replace option located on the top-right-hand side of your screen. Alternatively, you can also press Ctrl + H. The Find and Replace pop-up box will appear immediately.
Step #4 Type in the phrase or word you want to locate in your Word doc in the Find what field under the Find tab.
Step #5 Click on the Replace tab on the top menu bar. Type in the word you want to update in the Replace with field.
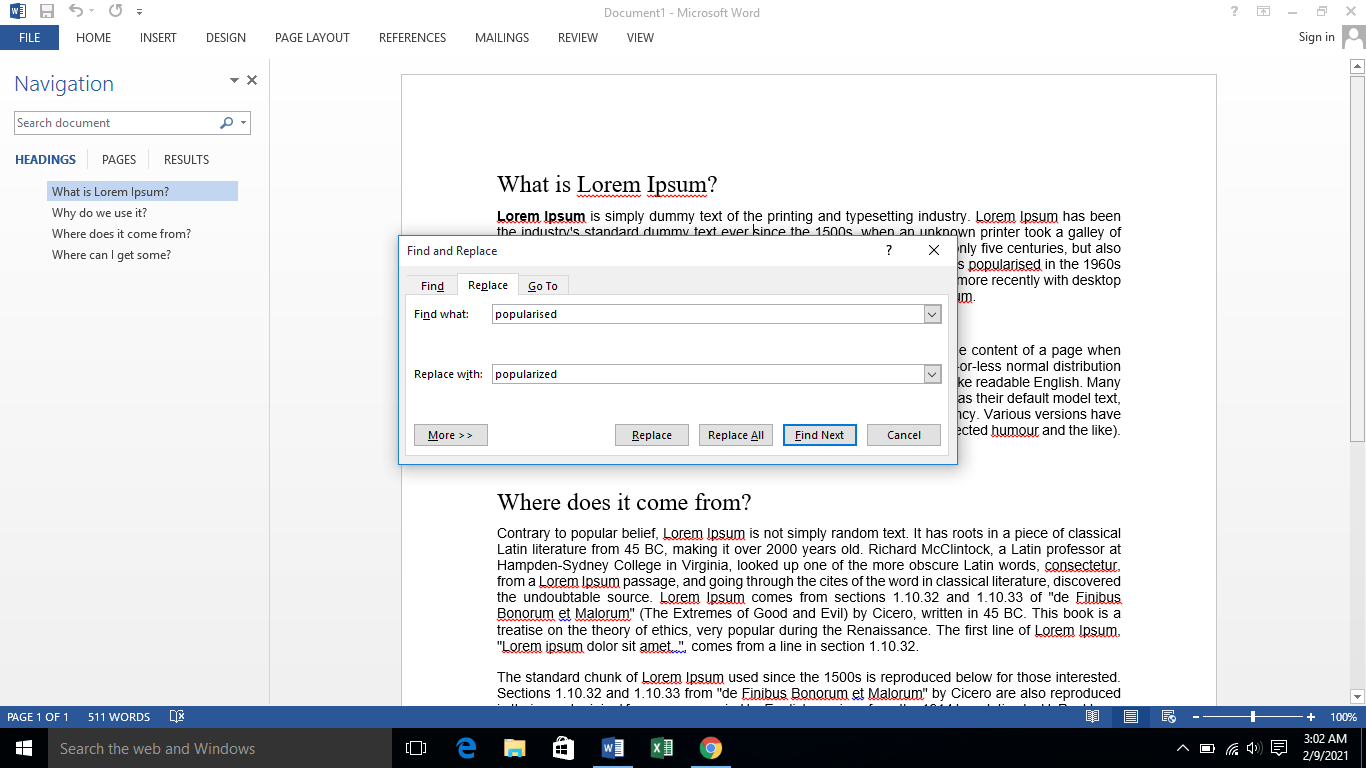
On clicking on the Replace button, the changes you want will be made one by one in the Word doc. However, if you want to update all fitting instances at once, you can click on Replace All instead.
Microsoft Word will give you a confirmation of the replacements made in your Word doc. It’ll look something like this:
How to Change and Replace Text in MS Word on Mac
Now that we’ve covered Windows, let’s see how you can use the Find and Replace feature on a MacBook. Here’s how to proceed in MS Word when you’re using an iOS device:
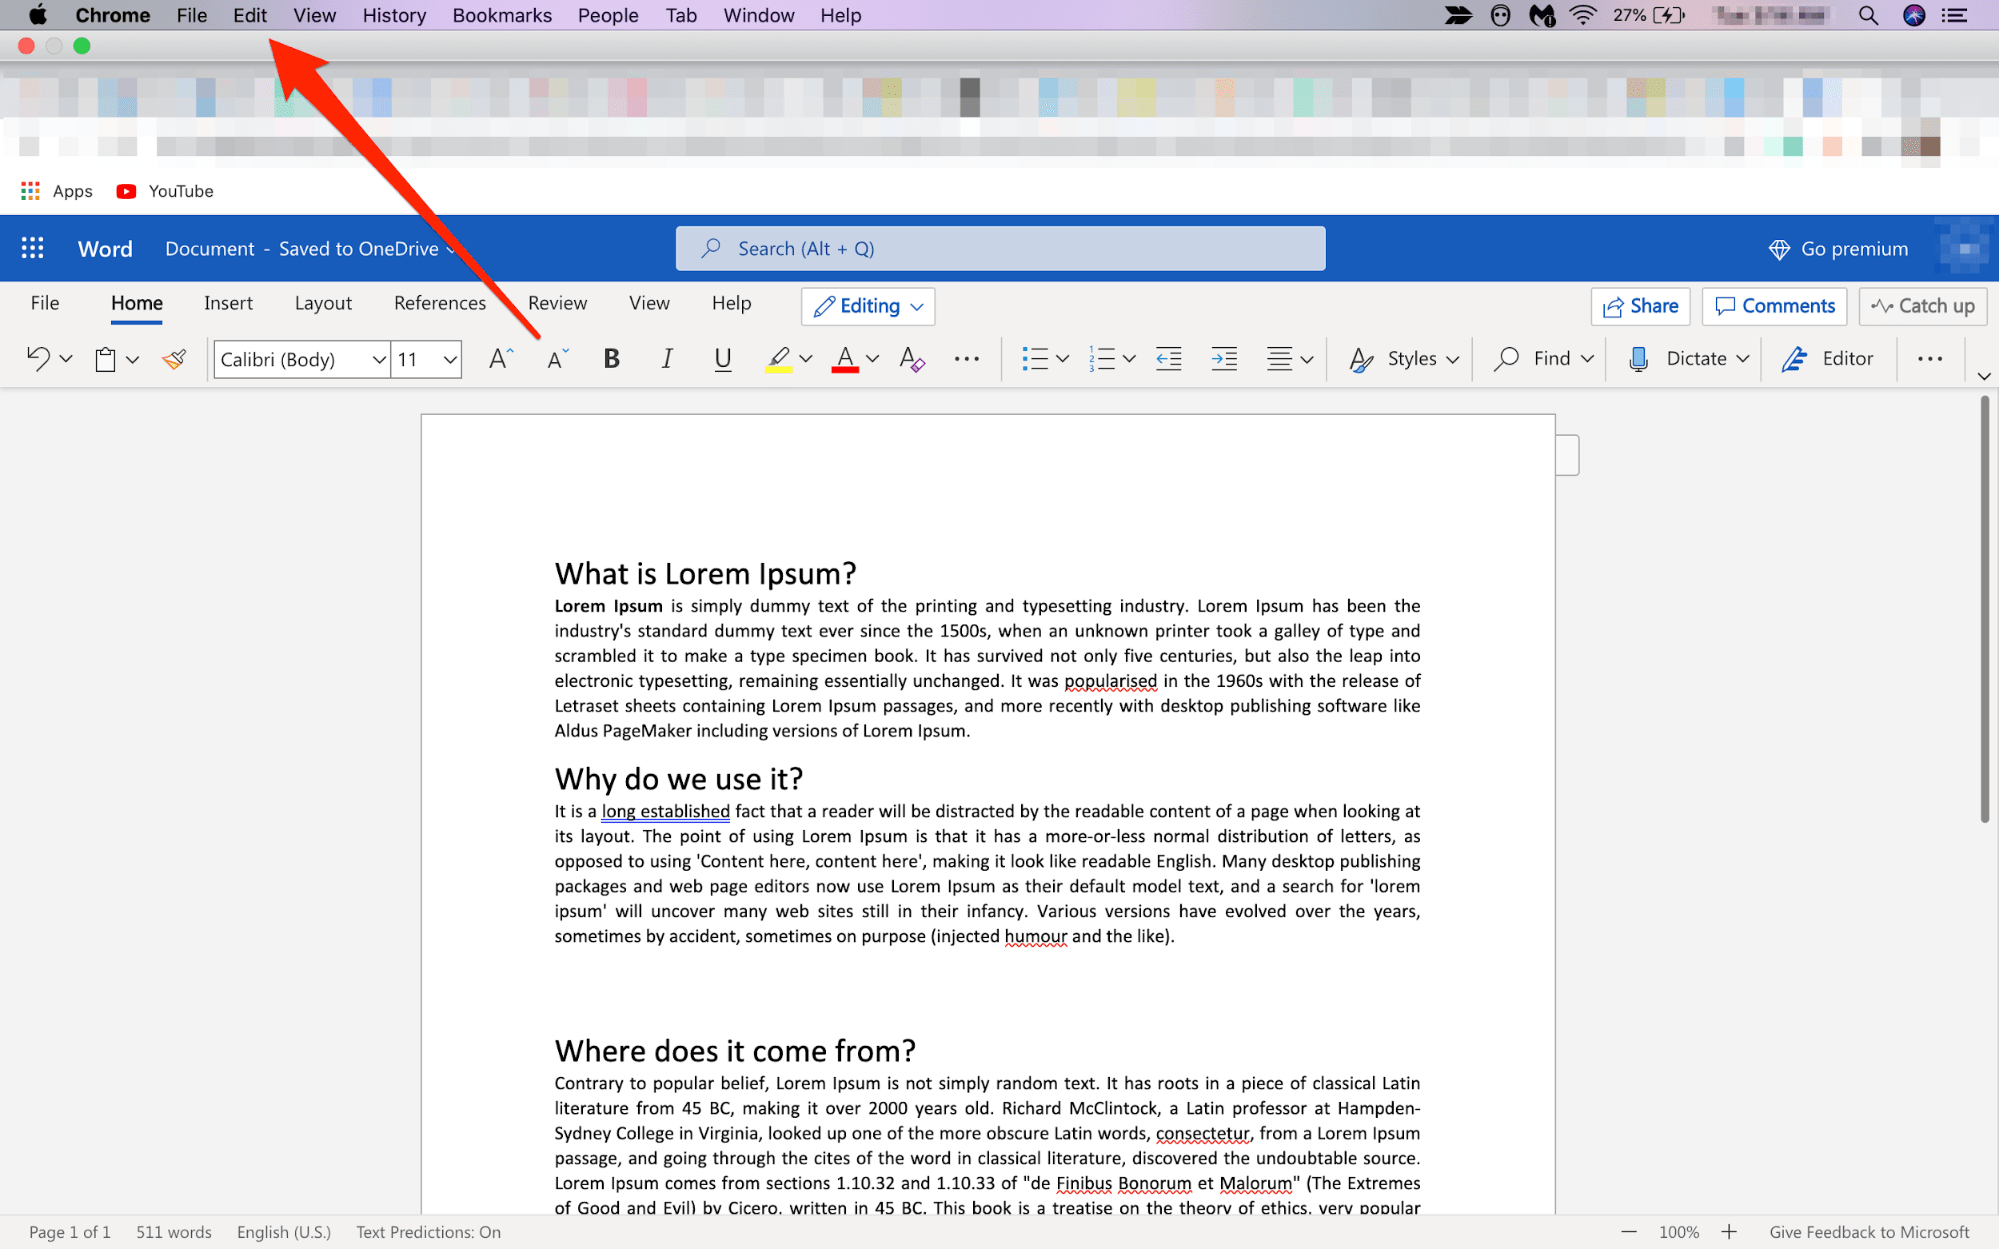
Step #1 Open the Microsoft Word document on your Mac.
Step #2 Take your cursor towards the top of your screen until you see your Mac’s top toolbar. Click on the Edit tab. A dropdown menu will appear.
Step #3 Click on Find from the displayed menu options. You’ll typically see a Replace… option on your screen.
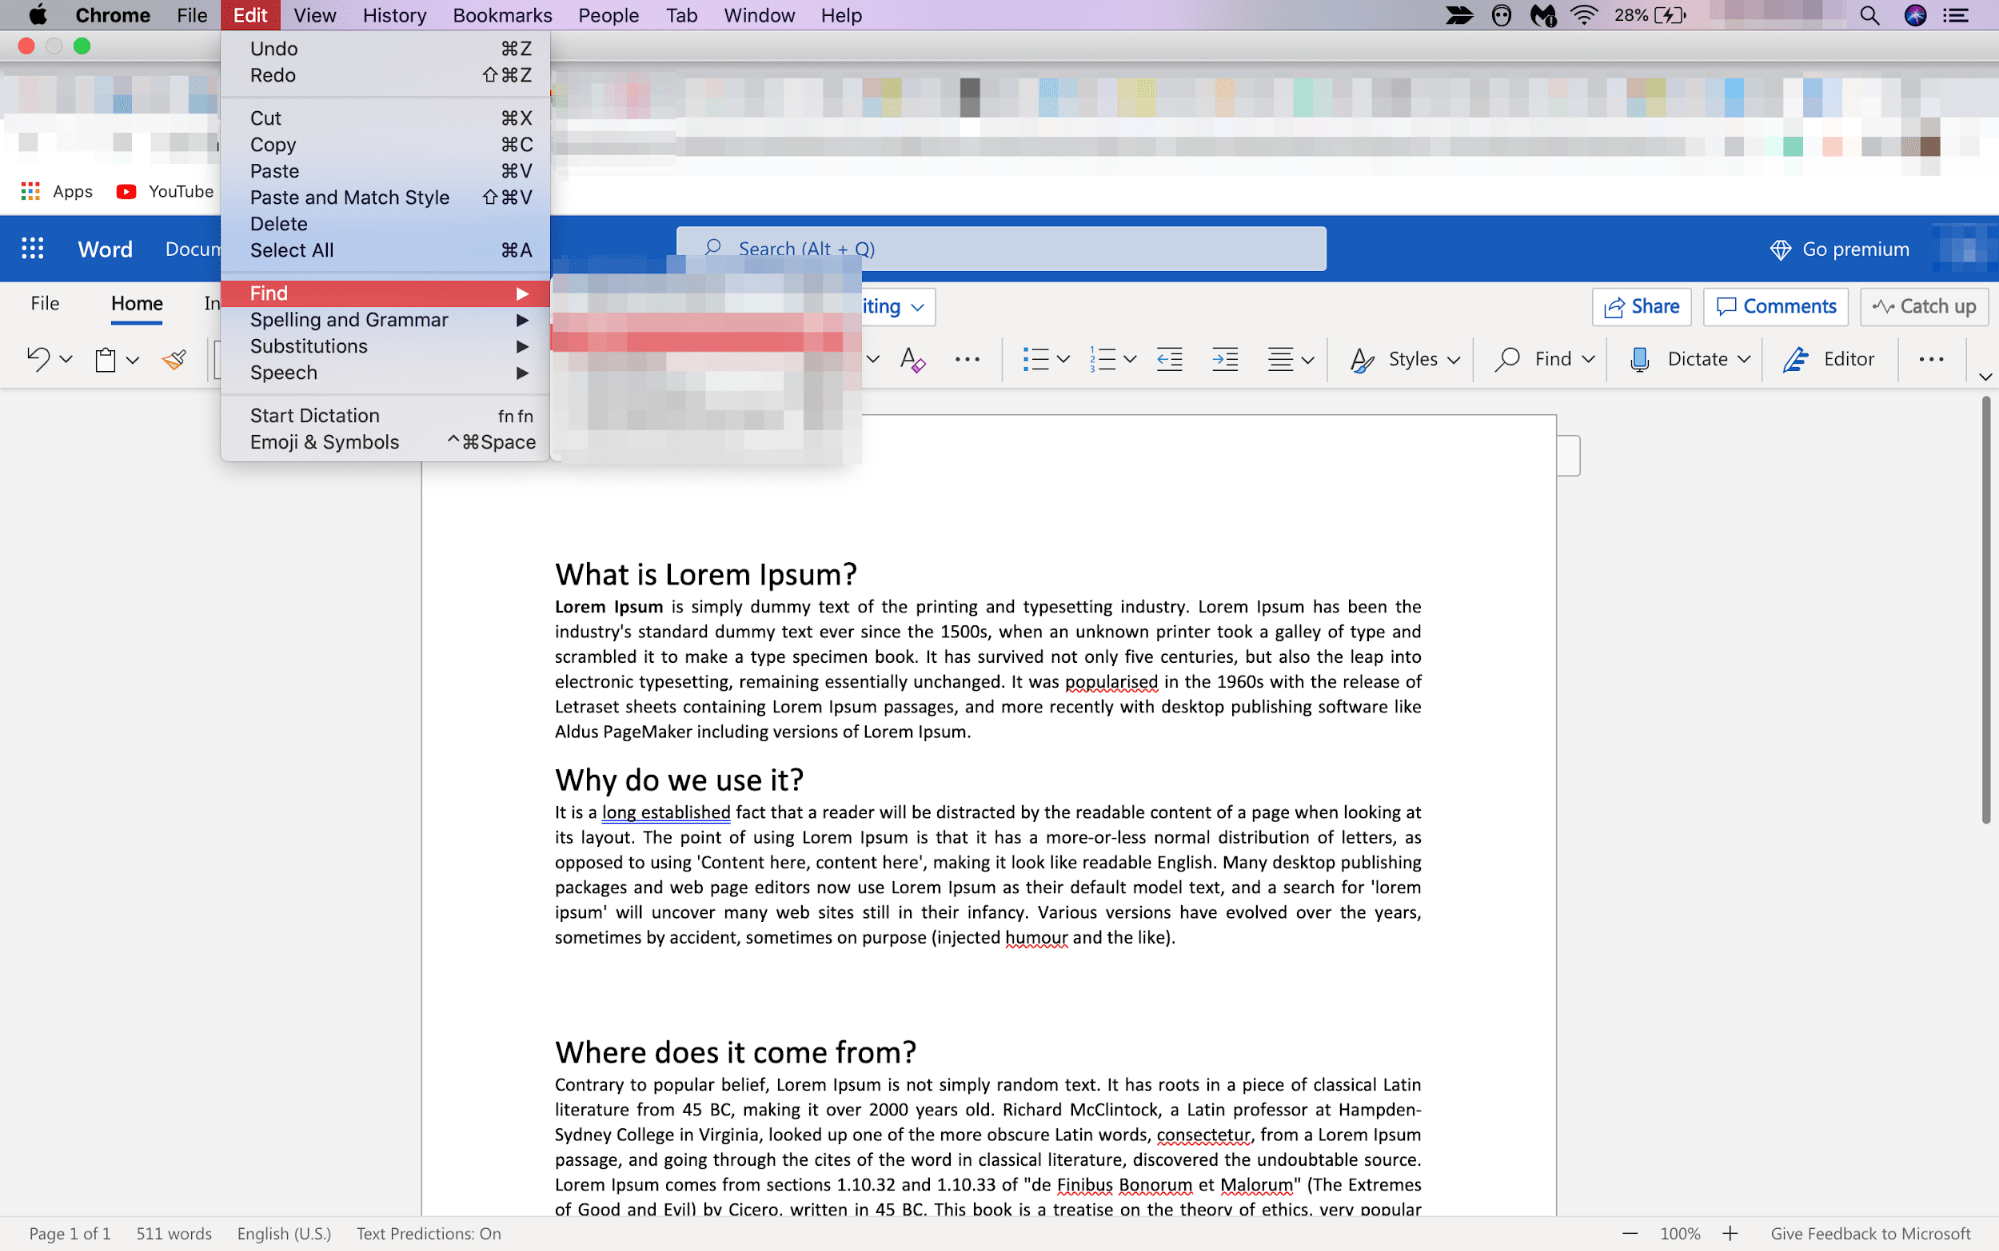
But if you don’t, simply press Shift + Command + H on your keyboard. A side navigation bar will appear on the left-hand side of your computer screen.
Step #4 Enter the word or phrase you want to replace in the doc in the Search for… field.
Once you’ve finished typing the incorrect word or phrase, type in the right word or phrase that you want to replace the incorrect one with in the Replace with… field.
Step #5 Click on the Find tab to locate the matches. Once you’re sure the match is right and highlighting the words you want to change, select Replace. This will replace every individual match one by one.
Again, if you click on the Replace All button, all the matching words and phrases will be changed at once.
After the changes are made, you’ll see an “All Done” message just below the Replace and Replace All buttons that indicate the replacement of the intended word or phrase.
Advanced Find and Replace Features: Everything You Need to Know
You can take this whole shebang of replacing words and phrases to the next level thanks to Microsoft Word’s Advanced Find and Replace option. In other words, you can use the Advanced settings to simplify the process further and make the results even more accurate.
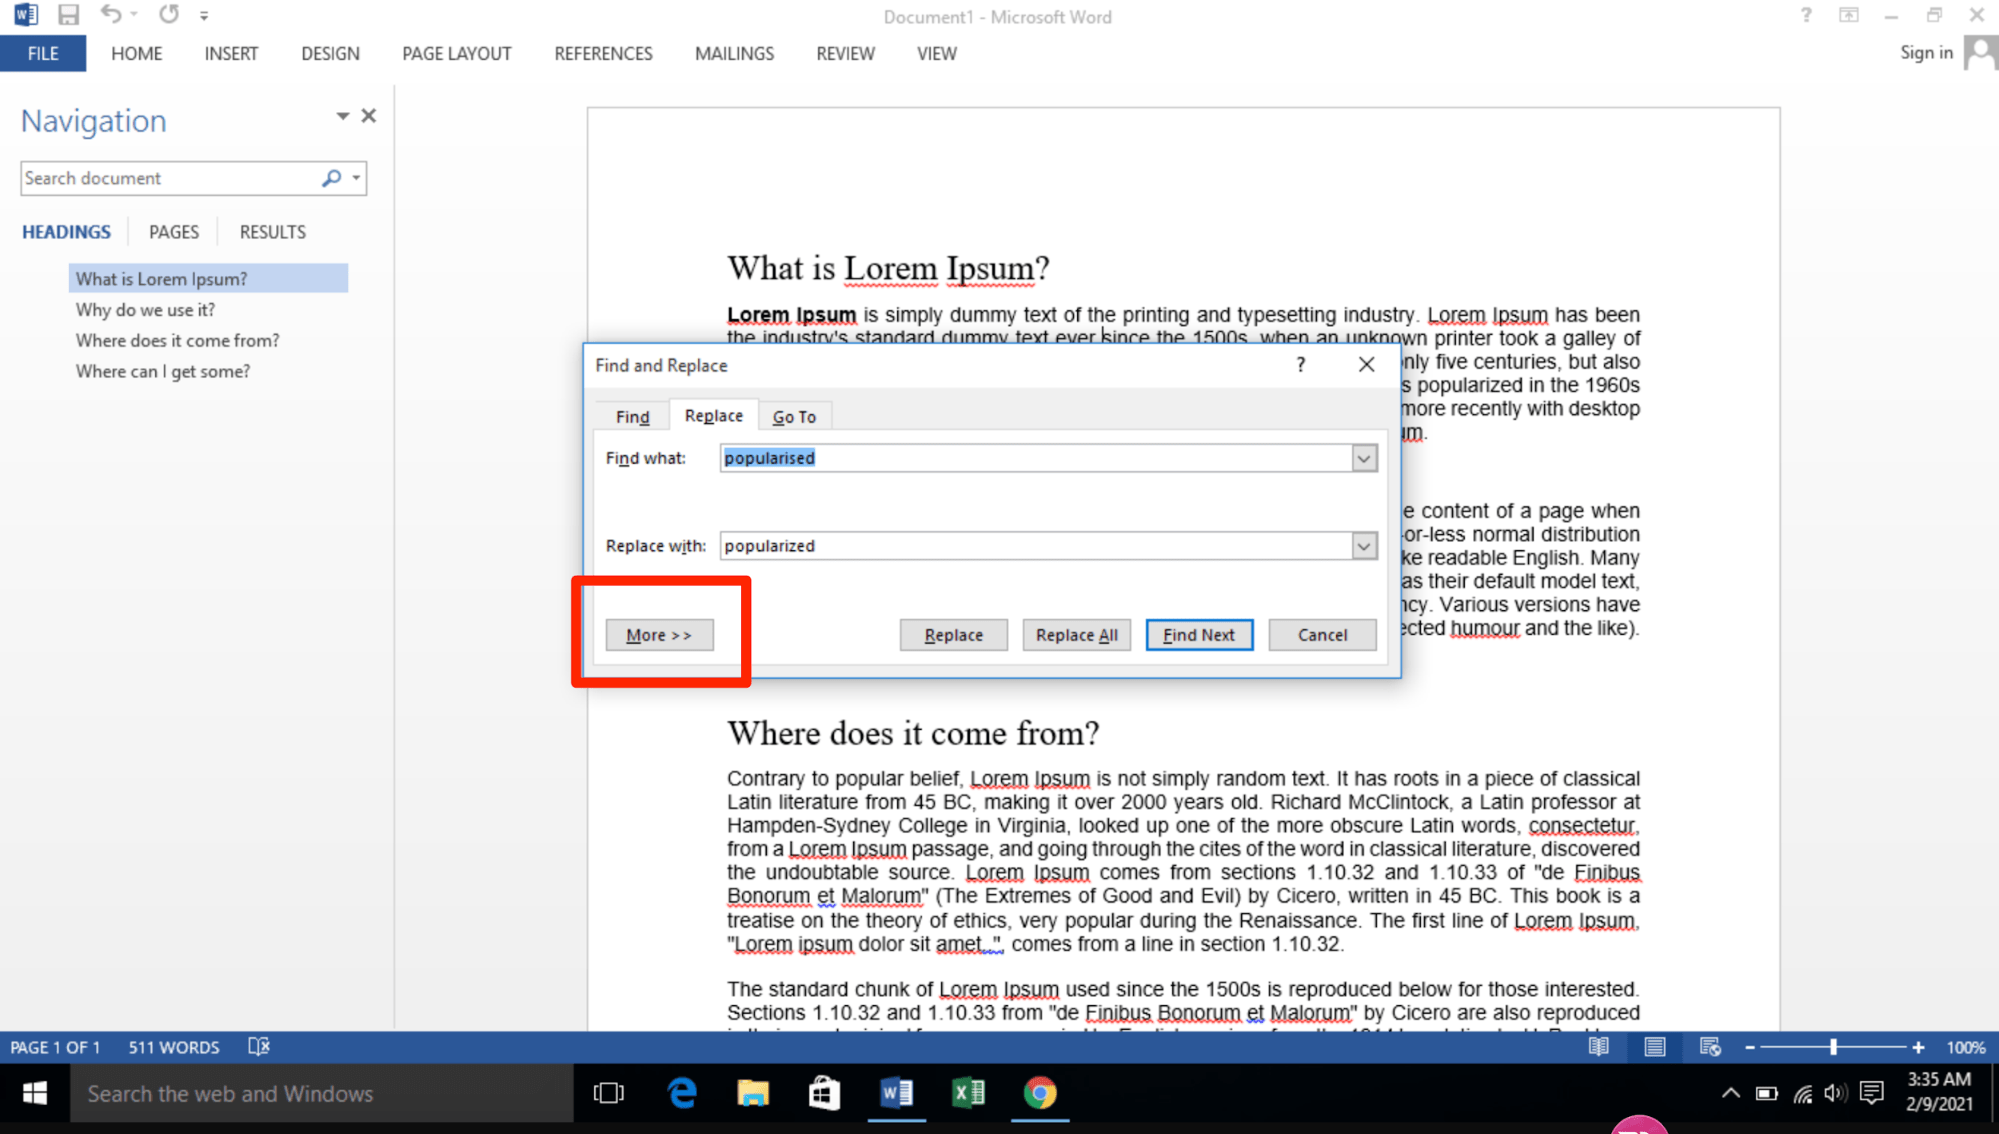
Follow the previously stated steps to open the Find and Replace pop-up box. On it appears on your screen, click on More.
You’ll immediately see a slew of additional options like Match case, Use wildcards, Match prefix, Match suffix, and so on. Here’s how the Advanced Find and Replace settings look like:
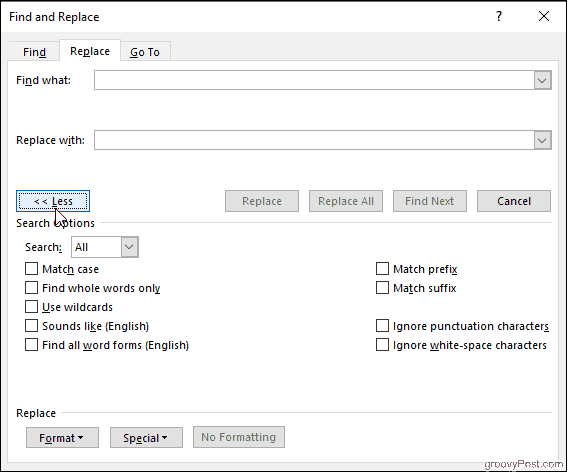
Each one of these has its own unique functions. Let’s discuss them in more detail below:
Find whole words only
If you check on the Find whole words only box, MS Word will treat your search term as an entire word and won’t look for your search term within other words.
Example: If you’re searching for the word “stand,“ the search feature won’t show you the word “standard.”
Use wildcards
Use wildcards is one of the more advanced search options that allows you to use question marks, brackets, asterisks, and other similar symbols to modify your search.
You see, a wildcat is a short string of characters – or a character – that represents multiple characters in a search.
Example: <(int)*(net)>
Sounds like (English)
As the name suggests, the Sounds like option finds similar-sounding words to your search term. This is best for finding homonyms and words that have varying spellings.
Example: This is common for words that have both UK and US variants. For instance, you can have both “colours” and “colors” on a document.
Find all word forms (English)
This option allows you to look for the word you searched for, along with other instances that are either plural or in a different tense.
Example: If you search for the word “be” after enabling the Find all word forms option, you’ll also find the words “are“ and “is“ highlighted as they are the different tense forms of “be.”
Match prefix and Match suffix
Checking off the Match prefix or Match suffix fields will limit your search to words that have the same beginning or the same ending, respectively.
Example: Suppose you enable Match prefix. When you search for the word “love,” Microsoft Word will find the words “love“ and “lovely.“ However, you won’t find the word “beloved“ highlighted in the search results as it’s a suffix of love.
Ignore punctuation characters and Ignore white-space characters
Again, this search option is self-explanatory. It tells Microsoft Word not to take up spaces, periods, hyphens, and similar attitudes into consideration.
Example: After clicking on the search options, when you type in “color block”, you’ll also see “color-block.”
When to Use the Find and Replace Feature of Microsoft Word
The whole point of the Find and Replace function in Microsoft Word is to allow MS Word users to search for target text – whether it’s a specific word, a type of formatting, or a string of wildcard characters – and replace them with whatever you want.
Typically, here’s why you should use this feature:
- When you want to maintain absolute consistency in your document
- When you want to speed up typing and formatting tasks
- When you realize last-minute mistakes and want to find and then replace your errors
- When you’re writing a document that includes words with varying spellings. For instance, if you typically follow US English, and are typing a doc according to the rules of UK English, the Find and Replace feature would be super helpful to identify and change spelling errors.
- Adding special characters to words
- editing partial words and phrases
- Correcting words that you may have misspelled in a hurry. For instance, if you type “h?t” instead of “hat” and enable Use wildcards, you’ll find it highlighted in your search.
- Eliminating extra spaces
- Changing the separator character in numerals
- Reversing currency symbols
Concluding Thoughts
As you may have realized, the Find and Replace feature of Microsoft is a lifesaver, to say the least.
It can help you save tons of time, which would otherwise have been wasted in looking for errors and then replacing them. Whether you are a student, an intern, or the CEO of a company, this is a functionality that we all can be very thankful for.
Let’s delve even deeper into the ‘Find’ function, looking specifically at a number of options that can be accessed in the Word “Find” feature (CTRL+F) by clicking its “More” button.
In a recent issue of Office for Mere Mortals we looked at how to search within a Word document. There is a lot of hidden power accompanying the relatively simple process of finding text within a document.
Advanced Find
The clever Find features are in Advanced Find. Press Ctrl + F to open the Word navigation pane, click on the pull-down menu then Advanced Find …

It’s called Advanced Find but many long-time Word users will know it as the standard Find dialog that’s been in Word for many, many years.
Click on the More … button to see a lot of power in Word’s Find.
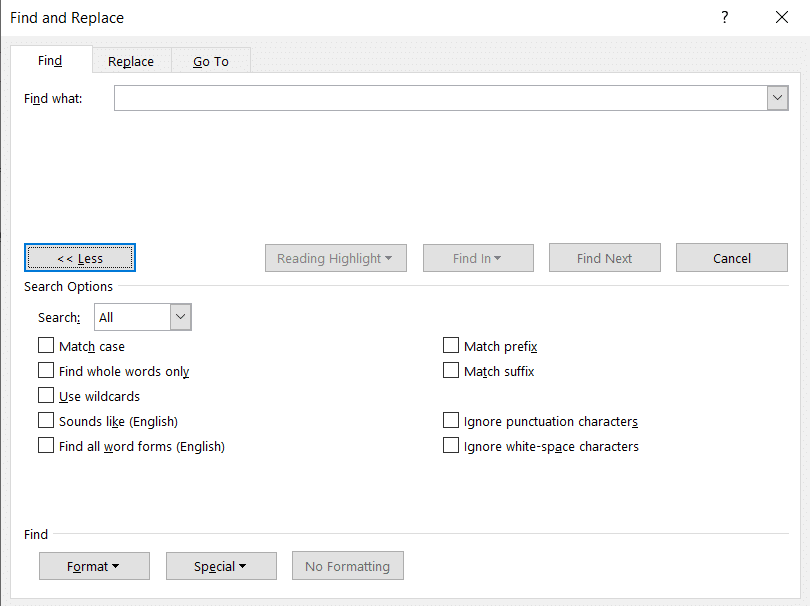
FIND WHOLE WORDS ONLY
‘Find whole words only’ is a selectable option in Word that can be accessed in the Find feature (Ctrl-F) by clicking the ‘More’ button to display more specific search features.
But what does it mean to find whole words only? Isn’t that what a normal search is meant to do? Well… yes and no. A ‘whole word’ is defined in Office as a group of characters surrounded on either side by one or more spaces or punctuation marks.
To demonstrate the difference between having the ‘Find whole words only’ option selected and not having it selected, I will use a very simple example. Feel free to try it for yourself in Microsoft Word.
Let’s pretend that you are searching for the word ‘ample’ out of the following short text: “This sample sentence is one way to demonstrate the ample finding flexibility of Office”.
There is only one instance of the word ‘ample’ within the text, searching without the ‘Find whole words only’ option would actually find 2 matches. The less obvious match comes as part of the tail-end of the second word of the text, which is ‘sample’.
To further demonstrate my point, the word ‘in’ does not appear within the sample sentence on its own using ‘Find whole words’, but would be found twice within the word “finding” with that choice off.
By selecting the ‘Find whole words only’ option, Office will omit matches to any search query that is found _within_ a word of the document. Such a search is less intensive for the program and will therefore be faster with large amounts of text.
Before you go setting this option, be forewarned that it will omit any plurals from your search results. Searching for the word ‘sport’ in the following text will not produce any matches: “Why are all the sports I want to watch on at the same time?”
USE WILDCARDS
A wildcard is a special character that you can use to represent one or more characters in a search string. Any character or set of characters can be represented by a wildcard character. It is really just another name for a “regular expression”.
With just a few special characters and the knowledge of what they represent, searching for strings that conform to a predefined grammar (or pattern) now becomes extremely easy.
The first step to using wildcards in your search terms is to select the ‘Use Wildcards’ option, which can be found in find dialog box after clicking the ‘More’ button. The ‘Match case’ and ‘Find whole words only’ check boxes are now unavailable (grayed out).
There are two ways to incorporate wildcards into your search query string. The first is to choose the particular wildcard character from a list. To do this, click the ‘Special’ pull-down menu and select the desired wildcard character from the resulting list. Then type any additional text into the ‘Find what’ box. The second way is to simply type in the wildcard character directly into the ‘Find what’ box!
The asterisk (*) is the most commonly used wildcard to search for a string of one or more characters. For example, just say you want to find all words that start with “a” and end with “m”. Then you could write “a*m” as your search term. Your results could be anything from “aim” to “antidisestablishmentarianism”.
The next most commonly used wildcard is the question mark (?), which can be used to substitute for any single character. For example, sat?n finds “satin” and “satan”.
SOUNDS LIKE… FO-NE-TIKS
The ‘Sounds like’ option is a type of search mechanism for words that may have been spelt phonetically. To make this point, searching for the word ‘phonetically’ with the ‘Sounds like’ option switched on, will find all of the words that would sound like the word ‘phonetically’ if you were to say them out aloud. As a test, I wrote down ‘fonetikalee’ in a document and searched for the word ‘phonetically’ with the ‘Sounds like’ option activated. The find feature was indeed able to determine that I was searching for the word ‘fonetikalee’.
This function may be of use for people who type up conversations between people in real-time. If someone uses a word you are not familiar with in such a situation, you don’t really have the time find out how to spell it properly. In such a situation, the common solution would be to simply type it phonetically (as it sounds) and then move on. Sometime after scribing the conversation, you may have a flash of enlightenment and realize what word the person actually said.
Instead of scrolling through pages of text to find it and change the potentially numerous incarnations of phonetic spelling, you can simply type in the correct word to the search facility with the ‘Sounds like’ option selected, and hope that your phonetic spelling was sufficient for the ‘Sounds like’ search algorithms to pick up.
FIND ALL WORD FORMS – PAST, PRESENT AND FUTURE TENSE
The ‘Find all word forms’ option has a simple, but powerful function. It acts by finding all possible tenses of the search word.
For example, if I searched for “run”, then both “run” and “ran” could be potential search results.
Similarly, searching for “talk” could have both “talk” and “talked” as potential search results.
Searching for “laugh” on the other hand, could have “laugh”, “laughed” and “laughing” as potential search results.
READER QUESTION: HOW DO YOU FIND A SPACE?
A question from an OfMM reader recently queried us how to find a space within a document. This is quite simply a case of typing a space into the ‘Find what’ text box and clicking the ‘Find Next’ button. This will find each and every space from the start to the end of the document. A useful application of this would be to insert two spaces in the “Find what” box in order to any occurrences of two consecutive spaces within a document, in order to ensure consistency of spacing between sentences.
Another way of doing this was mentioned in passing in the last OfMM newsletter in the section entitled “Strange Characters”. Selecting the ‘Special’ pull-down list in the Find dialog box will bring up a list of special search character types. The last option on this list is called ‘White-space’ and as the name suggests, can be used to find groups of white space within the search area. This is equivalent to typing /w into the ‘Find what’ text box.
THE ‘GO TO’ TAB
Another way of quickly accessing a certain area of a document, or even jumping through a document in regular increments, is to use the ‘Go To’ tab on the Find dialog box.
On this tab you can select between a number of document elements including: page, section, line, bookmark, comment, footnote, endnote, field, table, graphic, equation, object, and heading.
Then simply jump through the document For example, if the page option has been selected, you can type in the page you wish to ‘Go To’ in the ‘Enter page number’ text box. Then click the ‘Next’ button and you will be taken there.
An interesting function is to go to the heading in the document. If you have headings few and far between, then this is a useful tool. You have to make sure that your headings are formatted as a “Heading” within word, and aren’t simply bolded or formatted “Normal” text.
Lesson 7: Using Find and Replace
/en/word/formatting-text/content/
Introduction
When you’re working with longer documents, it can be difficult and time consuming to locate a specific word or phrase. Word can automatically search your document using the Find feature, and it allows you to quickly change words or phrases using Replace.
Optional: Download our practice document.
Watch the video below to learn more about using Find and Replace.
To find text:
In our example, we’ve written an academic paper and will use the Find command to locate all instances of a particular word.
- From the Home tab, click the Find command. You can also press Ctrl+F on your keyboard.

- The navigation pane will appear on the left side of the screen.
- Type the text you want to find in the field at the top of the navigation pane. In our example, we’ll type the word we’re looking for.

- If the text is found in the document, it will be highlighted in yellow and a preview of the results will appear in the navigation pane. You can also click one of the results below the arrows to jump to it.

-
When you’re finished, click X to close the navigation pane. The highlight will disappear.


For more search options, click the drop-down arrow next to the search field.

To replace text:
You may discover that you’ve made a mistake repeatedly throughout your document, like misspelling someone’s name, or that you need to exchange a particular word or phrase for another. You can use Word’s Find and Replace feature to quickly make revisions. In our example, we’ll use Find and Replace to change the title of a magazine so it is abbreviated.
- From the Home tab, click the Replace command. You can also press Ctrl+H on your keyboard.

- The Find and Replace dialog box will appear.
- Type the text you want to find in the Find what: field.
- Type the text you want to replace it with in the Replace with: field, then click Find Next.

- Word will find the first instance of the text and highlight it in gray.
- Review the text to make sure you want to replace it. In our example, the text is part of the title of the paper and does not need to be replaced. We’ll click Find Next again to jump to the next instance.

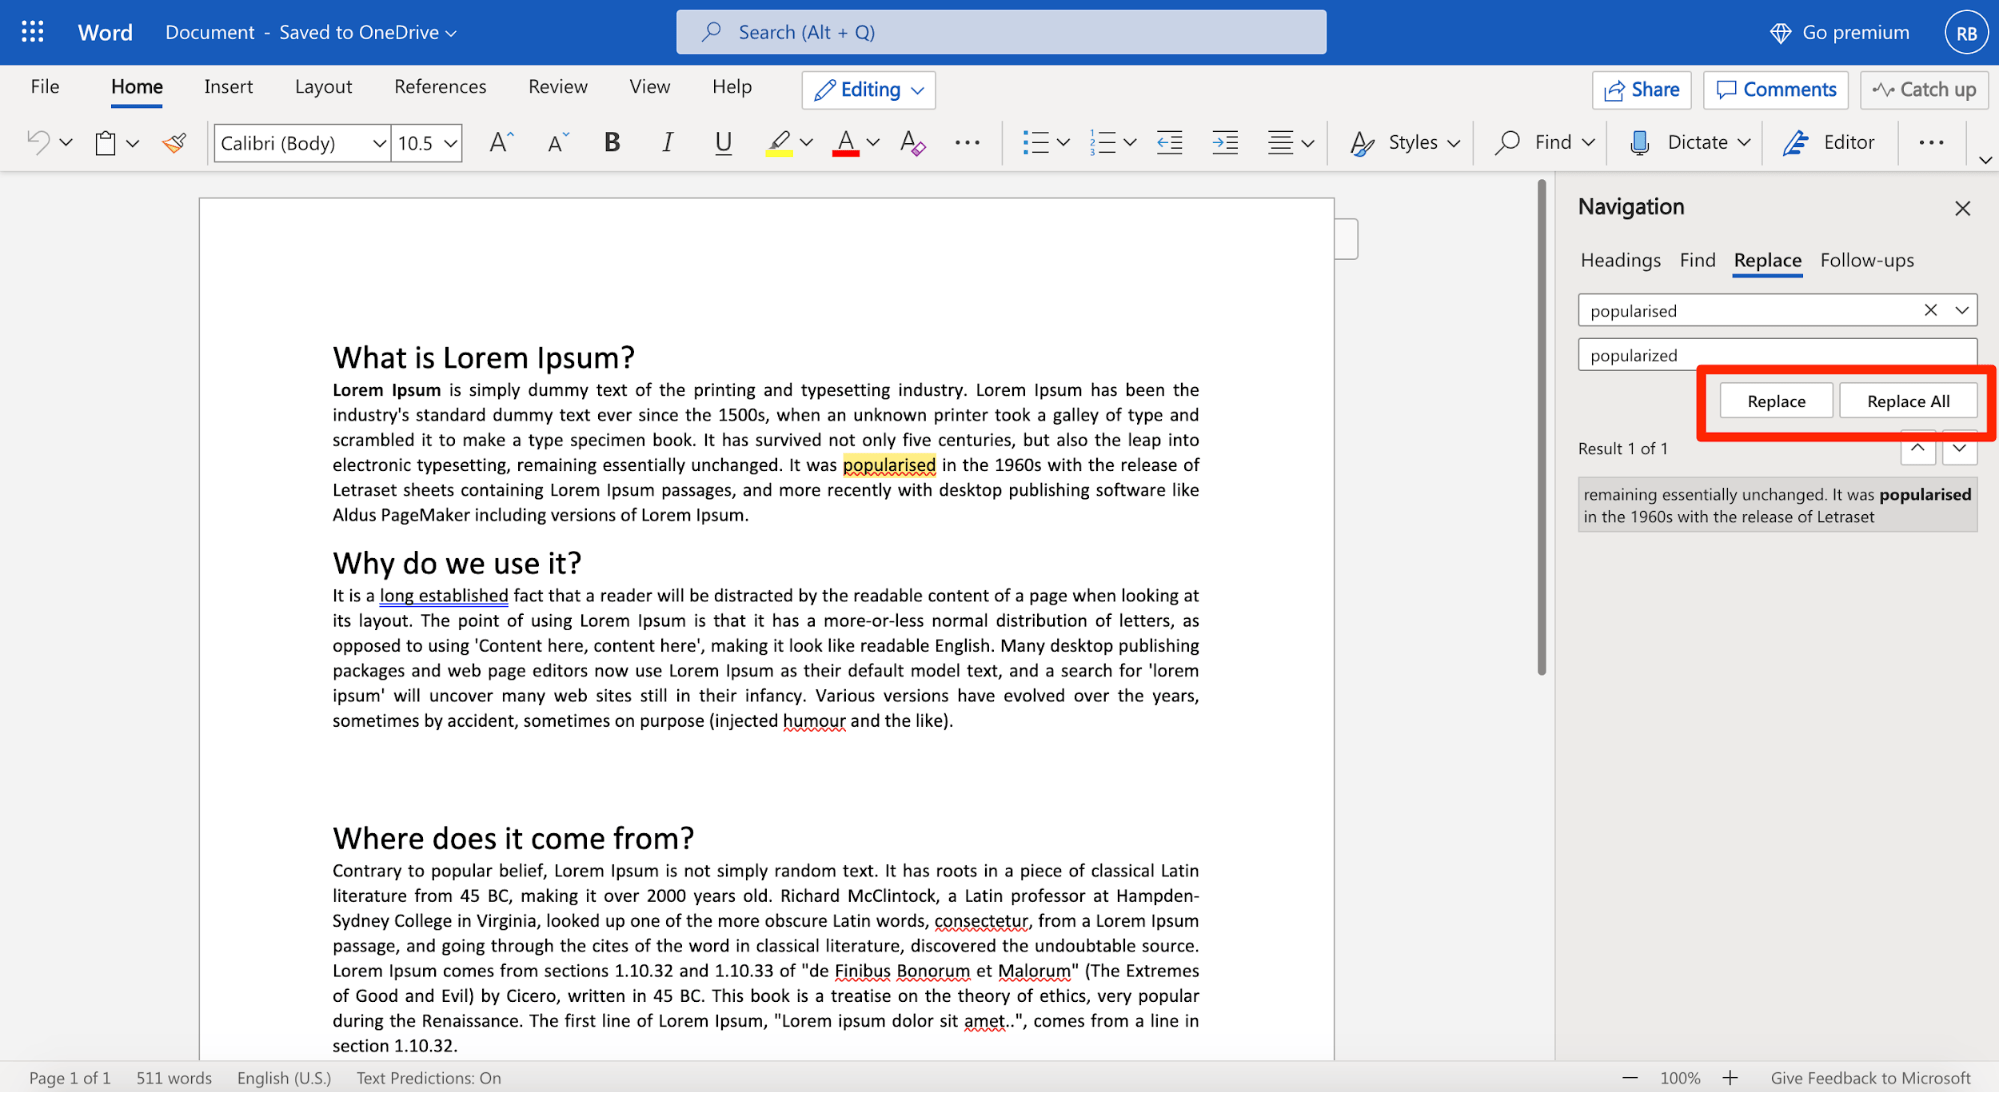
- If you want to replace it, you can click Replace to change individual instances of text. You can also click Replace All to replace every instance of the text throughout the document.

-
The text will be replaced.

-
When you’re done, click Close or Cancel to close the dialog box.


For additional search options, click More in the Find and Replace dialog box. From here, you can select additional options, like matching case and ignoring punctuation.

When it comes to using Replace All, it’s important to remember that it could find matches you didn’t anticipate and that you might not actually want to change. You should only use this option if you’re absolutely sure it won’t replace anything you didn’t intend it to.
Challenge!
- Open our practice document.
- Using the Find feature, determine which pages mention Caroline Gordon.
- The name T.S. Eliot is misspelled. Replace all instances of Elliot with Eliot. When you’re finished, you should have made three replacements.
- Allen Tate’s name is also misspelled. Find and Replace Alan with Allen. Hint: Do not use Replace All. Otherwise, you might accidentally replace the word balance.
/en/word/indents-and-tabs/content/