| title | ms.prod | ms.assetid | ms.date | ms.localizationpriority |
|---|---|---|---|---|
|
Working with tables |
word |
cf0858b7-6b39-4c90-552e-edb695b5cda3 |
06/08/2019 |
medium |
This topic includes Visual Basic examples related to the tasks identified in the following sections.
Creating a table, inserting text, and applying formatting
The following example inserts a four-column, three-row table at the beginning of the active document. The For Each…Next structure is used to step through each cell in the table. Within the For Each…Next structure, the InsertAfter method of the Range object is used to add text to the table cells (Cell 1, Cell 2, and so on).
Sub CreateNewTable()
 Dim docActive As Document
 Dim tblNew As Table
 Dim celTable As Cell
 Dim intCount As Integer

 Set docActive = ActiveDocument
 Set tblNew = docActive.Tables.Add( _
 Range:=docActive.Range(Start:=0, End:=0), NumRows:=3, _
 NumColumns:=4)
 intCount = 1

 For Each celTable In tblNew.Range.Cells
  celTable.Range.InsertAfter "Cell " & intCount
  intCount = intCount + 1
 Next celTable

 tblNew.AutoFormat Format:=wdTableFormatColorful2, _
 ApplyBorders:=True, ApplyFont:=True, ApplyColor:=True
End Sub
Inserting text into a table cell
The following example inserts text into the first cell of the first table in the active document. The Cell method returns a single Cell object. The Range property returns a Range object. The Delete method is used to delete the existing text and the InsertAfter method inserts the «Cell 1,1» text.
Sub InsertTextInCell()
 If ActiveDocument.Tables.Count >= 1 Then
  With ActiveDocument.Tables(1).Cell(Row:=1, Column:=1).Range
   .Delete
   .InsertAfter Text:="Cell 1,1"
  End With
 End If
End Sub
Returning text from a table cell without returning the end of cell marker
The following example returns and displays the contents of each cell in the first row of the first document table.
Sub ReturnTableText()
 Dim tblOne As Table
 Dim celTable As Cell
 Dim rngTable As Range

 Set tblOne = ActiveDocument.Tables(1)
 For Each celTable In tblOne.Rows(1).Cells
  Set rngTable = ActiveDocument.Range(Start:=celTable.Range.Start, _
  End:=celTable.Range.End - 1)
  MsgBox rngTable.Text
 Next celTable
End Sub
Sub ReturnCellText()
 Dim tblOne As Table
 Dim celTable As Cell
 Dim rngTable As Range

 Set tblOne = ActiveDocument.Tables(1)
 For Each celTable In tblOne.Rows(1).Cells
  Set rngTable = celTable.Range
  rngTable.MoveEnd Unit:=wdCharacter, Count:=-1
  MsgBox rngTable.Text
 Next celTable
End Sub
Converting existing text to a table
The following example inserts tab-delimited text at the beginning of the active document and then converts the text to a table.
Sub ConvertExistingText()
 With Documents.Add.Content
  .InsertBefore "one" & vbTab & "two" & vbTab & "three" & vbCr
  .ConvertToTable Separator:=Chr(9), NumRows:=1, NumColumns:=3
 End With
End Sub
Returning the contents of each table cell
The following example defines an array equal to the number of cells in the first document table (assuming Option Base 1). The For Each…Next structure is used to return the contents of each table cell and assign the text to the corresponding array element.
Sub ReturnCellContentsToArray()
 Dim intCells As Integer
 Dim celTable As Cell
 Dim strCells() As String
 Dim intCount As Integer
 Dim rngText As Range

 If ActiveDocument.Tables.Count >= 1 Then
  With ActiveDocument.Tables(1).Range
   intCells = .Cells.Count
   ReDim strCells(intCells)
   intCount = 1
   For Each celTable In .Cells
    Set rngText = celTable.Range
    rngText.MoveEnd Unit:=wdCharacter, Count:=-1
    strCells(intCount) = rngText
    intCount = intCount + 1
   Next celTable
  End With
 End If
End Sub
Copying all tables in the active document into a new document
This example copies the tables from the current document into a new document.
Sub CopyTablesToNewDoc()
 Dim docOld As Document
 Dim rngDoc As Range
 Dim tblDoc As Table

 If ActiveDocument.Tables.Count >= 1 Then
  Set docOld = ActiveDocument
  Set rngDoc = Documents.Add.Range(Start:=0, End:=0)
  For Each tblDoc In docOld.Tables
   tblDoc.Range.Copy
   With rngDoc
    .Paste
    .Collapse Direction:=wdCollapseEnd
    .InsertParagraphAfter
    .Collapse Direction:=wdCollapseEnd
   End With
  Next
 End If
End Sub
[!includeSupport and feedback]
Создание таблиц в документе Word из кода VBA Excel. Метод Tables.Add, его синтаксис и параметры. Объекты Table, Column, Row, Cell. Границы таблиц и стили.
Работа с Word из кода VBA Excel
Часть 4. Создание таблиц в документе Word
[Часть 1] [Часть 2] [Часть 3] [Часть 4] [Часть 5] [Часть 6]
Таблицы в VBA Word принадлежат коллекции Tables, которая предусмотрена для объектов Document, Selection и Range. Новая таблица создается с помощью метода Tables.Add.
Синтаксис метода Tables.Add
|
Expression.Add (Range, Rows, Columns, DefaultTableBehavior, AutoFitBehavior) |
Expression – выражение, возвращающее коллекцию Tables.
Параметры метода Tables.Add
- Range – диапазон, в котором будет создана таблица (обязательный параметр).
- Rows – количество строк в создаваемой таблице (обязательный параметр).
- Columns – количество столбцов в создаваемой таблице (обязательный параметр).
- DefaultTableBehavior – включает и отключает автоподбор ширины ячеек в соответствии с их содержимым (необязательный параметр).
- AutoFitBehavior – определяет правила автоподбора размера таблицы в документе Word (необязательный параметр).
Создание таблицы в документе
Создание таблицы из 3 строк и 4 столбцов в документе myDocument без содержимого и присвоение ссылки на нее переменной myTable:
|
With myDocument Set myTable = .Tables.Add(.Range(Start:=0, End:=0), 3, 4) End With |
Создание таблицы из 5 строк и 4 столбцов в документе Word с содержимым:
|
With myDocument myInt = .Range.Characters.Count — 1 Set myTable = .Tables.Add(.Range(Start:=myInt, End:=myInt), 5, 4) End With |
Для указания точки вставки таблицы присваиваем числовой переменной количество символов в документе минус один. Вычитаем единицу, чтобы исключить из подсчета последний знак завершения абзаца (¶), так как точка вставки не может располагаться за ним.
Последний знак завершения абзаца всегда присутствует в документе Word, в том числе и в новом без содержимого, поэтому такой код подойдет и для пустого документа.
При создании, каждой новой таблице в документе присваивается индекс, по которому к ней можно обращаться:
|
myDocument.Tables(индекс) |
Нумерация индексов начинается с единицы.
Отображение границ таблицы
Новая таблица в документе Word из кода VBA Excel создается без границ. Отобразить их можно несколькими способами:
Вариант 1
Присвоение таблице стиля, отображающего все границы:
|
myTable.Style = «Сетка таблицы» |
Вариант 2
Отображение внешних и внутренних границ в таблице:
|
With myTable .Borders.OutsideLineStyle = wdLineStyleSingle .Borders.InsideLineStyle = wdLineStyleSingle End With |
Вариант 3
Отображение всех границ в таблице по отдельности:
|
With myTable .Borders(wdBorderHorizontal) = True .Borders(wdBorderVertical) = True .Borders(wdBorderTop) = True .Borders(wdBorderLeft) = True .Borders(wdBorderRight) = True .Borders(wdBorderBottom) = True End With |
Присвоение таблицам стилей
Вариант 1
|
myTable.Style = «Таблица простая 5» |
Чтобы узнать название нужного стиля, в списке стилей конструктора таблиц наведите на него указатель мыши. Название отобразится в подсказке. Кроме того, можно записать макрос с присвоением таблице стиля и взять название из него.
Вариант 2
|
myTable.AutoFormat wdTableFormatClassic1 |
Выбирайте нужную константу с помощью листа подсказок свойств и методов – Auto List Members.
Обращение к ячейкам таблицы
Обращение к ячейкам второй таблицы myTable2 в документе myDocument по индексам строк и столбцов:
|
myTable2.Cell(nRow, nColumn) myDocument.Tables(2).Cell(nRow, nColumn) |
- nRow – номер строки;
- nColumn – номер столбца.
Обращение к ячейкам таблицы myTable в документе Word с помощью свойства Cell объектов Row и Column и запись в них текста:
|
myTable.Rows(2).Cells(2).Range = _ «Содержимое ячейки во 2 строке 2 столбца» myTable.Columns(3).Cells(1).Range = _ «Содержимое ячейки в 1 строке 3 столбца» |
В таблице myTable должно быть как минимум 2 строки и 3 столбца.
Примеры создания таблиц Word
Пример 1
Создание таблицы в новом документе Word со сплошными наружными границами и пунктирными внутри:
|
Sub Primer1() Dim myWord As New Word.Application, _ myDocument As Word.Document, myTable As Word.Table Set myDocument = myWord.Documents.Add myWord.Visible = True With myDocument Set myTable = .Tables.Add(.Range(0, 0), 5, 4) End With With myTable .Borders.OutsideLineStyle = wdLineStyleSingle .Borders.InsideLineStyle = wdLineStyleDot End With End Sub |
В выражении myDocument.Range(Start:=0, End:=0) ключевые слова Start и End можно не указывать – myDocument.Range(0, 0).
Пример 2
Создание таблицы под ранее вставленным заголовком, заполнение ячеек таблицы и применение автосуммы:
|
1 2 3 4 5 6 7 8 9 10 11 12 13 14 15 16 17 18 19 20 21 22 23 24 25 26 27 28 29 30 31 32 33 34 35 36 37 38 39 40 41 42 43 44 45 46 47 48 49 50 51 52 53 54 55 56 57 58 59 60 |
Sub Primer2() On Error GoTo Instr Dim myWord As New Word.Application, _ myDocument As Word.Document, _ myTable As Word.Table, myInt As Integer Set myDocument = myWord.Documents.Add myWord.Visible = True With myDocument ‘Вставляем заголовок таблицы .Range.InsertAfter «Продажи фруктов в 2019 году» & vbCr myInt = .Range.Characters.Count — 1 ‘Присваиваем заголовку стиль .Range(0, myInt).Style = «Заголовок 1» ‘Создаем таблицу Set myTable = .Tables.Add(.Range(myInt, myInt), 4, 4) End With With myTable ‘Отображаем сетку таблицы .Borders.OutsideLineStyle = wdLineStyleSingle .Borders.InsideLineStyle = wdLineStyleSingle ‘Форматируем первую и четвертую строки .Rows(1).Range.Bold = True .Rows(4).Range.Bold = True ‘Заполняем первый столбец .Columns(1).Cells(1).Range = «Наименование» .Columns(1).Cells(2).Range = «1 квартал» .Columns(1).Cells(3).Range = «2 квартал» .Columns(1).Cells(4).Range = «Итого» ‘Заполняем второй столбец .Columns(2).Cells(1).Range = «Бананы» .Columns(2).Cells(2).Range = «550» .Columns(2).Cells(3).Range = «490» .Columns(2).Cells(4).AutoSum ‘Заполняем третий столбец .Columns(3).Cells(1).Range = «Лимоны» .Columns(3).Cells(2).Range = «280» .Columns(3).Cells(3).Range = «310» .Columns(3).Cells(4).AutoSum ‘Заполняем четвертый столбец .Columns(4).Cells(1).Range = «Яблоки» .Columns(4).Cells(2).Range = «630» .Columns(4).Cells(3).Range = «620» .Columns(4).Cells(4).AutoSum End With ‘Освобождаем переменные Set myDocument = Nothing Set myWord = Nothing ‘Завершаем процедуру Exit Sub ‘Обработка ошибок Instr: If Err.Description <> «» Then MsgBox «Произошла ошибка: « & Err.Description End If If Not myWord Is Nothing Then myWord.Quit Set myDocument = Nothing Set myWord = Nothing End If End Sub |
Метод AutoSum суммирует значения в ячейках одного столбца над ячейкой с суммой. При использовании его для сложения значений ячеек в одной строке, результат может быть непредсказуемым.
Чтобы просуммировать значения в строке слева от ячейки с суммой, используйте метод Formula объекта Cell:
|
myTable.Cell(2, 4).Formula («=SUM(LEFT)») |
Другие значения метода Formula, применяемые для суммирования значений ячеек:
- «=SUM(ABOVE)» – сумма значений над ячейкой (аналог метода AutoSum);
- «=SUM(BELOW)» – сумма значений под ячейкой;
- «=SUM(RIGHT)» – сумма значений справа от ячейки.
What are the codes to create a table in MS Word?
I’ve used the record function for macro to see how it is written and i have no idea how to interpret this.
and can you not draw tables while recording a macro? It greys out the «draw table» function.
I need to make a talbe that has some merged cells within the table — it would be easier if i can draw the table and record using macro but it seems like i can’t do that…

I’ve used the draw function to draw the follow table but i can’t record it.
HELP?!
asked Nov 13, 2012 at 18:02
![]()
4
This should get you started.
Sub Tester()


    Dim x, w, c

    ThisDocument.Tables(1).Delete

    ThisDocument.Tables.Add Range:=Selection.Range, NumRows:=7, NumColumns:=1, _
                          DefaultTableBehavior:=wdWord9TableBehavior, _
                          AutoFitBehavior:=wdAutoFitFixed

    With ThisDocument.Tables(1)

        .Rows.Height = 70
        w = .Rows(1).Cells(1).Width

        .Rows(1).Cells(1).Split 1, 7
        .Rows(1).Cells(1).Width = w / 2
        For x = 2 To 7
            .Rows(1).Cells(x).Width = (w / 2) / 6
        Next x

        .Rows(5).Height = 15
        .Rows(7).Height = 15

        .Rows(7).Cells(1).Split 1, 7

        .Rows(6).Cells(1).Split 1, 4
        .Rows(6).Cells(2).Split 2, 1

        'Once you merge cells it gets difficult to use .Rows, but
        '  you can still address individual cells. Use the loop below to
        '  find out which one you need to operate on...
        x = 1
        For Each c In .Range.Cells
            c.Range.Text = x
            x = x + 1
        Next c

        .Range.Cells(16).Split 1, 4
        'you can figure out setting the exact required widths...
    End With
End Sub
answered Nov 13, 2012 at 20:23
![]()
Tim WilliamsTim Williams
150k8 gold badges96 silver badges124 bronze badges
5
the basic command for making a table is
ActiveDocument.Tables.Add Range:=Selection.Range, NumRows:=4, NumColumns:= 3
and to split/merge cells:
Selection.Cells.Split NumRows:=1, NumColumns:=2
Selection.Cells.Merge
answered Nov 13, 2012 at 19:11
![]()
SeanCSeanC
15.6k5 gold badges45 silver badges65 bronze badges
You could create the table and then save it as an autotext (select table — ALT+F3 — name of the autotext). Then when you need the table in a document, just type the name you gave it and press F3.
answered Mar 28, 2016 at 19:09
![]()
Add Table to Word Document
This simple macro will add a table to your Word document:
Sub VerySimpleTableAdd()
    Dim oTable As Table
    Set oTable = ActiveDocument.Tables.Add(Range:=Selection.Range, NumRows:=3, NumColumns:=3)
End Sub
Select Table in Word
This macro will select the first table in the active Word document:
Sub SelectTable()
'selects first table in active doc
    If ActiveDocument.Tables.Count > 0 Then    'to avoid errors we check if any table exists in active doc
        ActiveDocument.Tables(1).Select
    End If
End Sub
Loop Through all Cells in a Table
This VBA macro will loop through all cells in a table, writing the cell count to the cell:
Sub TableCycling()
' loop through all cells in table
    Dim nCounter As Long    ' this will be writen in all table cells
    Dim oTable As Table
    Dim oRow As Row
    Dim oCell As Cell

    ActiveDocument.Range.InsertParagraphAfter    'just makes new para athe end of doc, Table will be created here
    Set oTable = ActiveDocument.Tables.Add(Range:=ActiveDocument.Paragraphs.Last.Range, NumRows:=3, NumColumns:=3)    'create table and asign it to variable
    For Each oRow In oTable.Rows    ' outher loop goes through rows
        For Each oCell In oRow.Cells    'inner loop goes
            nCounter = nCounter + 1    'increases the counter
            oCell.Range.Text = nCounter    'writes counter to the cell
        Next oCell
    Next oRow

    'display result from cell from second column in second row
    Dim strTemp As String
    strTemp = oTable.Cell(2, 2).Range.Text
    MsgBox strTemp
End Sub
Create Word Table From Excel File
This VBA example will make a table from an Excel file:
Sub MakeTablefromExcelFile()
'advanced
    Dim oExcelApp, oExcelWorkbook, oExcelWorksheet, oExcelRange
    Dim nNumOfRows As Long
    Dim nNumOfCols As Long
    Dim strFile As String

    Dim oTable As Table    'word table
    Dim oRow As Row    'word row
    Dim oCell As Cell    'word table cell
    Dim x As Long, y As Long    'counter for loops

    strFile = "c:UsersNenadDesktopBookSample.xlsx"    'change to actual path
    Set oExcelApp = CreateObject("Excel.Application")
    oExcelApp.Visible = True
    Set oExcelWorkbook = oExcelApp.Workbooks.Open(strFile)    'open workbook and asign it to variable
    Set oExcelWorksheet = oExcelWorkbook.Worksheets(1)    'asign first worksheet to variable
    Set oExcelRange = oExcelWorksheet.Range("A1:C8")
    nNumOfRows = oExcelRange.Rows.Count
    nNumOfCols = oExcelRange.Columns.Count

    ActiveDocument.Range.InsertParagraphAfter    'just makes new para athe end of doc, Table will be created here
    Set oTable = ActiveDocument.Tables.Add(Range:=ActiveDocument.Paragraphs.Last.Range, NumRows:=nNumOfRows, NumColumns:=nNumOfCols)    'create table and asign it to variable
    '***real deal, table gets filled here
    For x = 1 To nNumOfRows
        For y = 1 To nNumOfCols
            oTable.Cell(x, y).Range.Text = oExcelRange.Cells(x, y).Value
        Next y
    Next x
    '***
    oExcelWorkbook.Close False
    oExcelApp.Quit
    With oTable.Rows(1).Range    'we can now apply some beautiness to our table :)
        .Shading.Texture = wdTextureNone
        .Shading.ForegroundPatternColor = wdColorAutomatic
        .Shading.BackgroundPatternColor = wdColorYellow
    End With
End SubUsing Excel VBA to create Microsoft Word documents
In these examples, we generate Microsoft Word Documents with various formatting features using
the Microsoft Excel VBA scripting language. These techniques can have many useful applications.
For instance if you have a list of data like a price or product list in Excel that you want to present
in a formatted Word Document, these techniques can prove useful.
In these examples, we assume the reader has at least basic knowledge of VBA, so we will not
go over basics of creating and running scripts. This code has been tested on Microsoft Word and Excel
2007. Some changes may be required for other versions of Word and Excel.
Writing to Word
Inserting a Table of Contents
Inserting Tabs
Inserting Tables
Inserting Bullet List
more on Inserting Tables
Multiple Features
Function that demonstrates VBA writing to a Microsoft Word document
The following code illustrates the use of VBA Word.Application object and related properties.
In this example, we create a new Word Document add some text.
'In Tools > References, add reference to "Microsoft Word XX.X Object Library" before running.
'Early Binding
Dim wdApp As Word.Application
Set wdApp = New Word.Application
'Alternatively, we can use Late Binding
'Dim wdApp As Object
'Set wdApp = CreateObject("word.Application")
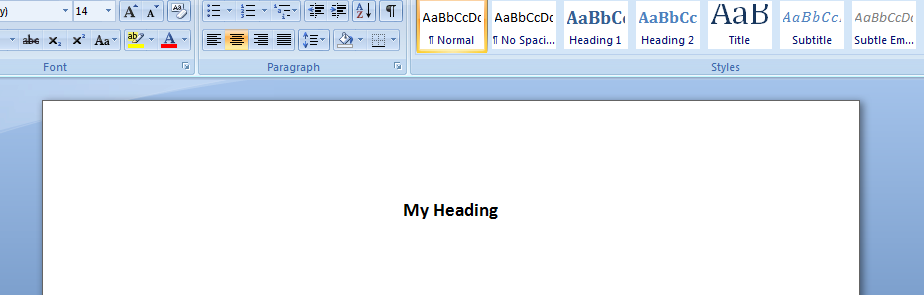
With wdApp
.Visible = True
.Activate
.Documents.Add
With .Selection
.ParagraphFormat.Alignment = wdAlignParagraphCenter
.Font.Bold = True
.Font.Name = "arial"
.Font.Size = 14
.TypeText ("My Heading")
.TypeParagraph
End With
End With
Some VBA Vocabulary
ParagraphFormat
Represents all the formatting for a paragraph.
output in MS Word:
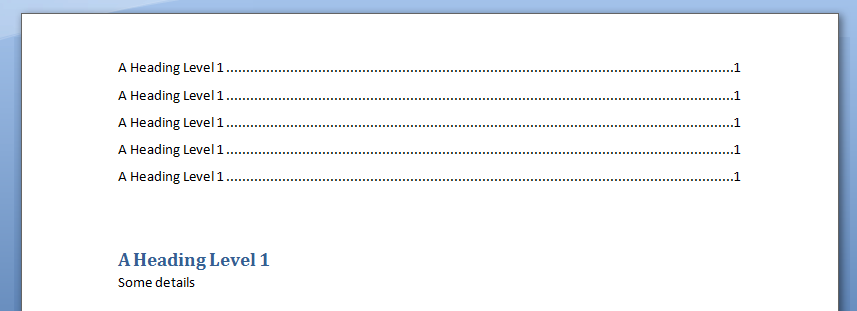
Inserting a Table of Contents into Word Document using Excel VBA
In this example, we generate a Table of Contents into a Word Document using Excel VBA
Sub sAddTableOfContents()

    Dim wdApp As Word.Application
    Set wdApp = New Word.Application

    'Alternatively, we can use Late Binding
    'Dim wdApp As Object
    'Set wdApp = CreateObject("word.Application")

    Dim wdDoc As Word.Document
    Set wdDoc = wdApp.Documents.Add

    ' Note we define a Word.range, as the default range wouled be an Excel range!
    Dim myWordRange As Word.range
    Dim Counter As Integer

    wdApp.Visible = True
    wdApp.Activate

    'Insert Some Headers
    With wdApp
        For Counter = 1 To 5
            .Selection.TypeParagraph
            .Selection.Style = "Heading 1"
            .Selection.TypeText "A Heading Level 1"
            .Selection.TypeParagraph
            .Selection.TypeText "Some details"
        Next
    End With

    ' We want to put table of contents at the top of the page
	Set myWordRange = wdApp.ActiveDocument.range(0, 0)

    wdApp.ActiveDocument.TablesOfContents.Add _
     range:=myWordRange, _
     UseFields:=False, _
     UseHeadingStyles:=True, _
     LowerHeadingLevel:=3, _
     UpperHeadingLevel:=1

End Sub
Some VBA Vocabulary
ActiveDocument.TablesOfContents.Add
The TablesOfContents property to return the TablesOfContents collection.
Use the Add method to add a table of contents to a document.
Some TablesOfContents Parameters
Range The range where you want the table of contents to appear. The table of contents replaces the range, if the range isn’t collapsed.
UseHeadingStyles True to use built-in heading styles to create the table of contents. The default value is True.
UpperHeadingLevel The starting heading level for the table of contents. Corresponds to the starting value used with the o switch for a Table of Contents (TOC) field. The default value is 1.
LowerHeadingLevel The ending heading level for the table of contents. Corresponds to the ending value used with the o switch for a Table of Contents (TOC) field. The default value is 9.
output Word Table in MS Word:
Write Microsoft Word Tabs
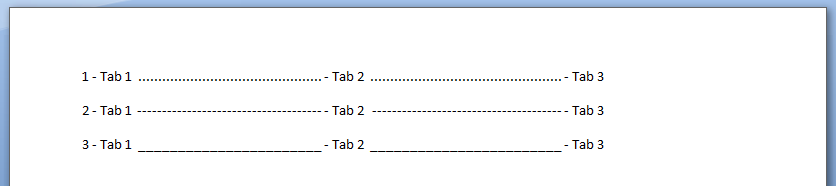
A function that writes tabbed content to a Microsoft Word Document. Note in each iteration, we change the
value of the leader character (characters that are inserted in the otherwise blank area created by the tab).
Public Sub sWriteMicrosoftTabs()

    'In Tools > References, add reference to "Microsoft Word XX.X Object Library" before running.

    'Early Binding
    Dim wdApp As Word.Application
    Set wdApp = New Word.Application

    'Alternatively, we can use Late Binding
    'Dim wdApp As Object
    'Set wdApp = CreateObject("word.Application")

    With wdApp
        .Visible = True
        .Activate
        .Documents.Add

        For Counter = 1 To 3
            .Selection.TypeText Text:=Counter & " - Tab 1 "

            ' position to 2.5 inches
            .Selection.Paragraphs.TabStops.Add Position:=Application.InchesToPoints(2.5), _
                Leader:=Counter, Alignment:=wdAlignTabLeft

            .Selection.TypeText Text:=vbTab & " - Tab 2 "

            ' position to 5 inches
            .Selection.Paragraphs.TabStops.Add Position:=Application.InchesToPoints(5), _
                Leader:=Counter, Alignment:=wdAlignTabLeft

            .Selection.TypeText Text:=vbTab & " - Tab 3 "

            .Selection.TypeParagraph
        Next Counter

    End With
End Sub
Some VBA Vocabulary
.TabStops.Add Use the TabStops property to return the TabStops collection. In the example above,
nprogram adds a tab stop positioned at 0, 2.5 and 5 inches.
output in MS Word:
Write Microsoft Word Tables
In this example, we generate a Microsoft Table using Excel VBA
Sub sWriteMSWordTable ()

    'In Tools > References, add reference to "Microsoft Word XX.X Object Library" before running.

    'Early Binding
    Dim wdApp As Word.Application
    Set wdApp = New Word.Application

    'Alternatively, we can use Late Binding
    'Dim wdApp As Object
    'Set wdApp = CreateObject("word.Application")

    With wdApp
        .Visible = True
        .Activate
        .Documents.Add

        With .Selection

            .Tables.Add _
                    Range:=wdApp.Selection.Range, _
                    NumRows:=1, NumColumns:=3, _
                    DefaultTableBehavior:=wdWord9TableBehavior, _
                    AutoFitBehavior:=wdAutoFitContent

            For counter = 1 To 12
                .TypeText Text:="Cell " & counter
                If counter <> 12 Then
                    .MoveRight Unit:=wdCell
                End If
            Next

        End With

    End With

End Sub
Some VBA vocabulary
Table.AddTable object that represents a new, blank table added to a document.
Table.Add properties
Range The range where you want the table to appear. The table replaces the range, if the range isn’t collapsed.
NumRows The number of rows you want to include in the table.
NumColumns The number of columns you want to include in the table.
DefaultTableBehavior Sets a value that specifies whether Microsoft Word automatically resizes cells in tables to fit the cells� contents (AutoFit). Can be either of the following constants: wdWord8TableBehavior (AutoFit disabled) or wdWord9TableBehavior (AutoFit enabled). The default constant is wdWord8TableBehavior.
AutoFitBehavior Sets the AutoFit rules for how Word sizes tables. Can be one of the WdAutoFitBehavior constants.
output in MS Word:

Write Microsoft Word bullet list
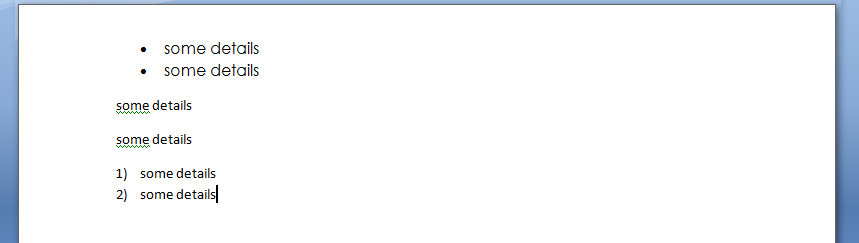
In this example, we write with bullet list and outline numbers with Excel VBA
    'In Tools > References, add reference to "Microsoft Word XX.X Object Library" before running.

    'Early Binding
    Dim wdApp As Word.Application
    Set wdApp = New Word.Application

    'Alternatively, we can use Late Binding
    'Dim wdApp As Object
    'Set wdApp = CreateObject("word.Application")

    With wdApp
        .Visible = True
        .Activate
        .Documents.Add
        ' turn on bullets
        .ListGalleries(wdBulletGallery).ListTemplates(1).Name = ""
        .Selection.Range.ListFormat.ApplyListTemplate ListTemplate:=.ListGalleries(wdBulletGallery).ListTemplates(1), _
            continuepreviouslist:=False, applyto:=wdListApplyToWholeList, defaultlistbehavior:=wdWord9ListBehavior

        With .Selection
            .ParagraphFormat.Alignment = wdAlignParagraphLeft
            .Font.Bold = False
            .Font.Name = "Century Gothic"
            .Font.Size = 12
            .TypeText ("some details")
            .TypeParagraph
            .TypeText ("some details")
            .TypeParagraph
        End With

        ' turn off bullets
        .Selection.Range.ListFormat.RemoveNumbers wdBulletGallery

        With .Selection
            .ParagraphFormat.Alignment = wdAlignParagraphLeft
            .TypeText ("some details")
            .TypeParagraph
            .TypeText ("some details")
            .TypeParagraph

        End With

        ' turn on outline numbers
        .ListGalleries(wdOutlineNumberGallery).ListTemplates(1).Name = ""
        .Selection.Range.ListFormat.ApplyListTemplate ListTemplate:=.ListGalleries(wdOutlineNumberGallery).ListTemplates(1), _
            continuepreviouslist:=False, applyto:=wdListApplyToWholeList, defaultlistbehavior:=wdWord9ListBehavior

        With .Selection
            .ParagraphFormat.Alignment = wdAlignParagraphLeft
            .TypeText ("some details")
            .TypeParagraph
            .TypeText ("some details")

        End With

    End With
output in MS Word:
Another example of Writing Tables to Microsoft Word
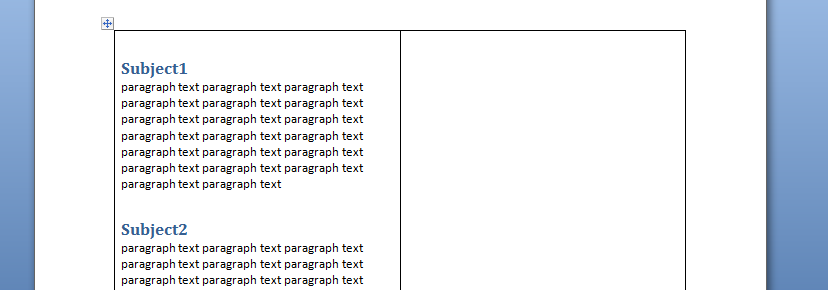
In this example we will create a word document with 20 paragraphs. Each paragraph will have a header with a header style element
   'In Tools > References, add reference to "Microsoft Word XX.X Object Library" before running.
    Dim wdApp As Word.Application
    Dim wdDoc As Word.Document

    Set wdApp = New Word.Application
    wdApp.Visible = True


    Dim x As Integer
    Dim y As Integer

    wdApp.Visible = True
    wdApp.Activate
    wdApp.Documents.Add

    wdApp.ActiveDocument.Tables.Add Range:=wdApp.Selection.Range, NumRows:=2, NumColumns:= _
        2, DefaultTableBehavior:=wdWord9TableBehavior, AutoFitBehavior:= _
        wdAutoFitFixed

    With wdApp.Selection.Tables(1)
        If .Style <> "Table Grid" Then
            .Style = "Table Grid"
        End If
        .ApplyStyleHeadingRows = True
        .ApplyStyleLastRow = False
        .ApplyStyleFirstColumn = True
        .ApplyStyleLastColumn = False
        .ApplyStyleRowBands = True
        .ApplyStyleColumnBands = False
    End With

    With wdApp.Selection

        For x = 1 To 2
            ' set style name
            .Style = "Heading 1"
            .TypeText "Subject" & x
            .TypeParagraph
            .Style = "No Spacing"
            For y = 1 To 20
                .TypeText "paragraph text "
            Next y
            .TypeParagraph
        Next x

        ' new paragraph
        .TypeParagraph

        ' toggle bold on
        .Font.Bold = wdToggle
        .TypeText Text:="show some text in bold"
        .TypeParagraph

        'toggle bold off
        .Font.Bold = wdToggle
        .TypeText "show some text in regular front weight"
        .TypeParagraph


    End With
Some VBA vocabulary
TypeText
Inserts specified text at the beginning of the current selection. The selection is turned into an insertion point at the end of the inserted text.
If Options.ReplaceSelection = True then the original selection will be replaced. This behaves exactly the same as typing some text at the keyboard.
TypeParagraph
Insert a new blank paragraph. The selection is turned into an insertion point after the inserted paragraph mark. If Options.ReplaceSelection = True then the original selection will be replaced. This behaves exactly the same as pressing the Enter key.
output in MS Word:
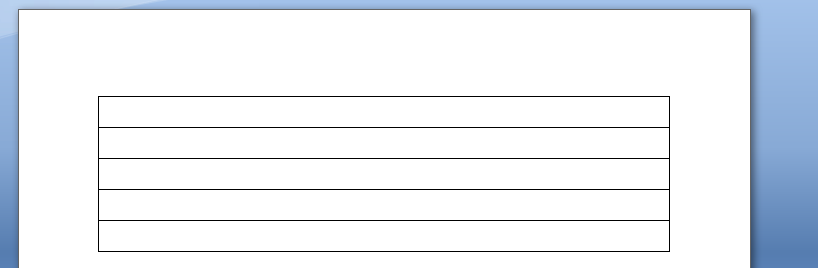
Generating a Word table with VBA
	'In Tools > References, add reference to "Microsoft Word XX.X Object Library" before running.

	Dim wdApp As Word.Application
	Dim wdDoc As Word.Document
	Dim r As Integer

	Set wdApp = CreateObject("Word.Application")
	wdApp.Visible = True

	Set wdDoc = wdApp.Documents.Add
	wdApp.Activate

	Dim wdTbl As Word.Table
	Set wdTbl = wdDoc.Tables.Add(Range:=wdDoc.Range, NumRows:=5, NumColumns:=1)

	With wdTbl

		.Borders(wdBorderTop).LineStyle = wdLineStyleSingle
		.Borders(wdBorderLeft).LineStyle = wdLineStyleSingle
		.Borders(wdBorderBottom).LineStyle = wdLineStyleSingle
		.Borders(wdBorderRight).LineStyle = wdLineStyleSingle
		.Borders(wdBorderHorizontal).LineStyle = wdLineStyleSingle
		.Borders(wdBorderVertical).LineStyle = wdLineStyleSingle

		For r = 1 To 5
			.Cell(r, 1).Range.Text = ActiveSheet.Cells(r, 1).Value
		Next r
	End With
output in MS Word:
Option Explicit
Dim wdApp As Word.Application
Sub extractToWord()
'In Tools > References, add reference to "Microsoft Word 12 Object Library" before running.
Dim lastCell
Dim rng As Range
Dim row As Range
Dim cell As Range
Dim arrayOfColumns
arrayOfColumns = Array("", "", "", "", "", "", "", "", "", "", "", "", "", "", "")
Dim thisRow As Range
Dim thisCell As Range
Dim myStyle As String
' get last cell in column B
lastCell = getLastCell()
Set rng = Range("B2:H" & lastCell)
'iterate through rows
For Each thisRow In rng.Rows
'iterate through cells in row row
For Each thisCell In thisRow.Cells
If thisCell.Value = arrayOfColumns(thisCell.Column) Or thisCell.Value = "" Then
' do nothing
''frWriteLine thisCell.Value, "Normal"
''frWriteLine arrayOfColumns(thisCell.Column), "Normal"
If thisCell.Value = arrayOfColumns(thisCell.Column) Or thisCell.Value = "" Then
End If
Else
myStyle = "Normal"
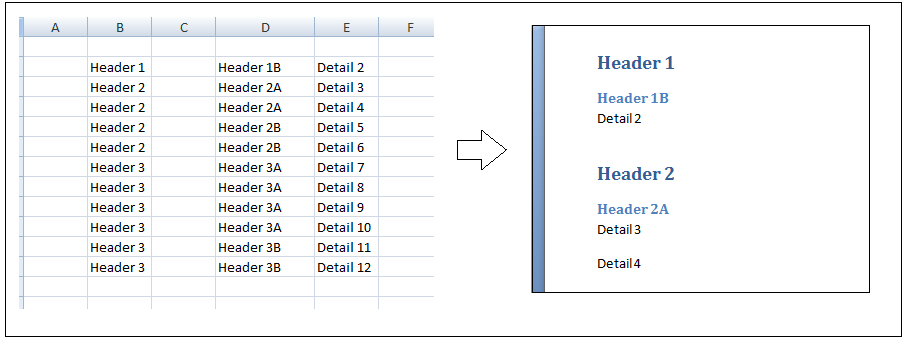
Select Case thisCell.Column
Case 2
myStyle = "Heading 1"
Case 3
myStyle = "Heading 2"
Case 4
myStyle = "Heading 3"
Case Is > 5
myStyle = "Normal"
End Select
frWriteLine thisCell.Value, myStyle
End If
arrayOfColumns(thisCell.Column) = thisCell.Value
Next thisCell
Next thisRow
End Sub
Public Function getLastCell() As Integer
Dim lastRowNumber As Long
Dim lastRowString As String
Dim lastRowAddress As String
With ActiveSheet
getLastCell = .Cells(.Rows.Count, 2).End(xlUp).row
End With
End Function
Public Function frWriteLine(someData As Variant, myStyle As String)
If wdApp Is Nothing Then
Set wdApp = New Word.Application
With wdApp
.Visible = True
.Activate
.Documents.Add
End With
End If
With wdApp
With .Selection
.ParagraphFormat.Alignment = wdAlignParagraphCenter
.Style = myStyle
.TypeText (someData)
.TypeParagraph
End With
End With
End Function
output in MS Word: