
| title | ms.prod | ms.assetid | ms.date | ms.localizationpriority |
|---|---|---|---|---|
|
Getting started with VBA in Office |
office |
7208a87a-a567-41d9-af5b-0df3884c58d9 |
08/14/2019 |
high |
Are you facing a repetitive clean up of fifty tables in Word? Do you want a particular document to prompt the user for input when it opens? Are you having difficulty figuring out how to get your contacts from Microsoft Outlook into a Microsoft Excel spreadsheet efficiently?
You can perform these tasks and accomplish a great deal more by using Visual Basic for Applications (VBA) for Office—a simple, but powerful programming language that you can use to extend Office applications.
This article is for experienced Office users who want to learn about VBA and who want some insight into how programming can help them to customize Office.
The Office suite of applications has a rich set of features. There are many different ways to author, format, and manipulate documents, email, databases, forms, spreadsheets, and presentations. The great power of VBA programming in Office is that nearly every operation that you can perform with a mouse, keyboard, or a dialog box can also be done by using VBA. Further, if it can be done once with VBA, it can be done just as easily a hundred times. (In fact, the automation of repetitive tasks is one of the most common uses of VBA in Office.)
Beyond the power of scripting VBA to accelerate every-day tasks, you can use VBA to add new functionality to Office applications or to prompt and interact with the user of your documents in ways that are specific to your business needs. For example, you could write some VBA code that displays a pop up message that reminds users to save a document to a particular network drive the first time they try to save it.
This article explores some of the primary reasons to leverage the power of VBA programming. It explores the VBA language and the out-of-the-box tools that you can use to work with your solutions. Finally, it includes some tips and ways to avoid some common programming frustrations and missteps.
[!includeAdd-ins note]
When to use VBA and why
There are several principal reasons to consider VBA programming in Office.
Automation and repetition
VBA is effective and efficient when it comes to repetitive solutions to formatting or correction problems. For example, have you ever changed the style of the paragraph at the top of each page in Word? Have you ever had to reformat multiple tables that were pasted from Excel into a Word document or an Outlook email? Have you ever had to make the same change in multiple Outlook contacts?
If you have a change that you have to make more than ten or twenty times, it may be worth automating it with VBA. If it is a change that you have to do hundreds of times, it certainly is worth considering. Almost any formatting or editing change that you can do by hand, can be done in VBA.
Extensions to user interaction
There are times when you want to encourage or compel users to interact with the Office application or document in a particular way that is not part of the standard application. For example, you might want to prompt users to take some particular action when they open, save, or print a document.
Interaction between Office applications
Do you need to copy all of your contacts from Outlook to Word and then format them in some particular way? Or, do you need to move data from Excel to a set of PowerPoint slides? Sometimes simple copy and paste does not do what you want it to do, or it is too slow. Use VBA programming to interact with the details of two or more Office applications at the same time and then modify the content in one application based on the content in another.
Doing things another way
VBA programming is a powerful solution, but it is not always the optimal approach. Sometimes it makes sense to use other ways to achieve your aims.
The critical question to ask is whether there is an easier way. Before you begin a VBA project, consider the built-in tools and standard functionalities. For example, if you have a time-consuming editing or layout task, consider using styles or accelerator keys to solve the problem. Can you perform the task once and then use CTRL+Y (Redo) to repeat it? Can you create a new document with the correct format or template, and then copy the content into that new document?
Office applications are powerful; the solution that you need may already be there. Take some time to learn more about Office before you jump into programming.
Before you begin a VBA project, ensure that you have the time to work with VBA. Programming requires focus and can be unpredictable. Especially as a beginner, never turn to programming unless you have time to work carefully. Trying to write a «quick script» to solve a problem when a deadline looms can result in a very stressful situation. If you are in a rush, you might want to use conventional methods, even if they are monotonous and repetitive.
VBA Programming 101
Using code to make applications do things
You might think that writing code is mysterious or difficult, but the basic principles use every-day reasoning and are quite accessible. Microsoft Office applications are created in such a way that they expose things called objects that can receive instructions, in much the same way that a phone is designed with buttons that you use to interact with the phone. When you press a button, the phone recognizes the instruction and includes the corresponding number in the sequence that you are dialing. In programming, you interact with the application by sending instructions to various objects in the application. These objects are expansive, but they have their limits. They can only do what they are designed to do, and they will only do what you instruct them to do.
For example, consider the user who opens a document in Word, makes a few changes, saves the document, and then closes it. In the world of VBA programming, Word exposes a Document object. By using VBA code, you can instruct the Document object to do things such as Open, Save, or Close.
The following section discusses how objects are organized and described.
The Object Model
Developers organize programming objects in a hierarchy, and that hierarchy is called the object model of the application. Word, for example, has a top-level Application object that contains a Document object. The Document object contains Paragraph objects and so on. Object models roughly mirror what you see in the user interface. They are a conceptual map of the application and its capabilities.
The definition of an object is called a class, so you might see these two terms used interchangeably. Technically, a class is the description or template that is used to create, or instantiate, an object.
Once an object exists, you can manipulate it by setting its properties and calling its methods. If you think of the object as a noun, the properties are the adjectives that describe the noun and the methods are the verbs that animate the noun. Changing a property changes some quality of appearance or behavior of the object. Calling one of the object methods causes the object to perform some action.
The VBA code in this article runs against an open Office application where many of the objects that the code manipulates are already up and running; for example, the Application itself, the Worksheet in Excel, the Document in Word, the Presentation in PowerPoint, the Explorer and Folder objects in Outlook. Once you know the basic layout of the object model and some key properties of the Application that give access to its current state, you can start to extend and manipulate that Office application with VBA in Office.
Methods
In Word, for example, you can change the properties and invoke the methods of the current Word document by using the ActiveDocument property of the Application object. This ActiveDocument property returns a reference to the Document object that is currently active in the Word application. «Returns a reference to» means «gives you access to.»
The following code does exactly what it says; that is, it saves the active document in the application.
Application.ActiveDocument.Save
Read the code from left to right, «In this Application, with the Document referenced by ActiveDocument, invoke the Save method.» Be aware that Save is the simplest form of method; it does not require any detailed instructions from you. You instruct a Document object to Save and it does not require any more input from you.
If a method requires more information, those details are called parameters. The following code runs the SaveAs method, which requires a new name for the file.
Application.ActiveDocument.SaveAs ("New Document Name.docx")
Values listed in parentheses after a method name are the parameters. Here, the new name for the file is a parameter for the SaveAs method.
Properties
You use the same syntax to set a property that you use to read a property. The following code executes a method to select cell A1 in Excel and then to set a property to put something in that cell.
    Application.ActiveSheet.Range("A1").Select
    Application.Selection.Value = "Hello World"
The first challenge in VBA programming is to get a feeling for the object model of each Office application and to read the object, method, and property syntax. The object models are similar in all Office applications, but each is specific to the kind of documents and objects that it manipulates.
In the first line of the code snippet, there is the Application object, Excel this time, and then the ActiveSheet, which provides access to the active worksheet. After that is a term not as familiar, Range, which means «define a range of cells in this way.» The code instructs Range to create itself with just A1 as its defined set of cells. In other words, the first line of code defines an object, the Range, and runs a method against it to select it. The result is automatically stored in another property of the Application called Selection.
The second line of code sets the Value property of Selection to the text «Hello World», and that value appears in cell A1.
The simplest VBA code that you write might simply gain access to objects in the Office application that you are working with and set properties. For example, you could get access to the rows in a table in Word and change their formatting in your VBA script.
That sounds simple, but it can be incredibly useful; once you can write that code, you can harness all of the power of programming to make those same changes in several tables or documents, or make them according to some logic or condition. For a computer, making 1000 changes is no different from making 10, so there is an economy of scale here with larger documents and problems, and that is where VBA can really shine and save you time.
Macros and the Visual Basic Editor
Now that you know something about how Office applications expose their object models, you are probably eager to try calling object methods, setting object properties, and responding to object events. To do so, you must write your code in a place and in a way that Office can understand; typically, by using the Visual Basic Editor. Although it is installed by default, many users don’t know that it is even available until it is enabled on the ribbon.
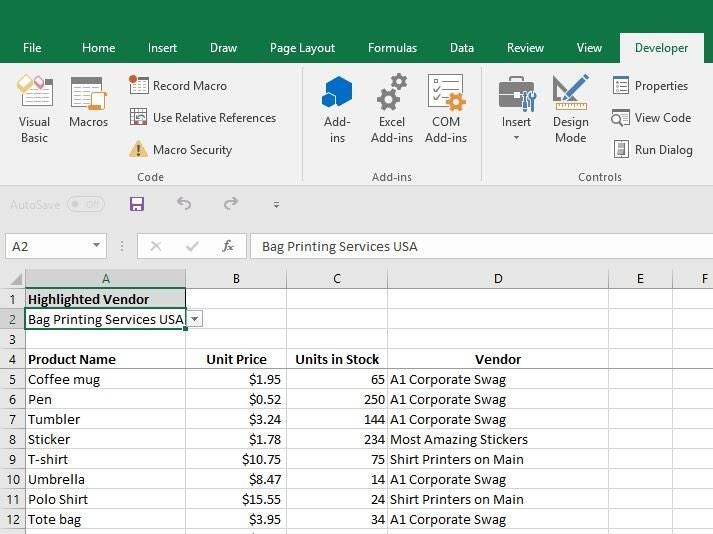
All Office applications use the ribbon. One tab on the ribbon is the Developer tab, where you access the Visual Basic Editor and other developer tools. Because Office does not display the Developer tab by default, you must enable it by using the following procedure:
To enable the Developer tab
-
On the File tab, choose Options to open the Options dialog box.
-
Choose Customize Ribbon on the left side of the dialog box.
-
Under Choose commands from on the left side of the dialog box, select Popular Commands.
-
Under Customize the Ribbon on the right side of the dialog box, select Main Tabs in the drop down list box, and then select the Developer checkbox.
-
Choose OK.
[!NOTE]
In Office 2007, you displayed the Developer tab by choosing the Office button, choosing Options, and then selecting the Show Developer tab in Ribbon check box in the Popular category of the Options dialog box.
After you enable the Developer tab, it is easy to find the Visual Basic and Macros buttons.
Figure 1. Buttons on the Developer tab

Security issues
To protect Office users against viruses and dangerous macro code, you cannot save macro code in a standard Office document that uses a standard file extension. Instead, you must save the code in a file with a special extension. For example you cannot save macros in a standard Word document with a .docx extension; instead, you must use a special Word Macro-Enabled Document with a .docm extension.
When you open a .docm file, Office security might still prevent the macros in the document from running, with or without telling you. Examine the settings and options in the Trust Center on all Office applications. The default setting disables macro from running, but warns you that macros have been disabled and gives you the option to turn them back on for that document.
You can designate specific folders where macros can run by creating Trusted Locations, Trusted Documents, or Trusted Publishers. The most portable option is to use Trusted Publishers, which works with digitally signed documents that you distribute. For more information about the security settings in a particular Office application, open the Options dialog box, choose Trust Center, and then choose Trust Center Settings.
[!NOTE]
Some Office applications, like Outlook, save macros by default in a master template on your local computer. Although that strategy reduces the local security issues on your own computer when you run your own macros, it requires a deployment strategy if you want to distribute your macro.
Recording a macro
When you choose the Macro button on the Developer tab, it opens the Macros dialog box, which gives you access to VBA subroutines or macros that you can access from a particular document or application. The Visual Basic button opens the Visual Basic Editor, where you create and edit VBA code.
Another button on the Developer tab in Word and Excel is the Record Macro button, which automatically generates VBA code that can reproduce the actions that you perform in the application. Record Macro is a terrific tool that you can use to learn more about VBA. Reading the generated code can give you insight into VBA and provide a stable bridge between your knowledge of Office as a user and your knowledge as a programmer. The only caveat is that the generated code can be confusing because the Macro editor must make some assumptions about your intentions, and those assumptions are not necessarily accurate.
To record a macro
-
Open Excel to a new Workbook and choose the Developer tab in the ribbon. Choose Record Macro and accept all of the default settings in the Record Macro dialog box, including Macro1 as the name of the macro and This Workbook as the location.
-
Choose OK to begin recording the macro. Note how the button text changes to Stop Recording. Choose that button the instant you complete the actions that you want to record.
-
Choose cell B1 and type the programmer’s classic first string: Hello World. Stop typing and look at the Stop Recording button; it is grayed out because Excel is waiting for you to finish typing the value in the cell.
-
Choose cell B2 to complete the action in cell B1, and then choose Stop Recording.
-
Choose Macros on the Developer tab, select Macro1 if it is not selected, and then choose Edit to view the code from Macro1 in the Visual Basic Editor.
Figure 2. Macro code in Visual Basic Editor

Looking at the code
The macro that you created should look similar to the following code.
Sub Macro1()
'
' Macro1 Macro
'
'
    Range("B1").Select
    ActiveCell.FormulaR1C1 = "Hello World"
    Range("B2").Select
End Sub
Be aware of the similarities to the earlier code snippet that selected text in cell A1, and the differences. In this code, cell B1 is selected, and then the string «Hello World» is applied to the cell that has been made active. The quotes around the text specify a string value as opposed to a numeric value.
Remember how you chose cell B2 to display the Stop Recording button again? That action shows up as a line of code as well. The macro recorder records every keystroke.
The lines of code that start with an apostrophe and colored green by the editor are comments that explain the code or remind you and other programmers the purpose of the code. VBA ignores any line, or portion of a line, that begins with a single quote. Writing clear and appropriate comments in your code is an important topic, but that discussion is out of the scope of this article. Subsequent references to this code in the article don’t include those four comment lines.
When the macro recorder generates the code, it uses a complex algorithm to determine the methods and the properties that you intended. If you don’t recognize a given property, there are many resources available to help you. For example, in the macro that you recorded, the macro recorder generated code that refers to the FormulaR1C1 property. Not sure what that means?
[!NOTE]
Be aware that Application object is implied in all VBA macros. The code that you recorded works with Application. at the beginning of each line.
Using Developer Help
Select FormulaR1C1 in the recorded macro and press F1. The Help system runs a quick search, determines that the appropriate subjects are in the Excel Developer section of the Excel Help, and lists the FormulaR1C1 property. You can choose the link to read more about the property, but before you do, be aware of the Excel Object Model Reference link near the bottom of the window. Choose the link to view a long list of objects that Excel uses in its object model to describe the Worksheets and their components.
Choose any one of those to see the properties and methods that apply to that particular object, along with cross references to different related options. Many Help entries also have brief code examples that can help you. For example, you can follow the links in the Borders object to see how to set a border in VBA.
Worksheets(1).Range("A1").Borders.LineStyle = xlDouble
Editing the code
The Borders code looks different from the recorded macro. One thing that can be confusing with an object model is that there is more than one way to address any given object, cell A1 in this example.
Sometimes the best way to learn programming is to make minor changes to some working code and see what happens as a result. Try it now. Open Macro1 in the Visual Basic Editor and change the code to the following.
Sub Macro1()
    Worksheets(1).Range("A1").Value = "Wow!"
    Worksheets(1).Range("A1").Borders.LineStyle = xlDouble
End Sub
[!TIP]
Use Copy and Paste as much as possible when working with code to avoid typing errors.
You don’t need to save the code to try it out, so return to the Excel document, choose Macros on the Developer tab, choose Macro1, and then choose Run. Cell A1 now contains the text Wow! and has a double-line border around it.
Figure 3. Results of your first macro

You just combined macro recording, reading the object model documentation, and simple programming to make a VBA program that does something. Congratulations!
Did not work? Read on for debugging suggestions in VBA.
Programming tips and tricks
Start with examples
The VBA community is very large; a search on the Web can almost always yield an example of VBA code that does something similar to what you want to do. If you cannot find a good example, try to break the task down into smaller units and search on each of those, or try to think of a more common, but similar problem. Starting with an example can save you hours of time.
That does not mean that free and well-thought-out code is on the Web waiting for you to come along. In fact, some of the code that you find might have bugs or mistakes. The idea is that the examples you find online or in VBA documentation give you a head start. Remember that learning programming requires time and thought. Before you get in a big rush to use another solution to solve your problem, ask yourself whether VBA is the right choice for this problem.
Make a simpler problem
Programming can get complex quickly. It’s critical, especially as a beginner, that you break the problem down to the smallest possible logical units, then write and test each piece in isolation. If you have too much code in front of you and you get confused or muddled, stop and set the problem aside. When you come back to the problem, copy out a small piece of the problem into a new module, solve that piece, get the code working, and test it to ensure that it works. Then move on to the next part.
Bugs and debugging
There are two main types of programming errors: syntax errors, which violate the grammatical rules of the programming language, and run-time errors, which look syntactically correct, but fail when VBA attempts to execute the code.
Although they can be frustrating to fix, syntax errors are easy to catch; the Visual Basic Editor beeps and flashes at you if you type a syntax error in your code.
For example, string values must be surrounded by double quotes in VBA. To find out what happens when you use single quotes instead, return to the Visual Basic Editor and replace the «Wow!» string in the code example with ‘Wow!’ (that is, the word Wow enclosed in single quotes). If you choose the next line, the Visual Basic Editor reacts. The error «Compile error: Expected: expression» is not that helpful, but the line that generates the error turns red to tell you that you have a syntax error in that line and as a result, this program will not run.
Choose OK and change the text back to»Wow!».
Runtime errors are harder to catch because the programming syntax looks correct, but the code fails when VBA tries to execute it.
For example, open the Visual Basic Editor and change the Value property name to ValueX in your Macro, deliberately introducing a runtime error since the Range object does not have a property called ValueX. Go back to the Excel document, open the Macros dialog box and run Macro1 again. You should see a Visual Basic message box that explains the run-time error with the text, «Object doesn’t support this property of method.» Although that text is clear, choose Debug to find out more.
When you return to the Visual Basic Editor, it is in a special debug mode that uses a yellow highlight to show you the line of code that failed. As expected, the line that includes the ValueX property is highlighted.
You can make changes to VBA code that is running, so change ValueX back to Value and choose the little green play button underneath the Debug menu. The program should run normally again.
It’s a good idea to learn how to use the debugger more deliberately for longer, more complex programs. At a minimum, learn a how to set break-points to stop execution at a point where you want to take a look at the code, how to add watches to see the values of different variables and properties as the code runs, and how to step through the code line by line. These options are all available in the Debug menu and serious debugger users typically memorize the accompanying keyboard shortcuts.
Using reference materials well
To open the Developer Reference that is built into Office Help, open the Help reference from any Office application by choosing the question mark in the ribbon or by pressing F1. Then, to the right of the Search button, choose the dropdown arrow to filter the contents. Choose Developer Reference. If you don’t see the table of contents in the left panel, choose the little book icon to open it, and then expand the Object Model Reference from there.
Figure 5. Filtering on developer Help applies to all Office applications

Time spent browsing the Object Model reference pays off. After you understand the basics of VBA syntax and the object model for the Office application that you are working with, you advance from guesswork to methodical programming.
Of course the Microsoft Office Developer Center is an excellent portal for articles, tips, and community information.
Searching forums and groups
All programmers get stuck sometimes, even after reading every reference article they can find and losing sleep at night thinking about different ways to solve a problem. Fortunately, the Internet has fostered a community of developers who help each other solve programming problems.
Any search on the Web for «office developer forum» reveals several discussion groups. You can search on «office development» or a description of your problem to discover forums, blog posts, and articles as well.
If you have done everything that you can to solve a problem, don’t be afraid to post your question to a developers forum. These forums welcome posts from newer programmers and many of the experienced developers are glad to help.
The following are a few points of etiquette to follow when you post to a developer forum:
-
Before you post, look on the site for an FAQ or for guidelines that members want you to follow. Ensure that you post content that is consistent with those guidelines and in the correct section of the forum.
-
Include a clear and complete code sample, and consider editing your code to clarify it for others if it is part of a longer section of code.
-
Describe your problem clearly and concisely, and summarize any steps that you have taken to solve the problem. Take the time to write your post as well as you can, especially if you are flustered or in a hurry. Present the situation in a way that will make sense to readers the first time that they read the problem statement.
-
Be polite and express your appreciation.
Going further with programming
Although this article is short and only scratches the surface of VBA and programming, it is hopefully enough to get you started.
This section briefly discusses a few more key topics.
Variables
In the simple examples in this article you manipulated objects that the application had already created. You might want to create your own objects to store values or references to other objects for temporary use in your application. These are called variables.
To use a variable in VBA, must tell VBA which type of object the variable represents by using the Dim statement. You then set its value and use it to set other variables or properties.
    Dim MyStringVariable As String
    MyStringVariable = "Wow!"
    Worksheets(1).Range("A1").Value = MyStringVariable
Branching and looping
The simple programs in this article execute one line at a time, from the top down. The real power in programming comes from the options that you have to determine which lines of code to execute, based on one or more conditions that you specify. You can extend those capabilities even further when you can repeat an operation many times. For example, the following code extends Macro1.
Sub Macro1()
    If Worksheets(1).Range("A1").Value = "Yes!" Then
        Dim i As Integer
        For i = 2 To 10
            Worksheets(1).Range("A" & i).Value = "OK! " & i
        Next i
    Else
        MsgBox "Put Yes! in cell A1"
    End If
End Sub
Type or paste the code into the Visual Basic Editor and then run it. Follow the directions in the message box that appears and change the text in cell A1 from Wow! to Yes! and run it again to see the power of looping. This code snippet demonstrates variables, branching and looping. Read it carefully after you see it in action and try to determine what happens as each line executes.
All of my Office applications: example code
Here are a few scripts to try; each solves a real-world Office problem.
Create an email in Outlook
Sub MakeMessage()
    Dim OutlookMessage As Outlook.MailItem
    Set OutlookMessage = Application.CreateItem(olMailItem)
    OutlookMessage.Subject = "Hello World!"
    OutlookMessage.Display
    Set OutlookMessage = Nothing
End Sub
Be aware that there are situations in which you might want to automate email in Outlook; you can use templates as well.
Delete empty rows in an Excel worksheet
Sub DeleteEmptyRows()
    SelectedRange = Selection.Rows.Count
    ActiveCell.Offset(0, 0).Select
    For i = 1 To SelectedRange
        If ActiveCell.Value = "" Then
            Selection.EntireRow.Delete
        Else
            ActiveCell.Offset(1, 0).Select
        End If
    Next i
End Sub
Be aware that you can select a column of cells and run this macro to delete all rows in the selected column that have a blank cell.
Delete empty text boxes in PowerPoint
Sub RemoveEmptyTextBoxes()
    Dim SlideObj As Slide
    Dim ShapeObj As Shape
    Dim ShapeIndex As Integer
    For Each SlideObj In ActivePresentation.Slides
        For ShapeIndex = SlideObj.Shapes.Count To 1 Step -1
            Set ShapeObj = SlideObj.Shapes(ShapeIndex)
            If ShapeObj.Type = msoTextBox Then
                If Trim(ShapeObj.TextFrame.TextRange.Text) = "" Then
                    ShapeObj.Delete
                End If
            End If
        Next ShapeIndex
    Next SlideObj
End Sub
Be aware that this code loops through all of the slides and deletes all text boxes that don’t have any text. The count variable decrements instead of increments because each time the code deletes an object, it removes that object from the collection, which reduces the count.
Copy a contact from Outlook to Word
Sub CopyCurrentContact()
   Dim OutlookObj As Object
   Dim InspectorObj As Object
   Dim ItemObj As Object
   Set OutlookObj = CreateObject("Outlook.Application")
   Set InspectorObj = OutlookObj.ActiveInspector
   Set ItemObj = InspectorObj.CurrentItem
   Application.ActiveDocument.Range.InsertAfter (ItemObj.FullName & " from " & ItemObj.CompanyName)
End Sub
Be aware that this code copies the currently open contact in Outlook into the open Word document. This code only works if there is a contact currently open for inspection in Outlook.
[!includeSupport and feedback]

on
November 30, 2017, 2:11 PM PST
How to enable the Developer tab and open the Visual Basic Editor in Word and Excel 2016 and Office 365
These step-by-step instructions show you how to add the Developer tab to the Ribbon in Word and Excel 2016 and Office 365, and to use it to launch the Visual Basic Editor and access Visual Basic for Applications.
Visual Basic for Applications (VBA for short) is a handy way to automate Microsoft Office tasks and is a favorite of many Word and Excel power users. And although VBA is installed by default, accessing the Visual Basic Editor (VBE), through which you’ll enter your VBA code, doesn’t automatically appear in the Ribbon.
Never fear, you can add it to the Ribbon by enabling the Developer tab. From within an Office application, such Word 2016 or Excel 2016:
- Click File
- Click Options
- Click Customize Ribbon
- Under the list of Main Tabs, select Developer
- Click OK
The Developer tab will now appear on the Ribbon and from it you can open the Visual Basic Editor.
If opening the Developer tab and clicking a button is a little too much work, you can also open the editor with the keyboard shortcut Alt+F11, which works whether the Developer tab is enabled or not.
SEE: Windows spotlight: 30 tips and tricks for power users (Tech Pro Research)
Also See
-
Eight tips for working more efficiently in the Visual Basic Editor
(TechRepublic) -
Three ways to find duplicates in Excel
(TechRepublic) -
Using Excel’s Find and Mid to extract a substring when you don’t know the start point
(TechRepublic) -
Excel errors: How Microsoft’s spreadsheet may be hazardous to your health
(ZDNet) -
Save time by using Excel’s Left, Right, and Mid string functions
(TechRepublic)
-
Microsoft
-
Software
Содержание
- VBA PDF (бесплатные загрузки)
- Примеры Word VBA «Шпаргалка»
- Учебное пособие по макросам Word VBA
- Пример простого макроса Word
- Объект документа Word
- Документы
- Диапазон, выделение, абзацы
- Примеры макросов Word
Добро пожаловать в наше мега-руководство по Word VBA / макросам!
Эта страница содержит:
-
- Учебное пособие по Word VBA в формате PDF (бесплатная загрузка)
- Word VBA «Шпаргалка», содержащая список наиболее часто используемых фрагментов кода Word VBA.
- Полное руководство по Word VBA / Macro.
- Список всех наших руководств по макросам Word VBA с возможностью поиска
Возможно, вас заинтересует наше интерактивное руководство по VBA для Excel. Хотя некоторые из примеров / упражнений относятся к Excel VBA, большая часть содержимого является общим для всех VBA, и вам может быть полезно изучить такие концепции, как If, Loops, MessageBoxes и т. Д.
VBA PDF (бесплатные загрузки)
Загрузите наше бесплатное руководство по Microsoft Word VBA! Или учебники VBA для других программ Office!

Скачать
Ниже вы найдете простые примеры кода VBA для работы с Microsoft Word.
Выбрать / перейти к
ОписаниеКод VBABackspaceSelection.TypeBackspaceВыбрать весь документSelection.HomeKey Unit: = wdStory
Selection.ExtendКопироватьSelection.CopyУдалитьSelection.Delete Unit: = wdCharacter, Count: = 1Вставить послеSelection.InsertAfter «текст»Начало строкиSelection.HomeKey Unit: = wdLineКонец линииSelection.EndKey Unit: = wdLineВставитьSelection.PasteВыбрать всеSelection.WholeStoryВыбрать всю строкуSelection.EndKey Unit: = wdLine, Extend: = wdExtendВверх по абзацуSelection.MoveUp Unit: = wdParagraph, Count: = 1Переместить вправо на один символSelection.MoveRight Unit: = wdCharacter, Count: = 1Переместить вправо на одну ячейку в таблицеSelection.MoveRight Unit: = wdCellПерейти к началу документаSelection.HomeKey Unit: = wdStoryПерейти в конец документаSelection.EndKey Unit: = wdStoryПерейти на страницу 1Selection.GoTo What: = wdGoToPage, Which: = wdGoToNext, Name: = ”1 ″Перейти к началу страницыSelection.GoTo What: = wdGoToBookmark, Name: = ” Page”
Selection.MoveLeft Unit: = wdCharacter, Count: = 1
Return to Top
Закладки
ОписаниеКод VBAДобавлятьС ActiveDocument.Bookmarks
.Add Range: = Selection.Range, Name: = «Name».
.DefaultSorting = wdSortByName
.ShowHidden = Ложь
Конец сСчитатьDim n as Integer
n = ActiveDocument.Bookmarks.CountУдалитьActiveDocument.Bookmarks («Имя закладки»). УдалитьСуществуют?Если ActiveDocument.Bookmarks.Exists («BookmarkName») = True, то
‘Сделай что-нибудь
Конец, еслиПерейти кSelection.GoTo What: = wdGoToBookmark, Name: = ”BookmarkName”ВыбиратьActiveDocument.Bookmarks («Имя закладки»). ВыберитеЗаменить текстSelection.GoTo What: = wdGoToBookmark, Name: = ”BookmarkName”
Selection.Delete Unit: = wdCharacter, Count: = 1
Selection.InsertAfter «Новый текст»
ActiveDocument.Bookmarks.Add Range: = Selection.Range, _
Name: = ”BookmarkName”
Return to Top
Документ
ОписаниеКод VBAАктивироватьДокументы («Example.doc»). АктивироватьДобавить в переменнуюDim doc As Document
Установить doc = Documents.AddДобавлятьDocuments.AddДобавить (из другого документа)Documents.Add Template: = ”C: Forms FormDoc.doc”, _
NewTemplate: = FalseЗакрыватьДокументы («Example.doc»). ЗакрытьЗакрыть — сохранить измененияДокументы («Example.doc»). Закройте SaveChanges: = wdSaveChangesЗакрыть — не сохранятьДокументы («Example.doc»). Закройте SaveChanges: = wdDoNotSaveChanges.Закрыть — запрос на сохранениеДокументы («Example.doc»). Закройте SaveChanges: = wdPromptToSaveChanges.
Return to Top
Столбцы
ОписаниеКод VBAСохранить какДокументы («Example.doc»). SaveAs («C: Example Example.doc»)СохранитьДокументы («Example.doc»). СохранитьЗащищатьДокументы («Example.doc»). Защитить пароль: = «пароль»Снять защитуДокументы («Example.doc»). Снять пароль: = «пароль»Число страницDim varNumberPages как вариант
varNumberPages = _
ActiveDocument.Content.Information (wdActiveEndAdjustedPageNumber)РаспечататьДокументы («Example.doc»). Распечатать
Return to Top
Устали искать примеры кода VBA? Попробуйте AutoMacro!
Шрифт
ОписаниеКод VBAРазмерSelection.Font.Size = 12ЖирныйSelection.Font.Bold = TrueКурсивSelection.Font.Italic = TrueПодчеркиваниеSelection.Font.Underline = wdUnderlineSingleВсе заглавные буквыSelection.Font.AllCaps = TrueЦветSelection.Font.TextColor = vbRedИмяSelection.Font.Name = «Абади»Нижний индексSelection.Font.Subscript = TrueSuperScriptSelection.Font.Superscript = TrueЦвет выделенияSelection.Range.HighlightColorIndex = wdYellowСтильSelection.Style = ActiveDocument.Styles («Нормальный»)
Return to Top
Вставлять
ОписаниеКод VBAВставить автотекстSelection.TypeText Текст: = ”a3 ″
Selection.Range.InsertAutoTextВставить код датыВставить файлSelection.InsertFile («C: Docs Something.doc»)Вставить разрыв страницыSelection.InsertBreak Тип: = wdPageBreakВставить символ абзацаSelection.TypeText Text: = Chr $ (182)Вставить вкладкуSelection.TypeText Текст: = vbTabВставить текстSelection.TypeText Text: = «Любой текст»Вставить абзац типаSelection.TypeParagraphВставить абзацSelection.InsertParagraph
Return to Top
Петли
ОписаниеКод VBAСделать до конца документаСделать до ActiveDocument.Bookmarks (« Sel») = ActiveDocument.Bookmarks (« EndOfDoc»)
‘Сделай что-нибудь
SubДля каждого документа в ДокументахDim doc As Document
Для каждого документа в документах
‘Сделай что-нибудь
Следующий документЦикл по абзацамПодпункты через абзацы
Dim i As Long, iParCount As Long
iParCount = ActiveDocument.Paragraphs.CountFori = 1 На iParCount
ActiveDocument.Paragraphs (i) .Alignment = wdAlignParagraphLeft
Далее я
Return to Top
Пункт
ОписаниеКод VBAKeepLinesTogetherSelection.ParagraphFormat.KeepTogether = TrueKeepWithNextSelection.ParagraphFormat.KeepWithNext = ИстинаПробел послеSelection.ParagraphFormat.SpaceAfter = 12Пространство доSelection.ParagraphFormat.SpaceBefore = 0Выровнять по центруSelection.ParagraphFormat.Alignment = wdAlignParagraphCenterВыровнять по правому краюSelection.ParagraphFormat.Alignment = wdAlignParagraphRightВыровнять по левому краюSelection.ParagraphFormat.Alignment = wdAlignParagraphLeftЛевый отступSelection.ParagraphFormat.LeftIndent = InchesToPoints (3,75)Правый отступSelection.ParagraphFormat.RightIndent = InchesToPoints (1)Межстрочный интервалС Selection.ParagraphFormat
.LineSpacingRule = wdLineSpaceExactly
.LineSpacing = 12
Конец сПеребрать все абзацыПодпункты через абзацы
Dim i As Long, iParCount As Long
iParCount = ActiveDocument.Paragraphs.CountFori = 1 На iParCount
ActiveDocument.Paragraphs (i) .Alignment = wdAlignParagraphLeft
Далее я
Return to Top
Учебное пособие по макросам Word VBA
Это руководство по использованию VBA с Microsoft Word. Это руководство научит вас писать простой макрос и взаимодействовать с документами, диапазонами, выделениями и абзацами.
Примечание. Если вы новичок в Macros / VBA, вам также может быть полезна эта статья: Как писать макросы VBA с нуля.
VBA — это язык программирования, используемый для автоматизации программ Microsoft Office, включая Word, Excel, Outlook, PowerPoint и Access.
Макросы представляют собой блоки кода VBA, которые выполняют определенные задачи.
Когда ты Записать макрос, Word запишет код VBA в макрос, что позволит вам повторять ваши действия. Вы можете увидеть список всех доступных макросов из Просмотр> Макросы.

После записи макроса вы сможете редактировать макрос из списка макросов:

Когда вы нажимаете Редактировать, вы открываете Редактор VBA. Используя редактор VBA, вы можете редактировать записанные макросы или писать макрос Word с нуля. Для доступа к редактору VBA используйте ярлык ALT + F11 или щелкните Visual Basic от Лента разработчика.

Пример простого макроса Word
Это простой пример макроса Word VBA. Он выполняет следующие задачи:
- Открывает документ Word
- Записывает в документ
- Закрывает и сохраняет документ Word.
| 123456789101112131415 | Sub WordMacroExample ()’Открыть документ и назначить переменнойDim oDoc как документУстановите oDoc = Documents.Open («c: Users something NewDocument.docx»).’Написать в документSelection.TypeText «www.automateexcel.com»Selection.TypeParagraph’Сохранить и закрыть документoDoc.SaveoDoc.CloseКонец подписки |
Основы работы с макросами Word
Весь код VBA должен храниться в подобных процедурах. Чтобы создать процедуру в VBA, введите «Sub WordMacroExample» (где «WordMacroExample» — желаемое имя макроса) и нажмите ВХОДИТЬ. VBA автоматически добавит круглые скобки и End Sub.

Объект документа Word
При взаимодействии с Microsoft Word в VBA вы часто будете ссылаться на Word «Объекты». Наиболее распространенные объекты:
Объект приложения — сам Microsoft Word
Объект документа — документ Word
Объект диапазона — Часть документа Word
Объект выделения — Выбранный диапазон или положение курсора.
заявка
Приложение — это объект «верхнего уровня». Через него можно получить доступ ко всем остальным объектам Word.
Помимо доступа к другим объектам Word, можно применить настройки «уровня приложения»:
| 1 | Application.Options.AllowDragAndDrop = True |
Это пример доступа к «Выборке» в «Windows (1)» в Приложении:
| 1 | Application.Windows (1) .Selection.Characters.Count |
Однако к наиболее распространенным объектам Word можно получить доступ напрямую, без ввода полной иерархии. Поэтому вместо этого вы можете (и должны) просто ввести:
| 1 | Selection.Characters.Count |
Документы
ActiveDocument
Часто у вас есть два или более документов, открытых в Word, и вам нужно указать, с каким конкретным документом Word следует взаимодействовать. Один из способов указать, какой документ использовать ActiveDocument. Например:
| 1 | ActiveDocument.PrintOut |
… Напечатал бы ActiveDocument. ActiveDocument — это документ в Word, который «имеет фокус»
Чтобы переключить ActiveDocument, используйте команду Activate:
| 1 | Документы («Example.docx»). Активировать |
Этот документ
Вместо использования ActiveDocument для ссылки на активный документ вы можете использовать ThisDocument для ссылки на документ, в котором хранится макрос. Этот документ никогда не изменится.
Переменные документа
Однако для более сложных макросов может быть сложно отслеживать активный документ. Также может быть неприятно переключаться между документами.
Вместо этого вы можете использовать переменные документа.
Этот макрос назначит ActiveDocument переменной, а затем распечатает документ, используя переменную:
| 12345 | Sub VarExample ()Dim oDoc как документУстановите oDoc = ActiveDocumentoDoc.PrintOutКонец подписки |
Документ Методы
Открыть документ
Чтобы открыть документ Word:
| 1 | Documents.Open «c: Users SomeOne Desktop Test PM.docx» |
Мы рекомендуем всегда назначать документ переменной при его открытии:
| 12 | Dim oDoc как документУстановите oDoc = Documents.Open («c: Users SomeOne Desktop Test PM.docx»). |
Создать новый документ
Чтобы создать новый документ Word:
Мы можем указать Word создать новый документ на основе некоторого шаблона:
| 1 | Documents.Add Template: = «C: Program Files Microsoft Office Templates MyTemplate.dotx» |
Как всегда, присвоение документа переменной при создании или открытии помогает избавить от серьезных проблем:
| 12 | Dim oDoc как документУстановите oDoc = Documents.Add (Template: = «C: Program Files Microsoft Office Templates MyTemplate.dotx») |
Сохранить документ
Чтобы сохранить документ:
или Сохранить как:
| 1 | ActiveDocument.SaveAs FileName: = c: Users SomeOne Desktop test2.docx «, FileFormat: = wdFormatDocument |
Закрыть документ
Чтобы закрыть документ и сохранить изменения:
| 1 | ActiveDocument.Close wdSaveChanges |
или без сохранения изменений:
| 1 | ActiveDocument.Close wdDoNotSaveChanges |
Распечатать документ
Это напечатает активный документ:
| 1 | ActiveDocument.PrintOut |
Диапазон, выделение, абзацы
Диапазон а также Выбор являются, вероятно, наиболее важными объектами в Word VBA и, безусловно, наиболее часто используемыми.
Диапазон относится к некоторой части документа, обычно, но не обязательно, к тексту.
Выбор относится к выделенному тексту (или другому объекту, например изображениям) или, если ничего не выделено, к точке вставки.
Абзацы представляют абзацы в документе. Это менее важно, чем кажется, потому что у вас нет прямого доступа к тексту абзаца (вам нужно получить доступ к определенному диапазону абзацев, чтобы внести изменения).
Диапазон
Диапазон может быть любой частью документа, включая весь документ:
| 12 | Dim oRange As RangeУстановите oRange = ActiveDocument.Content |
или он может быть маленьким, как один символ.
Другой пример, этот диапазон будет относиться к первому слову в документе:
| 12 | Dim oRange As RangeУстановите oRange = ActiveDocument.Range.Words (1) |
Обычно вам нужно получить диапазон, который относится к определенной части документа, а затем изменить его.
В следующем примере мы выделим первое слово второго абзаца жирным шрифтом:
| 123 | Dim oRange As RangeУстановите oRange = ActiveDocument.Paragraphs (2) .Range.Words (1)oRange.Bold = True |
Установить текст диапазона
Чтобы установить текстовое значение диапазона:
| 123 | Dim oRange As RangeУстановите oRange = ActiveDocument.Paragraphs (2) .Range.Words (1)oRange.Text = «Привет» |
(Совет: обратите внимание на пробел после «Hello». Поскольку слово «объект» включает пробел после слова, просто «hello» мы получим «Hellonext word»)
С диапазонами можно делать сотни вещей. Всего несколько примеров (предполагается, что вы уже сделали объектную переменную апельсин относится к интересующему диапазону):
Изменить шрифт
| 1 | oRange.Font.Name = «Arial» |
Отображение в окне сообщения количества символов в определенном диапазоне
| 1 | MsgBox oRange.Characters.Count |
Вставьте текст перед ним
| 1 | oRange.InsertBefore «это вставленный текст» |
Добавить сноску к диапазону
| 12 | ActiveDocument.Footnotes.Add Диапазон: = oRange, _Text: = «Подробнее читайте на easyexcel.net.» |
Скопируйте в буфер обмена
| 1234 | oRange.CopyЧасто вам нужно перейти к конкретному диапазону. Итак, вы можете начать, начать и закончитьoRange.Start = 5oRange.End = 50 |
После приведенного выше кода oRange будет относиться к тексту, начинающемуся с пятого и заканчивающемуся 50-м символом в документе.
Выбор
Выбор используется даже шире, чем Диапазон, потому что с ним легче работать Выборы чем Диапазоны, ЕСЛИ ваш макрос взаимодействует ТОЛЬКО с ActiveDocument.
Сначала выберите желаемую часть вашего документа. Например, выберите второй абзац в активном документе:
| 1 | ActiveDocument.Paragraphs (2) .Range.Select |
Затем вы можете использовать объект выбора для ввода текста:
| 1 | Selection.TypeText «Какой-то текст» |
Мы можем ввести несколько абзацев ниже «Некоторый текст»:
| 12 | Selection.TypeText «Какой-то текст»Selection.TypeParagraph |
Часто необходимо знать, выделен ли какой-то текст или у нас есть только точка вставки:
| 12345 | Если Selection.Type wdSelectionIP ТогдаSelection.Font.Bold = TrueЕщеMsgBox «Вам нужно выделить текст».Конец, если |
При работе с объектом Selection мы хотим поместить точку вставки в определенное место и запускать команды, начиная с этой точки.
Начало документа:
| 1 | Selection.HomeKey Unit: = wdStory, Extend: = wdMove |
Начало текущей строки:
| 1 | Selection.HomeKey Unit: = wdLine, Extend: = wdMove |
Параметр Extend wdMove перемещает точку вставки. Вместо этого вы можете использовать wdExtend, который выделит весь текст между текущей точкой вставки.
| 1 | Selection.HomeKey Unit: = wdLine, Extend: = wdExtend |
Переместить выделение
Самый полезный метод изменения положения точки вставки — «Перемещение». Чтобы переместить выделение на два символа вперед:
| 1 | Selection.Move Unit: = wdCharacter, Count: = 2 |
чтобы переместить его назад, используйте отрицательное число для параметра Count:
| 1 | Selection.Move Unit: = wdCharacter, Count: = — 2 |
Параметр единицы измерения может быть wdCharacter, wdWord, wdLine или другим (используйте справку Word VBA, чтобы увидеть другие).
Чтобы вместо этого переместить слова:
| 1 | Selection.Move unit: = wdWord, Count: = 2 |
С выделением легче работать (по сравнению с диапазонами), потому что он похож на робота, использующего Word, имитирующего человека. Где находится точка вставки — какое-то действие произойдет. Но это означает, что вы должны позаботиться о том, где находится точка вставки! Это непросто после многих шагов в коде. В противном случае Word изменит текст в нежелательном месте.
Если вам нужно какое-то свойство или метод, недоступный в объекте Selection, вы всегда можете легко получить диапазон, связанный с выбором:
| 1 | Установите oRange = Selection.Range. |
СОВЕТ: Использование Выбор часто проще, чем использование диапазонов, но также и медленнее (важно, когда вы имеете дело с большими документами)
Абзацы
Вы не можете напрямую использовать объект Paragraphs для изменения текста:
| 1 | ActiveDocument.Paragraphs (1) .Text = «Нет, это не сработает» |
Выше не сработает (на самом деле выдаст ошибку). Вам нужно сначала получить диапазон, связанный с конкретным абзацем:
| 1 | ActiveDocument.Paragraphs (1) .Range.Text = «Теперь работает :)» |
Но вы можете напрямую изменить его стиль:
| 1 | ActiveDocument.Paragraphs (1) .Style = «Нормальный» |
или измените форматирование на уровне абзаца:
| 1 | ActiveDocument.Paragraphs (1) .LeftIndent = 10 |
или, может быть, вы хотите сохранить этот абзац на одной строке со следующим абзацем:
| 1 | ActiveDocument.Paragraphs (1) .KeepWithNext = True |
Сделайте абзац по центру:
| 1 | ActiveDocument.Paragraphs (1) .Alignment = wdAlignParagraphCenter |
ОЧЕНЬ полезно назначить конкретный абзац объектной переменной. Если мы присвоим переменной конкретный абзац, нам не нужно беспокоиться, станет ли первый абзац вторым, потому что мы вставили перед ним один абзац:
| 12 | dim oPara как абзацУстановите oPara = Selection.Paragraphs (1) ‘здесь мы присваиваем первый абзац текущего выделения переменной |
Вот пример, в котором мы вставляем абзац над первым абзацем, но мы все еще можем ссылаться на старый первый абзац, потому что он был назначен переменной:
| 1234567 | Sub ParagraphExample ()Dim oPara как абзацУстановить oPara = ActiveDocument.Paragraphs (1)MsgBox oPara.Range.TextoPara.Range.InsertParagraphBefore ‘Вставить абзацMsgBox oPara.Range.TextКонец подписки |
Объект абзаца очень часто используется в циклах:
| 123456789101112 | Sub LoopThroughParagraphs ()Dim oPara как абзацДля каждого параметра в ActiveDocument.Paragraphs«Сделай что-нибудь с этим. Мы просто покажем’текст абзаца, если его стиль — «Заголовок 4″Если oPara.Style = «Заголовок 4», тоMsgBox oPara.Range.TextКонец, еслиДалее oParaКонец подписки |
Word VBA Tutorial Заключение
В этом руководстве были рассмотрены основы Word VBA. Если вы новичок в VBA, вам также следует ознакомиться с нашим общим руководством по VBA, чтобы узнать больше о переменных, циклах, окнах сообщений, настройках, условной логике и многом другом.
Примеры макросов Word
| Примеры макросов Word |
|---|
| Шаблоны |
| Добавить новые документы |
| Подсчет слов в выделенном фрагменте |
| Текстовые поля |
| Сохранить как PDF |
| Закладки |
| Таблицы |
| Найти, найти и заменить |
| Открытые документы |
Word VBA: часто задаваемые вопросы
Что такое макрос Word?
Макрос — это общий термин, обозначающий набор инструкций по программированию, которые автоматизируют задачи. Макросы Word автоматизируют задачи в Word с помощью языка программирования VBA.
Есть ли в слове VBA?
Да, в Microsoft Word есть редактор VBA. Доступ к нему можно получить, нажав клавиши ALT + F11 или перейдя в раздел «Разработчик»> «Visual Basic».
Как использовать VBA в Word?
1. Откройте редактор VBA (ALT + F11 или Разработчик> Visual Basic).
2. Выберите «Вставить»> «Модуль», чтобы создать модуль кода.
3. Введите «Sub HelloWorld» и нажмите Enter.
4. Между строками «Sub HelloWorld» и «End Sub» введите «MsgBox« Hello World! »
5. Вы создали макрос!
6. Теперь нажмите «F5», чтобы запустить макрос.
For most cases, you are often using VBA code to do various tasks in Your Word. However, do you really get hang of the steps to run VBA code? Therefore, in this article, we offer a detailed description of those steps for you.
In the followings, we take Word 2010 as an example to show the detailed steps. And you can easily apply the method to other versions in a similar way.
Step 1 Open the “Developer”
- First of all, go to the “File”, and click “Options”.

- Next click “Customize Ribbon” to check whether the “Developer” is selected.

If checked, you can go to the Step 2; if not, you need do the followings:
(1). On the right sections of Word Options, you need choose “Main Tabs” under the “Customize Ribbon”.
(2). Now you will find the “Developer”, and then check it.
(3). Finally, click “OK” to close the window.
(4). Back to the home screen of your word, you can easily find the “Developer” tab.
Step 2 Check Securities for the Macro
Before running VBA code, you need follow this step to check whether the operating environment is secure to run your macro.
- After enabling the “Developer”, you need click “Macro Security” in the “Code” group.

- Then make sure the “Disable all macro with notifications” is checked in “Macro Setting”.


Step 3 Edit the VBA code
- Firstly, click “Visual Basic” in the “Code” group, on “Developer” tab or you can press “Alt” + “F11” in your keyboard to open the VBA editor.
- Then click “Insert”, in the drop-down menu, you can click “Module”.
- Next double click to open a new module.

- Finally, in the empty area of this project, you can edit your VBA code in it.


Step 4 Run VBA code
After editing the VBA code you need, next comes to run it.
- Chick “Run” (the green triangle like bellowed picture) in the toolbar or hit “F5” in your keyboard in the current module.


Alternative Option: Add Macro Buttons to the Quick Access Toolbar
When finishing above steps, you can also add shortcut button for your macro.
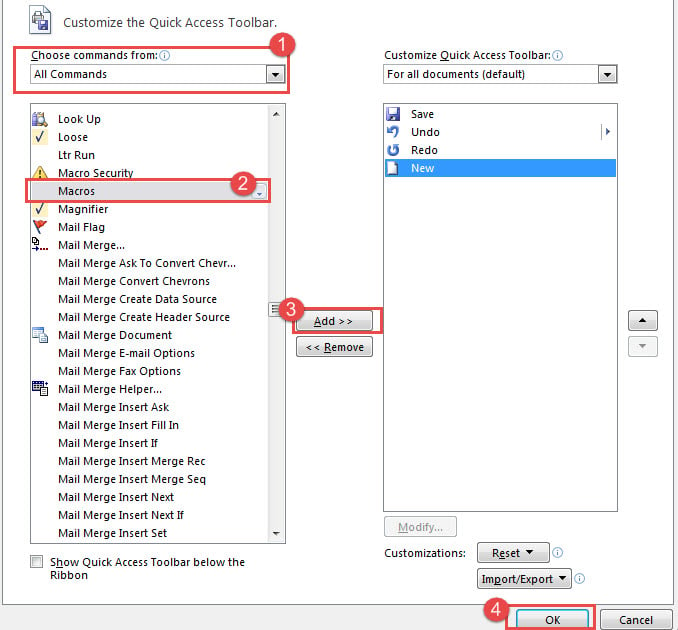
- Similarly, click “Options” in the “File” tab, and then click “Quick Access Toolbar”.
- Choose “Macros” and click “Add” to the toolbar after selecting “All Commands” from the “Choose commands from” drop down list.
- Then click “Ok” to close the window.
- Back to the document, you can find the macro is already in the Quick Access Toolbar. Therefore, you can easily click it to run your code.

Author Introduction:
Micky Ao is a data recovery expert in DataNumen, Inc., which is the world leader in data recovery technologies, including Excel fix and pdf repair software products. For more information visit www.datanumen.com
How do I get to the VBA editor in MS Word 2013? All my searches return information on Excel.
asked Apr 23, 2014 at 15:11
![]()
0
First you need to enable the Developer button in Word.
Click File, then Options, Customize Ribbon.
Then Select the Developer tab checkbox.
Developer will appear is a menu option now. Select it and you can the select Visual Basic to open the VBA editor.
answered Apr 23, 2014 at 15:24
![]()
KeltariKeltari
71.4k26 gold badges178 silver badges228 bronze badges

I think you can access it via the visual basic button under the Developer tab as above
answered Apr 23, 2014 at 15:17
![]()
SimkillSimkill
1,62711 silver badges15 bronze badges
0
Как установить VBA в приложениях Microsoft Office
Некоторые приложения пакета Microsoft Office, такие как Word, Excel, Access, Outlook, позволяют использовать для решения пользовательских задач язык программирования Visual Basic for Applications (VBA).
Для того чтобы использовать возможности VBA, макросы, процедуры и надстройки, написанные на этом языке программирования, необходимо чтобы компонент Visual Basic для приложений был установлен вместе с приложениями пакета Microsoft Office.
Как проверить установлен ли Visual Basic для приложений?
Самый простой способ проверить наличие либо отсутствие установленного VBA это попробовать его запустить. Запустить VBA можно сочетанием клавиш Alt+F11 на клавиатуре, либо кнопкой «Visual Basic» на вкладке «Разработчик». По умолчанию вкладка «Разработчик» отключена во всех приложениях пакета Microsoft Office, поэтому предварительно ее нужно отобразить в настройках ленты.
Итак, если VBA установлен, то нажатие горячих клавиш либо кнопки «Visual Basic» на ленте приложения приводит к появлению окна редактора Visual Basic на экране монитора. Выглядит редактор примерно так, как показано на изображении ниже.

В случае, если окно редактора не появилось, то компонент Visual Basic для приложений необходимо установить.
Как установить Visual Basic для приложений?
Чтобы установить компонент пакета Visual Basic for Applications, необходимо нажать кнопку Пуск, зайти в Панель управления/Программы и компоненты, выбрать программу Microsoft Office и нажать кнопку «Изменить», либо запустить установочный файл Setup.exe.

Далее выбрать опцию «Добавить или удалить компоненты», в параметрах установки выбрать компонент Visual Basic для приложений и доустановить его.
How to Run VBA Code in Your Word
For most cases, you are often using VBA code to do various tasks in Your Word. However, do you really get hang of the steps to run VBA code? Therefore, in this article, we offer a detailed description of those steps for you.
In the followings, we take Word 2010 as an example to show the detailed steps. And you can easily apply the method to other versions in a similar way.
Step 1 Open the “Developer”
- First of all, go to the “File”, and click “Options”.
- Next click “Customize Ribbon” to check whether the “Developer” is selected.
If checked, you can go to the Step 2; if not, you need do the followings:
(1). On the right sections of Word Options, you need choose “Main Tabs” under the “Customize Ribbon”.
(2). Now you will find the “Developer”, and then check it.
(3). Finally, click “OK” to close the window.
(4). Back to the home screen of your word, you can easily find the “Developer” tab.
Step 2 Check Securities for the Macro
Before running VBA code, you need follow this step to check whether the operating environment is secure to run your macro.
- After enabling the “Developer”, you need click “Macro Security” in the “Code” group.
- Then make sure the “Disable all macro with notifications” is checked in “Macro Setting”.
Step 3 Edit the VBA code
- Firstly, click “Visual Basic” in the “Code” group, on “Developer” tab or you can press “Alt” + “F11” in your keyboard to open the VBA editor.
- Then click “Insert”, in the drop-down menu, you can click “Module”.
- Next double click to open a new module.
- Finally, in the empty area of this project, you can edit your VBA code in it.
Step 4 Run VBA code
After editing the VBA code you need, next comes to run it.
- Chick “Run” (the green triangle like bellowed picture) in the toolbar or hit “F5” in your keyboard in the current module.
Alternative Option: Add Macro Buttons to the Quick Access Toolbar
When finishing above steps, you can also add shortcut button for your macro.
- Similarly, click “Options” in the “File” tab, and then click “Quick Access Toolbar”.
- Choose “Macros” and click “Add” to the toolbar after selecting “All Commands” from the “Choose commands from” drop down list.
- Then click “Ok” to close the window.
- Back to the document, you can find the macro is already in the Quick Access Toolbar. Therefore, you can easily click it to run your code.
How do you open the VBA editor in MS Word 2013? [duplicate]
How do I get to the VBA editor in MS Word 2013? All my searches return information on Excel.
2 Answers 2
First you need to enable the Developer button in Word.
Click File , then Options , Customize Ribbon .
Then Select the Developer tab checkbox.
Developer will appear is a menu option now. Select it and you can the select Visual Basic to open the VBA editor.
I think you can access it via the visual basic button under the Developer tab as above
In the first post in this series, we described VBA for Word and how it could be useful to writers. In this part, we delve into VBA and explore some basic tasks:
- Getting started
- Writing text to a document
- Reading text from a document
- Looping through all the paragraphs in a document
Getting Started
There are three things you need to do to start using VBA:
- Open the VBA Editor – Create a blank document in Word and press Alt+F11. The Microsoft Visual Basic for Applications window (the VBA Editor) opens. It may seem intimidating at first, but don’t be discouraged — it is much easier than you think!
- Create a Placeholder (Module) for Your Code – In the VBA Editor, on the left, you see two top-level folders called Normal and Project (Document1). Normal is the template that most Word documents are based on by default; you can ignore it in this context. Project (Document1) is the blank document that you just created. This is where you add your code.To do that, you must create a placeholder into which you can put your code. This placeholder is known as a Module. Right-click Project (Document1) and choose Insert Module. A new Module1 (Code) window opens. You’re ready to add some code.
- Create a Subroutine – In Word VBA, the simplest way to perform a task is to use a subroutine. Create a subroutine by typing Sub <Name>, where <Name> can be anything other than the few reserved keywords that VBA uses. Typically, you choose a name that closely relates to the task you want to perform as demonstrated in the following examples.
Writing Text to a Document
Writing text is a fundamental task you will need in almost any macro. For example, let’s say you want to get text from a different source (another Word document, an Excel document, or even a web page). Once you acquire the text, you will need to write it into your document. This section demonstrates one easy method you can use to write text.
Let’s create a subroutine called WriteText.
Note that when you type Sub WriteText and press Return, the VBA editor automatically adds an End Sub statement, which is the statement required to close the subroutine. This auto-complete feature is very helpful (as you will discover).
On the blank line between the Sub WriteText() and the End Sub statements, press Tab, then type:
Selection.InsertAfter («Hello World!»)
So your complete code looks like this:

Sub WriteText()
    Selection.InsertAfter ("Hello World!")
End Sub
Note that once you’ve typed Selection., the editor displays a drop-down list with possible alternatives. This is a feature that Microsoft calls IntelliSense. It helps you avoid spelling and syntax errors.
Now, with the cursor inside the subroutine, click ![]() (Run Sub/UserForm) on the toolbar. Alternatively, from the menu, choose Run > Run Sub/User Form.
(Run Sub/UserForm) on the toolbar. Alternatively, from the menu, choose Run > Run Sub/User Form.
Result: The script writes the text ‘Hello World!’ into Document1.
Congratulations! You have just created and run your first Word VBA macro. I think you’ll agree that it’s not too difficult.
A few things to note:
- Selection is a VBA object that represents whatever is selected at the time it is used. If nothing is selected, it represents the position of the cursor.
- InsertAfter is a method of the Selection object that inserts whatever text you specify after the selection.
- The method’s parameter (in parentheses) is the actual text that will be inserted. The double quotes tell VBA that you want to insert the string of text between them.
OK, so now you know how to write text into a Word document at the position of the cursor. Let’s save the document before we proceed.
In the VBA editor, choose File > Save As, and in the Save As dialog, select Word Macro-Enabled Document as the file type. This is a special format for documents that contain macros. Use ‘Hello World’ as the file name and press the Save button.
Reading Text from a Document
Reading text is a another fundamental task you will need in many macros. For example, you may want to read the text in the third paragraph of multiple documents for some specific reason. This section demonstrates a simple way to read text.
Continuing with your Hello World document, add the following lines of text so that you have something to read:
Apples
Oranges
Mary had a little lamb.

Now you have four paragraphs in your document. Let’s create a small VBA macro to read the third paragraph. In the VBA window, type the following text after your WriteText() subroutine:
Sub ReadText()
    MsgBox (ActiveDocument.Paragraphs(3).Range.Text)
End Sub
With the cursor inside the subroutine, click ![]() (Run Sub/UserForm) on the toolbar.
(Run Sub/UserForm) on the toolbar.
Result: A dialog box containing the word ‘Oranges’ pops up. This is the text in paragraph 3.
That’s it! You have programmatically read some text from the Word document. Using this macro, you can read the third paragraph of any Word file. Once again, surprisingly easy!
A few things to note:
- MsgBox() is an easy way to display the values of items. It is really useful for debugging. In this example, you use it to show the text content of paragraph 3.
- ActiveDocument is the currently active document, in this case the Hello World document you saved.
- Paragraphs is a collection (or group) of all the paragraphs in the active document. You want the third element in that collection, so you can write the notation Paragraphs(3).
- Range.Text represents the text of the paragraph.
The text of the paragraph is not the only thing you can read. For example, you can read the style of the paragraph. Add a second line (highlighted) to your macro as shown:
Sub ReadText()
    MsgBox (ActiveDocument.Paragraphs(3).Range.Text)
    MsgBox (ActiveDocument.Paragraphs(3).Style)
End Sub
With the cursor inside the subroutine, click ![]() (Run Sub/UserForm) on the toolbar.
(Run Sub/UserForm) on the toolbar.
Result: The dialog box pops up twice. The first time, it contains ‘Oranges’ as before. The second time, it contains ‘Normal’, which is the name of the style associated with the paragraph.
Looping Through All the Paragraphs in a Document
Another task that is often necessary is to loop through all the paragraphs in a document. For example, you may want to look at each paragraph for some style or characteristic. In VBA, it is easy to loop through the paragraphs in a document.
Type the following code in the VBA editor window:

Sub LoopThroughParas()
    For Each para In ActiveDocument.Paragraphs
        MsgBox (para.Range.Text)
    Next para
End Sub
With the cursor inside the subroutine, click ![]() (Run Sub/UserForm) on the toolbar.
(Run Sub/UserForm) on the toolbar.
Result: The dialog box pops up four times with the content of each paragraph.
A few things to note:
- For … Next is the VBA statement combination that does the looping.
- ActiveDocument.Paragraphs is the collection of all the paragraphs in the active document.
- para is a variable that represents one paragraph.
- para.Range.Text is the content of the paragraph. This changes on each loop, as a different paragraph is examined each time.
- MsgBox pops up the dialog box each time through the loop.
So with five short lines of code we can loop through every paragraph in the document, including paragraphs in tables. This works regardless of the size of the document. You could apply this macro to a document that is several hundred pages long. However, that would not be wise, because a dialog box would pop up for each and every paragraph. That would be a lot of dialog boxes to respond to.
Fortunately, there is another way to display output. Instead of using the MsgBox line, you can use Debug.Print <something>. The result is displayed in the Immediate window (if it’s not already visible in the VBA editor, choose View > Immediate window).
Replace the MsgBox line with Debug.Print para.Range.Text in your code as highlighted in the following code snippet:
Sub LoopThroughParas()
    For Each para In ActiveDocument.Paragraphs
        Debug.Print para.Range.Text
    Next para
End Sub
With the cursor inside the subroutine, click ![]() (Run Sub/UserForm) on the toolbar.
(Run Sub/UserForm) on the toolbar.
Result: The content of each paragraph is now written to the Immediate window.
Have you encountered situations where you needed to check through a document paragraph by paragraph for some reason? Do you think VBA could have helped? Let us know.
In the next post, we build on the basic skills learned here and look at some more practical applications for VBA.
Welcome to the Word VBA Tutorial. VBA is a great tool not only to be leveraged in MS Excel. Often it is worth to save some time doing repeatable tasks by adopting some VBA macros in Word or PowerPoint too. Today I wanted to focus a little bit on starting you off in Word VBA macro programming.
 When moving to macro programming in Word VBA you will stumble upon issues you would normally not expect in Excel. Lets take the example of moving around the Word file – in Excel you have spreadsheets which are easy to navigate around. In Word, however, you have a lot of different content e.g. text, objects like images and charts, tables etc. Navigating around Word file in VBA is the greatest challenge you will face. Today I would like to focus on that and other frequently used features in Word VBA. So let’s kick off this Word VBA Tutorial.
Starting your journey with programming in Visual Basic for Applications (VBA)? Start with my VBA Tutorial.
Word VBA is identical to Excel VBA – be sure to leverage the VBA Cheat Sheet
VBA Word Navigating
Let’s start with adding content to the most common places the start and end of a Word document in VBA. Know if you Google for this you will get tons of non-sense methods of navigating around Word files. I was truly amazed at how poorly it is documented.
Beginning and End of the Word Document
Go to the Beginning of a Word Document:
'Start - add text to the beginning of the Word Document
Dim startMark As Range
Set startMark = ActiveDocument.Range(0, 0)
startMark.Text = "This is the start of the document"
Go to the End of a Word Document:
'End - add text to the end of the Word Document
Dim endMark As Range
Set endMark = ActiveDocument.Range(Len(ActiveDocument.Range))
endMark.Text = "This is the end of the document"
Finding and replacing text in a Word Document with VBA
Finding and replacing text are basic functions that you will probably need to leverage every now and then.
'Find and print text in MsgBox
Dim selectText As Range
Set selectText = ActiveDocument.Content
selectText.Find.Execute "Hello"
If selectText.Find.Found Then
  MsgBox selectText.Text
End If
'Find and replace all instances of a specific text
Dim replaceText As Range
Set replaceText = ActiveDocument.Content
replaceText.Find.Execute FindText:="Hello", ReplaceWith:="Goodbye", Replace:=wdReplaceAll
VBA Word Text formatting
One of the first things you would want to do is probably text formatting in Word VBA.
Let’s start by adding some text to our document:
'Select the beginning of the document
ActiveDocument.Range(0).Select
'Type "Hello World!"
Selection.TypeText Text:="Hello World!"
Bold & Italic
To change the font weight to bold see below:
'Select the word "Hello"
ActiveDocument.Range(0, 5).Select

'Toggle the bold property
Selection.Font.Bold = wdToggle
To change the text decoration to italic see below:
'Select the word "World"
ActiveDocument.Range(0, 5).Select
'Toggle the bold property
Selection.Font.Bold = wdToggle
Below the final result of the code above:

Font size and name
Using the “Hello World!” example above we can similarly change the text font name and font size as shown below:
'Change font size
Selection.Font.Size = 20 'Size: 20
Selection.Font.Grow 'Size: 22
Selection.Font.Shrink 'Size: 20
'Change font name to "Aharoni"
Selection.Font.Name = "Aharoni"
VBA Word Tables
When editing Word files you might want to leverage tables as it is much easier to navigate around them in an automated way. My approach is to insert/modify tables in Word without and borders (invisible). This way you can guarantee a consistent and easy to navigate structure in Word. Let’s go through some of the basic functions around tables.
Add a table
Let’s add a table to the beginning of the Word document:
 Dim begin As Range
 Set startMark = ActiveDocument.Range(0, 0)
 'range as Range, NumRows as Long, NumColumns as Long
 Call ActiveDocument.Tables.Add(startMark, 3, 6) 'add to beginning of doc, 3 rows, 6 cols
Edit cell text
'Modify cell (1,3) to "Hello World!"
With ActiveDocument.Tables(1)
        .Cell(1, 3).Range.Text = "Hello World!"
End With
Working on rows and columns
With ActiveDocument.Tables(1)
        ' Modify height of row 1
        .Rows(1).Height = CentimetersToPoints(0.65)
        ' Modify width of column 1
        .Columns(1).Width = CentimetersToPoints(2.54)
        'Merge cell (1,3) with cell (1,4) - cells must be next to each other
        .Cell(1, 3).Merge .Cell(1, 4)
End With
Formatting borders
'Modify row 1 border, single, black and 100pt
 With ActiveDocument.Tables(1).Rows(3).Borders(wdBorderBottom)
        .LineStyle = wdLineStyleSingle
        .LineWidth = wdLineWidth100pt
        .Color = wdColorBlack
End With
In progress…