
Word for Microsoft 365 Outlook for Microsoft 365 Word 2021 Outlook 2021 Word 2019 Outlook 2019 Word 2016 Outlook 2016 Word 2013 Outlook 2013 Word 2010 Outlook 2010 Word 2007 Outlook 2007 More…Less
You can use the Quick Part Gallery to create, store, and reuse pieces of content, including AutoText, document properties (such as title and author), and fields. These reusable blocks of content are also called building blocks. AutoText is a common type of building block that stores text and graphics. You can use the Building Blocks Organizer to find or edit a building block.
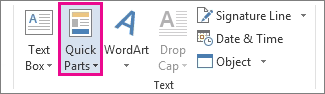
To open the Quick Part Gallery, on the Insert tab, in the Text group, click Quick Parts.
What do you want to do?
-
Select the phrase, sentence, or other portion of your document that you want to save to the gallery.
-
On the Insert tab, in the Text group, click Quick Parts, and then click Save Selection to Quick Part Gallery, change the name and add a description if you like, and click OK.
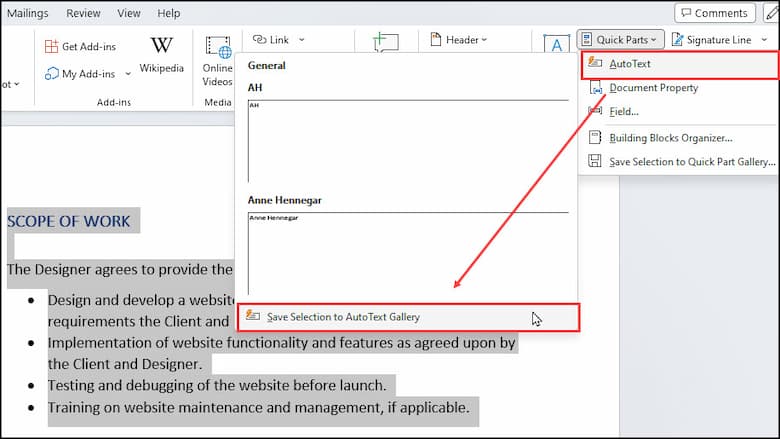
Note: To save a selection as AutoText, on the Insert tab, in the Text group, click Quick Parts > AutoText > Save Selection to AutoText Gallery.
-
Place your cursor where you want to insert a selection from the Quick Parts Gallery.
-
On the Insert tab, in the Text group, click Quick Parts, and then click the sentence, phrase, or other saved selection you want to reuse.
Note: If you saved the item as AutoText, click Insert > Quick Parts > AutoText to find and click the selection.
You can change a Quick Part by replacing the building block. You insert the building block, make the changes that you want, and then save the building block with the same name.
Important: To replace the original entry in the gallery, the name, category, and gallery must be the same as the original.
-
Click where you want to insert the building block.
-
On the Insert tab, in the Text group, click Quick Parts, and then click Building Blocks Organizer. If you know the name of the building block, click Name to sort by name.
-
Click Insert.
-
Make your changes to the building block
-
Select the revised text.
To store paragraph formatting—including indentation, alignment, line spacing, and pagination—with the entry, include the paragraph mark ( ¶ ) in the selection.
Note: To view paragraph marks, on the Home tab, in the Paragraph group, click Show/Hide.
-
On the Insert tab, in the Text group, click Quick Parts, and then click Save Selection to Quick Part Gallery.
-
In the Create New Building Block dialog box, type the original name, category, and gallery for the building block entry, and then click OK.
-
When asked whether you want to redefine the building block entry, click Yes.
-
On the Insert tab, in the Text group, click Quick Parts, and then click Building Blocks Organizer.
-
Click the name of the building block that you want to rename, and then click Edit Properties.
-
In the Modify Building Block dialog box, type a new name for the entry, and then click OK.
-
When asked whether you want to redefine the building block entry, click Yes.
-
Open a document that contains the Quick Part that you want to delete.
-
On the Insert tab, in the Text group, click Quick Parts, and then click Building Blocks Organizer. If you know the name of the building block, click Name to sort by name.
-
Select the entry, and then click Delete.
-
When asked whether you are sure you want to delete the building block entry, click Yes.
The building block that you deleted is no longer available in galleries, although the content might still appear in the document.
See also
Quick Parts
Automatically insert text
Need more help?
Inserting Quick Parts
-
In an open document, click Insert > Quick Parts.
-
Select an existing Quick Part or one of the other options.
AutoText is reusable content you can store and access again and again. Click AutoText to access the AutoText gallery and click on a selection on insert the text.
You can create new AutoText by selecting some existing text in your document and clicking Insert > Quick Parts > AutoText > Save Selection to AutoText Gallery.
The Quick Part Gallery is a list of phrases, sentences, or other text you’ve saved for easy access.
To insert an item from the Quick Part Gallery, select Insert > Quick Parts and click on the item. It will be placed in your document at the point of the cursor.
To create a new item for the Quick Part Gallery, select the portion of text from your document and click Insert > Quick Parts > Save Selection to Quick Part Gallery.
Document property allows you to insert a pre-defined variable, such as company address.
Select Insert > Quick Parts >Document property to see a list of the available properties. Select the one you want, and it will be placed in your document at the point of the cursor.
Use Field to insert fields that can provide automatically updated information, such as the time, title, page numbers, and so on.
Select Insert > Quick Parts >Field… to see a list of the available properties. You can refine how each property is formatted before using them. Clicking OK will be place the field in your document at the point of the cursor.
Select Insert > Quick Parts > Building Blocks Organizer to preview all of the building blocks available. You can edit, delete, and insert buildings blocks from here.
Inserting Quick Parts
-
Pop out a reply or new email and click into the message area. The email must be popped out to see the Insert menu. Quick Parts only works in the message area of the email.
-
Click Insert > Quick Parts.
-
Select an existing Quick Part or one of the other options.
AutoText is reusable content you can store and access again and again. Click AutoText to access the AutoText gallery and click on a selection on insert the text.
You can create new AutoText by selecting some existing text in your document and clicking Insert > Quick Parts > AutoText > Save Selection to AutoText Gallery.
The Quick Part Gallery is a list of phrases, sentences, or other text you’ve saved for easy access.
To insert an item from the Quick Part Gallery, select Insert > Quick Parts and click on the item. It will be placed in your document at the point of the cursor.
To create a new item for the Quick Part Gallery, select the portion of text from your document and click Insert > Quick Parts > Save Selection to Quick Part Gallery.
Have you ever started a document and thought about previous documents and content types? Chances are we have plenty of reusable content from past projects that we can leverage. In this tutorial, I’ll show you how to use Word Quick Parts to speed up document creation and workflow.
What Are Quick Parts
Quick Parts is a long-standing feature available in Microsoft Word and Microsoft Outlook. I first wrote about using Quick Parts in Outlook in 2008. The feature allows you to insert predefined reusable assets, document properties, or fields. These assets could be by Microsoft or ones you create.
For this tutorial, we’ll just deal with AutoText, Quick Parts Galley, and the Building Blocks Organizer. With the exception of document properties and fields, everything flows into the Building Blocks Organizer. Some other examples include:
- text
- images
- watermarks
- equations
- headers and footers
- tables
- signature blocks
On the surface, this may not sound exciting or even productive. However, Microsoft allows you to roll your own. This gives you flexibility and speed. For example, instead of editing an old document, you can start with a new one and insert your content types.
Let’s say you’re a web designer responding to a request for proposal (RFP) or drawing up a contract. Chances are, you’ve seen countless requirements and contracts. Using your previous work, you could use Quick Parts for your most frequent content items. Even though each proposal is different, you could create text blocks that define the following:
- Scope of work
- Project timeline
- Payment terms
- Client responsibilities
- Warranty
You might think of this list as boilerplate content.
Understanding Building Blocks
While the Word ribbon uses the phrase Quick Parts, these are a subset of building blocks. Any Quick Part asset you create can be found in the Building Blocks Organizer. Each block can be defined by its:
- Name [A]
- Gallery [B]
- Category [C]
- Template [D]
- Description [E]
The block organizer shows a list of assets that you can sort by various column headers. The block Description and Preview appear when you highlight an asset.

Creating a Quick Part
Before creating your asset, you may want to think about how granular you want to be. Microsoft doesn’t care about size or the amount of text, but you may. Returning to our web designer, some may want to break down their typical contract into the items I mentioned earlier. Others might combine several sections.
In this tutorial, I’ve copied text from a sample contract. In addition, I added variable placeholders for items such as dates [Date] and prices [Payment amount]. These placeholders [ ] remind me I need to edit the block after I insert the Quick Part.
To create an AutoText Quick Part
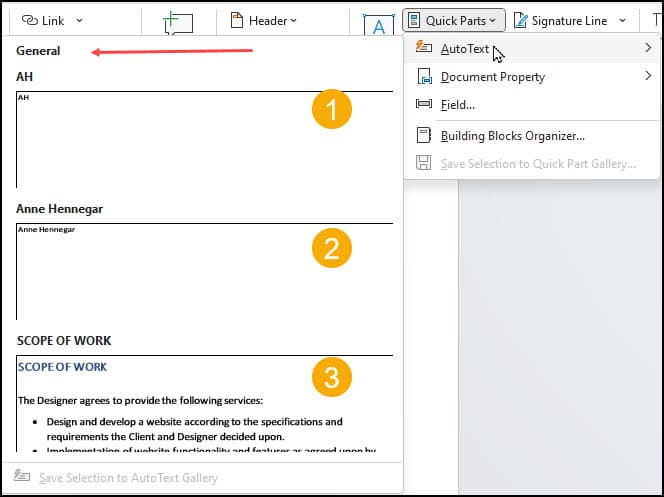
In this example, I’ll create an AutoText entry. This particular type of Quick Parts has its own menu item. These are text items you use frequently.
The AutoText menu entries are sorted by Category and then Name. You can start the name with an underscore if you wish to have your item at the top of a category. You can also create categories.
- Highlight the text you would like to use.

- From the ribbon’s Insert tab, click the Quick Parts button. It is in the Text group.
- From the drop-down menu, select AutoText.
- From the slide out menu, select Save Selection to AutoText Gallery.
- The Create New Building Block dialog opens.

- Make any changes to the block parameters. You can amend later if needed.
- Click the OK button.
Adding Parts to a Document
Any asset in the Building Blocks Organizer can be placed in your Word document. The advantage of AutoText entries is they are readily available from the side menu. For example, you can see three AutoText items in the screen snap below. The first two were created automatically by Microsoft when I installed Word. The third item is the custom one I added.
Inserting AutoText Entries
- Place your cursor where you’d like to add your AutoText entry.
- Click the Quick Parts button in the Text group.
- Hover over the AutoText menu.
- Select your entry from the slide out menu.
Adding From Building Blocks Organizer
The Organizer also allows you to add items to your document. Unfortunately, the tool doesn’t have a search mechanism. You’ll need to scroll through the list or sort by a column. By default, the Organizer sorts by Gallery names with AutoText at the top. You can click the Name, Category, or Template columns, and the list will resort.
The organizer also has several columns that don’t display unless you use the scroll bar. These include:
- Description
- Behavior
You can drag a column header to a new position. However, when you close the dialog box, the temporary position will revert to the standard order.
You may recall from a previous tutorial I made a custom watermark in Word which I saved to my watermark gallery. In turn, those assets also feed into the Building Block Organizer. Therefore, I don’t need to re-add them.
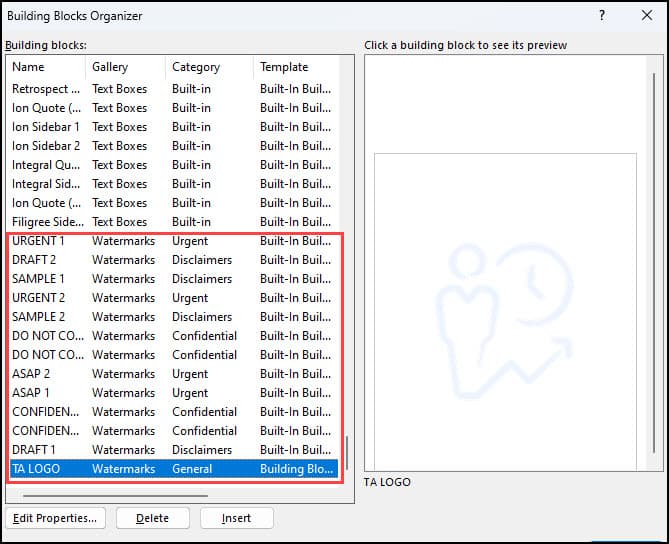
To add this watermark to a document, I’d highlight it and then click the Insert button. Regarding watermarks, I didn’t have to worry about positioning my cursor. Watermarks apply to the whole page.
Editing Block Properties
Sometimes when you save an asset, it’s not labeled correctly. For example, I want to create a new category instead of having my TA LOGO watermark in the General category.
- Click the Quick Parts button on the ribbon.
- Click Building Blocks Organizer…
- Highlight the block you wish to change.
- Click the Edit Properties… button in lower left.
- The Modify Building Block dialog box opens.
- Click the down arrow next to Category.
- From the drop-down list, click Create new category…
- In the Create New Category textbox, type the new value such as “website“.
- Click OK.
- Click OK.
- Click Yes when asked if you want to redefine the building block.
The same procedure works if you change galleries, although this list is fixed. You can’t create new galleries. This is because there is logic behind galleries and how Word displays them. For example, changing my TA logo from Watermark to AutoText would add the entry to the AutoText side menu. However, if I inserted it with AutoText, it would behave as an image, not a watermark. The display logic changed.
Editing Block Content
You might think that Word has a block editor. Sorry, it doesn’t. In essence, you need to open the existing block, make changes and save it with the same name and properties.
- Open the Building Block Organizer and find the asset to change.
- Make note of the Name:, Gallery:, Category: and Save in: fields.
- Insert your building block into your document.
- Make any necessary changes.
- Highlight the asset as before.
- Click the Quick Parts button.
- Select Save Selection to Quick Part Gallery…
- On the Create New Building Block dialog box remap the values to those in Step 2.
- Click OK.
After you save the block, you can go back and edit properties.
If you edit the properties and content simultaneously, you might create a duplicate building block.
Building Blocks and Templates
The initial template which stores all the built-in blocks is called Building Blocks.dotx. The location varies based on your operating system, username, Microsoft Word version, and language.
Below is an example from my Windows 11 desktop with my username of prodp. It’s a rather long path. You may have to turn on the feature to see hidden items in File Explorer.
C:Users[user name]AppDataRoamingMicrosoftDocument Building Blocks103316

Why Multiple Templates?
If you look at the screen snap above, you might wonder if I made a mistake because there are two similar template names. No, it’s by design.
- Building Blocks.dotx contains user created items except for AutoText.
- Built-In Building Blocks.dotx contains the base blocks in Microsoft Word.
- normal.dotm contains your AutoText entries. It’s the default template for a new Word document.
In addition to the templates above, you can store items you create in other templates. For example, if you made a new document using a template called webprop.dotx, you could assign building blocks to it. These blocks would only show when your document was based on that template. This system makes it easier to share blocks by sharing the attached template.
Troubleshooting
While the process of building blocks is pretty easy, there are some things that can create issues. All are easy to resolve.
Why can’t I see the Quick Parts button on my ribbon?
You probably have resized Word so portions of the ribbon collapsed. Word will shrink the group buttons and drop the labels. The fix is to widen Word until the button label reappears. The button is still there, but much smaller.

I created a building block, but I can’t find it.
If you’re sure you created the asset, it might be assigned to a custom template that your current document isn’t using. For example, you made a watermark and assigned it to webprop.dotx. However, the document you’re editing is based on another template, such as normal.dotm.
My building block isn’t behaving correctly. Why?
One reason for this is you changed the Gallery type. For example, when I changed my TA LOGO from the Watermark gallery to AutoText, it no longer behaved as a watermark. It reverted to an image. Change your block back to the original gallery type and see if that fixes the problem.
Быстрые детали – это удобная функция в Microsoft Word , которую можно использовать для создания фрагментов контента, включая автотекст и вставку их непосредственно в сообщения электронной почты Microsoft Outlook . Эта функция в основном предназначена для работы как с электронной почтой, так и с шаблонами Microsoft Office. Если вы обнаружите, что эта функция имеет огромное применение в вашей повседневной работе и хотите расширить ее функциональность до Outlook 2016, вот как вы можете это сделать.
Создание быстрых частей в Word и Outlook
Параметр «Быстрые детали» отображается на вкладке «Вставка» на ленте Word.

Чтобы использовать его для Microsoft Outlook, откройте приложение и создайте новое сообщение. Это самый простой способ для быстрого включения или создания Quick Parts для Outlook. Здесь вы добавляете несколько строк текста, которые хотите использовать в качестве шаблона. Как только это будет сделано, выполните следующие действия.
Выделите целые строки текста и перейдите на вкладку «Вставка».
Затем выберите «Быстрые детали» и выберите « Сохранить выбор в галерее быстрых деталей ».

После подтверждения действие откроет диалоговое окно Создать новый строительный блок , как показано на снимке экрана ниже.

Заполните все необходимые детали, и все готово!
Теперь, чтобы использовать то же самое и сэкономить время, силы и усилия при написании электронной почты в Microsoft Outlook, создайте новое сообщение электронной почты и поместите курсор туда, где вы хотите вставить «Быстрые детали», которые вы только что закончили создавать.
После этого перейдите на вкладку «Вставка» на ленте, нажмите «Быстрые детали», а затем выберите эскиз, соответствующий добавленной записи. Кроме того, вы можете искать ту же запись, введя инициалы записи.
Аналогичным образом, если вы хотите удалить запись из списка, выберите запись и нажмите «Удалить». Когда появится сообщение с предупреждением, проигнорируйте его и нажмите Да. Вы должны знать, что удаляемый вами строительный блок больше не будет доступен в галереях, но его содержание может все еще отображаться.
Надеюсь, вы найдете этот учебник полезным.
Для нескольких из прошлых итераций Word у Microsoft была функция автотекста, которая позволяет пользователям захватывать фрагмент текста и затем использовать его снова и снова в других частях своих документов или даже в других документах.
Microsoft добавила эту функцию, включив в нее то, что она называет, Quick Parts, которые по сути все еще являются автотекстами, но предлагают пользователям немного больше гибкости.
Чтобы увидеть, как автотекст работает с быстрыми частями, введите текст в тестовый документ; в этом примере будет использоваться адрес:
Затем выделите текст и нажмите Вставить вкладку на главной ленте, а затем нажмите на Быстрые Части значок:
Вы должны получить это выпадающее меню:
выбирать Сохранить выделение в галерее Quick Part, вы должны получить всплывающее окно, которое выглядит так:
В большинстве случаев вы можете использовать параметры по умолчанию, но если вы хотите изменить их в соответствии с вашими целями, нажмите на Хорошо кнопка.
Примечание. Имя быстрой детали, которую вы создаете, по умолчанию соответствует первой строке вашего текста.
Чтобы увидеть результаты своих усилий, перейдите к другой части документа, затем нажмите еще раз на Быстрые Части значок, вы должны увидеть захваченный текст в небольшом окне:
Нажав на Быстрые Части окно с вашим текстом вызывает вставку текста в документ в текущей позиции.
Однако есть еще более быстрый способ вставить текст быстрых деталей в документ; Переместитесь в пустое место и начните вводить тот же текст, который вы сохранили в качестве текста Quick Parts, вы должны получить небольшое всплывающее окно, показывающее, что Word распознает, что вы пытаетесь набрать текст Quick Parts.
В этом случае все, что вам нужно сделать, это нажать Войти Клавиша и Word заполнят оставшуюся часть Quick Parts для вас.
Примечание. Можно также ввести только пару первых символов текста быстрых деталей, а затем нажать клавишу F3, и Word вставит текст быстрых деталей, который он считает нужным.
Это быстрая часть быстрых частей, нажав всего один значок, вы сразу увидите захваченный текст и сможете вставить его всего одним щелчком мыши, или его вставят автоматически, когда он распознает то, что вы пытаетесь напечатать.
В Word все еще есть старая функция автотекста; чтобы использовать его, следуйте тому же пути, что вы сделали с Быстрые Части, только когда вы получите Создать новый строительный блок вместо всплывающего окна «Быстрые детали» в разделе «Галерея» выберите Авто текст:
Затем, чтобы использовать его, нажмите еще раз на Быстрые Части значок, а затем вместо выбора одного из текстовых полей для Быстрые Частищелкните вместо этого там, где написано Авто текст, вы должны увидеть выпадающее меню, которое выглядит примерно так:
Нажатие на то, где вы видите сохраненный текст, приводит к тому, что сохраненный текст вставляется в ваш документ так же, как Быстрые запчасти.
Два других варианта вставки из Быстрые Части меню Свойство документа а также поле:
Свойство документа позволяет вставлять текст с предопределенным заголовком в документ; чтобы увидеть, как это работает, нажмите на него, затем выберите один из доступных заголовков во всплывающем меню.
В этом примере мы выберем Компания, После выбора мы вставляем это в наш документ:
Нам нужно набрать название нашей компании, как только мы это сделаем, это выглядит так:
Затем, щелкнув где-нибудь еще в нашем документе, он будет выглядеть как обычный текст. Но в следующий раз, когда нам нужно будет ввести название нашей компании, мы можем вместо этого нажать на Быстрые Части значок, выберите Свойство документа, а потом Компания из выпадающего меню, и название компании будет вставлено в документ.
Другой вариант, Поле … используется для вставки предопределенных элементов Word в ваш документ; например, если вы хотите, чтобы текущее время было вставлено в ваш документ, вы должны нажать на Быстрые Части, тогда выбирай Поле … тогда выбирай Время из окна категории.
Текущее время будет вставлено в ваш документ.
Наконец, чтобы удалить текстовые записи Quick Parts, нажмите на Быстрые Части щелкните правой кнопкой мыши в окне, содержащем текст, который вы хотите удалить, затем щелкните там, где написано Организовать и удалить:
Затем нажмите на удалять Кнопка внизу всплывающего меню «Организовать и удалить».
Быстрые части и автотекст наиболее полезны, когда вы снова и снова набираете текст заново, особенно если это громоздкий набор текста, например длинные цифры или трудно произносимые названия или места.