
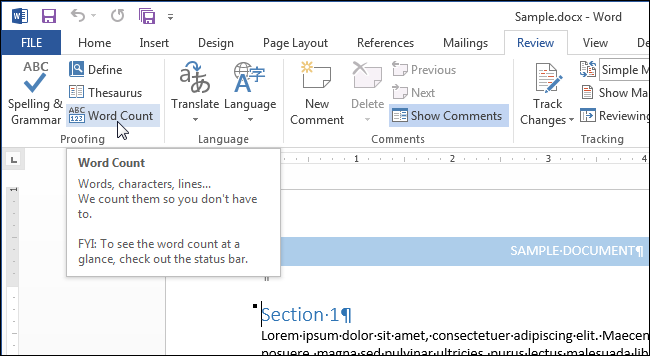
Show word count
Word counts the number of words in a document while you type. Word also counts pages, paragraphs, lines, and characters.

When you need to know how many words, pages, characters, paragraphs, or lines are in a document, check the status bar.

For a partial word count, select the words you want to count. The status bar shows the word count for that selection and for the entire document.
Tip: Find the number of characters, paragraphs, and lines by clicking on the word count in the status bar.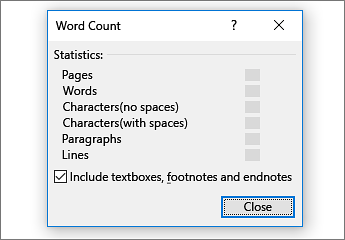
Count the number of characters, lines, and paragraphs
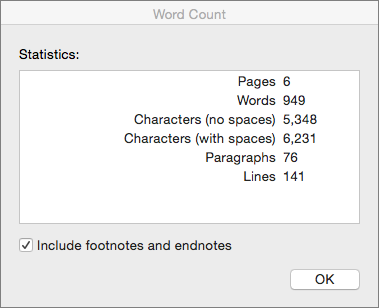
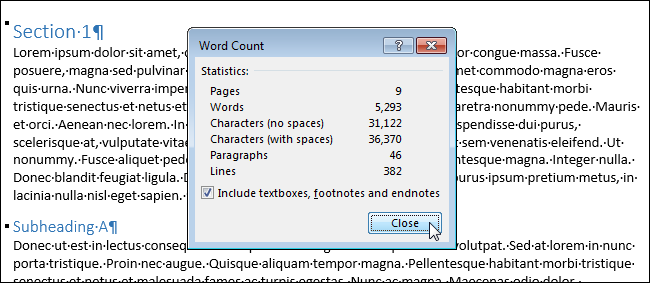
You can view the number of characters, lines, paragraphs, and other information in your Word for Mac, by clicking the word count in the status bar to open the Word Count box. Unless you have selected some text, Word counts all text in the document, as well as the characters, and displays them in the Word Count box as the Statistics.
Count the number of words in a part of a document
To count the number of words in only part of your document, select the text you want to count. Then on the Tools menu, click Word Count.
Just like the Word desktop program, Word for the web counts words while you type.
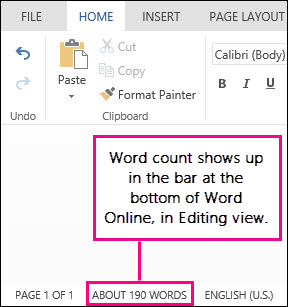
If you don’t see the word count at the bottom of the window, make sure you’re in Editing view (click Edit Document > Edit in Word for the web).
Click the word count to switch it off and on.

Maybe you noticed that Word for the web gives you an approximate word count. That’s because it doesn’t count words in areas like text boxes, headers, footers, and SmartArt graphics. If you need an exact count, click Open in Word, and look at the word count at the bottom of the Word document window.
Need more help?
Want more options?
Explore subscription benefits, browse training courses, learn how to secure your device, and more.
Communities help you ask and answer questions, give feedback, and hear from experts with rich knowledge.
In previous posts about word-count in Microsoft Word, we reviewed standard methods of counting words, characters, and lines in Microsoft Word, but what about page count?
If translators work with a lengthy document, it raises the issue of page count. To count pages manually is a bad idea, you know. So how do we deal with that?
Page count with the Microsoft Word statistics window.
You can access the word-count statistics pop-up window, where the Microsoft Word displays the number of pages. You can open it via the Review tab > Proofing > Word Count.
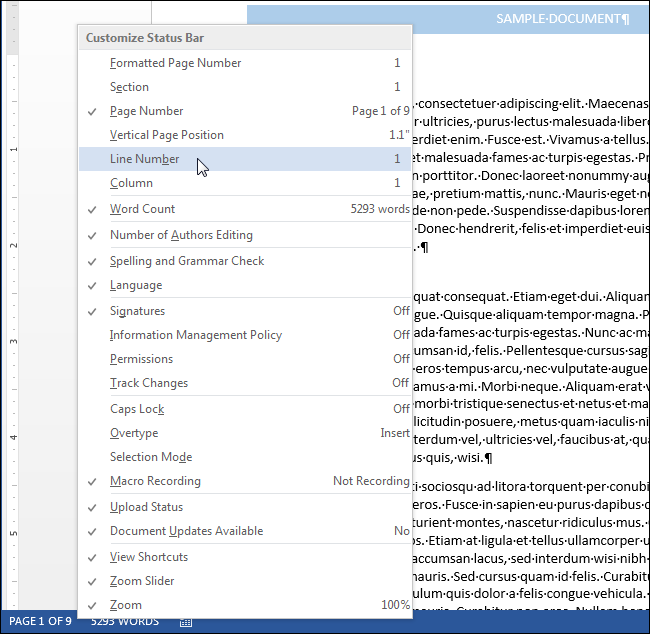
Count pages with the Status Bar.
On the status bar at the bottom of the Word window, you can find statistics on the number of pages, as well as the information about what page you are currently on.
If you don’t see your page statistics on the Status Bar, you should do the following:
- Right-click on the Status Bar
- After the “Customize Status Bar” shortcut menu appeared, activate the “Page Number” by ticking it.
- Page statistics should appear on the Status Bar.
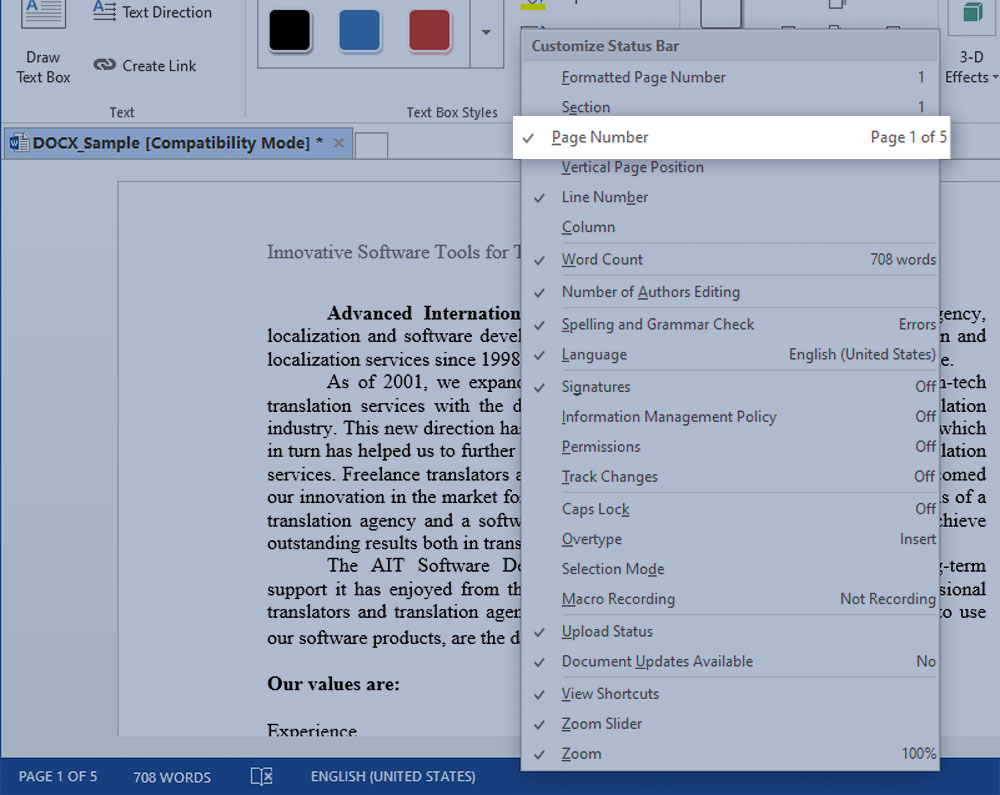
In case you need navigation between pages in your document, you can open the navigation pane by clicking the page number in the lower-left corner of the screen.

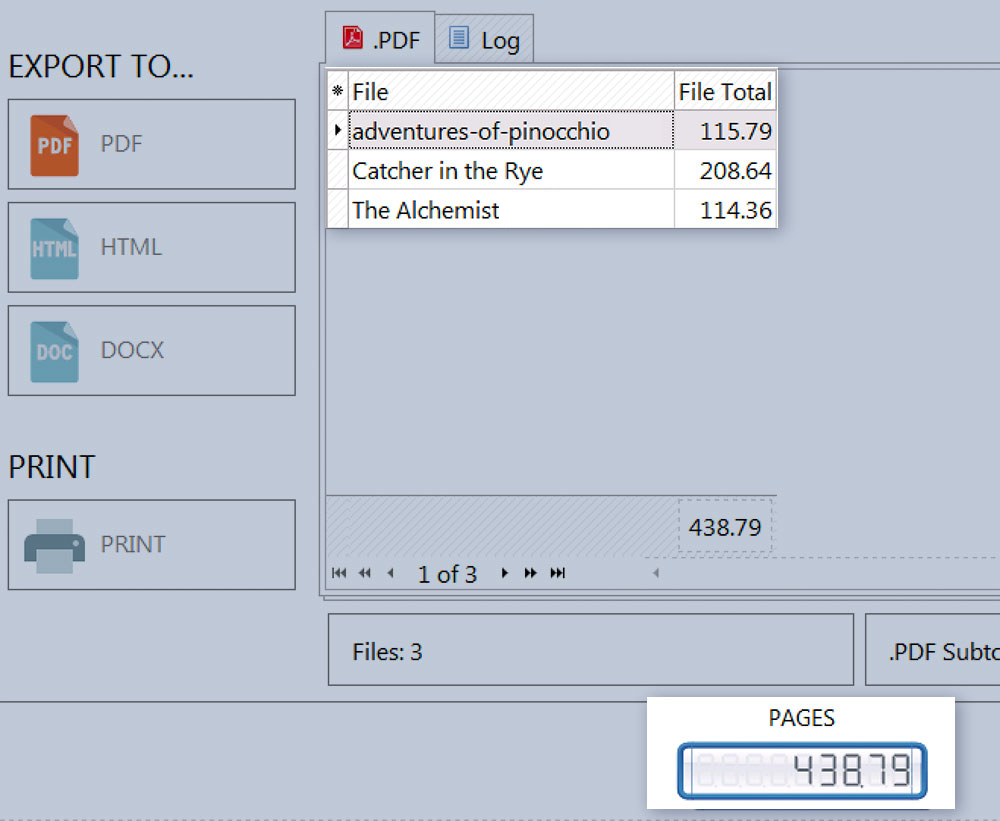
AnyCount handles page count better than any other word-count tool. Just select count units:
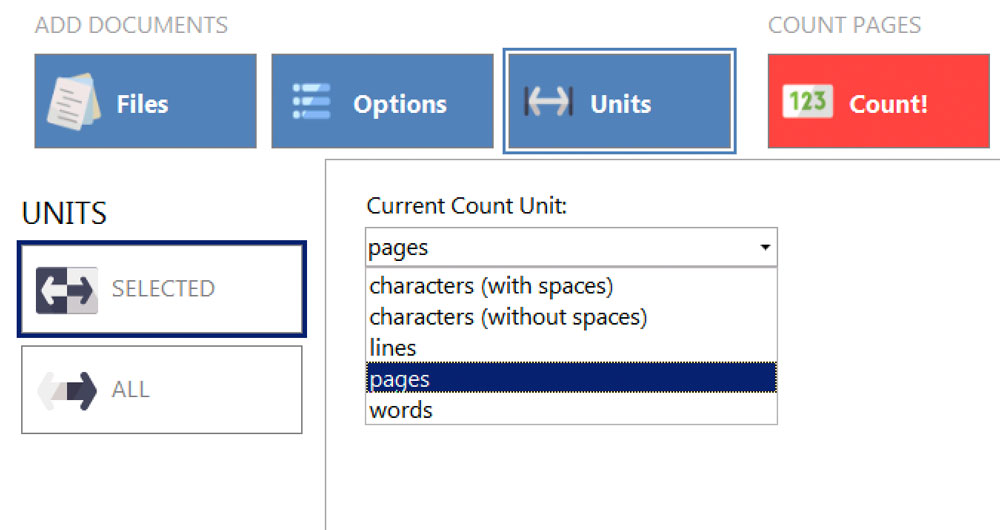
Click the “Count!” button and get results:
На чтение 2 мин Опубликовано 02.10.2015
В Word есть инструмент, который показывает простую статистику документа. Статистика содержит информацию о том, сколько страниц, слов, символов, абзацев и строк содержится в документе. Такая статистика полезна, если при создании документа необходимо ориентироваться на заданные параметры.
Чтобы увидеть статистику документа, откройте его и перейдите на вкладку Рецензирование (Review).
В разделе Правописание (Proofing) нажмите Статистика (Word Count).
Откроется диалоговое окно со статистикой, как показано на картинке в начале этой статьи. Кстати, количество страниц и слов в документе можно также увидеть в строке состояния в самом низу окна Word.
Замечание: Количество страниц отображается в строке состояния только в режимах Разметка страницы (Print Layout) или Черновик (Draft) – эти режимы включаются на вкладке Вид (View).

Если Вы не видите в строке состояния количество страниц и слов в документе, кликните по ней правой кнопкой мыши и в появившемся меню укажите элементы, которые желаете видеть. Кроме этого, Вы можете включить отображение номера строки, в которой в данный момент находится курсор.
Количество строк и страниц в документе может меняться – это зависит от нескольких факторов, таких как величина полей страницы, тип и размер шрифта, интервалы между абзацами и так далее. Например, если Вы уменьшаете размер шрифта, то число строк и страниц в документе также изменится. Разница в количестве строк и страниц может появиться даже из-за незначительных отличий в обработке шрифта разными драйверами печати.
Кроме этого, на количество строк, указанное в отчёте в диалоговом окне Статистика (Word Count), может повлиять скрытый текст. Если в параметрах Word отключена печать скрытого текста, то скрытый текст не будет учтён при подсчёте строк в документе. Если же Вы хотите, чтобы строки скрытого текста тоже были посчитаны, то печать скрытого текста в параметрах Word должна быть включена.
Оцените качество статьи. Нам важно ваше мнение:
I am making lots of changes to a Word document using automation, and then running a VBA macro which — among other things — checks that the document is no more than a certain number of pages.
I’m using ActiveDocument.Information(wdNumberOfPagesInDocument) to get the number of pages, but this method is returning an incorrect result. I think this is because Word has not yet updated the pagination of the document to reflect the changes that I’ve made.
ActiveDocument.ComputeStatistics(wdStatisticPages) also suffers from the same issue.
I’ve tried sticking in a call to ActiveDocument.Repaginate, but that makes no difference.
I did have some luck with adding a paragraph to the end of the document and then deleting it again — but that hack seems to no longer work (I’ve recently moved from Word 2003 to Word 2010).
Is there any way I can force Word to actually repaginate, and/or wait until the repagination is complete?
![]()
braX
11.5k5 gold badges20 silver badges33 bronze badges
asked Jun 3, 2013 at 10:03
![]()
Gary McGillGary McGill
26k25 gold badges117 silver badges200 bronze badges
17
I just spent a good 2 hours trying to solve this, and I have yet to see this answer on any forum so I thought I would share it.
https://msdn.microsoft.com/en-us/vba/word-vba/articles/pages-object-word?f=255&MSPPError=-2147217396
That gave me my solution combined with combing through the articles to find that most of the solutions people reference are not supported in the newest versions of Word. I don’t know what version it changed in, but my assumption is that 2013 and newer can use this code to count pages:
ActiveDocument.ActiveWindow.Panes(1).Pages.Count.
I believe the way this works is ActiveDocument selects the file, ActiveWindow confirms that the file to be used is in the current window (in case the file is open in multiple windows from the view tab), Panes determines that if there is multiple windows/split panes/any other nonsense you want the «first» one to be evaluated, pages.count designates the pages object to be evaluated by counting the number of items in the collection.
Anyone more knowledgeable feel free to correct me, but this is the first method that gave me the correct page count on any document I tried!
Also I apologize but I cant figure out how to format that line into a code block. If the mods want to edit my comment to do that be my guest.
![]()
Gary McGill
26k25 gold badges117 silver badges200 bronze badges
answered Jan 30, 2018 at 22:19
![]()
1
Try (maybe after ActiveDocument.Repaginate)
ActiveDocument.BuiltinDocumentProperties(wdPropertyPages)
It is causing my Word 2010 to spend half-second with «Counting words» status in status bar, while ActiveDocument.ComputeStatistics(wdStatisticPages) returns the result immediately.
Source: https://support.microsoft.com/en-us/kb/185509
answered Jul 15, 2015 at 8:41
![]()
alexkovelskyalexkovelsky
3,7911 gold badge27 silver badges21 bronze badges
5
After you’ve made all your changes, you can use OnTime to force a slight delay before reading the page statistics.
Application.OnTime When:=Now + TimeValue("00:00:02"), _
        Name:="UpdateStats"
I would also update all the fields before this OnTime statement:
ActiveDocument.Range.Fields.Update
answered Jun 15, 2013 at 11:19
![]()
Andy GAndy G
19.1k5 gold badges49 silver badges69 bronze badges
1
I found a possible workaround below, if not a real answer to the topic question.
Yesterday, the first ComputeStatistics line below was returning the correct total of 31 pages, but today it returns only 1.
The solution is to get rid of the Content object and the correct number of pages is returned.
Dim docMultiple As Document
Set docMultiple = ActiveDocument
lPageCount = docMultiple.Content.ComputeStatistics(wdStatisticPages)  ' Returns 1
lPageCount = docMultiple.ComputeStatistics(wdStatisticPages)  ' Returns correct count, 31
![]()
dwitvliet
7,0647 gold badges36 silver badges62 bronze badges
answered Jul 17, 2014 at 15:21
![]()
1
ActiveDocument.Range.Information(wdNumberOfPagesInDocument)
This works every time for me. It returns total physical pages in the word.
![]()
4b0
21.7k30 gold badges95 silver badges140 bronze badges
answered Oct 26, 2017 at 4:11
![]()
1
I used this from within Excel
it worked reliably on about 20 documents
none were longer than 20 pages but some were quite complex
with images and page breaks etc.
Sub GetlastPageFromInsideExcel()
Set wD = CreateObject("Word.Application")
Set myDoc = wD.Documents.Open("C:Tempmydocument.docx")
myDoc.Characters.Last.Select        ' move to end of document
wD.Selection.Collapse               ' collapse selection at end
lastPage = wD.Selection.Information(wdActiveEndPageNumber)
mydoc.close
wd.quit
Set wD = Nothing
End Sub
answered Mar 23, 2020 at 7:36
![]()
One problem I had in getting «ComputeStatistics» to return a correct page count was that I often work in «Web Layout» view in Word. Whenever you start Word it reverts to the last view mode used. If Word was left in «Web Layout» mode «ComputeStatistics» returned a page count of «1» page for all files processed by the script. Once I specifically set «Print Layout» view I got the correct page counts.
For example:
$MSWord.activewindow.view.type = 3    # 3 is 'wdPrintView', 6 is 'wdWebView'
$Pages = $mydoc.ComputeStatistics(2)  # 2 is 'wdStatisticPages'
answered Feb 17, 2022 at 1:48
![]()
You can use Pages-Object and its properties such as Count. It works perfect;)
Dim objPages As Pages
Set objPage = ActiveDocument.ActiveWindow.Panes(1).Pages
QuantityOfPages = ActiveDocument.ActiveWindow.Panes(1).Pages.Count
answered Sep 27, 2022 at 20:01
![]()
1
Dim wordapp As Object
Set wordapp = CreateObject("Word.Application")
Dim doc As Object
Set doc = wordapp.Documents.Open(oFile.Path)

Dim pagesCount As Integer
pagesCount = doc.Content.Information(4) 'wdNumberOfPagesInDocument
doc.Close False
Set doc = Nothing
answered May 30, 2019 at 5:42
![]()
soko8soko8
11 bronze badge
1

Word includes a tool that allows you to view simple statistics about your document. These statistics include how many pages, words, characters, paragraphs, and lines are in your document. This is useful if you have to follow certain guidelines when writing your document.
To view these statistics, open the document in question and click the “Review” tab.

In the “Proofing” section, click “Word Count”.
The “Word Count” dialog box displays, as shown in the image at the beginning of this document. The number of pages and words can also be viewed on the status bar at the bottom of the Word window.
NOTE: The number of pages is only visible on the status bar when you are viewing your document in “Print Layout” view or “Draft” view (using the “View” tab).
If you don’t see the number of pages and words on the status bar, right-click on the status bar and select the items you want to view from the popup menu. Note that you can also view the line number for the line where the cursor is currently located.
The number of lines and pages may vary, depending on several factors, such as the margins in your document, the font and font size, and paragraph spacing, to name a few. For example, if you change to a smaller font size, there will be fewer lines and pages in your document than there would be with a larger font size. Even different printer drivers can result in a slightly different rendering of a font, thereby changing the number of lines and pages in your document.
Hidden text can also affect the line count reported on the “Word Count” dialog box. If the option to print hidden text is turned of, Word doesn’t count hidden text in the line count. If you want hidden text included in the line count, make sure you configure Word to print hidden text.
READ NEXT
- › How to Count Characters in Microsoft Excel
- › How to Get Workbook Statistics in Microsoft Excel
- › How to Get a Paragraph Count for a Specific Paragraph Style in a Word Document
- › How to Count Characters in Word
- › How to Check the Word Count in Microsoft Word
- › Liquid Metal vs. Thermal Paste: Is Liquid Metal Better?
- › Microsoft Outlook Is Adding a Splash of Personalization
- › Why Your Phone Charging Cable Needs a USB Condom
How-To Geek is where you turn when you want experts to explain technology. Since we launched in 2006, our articles have been read billions of times. Want to know more?
View Word Count in Microsoft Word Documents
by Avantix Learning Team | Updated May 10, 2022
Applies to: Microsoft® Word® 2013, 2016, 2019, 2021 or 365 (Windows)
You can view word count in Word documents in several ways. Although word count is typically displayed in the Status Bar, you can view a Word Count dialog box which can be displayed using the Ribbon, the Status Bar or a keyboard shortcut. The Word counter will check a document for the number of characters, lines, paragraphs and pages. Word count and other statistics are also available in Word Properties.
The Word Count dialog box shows the number of pages, words, characters (with and without spaces), paragraphs and lines in your document. The dialog box displays counts for the current selection.
Recommended article: How to Quickly Remove Hard Returns in Word Documents
Do you want to learn more about Microsoft Word? Check out our virtual classroom or in-person Word courses >
To select the entire document, press Ctrl + A (although total count appears if you simply click in text). You can also triple-click in a paragraph or click at the beginning of a selection and Shift-click at the end of a selection. If you want to select non-adjacent or non-contiguous sections of text, press Ctrl and drag over areas of text. There are many other great ways to quickly select text in Word. Check out the article 14+ Word Selection Shortcuts to Quickly Select Text.
Note that screenshots in this article are from Word 365 but are very similar in Word 2013, 2016 and 2019.
The Word Count dialog box appears as follows (depending on the selection):

In the Word Count dialog box, you can turn a check box off or on to include text boxes, footnotes and endnotes in the word count. This is typically left unchecked. The number of lines in the Word Count dialog box represents the number of lines with characters, not the number of sentences. The number of lines in a document will be affected by formatting such as font size and indents.
Vword count in the Status Bar
When you select text, word count for the selected text should appear in the Status Bar on the bottom left of your screen automatically:
![]()
If no text is selected, the count shows the total for the entire document.
If you double-click the word count in the Status Bar, the Word Count dialog box appears.
Although word count typically displays by default in the Status Bar, you can choose options to display. If you right-click in the Status Bar, a pop-up menu appears. If Word Count has been deselected in this menu, it will not appear in the Status Bar.
Check word count using the Ribbon
To check word count using the Ribbon:
- Click the Review tab in the Ribbon.
- Click Word Count in the Proofing group. The Word Count dialog box appears.
- Click Close.
Word Count appears on the Review tab in the Ribbon:

Check word count using a keyboard shortcut
You can also display the Word Count dialog box by pressing Ctrl + Shift + G.
View word count in document statistics
Word, character, line, paragraph and page count can also be viewed in document statistics or Properties.
To view word count in document statistics or Properties:
- Open the Word file.
- Click the File tab in the Ribbon.
- Select Info.
- In the area on the right, under Properties, several statistics appear including word count.
- To view more information, click Properties. A drop-down menu appears.
- Select Advanced Properties. A dialog box appears.
- Click the Statistics tab to view statistics.
- Click OK.
When you click File and then Info, statistics appear on the right side of the dialog below Properties:

The statistics that appear in this area and in the Advanced Properties are for the entire document, not the selected text.
Subscribe to get more articles like this one
Did you find this article helpful? If you would like to receive new articles, JOIN our email list.
More resources
How to Hide Comments in Word (or Display Them)
How to Superscipt or Subscript in Word (with Shortcuts)
How to Insert or Type the Sigma Symbol in Word (Σ or σ)
How to Insert the Not Equal Sign in Word (5 Ways to Type or Insert ≠)
How to Insert a Check Mark in Word (5 Ways to Insert a Check or Tick Mark with Shortcuts)
Related courses
Microsoft Word: Intermediate / Advanced
Microsoft Excel: Intermediate / Advanced
Microsoft PowerPoint: Intermediate / Advanced
Microsoft Word: Long Documents Master Class
Microsoft Word: Styles, Templates and Tables of Contents
Microsoft Word: Designing Dynamic Word Documents Using Fields
VIEW MORE COURSES >
Our instructor-led courses are delivered in virtual classroom format or at our downtown Toronto location at 18 King Street East, Suite 1400, Toronto, Ontario, Canada (some in-person classroom courses may also be delivered at an alternate downtown Toronto location). Contact us at info@avantixlearning.ca if you’d like to arrange custom instructor-led virtual classroom or onsite training on a date that’s convenient for you.
Copyright 2023 Avantix® Learning
Microsoft, the Microsoft logo, Microsoft Office and related Microsoft applications and logos are registered trademarks of Microsoft Corporation in Canada, US and other countries. All other trademarks are the property of the registered owners.
Avantix Learning |18 King Street East, Suite 1400, Toronto, Ontario, Canada M5C 1C4 | Contact us at info@avantixlearning.ca
FREE TOOL
Word and Page Count Calculator
Choose your book type, genre, and audience for a word count and page number total.
Enter your details below to get your personalized word and page counts for your book!
Your Book Will Have
words
pages
*These results are based on industry standards. The total word and page count will vary from book to book and is dependent on your writing and overall book formatting*
Average Time to Write This Book: 60 days
Learn How to Write & Publish Your Book in 90 Days
![]()
Written by Allen Wyatt (last updated October 5, 2019)
This tip applies to Word 2007, 2010, 2013, 2016, 2019, and Word in Microsoft 365
Melissa has a document that begins with a title page. She wants the pages numbered beginning with 1, but that is actually the second page of the document. (The title page isn’t counted in the page count.) She got the page numbering to start correctly for her first page, but her footer now says, «Page 1 of 80,» «Page 2 of 80,» etc. It should only show 79 pages, again because of the title page. Melissa wonders how she can get the total page count, as shown in the footer, to be correct.
The type of page numbers that Melissa is working with are generally called «X of Y» page numbers. The X represents the current page numbers, while Y represents the total. You generally construct this type of page number in one of two ways. First, you can create your own page numbers in this way by using field codes. Assuming you already know how to add field codes to your document, the finished code would look something like this:
Page { PAGE } of { NUMPAGES }
Once collapsed, the first field code displays the current page number and the second displays the total number of pages in the document. This brings us to the second way to insert the «X of Y» page numbers—using the pre-defined page number formats in Word.
You insert these by using the Page Number tool, which can appear on various ribbon tabs. (Most notably it appears on the Insert tab of the ribbon, in the Header & Footer group, and if you are working within a header or footer, on the Design tab of the ribbon, in the Header & Footer group.) The choices presented by the Page Number tool include a Page X of Y group that provides different ways to insert the formatted page number. When you make one of these choices, the result is a field similar to the following:
Page { PAGE * Arabic * MERGEFORMAT } of { NUMPAGES * Arabic * MERGEFORMAT }
This field code looks much longer than the handcrafted one presented earlier, but it is essentially the same; it just has a few switches added for each of the field codes.
Melissa’s page layout most likely includes a section break between the title page and the first real page of the document. This assumption seems appropriate since Melissa indicated that she was able to basically suppress (hide) the page numbers on the title page and have the first real page start with page 1. The problem is that the field codes use the NUMPAGES field to get the desired «X of Y» type of page numbers. If your document has only two sections in it (one for the title page and the other for the rest of the document) you can simply change the NUMPAGES field to the SECTIONPAGES field. This field returns the total number of pages in the section (the main body of the document) instead of the total page count for the document. Your field code would, essentially, look like this:
Page { PAGE } of { SECTIONPAGES }
You can make the change by simply positioning the insertion pointer in the footer, next to the page numbers, and pressing Alt+F9. This displays all the field codes in the document instead of the field code results. Just make the change to the second field, replacing the letters «NUM» with «SECTION». Press Alt+F9 again, and your page numbering should be correct, showing Page 1 of 79.
This approach will not work, however, if you have more than the single section break in your document. In that case you’ll need to simply make a bit more complex change to the field codes used for the page number. Follow these steps:
- Position the insertion point just before the Y page number. At this point the field is probably highlighted automatically by Word.
- Delete the Y page number field.
- Press Ctrl+F9. Word inserts an empty set of field code braces.
- Type an equal sign and a space.
- Press Ctrl+F9 again. Word inserts another empty set of field code braces.
- Type NUMPAGES and a space.
- Position the insertion point just between the final two right braces.
- Type a minus sign and a 1. Your field code for the Y page number should now look very similar to this:
- Press Shift+F9 to collapse the fields.
{ = { NUMPAGES } - 1 }
This approach works because you are subtracting 1 (the length of the title page) from the total number of pages in the document. Thus, you end up with Page 1 of 79.
The two approaches discussed so far work great if you are going to be modifying the document and know that the length of your main body will change over time. If this assumption is not correct—if your document is static and it will never have less or more than 79 pages—then you can skip messing with the field code and simply type a static page count for the Y page number. (Just make sure you delete the field code for the Y page number first.)
WordTips is your source for cost-effective Microsoft Word training.
(Microsoft Word is the most popular word processing software in the world.)
This tip (5882) applies to Microsoft Word 2007, 2010, 2013, 2016, 2019, and Word in Microsoft 365.
Author Bio
With more than 50 non-fiction books and numerous magazine articles to his credit, Allen Wyatt is an internationally recognized author. He is president of Sharon Parq Associates, a computer and publishing services company. Learn more about Allen…
MORE FROM ALLEN
Using GEOMEAN with a Large List
When performing a statistical analysis on a large dataset, you may want to use GEOMEAN to figure out the geometric mean …
Discover More
Reducing Leading without Cutting Off Text
When decreasing the vertical spacing of lines in a paragraph, you might end up with a condition where parts of your …
Discover More
Printing Workbooks in a Folder
This tip presents two techniques you can use to print multiple workbooks all at the same time. Both techniques involve …
Discover More