
Finally after a long time, i create this add-in by using Windows hooks.
(Special thanks to @Reg Edit)
Here the entire code that i wrote and this work nice for me. (some optional section of code was removed.)
ThisAddIn.cs
using System;
using System.Collections.Generic;
using System.Linq;
using System.Text;
using System.Xml.Linq;
using Word = Microsoft.Office.Interop.Word;
using Office = Microsoft.Office.Core;
using Microsoft.Office.Tools.Word;
using System.Windows.Forms;

using System.Diagnostics;
using System.Runtime.InteropServices;
using System.Threading;

namespace PersianWords
{
    public partial class ThisAddIn
    {

        private const int WH_KEYBOARD_LL = 13;
        private const int WM_KEYDOWN = 0x0100;

        private static IntPtr hookId = IntPtr.Zero;
        private delegate IntPtr HookProcedure(int nCode, IntPtr wParam, IntPtr lParam);
        private static HookProcedure procedure = HookCallback;

        [DllImport("kernel32.dll", CharSet = CharSet.Auto, SetLastError = true)]
        private static extern IntPtr GetModuleHandle(string lpModuleName);

        [DllImport("user32.dll", SetLastError = true)]
        private static extern bool UnhookWindowsHookEx(IntPtr hhk);

        [DllImport("user32.dll", CharSet = CharSet.Auto, SetLastError = true)]
        private static extern IntPtr SetWindowsHookEx(int idHook, HookProcedure lpfn, IntPtr hMod, uint dwThreadId);

        [DllImport("user32.dll", CharSet = CharSet.Auto, SetLastError = true)]
        private static extern IntPtr CallNextHookEx(IntPtr hhk, int nCode, IntPtr wParam, IntPtr lParam);

        private static IntPtr SetHook(HookProcedure procedure)
        {
            using (Process process = Process.GetCurrentProcess())
            using (ProcessModule module = process.MainModule)
                return SetWindowsHookEx(WH_KEYBOARD_LL, procedure, GetModuleHandle(module.ModuleName), 0);
        }


        private static IntPtr HookCallback(int nCode, IntPtr wParam, IntPtr lParam)
        {

            if (nCode >= 0 && wParam == (IntPtr)WM_KEYDOWN)
            {
                int pointerCode = Marshal.ReadInt32(lParam);

                if (pointerCode == 162 || pointerCode == 160)
                {
                    return CallNextHookEx(hookId, nCode, wParam, lParam);
                }

                string pressedKey = ((Keys)pointerCode).ToString();

                //Do some sort of processing on key press
                var thread = new Thread(() =>
                {

                    MyClass.WrdApp.CustomizationContext = MyClass.WrdApp.ActiveDocument;

                    //do something with current document


                });
                thread.Start();
            }


            return CallNextHookEx(hookId, nCode, wParam, lParam);
        }


        private void ThisAddIn_Startup(object sender, System.EventArgs e)
        {
            hookId = SetHook(procedure);

            MyClass.WrdApp = Application;

            MyClass.WrdApp.CustomizationContext = MyClass.WrdApp.ActiveDocument;

        }


        private void ThisAddIn_Shutdown(object sender, System.EventArgs e)
        {
            UnhookWindowsHookEx(hookId);
        }

    #region VSTO generated code

    /// <summary>
    /// Required method for Designer support - do not modify
    /// the contents of this method with the code editor.
    /// </summary>
    private void InternalStartup()
    {
        this.Startup += new System.EventHandler(ThisAddIn_Startup);
        this.Shutdown += new System.EventHandler(ThisAddIn_Shutdown);


    }

    #endregion
    }
}

Word add-in development in Visual Studio: Application and base objects
Posted on Monday, July 8th, 2013 at 7:08 am by .
Microsoft Word has tons of objects and is a bit underrated when it comes to building Office solutions. My opinion is this is due to the attention Outlook and Excel receive… and rightfully so. But Word is just as powerful as its siblings, if not more so.
In this article (the first in a series of Word development topics), I’ll cover Microsoft Word application and base objects. And, as is our tradition, I’ll provide relevant code samples for Word 2013 – 2000 you can copy and paste into your solutions. You have my permission (otherwise it would be stealing).
- Word base objects
- Accessing base objects with code
- Useful events
Word’s base objects

- Application – The Word application itself. The mother ship… without her we don’t have Word.
- Document – A Word document… I know, almost needs no explanation.
- Selection – The currently selected content in a document. This one is tricky because it can also be the insertion point.
As you can see in the diagram to the right (which I lifted straight off MSDN), everything else resides beneath these three guys.
Today, we will focus on these three and save all the other hangers-on for another day.
Accessing base objects with code
Learning to work with the base objects is the 20% that empowers you to do 80% of what’s needed to make things happen. I’m going to do this in alphabetical order today. Let’s get to the code samples.
The Application object
This sample shows how to change some Word application-level settings. Add-in Express provides the WordApp within our AddinModule for easy access to the Word application.
Public Sub SetMyWordApplicationPreferences()
    WordApp.DisplayRecentFiles = True
    WordApp.RecentFiles.Maximum = 1
    WordApp.DisplayScreenTips = False
    WordApp.DisplayScrollBars = True
    WordApp.DisplayAlerts = Word.WdAlertLevel.wdAlertsNone
    WordApp.WindowState = Word.WdWindowState.wdWindowStateMaximize
    WordApp.ActiveWindow.View.ReadingLayout = False
End Sub
This routine clears Word just a little bit of distractions and prepares the serious writer for some serious writing. It reduces the recent files list to a single file, turns off screen tips and alerts. It also maximizes the Word window and turns off the reading layout. Ahh… now I’m ready to… ready to do some serious writing.
The Document object
Microsoft Word exists for users to author documents. It stands to reason, therefore, that the majority of the samples today are document focused.
Enumerate documents
Word has a documents collection that provides access to all open documents. Using the documents collection, you can do what you want with them (assuming the API supports it that is).
Public Sub EnumerateDocumentsAndCloseWithoutSaving()
    Dim docs As Word.Documents = Nothing
    docs = WordApp.Documents

    For i As Integer = docs.Count To 1 Step -1
        docs(i).Close(Word.WdSaveOptions.wdDoNotSaveChanges)
    Next

    Marshal.ReleaseComObject(docs)

End Sub
Here, I wanted to close all the documents and not save them.
Create a new Word document
To create a new word document, you need to add a new document to the Documents collection.
Public Sub CreateNewDocument(docName As String)
    Dim newDoc As Word.Document = Nothing
    newDoc = WordApp.Documents.Add()
    newDoc.SaveAs2(docName)

    Marshal.ReleaseComObject(newDoc)
End Sub
In the above sample, I go the extra trouble of saving the document using the passed docName.
Create a new document from a template
To create new document based on a template, you do the same thing as we just did except you provide the path to the document template.
Public Sub CreateNewDocumentFromTemplate(templatePath As String)
    Dim newDoc As Word.Document = Nothing
    newDoc = WordApp.Documents.Add(templatePath)

    Marshal.ReleaseComObject(newDoc)
End Sub
It’s easy but your users will believe it to be magic. And it is.
Open an existing document
To open a document you can call the Open method of the Documents collection and specify the path to the file you want to open.
Public Sub OpenDocument(docPath As String)
    Dim doc As Word.Document = Nothing
    doc = WordApp.Documents.Open(docPath)
     'or
    'doc = WordApp.Documents.Add(docPath)

    Marshal.ReleaseComObject(doc)
End Sub
You can also just add it to the documents collection.
The Selection object
There is always a selection in Word. Either there is selected content or there is an insertion point (meaning, no content is selected and we are ready to add content. This object provides quick access to the content that is the current focus of the user’s attention.
Private Sub ChangeSelectionFontAndCountWords()
    Dim selection As Word.Selection = Nothing

    selection = WordApp.Selection
    selection.Font.Name = "Arial"
    selection.Font.Size = 16
    MessageBox.Show( _
        selection.Words.Count, "Selection Word Count", _
        MessageBoxButtons.OK, MessageBoxIcon.Information)

    Marshal.ReleaseComObject(selection)
End Sub
This method changes the font and size of the text in the Selection object. It then displays the Word count in a message box.
Useful events
Working with the base objects and bending them to your will is one thing. Responding to events when they try to sneak away is another. When you combine the two, well, you are close to building some useful solutions.
NewDocument event
Don’t let the name of this event fool you. This event is a Word application event that executes when Microsoft Word creates a new document. It is the place for any setup logic you want to execute against a new document.
Private Sub adxWordEvents_NewDocument(sender As Object, hostObj As Object) _
    Handles adxWordEvents.NewDocument

    Dim doc As Word.Document = Nothing
    doc = TryCast(hostObj, Word.Document)
    doc.BuiltInDocumentProperties("Author") = "Me"
End Sub
This hostObj is the newly created document. By casting to a Document, I then access the built-in properties and set the Author property.
DocumentOpen event
I really like to see the Navigation Pane when I work with documents. If it is not visible, I immediately click the View tab and enable it. But that’s silly. Why not have some code to do it for me?
Private Sub adxWordEvents_DocumentOpen(sender As Object, hostObj As Object) _
    Handles adxWordEvents.DocumentOpen

    WordApp.ActiveWindow.DocumentMap = True
End Sub
This DocumentOpen event executes anytime Word opens a document. Thus, it is the event to respond to and automatically display the navigation pane (aka the DocumentMap)
DocumentBeforePrint event
Does anyone besides accountants and lawyers print documents these days? Heck, anytime I think about printing a document I receive, I feel guilty because lots of people have email signatures that include the phrase “Think before you print.” The DocumentBeforePrint is a good event for doing some last minute checking with the user as it executes right before sending the document to the printer.
Private Sub adxWordEvents_DocumentBeforePrint(sender As Object, _
    e As ADXHostBeforeActionEventArgs) _
    Handles adxWordEvents.DocumentBeforePrint

    'At least think about being green before printing
    If MessageBox.Show( _
        "Do you really want to print the document and contribute to the killing of a few _
         trees?", "Think Before You Print", MessageBoxButtons.YesNo) = DialogResult.No Then
        e.Cancel = True
    End If
End Sub
If the user clicks No, the method sets Cancel=True to cancel the print job. Otherwise, the print continues and a few trees are killed. Oh well, they’ll grow back I suppose. Another good use of this event is to automatically route print jobs to different printers depending on the logic of your choosing.
DocumentBeforeClose event
This event executes right before Word closes the document. It’s a good event for cleaning up the document.
Private Sub adxWordEvents_DocumentBeforeClose(sender As Object, _
    e As ADXHostBeforeActionEventArgs) Handles adxWordEvents.DocumentBeforeClose

    Dim doc As Word.Document = Nothing
    doc = TryCast(e.HostObject, Word.Document)

    If doc.Comments.Count > 1 Then
        If MessageBox.Show( _
            "This documents contains comments, do you really want to close it?", _
            "Respond to Comments?", MessageBoxButtons.YesNo) = DialogResult.No Then
            e.Cancel = True
        End If
    End If
End Sub
In this example, I reference the HostObject of the passed ADXHostBeforeActionEventArgs object. I do it because HostObject is the document that’s closing. After I recast it as a Document, I check for comments and alert the user to them and give them a chance to reconsider.
Application.Quit event
The Quit event is the place for doing some clean-up.
Private Sub adxWordEvents_Quit(sender As Object, e As EventArgs) _
    Handles adxWordEvents.Quit

    'Clear the recent docs list
    While WordApp.RecentFiles.Count > 0
        WordApp.RecentFiles.Item(1).Delete()
    End While
 End Sub
Continuing my theme of removing distractions, this sample removes all recent files. The NSA can’t track this! Notice that I do not up the count in the loop and always access WordApp.RecentFiles.Item(1). The reason is that each Delete action lowers the count in the RecentFiles collection. Thus, by calling Item(1) each time, I can safely delete each item.
***
Okay, there you go… that’s Word Application and Base Objects 101. This is enough information and samples to get you started. But, it’s also enough to make you thirst for more. You will not thirst for long as we have a whole series of Beginning Word Development topics set for this month.
Available downloads:
This sample Outlook add-in was developed using Add-in Express for Office and .net:
VB.NET sample Word add-in
You may also be interested in:
- Creating add-ins for Microsoft Word and Excel(C#, VB.NET)
- Sample Word addin (C#, VB.NET) with source code
Word add-in development in Visual Studio for beginners:
- Part 2: Customizing Word UI – What is and isn’t customizable
- Part 3: Customizing Word main menu, context menus and Backstage view
- Part 4: Creating custom Word ribbons and toolbars
- Part 5: Building custom task panes for Word 2013 – 2003
- Part 6: Working with Word document content objects
- Part 7: Working with Word document designs, styles and printing
- Part 8: Working with multiple Microsoft Word documents
- Part 9: Using custom XML parts in Word add-ins
- Part 10: Working with Word document properties, bookmarks, content controls and quick parts
- Part 11: Populating Word documents with data from external sources
- Part 12: Working with Microsoft Word templates
Understanding the events in the Word object model is critical because this is often the primary way that your code is run. This chapter covers all the events in the Word object model, when they are raised, and the type of code you might associate with these events.
Some of the events in the Word object model are repeated on the Application and Document objects. This repetition allows you to decide whether you want to handle the event for all documents or for a particular document. For example, if you want to know when any document is closed, you would handle the Application object’s DocumentBeforeClose event. If you want to know when a particular document is closed, you would handle the Close event on a particular Document object. When an event is repeated on the Application and Document object, it is raised first on the Document object and then the Application object.
Why Are There Multiple Application and Document Event Interfaces?
When you work with the Word Object model, you will quickly notice multiple public interfaces, classes, and delegates that contain the text «ApplicationEvents» and «DocumentEvents»:
- ApplicationEvents Interface
- ApplicationEvents_Event Interface
- ApplicationEvents_SinkHelper class
- ApplicationEvents2 Interface
- ApplicationsEvents2_Event Interface
- ApplicationEvents2_* Delegates
- ApplicationEvents2_SinkHelper class
- ApplicationEvents3 Interface
- ApplicationsEvents3_Event Interface
- ApplicationEvents3_* Delegates
- ApplicationEvents3_SinkHelper class
- ApplicationEvents4 Interface
- ApplicationsEvents4_Event Interface
- ApplicationEvents4_* Delegates
- ApplicationEvents4_SinkHelper class
- DocumentEvents Interface
- DocumentEvents_Event Interface
- DocumentEvents_* Delegates
- DocumentEvents_SinkHelper class
- DocumentEvents2 Interface
- DocumentEvents2_Event Interface
- DocumentEvents2_* Delegates
- DocumentEvents2_SinkHelper class
The only items from this list that you should ever use in your code are the ones in bold: ApplicationEvents4_Event interface, the ApplicationEvents4_* delegates, the DocumentEvents2_Event interface, and the DocumentEvents2_* delegates. You should only use the ApplicationEvents4_Event interface and the DocumentEvents2_Event interface when you have to cast an object declared as Application or Document to the corresponding event interface because a method name and event name collide. An example of this is the Document object that has both a Close method and a Close event. To disambiguate between the two, you will have to cast the Document object to the DocumentEvents2_Event interface when you want to handle the Close event.
The reason for the other items in this list is partially explained in Chapter 1, «An Introduction to Office Programming.» However, this explanation only covers the existence of the SinkHelper class and why there is both an ApplicationEvents/DocumentEvents interface and an ApplicationEvents_Event/DocumentEvents_Event interface. The reason there are multiple numbered event interfaces goes back to the original COM implementation of the Word object model.
The Word Application and Document COM objects are defined by the IDL definition shown in Listing 7-1. Note that the Application object has four event interfaces, and Document has two. ApplicationEvents4 is the default event interface for Word’s Application object, and DocumentEvents2 is the default event interface for Word’s Document object. ApplicationEvents, ApplicationEvents2, ApplicationEvents3, and DocumentEvents are supported for legacy purposes. Word had to keep these older interfaces in place for backward-compatibility reasons because older versions of Word used these interfaces.
Listing 7-1. The IDL Definition of Word’s Application and Document Objects
[
 uuid(000209FF-0000-0000-C000-000000000046),
]
coclass Application {
 [default] interface _Application;
 [source] dispinterface ApplicationEvents;
 [source] dispinterface ApplicationEvents2;
 [source] dispinterface ApplicationEvents3;
 [default, source] dispinterface ApplicationEvents4;
};

[
 uuid(00020906-0000-0000-C000-000000000046),
]
coclass Document {
 [default] interface _Document;
 [source] dispinterface DocumentEvents;
 [default, source] dispinterface DocumentEvents2;
};
Visual Studio Generation of Event Handlers
As you consider the code in some of the listings in this chapter, you might wonder how you will ever remember the syntax of complicated lines of code such as this one:
application.DocumentBeforeClose +=
 new Word.ApplicationEvents4_DocumentBeforeCloseEventHandler(
 app_DocumentBeforeClose);
Fortunately, Visual Studio helps by generating most of this line of code as well as the corresponding event handler automatically. If you were typing this line of code, after you type +=, Visual Studio displays a pop-up tooltip, as shown in Figure 7-1. If you press the Tab key twice, Visual Studio generates the rest of the line of code and the event handler method (app_DocumentBeforeClose) automatically.
Figure 7-1. Visual Studio generates event handler code for you if you press the Tab key.

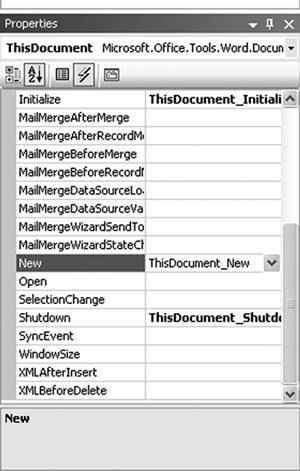
If you are using Visual Studio Tools for Office (VSTO), you can also use the Properties window to add event handlers to your document class. Double-click the project item for your document class. Make sure the Properties window is visible. If it is not, choose Properties Window from the View menu to show the Properties window. Make sure that the document class (typically called ThisDocument) is selected in the combo box at the top of the Properties window. Then click the lightning bolt icon to show events associated with the document. Type the name of the method you want to use as an event handler in the edit box to the right of the event you want to handle.
Figure 7-2 shows the Properties window and an event handler we have added by typing the text «ThisDocument_New» in the edit box next to the New event. This will cause the New event to be handled by a method called ThisDocument_New in the document class. If the method does not already exist, Visual Studio will add the method for you.
Figure 7-2. Adding a Document event handler using the Property window in VSTO.
Startup and Shutdown Events
Several events are raised when the application is started and shut down. The Word Application object has a Startup event that is raised when the application is started up before any documents are loaded. However, this event is marked as «restricted» in the COM object model and probably should not be used at all. The only kind of customization that can handle this event is an add-in. The event is raised before documents are loaded and before an automation executable can establish an event handler. Even add-ins do not need to use this event because they already implement OnConnection, which serves the same purpose. Our recommendation is not to use the Application object’s Startup event.
For VSTO customizations, we recommend that you use the Startup and Shutdown events raised by VSTO on a document project item. Startup is raised when the document is opened or created from a template. Shutdown is raised when the document is closed. In the project item created for you by VSTO, these events are already connected for you, as shown in Listing 7-2. The InternalStartup method shown in Listing 7-2 is used by VSTO to connect the Startup and Shutdown event handlers as well as other events you might add using VSTO.
Listing 7-2. A VSTO Customization That Handles the Startup and Shutdown Events
public partial class ThisDocument
{
 private void ThisDocument_Startup(object sender, EventArgs e)
 {
 }

 private void ThisDocument_Shutdown(object sender, EventArgs e)
 {
 }

 private void InternalStartup()
 {
 this.Startup += new System.EventHandler(ThisDocument_Startup);
 this.Shutdown += new System.EventHandler(ThisDocument_Shutdown);
 }
}
Word raises the Quit event when the application shuts down. Listing 7-3 shows an example of handling the Quit event. Quit is the name of both a method and an event on Word’s Application object. Because of this collision, you will not see the Quit event in Visual Studio’s pop-up menu of properties, events, and methods associated with the Application object. Furthermore, a warning displays at compile time when you try to handle this event. To get Visual Studio’s pop-up menus to work and the warning to go away, you can cast the Application object to the ApplicationEvents4_Event interface, as shown in Listing 7-3.
Listing 7-3. A VSTO Customization That Handles the Quit Event
public partial class ThisDocument
{
 Word.Application app;

 private void ThisDocument_Startup(object sender, EventArgs e)
 {
 app = this.Application;
 ((Word.ApplicationEvents4_Event)app).Quit +=
 new Word.ApplicationEvents4_QuitEventHandler(
 App_Quit);
 }

 void App_Quit()
 {
 MessageBox.Show("Quit Event Raised");
 }

 private void InternalStartup()
 {
 this.Startup += new System.EventHandler(ThisDocument_Startup);
 }
}
New and Open Document Events
Word raises a NewDocument event on the Application object and a New event on a Document object when a new document is first created by the user either as a blank document or from a template or existing document. These events are never raised again on subsequent opens of the document. Word also raises a DocumentOpen event on the Application object and an Open event on a Document object when an existing document is opened:
- Application.NewDocument is raised whenever a document is created. Word passes the Document that was created as a parameter to this event.
- Document.New is raised on a template or a new blank document. So for example, when a document is first created from a template, you can handle the New event to set up the document for the first time. For subsequent opens of the document, you can handle the Open event or the Startup event raised by VSTO.
- Application.DocumentOpen is raised whenever an existing document is opened. Word passes the Document that was opened as a parameter to this event.
- Document.Open is raised on an existing document when it is opened.
Listing 7-4 shows a VSTO customization that handles the Application object’s NewDocument event and puts into the footer of every new document created in Word the date the document was created and the name of the user who created the document. It also handles the Application object’s DocumentOpen event to put into the header of an existing document that is opened the date the document was opened and the name of the user who opened the document.
Listing 7-4. A VSTO Customization That Handles the Application Object’s NewDocument and DocumentOpen Events
public partial class ThisDocument
{
 Word.Application app;

 private void ThisDocument_Startup(object sender, EventArgs e)
 {
 app = this.Application;

 ((Word.ApplicationEvents4_Event)app).NewDocument +=
 new Word.ApplicationEvents4_NewDocumentEventHandler(
 App_NewDocument);

 app.DocumentOpen +=
 new Word.ApplicationEvents4_DocumentOpenEventHandler(
 App_DocumentOpen);
 }

 void App_NewDocument(Word.Document document)
 {
 MessageBox.Show(String.Format(
 "NewDocument event on {0}", document.Name));

 Word.Range range = document.Sections[1].Footers[
 Word.WdHeaderFooterIndex.wdHeaderFooterPrimary].Range;

 range.Text = String.Format("Created on {0} by {1}.",
 System.DateTime.Now, app.UserName);
 }

 void App_DocumentOpen(Word.Document document)
 {
 MessageBox.Show(String.Format(
 "NewDocument event on {0}", document.Name));

 Word.Range range = document.Sections[1].Headers[
 Word.WdHeaderFooterIndex.wdHeaderFooterPrimary].Range;

 range.Text = String.Format("Last opened on {0} by {1}.",
 System.DateTime.Now, app.UserName);
 }

 private void InternalStartup()
 {
 this.Startup += new System.EventHandler(ThisDocument_Startup);
 }
}
Listing 7-5 shows VSTO code behind a template that handles the Document object’s New event to display the time in the footer when the document is first created from a template. It also handles the Document object’s Open event to put into the header the date and user who last opened the document each time the document is opened.
To understand this listing, it is important to understand how Word templates work in VSTO. You should only write handlers for the Document object’s New event in a template project. When a user creates a new document from that template, the code associated with the template will be associated with the newly created document, and the New event will be raised on the newly created document.
Listing 7-5. A VSTO Customization That Handles the Document Object’s New and Open Events
public partial class ThisDocument
{
 private void ThisDocument_New()
 {
 MessageBox.Show("New event");
 Word.Range range = this.Sections[1].Footers[
 Word.WdHeaderFooterIndex.wdHeaderFooterPrimary].Range;

 range.Text = String.Format("Created on {0} by {1}.",
 System.DateTime.Now, this.Application.UserName);
 }

 private void ThisDocument_Open()
 {
 MessageBox.Show("Open event");
 Word.Range range = this.Sections[1].Headers[
 Word.WdHeaderFooterIndex.wdHeaderFooterPrimary].Range;

 range.Text = String.Format("Opened on {0} by {1}.",
 System.DateTime.Now, this.Application.UserName);
 }

 private void InternalStartup()
 {
 this.New += new Word.DocumentEvents2_NewEventHandler(
 this.ThisDocument_New);
 this.Open += new Word.DocumentEvents2_OpenEventHandler(
 this.ThisDocument_Open);
 }
}
Document Close Events
Word raises events when a document is closed. The DocumentBeforeClose event is raised on the Application object before the document closes, which allows the handler to cancel the closing of the document. The Close event raised on the Document object does not allow canceling the closing of the document.
Unfortunately, the Close event is raised even in cases where the document is not really going to close. The event is raised before a dialog is shown to the user prompting the user to save the document. Users are asked whether they want to save with a Yes, No, and Cancel button. If the user selects Cancel, the document remains open even though a Close event was raised. It is also possible for another add-in to handle the DocumentBeforeClose event and cancel the close of the document. For this reason, it is better to use VSTO’s Shutdown event on the document, which is not raised until after the user and any handlers of the DocumentBeforeClose event have been given a chance to cancel the closing of the document.
- Application.DocumentBeforeClose is raised before a document is closed. Word passes the Document that is about to close as a parameter to this event. It also passes by reference a bool cancel parameter. The cancel parameter can be set to true by your event handler to prevent Word from closing the document.
- Document.Close is raised when a document is about to be closed. However, as discussed earlier, the user can still cancel the closing of the document, so you cannot trust this event to tell you whether the document is going to close. Use VSTO’s Shutdown event instead.
Close is the name of both a method and an event on the Document object. Because of this collision, you will not see the Close event in Visual Studio’s pop-up menu of properties, events, and methods associated with the Document object. Furthermore, a warning displays at compile time when you try to handle this event. To get Visual Studio’s pop-up menus to work and the warning to go away, you can cast the Document object to the DocumentEvents2_Event interface, as shown in Listing 7-6.
Listing 7-6 shows a VSTO customization that handles the Application object’s DocumentBeforeClose event and the Document object’s Close event. In the handler of the DocumentBeforeClose event, the code checks to see if the document contains any spelling errors. If it does, a dialog displays with the number of spelling errors, and the user is told to correct them before closing the document. The cancel parameter is set to TRue to prevent the document from closing. Another thing to try when running this code is to press the Cancel button when you are prompted to save and observe that the Document object’s Close event fires in this case.
Listing 7-6. A VSTO Customization That Handles the Application Object’s DocumentBeforeClose Event and the Document Object’s Close Event
public partial class ThisDocument
{
 Word.Application app;
 Word.Document doc;

 void ThisDocument_Startup(object sender, EventArgs e)
 {
 app = this.Application;
 doc = app.Documents.Add(ref missing, ref missing,
 ref missing, ref missing);

 doc.Range(ref missing, ref missing).Text =
 "Lawts uf spellin errers!";

 app.DocumentBeforeClose += new
 Word.ApplicationEvents4_DocumentBeforeCloseEventHandler(
 App_DocumentBeforeClose);

 ((Word.DocumentEvents2_Event)doc).Close += new
 Word.DocumentEvents2_CloseEventHandler(
 Doc_Close);
 }

 void Doc_Close()
 {
 MessageBox.Show("Thanks for fixing the spelling errors.");
 }

 void App_DocumentBeforeClose(Word.Document document,
 ref bool cancel)
 {
 int spellingErrors = document.SpellingErrors.Count;
 if (spellingErrors > 0)
 {
 MessageBox.Show(String.Format(
 "There are still {0} spelling errors in this document.",
 spellingErrors));
 cancel = true;
 }
 }

 private void InternalStartup()
 {
 this.Startup += new EventHandler(ThisDocument_Startup);
 }
}
Document Save Events
Word raises the DocumentBeforeSave event on the Application object before any document is saved. Word passes the Document that is about to be saved as a parameter to this event. It also passes by reference a bool saveAsUI parameter and a bool cancel parameter. If you set saveAsUI to true, the Save As dialog displays for the document. If you set the cancel parameter to TRue, the save will be canceled. Often this event is handled to implement a custom save routinefor example, you might cancel the DocumentBeforeSave event but call the SaveAs method on Document to enforce a particular file format.
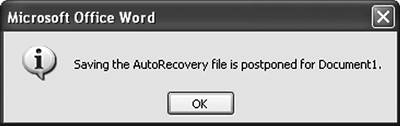
Note that the DocumentBeforeSave event is also raised when Word does an AutoSave on a document. You should be careful that you test your code to make sure that it works properly when AutoSave is triggered.
Listing 7-7 shows a VSTO customization that handles the DocumentBeforeSave event. If the document contains any spelling errors, it cancels the save by setting the cancel parameter to true. It also sets the saveAsUI parameter to TRue to force a Save As dialog to be shown for every save. When the DocumentBeforeSave event is triggered for an AutoSave, the dialog shown in Figure 7-3 displays.
Listing 7-7. A VSTO Customization That Handles the Application Object’s DocumentBeforeSave Event
public partial class ThisDocument
{
 Word.Application app;

 void ThisDocument_Startup(object sender, EventArgs e)
 {
 app = this.Application;

 app.DocumentBeforeSave += new Word.
 ApplicationEvents4_DocumentBeforeSaveEventHandler(
 App_DocumentBeforeSave);
 }

 void App_DocumentBeforeSave(Word.Document document,
 ref bool saveAsUI, ref bool cancel)
 {
 saveAsUI = true;

 if (document.SpellingErrors.Count > 0)
 {
 MessageBox.Show(
 "You shouldn't save a document with spelling errors.");
 cancel = true;
 }
 }

 private void InternalStartup()
 {
 this.Startup += new EventHandler(ThisDocument_Startup);
 }
}
Figure 7-3. The message displayed by Word when an automatic save is cancelled.
Document Activation Events
Word raises several events on the Application object when the active document changes. One such event is the DocumentChange event. The name DocumentChange makes you think that maybe this event would tell you when the contents of the document changeunfortunately, Word does not have a general event that tells you this.
The active document changes when you create a new documentthe new document becomes the active document. The active document changes when you open an existing documentthe document you opened becomes the active document. The active document changes when you switch between open documents by clicking a document that is not currently active or selecting a document using the Window menu or the Windows taskbar.
It is also possible to have multiple windows viewing the same documentfor example, because the user chose New Window from the Window menu. Word raises an event called WindowActivate that tells you when a particular window becomes the active window and an event called WindowDeactivate when a particular window is deactivated. Unlike Excel, switching to another application causes Word’s WindowDeactivate event to be raised, and switching back to Word causes the WindowActivate event to be raised.
- Application.DocumentChange is raised when the active document changes (not when the contents of the document change). Word passes no parameters to this event. To determine the new active document, you must use the Application object’s ActiveDocument property.
- Application.WindowActivate is raised when a Word window is activated. This can occur when the user switches between windows within Word or when the user switches to another application and then switches back to Word. Word passes the Document associated with the window that was activated as a parameter to this event. Word also passes the Window that was activated as a parameter to this event.
- Application.WindowDeactivate is raised when a Word window is deactivated. This can occur when the user switches between windows within Word or when the user switches to another application. Word passes the Document associated with the window that was deactivated as a parameter to this event. Word also passes the Window that was deactivated as a parameter to this event.
Listing 7-8 shows a VSTO customization that handles the DocumentChange, WindowActivate, and WindowDeactivate events and displays a message box when these events are raised.
Listing 7-8. A VSTO Customization That Handles the Application Object’s WindowActivate, WindowDeactivate, and DocumentChange Events
public partial class ThisDocument
{
 Word.Application app;

 void ThisDocument_Startup(object sender, EventArgs e)
 {
 app = this.Application;

 app.WindowActivate += new Word.
 ApplicationEvents4_WindowActivateEventHandler(
 App_WindowActivate);

 app.WindowDeactivate += new Word.
 ApplicationEvents4_WindowDeactivateEventHandler(
 App_WindowDeactivate);

 app.DocumentChange += new Word.
 ApplicationEvents4_DocumentChangeEventHandler(
 App_DocumentChange);
 }

 void App_WindowActivate(Word.Document document,
 Word.Window window)
 {
 MessageBox.Show(String.Format(
 "Window {0} was activated.", window.Caption));
 }

 void App_WindowDeactivate(Word.Document document,
 Word.Window window)
 {
 MessageBox.Show(String.Format(
 "Window {0} was deactivated.", window.Caption));
 }

 void App_DocumentChange()
 {
 MessageBox.Show(String.Format(
 "The active document is now {0}.",
 app.ActiveDocument.Name));
 }

 private void InternalStartup()
 {
 this.Startup += new EventHandler(ThisDocument_Startup);
 }
}
Document Print Events
Word raises a DocumentBeforePrint event on the Application object before a document is printed. Word passes the Document that is about to be printed as a parameter to this event. It also passes by reference a bool cancel parameter. If you set the cancel parameter to TRue, the default printing of the document will be canceled. Often this event is handled to implement a custom print routinefor example, you might cancel Word’s default print behavior and use the PrintOut method on Document to enforce a certain print format.
Listing 7-9 shows a VSTO customization that handles the DocumentBeforePrint event to enforce some custom print settings. It forces two copies to be printed and collation to be turned on when the user prints the document.
Listing 7-9. A VSTO Customization That Handles the Application Object’s DocumentBeforePrint Event
public partial class ThisDocument
{
 Word.Application app;

 void ThisDocument_Startup(object sender, EventArgs e)
 {
 app = this.Application;

 app.DocumentBeforePrint += new Word.
 ApplicationEvents4_DocumentBeforePrintEventHandler(
 app_DocumentBeforePrint);
 }

 void app_DocumentBeforePrint(Word.Document document,
 ref bool cancel)
 {
 // Print 2 copies and collate.
 object copies = 2;
 object collate = true;

 document.PrintOut(ref missing, ref missing, ref missing,
 ref missing, ref missing, ref missing, ref missing,
 ref copies, ref missing, ref missing, ref missing,
 ref collate, ref missing, ref missing, ref missing,
 ref missing, ref missing, ref missing);

 // Cancel because we printed already
 // and don't want Word to print again.
 cancel = true;
 }

 private void InternalStartup()
 {
 this.Startup += new EventHandler(ThisDocument_Startup);
 }
}
Mouse Events
Word raises events when the user right-clicks or double-clicks in the document area of a window. If the user right-clicks or double-clicks in an area of the window such as the ruler or the scrollbar, no events are raised.
- Application.WindowBeforeDoubleClick is raised when the document area of a window is double-clicked. Word passes the selection that was double-clicked. This can be a range of text or other objects in the document such as a shape. Word also passes by reference a bool cancel parameter. The cancel parameter can be set to TRue by your event handler to prevent Word from doing the default action associated with a double-click.
- Application.WindowBeforeRightClick is raised when the document area of a window is right-clicked. Word passes the selection that was right-clicked. This can be a range of text or other objects in the document such as a shape. Word also passes by reference a bool cancel parameter. The cancel parameter can be set to TRue by your event handler to prevent Word from doing the default action associated with a right-click.
Listing 7-10 shows a VSTO customization that handles the WindowBefore- DoubleClick and WindowBeforeRightClick events. When the document is double-clicked, this application sets the selected range of text to be all caps. The range of text that is selected depends on where the user double-clicked. If the user double-clicks a word, the selection changes to be the word. If the user triple-clicks, the selection changes to be a paragraph. If the user double-clicks the page margin, the selection changes to be the line next to where the user double-clicked.
When a range of text is right-clicked, this customization sets the range of text to be title case. Finally, if you double-click a shape in the document, the color is set to a dark red. We also set cancel to true to prevent the shape Properties dialog from being shown when a shape is double-clicked and to prevent the right-click menu from appearing when a range of text is right-clicked.
Listing 7-10. A VSTO Customization That Handles the Application Object’s WindowBefore- DoubleClick and WindowBeforeRightClick Events
public partial class ThisDocument
{
 Word.Application app;

 void ThisDocument_Startup(object sender, EventArgs e)
 {
 app = this.Application;

 app.WindowBeforeDoubleClick += new Word.
 ApplicationEvents4_WindowBeforeDoubleClickEventHandler(
 App_WindowBeforeDoubleClick);

 app.WindowBeforeRightClick += new Word.
 ApplicationEvents4_WindowBeforeRightClickEventHandler(
 App_WindowBeforeRightClick);
 }

 void App_WindowBeforeRightClick(Word.Selection selection,
 ref bool cancel)
 {
 if (selection.Type == Word.WdSelectionType.wdSelectionNormal)
 {
 selection.Range.Case = Word.WdCharacterCase.wdTitleWord;
 cancel = true;
 }
 }

 void App_WindowBeforeDoubleClick(Word.Selection selection,
 ref bool cancel)
 {
 if (selection.Type == Word.WdSelectionType.wdSelectionNormal)
 {
 selection.Range.Case = Word.WdCharacterCase.wdUpperCase;
 }
 else if (selection.Type == Word.WdSelectionType.wdSelectionShape)
 {
 selection.ShapeRange.Fill.ForeColor.RGB = 3000;
 cancel = true;
 }
 }

 private void InternalStartup()
 {
 this.Startup += new EventHandler(ThisDocument_Startup);
 }
}
Selection Events
Word raises several events when the selection changes in the active document.
- Application.WindowSelectionChange is raised when the selection in a document changes. This event is also raised when the location of the insertion point changes within the document because of clicking with the mouse or moving via navigation keys (such as page up and page down). This event is not raised when the insertion point is moved as a result of typing new text into the document. Word passes a Selection object representing the new selection as a parameter to this event. If only the insertion point has moved and no range of text is selected, the Selection object will be passed as a one-character-long Range object containing the character after the current location of the insertion point, and the Type property of the Selection object will return WdSelectionType.wdSelectionIP.
- Application.XMLSelectionChange is raised when the selected XML element changes in a document with XML mappings. Chapter 22, «Working with XML in Word,» discusses using XML mappings in Word. Word passes the new Selection object as a parameter to this event. It also passes the old XMLNode object that was selected previously and the XMLNode object that is now selected. It also passes a reason for the selection change of type WdXMLSelectionChange, which can be wdXMLSelectionChangeReasonDelete, wdXMLSelectionChangeReasonInsert, or wdXMLSelection-ChangeReasonMove.
Listing 7-11 shows a VSTO customization that uses the Range.Start and Range.End properties to display the start and end location of the selection. The code first checks whether the selection type is wdSelectionIP or wdSelectionNormal. It also prints the selection type using a helpful feature of Visual Studiowhen you use the ToString() method associated with an enumerated type, it displays the string name of the enumeration instead of just displaying a number.
Listing 7-11. A VSTO Customization That Handles the Application Object’s WindowSelectionChange Event
public partial class ThisDocument
{
 Word.Application app;

 void ThisDocument_Startup(object sender, EventArgs e)
 {
 app = this.Application;

 app.WindowSelectionChange += new Word.
 ApplicationEvents4_WindowSelectionChangeEventHandler(
 App_WindowSelectionChange);
 }

 void App_WindowSelectionChange(Word.Selection selection)
 {
 Word.WdSelectionType selType = selection.Type;

 MessageBox.Show(String.Format(
 "Selection type is {0}.", selType.ToString()));

 if (selType == Word.WdSelectionType.wdSelectionIP ||
 selType == Word.WdSelectionType.wdSelectionNormal)
 {
 MessageBox.Show(String.Format(
 "Start is {0} and End is {1}.",
 selection.Range.Start, selection.Range.End));
 }
 }

 private void InternalStartup()
 {
 this.Startup += new EventHandler(ThisDocument_Startup);
 }
}
Window Sizing Events
Word raises a WindowSize event on the Application object when a window associated with a document is resized. Once again, the behavior of this event is different than the window sizing event in Excel. The WindowSize event in Word is raised even when the document window is maximized to fill the Word application window and the Word application window is resized. The event is not raised for the Word application window when it is resized and no documents are opened.
Word passes the Document object associated with the window that was resized as a parameter to this event. Word also passes the Window object for the window that was resized.
XML Events
Word raises several events when XML elements have been mapped into the document using the XML Structure feature of Word. You have already learned about the Application object’s XMLSelectionChange that is raised when the selection changes from one XML element to another. Chapter 22, «Working with XML in Word,» considers Word’s XML features in more detail.
- Application.XMLValidationError is raised when the XML in the document is not valid when compared to the schema associated with the document. Word passes the XMLNode object corresponding to the invalid element as a parameter to this event.
- Document.XMLAfterInsert is raised after the user adds a new XML element to the document. If multiple XML elements are added at the same time, the event will be raised for each element that was added. Word passes the XMLNode object for the newly added element as a parameter to this event. It also passes an inUndoRedo bool parameter that indicates whether the XML element was added because undo or redo was invoked.
- Document.XMLBeforeDelete is raised when the user deletes an XML element from the document. If multiple XML elements are removed at the same time, the event will be raised for each element that was removed. Word passes a Range object representing the range of text that was deleted. If an element was deleted without deleting any text, the Range will be passed as null. Word also passes the XMLNode object that was deleted and a bool inUndoRedo parameter that indicates whether the XML element was deleted because undo or redo was invoked.
Sync Events
Word raises the Document object’s Sync event when a local document is synchronized with a copy on the server using Word’s document workspace feature. Word passes a parameter of type MsoSyncEventType that gives additional information on the status of the document synchronization.
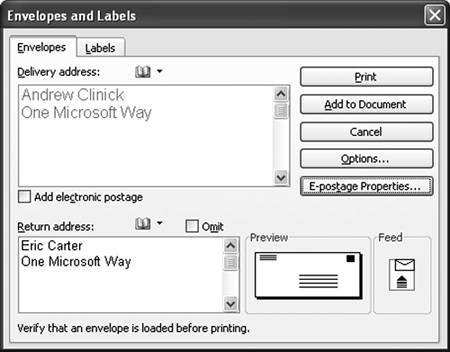
EPostage Events
Word supports a feature called electronic postage, which enables you to create an envelope or label with printed postage that is printed on an envelope or package along with the address. Figure 7-4 shows the Envelopes and Labels dialog box, which has an Add electronic postage check box and an E-postage Properties button that are used to configure electronic postage. Word provides three events to allow third parties to create an e-postage add-in: EPostageInsert, EPostageInsertEx, and EPostagePropertyDialog. An e-postage add-in is distinguished from other Word add-ins by a special registry key. There can only be one active e-postage add-in installed in Word. This book does not consider these events further because it is unlikely that you will ever need to create your own electronic postage add-in. You can read more about e-postage add-ins by downloading the E-postage SDK at http://support.microsoft.com/?kbid=304095.
Figure 7-4. The Envelopes and Labels dialog with electronic postage options.
Mail Merge Events
Word raises eight events associated with the mail merge feature. To understand these events, you must first understand how mail merge works and when and why each of these events is raised.
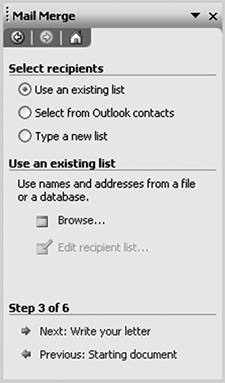
The user starts a mail merge by choosing Mail Merge from the Letters and Mailings menu of the Tools menu. This causes the Application object’s MailMergeWizardStateChange event to be raised, notifying us that we are moving from Step 0 to Step 1 of the Mail Merge Wizard. The Mail Merge task pane shown in Figure 7-5 then displays. The Mail Merge task pane is a wizard that can move back and forth through six steps. Whenever you move from step to step, the MailMergeWizardStateChange event is raised. When you close the document, the MailMergeWizardStateChange event is raised, moving from Step 6 back to Step 0.
Figure 7-5. Step 1 of the Mail Merge Wizard.

Step 2 is not shown hereit prompts you as to whether you want to start from the current document or from a template or existing document on disk. In Step 2, we will choose to use the current document. When we get to Step 3 of the Mail Merge Wizard, the user is prompted to select a data source for the mail merge. Figure 7-6 shows Step 3.
Figure 7-6. Step 3 of the Mail Merge Wizard.
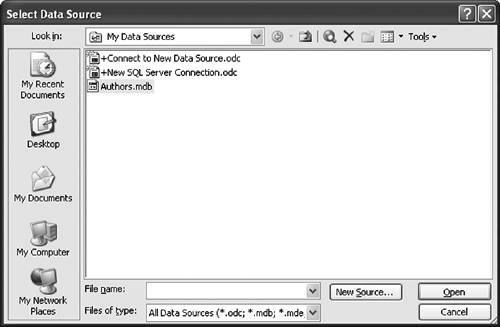
We choose Use an existing list and click the Browse link to locate an Access database we have previously created called Authors.mdb. Figure 7-7 shows the dialog to pick a data source.
Figure 7-7. Selecting a data source.
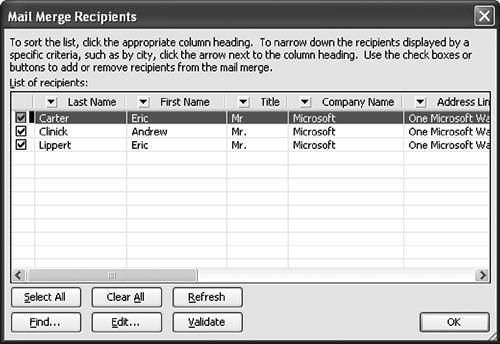
After we select the data source and choose Open, the Application object’s MailMergeDataSourceLoad event is raised. This event lets us know that a data source has been chosen and we can now examine the data source through the OM. After the MergeDataSourceLoad event has been raised, the Mail Merge Recipients dialog appears, as shown in Figure 7-8. This dialog shows each record in the data source and lets you further control which records you want to use for the mail merge.
Figure 7-8. The Mail Merge Recipients dialog.
The Mail Merge Recipients dialog has a button called Validate. When clicked, this button raises the Application object’s DataSourceValidate event. However, it only raises this event for the special e-postage add-in described earlier.
Step 4 of the Mail Merge Wizard lets you insert address blocks, greeting blocks, and other fields into the body of your document. Step 5 lets you preview the final look of your document when Word loads the data from your data source into the blocks you have defined.
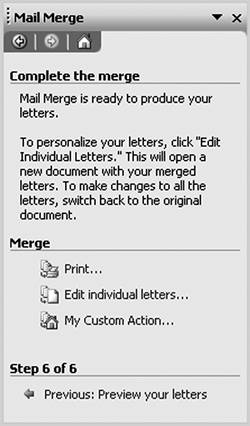
Step 6 displays two actions you can take to complete the mail merge. The first is to print the generated letters. The second is to create a new document and insert each letter into the new document. You can also specify a third action by writing a line of code such as the following before Step 6 of the wizard is shown:
document.MailMerge.ShowSendToCustom = "My Custom Action...";
The MailMerge object’s ShowSendToCustom property takes a string value and allows you to add a third custom action defined by your code to do at the end of a mail merge. When the user clicks this custom action, the Application object’s MailMergeWizardSendToCustom event is raised. Figure 7-9 shows Step 6 of the Mail Merge Wizard with a custom action called My Custom Action.
Figure 7-9. Step 6 of the Mail Merge Wizard.
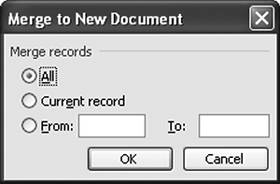
When the user chooses Print or Edit individual letters, the Application object’s MailMergeBeforeMerge event is raised. Word passes the start record and the end record that will be merged as int parameters. The default is to merge all the records. When all the records are going to be merged, Word passes 1 for the start record and 16 for the end record. Word also passes by reference a bool cancel parameter. If you set the cancel parameter to true, the mail merge will be canceled.
After the MailMergeBeforeMerge event is raised, Word shows a dialog letting the user change the records to merge, as shown in Figure 7-10. Unfortunately, if the user changes the records to be merged, Word does not re-raise the MailMergeBeforeMerge event. The next time the user does a mail merge, the user’s last selection in the dialog will be reflected in the parameters passed to MailMergeBeforeMerge.
Figure 7-10. Selecting the records to merge.
When the user clicks the OK button in the dialog shown in Figure 7-10, the mail merge begins in earnest. Before Word merges a record from the data source to create a letter, it first raises the Application object’s MailMergeBeforeRecordMerge event. It then creates the letter from the record and raises the Application object’s MailMergeAfterRecordMerge event when the letter for the record has been generated. This sequence of MailMergeBeforeRecordMerge followed by MailMergeAfterRecordMerge repeats for each record that is going to be merged. When all the records have been merged, Word raises the Application object’s MailMergeAfterMerge event and passes the newly created Document object as a parameter if the user chose to Edit individual letters in Figure 7-9. If the user chose Print, null will be passed for the newly created document.
Listing 7-12 shows a VSTO customization that handles all the mail merge events.
Listing 7-12. A VSTO Customization That Handles Mail Merge Events
public partial class ThisDocument
{
 Word.Application app;

 void ThisDocument_Startup(object sender, EventArgs e)
 {
 app = this.Application;

 // Have to set ShowSendToCustom so that there is a custom command
 // that can be clicked to raise the MailMergeWizardSendToCustom event
 this.MailMerge.ShowSendToCustom = "My Custom Command";

 app.MailMergeAfterMerge += new Word.
 ApplicationEvents4_MailMergeAfterMergeEventHandler(
 App_MailMergeAfterMerge);

 app.MailMergeAfterRecordMerge += new Word.
 ApplicationEvents4_MailMergeAfterRecordMergeEventHandler(
 App_MailMergeAfterRecordMerge);

 app.MailMergeBeforeMerge += new Word.
 ApplicationEvents4_MailMergeBeforeMergeEventHandler(
 App_MailMergeBeforeMerge);

 app.MailMergeBeforeRecordMerge += new Word.
 ApplicationEvents4_MailMergeBeforeRecordMergeEventHandler(
 App_MailMergeBeforeRecordMerge);

 app.MailMergeDataSourceLoad += new Word.
 ApplicationEvents4_MailMergeDataSourceLoadEventHandler(
 App_MailMergeDataSourceLoad);

 app.MailMergeDataSourceValidate += new Word.
 ApplicationEvents4_MailMergeDataSourceValidateEventHandler(
 App_MailMergeDataSourceValidate);

 app.MailMergeWizardSendToCustom += new Word.
 ApplicationEvents4_MailMergeWizardSendToCustomEventHandler(
 App_MailMergeWizardSendToCustom);

 app.MailMergeWizardStateChange += new Word.
 ApplicationEvents4_MailMergeWizardStateChangeEventHandler(
 App_MailMergeWizardStateChange);
 }

 void App_MailMergeAfterMerge(Word.Document document,
 Word.Document documentResult)
 {
 MessageBox.Show(String.Format(
 "MailMergeAfterMerge: Source = {0}, Result = {1}",
 document.Name, documentResult.Name));
 }

 void App_MailMergeAfterRecordMerge(Word.Document document)
 {
 MessageBox.Show(String.Format(
 "MailMergeAfterRecordMerge for {0}",
 document.Name));
 }

 void App_MailMergeBeforeMerge(Word.Document document,
 int startRecord, int endRecord, ref bool cancel)
 {
 MessageBox.Show(String.Format(
 "MailMergeBeforeMerge for {0}", document.Name));

 // Word passes -16 as the EndRecord if the user
 // chose to merge all records.
 if (endRecord == -16)
 {
 endRecord = document.MailMerge.DataSource.RecordCount;
 }

 MessageBox.Show(String.Format(
 "Merging records from record {0} to record {1}."
 , startRecord, endRecord));
 }

 void App_MailMergeBeforeRecordMerge(Word.Document document,
 ref bool cancel)
 {
 MessageBox.Show(String.Format(
 "MailMergeBeforeRecordMerge for {0}.",
 document.Name));
 }

 void App_MailMergeDataSourceLoad(Word.Document document)
 {
 MessageBox.Show(String.Format(
 "MailMergeDataSourceLoad for {0}.",
 document.Name));

 MessageBox.Show(String.Format(
 "The data source is {0}.",
 document.MailMerge.DataSource.Name));
 }

 // This event won't fire except for an e-postage add-in
 void App_MailMergeDataSourceValidate(Word.Document document,
 ref bool handled)
 {
 MessageBox.Show(String.Format(
 "MailMergeDataSourceValidate for {0}.",
 document.Name));
 }

 void App_MailMergeWizardSendToCustom(Word.Document document)
 {
 MessageBox.Show(String.Format(
 "MailMergeWizardSendToCustom for {0}.",
 document.Name));
 }

 void App_MailMergeWizardStateChange(Word.Document document,
 ref int fromState, ref int toState, ref bool handled)
 {
 MessageBox.Show(String.Format(
 "MailMergeWizardStateChange for {0}.",
 document.Name));
 }

 private void InternalStartup()
 {
 this.Startup += new EventHandler(ThisDocument_Startup);
 }
}
CommandBar Events
A common way to run your code is by adding a custom toolbar button or menu item to Word and handling the click event raised by that button or menu item. Word uses the same object model as Excel to add toolbar buttons and menu items. Chapter 4, «Working with Excel Events,» discussed this model in more detail.
One difference between Excel and Word is that Word can save an added toolbar or menu item in a template or a document. The default location that a new toolbar or menu item is saved to is the Normal template (normal.dot). You can specify that the new toolbar or menu item be associated with another template or with a document by using the Application object’s CustomizationContext property. The CustomizationContext property takes an object that is either a Template object or a Document object. Subsequent calls to add toolbars or buttons (for example, a CommandBarButton) will be saved in the template or document you set using the CustomizationContext property.
Listing 7-13 shows a listing similar to the Excel example in Listing 4-9, with two significant differences. First, we use the CustomizationContext property to make it so the toolbar we add will be associated with a particular document. Second, we pass TRue as the last parameter to the various Add methods so that the CommandBar, CommandBarButton, and CommandBarComboBox are added permanently rather than temporarily.
Listing 7-13. A VSTO Customization That Adds a Custom Command Bar
public partial class ThisDocument
{
 Word.Application app;
 Office.CommandBarButton btn;
 Office.CommandBarComboBox box;

 void ThisDocument_Startup(object sender, EventArgs e)
 {
 app = this.Application;

 // Store the new command bar in this document.
 app.CustomizationContext = this;

 Office.CommandBars bars = this.CommandBars;
 Office.CommandBar bar = bars.Add("My Custom Bar",
 missing, missing, true);
 bar.Visible = true;

 btn = bar.Controls.Add(
 Office.MsoControlType.msoControlButton,
 missing, missing, missing, true) as Office.CommandBarButton;

 btn.Click += new Office.
 _CommandBarButtonEvents_ClickEventHandler(
 Btn_Click);

 btn.Caption = "Display Message";
 btn.Tag = "WordDocument1.btn";
 btn.Style = Office.MsoButtonStyle.msoButtonCaption;

 box = bar.Controls.Add(
 Office.MsoControlType.msoControlComboBox,
 missing, missing, missing, true) as Office.CommandBarComboBox;
 box.Tag = "WordDocument1.box";

 box.AddItem("Choice 1", 1);
 box.AddItem("Choice 2", 2);
 box.AddItem("Choice 3", 3);
 box.Change += new Office.
 _CommandBarComboBoxEvents_ChangeEventHandler(
 Box_Change);
 }

 static void Btn_Click(Office.CommandBarButton ctrl,
 ref bool cancelDefault)
 {
 MessageBox.Show("You clicked the button.");
 }

 static void Box_Change(Office.CommandBarComboBox ctrl)
 {
 MessageBox.Show(String.Format(
 "You selected {0}.", ctrl.Text));
 }

 private void InternalStartup()
 {
 this.Startup += new EventHandler(ThisDocument_Startup);
 }
}
- Remove From My Forums
-
Question
-
Hi,
I have following query
I want to capture event on document open and close for word document.
That is if some body opens the word2003 document from explorer or by any way i want to get the event that document opened.
Similary if some body closes the word2003 document, i want to get the event.
Do i need to create word add in for this.
can some body tell me whether i am thinking in right direction.
Thanks and Regards,
Vinita Batra
Answers
-
You should never put any code in the InternalStartup procedure. This is used by the VSTO project to prepare for the Add-in code. There is even a comment to this effect when the project is generated. Your code belongs in the ThisAdd_Startup procedure.
Note, also, that your code is incorrect for a VSTO Add-in. You should not be instantiating a new instance of the Word class. Your Add-in is already running in a Word instance, and it should use that.
Please note that neither the NewDocument nor the DocumentOpen event will trigger when Word starts and the default new document is generated. This occurs before the Add-in loads and cannot be trapped. If you need to determine whether Word was started with the default new document, you can query the Count property of the Documents collection. (If Word is started by double-clicking a document, the DocumentOpen event will trigger.)
Code Snippet
public partial class ThisAddIn
{
Word.Application wb;
private void ThisAddIn_Startup(object sender, System.EventArgs e)
{
wb = this.Application;
if (wb.Documents.Count > 0)
{
object docIndex = 1;
MessageBox.Show(wb.Documents.Count.ToString() + «r» + wb.Documents.get_Item(ref docIndex).Name);
}
wb.DocumentOpen += new Word.ApplicationEvents4_DocumentOpenEventHandler(Application_DocumentOpen);
((Word.ApplicationEvents4_Event)wb).NewDocument += new Word.ApplicationEvents4_NewDocumentEventHandler(Application_NewDocument);
}
void Application_DocumentOpen(Microsoft.Office.Interop.Word.Document Doc)
{
MessageBox.Show(«Opened: « + this.Application.ActiveDocument.Name);
}
void Application_NewDocument(Microsoft.Office.Interop.Word.Document Doc)
{
MessageBox.Show(«New: « + this.Application.ActiveDocument.Name);
}
private void ThisAddIn_Shutdown(object sender, System.EventArgs e)
{
}
#region VSTO generated code
/// <summary>
/// Required method for Designer support — do not modify
/// the contents of this method with the code editor.
/// </summary>
private void InternalStartup()
{
this.Startup += new System.EventHandler(ThisAddIn_Startup);
this.Shutdown += new System.EventHandler(ThisAddIn_Shutdown);
}
#endregion
}
Introduction
Microsoft Word, along with the rest of the Office applications, has an API that can be called by a program to perform operations on the app’s document. If you’ve given this API any thought, you’ve probably considered it something only power users writing VBA scripts would use.
However, that’s not the case: in Word, the powerful API calls the app to perform just about any action the app can perform on its own. Further, you can write an add-in in C# that does everything a regular C# program does. That’s right—the entire .NET Framework is available to your add-in. You end up with a C# program that not only has all of .NET’s functionality, but also Word’s functionality too.
The first question you face when you create a Word add-in is which of two approaches to use: Visual Studio Tools for Office (VSTO) or an add-in that extends the IDTExtensibility2 interface. According to Microsoft, VSTO isn’t for commercial add-ins. (And I’m not sure of when you would want to use it. In fact, when I asked Microsoft P.R. for examples of when you would use VSTO – they could not give me examples either.) However, you should know it is an option. For more information about VSTO, visit MSDN.
In this article, I’ll show you how to create an IDTExtensibility2 Word add-in. To avoid duplicating details the Microsoft Knowledge Base articles explain at great length, I’ll refer you to the articles instead. I’ll also cover the bugs I ran across and the workarounds for them.
First, to create the Word add-in, read Knowledge Base article 302901. Note: as I demonstrate in this article, you don’t create a Microsoft Office System Projects project in Visual Studio. That’s where you go to create a VSTO project.
Now that you have your Word add-in, you can play around with it. However, you’ll soon discover you can’t turn on themes for buttons the way you do for a Windows application. But a solution exists. Knowledge Base article 830033 comes to the rescue. Once again, when you follow the instructions, turning on themes for buttons works perfectly.
Visual Studio performs a bit of magic so it can run your add-in in the debugger. There is a long explanation for this that will appear in Part II of this article.
So create your initial add-in, build it, and install it. Next, go to the Solution Explorer in Visual Studio, right-click on your project, then select Properties. In the Properties dialog, select Configuration Properties | Debugging, and go to the Start Application property. For that property, set the location of WINWORD.exe (for example, it’s C:Program FilesMicrosoft OfficeOFFICE11WINWORD.EXE on my system). Now, you can run or debug from Visual Studio.
I also recommend you never again run the installer on your development machine. Windows seems to get confused by having registry entries for both running the add-in from the debugger and running it as a standard Word add-in. Even if you uninstall the add-in, it appears to cause problems. And if you have to rename your add-in, create a new one with the new name instead, then copy the other files over. Renaming an existing add-in will break because the add-in won’t have any of the registry settings made during the creation process.
Write Your Add-In
Now you’re ready to start writing your add-in. The first step is to look at the documentation for the API so you can see what you can do. You look in the MSDN library. The documentation isn’t there. You try the Word online help. The documentation isn’t there. You search on Microsoft.com, Google, and post in the newsgroups … and the answer is: there is no documentation. Documentation exists for VBA, but not for C#.
It gets worse. The VBA documentation is only available through Word’s online help; the documentation on MSDN is incomplete. And the format for the documentation is likely one you’re not used to, making it hard for you to drill down to the info you need.
You’ll also come across properties that don’t exist. In those cases, you’ll have to call get_Property(). But again, this approach isn’t documented, so you’ll have to try it and see if it works. (Refer to the MSDN article, “Automating Word Using the Word Object Model”.) But wait—there’s more. The .NET API is a COM API designed for VB. So a method that takes two integers, such as Range(int start, int end) is actually declared as Range(ref object start, ref object end). You have to declare two object (not int) variables, assign int values to them, then pass them in. Yet, the int values are not changed by the call and only an int can be passed in.
But wait—there’s even more. I’ve only found this in one place so far but it probably holds elsewhere: there is no Application.NewDocument event (because there is an Application.NewDocument method in the Word API—and C# doesn’t support having an event and a method with the same name). However, you can cast an Application object to an ApplicationClass object, and you can then call ApplicationClass.NewDocument. Problem solved … well, actually, it’s not. The ApplicationClass solution works on some systems, but not on others. (I have no idea why – and could never get a straight answer on this from Microsoft.) But there is a solution. You can also cast the Application object to an ApplicationEvents4_Event object, and you then call the ApplicationEvents4_Event.NewDocument event (ApplicationEvents3_Event.NewDocument in Word 2002). (While this appears to work on all the systems I’ve tested thus far, you might come across systems where it doesn’t work.) So don’t cast objects to ApplicationClass; instead, cast them to ApplicationEvents4_Event objects. And the IntelliSense doesn’t work for the ApplicationEvents4_Event class, so you’ll have to type in the entire line of code, but it will compile and run fine.
Application.WindowSelectionChange is an event I haven’t found a solution for yet. It can always be set, but sometimes it doesn’t fire. And I can’t find any reason for this. I can start Word and it doesn’t fire, but when I exit and immediately restart, it works. It might not work two or three times in a row, but then work ten times in a row. Even when it works, if you enter text or press undo/redo, it doesn’t fire even though it changes the selection. So, it’s not an all selection changes event so much as a some selection changes event.
Enable and Disable Menu Items
Now, say you want to enable or disable menu items, like Word does for Edit, Copy and Edit, and Paste (only enabled if text is selected). An event is fired before the RMB pop-up menu appears. But for the main menu, there is no event before a menu is dropped down. (I know it seems like there must be an event for this, but there isn’t.)
The WindowSelectionChange event is the only method I’ve found to use. However, it’s inefficient because it either fires a lot or doesn’t fire at all, and it doesn’t fire when you enter text (for which there is no event).
So, you’ll need to do two things: first, enable or disable menu items when the selection event fires; and second, in the event handler for menu items that can be enabled or disabled, check when you first enter the event handler, and if the menu items should be disabled, call your menu update method and return. This way, after the user tries to execute that menu item, the menu is correct.
When you create menu objects, you’ll need to keep a couple of things in mind. First, you must store the returned menu objects in a location that will exist for the life of the program. The menus are COM objects, and if no persistent C# object is holding them, they are designated for garbage collection and your events will stop working the next time the garbage collector runs.
Second, the call CommandBarPopup.Controls.Add(MsoControlType.msoControlButton, Type.Missing, Type.Missing, Type.Missing, false) must have false for the final parameter. If this is set to true, as soon as any other add-in sets Application.CustomizationContext to another value, all your menus go away.
Apparently, temporary (the 5th parameter) isn’t the life of the application, but the life of the present CustomizationContext set as the CustomizationContext. If another add-in changes the CustomizationContext, your menu disappears. Given a user can normally have several add-ins, you can never set the 5th parameter to true. The downside is you’re adding your menus to the default template (normal if you don’t change it) permanently. I don’t think you can have menus exist for the life of the application, but not have them added to the template.
Give Users a Template
Another approach is to give users a template to use with your add-in. The template doesn’t have to do anything, but on startup, you look for that template and add your menus only if the template exists. You also add your menus to your template. In essence, you’re using the existence of the template as an Attribute. This is a clean way to have your add-in appear only when you want it to and have it not touch any other part of Word.
Each time your program starts, you need to determine if your menu has already been added (CommandBarControl.Tag is useful for this). If it isn’t there, add it. If it is there, either delete it and then add it, or set your events on the existing items. I delete and add it because over the course of writing the program, the menu items change at times. If you delete and add it, save the location of the menu and add it there. If a user customizes her menu by moving the location of your menu, you don’t want to force it back to the original position the next time Word runs.
When you set the menus, this changes the template, and Word normally asks the user when she exits if she wants to save the changed template. To avoid this, get the value of the default Template.Saved before making the changes, and set Template.Saved to that value after you’re done. If the template was not dirty when you first got the value, it will be set back to the clean value upon completion:
private Template TemplateOn
{
  get
  {


    Templates tpltColl = ThisApplication.Templates;

    foreach (Template tpltOn in tpltColl)
      if (tpltOn.Name == "MY_TEMPLATE.DOT")
        return tpltOn;
      return ThisApplication.NormalTemplate;
  }
}

...


Template thisTemplate = TemplateOn;


bool clean = thisTemplate.Saved;
ThisApplication.CustomizationContext = thisTemplate;
...

thisTemplate.Saved = clean;

...
One warning: don’t look at the Template.Dirty value using the debugger. The act of looking at it sets it to dirty. This is a true Heisenbug. (The Heisenberg theory is that the act of observing a particle affects the particle.)
And even after you take all these measures, there is one more issue. Sometimes, when you close all documents so you have Word running but no document open, the menu events still fire fine, but calls to CommandBarControl.Enabled throw exceptions. Once you create a new document, the problem usually goes away—unless you have two instances of Word, close the first one, then bring up a document in the second one. Then the problem remains. The solution to this is covered in Part II.
Find Text Within Range
Now for the last bug (in this article, at least, and one I’ve only seen when searching for ranges within table cells). You need to find some text within a certain range. So you set the range and call Range.Find.Execute(). However, this call sometimes returns matching text found outside the range you selected. It can find text before or after the range and return it. If it finds it before, it doesn’t mean the text doesn’t exist in your range, just that Range.Find.Execute() hasn’t gotten here yet. (And yes, it is only supposed to return text inside the passed range – but it will return text outside the range.)
To fix this, you’ll need to set range.Find.Wrap = WdFindWrap.wdFindContinue and keep calling it until you get a find in your range, or it goes past the end of your range. However, there is another problem with this approach. The Find can first return text after your range even though there is text inside your range. In this case, you need to cycle through the entire document until it wraps back to your range to find the text. While this can burn a lot of clock cycles (think of a 200-page document where you have to walk all the way around), it only happens in cases where this bug occurs and, fortunately, those cases are rare.
public Range Find (int startOffset, int endOffset, bool forward, string text)
{


    int rangeStart = Math.Max(0, startOffset - 1);


    int rangeEnd = Math.Min(endOffset + 1, ThisDocument.Content.End);

    object start = rangeStart;
    object end = rangeEnd;
    Range range = ThisDocument.Range (ref start, ref end);
    range.Find.ClearFormatting();
    range.Find.Forward = forward;
    range.Find.Text = text;
    range.Find.Wrap = WdFindWrap.wdFindStop;

    object missingValue = Type.Missing;
    range.Find.Execute(ref missingValue, ref missingValue,
                ref missingValue, ref missingValue, ref missingValue,
                ref missingValue, ref missingValue, ref missingValue,
                ref missingValue, ref missingValue, ref missingValue,
                ref missingValue, ref missingValue, ref missingValue,
                ref missingValue);


    if (range.Find.Found && (startOffset <= range.Start)
                             && (range.End <= rangeEnd))
        return range;


    start = startOffset;
    end = rangeEnd;
    range = ThisDocument.Range (ref start, ref end);
    string docText = range.Text;

    if (docText == null)
        return null;

    int ind = forward ? docText.IndexOf(text) : docText.LastIndexOf(text);
    if (ind == -1)
        return null;


    int _start = forward ? startOffset : rangeEnd - text.Length;
    while ((startOffset <= _start) && (_start < rangeEnd))
    {
        start = _start;
        end = rangeEnd;
        range = ThisDocument.Range (ref start, ref end);
        docText = range.Text;


        if ((docText != null) && docText.StartsWith(text))
        {

            int endPos = range.Start + text.Length;

            while (endPos < endOffset)
            {
                range.End = endPos;
                docText = range.Text;
                if (docText == text)
                    break;
                endPos ++;
            }
            return range;
        }
        _start += forward ? 1 : -1;
    }
    return null;
}
All in all, I’d say you should view the Word .NET façade as fragile. Aside from the Find bug, these problems are probably due to the façade and not Word itself. But keep in mind, you might have to experiment to find a way to talk to Word in a way that is solid.
Beyond the bugs I’ve discussed, you’ll want to keep these issues in mind for your add-in. If you need to tie data to the document, use Document.Variables. Two notes about this: first, Document.Variable only accepts strings (I uuencode my data); and second, it has a size limit between 64,000 and 65,000 bytes. Also, if you serialize your data, be aware that .NET sometimes has trouble finding the assembly of your add-in when deserializing the objects. This is a .NET issue, not a Word one.
If you’re going to call the Help methods from your add-in, they require a Control object for the parent window. Given Word isn’t a .NET program, you have no way to convert an hwnd (Word’s main window) to a Control. So for Help, you’ll need to pass a null parent window.
Occasionally (in my case, it’s about once a week), when you’re building the COM add-in shim, you’ll get the error:
stdafx.h(48): error C3506: there is no typelib registered
            for LIBID '{AC0714F2-3D04-11D1-AE7D-00A0C90F26F4}'
When you get this, go to C:Program FilesCommonFilesDesigner and run the regsvr32 msaddndr.dll command. I have no idea why this happens (sometimes it occurs between two builds when all I’ve done is edit a CS file), but it’s easy to fix.
The add-in you create is a COM add-in, not an automation add-in. To see it, add the tool menu item called curiously enough “COM Add-Ins” to the Tools menu.
Exit All Instances of Word
One issue that can sideswipe you in a myriad of ways is that if you use Outlook, it uses Word for composing messages. Word loads add-ins when the first instance starts, and uses that set of add-ins for all other instances. The only way to reload instances is to exit all instances of Word.
Word also locks the files it’s using, such as the DLL files for add-ins. Again, the executable files for your add-in are locked. If you run the debugger, it appears to lock the PDB files too. So if things become strange—builds fail, files are locked, new changes aren’t executing—make sure you’ve exited Outlook as well as all instances of Word. This isn’t a bug; it’s a correct operation, but it’s not obvious and can be frustrating to figure out.
Winword.exe can also run as an orphan process at times. No copy of Word will be on the screen; Outlook isn’t running; somehow an instance of Word never exited. Again, in this case, you can’t build until you kill that orphan process.
You’ll also come across the standard Visual Studio issue where occasionally you’ll need to exit and restart Visual Studio. This isn’t a Word issue (my work colleagues have the same problem when they’re writing C# Windows application code), and if all else fails, reboot.
Remember that Outlook starts Word without a document. Make sure your add-in handles this. Also keep in mind that because the API was originally from VB, all arrays are 1-based. This is a major pain to remember, but Microsoft does need to keep the API consistent across all .NET languages, and VB was used first for the API, so it wins.
Another issue to watch for is that Word doesn’t display exceptions thrown in your add-in. You can catch exceptions and act on them, but if you don’t catch the exception, it’s never displayed. You have to set your debugger to break on managed exceptions so you can see them, or put a try/catch in every event handler.
An IDTExtensibility2 add-in can run on Word 2002 (VSTO is limited to Word 2003). However, MSDN’s article on installing the Office 10 Primary Interop Assemblies, or PIAs, (see Additional Resources) is wrong or incomplete. You get the PIAs added to the GAC, but you can’t find them with add references – and you cannot select a file in the GAC. So copy the files out of the GAC, add those copied files, and it will then point at the PIAs in the GAC.
What about Word 2000? Supposedly, PIAs can be built for it. I’m still trying to figure this out, and if I do figure it out, look for it to be covered in Part II or Part III. But Microsoft does not provide Word 2000 PIAs.
Okay, you’ve got your add-in working; just a few more minutes and you can ship it to the world—or so it would seem. First comes the fact that if you Authenticode sign your C# DLL, it doesn’t matter to Word. You have to create a COM shim DLL that then calls your C# DLL. The MSDN article “Using the COM Add-in Shim Solution to Deploy Managed COM Add-ins in Office XP” covers this. Note: this does not work for VSTO applications. (To vent for a second: WHY, Why, why didn’t Microsoft set it up so Word accepts signed .NET DLLs as a signed Word add-in?) Follow the article very closely. In a number of cases, if your changes to the shim are just slightly wrong, the shim won’t work. And figuring out what is wrong is not easy. In fact, the only way to fix problems is to keep trying different approaches. There is a lot to cover about the shim add-in, and it is covered in Part II.
IMHO, this is the one place Microsoft really blew it. The shim solution adds a lot of work for every developer (as opposed to Microsoft doing it once up front), makes the whole solution more complex, and there is no way to debug problems with it.
Once you have the shim working, you’ll need to strong name all .NET DLLs, then Authenticode sign all DLLs. This is necessary to run on systems where security is set to High/do not trust add-ins.
There is one final issue you must address for your code to install correctly. Your initial setup program has registry settings in the HKCU for your add-in. These need to be deleted as you are not setting up your .NET code to be the add-in, but the shim instead. In your shim, the ConnectProxy.rgs file sets its add-in registry entries in the HKCU. If you always want to install your add-in for the current user only, this is fine. But if you want to give your users the choice of installing for everyone or installing for just me (and for 98% of you, you should), place the registry settings in the setup program under User/Machine Hive and delete them from ConnectProxk.rgs. (There will be a longer explanation of this in Part II.)
The biggest problem the Word add-in C# API suffers from is neglect, and its issues reside almost entirely in the .NET/C# wrapper and its associated features (such as documentation, signing security, and the shim layer). This means, once you figure out how to work around these issues, you’re left with a solid, powerful engine.
Additional Resources:
- Microsoft Knowledge Base article 302901: “How To Build an Office COM Add-in by Using Visual C# .NET”.
- Microsoft Knowledge Base article 830033: “How to apply Windows SP themes to Office COM add-ins”.
- MSDN Library: “Automating Word Using the Word Object Model”.
- MSDN Library: “Using the COM Add-in Shim Solution to Deploy Managed COM Add-ins in Office XP” by Misha Shneerson and Siew-Moi Khor.
- MSDN Library: “Working with the Office XP Primary Interop Assemblies” by Paul Cornell.
| title | description | ms.date | ms.topic | dev_langs | helpviewer_keywords | author | ms.author | manager | ms.technology | ms.workload | ||||||
|---|---|---|---|---|---|---|---|---|---|---|---|---|---|---|---|---|
|
Walkthrough: Create your first VSTO Add-in for Word |
Create an application-level Add-in for Microsoft Word. This feature is available to the application itself, regardless of which documents are open. |
02/02/2017 |
conceptual |
|
|
John-Hart |
johnhart |
jmartens |
office-development |
office |
Walkthrough: Create your first VSTO Add-in for Word
[!INCLUDE Visual Studio]
This introductory walkthrough shows you how to create a VSTO Add-in for Microsoft Office Word. The features that you create in this kind of solution are available to the application itself, regardless of which documents are open.
[!INCLUDEappliesto_wdallapp]
This walkthrough illustrates the following tasks:
-
Creating a Word VSTO Add-in project.
-
Writing code that uses the object model of Word to add text to a document when it is saved.
-
Building and running the project to test it.
-
Cleaning up the completed project so that the VSTO Add-in no longer runs automatically on your development computer.
[!INCLUDEnote_settings_general]
Prerequisites
You need the following components to complete this walkthrough:
-
[!INCLUDEvsto_vsprereq]
-
Microsoft Word
Create the project
To create a new Word VSTO Add-in project in Visual Studio
-
Start [!INCLUDEvsprvs].
-
On the File menu, point to New, and then click Project.
-
In the templates pane, expand Visual C# or Visual Basic, and then expand Office/SharePoint.
-
Under the expanded Office/SharePoint node, select the Office Add-ins node.
-
In the list of project templates, select a Word VSTO Add-in project.
-
In the Name box, type FirstWordAddIn.
-
Click OK.
[!INCLUDEvsprvs] creates the FirstWordAddIn project and opens the ThisAddIn code file in the editor.
Write code to add text to the saved document
Next, add code to the ThisAddIn code file. The new code uses the object model of Word to add boilerplate text to each saved document. By default, the ThisAddIn code file contains the following generated code:
-
A partial definition of the
ThisAddInclass. This class provides an entry point for your code and provides access to the object model of Word. For more information, see Program VSTO Add-ins. The remainder of theThisAddInclass is defined in a hidden code file that you should not modify. -
The
ThisAddIn_StartupandThisAddIn_Shutdownevent handlers. These event handlers are called when Word loads and unloads your VSTO Add-in. Use these event handlers to initialize your VSTO Add-in when it is loaded, and to clean up resources used by your VSTO Add-in when it is unloaded. For more information, see Events in Office projects.
To add a paragraph of text to the saved document
-
In the ThisAddIn code file, add the following code to the
ThisAddInclass. The new code defines an event handler for the xref:Microsoft.Office.Interop.Word.ApplicationEvents4_Event.DocumentBeforeSave event, which is raised when a document is saved.When the user saves a document, the event handler adds new text at the start of the document.
C#
:::code language=»csharp» source=»../vsto/codesnippet/CSharp/FirstWordAddIn/ThisAddIn.cs» id=»Snippet1″:::
VB
:::code language=»vb» source=»../vsto/codesnippet/VisualBasic/FirstWordAddIn/ThisAddIn.vb» id=»Snippet1″:::
[!NOTE]
This code uses an index value of 1 to access the first paragraph in the xref:Microsoft.Office.Interop.Word._Document.Paragraphs%2A collection. Although Visual Basic and Visual C# use 0-based arrays, the lower array bounds of most collections in the Word object model is 1. For more information, see Write code in Office solutions. -
If you are using C#, add the following required code to the
ThisAddIn_Startupevent handler. This code is used to connect theApplication_DocumentBeforeSaveevent handler with the xref:Microsoft.Office.Interop.Word.ApplicationEvents4_Event.DocumentBeforeSave event.:::code language=»csharp» source=»../vsto/codesnippet/CSharp/FirstWordAddIn/ThisAddIn.cs» id=»Snippet2″:::
To modify the document when it is saved, the previous code examples use the following objects:
-
The
Applicationfield of theThisAddInclass. TheApplicationfield returns a xref:Microsoft.Office.Interop.Word.Application object, which represents the current instance of Word. -
The
Docparameter of the event handler for the xref:Microsoft.Office.Interop.Word.ApplicationEvents4_Event.DocumentBeforeSave event. TheDocparameter is a xref:Microsoft.Office.Interop.Word.Document object, which represents the saved document. For more information, see Word object model overview.
Test the project
To test the project
-
Press F5 to build and run your project.
When you build the project, the code is compiled into an assembly that is included in the build output folder for the project. Visual Studio also creates a set of registry entries that enable Word to discover and load the VSTO Add-in, and it configures the security settings on the development computer to enable the VSTO Add-in to run. For more information, see Build Office solutions.
-
In Word, save the active document.
-
Verify that the following text is added to the document.
This text was added by using code.
-
Close Word.
Clean up the project
When you finish developing a project, remove the VSTO Add-in assembly, registry entries, and security settings from your development computer. Otherwise, the VSTO Add-in will continue to run every time that you open Word on your development computer.
To clean up the completed project on your development computer
- In Visual Studio, on the Build menu, click Clean Solution.
Next steps
Now that you have created a basic VSTO Add-in for Word, you can learn more about how to develop VSTO Add-ins from these topics:
-
General programming tasks that you can perform in VSTO Add-ins: Program VSTO Add-ins.
-
Programming tasks that are specific to Word VSTO Add-ins: Word solutions.
-
Using the object model of Word: Word object model overview.
-
Customizing the UI of Word, for example, by adding a custom tab to the Ribbon or creating your own custom task pane: Office UI customization.
-
Building and debugging VSTO Add-ins for Word: Build Office solutions.
-
Deploying VSTO Add-ins for Word: Deploy an Office solution.
See also
- Office solutions development overview (VSTO)
- Word solutions
- Program VSTO Add-ins
- Word object model overview
- Office UI customization
- Build Office solutions
- Deploy an Office solution
- Office project templates overview
Introduction
Microsoft Word, along with the rest of the Office applications, has an API that can be called by a program to perform operations on the app’s document. If you’ve given this API any thought, you’ve probably considered it something only power users writing VBA scripts would use.
However, that’s not the case: in Word, the powerful API calls the app to perform just about any action the app can perform on its own. Further, you can write an add-in in C# that does everything a regular C# program does. That’s right—the entire .NET Framework is available to your add-in. You end up with a C# program that not only has all of .NET’s functionality, but also Word’s functionality too.
The first question you face when you create a Word add-in is which of two approaches to use: Visual Studio Tools for Office (VSTO) or an add-in that extends the IDTExtensibility2 interface. According to Microsoft, VSTO isn’t for commercial add-ins. (And I’m not sure of when you would want to use it. In fact, when I asked Microsoft P.R. for examples of when you would use VSTO – they could not give me examples either.) However, you should know it is an option. For more information about VSTO, visit MSDN.
In this article, I’ll show you how to create an IDTExtensibility2 Word add-in. To avoid duplicating details the Microsoft Knowledge Base articles explain at great length, I’ll refer you to the articles instead. I’ll also cover the bugs I ran across and the workarounds for them.
First, to create the Word add-in, read Knowledge Base article 302901. Note: as I demonstrate in this article, you don’t create a Microsoft Office System Projects project in Visual Studio. That’s where you go to create a VSTO project.
Now that you have your Word add-in, you can play around with it. However, you’ll soon discover you can’t turn on themes for buttons the way you do for a Windows application. But a solution exists. Knowledge Base article 830033 comes to the rescue. Once again, when you follow the instructions, turning on themes for buttons works perfectly.
Visual Studio performs a bit of magic so it can run your add-in in the debugger. There is a long explanation for this that will appear in Part II of this article.
So create your initial add-in, build it, and install it. Next, go to the Solution Explorer in Visual Studio, right-click on your project, then select Properties. In the Properties dialog, select Configuration Properties | Debugging, and go to the Start Application property. For that property, set the location of WINWORD.exe (for example, it’s C:Program FilesMicrosoft OfficeOFFICE11WINWORD.EXE on my system). Now, you can run or debug from Visual Studio.
I also recommend you never again run the installer on your development machine. Windows seems to get confused by having registry entries for both running the add-in from the debugger and running it as a standard Word add-in. Even if you uninstall the add-in, it appears to cause problems. And if you have to rename your add-in, create a new one with the new name instead, then copy the other files over. Renaming an existing add-in will break because the add-in won’t have any of the registry settings made during the creation process.
Write Your Add-In
Now you’re ready to start writing your add-in. The first step is to look at the documentation for the API so you can see what you can do. You look in the MSDN library. The documentation isn’t there. You try the Word online help. The documentation isn’t there. You search on Microsoft.com, Google, and post in the newsgroups … and the answer is: there is no documentation. Documentation exists for VBA, but not for C#.
It gets worse. The VBA documentation is only available through Word’s online help; the documentation on MSDN is incomplete. And the format for the documentation is likely one you’re not used to, making it hard for you to drill down to the info you need.
You’ll also come across properties that don’t exist. In those cases, you’ll have to call get_Property(). But again, this approach isn’t documented, so you’ll have to try it and see if it works. (Refer to the MSDN article, “Automating Word Using the Word Object Model”.) But wait—there’s more. The .NET API is a COM API designed for VB. So a method that takes two integers, such as Range(int start, int end) is actually declared as Range(ref object start, ref object end). You have to declare two object (not int) variables, assign int values to them, then pass them in. Yet, the int values are not changed by the call and only an int can be passed in.
But wait—there’s even more. I’ve only found this in one place so far but it probably holds elsewhere: there is no Application.NewDocument event (because there is an Application.NewDocument method in the Word API—and C# doesn’t support having an event and a method with the same name). However, you can cast an Application object to an ApplicationClass object, and you can then call ApplicationClass.NewDocument. Problem solved … well, actually, it’s not. The ApplicationClass solution works on some systems, but not on others. (I have no idea why – and could never get a straight answer on this from Microsoft.) But there is a solution. You can also cast the Application object to an ApplicationEvents4_Event object, and you then call the ApplicationEvents4_Event.NewDocument event (ApplicationEvents3_Event.NewDocument in Word 2002). (While this appears to work on all the systems I’ve tested thus far, you might come across systems where it doesn’t work.) So don’t cast objects to ApplicationClass; instead, cast them to ApplicationEvents4_Event objects. And the IntelliSense doesn’t work for the ApplicationEvents4_Event class, so you’ll have to type in the entire line of code, but it will compile and run fine.
Application.WindowSelectionChange is an event I haven’t found a solution for yet. It can always be set, but sometimes it doesn’t fire. And I can’t find any reason for this. I can start Word and it doesn’t fire, but when I exit and immediately restart, it works. It might not work two or three times in a row, but then work ten times in a row. Even when it works, if you enter text or press undo/redo, it doesn’t fire even though it changes the selection. So, it’s not an all selection changes event so much as a some selection changes event.
Enable and Disable Menu Items
Now, say you want to enable or disable menu items, like Word does for Edit, Copy and Edit, and Paste (only enabled if text is selected). An event is fired before the RMB pop-up menu appears. But for the main menu, there is no event before a menu is dropped down. (I know it seems like there must be an event for this, but there isn’t.)
The WindowSelectionChange event is the only method I’ve found to use. However, it’s inefficient because it either fires a lot or doesn’t fire at all, and it doesn’t fire when you enter text (for which there is no event).
So, you’ll need to do two things: first, enable or disable menu items when the selection event fires; and second, in the event handler for menu items that can be enabled or disabled, check when you first enter the event handler, and if the menu items should be disabled, call your menu update method and return. This way, after the user tries to execute that menu item, the menu is correct.
When you create menu objects, you’ll need to keep a couple of things in mind. First, you must store the returned menu objects in a location that will exist for the life of the program. The menus are COM objects, and if no persistent C# object is holding them, they are designated for garbage collection and your events will stop working the next time the garbage collector runs.
Second, the call CommandBarPopup.Controls.Add(MsoControlType.msoControlButton, Type.Missing, Type.Missing, Type.Missing, false) must have false for the final parameter. If this is set to true, as soon as any other add-in sets Application.CustomizationContext to another value, all your menus go away.
Apparently, temporary (the 5th parameter) isn’t the life of the application, but the life of the present CustomizationContext set as the CustomizationContext. If another add-in changes the CustomizationContext, your menu disappears. Given a user can normally have several add-ins, you can never set the 5th parameter to true. The downside is you’re adding your menus to the default template (normal if you don’t change it) permanently. I don’t think you can have menus exist for the life of the application, but not have them added to the template.
Give Users a Template
Another approach is to give users a template to use with your add-in. The template doesn’t have to do anything, but on startup, you look for that template and add your menus only if the template exists. You also add your menus to your template. In essence, you’re using the existence of the template as an Attribute. This is a clean way to have your add-in appear only when you want it to and have it not touch any other part of Word.
Each time your program starts, you need to determine if your menu has already been added (CommandBarControl.Tag is useful for this). If it isn’t there, add it. If it is there, either delete it and then add it, or set your events on the existing items. I delete and add it because over the course of writing the program, the menu items change at times. If you delete and add it, save the location of the menu and add it there. If a user customizes her menu by moving the location of your menu, you don’t want to force it back to the original position the next time Word runs.
When you set the menus, this changes the template, and Word normally asks the user when she exits if she wants to save the changed template. To avoid this, get the value of the default Template.Saved before making the changes, and set Template.Saved to that value after you’re done. If the template was not dirty when you first got the value, it will be set back to the clean value upon completion:
private Template TemplateOn
{
  get
  {


    Templates tpltColl = ThisApplication.Templates;

    foreach (Template tpltOn in tpltColl)
      if (tpltOn.Name == "MY_TEMPLATE.DOT")
        return tpltOn;
      return ThisApplication.NormalTemplate;
  }
}

...


Template thisTemplate = TemplateOn;


bool clean = thisTemplate.Saved;
ThisApplication.CustomizationContext = thisTemplate;
...

thisTemplate.Saved = clean;

...
One warning: don’t look at the Template.Dirty value using the debugger. The act of looking at it sets it to dirty. This is a true Heisenbug. (The Heisenberg theory is that the act of observing a particle affects the particle.)
And even after you take all these measures, there is one more issue. Sometimes, when you close all documents so you have Word running but no document open, the menu events still fire fine, but calls to CommandBarControl.Enabled throw exceptions. Once you create a new document, the problem usually goes away—unless you have two instances of Word, close the first one, then bring up a document in the second one. Then the problem remains. The solution to this is covered in Part II.
Find Text Within Range
Now for the last bug (in this article, at least, and one I’ve only seen when searching for ranges within table cells). You need to find some text within a certain range. So you set the range and call Range.Find.Execute(). However, this call sometimes returns matching text found outside the range you selected. It can find text before or after the range and return it. If it finds it before, it doesn’t mean the text doesn’t exist in your range, just that Range.Find.Execute() hasn’t gotten here yet. (And yes, it is only supposed to return text inside the passed range – but it will return text outside the range.)
To fix this, you’ll need to set range.Find.Wrap = WdFindWrap.wdFindContinue and keep calling it until you get a find in your range, or it goes past the end of your range. However, there is another problem with this approach. The Find can first return text after your range even though there is text inside your range. In this case, you need to cycle through the entire document until it wraps back to your range to find the text. While this can burn a lot of clock cycles (think of a 200-page document where you have to walk all the way around), it only happens in cases where this bug occurs and, fortunately, those cases are rare.
public Range Find (int startOffset, int endOffset, bool forward, string text)
{


    int rangeStart = Math.Max(0, startOffset - 1);


    int rangeEnd = Math.Min(endOffset + 1, ThisDocument.Content.End);

    object start = rangeStart;
    object end = rangeEnd;
    Range range = ThisDocument.Range (ref start, ref end);
    range.Find.ClearFormatting();
    range.Find.Forward = forward;
    range.Find.Text = text;
    range.Find.Wrap = WdFindWrap.wdFindStop;

    object missingValue = Type.Missing;
    range.Find.Execute(ref missingValue, ref missingValue,
                ref missingValue, ref missingValue, ref missingValue,
                ref missingValue, ref missingValue, ref missingValue,
                ref missingValue, ref missingValue, ref missingValue,
                ref missingValue, ref missingValue, ref missingValue,
                ref missingValue);


    if (range.Find.Found && (startOffset <= range.Start)
                             && (range.End <= rangeEnd))
        return range;


    start = startOffset;
    end = rangeEnd;
    range = ThisDocument.Range (ref start, ref end);
    string docText = range.Text;

    if (docText == null)
        return null;

    int ind = forward ? docText.IndexOf(text) : docText.LastIndexOf(text);
    if (ind == -1)
        return null;


    int _start = forward ? startOffset : rangeEnd - text.Length;
    while ((startOffset <= _start) && (_start < rangeEnd))
    {
        start = _start;
        end = rangeEnd;
        range = ThisDocument.Range (ref start, ref end);
        docText = range.Text;


        if ((docText != null) && docText.StartsWith(text))
        {

            int endPos = range.Start + text.Length;

            while (endPos < endOffset)
            {
                range.End = endPos;
                docText = range.Text;
                if (docText == text)
                    break;
                endPos ++;
            }
            return range;
        }
        _start += forward ? 1 : -1;
    }
    return null;
}
All in all, I’d say you should view the Word .NET faзade as fragile. Aside from the Find bug, these problems are probably due to the faзade and not Word itself. But keep in mind, you might have to experiment to find a way to talk to Word in a way that is solid.
Beyond the bugs I’ve discussed, you’ll want to keep these issues in mind for your add-in. If you need to tie data to the document, use Document.Variables. Two notes about this: first, Document.Variable only accepts strings (I uuencode my data); and second, it has a size limit between 64,000 and 65,000 bytes. Also, if you serialize your data, be aware that .NET sometimes has trouble finding the assembly of your add-in when deserializing the objects. This is a .NET issue, not a Word one.
If you’re going to call the Help methods from your add-in, they require a Control object for the parent window. Given Word isn’t a .NET program, you have no way to convert an hwnd (Word’s main window) to a Control. So for Help, you’ll need to pass a null parent window.
Occasionally (in my case, it’s about once a week), when you’re building the COM add-in shim, you’ll get the error:
stdafx.h(48): error C3506: there is no typelib registered
            for LIBID '{AC0714F2-3D04-11D1-AE7D-00A0C90F26F4}'
When you get this, go to C:Program FilesCommonFilesDesigner and run the regsvr32 msaddndr.dll command. I have no idea why this happens (sometimes it occurs between two builds when all I’ve done is edit a CS file), but it’s easy to fix.
The add-in you create is a COM add-in, not an automation add-in. To see it, add the tool menu item called curiously enough “COM Add-Ins” to the Tools menu.
Exit All Instances of Word
One issue that can sideswipe you in a myriad of ways is that if you use Outlook, it uses Word for composing messages. Word loads add-ins when the first instance starts, and uses that set of add-ins for all other instances. The only way to reload instances is to exit all instances of Word.
Word also locks the files it’s using, such as the DLL files for add-ins. Again, the executable files for your add-in are locked. If you run the debugger, it appears to lock the PDB files too. So if things become strange—builds fail, files are locked, new changes aren’t executing—make sure you’ve exited Outlook as well as all instances of Word. This isn’t a bug; it’s a correct operation, but it’s not obvious and can be frustrating to figure out.
Winword.exe can also run as an orphan process at times. No copy of Word will be on the screen; Outlook isn’t running; somehow an instance of Word never exited. Again, in this case, you can’t build until you kill that orphan process.
You’ll also come across the standard Visual Studio issue where occasionally you’ll need to exit and restart Visual Studio. This isn’t a Word issue (my work colleagues have the same problem when they’re writing C# Windows application code), and if all else fails, reboot.
Remember that Outlook starts Word without a document. Make sure your add-in handles this. Also keep in mind that because the API was originally from VB, all arrays are 1-based. This is a major pain to remember, but Microsoft does need to keep the API consistent across all .NET languages, and VB was used first for the API, so it wins.
Another issue to watch for is that Word doesn’t display exceptions thrown in your add-in. You can catch exceptions and act on them, but if you don’t catch the exception, it’s never displayed. You have to set your debugger to break on managed exceptions so you can see them, or put a try/catch in every event handler.
An IDTExtensibility2 add-in can run on Word 2002 (VSTO is limited to Word 2003). However, MSDN’s article on installing the Office 10 Primary Interop Assemblies, or PIAs, (see Additional Resources) is wrong or incomplete. You get the PIAs added to the GAC, but you can’t find them with add references – and you cannot select a file in the GAC. So copy the files out of the GAC, add those copied files, and it will then point at the PIAs in the GAC.
What about Word 2000? Supposedly, PIAs can be built for it. I’m still trying to figure this out, and if I do figure it out, look for it to be covered in Part II or Part III. But Microsoft does not provide Word 2000 PIAs.
Okay, you’ve got your add-in working; just a few more minutes and you can ship it to the world—or so it would seem. First comes the fact that if you Authenticode sign your C# DLL, it doesn’t matter to Word. You have to create a COM shim DLL that then calls your C# DLL. The MSDN article “Using the COM Add-in Shim Solution to Deploy Managed COM Add-ins in Office XP” covers this. Note: this does not work for VSTO applications. (To vent for a second: WHY, Why, why didn’t Microsoft set it up so Word accepts signed .NET DLLs as a signed Word add-in?) Follow the article very closely. In a number of cases, if your changes to the shim are just slightly wrong, the shim won’t work. And figuring out what is wrong is not easy. In fact, the only way to fix problems is to keep trying different approaches. There is a lot to cover about the shim add-in, and it is covered in Part II.
IMHO, this is the one place Microsoft really blew it. The shim solution adds a lot of work for every developer (as opposed to Microsoft doing it once up front), makes the whole solution more complex, and there is no way to debug problems with it.
Once you have the shim working, you’ll need to strong name all .NET DLLs, then Authenticode sign all DLLs. This is necessary to run on systems where security is set to High/do not trust add-ins.
There is one final issue you must address for your code to install correctly. Your initial setup program has registry settings in the HKCU for your add-in. These need to be deleted as you are not setting up your .NET code to be the add-in, but the shim instead. In your shim, the ConnectProxy.rgs file sets its add-in registry entries in the HKCU. If you always want to install your add-in for the current user only, this is fine. But if you want to give your users the choice of installing for everyone or installing for just me (and for 98% of you, you should), place the registry settings in the setup program under User/Machine Hive and delete them from ConnectProxk.rgs. (There will be a longer explanation of this in Part II.)
The biggest problem the Word add-in C# API suffers from is neglect, and its issues reside almost entirely in the .NET/C# wrapper and its associated features (such as documentation, signing security, and the shim layer). This means, once you figure out how to work around these issues, you’re left with a solid, powerful engine.
Additional Resources:
- Microsoft Knowledge Base article 302901: “How To Build an Office COM Add-in by Using Visual C# .NET”.
- Microsoft Knowledge Base article 830033: “How to apply Windows SP themes to Office COM add-ins”.
- MSDN Library: “Automating Word Using the Word Object Model”.
- MSDN Library: “Using the COM Add-in Shim Solution to Deploy Managed COM Add-ins in Office XP” by Misha Shneerson and Siew-Moi Khor.
- MSDN Library: “Working with the Office XP Primary Interop Assemblies” by Paul Cornell.
Надстройки — это подключаемые модули, которые расширяют возможности приложения, в данном случае Microsoft Word. Существуют разные виды надстроек, остановимся пока на надстройках, основанных на шаблонах.
Что такое шаблон в Word? Шаблон — это специальный файл, в котором содержатся различные сведения о стилях, структуре, параметрах страниц, содержащихся макросах и так далее, на основе которого можно создавать новые документы.
Существует два вида шаблонов — общие и шаблоны конкретных документов. Файлы шаблонов имеют расширение «.dot» или «.dotm». Общие шаблоны, в том числе и шаблон Normal.
dot, в который по умолчанию сохраняются макросы записываемые макрорекордером, содержат настройки, доступные всем документам MS Word. Шаблон конкретного документа содержит настройки, доступные только для документов, основанных на этом шаблоне.
В Word имеется ряд встроенных шаблонов документов, например шаблоны писем, контрактов, резюме и прочее. Выбрать нужный шаблон можно при создании нового документа.

Кроме этого пользователи могут сами создавать шаблоны для своих документов. Один и тот же шаблон может использоваться и как общий шаблон и как шаблон документа. Теперь рассмотрим сам процесс загрузки и подключения шаблонов. Чтобы не возникало путаницы, условно разделим шаблоны на «загруженные» и «подключенные».
Загруженными будем считать шаблоны, ставшие доступными приложению MS Word, а подключенными будем считать шаблоны, которые не только загружены, но и сделаны активными (в списке шаблонов и надстроек перед ними проставлены флажки). Глобальный шаблон Normal.dot по умолчанию всегда и загружен и подключен.
Обратите внимание на скриншот ниже, загружено три шаблона, а подключен из них один (не считая шаблона Normal).

В зависимости от того насколько часто шаблон будет использоваться, расположить его можно в разных папках. Для того, чтобы шаблон автоматически загружался и также автоматически подключался при каждом запуске MS Word, расположить его нужно в папке по адресу Documents and Settings/Ваше имя/Application Data/Microsoft/Word/Startup.
Если шаблон разместить в папке Documents and Settings/Ваше имя/Application Data/Microsoft/Шаблоны, то загружать и подключать его нужно будет вручную (об этом чуть позже), кроме того при каждом следующем запуске приложения Word, этот шаблон будет в списке загруженных шаблонов и надстроек, но снова будет выключенным. В этом списке отображаются не только общие шаблоны из папки «Шаблоны», но и шаблоны, автоматически загружаемые при запуске MS Word.
Еще один типичный случай, когда шаблон расположен в совершенно произвольной папке. Подключение рассмотрим в разных версиях в отдельности.
Microsoft Word 2003
Запускаем приложение, заходим в меню Сервис/Шаблоны и надстройки…

В появившемся диалоговом окне «Шаблоны и надстройки» нажимаем кнопку «Добавить…»

Через открывшееся окно проводника находим папку с нужным шаблоном. После добавления этот шаблон появится в списке шаблонов и надстроек, слева от него будет установлена галочка. Шаблон (надстройка) загружен и подключен.
Microsoft Word 2007
В запущенном приложении нажимаем кнопку Office и переходим в «Параметры Word». В диалоговом окне «Параметры Word» выбираем раздел «Надстройки». В поле «Управление» выбираем пункт «Надстройки Word» либо «Шаблоны» без разницы, после чего нажимаем кнопку «Перейти…».

Появляется диалоговое окно «Шаблоны и надстройки», в нем нажимаем кнопку «Добавить…» и добавляем нужный шаблон.

Это же диалоговое окно можно вызывать нажатием кнопки «Шаблон документа» на вкладке «Разработчик».

Если такая вкладка в Вашем приложении отсутствует, ее необходимо предварительно отобразить, это упростит и ускорит доступ к окну управления шаблонами и надстройками.
Microsoft Word 2010
В запущенном приложении переходим на вкладку «Файл», окрашенную в синий цвет, после чего переходим в «Параметры Word». В диалоговом окне «Параметры Word» выбираем раздел «Надстройки». В поле «Управление» выбираем пункт «Надстройки Word» либо «Шаблоны» без разницы, после чего нажимаем кнопку «Перейти…».

В появившемся диалоговом окне «Шаблоны и надстройки» нажимаем кнопку «Добавить…» и выбираем шаблон, который собираемся установить.

Тоже самое можно проделать еще быстрее, просто нажать кнопку «Шаблон документа» на вкладке «Разработчик».

Но есть один нюанс, вкладка «Разработчик» по умолчанию в приложении отсутствует, ее необходимо предварительно отобразить, на вкладке собраны инструменты для работы с макросами и надстройками и отображение этой вкладки упростит и ускорит доступ к окну управления шаблонами и надстройками.
Microsoft Word 2013
Также как и в Word 2010, в Word 2013 надстройки (шаблоны) можно установить двумя способами:
Через вкладку «Файл»/Параметры/Надстройки, в поле «Управление» из выпадающего списка выбрать пункт «Надстройки Word» либо «Шаблоны» и кликнуть по кнопке «Перейти». В появившемся окне менеджера надстроек «Шаблоны и надстройки» при помощи кнопки «Добавить» выбрать файл устанавливаемой надстройки и нажать «ОК».
Отобразить на ленте вкладку «Разработчик» и кликнуть по кнопке «Надстройки» в группе кнопок «Надстройки» либо по кнопке «Шаблон документа» в группе кнопок «Шаблоны».
Microsoft Word 2016
В Word 2016 установить надстройку/шаблон можно также, как и в предыдущих версиях, либо через вкладку «Файл»/Параметры/Надстройки с выбором пункта «Надстройки для Word» в поле «Управление», либо отобразить на ленте вкладку «Разработчик», кликнуть по кнопке «Надстройки» либо «Шаблон документа» и при помощи кнопки «Добавить» выбрать файл надстройки, которые требуется установить.
Автозагрузка надстроек в Microsoft Word
Чтобы надстройка автоматически загружалась и подключалась при запуске Word, её необходимо разместить в определенной папке по адресу …/Microsoft/Word/Startup. Если в папке …/Microsoft/Word нет папки Startup, то её можно создать вручную. Та часть пути к папке, которая обозначена многоточием, может различаться в зависимости от версий Windows и Office.
Универсальный способ при помощи которого можно определить весь путь к папке автозагрузки, независимо от версий операционной системы и Office — найти место расположения шаблона Normal.dot или Normal.dotm, подняться на один уровень вверх, это будет папка «…/Microsoft» найти и перейти в папку «Word».
Путь к папке автозагрузки должен выглядеть примерно так:
C:UsersВашеИмяAppDataRoamingMicrosoftWordSTARTUP
Источник: http://macros-vba.ru/nadstrojki/word/88-kak-ustanovit-nadstrojku-dlya-word
Для пользы дела: 20 лучших надстроек для Microsoft Office
Пакет Microsoft Office не нуждается в представлении. На протяжении почти трёх десятков лет это программное решение популярно в IT-среде и известно широкому кругу пользователей от мала до велика.
Специалисты всевозможных профессий, рядовые сотрудники крупных и небольших компаний, индивидуальные предприниматели, владельцы домашних компьютеров и мобильных устройств повсеместно используют этот инструмент для работы с различными типами документов: текстами, электронными таблицами, презентациями, почтой, базами данных и др. Неоценимую помощь MS Office оказывает студентам, аспирантам и научным руководителям, которые занимаются подготовкой рефератов, курсовых, дипломных и исследовательских работ, а также кандидатских и докторских диссертаций. Аудитория пользователей продукта огромна, а значит, наша подборка надстроек для Microsoft Office может пригодиться многим читателям 3DNews.

Перед тем как перейти непосредственно к обзору, позволим себе сделать небольшое отступление и сфокусировать внимание на двух важных, на наш взгляд, моментах. Во-первых, все перечисленные ниже расширения заимствованы из официального магазина приложений Office Store (он же — AppSource), поэтому в их надёжности и безопасности можно не сомневаться.
Во-вторых, скачивать дополнения можно как из онлайн-маркета, так и непосредственно из входящих в состав Microsoft Office программ, используя меню «Вставка → Надстройки». Оба варианта не отнимают много времени, просты в использовании и позволяют инсталлировать расширения буквально в два клика мышью.
Для быстрого доступа к установленным расширениям любое из них можно закрепить на панели инструментов офисных приложений.

Adobe Stock. Надстройка для PowerPoint, которая даёт доступ к внушительной коллекции высококачественных фотографий и иллюстраций.
Она позволяет выполнять поиск изображений по ключевым словам или категориям, не покидая презентацию.
Для работы с расширением необходимо зарегистрировать учётную запись на одноимённом портале Adobe Stock и оформить подходящий вариант подписки на услуги сервиса.
Imagebank. Аналог упомянутой выше надстройки, пользоваться которым можно бесплатно в течение 30 дней после регистрации аккаунта на сайте фотобанка. Отличный вариант для тех, кому требуется на скорую руку и без финансовых затрат красочно оформить документ или презентацию.

Modern Charts. Позволяет существенно расширить возможности табличного процессора Excel по визуализации данных.
Содержит более 20 готовых шаблонов для создания красивой инфографики профессионального уровня, включающей гистограммы, временные шкалы, карты, диаграммы областей и многие другие графические элементы.
Особенностями надстройки являются встроенный мастер диаграмм и широкие возможности по их конфигурированию.

Lucidchart. Ещё одна надстройка, упрощающая процесс рисования схем и диаграмм в табличном процессоре.
Пользователю доступны образцы и примеры блоков системных схем, UML- и ER-диаграмм, моделей бизнес-процессов, организационных проектов, различных типов связей между объектами и сущностями.
Предусмотрены средства конвертирования чертежей в различные графические форматы (включая векторные), а также экспортирования готовых макетов документов в профессиональный редактор диаграмм и блок-схем Microsoft Visio.
Yandex.Translate. С помощью этого инструмента легко переводить нужные слова и фразы, просто выделив их в тексте. Полученный перевод можно редактировать в отдельном окне, а затем вставлять обратно в текст. Поддерживается более 40 языков.
Translator. Ещё одна надстройка, которая может быть полезна при работе с документами на иностранных языках.
Функционирует в паре с одноименным переводческим веб-сервисом компании Microsoft, предлагает несколько вариантов перевода (если доступны) и позволяет профессиональным переводчикам, которые пользуются службой Translator Hub Category Service, получать доступ к хранилищу корпоративных или отраслевых переводов.

Evernote. Расширение для интеграции Outlook с сервисом для создания и синхронизации заметок Evernote.
Используя эту надстройку, можно сохранять письма в Evernote, сортировать их по блокнотам, присваивать метки, редактировать, синхронизовать с подключёнными устройствами и делиться с другими пользователями сервиса.
Также доступна возможность быстрого добавления заметок из Evernote в создаваемые в Outlook письма.
RMail. Связывает Outlook с одноимённым онлайн-сервисом и добавляет в программу такие функции, как шифрование электронной корреспонденции, отслеживание почтовых отправлений, автоматическое конвертирование писем и вложенных файлов в формат PDF, а также подписание документов электронной подписью, надёжно защищающей их от подделки и несанкционированных изменений.
Wikipedia. Надстройка, название которой говорит само за себя. Позволяет «подружить» текстовый редактор Word и табличный процессор Excel с развиваемой энтузиастами со всего мира свободной онлайн-энциклопедией Wikipedia.
Для работы с расширением достаточно выделить слово или словосочетание в тексте, и программа автоматически отобразит в отдельном окне подходящий справочный материал из «Википедии».
Тем, кому по долгу службы часто приходится работать с документами со множеством специфических терминов, такая надстройка придётся как нельзя кстати.

CompareDocs. Добавляет в рабочее окружение Word инструмент для автоматизированного сравнения двух версий одного документа в разных форматах — стандартном вордовском (DOC, DOCX и т. п.) и PDF, извлечь текст из которого порой бывает не так-то просто. CompareDocs решает эту задачу и находит все несовпадающие фрагменты.
Отличный вариант для сравнения юридически значимых документов и поиска несогласованных правок.
«Главред». Надстройка для улучшения читабельности набираемых в редакторе Word текстов.
Помогает находить в тексте стоп-слова: языковой мусор, рекламные и журналистские штампы, необъективные оценки, огульные обобщения, плеоназмы, неправильно используемые заимствования, признаки плохого синтаксиса, канцелярит и прочие требующие внимания словесные конструкции. Без этих слов текст становится понятным, коротким и информативным.
Чтобы приступить к работе с «Главредом», необходимо выделить мышью часть текста: приложение проанализирует содержимое отмеченной области, отобразит его в отдельной панели, подчеркнёт подозрительные места и предложит комментарии по исправлению.
Для проведения проверки надстройка передаёт выделенный текст одноимённому онлайновому сервису glvrd.ru, который, как утверждают разработчики, не сохраняет текст на сервере, не собирает и не хранит личной информации о пользователях.
Важно также помнить, что «Главред» не проверяет орфографию и пунктуацию — для подобного рода задач в Word предусмотрены встроенные средства проверки правописания.

LanguageTool. Надстройка, которая расширяет возможности встроенных в Word средств проверки правописания.
Умеет находить орфографические и пунктуационные ошибки, опечатки, а также проблемы в стилевой грамотности набираемых текстов. Поддерживает русский, английский, украинский, испанский, французский, немецкий, польский и другие языки.
Хороший выбор для тех, кто изучает иностранные языки и хочет быть уверенным в грамотности своей письменной речи.

PayPal for Outlook. Расширение для работы с одной из самых популярных электронных платёжных систем в мире.
Позволяет оплачивать счета и покупки, отправлять и принимать денежные переводы непосредственно из приложения Outlook, помимо средств для работы с электронной корреспонденцией предоставляющего функции органайзера, календаря, планировщика задач, записной книжки и менеджера контактов.
Fax.Plus. Добавляет в текстовый редактор Word возможность отправки факсимильных сообщений. Поддерживается пересылка документов более чем в 180 стран и отправка данных по расписанию. Передача данных осуществляется через одноимённый интернет-сервис, поэтому заморачиваться с приобретением и подключением к компьютеру факс-модема не нужно.

Email Recovery. Настройка для Outlook, о предназначении которой нетрудно догадаться по её названию.
Она сканирует почтовые базы, анализирует структуру данных и позволяет восстанавливать случайно удалённую корреспонденцию.
Потеря важных писем способна испортить настроение и изрядно потрепать нервы любому пользователю компьютера, поэтому списывать со счетов это расширение не стоит.
XLTools.net SQL Queries. Ещё одна полезная надстройка для табличного процессора Microsoft Office от тех же разработчиков.
При работе с большими листами Excel такие задачи, как объединение нескольких таблиц в одну, удаление дубликатов, сложносоставная фильтрация, группировка, сортировка и т. д., превращаются в трудоёмкие операции.
Приложение XLTools.net SQL Queries позволяет легко справиться с этими задачами.

XLTools.net SQL Queries . Ещё одна полезная надстройка для табличного процессора Microsoft Office от тех же разработчиков.
При работе с большими листами Excel такие задачи, как объединение нескольких таблиц в одну, удаление дубликатов, сложносоставная фильтрация, группировка, сортировка и т.д., превращаются в трудоёмкие операции. Приложение XLTools.
Источник: https://3dnews.ru/991894/20-luchshih-nadstroek-dlya-microsoft-office
Создание надстроек в Microsoft Office: Справочник по C#

В Office 2013, Office 2010 и Office 2007, есть возможность расширения функционала используя инструменты разработчиков Office в Visual Studio. В них входят шаблоны проектов, помогающие создавать решения Office с использованием Visual Basic и Visual C#, а также визуальные конструкторы, позволяющие создавать настраиваемые пользовательские интерфейсы для решений Office. Рассмотрим создание надстройки для Microsoft Outlook 2010. Запустите Microsoft Visual Studio и перейдите в «Файл» – «Создать проект». В левой части, открывшегося окна, расположен список разделов установленных шаблонов. Выберете раздел «Office», в центральной части окна, вам будет предложено выбрать один из шаблонов. Выберете шаблон «Надстройка Outlook 2010».

После создания проекта по шаблону, у вас автоматически откроется файл проекта «ThisAddIn.cs».

В обозревателе решений выберете ваш проект и сделайте клик правой клавишей мыши по нему. В открывшемся контекстном меню, выберете пункт «Добавить» – «Компонент…».

У вас откроется окно «Добавление нового элемента – OutlookAddIn1». В левой части окна «Установленные шаблоны», выберете раздел «Office». После выбора данного раздела, в центральной части окна вам будет предложено выбрать элемент для добавления, выберете «Лента (визуальный конструктор)». Нажмите на кнопку «Добавить».

После добавления нового элемента Ribbon (Лента (визуальный конструктор)), у вас откроется новая вкладка «Ribbon1.cs [Конструктор]» в режиме конструктора.
Ribbon или Microsoft Fluent Interface — тип интерфейса в GUI-приложениях, основанный на панелях инструментов, разделенных вкладками. Последние приложения, выпущенные компанией Microsoft, применяют эту форму интерфейса, главной частью которой является модульная лента. Дополнительную информацию по данному типу интерфейса вы можете получить по адресу: http://ru.wikipedia.org/wiki/Ribbon.
По умолчанию, у вас создается вкладка «TabAddIns (Встроенный)» и в ней группа «group1». Сделайте клик правой клавишей мыши по группе «group1» и выберете из появившегося контекстного меню, пункт «Свойства».

В свойствах данного элемента вы можете изменить текст, отображаемый на данной группе.

Перейдите в «Панель элементов», из предложенного списка «Элементы управления ленты Office» выберете «Button» и добавьте его на группу «group1».

У вас получится приведенный ниже вариант.

Что бы вкладка отображалась в Microsoft Outlook, ей необходимо задать место отображения, это может быть как основное окно, так и отображение только в отдельном окне, например, создания сообщения.
Зададим расположение данной вкладки, в ленте основного окна. В конструкторе «Ribbon1. cs», сделайте клик правой клавишей мыши по надписи «Ribbon1» и выберете из появившегося контекстного меню, пункт «Свойства».
У вас откроются свойства самого элемента управления «Ribbon». Найдите свойство «RibbonType». Данное свойство отвечает за определение типов инспекторов Outlook, к которым применяется лента, т.е. где будет отображаться вкладка с кнопкой. Напротив данного свойства присутствует выпадающий список инспекторов Outlook, выберете только «Microsoft.Outlook.Explorer».
Данный тип устанавливает отображение вашей вкладки на ленте основного окна Microsoft Outlook.
В конструкторе «Ribbon», сделайте двойной клик по компоненту «Button». Вы перейдете в автоматически созданный метод «button1_Click». Добавьте в него приведенный ниже листинг кода. Данный код создает новое сообщение с заполнением некоторых полей.
Outlook.MailItem mailItem = (Outlook.MailItem)
OutlookAddIn1.Globals.ThisAddIn.Application.CreateItem(Outlook.OlItemType.olMailItem);
mailItem.Subject = «Тестовое письмо»;
mailItem.To = «test@csharpcoderr.com»;
mailItem.Body = «Текст сообщения»;
mailItem.Importance = Outlook.OlImportance.olImportanceLow;
mailItem.Display(false);
Для работы данного кода, вам необходимо подключить следующие пространства имен и добавить соответственно, ссылки на библиотеки в обозревателе решений.
using Outlook = Microsoft.Office.Interop.Outlook;
using Office = Microsoft.Office.Core;
Для проверки работоспособности вашего проекта, нажмите на клавиатуре клавишу «F5». У вас откроется Microsoft Outlook с вашей вкладкой в главной ленте.
Выберете вашу вкладку и нажмите на единственную кнопку, которую вы добавили. У вас откроется новое сообщение, с заполненными некоторыми полями.
Закройте Microsoft Outlook и остановите отладку вашего проекта. Если вы теперь запустите Microsoft Outlook, вы так же увидите вашу вкладку на ленте главной панели.
Для удаления надстройки, необходимо удалить сборку надстройки, записи реестра и параметры безопасности. В противном случае, надстройка будет запускаться каждый раз при открытии Microsoft Outlook, на компьютере разработчика. Все это, можно сделать в два клика.
Перейдите в Microsoft Visual Studio, «Построение» – «Очистить OutlookAddIn1».
Дополнительную информацию по данной проблеме вы можете получить по адресу http://msdn.microsoft.com/en-us/library/cc668191.aspx.
Для установки проекта на другие компьютера, вы можете выполнить создание файла установки (Setup.exe). Сделайте клик правой клавишей мыши по вашему решению в обозревателе решений и выберете из появившегося контекстного меню «Добавить» – «Создать проект…».
У вас откроется новое окно «Добавить новый проект». В левой части окна «Установленные шаблоны», выберете раздел «Другие типы проектов» – «Установка и развёртывание» – «Установщик Visual Studio». После выбора данного раздела, в центральной части окна, вам будет предложено выбрать тип шаблона установки, выберете шаблон «Проект установки».
В обозревателе решений у вас появится новый проект установки. Сделайте клик правой клавишей мыши по новому проекту и выберете из появившегося контекстного меню, пункт «Добавить» – «Выходной элемент проекта…».
У вас откроется новое окно «Добавление выходной группы проекта». По умолчанию, у вас выберется ваш проект надстройки, а так же будет предложен список, какие файлы проекта вы можете добавить в файл установщика. Выберете «Основные выходные файлы».
После нажатия кнопки «ОК», в обозревателе решений, в проекте установки, у вас появится список обнаруженных зависимостей, а так же новое свойство проекта «Основные выходные файлы из OutlookAddIn1 (Активный)».
При построении проекта в папке «Debug» у вас создался установочный файл надстройки с расширением *.vsto и дополнительный файл с расширением *.dll.manifest. Эти два файла также необходимо добавить в проект установки.
Манифест сборки(*.dll.manifest). Любая сборка, статическая или динамическая, содержит коллекцию данных с описанием того, как ее элементы связаны друг с другом. Эти метаданные содержатся в манифесте сборки. Манифест сборки содержит все метаданные, необходимые для задания требований сборки к версиям и удостоверения безопасности, а также все метаданные, необходимые для определения области действия сборки и разрешения ссылок на ресурсы и классы. Дополнительную информацию вы можете получить по адресу http://msdn.microsoft.com/ru-ru/library/1w45z383(v=vs.110).aspx.
Для добавления этих файлов в проект установки, сделайте клик правой клавишей мыши по проекту установки и выберете из появившегося контекстного меню, пункт «Добавить» – «Файл…».
У вас откроется окно «Добавление файлов», перейдите в выходной каталог «Debug», вашего проекта и выберете два файла, с расширением *.vsto и дополнительный файл с расширением *.dll.manifest.
После нажатия на кнопку «Открыть», в обозревателе решений, в проекте установки, вы увидите имена ваших добавленных файлов.
Нажмите на клавиатуре клавишу «F6», для построения всего решения. А так же в обозревателе решений вашего проекта, сделайте клик правой клавишей мыши по проекту установки «SetupOutlookAddIn» и выберете из появившегося контекстного меню пункт «Построение».
В папке «OutlookAddIn1SetupOutlookAddInRelease» вашего проекта, вы найдете файл установки.
Запустите его и следуйте указаниям мастера установки. После успешной установки, перезапустите Microsoft Outlook, если он был запущен или запустите его. На панели вкладок вы увидите вашу надстройку. Так же в «Панель управления» – «Программы и компоненты» (Установка и удаление программ), в списке установленных программ вы найдете вашу надстройку.
Так же можно выполнить установку вашей надстройки и без проекта установщика Visual Studio. Перейдите в каталог «Release» вашего проекта «OutlookAddIn1». Найдите файл с именем «OutlookAddIn1.vsto» и сделайте двойной клик левой клавишей мыши по нему. У вас запустится «Установщик настройки Microsoft Office». Нажмите на кнопку «Установить».
После успешной установки, вы увидите сообщение: «Настройка Microsoft Office успешно установлена».
Чтобы скрыть или удалить вашу надстройку, откройте Microsoft Outlook и перейдите в «Файл» – «Параметры».
В открывшемся окне «Параметры Outlook», выберете в левой части окна раздел «Надстройки». После выбора данного раздела, в правой части окна, откроется список установленных надстроек. Найдите и выберете вашу надстройку, в нижней части окна, расположено поле «Управление», с кнопкой «Перейти», нажмите на нее.
У вас откроется окно «Настройки для модели компонентных объектов (COM)». Для отключения (скрытия) вашей надстройки снимите галочку, расположенную перед именем вашей надстройки. Чтобы удалить вашу надстройку из Microsoft Outlook, выберете вашу надстройку и нажмите на кнопку «Удалить».
После нажатия кнопки «Удалить», ваша надстройка автоматически удалится из панели вкладок. Но если захотите повторно выполнить установку данной надстройки, запуском файла с именем «OutlookAddIn1.vsto», вы получите сообщение «Последняя версия этой настройки уже установлена».
Microsoft Outlook удалил, только ссылки на вашу надстройку. Для полного удаления, зайдите в «Панель управления» – «Программы и компоненты» (Установка и удаление программ).
В списке установленных программ вы найдете вашу надстройку, выберете ее и нажмите на кнопку «Удалить». Только после выполнения этих действий ваша надстройка полностью удалится с компьютера.
Ссылка для скачивания примера: Яндекс.Диск
Создание надстроек в Microsoft Office: Справочник по C#
Источник: http://csharpcoderr.com/2013/12/microsoft-office.html
Не волнуйтесь, я сейчас все объясню!
Если вы следите за новостями от Microsoft, то, наверняка видели в последней рассылке TechNet замечательную статью Татьяны Сушенко 8 бесплатных надстроек к Office 2010, о которых вы не знаете.
Действительно, надстройки к Microsoft office могут достаточно серьезно изменить функциональные возможности входящих в него программ, сделав их более подходящими для решения рутинных задач пользователя. Понятно, что для разных категорий пользователей эти задачи разные, поэтому разные пользователи и надстройки выбирают разные.
Мне показалось важным подобрать 10 бесплатных надстроек для Microsoft Office, которые сделают его более пригодным для нужд образования — для учителей, преподавателей, студентов. мне кажется, каждое из этих приложений может быть прекрасным подарком ко Дню учителя, который мы вскоре будем отмечать. Пусть каждый выберет себе подарок по душе.
1. PPTMerge — Слияние данных в PowerPoint
Многие хорошо знают замечательные инструменты слияния, которые используются в Microsoft Office Word, Excel, Outlook. При помощи этих инструментов очень удобно готовить персонифицированные письма, делая адресные рассылки, печатать приглашения и т.д.
Программа PowerPoint в этом семействе оказалась незаслуженно обойдена подобным инструментом. безусловно, основная задача PowerPoint — создание презентаций.
однако беглого взгляда на шаблоны достаточно, чтобы увидеть, что многие пользователи используют PowerPoint как программу для создания дипломов, почетных грамот и открыток.
PPTMerge позволит методом слияния создать десятки и сотни персонифицированных поздравительных открыток или приглашений на праздник Последнего звонка.
Все, что от вас требуется, это открыть шаблон презентации, которая содержит специальные текстовые «поля слияния» , и выбрать файл данных для объединения. PPTMerge сделает все остальное, автоматически создав слайды или целые презентации, наполнив их данными из каждой записи в вашем файле данных.
- Предположим, вы должны создать презентацию для церемонии награждения.
- У вас уже есть список имен 50 лауреатов, награды, которые они выиграли, есть файлы с фотографиями лауреатов и некоторая другя личная информация по каждому участнику.
- И у вас уже есть шаблон презентации, предназначенной для показа на церемонии награждения.
Обычно в этом случае организатор кропотливо повторяет операции копирования / вставки имен и другой информации в PowerPoint, а затем импортируете все фотографии по одной. Надеюсь, что вы успеете сделать это вовремя (:-). И без ошибок (:-). При этом постарайтесь не свалиться от истощения.
PPTMerge делает всю эту работу за вас. В течение всего нескольких секунд, он может создать новую презентацию на основе шаблона, добавить новый слайд для каждого лауреата, и заменить поля в шаблоне «живой» информацией о каждом лауреате, взятой из вашего файла Excel или текстового файла с информацией, разделенной запятыми (CSV) .
PPTMerge будет отличным подарком ко Дню учителя для педагога-организатора или зам. директора по воспитательной работе, которым много приходится создавать презентаций, подобных описанной.
Скачать бесплатную демо-версию можно с сайта создателя: PPTools PPT Merge — Mailmerge for PowerPoint
2. Chemistry Add-in for Word
Chemistry Add-in for Word — незаменимая надстройка к Microsoft Office для тех, кто изучает органическую химию. Она позволяет студентам, изучающим химию, преподавателям и исследователям легко вставлять и изменять информацию о химических веществах, рисовать структурные формулы, создавать наглядные пособия на небывалом прежде уровне.
В дополнение к возможности создания формул и двумерных структур, Chem4Word позволяет пользователю обозначать различные «химические зоны » внутри структуры, и создавать качественные визуальные изображения химических структур, пригодные для распечатки плакатов и наглядных пособий с возможностью хранить не просто картинки химических структур, формулы, несущие в себе огромное количество различной химической информации.

- При установке надстройки в панель инструментов Microsoft Office добавляется еще одна вкладка Chemistry:

- Эта вкладка позволяет создать в документе так называемую «химическую зону», в которую можно либо вставить химическую структуру из готовой библиотеки структур, входящей в комплект, либо построить свою химическую формулу (в том числе и на основе шаблонов, которые тоже в программе имеются.

- Всю прелесть работы с этой надстройкой могут оценить только химики, безуспешно пытавшиеся конструировать химические формулы при помощи стандартного редактора формул Microsoft Office Word. Для учителя химии эта надстройка будет лучшим подарком к Дню учителя
- Chemistry Add-in for Word полностью бесплатна. Скачать ее можно с сайта Microsoft Research


3. Microsoft Math Add-in for Microsoft Office Word 2007
Microsoft Math Add-In для Microsoft Office Word 2007 позволяет легко создавать графики, выполнять вычисления, и решать различные уравнения с переменными, созданные непосредственно в Word.
Microsoft Math Add-In добавляет вычислительные и графические возможности к редактору формул в ленте Word 2007.
С Microsoft Math Add-In для Word 2007 вы можете:
Пакет этот настолько мощный, что все функции, пожалуй, и не перечислишь.
Пакет бесплатный и может быть прекрасным подарком ко Дню Учителя для всех, кто использует в своей работе математику. Скачать его можно здесь.
4. Обучающая игра от Office Labs
Изобретатели из Office Labs создали игру Ribbon Hero, которая помогает изучать новые возможности Office 2007 и Office 2010.
В чем заключается эта игра? Пользователю необходимо загрузить небольшой плагин для Office и выполнить ряд заданий. Например, создать документ по образцу. За точное выполнение и правильное использование ленточного интерфейса, игроку начисляются баллы.
Источник: http://shperk.ru/uroki/word/10-nadstroek-dlya-microsoft-office.html
Топ 20 надстроек для Microsoft Office
Microsoft Office — это незаменимый инструмент для работы, учебы, и просто даже для частого использования в повседневной жизни при использования компьютера. MS Office уже имеет «из коробки» множество функций, но Вы так же можете скачать с официального магазина Office Store (он же — AppSource) (бесплатно) дополнительные надстройки (расширения) для своего Офисного пакета.
Они могут быть чрезвычайно полезны и облегчить Вам повседневную рутину, и возможно, о большинстве из них Вы даже не догадывались. В названии надстройки мы указали ссылку, для скачивания приложения с официального магазина для Вашего удобства.
А так же, после скачивания приложения и дальнейшего его использования, для быстрого доступа к ним — Вы можете закрепить их на панели инструментов.

Adobe Stock — Это надстройка для PowerPoint, она дает доступ к огромной коллекции качественных фотографий и иллюстраций. Поиск изображений может быть осуществлен по ключевым словам, или категориям прямо не выходя из презентации. Для работы с данным расширением Вам нужно зарегистрироваться на портале Adobe Stock, и соответственно оформить вариант подписки.
Imagebank — Прямой аналог вышеупомянутого расширения, с одним приятным ньюансом, пользоваться им можно бесплатно в течении 30 дней, после регистрации аккаунта на ресурсе фотобанка. Отлично подходит для того, чтобы быстро и без финансовых вложений красочно оформить свой документ или презентацию.

Modern Charts — Надстройка для расширения возможности таблиц Exel для визуализации данных. Содержит в себе свыше 20 готовых шаблонов, которая позволит Вас создать красочную инфографику на профессиональном уровне.
Она включает в себя гистограммы, временные шкалы, карты, диаграммы областей и многие другие графические элементы. Отличительной особенностью является встроенный конструктор диаграмм, и обширные возможности его конфигурации.

Lucidchart — Еще одно дополнение для Exel, упрощающая процесс рисования схем и диаграмм.
Пользователю доступны шаблоны блоков системных схем, UML- и ER-диаграмм, моделей бизнес-процессов, организационных проектов, различных типов связей между объектами и сущностями.
А так же, есть функция конвертирования чертежей в различные графические форматы, в т.ч векторные и все это можно будет экспортировать в Microsoft Visio!
Yandex.Translate — Дополнение переводчика от Яндекс в Ваш Microsoft Ofiice. Переводите нужные слова, фразы и текста, просто выделив их в тексте. Поддержка более 40 языков.
Translator — Еще одно дополнение «переводчика» поможет Вам с документами на иностранных языках. Отличительной особенностью является облачное хранилище Translator Hub Category Service, которое позволяет получать доступ к облаку корпоративных или отраслевых переводов.

Evernote — Данная надстройка создана для Outlook, она интегрирует Оутлук с сервисом синхронизации заметок Evernote. Используя это расширение Вы сможете сохранять письма в Evernote, а так же производить их сортировку по меткам, категориям и редактировать их, синхронизировать с другими устройствами и делиться с другими пользователями данного сервиса.
RMail — Дополнение интегрирует Outlook с сервисом RMail и предоставляет возможности шифрования писем, отслеживание отправлений, автоматическое конвертирование самих писем, так и их вложений в формат PDF, и по мимо всего прочего — подписание документов электронной подписью.
Wikipedia — Синхронизирует Ваш Microsoft Office с энциклопедией Wikipedia. Просто выделяете слово, или словосочетание и Ваш Office отобразит в отдельном окне подходящий материал из Википедии.

CompareDocs — Данное расширение добавляет в Word для автоматического сравнения двух версий одного документа в разных форматах (DOC, DOCX и т. п.) и PDF. Такая надстройка найдет и покажет все не совпадающие фрагменты, незаменимый инструмент для быстрого сравнения юридически-значимых документов и поиска несогласованных правок.
«Главред» — Умное расширение для улучшения читабельности текста в приложении Word.
Дополнение поможет Вам найти в тексте стоп-слова: рекламные штампы, журналистикие штампы, слова-паразиты, плеоназмы, огульные обобщения, заимствования, которые были не правильно использованы, плохой синтаксис, не правильно поставленные слова, канцелярит и пр.
требующие внимания словесные конструкции. Без этих слов текст становится понятным, коротким и информативным. Главред не проверяет орфографию и пунктуацию, т.к такая функция уже встроена в приложение Word.
Чтобы приступить к работе с данным расширением, нужно выделить текст и тогда приложение проанализирует и отобразит в отдельной панели свой результат. Сервис берет обязательство, что Ваш текст не сохраняется на серверах и данная проверка является полностью анонимной.
 LanguageTool — Это дополнение является «дополнением» к уже существующей функции Word встроенной проверки правописания.
Надстройка найдет Вам орфографические, пунктуационные ошибки, опечатки, и проблемы в стилевой грамотности набираемых текстов, что бы все слова были на своих местах.
Дополнение поддерживает русский, английский, украинский, испанский, французский, немецкий, польский и многие другие языки. Отличный помощник для тех, кто изучает иностранные языки и хочет быть уверенным в правильности и грамотности написанного текста.

PayPal for Outlook — Данное расширение позволяет работать с системой электронных платежей PayPal прямо из приложения Outlook.
Fax.Plus — Дополнение для отправки Факса (факсимильных сообщений) прямо из приложения Word, поддерживается более 180 стран (в т.ч РФ) и отправка данных по расписанию. Передача факса осуществляется через интернет-сервис и благодаря этому подключать к компьютеру факс-модем, или телефонную линию не нужно.

15) Email Recovery — Название надстройки говорит само за себя. Дополнение позволяет восстановить случайно удаленные письма. Потеря важных писем может изрядно потрепать Вам нервы, но с этой надстройкой у Вас еще будет шанс все вернуть ????
XLTools.net SQL Queries — Еще одна полезная надстройка для Exel. В легком графическом интерфейсе позволяет объединять таблицы, удалять дубликаты, умеет в сложносоставную фильтрацию, группировку, сортировку и многое другое!

Источник: https://softcomputers.org/blog/top-20-nadstroek-dlya-microsoft-office/
Пошаговое руководство. Создание первой надстройки VSTO для Word
Опубликовано: Апрель 2016
В этом вводном пошаговом руководстве показано, как создать надстройку VSTO для Microsoft Office Word. Функции, создаваемые в таком решении, доступны для самого приложения независимо от того, какие документы открыты.
**Применимость.** Информация в этой статье относится к проектам надстроек VSTO для Word. Дополнительные сведения см. в разделе [Доступность функций по типам приложений Office и проектов](../Topic/Features%20Available%20by%20Office%20Application%20and%20Project%20Type.md).
В данном пошаговом руководстве рассмотрены следующие задачи:
- Создание проекта надстройки VSTO для Word
- Написание кода, который использует объектную модель Word для добавления текста в документ при его сохранении.
- Построение и запуск проекта для тестирования.
- Очистка готового проекта для прекращения автоматического запуска надстройки VSTO на компьютере разработчика.
Примечание
Отображаемые на компьютере имена или расположения некоторых элементов пользовательского интерфейса Visual Studio могут отличаться от указанных в следующих инструкциях. Это зависит от имеющегося выпуска Visual Studio и используемых параметров. Для получения дополнительной информации см.
Персонализация интегрированной среды разработки Visual Studio.
Ниже приведены компоненты, необходимые для выполнения данного пошагового руководства.
Выпуск Visual Studio, включающий инструменты разработчика Microsoft Office. Дополнительные сведения см. в разделе [Настройка компьютера для разработки решений Office](../Topic/Configuring%20a%20Computer%20to%20Develop%20Office%20Solutions.md).
- Запустите Visual Studio.
- В меню Файл выберите пункт Создать, а затем команду Проект.
- В области шаблонов разверните узел Visual C# или Visual Basic, а затем узел Office/SharePoint.
- В развернутом узле Office/SharePoint выберите узел Надстройки Office.
- В списке шаблонов проектов выберите проект надстройки VSTO для Word.
- В поле Имя введите FirstExcelAddIn.
- Нажмите кнопку ОК.
Visual Studio создает проект FirstWordAddIn и открывает файл кода ThisAddIn в редакторе.
Написание кода для добавления текста в сохраняемый документ
Добавьте код в файл кода ThisAddIn. Новый код использует объектную модель Word для добавления стандартного текста в каждый сохраненный документ. По умолчанию файл кода ThisAddIn содержит следующий созданный код:
- Частичное определение класса ThisAddIn. Этот класс предоставляет точку входа для кода и обеспечивает доступ к объектной модели Word. Дополнительные сведения см. в разделе
Приступая к программированию надстроек VSTO. Остальная часть класса ThisAddIn определяется в скрытом файле кода, изменять который не следует. - Обработчики событий ThisAddIn_Startup и ThisAddIn_Shutdown. Эти обработчики событий вызываются, когда Excel загружает и выгружает надстройку VSTO. Их можно использовать для инициализации надстройки VSTO в процессе ее загрузки, а также для освобождения ресурсов, используемых вашей надстройкой VSTO при ее выгрузке. Дополнительные сведения см. в разделе
События в проектах Office.
В файле кода ThisAddIn добавьте в класс ThisAddIn указанный ниже код. Новый код определяет обработчик событий для события
E:Microsoft.Office.Interop.Word.ApplicationEvents4_Event.DocumentBeforeSave, которое возникает при сохранении документа.
Когда пользователь сохраняет документ, обработчик событий добавляет новый текст в начало документа.
void Application_DocumentBeforeSave(Word.Document Doc, ref bool SaveAsUI, ref bool Cancel)
{
Doc.Paragraphs[1].Range.InsertParagraphBefore();
Doc.Paragraphs[1].Range.Text = «This text was added by using code.»;
}
Private Sub Application_DocumentBeforeSave(ByVal Doc As Word.Document, ByRef SaveAsUI As Boolean, _
ByRef Cancel As Boolean) Handles Application.DocumentBeforeSave
Doc.Paragraphs(1).Range.InsertParagraphBefore()
Doc.Paragraphs(1).Range.Text = «This text was added by using code.»
End Sub
Если вы используете C#, добавьте в обработчик событий ThisAddIn_Startup указанный ниже код. Этот код используется для подключения обработчика событий Application_DocumentBeforeSave к событию
E:Microsoft.Office.Interop.Word.ApplicationEvents4_Event.DocumentBeforeSave.
this.Application.DocumentBeforeSave +=
new Word.ApplicationEvents4_DocumentBeforeSaveEventHandler(Application_DocumentBeforeSave);
Для изменения документа при его сохранении в приведенных выше примерах кода используются следующие объекты.
Нажмите клавишу F5 для сборки и запуска проекта.
При сборке проекта код компилируется в сборку, которая включается в выходную папку сборки для проекта. Visual Studio также создает ряд записей реестра, которые позволяют Excel обнаружить и загрузить надстройку VSTO, и настраивает параметры безопасности на компьютере разработчика, разрешая запуск надстройки VSTO. Дополнительные сведения см. в разделе
Построение решений Office.
В Word сохраните активный документ.
Убедитесь, что в документ добавлен следующий текст.
Этот текст был добавлен с помощью кода.
Закройте Word.
Завершив разработку проекта, удалите с компьютера разработчика сборку надстройки VSTO, записи реестра и параметры безопасности. В противном случае надстройка VSTO будет запускаться при каждом открытии программы Word на компьютере разработчика.
В Visual Studio в меню Сборка выберите пункт Очистить решение.
Теперь, когда вы создали базовую надстройку VSTO для Word, ознакомьтесь с более подробными сведениями о разработке надстроек VSTO в следующих разделах.
Источник: https://technet.microsoft.com/ru-ru/security/cc442946(v=vs.85)
I am a novice.
I wish for my word add-in to be notified when text changes or selection changes.
This is my code, it didn’t work as expected。
Office.context.document.addHandlerAsync(Office.EventType.BindingDataChanged, results => {
    console.log(results);
});
Am I using it correctly? Is there any other way to monitor text or selection changes?
Reference document address
https://docs.microsoft.com/en-us/javascript/api/office?view=common-js
https://docs.microsoft.com/en-us/javascript/api/word?view=word-js-preview