
111
111 people found this article helpful
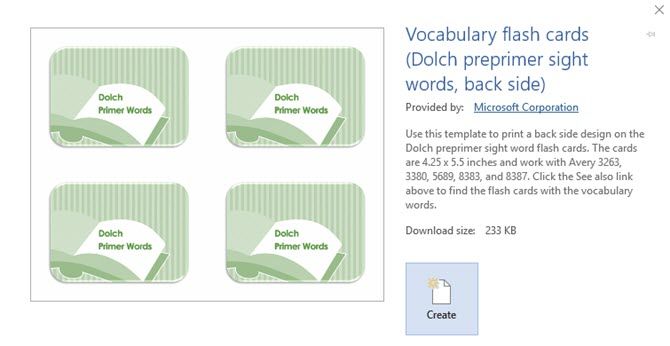
Use a template to make printable flash cards
Updated on September 24, 2022
What to Know
- In Word, open a new blank document. Choose the Layout tab. Select Layout > Orientation > Landscape.
- In Layout > Size, choose 4″ x 6″. Type what you want the card to say. Press Ctrl+Enter to generate a new card.
- Go to the Design tab to add a theme, color, or effects to the flashcard.
This article explains how to make flashcards using Microsoft Word by changing the size of the document. It also contains information on making index cards using the envelope and label print settings. The instructions in this article apply to Microsoft Word 2019, Microsoft 365, and Word 2016.
How to Make Your Own Flashcards in Word
Flashcards are a wonderful learning tool both for children and adults, but writing each one by hand can be time consuming. With Microsoft Word you can make your own flashcards and print them out ready to use.
While older versions of Microsoft Word had simple flashcard or index card templates, it seems those templates were no longer available as of Word 2016. No need to fret because making flashcards on Word is still easy to do, and you can save your flashcards as a template as well.
-
Open Microsoft Word and select a new blank document.
-
Click Layout Tab, this is going to allow you to resize the page into a more proper flashcard size.
-
Under Layout > Orientation, select Landscape.
-
In Layout > Size, select 4”x 6” size. This will give you the perfect size for printable flashcards.
-
Type out what you want the card to say and press Ctrl+Enter to create a new card. This is where you write the response for the first card if necessary or create a new card.
-
Also, remember you can go to the Design tab and add a theme, colors, and effects to the flashcards if you need them to stand out a bit or make them colorful.
This is also a great tool for teachers to create flashcards for their students without having to spend their already limited amount of time and resources making them.
How to Make Index Cards from the Envelopes & Labels Printing Settings
Another easy way to make index cards is by using the envelopes and labels printing settings in Microsoft Word 2016. Here’s what you need to do:
-
Start with a blank document in Word and go to the Mailings tab.
-
Select the Labels option in the top left of the Mailings tab.
-
A window will open up, click the Labels tab, and select the Options button.
-
Now select Index Cards from the menu. To the right of the selection, you will see the measurements for the index card.
Printer Settings for Flashcards on Word
Now that you are done creating the cards, it’s time to have them all printed out. If you have the style of flashcards where you need one side with a question or statement and the opposite side to have the answer, then you will want to turn on double-sided printing. If you just need to have the information or image printed on one side of the card, then make sure you have double-sided printing turned off.
Go to File > Print. Now just choose the size you selected for the cards: 3.5 x 5 or 4×6. You might want to select Narrow Margins for the flash cards.
Save the Flashcards as a Microsoft Word Template
Even though the steps to create flashcards are simple to follow, it will make life easier if you just save this file as a template. This way, you can always jump right into the formatted document and just insert the new information you need for the new index cards.
FAQ
-
How do you insert a signature in Microsoft Word?
To insert a signature in Word, scan and insert a signature image into a new Word document and type your information beneath it. Select the signature block and go to Insert > Quick Parts > Save Selection to Quick Part Gallery. Name the signature. Select AutoText > OK.
-
How do you delete a page in Microsoft Word?
To delete a page in Microsoft Word, select View, then go to the Show menu and select Navigation Pane. In the left pane, choose the page you want to delete and press the delete/backspace key.
-
How do you check the word count in Microsoft Word?
To check the word count in Microsoft Word, look at what’s displayed in the Status Bar at the bottom of the screen. If you don’t see the number of words, right-click the Status Bar and choose Word Count.
Thanks for letting us know!
Get the Latest Tech News Delivered Every Day
Subscribe
Это также отличный инструмент для учителей для создания карточек для своих учеников без необходимости тратить их и без того ограниченное количество времени и ресурсов на их изготовление.
Откройте Microsoft Word и выберите новый пустой документ .
Нажмите вкладку Layout , это позволит вам изменить размер страницы до более подходящего размера карточки.
На вкладке макета вам нужно будет выбрать страницу размером 4 x 6 дюймов и выбрать альбомную или портретную компоновку — в зависимости от того, что вам больше подходит. Это даст вам идеальный размер для печати карточек.
Введите то, что вы хотите сказать, и нажмите Ctrl + Enter, чтобы создать новую карту. Здесь вы пишете ответ для первой карты, если это необходимо, или создаете новую карту.
Кроме того, помните, что вы можете перейти на вкладку «Дизайн» и добавить тему, цвета и эффекты на карточки, если вам нужно, чтобы они немного выделялись или делали их яркими.
Word for Microsoft 365 Publisher for Microsoft 365 Word 2021 Publisher 2021 Word 2019 Publisher 2019 Word 2016 Publisher 2016 Word 2013 Publisher 2013 Word 2010 Publisher 2010 More…Less
Word and Publisher come with built-in templates that you can use to print different types of labels, business cards, dividers, name badges, postcards, and more. To see them in Word or Publisher, click File > New and search for labels or business cards.
See Also
Create and print labels
Mail merge for labels
Use Avery templates in Word
Mail merge using an Excel spreadsheet
Download more Microsoft templates
Need more help?
Microsoft Word may not be a full-fledged graphics program, but you can use its layout, font, text box, and other features to make, surprisingly, exceptional custom holiday cards with a little clever manipulation and some creativity. You can use images or clipart from your own collection, download royalty-free images from the web, or use Shapes and Special Effects in Word to draw your own custom images.
Note: If you’re planning to use envelopes (as opposed to a postcard-type design), note that the paper size may be determined by the size of the envelope. So, choose your envelopes first, then create your project.
Designing envelopes in Word
1. Because envelopes are generally wider than tall, open a blank Word document, and select Page Layout > Orientation > Landscape.
2. Next, select Page Layout > Size > More Paper Sizes.
Select Orientation and Paper Size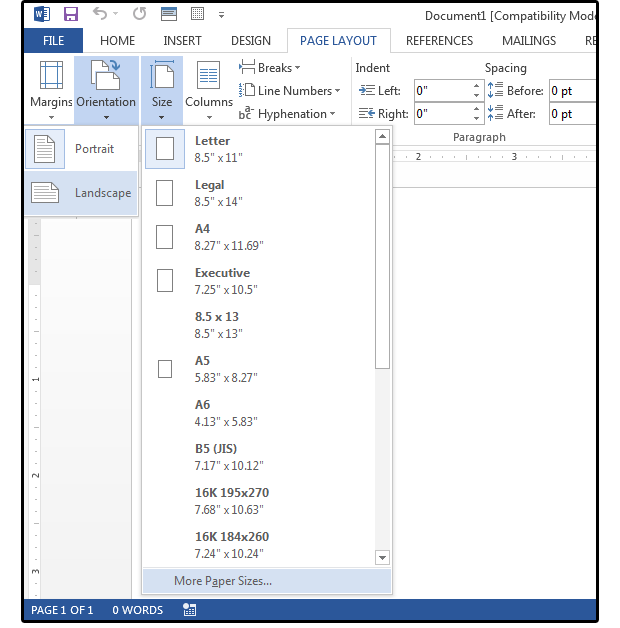 JD Sartain
3. Under Paper Size on the Page Setup screen, scroll down to the envelope section. Note that there are five preset options, plus an option to create a custom-sized envelope. The presets are as follows:
a. #10 Envelope: 9.5 inches wide x 4.13 inches tall
b. Envelope Monarch: 7.5 inches wide x 3.88 inches tall
c. Envelope B5: 9.84 inches wide x 6.93 inches tall
d. Envelope C5: 9.02 inches wide x 6.38 inches tall
e. Envelope DL: 8.66 inches wide x 4.33 inches tall
f. Custom: any size you like
Most greeting card sizes are about 5 x 7 inches with an A7 (5.25 x 7.25-inch) envelope; about 4.5 x 6.125 inches (or 4 x 6 inches) with an A6 (4.75 x 6.5 inches) envelope; or 4.25 x 5.5 inches with an A2 (4.375 x 5.75 inches) envelope. Office supplies and stationery stores sell all of these sizes and more; however, it’s still a good idea to buy the envelopes first, then design the product.
4. Select the Custom paper size from the Page Setup Screen, then enter a width of 7.25 inches and a height of 5.25 inches (this is for a card size of 5 x 7 inches). Click OK. Notice that the envelope now appears on your screen.
Choose a preset paper size or create a custom size envelope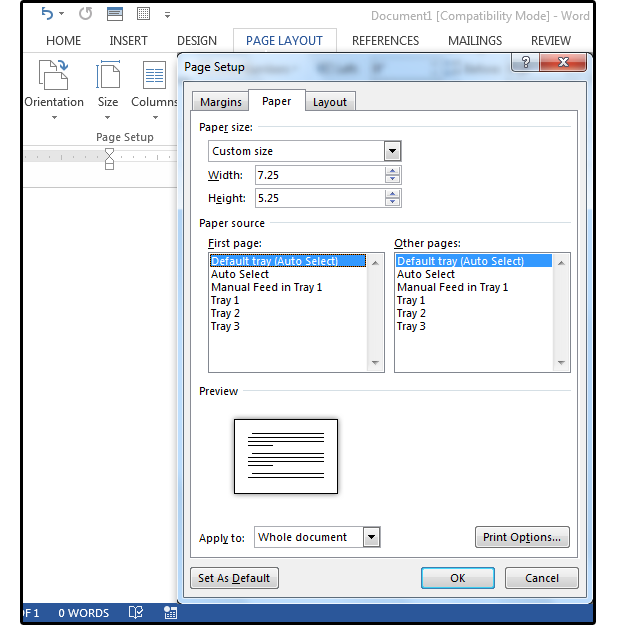 JD Sartain
Note: If you use Word to create your envelopes, you can mail-merge your mailing list from any ASCII/CSV database, from your Outlook Address Book, or from your phone. Our story on mail merge using an Excel database offers more information on this process.
5. Change the margins on the envelope to 0.5 inches on all sides.
6. Select Insert > Pictures, browse to your corporate logo, then click the Insert button. Size the logo to fit three to four lines. Modify the font to match your corporate branding and choose a larger size such as 14 to 18 point.
7. Click the Layout Options icon button, then choose the first icon under With Text Wrapping, and check the radio button: Fix Position on Page. The cursor moves to the right, top side of the logo.
8. Enter your company’s address, then press the Enter key six times.
Insert your corporate logo and return address![]() JD Sartain
JD Sartain
9. Press the Indent key (not the Tab key) four times, then enter the recipient’s information. If you’re unhappy with the spacing, highlight the entire address and press the Increase Indent key or Decrease Indent key until you’re satisfied with the spacing.
10. Now, be creative and add a festive, decorative border along the bottom. Select Insert > Online Pictures, type Christmas bottom border in the Search box, and press Enter. Select one that looks festive, and click Insert.
11. Size the graphic, stretch to make larger or smaller, then center it on the page or envelope. When the icon button appears, choose the first icon under With Text Wrapping, and check the radio button: Fix Position on Page.
Select a festive border, then size it and center it at the bottom of the envelope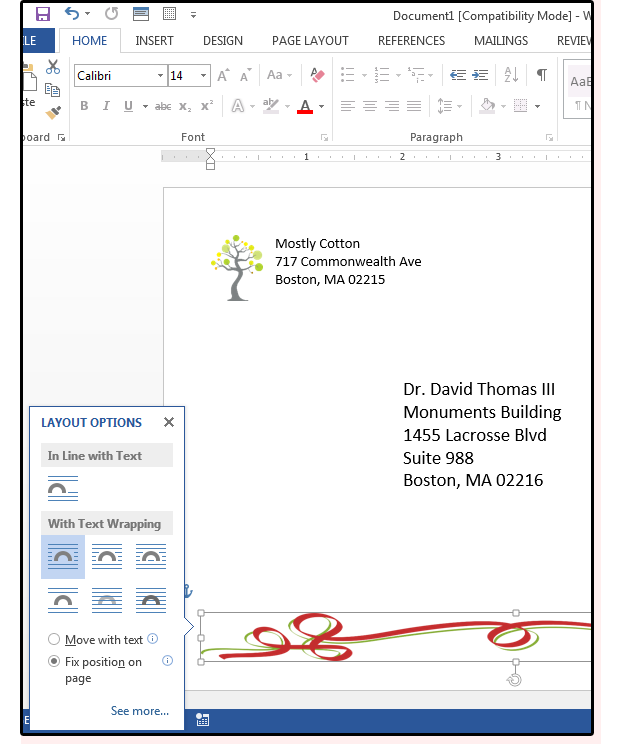 JD Sartain
Cards, invitations, announcements in Word
1. Because we selected a 7.25 x 5.25-inch envelope, the card/invitation/announcement size will be 5 inches by 7 inches in portrait or landscape, whichever you prefer.
2. Open a new blank Word document. Select Page Layout > Size > More Paper Sizes.
3. Select the Custom paper size from the Page Setup Screen or just enter the height and width of your custom card (in this case, 10.5 inches wide x 7 inches tall), then click OK.
4. Next, change the Orientation to Landscape. For a 5×7 folding card, you’ll need 10.5 inches width (5 inches for each side plus 0.5 inches for the fold).
Create a custom card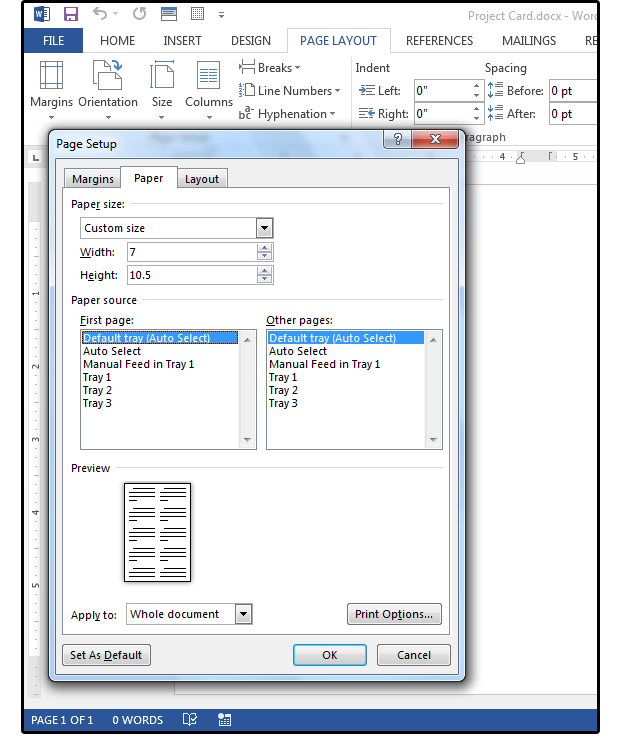 JD Sartain
Notice that the blank card now appears on your screen. Also note, that one page is the front and back (side by side), and the next page shows the inside pages.
5. Select Insert > Shape and choose the line shape, then draw a line from the top of the card to the bottom at 5.25 inches. This helps keep the two sides balanced. Copy the line to Page 2 for the inside of the card. Don’t worry, you can always delete these lines after your card is finished.
6. Enter a 0.5 inch margin on all sides.
06 Draw a vertical line to separate front, back, + inside pages JD Sartain
7. Create your card design on the right side of the page. Anything you place on the left side will be on the back of the card. Enter your message first. Choose a font, size it, then center or justify your greeting on the left or right side of the page. You can also turn your text sideways.
8. Choose a festive font for the Happy Holidays (such as AmoreATT) with a font size that almost touches the right and left borders, such as 48 points. Change the “auto” leading to 48 inches under Home > Paragraph > Indents and Spacing > Line Spacing> with a leading size of 48. This moves the two words closer together vertically.
Enter a festive font; choose a size, spacing, color and/or special effects, and then alter the leading JD Sartain
9. Unlike graphics programs, you cannot just pick up the greeting and move it anywhere you like on the page. If you use regular page text, it’s confined to the lines on the page. However, you can also use Word Art or a Text Box. Just select Insert > Word Art, then choose a style from the sample box; or select Insert > Text Box > Draw Text Box. With both selections, enter your greeting text, then choose a font, style, color, size, leading, spacing, and justification.
Hint: The Text Box option is definitely the easiest to work with because you can move and position the Text Box anywhere you like on the page, easily make lines of text as close or as far away from each other as needed, stack Text Boxes on top of one another, and rotate the text in any direction.
08 Insert line text, Word Art, or a Text Box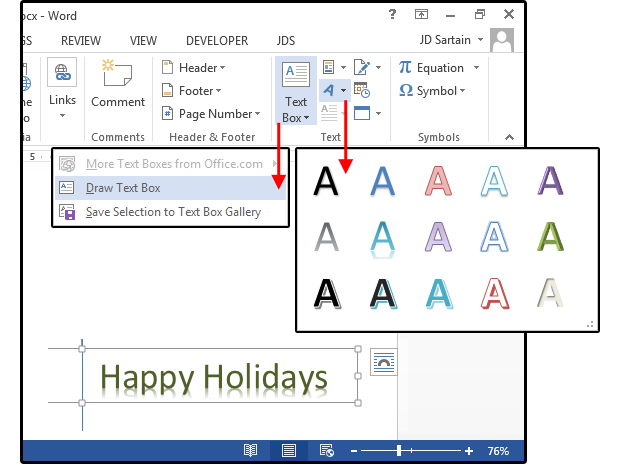 JD Sartain
10. Notice that when the Text Box is selected, the Ribbon changes and displays the Drawing/Format menu. Use the features to edit the text or change the color, size, and other attributes, or to add some special effects to your greeting such as Shadow, Reflection, or Glow.You can also add or remove borders or shading to the Text Box itself.
Select the Text Box and decorate your text message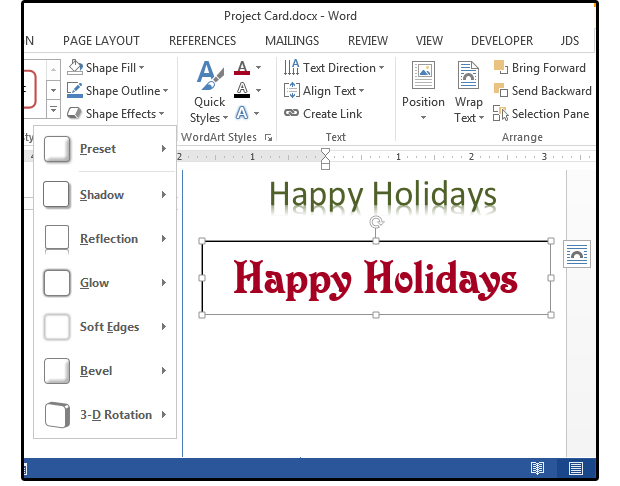 JD Sartain
11. Next, add and size your images.
12. And last, enter your inside greeting text (follow the instructions above to add another text box for your message), then size and position to fit the page/card.
13. Play around with different fonts and images. Have some fun with it.
14. When finished, Save and Print. Don’t forget to print page 2 on the back of page 1.
Finish, Save, and Print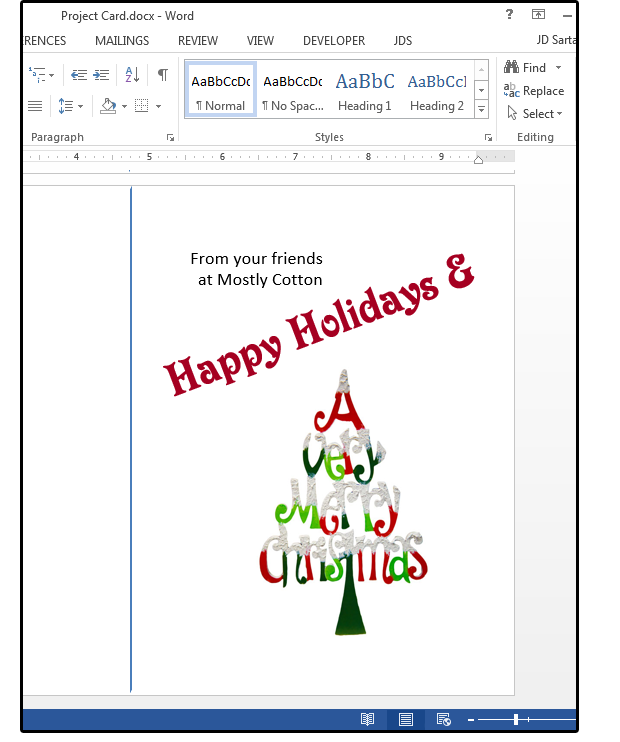 JD Sartain
Powerful Word Add-Ins from DocTools
Skyrocket your productivity in Word with easy-to-learn, easy-to-use Word add-ins from DocTools
- Overview of all available DocTools Word add-ins

What is the idea of using add-ins for Word?
As stated on the home page of wordaddins.com, Microsoft Word is the most powerful word processor ever developed. Microsoft Office is used by more than one billion users all over the world. If you are using Word in your daily work, you have most likely experienced several situations where you find the work more time-consuming or tedious than you like. You may also have run into tasks that you were not able to solve using the built-in functionality in Word. It is where add-ins get relevant.
Word add-ins can work as productivity tools that:
- automate or simplify tasks
- make it possible to perform tasks that you cannot solve using the built-in features in Word
- save you a lot of time and cost!
In addition to the results listed above, add-ins can also help you improve the quality of documents. Mistakes you may make when performing a series of tasks manually can be eliminated by using well-prepared and tested tools that do the tasks for you.
The purpose of the DocTools Word add-ins is to function as such productivity software for Word. Each of the add-ins has been developed to assist you in your work with specific tasks in Word.
It takes only a moment to install a DocTools Word add-in. Once installed, the tools included in the add-in will automatically be available in Word, ready for you to use in any Word document you are working with.
9 advanced productivity tools for Word – start saving time immediately
Below, you will be introduced to 9 powerful Word add-ins. Each of the add-ins can help you work smarter and increase your productivity in Word.
All the 9 Word add-ins work with Word 2016, Word 2019, Word 2021, and Word for Microsoft 365. Most add-ins also work with one or more earlier versions of Word. For an overview, see Which Word versions do the add-ins work with?
The add-ins are developed for PC / Windows and work with both 32-bit and 64-bit versions of Word.

Try before you buy – 7-day FREE TRIAL
To give you the chance to try out an add-in before you buy, I offer a 7-day FREE trial of each of the add-ins.
Get instant access and start to boost your productivity in Word immediately.
How to learn more about the add-ins
Click a READ MORE button to learn more about an add-in. From the product-specific page, you can also get access to a free trial version. Follow the instructions on the page.
CommentManager
Manage comments in Word fast and easy – smart tools for numbering comments, reviewing comments, extracting comments, etc.

DocTools CommentManager is a time-saving tool for anyone who is involved in editing and reviewing contracts, specifications, legal documents, scientific reports, technical specifications, user manuals and other documents where comments are used extensively.
Powerful tools and unique features for automatic comment numbering, reviewing comments, extracting comments, inserting special inline comments – and much more…
FREE TRIAL
CrossReferenceManager
Simplify and speed up the management of cross-references even in your most complex documents

DocTools CrossReferenceManager is the perfect, time-saving tool for anyone who uses Word for writing contracts, scientific reports, technical reports, technical specifications, user manuals, academic dissertations and other documents in which cross-references are needed.
A lot of powerful and unique features: Insert text with multiple cross-references with a single click. Powerful tools to detect and repair cross-reference errors – and much more…
FREE TRIAL
DocPropertyManager NEW version
Manage document data and repeat data in Word fast and easy with custom document properties and DocProperty fields

DocTools DocPropertyManager lets you quickly define data that can be inserted anywhere in the document with the click of a button. This way, you maintain data in one place only and you can repeat the data as many times you want. Lets you import custom document properties from any other Word document – and much more…
Useful in all kinds of documents – letters, contracts, scientific reports, technical reports, technical specifications, user manuals, academic dissertations, etc.
FREE TRIAL
ExtractChanges Pro NEW version
Extract insertions, deletions and comments from any Word document, incl. context and headings

DocTools ExtractChanges Pro is the perfect time-saving tool for anyone who is editing large contracts, specifications and similar documents and for anyone who participates in the review process of such documents.
Batch compare a specific document with all documents in a selected folder in one operation – and much more…
Perfect for business, government, law, sales, finance, etc.
FREE TRIAL
ProcedureGrammarChecker NEW
Check safety-critical procedure documents for human factor issues in minutes – improve quality and help prevent errors
![]()
DocTools ProcedureGrammarChecker provides advanced and customizable tools for checking procedure documents for human factor issues.
The tools can help you ensure that instructions follow strict rules, are accurate and will not be misunderstood.
Clear, concise, and consistent procedures can help prevent errors and mistakes and help ensure that critical steps are carried out correctly.
FREE TRIAL
AddBoilerplate
Generate complete documents in seconds from re-usable text or graphics

DocTools AddBoilerplate is a powerful tool that is both a time-saving document-generation tool for busy professionals and the simplest solution for standardizing documents and corporate language across entire organizations.
Create and select from an unlimited number of boilerplate, with precisely the content you want. With a single click of your mouse, insert any boilerplate – a word, a graphic, an entire page, or more – in any Word document.
FREE TRIAL
ScreenTipManager
Create screen tips in Word fast and easy – with up to 2040 characters

DocTools ScreenTipManager makes it fast and easy to create and edit screen tips in Word, something that is very tedious using the built-in functionality of Word.
Screen tips may also be referred to as e.g. pop-up windows, pop-up tooltips, info tips or mouse-over explanations.
Includes several powerful and unique capabilities. Create screen tips with up to 2040 characters instead of only 255, apply formatting to screen tips, etc.
Compare with Word’s built-in features
ScreenTipManager features compared with Word’s built-in screen tip features
FREE TRIAL
HighlightManager
Apply any highlight color or remove highlight in Word with a single click – replace highlight, extract highlight – customizable shortcuts

DocTools HighlightManager makes the work with highlight a lot easier and much more efficient. Powerful and unique capabilities.
No more time spent on switching from one highlight color to another.
You can apply or remove highlight via a dialog box that can remain open as you work. You can also apply or remove highlight via customizable keyboard shortcuts. You can review and replace highlight colors, extract highlight to a new document, and more.
Compare with Word’s built-in features
HighlightManager features compared with Word’s built-in highlight features
FREE TRIAL
ObjectBrowser
Browse objects and find text in Word – faster and easier than ever – Get object browser feature from Word 2010 and earlier back!

DocTools ObjectBrowser is a perfect, time-saving tool for Word power-users and for anyone who uses Word on a daily basis for creating and editing documents. Especially useful in long documents.
Browse pages, sections, headings, tables, etc. with the click of a button.
Quick Find feature lets you find anything you can find using Word’s own Find feature and repeat the same Find operation as many times you want with a single click.
FREE TRIAL
4 free DocTools Word add-ins
I provide the Word add-ins listed below totally free of charge. Click a READ MORE button to learn more about an add-in. From the product-specific page, you can get access to a free download. Follow the instructions on the page.
TIP: For an overview of which versions of Word the Word add-ins work with, see Which versions of Word do the individual add-ins work with? at the end of this page. The specific page for each add-in includes version information about that add-in.
AddAutoCorrect
Adds AutoCorrect Options to right-click menu in Word 2013 or Word 2016
FREE
ExtractData
Extract acronyms, bookmarks, tracked changes or comments from any Word document
FREE
StopSpellingPopUp
Disables Spelling and Grammar pop-ups when you left-click in an error in Word
FREE
Word Toolkit
Tools for advanced management of headers and footers in Word
FREE
The stories behind the productivity tools
Each of the DocTools Word add-ins has its own backstory. Most of them have been developed and continuously improved over a long time.
Some add-ins were born as tools I developed for myself to speed up my work in Word. As soon as I experience that I have to spend longer time than I like on a specific task – and especially if I know that I need to do the same kind of work repeatedly – I develop tools to automate the task. Some of the tools end as ready-to-use add-ins on this website.
Other add-ins were initially developed to fulfill a wish from Word users and customers.
In general, it requires a lot of work to take a Word add-in from a personal tool to a well-functioning productivity tool for general use. My goal is always to make tools that are easy to use.
On the pages for the individual add-ins, you will find a short backstory about that specific add-in.
We love the CrossReferenceManager tool, it has made life incredibly easy for us! :- )
Swati Johri
Director, PEGASUS LEGAL PTY LTD
I have literally compacted a full day’s work into about 1 minute and at the push of a button in DocTools ExtractChanges Pro.
Tony Johnson
Financial Analyst
The use of the DocTools add-ins have tremendously boosted my productivity.
Carlos Blanco Villa
CEO, BIOMETRICA SRL, Belgium
Carlos Blanco Villa is currently using six of the advanced DocTools Word Add-Ins – you can read his full testimonial on the Testimonial page.
Related information
For an overview of the version history of each Word add-in, see Changelog.
If you have purchased license(s) to an earlier version of a DocTools Word add-in, you can continue to use that version even if a newer version is available. If you want to update to the newest version, see How to update a Word add-in from DocTools to the newest version.
For an overview of which versions of Word the individual add-in works with, see Which versions of Word do the add-ins work with?
The specific page for each add-in also includes version information about that add-in.
All DocTools Word add-ins are created for PC / Windows and work with both 32-bit and 64-bit versions of Word. If you are using a Mac, see the FAQ page.
Learn more about the powerful productivity tools for Microsoft Word on the individual product pages you can access from the Products menu above.
![]()
Download Article
Step-by-step guide to making your own business cards in Word
![]()
Download Article
- Using a Template
- Creating from Scratch
- Video
- Expert Q&A
|
|
|
If you need to make business cards in a hurry and you don’t have fancy design software, Microsoft Word has the tools you need to make and print business cards. You can use templates to make the process easy but still maintain an individual feel, or you can create the cards completely from scratch. If you are creating cards from scratch, you can use the Table tool to help keep your cards at the proper size. This wikiHow guide will show you how to make business cards in Microsoft Word.
Things You Should Know
- Use a template by going to File > New and searching for «business cards.»
- Create your own card from scratch by going to File > New > Blank document.
- Use a table to organize copies of your business card on a single page.
-
1
Click the File tab and select New. You’ll be creating a new document from a business card template. If you just opened Microsoft Word, you can click New in the left menu.
Tip: Using a template will allow you to quickly make a lot of professional-looking cards at once.
-
2
Search for business card templates. Use the search field in the new document creation window to search for «business card». This will bring up a variety of free templates that you can use for business cards. There are templates for horizontal and vertical cards.
Advertisement
-

3
Click a template that you want to use. You’ll be able to change any element of the template you’d like, including colors, images, font, and layout. Pick the template that most closely matches the vision of your business card in your head.[1]
- Clicking a template will open a window with more information about the template.
-
4
Click the Create button to open the template in Word. This is under the description of the template. This will create a new file with the document template for you to use.
-
5
Fill out the information fields in the first card. If you’re using Office 2010 or newer (and the template was designed for 2010 or newer), you’ll see your text appear in all of the business cards on the page. You’ll only have to fill out information for one card this way. If the template is not designed to automatically fill out successive cards, you’ll need to enter the data for each one manually.
-
6
Change the format of any elements. You can select any of the text on the business card and change the format. You can switch fonts, change colors and size, and more, just like you would regular text.
- Since this is a business card, make sure that the font you choose is easy to read.
-
7
Replace the logo (if necessary). If the business card template has a placeholder logo, you can click it to replace it with your own. Make sure that you resize your logo so that it fits, and that it doesn’t look bad when the size has been changed.
-
8
Proofread the cards. Make absolutely sure that your business cards do not have any typos or other mistakes. Your business card is one of the first impressions people will have of you, so you don’t want to start off on the wrong foot.
- You can have a family member or friend review your cards before printing to make sure they’re free of errors.
-
9
Print the cards on stock, or send the file to a printer. If you’re going to be printing the cards at home, you’ll need high quality stock paper. Stick to white or off-white, and pick your finish. Most business cards don’t have a finish, but some people prefer a glossier card. Many print shops will be able to open your saved business card template and print them for you as well.
- When purchasing paper, make sure that your printer at home can handle it. Check your printer’s documentation or support site for details on the type of paper that it supports.
-
10
Use a precision cutting tool to finish the cards. Once the cards are printed, you’ll need to cut the sheet up. Each sheet will typically have ten cards on it. Don’t use scissors or other methods of cutting that rely on you keeping a straight line. Instead, use a paper guillotine or precision paper cutter. Many print shops have these tools available for customers, or can do the cutting for you.
- Note that the standard business card size varies by country. Here are a few other standards:
- The standard business card size is also 3.5 inches (8.9 cm) x 2 inches (5.1 cm) in Canada.
- In the United Kingdom, the standard size is 8.5 centimetres (3.3 in) x 5.5 centimetres (2.2 in).
- For Australia, the standard size is 9.1 centimetres (3.6 in) x 5.5 centimetres (2.2 in).
Tip: The standard US business card size is 3.5 inches (8.9 cm) x 2 inches (5.1 cm) (or 2 inches (5.1 cm) x 3.5 inches (8.9 cm) for vertical cards).
- Note that the standard business card size varies by country. Here are a few other standards:


Advertisement
-
1
Click New to create a new blank document. If you’d prefer to create your business card yourself, you can use the Table tool to make it easier.
- You can also use photo editing software like Photoshop to make a custom business card.
-
2
Click the Layout tab and click Margins. Select «Narrow» to make the margins a little smaller than the default setting. This will allow you to fit the business cards on the page.
-
3
Click the Insert tab and then click Table. A grid will appear beneath the Table button.
-
4
Create a 2 x 5 table. Use the grid to insert a table that is two cells wide and five cells high.
-
5
Right-click on the table’s selection crosshair and select «Table Properties». This will open the Table Properties window. The selection crosshair appear in the upper-left corner of the table when you hover over it.
-
6
Set the alignment of the table to Center. This will make it easier to make the cards even. This setting is in the Table tab of the «Table Properties» window.
-
7
Click the «Row» tab and check the «Specify height» box. Enter 2" and change the drop-down menu to «Exactly».
- Note that the standard business card size varies by country. The standard US business card size is 3.5 inches (8.9 cm) x 2 inches (5.1 cm). Here are a few other standards:
- The standard business card size is also 3.5 inches (8.9 cm) x 2 inches (5.1 cm) in Canada.
- In the United Kingdom, the standard size is 8.5 centimetres (3.3 in) x 5.5 centimetres (2.2 in).
- For Australia, the standard size is 9.1 centimetres (3.6 in) x 5.5 centimetres (2.2 in).
- Note that the standard business card size varies by country. The standard US business card size is 3.5 inches (8.9 cm) x 2 inches (5.1 cm). Here are a few other standards:
-
8
Click the «Column» tab and check the «Specify width» box. Enter 3.5" and change the drop-down menu to your preferred measurement such as «Inches».
-
9
Examine your table. You should now have a table on your page that is separated into ten identical business card-sized cells. If the table doesn’t fit, you may have to extend your bottom margin by a tenth of an inch.
-
10
Right-click the crosshair again and select AutoFit. Choose «Fixed column width». This will prevent the table from changing shape as you add information to the first cell.
- For double-sided business cards, copy and paste the table onto a second page in the Word document. The second page will be the back of the business card.
-
11
Add your information to the first cell. You can use all of your regular Word formatting tools while typing in the cell. You can insert text boxes and images, change fonts, add color, or perform any other formatting that you’d like.
- Adding pictures to your business card can give it a personal touch and build your brand. You can crop and rotate the images as needed.
- Check out our guide to formatting in Word for more tips!
- If you’re creating a double-sided card, add your additional information to the first cell in the second page table.
-
12
Proofread the card. Before copying the information into each of the other cells, take the time to review it now for any errors or typos. If you proofread later, you’ll have to change each cell instead of just changing the first before copying it.
- You can have a family member or friend review your cards before printing to make sure they’re free of errors.
-
13
Select the entire first cell when you’re satisfied. To do so:
- Move your cursor to the bottom-left corner of the cell until it turns into a diagonal arrow.
- Click and the cell’s contents will be selected.
- Press Ctrl+C (Windows) or ⌘ Cmd+C (Mac) to copy the contents of the cell to the clipboard.
-
14
Click in the next cell and paste the copied information. You can click «Paste» in the Home tab, or you can press Ctrl+V (Windows) or ⌘ Cmd+V (Mac). Your copied information will appear in the cell in the right locations. Repeat this for each of the cells on the page.
- Make sure that your business card organization is minimalistic. You can’t realistically fit everything about your company into a single card—instead, focus on the most important info like your company logo, name, email address, physical address, website, and role in the company.[2]
- Make sure that your business card organization is minimalistic. You can’t realistically fit everything about your company into a single card—instead, focus on the most important info like your company logo, name, email address, physical address, website, and role in the company.[2]
-
15
Right-click the crosshair again and select «Table Properties». Click the «Borders and Shading» button and select «None» for the border. This will ensure that parts of the cell borders don’t appear when the cards are cut.
- Make sure to save your Word document in case you want to edit it later!
-
16
Find good paper for the cards. You’ll want a nice card stock paper to print your new business cards on. Make sure that your printer supports the type of paper that you get. You can also send your completed file off to a printer to have the cards professionally printed.
- To print double-sided cards, make sure to select Print on both sides in the print menu. This will print the second page (the back of the business card) on the back side of the paper.
- Print one test sheet first to make sure everything looks good and that the back side is aligned properly with the front.
-
17
Use a precision cutting tool. Avoid using scissors or other cutting tools that require you to maintain a straight line. Use professional paper cutting tools to make sure your cuts are even and properly measured.


Advertisement
Add New Question
-
Question
How do I print different business cards on the same page?

Kyle Smith is a wikiHow Technology Writer, learning and sharing information about the latest technology. He has presented his research at multiple engineering conferences and is the writer and editor of hundreds of online electronics repair guides. Kyle received a BS in Industrial Engineering from Cal Poly, San Luis Obispo.
wikiHow Technology Writer
Expert Answer
If you’re using a template, you’ll need to choose a template that doesn’t automatically update the rest of the cards. If you’re creating a card from scratch using a table, you can make each cell a different card.
-
Question
How do I put an online photo on my business cards in Microsoft Word?
Kyle Smith is a wikiHow Technology Writer, learning and sharing information about the latest technology. He has presented his research at multiple engineering conferences and is the writer and editor of hundreds of online electronics repair guides. Kyle received a BS in Industrial Engineering from Cal Poly, San Luis Obispo.
wikiHow Technology Writer
Expert Answer
You’ll need to copy or download the online photo. Then, in Microsoft Word, go to Insert > Picture to add a photo to the business card.
-
Question
make one card on a sheet
Kyle Smith is a wikiHow Technology Writer, learning and sharing information about the latest technology. He has presented his research at multiple engineering conferences and is the writer and editor of hundreds of online electronics repair guides. Kyle received a BS in Industrial Engineering from Cal Poly, San Luis Obispo.
wikiHow Technology Writer
Expert Answer
You can make a single card by following the table method above and only filling in one cell. Make sure the table is formatted with the standard business card measurement.

See more answers
Ask a Question
200 characters left
Include your email address to get a message when this question is answered.
Submit
Advertisement
Sample Business Cards
Video
About This Article
Article SummaryX
1. Click the File menu and select New.
2. Search for business card templates.
3. Select a template.
4. Fill out the fields in the first card.
5. Edit format, fonts, and colors.
6. Replace the logo (optional).
7. Proofread the cards.
8. Print the cards to cardstock.
9. Cut the cards.
Did this summary help you?
Thanks to all authors for creating a page that has been read 827,811 times.
Is this article up to date?
The number of Microsoft Office users today, estimated to be over 1.2 billion, can easily form their own country. And it’s safe to say that Microsoft Word users are a big part of that productive population.
Microsoft Word (2019, 2016, or Microsoft 365) can help you design virtually every kind of professional document — from a simple office memo to a Kindle e-book. But sometimes you could use a bit of extra oomph in your Word documents. That’s where a roster of excellent and mostly free Microsoft Word add-ins can help.
Why are Microsoft Word add-ins so important?
Google Chrome has extensions. Microsoft Office has add-ins. Earlier, they were called Office Apps. These are little assistants which help you do a few things that Word cannot do on its own.
Want to send a document for an e-signature and track its status? Maybe you are a student who wants to add math equations quickly? Or do you just want to grab some beautiful stock photos for a document?
Add-ins can do all that and make Microsoft Word seem more powerful than it already is.
Today, we will look at how to install and manage these little tools and suggest a few of the best Microsoft Word add-ins you should install to improve your productivity.
Most of these add-ins will work with Microsoft Word 365, 2016, 2019, and Microsoft Word Online.
Get your free Word shortcuts cheatsheet!
Download the print-ready shortcut cheatsheet for Word.
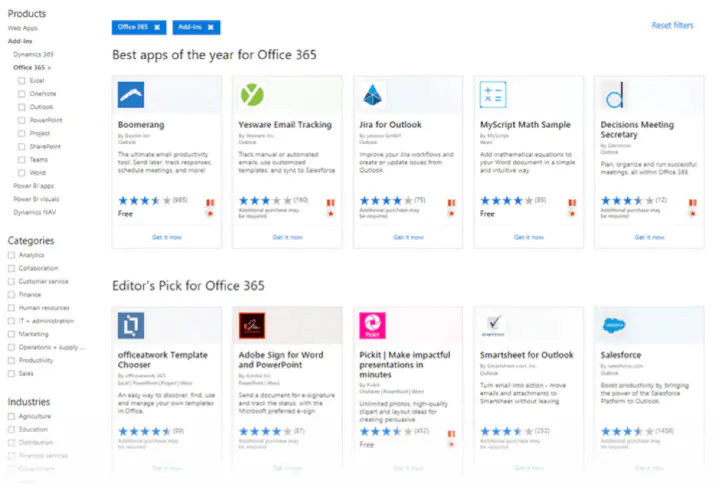
Which add-ins should you install?
There are more than 2000 Microsoft Office add-ins. Microsoft Office organizes all add-ins in neat categories. You can also filter them by:
- Rating
- Name
Microsoft Office also automatically suggests a few add-ins to you. And there’s a category called Editor’s Picks, which displays a few highly-rated selections. Work through the choices and pick the ones that fit your workflow.
How to install and manage Microsoft Word add-ins
There are two simple routes to browse and download the add-ins you want.
1. Microsoft Word has a dedicated Office Store (AppSource), which lists all add-ins available for all Office applications.
 2. You can also access the add-ins inside Word (and other Office apps), and Word for other platforms, like Word for iPad, Word for Mac, and Word Online.
How to download add-ins from the Office Store
The Office Store can be browsed like any other website. Filters on the left help you drill down to the add-ins you need.
Do read the reviews for each add-in and check the ratings. The better add-ins will be strong in both areas.
1. Click the blue Get It Now button.
2. Sign into AppSource with your Microsoft account.
3. Give Microsoft permission to install the add-in.
4. Continue the installation by selecting the application you want it for.
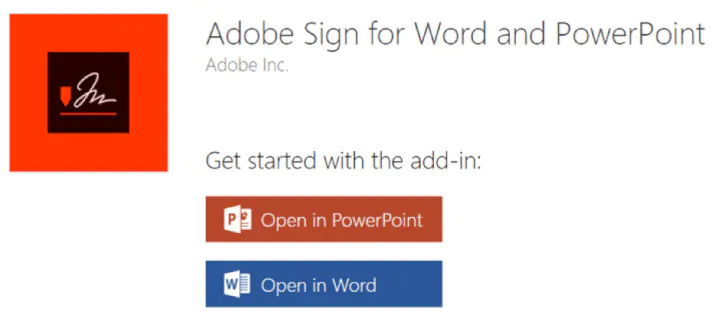 5. The add-in will appear on the extreme right of the Ribbon. Click the add-in button and a sidebar appears on the side of your document.
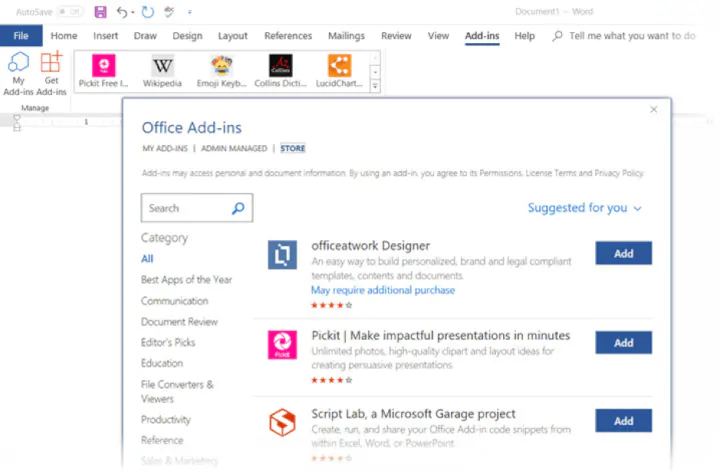
How to download add-ins from inside Microsoft Word
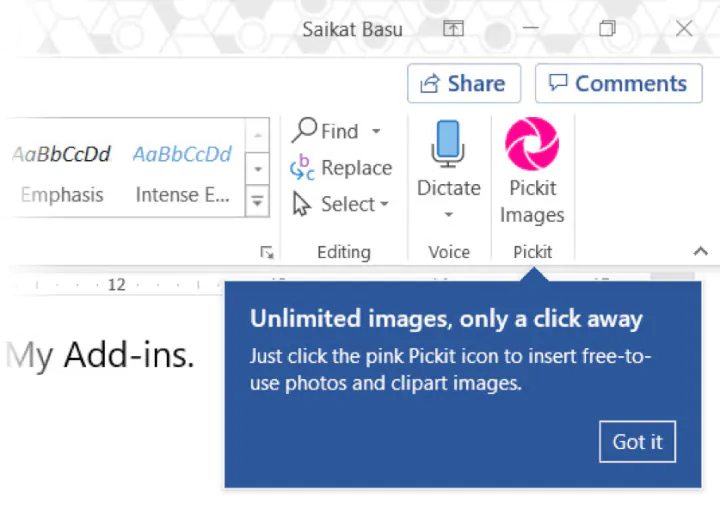
1. Go to Ribbon > Add-Ins > Get Add-Ins.
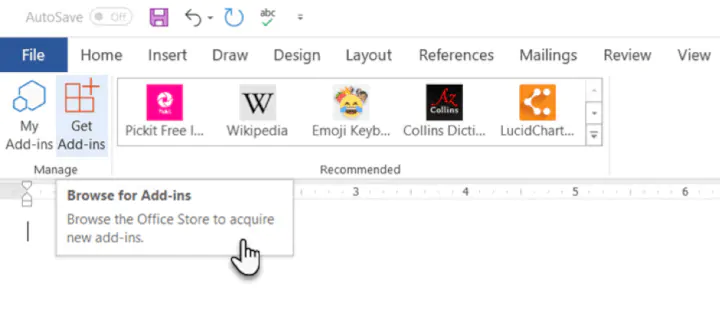 2. Use the Store pane to browse for add-ins and install them. All installed add-ins will be listed under My Add-Ins.
3. Give your permission to Microsoft and allow the installation to proceed.
As in the download from the website, the add-in appears as a button on the Ribbon. When you are done with an add-in, you can close it by clicking the “X” button in the sidebar.
All free and purchased add-ins are part of your Microsoft account. After you’ve added them, you’ll have quick access to them from the My Add-ins button on the menu. The Manage My Add-ins link on the window will also take you to a page where you can see more details.
For e.g. an option to hide an add-in if you don’t want to see it on your list.
If you don’t use an add-in, then you can always delete them to clean up your list.
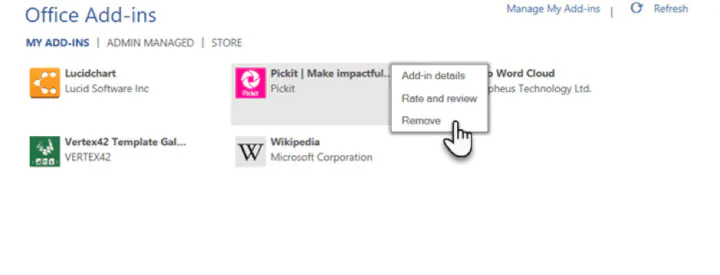
How to delete add-ins you don’t want
1. When you want to remove an add-in, go to Ribbon > Add-ins > My Add-ins. If you don’t see your add-in, then click on the Refresh link at the top of the window.
2. In the Office Add-ins window, click the menu option (three dots) for the specific add-in and click on Remove.
 With this basic process covered, let us move on to select a few choice add-ins that can set you up for productivity.
The best free Microsoft Word add-ins for everyday productivity
It’s a tough job selecting add-ins from a stock of 2000+. But let’s look at a few which can cut across all sections of users — from the layman to the white-collar worker.
Also, the focus of the list is on free add-ins. A few excellent add-ins with trial accounts have been thrown into the mix to demonstrate how you can extend Word when your needs demand it.
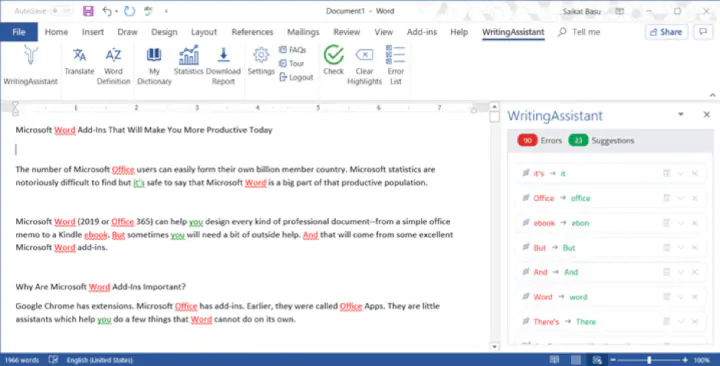
1. WritingAssistant
Cost: Free.
Key Benefit: Improve your English with AI.
When English isn’t your first language, then you should welcome some help. Writing Assistant is an artificial intelligence-powered text checker that flags errors in your grammar. It claims to adapt to your context and offer suggestions.
Use it alongside Word’s own Grammar and Spell Checker to improve your writing.
Also: Grammarly is popular, and it also has a powerful add-in for Word and Outlook.
2. MyScript Math Sample
Cost: Free.
Key Benefit: A math equation editor that works like a scratchpad.
In Word, go to Insert > Equation. You can use the gallery of equations in Word or manually type it out (or use Ink Equation). If this seems like hard work, try the MyScript Math Sample add-in now.
Use the side panel to write an equation with a finger, stylus, or the mouse. The add-in supports more than 200 symbols. Thanks to real-time handwriting recognition, your input is instantly converted to a clear typed equation. It just feels more intuitive, and you can combine it with Word’s own equation features.
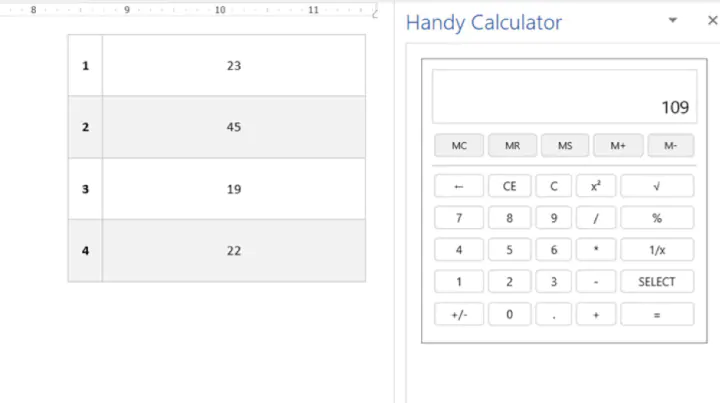
3. Handy Calculator
Cost: Free.
Key Benefit: Use it like a built-in calculator for Microsoft Word.
There could be a calculator sitting in your taskbar. But Handy Calculator saves you a few seconds as it works alongside your open Word document in a task pane. The calculator supports all common functions and the usual memory keys to recall any value stored in memory.
If you work a lot with Word and Excel, then use the Select button for quick cell calculations.
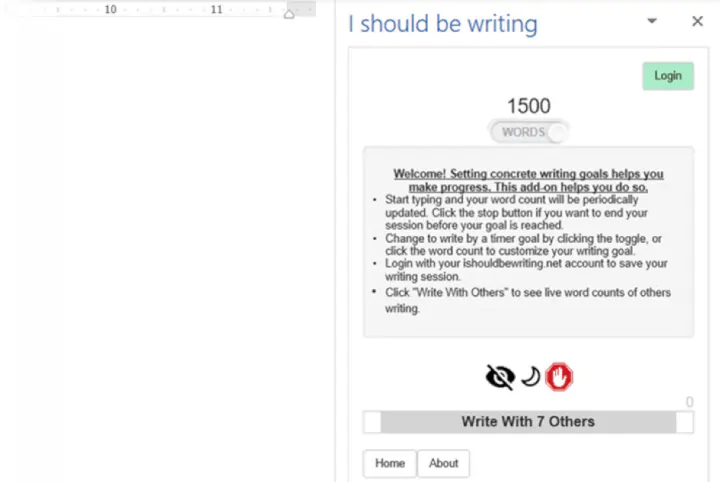
4. I Should Be Writing
Cost: Free.
Key Benefit: Keeps you motivated with a timer and a word count tracker.
Writing is a lonely job and sometimes you just have a word count to aim for. This simple add-in does this well by allowing you to set a countdown timer or a word count goal.
A Write with Others setting nudges your motivation with a live word count of other users or your team.
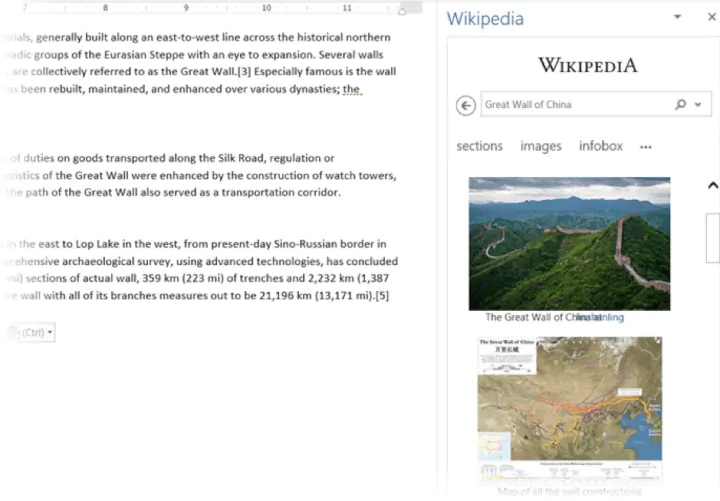
5. Wikipedia
Cost: Free.
Key Benefit: Simplify the search for facts.
It can be a college essay or a research paper. The world’s favorite encyclopedia is often the first source for facts. So, don’t jump between your Word document and the browser.
The Wikipedia add-in can work alongside Word’s Researcher function to help you crosscheck information and improve accuracy.
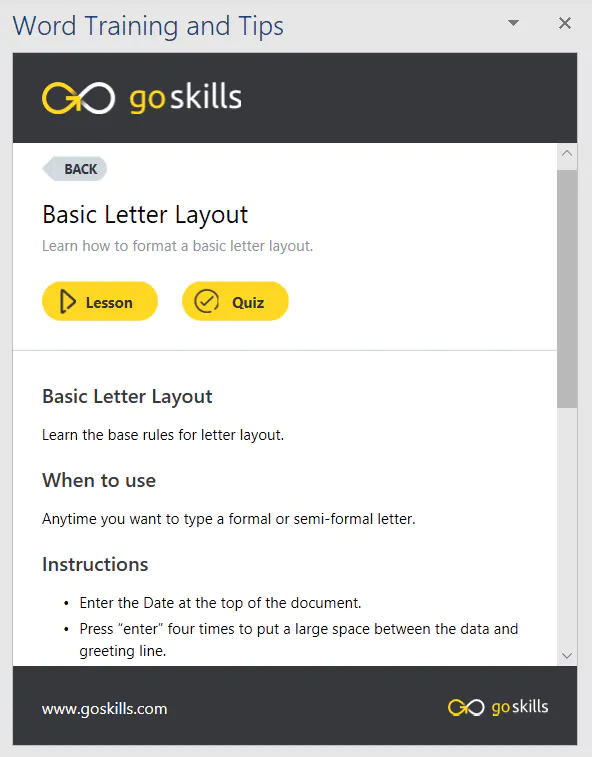
6. Word Training and Tips
Cost: Free.
Key Benefit: Become a better Microsoft Word user.
This add-in gives you access to GoSkills “how-to” cheat sheets from the popular Microsoft Word course. Get handy step-by-step instructions on formatting, styles, and more right within your Word document.
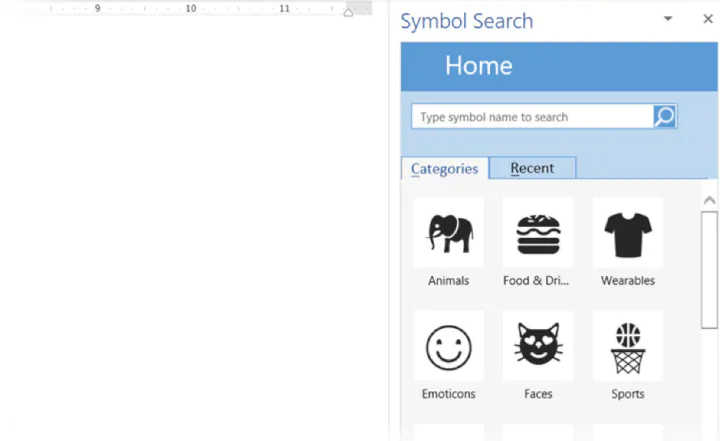
7. Symbol Search
Cost: Free.
Key Benefit: Search and use high-quality symbols in your documents.
Microsoft Word has a nice Icons gallery on the Ribbon to help you communicate with symbols. But it’s always useful to have quick access to more. Symbol Search has a categorized lineup and a handy search box to find a unique symbol.
Click on More (three-dot menu option) and find the registered symbol, double asterisks, subscript numbers etc.
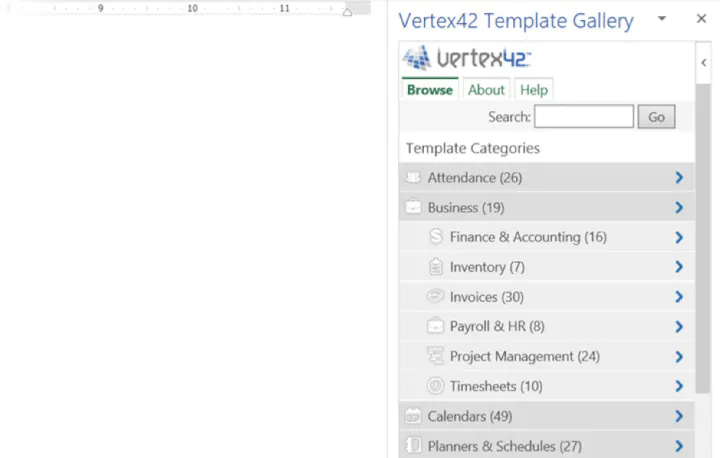
8. Vertex42 Template Gallery
Cost: Free.
Key Benefit: Select from 300+ professionally designed templates for Word and Excel.
There’s a sameness to the default templates in Microsoft Office. Vertex42 specializes in templates for Word and Excel and it shows in the variety they offer.
The collection of 431 documents is organized in neat categories that cover personal, educational, and professional templates.
Also: Look at Spreadsheet123 and its collection of 200 templates for Word and Excel.
Get your free Word shortcuts cheatsheet!
Download the print-ready shortcut cheatsheet for Word.
Get your free Word shortcuts cheatsheet!
Download the print-ready shortcut cheatsheet for Word.
9. Pro Word Cloud
Cost: Free.
Key Benefit: Visualize your text and get your point across.
Word clouds add a visual element to any document or presentation. If it’s text dense, then you can use a word cloud to check the frequency of your main keyword. It can also help summarize the core idea of any document for your readers.
You can customize the word clouds with different sizes, fonts, layouts, and color schemes.

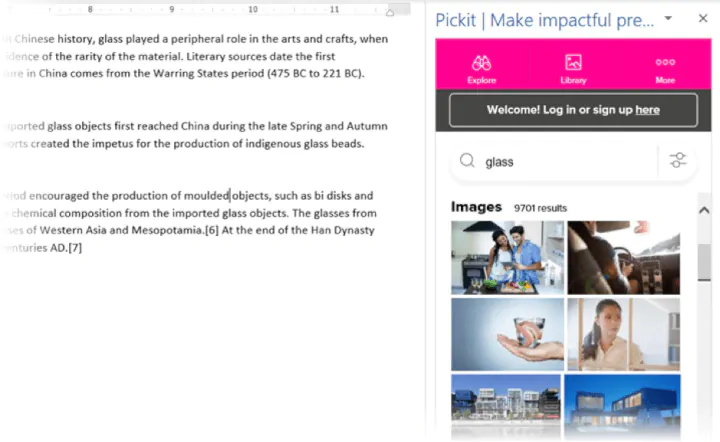
10. Pickit
Cost: Free for 7 days, $5.00/month after.
Key Benefit: Find the right photo or clipart to use from a vast image bank.
Pickit is a stock illustration site that can complement your documents with beautiful photos and clipart. PowerPoint designs aside, you can create impactful Word documents too by breaking up text with a photo that sends a visual message.
The add-in is free to download but you have to subscribe for premium features after seven days.
Also: Looking for a completely free alternative with Creative Commons licensed photos? Try the excellent Word add-in that sources images from Pexels.
11. PDFfiller
Cost: Free trial, $6.00/month after.
Key Benefit: Edit, sign, and share PDF files stored in OneDrive.
Word can open PDF files and even edit them. But it’s not perfect as lines and pages can break. PDFFiller opens a fillable, printable PDF in its own editor from OneDrive. Edit, sign, and share the files again from the same window within Word.
You can save a lot of time as you do not have to download or upload the files from the desktop.

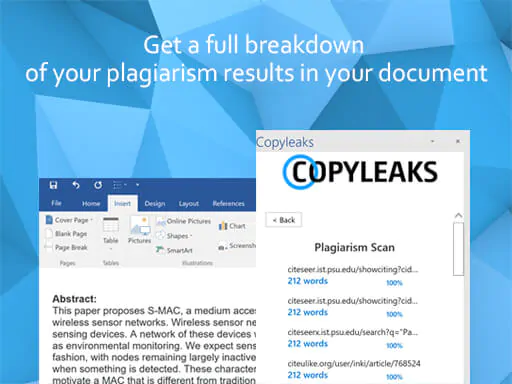
12. Copyleaks Plagiarism Checker
Cost: Free with a limited number of scans.
Key Benefit: Check if any document is original.
No one wants to be called a plagiarist. And Copyleaks has built its reputation as a search engine for avoiding that charge. The cloud-based app uses its algorithms to scan any document and ensure its integrity. Copyleaks also supports multiple languages.
The Word add-in allows you to scan 10 pages a month for free. If you are a heavy user, then go for an additional purchase.
13. Lucidchart Diagrams for Word
Cost: Free with a limited number of diagrams.
Key Benefit: Draw flowcharts, mockups, mind maps, and business process charts easily.
Sometimes, a flowchart or a business process diagram can make a complex concept simpler. Lucidchart is an industry-leading software that offers this add-in for Word users. Use the library of shapes and lines to quickly create your own diagrams. The learning curve is shallow.
Lucidchart also supports collaboration and version control. You can download the add-in for free and create a limited number of free documents. Additional upgrades need to be purchased.
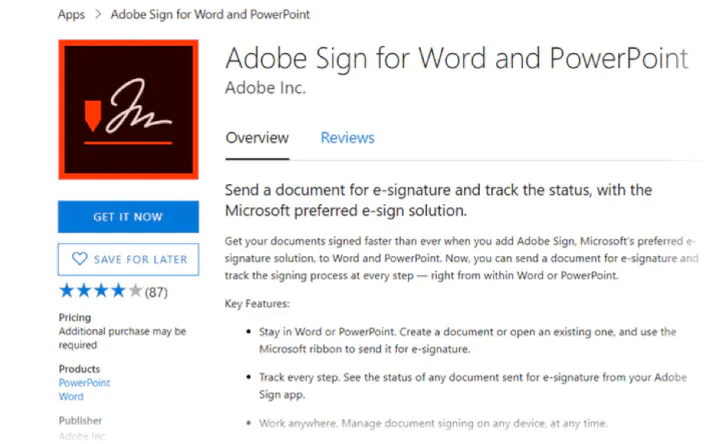
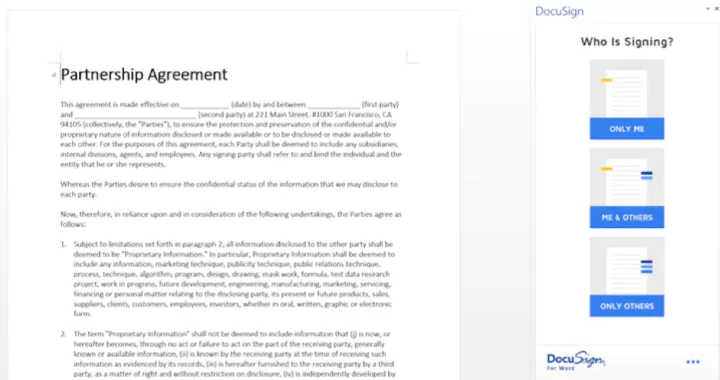
14. DocuSign for Word
Cost: Free to try. Additional purchases are required.
Key Benefit: Sign or request eSignatures for important documents without leaving Word.
Digital signatures have become foolproof and legally binding identification tools for critical documents. In many countries, they are the same as physical signatures on paper documents. Sign in with your Microsoft 365, Microsoft, or DocuSign account. Email a completed copy of the signed documents, and automatically save them in DocuSign or on a cloud platform for collaboration.
DocuSign offers a free trial (sign and send 5 documents with a Microsoft 365 account and 10 documents with a Microsoft account).
15. Qorus
Cost: Free to try. Additional purchases are required.
Key Benefit: Make business documents effortlessly.
Qorus is a business document builder. It works seamlessly across Outlook, Word, and PowerPoint to create personalized business documents like requests for proposals, pitches, and NDAs. Qorus includes tools that can quickly create fresh documents from templates, answer queries with a bank of reusable content, and even collaborate on documents with a team.
Qorus is a bid and proposal management solution on its own. The advantages can outweigh the costs if your enterprise needs it. Try it with a 14-day trial.
16. GetMpas
Cost: Free.
Key Benefit: Show locations on documents quickly.
Making an event flyer in Microsoft Word? Why not help your guests by displaying a small map that shows exactly where it will take place? There is Google Maps, but this little touch saves everyone a few seconds.
The add-in allows you to customize the appearance and size of the map.

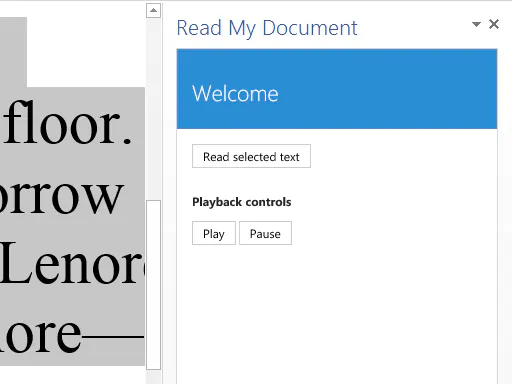
17. Read My Document
Cost: Free.
Key Benefit: Go easy on your eyes.
Read My Document is a text-to-speech converter that reads your Microsoft Office documents aloud. It can be an invaluable editing aid when you are proofreading a document. Pick a voice and the speech speed to begin.
Alternatively, you can multitask by letting it read a document while you do something else. But don’t use it for confidential documents as the engine can send data over the internet.
18. Woodpecker
Cost: Free.
Key Benefit: Reuse your most important legal documents.
Legal documents should always be standardized. It makes it not only easier to understand them but also saves a lot of time when you need to reuse them. Woodpecker is an easy-to-use add-in that removes the chore of re-creating legal docs every time you need to change a minor detail.
Woodpecker also promises secure document management and collaboration with your own account. Project managers can try this add-in to enhance the role of their Word templates.
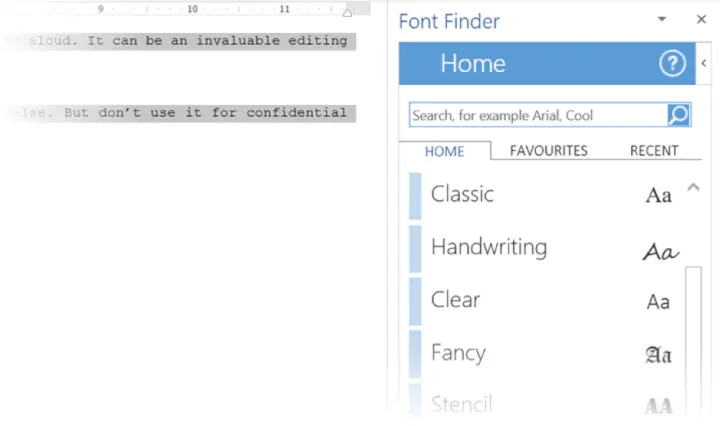
19. Font Finder
Cost: Free.
Key Benefit: Select and save your favorite fonts.
It is surprising that desktop publishing software like Microsoft Word still does not have an adept font management system. For instance, you cannot save your favorite fonts. You can create styles for them, but that is a roundabout way. Font Finder makes it easier.
Use the add-in tab screen to browse through the categorized fonts. Search for the font you want to use and set them as favorites with a click on the star. However, a small pitfall is that it seems to ignore fonts that do not come with Word.
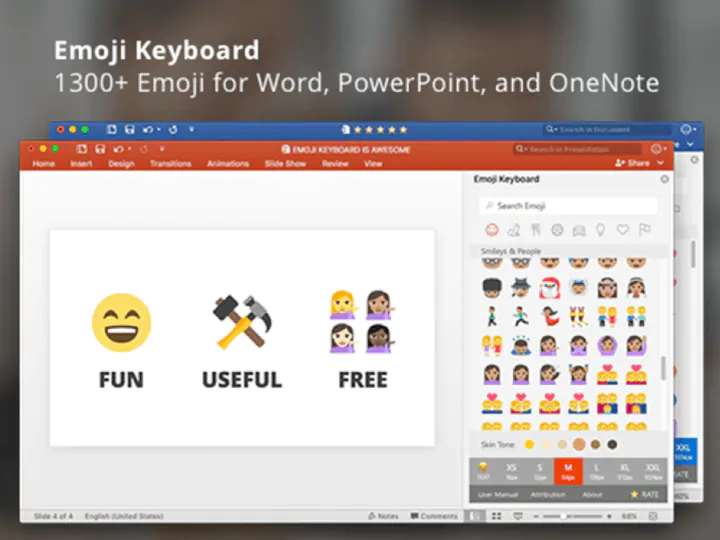
20. Emoji Keyboard
Cost: Free.
Key Benefit: Give your communication some color.
Microsoft Word add-ins shouldn’t be all sober and somber. Why not give it a bit of color with the Emoji Keyboard? After all, emojis are stuck to our digital tongues. And this keyboard gives you 1300 to choose from.
Get more work done today with these add-ins
We hope these useful and mostly free Microsoft Word add-ins help you plug a few productivity gaps, reduce a few steps and add up to a more efficient workflow at the end of your day!
If you are looking to sharpen your Microsoft Office skills, check out our Microsoft Word course to learn time-saving tips and tricks for formatting, margins, mail merges, and much more.
Ready to master Microsoft Office?
Start learning for free with GoSkills courses
Start free trial
What is your favorite low-tech tool?
A lot of my friends tell me it is the Post-it note. A few say that they favor its less colorful cousin – the index card.
Ask around. Some of your own friends may have a stack of index cards tucked away for learning a new language or as presentation notes for the next meeting. Apply them as a memory aid and they become flash cards.
For me, the no-frills index card leaps to the rescue when life is bottle-necked by details. The little rectangle of paper helps to simplify with a few lines of text or a hastily drawn doodle. I use it to remember a little from the umpteen life hack tips I read every day.
And I am not the only one who finds the productivity in it.
I believe in lists and I believe in taking notes, and I believe in index cards for doing both.
~ Anne Lamott (Author of Bird by Bird: Some Instructions on Writing and Life)
Carl Linnaeus invented the index card and he is often considered as a pioneer of information retrieval. People had problems with information overload even three hundred years ago. The term does sound familiar, doesn’t it?
The deluge of information has swamped us again. So thankfully, index cards are still around. And we can use them to sharpen the capacity of our data-numbed brains. Head to your nearest office supplies store and buy a stack. Or, save yourself the cost and launch Microsoft Word. It does a fine job of creating index cards from scratch.
All you need now are the ideal measurements and the right kind of paper to print your index cards on. I will leave that choice to you as we pick one from the three methods.
The Quickest Way – Use Index Card Templates
Templates can save you a lot of time. Microsoft Word has an entire gallery of templates that are designed for any personal or professional need. And, it hasn’t forgotten about index cards or flash cards. The way to get to them is through a search.
Open Microsoft Word. Go to File > New. Type Index card in the search field.

The results are displayed as thumbnails and you can easily sort through them visually or with the category list on the right. If you need a specific type of index card, try a search with that.
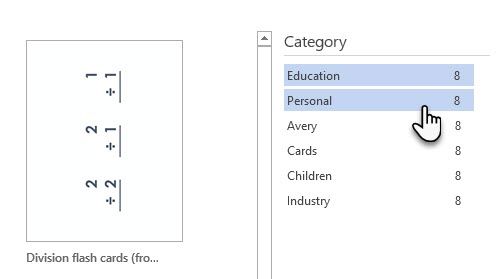
For instance, you can type «flash card» to scour for educational flash cards. The template gallery has a variety of flash cards for basic English and Math. Select the template and it opens as a new Microsoft Word document.
Use the index card as it is or re-purpose it around your content. For instance: how about styling your fonts and make the text on the card stand out.
Make an Index Card in Microsoft Word from Scratch
The templates won’t fill every need. So, a do-it-yourself approach will not only give you the power to make your own custom designed index cards but also fit it around the printer you have at your disposal. The good news is that Microsoft Word makes the process easy.
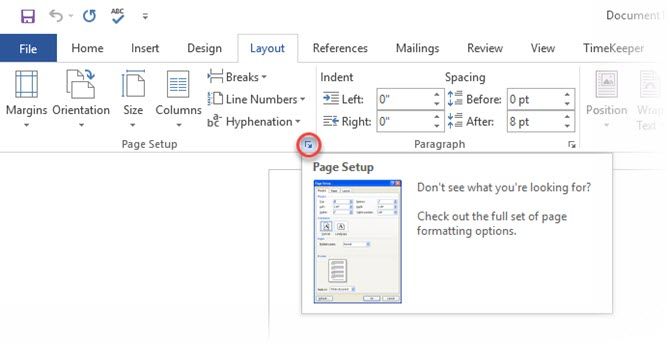
Open a new Microsoft Word document. To set the right size for the index cards, head to the Layout tab on the Ribbon. Click the little arrow at the edge of the Page Setup group to open the options.
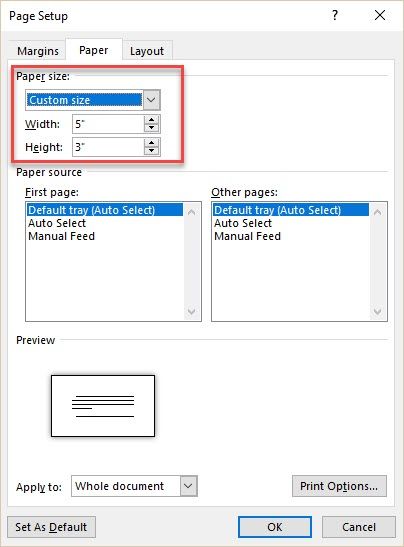
On the Page Setup panel click on the tab for Paper. Scroll down the paper sizes given. If you get a size close to your desired number select that. If not then select Custom Size which is the last choice on the drop-down list. Enter the Width and Height as per the dimensions of the size of your index card. Click OK to set the dimensions.
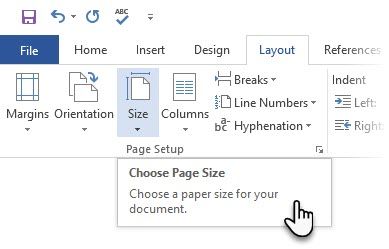
You can also arrive at the same options by selecting Size from the Layout tab. The scroll-down list brings you to different paper sizes and the More Paper Sizes command at the end. It opens the same dialog box we see above.
Index cards can be of different sizes. Wikipedia says that the most common size for index cards in North America and the UK is 3 by 5 inches. It is commonly known as the 3 by 5 card. Other available sizes include 4 by 6 inches, 5 by 8 inches, and ISO-size A7 (74 by 105 mm or 2.9 by 4.1 in).
Set the Margin (& Other Design Tweaks)
If you want to keep them organized in a binder file, you might like to set a margin that leaves space for a punch hole.
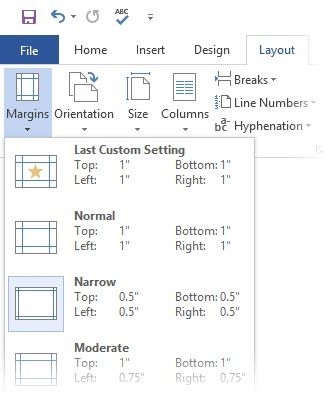
Set the print margins on the card from the default 1″ to the Narrow .5″. Go to the first button on the Layout tab that says Margins. Choose Normal (which is the default) or Narrow from the drop-down. Or, any other dimension that is suitable for the look of the cards.
The Word document is now set up with your custom dimensions. By default, Microsoft Word will print the cards in portrait. Flip the orientation between Portrait and Landscape if you wish (Layout > Orientation). For instance, a recipe card would look better in portrait. A vocabulary card would be ideal with a landscape adjustment.
Design Your Index Cards to Fit Their Purpose. Your first blank index card is ready. Now you can fill it with any information you desire. From clipart for illustrated information to charts or just normal text — format the look as you would do for a normal Microsoft Word document.
Press Enter or do a Page Break to open the second page or in this case the second index card with the same dimensions. Create as many index cards as you wish.
Make an Index Card with Word’s Inbuilt Label Standards
Open a blank Microsoft Word document. Go to the Mailings tab on the Ribbon.
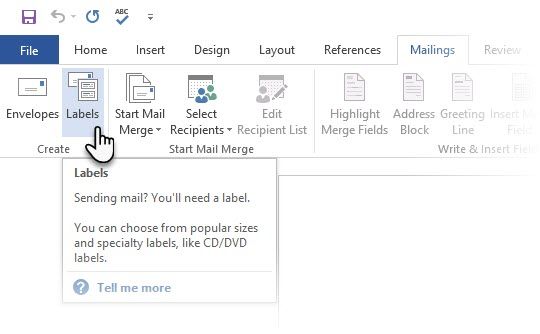
On the Create (Envelopes and Labels) panel click on Labels. In the Envelopes and Labels settings choose the Labels tab click on Options.
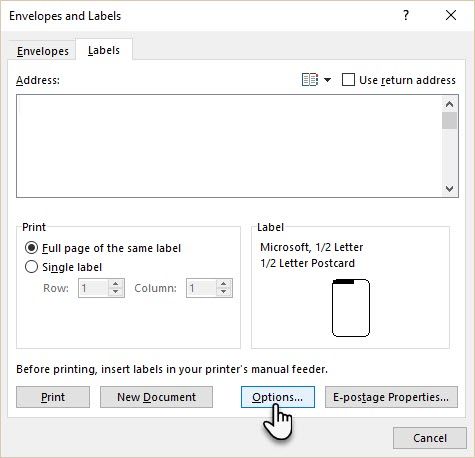
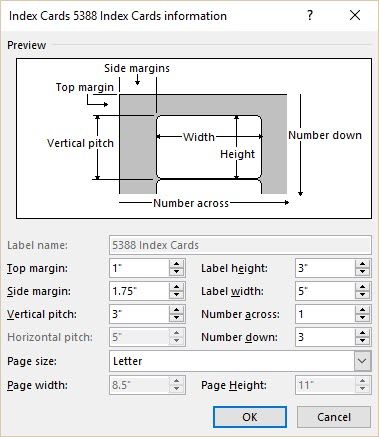
The Options box lists a huge number of Label Vendors and their Product Numbers. You can use these pre-configured label templates to create index cards easily. The Label Information on the right gives the dimensions and the page size required.
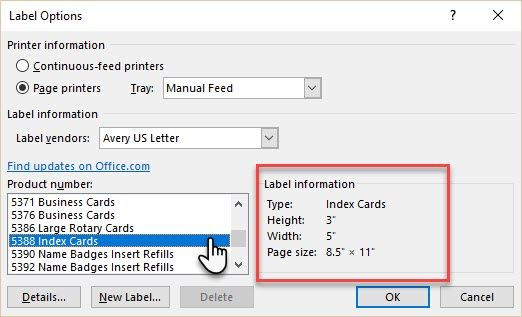
From the drop-down, choose Microsoft or a vendor like Avery US Letter. Scroll down to an Index card dimension (Avery Number 5388) – it will give you three 3″ x 5″ cards on an 8.5″ x 11″ sheet. This is an Avery standard for the index card type chosen (I got the number from the Avery website). Select OK.
Like any print job, you should check that your label dimensions and page margins are not larger than the actual paper size. Click on Details to preview the dimensions. Tweak a setting like Page Size as per the size of the paper you plan to print on.
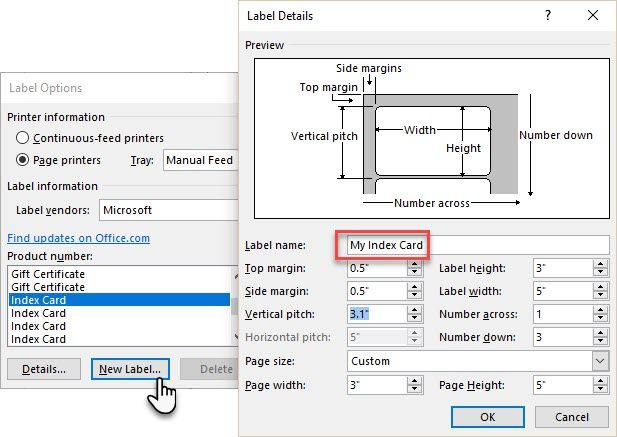
Microsoft Word as always allows you to make your own custom-sized labels when the pre-configured measurements don’t help.
Select New Label in the Label Options box and enter the dimensions in the Label Details dialog box. The custom label will be added to the list with the descriptive name you attach to it.
Click OK. In the Envelopes and Labels dialog box, select New Document. The Microsoft Word document shows the three index cards marked out by dashed border lines. All you have to do is to insert the content, print it and cut it out into three. Click on New Document again to get the next sheet of index cards.
When Was the Last Time You Used Index Cards?
Paper can still be the killer productivity app. A few extra bits of card stock won’t harm it.
America’s first woman ambassador once said that the height of sophistication is simplicity. Much before it was mis-attributed to Steve Jobs. Even Google has embraced this simplicity and has brought back the index card in a new digital avatar.
The look of everything from the Knowledge Graph to Google Keep is a subtle tribute to the index card. In a Co.Design article, Matias Duarte, UX director for Android said,
We’ve actually tapped into one of the oldest pieces of graphic and information design around–business cards, calling cards, greeting cards, playing cards.
Now, what about you?
Maybe, you can use them like a memory index of alternative ideas as Maria Popova does? Or, be like Ronald Reagan who used them to throw out his funny one-liners? You can mimic Vladimir Nabokov and plot your entire book (or just the next term paper) on a series of index cards. At the very least, you can use them to leave love notes for your better half!
Tell us your own experience with index cards. And, throw your best creative ideas in the comments that will help us squeeze benefits from a simple stack of card stock.