
Produce a 1,500 word account, in report format, of an observed positive behavioural change — Assignment Example There can be many factors and aspects in humans’ life which can reduce the contentment and happiness. To overcome such factors and regain therapeutic life is the basic aim of positive psychology. (wisegeek, 2011) MY BEHAVIOR CHANGE TARGET: After my self-assessment, the change I chose for my positive wellbeing is to get rid of caffeine addiction. At first the caffeine addiction didn’t look like to have a link with mood and behavior in general to most of people; but being a caffeine addict I have faced many mood swings which eventually affect my wellbeing and efficient functioning in daily routine. The reason to get rid of caffeine and taking it as a positive behavior change is that in recent past I have realized that this addition is not only effecting my daily routine but is also effecting my health. Caffeine addiction has made me completely dependent over it due to which If I don’t get caffeine intake I experience many unpleasant challenges. The main reasons for gettin g rid of addiction are that I already have hectic and stressful life routine, I don’t get average amount of sleep which had become worse with the regular intake of caffeine. And whenever I tried to quit caffeine intake I felt extreme headache n nausea which led me to grab caffeine again. Adrenal gland main function is to regulate our hormones controlling the body reaction towards stress which help human to cope the stress physically and mentally. When people take caffeine it produces hormones artificially which led to unnatural alertness. After prolonged use of caffeine the adrenal gland functions depletes which affects human normal body functioning leading to psychological and physical problems. (ehow, 2011) The other researches which I came across about caffeine addiction are also related to its effect on human gland and mood swings. According to Stephen Cherniske research  caffeine blues†the intake of caffeine immediately stimulates the central nervous system of human, which triggers stress hormones in the body and leads to fight or flight response; causing stress. The fight or flight response is useful when u have to deal immediate with a dangerous situation but when this feeling of alertness and agitation come up very with every intake of caffeine, then when the effect of caffeine will go the person will feel more tired and low in energy because his body is used to of excessive alertness. And this is why caffeine is also considered an addiction. Because when the effect of caffeine fades away the person starts to feel tired and again look for caffeine intake and the circle goes on. And this not only makes u addict but also makes the body and mind tired as it becomes drained by constant ups and downs in body energy level. (Natural News Network , 2011) GOAL SETTING: I have aimed to get rid of my caffeine addiction. If I will succeed I will be able to sleep more and peacefully which is very important to work properly when you are awake. I will be able to have a sound sleep which was previously very disturbed and short because of excessive caffeine intake. My behavior will become more constant which will lead me to do my work efficiently and calmly. Plus I will be able to enjoy life more as now I most of time feel agitated and anxious. So the outcome of my goal setting includes these points: 1. Would be able to do my work properly and calmly
Microsoft Word is one of the most popular word processing tools for creating reports and other documents. Whether you are a student, professional or anyone who does documentation works, proficiency in Microsoft Word is a skill that is necessary for today’s digital age. Microsoft Word software comes with a vast number of features to improve the productivity of your works and to produce accurate outputs. In this post, I will show you how to use some of these features to create professional reports with Microsoft Word.
When you write a Thesis, Dissertation, Project Report, and Technical Report, etc… Microsoft Word helps you to keep your content more organized, clear and structured. Microsoft Word comes with inbuilt options such as Source Manager for managing your citations, Track Changes, Document Outlines, etc… to make it easier to handle your documents and related resources.
If you closely observed any professional report created with Microsoft Word, you can identify there are several common features in every document. Those common features include Table of Contents, List of Tables, List of Figures, different levels of Heading Styles, Sections, Image and Table Captions, Index, Headers & Footers, Page Numbering, etc… Microsoft Word has specific ways of creating and generating those features. If you follow those methods correctly, you can create your report more easily and correctly.
In this series of tutorials, I will show you how to create Microsoft Word reports and make use of the inbuilt features correctly to make your report looks professional.
For better understanding, I have created a separate post for each key options that you will need to create reports and documents with Microsoft Word. I have listed out all the posts below, and it is not necessary to follow the same order. How ever, to use some options there are some prerequisites. I have added links to those prerequisites within the post itself.
First of all, let’s identify the main sections of a report.
Identify the main sections of a report
In a professional report, the appearance or look of the report as well as it’s flow is significant. So, you should first identify the main sections of the report. The sections given below are the most common in a professional report. (in this post I assume that you know the meaning of bellow terms)
- Cover Page
- Title Page
- Abstract
- Acknowledgement
- Table of Contents
- List of Figures
- List of Tables
- List of Acronyms
- Main Content/ Chapters
- References
- Appendixes
- Index
Creating these sections manually is not an easy task. However, if you practice the following Microsoft Word features, you can easily create the above sections.
The list of must-know features in Microsoft Word to create Professional Reports
Each feature below described in separate pages. You may click the post image or “read more” link to access these pages.
Insert Section Breaks

As the name suggests, section breaks used to break the document into separate sections. Sections allow you to handle its contents separately with the contents of other sections. Read More…
Create Numbered Multilevel Heading Styles

Numbered multilevel heading styles let you clearly distinguish the heading levels make the report easy to read & track. Correctly styled headings are used to generate… Read More…
Add Captions

It is a good practice to caption all the tables, images, maps, etc… added to your report. Caption helps you to refer to those objects precisely in your text. Read More…
Add Citations and Bibliography

Citation is “a word or piece of writing taken from a written work” [Cambridge Dictionary]. If you are obtaining information from another source, you must reference them. Read More…
Add Headers and Footers

Headers and footers are areas in the top or bottom of each page in a document. You can add title, page numbers, dates, or some graphics to every page in a document using headers and footers. Read More…
Add Page Numbers

Page numbers are generally added in the footer section of the document. Therefore the easiest way to add Page Numbers in Microsoft Word is to select a footer with page numbers when you are adding footers to the document. Read More…
Create a Table of Contents

Table of content help readers to easily navigate through your document. In this post, I will show you how easily you can create a table of contents in Microsoft Word. Read More…
Create List of Tables and Figures

When you add several tables and figures or any other objects in your report, it is a best practice to create a list of tables and figures or lists of other objects in the preface of the report. Read More…
Create an Index

An Index is a list of terms and topics that are discussed in a document. The terms and topics are listed along with the page numbers that they appear in the document. Read More…
Wrapping Up
The listed above are the essential features required to create professional reports with Microsoft Word. Here I have explained the basics of those features only. Once you get used to them, you can find more design and customization options inside those features. These features not only adding rich & professional looks to your documents, but they also help you to create and manage your report more easily and productively.
Translation reports and word count
Learn how to view translation reports and how we count words for the performed translations.
![]()
Written by Nick Ustinov. Updated over a week ago
Translation reports provide detailed information on a per-user basis showing what translations and reviews this user has performed, when, in which project, and how many words are credited to this user.
Index
Translation report contents
Reports contain very detailed information on every translation-related action. You’ll see the following columns:
Here’s an example demonstrating part of a personal report:
![]()
Viewing translation reports
Viewing personal reports
Every Lokalise user can view his/her own personal reports by clicking on the avatar in the bottom left corner and choosing Profile settings:
![]()
Then proceed to the Translation reports tab:
![]()
Choose a translation project from the Projects dropdown to view a report for (or choose «All projects»). Then adjust the Date range and press Download report.
Viewing team users reports
Team admins, billers, and owners can view reports for any team user. To achieve that, click on the avatar in the bottom left corner and choose Team settings:
![]()
Then proceed to the Team tab and scroll to the bottom of the page. You’ll see a Translation reports button:
![]()
Clicking on this button will display a dialog box where you can choose a team user to generate a report for (you can also choose «All users») and the date range.
![]()
Once you are ready, click Download report.
How to read translation reports
For the most part, translation reports are quite self-explanatory but when things come to the accounted_word_count and total_words_accounted fields, it’s not that simple. To understand what data these fields represent and how they differ from each other, let’s take a look at the following report for a user named John:

John has performed eight actions in a single project: he provided Russian translations for two keys (the language column is hidden as it contains identical values), then he updated these translations, and finally set their statuses to «reviewed». But the question is, what do these word counts actually represent?
Let’s move from top to bottom:
So, after performing all the calculations we can see that John has 8 accounted words for translations and 6 accounted words for reviewing.
For any business or for any organization it is critical that they make sales and some profit to ensure their place in the market and their running. For this various tactics are used and customers are brought in the business which then provides sales and profits. Many organization and businesses have to have an account in which details regarding every client and the sales that have been made to the account along with what has been brought and the details regarding the client are to be maintained. This account is critical for the business since it is this account that helps the organization to run.
In order to keep a check and balance and for the maintenance of an account, a statement of account is made by the organization or business and made in use.
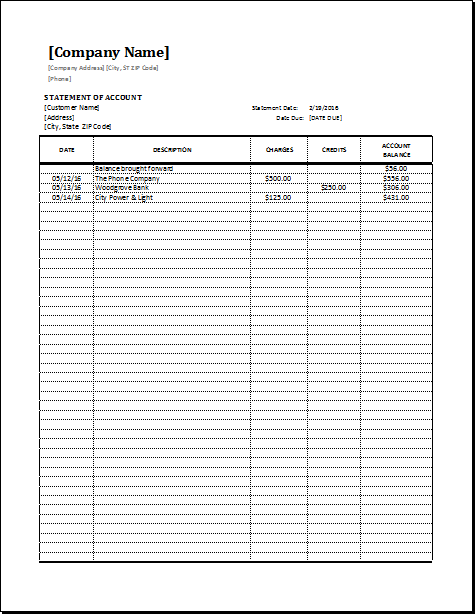
Statement of account is a document used by different organizations in an attempt to keep track of all the sales conducted by the business in the specific period of one time. Generally, this document is used to maintain the record of a month.
Why is it important to use the statement of account?
The use of a statement of account is an essential document for a business wanting to boost its sales since this statement allows a business to keep the record of all the receivables.
A business maintains a separate record of receivables of every customer. The receivable sheet of every customer includes information about the payment made by the customer, amount of balance which is due and a lot more.
By creating a separate sheet of receivables for every customer, the business can send the monthly statement to every customer at the end of the month. This helps them let the customers know about the amount of money they are liable to pay
The statement of account is a very useful document since it enables the business to prepare the account statement of every customer individually.
What is the main purpose of using the statement of account?
The basic objective of preparing the statement of account is to keep the customers informed about the balance due on their side. The business also used this document to know about the payment made by the customer in a specific period of time.
This statement of account is used for every client and consists of details such as the name and number of the client, what has been sold to them and on how much quantity, how much amount has been brought to the business because of this particular client and on an average how much is spent to keep this account. Because businesses and organizations don’t have a lot of time on their hands and neither do they want to make use of a lot of resources, they make use of a template which helps them to make use of it for every client that they deal with. This is easier and very cost effective.
People who want to save their time and use a readymade statement of account can make use of a statement of account template. This template is available here in the form of the spreadsheet document. The user is required to download the template once and then he can use it for every customer.
The template available here is completely customizable that allows the user to change its format to make it suitable to be used. The user can add and remove the details depending on his needs.
The template also allows the user to use it in the daily routine for maintaining the record of every customer.
Preview and details of the template
File: Word (.doc) 2007+ and iPad
Size 34 Kb | Download
File: OpenOffice (.odt) Writer [Writer]
Size 18 Kb | Download
License: ENERGY (Personal use only)
(Distribution) by Kate Elizabeth(CEO)
You can create a variety of different reports in Access, ranging from the simple to the complex. Begin by thinking about your report’s record source. Whether your report is a simple listing of records or a grouped summary of sales by region, you must first determine which fields contain the data you want to see in your report, and in which tables or queries they reside.
After you choose your record source, you will usually find it is easiest to create your report by using the Report Wizard. The Report Wizard is a feature in Access that guides you through a series of questions and then generates a report based on your answers.
What do you want to do?
-
Choose a record source
-
Create a report by using the Report tool
-
Create a report by using the Report Wizard
-
Create labels by using the Label Wizard
-
Create a report by using the Blank Report tool
-
Understand the report sections
-
Understand controls
-
Fine-tune your report in Layout view
-
Fine-tune your report in Design view
-
Add controls to the report
-
Save your work
-
View, print, or send your report as an e-mail message
-
View your report
-
Print your report
-
Send your report as an e-mail message
Choose a record source
A report consists of information that is pulled from tables or queries, as well as information that is stored with the report design, such as labels, headings, and graphics. The tables or queries that provide the underlying data are also known as the report’s record source. If the fields that you want to include all exist in a single table, use that table as the record source. If the fields are contained in more than one table, you need to use one or more queries as the record source. Those queries may already exist in your database, or you may need to create new queries specifically to fit the needs of your report.
Create a report by using the Report tool
The Report tool provides the fastest way for you to create a report, because it generates a report immediately without prompting you for information. The report displays all the fields from the underlying table or query. The Report tool may not create the final, polished product that you ultimately want, but it is quite useful as a means to quickly look at the underlying data. You can then save the report and modify it in Layout view or Design view so that it better serves your purposes.
-
In the Navigation Pane, click the table or query on which you want to base the report.
-
On the Create tab, in the Reports group, click Report.
Access builds the report and displays it in Layout view.
-
For more about viewing and printing your report, see the section View, print, or send your report as an e-mail message.
After viewing the report, you can save it and then close both the report and the underlying table or query that you used as a record source. The next time that you open the report, Access will display the most recent data from your record source.
Create a report by using the Report Wizard
You can use the Report Wizard to be more selective about what fields appear on your report. You can also specify how the data is grouped and sorted, and you can use fields from more than one table or query, provided you have specified the relationships between the tables and queries beforehand.
-
On the Create tab, in the Reports group, click Report Wizard.
-
Follow the directions on the Report Wizard pages. On the last page, click Finish.
When you preview the report, you see the report as it will appear in print. You can also increase the magnification to zoom in on details. For more about viewing and printing your report, see the section View, print, or send your report as an e-mail message.
Note: If you want to include fields from multiple tables and queries in your report, do not click Next or Finish after you select the fields from the first table or query on the first page of the Report Wizard. Instead, repeat the steps to select a table or query, and click any additional fields that you want to include in the report. Then, click Next or Finish to continue.
Create labels by using the Label Wizard
Use the Label Wizard to easily create labels for a wide variety of standard label sizes.
-
In the Navigation Pane, open the table or query that will be the record source for your labels by double-clicking it.
-
On the Create tab, in the Reports group, click Labels.
-
Follow the directions on the pages of the Label Wizard. On the last page, click Finish.
Access displays your labels in Print Preview so that you can see them as they will appear when they are printed. You can use the slider control on the Access status bar to zoom in on details. For more information about viewing and printing your report, see the section View, print, or send your report as an e-mail message.
Note: Print Preview is the only view you can use to see multiple columns — the other views show the data in a single column.
Create a report by using the Blank Report tool
If you aren’t interested in using the Report tool or the Report Wizard, you can use the Blank Report tool to build a report from scratch. This can be a very quick way to build a report, especially if you plan to put only a few fields on your report. The following procedure explains how to use the Blank Report tool:
-
On the Create tab, in the Reports group, click Blank Report.
A blank report is displayed in Layout view, and the Field List pane is displayed on the right side of the Access window.
-
In the Field List pane, click the plus sign next to the table or tables containing the fields that you want to see on the report.
-
Drag each field onto the report one at a time, or hold down CTRL and select several fields, and then drag them onto the report at the same time.
-
Use the tools in the Header/Footer group on the Design tab to add a logo, title, page numbers, or the date and time to the report.
Understand the report sections
In Access, the design of a report is divided into sections. You can view your report in Design view to see its sections. To create useful reports, you need to understand how each section works. For example, the section in which you choose to place a calculated control determines how Access calculates the results. The following list is a summary of the section types and their uses:
-
Report Header This section is printed just once, at the beginning of the report. Use the report header for information that might normally appear on a cover page, such as a logo, a title, or a date. When you place a calculated control that uses the Sum aggregate function in the report header, the sum calculated is for the entire report. The report header is printed before the page header.
-
Page Header This section is printed at the top of every page. For example, use a page header to repeat the report title on every page.
-
Group Header This section is printed at the beginning of each new group of records. Use the group header to print the group name. For example, in a report that is grouped by product, use the group header to print the product name. When you place a calculated control that uses the Sum aggregate function in the group header, the sum is for the current group.
-
Detail This section is printed once for every row in the record source. This is where you place the controls that make up the main body of the report.
-
Group Footer This section is printed at the end of each group of records. Use a group footer to print summary information for a group.
-
Page Footer This section is printed at the end of every page. Use a page footer to print page numbers or per-page information.
-
Report Footer This section is printed just once, at the end of the report. Use the report footer to print report totals or other summary information for the entire report.
Note: In Design view, the report footer appears below the page footer. However, when the report is printed or previewed, the report footer appears above the page footer, just after the last group footer or detail line on the final page.
Top of Page
Understand controls
Controls are objects that display data, perform actions, and let you view and work with information that enhances the user interface, such as labels and images. Access supports three types of controls: bound, unbound, and calculated:
-
Bound control A control whose source of data is a field in a table or query is a bound control. You use bound controls to display values from fields in your database. The values can be text, dates, numbers, Yes/No values, pictures, or graphs. A text box is the most common type of bound control. For example, a text box on a form that displays an employee’s last name might get this information from the Last Name field in the Employees table.
-
Unbound control A control that doesn’t have a source of data (a field or expression) is an unbound control. You use unbound controls to display information, lines, rectangles, and pictures. For example, a label that displays the title of a report is an unbound control.
-
Calculated control A control whose source of data is an expression rather than a field is a calculated control. You specify the value that you want in the control by defining an expression as the source of data for the control. An expression is a combination of operators (such as = and + ), control names, field names, functions that return a single value, and constant values. For example, the following expression calculates the price of an item with a 25 percent discount by multiplying the value in the Unit Price field by a constant value (0.75).
= [Unit Price] * 0.75
An expression can use data from a field in the report’s underlying table or query, or from a control in the report.
When you create a report, it is probably most efficient to add and arrange all the bound controls first, especially if they make up the majority of the controls on the report. You can then add the unbound and calculated controls that complete the design by using the tools in the Controls group on the Design tab.
You bind a control to a field by identifying the field from which the control gets its data. You can create a control that is bound to the selected field by dragging the field from the Field List pane to the report. The Field List pane displays the fields of the report’s underlying table or query. To display the Field List pane, on the Design tab, in the Controls group, click Add Existing Field.
Alternatively, you can bind a field to a control by typing the field name in the control itself or in the box for the ControlSource value in the control’s property sheet. The property sheet defines the characteristics of the control, such as its name, the source of its data, and its format.
Using the Field List pane is the best way to create a control for two reasons:
-
A bound control has an attached label, and the label takes the name of the field (or the caption defined for that field in the underlying table or query) as its caption by default, so you don’t have to type the caption yourself.
-
A bound control inherits many of the same settings as the field in the underlying table or query (such as for the Format, DecimalPlaces, and InputMask properties). Therefore, you can be sure that these properties for the field remain the same whenever you create a control that is bound to that field.
If you already created an unbound control and want to bind it to a field, set the control’s ControlSource property to the name of the field. For details about the ControlSource property, search Help for «ControlSource.»
Top of Page
Fine-tune your report in Layout view
After you create a report, you can easily fine-tune its design by working in Layout view. Using the actual report data as your guide, you can adjust the column widths, rearrange the columns, and add grouping levels and totals. You can place new fields on the report design and set the properties for the report and its controls.
To switch to Layout view, right-click the report name in the Navigation Pane and then click Layout View.
Access shows the report in Layout view.
You can use the property sheet to modify the properties for the report and its controls and sections. To display the property sheet, press F4.
You can use the Field List pane to add fields from the underlying table or query to your report design. To display the Field List pane, do one of the following:
-
On the Design tab, in the Tools group, click Add Existing Fields.
-
Press ALT+F8.
You can then add fields by dragging them from the Field List pane to the report.
Top of Page
Fine-tune your report in Design view
You can also fine-tune your report’s design by working in Design view. You can add new controls and fields to the report by adding them to the design grid. The property sheet gives you access to a large number of properties that you can set to customize your report.
To switch to Design view, right-click the report name in the Navigation Pane and then click Design View.
Access shows the report in Design view.
You can use the property sheet to modify the properties for the report itself and the controls and sections it contains. To display the property sheet, press F4.
You can use the Field List pane to add fields from the underlying table or query to your report design. To display the Field List pane, do one of the following:
-
On the Format tab, in the Controls group, click Add Existing Fields.
-
Press ALT+F8.
You can then add fields by dragging them from the Field List pane to the report.
Top of Page
Add fields from the Field List pane
-
To add a single field, drag the field from the Field List pane to the section where you want it displayed on the report.
-
To add several fields at once, hold down CTRL and click the fields that you want. Then, drag the selected fields onto the report.
When you drop the fields onto a report section, Access creates a bound text box control for each field and automatically places a label control beside each field.
Top of Page
Add controls to the report
Some controls are created automatically, such as the bound text box control that is created when you add a field from the Field List pane to your report. Many other controls can be created in Design view by using the tools in the Controls group on the Design tab.
Determine the name of a tool
-
Place the mouse pointer over the tool.
Access displays the name of the tool.
Create a control by using the tools in the Controls group
-
Click the tool for the type of control that you want to add. For example, to create a check box, click the Check Box
 tool.
tool. -
Click in the report design grid where you want to position the upper-left corner of the control. Click once to create a default-sized control, or click the tool and then drag in the report design grid to create a control of the size that you want.
-
If you don’t position the control perfectly on the first try, you can move it by using the following procedure:
-
Click the control to select it.
-
Position the mouse pointer over the edge of the control until the pointer turns into a four-headed arrow
. -
Drag the control to the location that you want.
-
 tool.
tool. .
.This procedure creates an «unbound» control. If the control is the type that can display data (a text box or check box, for example), you need to enter a field name or expression in the ControlSource property for the control before it will display any data. See the Understand controls section in this topic for more information.
Display the property sheet
To display the property sheet in Design view, do one of the following:
-
On the Design tab, in the Tools group, click Property Sheet.
-
Press F4.
Top of Page
Save your work
After you save your report design, you can run the report as often as you need to. The report’s design stays the same, but you get current data every time you print or view the report. If your reporting needs change, you can modify the report design or create a new, similar report based on the original.
Save your report design
-
Click File > Save or press CTRL + S.
Alternatively, click Save on the Quick Access Toolbar.
-
If the report is untitled, type a name in the Report Name box, and then click OK.
Save your report design under a new name
-
If you’re using Access 2013 or higher, click File > Save As > Save Object As.
If you’re using Access 2010, click File > Save Object As.
-
In the Save As dialog box, type a name in the Save Report to box for the new report and then click OK.
Top of Page
View, print, or send your report as an e-mail message
After you save your report design, you can use it over and over again. The report’s design stays the same, but you get current data every time you view or print the report. If your reporting needs change, you can modify the report design or create a new, similar report based on the original.
View your report
There are several ways to view your report. Which method you choose depends on what you want to do with the report and its data:
-
If you want to make temporary changes to which data appears on the report before you print it, or if you want to copy data from the report to the clipboard, use Report view.
-
If you want to be able to change the design of the report while looking at the data, use Layout view.
-
If you simply want to see what the report will look like when it is printed, use Print Preview.
Note: If your report is formatted with multiple columns, you can only see the column layout in Print Preview. Layout view and Report view display the report as a single column.
View your report in Report view
Report view is the default view that is used when you double-click a report in the Navigation Pane. If the report is not open, double-click the report in the Navigation Pane to see it in Report view.
If the report is already open, right-click the report name in the Navigation Pane and then click Report View.
Work with your data in Report view
In Report view, you can select text and copy it to the clipboard. To select entire rows, click and drag in the margin next to the rows that you want to select. You can then copy these rows to the clipboard by doing one of the following:
-
On the Home tab, in the Clipboard group, click Copy.
-
Right-click the selected rows and then click Copy.
-
Use the keyboard shortcut — Press CTRL+C.
Show only the rows you want by using filters
You can apply filters directly to your report without leaving Report view. For example, if you have a «Country/region» column and you want to see only those rows where the country/region is «Canada», do the following:
-
Find the word «Canada» in the report and right-click it.
-
Click Equals «Canada».
Access creates and applies the filter.
Toggle a filter on and off
You can switch between a filtered and non-filtered display by clicking Toggle Filter in the Sort & Filter group of the Home tab. This does not remove the filter — it just turns it on and off.
Remove a filter
-
Right-click the field from which you want to remove the filter.
-
Click Clear Filter from fieldname. (Your actual field is listed for fieldname.)
Once a filter has been removed, you cannot switch it back on by using the Toggle Filter command. You must first re-create the filter.
Note: If you apply a filter to a report and then save and close the report, the filter will be saved. However, the next time you open the report, Access will not apply the filter. To reapply the filter, on the Home tab, in the Sort & Filter group, click Toggle Filter.
Preview your report by using Print Preview
Right-click the report in the Navigation Pane, and then click Print Preview on the shortcut menu.
You can use the navigation buttons to view the pages of a report sequentially or to jump to any page in the report.
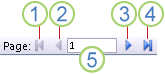
1. Click to display the first page.
2. Click to display the previous page.
3. Click to display the next page.
4. Click to display the last page.
5. Type a page number in this box and then press ENTER to jump to a specific page.
In Print Preview, you can zoom in to see details or zoom out to see how well the data is positioned on the page. With the cursor positioned over the report, click once. To reverse the effect of the zoom, click again. You can also use the zoom control on the Access status bar to zoom further in or out.
To close Print Preview, do one of the following:
-
On the Print Preview tab, click Close Print Preview.
-
Right-click the report in the Navigation Pane and then click Layout View or Design View on the shortcut menu.
Tip: After previewing your report, you can export the results to Microsoft Word, Microsoft Excel, or several other Office programs. On the External Data tab, in the Export group, click the button for the format that you want and follow the instructions.
Top of Page
Print your report
You can print a report while it is open in any view, or even while it is closed. Before you print, be sure to double-check the page settings, such as the margins or page orientation. Access saves the page settings with the report, so you need to set them only once. You can set them again later, if your printing needs change.
Change the page settings
-
Open the report in Print Preview. You can change page settings in any view, but Print Preview is best because you can see the effects of any changes immediately.
-
On the Print Preview tab, in the Page Layout and Page Size groups, click Portrait
or Landscape to set the page orientation, Size to set the paper size, Margins to adjust the margins, and so on. -
After you make a change, use the navigation buttons to view several pages to ensure that you haven’t created any formatting problems on later pages.
 or Landscape
  to set the page orientation, Size
  to set the paper size, Margins
  to adjust the margins, and so on.
Send your report to a printer
-
Open the report in any view, or select the report in the Navigation Pane.
-
Click File > Print > Print.
Access displays the Print dialog box.
-
Enter your choices for options such as printer, print range, and number of copies.
-
Click OK.
Top of Page
Send your report as an e-mail message
You can send your report to recipients as an e-mail message instead of printing a paper copy:
-
In the Navigation Pane, click the report to select it. On the External Data tab, in the Export group, click Email.
-
In the Send Object As dialog box, in the Select Output Format list, click the file format that you want to use.
-
Complete any remaining dialog boxes.
-
In your e-mail application, type the message details and send the message.
Top of Page
If Microsoft Office had been a country, it would have been the third most populous country in the world. 1.2 billion people using a single suite of apps is mind-boggling. And, they «speak» 107 languages!
But right now, you and I are speaking in English and we are going to talk about the most popular tool in the Microsoft Office arsenal — Microsoft Word 2016.
This document editor is used for writing a variety of documents. From a simple application to the necessary resume. From a plain bucket list to an office memo. We think we can work with Word. But it is when we sit down to write a serious professional report, we discover an important fact.
Professional report writing needs a different set of skills.
So, ask yourself this — can you make the leap from a single document to a lengthy report? Do you know all the Microsoft Word features that will help manage this large scale document project? Can you collaborate on the work with other team members?
You may be a student, a small business owner, or an office worker…you will need to create a report or a professionally formatted document of some kind. This MakeUseOf guide will help you update your techniques and sharpen your design approach.
In this guide:
Writing a Report — Introduction | The Report Checklist
Useful Microsoft Word Tools — Paste Special | Researcher | Freeze Parts of Your Document
Work on the Layout & Design — Intro | Cover Page | Table of Contents | Header and Footer | Page Numbers | Font Styling | Paragraph Styling | Page Breaks | Styles and Themes | Captions | Quick Parts | Page Borders
References and Collaboration — Index | Bibliographies | Cross-Referencing | Comments
Finalize Your report — Signatures | Watermarks | Read Only | Print to PDF
The Next Step — Conclusion
Writing a Report
Report writing involves research and then publishing the outcome of that analysis. In the professional world, the «look» or appearance of what you publish is paramount. The eye-pleasing final result could burnish your reputation and enhance your personal brand.
The steps below will handhold you through the expert features in Microsoft Word 2016. Spend a lot of time on a plan. Start with these guidelines…

Step 1: Decide the Purpose
Before you begin the report, you must first know why you are writing it in the first place. Reports are of many kinds but they are either meant to inform or persuade. It can be meant for describing a technical process, sharing background information, or demonstrate progress on a project.
Ask yourself – What and Why. This will help you distill the purpose to the one main point and stick to it instead of rambling on with unnecessary details.
Step 2: Identify Your Audience
The second important consideration is to evaluate your audience. Will they be able to understand what you are talking about? Are there different levels of readers who will read the report? The reader’s knowledge of the subject will greatly influence the information that you need to include.
Decide on the primary audience and then script the report at the adequate technical level. The secondary audience can be supported with supplemental information at the end of the report.
Step 3: Know Your Topic
You must know what you are talking about. So, research the topic, and include all the relevant information to prove your point. Make sure that you come to a conclusion based on facts and not personal opinion. The information must be correct, current, and well-referenced.
Also use a variety of resources such as journals, newspaper articles, books, websites, brochures, raw data, annual reports, and speeches to help support your point. Just don’t stick to Wikipedia.
Step 4: Outline the Report
You have done the research. There’s a ton of information that is waiting to be typed and printed. But wait! Don’t drown before you enter the water. Prepare the final outline of the report which will be the chart of waypoints to help you navigate from start to finish. The outline is the blueprint. It will give you a bird’s eye view of the land and also show you where you need to fill in the details.
The structure of an idea report can include the following elements:
- Title Page
- Executive Summary
- Table of Contents
- Introduction
- The Body of the Report
- Conclusion
- Recommendations
- Appendix
- Bibliography and References
Microsoft Word’s Document Outline is a powerful feature that can help you organize a document even before you start filling it with research. Take advantage of brainstorming and mind-mapping templates too.
Step 5: Write, Edit, Proofread, and Finish
Once you have structured your report, it is time to fill out the headers with content. I personally find it best to tackle a little bit of each section, and then bulk it up with information. You can do that if you want, or finish each section as you go down the report structure. Make sure you focus on presenting your ideas and using supportive evidence rather than spelling and grammar first. Outline your argument and write a few sentences that cast your main ideas. If you find something worth quoting, quote it.
Once the majority of your text is written, it is now time to read through it and make sure it flows well. Make sure you guide the reader’s understanding with transition words such as «This information shows…», «In other words…», «Similarly…» and do highlight relevant and key points.
Finally, spend time to proofread, check for grammar and spelling, and double-check all relevant information and its logical flow. It is best to leave at least one day to check and proofread your work. Don’t try to edit it straight after you think you have finished, as you will tend to miss read what you have written. Get some sleep, and proofread it the next day.
The Report Checklist
Before you go and submit or hand in your report that you have worked so hard on, make sure you have done the following:
- Completed the title page with the Title, Your Name, Date, Who the report is for, and a possible description of what the report is about.
- The contents page has appropriate headings and pages numbers are correct.
- Make sure the introduction covers key points, the scope of the report, and the objective it wants to meet.
- You have added captions above tables and below images/graphs.
- Does the content of the report present the information in a clear way, logical, factual, stay on topic, is to the point?
- Does the conclusion state the results, restate main idea’s, and does not include any new information?
- Are the headings and sub headings clearly labeled?
- Are quotes relevant, up-to-date, and correctly referenced?
- Have you used page breaks where appropriate?
Now, let’s launch Microsoft Word and take you through the features that will help piece together the draft of your report and present it as a professional document.
Useful Microsoft Word Features for Report Writing
Take these as bite-sized tips and master them one by one.
Microsoft Word is a big howitzer with many nuts and bolts. Let’s focus on the key skill sets and the tools you will need to plan, prepare, and present the professional report. The Microsoft Word features we will cover below are also productivity shortcuts that will make your job easier.
Tip: Use Microsoft Word 2016’s «Tell Me» assistant to learn more about new features in the Office suite.
Let’s start with three preliminary tools…
Use Paste Special
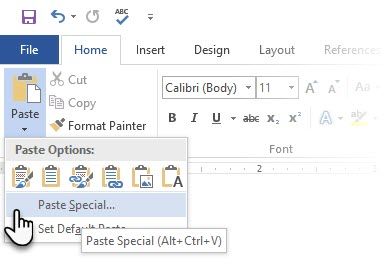
For most of us, when we need to copy text or an image into Word, the CTRL+V shortcut does just fine. But sometimes we might want to paste the copied data into another format, such as Excel data as an image. With the Paste Special command you can discard or specify the format when you paste a picture, presentation data, table, or object from any other program into Word.
You will work a lot with Excel tables and charts in a professional document.
If you just copy what you want and click paste, you will notice that it will insert the data as tables. But, if it is a large area of cells you want to paste, and you do not want to edit it, you may want to paste it as an image, with the extra option to edit it.
In Microsoft Excel: Select and highlight the cells that you want to copy > Press CTRL+C.
In Microsoft Word: Go to Home > Paste > Paste Special. Select Paste Special and from the dialog select Microsoft Office Excel Worksheet Object.
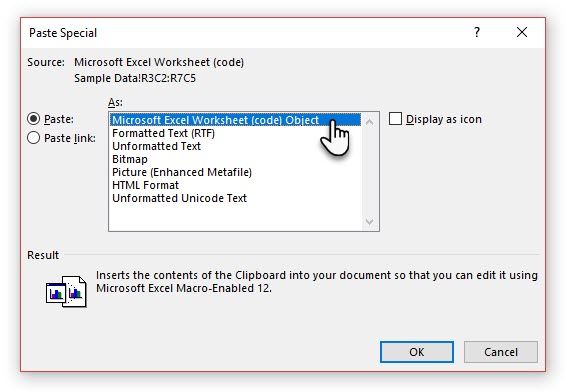
You can resize the data as it was an image, and if you double click, you will be able to edit the values. You can change the table or chart and redesign it. And, if you update the data in the chart or table in Excel, you can automatically refresh the chart in Word.
Try the right-click context menu too. The Paste Special menu pops up:
There are more options to import data from Excel into Word. The Microsoft Office Support page also describes them in detail.
Use the Researcher
Yes, there is Google and Wikipedia. But constantly switching from Word to your browser can hamper your productivity. Office 2016 brings in powerful research integration to this grunt work. The Researcher can not only help you find content from within Microsoft Word but also help you quickly add citations. It uses the Bing Knowledge Graph to find the right content to support your document.
Go to Ribbon > References tab and c Choose Researcher. A pane will open on the right with the search options.
Type a keyword for the topic want to search for and press Enter.
The Results pane shows a list of sources you can use in your document. Choose a topic to explore in detail.
Add the topic to your Microsoft Word document with a click on the plus sign on the top-right. You can also click the plus sign on any result to cite the source in your research document. The cite source helps you support your research with web sources and books.
As we will see later, an annotated bibliography is one of the toughest parts of a document. The Researcher is an intelligent assistant who steps in.
Freeze Part of Your Word Document
Let’s take for granted that your professional report will be a long and complex work. You can split the Word window into two panes so that you can view two different parts of a document at the same time. It is a valuable time saver when you want to copy and paste parts from one place to another or refer to one part of the document while working in another.
Go to Ribbon > View tab > Split.
To remove the split, click on Remove Split in the same tab.
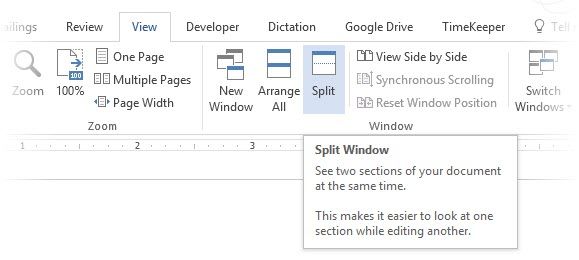
The Windows group gives you several options to change the way you work with two or more documents. The features are self-explanatory.
To scroll both documents at the same time, click Synchronous Scrolling in the Window group on the View tab. You can also click on View Side by Side to put two parts of the document next to each other.
Tip: Use Split View to display two different layouts – for instance, Print and Outline. Set the split. Then, click in the pane that you want to change, and then select a different layout on the View tab.
Work on the Layout & Design
The presentation of a report is what gets someone to read a report in the first place, and that is why it is crucial that your report is well presented. If you had the choice of four reports to read, what will you choose?
- A hand written report.
- A document printed in black and white.
- A report printed on normal A4 paper in color.
- A report printed in color, with a catchy title page, neatly bounded, and slick?
You will pick up the fourth report because it will pull you towards it by the visual appearance alone.
The front cover is not the only reason. A well-designed report is easier to read. It is also easier to scan when you don’t have time to read. That is why you need to spend some time on your headers and footers, and the different styles and themes. In short – the formatting of every element in the report.
Formatting may seem like a difficult chore, but it is a fun exercise that will exercise all your creative muscles. The key takeaways will be the skills you can apply to anything in Microsoft Office going forward. And the time you will save with all the productivity tips learned here.
Microsoft Word 2016 has a wealthy set of features. These are only some of the ways that your report design can stand out from the rest and be professional. So, let’s break down the layout and design skills.
This section will cover these features step-by-step:
- Start with a Cover Page
- Make a Table of Contents
- Create Your Header and Footer
- Add Page Numbers
(Format the Content)
- Pick the Right Fonts
- Style the Paragraphs
- Control Page Breaks
- Use Styles and Themes
- Captions
- Use Quick Parts
- Decorate with Page Borders
1. Start With a Cover Page
The first page is the first point of contact with your reader. It is also your opportunity to make a favorable impression. Don’t let your lack of artistic skills be an excuse because Word takes up the job with its in-built gallery of title pages. All you have to do is marry one to the theme of the report.
Microsoft Word 2016 offers you 16 pre-formatted templates and three more on Office.com.
Go to Insert > Pages Group > Cover Page.
The cover page appears at the beginning of the document by default.
As there are only 16 «official» templates on offer, you may find that all your other peers have the same cover page. So, why not customize it, and make it a bit more unique.
You can design a title page (or cover page) in Microsoft Word that can be an original in the stack. Save it as a template or easily change the design on the fly.
2. Make a Table of Contents
Casual readers scan. Good readers scan first and then dive deep. A table of contents provides the waypoints that help both. When it is a long and complicated document, wouldn’t you rather check the lay of the land before you head to the section that interests you?
Consider a Table of Contents (TOC) if your document is more than 10 pages long. You should first make sure you don’t need to rearrange any pages in your document before creating the TOC.
In Microsoft Word, you don’t have to write the entire TOC by hand. There’s a Table of Contents automatic tool under the References tab which takes your outline and designs it for you. Also, you can easily keep it updated when you want to change something.
There are also templates you can download and fit it around the nature of the content. For instance, a TOC for a thesis will look different from that of a company’s annual report.
We have a complete tutorial on how to create a table of contents page in Word.
The gist of it is this:
Create the outline and use heading styles to organize the hierarchy. Apply the automatic TOC tool to the heading styles. Word 2016 searches for those headings and then inserts the table of contents into your document. Then you can automatically update your TOC if you make changes in your document.
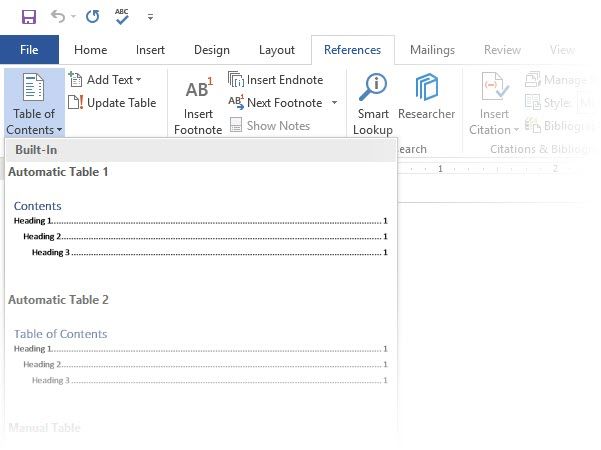
For more hands-on control, you can also use the Manual Table of Contents style. Word inserts placeholder text and you have to insert and format each content in the list.
3. Create Your Header and Footer
Headers and Footers are important in reports as the main purpose is to provide information about the report on every page. They are the common display areas for page numbers. The header of the document should contain the title of the report, and possibly the name of who created it. The title of the current section is helpful.
The footer, on the other hand, should include the page numbers, date of publication, and other administrative information that is required. Do note that some style guides have special guidelines for headers and footers.
Let’s start with the header in your document and give it a unique look.
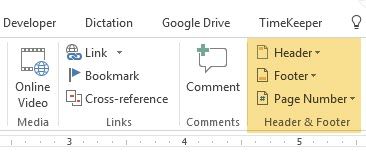
Select Insert, then select either Header or Footer from the group. The built-in gallery shows you several options you can choose from.
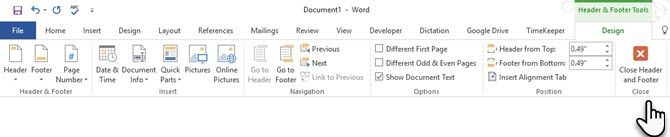
The header and footer space is inserted in your document with placeholder text or table. The Header & Footer Tools opens on the Ribbon for other formatting work like the date, time, or picture.
Enter your text and then select Close Header and Footer.
You can start with a blank header and footer. If you have the design skills, use the Header & Footer Tools to design your own. Master the header and footer space if you want to create custom letterheads for your organization. You can use brand elements like company or organization logos at the top and neatly formatted footnotes at the bottom
Let’s try with and modify one of the inbuilt headers. I selected Facet from the gallery.
The final look took two minutes to put together with simple text effects and an icon sourced from the Microsoft Office icon gallery.

The header and footer are in place. But, how do you know where you are in the document? Insert page numbers as the next important signpost.
4. Add Page Numbers
Page numbers look best in the footer (unlike in the header as in the image above). You can add a basic page number from the Insert > Page Number button on the Ribbon. You can also add it from the Design tab that appears when you add the header and the footer.
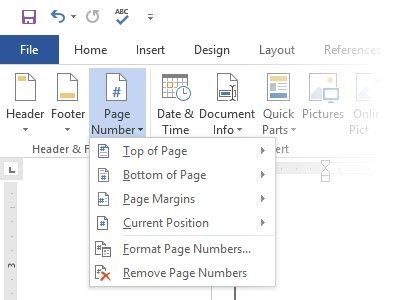
You have a lot of control over page numbers. Choose from a wide range of number formats and customize them to your needs. In this case, we are adding the number to the footer, but you can put them at the top or even at the margins. In this example, I have placed the page number at the bottom left. But, I would like to change the default look and the format.
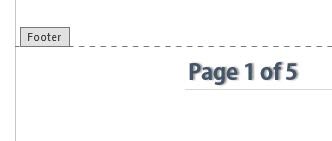
For example: Using a «Page X of XXX» makes for a better indicator on a long document.
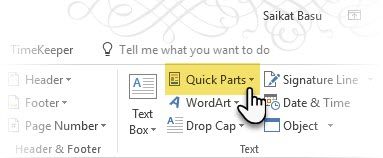
Select the page number. Go to Insert > Quick Parts. From the drop-down menu, select Field. You can also reach the Field dialog from the Header and Footer Design tab.
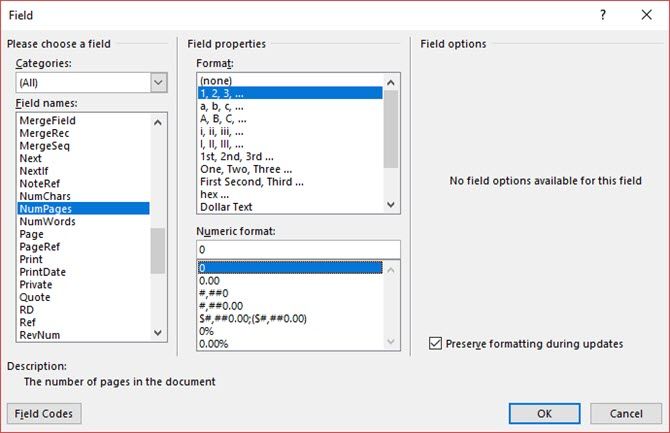
Choose NumPages from the long list of field names. From the box on the right, you can pick a specific format. I selected the usual 1, 2, 3. Click OK, and the number of the number of pages will appear. Now all you have to do is add your text such as Page X of XXX, and change the look of the numbers with the usual text formatting tools available from the Home tab.
It now looks like this:
Design the look on any page number in your document and Word updates all the remaining automatically. Page numbers are the most common elements in a footer, but it can also hold any other information like the header. From the options in the Insert group, you can add the date and time, document info, pictures, and more to your header or footer.
Next, we’re heading into formatting the content.
The visual draw of your professional report comes together with the «beautification» you apply to the content. Formatting is also an essential step for a document that flows well. So, you must focus a lot of energy on picking the right font, paragraph space, and the colors.
Don’t worry. Even, the artistically challenged will find this part easy because Microsoft Word comes packaged with default themes and visual styles. Let’s start with the most basic element of a document.
5. Pick and Style the Right Font
Your choice of font in a professional Word report not only determines how the text stands out but also how it is printed. You want both for maximum impact.
You can apply a typeface (i.e. the visual look of the font) to either an entire document or to specific parts of a document. All font choices are available from the Home tab. Go to Home > Font.
The default font in Microsoft Word 2016 is Calibri. Look beyond that as you have lots of others to choose from. If you choose Times New Roman, you may be considered lazy, if you choose Windings, well… I don’t think I need to explain that. So make sure you choose a font that is easy to read and suits the report. To play it safe, pick from one of these professional-looking Google fonts; they’re available for free.
Tip: Baskerville and Georgia are good alternatives to the over-used Times New Roman
Try different font pairing for the body text and Headings (and Subheadings). Several websites like FontJoy and TypeWolf will help you experiment with font pairings. You can download and use custom fonts too. But remember the thumb-rule — never use more than three different typefaces in a document.
For that extra bit of pizazz, try a drop cap to enhance your text.
6. Style the Paragraphs
If you want to have your lines double spaced, or single spaced, you need to change the format of the paragraphs. By changing the spacing, you can make a document easier to read or give the impression that it is longer and that you have put more work into it.
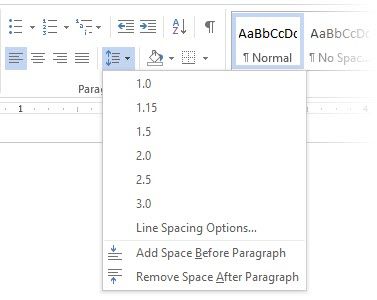
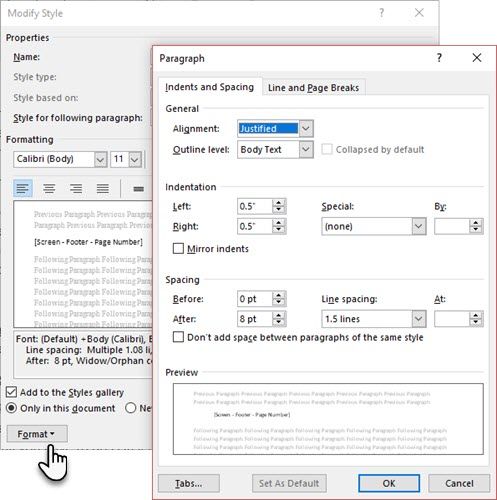
To change the paragraph for the whole document, it is best that you select each block of text; otherwise, if you are using headers in your report, they will change too. Another better option is if you customize the particular style you are using to format the paragraph.
To do this, go to Home > Styles. Right click on the style you want to change and select Modify. Click on Format > Paragraph which is at the bottom of the dialog box. Now, change the spacing, indentation, and alignment for the paragraph. Click OK to close the dialogs.
When you want to change a smaller portion of the document, select what you want to change. Right click on the highlighted text and select Paragraph. The same dialog box as above will appear.
7. Control Page Breaks
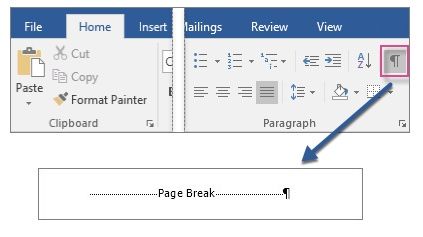
A page break — by its very name — splits a continuous block of text across two pages. Page breaks are important structural elements for long documents. Word automatically inserts a page break at the end of the page. But in a long document, you can place page breaks where you want them.
To insert a manual page break, click Insert > Page Break. (Keyboard shortcut: CTRL + Enter)
A page break looks like this when you click on the Show/Hide command in the Paragraph group.
But what if you want to keep a bunch of lines together on a page or column and not have them separate because of a page break? The layout is in your control. Click the tiny arrow you see in the bottom right of the Paragraph group.
In the Paragraph box, click Line and Page Breaks. Select from these four pagination options:
- Widow/Orphan control places at least two lines of a paragraph at the top or bottom of a page.
- Keep with next prevents breaks between paragraphs you want to stay together.
- Keep lines together prevents page breaks in the middle of paragraphs.
- Page break before adds a page break before a specific paragraph.
We’ve also shown how to remove page breaks when necessary.
8. Use Styles and Themes
Styles and themes are perhaps two of the more underused features in Microsoft Word. But I think you should use them at every opportunity to save a lot of time.
But what is the difference between a theme and a style? Microsoft says:
Themes provide a quick way to change the overall color and fonts. If you want to change text formatting quickly, Word Styles are the most effective tools.
So, as themes control the general look with color, effects, and fonts – start with a good theme for your document first. Then, use Styles to dig into the specific portions you want to change the appearance for.
For Themes: Go to the Design tab. Pick a theme from the gallery. You can see previews of what the color combination is like.
For Styles: Select the part of the text you want to change. Go to the Styles group on the Home tab. You can see previews of what they look like. Choose the Style that is suitable for your content. For instance, choose a heading style for the headings in your document. Or, a particular style for any quotes. You can also modify an existing style and create new styles from scratch.
9. Captions
Every picture, chart, or illustration needs a caption to clearly describe it. It is a single line of text, usually located below a graphic. Captions are also an important reference when you need to mention them in another place. Many documents omit this small detail.
It is easy to add a caption. Right-click the illustration you want to add a caption to. Select Add Caption.

In the dialog box, add your caption text and configure the remaining options. Captions can be automatically referenced in Word.
10. Use Quick Parts
Professional documents can get repetitive. This is why you should start using Quick Parts for boilerplate content you reuse all the time. For instance, let’s say there is a contract clause you include with every document. Or, some introductory information. Instead of repeated copy-paste, save them as Quick Parts and re-use them again and again.
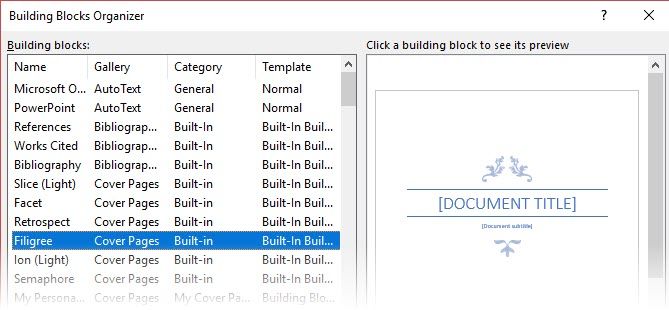
Quick Parts is also a type of building block. You can see the gallery of all reusable blocks of content in the Building Block Organizer.
Save and reuse your own Quick Parts in two steps:
- Select the phrase, sentence, or other portion of your document that you want to save to the gallery.
- Go to Insert > Text group > Quick Parts > Save Selection to Quick Part Gallery. Change the name and add a description if you like. Click OK.
Just as easily, you can re-use the saved snippet of content.
Place your cursor where you want to insert a selection from the Quick Parts Gallery. Go to Insert > Text group > Quick Parts. Then click the sentence, phrase, or other saved selection you want to reuse.
You will notice three other categories in the Quick Parts menu.
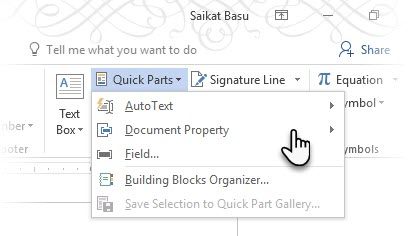
AutoText: Word 2016 has retained the old AutoText feature. It works like Quick Parts for any block of text that you use a great deal. Example: A note you want to use with every document.
Document Property: A set of constant properties that you can include with every document. Example: Company name or author.
Fields: These are predefined elements that update automatically. Example: Date, time, page numbers etc.
Remember, entries for document property can sometimes include information you wouldn’t want to share with everyone. So, keep a close eye on these fields and remove the hidden personal data whenever required.
11. Decorate With Page Borders
Page borders look good not only on flyers and invitations. If done right, they can add a touch of class to a document. A variety of line styles and widths and art borders are available from the Design menu on the Ribbon.
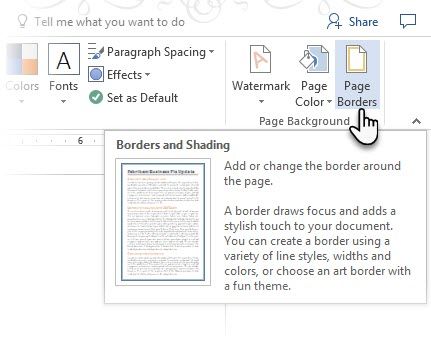
Go to Design > Page Borders.
In the Borders and Shading box, use the Page Border tab to design your border.
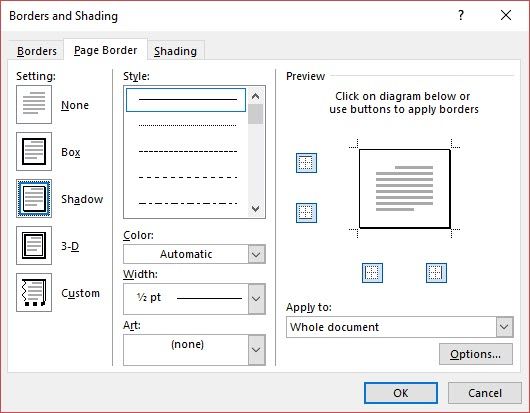
The settings are self-explanatory. Try Shadow or 3-D with the right colors to add a subtle but elegant border. The Art styles with their clip-art borders might be too garish for professional documents.
Use the four corner buttons in the Preview window to select the sides of the page to draw borders. Click these buttons to remove or add borders, as you wish.
Place the cursor on the first page of a document if you want to put a border around only the first page. You can also put borders around certain pages in a section. Place the cursor in the section — either in the first page of that section or in a subsequent page.
References and Collaboration
A Word report can seem like an unmanageable chore. It’s like organizing a million piles of hay into neat little stacks. The idea is to know precisely which stack has the pin you are looking for. These features are meant to make it easier.
1. Create an Index
When writing large documents such as a report that contains a lot of information, a contents page may not be enough. An Index should appear at the end of the document, with page numbers to keywords and information in the report. Create an index to help the reader reference the right information with just the page number.
Make an index if your document has more than 20 pages. Microsoft Word 2016 doesn’t let the process overwhelm you. It basically has two parts:
- Select the words or information you want to include in the index.
- Place the index at the right place in your document.
You can scroll through the finished document and mark the words or phrases you want to include in the index or mark them as you go along. Either way, select the text you’d like to use as an index entry or click where you want to insert the entry.
1. Click References > Mark Entry.
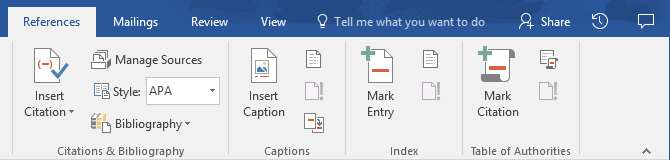
2. Edit the text in the Mark Index Entry dialog box. You can also add a sub-entry which further defines the main word you used in the index. You can add multiple levels and each appears indented under the main entry.
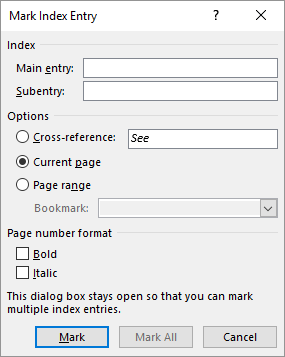
3. Under Options, you can also create a cross-reference to another main entry. A reader can use this to refer related information elsewhere in the same document.
4. Use the Page number format to decide on the appearance of the page numbers in the index.
5. Click Mark to mark the index entry. To mark this text everywhere it shows up in the document, click Mark All.
6. Repeat the process for all the words and phrases you want to include in the index.
You have now built your index. Insert it at the right place towards the end of the document.
1. Click on the page where you want to insert the index.
2. Click References > Insert Index.
3. The Index dialog box is displayed. Here you can choose to format the text entries, page numbers, tabs, and leader characters.
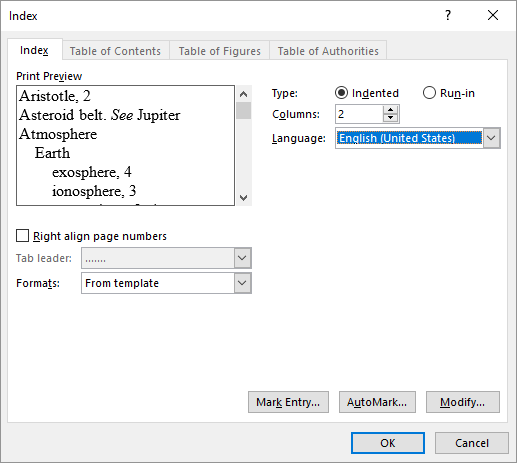
4. Choose the appearance from the different formats in the list and check the Preview window on the right. Remember, the Preview window doesn’t show you actual index. It is just a «simulation» of how it will look like.
5. Click OK. Your Index is now ready.
Sometimes, you may need to add more entries to the index after you have inserted it on the page. Mark the entry and go to References > Update index to include the new mentions.
Also, add a heading for the index because Word doesn’t do it automatically.
2. Creating Bibliographies
Your document is almost done. Now, you need to credit all the other research work and ideas which you have referenced in your document. It’s time for a bibliography.
A company report might not need a bibliography but an academic paper isn’t finished without one. The bibliography is one of the most painstaking jobs in an academic report. You need to have all your citations in order before you sit down to frame the bibliography. Also, decide on the citation style (typically MLA, APA, or Chicago-style) as per the guidelines of your subject.
Don’t hesitate to take advantage of third-party citation and bibliography generators for constructing this section.
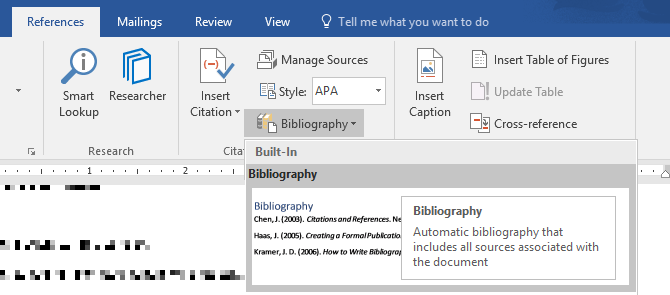
But, Microsoft Word 2016 has a complete toolset to make this process as painless as possible. So, go to the point in the document where you would like to place the bibliography. It’s good if you have at least one citation to include, but even if you don’t, Word 2016 lets you use a placeholder citation and fill in the sources later.
Click References > Bibliography.
Word offers a few bibliography styles that differ only in their heading names. Choose the appropriate style and then insert citations from the button in the Citations & Bibliography group.
The bibliography tool has a few steps to it. For the sake of brevity, I will direct you to the excellent Microsoft Office help page which is a step-by-step guide.
Some academic papers will ask you to create an annotated bibliography. It is a more fleshed out version of a bibliography with a list of citations to journals, books, articles, and other documents followed by a brief paragraph. The paragraph is a description of the source and how it supports your paper.
3. Cross-Referencing
You can use a cross-reference to help the reader navigate through a long document. At any point in a document, you can tell the reader to refer back to a heading, page number, image, chart, footnote, endnote, and paragraph. A cross-reference link is a neat way to connect related information together. The reader just has to click on the link to go that snippet of information.
Here’s how you begin:
1. Select the place for the cross-reference and type the text that tells the reader about it. For instance: «Refer to Chart 3 for future trends.»
2. Go to Insert > Cross-reference.
3. In the Reference type box, click the drop-down list to select what you want to link to.
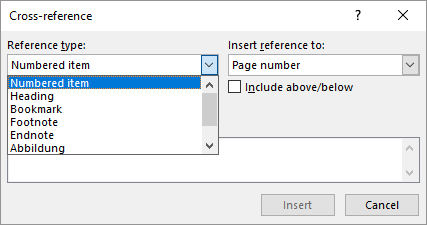
4. The options in the Insert Reference to drop-down will change according to your choice above.
5. In the For Which field, go through the choices and tell Word the exact information to link to.
6. Check the Insert as hyperlink box to create the hyperlink for the referenced information.
7. Click on Insert to include the cross-reference in the document.
Remember, our mention of captions? You can make cross-references to equations, figures, graphs, and tables if you used captions below them.
Word cannot create a cross-reference for something that does not exist. Word will let you know about these errors and also update the cross-references automatically when you change the page number or text of the referenced item.
A professional report can be a solitary job or you can take the help of a team to prepare the first draft. The humble Comment is one of the most underused tools of a Word document. It is displayed as a rectangular colored balloon in the margin or in the Reviewing Pane.
You can use comments as small «stickies» or self-notes. Leave little notes to yourself in the margins as you write, edit, and revise your way through a report or a manuscript. Be creative – add extra links to other resources, use them for tips and pointers, link to different parts of a document, or set up a feedback link for your readers. And when you finalize, you can easily remove all comments in Word.
Microsoft Word 2016 is also an enhanced collaborative writing tool. Comments play a huge role in communicating feedback across a team. Here’s how the comment system works…
1. Highlight the text you want to add a comment to or click at the end of a text block.
2. Go to Insert > Comment. Type your comment in the box. The comments appear in the markup area on the right. The Print Layout view is usually the best way to see the comments alongside the text.

3. Go to the Review tab and see more options for comments. This tab also shows all the controls for tracking changes and comments in a collaborative document. Use the Markup options to display or hide the comments. For instance: No Markup will hide the comments and the markup area on the right.

Finalize Your Report
Once the bulk of your report is completed and saved, it is time to finalize your report. When I say finalize, I don’t mean proofread it. That should be done too. Now, you have to take the security measures to protect the report from unauthorized changes and plagiarism.
These security measures will give an extra level of authenticity to your electronic file before you share it.
This section will cover:
- Signatures
- Insert watermarks
- Make the document ‘read only’
- Password protect your document
- Print your document to PDF
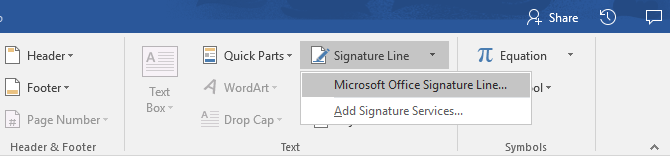
1. Signatures
You can add text signature for a personal touch to the report. But a simple text signature does not need any authentication. A digital signature is the better way to protect your document from unauthorized access. A digital signature confirms that the document came from the signer and hasn’t been tampered in any way.
Let’s create a signature line in Microsoft Word 2016.
In the document, place your cursor where you want to create a signature line.
1. Go to Insert > Text group > Signature Line and click Microsoft Office Signature Line.
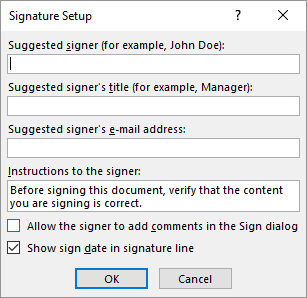
2. The Signature Setup dialog box is displayed. Fill the fields as indicated. If you are sending the document to someone else for signing, add instructions for the signer in the field reserved for it (Instructions to the signer). The signer can also add give the purpose for the signing if the Allow the signer to add comments in the Sign dialog box is checked.
3. Click on OK and the document will now display a placeholder for the signature.

Enter a signature:
When you need to sign a document with a digital signature, go to the signature line and right-click on it.
You will be prompted to sign with a digital ID. If you don’t have one, Microsoft will tell you to get one from a signature service partner.
If you don’t have a digital ID, you can just insert a textual representation of a signature line. You can use a written signature or an image that doesn’t require authentication.
2. Insert Watermarks
A Microsoft Word watermark is a «fake» but still useful visual indicator for the status of the document. For instance, you can use a watermark that says «Drafts» to differentiate it from the final version of the document. Or, use the watermark to suggest the document is «Copyrighted» or «Confidential».
The «Draft» mark is the most common. But, Microsoft Word gives you several other watermarks to choose from.
1. Go to Design > Page Background and choose Watermark. The Watermark button will be enabled in the Print view only.
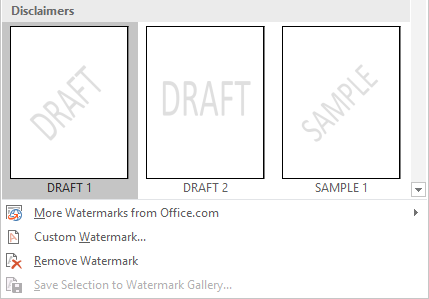
2. You can choose a picture or a text watermark from the gallery. Both horizontal and diagonal versions are available. The dialog box gives you all the customization options for the final look of the watermark. Try different fonts, layouts, sizes, and colors.
3. You can type your own text in the Text field to create your custom watermark.
4. Choose OK to apply the watermark to your document. Word automatically applies the watermark to every page except the title page.
3. Make Documents «Read Only»
A professional report by its nature should not need to be edited by its readers. Converting the document to a PDF is one way. But, you can also apply a few more restrictions in Microsoft Word and prevent accidental modification or omission of any kind.
There are three ways to protect a document.
First — Make your document «read only».
This ensures that your document can only be read or copied. It won’t prevent anyone from copying the file and making changes to the copy.
1. Go to the File tab > Info > Protect Document > Mark as Final.
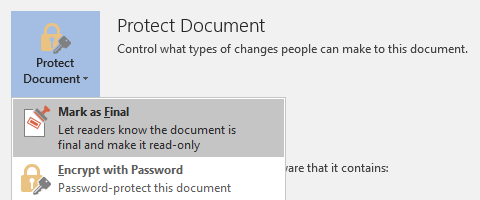
2. When readers open a document, a bar on top will prompt readers to treat this document as read only. But, they can click on «Edit Anyway» to open the document in Edit mode.
Second — Password Protect Your Document.
Protect your document from unwanted edits with a password barrier.
1. Under Protect Document, choose Encrypt with Password. Type a password and click OK.
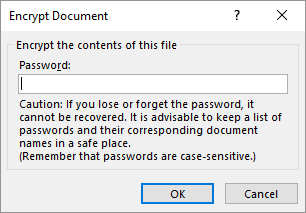
2. In the Confirm Password box, type the password again, and then click OK. The document will open with the reader prompted for a password.
Microsoft uses the AES (Advanced Encryption Standard), 128-bit key length, SHA1 (a cryptographic hashing algorithm which generates an almost unique 160-bit key to replace the plaintext), and CBC (cipher block chaining) to give a hacker a well-deserved headache.
Third — Restrict Editing.
This control feature helps you as the author decide which parts of the document others can edit and which will be locked out. Think of it as the bouncer who lets the VIPs in but otherwise bars the door for the common folk.
1. Go to Review > Restrict Editing.
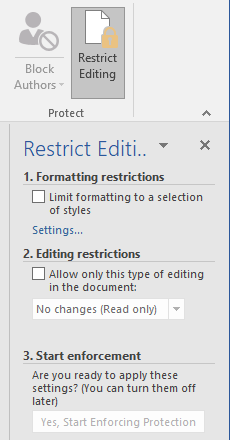
2. Under Editing restrictions, check Allow only this type of editing in the document, and make sure the list says No changes (Read only).
No changes (Read only) is the default restriction type. For a different restriction level for the document, click the menu and select from Tracked changes, Comments, or Filling in forms.
3. To free some sections from the editing blockade, select the sections for editing without restrictions. To select more than one area, click CTRL while selecting the area using the mouse.
4. You can check Everyone under Exceptions (optional) in the Restrict Editing panel. Or, click More users… and allow only specific users to modify the sections. The allowable areas will be marked with square brackets.
5. Click Yes, Start Enforcing Protection.
Now, type a unique password in the box that opens. You have to type it again to confirm it.
The password is optional. But it ensures that no one can just click Stop Protection and edit the document. If you are still paranoid, go ahead and encrypt your Microsoft Word document as we did in the second process above.
4. Print Your Report to PDF
The Portable Document Format comes with many advantages. Not least is its cross-platform compatibility across all computers. Your document is ready and now you need to share it or send it across to be printed. Many professional reports — for instance, a legal document — need to retain the format as intended.
Save or convert a copy to PDF. Microsoft Word 2016 does not need any third-party add-ins.
Go to File > Export > Create PDF/XPS.
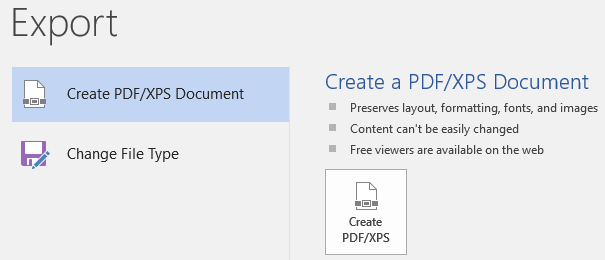
Remember, your Word document may contain sensitive information that you do not want to be included in the PDF. Remove it before you publish to PDF. In the Publish as PDF or XPS window, choose Options. Then select Document and clear Document properties. Set any other options you want and choose OK.
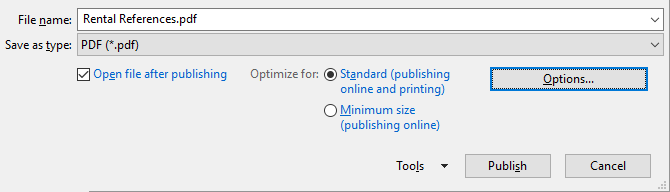
Browse to where you want to save the file and click on Publish.
The Next Step…
You are close to the finishing line. The report is ready to be handed over to your readers. But there’s one last job left.
Turn the pages and make sure (again) that your report is reader-friendly. Approach it with the eye of the reader. Have you organized your thoughts and written persuasively? Does the information flow well with the charts and illustrations? Can they skim through and find the information quickly? Is the text readable? Use the readability score to gauge the readability level of your documents as a final step.
You also might have noticed we didn’t cover some aspects of Microsoft Word. For instance, Microsoft Word Tables are an important tool for data display. Or, the power of lists in information management.
Microsoft Word is more than a quarter of a century old, and packed with little features. At MakeUseOf, we have covered every nook and cranny of this beast. So, do use our resources to learn more about this software for free. Each new feature of Microsoft Word learned will make your life easier.
Make Your Report Shine
As author Nathaniel Hawthorne said,
Easy reading is damn hard writing
Isn’t this true for professional report writing too? After all, if given a choice, no one may want to read it. Writing a business report and using it to communicate are two different things. Microsoft Word is just a tool — it’s your job to engage.
For some alternatives, check out the best online word processors. And for more help with professional writing, take a look at how to apologize in an email and mean it.
What are the best practices for writing professional business reports? Tell us in the comments.
The ability to produce a professional report design is not a dark art. By adopting some simple guidelines, you can create documents that your audience will be able to read and understand more easily.
The report designs we create for our clients are based on the science of how our brain and eyes work when they engage with information – these guidelines use that same science.
It’s all about
cognitive fluency; the ease with which we process information in the form of words
or graphics so that we understand their meaning. It’s our job to make that
process as short and simple as possible.
We’re sharing six
creative guidelines that we use to do this within our work, and that could help
give professional finesse to your own report design.
01. Add a page header
Including a page header in your report design is a simple but effective feature. Many reports are now viewed digitally, and navigation bars can help your readers to move around your content more easily. They also give structure to the page and the document as a whole, framing the content and providing a consistent reference point for readers. Use colour or a bold font to help readers see where they are in the report.

02. Use columns for body copy
The
column structure in which the words of the report are set is a key design
feature of any written document and the width of a column affects readability.
We
don’t read character by character or even word by word but instead we scan and
then pause to pick up groups of three or four words. As three or four pauses happen
before it gets tiring, we can work out that a column width should be between
9-12 words. That’s the principle.
Using
two or three columns for your text can completely reinvent the look of your
report. Try using one column for pull-out quotes, key points or imagery. It’s
worth noting that white space is not wasteful, but more of that later.


03. Experiment with fonts
Before you start, think about the style of font (or
typeface) you would like to use. Bear in mind that your choice will have an impact
on how your report is perceived by readers as well as the more pragmatic design
consideration of how easy it is for them to read it.
Try and break out of the default standard fonts, Times New
Roman and Arial for example. There are plenty of good, standard fonts to choose
from, whether you’re using Mac or Windows. Google fonts also has plenty of free
commercial typefaces to download and use.
Fonts that have a range of weights (light, regular, medium,
bold, italicised) are especially useful as you can add more sophistication to
your report design. Light weights are effective for body copy and medium and
bold for headings.

Add colour for important information such as headings
and call-outs. Try a dark grey for body copy — it’s less stark than black and can make a report feel
warmer and more appealing. Don’t go too far and too bright with the colours — readers will be put off as they reach for sunglasses and
headache tablets.
04. Reduce the font size
In general, 10pt or 11pt is the widely used default size
but in professional report design we most often use 9pt, sometimes dropping to 8pt.
Often, text in 8pt or 9pt with deeper line spacing (known as leading) can be
easier and faster to read because our eye can more easily see where the next
word or line starts.
Consider if it’s likely that the report you’re working on may be read by those, old or young, who are partially sighted. Guidance about point size can be found on the websites of the RNIB, the charity for blind and partially sighted people or the UK Association for Accessible Formats.

05. Use white space
White space does not have to be white — the term simply refers to the space around written
content, and it is certainly not wasted space.
Using white space enables you to draw your readers eye
to a particular point or paragraph that you want to highlight and then gives
your readers the room so that they can focus on the key section; understanding
rises accordingly.
White space also allows the eyes and brain to rest at
points, to stay interested as layouts differ from page to page, and prevents
the brain from tiring as quickly as it might when presented with a full page of
information to process.

06. Think
about alignment
Alignment
of words is simply the way in which you arrange the lines on the page. The most
common are justified and ranged left. The former is where the column of words
is aligned on both the right and left of a column; the latter is where the text
is aligned just on the left.
When text is justified,
each
line is the same length, so the spacing between words varies from line to line.
Justified text can look neater in smaller point sizes and wide columns, but is
harder to read as the start and of end each line is more difficult to find.
When text is ranged
left, the spacing between words is the same throughout the document,
and the staggered line lengths actually make it easier to read as our brains
more easily identify where a line starts and ends.
Our advice is to
use left-ranged text with a two or three column layout.
The way a report
is designed can say a huge amount about the value you place on your content.
Client and, more importantly, potential client perceptions will be informed by
the design of printed or online reports you produce as well as by the way they
read.
If you’d like to chat to us about how we could help you create a professional report design, call us on 01606 276176 or email us workwithus@nwc.design.