Word for Microsoft 365 Word for Microsoft 365 for Mac Word for the web Word 2021 Word 2021 for Mac Word 2019 Word 2019 for Mac Word 2016 Word 2016 for Mac Word 2013 Word 2010 Word for Mac 2011 More…Less
You can control the vertical space between the lines of text in your document by setting the line spacing. Or, you can change the vertical space between paragraphs in your document by setting the spacing before or spacing after paragraphs. You can also choose to keep lines of text together or keep paragraphs together on a page.
Change the line spacing in an entire document
-
Go to Design > Paragraph Spacing.
-
Choose an option. To single space your document, select No Paragraph Space.
To return to the original settings later, go to Design > Paragraph Spacing and choose the option under Style Set. This may be Default or the name of style you’re currently using.
Change the line spacing in a portion of the document
-
Select one or more paragraphs to update. Press Ctrl + A to select all.
-
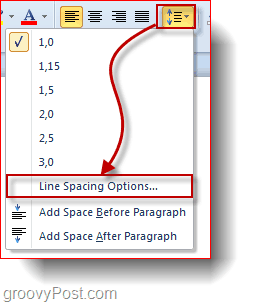
Go to Home > Line and Paragraph Spacing

-
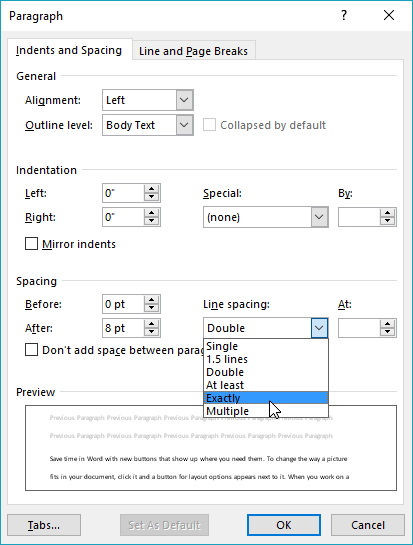
Select Line Spacing Options and choose an option in the Line spacing box.
-
Adjust the Before and After settings to change spacing between paragraphs.
-
Select OK.


For more info, see Adjust indents and spacing.
Change the line spacing in an entire document
-
Go to Design > Paragraph Spacing.
-
Choose the option you want. If you want to single space your document, choose No Paragraph Space.

This overrides the settings of the style you’re currently using. If you decide later to return to the original settings, go to Design > Paragraph Spacing and choose the option under Style Set. The option might be Default, as shown above, or it will show the name of style you’re currently using.
Change the line spacing in a portion of the document
-
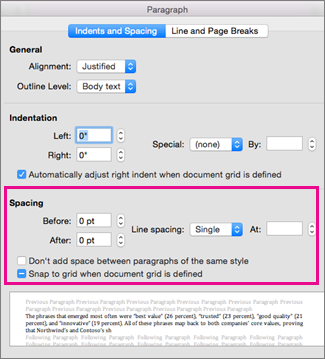
Select the paragraphs you want to change.
-
Go to Home > Line and Paragraph Spacing.
-
Choose the number of line spaces you want or select Line Spacing Options, and then select the options you want under Spacing.
-
To change the spacing before or after each of the paragraphs in the text you selected, click the arrow next to Before or After and enter the amount of space that you want.
-
Select OK.

-
Select the paragraph whose lines you want to keep together.
-
Go to Format > Paragraph >Line and Page Breaks.
-
Select Keep lines together.
-
Select the first of the two paragraphs that you want to keep together.
Tip: If you want to keep more than two paragraphs together, select all but the last paragraph.
-
Go to Format > Paragraph.
-
Go to Line and Page Breaks.
-
Select Keep with next.
-
Select OK.
-
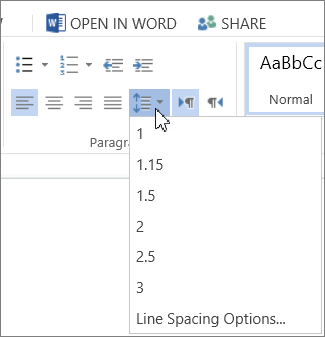
Select the paragraphs you want to change, or press Ctrl+A to select everything.
-
Go to Home > Line Spacing.
-
Choose the number of line spaces you want, or select Line Spacing Options and then select the options you want in the Paragraph dialog box under Spacing:
Tip: If you want to change the spacing before or after the selected paragraphs, select the arrows in the Before or After boxes, or type a number directly.
Need more help?
I cannot find any answers on google on how to do this. I want literally no space between lines. But to Microsoft Word 2010, no space means this:

But I want literally no space. Like this:

I think the problem lies here. When I highlight the text, you can see there is space above and below the text:

So then, according to the space highlighted, there is technically «no space». But there clearly is space between the actual characters in the line.
I think if the highlighting could be like this, then maybe «no space» would actually be correctly «no space» between lines:

Things I have tried (which proved unsuccessful):
Highlight text -> Home tab -> Paragraph -> Setting line spacingtoExactlyand fidgeting with the numberHighlight text -> Home tab -> Font -> Advanced tab -> Position:Raised, By: fidgeting with this number. This actually doesn’t do anything.
So please, if anyone knows how to make literally no space between lines, like in picture #2, please let me know!
Во время набора текста или при оформлении документа наряду с размером и типом шрифта важную роль играет межстрочный интервал в Ворде. От этого зависит удобочитаемость текста, междустрочный интервал относится к параметрам форматирования в Microsoft Word.
Расстояние между двумя строками, известное как междустрочный интервал в Ворде, влияет на визуальное восприятие текстовой информации. Например, если расстояние слишком маленькое, то такой текст будет затруднительно читать, а при большем интервале текст выглядит рассеянным, что также не способствует комфортному чтению.
Содержание:
- Как сделать межстрочный интервал в Ворде — 1 способ
- Как сделать междустрочный интервал в Word — 2 способ
- Как настроить междустрочный интервал в документе Microsoft Word — 3 способ
- Как изменить межстрочный интервал в Word — 4 способ
- Выводы статьи
- Как изменить межстрочный интервал в Word (видео)
Междустрочный интервал определяет расстояние между строками в тексте документа Word. Интервал между строк текста впрямую зависит от размера используемого шрифта. Расстояние учитывается между базовыми линиями каждой строки, проходящими строго по центру букв (с учетом верхних и нижних их элементов).
Во многих случаях при наборе текста используется одинарный междустрочный интервал, который равен размеру шрифта текста. Часто используется и полуторный междустрочный интервал, который применяется при оформлении рефератов, курсовых и дипломов.
Наряду с другими вариантами, для увеличения пространства между стоками текста применяют двойной интервал. Благодаря этому удваивается пространство между строками документа, потому что вы добавляете полную строку пробела между каждой строкой текста.

Какой межстрочный интервал выбрать зависит от решаемых задач и предъявляемых требований к оформлению документа Word.
В этом руководстве вы найдете инструкции о том, как сделать междустрочный интервал в Ворде, и как настроить межстрочный интервал, используя пользовательские параметры.
Как сделать межстрочный интервал в Ворде — 1 способ
Вы можете быстро увеличить межстрочный интервал Word с помощью встроенных параметров текстового редактора. Этот способ можно применить в версиях программы MS Word 2021, MS Word 2019, MS Word 2016, MS Word 2013.
Пройдите последовательные шаги:
- Откройте документ Word.
- Войдите во вкладку «Конструктор» («Дизайн»).
- В группе «Форматирование документа» найдите и щелкните по кнопке «Интервал между абзацами».

- В выпадающем меню предлагаются следующие варианты:
- По умолчанию — междустрочный интервал «1,08».
- Отсутствует — междустрочный интервал «1».
- Сжатый — междустрочный интервал «1».
- Узкий — междустрочный интервал «1,15».
- Неплотный — междустрочный интервал «1,15».
- Свободный — междустрочный интервал «1,5».
- Двойной — междустрочный интервал «2».

Перемещая курсор мыши между этими пунктами, вы можете визуально наблюдать за изменениями интервалов между строками текста.
- Выберите один из подходящих вариантов. При выборе любого из предложенных параметров изменения применяются ко всему документу Word.

Вы можете создать свой собственный стиль междустрочного интервала. Для этого выберите пункт «Пользовательский интервал между абзацами…».
В окне «Управление стилями», после открытия вкладки «По умолчанию» настраивается изменение междустрочного интервала. Укажите подходящие значения в группе «Интервал». В параметрах стилей, помимо интервала между строками абзаца, имеется возможность изменить интервал до или после абзаца.

Как сделать междустрочный интервал в Word — 2 способ
В случае необходимости, вы можете задать пользовательский размер междустрочного интервала в документе Word.
Чтобы изменить междустрочный интервал Word, выполните следующие действия:
- В окне открытого документа Word выделите нужные абзацы. Если вам необходимо применить изменения ко всему тексту, нажмите на клавиши «Ctrl» + «A» для его выделения.
- Щелкните правой кнопкой мыши по выделенному фрагменту.
- В контекстном меню выберите пункт «Абзац».

- В окне «Абзац» на вкладке «Отступы и интервалы» находятся параметры междустрочного интервала. В группе «Интервал» в графе «междустрочный:» выберите нужный интервал:
- Множитель — самостоятельная установка межстрочного интервала. Если вы не вносили изменений, в настройках отображается значение по умолчанию.
В версиях Word 2021-2013 по умолчанию используется интервал в 1,08 строки, что немного больше, чем при одинарном интервале. В версиях Word 2010-2007 по умолчанию используется значение «1,15».
- Одинарный — размер интервала равен размеру текущего шрифта текста абзаца.
- 1,5 строки — интервал равен полуторному размеру шрифта текста абзаца.
- Двойной — интервал равен двойному размеру шрифта текста абзаца.
- Минимум — интервал не меньше заданного в пунктах настроек размера.
- Точно — интервал точно соответствует заданному в пунктах размеру.

- Нажмите на кнопку «ОК», чтобы изменения вступили в силу.
Интервалы «Одинарный», «1,5 строки» и «Двойной» зависят от высоты текущего шрифта. Если вы увеличите размер шрифта, то соответственно пропорционально увеличится и размер интервала между строками абзаца.
В интервалах «Минимум» и «Точно» устанавливается точное значение междустрочного интервала в «пунктах» (типографских пунктах). В случае увеличения или уменьшения высоты шрифта, межстрочный интервал не изменяется.

Как настроить междустрочный интервал в документе Microsoft Word — 3 способ
Ознакомьтесь с другим способом установить интервал между строками абзаца самостоятельно, выбрав подходящий вариант.
Проделайте следующее:
- В открытом документе Word переходим во вкладку «Главная».
- Выделяем нужные абзацы.
- В группе «Абзац» щелкаем по кнопке «Интервал» («Междустрочный интервал»).

- В открывшемся меню выбираем необходимый межстрочный интервал абзаца:
- 1,0;
- 1,15;
- 1,5;
- 2,0;
- 2,5;
- 3,0;
Здесь есть возможности для добавления интервала перед и после абзаца или можно выбрать другие варианты междустрочных интервалов. Затем вы можете применить выбранные настройки к текущему документу или к новым документам, использующим текущий шаблону.
Как изменить межстрочный интервал в Word — 4 способ
Существует простой способ для изменения интервалов между строк при редактировании документа MS Word. Этим методом вы можете задать одинарный (междустрочный интервал 1), полуторный (межстрочный интервал 1,5), и двойной (межстрочный интервал 2).
Чтобы изменить межстрочный интервал в тексте, выполните действия:
- В открытом окне текстового редактора Word установите указатель мыши в нужный абзац текста.
- Используйте следующие сочетания клавиш клавиатуры, чтобы задать необходимые параметры:
- «Ctrl» + «1» — одинарный интервал;
- «Ctrl» + «5» — полуторный интервал;
- «Ctrl» + «2» — двойной интервал.
Выводы статьи
Высота и тип шрифта, а также междустрочный интервал играют важную роль для визуального восприятия текста в документе Word. Интервал можно изменить, увеличивая или уменьшая расстояние между строками текста. В случае необходимости, пользователь может применить готовые параметры междустрочных интервалов в Word или самостоятельно настроить межстрочный интервал абзаца во время оформления документа.
Как изменить межстрочный интервал в Word (видео)
Похожие публикации:
- Режим чтения Word: как включить или как убрать
- Как объединить документы Ворд в один файл
- Как сделать обтекание текстом в Word — 3 способа
- Как сохранить картинки из Word
- Как убрать красные подчеркивания в Word — 3 способа
A couple of days ago we showed you How-To Bookmark Parts of a Word 2010 Document and today we’ll bring you another neat Word 2010 trick. If you’re looking for that classic Office 2003 look and really hate having to change your line spacing options every time you start Word, then we’ve got a solution for you which quickly changes the default line spacing in word 2010.
To kick things off, let’s take a look at the Video How-To followed by our standard Step-by-Step.
Option 1 – Change The Style to Office 2003
The first way to change the default line spacing is to make the Word 2003 style your default. To do this, Click Change Styles, then Click Style Set and Check Word 2003. You can go ahead and type in a few words to see if this style fits your needs.

If you want to set the Word 2003 style as a default for every new document, simply Click Change Styles again and then Press the Set as Default button. I wouldn’t fully recommend this method since it changes the entire layout to be like a document made in Word 2003 and you may not want this but hey, perhaps that’s exactly what you want!

Option 2 – Change The Line Spacing Options Only
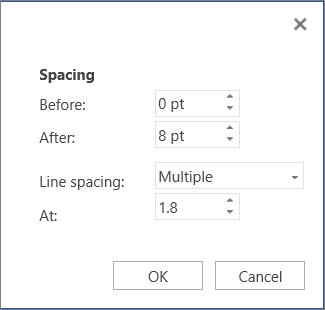
This is the method I would probably recommend. Click the Line and Paragraph Spacing button and then Click Line Spacing Options.
Now find the Spacing section of the Paragraph window and Change the value from “At:” to 1,00.

Then just Click Set as Default below and you’re done.

![]()
spacing between words in word :Fix error: spaces are missing between some words in Microsoft Word. . Hi all, today i am going to help you fixed the error: spaces are missing between some words when open a Word 2010 document in Word 2007

Change the line spacing in an entire document
-
Go to Design > Paragraph Spacing.
-
Choose an option. To single space your document, select No Paragraph Space.
To return to the original settings later, go to Design > Paragraph Spacing and choose the option under Style Set. This may be Default or the name of style you’re currently using.
Change the line spacing in a portion of the document
-
Select one or more paragraphs to update. Press Ctrl + A to select all.
-
Go to Home > Line and Paragraph Spacing

-
Select Line Spacing Options and choose an option in the Line spacing box.

-
Adjust the Before and After settings to change spacing between paragraphs.
-
Select OK.

This error caused by the adaption between Word 2007 version and 2010 version. We have only method to fix it:

1- If you want continue save as .docx to To resolve this problem, install the 2007 Microsoft Office Suite Service Pack 3 (SP3). To download the service pack, visit the following Microsoft website: https://www.microsoft.com/en-us/download/details.aspx?displaylang=en&id=27838
2 If you want to fix it when you still using word 2007, please save file as .doc for keep the speces between words.
From microsoft forum fix spaces are missing between some words in the document:
I am a Microsoft employee, I lead the Program Management team for Office Sustaining Engineering.
This is a known issue with Word 2007.
The issue has already been addressed in a release that first appeared on September 25, 2008. The “non-security fixes” section of the article describes the behavior. The knowledge base article and solution for the problem are located under the link. For Office 2007 users who will receive your documents, ensure they are current on updates for Office. Specifically, ensure the patch referenced in the link above is installed, or ensure the user of 2007 has installed Office 2007 Service Pack 2.
The easiest way to obtain the fix is to install Office 2007 Service Pack 2.
This is an issue related to opening files that we discovered and fixed before the shipment of Office 2010. It was important enough for us to push the fix through the security update channel. At Microsoft we were able to re-produce the problem on machines which did not have the patch installed for Office 2007, and we are unable to reproduce the problem on machines that have the patch installed.
Yesterday we re-tested this problem based on the information being reported in the forums and on various blogs. There are a few details worth noting:
– If you have already saved the document in an unpatched version of Word and the spaces are missing, unfortunately there is no way to recover them.
– When you send the file to other users from Office 2010, unpatched 2007 users who edit the document may cause the spaces to disappear. It is important to ensure Office 2007 users are patched with this update, and ensuring that can be done by turning on Automatic Updates.
Related to the forum post on this topic:
– In our testing, turning spooling services on and off did not affect the problem.
– Additionally, the presence (or not) of a specific printer driver or any printer driver did not solve or cause the problem.
As has been reported on various blogs, the Open XML standard is not the cause of the issue. This is an issue with Word 2007, and we believe a solution has been available since 2008.
We certainly regret any inconvenience this issue may have caused.
If you patch your 2007 installation to the current update level, and you are authoring documents on patched versions of Word 2007 (or 2010), and you still experience this problem, please don’t hesitate to contact us.
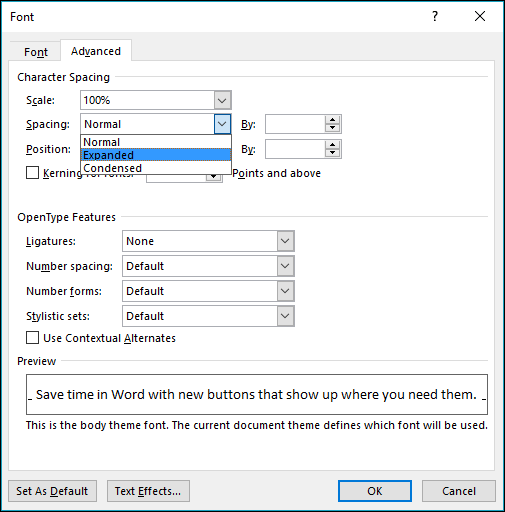
Change the spacing between characters
Selecting Expanded or Condensed alters the spacing between all selected letters by the same amount. Kerning alters the spacing between particular pairs of letters – in some cases reducing and in other cases expanding the space depending upon the letters.
Expand or condense the space evenly between all the selected characters
-
Select the text that you want to change.
-
On the Home tab, click the Font Dialog Box Launcher, and then click the Advanced tab.

Note: If you’re using Word 2007 the tab is called Character Spacing.
-
In the Spacing box, click Expanded or Condensed, and then specify how much space you want in the By box.

Kern the characters that are above a particular size
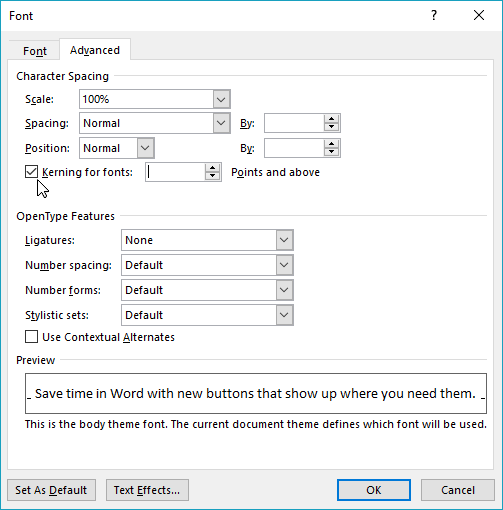
Kerning refers to the way spacing between two specific characters is adjusted. The idea is to give a better looking result by reducing the spacing between characters that fit together nicely (such as “A” and “V”) and increasing the spacing between characters that don’t.
-
Select the text that you want to change.
-
On the Home tab, click the Font Dialog Box Launcher, and then click the Advanced tab.
Note: If you’re using Word 2007 the tab is called Character Spacing.
-
Select the Kerning for fonts check box, and then enter the point size in the Points and above box.

Stretch or scale the text horizontally
When you scale the text, you change the shapes of the characters by percentages. You can scale text by stretching it or by compressing it.
-
Select the text that you want to stretch or compress.
-
On the Home tab, click the Font Dialog Box Launcher, and then click the Advanced tab.
Note: If you’re using Word 2007 the tab is called Character Spacing.
-
In the Scale box, enter the percentage that you want.
Percentages above 100 percent stretch the text. Percentages below 100 percent compress the text.
Change the line spacing
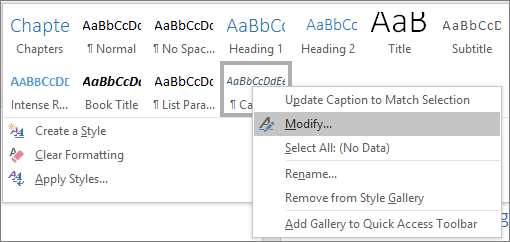
To increase or decrease the amount of vertical space between lines of text within a paragraph, the best method is to modify the style the paragraph uses.
-
Find the style you’re using in the Styles gallery on the Home tab.
-
Right-click the style you want to change and select Modify.

-
Near the center of the dialog box you’ll find the line spacing buttons that let you select single, 1.5x or double spaced. Choose the spacing you want to apply and click OK.


If you’d like to apply more specific line spacing to the style, clickthe Format button at the bottom left corner of the Modify Style dialog box and select Paragraph. The Line spacing drop-down lets you select or set more specific line spacing.