
Примечание: Эта статья выполнила свою задачу, и в скором времени ее использование будет прекращено. Чтобы избежать появления ошибок «Страница не найдена», мы удаляем известные нам ссылки. Если вы создали ссылки на эту страницу, удалите их, и вместе мы обеспечим согласованность данных в Интернете.
Вы развертываете Microsoft Word 2010 для группы пользователей? Ниже описаны некоторые основные новые возможности Word 2010 и некоторые ресурсы, которые сделают переход более плавным.
В этой статье
Работа с более простыми возможностями
Настройка ленты
Представление Microsoft Office Backstage
Навигация и поиск в длинных документах
Восстановление несохраненной работы
Эффективное качество совместной работы
Сохранение документов и презентаций прямо в SharePoint из Word
Одновременная работа с одним и тем же документом
Безопасная защита с помощью защищенного просмотра
Поиск и удаление скрытых метаданных и персональных данных в файлах
Предотвращение изменений в финальной версии документа
Создание документов для людей с ограниченными возможностями
Ускоренная скорость
Работа с более простыми возможностями
Настройка ленты
Вы можете добавлять настройки ленты в Word 2010 для создания вкладок и групп, связанных с группой или компаниями, с помощью команд, наиболее часто используемых в работе Организации.

Дополнительные сведения о настройке ленты можно найти в разделе Настройка ленты.
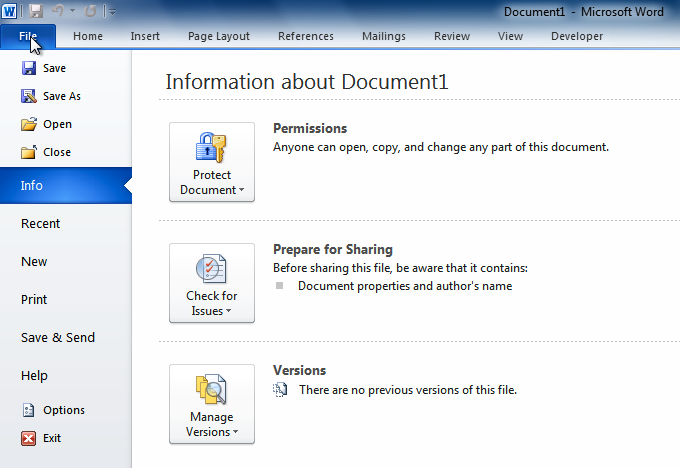
Представление Microsoft Office Backstage
В представлении Microsoft Office Backstage пользователи могут выполнять все действия с файлами, которые они не выполняют в файле. Последние инновации в пользовательском интерфейсе Microsoft Office Fluent и сопутствующие функции на ленте — представление Backstage — это область, в которой можно управлять файлами — создание, сохранение, печать, общий доступ, Настройка параметров и проверка файлов для скрытых метаданных и персональных данных Информация.
Если документ подключен к SharePoint 2010, авторы документов также могут вводить метаданные документов. Авторы, совместно работающие над файлом, могут использовать представление Backstage для доступа к другим профилям авторов и для взаимодействия с рабочими процессами.
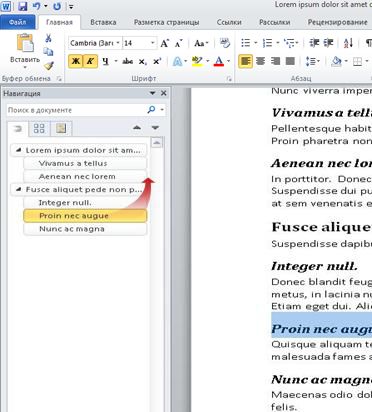
Навигация и поиск в длинных документах
В Word 2010 люди могут быстро переходить с помощью длинных документов. Кроме того, они могут легко переупорядочивать документы, перетаскивая заголовки, а не копировать и вставлять. Кроме того, они могут находить содержимое с помощью последовательного поиска, поэтому им не нужно знать, что именно нужно найти.
В Word 2010 вы можете сделать следующее:
-
Перемещайтесь между заголовками в документе, щелкая части схемы документа.
-
Сверните уровни структуры, чтобы скрыть вложенные заголовки, чтобы можно было легко работать с картой даже в более глубоко структурированных и сложных больших документах.
-
Введите текст в поле поиска, чтобы быстро найти его место.
-
Перетаскивайте заголовки в документе, чтобы изменить их структуру. Вы также можете удалить заголовки и их содержимое.
-
Вы можете легко повысить или понизить уровень заданных заголовков или заголовков и всех вложенных заголовков, находящихся в иерархии вверх или вниз.
-
Добавьте в документ новые заголовки, чтобы создать простую структуру или вставить новые заголовки без прокрутки в документе.
-
Согласитесь с тем, что контент редактирует другие пользователи, просматривая заголовки, содержащие индикатор совместного редактирования.
-
Просмотрите эскизы всех страниц в документе и щелкните их для перемещения по документу.
Дополнительные сведения можно найти в разделе Перемещение по документу с помощью области навигации.
Восстановление несохраненной работы
Если вы закроете файл без сохранения или хотите вернуться к более ранней версии файла, в котором вы уже работаете, вам будет проще восстановить документ Word. Как и в более ранних версиях Word, функция автовосстановления сохраняет версии, пока вы работаете с файлом в выбранном интервале.
Теперь вы можете сохранить последнюю автоматически сохраненную версию файла в том случае, если вы случайно закрыли этот файл без сохранения, чтобы его можно было легко восстановить при следующем открытии файла. Кроме того, работая с файлом, вы можете получить доступ к списку автоматически сохраненных файлов из представления Microsoft Office Backstage.
Эффективное качество совместной работы
Word 2010 поможет вам эффективнее работать с коллегами. вWord 2010 также есть функции, обеспечивающие надежную защиту данных при совместном использовании и для обеспечения более надежной защиты компьютера от файлов, которые могут быть небезопасными.
Сохранение документов и презентаций прямо в SharePoint из Word
Пользователи могут сохранять документы Word 2010 прямо в библиотеке документов SharePoint 2010 из представления Backstage. При нажатии кнопки сохранить & отправить в представлении Backstage, а затем нажмите кнопку Сохранить в SharePoint, после чего в Word появится список библиотек документов, к которым вы недавно обращались.
Дополнительные сведения можно найти в разделе Сохранение документа в SharePoint из Office 2010.
Одновременная работа с одним и тем же документом
В Word 2010 вы можете работать прямо в Word. Вам не нужно отправлять вложения в сообщения электронной почты или сохранять документы черновиков с именами, такими как TSP_final_2_FINAL. docx. Вместо этого просто откройте документ и начните работать. Вы можете видеть, кто работает вместе с вами, и где они редактируются. Вы можете работать вместе с любым документом, сохраненным на сайте Microsoft SharePoint Foundation 2010, который поддерживает рабочие области или OneDrive.
При открытии общего документа Word автоматически кэширует его, чтобы можно было вносить в него изменения в автономном режиме, а затем Word автоматически синхронизирует изменения после того, как вы вновь подключитесь к Интернету. Если вы хотите работать не в офисе, вам больше не придется сохранять локальные копии или вручную объединять изменения в документ на сервере при возврате в Office.
В Word 2010 несколько авторов могут одновременно работать над документом, а Office в Интернете программы позволяют работать над документами.
Обратите внимание: теперь служба SkyDrive называется OneDrive, а SkyDrive Pro — OneDrive для бизнеса. Дополнительные сведения об этих изменениях можно найти в статье От SkyDrive к OneDrive.
Одновременное редактирование одного документа несколькими авторами и синхронизация осуществляется с изменениями, внесенными другим автором. Авторы могут заблокировать доступ к областям документа во время работы над ними.
Безопасная защита с помощью защищенного просмотра
В режиме защищенного просмотра файлы открываются с отключенными функциями редактирования. Файлы из потенциально небезопасных расположений, например Интернет или вложение электронной почты или элементы ActiveX, которые содержат активный контент, такие как макросы, подключения к данным, и данные, можно открывать в режиме защищенного просмотра. Файлы из надежных источников можно включить, выбрав команду Разрешить редактирование, или данные о файле можно просмотреть в представлении Microsoft Office Backstage.
Дополнительные сведения о режиме защищенного просмотра можно найти в разделе что такое защищенный режим?
Поиск и удаление скрытых метаданных и персональных данных в файлах
Перед предоставлением общего доступа к документу с другими людьми можно использовать инспектор документов для проверки документа на наличие скрытых метаданных, персональных данных или содержимого, которые могут храниться в документе.
С помощью инспектора документов можно найти и удалить такие данные, как, например, указанные ниже.
-
Примечания
-
Версии
-
исправления;
-
Рукописные примечания
-
Скрытый текст
-
Свойства документов
-
Настраиваемые XML-данные.
-
Информация в верхних и нижних колонтитулах
Инспектор документов поможет вам убедиться в том, что документы, к которым предоставлен общий доступ другим пользователям, не содержат скрытых персональных данных или скрытого контента, который может не распространяться в вашей организации. Кроме того, ваша организация может настроить инспектор документов для добавления проверок для дополнительных типов скрытых данных.
Дополнительные сведения об инспекторе документов можно найти в разделе Удаление скрытых и персональных данных с помощью проверки документов.
Предотвращение изменений в финальной версии документа
Перед предоставлением общего доступа к финальной версии документа вы можете использовать команду » помечать как результат «, чтобы документ был доступен только для чтения и сообщить другим людям о том, что вы предоставляете общий доступ к финальной версии документа. Если документ помечен как конечный, команды редактирования и метки проверки правописания отключены и пользователи, просматривающие документ, не могут случайно изменить документ.
Команда » помечать как результат » не является функцией безопасности. Любой пользователь может изменить документ, помеченный как завершенный, отключив функцию Пометить как финальную .
Дополнительные сведения можно найти в разделе Справка о запрете изменений в финальной версии файла.
Создание документов для людей с ограниченными возможностями
Средство проверки читаемости помогает выявить и устранить проблемы с читаемостью в документах, чтобы устранить возможные проблемы, которые могут привести к неограниченному доступу к содержимому.
Если в документе есть проблемы с читаемостью, в представлении Microsoft Office Backstage отображается оповещение, которое позволяет просматривать и устранять любые проблемы в документе (при необходимости). Это предупреждение можно увидеть, открыв вкладку Файл. В группе Подготовка к общему доступу нажмите кнопку Поиск проблем и выберите пункт Проверить специальные возможности.
Дополнительные сведения можно найти в разделе Проверка читаемости.
Lesson 1: Getting Started with Word
Introduction
Word 2010 is a word processor that allows you to create various types of documents such as letters, papers, flyers, and faxes. In this lesson, you will be introduced to the Ribbon and the new Backstage view, and you’ll learn how to create new documents and open existing ones.
Getting to know Word 2010
Word 2010 is a bit different from earlier versions, so even if you’ve used Word before you should take some time to familiarize yourself with the interface. The toolbars are similar to those in Word 2007, and they include the Ribbon and the Quick Access toolbar. Unlike Word 2007, commands such as Open and Print are housed in Backstage view, which replaces the Microsoft Office button.
The Ribbon
The new tabbed Ribbon system was introduced in Word 2007 to replace traditional menus. The Ribbon contains all of the commands you’ll need in order to perform common tasks. It contains multiple tabs, each with several groups of commands, and you can add your own tabs that contain your favorite commands. Some groups have an arrow in the bottom-right corner that you can click to see even more commands.
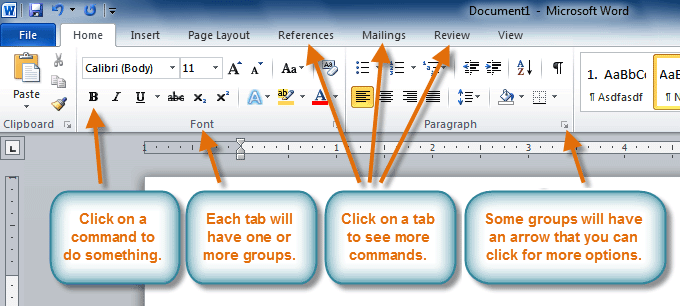 The Ribbon
Certain programs, such as Adobe Acrobat Reader, may install additional tabs to the Ribbon. These tabs are called add-ins.
To minimize and maximize the Ribbon:
The Ribbon is designed to be easy to use and responsive to your current task; however, you can choose to minimize it if it’s taking up too much screen space.
- Click the arrow in the upper-right corner of the Ribbon to minimize it.
 Minimizing the Ribbon
 - To maximize the Ribbon, click the arrow again.
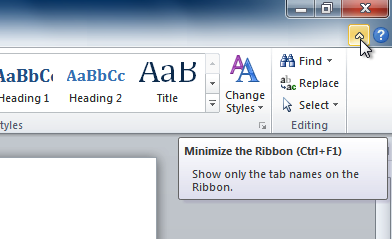
When the Ribbon is minimized, you can make it reappear by clicking on a tab. However, the Ribbon will disappear again when you’re not using it.
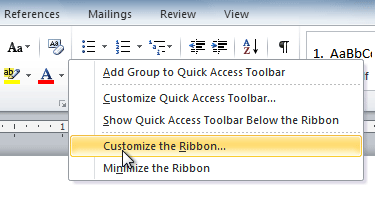
To customize the Ribbon:
You can customize the Ribbon by creating your own tabs with the commands you want. Commands are always housed within a group, and you can create as many groups as you want in order to keep your tab organized. If you want, you can even add commands to any of the default tabs, as long as you create a custom group in the tab.
- Right-click the Ribbon and select Customize the Ribbon. A dialog box will appear.
Right-clicking the Ribbon to customize it
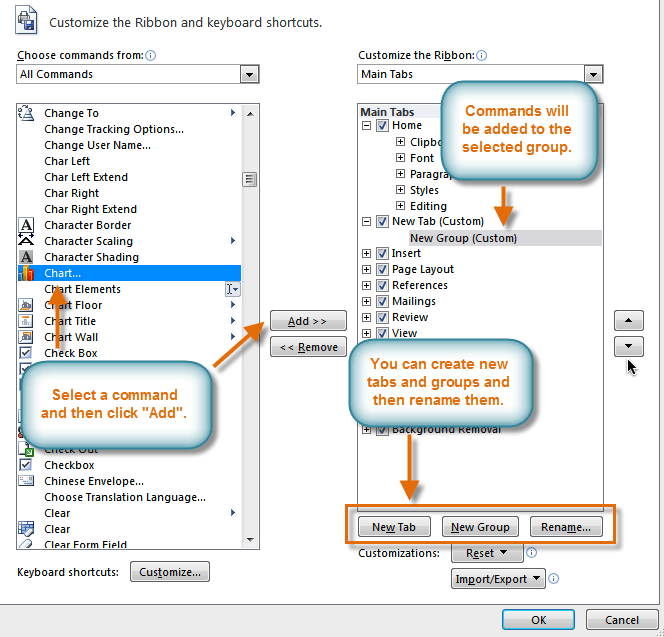
- Click New Tab. A new tab will be created with a new group inside it.
- Make sure the new group is selected.
- Select a command from the list on the left, then click Add. You can also drag commands directly into a group.
- When you are done adding commands, click OK.
The dialog box where you can customize the Ribbon
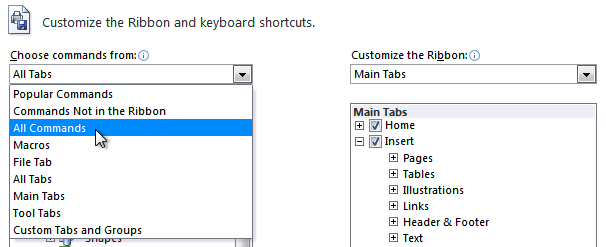
If you don’t see the command you want, click the Choose commands from: drop-down box, then select All Commands.
Displaying All Commands=
Backstage view
Backstage view gives you various options for saving, opening, printing, and sharing your files. It’s similar to the Microsoft Office button menu from Word 2007 and the File menu from earlier versions of Word. However, instead of just a menu it’s a full-page view, which makes it easier to work with.
To get to Backstage view:
- Click the File tab.
Backstage view
- You can choose an option on the left side of the page.
- To get back to your document, click any tab on the Ribbon.
Click the buttons in the interactive below to learn about the different things you can do in Backstage view.
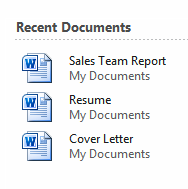
Recent
For convenience, recent documents will appear here.
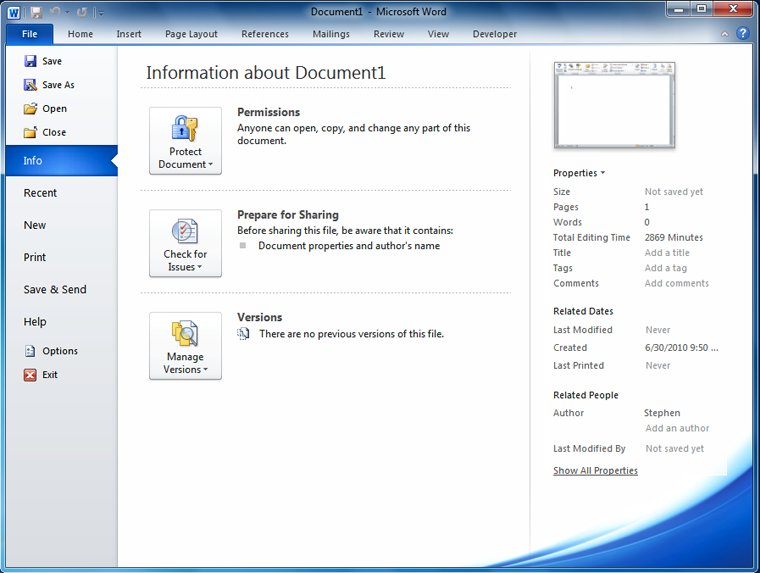
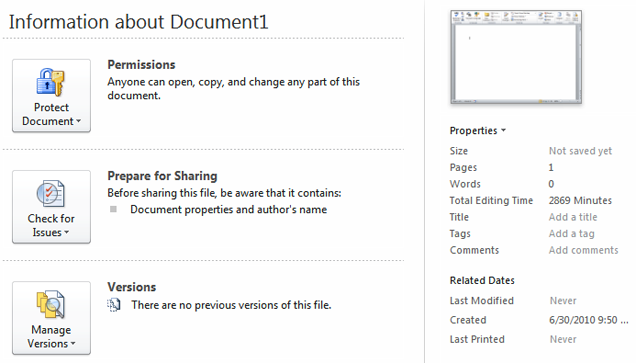
Info
Info contains information about the current document. You can also inspect the document and edit document permissions.
Save, Save As, Open and Close
Familiar tasks such as Save, Save As, Open, and Close are now found in Backstage view.
Options
Here, you can change various Word options. For example, you can control the spelling and grammar check settings, AutoRecover settings, and Language preferences.
Help
From here, you can access Microsoft Office Help or check for updates.
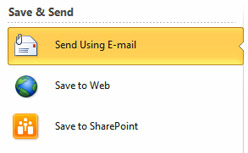
Save & Send
Save & Send makes it easy to email your document, post it on the Web, or change the file format.
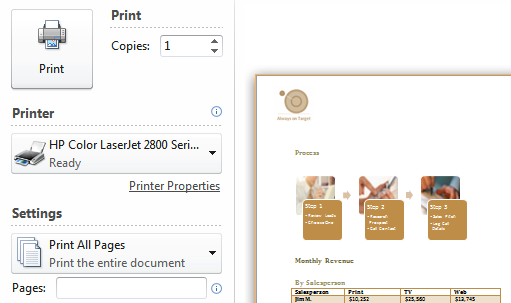
From the Print pane, you can change the print settings and print your document. You can also see a preview of your document.
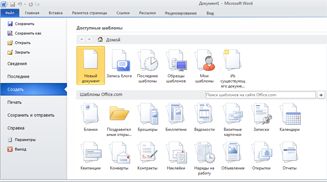
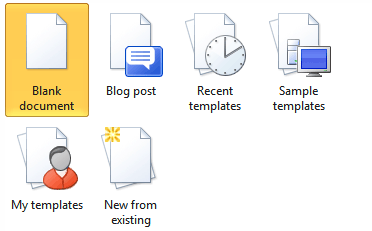
New
From here, you can create a new blank document, or you can choose from a large selection of templates.
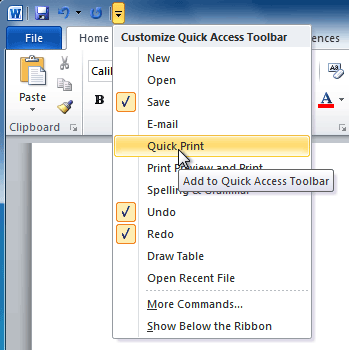
The Quick Access toolbar
The Quick Access toolbar, located above the Ribbon, lets you access common commands no matter which tab you’re on. By default, it shows the Save, Undo, and Repeat commands. You can add other commands to make it more convenient for you.
To add commands to the Quick Access toolbar:
- Click the drop-down arrow to the right of the Quick Access toolbar.
- Select the command you want to add from the drop-down menu. It will appear in the Quick Access toolbar.
Adding a command to the Quick Access toolbar
The Ruler
The Ruler is located at the top and to the left of your document. It makes it easier to adjust your document with precision. If you want, you can hide the Ruler to free up more screen space.
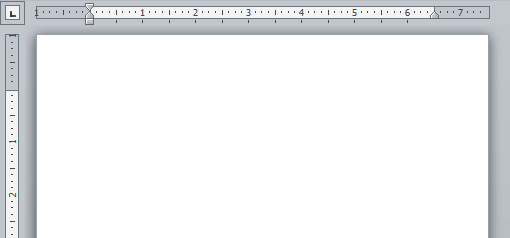 The Ruler
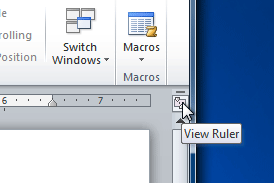
To hide or view the Ruler:
- Click the View Ruler icon over the scrollbar to hide the ruler.
- To show the ruler, click the View Ruler icon again.
Hiding and viewing the Ruler
Creating and opening documents
Word files are called documents. When you start a new project in Word, you’ll need to create a new document, which can either be blank or from a template. You’ll also need to know how to open an existing document.
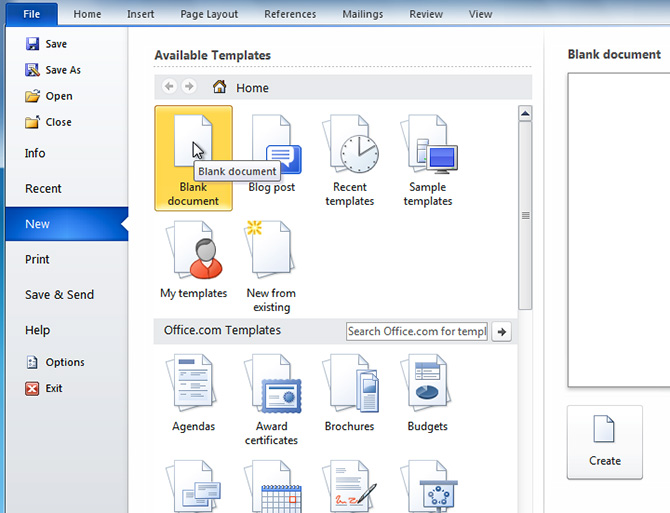
To create a new blank document:
- Click the File tab. This takes you to Backstage view.
- Select New.
- Select Blank document under Available Templates. It will be highlighted by default.
Creating a new document
- Click Create. A new blank document appears in the Word window.
To save time, you can create your document from a template, which you can select from the New Document pane. We’ll talk about templates in a later lesson.
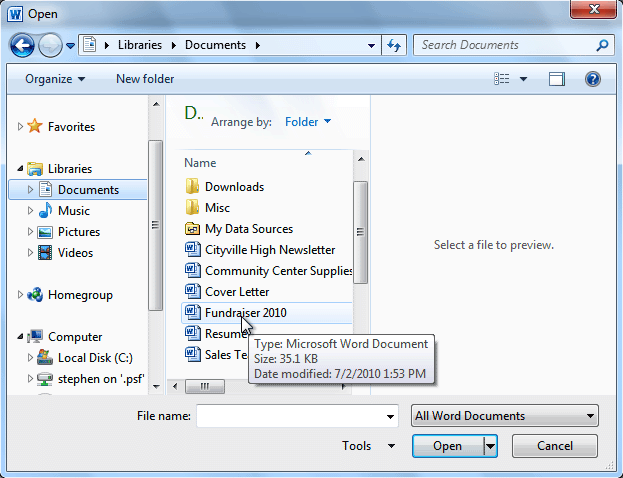
To open an existing document:
- Click the File tab. This takes you to Backstage view.
- Select Open. The Open dialog box appears.
Opening a document
- Select your document, then click Open.
If you’ve opened a file recently, you can also access it from the Recent Documents list. Just click on the File tab and select Recent.
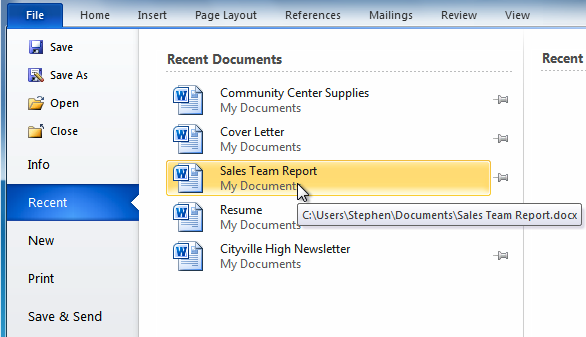 Opening a recent document
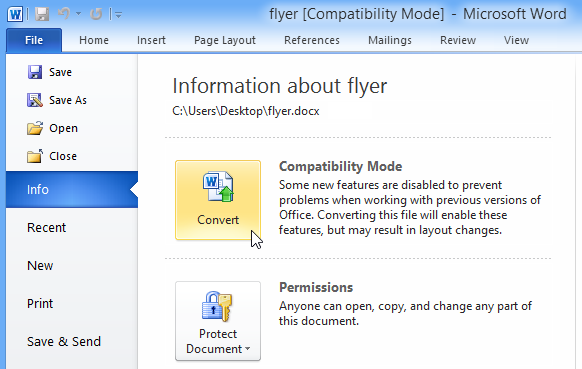
Compatibility mode
Sometimes you may need to work with documents that were created in earlier versions of Microsoft Word, such as Word 2007 or Word 2003. When you open these types of documents, they will appear in Compatibility mode.
Compatibility mode disables certain features, so you’ll only be able to access commands found in the program that was used to create the document. For example, if you open a document created in Word 2007, you can only use tabs and commands found in Word 2007.
In the image below, you can see how Compatibility mode can affect which commands are available. Because the document on the left is in Compatibility mode, it only shows commands that were available in Word 2007.
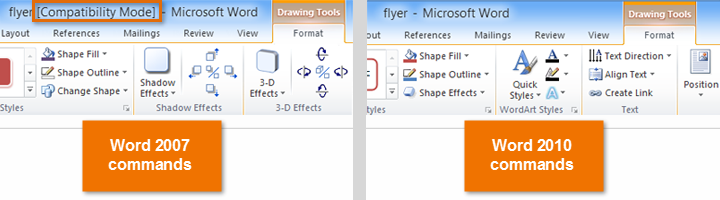 Compatibility mode vs. Normal mode
To exit Compatibility mode, you’ll need to convert the document to the current version type. However, if you’re collaborating with others who only have access to an earlier version of Word, it’s best to leave the document in Compatibility mode so the format will not change.
You can review this support page from Microsoft to learn more about which features are disabled in Compatibility mode.
To convert a document:
If you want access to all Word 2010 features, you can convert the document to the 2010 file format.
Note that converting a file may cause some changes to the original layout of the document.
- Click the File tab to access Backstage view.
- Locate and select the Convert command.
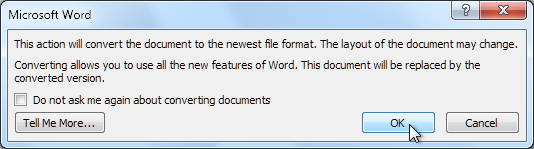
 Converting the document to the newest file type
 - A dialog box will appear. Click OK to confirm the file upgrade.
 Clicking OK
 - The document will be converted to the newest file type.
Challenge!
- Open Word 2010 on your computer. A new blank document will appear on the screen.
- Make sure the Ribbon is maximized.
- Display the Ruler.
- Add any commands you want to the Quick Access toolbar.
- Close Word without saving the document.
/en/word2010/text-basics/content/
View a manual of the Microsoft Word 2010 below. All manuals on ManualsCat.com can be viewed completely free of charge. By using the ‘Select a language’ button, you can choose the language of the manual you want to view.
Page: 1
Microsoft Word 2010
Product Guide
Page: 2
Introduction…………………………………………………………………………………………………………………………………. 1
Word 2010: At-a-Glance……………………………………………………………………………………………………………….. 2
Give your text the power to jump off the page………………………………………………………………………………………….2
Create visually compelling documents ………………………………………………………………………………………………………..2
Get easier access to the right tools, at the right time……………………………………………………………………………….3
Save time and simplify your work…………………………………………………………………………………………………………………3
Redefine working together on documents …………………………………………………………………………………………………4
Work when and where you choose………………………………………………………………………………………………………………5
Word 2010: A Closer Look…………………………………………………………………………………………………………….. 6
Text Effects New!…………………………………………………………………………………………………………………………….6
OpenType Typography New!………………………………………………………………………………………………………..7
Picture Editing Tools New and Improved!…………………………………………………………………………………..8
Insert Screenshot New!………………………………………………………………………………………………………………. 10
Additional Office Themes Improved! ……………………………………………………………………………………….. 10
Additional SmartArt Graphics Improved! ………………………………………………………………………………… 12
Shapes and Shape Effects Improved!……………………………………………………………………………………….. 13
Ribbon Improved!………………………………………………………………………………………………………………………… 14
Microsoft Office Backstage View New!……………………………………………………………………………………. 15
Navigation Pane Improved!……………………………………………………………………………………………………….. 16
Find Tools Improved! ………………………………………………………………………………………………………………….. 17
Recover Unsaved Versions New!………………………………………………………………………………………………. 18
Paste with Live Preview New! ……………………………………………………………………………………………………. 19
OneNote Linked Notes New!…………………………………………………………………………………………………….. 20
Contextual Spell Checker Improved!………………………………………………………………………………………… 21
Co-authoring New!……………………………………………………………………………………………………………………… 22
Streamlined Communications New! ………………………………………………………………………………………… 24
Page: 3
Protected View New! ………………………………………………………………………………………………………………….. 25
Trusted Documents New! ………………………………………………………………………………………………………….. 26
Accessibility Checker New!………………………………………………………………………………………………………… 26
Language Tools Improved! ………………………………………………………………………………………………………… 27
Translation Tools Improved!………………………………………………………………………………………………………. 28
Share through Communicator ―14‖ New!……………………………………………………………………………….. 28
Content Controls Improved!………………………………………………………………………………………………………. 29
Word Web App New! …………………………………………………………………………………………………………………. 30
Word Mobile 2010 Improved! …………………………………………………………………………………………………… 32
Power User Tips…………………………………………………………………………………………………………………………..33
Where to Find It…………………………………………………………………………………………………………………………..39
Version Comparison…………………………………………………………………………………………………………………….46
FAQ……………………………………………………………………………………………………………………………………………..53
RequirementsDisclosures……………………………………………………………………………………………………………62
Page: 4
1
If you are one of the millions of people worldwide who rely on Microsoft® Word to create
documents for business, school, or personal projects, you might have some expectations for
what you’ll find in this new version. Whether you want faster, more convenient ways to
accomplish everyday tasks or new technologies that help take your results to a new level,
Microsoft Word 2010 has the tools you need.
Create better documents that help your important content shine.
Work more quickly and easily when working with others on documents.
Access and edit your documents when it’s convenient for you—online or on the road—
rather than being tied to your computer.
New and improved tools for formatting and managing documents make it easier than ever to
create incredible content. Working with others on documents no longer means waiting your
turn. And, you can access and work on your files where and when your best ideas occur.
Welcome to Word 2010—our most powerful, intuitive, and customizable release yet.
Page: 5
2
Today’s documents range from simple letters and lists, to forms, complex reports and papers
that used to require a professional print shop. But one thing is common to all of them—your
documents represent your ideas. That’s why you want them to be more than just words on
paper.
Word 2010 gives you the tools to create the professional, polished documents that help you
express yourself effectively.
Give your text the power to jump off the page
Effective document design is about helping you convey your important information. When you
need your text to be as powerful as your images, Word 2010 offers flexible and easy-to-use
tools that give new life to your words.
Apply impressive text effects—such as gradient fills and reflections—directly to the text
in your document, as easily as applying bold or underline.
Put a creative flourish on your documents by getting the most out of OpenType fonts.
New OpenType typography features provide support for ligatures, stylistic sets, and
more.
Create visually compelling documents
Whether good or bad, the colors, effects, and graphics in documents always get noticed. So, if
you’re not a graphic designer and you don’t have a lot of time to spend on the look of your
documents, how can you create a customized, well-crafted look? Word 2010 provides an array
of new and improved features that help you look like a design pro and help your documents
make the right statement every time.
Use new and improved picture editing tools—including professional-quality artistic
effects and advanced correction, color and cropping tools—and fine-tune the pictures in
your documents without the need for additional photo-editing programs.
Page: 6
3
Take advantage of more professionally-designed, customizable Office themes and
coordinating Word templates. Use themes to apply consistent colors, fonts, and graphic
formatting effects throughout all of your Microsoft Office 2010 documents in just a few
clicks.
Explore a wide selection of additional SmartArt graphics—including many new layouts
for organization charts and picture diagrams—to create inspiring graphics just by typing
a bulleted list.
Get easier access to the right tools, at the right time
New and improved features can help you be more productive, but only if you can find them
when you need them. Fortunately, the enhanced, customizable Ribbon in Word 2010 makes it
easy to uncover more commands so you can focus on the end product, not how to get there.
Want an easier time making sure the document you’re working on is finished and ready to
share? Wishing for a faster, more direct way to print something? The new Microsoft Office
Backstage™ view can help you achieve all of this and more. You can now more easily print,
share, and manage your documents, and customize your Word 2010 experience, all from one
convenient location.
Save time and simplify your work
No matter what type of documents you create, you want to focus on your content, not the tasks
associated with creating and managing documents. Word 2010 delivers new and improved tools
that simplify and save time at every step.
Find your way with the improved Navigation Pane with integrated Find tools in Word
2010. Jump to the right place in your document, easily rearrange content, and find what
you need quickly with a new results list and automatic hit highlighting.
Recover files that you closed without saving! You can now recover files after you
accidentally close without saving, even if you had never saved the document.
Save time and improve results with intuitive features such as the new Paste with Live
Preview and an improved Contextual Spell Checker. Getting it right the first time is
always faster than doing it over.
Page: 7
4
Keep your thoughts and ideas organized and accessible while planning and authoring
your document by using the new Linked Notes feature with Word 2010 and Microsoft
OneNote®
2010.
You may need to share documents with colleagues, classmates or friends, or perhaps you need
to work with others on a team project. Regardless, the complications and delays that can arise
when sharing or working together on content can be frustrating to say the least. That is, until
now. Word 2010 makes waiting your turn a thing of the past and gives you new and improved
tools that make sharing your work simple and hassle-free.
Redefine working together on documents
Word 2010 provides easy ways to bring people together. New and improved technologies help
break down barriers so you can share and collaborate more efficiently and effectively.
You can now edit the same document, at the same time, as other people in other
locations. 1
You can even communicate instantly as you work, directly from Word.2
Collaborate with confidence using new, improved and simplified security tools. For
example, the new Protected View helps you make informed decisions when opening
unknown files, before exposing your computer to possible vulnerabilities.
Break down language barriers with improved translation tools and language settings.
If your ideas, deadlines, and work emergencies don’t always occur conveniently when you are at
your desk, you are certainly not alone. Fortunately, Word 2010 gives you the power to get things
done when and where you want.
1
Co-authoring requires Microsoft SharePoint
®
Foundation 2010 for business or a free Windows Live™ ID for personal use. Co-
authoring via Windows Live will become available in the second half of calendar year 2010.
2
Instant messaging requires one of the following: Microsoft Office Communications Server 2007 R2 with Microsoft Office
Communicator 2007 R2; Windows Live Messenger, or another instant messaging application that supports IMessenger. Voice calls
require Office Communications Server 2007 R2 with Office Communicator 2007 R2 or an instant messaging application that supports
IMessengerAdvanced.
Page: 8
5
Work when and where you choose
It’s easy to take your Word 2010 documents with you and stay on top of your work when you’re
on the go.
Microsoft Word Web App enables you to view a high fidelity version of your
documents and make light edits using some of the same formatting and editing tools
that are in Word 2010, from virtually any computer with a Web browser.3
Microsoft Word Mobile 2010 gives you a lightweight editor for your documents that’s
especially designed for easy use on your Windows phone.4
Whether you’re writing that career-making report, revising your term paper, working with a
volunteer team on the next big fundraiser, or getting things done on the run, Word 2010 makes
it easier to get what you need done more quickly, with more flexibility, and with better results.
3
Microsoft Office Web Apps require an appropriate device, Internet connection, supported Internet Explorer, Firefox, or Safari
browser, and either SharePoint Foundation 2010 for business or a free Windows Live ID for personal use. Editing in Word Web App
via Windows Live will become available in the second half of calendar year 2010. There are some differences between the features of
Office Web Apps and the Office 2010 applications.
4
An appropriate device is required. Some mobile functionality requires an Internet connection. Office Mobile 2010 is not included in
Office 2010 applications, suites, or Office Web Apps. It will be available at the general availability of Office 2010 on Windows phones
(Windows Mobile 6.5 or above). There are some differences between the features of Office Mobile 2010 and the Office 2010
applications.
Page: 9
6
Give your text the power to jump off the page
Text Effects New!
You already use graphics and images to call attention to important content in your documents.
Now, you can apply the same types of formatting that you use for those graphics and images
directly to document text. Unlike WordArt from earlier versions of Word, you apply text effects
to actual document text, so you can still edit and spell check that text and even add text effects
to paragraph, character, list, or table styles.
Available text effects include gradient fills, custom shadows, reflection, glow, soft edges, bevels
and more, as well as a range of preset gallery options that enable you to quickly apply a
coordinated set of effects.
Figure 1: Find the Text Effects
gallery in the Font group on
the Home tab.
Note: When you access the command labeled WordArt from the Insert tab in Word 2010, you
now get an editable text box within which you can use the same text effects discussed here.
These same effects are also available to any text in Microsoft PowerPoint®
2010 and to text in
Page: 10
7
graphics in Microsoft Excel®
2010. Text effects were introduced in PowerPoint and Excel in Office
2007 and are referred to as WordArt in those applications.
Quick Tip: For additional text effects that you do not see in the Text Effects gallery, click the dialog box
launcher icon in the Font group. At the bottom of the Font dialog box, click Text Effects to open a dialog
box that includes effects such as gradient fills, gradient lines, and 3-D bevels.
OpenType Typography New!
In Word 2010, it’s easy to make an impact with your text by taking advantage of the typography
capabilities in many OpenType fonts. For example, explore the OpenType typography features in
existing fonts such as Calibri, Corbel, and Cambria. Or try Gabriola, a new font in Office 2010
that offers a rich array of Stylistic Sets.
Word 2010 provides support for the following OpenType typography features:
Ligatures: Ligatures give your document the look of professional typesetting by
combining character pairs, as shown in Figure 2.
Figure 2: Standard
ligatures applied to text
in the Constantia font.
Stylistic Sets: Use stylistic sets to add flair to your documents, as shown in Figure 3.
Figure 3: Text in the Gabriola
font, using stylistic sets 1, 4,
and 7.
Page: 11
8
Alternate Number Forms and Number Spacing: Control the appearance and layout of
numbers in your text using number forms and number spacing alternatives, as you see in
Figure 4.
Figure 4: Number Forms and Number
Spacing applied to text in the Cambria font.
OpenType Kerning: When you apply the font kerning in Word that you already know,
Word 2010 now uses the OpenType values when available in the font for a more precise
result as specified by the font designer.
Note: Several OpenType typography features are also available in Microsoft Publisher 2010.
Create visually compelling documents
Picture Editing Tools New and Improved!
Word 2010 gives you the freedom to be your own graphic artist with a range of new and
improved tools for working with images.
Apply all new Artistic Effects, such as paint strokes, glass, pencil sketch, and pastels.
Grab only what you want from your image and leave the rest behind with the new
Remove Background tool.
Figure 5: An original image (top left) and the same image with the glow edges (center) and
glass (right) artistic effects applied, and with background elements removed (bottom). Picture
styles and effects are also applied to the top row of images to provide shapes, reflection,
gradient border, shadow, bevel, and 3-D rotation.
Page: 12
9
Explore new Sharpen and Soften correction tools along with improved Brightness and
Contrast.
Experiment with new color tools including Color Saturation and Color Tone, as well as an
improved Recolor tool.
Perfect your pictures quickly with an advanced cropping tool that enables you to crop to
a shape or to a selected aspect ratio, or to pan and zoom in on key image elements just
by dragging and resizing the picture within the crop area.
Figure 6: An advanced cropping tool displays your full image in shadow while you crop.
Quick Tip: Use Live Preview to save time when editing photos. Point to an option in the Correction,
Color, or Artistic Effects galleries to see the settings applied to your selected picture. And, if you don’t
see exactly what you want in the galleries, click … Options at the bottom of any of those galleries for a
dialog box that offers advanced formatting choices.
Note: The same new and improved picture editing tools are also available in PowerPoint 2010,
Excel 2010, and Microsoft Outlook®
2010.
Page: 13
10
Insert Screenshot New!
Want even more ways to add the impact of images to your documents? Take screenshots in
your other open windows directly from Word 2010. Or, select from a gallery of available
screenshots automatically populated by your open windows.
Note: The ability to take screenshots directly from Office 2010 programs is also available in
PowerPoint, Excel, Outlook, Publisher and OneNote.
Additional Office Themes Improved!
You want all your documents to have a consistent, professional look—but who has the time for
all that formatting? You do, because Office themes enable you to apply a coordinated set of
fonts, colors, and graphic effects to your entire document in just a couple of clicks.
Themes were introduced in Office 2007 for Word, PowerPoint, Excel, and Outlook, enabling you
to apply a consistent, professional look to all of your content. Office 2010 adds 20 additional
built-in, professionally-designed themes for a total of 40 built-in designs, as well as easy access
to many additional themes on Office.com. Customize or create your own themes for an
effortless way to implement your own personal or business branding, or use the designs
provided to quickly add impact to any content.
Figure 7: Find the Themes
group on the Page Layout tab
in Word.
Page: 14
11
Quick Tips:
In Word 2010, you can also apply theme effects or other theme fills to shapes. The other theme fills
available are the PowerPoint slide backgrounds from your theme—making it easy to coordinate all of
your Office 2010 documents. To access the fills that match your PowerPoint slide backgrounds, select
the shape to fill and then, on the Drawing Tools Format tab, in the Shape Styles group, expand the
Shape Styles gallery and then point to Other Theme Fills. (Note that these same fills are also
available to shapes in PowerPoint and Excel and were introduced in those programs in Office 2007.)
Word 2010 also includes several new, professionally-designed templates that coordinate with Office
themes. For example, create a new document based on the Adjacency Report template and then point
to different themes in the Themes gallery to see how the graphic elements in that template change,
as shown in Figure 8. Notice that shapes used as backgrounds on the first two pages of this template
use the slide background fills noted in the preceding tip. To access templates that are installed with
Word 2010, click the File tab to open the new Backstage view, click New and then click Sample
Templates.
Figure 8:
Original
Adjacency
Report template
(top) and,
clockwise from
top with Black
Tie, Austin,
Angles, and
Hardcover
themes applied.
Page: 15
12
Quick Tips: You can mix and match theme elements to create a custom look in no time. Select
separate theme colors, theme fonts, and theme formatting effects from their respective galleries on
the Page Layout tab, in the Themes group. Then, use the Save Current Theme option at the bottom
of the Themes gallery to save your selections as a custom theme that you can apply to content in
Word, PowerPoint, Excel, Outlook, and even Microsoft Access®
2010.
In addition to the 40 built-in themes available from the Themes gallery, explore the Office.com
category in that gallery and check it often—select themes appear automatically as they become
available.
Additional SmartArt Graphics Improved!
You know that a graphic can often help display your important points more effectively than just
text. That’s why it’s so important to choose the right type of graphic for your content and make
it look its best. Fortunately, Office 2010 adds dozens of additional SmartArt layouts for a total of
more than 130 different diagrams that you can create as easily as typing a bulleted list.
These popular graphics, introduced in Office 2007, make it possible for anyone to create truly
impressive diagrams. SmartArt layouts include a broad range of options from lists to process,
cycle, and relationship diagrams that can help you convey related ideas and non-linear concepts
with greater visual impact.
The new layouts added in Office 2010 include additional organization charts, picture diagrams,
and many more. You also get improved tools for working with picture diagrams, such as the
ability to easily add or replace images from within the text pane or replace selected images in
your diagram using the Change Picture Command on the Picture Tools Format tab.
Figure 9: The
Choose a SmartArt
Graphic dialog box,
available on the
Insert tab in the
Illustrations group.
Page: 16
13
Quick Tips:
When you insert or select a SmartArt graphic, the SmartArt Tools Design and Layout tabs become
available on the Ribbon. On the SmartArt Tools Design tab, find galleries of formatting effect styles
and color options that automatically coordinate with your theme. Also find the Layouts gallery on
that tab, from which you can select a different layout and just click to apply it to your selected
diagram. Content you’ve already added to your graphic automatically updates in the new layout.
When you insert a SmartArt graphic, a text pane automatically appears. Type in that text pane to
populate shapes in your graphic with text, press ENTER to add new shapes, and use the TAB and
SHIFT+TAB keys just as you do in a bulleted list, to promote or demote shapes or text within shapes.
Notice the Office.com category in the SmartArt dialog box. Check that category periodically for select
new layouts that are added automatically as they become available.
Note: SmartArt graphics are also available in PowerPoint 2010, Excel 2010, and Outlook 2010.
Shapes and Shape Effects Improved!
Word 2010 provides full support for Office Art. That means you now have many of the advanced
capabilities for working with shapes in Word that you have in PowerPoint and Excel. Select from
additional shape types and enjoy more tools, timesavers, and formatting flexibility. For example,
just select a shape and start typing to add text.
Additionally, you can apply the same formatting effects to shapes that you can apply to other
graphics in your documents, such as bevels, reflections, and soft edges. As with SmartArt
graphic styles and chart styles, shape styles now also coordinate automatically with your theme
fonts, colors, and effects.
Page: 17
14
Figure 10: The Shape Styles group
on the Drawing Tools Format tab
provides styles that automatically
coordinate with your active
document theme as well as a wide
selection of effects.
Quick Tips:
Try new keyboard shortcuts for working with shapes. Select the shape and then use SHIFT+ the arrow
keys on your keyboard to resize the shape. Or, hold the ALT keys while you press left or right arrow
keys to rotate a shape. Add CTRL to these key combinations to resize or rotate in smaller increments.
Also new to Word 2010, check out the Selection Pane. Find this pane on the Home tab, in the Editing
group or on the Drawing Tools Format or Picture Tools Format tabs, in the Arrange group. the
Selection Pane enables you to easily select, rename, reorder or hide graphics in your document.
Expand the Shape Styles gallery for the option Other Theme Fills, which enables you to apply the
PowerPoint slide backgrounds from your theme as shape fills. See the information on Office themes
earlier in this guide for more detail and examples.
Get easier access to the right tools, at the right time
Ribbon Improved!
Locate the commands you need when you want them and where you want them. The improved,
customizable Ribbon, available in all Office 2010 applications, replaces traditional menus and
toolbars to give you a more personalized work experience. It’s designed to help you more easily
find and use the full range of features that Word provides—so that you can get more done in
less time.
Create your own tabs or customize built-in tabs on the Ribbon to personalize the Word 2010
experience to your work style.
Page: 18
15
The standard tabs that you see on the Ribbon are organized to display commands relevant
to a given task, so that you can find what you need more quickly.
The Ribbon also provides contextual tabs to give you exactly the right tools for the task. For
example, when you click in a table, contextual tabs appear on the Ribbon to provide easy
access to all the features you need for working with that table.
Figure 11: Contextual tabs automatically display when you need them.
Microsoft Office Backstage View New!
On the left edge of the Ribbon you see the File tab. Just click that tab for an all-access pass that
makes it easier than ever to manage your files and customize your Word experience.
The new Backstage view replaces the traditional File menu to provide a single location for all of
your document management tasks. For example:
When you first open Backstage view, you’re on the Info tab. From this one location, you
can manage document protection options, view and edit file properties, inspect the
document for proprietary information you may not want to share, and much more.
From the Save & Send tab in Backstage view, you can send your document as a Word
2010 attachment, or as a PDF or XPS file. You can also publish your document as a blog
post or save the document to an online location for access to incredible new
collaboration features discussed later in this guide.
The Print tab, shown in Figure 12, provides a new, integrated print experience with a full
page Print Preview right alongside all of the print options you need.
Page: 19
16
Figure 12: The new
integrated Print
environment
available from
Backstage view.
Quick Tip: Check out the Recent tab in Backstage view for lists of both recently accessed files and
recently accessed locations. Pin files or locations to that tab to move them to the top and keep them
easily accessible. In addition, you can remove a recently used file or location by right-clicking the list item
and then clicking Remove from list..
The Ribbon helps you create your content. Backstage view helps you manage it.
Save time and simplify your work
Navigation Pane Improved!
The improved Navigation Pane in Word 2010 (formerly called the Document Map) transforms
the document navigation user experience, providing a visual representation of the heading
structure of your document.
Using the Navigation Pane, you can do the following:
Browse headings to quickly find your place within a document and just click to go to that
location.
Drag and drop to quickly and easily rearrange headings and the content beneath them.
Locate where someone else is currently editing in the document, or where their most
recent changes were.
Page: 20
17
Figure 13: Drag and drop headings in the improved Navigation Pane to quickly rearrange
document content.
Find Tools Improved!
The improved Find experience is now seamlessly integrated in the Navigation Pane. Word 2010
automatically searches as you type the term you’re looking for, visually highlighting all matches.
The new results view in the Navigation pane shows a quick preview of all search
matches—click any preview to jump to that point in the document.
The headings view highlights the areas in the document in which results appear.
The thumbnails view filters to show you just the set of pages that contain a search result.
From the Navigation Pane, you can also browse the document by object type, including
graphics, tables, equations, footnotes, endnotes, and comments.
The familiar Find and Replace dialog box is still available for more advanced searches
and Replace tasks.
Page: 21
18
Figure 14:
The
improved
Find tools,
integrated
into the
Navigation
pane, include
the new
search results
pane shown
here.
Quick Tip: Use the familiar CTRL+F shortcut to activate the Search Document box in the Navigation
pane. To access the Find and Replace dialog box, click the arrow on the right edge of the Search
Document box and then click Advanced Find. Or, press CTRL+H to open the Find and Replace dialog
box to the Replace tab and CTRL+G to open that dialog box to the Go To tab.
Recover Unsaved Versions New!
We’ve all done it. You work for a while, get the content just right, and then close the document
without saving. Maybe you thought the save prompt was for a different file that you didn’t want
or maybe you were just distracted while closing the file. The result is the same—your work and
the time you spent to create it have been lost. Well, not anymore!
Expanding on the AutoRecover capabilities that you may know from earlier versions of Microsoft
Office, Office 2010 now recovers versions of files that you close without saving.5
Easily access
and manage recovered documents right from the Info tab in Backstage view, as shown here.
5
Recovering available unsaved documents and autosave versions requires you elect to save AutoRecover information. To keep an
autosave version until your next editing session you must also elect to keep the last autosaved version when you close without
saving. To access these options, in Backstage view click Options and then click Save.
Page: 22
19
Figure 15: Access
recovered versions
of your documents
on the Info tab in
Backstage view,
under the Versions
heading.
You can recover drafts of documents that were never saved. Find this option in
Backstage view, on the Info tab, under the Manage Versions button.
Also access up to the last five autosave versions of your previously saved active
document from the Info tab in Backstage view. By default, the last autosave version
remains available temporarily if you close the document without saving.
Quick Tips:
Need to quickly access other content in the folder where your active document is stored? In
Backstage view, on the Info tab, just click Open File Location. Find this option under the heading
Related Documents in the Properties pane shown in Figure 15.
Learn more about working with recovered versions in the Power User Tips section of this guide.
Paste with Live Preview New!
Save time when reusing content within Word 2010 or across applications. Paste with Live
Preview enables you to preview various Paste Options, such as Keep Source Formatting or Keep
Text only, so you can see how your pasted content will look prior to actually pasting. Instead of
using Undo and trying again, Paste with Live Preview now helps you get it right the first time.
Page: 23
20
Figure 16: Point to a
paste option to preview
results and then click to
select the option you
prefer.
Quick Tip: You can still access paste options after you paste and change your mind without having to
undo actions. Click the icon that appears alongside pasted content to expand Paste Options. Or, if you
prefer to use the keyboard, press CTRL to expand Paste Options and then use the left and right arrow keys
to move through options. If you select a new option, the result automatically updates.
Note: Paste with Live Preview is also available in PowerPoint 2010, Excel 2010, Outlook 2010,
and for text in Publisher 2010.
OneNote Linked Notes New!
You do research and gather content while working on documents. But, how do you keep all of
the pieces connected and find the information you need when you need it?
OneNote 2010 makes it easy by creating links not just to the document you’re working on, but
to the location where you were working in the document when you took a given note. Dock
OneNote on the side of your desktop and take notes while you work on your Word 2010
document. As you see in Figure 17, OneNote adds an icon in the margin beside your notes. Just
click that icon when reviewing your notes later to open the source file and jump straight to the
information you need.
Page: 24
21
Figure 17: The OneNote Linked Notes feature adds an icon in the margin of each paragraph
as you take notes in the docked OneNote pane, indicating the source program and providing
a link to your location in the source file at the time you took the note.
Quick Tip: To take Linked Notes while working in Word, start with a previously-saved document in Word
2010 file format and take your notes in a OneNote 2010 notebook.
Note: This OneNote 2010 feature is also available when working in PowerPoint 2010 or when
browsing the Web using Windows®
Internet Explorer®
6 or later.
Contextual Spell Checker Improved!
The improved contextual spell-checker in Word 2010 delivers a context-sensitive speller that
corrects your spelling errors when a word is correctly spelled but misused. For example,
―economical condition‖ will be flagged so you can correctly communicate ―economic condition.‖
Page: 25
22
Redefine working together on documents
Co-authoring New!
Save time, simplify tasks, and improve your teamwork. Co-authoring capabilities in Word 2010
enable you to simultaneously edit the same document with colleagues or friends.6
Automatically
see who else is editing and where they are working in the document. You can even initiate a
conversation with other editors instantly, right from Word 2010.7
Figure 18: Clearly see where another editor is working in the same document and connect
with them without leaving Word.
Wherever you see the name of another editor, as shown in Figure 18, you see presence
information that tells you the person’s availability. Point to the person’s name for a
contact card from which you can begin a conversation.
Just save the document to see changes from other editors as you work. Your changes
also become available to other editors each time you save.
6
Co-authoring requires SharePoint Foundation 2010 for business or a Windows Live ID for personal use. Co-authoring in Word 2010
via Windows Live will become available in the second half of calendar year 2010.
7
Instant messaging requires one of the following: Microsoft Office Communications Server 2007 R2 with Microsoft Office
Communicator 2007 R2; Windows Live Messenger, or another instant messaging application that supports IMessenger. Voice calls
require Office Communications Server 2007 R2 with Office Communicator 2007 R2 or an instant messaging application that supports
IMessengerAdvanced.
Page: 26
23
View the names of all current editors at-a-glance from a pop-up list on the Status bar at
the bottom of the screen. Or, as shown in Figure 19, see and connect with other editors,
check sync status, and more from the Info tab in Backstage view.8
If another editor goes offline while they have the file open for editing, you can still access
the document and make your changes. When that person is next online and saves the
file, the changes they made are merged with yours and you can then see their changes.
Figure 19: When in a co-
authoring session, you
see availability of
updates from other
editors and can contact
other current editors
from Backstage view.
Quick Tip: Corporate users in companies running Microsoft SharePoint®
Foundation 2010 can use co-
authoring within their firewall. With Microsoft Office Communicator now integrated with several Office
2010 applications, you can view presence information and initiate instant messaging or voice calls directly
from Word.
If you’re in a small company or use Word 2010 for your home or school work, you can take advantage of
co-authoring capabilities through Windows Live™. All you need is a free Windows Live ID to
simultaneously edit documents with others. An instant messenger account (such as the free Windows Live
Messenger) is required to view availability of other document authors and start an instant messaging
conversation.9
8
Communication with other authors from the People Currently Editing pane in Backstage view requires Microsoft Office
Communications Server 2007 R2 with Microsoft Office Communicator 2007 R2, or another instant messaging application that
supports IMessengerAdvanced.
9
Co-authoring in Word 2010 via Windows Live will become available in the second half of calendar year 2010.
Page: 27
24
Streamlined Communications New!
Connect with your contacts without leaving Word 2010.
As shown in Figure 18 and Figure 19, you see the presence icon or presence bar in
several places while in a co-authoring session in Word 2010. In addition to co-authoring, you
can also see presence information for authors, managers, and last editors in the Properties pane
on the Info tab in Backstage view.
When combined with Office Communicator or your favorite instant messaging application, you
can view information about that person and initiate contact instantly via their contact card, as
shown in Figure 20.10
Figure 20: Hover your mouse pointer on a person’s name or presence icon to
view their contact card and initiate a conversation instantly. Or expand that
card to see additional information about your contact.
10
Instant messaging and presence information requires one of the following: Microsoft Office Communications Server 2007 R2 with
Microsoft Office Communicator 2007 R2; Windows Live Messenger, or another instant messaging application that supports
IMessenger. Voice calls require Office Communications Server 2007 R2 with Office Communicator 2007 R2 or an instant messaging
application that supports IMessengerAdvanced.
Page: 28
25
Quick Tips:
Click the push-pin near the top of the contact card to keep it on top of other windows and readily
available.
Microsoft Exchange users see calendar status on the top portion of the contact card and in the
expanded details.
Note: Presence information and contact card are also available when using co-authoring in
PowerPoint 2010 and from File Properties in Backstage view in PowerPoint and Excel 2010. In
Outlook 2010, these features are available from many types of Outlook items, such as meeting
requests and e-mail messages. Additionally, in Microsoft SharePoint®
Workspace 2010, presence
and contact card are available from the Members pane in a Microsoft Office Groove workspace.
A separate instant messaging program is not required when using presence in a Groove
workspace.
Protected View New!
Like many people, you probably receive more files today by e-mail attachment or by
downloading from the Web than by any other means. So, how do you help protect your
computer when opening files from potentially unknown sources?
Office 2010 introduces Protected View in Word, Excel, and PowerPoint, to help you make more
informed decisions before exposing your computer to possible vulnerabilities. By default,
documents that originate from an Internet source—or that may otherwise be likely to include
potentially harmful content—are automatically opened in a Protected View. When this happens,
you see a warning on the Message bar, as shown in Figure 21, along with the option to Enable
Editing.
Figure 21: Documents that originate from an Internet source open automatically in Protected
View.
Page: 29
26
Quick Tip: You can control which originating sources trigger Protected View. You can also set specific file
types to open in Protected View regardless of where they originate.
To do either of these tasks, click the File tab to open Backstage view and then click Options. In the Word
Options dialog box, click Trust Center and then click Trust Center Settings. Then, to manage Protected
View settings, click Protected View. Or, to enable protected view for specific file types, click File Block
Settings.
Trusted Documents New!
You want to be highly protected from potential threats to your computer and to your files. But
why go through repeated security checks after you confirm that a file is trusted?
Office 2010 introduces the Trusted Documents feature for the documents you work with that
contain active content, such as macros. Now, after you confirm that active content in a
document is trusted to enable, you don’t have to repeat yourself. Word 2010 remembers the
documents you trust so that you can avoid being prompted each time you open the document.
Quick Tip: What if you accidentally trust a document that you shouldn’t or content is added to a
document that you previously trusted? The Trust Center, available through the Word Options dialog box,
gives you one-click access to reset trusted documents or to disable the ability to trust documents
automatically.
Accessibility Checker New!
The new Accessibility Checker inspects your document for content that may be difficult for those
with disabilities to read. When issues are found, the tool provides an explanation of the issues
along with step-by-step help for correcting them.
Quick Tip: When formatting a document to help ensure improved accessibility, note that Word 2010
offers expanded alternative text options. Add alternative text for both title and description in pictures and
in tables. Find Alt Text options in the Format Picture dialog box and the Table Properties dialog box.
Page: 30
27
Language Tools Improved!
If you’re one of the many people who work across multiple languages, you now have more
flexibility to work as you choose. Simplify and customize your multilingual experience with
separate language settings for editing, Help, display, and ScreenTips.
Figure 22: Easily set separate editing, Help, display, and ScreenTip languages.
Quick Tips:
If you add a language for which proofing tools or keyboard layout are not installed, you see
notification with links to help you easily correct the issue, as shown in Figure 22.
When you set your language preferences in Word 2010, you set them for all applicable Office 2010
languages, including Excel 2010, PowerPoint 2010, Outlook 2010, OneNote 2010, Publisher 2010, and
(excluding ScreenTip settings) Access 2010, SharePoint Workspace 2010 and Microsoft InfoPath 2010.
Page: 31
28
Translation Tools Improved!
Word 2010 makes it easier than ever to communicate across multiple languages. Get easy
access to translation tools from the Review tab in Word 2010, as shown in Figure 23. Or, use the
improved Mini Translator (formerly called Translation ScreenTips) for on-the-spot translations.
Figure 23: Translation tools are available from
the Review tab, in the Language group.
Figure 24: Enable the Mini Translator
from the translation options on the
Review tab. Then, just hover your mouse
pointer on a word in your document for
instant translation.
Quick Tip: English assistance and Windows English text-to-speech playback (along with additional text-
to-speech languages for download) are available from the toolbar at the bottom of the Mini Translator,
shown in Figure 24.11
Share through Communicator “14” New!
Sometimes you need a virtual meeting space to collaborate on a project with colleagues. With
Word 2010 and Microsoft Communicator ―14‖, you can now initiate a virtual meeting without
leaving your work—share your application window as easily as sending an instant message. Or,
share a document quickly and easily when you send it via instant message right from Word. 12
11
Additional text-to-speech languages are free and available to download from the Microsoft Download Center:
http://www.microsoft.com/download.
12
Requires Communicator ―14‖ and Microsoft Communications Server ―14‖. Beta versions of Communicator ―14‖ and
Communications Server ―14‖ will become available in the second half of calendar year 2010.
Page: 32
29
Quick Tip: Start a sharing session from the Save & Send tab in Backstage view in just a few clicks.
Instantly see your colleagues’ availability and share your application window. Your colleagues get a clear
view of the application and see any changes you make in real-time.
Note: Share through Office Communicator is also available in PowerPoint 2010 and Excel 2010.
Content Controls Improved!
Content controls were introduced in Word 2007 for reusing dynamic content throughout your
documents and easily creating powerful forms. Word 2010 adds the widely requested check box
control for even more versatile form design.
Figure 25: Find content controls on the Developer tab, in the Controls group.
Quick Tips:
If you don’t see the Developer tab shown in Figure 25, click the File tab to open Backstage view and
then click Options. Click Customize Ribbon and then, under the heading Customize the Ribbon
that appears on the right side of that dialog box, check the box labeled Developer to enable that tab.
Using Office Open XML, developers can create powerful, flexible templates and documents with
content that updates automatically by binding content controls to external data, such as data stored
in a Microsoft SharePoint list.
Content controls bound to commonly used document properties are automatically available for your
use in documents, no developer required. On the Insert tab, in the Text group, click Quick Parts and
then click Document Property to select from a list of available controls. For example, insert the Title
control on your cover page, in headers, or wherever the document title is required. Then, if the title
changes, just update one instance of that control and the rest update automatically.
Page: 33
30
Work when and where you choose
Word Web App New!
When you want to leave your computer behind or need easy, shareable tools for collaborating
with others, do you have what you need to get things done easily and effectively? Now you do.
Save your Word documents online and then access, edit, and share them from virtually any
computer with an Internet connection.13
Get high-fidelity online viewing for the rich documents
that you create in Word 2010 and easily make light edits on the go using some of the same
tools that you know from Word.14
Figure 26:
View
documents
in high
fidelity and
easily make
light edits
with Word
Web App.
13
Office Web Apps require an appropriate device, Internet connection, supported Internet Explorer, Firefox, or Safari browser, and
either SharePoint Foundation 2010 (for business) or a free Windows Live ID (for personal use). Editing documents in Word Web App
via Windows Live will become available in the second half of calendar year 2010. There are some differences between the features of
Office Web Apps and the Office 2010 applications.
14
Microsoft Silverlight
™
is not required for any functionality but is recommended for best results when viewing Word documents in
Office Web Apps.
Page: 34
31
Copy text from your document or search for document text directly in Word Web App
when in view mode. The search pane provides a linked summary of search results and
automatic highlighting of search hits in the document, similar to the improved search
experience in Word 2010.
Use familiar formatting and editing tools that you know from Word, including
AutoCorrect, spell-checking as you type, font and paragraph formatting, and styles.
Insert pictures, tables, and even Office.com Clip Art.
Microsoft Office Web Apps—including Word Web App, Microsoft Excel®
Web App, Microsoft
PowerPoint®
Web App, and Microsoft OneNote®
Web App—give you flexible access, a familiar
editing environment, and a selection of features that you already know to help you get your
work done on your terms.
Quick Tips:
Word Web App makes it easy to share files with people who work on earlier versions of Microsoft
Office for Windows or Mac, or even with those who don’t have Microsoft Office installed on their
computer.
If your company runs Office Web Apps on Microsoft SharePoint 2010, access and view the documents
you save to your SharePoint site from your smartphone using a mobile version of Word Web App.15
15
Supported mobile viewers for Word, Excel, and PowerPoint Web Apps on SharePoint 2010 include Internet Explorer on Windows
Mobile 5 or later, Safari 4 on iPhone 3G or 3GS, BlackBerry 4.x and later, Nokia S60, NetFront 3.4, 3.5 and later, Opera Mobile 8.65
and later, and Openwave 6.2, 7.0 and later.
Page: 35
32
Word Mobile 2010 Improved!
Sometimes you’ve got to work when you’re moving between point A and point B. Fortunately,
the improved Word Mobile 2010 enables you to easily take action while you’re on the road.16
Enjoy a familiar experience when creating or editing Word documents on your mobile
device. Essential authoring capabilities include font and paragraph formatting, bullets
and numbering, spell check, and AutoCorrect.
Use the new selection mode to select your content with precision.
Figure 27: Open documents that were
created in a desktop application and view
them on your Windows phone in high-
fidelity, using Text Reflow technology in
Word Mobile 2010.
Quick Tip: Easily distribute documents right from your Windows phone. Send your Word documents by
e-mail or save them directly back to SharePoint 2010 by using the new SharePoint Workspace Mobile
2010 application.
16
An appropriate device is required. Some mobile functionality requires an Internet connection. Office Mobile 2010 includes Word
Mobile 2010, Excel Mobile 2010, PowerPoint Mobile 2010, OneNote Mobile 2010 and SharePoint Workspace Mobile 2010. Outlook
Mobile 2010 comes pre-installed on Windows phones and is the default e-mail client. Office Mobile 2010 is not included in Office
2010 applications, suites, or Office Web Apps. It will be available at the general availability of Microsoft Office 2010 on Windows
phones (Windows Mobile 6.5 or above). There are some differences between the features of Office Mobile 2010 and the Office 2010
applications.
Page: 36
33
Are you the office, family, or class Word guru? Do you support, teach, or create documents and
templates for other Word users? If you are a Word power user or would like to be, check out a
few tips and tricks to help you do even more with Word 2010.
Easily format graphics across your Word 2010 documents
Do you want consistent, professional, eye-catching formatting and effects for all of the graphics
in your Word 2010 documents? Getting there might be much easier than you think.
The quick style galleries available on the Drawing Tools Format tab, SmartArt Tools
Design tab, and Chart Tools Design tab automatically coordinate with the colors, fonts,
and graphic formatting effects of your active document theme.
Try out different theme effects without changing other elements of your theme. On the Page
Layout tab, in the Themes group, point to options in the Effects gallery to see a Live Preview of
those effects on the graphics in your document. When you find effects that you like, just click
once to apply them to all of the Office 2010 graphics in your document. (Note that you have to
have applied quick styles that use theme effects to your graphics in order to see formatting
change when you make selections in the Theme Effects gallery.)
Apply many of the same custom effects—such as shadows, bevels, and gradient fills—to
text, shapes, SmartArt graphics, charts, and pictures in your Word 2010 documents.
Word provides galleries of easy-to-use choices for formatting any of these content types.
But, if you need to customize effects beyond what you see in the galleries, check out the
format dialog box for each. Format Text Effects, Format Shape, Format Picture, and
several chart element format dialog boxes give you the tools to customize effects such
as multi-stop gradient fills and lines, bevels, lighting, reflections, and more.17
To quickly access Format Shape, Format Picture, or the chart element format dialog boxes, right-
click the object and then click the format option at the bottom of the shortcut menu. To access
Format Text Effects, press CTRL+D to open the Font dialog box and then click Text Effects.
17
In Excel charts, reflection effects are available when formatting text.
Page: 37
34
Explore Recover Unsaved Documents and autosave versions
When you work on a document for a while and then close it without saving, Word 2010
automatically saves a copy for you. As you may have already learned in this guide, this exciting
new development in AutoRecover capabilities enables you to easily retrieve documents, even if
you never saved the file. Use the following tips to help you get more from these great new
timesaving tools:
While working on a previously saved document, access up to the last five autosave
versions while you are still in the document, without leaving Word. So, if you accidentally
delete something and later need it back, you may be able to retrieve that content from
an earlier autosave version. 18
To access available autosave versions, click the File tab to open Backstage view. Find available
autosave versions under the Versions heading on the Info tab.
By default, Word 2010 automatically saves the last autosave version of your file if you
close without saving.
To turn off this capability, in Backstage view, click Options. In the Word Options dialog box, on
the Save tab, find the setting Keep the last autosaved version if I close without saving.
Note: Your autosave files are stored in the same location as your AutoRecover files. Your
AutoRecover file location can be found in Word Options, on the Save tab.
Recover all available unsaved documents (files that were never previously saved) from
one convenient location.
On the Info tab in Backstage view, click Manage Versions and then click Recover Unsaved
Documents. Or, at the bottom of the Recent tab in Backstage view, click Recover Unsaved
Documents. The dialog box that opens displays your UnsavedFiles folder, containing available
unsaved documents.
18
The ability to retrieve content from an autosave version is limited to five versions and requires that you elect to save AutoRecover
information and keep the last autosave version when you close without saving. To access these options, in Backstage view click
Options and then click Save.
Page: 38
35
The files that you see in the UnsavedFiles folder are automatically deleted after four days.
If you ever need to work on a shared or public computer, such as in an Internet café or school
computer lab, it’s easy to ensure that unsaved documents are not retained. Create a new
document (CTRL+N) but do not save it. Then, in Backstage view, on the Info tab, click Manage
Versions and then click Delete all Unsaved Documents.
Note: The Delete All Unsaved Documents option only appears if you are working on a file that
has never been previously saved. If you view Manage Versions options for a previously saved file,
the Delete All Unsaved Documents option will not be available.
Customize the Ribbon
Customizing your Word 2010 experience has never been easier. Add your own groups to any
built-in Ribbon tab, or create your own tabs.
To customize the Ribbon, click the File tab to open Backstage view. Click Options and
then click Customize Ribbon. From this location, customize tabs to include your favorite
commands from any built-in tab as well as many commands that don’t appear on the
Ribbon or even your own macros.
Notice that you can
also clear the check
box beside any tab
listed in this dialog
box to prevent it
from appearing on
the Ribbon.
Page: 39
36
In addition to customizing the tabs that you always see on the Ribbon, you can customize
contextual tabs as well. Those are the tool tabs that appear when you’re working on specific types
of content, such as pictures or tables. To access these additional tabs when customizing the
Ribbon, select Tool Tabs from the list labeled Customize the Ribbon, as you see in the
preceding image.
To start customizing the Ribbon, just select the tab before which you want to place your
new custom tab and then click New Tab. Or, expand a tab to view its groups, select the
group after which you want to place a custom group, and then click New Group. You
can then add commands from the left side of the dialog box.
To share your custom Ribbon with other Word 2010 users, you can use the Import/Export option
at the bottom of the dialog box. Just export your custom Ribbon settings and share the exported
file so that others can import your customizations on their PC.
Customize documents and save time using Office Open XML
With all of the great new features in Word 2010 and Office 2010, you never have to leave the
Office 2010 programs to create the extraordinary documents you’ve always wanted. But, if you
are an advanced user and you want to see just how far you can take the great content you
create with Office 2010, you might want to check out what’s going on under the hood of your
documents.
The Office Open XML Formats are the file formats for your Office 2010 documents, and were
first introduced in Office 2007. A lot of the great functionality that you use in Office 2010 is built
using the Office Open XML language—such as document themes, SmartArt, and the Ribbon.
And, if you are an advanced Microsoft Office user, you might be amazed at the time you can
save and the types of customizations you can do when you begin to explore Office Open XML.
You don’t need to be a professional developer to learn and use the basics of Office Open XML.
For example, consider the following:
If you already customize Office themes and you’d like to learn how to create a complete
custom theme from scratch, including your own custom theme effects, explore the
Theme Builder.
Page: 40
37
The Office team at Microsoft created the Theme Builder tool, which is in a public beta release at
this time of this publication. The Theme Builder actually writes the Office Open XML for you,
giving you an interface from which you can create your own custom theme effects. On the Help
menu of the Theme Builder, you’ll also find a detailed theme creation guide and themes SDK
documentation, for in-depth guidance and best practices when creating custom themes.
Download the Theme Builder from Microsoft Connect.
With just a few Office Open XML basics under your belt, you can customize formatting
and save time on many tasks. Consider the following examples:
You use the Change Shape feature to change the rectangles in your SmartArt graphic
to ovals. It works great and may be exactly what you need most of the time. But
when you add a new shape, it’s still a rectangle. Would you like to change that shape
in the SmartArt layout instead, so that anyone who edits the graphic gets the shape
you want them to use? All it takes is one simple find and replace in Office Open XML.
You are about to hand the courier that important proposal document when you learn
that the client changed their logo last week. The logo appears dozens of times in the
document and the clock is ticking. Wouldn’t it be nice if you could paste the new
logo once and Word would place it everywhere it needed to be, with formatting and
positioning automatically retained? When you understand the core Office Open XML
structure of your Word 2010 documents, you can—and you might even be able to do
it without writing a single word of Office Open XML.
You’re creating a new Word 2010 template to share with others and you would like
to create a custom Ribbon just for that template. You know that Office 2010 gives
you the power to customize the Ribbon for each application, but how can you get
that done for just a single template? Office Open XML makes it easy.
Page: 41
38
These are just a few of many tasks that advanced Office 2010 users can easily accomplish using
basic Office Open XML. Explore the resources that follow to help you get started with Office Open
XML and for the steps you need to accomplish these tasks and more:
Note: The following resources were written for Office 2007 but are equally applicable to the tasks
discussed here for Office 2010.
Office Open XML I: Exploring the Open XML File Formats
Office Open XML II: Editing documents in the XML
A Guide to Customizing the Office 2007 Ribbon
Using Office Open XML to Customize Document Formatting in the 2007 Office System
Getting More from Document Themes in the 2007 Office System with Office Open XML (if
you’re new to themes and Office Open XML, read this article before the one that follows)
Creating document themes with the Office Open XML Formats
Using Office Open XML to Save Time Without Writing Code
Page: 42
39
Features and Benefits Where to Find
New! Text effects On the Home tab, in the Font group, click
Text Effects .
Note: Additional text effects are available through the
Text Effects dialog box. To access this dialog box, on
the Home tab, in the Font group, click the dialog
launch icon . Then, at the bottom of the Font
dialog box, click Text Effects.
New! OpenType typography On the Home tab, in the Font group, click
the dialog launch icon to open the Font
dialog box. Or, press CTRL+D. Find OpenType
features including ligatures, stylistic sets and
more on the Advanced tab of that dialog
box.
Improved! Picture editing Select as picture in your document. Or, on the
Insert tab, in the Illustrations group, click
Picture to insert a picture from your files.
The Picture Tools Format tab appears
automatically when a picture is selected. Find
Artistic Effects, Remove Background,
Color, and Correction tools in the Adjust
group. Find Crop in the Size group.
New! Insert screenshot On the Insert tab, in the Illustrations group,
click Screenshot.
Page: 43
40
Features and Benefits Where to Find
Improved! Additional Office
themes
On the Page Layout tab, in the Themes
group, click Themes.
Note: To access additional theme fills for shapes, select
a shape in your Word 2010 document and then, on the
Drawing Tools Format tab, in the Shape Styles
group, expand the Shape Styles gallery and then point
to Additional Theme Fills.
Improved! Additional SmartArt
graphics
On the Insert tab, in the Illustrations group,
click SmartArt and then select a SmartArt
layout.
The SmartArt Tools Design and Format tabs
appear automatically whenever your insertion
point is in a SmartArt graphic.
Improved! Shapes and shape
effects
To view and insert available shapes, on the
Insert tab, in the Illustrations group, click
Shapes.
To view and apply available shape effects,
select a shape in your document. The
Drawing Tools Format tab appears
automatically when a shape is selected.
Explore the Shape Styles group on the
Drawing Tools Format tab for individual
Shape Effects and Shape Styles that
automatically coordinate with the active
theme in your document.
New! Selection pane On the Home tab, in the Editing group, click
Select and then click Selection Pane.
Improved! Navigation Pane On the View tab, in the Show group, select
Navigation Pane.
Page: 44
41
Features and Benefits Where to Find
New and
Improved!
Find experience On the Home tab, in the Editing group, click
Find to open the Navigation Pane. Or, press
CTRL+F.
Type a search term in the Search box or click
the drop-down arrow on the right side of the
Search box for additional search options
including access to the Find and Replace
dialog box.
New and
Improved!
Recover Unsaved
Versions
Click the File tab to open Backstage view. On
the Info tab, under the Versions heading,
view available autosave versions or click
Manage Versions to access Recover
Unsaved Documents.
New! Paste with Live Preview When you’re ready to paste content, click
where you intend to paste in the document.
On the Home tab, in the Clipboard group,
click the arrow beneath the Paste button to
view Paste Options. Or, right click at the
insertion point to view Paste Options. Then,
point to individual Paste Options to preview
results and click your preferred option to
paste.
New! Linked Notes Open or save a new Word 2010 document.
Then, on the Review tab, in the OneNote
group, click Linked Notes.
Improved! Contextual spelling
checker
On the Review tab, in the Proofing group,
click Spelling & Grammar.
Page: 45
42
Features and Benefits Where to Find
Improved! Ribbon The Ribbon appears at the top of the screen.
To customize the Ribbon, click the File tab to
open Backstage view. Click Options and then
click Customize Ribbon.
New! Backstage view Click the File tab to open Backstage view.
Features and Benefits Where to Find
New! Co-authoring To see this feature, save your document to a
SharePoint Foundation 2010 site or a
Windows Live SkyDrive folder, and then have
someone else open the document for editing
while you are still in it.
You can automatically see where other
editors are currently working in the
document. You can also view a list of other
editors from the Info tab in Backstage view
or on the Status bar at the bottom of your
screen.
Note: Co-authoring via Windows Live will become
available in the second half of calendar year 2010.
Page: 46
43
Features and Benefits Where to Find
Improved! Streamlined
communications
Wherever you see presence information that
shows availability of other document editors,
point to the person’s name for a contact card
from which you can initiate a conversation.
Note: Instant messaging and presence information
requires one of the following: Office Communications
Server 2007 R2 with Office Communicator 2007 R2,
Windows Live Messenger, or another instant
messaging application that supports IMessenger. Voice
calls require Office Communications Server 2007 R2
with Office Communicator 2007 R2 or an instant
messaging application that supports
IMessengerAdvanced.
New! Protected View Opening in Protected View is automatic when
you open a file that originated from an
Internet location. A message bar appears
below the Ribbon to indicate that your file
has been opened in Protected View and gives
you the option to enable editing.
To manage Protected View settings, click the
File tab to open Backstage view and then
click Options. Click Trust Center and then
click Trust Center Settings. Find options for
working with Protected View on both the
Protect View and File Block Settings tabs of
the Trust Center dialog box.
New! Accessibility Checker Click the File tab to open Backstage view. On
the Info tab, click Check for Issues and then
click Check Accessibility.
Page: 47
44
Features and Benefits Where to Find
New! Trusted Documents
To manage trusted documents:
Click the File tab to open Backstage view and
then click Options. In the Word Options
dialog box, click Trust Center and then click
Trust Center Settings. In the Trust Center
dialog box, click Trusted Documents.
To add a trusted document:
When you open a document containing
active content such as macros, on the
Message Bar, click Enable Content.
Improved! Language tools On the Review tab, in the Language group,
click Language and then click Language
Preferences.
Note: Changing these settings from any application
changes them for all applicable Office 2010
applications.
Improved! Translation tools On the Review tab, in the Language group,
click Translate.
New! Share through
Communicator “14”
Click the File tab to open Backstage view.
Find Send by Instant Message and
Share Document Window on the Save
& Send tab.
Note: Share through Communicator ―14‖ requires
Communicator ―14‖ and Communications Server ―14‖.
Beta versions of Communicator ―14‖ and
Communications Server ―14‖ will become available in
the second half of calendar year 2010.
Improved! Content Controls On the Developer tab, in the Controls
group, explore available content controls,
including the new check box control.
Note: If you do not see the Developer tab on the
Ribbon, click the File tab to open Backstage view and
then click Options. Click Customize Ribbon and then,
on the right side of the dialog box, select Developer.
Page: 48
45
Features and Benefits Where to Find
New! Access your
documents on the
Web
Visit http://office.com/web-apps for
information on how to get started with Office
Web Apps.
Improved! Word Mobile 2010 Office Mobile 2010 is not included in Office
2010 applications, suites, or Web Apps. It will
be available at general availability of
Microsoft Office 2010 on Windows phones
(Windows Mobile 6.5 or above).
Page: 49
46
FeatureBenefit Included Improved New
Give your text the power to jump off the page
2003 2007 2010
Text Effects
Apply rich effects—such as bevels, reflections and
gradient fills—directly to document text.
OpenType Typography
Take advantage of the ligatures, stylistic sets, and
other typography features available in many
OpenType fonts.
Create visually compelling documents
2003 2007 2010
Picture Editing Tools
New professional-quality artistic effects as well as
advanced color, correction, cropping, and
background removal tools, enable you to edit
pictures like a pro.
Page: 50
47
2003 2007 2010
Office Themes
Select from a wide range of additional Office
themes to apply fonts, colors, and formatting
effects throughout your document in just a few
clicks.
SmartArt Graphics
Select from several new SmartArt layouts—
including new organization charts and picture
diagrams—to build professional graphics as
easily as typing a bulleted list.
Shape Effects
Get an array of advanced formatting effects—
such as reflections, bevels, and improved
shadows and gradients—as well as shape styles
that coordinate with the same theme effects used
for charts and diagrams.
Selection Pane
Use the new Selection Pane to easily select,
rename, or hide graphics in your documents.
Chapter 1. Basic Word Processing
With Word 2007, Microsoft completely overhauled its
world-famous electronic typewriter. Gone were menus that buried commands two or more
levels deep. In their place were tabs and the ribbon, a dynamic, turbo-charged
toolbar that put the most common tasks out in plain view as easy-to-find buttons.
Word 2010
improves on this model, letting you work with documents even more efficiently and
giving you easy-to-find, detailed information about your document with Backstage
view.
This chapter gets you up to speed—fast—with Word 2010 basics. Learn
where everything is onscreen; find out how to create, save, and open documents; and
check out the different ways to view your creations. Whether you’re looking for a
quick refresher or a step-by-step guide to getting started with Word, you’ll find it
here.
Opening Word
You can open Word in several different ways, depending on how you installed
it, but the most common method is clicking the lower-left Windows Start button.
From the menu that appears, select All Programs→Microsoft
Office→Microsoft Word 2010. Word opens, displaying the screen shown in
Figure 1-1.
If you’ve opened Word recently, it appears as an option on the Start menu; if
that’s the case, save yourself some menu burrowing and just click
Start→Microsoft Word 2010. You can also open Word by opening a
document you’ve been working on. In Windows 7, click Start→Documents, and
then select the one you want from the Documents library. Alternatively, click
Start and then click the right-pointing arrow next to Microsoft Word 2010. This
opens a list of documents you’ve saved recently; make your pick and Word
launches automatically.
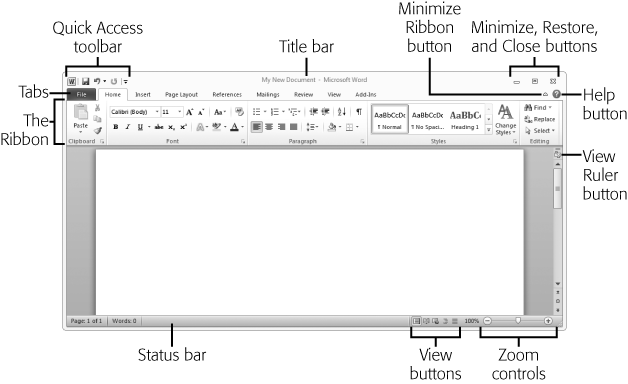
Figure 1-1. The Word 2010 screen features the ribbon, which gathers together related
buttons for common tasks. Click any tab’s name—File, Home, and so
on—to change the ribbon to show buttons related to that tab.
If your computer has Windows Vista, then click Start→Recent
Items to see a list of all the files you’ve worked with recently; choose a Word
document from the list to open Word.
Tip
In Windows 7 and Vista, you can pin (permanently
affix) a program you use regularly to the Start menu, making it easy to
find. Click Start, right-click the program you want to pin (such as Word),
and then select Pin to Start Menu from the shortcut menu that appears.
Pinned programs always appear at the top of the Start menu, above a
horizontal line that separates them from recently used (but unpinned)
programs. In Windows 7, you can also pin a program to the taskbar, giving
you one-click access to the program.
If you’re a Word 2007 veteran, the biggest change you’ll notice in the Word
screen—and you’ll notice it right away—is that the upper-left
Office button has disappeared. Replacing it is the File tab, a blue
tab on the left side of the screen. (It’s always blue, no matter which tab
you’ve selected.) The File tab brings back a souped-up version of the File menu
you may remember from earlier versions of Word. Clicking this tab gives you what
Microsoft calls the Backstage view of your document, shown in
Figure 1-2; what you see on
the main part of the screen depends on which menu item you select. You’ll be
seeing more about Word’s Backstage view as you read on, but it’s more or less
what you’d expect: choices that let you open, print, share, and so on.
The Word 2010 Screen
Here’s a quick guided tour of the Word 2010 screen, starting in the upper
left:
-
The Word button.
Clicking this tiny W-in-a-box opens a menu that lets you resize the
Word window or close the program entirely.
Figure 1-2. Clicking the File tab takes you Backstage to see information
about your document. From the File menu, you can also work with
the document in various ways and set options for Word. -
Quick Access toolbar. No matter which tab you select,
the Quick Access toolbar remains visible at the top of the
screen,
giving you easy access to frequently used buttons. The standard
icons on this toolbar are Save, Undo, and Redo, but you can
customize it with your own personal faves. (Customizing the Quick Access Toolbar tells you
how.) -
Title bar. Across the top of the screen, the
middle section shows you the name of this document—handy when
you’re working on several files at once. If the document is one you
just created, the title bar shows Document1 or Document2 (and so
on), until you’ve saved and named your work. -
Minimize, Restore, and Close
buttons. These upper-right buttons give you a
one-click way to work with the currently open window:-
Minimize. Click this to
make your document disappear from the screen without closing
the file. Word shrinks your document down to nothing but
leaves its button on the taskbar. To summon it again, click
that taskbar button. -
Restore
Down/Maximize. This resizes the window
that displays your document. When the button shows two
overlapping windows, then the Word screen is at full size;
click the button to shrink the window. When the button shows
a single window (as in Figure 1-1),
the window isn’t taking up the full screen; click the button
to maximize the window.Tip
You can resize the Word window by hand so it’s exactly
the size you want. Click the Restore Down button to make
the window smaller. Then position the mouse pointer
along the window’s border so it becomes a two-headed
arrow. Click and, while holding down the mouse button,
drag the window to the size you want. Then let go of the
mouse button. -
Close. Click this button to
close the current window.
Note
If you have just one document open, clicking the upper-right
Close button closes Word as well as the
document. -
-
Minimize Ribbon button. The ribbon (described below)
takes up a fair chunk of screen
space. If you want to see more of your document as you work on it,
click the upper-right Minimize Ribbon button. When you
do, the ribbon disappears, leaving just the tabs across the top of
the screen. To bring the ribbon back, click the button
again—or simply click whichever tab you want to use.Tip
A quick way to minimize the ribbon (and expand it again):
Press Ctrl+F1. -
Help button. Click the Help button when you want
to search or browse through Microsoft’s built-in Word
help center. -
Ribbon. The ribbon shows the most
commonly used buttons associated with a certain task. Each task gets
its own tab name, listed along the top of the ribbon:-
Home. This tab gathers
together buttons you’ll use most often as you write, divided
into these sections: Clipboard (Four Ways to Move Text), Font (Text Formatting: Font, Size, and Style),
Paragraph (Paragraph Formatting: Aligning, Indenting, Spacing),
Styles (Formatting Power with Styles), and
Editing (Finding and Replacing Text). -
Insert. Modern documents
hold more than words and paragraphs. This tab has buttons
for inserting just about anything you might want: Pages
(Inserting Page Breaks), Tables (Creating a Table), Illustrations (Inserting Images), Links (Helping Readers Navigate Your Document),
Header & Footer (Inserting Headers, Footers, and Page Numbers),
Text (for special text effects, Fun with Fonts and Art That’s Smart and Inserting a Text Box), and Symbols (Formatting a bulleted list). -
Page Layout. Here’s where
you format your writing canvas and, if you want, give it a
theme, with buttons in these sections: Themes (Themes: The Way to Better Designs), Page
Setup (Formatting a Document), Page
Background (Using the Page Background Section),
Paragraph (Paragraph Formatting: Aligning, Indenting, Spacing),
and Arrange (Wrapping Text Around an Image). That last item has commands for positioning images and
graphics in your document. -
References. This tab helps
you work with long, formal documents, thanks to these
sections: Table of Contents (Creating a Table of Contents), Footnotes
(Footnotes and Endnotes), Citations
and Bibliography (Citations and Bibliographies), Captions
(Inserting a Screenshot), Index (Creating an Index), and Table of
Authorities, which sounds like where you don’t want to sit
at a school banquet but is actually a list of references
common in legal documents. -
Mailings. One of the great
advantages of word processing is how easy it makes mass
mailings. This tab makes sending out a mailing even easier,
thanks to the buttons in these sections: Create (Printing Envelopes for printing envelopes
and Printing Labels for labels), Start
Mail Merge (Merging Names and Addresses with Documents),
Write & Insert Fields (Do-It-Yourself Mail Merge with the Mailings Tab’s Buttons),
Preview Results (Do-It-Yourself Mail Merge with the Mailings Tab’s Buttons),
and Finish (Do-It-Yourself Mail Merge with the Mailings Tab’s Buttons). -
Review. The buttons on this
tab help you check your document to make sure it’s correct
before sending it out into the world. It also groups
together some super-helpful collaboration tools. Here’s
what’s on it: Proofing (Checking Spelling and Grammar), Language
(Word’s Built-in Research Tools),
Comments (Saving a Document to SharePoint), Tracking (Tracking Changes), Changes
(Accepting or Rejecting Changes),
Compare (Comparing Documents), Protect
(Combining Documents), and OneNote
(Using OneNote with Other Office Programs). -
View. Click the View tab
for different ways of looking at your document as you work
on it. Here you’ll find Document Views (Different Ways to View Your Work); Show to
show or hide the ruler (The Word 2010 Screen), table gridlines, and the Navigation pane (Searching with the Navigation Pane);
Zoom (Page view in the Navigation pane); and
Window (Working with Multiple Windows). -
Add-Ins.
Add-ins are programs that beef up
Word’s ability to work
even harder for you, adding custom commands and specialized
features. For example, your company might add a special
template for certain documents. If your copy of Word has any
add-ins, they appear on this tab.
Click any tab, and the ribbon changes to show the sections and
buttons on that tab.Tip
Some sections of the ribbon have more options than the ribbon
can show. When that’s the case, you see a pop-out icon, which
looks like a square with a diagonal arrow pointing outward, in
the section’s lower-right corner. Click the icon to open a
dialog box that gives you all the options for that
section. -
-
View Ruler button. Word’s ruler measures your document
and shows indenting and tabs. To display it (or hide it again),
click this button on the right side of the document window. -
Scroll bars. Just as you’d expect: These babies
let you navigate up and down through your document. -
Status bar. Across the bottom of
the Word screen
is the status bar, which gives you information about the current
document. Standard info includes what page you’re on and how many
pages and words make up the document; you can also customize the
status bar (Customizing the Status Bar tells you
how). -
View buttons. As Different Ways to View Your Work explains, Word can
display your document in one of five different views: Print Layout,
Full Screen Reading, Web Layout, Outline, and Draft. You can select
any of these views from the View tab, or just click one of these
buttons on the right-hand side of the status bar. -
Zoom level button. This button
shows you whether you’re viewing the text in the document at normal
size (100%), larger, or smaller. Click the button to open the Zoom
dialog box (Using the Zoom dialog box) and adjust
the text viewing size. -
Zoom controls. To increase or
decrease text size even faster than clicking the Zoom button, use
this slider—just drag the pointer to the left or right. Slide
to the left to zoom out (making text smaller); slide to the right to
zoom in (making text bigger). For more about zooming, see Page view in the Navigation pane.
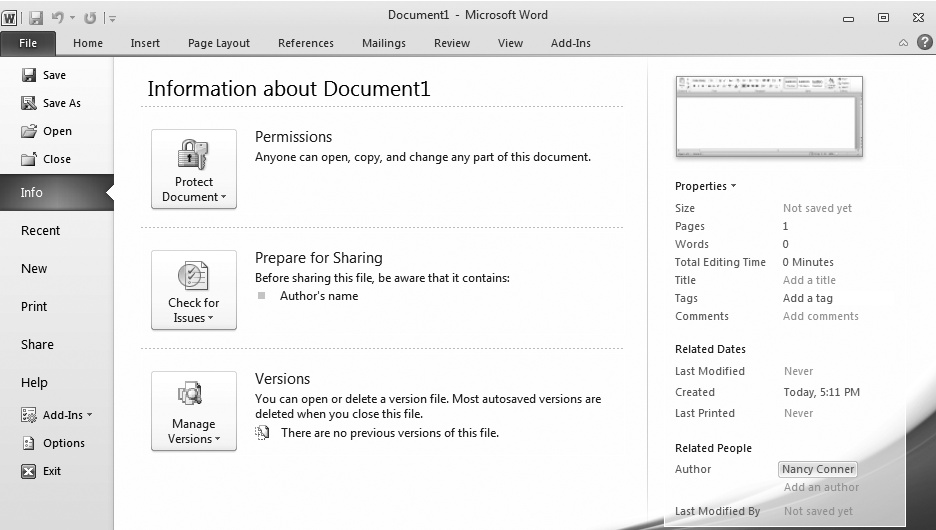
Note
Zoom controls don’t change the font size of the text in your document;
they just let you get a closer look or take a longer view of what’s on
the page.
Using Keyboard Shortcuts
If you’ve used earlier versions of Word, you know how much faster you can
work by keeping your hands on the keyboard. (That way, you can just keep
typing, rather than having to reach for the mouse, move it
around, click a few times, reposition your fingers—and then repeat
the whole ordeal each time you need a command.) So you may have learned
certain keyboard shortcuts, such as Ctrl+C for copy and Ctrl+V for paste.
You’ll be pleased to know that these shortcuts work are alive and kicking in
Word 2010.
Starting with Word 2007—and continuing in Word
2010—Microsoft has revamped the keyboard shortcut system, and it
stars the Alt key. No longer do you have to remember dozens of keystroke
combinations. Just click Alt, and Word shows you which key to press to
perform the task you want, as shown in Figure 1-3. For example, if
you want to choose a task from the File menu, press Alt, then F (you don’t
have to hold the keys down at the same time) to open that menu. Similarly,
to do something on the Review tab, press Alt, then R. Each option on the
menu or ribbon is labeled with its own shortcut key, so you know what to
press next.
To hide the labels, simply press Alt again or click anywhere on the
screen.
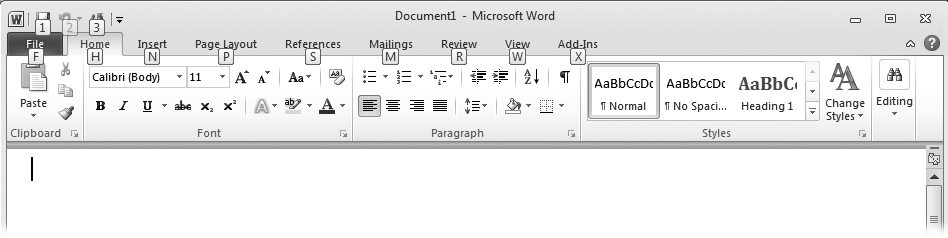
Figure 1-3. When you press the Alt key, little word- and number-labels sprout
onscreen, indicating keyboard shortcuts. Here, for example, press N to
open the Insert tab, P to open Page Layout, and so on.
Creating a New Document
It doesn’t get much easier: Just open Word from the Start menu, and a fresh,
new, blank document, called Document1, appears with a blinking cursor at the
beginning of the first line. All you need to do is start typing.
Note
Opening Word directly from the Start menu creates a new blank document.
But if you’ve already opened Word (or if you opened
Word by opening an existing document), then you need to use one of the
methods below to create a new document.
To create a new document after you’ve opened Word, use any of these
methods:
-
Create a new blank document.
-
Create a new document from a template.
-
Create a new document from an existing document.
The sections that follow show you how.
Creating a New Blank Document
If you’ve already got Word open and want to create a new document, simply
press Ctrl+N (think N for new).
Doing so opens a window with a new blank document. Or follow these
steps:
-
Click File→New (Alt, F,
N).The Available Templates pane opens with “Blank document” already
selected, as shown in Figure 1-4. In the
right pane, Word previews what the blank document you’re creating
will look like. It’s a big, empty rectangle, just like a blank
page. -
In the right pane, under the blank document,
click Create (or, if you’ve got keyboard shortcuts turned on,
press N). Alternatively, you can double-click “Blank
document”.Word creates a new blank document. You’re good to go.
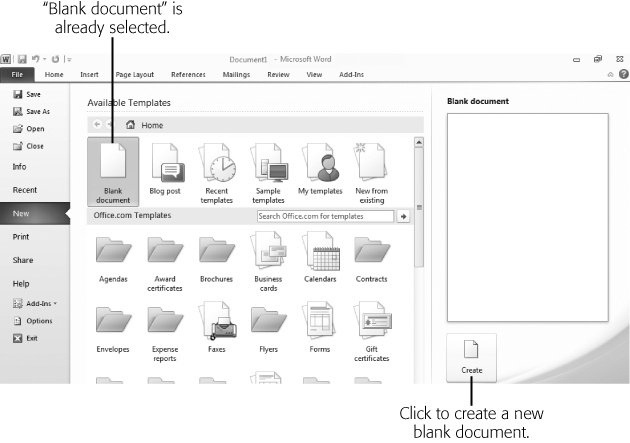
Figure 1-4. When you create a new document, you can start off with a blank
document or choose a template or an existing document as the basis for
your new one.
Creating a New Document from a Template
Imagine you return from lunch to find an email from the boss in your
inbox: “We need 15 award certificates for tonight’s banquet. Attached is the
list of recipients and awards.”
Oh, great. You have an idea of what an award certificate looks like, but
you’ve never made one before—let alone 15. Never fear. Word comes to
the rescue with a huge variety of prebuilt templates. A
template is a reusable model for a document, with
specialized formatting already built in. For an award certificate, for
example, the template already has formatting to make it horizontal
(landscape orientation) and to center and space the text. Use the template
as a starting point, tweak it to meet your needs, add your
information—and you’re done. You’ll have the stack of award
certificates printed out in no time. (Chapter 5
tells you everything you need to know about printing documents.)
Tip
Word 2010 comes with some templates built
right in, but Microsoft keeps a much larger selection of Word templates
online at http://office.microsoft.com. You can find and
download these templates right from Word, so for the widest selection
make sure your computer is connected to the Internet before creating a new document
using a template.
To create a new document from a template, follow these steps:
-
Click File→New (Alt, F,
N).The Available Templates pane (Figure 1-4) opens.
Templates take up most of this pane. -
Click “Sample templates” to see the ones
preloaded in Word. (If you’ve recently created a document using
a template, you can also look in “Recent templates” or “My
templates”.) If you’re connected to the Internet, look in the
Office.com Templates section for a wide variety of all kinds of
templates: Find a category that fits the template you want, and
click that category. (If the category is a folder, it holds more
than one template.)Word shows you the available templates in whatever category you
chose. -
To see what any template looks like, click
it.Word previews the template in the right pane, as shown in Figure 1-5.
-
To use a template as the basis for your new
document, click the Create button (for a preloaded template) or
the Download button (to get the template from
Office.com).Word creates a new document using the template you chose. Now you
can type your own information into the template.
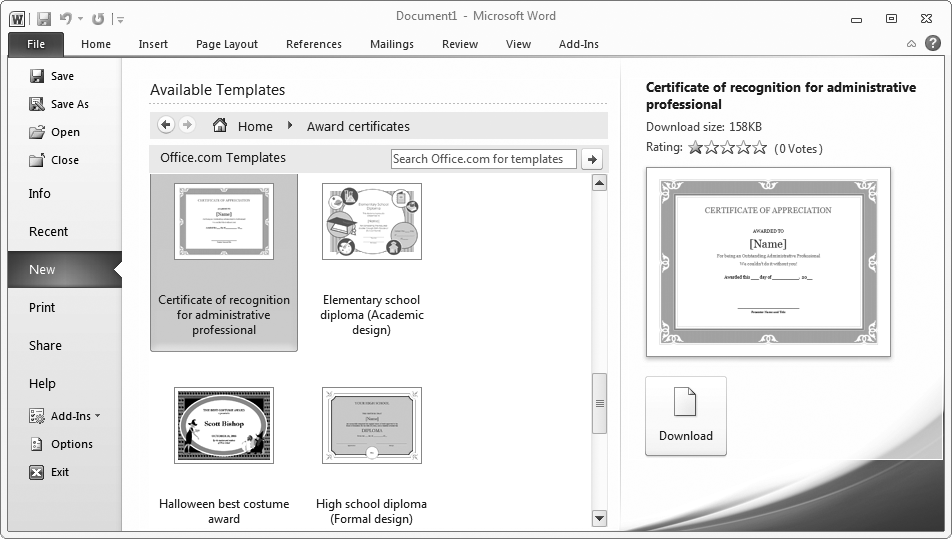
Figure 1-5. Templates give you preformatted documents for a wide variety of
purposes, like the award certificates shown here. Click any template to
see a preview of it in the right pane; if it looks good, click Download
to create a new document based on that template.
Tip
If you’re online, you can also search for a template. On the right
side of the bar that says Office.com Templates, type the word or
phrase you want to search for into the Search box. Press Enter or click
the right-pointing arrow. Word shows you all templates related to your
search term.
Creating a New Document from an Existing Document
If there’s a document format you use frequently—such as a meeting
agenda, a report, a memo, whatever—you can use an existing version of
that document to create a brand new one. For example, say it’s your job to
create the agenda for the weekly departmental meeting. Instead of starting
from scratch each week, just use an agenda you’ve already created as the
basis for a new one. The format and some placeholder text are already there;
just fill in the new information—and save yourself a lot of time.
Here’s how:
-
Click File→New (Alt, F,
N).Word opens the Available Templates pane.
-
Click “New from existing” (keyboard
shortcut: Press X).The New from Existing
Document dialog box opens, showing folders and documents, as you can
see in Figure 1-6. -
Navigate to the document you want.
Double-click a folder to open it and see the documents it
contains. Double-click the document you want to use to create
your new document (or click the document to select it, and then
click the Create New button). Alternatively, if you know the
name of the document you want, type its name into the “File
name” box and click Create New.Word opens the document you
selected—but as a new document. If you selected “Agenda
10-14-10”, for example, Word doesn’t show that filename in the title
bar. Instead, it shows “Document2” (the number will vary, depending
on how many new files you’ve created this session). Word has made a
copy of Agenda 10-14-10, so any changes you now make happen to the
new file, not to the original on which Word based the copy. Type in
whatever new information you want, and then save the document with a
new name (the next section tells you how).
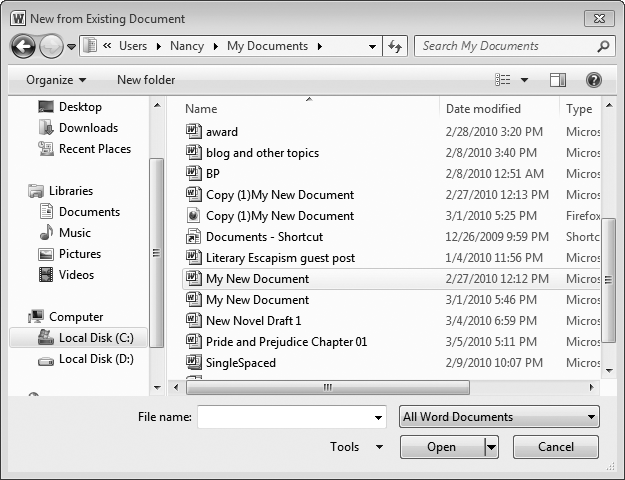
Figure 1-6. To create a new document from an existing one, find the document you
want to use as the basis for your new document (use the left-hand pane
to change folders). Select a file, and then click Open.
Typing in Some Text
This part’s easy. Just place your fingers on the keyboard and type away. The
cursor, a blinking vertical line, shows where the text will appear as you type.
You can move the cursor with the mouse (put the mouse pointer where you want it,
and then click to make the cursor jump there) or by using the arrow keys and
navigation keys (Page Up, Page Down, Home, and End).
As you type, Word automatically
moves to the next line when you reach the end of the current one (this is called
wrapping). To start a new paragraph, press
Enter.
If you make a mistake, use the Backspace and Delete keys to erase characters.
Backspace deletes the character immediately to the left of the cursor, and
Delete deletes the character immediately to the right of the cursor. Or you can
select text (holding down the mouse button, drag the cursor across the text you
want to select) and then press either Backspace or Delete to make that text
disappear. You can also delete text by typing new text over it: Select what you
want to delete, and then type its replacement text.
Saving a Document
After you’ve created a document and typed in some text, you need to save your
work. Whether you’re retaining the document for posterity or because you want to
work on it again later, the advice is the same: Save early, save often. In order
to do so, you need to first give it a name and tell Word where to store it. Word
offers a bunch of different ways to perform this safety dance, and this section
explains ‘em all.
Saving a Document Using Your Mouse
You can use your computer’s mouse or your laptop’s touchpad to save a
document using Word’s menu commands. When
you’re ready, use one of these methods:
-
On the Quick Access toolbar, click
Save. The Save button looks like an old-fashioned
floppy disk (um, maybe it’s time for a new icon designer?). If you
click this button to save a document that you haven’t yet saved,
Word opens the Save As dialog box shown in Figure 1-7. If you’ve
already named the document and saved it once, Word does a quick save
of the document as it exists right now, no dialog box
required. -
Click File→Save. This opens
the Save As dialog box (Figure 1-7), where you
can name and save the file. If you’ve already saved the file at
least once, Word saves the file without opening
the dialog box. -
Click File→Save As. Whether
or not you’ve already saved the document, this opens the Save As
dialog box (Figure 1-7). This option is handy when you want to save a previously saved
file with a new name or in a different file format. For example, if
you opened up your novel-in-progress (a filed called, say,
“Vampires.docx,” and proceeded to add a new lead villain, you could
use Save As to create a new file called “Wolves and Vampires.docx.”
That way you preserve the first vampire-only version and create a
separate dual-beast version.
Saving a Document Using Keyboard Shortcuts
If you want to do a quick save to make sure Word is keeping up with you
as you type, using keyboard shortcuts is
the way to go; just press a couple of keys and get on with your typing. You
can quickly save a document using any one of these keyboard
shortcuts:
-
Press Ctrl+S. If you haven’t yet
saved the document, this opens the Save As dialog box (Figure 1-7). If you’ve
already saved it, this key combination saves the current version of
your document. -
Press Alt, 1. This is the same as
clicking the Save button on the Quick Access toolbar. -
Press Alt, F, S. This is the same
as clicking File→Save. -
Press Alt, F, A. This is the same
as clicking File→Save As.
Using the Save As Dialog Box
However you open the Save As dialog box, here’s how to use it:
-
Open the Save As dialog box using one of the
methods described earlier.The dialog box looks like the one in Figure 1-7.

Figure 1-7. To save a file, choose a location, give the file a name, and
then click Save. If the dialog box looks a little crowded to
you, then click the lower-left Hide Folders button to streamline
it by hiding the left-hand navigation pane. -
In the left pane, double-click the folder
where you want to store the document.The center pane shows all the documents in that folder.
-
In the “File name” text box, type in a name
for your document.Word uses the first few words of your document to guess at a name,
but you can call the document whatever you want. -
From the “Save as type” menu, select the
file type you want for this document. The box on File Types in Word explains about file types.
Click Save.Word saves your document.
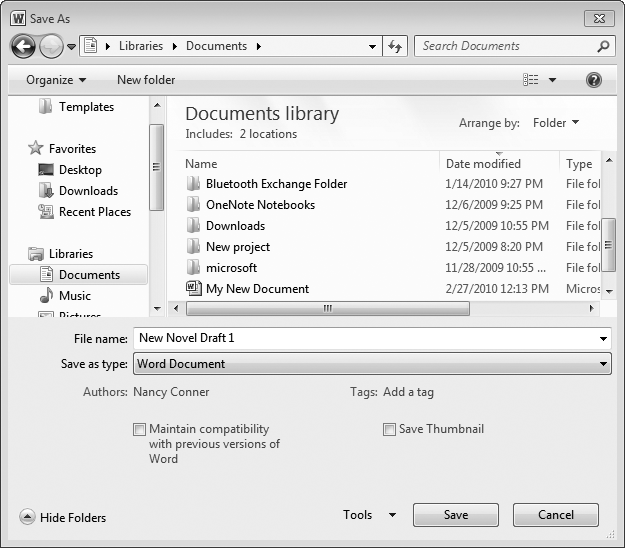
Tip
If you save a lot of documents in a format other than Word’s standard
.docx format, you can choose that format as the default. Click
File→Options (Alt, F, I) and then choose Save. In the “Save
documents” section, use the “Save files in this format” dropdown list to
choose the file type you want as your standard. Click OK. From now on,
Word saves all your documents as this type, unless you tell it otherwise
when you save.
Closing a Document
When you’re done working on a document, Word gives you several different ways
to close it:
-
Click the X in the upper right.
-
Click the upper-left Word button, then select Close.
-
Press Alt, F, C.
-
Press Alt+F4.
If your document has unsaved changes, Word shows a dialog box asking if you
want to save those changes. Make your pick:
-
Save. This tells Word to save the
changes and close the document. -
Don’t Save. When you click this button,
Word discards your changes and closes the document.Note
A new feature in Word 2010 helps you avoid forehead
smacks when you accidentally close a document without saving your
changes. If you choose Don’t Save when closing your document and
Word has autosaved the document at least once, it temporarily hangs
onto the autosaved version as a draft (for a week), just in case you
change your mind and want it later.To see whether there’s a saved version of a document you closed
without saving, click File→Recent (Alt, F,
R). At the bottom of the screen, click Recover Unsaved Documents.
You see the Open dialog box (Figure 1-8) with a
list of all the recent documents you saved without closing. Select
the document you want, and click Open to open it. If you want to
keep the draft this time, save it in the usual way (Saving a Document). -
Cancel. If you change your mind and
don’t want to close the document right now, this button keeps the
document open so you can continue to work on it.
Opening an Existing Document
Say you’re working on a report. You created the document, typed in some text,
saved it, and closed it when you left work for the day. The next morning, you’re
ready to crack it open again. Here’s how to find the document you want and open
it, so you can get back to work:
-
Click File→Open. (Ctrl+O or Alt, F,
O.)The Open dialog box, shown in Figure 1-8,
appears. -
Navigate to the folder and file you want to
open.When you double-click a folder, Word displays its
contents in the center pane. Select a file by clicking its name. -
Click Open.
Word opens the document.

Figure 1-8. To open a document, navigate to the file you want and click the
lower-right Open button.
Tip
For a shortcut to opening a document you’ve worked with recently, click
File→Recent (Alt, F, R) to see a list of recent files. Click any file
(or, if you’re using keyboard shortcuts, type its number) to open the
document.
When you open a document in the way just described, you open it as a normal
document that you can read and edit in Word. But you also have a few
other options. To see them, follow steps 1 and 2 above,
then click the downward-pointing arrow to the right of the Open button. These
are your choices:
-
Open. This opens the document as usual,
so that you can read and edit it. -
Open Read-Only. When you select this
option, you can read the document but not make any changes to it. -
Open as Copy. This copies the file and
opens that duplicate, rather than the original. If the original file had
the title “Smith Report,” the new file gets named “Copy(1)Smith Report.”
(When you save the new file, you can give it whatever name you
like.) -
Open in Browser. If you saved a
document as a web page (Closing a Document), then you can open it in a web
browser (like Internet Explorer or Firefox) instead of in Word. -
Open with Transform. When you open an
XML file (Closing a Document) in Word, this command
determines which data makes it into the Word document. The Transform option works like a
filter: If the Transform can’t work with some of the data in the file
you open, then that data doesn’t make it to the open file. You might use
Transform to create a list of products and prices, for example,
automatically filtering out the data you don’t want instead of doing it
by hand. When you use Open with Transform to open an XML document, click
the Transform button to choose the Transform you want to apply. -
Open in Protected View. When you open a file
from an iffy source, like the Internet or an email attachment from
someone you don’t know, this option opens a read-only copy that can’t
run any malicious code that might harm your computer.Note
When you open a document you downloaded from the Internet or got
as an email attachment, Word automatically opens the file in
Protected view, telling you this via a yellow bar above the
document. If you trust the document’s source, click the yellow bar’s
Enable Editing button to work with it in the normal way. -
Open and Repair. If you can’t open a
file because Word tells you it’s been damaged, try this
option. -
Show Previous Versions. When you
choose this option, Word searches for earlier versions of the file and
displays them in a list. Select a version from the list, and click Open
to open the older version. See Comparing Documents for
more about comparing different versions of a document.
Different Ways to View Your Work
Word gives you numerous options for viewing your document, so you can
choose the view that lets you work best on the task at hand. If you’re writing
the first draft of a report, for example, you want to focus on what you’re
writing, and you might choose Draft view. Later, when you’re ready to print the
report, you might switch to Print Layout view to make sure the margins, headers,
and page numbers look the way you want them to on the page. Or if the report is
long, with lots of headings and subheadings, and you want to check how it’s
shaping up, Outline view gives you a high-level look at its organization. These
are just some of the ways you can view a document in Word—read
on to learn about them all.
To look at a document in one of Word’s
views, click the View tab, shown in Figure 1-9, and then choose the
view you want. Or click a view in the lower-right part of the screen—they
open the same views. Going from left to right, these are Word’s view
options:
-
Print Layout (Alt, W, P). This layout
is the standard view for a Word document, the one you see when you start
the program and the one most folks use. It shows the document laid out
like a physical page, including the edges of the page, margins, headers
and footers, page numbers, and so on. This
what-you-see-is-what-you-print view lets you make sure the document
looks the way you want it before you send it to the printer (Getting Started with Printing). -
Full Screen Reading (Alt, W, F). In
Full Screen Reading View, the ribbon, its tabs, the status bar, and the
scroll bars all disappear so you can concentrate on the text. The view
also zooms out so you see a full page on the screen. To navigate through
the pages, click the arrows at the top of the screen or in the
lower-left and -right corners of the pages. To switch from this view
back to Print Layout view, click the upper-right Close button. (Clicking
Close doesn’t close the document, only this view.)Tip
Full Screen Reading view lets you choose what you see on the page.
When you’re in this view, click the upper-right View Options button
to select Show One Page, Show Two Pages, or Show Printed
Page. -
Web Layout (Alt, W, L). To see how your
document would look as a web page, choose this view. It removes page
breaks and shows text and images as they’d appear if you posted this
document on the Web—as one long scrolling page. -
Outline (Alt, W, U). This view gives
you an overview of your document, collapsing it into outline format.
Outline view emphasizes headings and subheadings and treats paragraphs
like subsections—so you need to use it in a document that has
headings, or this view won’t make much sense. This view can be useful
when you’re working on a long document; switch to Outline view to see
the document’s sections and check its organization, then go back to
Print Layout or Draft view to work on the text. -
Draft (Alt, W, E). If you want to focus
on what you’re writing—not how it will look on the
page—try Draft view. This view fits more text on the screen
because it doesn’t show margins, headers, footers, or page numbers, and
it marks page breaks with a dotted line. Draft view does show other
formatting, however, like font and line spacing, so you can see what
you’re doing if you apply, for example, italics or underlining.
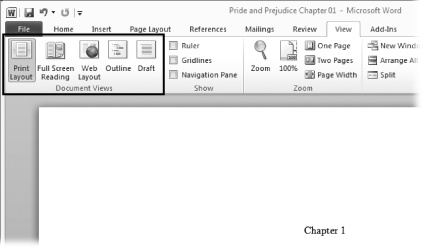
Figure 1-9. Your options for viewing a document appear on the left side of the View
tab. The tiny illustration on each button gives you an idea of what the view
looks like.
Viewing a Document in the Navigation Pane
New to Word 2010 is the Navigation pane, which
provides a high-level map of your document. To turn on the Navigation pane,
click View (Alt, W). In the ribbon’s Show section, turn on the Navigation
Pane checkbox. This opens the Navigation pane on the left side of your
screen, as shown in Figure 1-10.
Outline view in the Navigation pane
If your document has headings to introduce sections and subsections,
click the Navigation pane’s Outline tab to see just those headings in
the pane, as shown in Figure 1-10. Each heading
is a button you can click to jump to that section in your document. It’s
a fast way to find your way through a long document.
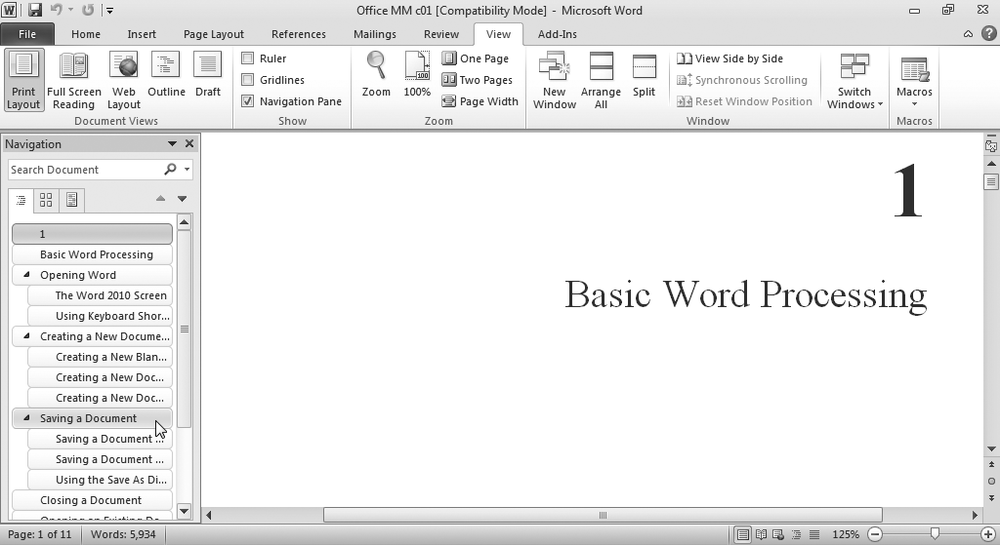
Figure 1-10. The Navigation pane helps you find what you’re looking for with a
high-level view of your document. In Outline view (shown here),
click any heading to jump to that section in the document. To close
the Navigation pane, click its upper-right X or turn off the View
tab’s Navigation Pane checkbox.
Page view in the Navigation pane
To find and jump to a particular page, click the Navigation pane’s
middle tab. The pane switches to a view that lets you browse your
document page by page, as shown in Figure 1-11. Pages in the
pane appear in Print Layout view and are numbered; click any page to
move to that page in the document.
Tip
The Navigation pane is also home to Word 2010’s
supercharged new search function. Read more about how to find a
word or phrase in your
document on Finding and Replacing Text.
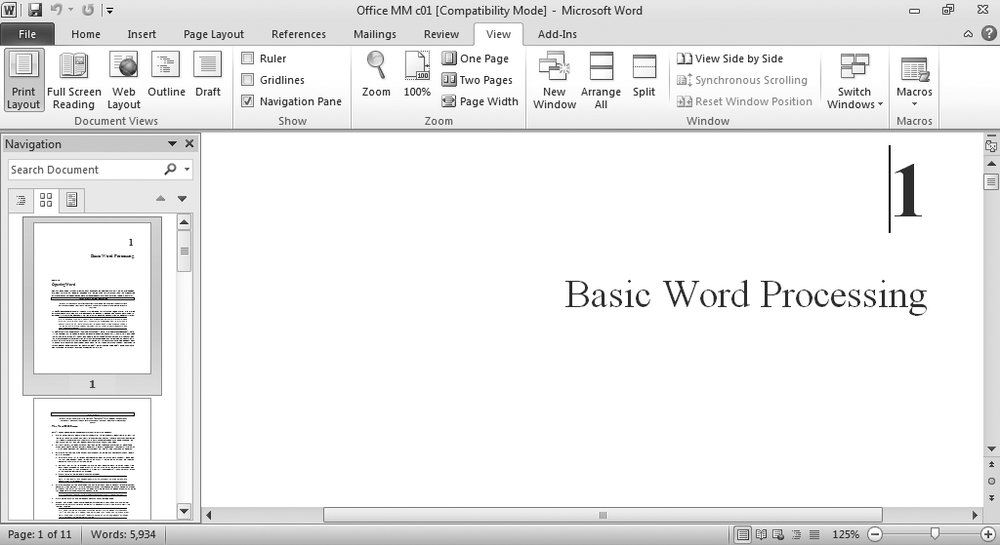
Figure 1-11. Use the Navigation pane to browse through the pages of your
document; click any page to jump there.
Zooming In and Out
You don’t have to get a headache squinting at the screen, trying to make
out words written in a teensy-tiny font. And neither do you have to spend
time scrolling back and forth to read lines written in a large font.
Instead, just zoom in or out to make the text the perfect size for your
peepers. Zooming doesn’t change the font size; it just gives you a close-up
or bird’s-eye view of the words on your pages. This section will have you
zooming in and out in no time.
Using the Zoom slider
The Zoom slider appears in the lower-right corner of the Word screen.
A pointer indicates the current magnification. When the pointer is in
the middle of the slider, the document is at 100 percent. But you can
make the text appear larger or smaller:
-
To magnify the text, click the pointer and,
holding the down the mouse button, drag the pointer to the
right. As you drag, the text gets bigger. When it reaches the
size you want (the maximum on the slider is 500 percent), let go
of the mouse button. The text remains the size you’ve
selected. -
To reduce the text, click the
pointer and hold down the mouse button as you drag the pointer
to the left. The farther left you go, the smaller the text gets,
all the way down to 10 percent. When it’s the size you want, let
go of the mouse button.
Tip
Instead of clicking and dragging, you can zoom in or out in 10
percent increments by clicking the plus sign (to magnify) or the
minus sign (to reduce) on either end of the slider.
Using the Zoom dialog box
The Zoom slider is great for quick adjustments in and out. If you
prefer, you can also zoom using the Zoom dialog box, shown in Figure 1-12, which gives
you more options and more precision. To open it, click View→Zoom
(Alt, W, Q). Or you can click the current zoom percentage in the
lower-right part of the screen (it’s just to the left of the Zoom
slider).
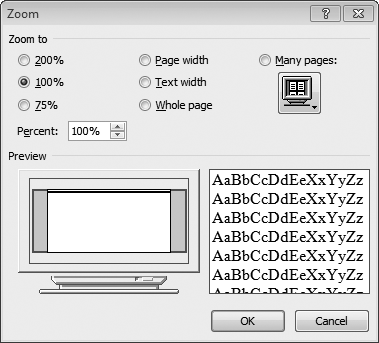
Figure 1-12. Use the Zoom dialog box to zoom in and out with precision, or to
show multiple pages on the screen.
In the Zoom dialog box, you’ve got a couple of different ways to
change your view:
-
By percentage. Word offers three popular zoom
settings: 200 percent, 100 percent, and 75 percent. Turn on the
radio button for the size you want. Or set the size in the
Percent box: Click the up and down arrows to change
magnification, or double-click the number in the box and type in
the percentage you want. Click OK to zoom. -
By width/size. If thinking in terms of
percentages makes your head hurt, you can zoom using one of
these plain-English options instead:-
Page width. Choose this
to make the page as wide as possible on your screen (you
can still see the page’s margins). -
Text width. This option
makes the text even bigger than page width by showing
lines of text but not margins or the edges of the
page. -
Whole page. Choose this
if you want to shrink down the text to display a single
page, from top to bottom and left to right, on the
screen. You may not be able to read the text at this
size, but (believe it or not) you can still edit
it. -
Many pages. With this
option, you can display multiple pages on the screen at
one time. Click the button underneath “Many pages” (it
shows a computer monitor displaying multiple pages) to
select how many pages you want to see. When you click
that button, a menu opens showing two rows of four pages
across, as shown in Figure 1-13. Move the mouse pointer to select the number of pages
you want, and then click it.
-
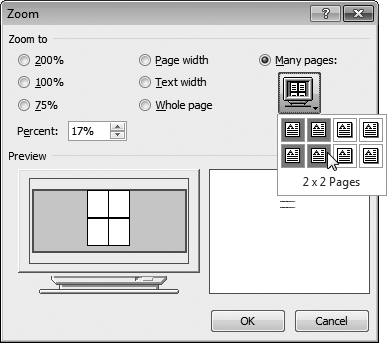
Figure 1-13. To see multiple pages at once on your screen, use the mouse to
choose the number of pages and the layout you want to see.
As you make choices in the Zoom dialog box, the Preview section gives
you an idea of the size of the text and how the page will appear on your
monitor. When everything looks good, click OK to apply your
selection.
Working with Multiple Windows
Using multiple windows can speed up your
work exponentially. Instead of having to switch back and forth between two
different windows showing two different
Word documents, you can show them both on the same
screen. That way, you can compare different drafts of the same document or
easily copy text from one document into another. You work with multiple
windows from the View tab’s Window section, shown in Figure 1-14. Click View (Alt,
W) and then choose one of these options:
-
New Window (Alt, W, N). This opens another copy of
the current document in a new window, which can come in handy when
you’re working on a long document and you need to see two different
sections of it at the same time. For example, if Section 3 develops
a topic you touched on briefly in Section 1, you might want to see
both sections at the same time to make sure they’re in sync. When
you open the same document in a new window, you can move through
each one independently and any change you make to the document in
one window also happens in the other. Nice.
Figure 1-14. The buttons in the View tab’s Window section let you work
with more than one document, or with different sections of the
same document, at once. -
Arrange All (Alt, W, A). When you’re working with two
windows, it takes a lot of mouse-clicking to jump back and forth
between them. It’d be a lot easier to see both windows on the same
screen, and that’s what the Arrange All button is for. When you
click it, Word resizes the windows for all open documents and shows
them on the same screen, as shown in Figure 1-15. Each
resized document window gets the same amount of screen space. To
devote the full screen to any one window again, click its
upper-right Maximize button. -
Split (Alt, W, S). Use the Split button to
divide a document’s window horizontally, giving it an upper and a
lower scroll bar. After you’ve split the screen, use the scroll bars
to move through each part of the document independently—for
example, hold your place in the document’s Introduction while you
check that Chapter 2 covers the all
topics it’s supposed to. When you click Split (or press Alt, W, S),
Word draws a horizontal line across
the screen. Use the mouse to position the line where you want the
screen to split, and then click there. Word splits the screen and
creates a second scroll bar. To go back to a single screen, click
View→Remove Split (Alt, W, S).
Figure 1-15. Arrange All shows you two or more documents at once. If the
screen looks a little crowded, click the upper-right Minimize
Ribbon button (circled) in either or both documents so you can
read more text. -
View Side by Side (Alt, W,
B). When you choose this option,
Word resizes your documents’ windows and displays them side by side,
as shown in Figure 1-16. When you view your documents this way, Word automatically turns
on synchronous
scrolling (View→Window→Synchronous Scrolling or Alt,
W, ZW, VS), so that when you scroll through one window, the other
window scrolls right along with it. (If you
don’t want synchronous scrolling, you can toggle it off by clicking
View→Window→Synchronous Scrolling or pressing Alt, W,
ZW, VS.) While the windows are side by side, you can resize them if
you want, perhaps making one larger to see a little more of its
text. To restore the side-by-side windows to their original sizes,
click View→Window→Reset Window Position (Alt, W, ZW,
T).

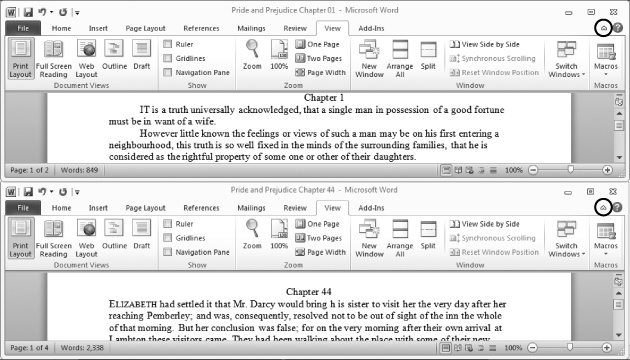
Tip
When you use New Window to open the same document in two different
windows, use Arrange All or View Side by Side to see both windows on the
same screen.
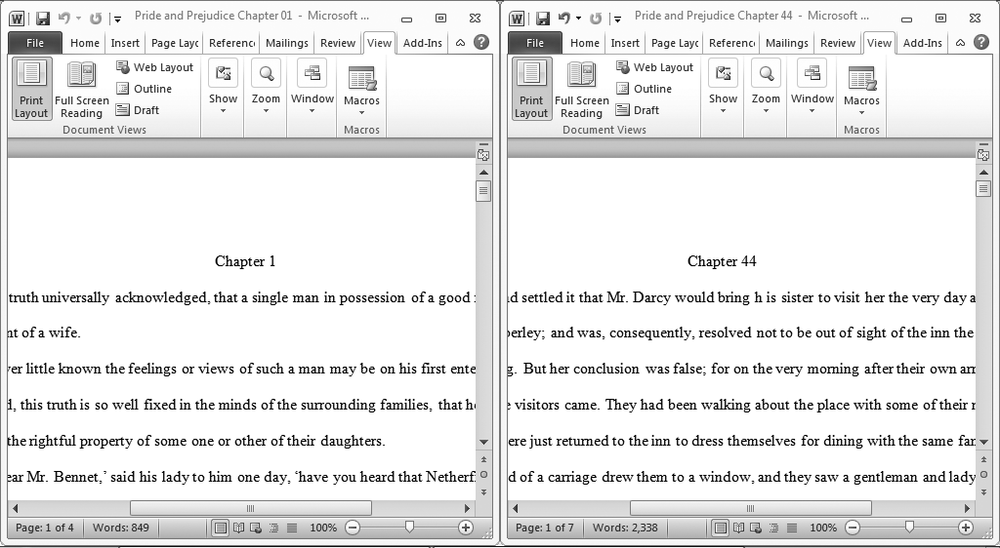
Figure 1-16. When you view two documents side by side, Word squeezes the ribbon so
you can still see all its sections. Click the arrow in any section to
see its buttons.
Note
When Word arranges two document windows side by side, it has to
squeeze the ribbon so everything fits. In Side by Side view, you won’t
see all the buttons for each section of the ribbon. To see the buttons
for a particular section, click the down arrow beneath the section’s
name, and Word opens the toolbar for that section. And if you’re using
keyboard shortcuts, there’ll be an extra command in the sequence to open
the section before you can choose a button.
Get Office 2010: The Missing Manual now with the O’Reilly learning platform.
O’Reilly members experience books, live events, courses curated by job role, and more from O’Reilly and nearly 200 top publishers.