
Open the template or a document based on the template whose default settings you want to change. On the Format menu, click Font, and then click the Font tab. Make any changes that you want, and then click Default. Note: Most of the styles in Word are based on the Normal style.
Contents
- 1 How do I get Microsoft Word back to default settings?
- 2 What is the default Microsoft Word format?
- 3 Why is it important to understand the default settings in Microsoft Word?
- 4 How do I change the default text in Word?
- 5 What are the default setting of left and right margins?
- 6 What does a default setting do?
- 7 What is the default font in MS Word 2010?
- 8 What is the default font in MS Word 2007?
- 9 How do I change the default font in Windows 10?
- 10 What are the default margins in Word?
- 11 What are normal margin settings in Word?
- 12 Why are my Microsoft Word margins messed up?
- 13 What does the word default mean on a computer?
- 14 What is default give example?
- 15 What is the meaning of default mode?
- 16 How do I change the default settings in Word 2010?
- 17 What is the default font in Word 2016?
- 18 How do I set the default font in Word 2010?
- 19 How do I change the default settings in Word 2007?
- 20 How do I set the default font in Microsoft Word 2007?
How do I get Microsoft Word back to default settings?
Unfortunately, there is no button in Word to reset the program to its default settings. However, you can rename Word’s global template to see if that fixes its problems. If Word continues to have issues or it runs very slow, another option is to delete Word’s registry key.
The Normal. dotm template opens whenever you start Microsoft Word, and it includes default styles and customizations that determine the basic look of a document.dotm will be applied to documents that you create in the future. When you have finished, click the File tab, and then click Save.
Why is it important to understand the default settings in Microsoft Word?
By educating and guiding users, default values help reduce errors. It’s therefore important to select helpful defaults, rather than those based on the first letter of the alphabet or whatever the first option on your original list happened to be. Defaults can also affect your company’s bottom line.
How do I change the default text in Word?
Go to Format > Font > Font. + D to open the Font dialog box. Select the font and size you want to use. Select Default, and then select Yes.
What are the default setting of left and right margins?
Margins are the space between the edge of the paper and the text.By default, Word sets all margins left, right, top, and bottom to 1 inch.
What does a default setting do?
A default, in computer science, refers to the preexisting value of a user-configurable setting that is assigned to a software application, computer program or device.Such an assignment makes the choice of that setting or value more likely, this is called the default effect.
What is the default font in MS Word 2010?
Calibri 11
The default font style and size in Microsoft Word 2010 is Calibri 11. Below are the steps to change Word’s default font settings. 1. Click the Dialog box launcher located in the lower right hand corner of the Font Group.
What is the default font in MS Word 2007?
Calibri font
By default, Microsoft Office Word 2007 uses the Calibri font in font size 11 when you type text in a document, but you can change the default font and font size for all new documents that you create.
How do I change the default font in Windows 10?
Open the “Start” menu, search for “Settings,” then click the first result. You can also press Windows+i to quickly open the Settings window. In Settings, click “Personalization,” then select “Fonts” in the left sidebar. On the right pane, find the font that you want to set as the default and click the font name.
What are the default margins in Word?
Word’s default margins are 1 inch on each side of the page, but you can change the margins to accommodate the needs of your document.
Word includes several built-in margin settings that you can choose from.
- Click the Layout tab.
- Click Margins button.
- Select a new margin setting.
What are normal margin settings in Word?
Both the MLA and APA style guides require 1-inch margins on the top, bottom and both sides of the page. In most cases, when you open Microsoft Word, the margins will already be set to 1-inch. To be sure you have the margins set to 1-inch: Click on the Page Layout tab.
Why are my Microsoft Word margins messed up?
If your document is in Print Layout view and the top and bottom margins appear to be cut off, the option for hiding margins has been switched on. Here’s how to switch it off: Point to the top or bottom of a page until the pointer becomes a double-pointed arrow, and then double-click.
What does the word default mean on a computer?
In computer technology, a default (noun, pronounced dee-FAWLT ) is a predesigned value or setting that is used by a computer program when a value or setting is not specified by the program user.The program is said to default when it uses a default value or setting.
What is default give example?
Default is defined as the action of failing to fulfill an obligation. An example of default is the action you take when you fail to pay your credit card.
What is the meaning of default mode?
the default mode network (sometimes called the default network) refers to a group of interconnected brain structures that are hypothesized to be part of a functional system activated when one is awake but not involved in any specific mental exercise.
How do I change the default settings in Word 2010?
How to change Default setting in word 2010
- Press Ctrl+D to open the Font dialog.
- Select your desired font.
- Click Set as Default.
- In the ensuing dialog, choose the radio button for “All documents based on the Normal. dotm template” and click OK.
What is the default font in Word 2016?
Calibri
By default, the font of each new document is set to Calibri. However, Word provides many other fonts you can use to customize text. Select the text you want to modify. On the Home tab, click the drop-down arrow next to the Font box.
How do I set the default font in Word 2010?
Changing the default typeface in Word 2010 and later versions is easy:
- Open any Word document.
- Right-click somewhere in the document and choose “Font”.
- In the Font dialog box, select your preferred typeface and any other settings you want to change (e.g., font size).
- Click the “Set As Default” button.
How do I change the default settings in Word 2007?
- Right-click the desktop’s lower left corner, and then click “Control Panel” to launch the Control Panel.
- Click “Programs” then click “Default Programs” to open the Default Programs window.
- Click “Set Your Default Programs.”
How do I set the default font in Microsoft Word 2007?
Word 2007
- Open a new document, click on the Home tab, click on the Font Dialog Box Launcher (as shown in the screenshot below) and select the Font tab.
- Select a new font and size in the Font dialog box, and then click Default.
- Click Yes to make the changes permanent.
Если при использовании текстового редактора Microsoft Word в работе приложения возникают ошибки, у пользователя возникает вопрос о том, как сбросить Ворд к настройкам по умолчанию. Этот метод позволит решить многие возникшие проблемы.
Настройка Word по умолчанию помогает избавиться от проблем, вызванных изменением конфигурации программы. Многие пользователи самостоятельно меняют настройки Ворд по умолчанию. Бывает и другой вариант, когда сторонние программы применяют модификации, например, добавляя плагины, макросы или другие надстройки в Word.
Содержание:
- Как сбросить настройки Word по умолчанию — 1 способ
- Как вернуть Ворд к стандартным настройкам — 2 способ
- Как сбросить Ворд по умолчанию с помощью редактора реестра — 3 способ
- Выводы статьи
- Как сбросить Word по умолчанию (видео)
В результате из-за измененных параметров, Word стал работать совсем не так как хотелось бы пользователю. Во многих случаях отменить проблемные параметры не представляется возможным из-за того, что пользователь не помнит или не знает, что именно и когда было изменено.
Чтобы исправить проблемы, необходимо вернуть в Ворд стандартные настройки. В связи с этим возникает вопрос: как сбросить Word?
Вы можете в Word сбросить настройки по умолчанию несколькими способами, о которых вы узнаете ниже. Перед проведением изменений на компьютере, касающихся редактора Word, ознакомьтесь со следующими обстоятельствами:
- Некоторые настройки могут быть сброшены только после полной переустановки программы Word.
- Не используйте MS Word во время проведения сброса приложения. Имейте в виду, что во время работы текстового редактора применяемые изменения могут быть перезаписаны, поэтому не получится вернуться к стандартным параметрам.
В этом руководстве вы найдете инструкции о том, как сбросить настройки в Ворде по умолчанию несколькими способами. Материалы из этой статьи подходят для версий Word 2021, Word 2019, Word 2016, Word 2013, Word 2010, Word 2007, Word 2003.
Как сбросить настройки Word по умолчанию — 1 способ
Сначала мы рассмотрим наиболее часто применяемый способ, как сбросить настройки Ворда по умолчанию. Метод заключается в перезаписи обычного шаблона с параметрами по умолчанию.
Часто ошибки случаются из-за шаблона «Обычный» (Normal.dotm или Normal.dot). Этот шаблон имеет расширения «*.dot» и «*.dotm». В обычном шаблоне содержатся стили и другие параметры, влияющие внешний вид нового документа.
В процессе работы с Word пользователи вносят свои изменения, которые затем применяются ко всем новым документам. Бывает, что в программе используются совсем не те параметры, которые нужны пользователю. Чтобы исправить ситуацию, необходимо выполнить в Word сброс настроек по умолчанию.
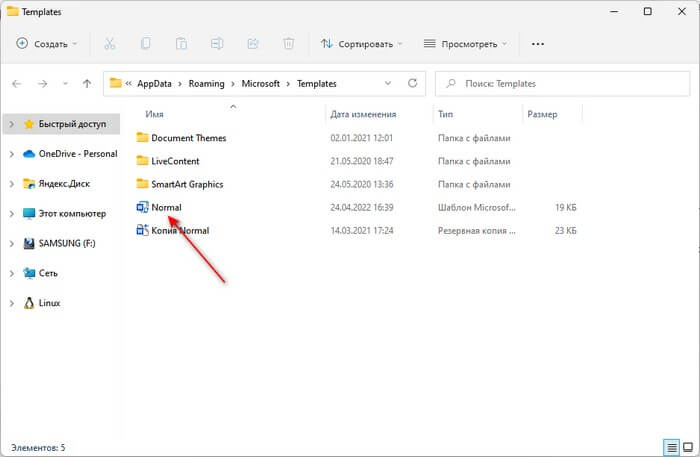
Нам нужно изменить имя текущего файла шаблона (или удалить этот файл), чтобы он не применялся в Word. При новом запуске программа Microsoft Word автоматически создаст новый файл обычного шаблона с параметрами по умолчанию.
Шаблон «Обычный» (Normal.dotm) находится по пути:
C:UsersИмя_пользователяAppDataRoamingMicrosoftTemplates
Проделайте следующие действия:
- Нажмите на клавиши «Win» + «R».
- В диалоговом окне «Выполнить» введите команду — «%appdata%/Microsoft/Templates».

- Нажмите на клавишу «Enter».
- В открывшемся окне Проводника в паке «Templates» найдите файл «Normal.dotm».
- Удалите файл «Normal» (по умолчанию он отображается без расширения имени файла), или переименуйте этот файл, например, в «Old.Normal».
- Откройте программу Word, в которой сразу после запуска создется новый файл «Normal.dotm» с установками по умолчанию.
- Посмотрите была ли решена проблема или нет.
Этот метод позволяет удалить все изменения, которые вносились пользователем в настройки Word. Не всегда данный способ решает все возникающие проблемы. Поэтому далее мы рассмотрим еще два варианта, как сбросить Ворд до заводских настроек.
Как вернуть Ворд к стандартным настройкам — 2 способ
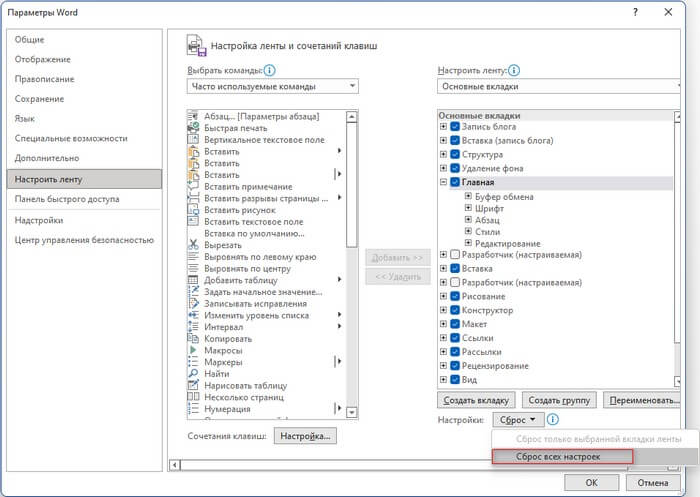
В некоторых случаях пользователю нужно сбросить настройки ленты, сочетаний клавиш и панели быстрого доступа. Для этого вы можете воспользоваться стандартными настройками в параметрах Word.
Выполните следующее:
- В окне открытого документа Word нажмите на «Файл».
- Войдите в «Параметры».
- В окне «Параметры Word» откройте вкладку «Настроить ленту» или «Панель быстрого доступа».
- В опции «Настройки:» нажмите на кнопку «Сброс».
- В выпадающем меню выберите пункт «Сброс всех настроек».
- В открывшемся окне нажмите на кнопку «Да», чтобы удалить все настойки ленты и панели быстрого доступа.
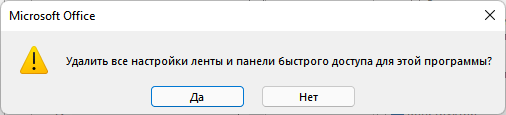
- Нажмите на кнопку «ОК», чтобы выйти из настроек программы.
- Перезапустите приложение Microsoft Word.
С помощью встроенного системного инструмента — редактора реестра Windows вы можете в Word сбросить настройки по умолчанию.
Нам нужно будет удалить несколько разделов реестра, относящихся к программе Word. После удаление записей в реестре, при новом запуске Word ранее удаленные разделы реестра будут заново созданы с параметрами по умолчанию. Таким образом мы сможем сбросить Word по умолчанию.
Перед выполнением работ в системном реестре Windows рекомендуется создать резервную копию реестра. Если что-то пошло не так, с помощью резервной копии вы сможете восстановить измененные значения реестра.
Пройдите последовательные шаги:
- Закройте окно программы Word.
- В поле поиска Windows введите «regedit», а затем запустите это приложение на компьютере.
- В окне «Редактор реестра» пройдите по пути в соответствующих версиях программы.
В Word 2021, Word 2019, Word 2016, Microsoft 365:
HKEY_CURRENT_USERSoftwareMicrosoftOffice16.0Word
В Word 2013:
HKEY_CURRENT_USERSoftwareMicrosoftOffice15.0Word
В Word 2010:
HKEY_CURRENT_USERSoftwareMicrosoftOffice14.0Word
В Word 2007:
HKEY_CURRENT_USERSoftwareMicrosoftOffice12.0Word
В W0rd 2003:
HKEY_CURRENT_USERSoftwareMicrosoftOffice11.0Word
- Выделите раздел «Data».
- Щелкните правой кнопкой мыши по разделу «Data», а в контекстном меню нажмите «Удалить».
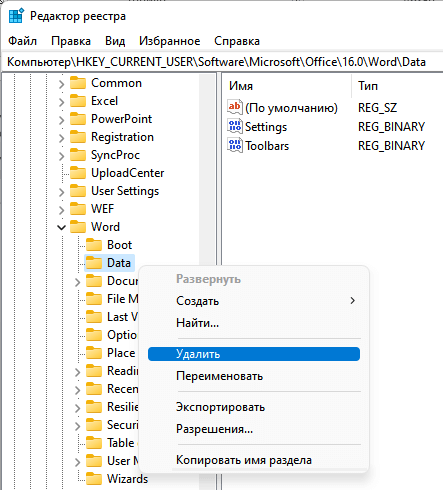
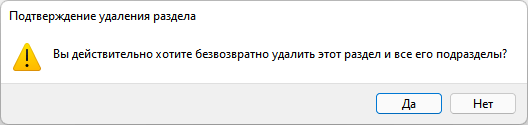
- В окне «Предупреждение удаления раздела» нажмите на кнопку «Да».
- Выделите раздел «Options».
- Щелкните по нему правой кнопкой мыши, выберите «Удалить».
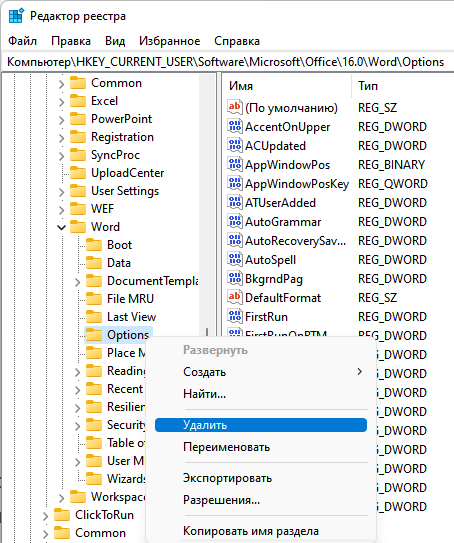
- Подтвердите удаление раздела.
- Перезагрузите компьютер.
- Запустите редактор, чтобы выполнить в Word сброс настроек по умолчанию, когда программа заново создаст удаленные разделы со стандартными настройками.
В некоторых случаях потребуется переустановка Microsoft Office на компьютере. Сначала вам нужно будет удалить полностью офисный пакет приложений, потом перезагрузить ПК, а затем вам необходимо снова установить MS Office на компьютер.
Выводы статьи
В работе редактора Microsoft Word могут возникнуть проблемы из-за неправильных настроек или по другим причинам. Чтобы устранить проблему, пользователю необходимо знать, как вернуть настройки Ворд по умолчанию.
С помощью нескольких способов пользователь может восстановить настройки Ворда по умолчанию: методом удаления, а затем автоматического создания файла «Normal.dotm», сбросом настроек ленты и панели быстрого доступа, удалением и воссозданием разделов реестра в Windows, относящихся к этому редактору.
Как сбросить Word по умолчанию (видео)
Похожие публикации:
- Как сделать междустрочный интервал в Word — 4 способа
- Как сделать сноски в Word
- Как сделать вертикальный текст в Word — 5 способов
- Как убрать красные подчеркивания в Word — 3 способа
- Режим чтения Word: как включить или как убрать
 Please Note:
This article is written for users of the following Microsoft Word versions: 2007, 2010, 2013, 2016, 2019, and Word in Microsoft 365. If you are using an earlier version (Word 2003 or earlier), this tip may not work for you. For a version of this tip written specifically for earlier versions of Word, click here: Factory Default Settings for Word.
![]()
Written by Allen Wyatt (last updated March 28, 2020)
This tip applies to Word 2007, 2010, 2013, 2016, 2019, and Word in Microsoft 365
There may be times when you want to set Word back to a pristine, first-installed condition. For instance, you may be offering Word training, and you want to reset Word between each class offered. Many people think that the easiest way to do this is to simply allow Word to recreate the Normal.dot template. While this will restore some settings to their first-used state (such as macros, toolbars, and the like), it will not do the entire trick.
Other suggestions may include uninstalling and reinstalling Word. This, however, will not lead to a pristine version of Word. Many of the configuration settings unique to Word are stored in the Registry. The uninstall process does not remove all option settings stored in the Registry and many of these will be picked up after the re-install so that Word can use them. This is ideal for those who are upgrading—they get to keep their settings rather than find the upgrade overwriting them. However, it’s not so useful for those who are looking to get a completely ‘clean’ install with no throwbacks to previous installs. Thus, after an uninstall, it is likely to be necessary to edit the Registry to remove the settings.
You should remember that you cannot do «resetting» of Word while the program is running. This is because Word saves configuration information as it exits. If you make changes and then exit, you overwrite any resetting you did.
You should make sure you rename the Normal.dotx file to a different name. In fact, it is a good idea to look for any file that begins with the word «Normal» and then look at the filename extensions for those files to determine if you should rename them. You should also remove any files from the Startup folder.
This is not the end of the process; you also need to make a few changes to the Registry. You may want to protect yourself from potential problems by backing up the Registry first, and then you can accomplish the following steps:
- Choose the Run option from the Start menu. This displays the Run dialog box.
- In the Open box enter the name regedit.
- Click on OK. This starts the Regedit program.
- If you are using Word 2007, select the HKEY_CURRENT_USER/Software/Microsoft/Office/12.0/Word key.
- If you are using Word 2010, select the HKEY_CURRENT_USER/Software/Microsoft/Office/14.0/Word key.
- If you are using Word 2013, select the HKEY_CURRENT_USER/Software/Microsoft/Office/15.0/Word key.
- If you are using Word 2016 or a later version, select the HKEY_CURRENT_USER/Software/Microsoft/Office/16.0/Word key.
- Press the Delete key. You are asked if you want to really delete the key.
- Click on Yes. The selected key is deleted.
- Close the Registry Editor.
- Restart Word. Word has been reset to default settings.
Understand that when you make all these changes, there are still a couple of settings that can then only be changed by a complete reinstall. For instance, the company name you entered when you first installed Word is actually stored in the Word program file. There are also other files that can be changed during the course of using Word, but you cannot «reset» by simply deleting them. An example would be any file on your system ending with the .ACL file name extension. These are used for shared and user-specific AutoCorrect settings. If you simply delete the files, you are removing all AutoCorrect settings, not setting them back to factory defaults.
For additional information about resetting options and Registry settings, you may find the following useful:
https://docs.microsoft.com/en-us/office/troubleshoot/word/reset-options-and-settings-in-word
WordTips is your source for cost-effective Microsoft Word training.
(Microsoft Word is the most popular word processing software in the world.)
This tip (12864) applies to Microsoft Word 2007, 2010, 2013, 2016, 2019, and Word in Microsoft 365. You can find a version of this tip for the older menu interface of Word here: Factory Default Settings for Word.
Author Bio
With more than 50 non-fiction books and numerous magazine articles to his credit, Allen Wyatt is an internationally recognized author. He is president of Sharon Parq Associates, a computer and publishing services company. Learn more about Allen…
MORE FROM ALLEN
Hiding Excel in VBA
Want to have you macro completely hide the Excel interface? You can do so by using the Visible property for the Excel …
Discover More
Using Custom Add-Ins
Once you’ve created your custom add-in, you need to know how you or other people can use it. Here are the simple steps to …
Discover More
Finding Text Not Using a Particular Font
Word makes it easy to find text that uses a particular font or font characteristics. What it doesn’t do is make it easy …
Discover More
New to Office 2007? Don’t like the default font, font size, spacing, or justification for Word 2007? Tired of changing it to your preferred setup each time? Let’s configure the Microsoft defaults to your defaults.
First, make sure all Office applications are closed. Now we’re going to browse to where the default template stores these settings.
Open up My Computer and you’ll need to make sure show hidden files and folders is turned on.
Under Tools, Options… go to the View tab and click on the radio button next to “Show hidden files and folders.” Also make sure “Hide extensions for known types” is unchecked. Click Ok.
Now browse to this location (running Windows XP or Server 2003): C:Documents and Settings[user name]Application dataMicrosoftTemplates
(Running Windows Vista): C:Users[user name]AppDataMicrosoftTemplates
Make a note of the full file name for the Normal file. Most likely it will be Normal.dotm, but it could be Normal.dot or other variants. In this screenshot, the full file name is Normal.dotm.

Go ahead and keep this window open, minimize if necessary.
Launch Microsoft Word 2007. With a blank document, make all the changes you want for your default. Such as which font, font size, justification, formatting symbols shown, macros installed, and more.
When done go to the Office Button, Save As, Word Template.

In the drop-down box, change the file type to a Word macro-enabled template .dotm. Give your file a temporary name like ‘temp.dotm’ or ‘asdf.dotm’ anything but Normal.dotm and save it to the same location we went to earlier: (running Windows XP or Server 2003): C:Documents and Settings[user name]Application dataMicrosoftTemplates
(Running Windows Vista): C:Users[user name]AppDataMicrosoftTemplates

After saving the file, you may get a prompt about compatibility mode and the new file format. Just click ok on this window after you read the message.

Now close Word completely. Restore the window we were looking at earlier that pointed to the Templates folder. Rename the existing file (Normal.dotm) to something like Normal.old or old.dotm. Then rename your file that was just saved to Normal.dotm or the filename that you noted earlier.
Next time you open up Word, it should be holding onto all of the settings you specified earlier. If you find any preferences are incorrect or aren’t your prefered defaults, just run through these instructions again.
+ Microsoft has a comprehensive write-up in their TechNet site about migrating AutoText, AutoCorrect, Add-ins, and more from previous versions to Office 2007. Why reinvent the wheel?
Главная » Разное » Как сбросить настройки word 2007 по умолчанию
сброс настроек word 2007 по умолчанию
В разделе Интернет на вопрос Как сбросить все настройки ворд 2007 по умолчанию раньше листы шли один за одним, сейчас по 3 листа подряд заданный автором Анна Тихомирова лучший ответ это вопросы задавать вас кто учил?где шли? где сейчас по 3??
Ответ от 22 ответа[гуру] Привет! Вот подборка тем с ответами на Ваш вопрос: Как сбросить все настройки ворд 2007 по умолчанию раньше листы шли один за одним, сейчас по 3 листа подряд
Настройки по умолчанию word 2007, 2003, 2010
Чтобы сбросить настройки в Office Word 2007 или 2003, MS предлагает скачать Microsoft Fix it 50599. Или затереть соответствующие ветви реестра : Ветвь текущего пользователя: Word 2010 HKEY_CURRENT_USERSoftwareMicrosoftOffice14.0Word
Word 2007
HKEY_CURRENT_USERSoftwareMicrosoftOffice12.0Word
Word 2003
HKEY_CURRENT_USERSoftwareMicrosoftOffice11.0Word
Word XP
HKEY_CURRENT_USERSoftwareMicrosoftOffice10.0Word
Word 2000
HKEY_CURRENT_USERSoftwareMicrosoftOffice9.0Word
Для всех пользователей:
Word 2003 HKEY_USERS.DEFAULTSoftwareMicrosoftOffice11.0Word
Word XP
HKEY_USERS.DEFAULTSoftwareMicrosoftOffice10.0Word
Word 2000
HKEY_USERS.DEFAULTSoftwareMicrosoftOffice9.0Word
Если Вам помогла статья — подарите нам немного Яндекс-денег. Или обратите внимания на рекламу на сайте — это БЕСПЛАТНО.
Как очистить форматирование (сбросить настройки) текста в MS Word 2010
 Если вы работаете в редакторе Word 2007, то для вставки рисунка перейдите на вкладку Вставка, нажмите кнопку Рисунок и в открывшемся диалоговом окне выберите ваш рисунок и нажмите кнопку Вставить. Не забудьте, в самом конце, поставить переключатель применимости изменений (внизу диалогового окна “Изменение стиля”) в положение “В новых документах, использующих этот шаблон”. Также помимо прочих настроек Word 2007 позволяет пользователю настраивать интерфейс для более удобной работы. Нажмите на кнопку «Офис» и выполните команду «Параметры Word». В левом блоке выберите строку «Основные». Теперь в правой части диалога настроек находятся основные параметры.