
Last updated on October 13th, 2020 at 03:44 pm

2 Pics 1 Word Two In One Word 100 Answers, Cheats, Word list on Android, Kindle, game by Second Gear Games.
What is the solution for Two In One Word 100 ?
We are trying our best to solve the answer manually and update the answer into here, currently the best answer we found for these are:
- Frostbite
Some people are looking for these:
- 2 Pics 1 Word Word 100
- Two In One Word 100
- 2 Pics 1 Word Two In One Word 100
More Related To This Page:
Tags:
- 2 Pics 1 Word Android
- 2 Pics 1 Word Answers
- 2 Pics 1 Word Level
- 2 Pics 1 Word Two In One Cheats
- Second Gear Games
- Two In One Answers
- Two In One Answers Word
2 Pics 1 Word Two in One Word 81 – Word 100 Answers and Cheats with photos. Each of the two pictures represent a half of a word. Can you guess the word? Combine the words and solve the puzzle! Honey + moon = honeymoon! Can you solve all the puzzles? 2 Pics 1 Word Mix Pics Puzzle is developed by Second Gear Games.

Download 2 Pics 1 Word on iTunes Appstore – iPhone – iPad
2 Pics 1 Word Two in One Word 81 – Word 100 Answers
- Two in One Word 81: Spaceship
- Two in One Word 82: Ballot
- Two in One Word 83: Suitcase
- Two in One Word 84: Baseball
- Two in One Word 85: Sunburn
- Two in One Word 86: Sweetheart
- Two in One Word 87: Teapot
- Two in One Word 88: Bargain
- Two in One Word 89: Tenant
- Two in One Word 90: Wallpaper
- Two in One Word 91: Bedbug
- Two in One Word 92: Warehouse
- Two in One Word 93: Legend
- Two in One Word 94: Waterfall
- Two in One Word 95: Aircraft
- Two in One Word 96: Notebook
- Two in One Word 97: Alphabet
- Two in One Word 98: Antarctic
- Two in One Word 99: Barley
- Two in One Word 100: Frostbite
Go Back to 2 Pics 1 Word Two in One Answers
This game is similar to other 2 pic games, but there are a few differences. There are 2 games modes to play, ‘Two in One’ or ‘Mix and Make’, each is slightly different because you combine the words in a different way. Other than that, the game is similar to other titles like this. The artowkr is good and the game runs smoothly. We have all the answers for 2 Pics 1 Word below! This game developer is listed as Maribou on iOS.
![]() Answers
Answers
Answer
Frostbite

100%
of users think this is useful.
What do you think?
of users think this is useful. What do you think?
![]()
You will receive a trophy for your first vote on Game Help Guru and 2 reputation for every vote cast.
![]() Social
Social
86
users following 2 Pics 1 Word this month.
Microsoft Word is the popular word processing tool used primarily to create, edit and save the documents for any kind of business. Apart from creating just files, one of the most important advantages of using Microsoft Word is that you can easily analyze the feedback for the documents from multiple reviewers and rewrite them by combining multiple documents sent for a review into one.
Why combine multiple Word documents into one?
There may be times when you may have to send your documents to your editors or team members for a quick review, feedback and suggestions. After a review, you receive a handful of feedback and revision copies in the form of word outlining a number of edits and changes from a lot of reviewers. A simple copy and paste will consume enormous time if you want to combine reviews and changes from multiple copies. With so many copies of changes and edits from multiple authors or reviewers, it is quite possible that things can go weary.
To make sure that you don’t miss out on any important feedback and revisions, you may find it useful to combine all the Word documents containing feedback from multiple authors into a single original document. That being said, combining feedback from multiple reviewers into a single word document will let you label the changes made by specific reviewers. This way it will ease out your work to review comments and make necessary changes.
In this article, we explain how to easily merge multiple documents in Microsoft Word.
Merge two Word documents into one
Launch Microsoft Word and open your original document which you sent for review.
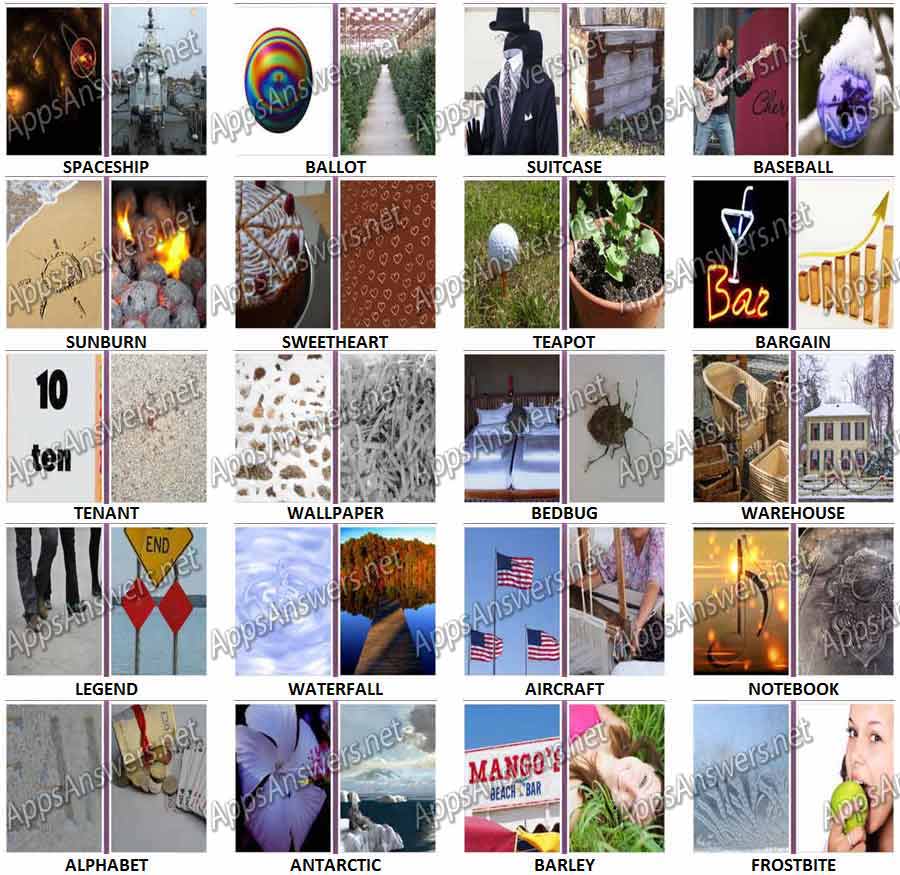
In the toolbar, navigate to Review tab and click Compare.
Select the option Combine from the drop-down menu. This will pop up a secondary window that allows you to choose the two documents which you want to combine.
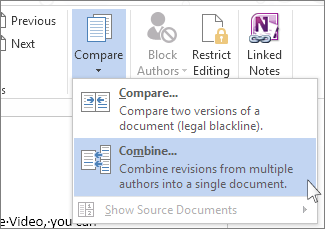
Under the option Original document, select the primary document which you have sent for suggestions and reviews. Make sure that you select the original documents that you have worked on which do not contain any edits and modifications from reviewers.
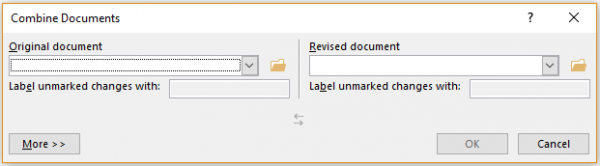
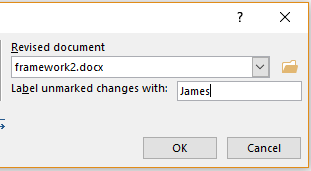
In the Label unmarked changes with box, type original or any phrase to know that this is the original document which was sent for review.
Under the Revised document, choose a reviewed document which you want to combine.
In the Label unmarked changes with box, write the name of the author to know who suggested the modifications.
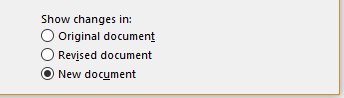
Click More and under Show Changes in option, select the New document.
Click OK.
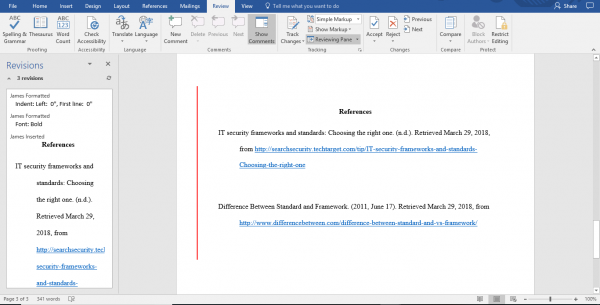
The Word now opens a new document that will display both your original document which you sent for review and the copy from the author which you merged. The word divides the screen into three sections with a combined document displayed at the center, revisions outlined to the left of the screen and, displays both original and revised documents simultaneously split into two in the third section.

If you find this information very confusing, you can bring down the sections to two to make the visuals more appealing. Follow the below steps to minimize the display in the toolbar.
Navigate to Compare.
Click Show source Documents and select Hide Source Documents.
Once you have included all the changes the way you want, Save the document.
Combine additional Word copies
If you want to combine more copies from a different reviewer, repeat the same steps as mentioned above. However now to merge additional copies you need to use the revised documents which you got from merging the two documents in the above and add secondary documents into the revised word file. Follow the below steps to merge the additional copies
In the toolbar, navigate to Review tab and click Compare.
Under the option Original document, select the revised document that contains the combined changes
In the Label unmarked changes box, type any phrase to know that this is a revised document that contains the combined changes.
Under the Revised document, choose any document which you want to combine.
In the Label unmarked changes box, write the name of the author to know who suggested the modifications.
Click More and under Show Changes in option, select the New document.
Click OK.
Word opens a new document that will display both your revised document that contains combined changes and the secondary reviewed document from the author which you merged.
Once you have included all the changes the way you want, Save the document.
The above-mentioned procedure works well with Microsoft Word for Office 365, Word 2019, Word 2016, Word 2013, Word 2010 and Word 2007.
Wrapping up
Merging documents is extremely useful if you have got too many edits during the review process. For a document with huge content, adding too many changes will be time-consuming. In such a scenario, it is quite helpful to merge documents in Word. However, If your content is not very large and if you find the above steps overwhelming, you can simply copy the text that you want to include in the document and past them directly into your new documents.

| 1st | first | первый | |
| 2nd | second | второй | |
| 3rd | third | третий | |
| 4th | fourth | четвертый | |
| 5th | fifth | пятый | |
| 6th | sixth | шестой | |
| 7th | seventh | седьмой | |
| 8th | eighth | восьмой | |
| 9th | ninth | девятый | |
| 10th | tenth | десятый | |
| 11th | eleventh | одиннадцатый | |
| 12th | twelfth | двенадцатый | |
| 13th | thirteenth | тринадцатый | |
| 14th | fourteenth | четырнадцатый | |
| 15th | fifteenth | пятнадцатый | |
| 16th | sixteenth | шестнадцатый | |
| 17th | seventeenth | семнадцатый | |
| 18th | eighteenth | восемнадцатый | |
| 19th | nineteenth | девятнадцатый | |
| 20th | twentieth | двадцатый | |
| 21st | twenty-first | двадцать первый | |
| 22nd | twenty-second | двадцать второй | |
| 23rd | twenty-third | двадцать третий | |
| 24th | twenty-fourth | двадцать четвертый | |
| 25th | twenty-fifth | двадцать пятый | |
| 26th | twenty-sixth | двадцать шестой | |
| 27th | twenty-seventh | двадцать седьмой | |
| 28th | twenty-eighth | двадцать восьмой | |
| 29th | twenty-ninth | двадцать девятый | |
| 30th | thirtieth | тридцатый | |
| 31st | thirty-first | тридцать первый | |
| 32nd | thirty-second | тридцать второй | |
| 33rd | thirty-third | тридцать третий | |
| 34th | thirty-fourth | тридцать четвертый | |
| 35th | thirty-fifth | тридцать пятый | |
| 36th | thirty-sixth | тридцать шестой | |
| 37th | thirty-seventh | тридцать седьмой | |
| 38th | thirty-eighth | тридцать восьмой | |
| 39th | thirty-ninth | тридцать девятый | |
| 40th | fortieth | сороковой | |
| 41st | forty-first | сорок первый | |
| 42nd | forty-second | сорок второй | |
| 43rd | forty-third | сорок третий | |
| 44th | forty-fourth | сорок четвертый | |
| 45th | forty-fifth | сорок пятый | |
| 46th | forty-sixth | сорок шестой | |
| 47th | forty-seventh | сорок седьмой | |
| 48th | forty-eighth | сорок восьмой | |
| 49th | forty-ninth | сорок девятый | |
| 50th | fiftieth | пятидесятый | |
| 51st | fifty-first | пятьдесят первый | |
| 52nd | fifty-second | пятьдесят второй | |
| 53rd | fifty-third | пятьдесят третий | |
| 54th | fifty-fourth | пятьдесят четвертый | |
| 55th | fifty-fifth | пятьдесят пятый | |
| 56th | fifty-sixth | пятьдесят шестой | |
| 57th | fifty-seventh | пятьдесят седьмой | |
| 58th | fifty-eighth | пятьдесят восьмой | |
| 59th | fifty-ninth | пятьдесят девятый | |
| 60th | sixtieth | шестидесятый | |
| 61st | sixty-first | шестьдесят первый | |
| 62nd | sixty-second | шестьдесят второй | |
| 63td | sixty-third | шестьдесят третий | |
| 64th | sixty-fourth | шестьдесят четвертый | |
| 65th | sixty-fifth | шестьдесят пятый | |
| 66th | sixty-sixth | шестьдесят шестой | |
| 67th | sixty-seventh | шестьдесят седьмой | |
| 68th | sixty-eighth | шестьдесят восьмой | |
| 69th | sixty-ninth | шестьдесят девятый | |
| 70th | seventieth | семидесятый | |
| 71st | seventy-first | семьдесят первый | |
| 72nd | seventy-second | семьдесят второй | |
| 73rd | seventy-third | семьдесят третий | |
| 74th | seventy-fourth | семьдесят четвертый | |
| 75th | seventy-fifth | семьдесят пятый | |
| 76th | seventy-sixth | семьдесят шестой | |
| 77th | seventy-seventh | семьдесят седьмой | |
| 78th | seventy-eighth | семьдесят восьмой | |
| 79th | seventy-ninth | семьдесят девятый | |
| 80th | eightieth | восьмидесятый | |
| 81st | eighty-first | восемьдесят первый | |
| 82nd | eighty-second | восемьдесят второй | |
| 83rd | eighty-third | восемьдесят третий | |
| 84th | eighty-fourth | восемьдесят четвертый | |
| 85th | eighty-fifth | восемьдесят пятый | |
| 86th | eighty-sixth | восемьдесят шестой | |
| 87th | eighty-seventh | восемьдесят седьмой | |
| 88th | eighty-eighth | восемьдесят восьмой | |
| 89th | eighty-ninth | восемьдесят девятый | |
| 90th | ninetieth | девяностый | |
| 91st | ninety-first | девяносто первый | |
| 92nd | ninety-second | девяносто второй | |
| 93rd | ninety-third | девяносто третий | |
| 94th | ninety-fourth | девяносто четвертый | |
| 95th | ninety-fifth | девяносто пятый | |
| 96th | ninety-sixth | девяносто шестой | |
| 97th | ninety-seventh | девяносто седьмой | |
| 98th | ninety-eighth | девяносто восьмой | |
| 99th | ninety-ninth | девяносто девятый | |
| 100th | hundredth | сотый |
The default layout in Microsoft Word is to display one page at a time with a zoom level of 100 percent. If you need to compare pages side-by-side or just don’t like the single page view, you can create a double page layout instead. Changing the view layout doesn’t affect the layout during printing, so if you need a double page print layout — i.e., two pages on one sheet — you have to adjust another setting.
Onscreen Double Page Layout
-
Click the «View» tab in your Word document.
-
Click the «Two Pages» button in the «Zoom» section of the ribbon.
-
Scroll through your Word document until the desired pages appear in the double page layout view.
Printed Double Page Layout
-
Click the «File» menu in your Word document.
-
Click the «Print» tab on the left side. A preview of what the print will look like appears on the right.
-
Click the «1 Page Per Sheet» button to open a drop-down menu with more options. Click «2 Pages Per Sheet.»
-
Click «Print» to print the document in the double page layout.
Word for Microsoft 365 Word 2021 Word 2019 Word 2016 Word 2013 Word 2010 Word 2007 More…Less
You can often improve the look of your document by keeping certain words and paragraphs together on the page or across page breaks. Also, you can use hyphenation to improve overall readability.
Word automatically breaks the text at a space or a hyphen at the end of a line. To keep two words or a hyphenated word together on one line, you can use a nonbreaking space or nonbreaking hyphen instead of a regular space or hyphen.
-
Click where you want to insert the nonbreaking space.
-
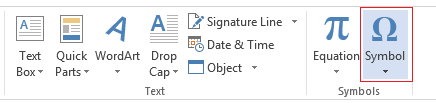
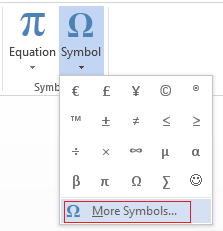
On the Insert tab, in the Symbols group, click Symbol.
-
In the box that opens, click More Symbols.
-
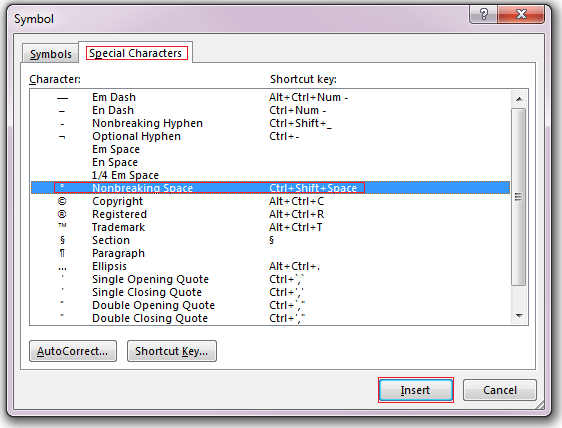
In the Symbol dialog box, on the Special Characters tab, click the Nonbreaking Space row to highlight it, and then click Insert.
-
Click Close.
Tip: You can also use the keyboard shortcut. Click where you want to insert the nonbreaking space, and press Ctrl+Shift+Spacebar.
Sometimes you want a hyphenated word to stay together on one line, without it breaking across lines.
-
Click where you want to insert the nonbreaking hyphen.
-
On the Insert tab, in the Symbols group, click Symbol.
-
In the box that opens, click More Symbols.
-
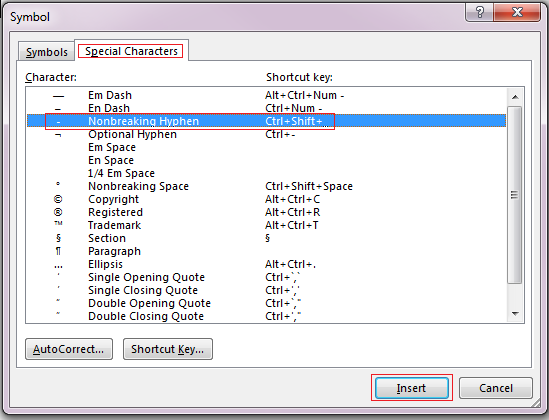
In the Symbol dialog box, on the Special Characters tab, click the Nonbreaking Hyphen row to highlight it, and then click Insert.
-
Click Close.
Tip: You can also use the keyboard shortcut. Click where you want to insert the nonbreaking hyphen, and press Ctrl+Shift+Minus Sign.
Word automatically breaks paragraphs at the end of a page, so a paragraph that started on one page continues on to the next page. To keep the whole paragraph on the same page, follow these steps.
-
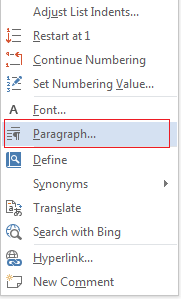
Right-click the paragraph that you want to keep together. In the box that opens, select Paragraph.
-
In the Paragraph dialog box, click the Line and Page Breaks tab.
-
In the Pagination section, select the Keep lines together check box, and click OK.
If two consecutive paragraphs or a subhead and a paragraph are closely related, you might want to keep them on the same page.
-
Right-click the paragraph or subhead that you want to keep with the content that follows it. In the box that opens, select Paragraph.
-
In the Paragraph dialog box, click the Line and Page Breaks tab.
-
In the Pagination section, select the Keep with next check box, and click OK.
Tip: It’s best not to add additional line breaks between your paragraphs because Word interprets each line break as a beginning of a new paragraph, and page breaks might not occur properly. If you want spaces between paragraphs, use the Paragraph Spacing controls. For more information, see Change spacing between paragraphs.
If a paragraph has a page break in the middle so that only the last line appears at the top of the following page, this lonely line is called a “widow.” If, on the other hand, a paragraph has a page break in the middle so that only the first line appears at the bottom of a page while the rest of the paragraph appears on the next page, this lonely line is called an “orphan.”
If you want to avoid widow and orphan lines in your document, follow these steps.
-
Right-click the paragraph in which you want to avoid widows and orphans. In the box that opens, select Paragraph.
-
Click the Line and page breaks tab.
-
In the Pagination section, select the Widow/Orphan control check box.
-
Click OK.
If a word is too long to fit at the end of a line, Microsoft Office Word 2007 moves the word to the beginning of the next line instead of hyphenating it. However, you can use the Hyphenation feature to automatically or manually hyphenate the text, insert optional or nonbreaking hyphens, and set the maximum amount of space allowed between a word and the right margin without hyphenating the word.
With automatic hyphenation, Office Word 2007 automatically inserts hyphens where they are needed. If you edit the document later and change line breaks, Office Word 2007 will re-hyphenate the document.
-
Make sure that no text is selected.
-
On the Page Layout tab, in the Page Setup group, click Hyphenation, and then click Automatic.
An optional hyphen is a hyphen that is used to control where a word or phrase breaks if it falls at the end of a line. For example, you can specify that the word «nonprinting» breaks as «non-printing» instead of «nonprint-ing.» When you insert an optional hyphen in a word that is not at the end of a line, the hyphen will be visible only if you turn on Show/Hide.
-
On the Home tab, in the Paragraph group, click Show/Hide.
-
Click in the word where you want to insert the optional hyphen.
-
Press CTRL+HYPHEN.

To automatically hyphenate part of a document, do the following:
-
Select the text that you want to hyphenate.
-
On the Page Layout tab, in the Page Setup group, click Hyphenation, and then click Automatic.
When you manually hyphenate text, Office Word 2007 searches for text to hyphenate. After you indicate where you want to hyphenate the text, Word inserts an optional hyphen. If you later edit the document and change line breaks, Office Word 2007 displays and prints only the optional hyphens that still fall at the end of lines. Word doesn’t re-hyphenate the document.
-
Select the text you want to hyphenate.
-
On the Page Layout tab, in the Page Setup group, click Hyphenation, and then click Manual.
-
If Office Word identifies a word or phrase to hyphenate, do one of the following:
-
To insert an optional hyphen in the location that Office Word proposes, click Yes.
-
To insert an optional hyphen in another part of the word, move the insertion point to that location, and then click Yes.
-
Nonbreaking hyphens prevent hyphenated words, numbers, or phrases from breaking if they fall at the end of a line of text. For example, you can prevent 555-0123 from breaking; instead, the entire item will move to the beginning of the next line.
-
Click where you want to insert a nonbreaking hyphen.
-
Press CTRL+SHIFT+HYPHEN.
The hyphenation zone is the maximum amount of space Office Word 2007 allows between a word and the right margin without hyphenating the word. You can change the hyphenation zone to make it wider or narrower. To reduce the number of hyphens, make the hyphenation zone wide. To reduce the raggedness of the right margin, make the hyphenation zone narrower.
-
On the Page Layout tab, in the Page Setup group, click Hyphenation, and then click Hyphenation Options.
-
In the Hyphenation zone, type the amount of space you want.
You can remove all automatic hyphenation and each instance of manual hyphenation, such as optional and nonbreaking hyphens.
-
To remove automatic hyphenation, on the Page Layout tab, in the Page Setup group, click Hyphenation, and then click None.

-
To remove manual hyphenation, on the Home tab, in the Editing group, click Replace.
-
If you don’t see the Special button, click More.
-
Click Special, and then click either Optional Hyphen to remove manual hyphens, or Nonbreaking Hyphen to remove nonbreaking hyphens.
-
Leave the Replace box empty.
-
Click Fix Next, Replace, or Replace All.
See Also
Line and page breaks
Insert a page break
Change spacing between paragraphs
Need more help?

When laying out your document in Word, it’s sometimes helpful to view multiple pages on the screen at one time, especially if you have a large monitor. Seeing multiple pages at a time allows you to get a sense of how your overall layout looks.
NOTE: We used Word 2013 to illustrate this feature.
You must be in “Print Layout” view to view multiple pages at one time. If you are not in “Print Layout” view, or if you’re not sure which layout is currently active, click the “View” tab.

In the “Views” section of the “View” tab, click “Print Layout.”
To view multiple pages at one time, keep the “View” tab active. Place your cursor in the text of the first page you want to view in the multiple-page view. In the “Zoom” section, click “Multiple Pages.”
By default, two pages are shown side-by-side. The pages are shrunk so the full pages can be viewed. This is why viewing multiple pages at once is good for reviewing your layout, but not necessarily for reading your document.
To return to viewing one page at a time, click “One Page” in the “Zoom” section of the “View” tab.
The page in which you had placed the cursor displays, but smaller than 100 percent. To zoom back to regular size, click “100%” in the “Zoom” section.
You can view more than two pages at a time. To do so, click the “Zoom” button in the “Zoom” section of the “View” tab.
The “Zoom” dialog box displays. You can zoom to various percentages (including a custom percent), widths, or the whole page. To view multiple pages, select the “Many pages” radio button. Then, click the monitor button below the radio button and select the number of pages you want to view at a time from the drop-down menu.
The “Preview” shows how the pages will be displayed. Click “OK” to accept the change and close the “Zoom” dialog box.
The view changes to show the number of pages at once that you specified.
Remember to go back to viewing one page at a time, click the “One Page” button. To go back to viewing your text at 100 percent, click the “100%” button.
READ NEXT
- › How to Get a Refund on the PlayStation Store
- › Save Hundreds on Elegoo’s New PHECDA Laser Engraver Through Kickstarter
- › The New Winamp Is Here, but It’s Not What You’d Expect
- › Windows 11 Has a New Photo Gallery in the File Explorer
- › Five Types of Phone Damage That Aren’t Covered by Your Free Warranty
- › Android’s Nearby Share Has (Unofficially) Arrived on Mac
How-To Geek is where you turn when you want experts to explain technology. Since we launched in 2006, our articles have been read billions of times. Want to know more?