
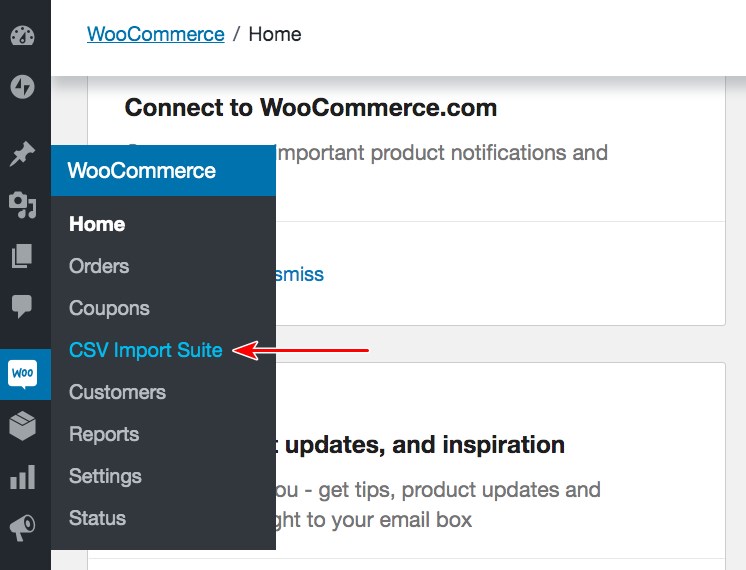
- Details
- Reviews
- Installation
- Development
Export products to CSV, Excel, or XML files with the WooCommerce Product Export Add-On for WP All Export.
Select your product export columns, then rearrange, combine, or rename them as needed. Add any columns, including those created by 3rd-party plugins or add-ons. You can even create custom columns by using our embedded functions.
Apply flexible filters to limit your export to the exact products that you want.
Bulk edit your products or migrate them from one site to another with just a few clicks using a combination of WP All Export and WP All Import.
Schedule your product export to run automatically, then use Zapier to integrate your export file with any of 1000s of external applications.
Need to upload your product data to the Google Merchant Center? No problem. We’ve created a special template that will help you generate a Google Shopping feed in a fraction of the time it would take to do it on your own.
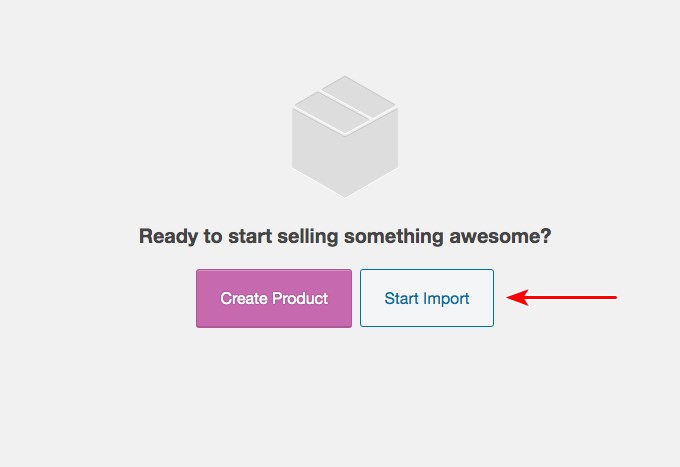
Click here to try WP All Export right now.
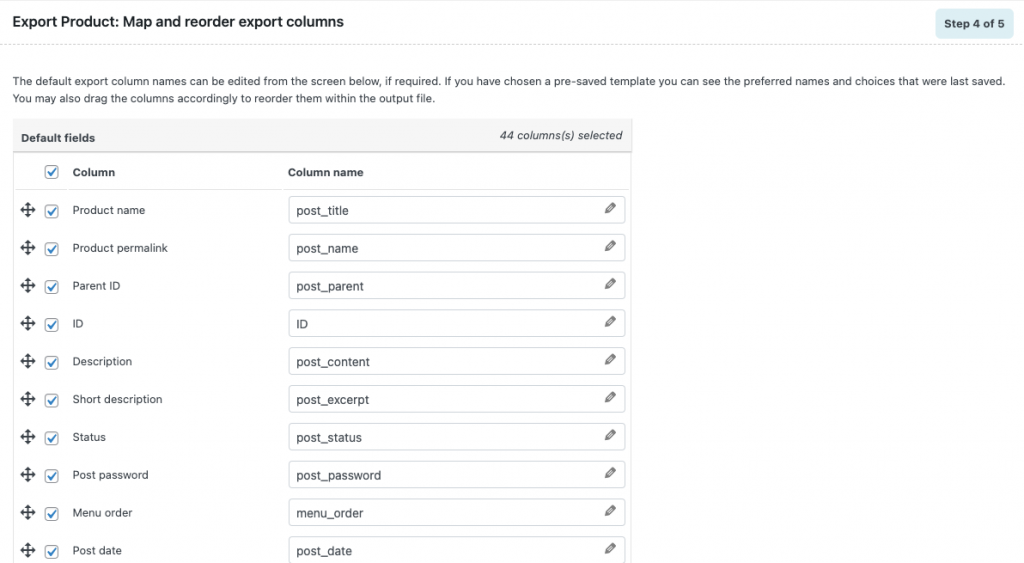
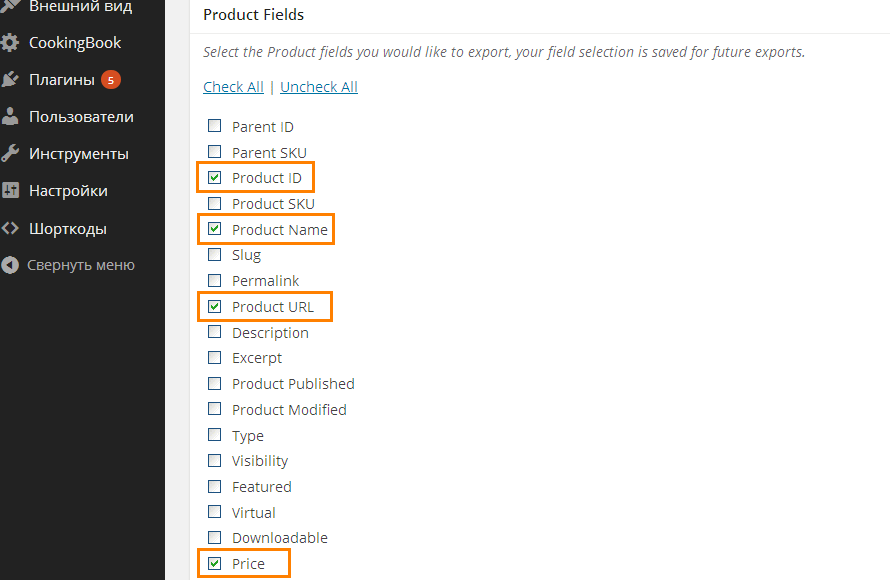
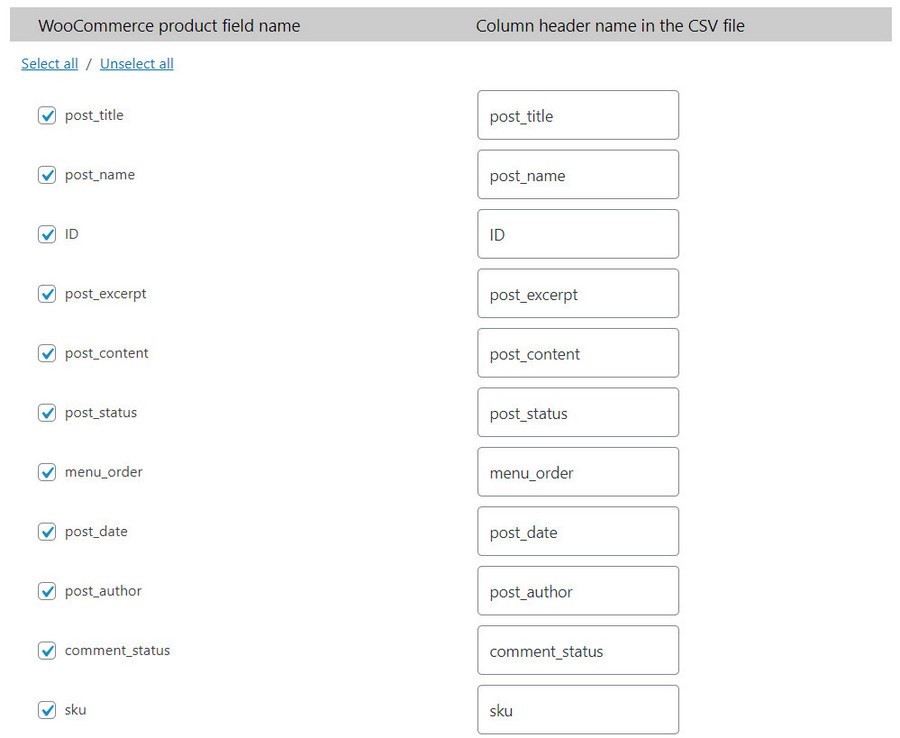
Select Your WooCommerce Product Export Columns
As the video demonstrates, you can use our Drag & Drop tool to quickly select your product export columns. You can rearrange these columns, rename them, and even combine them. If you need an entirely custom product field, you can build it using our embedded PHP functions.
In other words, you can build a product export that meets your exact layout requirements, whatever they may be.
Create Flexible Product Export Filters
Sometimes, you need to export only a subset of your products. For example, you may want to export only active products.
You can do this easily with WP All Export. You can build filters using any combination of product fields, including those created by 3rd-party plugins or add-ons.
You can build simple filters, combination filters, or nest your filter conditions (equivalent to using parentheses).
If filtering against date fields, you can even use relative date filter conditions like “last week” or “last month”.
There is no need to compromise here. You can filter your product export in whatever way you want.
Export Products to CSV, Excel, and XML
By default, our plugin exports products to a CSV file format.
But you can just as easily export products to Excel using either the .xls or .xlsx formats.
If you prefer XML, you can build everything from the simplest to the most complex XML feed imaginable.
Export Products to the Google Merchant Center
The Google Merchant Center (GMC) is a platform that lets you share your product information across Google, which makes it easier for customers to find your products and your store.
That’s the good news. The bad news is that GMC has extensive data requirements that can take many hours to satisfy.
To address this, we’ve built a product export template that helps you comply with Google’s requirements. Just choose the Google Merchant Center Product Feed as your export type, fill out the onscreen forms, and you’ll be able to upload your products in a matter of minutes.
Even better, if Google modifies its requirements in any way, we immediately update our plugin to match, meaning you can just re-run your product export to fulfill the new requirements.
Bulk Edit Your WooCommerce Product Data
Bulk editing WooCommerce products is a common task. Sometimes, you need to alter many product prices or modify product descriptions as part of a sales promotion.
Whatever your reason, we make bulk editing products painless. Just export your products, edit them in a spreadsheet using features like search-and-replace, copy-and-paste, etc., then import everything back into WooCommerce using WP All Import.
What makes this so painless is that WP All Import is aware of the export settings, which allows it to automatically configure the import process. No muss, no fuss, just a quick, highly efficient editing process.
Migrate Your WooCommerce Products From One Store to Another
Need to copy your WooCommerce products from one store to another?
No problem. When you export products from the source site, just download our special bundle file. This file contains import instructions in addition to your product export data.
Import this bundle file on your destination site, and WP All Import will automatically configure itself. It really couldn’t be any easier.
Run Your Product Export on a Schedule
A product export can play a vital role in synchronizing data with other stores or marketing platforms. These updates generally occur on a regular basis.
To support this, we allow you to schedule your product export. You can do this using cron jobs on your server, or, if you sign up for our automatic scheduling service, you can do it directly through our plugin’s interface.
Either way, you can set up your product export just once and then forget about it.
Integrate Your Product Export with External Applications
Zapier is a leading integration platform. It allows you to connect triggers, such as the completion of a product export, to actions. These actions can include uploading an export file to one of many file host platforms, generating an email with the export file as an attachment, etc.
Our plugin is designed to work with Zapier, meaning that you can connect your product export to any of 1000s of external applications. Talk about extensibility!
WooCommerce Product Export Free Version
With the free version of WooCommerce Product Export, you can:
-
Export products to CSV or to a simple XML feed
-
Select, rearrange, and modify basic product export fields, including fields added by 3rd-party plugins or add-ons
-
Export product data, bulk edit it in a spreadsheet, and then use WP All Import to import those changes back into WooCommerce
-
Migrate product data from one WooCommerce store to another
WooCommerce Product Export Premium Version
With the premium version of WooCommerce Product Export, you get all the free features plus:
-
Export product data directly to Excel (.xls and .xlsx)
-
Build custom XML feeds for your product exports, no matter how complex
-
Export product data to the Google Merchant Center
-
Export all WooCommerce product fields, including attributes and product variations, along with options to export only parent products, only variations, or both
-
Filter your product export
-
Schedule your product export
-
Integrate your product export with external applications via Zapier
-
Modify your product export data using custom PHP functions
-
Get guaranteed technical support via email (see below)
Premium Support
Upgrade to the Pro edition of WP All Export for premium support.
Our team of support specialists has answered many thousands of support requests over more than a dozen years. Whatever your product export goals, we’ll help you achieve them.
Email: support@wpallimport.com
Related Plugins
Export any WordPress data to XML/CSV
Import any XML or CSV File to WordPress
Import Products from any XML or CSV to WooCommerce
Custom Product Tabs for WooCommerce WP All Import Add-on
Export Orders to CSV/XML for WooCommerce
Export WordPress Users to CSV/XML
Either: –
- Upload the plugin from the Plugins page in WordPress
- Unzip product-export-for-woocommerce.zip and upload the contents to /wp-content/plugins/, and then activate the plugin from the Plugins page in WordPress
-
Can I add product attributes to my product export?
-
Yes. The premium version allows you to add any attributes associated with products, including those from any plugin or WooCommerce extension.
-
Does WooCommerce Product Export output product variations?
-
Yes. The plugin gives you access to all product variable data.
-
Can I export products to CSV?
-
Yes. This is the default file type for exporting products.
-
Can I export products to Excel?
-
With the free version of WooCommerce Product Export, you can export products to CSV, which you can then open in Excel. With the premium version, you can export products directly to .xls or .xlsx.
-
Can I export products to XML?
-
Yes. With the free version of WooCommerce Product Export, you can build a simple XML feed with just a few clicks. With the premium version, you can build a completely custom XML feed regardless of complexity.
-
How many WooCommerce products can I export at one time?
-
You can export as many products as you wish. The only limit is to the file size allowed by the server or imposed by your method of file transmission.
In either case, WooCommerce Product Export allows you to avoid these constraints by splitting your product exports into multiple files based on record counts.
-
Can I export products in different languages?
-
Yes. By installing the WordPress Multilingual Plugin (WPML), you can export WooCommerce product text in more than 40 languages.
-
Can I bulk edit WooCommerce products?
-
Absolutely. Just export your products to a spreadsheet, perform your bulk edits there, then import the modified products back into WooCommerce.
-
Can I migrate products from one WooCommerce store to another?
-
Yes. Because WP All Export and WP All Import understand each other, you can do this with just a few clicks.
-
How do I Synchronize My WooCommerce Store with the Google Merchant Center?
-
As long as you set up the product export feed generated by WooCommerce Product Export so that it completes before the scheduled fetch that you’ve set up for the Merchant Center, synchronization should occur at the scheduled intervals. You might also consider setting up an email notification to verify that the export was successful.
-
How often is WooCommerce Product Export updated?
-
At a minimum, both the free and premium versions of the plugin are updated with each major WordPress release and often many times in between.
-
How do I get support?
-
The free version of WooCommerce Product Export is supported through the WordPress.org community forums. Purchasers of the premium version can email us directly. We will respond as fast as we can, usually within one business day.

The only plugin you will ever need to export your products the way you want. Fabulous flexibility and awesome support for the whole suite.

I use this plugin on many projects, some of them with lot of data, I can do all my imports without any difficulty, even the most complex ones.

Both the WP All Export and WP All Import plugins are a necessity to my business. I have been using both for many years and have not come across any other plugins that can match them. Very simple and filled with options. Especially for my WooCommerce store.

Nearly perfect. Helps my Work for about 5 Years now. The Pro-Version is worth every penny.

Really heavy tool, lots of options. Lots of possibilities. Saving time for me (developer) and letting earn more! Full Pro plugin version paid off for me in few months 🙂
Recommending 100%

if you need to manipulate data in bulk then all of the import/export tools from this company are excellent.
Read all 11 reviews
“Product Export for Woocommerce to CSV, Excel, XML, and the Google Merchant Center” is open source software. The following people have contributed to this plugin.
Contributors
1.0.2
- improvement: don’t include non-category terms in the Taxonomies section for Product exports
1.0.1
- improvement: PHP 8 compatibility
1.0.0
- Initial release on WordPress.org.
Есть два способа экспорта товаров в Excel:
1) стандартный — с помощью встроенного функционала WooCommerce
2) расширенный — с помощью плагина WP All Export
Внимание! Экспорт товаров производится в формате CSV, а не в XLS. CSV — это текстовый формат данных, но не смотря на это прекрасно открывается в экселе. В конце статьи пошагово покажу, как это сделать.
Стандартный экспорт товаров
Шаг 1. Открыть список товаров и выбрать “Экспорт”

Шаг 2. Указать, какие данные о товарах экспортировать. Как правило это название и цена.

При нажатии на кнопку «Сгенерировать CSV» начнётся подготовка таблицы и после откроется окно для сохранения файла. Далее файл можно открыть в Excel.
Расширенный экспорт товаров
Плагин WP All Export предлагает больше возможностей для экспорта данных. Например выгружать не все атрибуты, а только выбранные. Платная версия плагина позволяет выгружать сразу в Excel.
Шаг 1. Выбрать тип данных: WooCommerce товары

Шаг 2. Можно удалить лишние столбцы, перетаскивая мышью элементы. Или добавить дополнительные с помощью кнопки «Add Field».

Шаг 3. Подтвердить и запустить экспорт. После подготовки таблицы вам будет доступна ссылка для скачивания файла.

Как открыть CSV в Excel
Шаг 1: Выбрать формат данных: с разделителями

Шаг 2: Выбрать разделитель: запятая

Шаг 3. Выбор формата данных столбцов можно пропустить. Готово.


Пишу о парсинге, разработке интернет-магазинов и автоматизации рутины. Канал на YouTube.
Donation
To export your products, navigate to All Export › New Export and choose WooCommerce Products. Use our drag & drop tool to configure your export column layout, then run the export and download your file.
![]()
This documentation covers how to export WooCommerce products using WP All Export. For a broader look at exporting WooCommerce products, check out:
export WooCommerce products
![]()
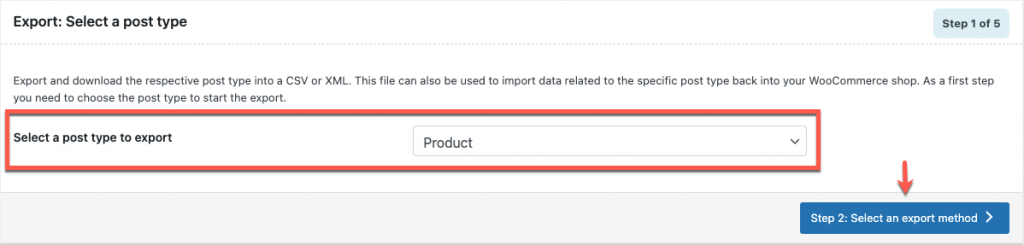
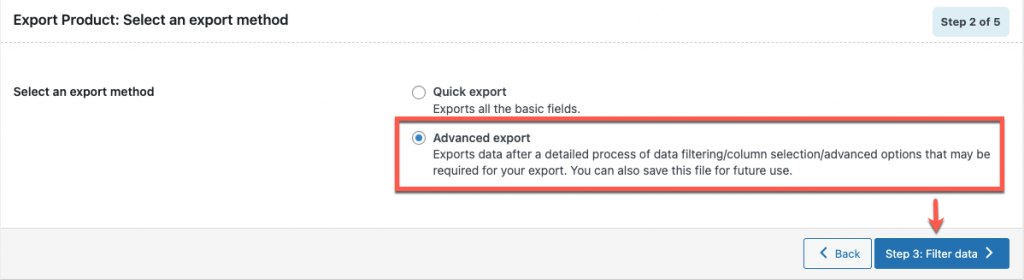
Step 1: Create a New Export for WooCommerce Products
Navigate to All Export › New Export and choose a post type of WooCommerce Products. To continue, click the Customize Export File button.
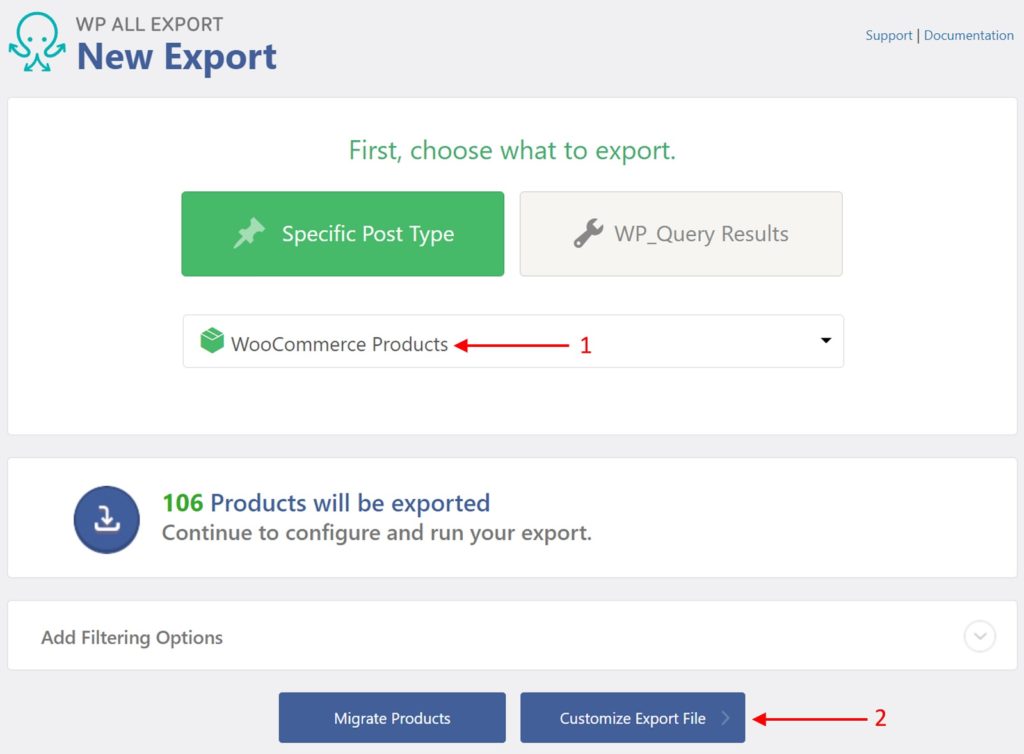
If you need to export only some products, you can add filters in this step. For more information, see the section Filtering WooCommerce Product Exports later in this document.
Step 2: Customize Your WooCommerce Products Export File
In most cases, you don’t need to export all of your product fields. Our simple Drag & Drop interface allows you to select the exact fields that you want.
To add a field to your product export, simply drag it from the Available Data section on the right to the column selection area:
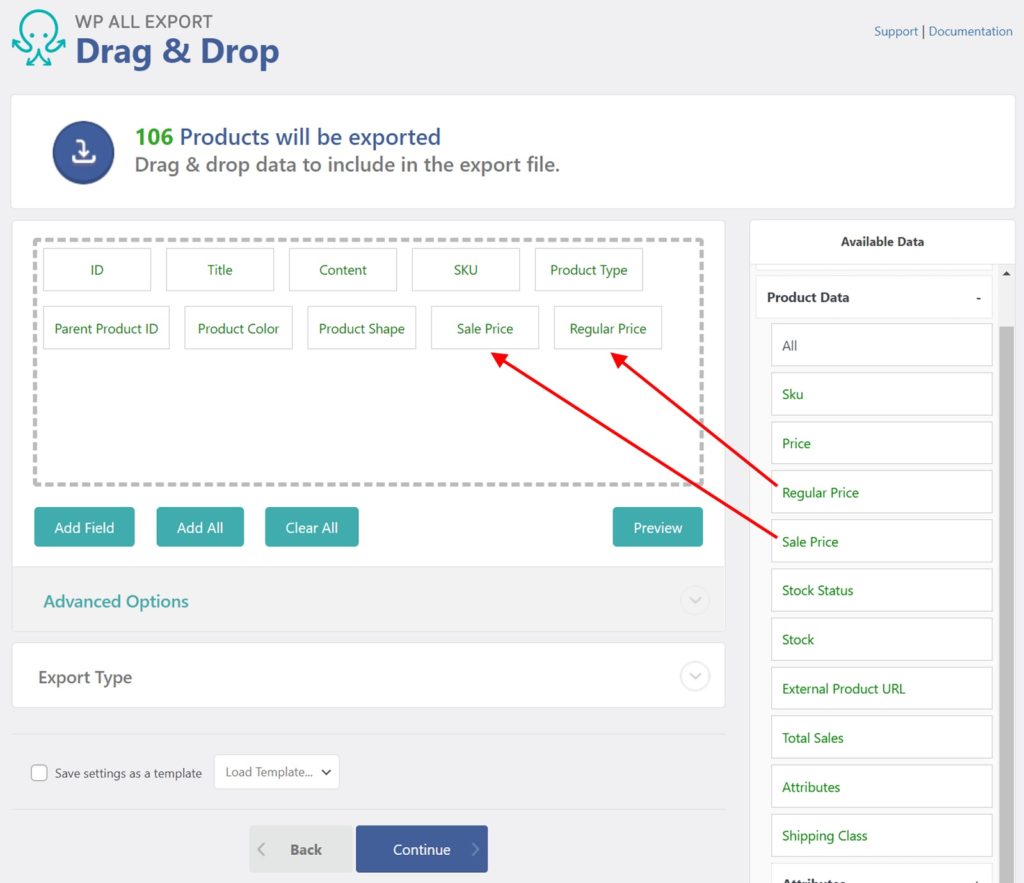
Dragging a column out of the selection area and dropping it on another part of the interface removes the column from the export.
You can also use the green buttons at the bottom of the column selection area to Add Field, Add All (fields) or Clear All (fields). There’s also a Preview button to see an example of the first ten products that will be exported.
Understanding Product Export Fields
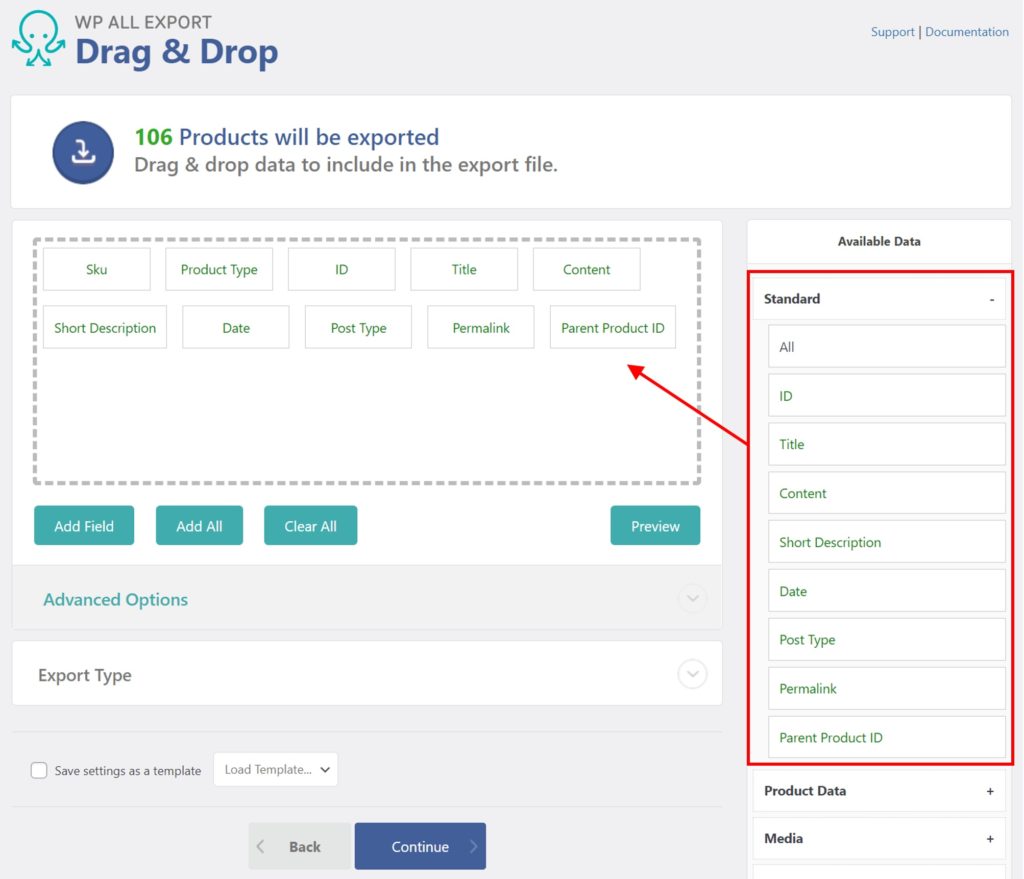
The available export fields are divided into the following sections: Standard, Product Data, Media, Taxonomies, Custom Fields, and Other.
WooCommerce Standard Data
WooCommerce standard data is found under Available Data › Standard.
- ID: The post ID, a unique number given to every post in WordPress.
- Title: The title or name of the WooCommerce product.
- Content: A description of the product.
- Short Description: Similar to the excerpt for posts, usually a summary of the content section.
- Date: The date the product was published, in y-m-d format.
- Post Type: The post type being exported, which is
productin this case. - Permalink: The URL of the product.
- Parent Product ID: WooCommerce variable products are attached to a parent product, and this exports the post ID of that parent product (a
0is exported for products without a parent).
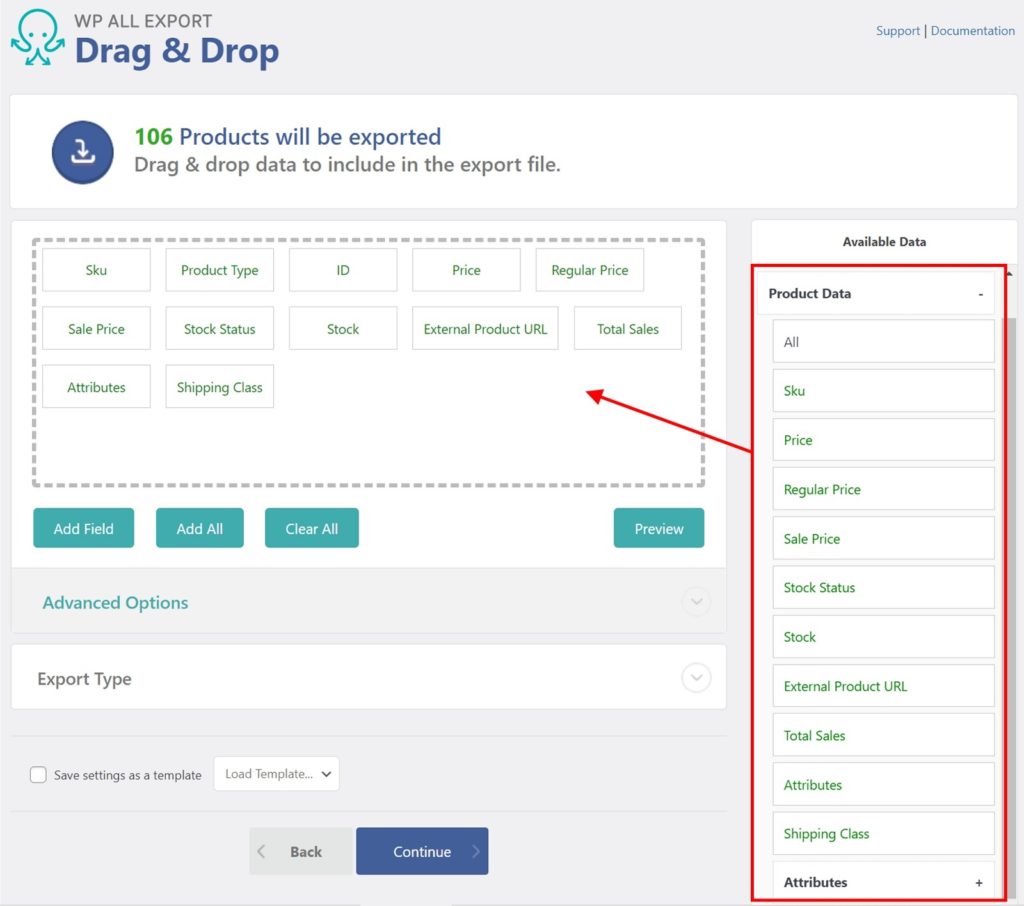
WooCommerce Product Data
More detailed product data is in Available Data › Product Data:
- Sku: A product code used to reference and differentiate products.
- Price: The product’s current price, which is the regular price unless the sale price is active and lower.
- Regular Price: The regular, full price of the product.
- Sale Price: The sale price of the product.
- Stock Status: One of several preset values. The default WooCommerce stock statuses are
instock,outofstock, andonbackorder. - Stock: The number of products currently in stock and available for sale.
- External Product URL: The affiliate link for external products.
- Total Sales: Number of times the product has been sold.
- Attributes: This will export the attribute’s name, value, whether it’s used in variations, is visible, and is a taxonomy. This data is more easily exported in the Attributes section.
- Shipping Class: If configured, it exports the name of the product’s shipping class.
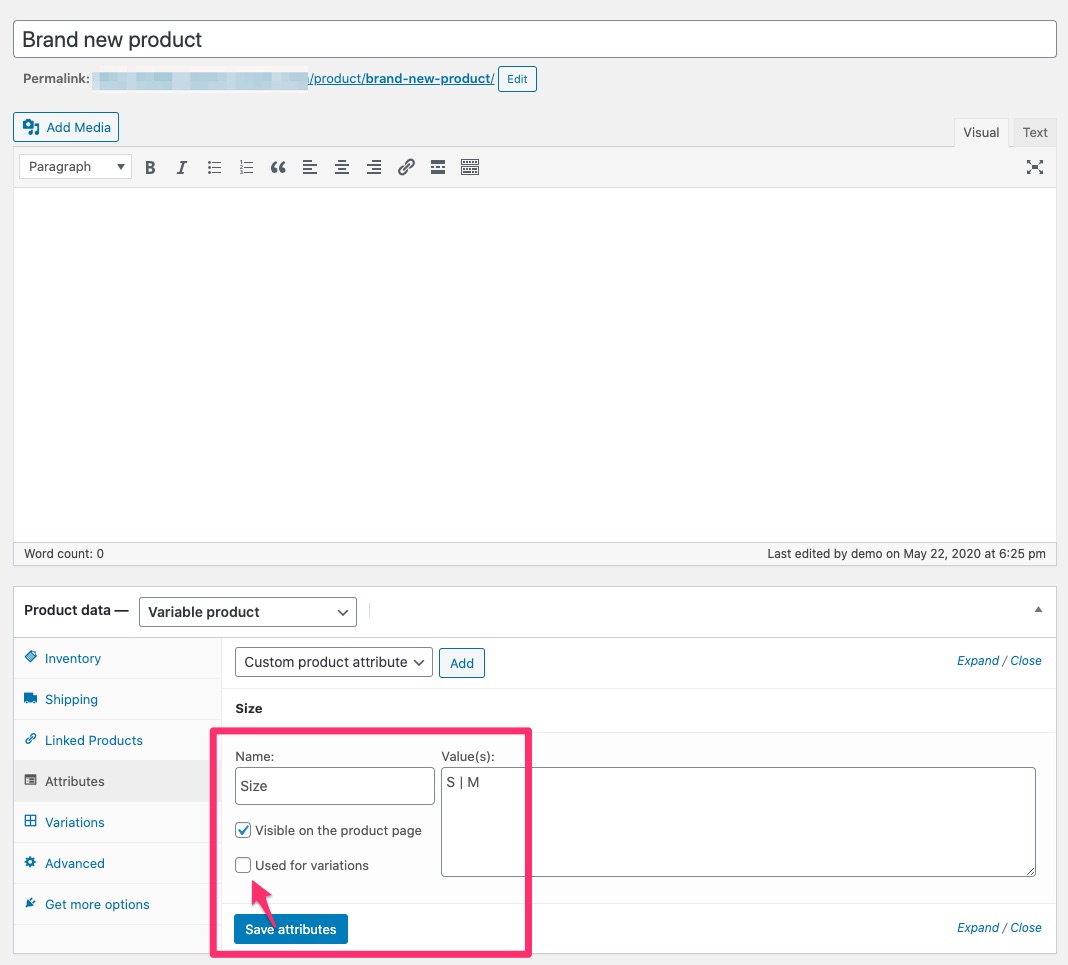
If your product has attributes like size or color, they will automatically be detected and added to the Attributes section at the bottom of Product Data.
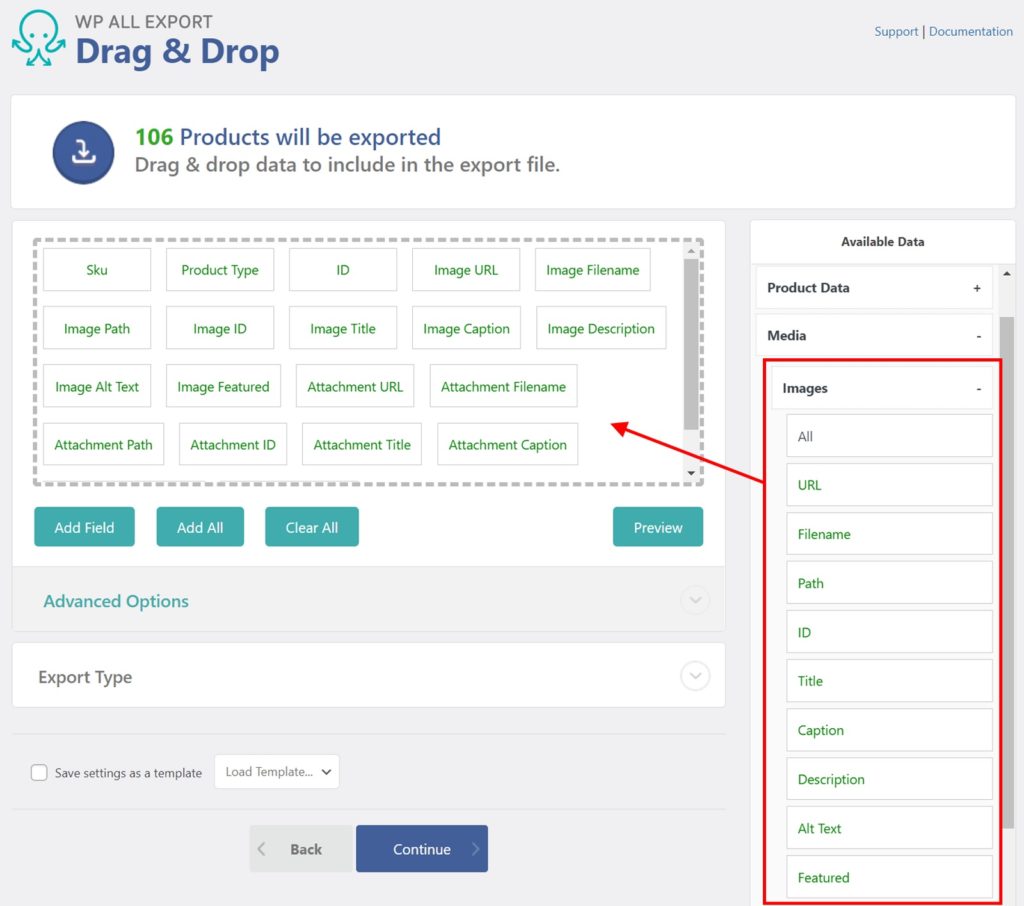
Media
Images and file attachments associated with your WooCommerce products are in Available Data › Media. Images and files are treated the same by WordPress. There are two sections inside the Media section: Images and Attachments (not shown in the image below due to a lack of space). Both contain the same types of fields:
- URL: The URL of the file or image.
- Filename: The filename of the file or full-size image.
- Path: The path or location on the server of the file or image.
- ID: The attachment ID of the file or image, similar to a post ID.
- Title: The file or image title.
- Caption: The file or image caption.
- Description: The file or image description.
- Alt Text: The file or image alternative text.
- Featured: The URL of the featured image.
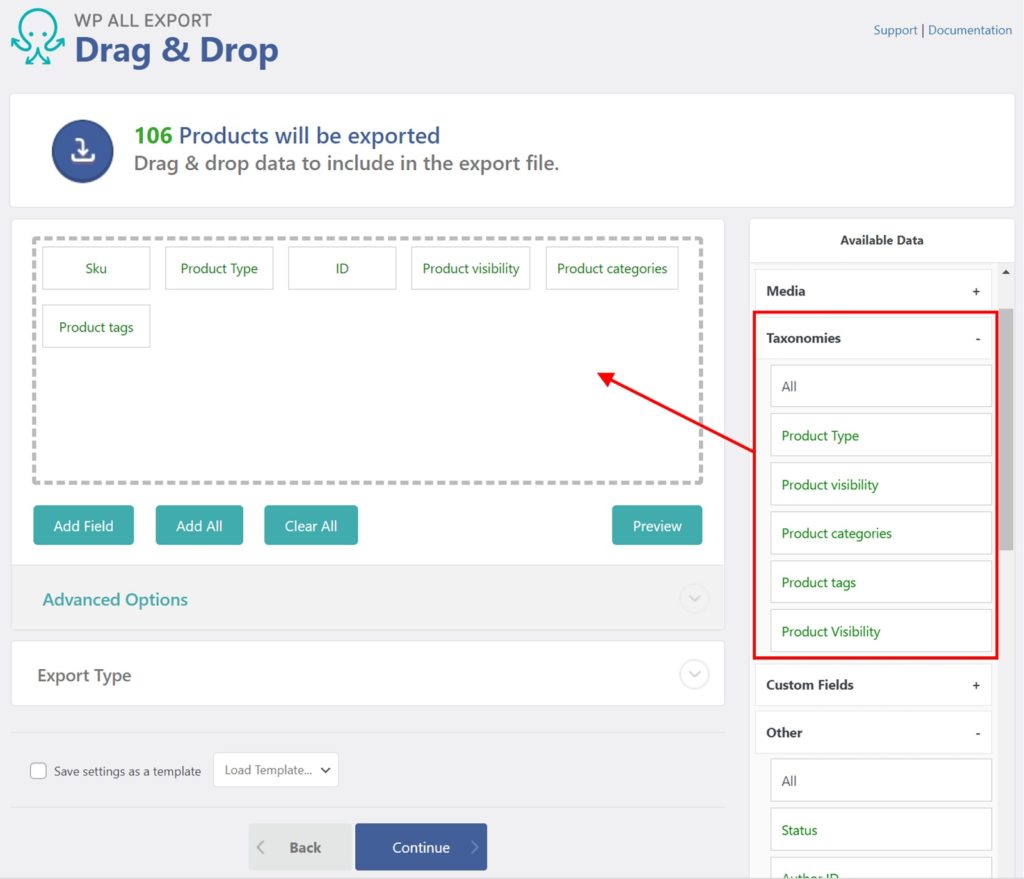
Product Taxonomies
The categories and tags attached to the products are in Available Data › Taxonomies. By default, there are only two, but all custom taxonomies will be automatically detected and available here.
- Product categories
- Product tags
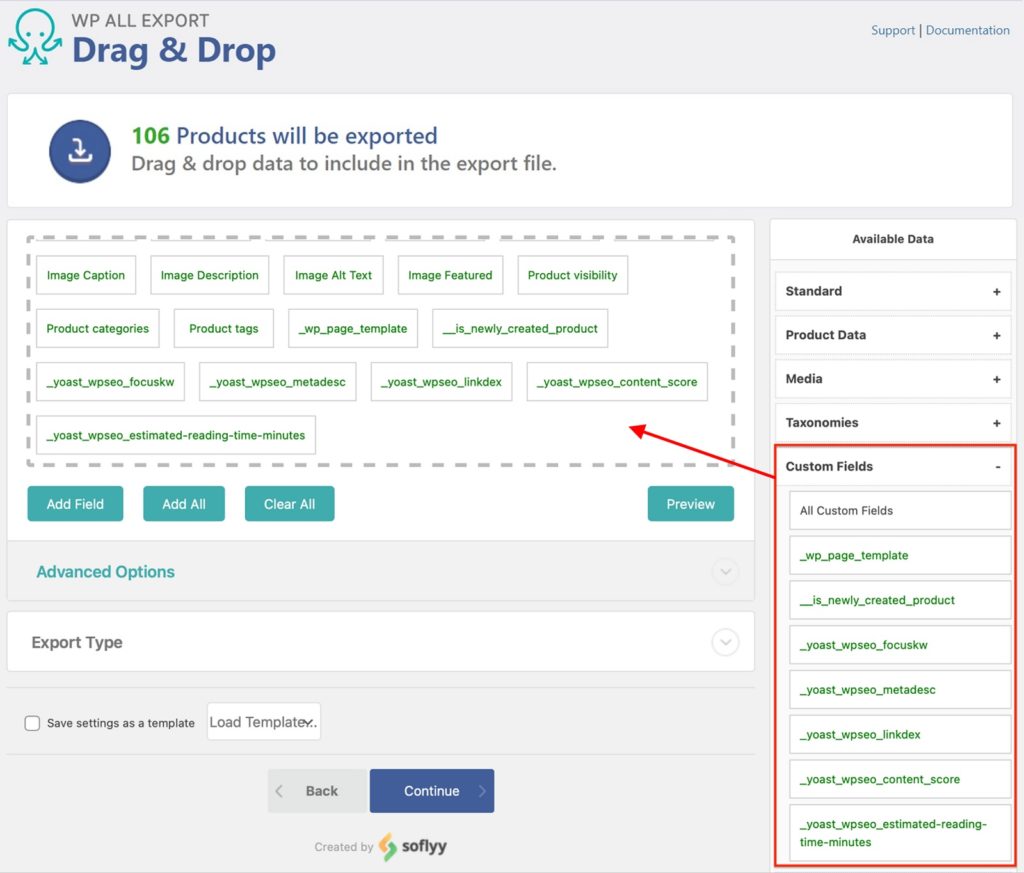
WooCommerce Custom Fields
Custom fields are in Available Data › Custom Fields. The custom fields are data added by custom code or third-party plugins. For example, fields added by Yoast SEO would appear here.
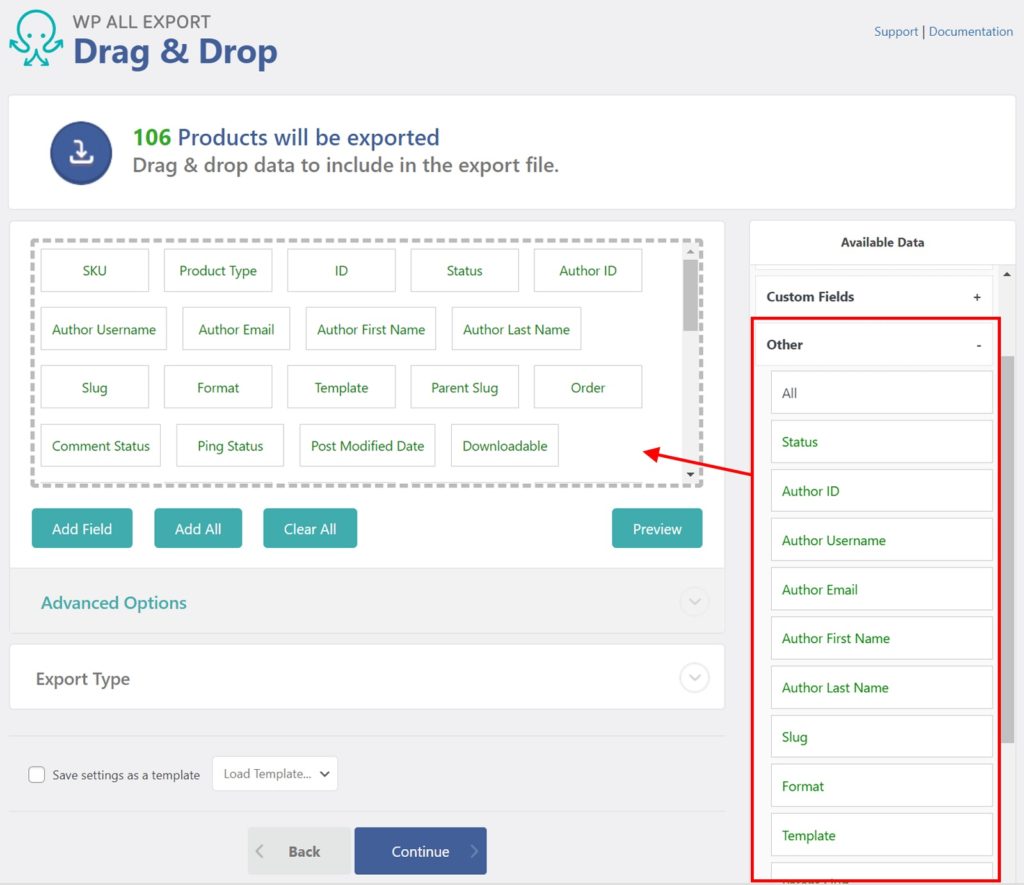
Other WooCommerce Product Fields
Other, less-used product data is in Available Data › Other. This is an incomplete list with only the more important export fields:
- Status: Similar to the post status. The default product statuses are
publish,draft, andprivate. - Slug: The database-friendly name of the WooCommerce product, used in the product URL.
- Downloadable: Whether the product is downloadable or not.
- Downloadable Files: This contains the files for that product if the product is downloadable.
- Sale Price Dates From: When the sale date starts.
- Sale Price Dates To: When the sale date ends.
- Manage Stock: If the WooCommerce product handles stock or not, exports
yesorno. - Up-Sells: SKU list of up-sell products. Multiple products are separated by a pipe ( | ) character.
- Cross-Sells: SKU list of cross-sell products. Multiple products are separated by a pipe ( | ) character.
- Tax Status: Exports the product’s current tax status. Default is none. It can also export as taxable or shipping (used for Shipping only).
- Tax Class: This is the tax class selected for the product. The defaults are standard, zero-rate, and reduced-rate.
- Weight: Product’s weight.
- Length: Product’s length.
- Width: Product’s width.
- Height: Product’s Height.
After you’ve completed your export column, click Continue to configure your export settings.
Step 3: Configure Your Export Settings
When you’re ready to run your export, click Confirm & Run Export. This will bring you to the Export Settings page:
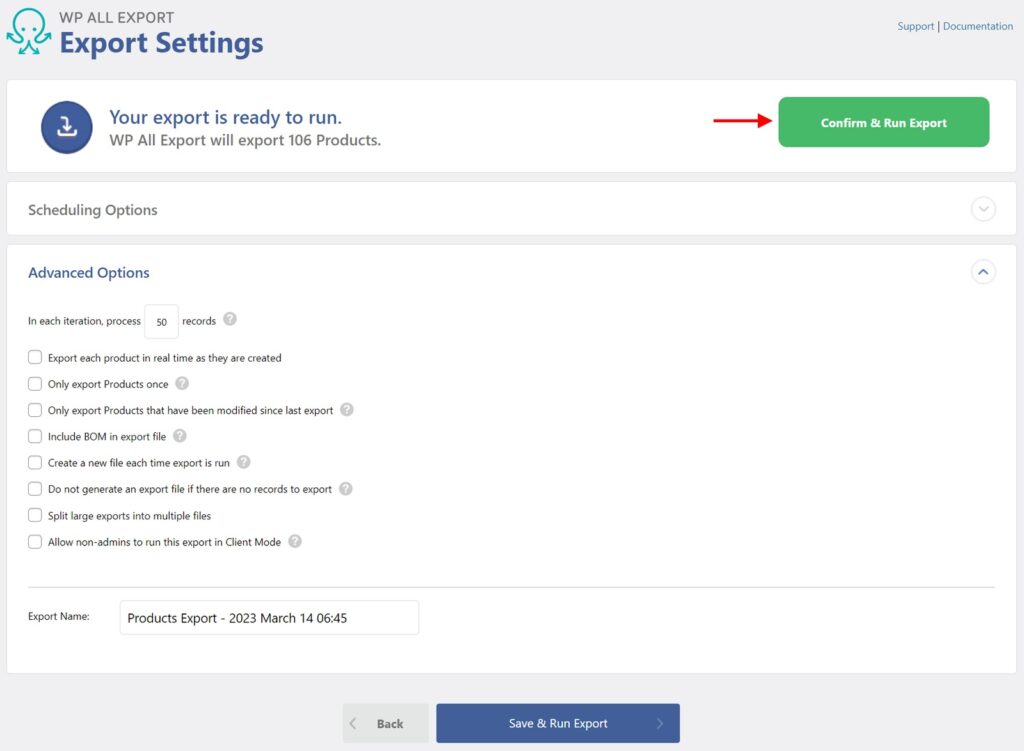
In this screen, you can set the following types of options:
- Schedule your product export to run every week or month by expanding the Scheduling Options section;
- Set whether each subsequent run of the export should only export products that were added or modified since the previous export;
- Change the batch processing size for the export (affects performance);
- Split large exports into multiple files to avoid exceeding server file limit sizes;
For this example, just leave everything at its default setting, but don’t forget this screen. It is full of powerful settings.
Click the Confirm & Run Export button to start the export.
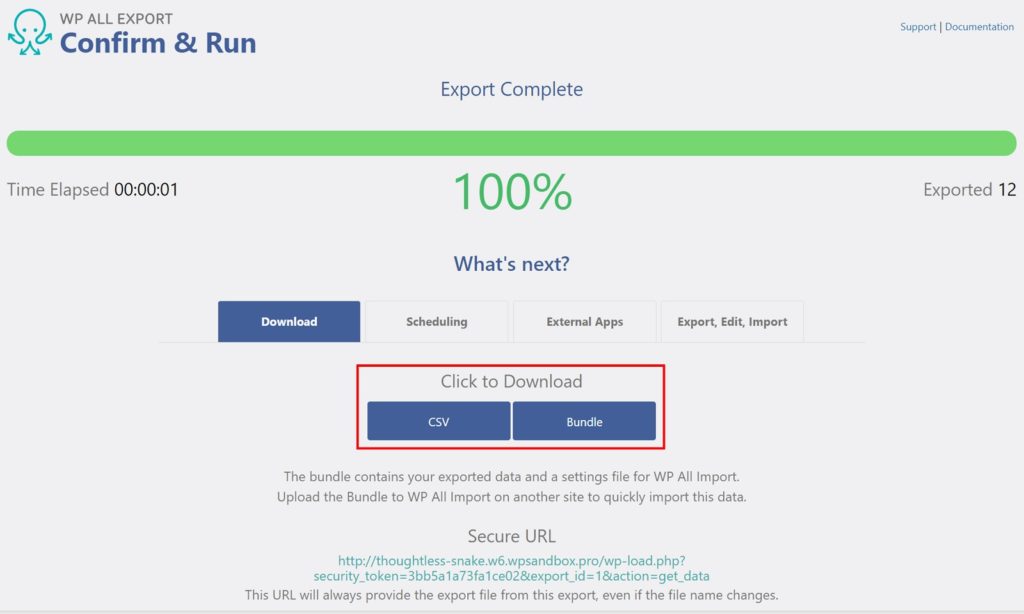
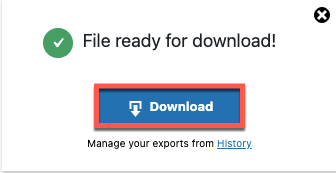
Step 4: Download Your WooCommerce Product Export
Once the export is complete, you will have two options to download your export file, both shown in the Click to Download section. One is the selected file type for your export (in this case, the default file type of CSV). The other is the Bundle option, which downloads a zip file that contains the export file and an import template. You can use the import template to migrate WooCommerce products to another site using WP All Import.
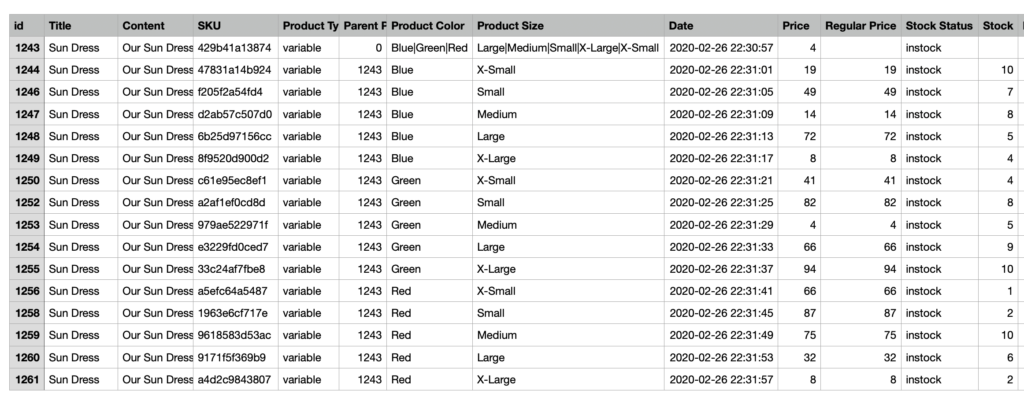
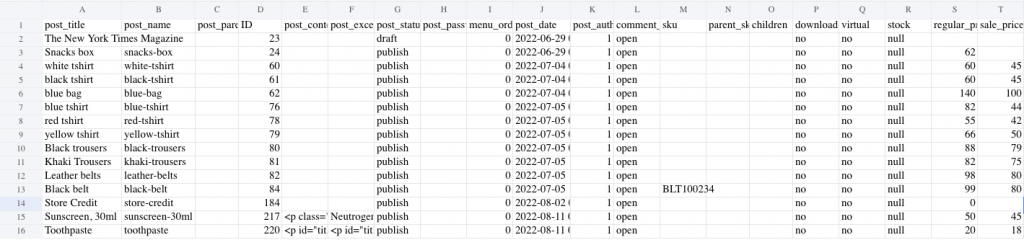
Here’s a quick look at an example product export:
Export WooCommerce Products — Advanced Topics
Filtering WooCommerce Product Exports
Often, a user wishes to export only a subset of products. This subset can be based on product categories, stock availability, or any of the export fields described in the previous sections of this tutorial.
To filter your products, expand the Add Filtering Options panel near the bottom of the New Export screen (step 1 in the above guide), then select an Element, Rule, and Value:
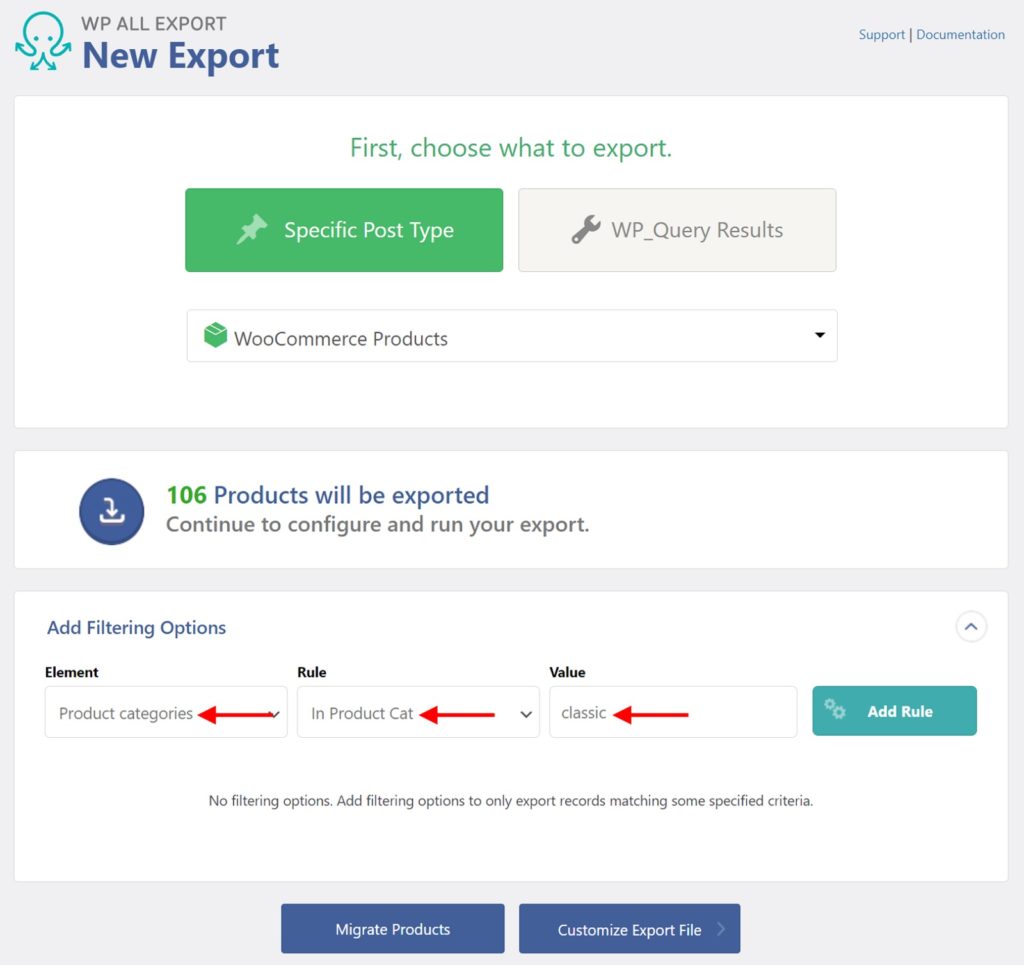
In this example, you are setting:
Element = Product categories
Rule = In Product Cat
Value = classic
This is the same as saying, “Export products with a product category of ‘classic’.»
If required, you can also combine multiple filters. For example, to export products with a product category of «classic» that are currently in stock, set your filters like this:
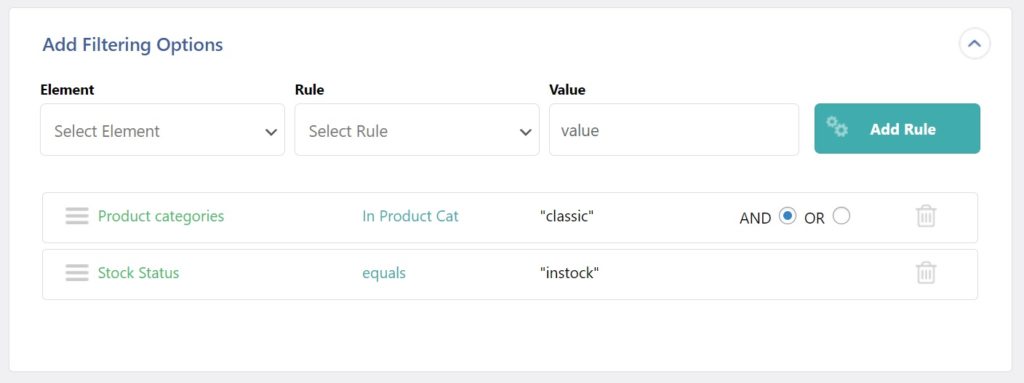
Product filters can be as complex as you need them. You can also modify existing export filters via All Export › Manage Exports › Settings using the same Filtering Options section.
Default Export File Format: CSV
By default, the export file type is CSV. This means that all new exports will automatically have CSV File selected as the Export Type:
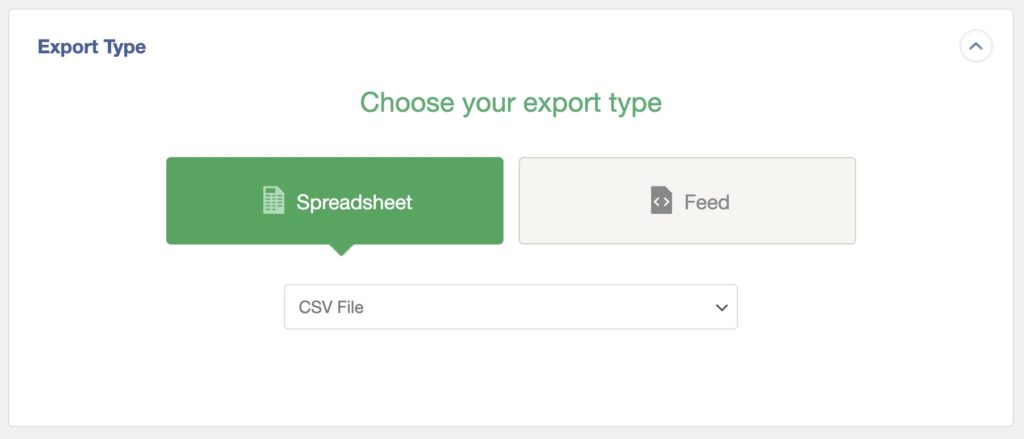
CSV stands for comma-separated values, which is a delimited text file that uses commas to separate values. This format can be opened with spreadsheet software or with most text editors.
How to Export to WooCommerce Products to Excel
To export to Excel, do the following in the Drag & Drop interface (step 2 in the guide above):
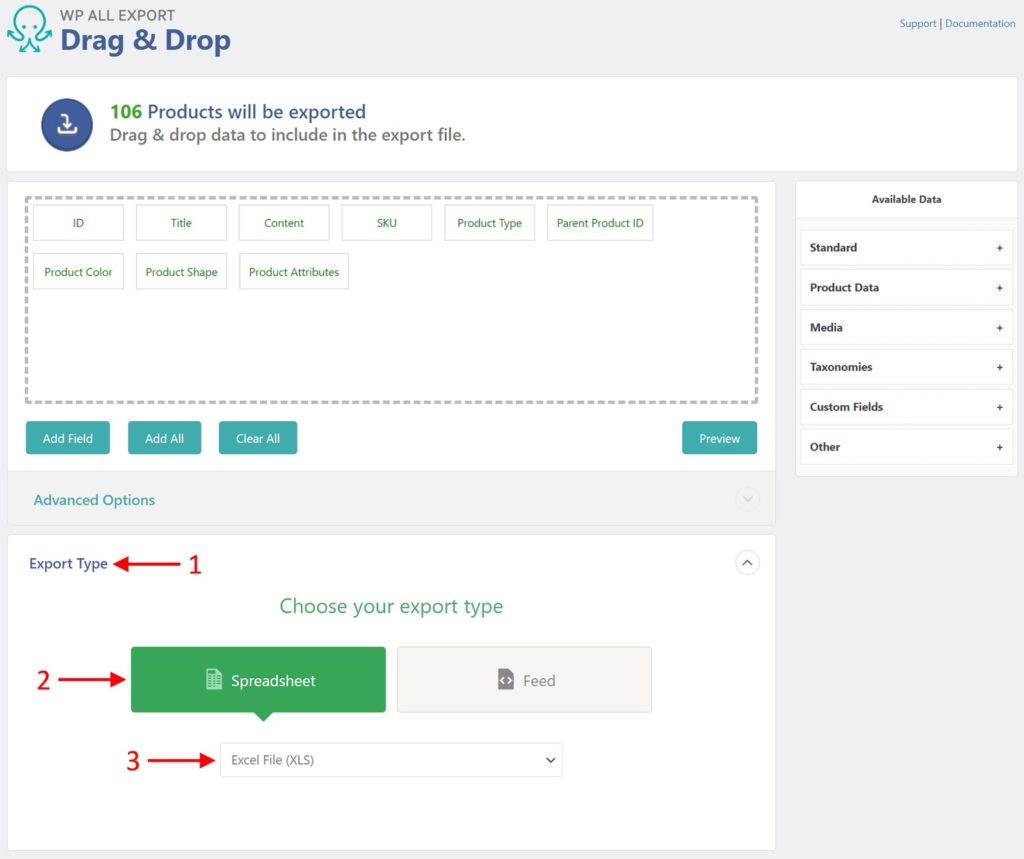
- Expand the Export Type panel just below the Advanced Options panel.
- Select Spreadsheet as your principal export type.
- Select either Excel File XLS or Excel File XLSX as your specific file format.
Excel files, either XLS or XLSX, can be opened using Microsoft Excel or other spreadsheet software that supports it.
How to Export WooCommerce Products to XML
Prefer exporting an XML file? See below:
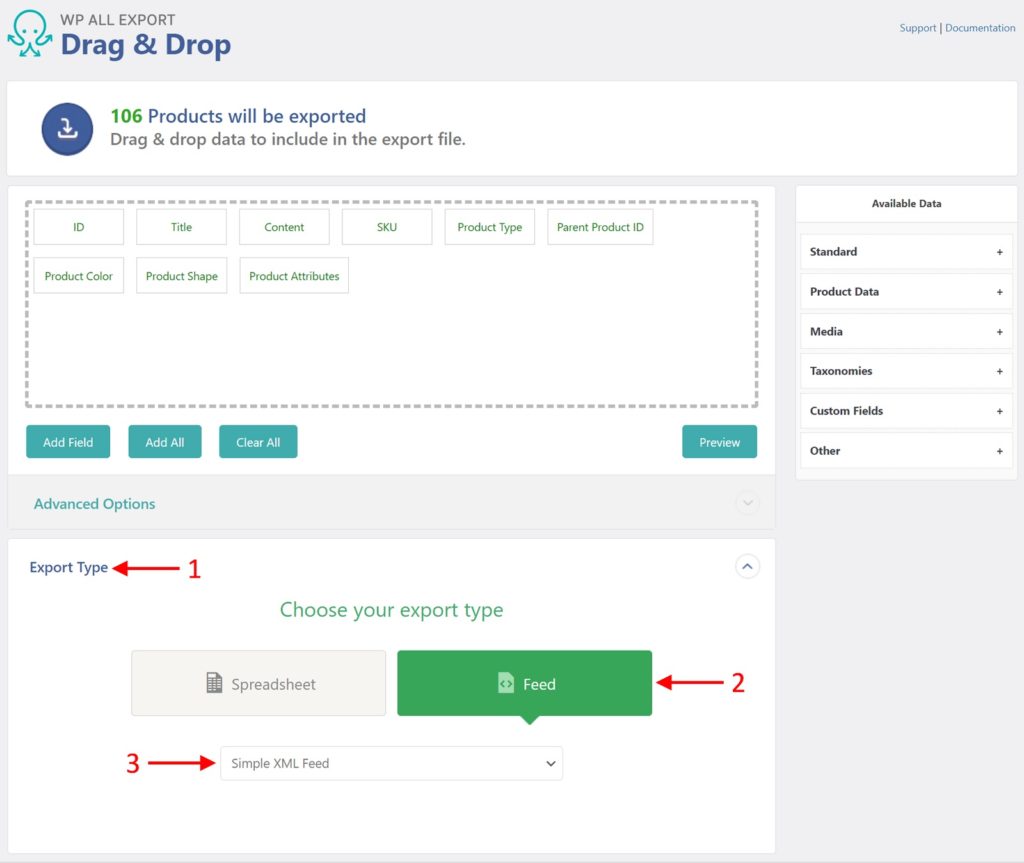
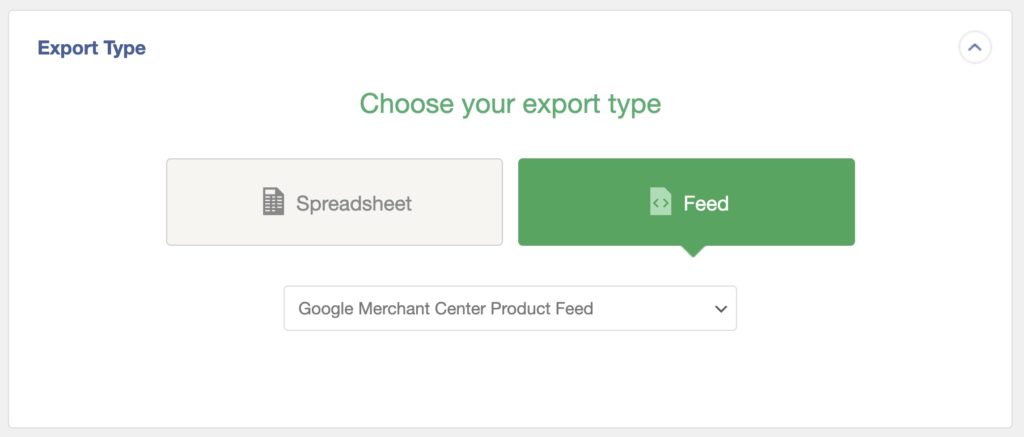
- Expand the Export Type panel.
- Choose Feed.
- Select either Simple XML Feed or Custom XML Feed.
XML stands for Extensible Markup Language, which is a markup language that doesn’t have predefined tags to use. Instead, you define your own tags.
Note that the Simple XML Feed creates a simple, single-level XML feed of your product data that will work for most cases. If you need something more sophisticated, the Custom XML Feed option lets you fully customize the structure of your XML file (including nested elements), control the names and order of the XML elements, and easily add static data to the feed. For more information on XML, see exporting WordPress data to XML.
Google Merchant Center Product Feed Export
There is also a Google Merchant Center Product Feed option (under Export Type) that lets you easily upload WooCommerce Products to the Google Merchant Center. WP All Export extracts all of the necessary information from your WooCommerce products to satisfy this feed format, with options to map categories and configure other options that are specific to the Google Merchant Center. This option generates a .TXT file out of the box.
Advanced Options Available When Exporting Products
You can see the Advanced Options panel just above the Export Type section:
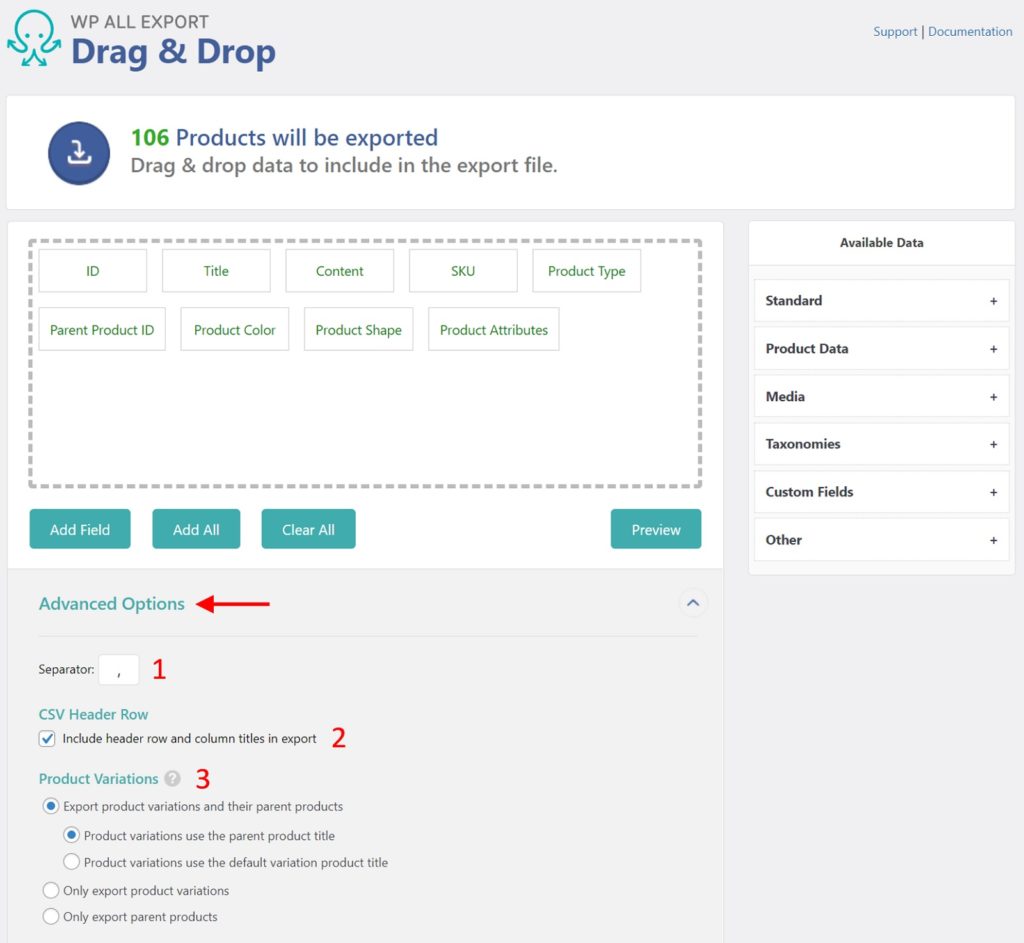
Use this panel to control various settings for the export file. For CSV files, these include:
- The field separator. The most common choices here are either the comma or the pipe (I) separator.
- Whether to include header row and column titles in the export.
- Settings for exporting product variations, all of which are self-explanatory.
Excel files only allow the product variations options, while XML files support both product variations options and CData tags.
Export WooCommerce Products — Frequently Asked Questions
If you are looking for information on our product export add-on, see Export WooCommerce Products.
What Plugins Do I Need to Export Products From WooCommerce?
To export products from WooCommerce, you need WP All Export Pro and the WooCommerce Product Export Add-On. These are included in the WooCommerce Export Package.
How Do I Export a Single Product From WooCommerce?
- Create a new export in All Export > New Export.
- Select WooCommerce Products from the dropdown list.
- Click on Add Filtering Options and add a rule to target the desired product.
- Run the export and download the exported WooCommerce product.
How Do I Export All WooCommerce Products?
- Navigate to All Export > New Export.
- Select to export WooCommerce Products from the available post types.
- Do NOT apply any filters.
- Complete the export and download the exported WooCommerce products.
How Do I Export WooCommerce Products to CSV?
To export WooCommerce products to CSV, just follow the steps in this guide, as CSV is WP All Export’s default file format.
How Do I Export WooCommerce Products to Excel?
- Create a new export in All Export > New Export.
- Select WooCommerce Products from the available post types.
- Customize the export file.
- Select Export Type > Spreadsheet > Excel File.
- Complete the export and download the exported Excel file.
How Do I Export All Products From WooCommerce with Images?
- Create a new export for WooCommerce products, as explained in this guide, but do not set any filters. This will ensure that you export all products.
- Add the images and attachments to the export as per the Media section of Step 2 in this guide.
- Run the export and download your exported file.
- Check the contents of the export file to verify that the image data is correct.
How Do I Export Products and Categories in WooCommerce?
- Set up a new export via All Export > New Export.
- Choose WooCommerce Products from the dropdown list.
- Build your export file, then drag and drop the Product categories field from Available Data > Taxonomies.
- Complete the export and download your exported file.
How Do I Export Product Attributes in WooCommerce?
- Create a new export via All Export > New Export.
- Select to export WooCommerce Products from the dropdown list.
- Drag and drop the desired attributes from Available Data > Product Data > Attributes.
- Run the export and download the exported file.
How Do I Set Up a Google Shopping Product Feed for WooCommerce?
- Go to All Export > New Export and select WooCommerce Products.
- Change the Export Type to Feed > Google Merchant Center Product Feed.
- Configure the export as required.
- Upload to Google.
- You can also create a custom WooCommerce product feed.
See Export WooCommerce Products to Google Shopping for more information.
How Do I Schedule WooCommerce Product Exports?
You can schedule your WooCommerce product exports to run on any schedule. You can do this using either cron jobs manually via your server or by using our automatic scheduling service to set your product export schedule directly from our interface.
To learn more, please see How to Schedule WordPress Exports.
How Do I Import Products into WooCommerce?
- In the WordPress main menu, navigate to All Import › New Import.
- Choose how you want to import your data (i.e., upload a file, download a file from a URL, etc.).
- Select your import file.
- Choose your import target (i.e., WooCommmerce Products).
- Map the incoming fields to your WooCommerce target fields using drag & drop.
- Run the import.
For a full list of import features, see Import WooCommerce Products.
How Do I Migrate Products to a Different Website?
- Export a set of WooCommerce products.
- When downloading your export file, choose the Bundle option. In addition to the exported products, the bundle contains an import template.
- To migrate the products to the other site, upload the bundle file.
- WP All Import will automatically import the WooCommerce products from the bundle file based on its import template.
- Check your imported products.
For additional information, see Migrate WooCommerce Products.
How Do I Bulk Edit WooCommerce Products?
- Export the products that you wish to edit.
- Open the export file in a spreadsheet app, where it is easy to perform bulk edits using copy and paste, search-and-replace functions, etc.
- Complete your edits.
- Reimport the edited file back into WooCommerce.
- Verify your results.
To learn more, please see Easily Bulk Edit WooCommerce Products.
How Do I Print a WooCommerce Product List?
The quickest way to print a WooCommerce product list is to go to Products > All Products and click Control+P from your browser. Just click the Print button to print your WooCommerce product list. If you want to control layout, styling, or manipulate the list data in any way, export your products to a spreadsheet and print from there.
How Do I Export Sales from WooCommerce?
- Navigate to All Export > New Export.
- Choose to export WooCommerce Orders in the dropdown list.
- Define the export template with all of your orders.
- Proceed to run the export.
- Download the exported file with all of your sales.
For additional details, see WooCommerce Order Export.
Learn how to export WooCommerce reviews.
Describes how to export WooCommerce orders to a CSV, Excel, or XML file.
Shows you how to export WooCommerce customers to Excel or another spreadsheet.
Learn how to export WooCommerce coupons.
Last updated on August 25, 2022
With the Product Import Export Plugin for WooCommerce, you can easily export WooCommerce products. The products are exported to CSV (Comma-separated values), XML (Extensible Markup Language), TSV (Tab-separated values), or Mircosoft Excel files. The Excel file can have XLS or XLSX file formats.
To export the product data to an Excel file:
- Navigate to WebToffee Import Export (Pro) > Export from your WordPress admin dashboard.
- Choose the post type as Product.
- Now select an export method. Since Advanced export is selected by default, let’s proceed with that (Note that Excel is supported for quick export as well).
- You can filter out the required data with the help of WooCommerce product filters using this step. However, if you want to export all data ignore this step and proceed to the next.

- In this step, you can select, rename and re-order the product data columns that you want in the Excel file. But if you are fine with the default selections, you may simply proceed to the next step.
- In the Advanced options/Batch Export/Scheduling page, you may provide an export file name and change the Export file format to XLS or XLSX.
- Configure other advanced options on the page if required and then click on the Export button.

- Click on Download in the pop-up window to initiate the file download.
Refer to the detailed documentation on how to import and export WooCommerce products for more information.
With this, you can get all the information about a product, such as images, categories, prices, and so on, in an excel spreadsheet.
- Was this article helpful?
- Yes, thanks!Not really

Written by
WebToffee Team
WebToffee Team is a group of WordPress and WooCommerce enthusiasts consisting of expert developers, testing engineers, technical support engineers, and SMEs.
Often, when you wish to revamp your website or make major changes that may potentially impact your store structure or product categories, it would be wise to backup all your Products data first by simply exporting your products and products categories to excel or CSV file.
In this post, we’ll take you through the steps on how to export your WooCommerce products categories to excel or even Google sheet and thus have a backup of the data.
For this requirement, you can use a plugin known as the WooCommerce Store Exporter plugin. It has free as well as paid versions.
Another plugin you can use is Smart Manager. Smart Manager plugin allows you to export products, categories, attributes and all other product fields to CSV. You can also export product data based on advanced search filters.
If you don’t wish to use a plugin, the other alternative is to write a query using the three database tables viz. wp_term_taxonomy, wp_term_relationships and wp_terms, or take a backup of these tables, as information pertaining to product categories is stored in these tables.
How to Export Products and Categories to Excel or CSV using WooCommerce Store Exporter Plugin
Keep reading to take a grasp of how to export WooCommerce categories with a third-party plugin. Later in the post, we’ll walk you through how to export products with the Woocommerce platform’s built-in feature.
Step 1: Install and Activate the WooCommerce Store Exporter Plugin
This free plugin by Visser Labs lets you export a wide range of elements of your WooCommerce Store including your categories and all the products under it. Installing this plugin is the same as every other plugin in WordPress. However, if you are a beginner, here’s how to install and activate plugins in WordPress.
Step 2: Go to the plugin page
Once you install this plugin, you can access the Export option from the Plugins page or click on the Store Export option which will appear inside the WooCommerce menu on the left-hand side of your WordPress dashboard:


Clicking on any of the two links above (as shown in the screenshots) will take you to the Export page. As you can see in the screenshot of this page below, with this free version, you can export Categories, Products, Tags and Users.

Step 3: Click on the Export Categories.
You will be directed to a page where you can still change your selection or leave it to the default selected option which is “Categories”. If you wish to select only a few category fields, scroll below else, click on Quick Export to generate a CSV file.

Step 4: Open the Downloaded File with Excel on Your Computer
As mentioned before, if you want to only export certain fields of the Category from your Woocommerce store, you can skip the “Quick Export” and instead scroll down the page, choose the required fields and click on Export Categories. This will also generate a CSV file.

This file will contain columns pertaining to every category field:

This plugin however requires you to upgrade to their paid version if you wish to import the product categories.
Though this plugin was last updated 9 months ago at the time of writing and hasn’t been tested with the latest 3 major releases of WordPress, it worked fine when I ran my tests on WooCommerce 3.6.3 & WordPress 5.1.
Now that we have been able to export our WooCommerce categories, let’s see how we can export individual products to Excel or CSV files.
Exporting WooCommerce Products to CSV or Excel
Sometimes you may want to export WooCommerce products to an excel file instead of just the product categories. This requirement is met by the newer versions of WooCommerce (3. x). In these versions, you can export products directly through the dashboard.
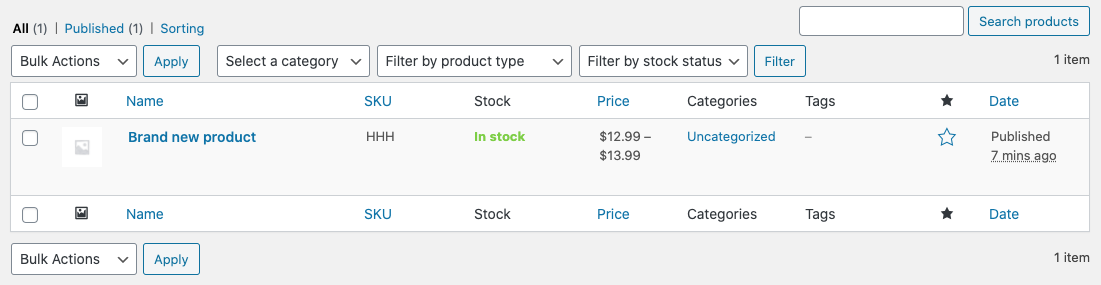
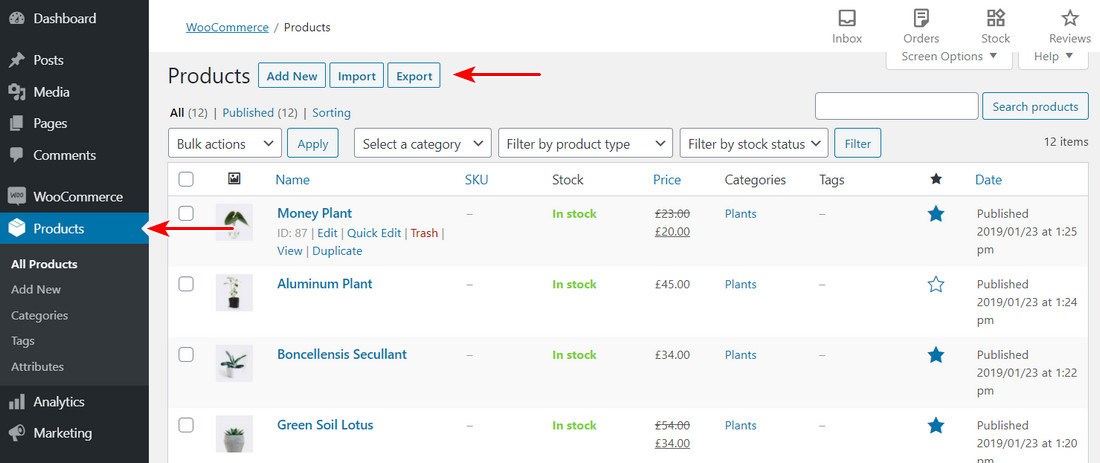
Step 1: Navigate to Products->All Products in your WordPress Dashboard:

Step 2: Click on the Export Button
Next to the heading that says “Products”, you will find three buttons viz. Add New, Import and Export. Now, click on the “Export” button as shown below:

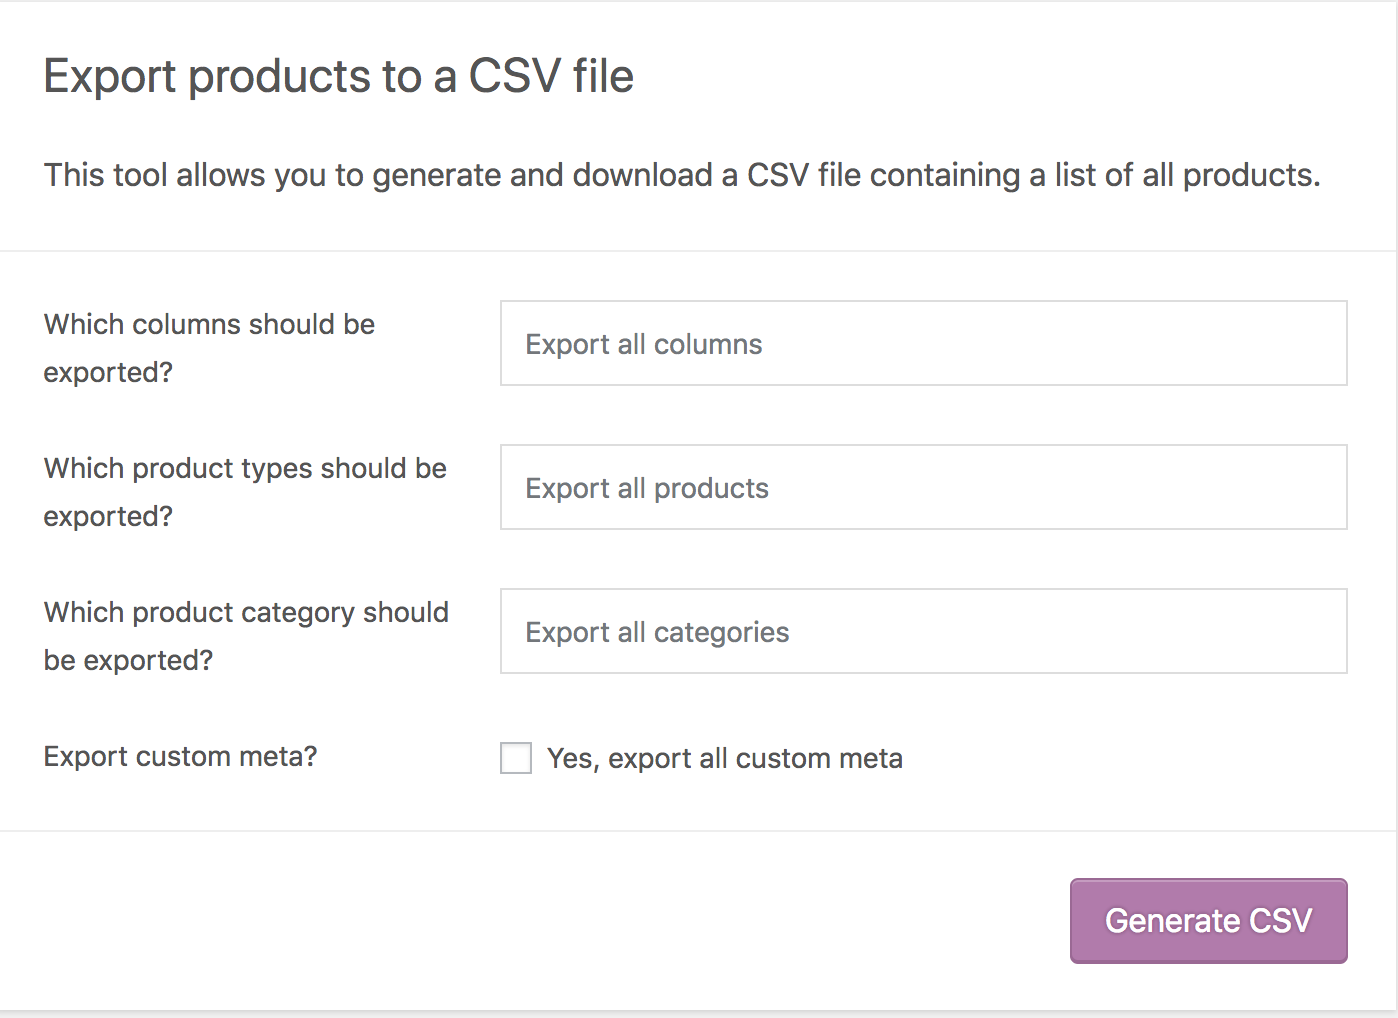
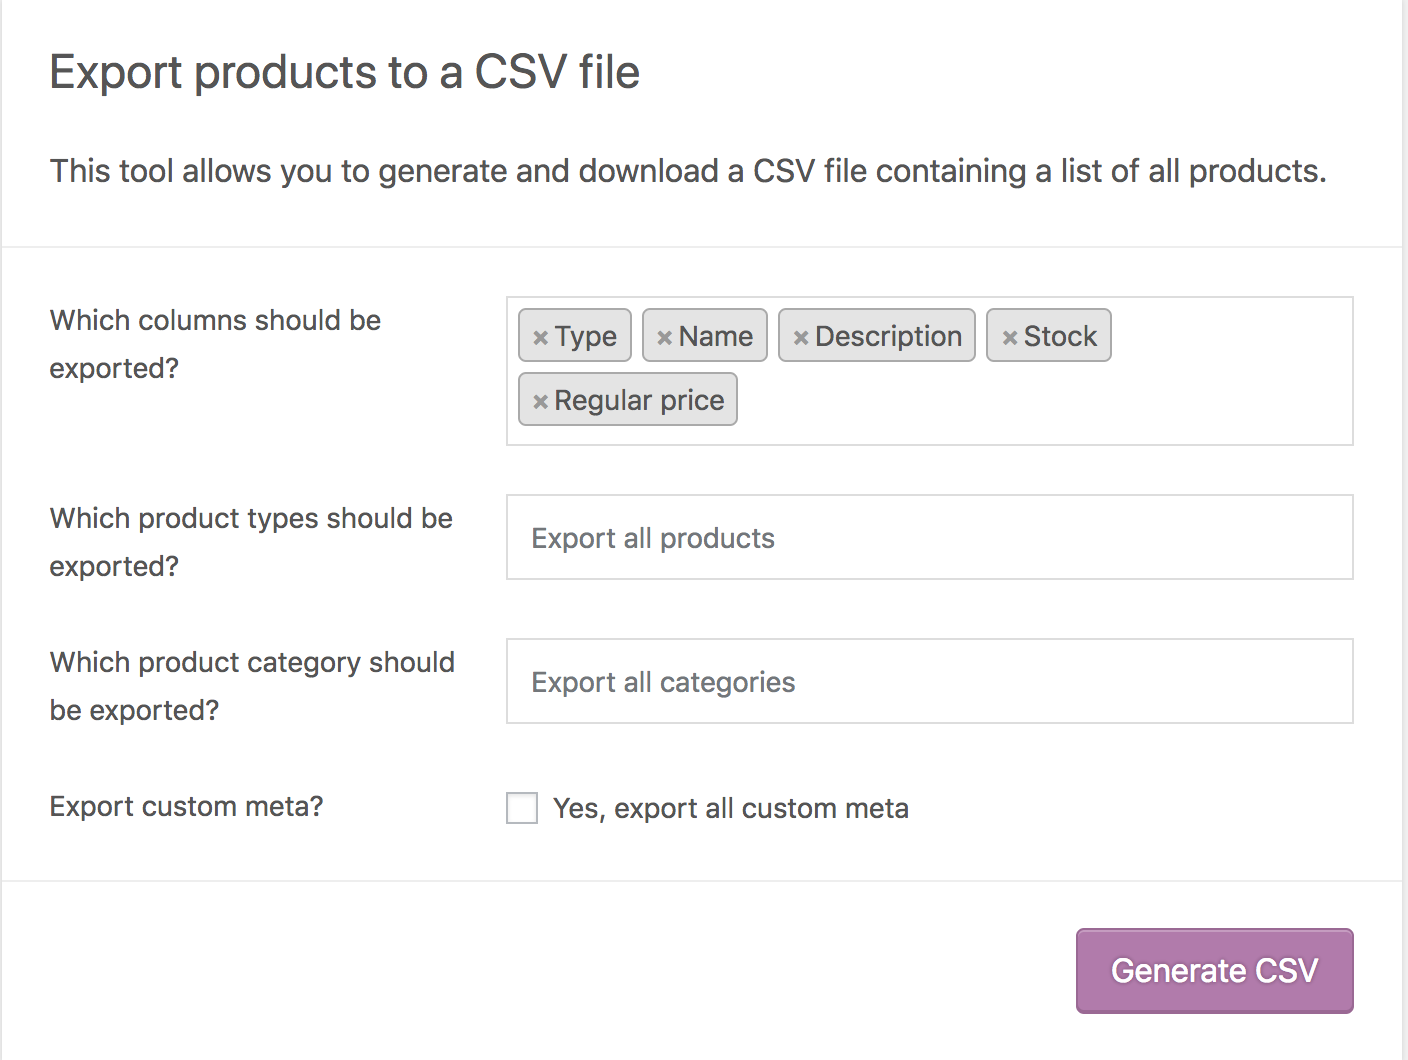
This is where you can export your products and categories:

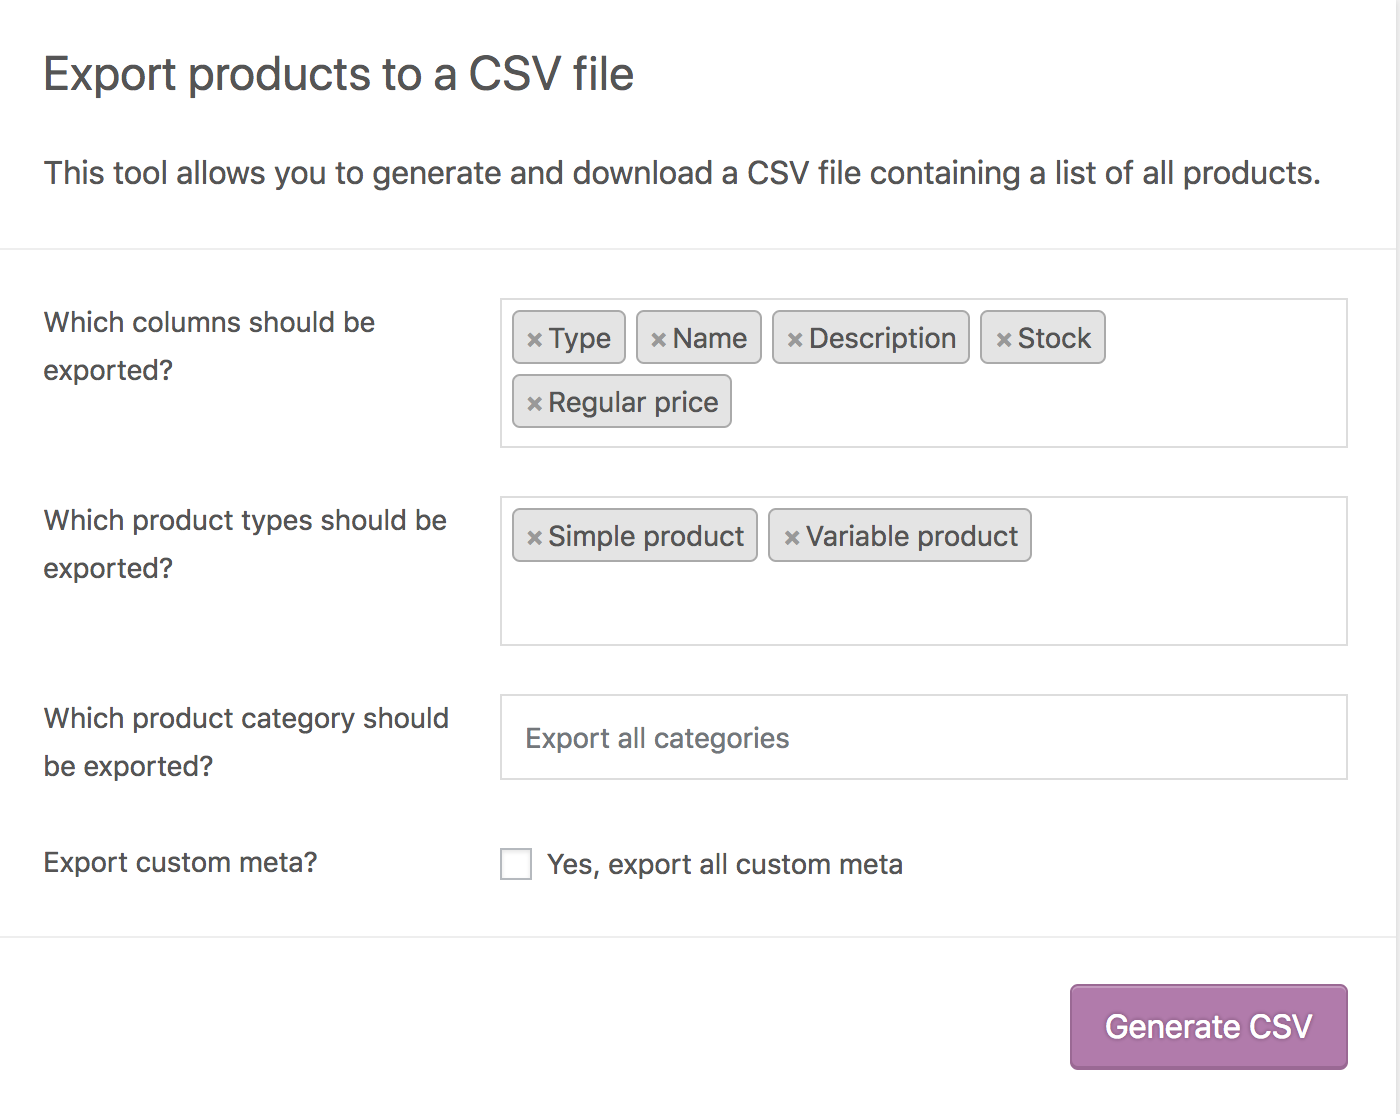
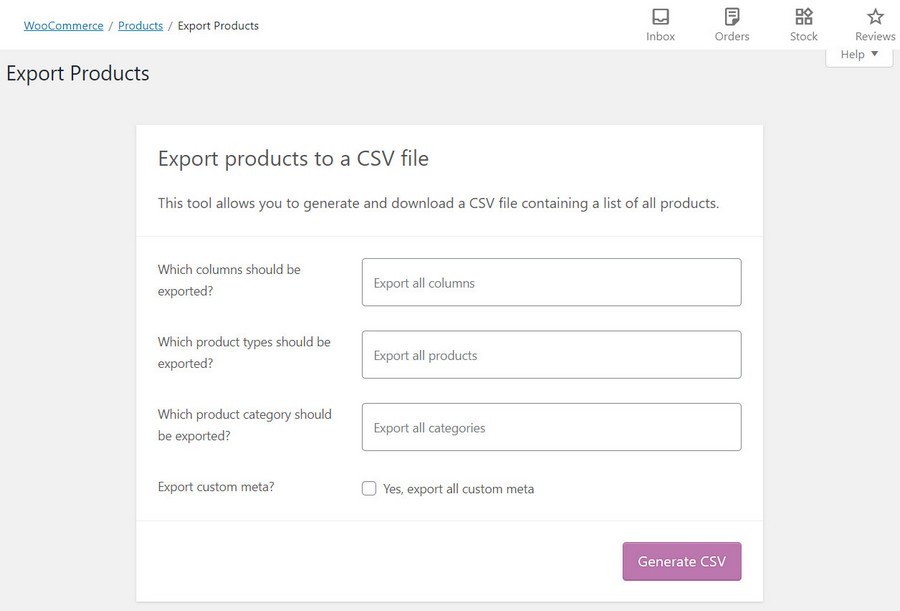
You can choose to export only a few columns of the product, by selecting the required columns from the dropdown available in the first field. However, it is recommended that if you intend to take a backup, then leave this to its default value i.e. “Export all columns“.
The next field takes in the product types that you wish to export if you have a specific requirement. You can specify which product categories you wish to export using the third field. The last field, which refers to “custom meta” is to be checked only if you have created any custom fields for your products.
Step 3: Generate CSV File
Finally, by clicking on “Generate CSV” as shown in the image above, a new CSV file of your product structure will be downloaded on your device, which you can then open with your Excel tool.


Note: All associated Products data will be exported to an excel file. This product data can include:
- SKU: A product code used for referencing products.
- Price: The product’s current price
- Regular Price
- Sale Price
- Stock Status:
instock,outofstock, andonbackorder. - Stock: The number of products currently in stock and available for sale.
- Tax information.
- External Product URL: The affiliate link for external products.
- Total Sales.
- Attributes: This will export the attribute’s name, value, if it’s is used in variations, if it’s visible, and if it’s a taxonomy or not.
- Shipping Class: If configured, it exports the name of the product’s shipping class.
Product Import and Export for Woo Plugin
With the free version of this plugin, you can export as well as import products. You can access this interface through the Plugins page or by directly clicking on the “Product Im-Ex” link under Products on the left-hand side of the dashboard.

As you can see, you can also specify which fields of the product you want to export and also mention a limit to the number of products you want to export. The offset field is used to specify the number of products to be skipped before exporting. In the case of this plugin too, a CSV file will be generated, which you can use to import the products again.

Wrapping it up
Exporting product categories as well as products is thus quite simple and it is also recommended that you do it every once in a while, to ensure copies of this data. This can be especially useful in multiple scenarios e.g. moving from one web platform to another, integrating with an external system or simply restructuring your categories. Another important thing that you might need to regularly export to excel is your products orders. And to help you in exporting your Woocommerce orders, we have created a step-by-step guide on how to export Woocommerce orders to Google Sheet in real-time.
WooCommerce has a built-in product CSV Importer and Exporter.
Import, export, or update hundreds or thousands of products in your WooCommerce store with a single CSV. This tool supports most product types, including variations.
- First-time store owners get started more quickly by exporting and importing products during setup.
- Existing store owners can update tens or hundreds of products with new info or place them on sale, or sync multiple storefronts.
Note: If you are using the Product CSV Import Suite paid extension, refer to documentation at: Product CSV Import Suite.
We recommend using:
- Online spreadsheet editor Google Drive / Docs
- Free spreadsheet app in OpenOffice
- Free Calc app in LibreOffice
- Numbers for macOS
If possible, avoid Microsoft Excel due to formatting and character encoding issues.
To import new products or update existing products, you need a CSV containing your product information. You can:
- Export a CSV of products from an existing store.
- Download a CSV file with sample data from GitHub and replace it.
- Use your own CSV. Any information you wish to include should follow the formatting and columns of the Product CSV Import Schema.
If using the built-in WooCommerce Product CSV Importer and Exporter tool to export a CSV, it already follows the schema and is ready to use. If using the blank and formatted CSV file, it also follows the schema; just be sure to enter the info as instructed at Product CSV Import Schema.
- CSVs should be in UTF-8 format.
- Dates should be defined for the store’s local timezone.
- Use 1 or 0 in your CSV, if importing a Boolean value (true or false)
- Multiple values in a field get separated with commas.
- Wrapping values in quotes allows you to insert a comma.
- Prefix the id with
id:if referencing an existing product ID. No prefix is needed if referencing an SKU. For example:id:100,SKU101 - Custom meta is supported/imported but only plain text – no support for JSON or Serialized data.
- Taxonomy term hierarchy is denoted with
>, terms are separated with commas. - Draft products are not exported, only published and privately published products.
- It is not possible to assign a specific post ID to product on import. Products will always use the next available ID, regardless of the ID included in the imported CSV.
- Images need to be pre-uploaded or available online to import to your store.
- External URLs are supported and imported into the Media Library if used, provided the images are directly accessible and not behind a redirect script (as happens on some cloud storage services).
- You can define the filename if the image already exists in the Media Library.
First-time and existing store owners using WooCommerce can use the CSV to add new products with one upload.
1/ Go to: WooCommerce > Products.
2/ Select Import at the top. The Upload CSV File screen displays.

3/ Select Choose File and the CSV you wish you use.
CSV delimiter (Advanced option): Generally CSV elements are separated by a comma. If you are using a different delimiter in your file, you can set it here.
4/ Continue.
The Column Mapping screen displays, and WooCommerce automatically attempts to match or “map” the Column Name from your CSV to Fields.
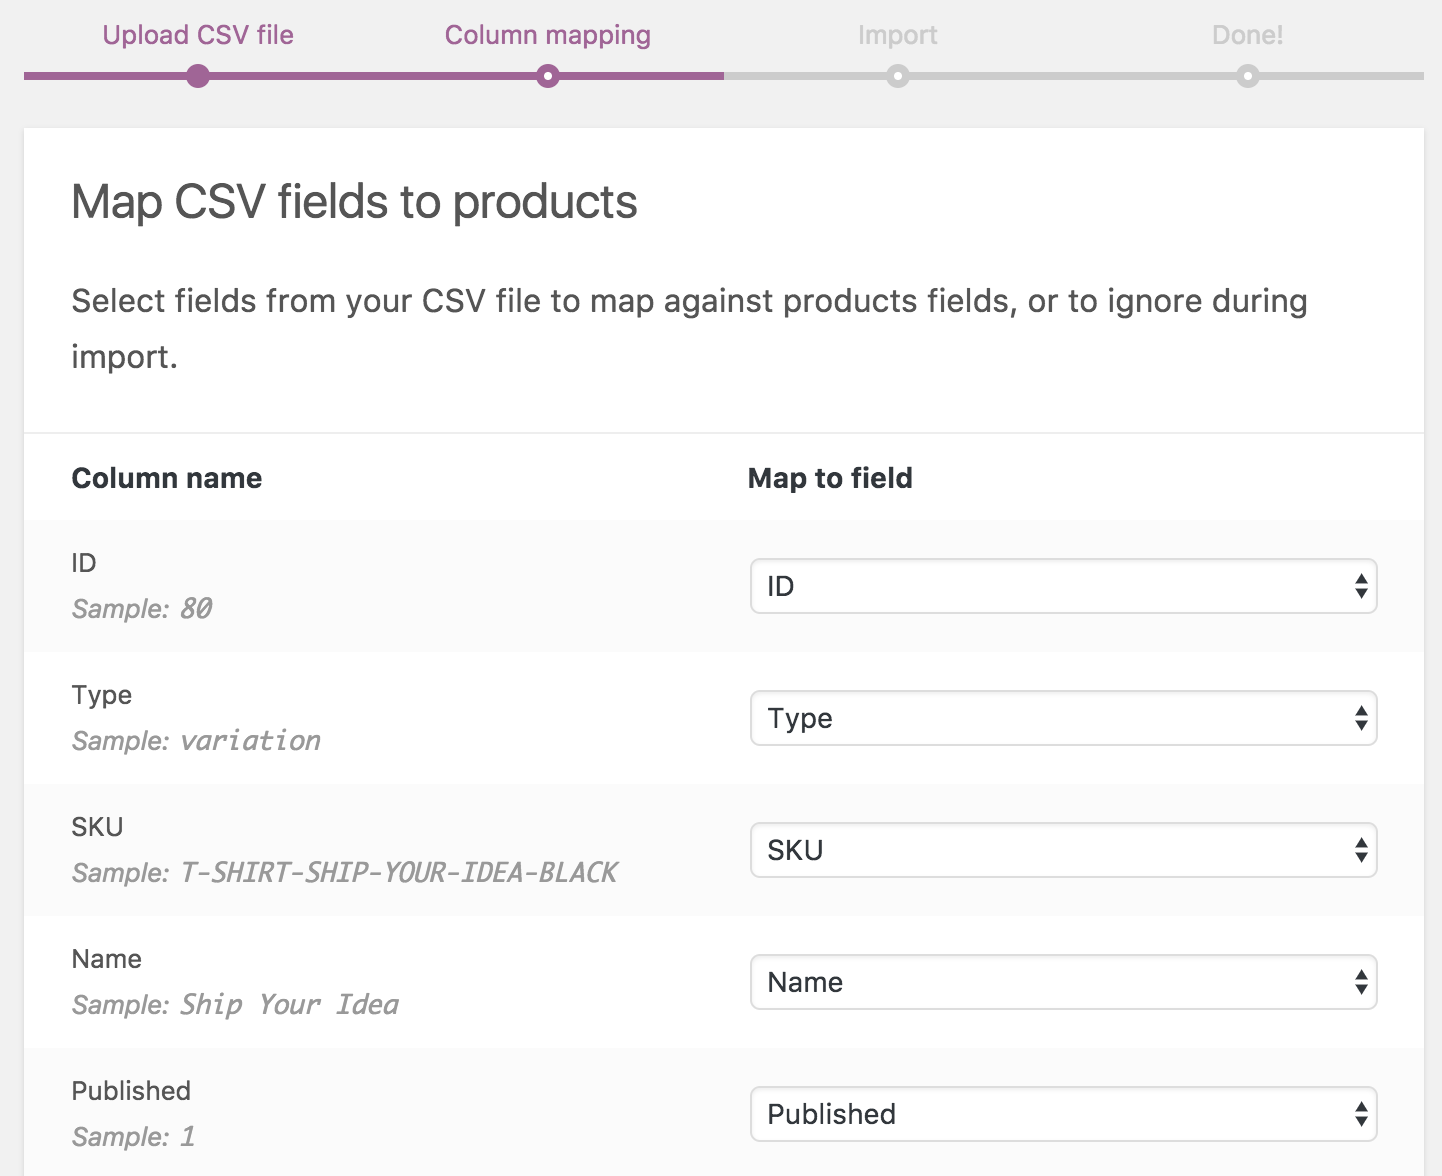
5/ Use dropdown menus on the right side to adjust fields or indicate ‘Do not import.’
*Any unrecognized columns will not be imported by default.
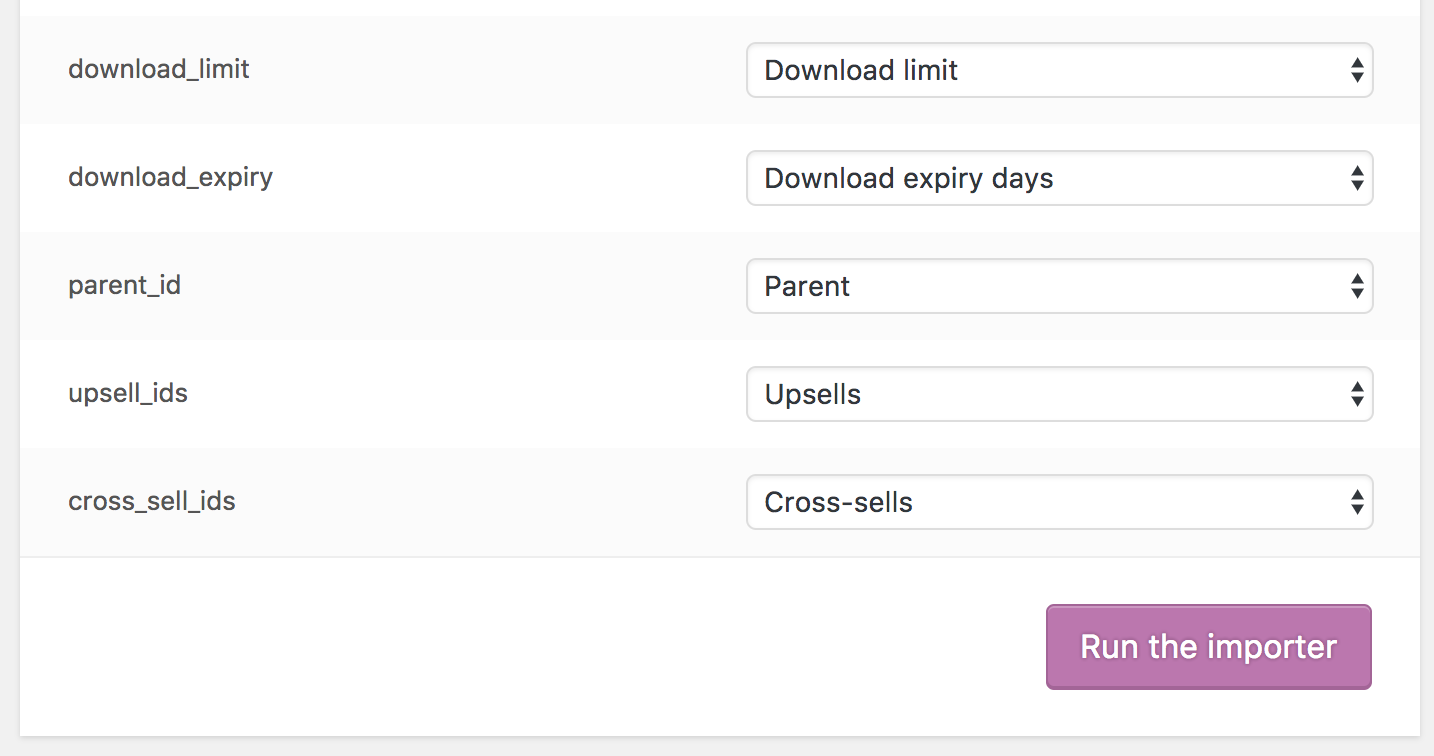
6/ Select Run the Importer.
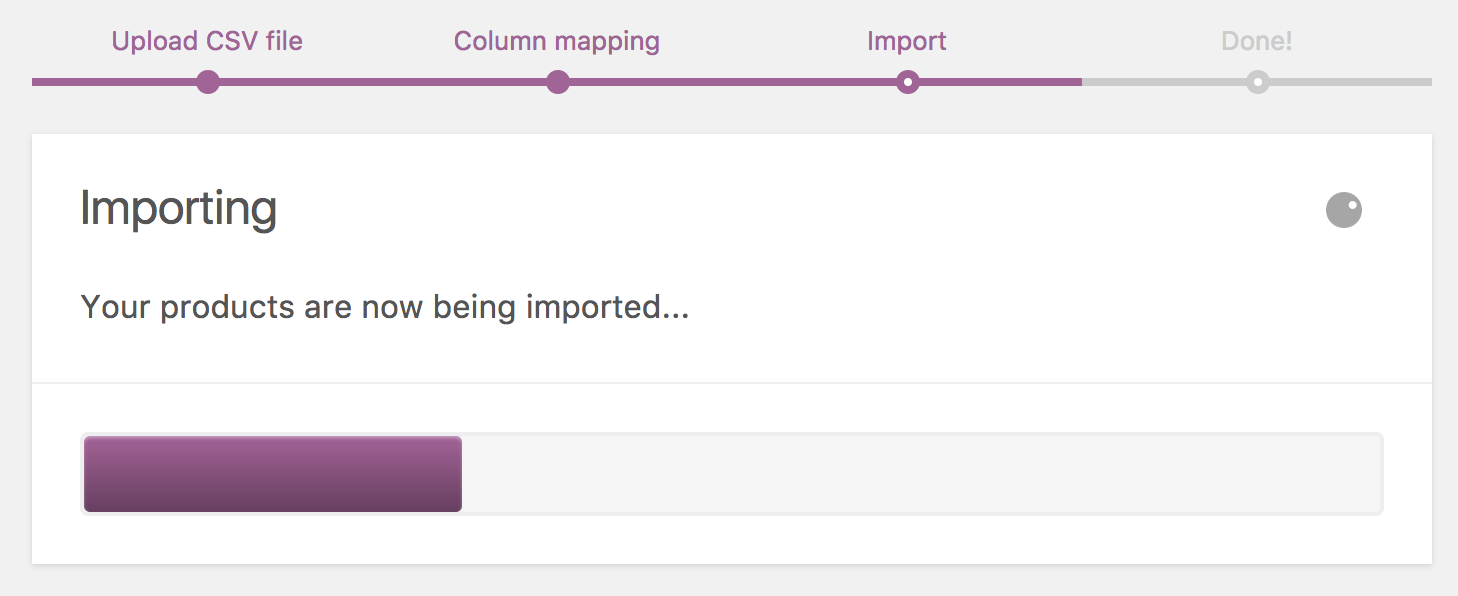
7/ Wait until the Importer is finished. Do not refresh or touch the browser while in progress.
Store owners can use the CSV Importer tool to update existing products with new info, e.g., Adding a brand, changing a tax class, bulk-update for a special sale or event, etc.
1/ Make a CSV file as indicated in Create Your CSV, using the IDs and/or SKUs of products you wish to update.
The importer uses the ID and/or SKU to auto-match and auto-update whatever info you enter on each line.
2/ Go to: WooCommerce > Products.
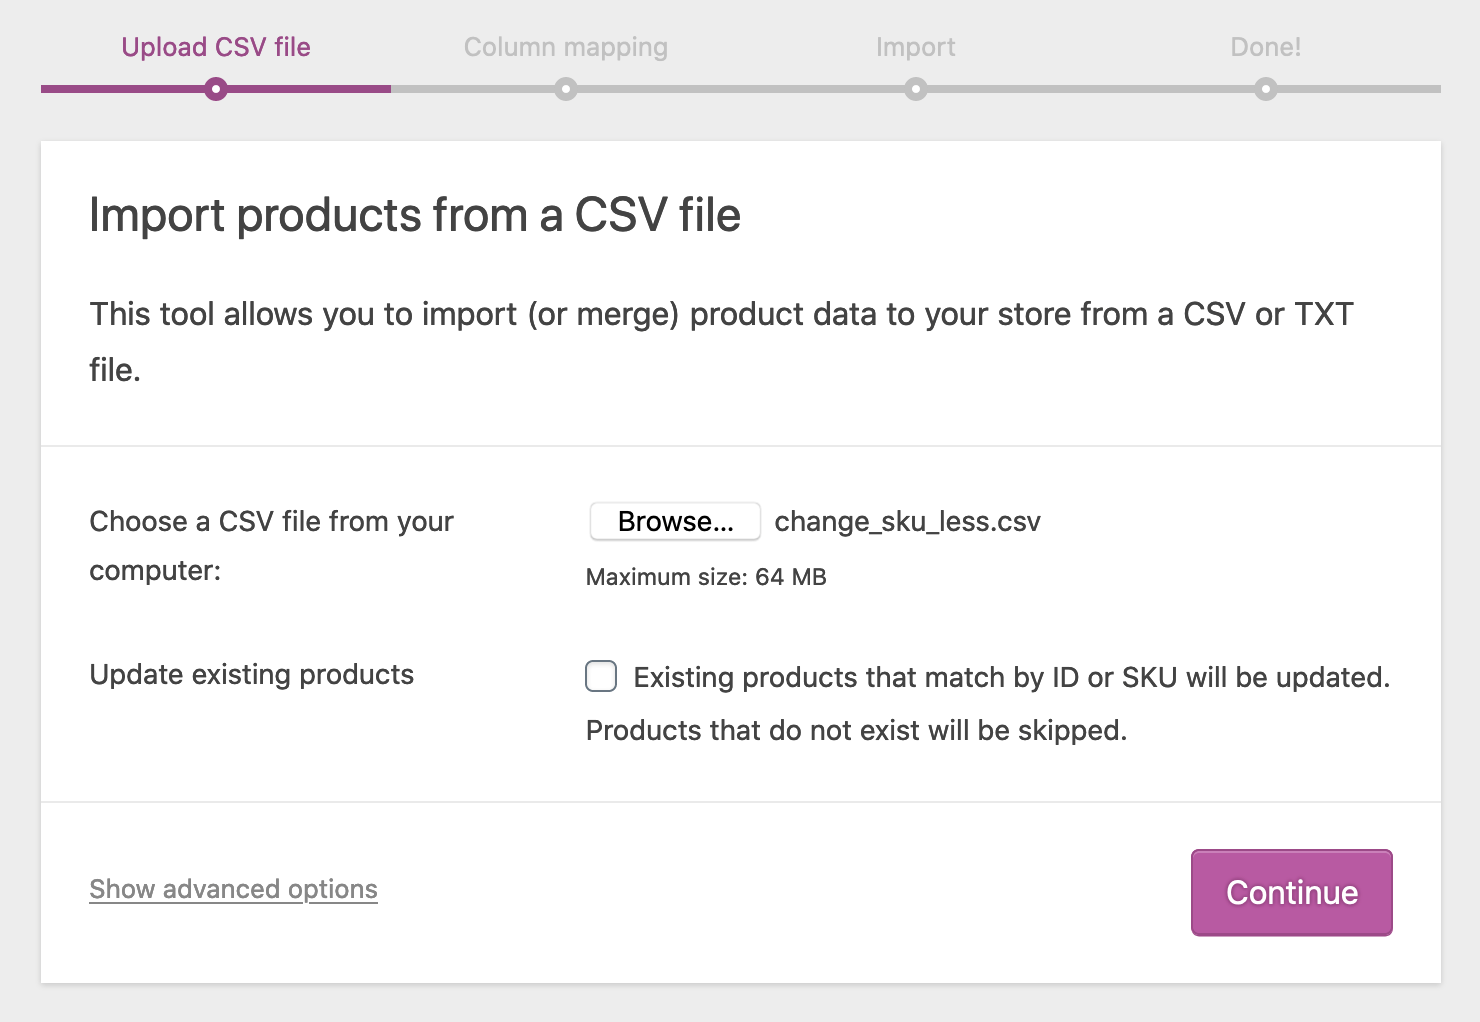
3/ Select Import at the top. The Upload CSV File screen displays.
4/ Select Choose File and the CSV you wish you use.
5/ Tick the checkbox for Update Existing Products.

6/ Continue.
The Column Mapping screen displays, and WooCommerce automatically attempts to match or “map” the Column Name from your CSV to Fields.
7/ Use dropdown menus on the right side to adjust fields or indicate ‘Do not import.’
*Any unrecognized columns will not be imported by default.
8/ Select Run the Importer.
9/ Wait until the Importer is finished. Do not refresh or touch the browser while in progress.
Store owners can use the CSV Importer tool to convert the existing simple product to a variable. In order to do that, the following steps need to be taken:
1/ Create a simple product that has a price and SKU.
2/ Export product via built-in CSV Exporter on the All Products page.
3/ Open CSV file and convert the simple product to a variable. Steps that need to be taken for it (for example to convert to a variable product with 1 attribute and 2 variations):
- Add 2 new rows
- Add 4 new columns after the last column:
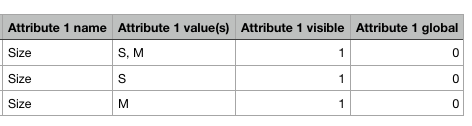
Attribute 1 nameAttribute 1 value(s)Attribute 1 visibleAttribute 1 global
In our case, we are adding Size variations so our new 4 columns look as follows:
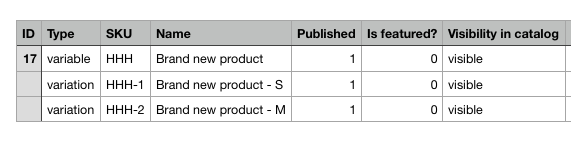
- Change the type of the product from
simpletovariableand add typevariationto variation rows (2 new rows that you created). Add SKU to variation rows. Give it a name as well. It looks like this in our example:
- Update the following columns as well (and any other columns if needed):

- Very important – add SKU to all fields in the
Parentcolumn – this is to map parent product with its variations:

4/ Save a new CSV file.
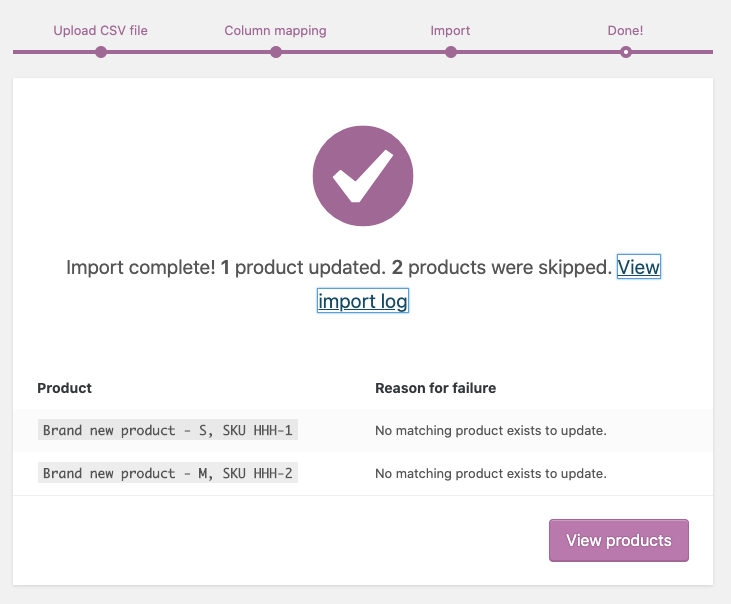
5/ Import the updated CSV file back to the site using built-in CSV Importer on All Products view.
6/ Select to update existing products before import since we want to update the
existing product on the site:
7/ Proceed with import (nothing to be mapped).
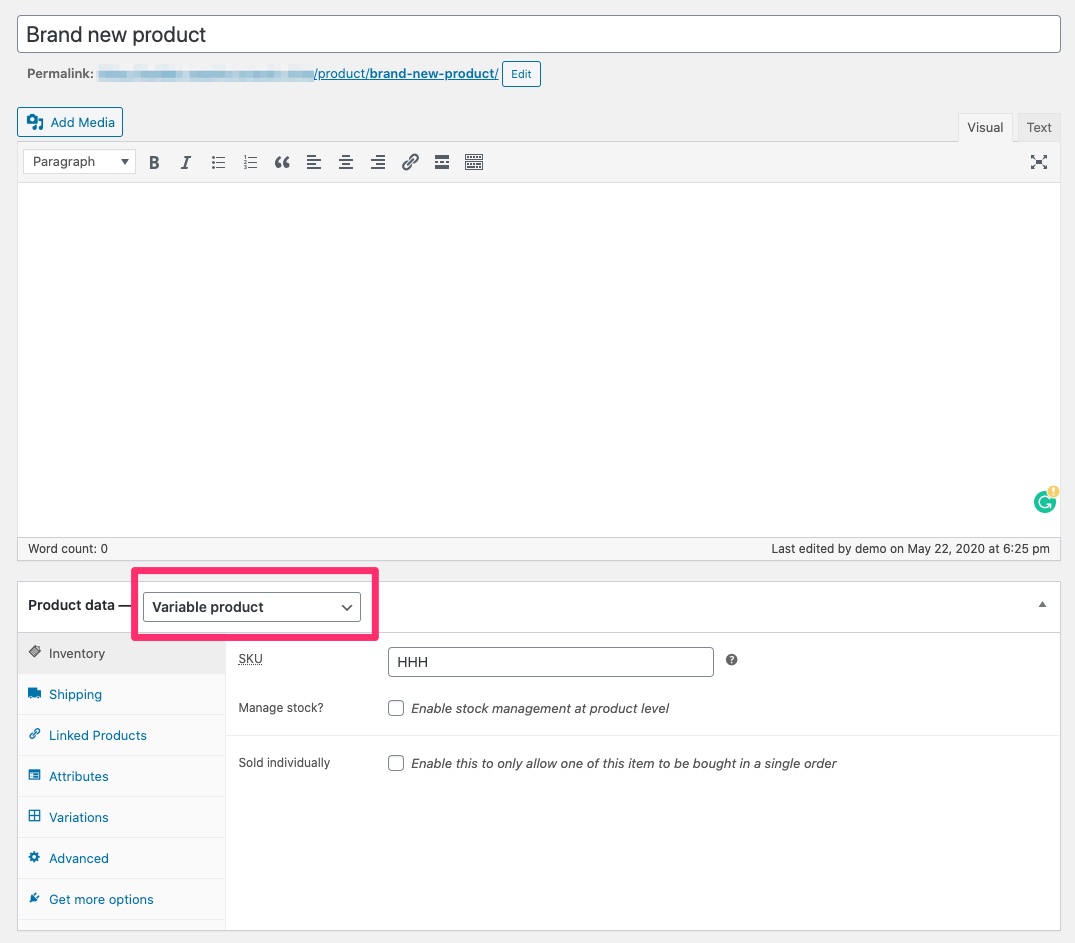
8/ You will see the following which is expected:
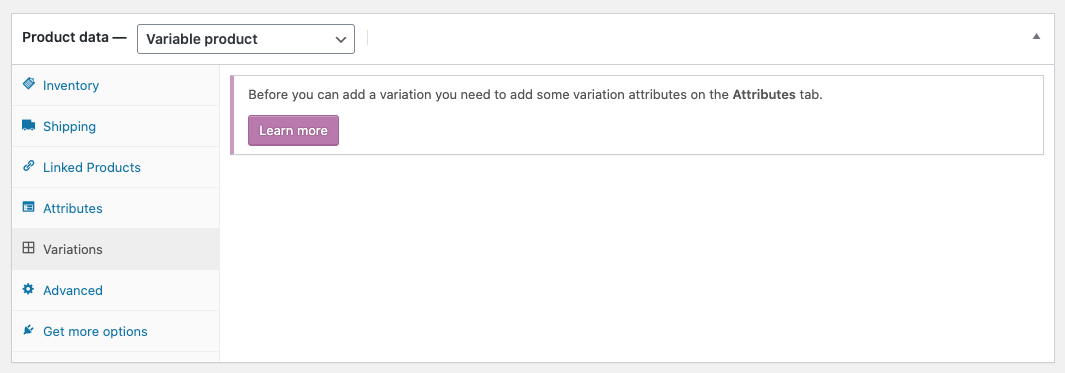
9/ Navigate to the product. You will see that it is now variable and has 1 attribute added but no variations were created. Note that Used for variations checkbox is not selected. This is also expected:
10/ Next, open the CSV file again (the one where you already created rows for variations) and delete the parent product row. Leave variations rows without changes:

11/ Save the updated CSV file.
12/ Next, import updated CSV file to the site but this time don’t select the box next to Update existing products:
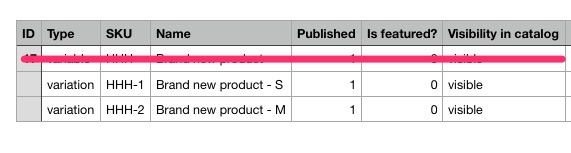
13/ Proceed with import (no fields need to be mapped). You should see that variations have been imported:

14/ After completing the import, navigate to the product. It should now be a variable product with variations:
Store owners wishing to export their current catalog of products for any reason can generate a CSV using the Product Importer/Exporter.
1/ Go to: WooCommerce > Products.
2/ Select Export at the top. The Export Products screen displays.
3/ Select to Export All Columns. Or select which columns to export by using the dropdown menu.
4/ Select to Export All Products. Or select which product types to export by using the dropdown menu.
5/Select to Export All Categories. Or select which categories to export by using the dropdown menu.
6/ Tick the box to Export Custom Meta, if you need this info.
Meta data on your products is typically from other plugins. Meta data columns are exported following the meta:-prefix standard detailed above in the importer mapping section. By default, no additional meta data is exported.
7/ Select Generate CSV. Wait for the export to finish.

8/ Exit the exporter.
Yes. Feel free to visit the WooCommerce repo at GitHub to see the custom code at Adding Custom Import Columns. Be aware that is Developer level info for which we provide no assistance under our Support Policy.
Yes. Feel free to visit the WooCommerce repo at GitHub to see the custom code at Adding Custom Export Columns. Be aware that this is Developer level info for which we provide no assistance under our Support Policy.
Why aren’t all my products exported?
Previous to WooCommerce 3.6.5, only products with a status of ‘publish’ or ‘private’ were exported, not those in ‘draft.’ If you want to change that, there’s a filter you can use, but this would require custom coding, which we can’t provide assistance with.
Why aren’t all of my products imported?
Previous to WooCommerce 3.6.5, only products with a status of ‘publish’ or ‘private’ were imported, not those in ‘draft.’ As of WooCommerce 3.7, CSV product import now allows true/false values for the published field, as well as the original 0 (private), -1 (draft), 1 (publish) values.
Are you seeing the following permission error when importing your CSV file?Sorry, this file type is not permitted for security reasons.
When an import file contains HTML the file type can be mis-detected by WordPress on some servers. One workaround is to add the following line to your wp-config.php file:define( 'ALLOW_UNFILTERED_UPLOADS', true );
For security reasons, you should only enable this temporarily for the time of import, and then remove it again from the configuration file.
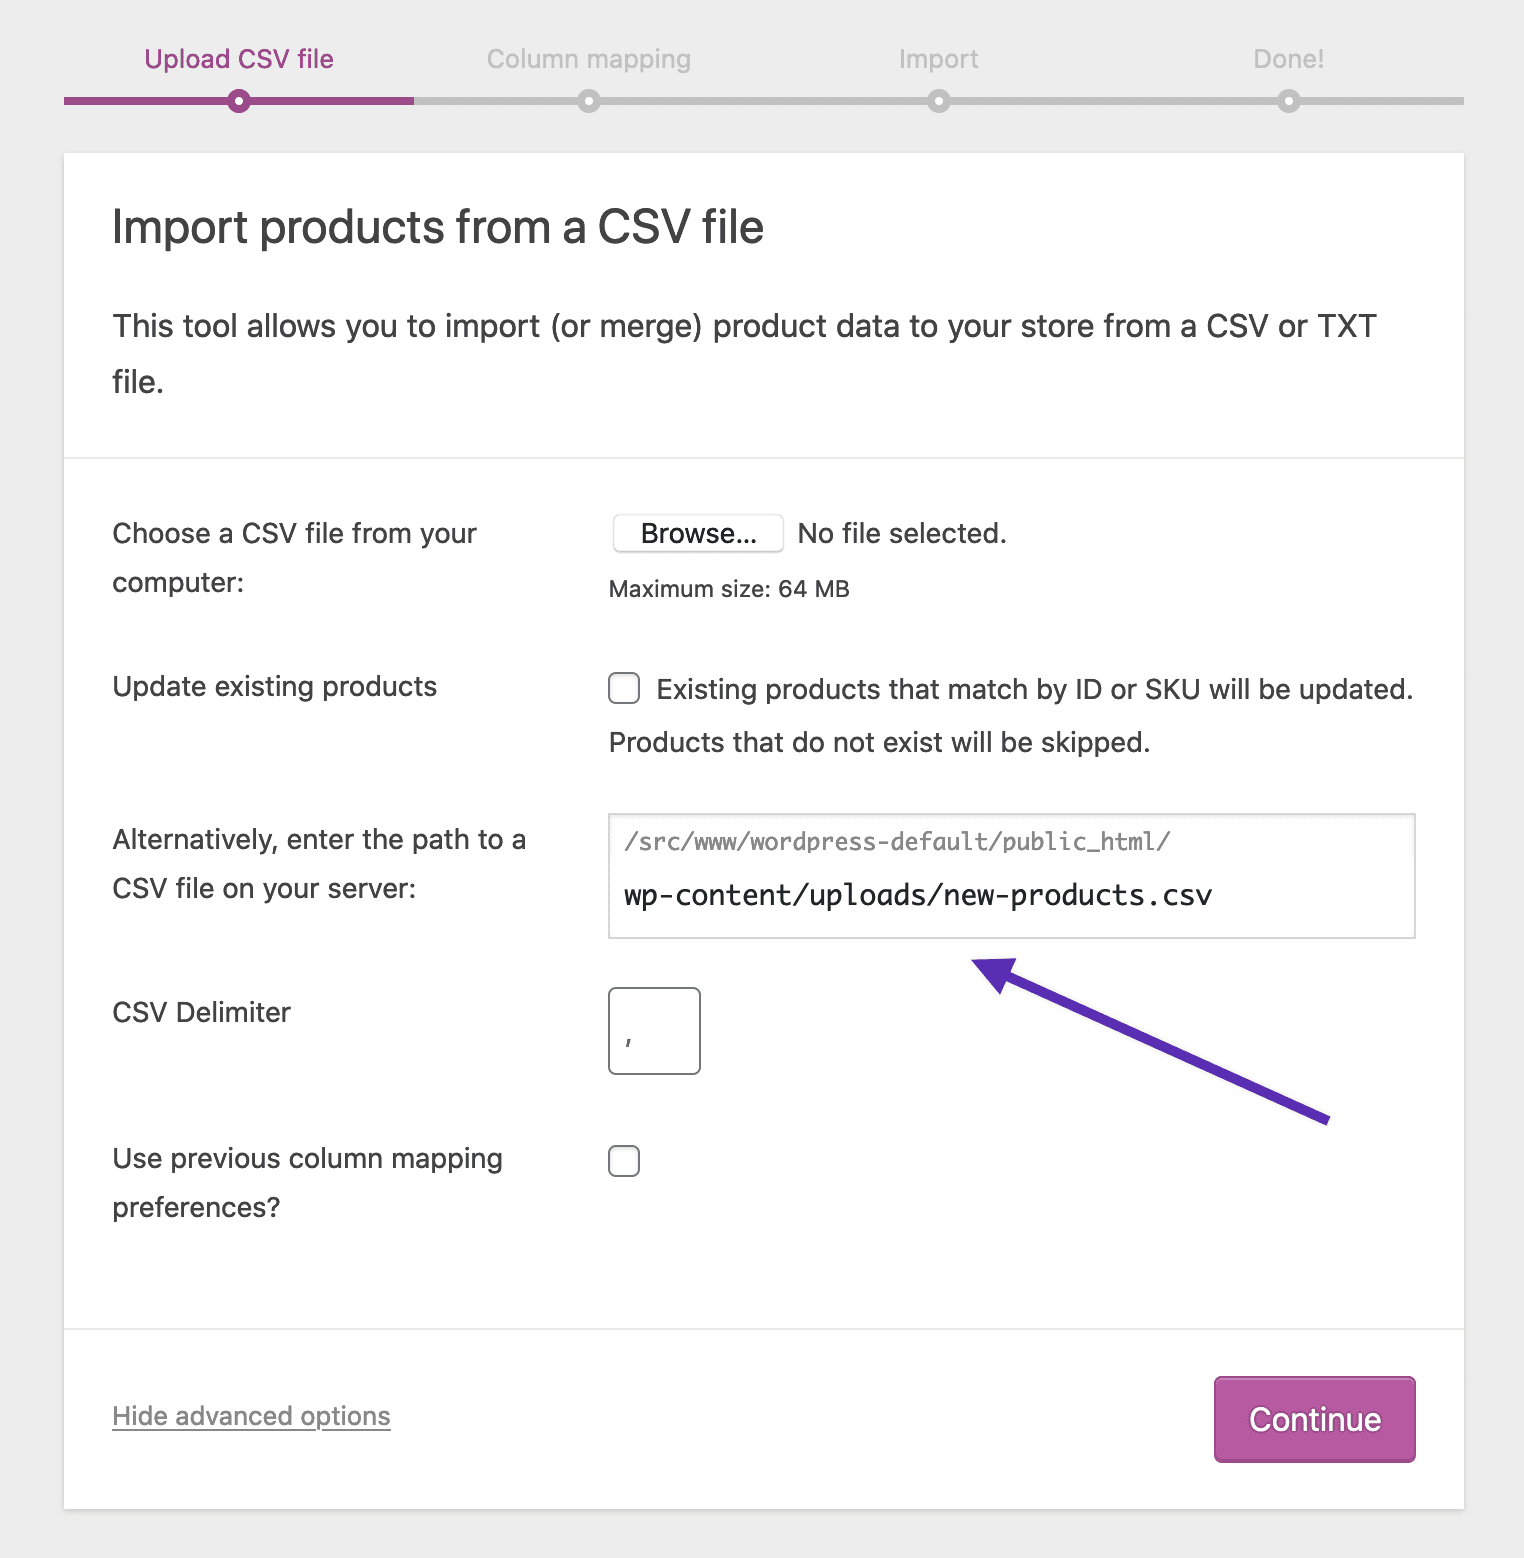
Alternatively, instead of Choose a CSV file from your computer, you can first upload the CSV file to your website’s upload directory via FTP or your host’s admin panel file manager. Then, via Advanced Options, specify the location of that file for upload:
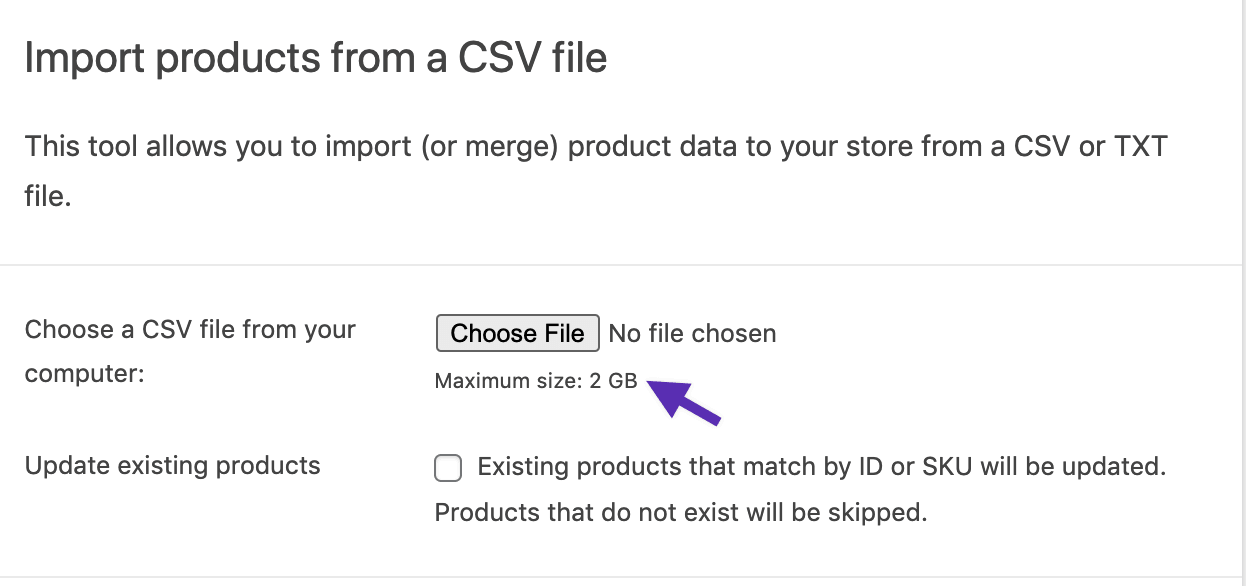
The Maximum size value is set at the server level. To increase the maximum file size, please contact your hosting company. As a workaround, you can split the CSV into multiple parts to upload separately.
Do you still have questions and need assistance?
- Get in touch with a Happiness Engineer via our Help Desk. We provide support for extensions developed by and/or sold on WooCommerce.com, and Jetpack/WordPress.com customers.
- If you are not a customer, we recommend finding help on the WooCommerce Support Forum or hiring a recommended expert on our customizations page.

Экспорт товаров WooCommerce в Excel для возможности быстрой, удобной и массовой правки товаров. Плагин WP All Export PRO.
В примере экспорт товаров для правки параметров веса и размеров товара (длина, ширина и высота).
Плагин WP All Export: https://www.wpallimport.com
Как экспортировать товары WooCommerce в Excel? ➤ WP All Export
Примечание: Я на автомате в этом видео сказал, что для экспорта товаров необходимы два плагина: “WP All Export” и “WP All Import – WooCommerce Add-On Pro”. Это не так. Для экспорта товаров необходим только один плагин “WP All Export”.
Также, для экспорта товаров вы можете использовать бесплатный плагин WP All Export (он есть в каталоге плагинов WordPress).
Разница между бесплатной и платной версиями плагина:
1) нет возможности фильтровать товары для экспорта
2) нельзя экспортировать товары в форматы XLS, XLSX
Возникли трудности с импортом или обновлением товаров и их цен? Вы можете заказать консультацию или услугу импорта товаров. Мои контакты

Следите за новостями и присоединяйтесь к нашим online-конференциям в Telegram-канале InwebPress.
Читайте также

Веб-разработчик сайтов для малого и среднего бизнеса. Автор Youtube-канала «InwebPress».
Услуги: создание сайтов под ключ, контекстная реклама (Google), аудит сайта, техническая оптимизация, внутренняя SEO-оптимизация сайтов, а также индивидуальные консультации. Обращайтесь!
В этой краткой заметке опишем один из многочисленных способов экспорта товаров в файл Excel с магазина на базе WooCommerce (WordPress). Для этого понадобится такой плагин:
Store Exporter – https://wordpress.org/plugins/woocommerce-exporter/
У плагина есть много возможностей и … особенностей, с которыми нужно, увы, бороться. Здесь мы опишем первый попавшийся алгоритм выгрузки товаров с магазина в Эксель.
Итак, приступим:
1) В настройках плагина (таб «Settings») в разделе «CSV Settings» указываем любой уникальный символ, например, ~ в поле «Field delimiter». Этот символ будет далее использоваться для разбиения значений товара (его цена, артикул и т.д.) по отдельным колонкам в Excel.
Оригинальное описание этого поля в самом плагине выглядит так: «The field delimiter is the character separating each cell in your CSV. This is typically the ‘,’ (comma) character.»
Базовое значение (запятая) нам не подходит, поскольку запятая может встречаться в описании самого товара – в таком случае разбиение по колонкам в Экселе пройдёт с ошибками.

2) Нажимаем таб “Export” и отмечаем нужные поля, например так:
Получаем файл такого вида: export_product.csv
3) Открываем файл в Excel и разбиваем по колонкам содержимое с мощью разделителя ~ , который мы и задавали в настройках плагина.
Получаем такой результат: export_product.xlsx
Как видим, все значения товаров разбиты по колонкам:
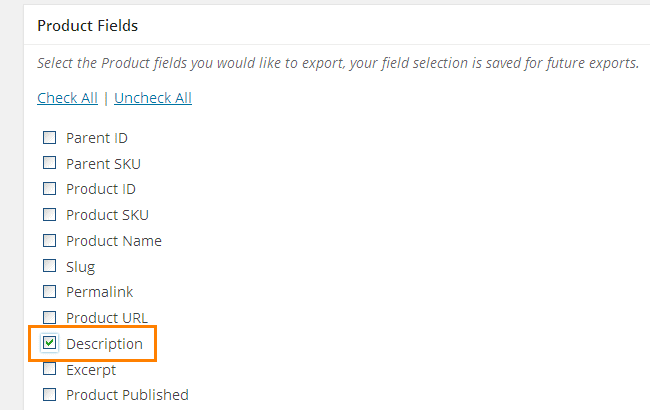
 4) Обратите внимание, свойство товара “Description” следует выгружать отдельно, в противном случае получим кашу в файле, которую разбить по колонкам не удастся.
Для этого отмечаем чекбокс “Description” в настройках плагина Store Exporter:
В результате получаем файл с аккуратно расположенными описаниями товаров: для каждого товара описание в отдельной строчке (сколько товаров, столько строчек).
Файл-пример выгрузки: export_product-description.csv
5) Поскольку полученные в предыдущем пункте описания товаров расположены в том же порядке, что и в файле export_product.xlsx (автоматически сортируются плагином по ID в обратном порядке), то наша задача заключается лишь в объединении двух файлов в один.
Открываем export_product-description.csv и копируем первую колонку с описаниями товаров в файл export_product.xlsx (в последнюю колонку). Получаем итоговый файл с аккуратно структурированными данными по товарам нашего магазина. Теперь Вы можете использоваться этот файл экспорта базы товаров с магазина на своё усмотрение: добавлять наценки и обратно импортировать (это – отдельная тема разговора), вести различные электронные учёты, прочее.
Файл-результат: export.xlsx
What’s the first thought that comes into your mind when you consider shifting your WooCommerce store to a new hosting service provider?
I’m guessing it is how long it’s going to take to backup your entire store and export all those products. How to export all your products, the product variants, images, customer details, reviews, blog articles, well, just about your entire store.
This article will walk you through the entire process of exporting WooCommerce products quickly and easily.
You could also check out our article on How To Build A WooCommerce Website With Elementor and Astra Theme if you’d like to create a WooCommerce store from scratch.
In addition to shifting to a new hosting service provider, you may need to update the products in bulk or even keep a backup of all your products, just in case.
This article will show you how to do exactly that.
This article will cover how to export your WooCommerce products using two foolproof methods.
In the first method, we will use the default WooCommerce system. In the second, we will make use of a WordPress plugin.
While there are several plugins available, both free and paid, we will make use of the ‘Product import-export for WooCommerce’ plugin.
Product import-export for WooCommerce is one of the most common plugins to help you manage your WooCommerce products.
Before we go ahead and cover how to export WooCommerce products, we need to become familiar with CSV files as both methods of exporting from WooCommerce requires them.
Both methods we suggest for easily exporting WooCommerce products, manual export, and using a plugin, use CSV files.
Table Of Contents
- What Is a CSV File?
- Method 1: How to Export Products Using the Default WooCommerce Tool
- Method 2: How to Export WooCommerce Products Using a Plugin
- How to Import WooCommerce Products Using a CSV File
- Plugins to Help You Export WooCommerce Products
- Conclusion
What Is a CSV File?
A CSV file, a Comma Separated Values file is a simple text file that contains a list of data. These files are used to exchange data between different applications.
For example, applications with huge databases often support CSV files. You can export the data from one application as a CSV file and then import it to another application also as a CSV file.
These files, more often than not, use the comma character to separate the data. Hence the terminology, Comma Separated Values (CSV) file.
For example, let’s say you have a few products in your WooCommerce database, and you export them as a CSV file.
You will get a file containing text similar to this,
Product Name,Type,Make,Size
Polo T-Shirt,Clothing,ABC,S/M/L
That’s really what a CSV file is.
Of course, it will contain way more data than I’ve shown here but you get the idea!
Once you have exported a CSV file, you can access it through a text editor of your choice, such as Notepad.
However, with the amount of data in a CSV file and without any text wrap, it will be difficult to view the file, let alone edit it.
I would recommend you open the file using a spreadsheet. You could use Microsoft Excel or even upload the file online and use Google Sheets.
Now you know what a CSV file is, let’s see how to use them in the export process.
Method 1: How to Export Products Using the Default WooCommerce Tool
In this first method, we will be using the default WooCommerce tool that has a built-in product CSV importer and exporter. You could import, export, or even update the products in your WooCommerce store with a single CSV.
This tool supports all types of products, i.e., the Simple, Group, External/Affiliate, and Variable products.
Before we begin, I’m assuming you have WooCommerce installed on your WordPress website.
For this article, I’ve installed WooCommerce on my store and used the ‘Simply Natural’ Astra starter template. You could select an Astra Starter template of your choice.

Upon successful installation of WooCommerce and your starter template, you will have several sample products in your store.
To export these products, go ahead and click on ‘Export’ on the top.
You’d find yourself on the following page.
You could now choose the columns, product types, and product categories you’d like to export.
By clicking on any field, you’d get a drop-down, as shown below.
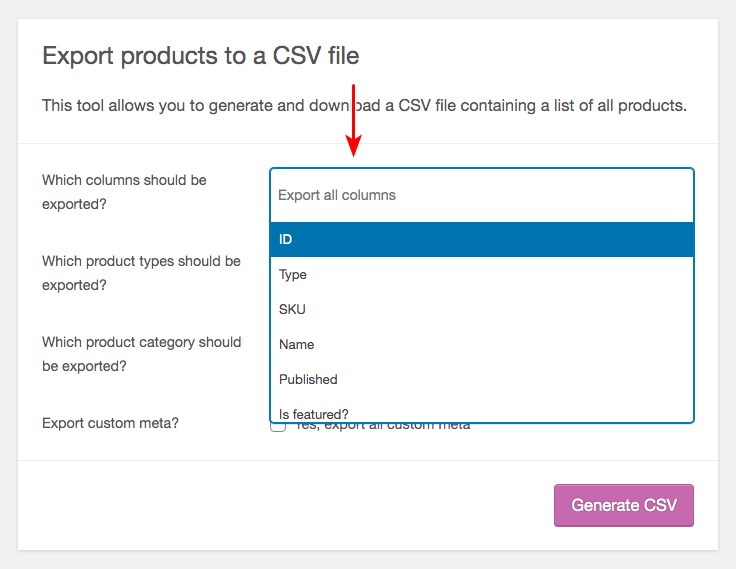
If you’d like to export all the fields and data, irrespective of having data in it or otherwise, just leave it the way it is and click on ‘Generate CSV’.
If you have data in only a few select fields, you could opt only for those options that you want to be exported.
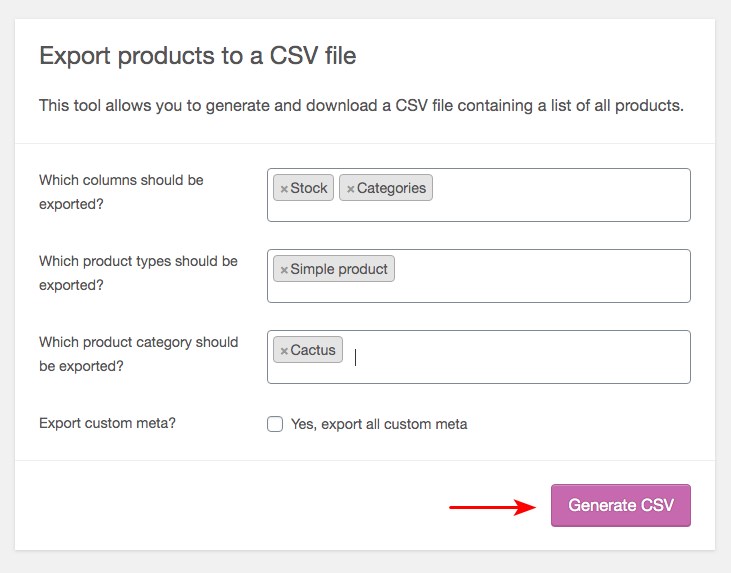
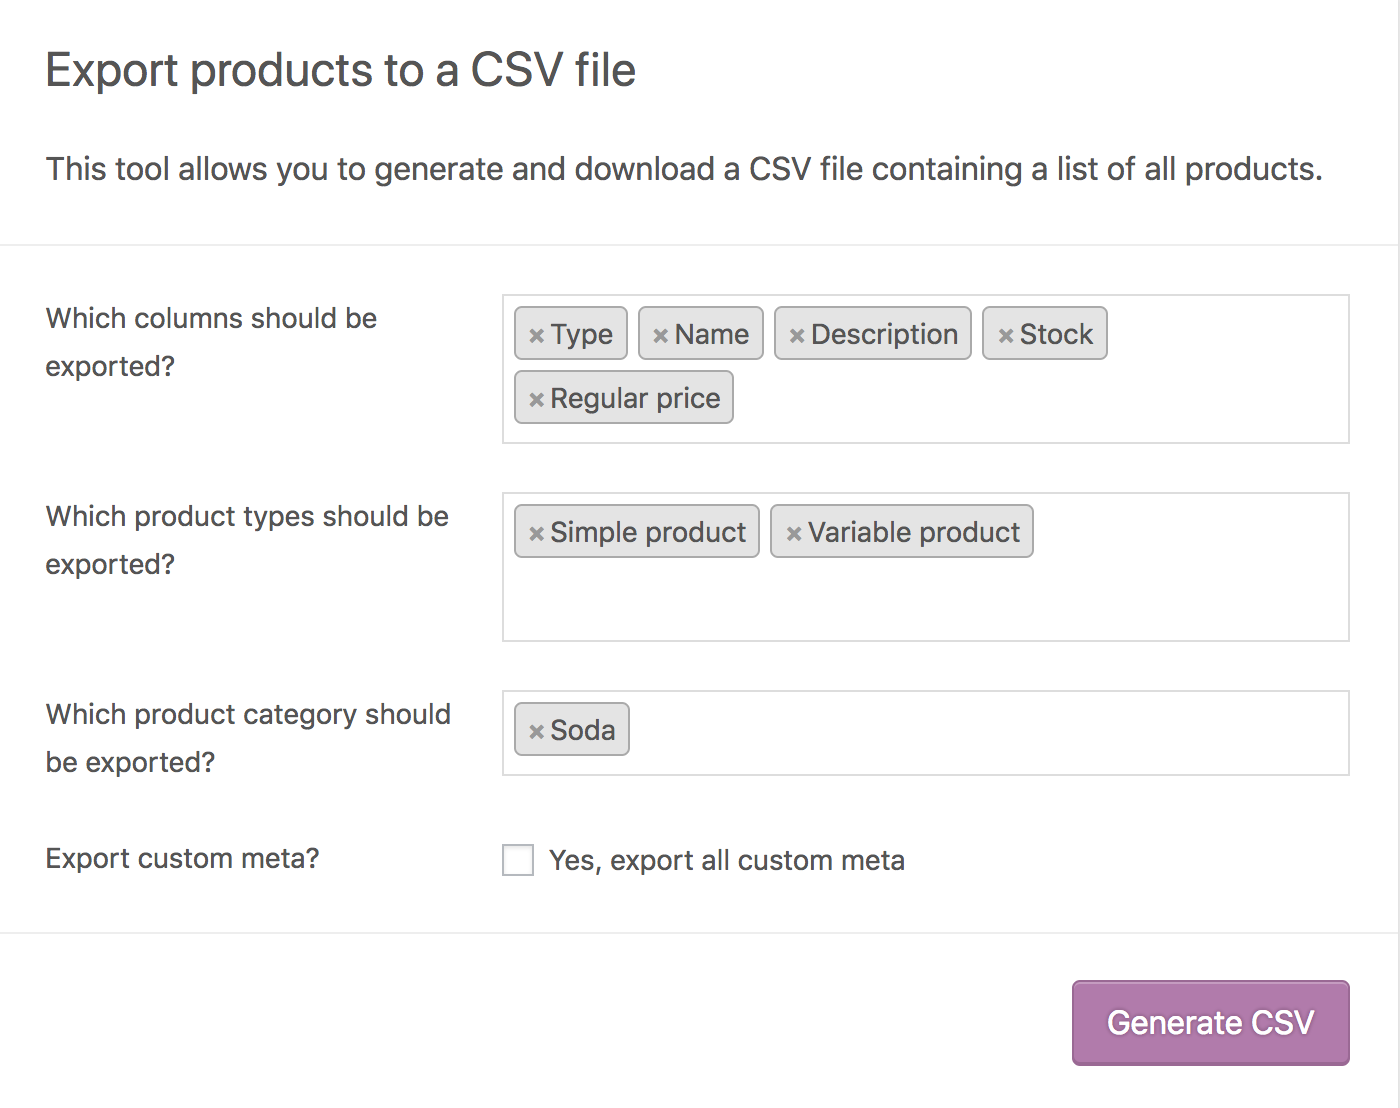
Let’s say my store has data on only the ‘Cactus’ product category. The product type is ‘Simple product’ and I have data in only the ‘Stock’ and ‘Categories’ fields.
I would select only these fields, as shown above.
If you have installed a plugin to add additional information for your products via any meta plugin, you could check the ‘Export custom meta?’ field too.
Once you have completed these steps, click on ‘Generate CSV’.
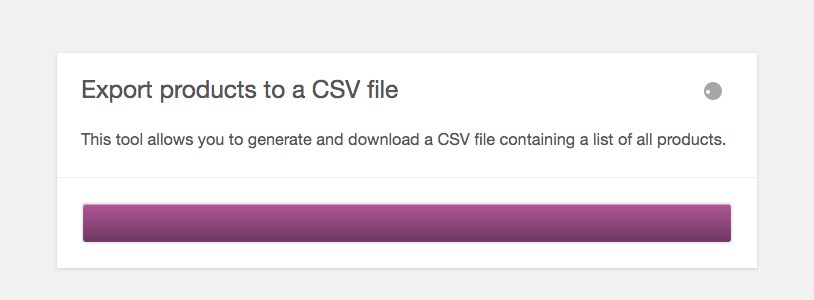
Once the export is complete, your CSV file will be downloaded. The CSV file may have the date included within the file name.
For example, ‘wc-product-export-13-11-2020-1605232625008.csv’ is the file that was downloaded when I did it.
And just in case you are wondering if you could customize the file name, which did cross my mind too, well, it gets a little technical.
You’d have to access the ‘abstract-wc-csv-exporter.php’ file under ‘woocommerce > includes > export’ from your website control panel and edit the following section.

WooCommerce Product CSV Import Suite
You may notice that the default option that WooCommerce has to offer has a few limitations.
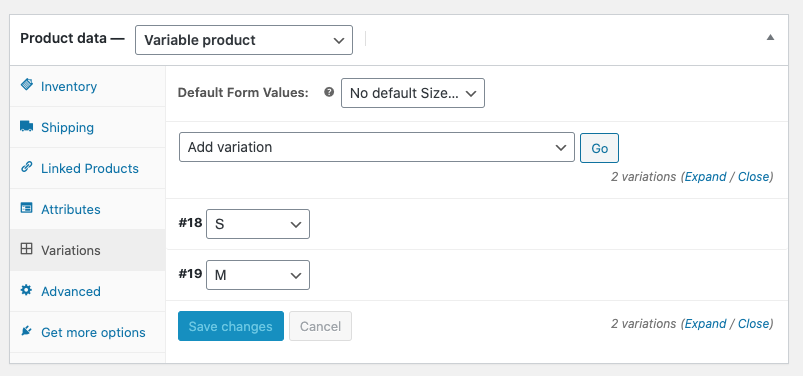
One such limitation is in exporting complex product variations. Especially when you have variable products with multiple attributes (e.g., colour and size, if your store sells apparel).
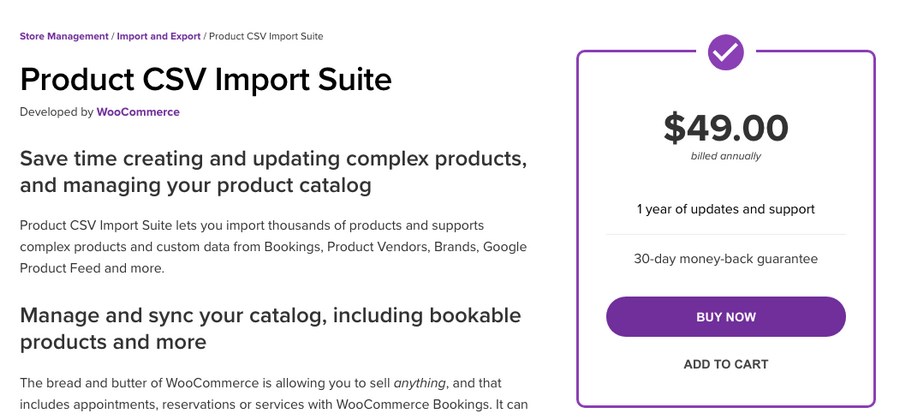
In addition to the product variations, if you would like to export custom data from bookings, product vendors, or create and update thousands of products all at once, you could consider the WooCommerce Product CSV Import Suite.
However, this is a paid option.
Using the WooCommerce Product CSV Import Suite, you could include complex products, bulk update the standard items like price and description, along with custom data like appointment availability, resources, and more.
For a full list of features, check out the WooCommerce Product CSV Import Suite page.
Once you have downloaded the WooCommerce Product CSV Import Suite, you will find a ‘CSV Import Suite’ link under WooCommerce in your dashboard.
Under ‘CSV Import Suite’, you have the option to ‘Import Products’ as well as ‘Export Products’ as shown in the following image.
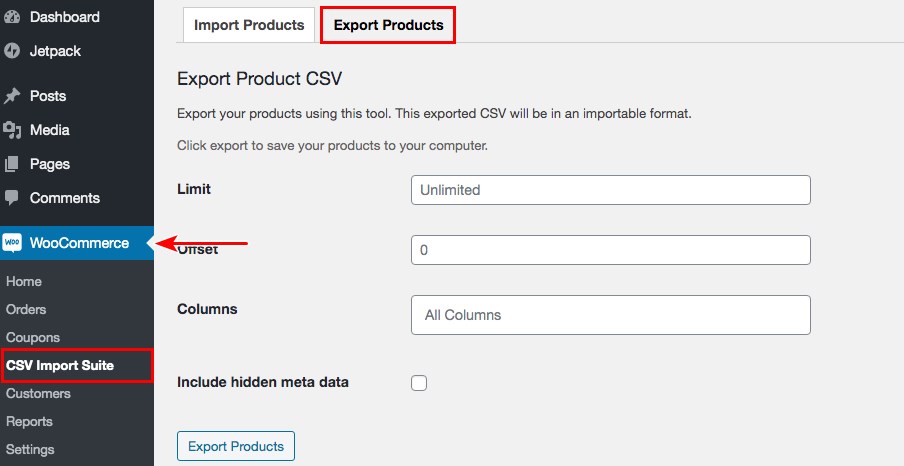
Click on the ‘Export Products’ tab.
You have the option to export either the products by themselves or export the product variations too.
As in the case with the default WooCommerce system, you have several export options.
You can set a limit to the maximum number of products you wish to export. For example, if you set the ‘Limit’ to 100 with an ‘Offset’ of 200, you could then export the products from 200 up to 300 to your CSV.
The ‘Limit to parent ID(s)’ is applicable only for the product variations. If you wish to export only select variations of a specific parent product, you could mention those product IDs, separated by commas.
For example, if you are selling shirts with variants such as colour and size, you could select the specific variant you’d like to export.
Under the ‘Columns’ option, you could select the specific column(s) you wish to export.
You can opt to select the ‘Include hidden metadata’, if you wish to show custom metadata information, such as custom booking orders, customer information, for your products and/or product variations.
Once you’ve completed the above steps, select ‘Export Products’ or ‘Export Variations’ based on your requirement. Your CSV file will be downloaded.
Method 2: How to Export WooCommerce Products Using a Plugin
A common saying in the WordPress fraternity is that there’s a plugin for just about anything. And yes, there are several plugins available to export your WooCommerce products.
While we will be covering some of the recommended plugins to help you import and export your products later in this article, we will install one such plugin here. The ‘Product Import Export for WooCommerce’ plugin. Or you can install WP All Import WooCommerce product export premium plugin.
Product Import Export for WooCommerce is a very popular plugin. There is a free version and a pro version that offers more features and benefits.
The free version allows you to import and export only simple products. For products with variations, you would have to consider the pro version.
Some features of the pro version include import and export of all types of products such as simple, group, external, and variation products, export products by their category, import and export product reviews, amongst many more.
Go ahead, search for the plugin, install, and activate it.
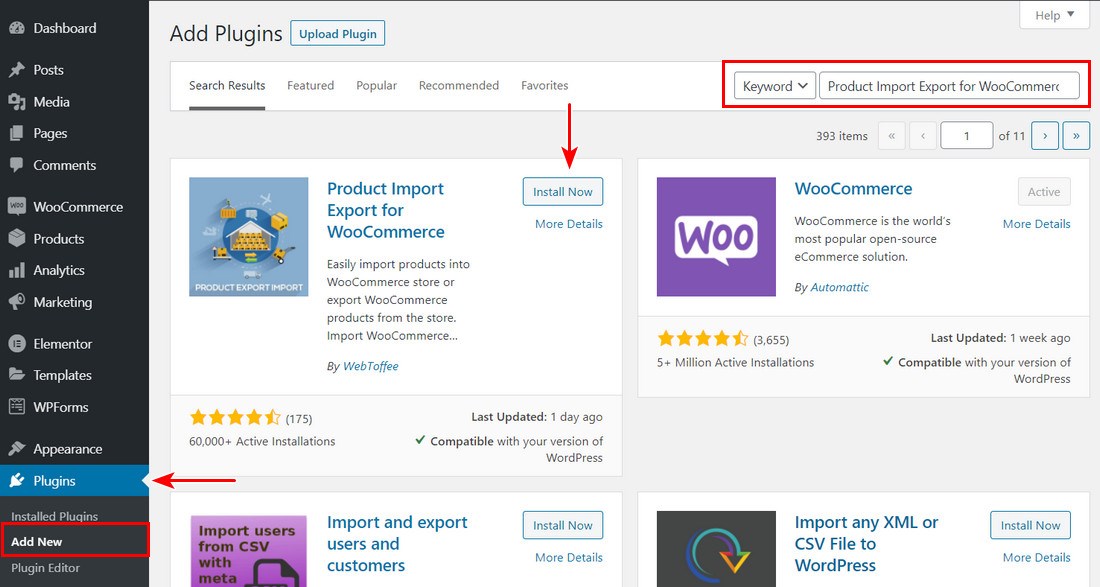
Once installed, you will see a new menu option under Products in WooCommerce. Click on ‘Product Im-Ex’ under ‘Products’.
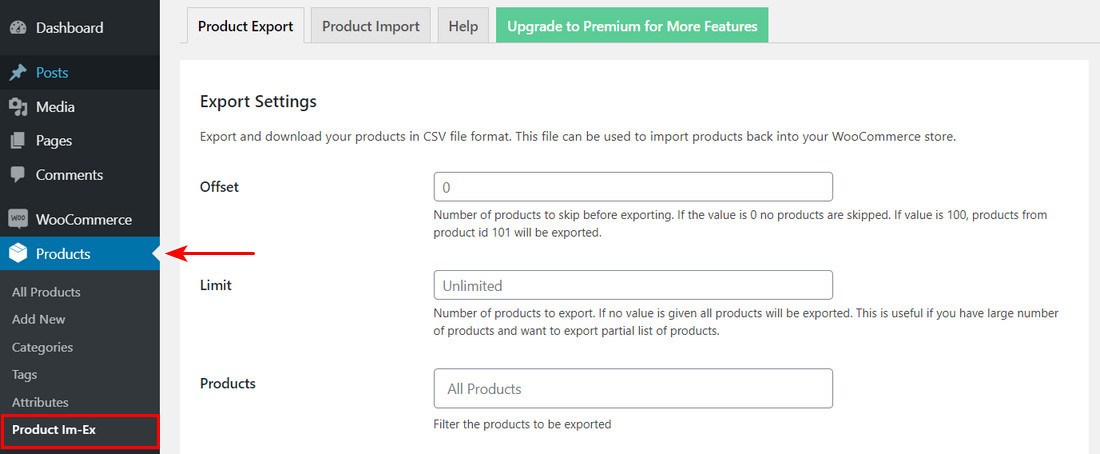
Under the default ‘Product Export’ tab, you will notice ‘Offset’ and ‘Limit’ in addition to several fields under Columns.
As in the case of the WooCommerce Product CSV Import Suite, we covered earlier, you could set an ‘Offset’ and a ‘Limit’ number.
Just to recall, if you set the ‘Limit’ to 100 with an ‘Offset’ of 200, you could then export the products from 200 up to 300 to your CSV.
The next set of fields are the Columns.
You can use checkboxes to select the various fields you would like to export. You also have the option of customizing your column header, to how it should appear in your CSV file.
Once you have selected the required options, click on ‘Export Products’, and your CSV file will be downloaded.
If you purchase the premium version of this plugin, you have the option to export ‘Variable Products too’.
In addition to ‘Variable Products’, you have some additional options such as exporting and importing Product Reviews, Batch Export, and more plugin settings.
The Batch Export tab is particularly helpful when you have a huge number of products and would like to set a limit to the number of products exported per batch.
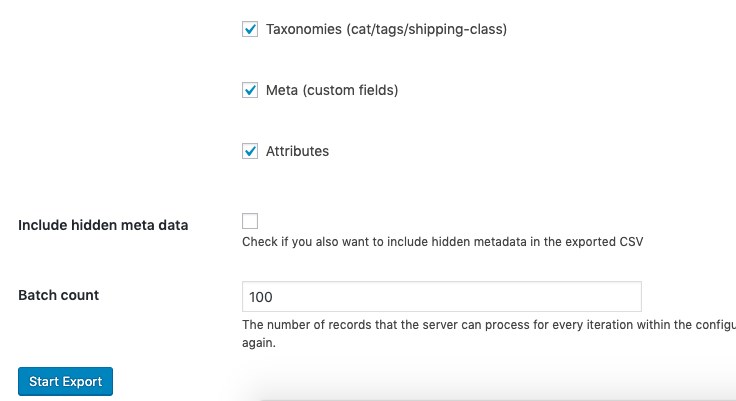
As indicated in the image above, setting a ‘Batch count’ limit helps overcome memory limitations or low timeout interval in WordPress.
Once set, click on ‘Start Export’ to download your CSV file.
How to Import WooCommerce Products Using a CSV File
We now know how to export WooCommerce products. The next obvious question would be, how do we import the products into a new store?
And while I am pretty confident that you’ve already guessed how to go about importing products, when we covered exporting, I will go ahead and explain how to import your CSV file anyway.
Go to ‘Product > All Products’.
Whether you’re starting a new store or adding new products to an existing store, the procedure is going to be the same.
The image above is if you have existing products in your store, and you want to add new products. Simply click on ‘Import’.
If you have no products in your store so far and would like to add new ones, the following page will be displayed.
Click on ‘Start Import’.
The rest of the steps remain the same whether you have existing products in your store or not.
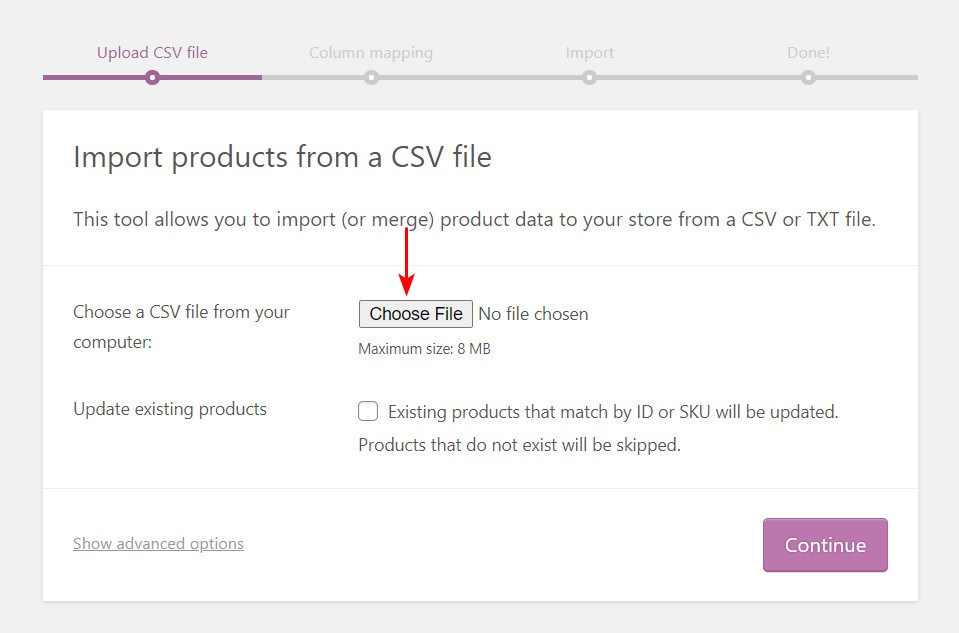
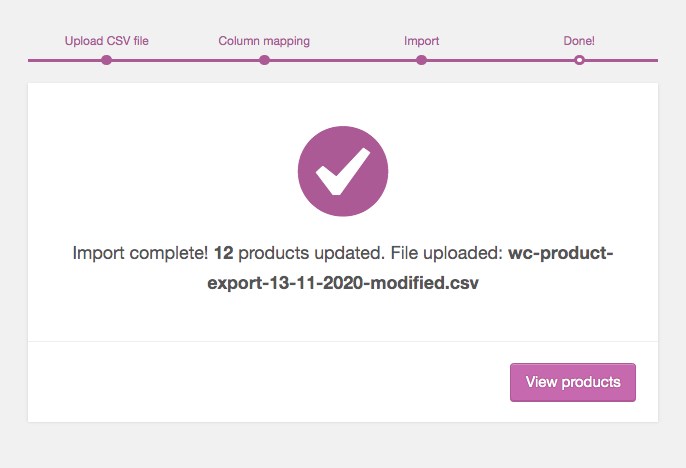
The first step would be to ‘Upload CSV file’.
For this article, I will go ahead and upload the same CSV file that I exported earlier, the ‘wc-product-export-13-11-2020-1605232625008.csv’ file.
Click on ‘Continue’ after selecting your file.
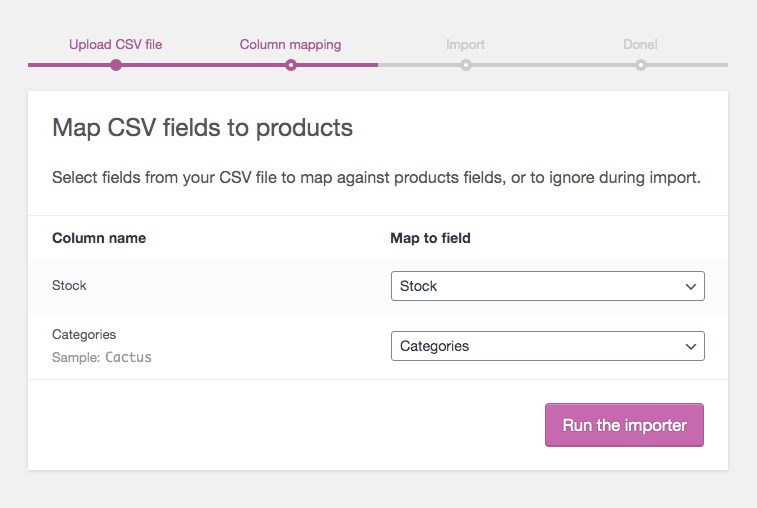
In the current screen, ‘Column mapping’, the WooCommerce system automatically “maps” the Column Name from your CSV to the Fields.
When I exported the CSV file earlier, I selected only the ‘Stock’ and ‘Categories’ fields. So that is what you get to see under ‘Column name’, on the left-hand side. If you had selected additional fields, the same would get displayed under ‘Column name’.
The WooCommerce system automatically maps the column name to its respective field. As shown in the image above, ‘Stock’ is automatically mapped to ‘Stock’ under ‘Map to field’. Similarly, ‘Categories’ to ‘Categories’.
You could make use of the dropdown menus on the right side to adjust the fields accordingly.
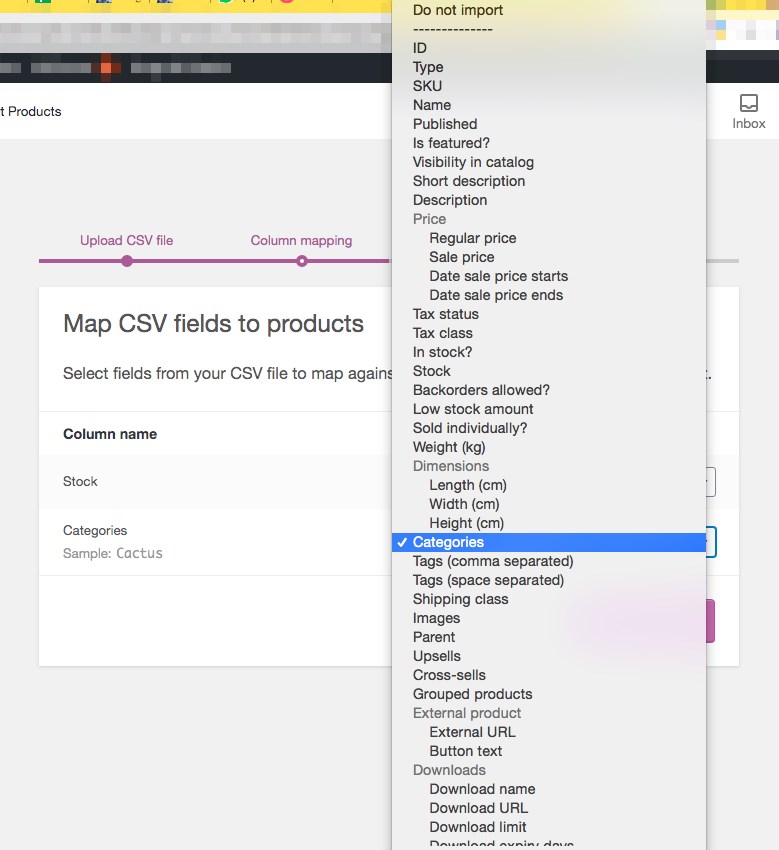
If there is a situation where you don’t want to import a particular field, under ‘Column name’, you could opt for the ‘Do not import’ option on the right-hand side.
On completion of these steps, click on ‘Run the importer’.
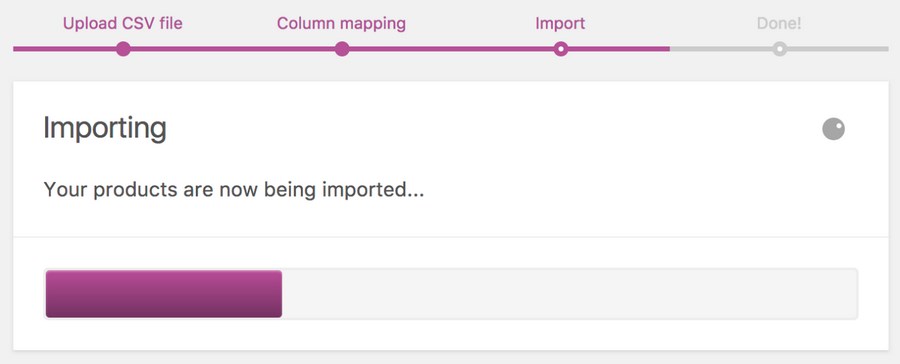
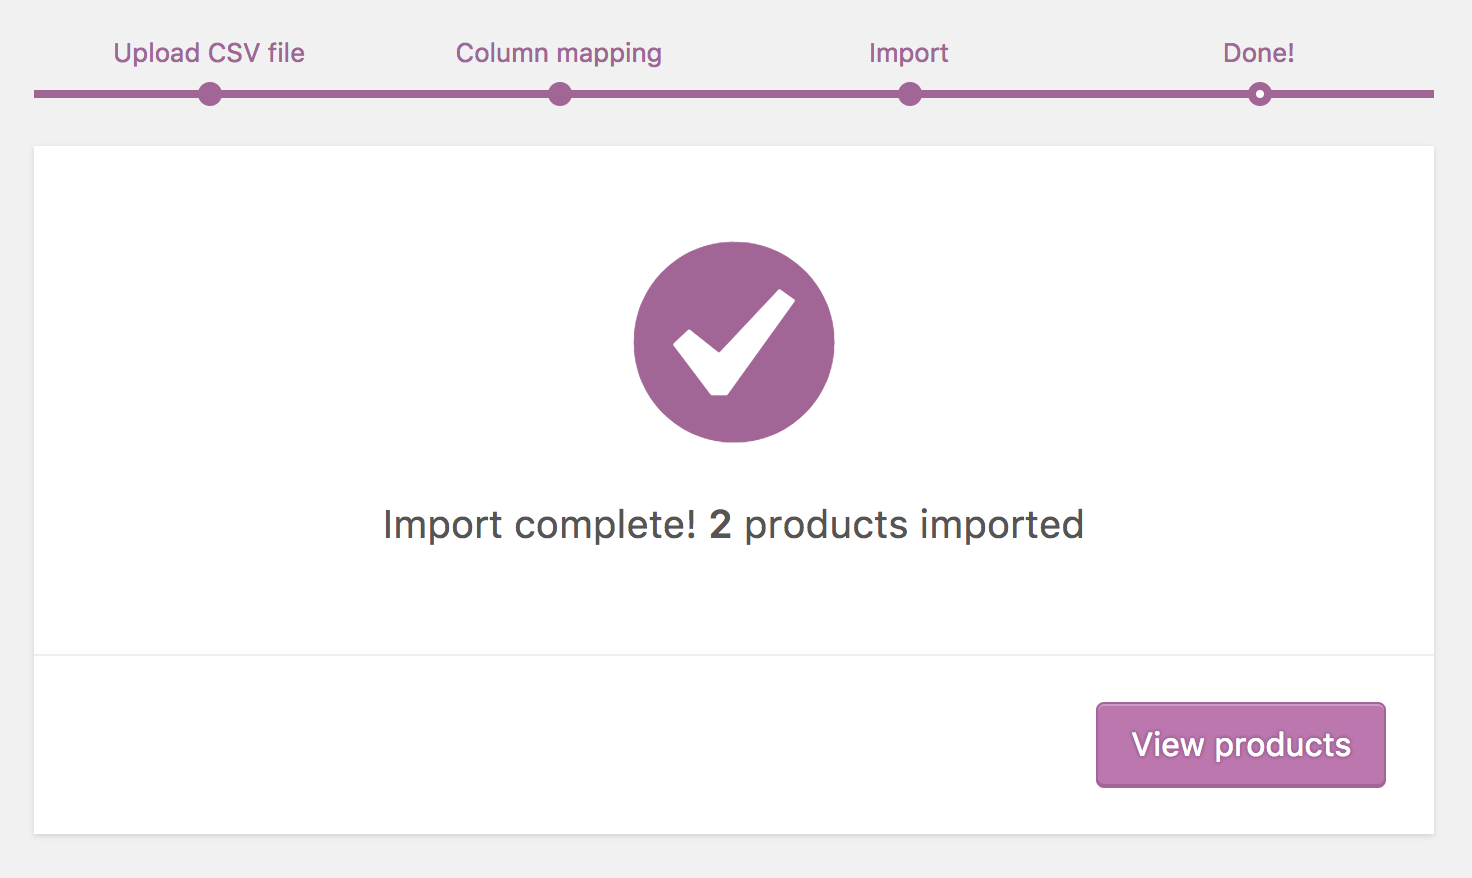
Once the import has been completed, the ‘Done!’ screen will be displayed.
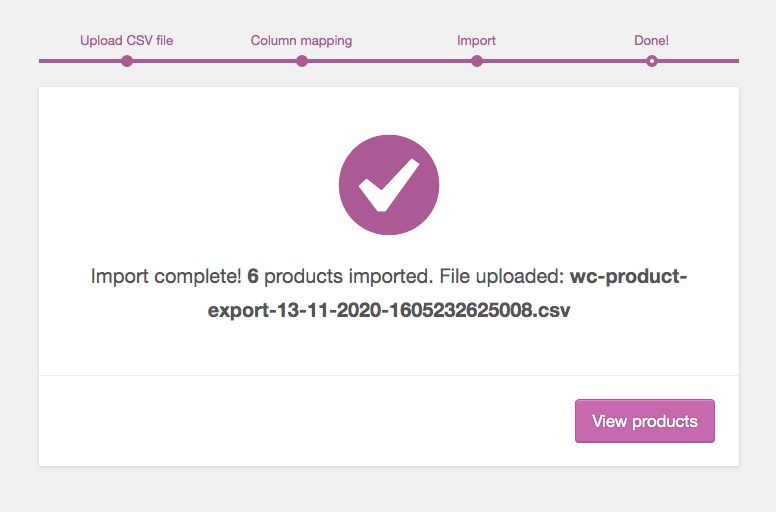
As indicated in the above image, six products were imported.
Update Existing Products
Let’s say you’d like to update an existing product with some additional information such as taxes, or location. While the process is more or less the same as what we’ve just covered, a key element to take note of is the inclusion of the product ID.
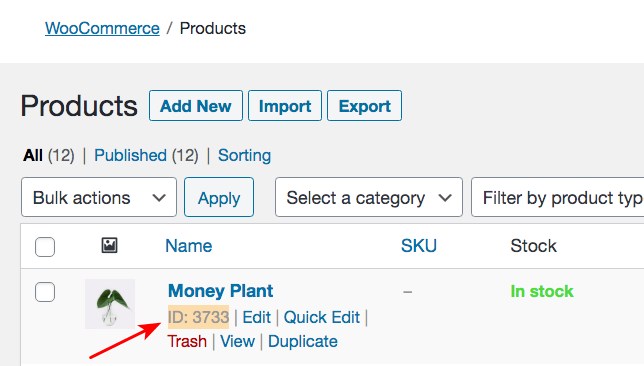
If you hover over any product, you will notice the ‘ID’. In the above example, you’d notice the ID is 3733. Similarly, every product has a unique ID.
While creating your CSV file, you must include the product ID. This will allow the WooCommerce system to automatically map the product against the respective product ID and update it.
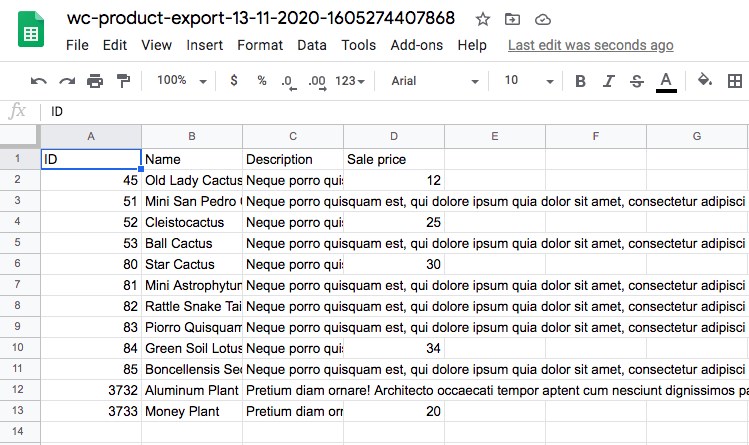
For example, I’ve gone ahead and exported a new file.

This time around, I’ve exported additional fields, and most importantly, included/exported the product ID too.
The following screen displays the exported CSV file opened in Google Sheets.
Now, I will include a new column. For example, I will include a new column ‘Location’.
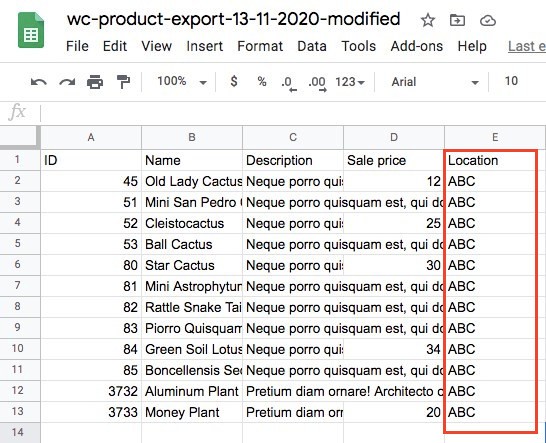
I’ve entered some dummy values under ‘Location’ and renamed the file with a ‘modified’ included in the file name.
The next step remains the same, i.e., click on ‘Import’ under ‘Products > All Products’ and select the file you’d wish to import.
Which in this example is a CSV file with a ‘modified’ at the end of the file name.
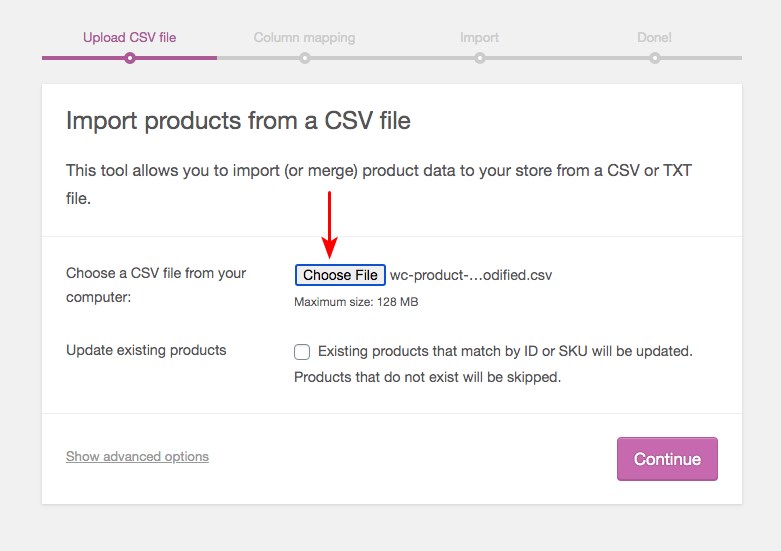
The only difference this time around is to check the ‘Update existing products’ option.
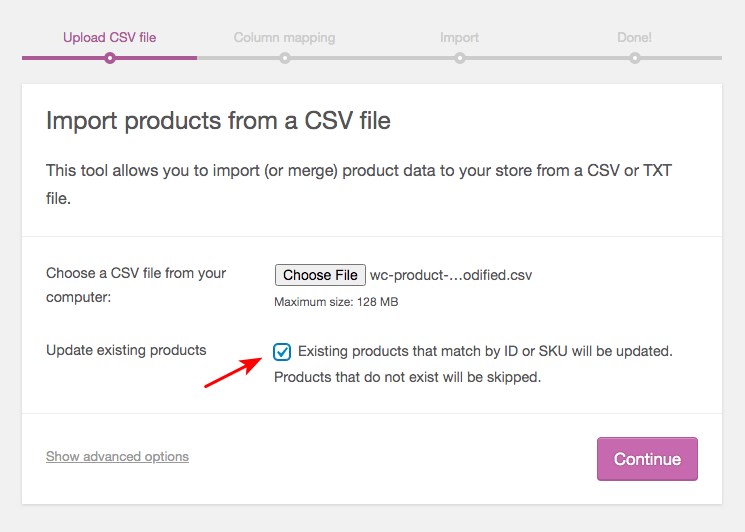
Click on ‘Continue’ and the ‘Column mapping’ screen will be displayed.
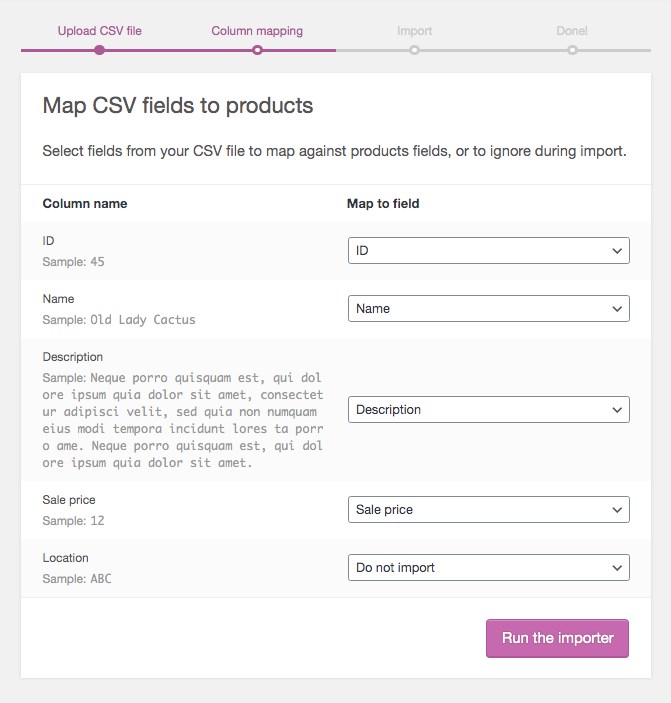
You will notice that all the fields under the ‘Column name’ have been mapped accordingly, except for the field we just included, i.e., ‘Location’.
You could either opt for ‘Do not import’ or select an option corresponding to your field.
Once this step is completed, click on ‘Run the importer’.
Your products have been updated successfully.
How do you check if the products have been successfully updated? The simplest method is to export the products and check to see if they were updated.
Now that we have covered how to import and export WooCommerce products using the default WooCommerce system and the ‘Product Import Export Plugin for WooCommerce’ plugin, let’s cover some additional plugins that you could consider.
Plugins to Help You Export WooCommerce Products
Ok, heads up. Most of the plugins mentioned here provide the best features and functionality if you buy the premium version. If you are looking only for the basic export and import functionality, the WooCommerce built-in import and export feature should suffice.
But features such as exporting and importing product variants, bulk products, product reviews, custom booking details, customer details, among many more are available only with the premium versions.
Some of the following plugins specialize in specific tasks such as importing and exporting. Some are capable of a lot more.
1. WooCommerce Product CSV Import Suite
This is my first choice to help you import and export WooCommerce products. We have covered this earlier in the article too.
You could even test this extension before purchasing it. Click on the ‘Try before you buy’ button, below the buy now button. A demo site will be created for you to test the extension.
For a complete list of features and to consider this extension, visit the Product CSV Import Suite page.
2. WP All Import
WP All Import is another popular plugin to help you import and export your products in a matter of a few clicks.Image
You can try the ‘WP All Import’ plugin for free for 7 days. Visit the ‘WP All Import’ product page, create a sandbox (demo site), and give it a try.
3. Product Import Export Plugin for WooCommerce
Another very popular plugin, and one we have also used in this article, is the ‘Product Import Export Plugin for WooCommerce’ plugin.
This plugin is available for free in the WordPress plugin repository. The free plugin has limited options as we discovered. To explore the extended functionality, you could consider the premium version.
To check out the various features of the premium version and to purchase the plugin, visit the ‘Product Import Export Plugin for WooCommerce’ page.
4. WooEXIM
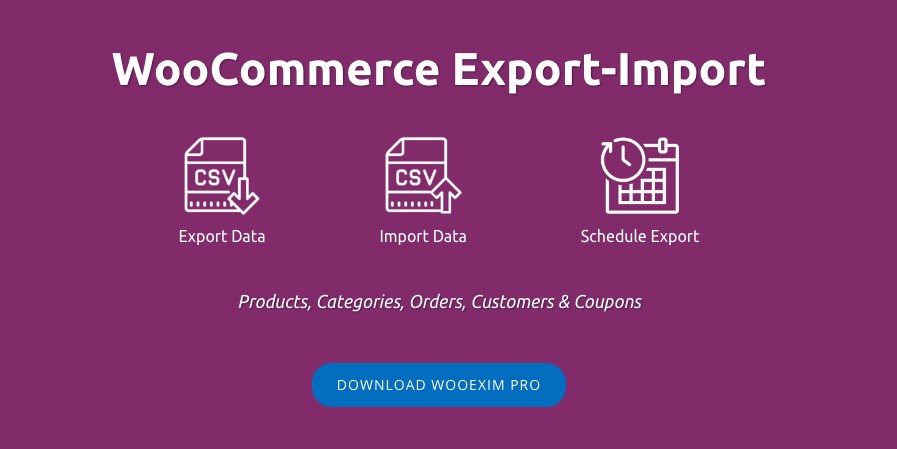
My final recommendation is WooEXIM.
In addition to helping you import and export your WooCommerce products, you can use the WooEXIM plugin to import and export data such as customers, orders, coupons, and much more. You can also schedule your export for a convenient time.
For a detailed list of its features and demos, do visit the WooEXIM product page.
Conclusion
If you are running a WooCommerce store, exporting products will soon become second nature. In addition to exporting WooCommerce orders, creating backups, updating your product information, or even migrating to a new site, you may need to export the product data for inventory accounting purposes.
The default WooCommerce system has a fairly decent set of tools to handle the import and export of your products. However, some of the solutions available in the market offer much better features and functionality compared to the default WooCommerce system.
This article on how to export WooCommerce products should have given you a fair indication of what these export plugins can do and how to go about exporting your products too.
Do you use any of these plugins? Do you know of a better tool to import or export WooCommerce plugins? Share your thoughts in the comments.
В данном руководстве речь пойдет про удобный и мощный плагин экспорта товаров и не только. Мы ограничимся описанием экспорта товаров, а экспорт заказов и покупателей уже описали в этом туториале.
Экспорт товаров WooCommerce:
Экспорт WooCommerce подходит для экспортирования небольшого количества товаров, но не для переноса магазина с другой платформы, и тем более не подходит для экспорта в прайс-агрегаторы.

Преимущества:
- экспорт в несколько шагов
- входит в плагин WooCommerce, не нужно устанавливать дополнительные плагины
Недостатки:
- поддерживает только CSV-файлы
- отсутствуют гибкие настройки
Экспорт товаров с помощью плагина WP All Export Pro
Проведя исследование существующих на рынке решений для усовершенствования стандартного экспорта, мы остановились на плагине WP All Import Pro.
Помимо обычного экспорта товаров, который предлагает WooCommerce из коробки, он предоставляет еще и следующие возможности:
- Экспорт в CSV, XML и Excel
- Очень гибкие настройки
- Удобный и простой интерфейс
- Automatically run exports on a schedule
- Easily filter exported data
- Fully integrated with WooCommerce & Advanced Custom Fields
- Пост-процес экспортированных данных с использованием PHP
Подготовка к экспорту
Для корректного экспорта товаров убедитесь, что следующие плагины установлены и активированы:
- WooCommerce
- WP All Export Pro
Инструкция по экспортированию товаров
1. Откройте страницу WP All Export Pro

2. Выберите тип экспорта WooCommerce Products в выпадающем списке:

3. Этот шаг является опциональным. После выбора данных для экспорта, плагин дает возможность добавить фильтры, чтобы отсеять ненужную информацию. Например, вам нужны только товары категории Woo, для этого выполните следующие шаги:
3.1. Кликните на блок Добавить параметры фильтрации

3.2. Выберите в выпадающем списке Элемент позицию Категории товаров, в Роль — In Product Cat и напишите название категории в поле Значение, в нашем случае Woo.

3.3. Кликните на кнопку Добавить правило
3.4. Система автоматически пересчитает количество элементов, которые соответствуют критериям фильтрации:

4. Если вам нужно экспортировать все данные о товарах:
4.1. Кликните на кнопку Миграция товаров
4.2. Перейдите к пункту 6
5. Если вам нужно настроить данные экспортирования:
5.1. Кликните на кнопку Настройка файла экспорта.

5.2. Плагин предоставляет 6 различных типов экспорта данных:
- CSV
- Excel File (XLS)
- Excel File (XLSX)
- Simple XML Feed
- Custom XML Feed
- Google Merchant Center Product Feed
Интерфейс настройки экспорта данных одинаковый в первых 4 типах, разница только в типе экспортируемого файла и формированиb структуры данных в нем.
5.3. Для изменения типа экспорта данных:
5.3.1. Кликните на блок Тип экспорта

5.3.2. Кликните на нужную группу типов: Spreadsheet (CSV, Excel Файла (XLS), Excel Файл (XLSX)) и Feed (Simple XML Feed, Custom XML Feed, Google Merchant Center Product Feed)


5.3.3. Выберите нужный тип из выпадающего списка
5.4. Настройки экспорта в CSV, Excel Файла (XLS), Excel Файл (XLSX), Simple XML Feed:
5.4.1. Формирование файла экспорта происходит путем перетаскивания плиток доступной информации, которая касается товаров, из блока Доступные данные в блок слева:


Таким же методом изменяется порядок данных в экспортном файле внутри главного блока экспорта.

5.4.2. Чтобы увидеть результат работы — кликните на кнопку Превью. Эта опция очень удобна, когда вы делаете настройки экспорта. Для CSV, Excel Файла (XLS), Excel Файл (XLSX) и Simple XML Feed предусмотрены дополнительные возможности редактирования данных:
- изменение названия столбца/элемента в экспортном файле
- кликните на нужный элемент

- измените название и нажмите Готово

- обработка данных собственными функциями php:
- активируйте чекбокс Экспортировать значение, возвращаемое функцией PHP
- введите название функции и ее код
- кликните Сохранить функцию
- кликните Готово

5.4.3. Блок Доступные данные разделен на несколько групп:
- Стандарт — основная информация о товаре, такая как ID, Название, содержание, дата, Тип сообщения, Пермалинк и другое
- Данные о товаре — Sku, Цена, Акции, Видимость, Атрибуты и другое
- Медиа — Все данные изображений и прикрепленные данные
- Таксономии — Тип товара, Теги товара, Категории товара и бренды (если у вас установлен плагин Premmerce WooCommerce Brands)
- Настраиваемые поля
- Другое — подробная информация о товаре
5.4.4. Расширенные опции
- для XLS и XLSX:

для CSV:
- хадать собственный разделитель данных
- возможность добавить строку с названиями столбцов в CSV-файл экспорта.

для Simple XML Feed:
- возможность установить названия основных XML тэгов
- дополнительные параметры CDATA:
 для Custom XML Feed:
- дополнительные параметры CDATA:

5.5. Экспорт в Custom XML Feed представляет собой возможность написать собственную структуру XML-файла экспорта товаров. Присутствует возможность перетаскивания доступных данных для экспорта из блока Доступные данные, как в предыдущих типах экспорта:


5.6. Экспорт в Google Merchant Center Product Feed.

5.6.1. Вы можете оставить настройки по умолчанию или установить их вручную. Для этого в правой секции выберите радиобокс Пользовательские данные и перетащите в поле, которое появилось, нужную плитку данных с Доступные данные

Обратите внимание на поле Item Conditions: оно принимает только три значения: ‘new’, ‘refurbished’, and ‘used’, в зависимости от того, какие товары вы продаете. Оно находится в плитке Основная информация о продукте — дополнительные параметры.

Рекомендуем в плитке Категории товара выбрать радиобокс Map WooCommerce’s Категории товаров для категорий товаров Google и вручную установить соответствующие категории товаров Google в вашем магазине.

В плитке Уникальные идентификаторы, в поле MPN перетащите Доступные данные в плитку, которая отвечает за SKU продукта.
5.7. К каждому типу экспорта вы можете добавить функции или скрипты, которые выполнятся во время экспорта

5.8. После окончания всех настроек рекомендуем их сохранить как шаблон, для этого включите чекбокс Сохранить настройки как шаблон и введите название в поле Имя шаблона.

Загрузка шаблона происходит в этом же блоке, из выпадающего списка Загрузить шаблон.t.
5.9. Кликните Продолжить
6. Сделайте нужные настройки и кликните Подтвердить & Начать экспорт:

- Экспорт продуктов один раз. Если повторный запуск, это будет только экспорт записей, которые ранее не экспортировались.
- Включить спецификацию в файл экспорта. Спецификация поможет некоторым программам, например Excel, прочитать ваш файл экспорта, если в него включены не английские символы.
- Friendly Name: — название файла, в который экспортируются данные.
7. Дождитесь окончания экспорта товаров

7.1. На этой странице вы сможете загрузить CSV-файл экспорта — кликните на кнопку CSV (в зависимости от типа экспорта данных — кнопка будет меняться на XLS, XLSX или XML).
7.2. Если вы будете делать миграцию товаров на другой магазин — вы сможете скачать ZIP файл, который содержит CSV файл экспорта и шаблон импорта для WP All Import — кликните на кнопку Bundle. Чтобы импортировать эти данные, создайте новый импорт с помощью WP All Import и загрузите этот zip-файл.
7.3. Также вам будет доступнен URL для скачивания CSV файла экспорта
7.4. Планирование повторного экспортирования товаров — кликните на кнопку Планирование.

Автоматическое экспортирование товаров происходит с помощью CRON JOB. Их должен настроить ваш веб-хостер. Для этого ему нужны две ссылки: Trigger Script URL (обычно этот скрипт выполняют 1 раз в день) и Execution Script URL (этот скрипт устанавливаете так часто, как вам нужно экспортировать данные). Читайте больше здесь.
7.5. Если вы экспортировали файл типа Google Merchant Center Product Feed, то получите краткую инструкцию и Export Feed URL для Merchant Center

Управление экспортом
Это отдельная страница с таблицей всех экспортов, которые осуществлялись ранее.

Здесь вы можете сделать следующие действия:
1. Удалить экспорт с помощью Массовые действия или кликом на соответствующую кнопку под названием экспорта.

2. Редактировать экспорт — редактирование шаблона экспорта — смотрите пункт 5 экспорта товаров. Чтобы сохранить изменения, кликните на кнопку Обновить шаблон.

3. Настройки экспорта — изменение настройки экспорта — смотрите пункт 6 экспорта товаров.

Скачать файл экспорта — кликните на название типа экспортируемого файла:
CSV:

Excel File (XLS):

Excel File (XLSX):

Simple XML Feed:

Custom XML Feed:

Google Merchant Center Product Feed:

5. Обновление файла экспорта — кликните на кнопку Начать экспорт — смотрите пункт 6, 7 экспорта товаров
6. Cron Scheduling — это страница с описанием настройки автоматического экспорта

7. Загрузить шаблоны импорта — шаблон настройки импорта товаров из экспортируемого файла.

Перед использованием его нужно предварительно установить в настройках плагина WP All Import

8. Google Merchant Center Info
