
Word for Microsoft 365 Word 2021 Word 2019 Word 2016 Word 2013 Word 2010 Word Starter 2010 More…Less
You can easily insert a special character, fraction, or other symbol in your Word documents.
The most important thing to understand when inserting symbols, fractions, special characters, or international characters is that the font you use is critical. Not all fonts have the same characters in them. For example, the Elephant font has no fraction characters in it, while Verdana does. As a result it’s important to use the right font to find the symbol or character you want.
These marks are static symbols. If you’re looking for an interactive check box that you can click on to check or uncheck, see Make a checklist in Word.
Symbol such as currency (¥), music (♫), or check marks (✔)
-
Place your cursor in the file at the spot where you want to insert the symbol.
-
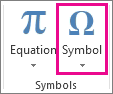
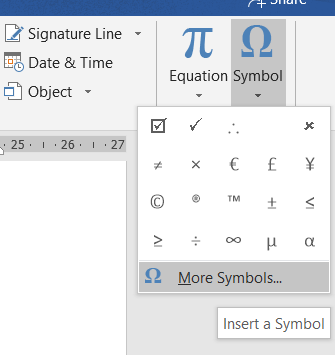
Go to Insert > Symbol.

-
Pick a symbol, or choose More Symbols.
-
Scroll up or down to find the symbol you want to insert.
Different font sets often have different symbols in them and the most commonly used symbols are in the Segoe UI Symbol font set. Use the Font selector above the symbol list to pick the font you want to browse through.
-
When you find the symbol you want, double-click it. The symbol will be inserted in your file.
-
Select Close.
Tip: If you want to make your symbol larger or smaller, select it and use the Font Size setting.
If you’re going to insert the same symbol often, consider setting up AutoCorrect to insert it for you. You can find more info about that here: Insert a check mark or other symbol using AutoCorrect.
-
Click or tap where you want to insert the special character.
-
Go to Insert > Symbol > More Symbols.
-
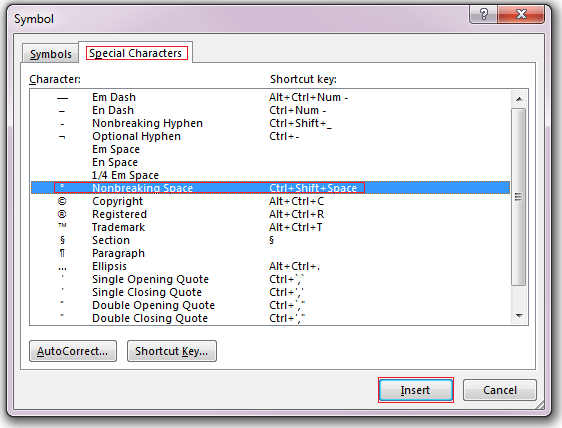
Go to Special Characters.
-
Double-click the character that you want to insert.
Tip: Many of the special characters have shortcut keys associated with them. If you want to insert that special character again in the future, just press the shortcut key. ALT+CTRL+C inserts the Copyright symbol (©), for example.
-
Select Close.
Some fractions (1/4, 1/2, and 3/4) automatically switch to a fraction character (¼, ½, ¾) when you type them. But others do not (1/3, 2/3, 1/5, etc.) so if you want to insert those as symbols you’ll need to use the insert symbol process.
-
Click or tapwhere you want to insert the fraction.
-
Go to Insert > Symbol > More Symbols.
-
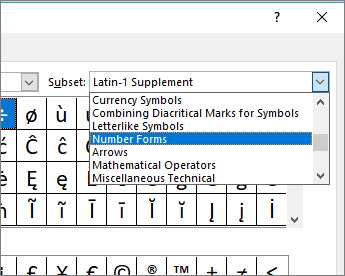
In the Subset dropdown, choose Number Forms.
Note: Not all fonts have a number forms subset. If you don’t see the number forms subset available for your font you will have to use a different font, such as Calibri, to insert the fraction character.
-
Double-click the fraction that you want to insert.
-
Select Close.
Only a handful of common fractions have a symbol that you can substitute. For more unusual fractions, such as 8/9, you can approximate the symbol by setting the numerator as superscript and the denominator as subscript. For more information see Insert subscript or superscript text.
If you plan to type in other languages often you should consider switching your keyboard layout to that language. You can find more information about that at Enable or change a keyboard layout language.
For one-off characters there are almost always keyboard shortcuts in Office to do that. For example:
-
CTRL+SHIFT+ALT+? inserts a ¿
-
CTRL+SHIFT+~ followed immediately by «a» will insert ã.
-
CTRL+SHIFT+: followed immediately by «u» will insert ü.
For more info on international characters see: Keyboard shortcuts for international characters.
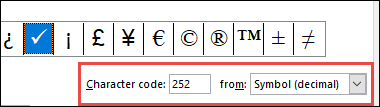
You can also use the character code of the symbol as a keyboard shortcut. Symbols and special characters are either inserted using ASCII or Unicode codes. You can tell which is which when you look up the code for the character.
-
Go to Insert >Symbol > More Symbols.
-
Scroll up or down the list to find the symbol you want. You might have to change the font or the subset to locate it.
Tip: The Segoe UI Symbol font has a very large collection of Unicode symbols to choose from.
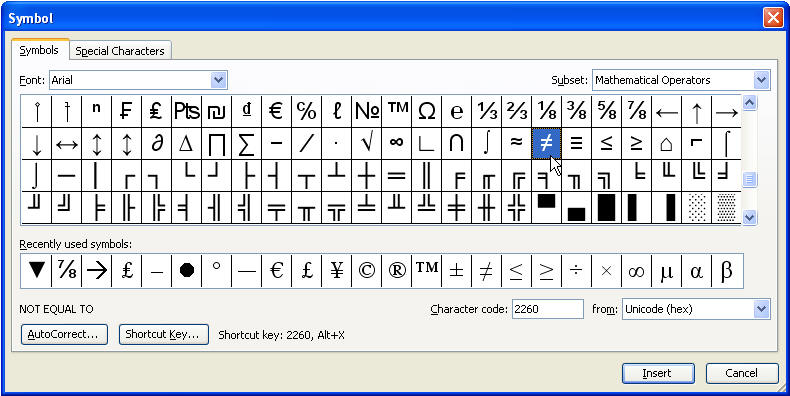
-
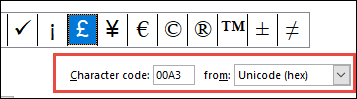
Towards the bottom right you’ll see boxes for Character code and a from:. The character code is what you’ll enter to insert this symbol from the keyboard and the from: tells you what kind of character it is. If from: says «Unicode (hex)» it’s a Unicode character. If from: says «Symbol (Decimal)» then it’s an ASCII character.
Unicode
ASCII
ASCII and Unicode information and character tables
For more info about using ASCII or Unicode characters, see Insert ASCII or Unicode character codes.
Insert a check mark
For info on inserting a check mark, see Insert a check mark.
Need more help?
Your average keyboard has enough letters, numbers, and punctuation marks for all your day-to-day typing needs. But what if you need symbols or special characters that aren’t on your keyboard?
Well, in Microsoft Word, you have three main options:
- Use the Symbol menu.
- Learn some ASCII codes.
- Use Microsoft Word’s special character shortcuts.
In the rest of this post, we’ll look at how to do each of these in your writing. Watch the video or read the post below to get started:
1. Using the Symbol Menu
To see the Symbol menu in Microsoft Word, go to Insert > Symbols on the ribbon and click the Symbol button (or Insert > Advanced Symbol > Symbols in the menu system in Word for Mac).
This will open a quick access menu of 20 frequently used symbols to pick from. However, you can also access the full range of special characters in Microsoft Word as follows:
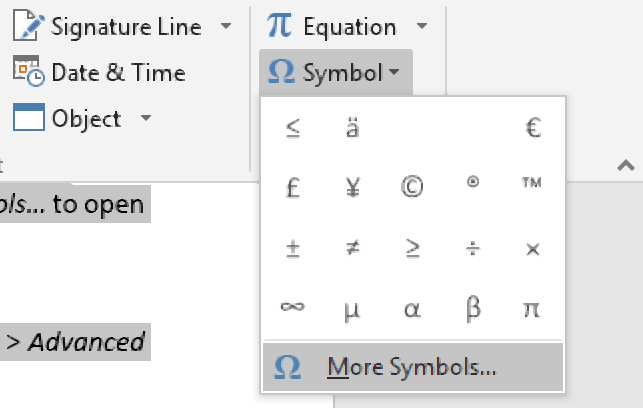
- Go to Insert > Symbols and click Symbol to open the menu.
- Click More Symbols… to open a new window.
- Scroll through until you find the symbol you want to use.
- Click Insert to add the symbol to your document.
The symbol will then appear in your document at your cursor. Microsoft Word will also add it to the quick access menu, saving your time if you need to use the same symbol again.
2. ASCII Codes
ASCII codes each indicate a different symbol, so you can use them to add special characters to a document quickly via the numeric keypad:
- Learn or look up the correct ASCII code for the symbol(s) you need.
- Turn on Num Lock on your keyboard to activate the numeric keypad.
- Hold down the Alt key and type the required code.
The corresponding symbol will then appear at your cursor position.
3. Shortcuts for Special Characters
For some special characters, your simplest option is to let Microsoft Word do the hard work! There are, for example, shortcuts available for the following common symbols:
|
Special Character |
Shortcut |
Autocorrect Option |
|
Trademark symbol (™) |
Ctrl + Alt + T |
Write “TM” in parentheses |
|
Registered trademark symbol (®) |
Ctrl + Alt + R |
“R” in parentheses |
|
Copyright symbol (©) |
Ctrl + Alt + C |
“C” in parentheses |
|
Closed Ellipsis (…) |
Ctrl + Alt + . |
Three periods without spaces |
|
Euro (€) |
Ctrl + Alt + E |
“E” in parentheses |
You’ll notice we’ve included an “autocorrect” version for each symbol above. In these cases, Microsoft Word will automatically correct the specified text to create the symbol.
Find this useful?
Subscribe to our newsletter and get writing tips from our editors straight to your inbox.
For example, to add a trademark symbol to a document, we have two options:
- Hold down Ctrl + Alt + T at the same time.
- Write “(TM)” and let Microsoft Word change this to the symbol.
These shortcuts are very quick and simple, so it is worth memorizing them if you use any of these symbols frequently. Similar shortcuts are also available for accented letters.
Microsoft Word symbols cannot be easily typed in using the keyboard.
However,
the need to include these characters in documents is increasingly common these
days.
Even when writing in English, foreign names of places and people may require some of these special characters.
Scientific writings also include mathematical symbols and Greek letters.
Text may also include characters like the degree symbol and copyright symbol.
There
are character codes you can use to enter a symbol in Word. However, most people
don’t have the time to memorize these character codes.
So, in this guide today, you’ll learn how to insert any symbol in Word either using the mouse pointer or a keyboard shortcut.
NOTE: There are several methods you can use to type symbols in Word. For me, the method I use to type symbols depends on how many and how frequently I need to type them. Keep reading to choose the best method for you
Without
further ado, below are the ways to type symbols in word
1st Method: Using Insert Symbols
This
method involves using the symbols dialog box located in the symbols area at the
right border of the insert tab.
Below are steps to insert symbols in MS Word using Insert Symbols.
NOTE: in the steps below, I’ll illustrate how to insert symbols in MS Word by inserting the greater than or equal to symbol. You can use the same steps to insert any symbol of your choice.

- STEP 1: Click to position the insertion point at where you want to insert the symbol. In this example, we will place the symbol between X and 10 as you can see in the above picture.
- STEP 2: Go to the Insert tab, in the Symbols group and click Symbol, then More Symbols.

NOTE: If the symbol you want to insert is found in the symbols gallery as shown in the picture above, click it to insert it into your document. Any symbol you use will move to the first position in the gallery. Thus, the symbol gallery box gives you access to the 20 most recently used symbols. However, if you can’t find the symbol you are looking for in the symbol gallery, click on More Symbols to display all the symbols.
- STEP 3: Select your desired font from the Font drop down. You can leave it as default (Normal text). You don’t have to explore every font in the list. However, it is worth looking at Wingdings or Symbol if you want a fancy symbol.

- Step 4: Scroll down or up until you find the required symbol, then
click to select it. You can also click the desired symbol in the Recently used
symbols. - Step 5: Click Insert to insert the selected symbol then click
to close the dialog. Alternatively, double-click on the desired symbol to
insert it into your document, then close the dialog.
As soon as you click insert or double-click the symbol, Word will insert it into your document.
2nd
Method: Using the keyboard to insert symbols in Word.
Not all the symbols in Word can be found on the keyboard.
However, all the symbols can be typed using the keyboard.
Typing symbols that are not found on the keyboard can be very tedious. In fact, it is not even necessary in Word because using the first method above is much easier and simple to compare with.
However, it is still useful to know as it becomes handy to obtain certain characters or symbols in software that has no access to Insert Symbol like in Microsoft Word.
Let’s use the following exercise for example:
- Turn on your Num Lock.
- Whilst holding down the [Alt] key, type [065]
on the numeric keypad (on the right). - Then release the [Alt] key. The letter A should
appear. - To type the letter B, repeat steps 2 and 3. But this
time type [Alt 066] on the numeric keypad. - [Alt 067] should give you C, and [Alt 068] should give
you D, and so on.
This
exercise isn’t really necessary because one can easily type in any letter
directly with the keyboard.
However, not all characters and symbols are on the keyboard. Hence let’s try out the following:
- Hold down the [Alt] and type [0176] for a degree sign (°)
- Type [Alt 0189] and [Alt 0190] for fractions (½ and ¾)
- Also try [Alt 0181] for µ
But
how do you remember the number for each symbol?
It’s
almost impossible to remember. It’s not even necessary.
Instead, you should make a note of the symbols or characters you use very often.
In the next section, you’ll learn how to get the shortcut to any symbol into your Word document.
How to find the keyboard shortcut for symbols in word
You
can use the Symbol dialog box to find the character code (or keyboard shortcut)
for any symbol or character.
This way you can insert symbols by typing them on your keyboard instead of using the Symbol dialog box.
Here’s how to learn the keyboard shortcut code for a particular symbol or character in Word:
- Open the Symbols dialog box.
To
display the Symbols dialog box, go to the Insert tab, in the
Symbols group and click Symbol, then More Symbols.
- Select the symbol you want to take note of, then look near
the bottom of the dialog for the symbol name as well as its code. - To insert any symbol using its character code, press down the
[Alt] key, type the code, then release the [Alt] key.
If you are lucky, you’ll see another shortcut key aside from the character code which is much easier to type than the code.
See
screenshot below:

Assigning
shortcut keys to symbols
In
Microsoft word, you are not limited to the default hotkeys.
You can assign any keyboard shortcut key to any command or symbol to fit your needs.
As
mentioned, each and every character or symbol in Microsoft Word has a character
code that you can use on the keyboard.
Aside from these character codes, Word still gives you the space to assign a shortcut key to any symbol.
Below
are the steps to do so:
- Open the Symbols dialog box.
To
display the Symbols dialog, navigate to the Insert tab, in the
Symbols group and click Symbol, then More Symbols. The Symbols
dialog box should display.
- Click to select the symbol to which you want to assign a shortcut.
- At the bottom area of the dialog, click Shortcut Key… The Customize Keyboard dialog box appears.

- Under Specify keyboard sequence, in the Press new shortcut key field, type the keyboard shortcut you want to assign for the symbol.
If the shortcut key you assign is already assigned for a command, Word will tell you that hey dude, the shortcut key you are assigning to this symbol is already taken by another command. If you ignore and continue to assign, Word will not stop you. However, this shortcut will not work again for the command it was previously assigned to. It will now work for this symbol.

- Click Assign to assign the shortcut.
NOTE: There is another box labeled Current keys. These are the current hotkeys assigned to the selected symbol. You can take note of these hotkeys without assigning another one for the same symbol.
Typing
any symbol in Word doesn’t have to be difficult as you can see.
If you don’t understand anything explained here, let me know in the comments section below for more clarification.
Thank you very much for reading this article.
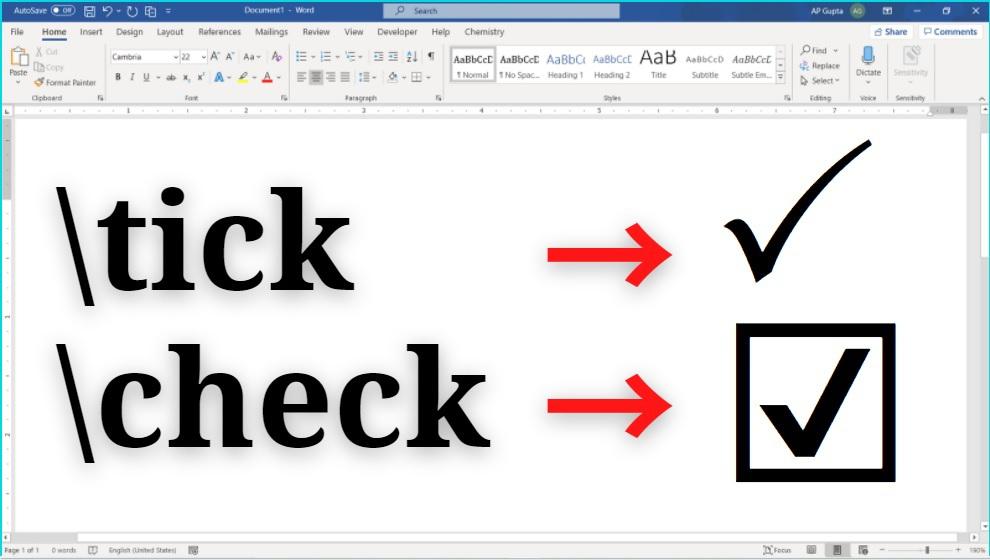
Tick symbol (🗸) also known as a check mark is a symbol for “Yes”. Sometimes tick in a box (☑) is preferred over tick symbol to denote yes or completion. In this blog we have covered, four different ways to insert tick and tick in box symbol in Microsoft Word.
Place your cursor where you want to insert the symbol and use any of the following 4 methods. Method 4 is easiest and up to 7 times faster.
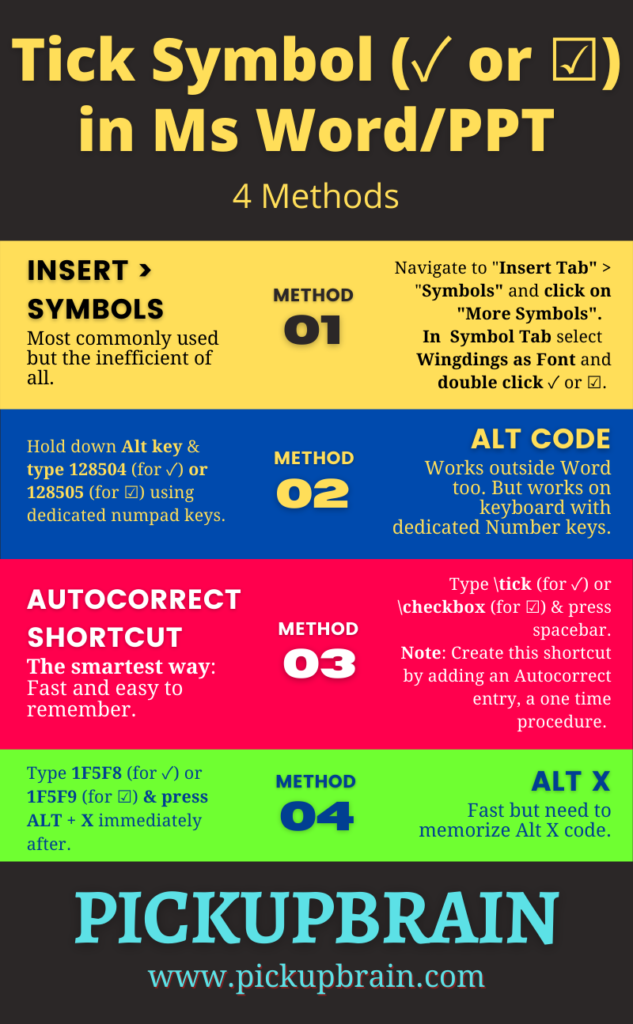
Method 1 – Insert > Symbols
- Navigating Insert Tab > Symbols and select More Symbols
2. Select Symbol Tab > Wingdings Font, and double click on desired symbol i.e. 🗸 or ☑.
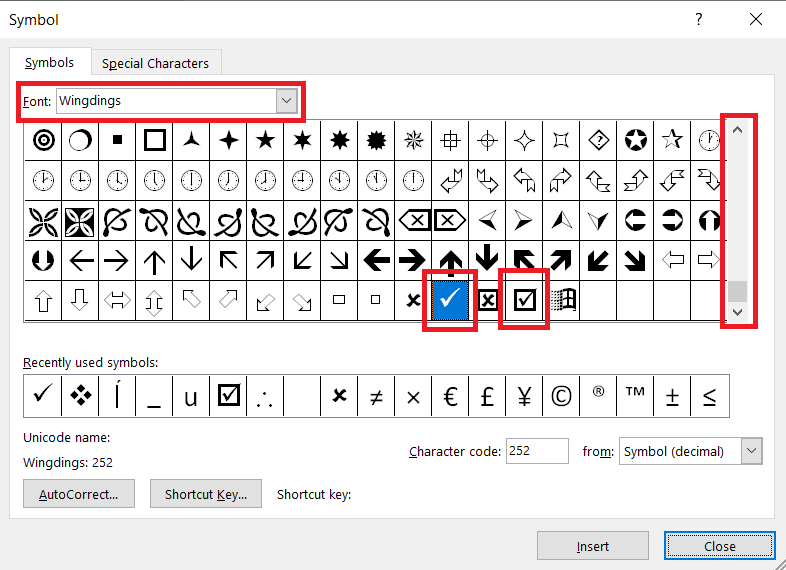
3. Select Close
Method 2 – Alt Code (Requires dedicated Number pad keys)
Ms Word Alt code for Tick (or Check) Mark and Tick in Box are:
| Tick Symbol or Check Mark (🗸) | Tick in Box (☑) |
|---|---|
| 128504 | 128505 |
To insert symbol, type corresponding Alt Code using Number pad (not using numerics key using above letters) while holding down Alt key.
Method 3 – Autocorrect (Fastest method for Tick Symbol Word)
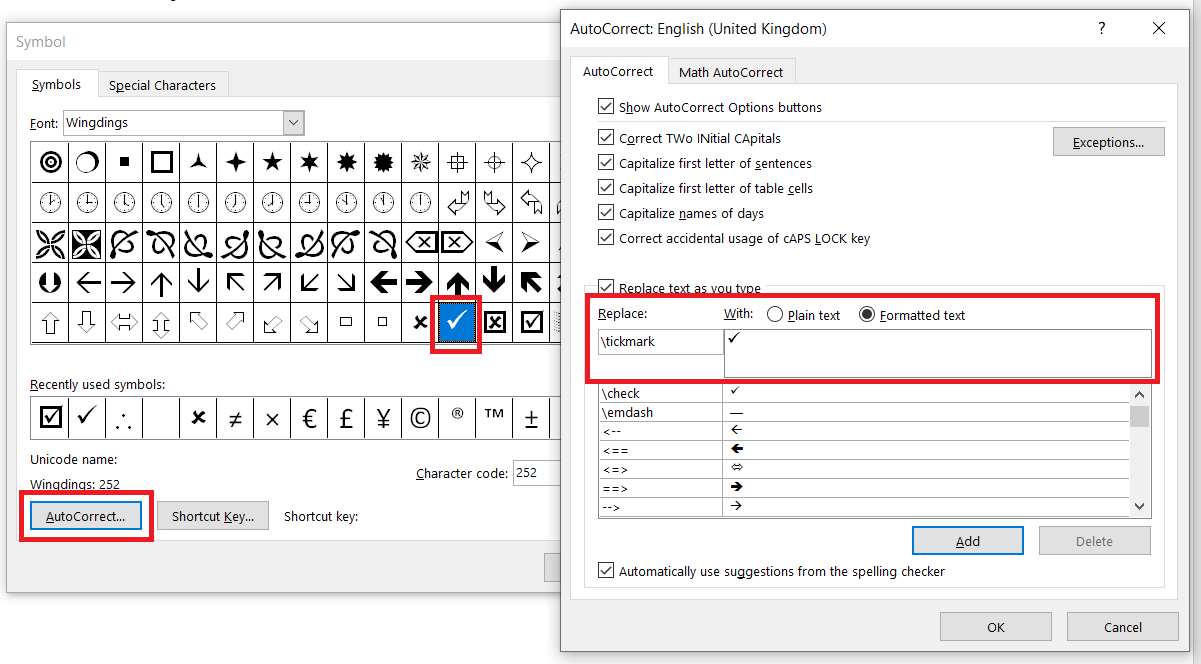
- Create Autocorrect entry
- Locate Tick Symbol or Tick in Box symbol (as shown in Method 1) by navigating to Insert > Symbols > More Symbols and select symbol.
- Click Autocorrect Button to open new AutoCorrect Dialogue box.
- Type desired shortcut text (say tick or checkbox) in Replace.
- Click Add.
- Close Autocorrect and Symbol Window.
2. Type autocorrect text created in above step and press space (for e.g. tick) to convert into corresponding symbol.
Method 4 – Alt X
Alt X code for Tick (or Check) Mark & Tick in Box are
| Tick Symbol or Check Mark (🗸) | Tick in Box (☑) |
|---|---|
| 1F5F8 | 1F5F9 |
To insert thick (or check) mark, type 1F5F8 and press Alt + X immediately following it. Similarly, for inserting tick in box, type 1F5F8 and press Alt + X.
Summary
There are four different methods to insert tick symbol in Ms Word. Of all, Alt X and Alt Code method requires remembering 4-5 digit code. While, the Insert Symbol and Autocorrect method are straightforward and relatively easy to remember. Of all these, the smartest way to insert tick symbol or tick in box is Autocorrect method as it is fastest and easy to remember.
Related Posts
![]()
Download Article
![]()
Download Article
This wikiHow teaches you how to place a symbol, such as the copyright symbol or the division sign, in a Microsoft Word document. You can do this in Microsoft Word for both Windows and Mac.
-
1
Open Microsoft Word document. Double-click a Microsoft Word file, or open Microsoft Word and then select the file from the home page. Doing so will open the last-saved version of the file.
-
2
Place your cursor where you want to insert the symbol and click. This will set that location as the point at which your symbol will be inserted.
Advertisement
-
3
Click the Insert tab. It’s in the upper-left side of the blue ribbon that’s at the top of the Word window.
-
4
Click Symbol. This option is on the far-right side of the Insert toolbar. Doing so prompts a drop-down menu.
-
5
Click More Symbols. It’s at the bottom of the drop-down menu. This opens the Symbol pop-up window.
- If you see the symbol you want in the drop-down menu, click it instead to insert it immediately.
-
6
Select a symbol to insert. Simply click a symbol to select it. You can scroll through the available symbols by clicking the ↑ or ↓ arrows on the right side of the Symbol window.
- You can also click the Special Characters tab at the top of the Symbol window to browse additional characters.
-
7
Click Insert. This button is at the bottom of the Symbol window. Doing this will insert the selected symbol at the cursor’s point.
- You can repeat this process with as many symbols as you like.
-
8
Click Close. It’s at the bottom of the Symbol window. Your symbol(s) will remain in the Microsoft Word document.


Advertisement
-
1
Open Microsoft Word document. Double-click a Microsoft Word file, or open Microsoft Word and then select the file from the home page. Doing so will open the last-saved version of the file.
-
2
Place your cursor where you want to insert the symbol and click. This will set that location as the point at which your symbol will be inserted.
-
3
Click the Insert tab. It’s in the upper-left side of the blue ribbon that’s at the top of the Word window.[1]
- Do not click the Insert menu item that’s in the bar at the top of your Mac’s screen.
-
4
Click Advanced Symbol. This option is on the far-right side of the Insert toolbar. Doing so opens the Symbol window.[2]
-
5
Select a symbol you wish to insert. Click a symbol on the page to do so.
- You can also click the Special Characters tab at the top of the Symbol window to browse additional symbols.
-
6
Click Insert. It’s in the bottom-right corner of the Symbol window. Doing so will place the symbol in your document.
- You can insert as many symbols as you like in this way.
-
7
Click Close. It’s at the bottom of the Symbol window. Your symbol(s) should now be in your Microsoft Word document.


Advertisement
Add New Question
-
Question
How do I find the alternate code for a particular symbol?

In the Symbol menu (which you got to by clicking Insert > Symbol> More options) choose your font. Click once on a symbol. Look at the bottom of that window, there should be shortcut keys showing. If you change the option box at the right to ASCII (decimal), then you’ll see a number in the Character code box : for small a with an acute mark á, the number is 225. Add a zero to the front of that. In your document (or wherever else that ascii codes work), hold down the ALT button and type 0225 on the number pad. Note that Alt+225 is different to Alt+0225. There you have it, an acute á. A degrees C/F sign is Alt+0176, that’s a handy number to remember.
-
Question
I’m working on Microsoft Word 2013 and trying to make the symbol for a trademark. How do I do this?
Click Alt + to insert symbols in Word 2013. Find the symbol you prefer for trademark.
-
Question
How do I replace (C), (R) and (TM) with the correct symbols in MS Word?
Use ALT codes. That is, press ALT + (number). There are different numbers for all symbols, you can find them at alt-codes.net.
See more answers
Ask a Question
200 characters left
Include your email address to get a message when this question is answered.
Submit
Advertisement
Video
-
On Windows computers, you’ll see a code for each symbol you select in the «Character code» box. You can type this code into Word and then press Alt+X to convert the code into a symbol.
-
Keyboard shortcuts for some common symbols include the following:
- (r) or (R) — ®
- (c) or (C) — ©
- (tm) or (TM) — ™
- e or (E) — €
Thanks for submitting a tip for review!
Advertisement
-
The Mac version of Microsoft Word doesn’t have the same range of symbols as the Windows version.
Advertisement
About This Article
Article SummaryX
1. Click the Insert tab.
2. Click Symbol.
3. Click More Symbols.
4. Select a symbol.
5. Click Insert.
Did this summary help you?
Thanks to all authors for creating a page that has been read 788,100 times.
Is this article up to date?
It seems a lot of people can’t find how to get certain symbols or
characters into their documents, so I hope to offer every method here.
Insert Symbol
This is one of the easiest methods. If you use the symbol a lot, you may
want to memorize the shortcut key for it, or create a shortcut key or
AutoCorrect entry for it. This is Word’s Symbol dialog.
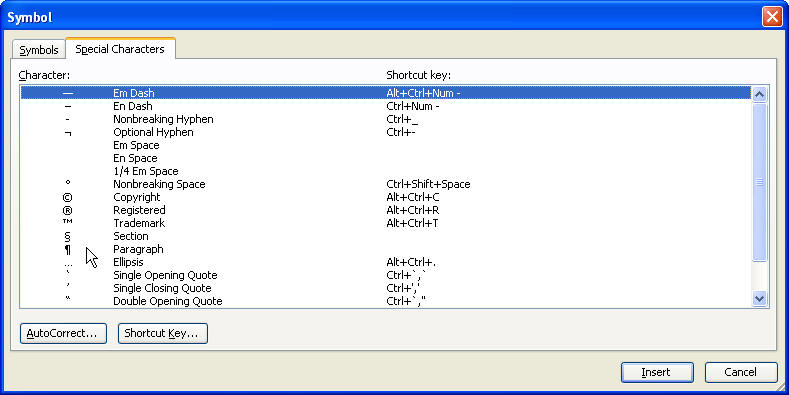
Word’s Symbol dialog also has a Special Characters tab that
you shouldn’t miss if you use Word a lot. One of the most commonly looked for
symbols here is the Paragraph return, also called a Pilcrow.
Special for Excel
Excel lovers can download a special
Excel Insert Character
dialog created by Jon Peltier, Microsoft Excel MVP and owner of
PeltierTech. Thanks very much, John!
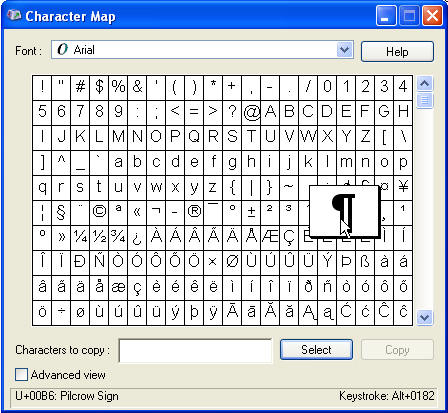
Character Map
If you can’t find your symbol or character using the Symbol
dialog, try the Character Map, which comes with Windows. To use it, hit Start Run
and type «charmap» (without the quotes) and hit Enter.
Shortcut Keys
Both the above methods may show keystrokes to use, such as the
one above displays:
Keystroke: Alt+0182
To use this keystroke, hold your Alt key while typing the
numbers on the number keypad. It won’t work using the regular keypad. Once you
type the last number, your symbol or character should appear.
Equation Editor
For even more symbols, usually of a scientific or mathematic
nature, or for creating Arithmetic problems, use the Equation Editor. Don’t
expect to jump right in and become an expert. It takes a bit of time. My
experience has been, too, that every time I try to edit the fonts, I mess it
up even more. Try to live with them the way they are.
To access the Equation Editor, hit Insert Object,
choose Microsoft Equation 3.0. This brings up the toolbar. You can create an
equation, which looks a lot like a graphic in your document. To edit the
equation later, just double-click it. To create another, you can copy the
first one, and paste it, then double-click it to change it.

Microsoft Word is a software tool that allows us to create documents file like articles, office letters, projects files and many more in a very simplest and easy manner. MS Word makes our document more attractive as compared to paper or file work by providing different features like it has different sizes of pages, fonts, colors, design, bullets, tables, charts, page border/number, and many more.
It also provides various features like editing, texting, formatting, graphics designs, fonts color and styles, inserting images, videos, printing documents etc.
This MS Word software saves our articles/letters in a form of a document and saves them on the computer forever. Whenever it is required it can be shared or can access the document.

Features of MS Word
- Images- MS Word provides the inserting of various images in our document.
- Videos- We can insert videos in our document
- Fonts Styles- It has a wide range of font styles for our text.
- Colors- It also has different types of colors to make our document more attractive.
- Page number and size- You can set the size of the page of your document
- WordArt- It provides various writing styles for our documents.
- Tables- Tables in MS Word are used to represent data in Tabular form
- Graph and Charts- These are used to represent statistical data
- Animations and Designs- MS Word allows the creation of Animations and designs as per user needs
- Page border/color- MS Word allows adding borders and colors to pages.
What are Symbols in MS Word?
Microsoft Word has a special features called symbols in which user can insert many different types of symbols in the document.
MS Word has a variety of symbols, special characters, fractions, languages, etc. We can insert the symbols and special characters with the help of the Symbol dialog box present in MS Word.
Some pictures of symbols in MS Word are:


Steps to Add Symbols in MS Word
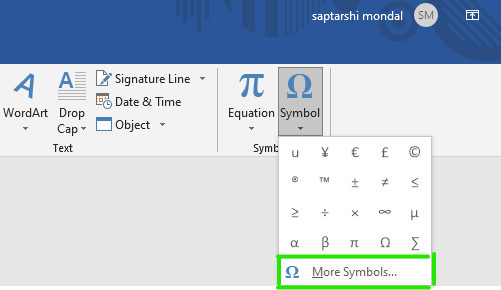
Step 1: On the navigation menu click on the insert option.

Step 2: On the right-hand side of the navigation menu select the Symbol option as shown in figure:

Step 3: Next select the symbol from the menu as per your need.

Step 4: You can also select more different types of symbols by just clicking on the More Symbols option as shown in the figure:

Step 5: A symbol dialog box will be pop up on the screen.

Step 6: Now click on the symbols option as shown in the figure:
Step 7: Next click on the drop-down arrow of the font box to change the font style of symbols.

Step 8: Select the font style from the style menu.

Step 9: Next click on the drop-down arrow of subset box to select the different categories of the symbols.

Step 10: Select the symbol category from the menu.

Step 11: Select the symbol as per your choice as shown in the figure:

Step 12: Then click on the insert option to insert the symbol on your current page of the document.

Note – You can also search for a particular symbol using its character code as shown in the figure:

Step 13: Enter the symbol character code in the character code box.

Step 14: Select the option (UNICODE, ASCII) as shown in the figure:

Step 15: Then click on the insert option.
Step 16: Close the symbol dialog box as shown in the figure:

Finally, the symbol is added to your document.
Steps to Insert Special Symbols in MS Word
Step 1: Click on the Symbol option from the navigation menu.

Step 2: Select the More Symbols option as shown in the figure:
Step 3: A symbol dialog box will open.
Step 4: Now select the special characters option as shown in the figure:

Step 5: Select the special character as per your choice from the menu.

Step 6: Click on the insert option to continue.

Step 7: Close the symbol dialog box.

Finally, special characters symbol is added to your document.


These are some of the steps to insert symbols and special characters in the document.
Insert the Euro Sign or Symbol in Microsoft Word Documents (with Shortcuts)
by Avantix Learning Team | Updated January 29, 2022
Applies to: Microsoft® Word® 2013, 2016, 2019 or 365 (Windows)
You can insert the Euro sign or symbol (€) in a Word document using built-in Word commands or keyboard shortcuts (including Alt code, AutoCorrect or built-in shortcuts).
Recommended article: How to Check Word Count in Microsoft Word (4 Ways)
In this article, we’ll look at 4 ways to insert or type the Euro symbol in a Word document:
- Use the Insert Symbol command
- Press Alt and then enter a number sequence
- Use a built-in Word shortcut
- Insert an AutoCorrect entry
Do you want to learn more about Microsoft Word? Check out our virtual classroom or in-person Word courses >
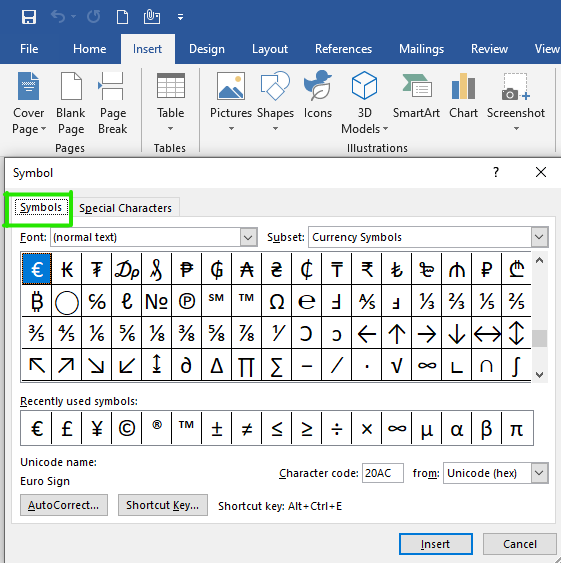
1. Insert the Euro symbol using Insert Symbol
To insert the Euro sign or symbol using Insert Symbol in the Ribbon in Word:
- Position the cursor in the Word document where you want to insert the Euro symbol.
- Click the Insert tab in the Ribbon.
- In the Symbols group, click Symbol. A drop-down menu appears.
- Click More Symbols. A dialog box appears.
- If necessary, click the Symbols tab.
- Select (normal text) from the Font drop-down menu.
- Select Currency Symbols from the Subset drop-down menu.
- Scroll through the list of symbols until you find the euro symbol (€) and then click it.
- Click Insert.
- Click Close.
The Insert Symbol dialog box appears as follows (with € selected):

2. Insert the Euro symbol using an Alt code keyboard shortcut
To insert the Euro sign or symbol in a Word document using an Alt code shortcut:
- Position the cursor where you want to insert the Euro symbol.
- Press and hold Alt + 0128 on the numeric keypad.
If the sequence doesn’t work, press NumLock on the numeric keypad. If you don’t have a numeric keypad on your laptop, you may be able to access number keys at the top of your keyboard in combination with another key (like Fn).
3. Insert the Euro symbol using a built-in Word shortcut
To insert the Euro symbol using a built-in Word shortcut, press Ctrl + Alt + E (do not press Shift as this is a lower case e).
4. Inserting the Euro symbol using AutoCorrect
You can also insert the Euro symbol automatically using AutoCorrect.
To insert an AutoCorrect entry for the Euro sign or symbol:
- Position the cursor in a Word document where you want to insert the Euro symbol.
- Type (e).
The entry will be inserted as soon as you finish typing.
Subscribe to get more articles like this one
Did you find this article helpful? If you would like to receive new articles, JOIN our email list.
More resources
How to Insert a Check Mark in Word (5 Ways)
14+ Shortcuts to Quickly Select Text in Microsoft Word
How to Show or Hide White Space in Word Documents
How to Insert or Type the Sigma Symbol in Word (Σ or σ)
How to Create a Table of Contents in Microsoft Word (Insert, Format and Update a TOC)
Related courses
Microsoft Word: Intermediate / Advanced
Microsoft Excel: Intermediate / Advanced
Microsoft PowerPoint: Intermediate / Advanced
Microsoft Word: Long Documents Master Class
Microsoft Word: Styles, Templates and Tables of Contents
Microsoft Word: Designing Dynamic Word Documents Using Fields
VIEW MORE COURSES >
Our instructor-led courses are delivered in virtual classroom format or at our downtown Toronto location at 18 King Street East, Suite 1400, Toronto, Ontario, Canada (some in-person classroom courses may also be delivered at an alternate downtown Toronto location). Contact us at info@avantixlearning.ca if you’d like to arrange custom instructor-led virtual classroom or onsite training on a date that’s convenient for you.
Copyright 2023 Avantix® Learning
Microsoft, the Microsoft logo, Microsoft Office and related Microsoft applications and logos are registered trademarks of Microsoft Corporation in Canada, US and other countries. All other trademarks are the property of the registered owners.
Avantix Learning |18 King Street East, Suite 1400, Toronto, Ontario, Canada M5C 1C4 | Contact us at info@avantixlearning.ca
![]()
Written by Allen Wyatt (last updated December 10, 2020)
This tip applies to Word 2007, 2010, 2013, and 2016
Rachelle often needs to insert a symbol into Word; perhaps a check mark, an accented letter, or a divide-by symbol. To her, Word’s Insert Symbol dialog box seems stuck in the 1990s. She spends too much time scrolling through font families trying to find characters. The «recently used» list is useless as it contains symbols she’s never used and omits symbols she often uses. Rachelle would appreciate any Word hacks, add-ins, or alternative ways of inserting symbols.
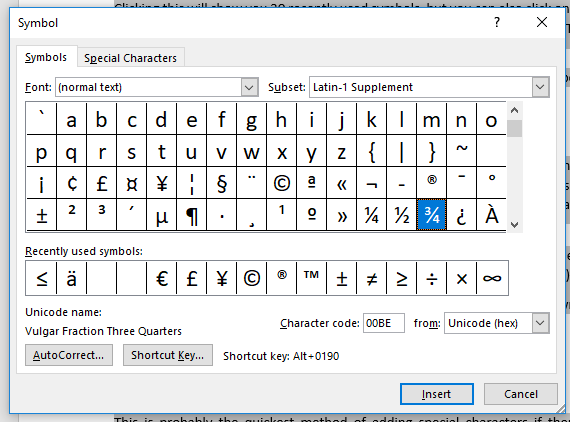
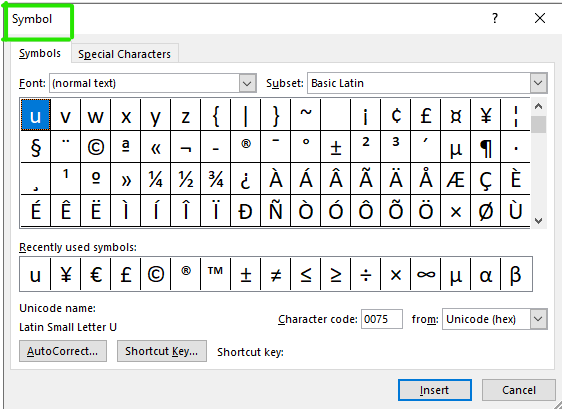
There are quite a few ways that you can work with symbols in Word. Most people, as Rachelle notes, use the Symbol dialog box. If you need to use the dialog box quite often, you quickly find that it can be a pain to work with. To get around this, it is good to note that the Symbol dialog box actually includes a few helps you can use. (See Figure 1.)
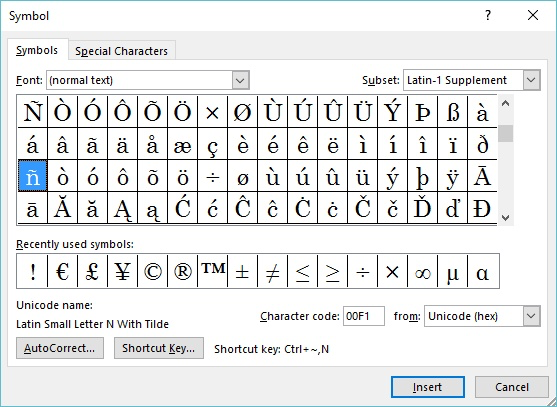
Figure 1. The Symbol dialog box.
Note that when you select a symbol, there is a «character code» shown near the bottom-right corner of the dialog box. This character code can actually be used as a shortcut key. All you need to do is hold down the Alt key as you type that character code. When you release the Alt key, Word inserts the symbol in the document. Another approach is to simply type the four Unicode characters and then press Alt+X, which converts the character code to the symbol.
If you have only a few characters that you insert regularly, then you can simply memorize the codes. If you have a «few more than a few,» some people simply jot them down on a sticky note and use it as a cheat sheet to enter the characters they desire.
Looking back at the Symbol dialog box, you’ll notice that near the bottom of the dialog box is a Shortcut Key button, and to the right of the button is an indication of whether there is a shortcut key assigned for the character. If you want to change the shortcut key (or create your own shortcut key if the character has none), you can click the Shortcut Key button and Word displays the Customize Keyboard dialog box. (See Figure 2.)
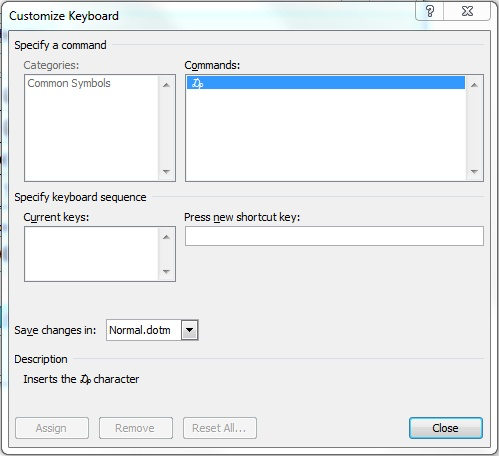
Figure 2. The Customize Keyboard dialog box.
Using the Press New Shortcut Key field, you can specify what shortcut key you want to use for the symbol. If you define a series of shortcut keys for the symbols you use most often, you’ll seldom need to display the Symbol dialog box again.
Finally, you can also use AutoCorrect to input your common symbols. In fact, if you look back at the Symbol dialog box, you’ll see that there is an AutoCorrect button. Select the symbol you want to create an AutoCorrect entry for, and then click the AutoCorrect button. Word fills in what it can for a new AutoCorrect entry, and all you need to do is provide what you want to use as the «trigger» for that entry. For instance, if you use a checkmark symbol quite frequently, you could create an AutoCorrect entry that would automatically replace «;ck» with the check mark.
Some folks go the extra mile and simply create an in-house «symbol sheet.» This Word document includes the common symbols used in the company, along with notes as to how the symbols are to be used. For instance, if the in-house style calls for a «degree symbol» to include a small space before it, that could be noted in the document. Then, people can simply copy from the symbol sheet and paste into the document where they want to use the symbol. The benefit of this approach is that it encourages consistency among multiple users.
Still another approach is to bypass the Symbol dialog box and use one of the basic accessories available in Windows: the Character Map accessory. At first glance it seems like a «stripped down» version of the Symbol dialog box. The benefit, though, is that because it is a bit simpler, it can also be easier to use. Plus, it will work with any Windows program, not just Windows.
Finally, if you feel really industrious, you may want to create your own font. Believe it or not, Windows provides a tool to help you in such an endeavor. You can find more information at this page:
http://www.makeuseof.com/tag/create-your-own-fonts-symbols-characters-windows/
WordTips is your source for cost-effective Microsoft Word training.
(Microsoft Word is the most popular word processing software in the world.)
This tip (563) applies to Microsoft Word 2007, 2010, 2013, and 2016.
Author Bio
With more than 50 non-fiction books and numerous magazine articles to his credit, Allen Wyatt is an internationally recognized author. He is president of Sharon Parq Associates, a computer and publishing services company. Learn more about Allen…
MORE FROM ALLEN
Changing the Way Endnotes Are Numbered
Word is flexible on how it numbers your endnotes. This tip shows how easy it is to make the changes to the numbering system.
Discover More
Inserting a Non-Breaking Space
In Word a non-breaking space will help you keep two words together on the same line. Here’s two different ways that you …
Discover More
Don’t Update Links to Other Programs
If you have links in your workbook to data in other workbooks, you may want to control whether Excel updates those links …
Discover More
HTTA is reader supported. When you buy through links on our site, we may earn an affiliate commission at no extra cost to you. Learn more.
In today’s article, you’ll learn how to use some keyboard shortcuts and other methods to type or insert the Nabla Symbol (text) in MS Word for Windows.
Just before we begin, I’ll like to tell you that you can also use the button below to copy and paste the Nabla symbol text into your work for free.
However, if you just want to type this symbol on your keyboard, the actionable steps below will show you everything you need to know.
Nabla Symbol [∇] Quick Guide
To type the Nabla Symbol on Word for Windows, simply press down the Alt key and type 8711 using the numeric keypad, then let go of the Alt key. This shortcut works only on MS Word.
The below table contains all the information you need to type this Symbol on the keyboard on Word for Windows PC.
| Name | Nabla Sign |
| Text | ∇ |
| Alt Code | 8711 |
| Shortcut (Word) | Alt+8711 |

The quick guide above provides some useful shortcuts and alt codes on how to type the Nabla symbol in Word on Windows.
For more details, below are some other methods you can also use to insert this symbol into your work such as Word or Excel document.
Microsoft Office provides several methods for typing Nabla Symbol or inserting symbols that do not have dedicated keys on the keyboard.
In this section, I will make available for you 3 different methods you can use to type or insert this and any other symbol on your PC, like in MS Word for Windows.
Without any further ado, let’s get started.
See Also: How to type For All Symbol in Word
Using the Nabla Symbol Alt Code (Windows Only)
The Nabla Symbol alt code is 8711.
Even though this Symbol has no dedicated key on the keyboard, you can still type it on the keyboard with the Alt code method. To do this, press and hold the Alt key whilst pressing the Nabla Alt code (i.e. 8711) using the numeric keypad.
This method works on Windows only. And your keyboard must also have a numeric keypad.
Below is a break-down of the steps you can take to type the Nabla Sign on your Windows PC:
- Place your insertion pointer where you need the Nabla Symbol text.
- Press and hold one of the Alt keys on your keyboard.
- Whilst holding on to the Alt key, press the Nabla Symbol’s alt code (8711). You must use the numeric keypad to type the alt code. If you are using a laptop without the numeric keypad, this method may not work for you. On some laptops, there’s a hidden numeric keypad which you can enable by pressing Fn+NmLk on the keyboard.
- Release the Alt key after typing the Alt code to insert the Symbol into your document.
This is how you may type this symbol in Word using the Alt Code method.
Copy and Paste Nabla Sign ∇ (text)
Another easy way to get the Nabla Symbol on any PC is to use my favorite method: copy and paste.
All you have to do is to copy the symbol from somewhere like a web page, or the character map for windows users, and head over to where you need the symbol (say in Word or Excel), then hit Ctrl+V to paste.
Below is the symbol for you to copy and paste into your Word document. Just select it and press Ctrl+C to copy, switch over to Microsoft Word, place your insertion pointer at the desired location, and press Ctrl+V to paste.
∇
Alternatively, just use the copy button at the beginning of this post.
Using insert Symbol dialog box (Word, Excel, PowerPoint)
The insert symbol dialog box is a library of symbols from where you can insert any symbol into your Word document with just a couple of mouse clicks.
Obey the following steps to insert this symbol (∇) in Word or Excel using the insert symbol dialog box.
- Open your Word/Excel/PowerPoint document.
- Click to place the insertion pointer where you wish to insert the symbol.
- Go to the Insert tab.

- In the Symbols category, click on the Symbol drop-down and select the More Symbols button.

The Symbol dialog box will appear.
- To easily locate the Nabla symbol, Select Symbol in the Font drop-down list and type 00D1 in the character code field at the bottom of the window. After typing this character code, the Nabla symbol will appear selected.
- Now click on the Insert button to insert the symbol into your document.

- Close the dialog.
The symbol will then be inserted exactly where you placed the insertion pointer.
These are the steps you may use to insert this Symbol in Word.
Conclusion
As you can see, there are several different methods you can use to type the Nabla Sign in Microsoft Word.
Using the alt code shortcut for Word makes the fastest option for this task. Shortcuts are always fast.
Thank you very much for reading this blog.
If you have anything thing to say or questions to ask concerning the Nabla Symbol, please drop it in the comments.