
Содержание
- Excel macro with sheets
- Вариант 1
- Sheets(1).Cells(1,1)
- Вариант 2
- Sheets(«First»).Cells(1,1)
- Вариант 3
- Public Const wsFirst = «First»
- Sheets(wsFirst).Cells(1,1)
- Вариант 4
- Лист1.Cells(1,1) или [Лист1].Cells(1,1)
- Вариант 5
- Public wsData As Worksheet
- Set wsData = Лист1
- wsData.Cells(1,1)
- Вариант 6
- ActiveSheet.Cells(1,1)
- Вариант 7
- Macro to Loop Through All Worksheets in a Workbook
- Summary
- More Information
- References
- Excel VBA Sheets and Worksheets: Step-by-Step Guide and 16 Examples to Refer to Sheets or Worksheets in Macros
- Related Excel VBA and Macro Tutorials
- #1: Refer to all sheets in workbook
- VBA code to refer to all sheets in workbook
- Process to refer to all sheets in workbook
- VBA statement explanation
- Macro example to refer to all sheets in workbook
- Effects of executing macro example to refer to all sheets in workbook
- #2: Refer to all worksheets in workbook
- VBA code to refer to all worksheets in workbook
- Process to refer to all worksheets in workbook
- VBA statement explanation
- Macro example to refer to all worksheets in workbook
- Effects of executing macro example to refer to all worksheets in workbook
- #3: Refer to active sheet
- VBA code to refer to active sheet
- Process to refer to active sheet
- VBA statement explanation
- Macro example to refer to active sheet
- Effects of executing macro example to refer to active sheet
- #4: Refer to sheet by index number
- VBA code to refer to sheet by index number
- Process to refer to sheet by index number
- VBA statement explanation
- Macro example to refer to sheet by index number
- Effects of executing macro example to refer to sheet by index number
- #5: Refer to worksheet by index number
- VBA code to refer to worksheet by index number
- Process to refer to worksheet by index number
- VBA statement explanation
- Macro example to refer to worksheet by index number
- Effects of executing macro example to refer to worksheet by index number
- #6: Refer to sheet by name
- VBA code to refer to sheet by name
- Process to refer to sheet by name
- VBA statement explanation
- Macro example to refer to sheet by name
- Effects of executing macro example to refer to sheet by name
- #7: Refer to worksheet by name
- VBA code to refer to worksheet by name
- Process to refer to worksheet by name
- VBA statement explanation
- Macro example to refer to worksheet by name
- Effects of executing macro example to refer to worksheet by name
- #8: Refer to sheet by code name
- VBA code to refer to sheet by code name
- Process to refer to sheet by code name
- VBA statement explanation
- Macro example to refer to sheet by code name
- Effects of executing macro example to refer to sheet by code name
- #9: Refer to several sheets
- VBA code to refer to several sheets
- Process to refer to several sheets
- VBA statement explanation
- Macro example to refer to several sheets
- Effects of executing macro example to refer to several sheets
- #10: Refer to several worksheets
- VBA code to refer to several worksheets
- Process to refer to several worksheets
- VBA statement explanation
- Macro example to refer to several worksheets
- Effects of executing macro example to refer to several worksheets
- #11: Loop through all sheets in workbook with For Each… Next
- VBA code to loop through all sheets in workbook with For Each… Next
- Process to loop through all sheets in workbook with For Each… Next
- VBA statement explanation
- Lines #1 and #3: For Each Sheet In Workbook.Sheets | Next Sheet
- Line #2: Statements
- Macro example to loop through all sheets in workbook with For Each… Next
- Effects of executing macro example to loop through all sheets in workbook with For Each… Next
- #12: Loop through all worksheets in workbook with For Each… Next
- VBA code to loop through all worksheets in workbook with For Each… Next
- Process to loop through all worksheets in workbook with For Each… Next
- VBA statement explanation
- Lines #1 and #3: For Each Worksheet In Workbook.Worksheets | Next Worksheet
- Line #2: Statements
- Macro example to loop through all worksheets in workbook with For Each… Next
- Effects of executing macro example to loop through all worksheets in workbook with For Each… Next
- #13: Loop through all sheets in workbook with For… Next
- VBA code to loop through all sheets in workbook with For… Next
- Process to loop through all sheets in workbook with For… Next
- VBA statement explanation
- Lines #1 and #3: For Counter = 1 To Workbook.Sheets.Count | Next Counter
- Line #2: Statements
- Macro example to loop through all sheets in workbook with For… Next
- Effects of executing macro example to loop through all sheets in workbook with For… Next
- #14: Loop through all worksheets in workbook with For… Next
- VBA code to loop through all worksheets in workbook with For… Next
- Process to loop through all worksheets in workbook with For… Next
- VBA statement explanation
- Lines #1 and #3: For Counter = 1 To Workbook.Worksheets.Count | Next Counter
- Line #2: Statements
- Macro example to loop through all worksheets in workbook with For… Next
- Effects of executing macro example to loop through all worksheets in workbook with For… Next
- #15: Loop through all sheets in reverse order
- VBA code to loop through all sheets in reverse order
- Process to loop through all sheets in reverse order
- VBA statement explanation
- Lines #1 and #3: For Counter = Workbook.Sheets.Count To 1 Step -1 | Next Counter
- Line #2: Statements
- Macro example to loop through all sheets in reverse order
- Effects of executing macro example to loop through all sheets in reverse order
- #16: Loop through all worksheets in reverse order
- VBA code to loop through all worksheets in reverse order
- Process to loop through all worksheets in reverse order
- VBA statement explanation
- Lines #1 and #3: For Counter = ThisWorkbook.Worksheets.Count To 1 Step -1 | Next Counter
- Line #2: Statements
- Macro example to loop through all worksheets in reverse order
- Effects of executing macro example to loop through all worksheets in reverse order
- Learn more about working with sheets and worksheets in VBA
Excel macro with sheets
Поговорим про то, как в VBA обращаться к листам книги Excel.
Вариант 1
У глобального объекта Excel Application есть 2 коллекции листов: Sheets и Worksheets . Отличаются они тем, что вторая коллекция не включает в себя специальные листы макросов, которые поддерживала Excel 4.0 (на минуточку — 1992 год) во времена, когда VBA ещё не было в природе (появился в Excel 5.0). Тяжело найти эстетов, которые всё ещё пользуются такими листами с макросами, поэтому можно считать, что эти коллекции идентичны. Лично я использую коллекцию Sheets просто потому, что 5 букв лучше, чем 9.
Sheets(1).Cells(1,1)
Sheets(1) — это не первый лист, созданный в книге, а лист, который на панели ярлыков листов занимает КРАЙНЕЕ ЛЕВОЕ положение. То есть Sheets(2) будет указывать на второй слева лист на панели ярлыков. Если вам нужен конкретный лист, то ТАК ссылаться на него, как вы понимаете, плохая идея, ибо пользователь, изменив порядок следования листов, нарушит работоспособность вашей программы.
Во всех примерах я буду обращаться к ячейки A1, так как речь не о свойствах объекта Worksheet , а о том, какие есть способы получить синтаксическую конструкцию, указывающую на нужный нам лист.
Вариант 2
Sheets(«First»).Cells(1,1)
Пожалуй, такое обращение к листу наиболее популярно в народе. В скобках и кавычках мы видим пользовательское имя листа. Плохо только то, что имя листа, что называется «hard coded» (жёстко запрограммировано), что является моветоном в программировании. Ибо, если у вас в модуле конструкция Sheets(«First») встречается 100 раз, то при смене имени листа придётся делать поиск с заменой 100 констант в коде. Поэтому обычно делают иначе.
Вариант 3
Гораздо разумней добавить ещё один уровень абстракции и объявить константу, ссылающуюся на имя листа.
Public Const wsFirst = «First»
Sheets(wsFirst).Cells(1,1)
В случае смены имени вам придётся исправить ТОЛЬКО эту константу в начале модуля. Однако, если программа написана и сдана пользователю, а тот в один прекрасный момент берёт и переименовывает лист, то наш код тут же перестаёт работать, что, согласитесь, не слишком хорошо.
Вариант 4
У листа есть свойство Name , которое мы видим на ярлыке листа и которое можем менять (если не включена защита структуры книги, но сейчас не об этом), но ещё есть свойство CodeName , которое присваивается листу в момент создания, и которое пользователь сменить не может. В русской редакции офиса эти CodeName -ы формируются по принципу: Лист1 , Лист2 , Лист3 и т.д. В англоязычной версии это: Sheet1 , Sheet2 , Sheet3 , etc.
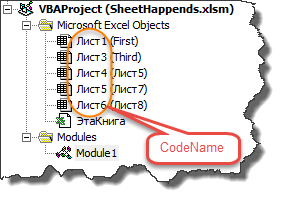
Если вы удалите лист, то его CodeName повторно не будет использовано. Так вот — VBA разпознаёт имена совпадающие с CodeName листа, как объекты типа Worksheet .
Лист1.Cells(1,1) или [Лист1].Cells(1,1)
Это отличная защита от того, что пользователь перенесёт или переименует лист. Но подобные имена ни о чём не говорят нам в процессе программирования в плане того, что располагается на листе, поэтому вы будете частенько ошибаться, путая листы. А те, кто будут потом разбираться в вашем коде, тоже спасибо вам не скажут. Поэтому я предлагаю следующую модификацию этого способа:
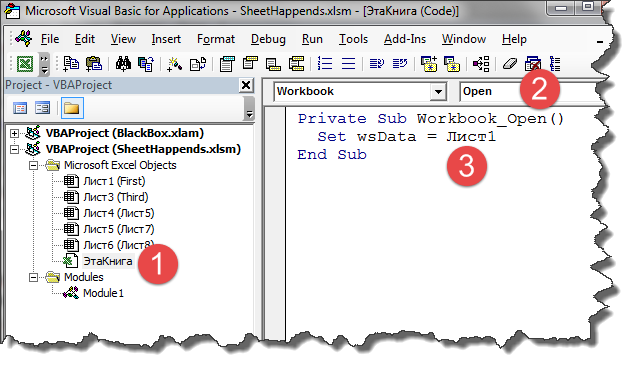
Вариант 5
Public wsData As Worksheet
Set wsData = Лист1
wsData.Cells(1,1)
Строку 1 размещаем в объявлениях модуля. Строку 2 размещаем в обработчике события Workbook_Open . И после этого в любом месте книги мы можем использовать объявленные переменные ( wsData , строка 3). На мой взгляд, это самый удобный и продвинутый вариант из рассмотренных.
Вариант 6
Не забываем про свойство ActiveSheet объекта Application , указывающее на активный лист книги. Если вы работаете с текущим листом, то использовать его, я считаю, оптимально.
ActiveSheet.Cells(1,1)
Вариант 7
Ну и последнее, если вам передан в подпрограмму объект типа Range, то не забываем, что ссылку на лист возвращает его свойство Worksheet .
Это всё, что я имел сказать по поводу ссылок на листы в Excel VBA 🙂
Источник
Macro to Loop Through All Worksheets in a Workbook
Summary
This article contains a Microsoft Visual Basic for Applications macro (Sub procedure) that loops through all the worksheets in the active workbook. This macro also displays the name of each worksheet.
More Information
Microsoft provides programming examples for illustration only, without warranty either expressed or implied. This includes, but is not limited to, the implied warranties of merchantability or fitness for a particular purpose. This article assumes that you are familiar with the programming language that is being demonstrated and with the tools that are used to create and to debug procedures. Microsoft support engineers can help explain the functionality of a particular procedure, but they will not modify these examples to provide added functionality or construct procedures to meet your specific requirements. To try the sample macro, follow these steps:
Type the following macro code into a new module sheet.
To run the macro, position the insertion point in the line that reads «Sub WorksheetLoop(),» and press F5.
The macro will loop through the workbook and display a message box with a different worksheet name each time it runs through the loop. Note that this macro will only display worksheet names; it will not display the names of other types of sheets in the workbook.
You can also loop through all of the worksheets in the workbook by using a ‘For Each’ loop.
Enter the following macro code into a new module sheet.
To run the macro, position the insertion point in the line that reads «Sub WorksheetLoop2(),» and press F5.
This macro works identically to the WorksheetLoop macro, except that it uses a different type of loop to process all of the worksheets in the active workbook.
References
For additional information about getting help with Visual Basic for Applications, please see the following article in the Microsoft Knowledge Base:
163435 VBA: Programming Resources for Visual Basic for Applications
226118 OFF2000: Programming Resources for Visual Basic for Applications
Источник
Excel VBA Sheets and Worksheets: Step-by-Step Guide and 16 Examples to Refer to Sheets or Worksheets in Macros
 In this VBA Tutorial, you learn how to refer to, and work with, sheets and worksheets in macros. This includes:
- How to refer to all sheets in a workbook.
- How to refer to all worksheets in a workbook.
- How to refer to the active sheet.
- How to refer to a sheet by its index number.
- How to refer to a worksheet by its index number.
- How to refer to a sheet by its name.
- How to refer to a worksheet by its name.
- How to refer to a sheet by its code name.
- How to refer to several sheets.
- How to refer to several worksheets.
- How to loop through all sheets in a workbook with the For Each… Next loop.
- How to loop through all worksheets in a workbook with the For Each… Next loop.
- How to loop through all sheets in a workbook with the For… Next loop.
- How to loop through all worksheets in a workbook with the For… Next loop.
- How to loop through all sheets in a workbook in reverse order.
- How to loop through all worksheets in a workbook in reverse order.
This VBA Tutorial is accompanied by an Excel workbook containing the macros I use in the examples below. You can get immediate free access to this example workbook by subscribing to the Power Spreadsheets Newsletter.
Alternatively, you can access all the files that accompany my Tutorials here.
Table of Contents
The following VBA and Macro Tutorials may help you better understand and implement the contents below:
- General VBA constructs and structures:
- Learn the basics of working with macros here.
- Learn about basic VBA terms and constructs here.
- Learn how to enable or disable macros here.
- Learn how to work with the Visual Basic Editor here.
- Learn how to create Sub procedures here.
- Learn how to create object references here.
- Learn how to work with object properties here.
- Learn how to work with object methods here.
- Learn how to declare and work with variables here.
- Learn about VBA data types here.
- Learn how to work with arrays here.
- Learn how to work with loops here.
- Practical VBA applications and macro examples:
- Learn how to delete sheets and worksheets here.
You can find additional VBA and Macro Tutorials in the Archives.
#1: Refer to all sheets in workbook
VBA code to refer to all sheets in workbook
To refer to all sheets in a workbook with VBA, use an object reference with the following structure:
Process to refer to all sheets in workbook
To refer to all sheets in a workbook with VBA, follow these steps:
- Identify the workbook containing the sheets (Workbook).
- Refer to the Sheets collection representing all sheets in Workbook (Sheets).
VBA statement explanation
Item: Workbook
Workbook object representing the Excel workbook containing the sheets you refer to.
You can usually work with one of the following properties to refer to this Workbook object:
- Application.ActiveWorkbook.
- Application.ThisWorkbook.
- Application.Workbooks.
Item: Sheets
The Workbook.Sheets property returns a Sheets collection representing all sheets in Workbook. The Sheets collection can, generally, contain both:
- Chart objects, where each Chart object represents an individual chart sheet; or
- Worksheet objects, where each Worksheet object represents an individual worksheet.
Macro example to refer to all sheets in workbook
The following macro example displays a message box (MsgBox) with the number of sheets (Sheets.Count) in the workbook where the macro is stored (ThisWorkbook).
Effects of executing macro example to refer to all sheets in workbook
The following GIF illustrates the results of executing the macro example. The workbook where the macro is stored contains 5 worksheets (Sheet1 through Sheet5) and 5 chart sheets (Chart1 through Chart5). Therefore, Excel displays a message box with the number 10.

#2: Refer to all worksheets in workbook
VBA code to refer to all worksheets in workbook
To refer to all worksheets in a workbook with VBA, use an object reference with the following structure:
Process to refer to all worksheets in workbook
To refer to all worksheets in a workbook with VBA, follow these steps:
- Identify the workbook containing the worksheets (Workbook).
- Refer to the Sheets collection representing all worksheets in Workbook (Worksheets).
VBA statement explanation
Item: Workbook
Workbook object representing the Excel workbook containing the worksheets you refer to.
You can usually work with one of the following properties to refer to this Workbook object:
- Application.ActiveWorkbook.
- Application.ThisWorkbook.
- Application.Workbooks.
Item: Worksheets
The Workbook.Worksheets property returns a Sheets collection representing all worksheets in Workbook.
Macro example to refer to all worksheets in workbook
The following macro example displays a message box (MsgBox) with the number of worksheets (Worksheets.Count) in the workbook where the macro is stored (ThisWorkbook).
Effects of executing macro example to refer to all worksheets in workbook
The following GIF illustrates the results of executing the macro example. The workbook where the macro is stored contains 5 worksheets (Sheet1 through Sheet5). Therefore, Excel displays a message box with the number 5.

#3: Refer to active sheet
VBA code to refer to active sheet
To refer to the active sheet with VBA, use an object reference with the following structure:
Process to refer to active sheet
To refer to the active sheet with VBA, follow these steps:
- Identify the workbook containing the sheet (Workbook). If you don’t identify Workbook, VBA works with the active workbook.
- Refer to the active sheet in Workbook (ActiveSheet).
VBA statement explanation
Item: Workbook
Workbook object representing the Excel workbook containing the active sheet you refer to.
You can usually work with one of the following properties to refer to this Workbook object:
- Application.ActiveWorkbook.
- Application.ThisWorkbook.
- Application.Workbooks.
If you don’t specify Workbook when referring to the active sheet with ActiveSheet, VBA works with the active workbook (the workbook on top).
Item: ActiveSheet
The ActiveSheet returns an object representing the active sheet (the sheet on top) in Workbook, as follows:
- If you specify Workbook, ActiveSheet returns an object representing the active sheet in Workbook.
- If you don’t specify Workbook, ActiveSheet returns an object representing the active sheet in the active workbook (the workbook on top).
Macro example to refer to active sheet
The following macro example displays a message box (MsgBox) with the name (Name) of the active sheet in the active workbook (ActiveSheet).
Effects of executing macro example to refer to active sheet
The following GIF illustrates the results of executing the macro example. As expected, Excel displays a message box with the name of the active sheet (Sheet1).

#4: Refer to sheet by index number
VBA code to refer to sheet by index number
To refer to a sheet by its index number with VBA, use an object reference with the following structure:
Process to refer to sheet by index number
To refer to a sheet by its index number with VBA, follow these steps:
- Identify the workbook containing the sheet (Workbook).
- Identify the sheet by its index number (Sheets(SheetIndexNumber)).
VBA statement explanation
Item: Workbook
Workbook object representing the Excel workbook containing the sheet you refer to.
You can usually work with one of the following properties to refer to this Workbook object:
- Application.ActiveWorkbook.
- Application.ThisWorkbook.
- Application.Workbooks.
Item: Sheets(SheetIndexNumber)
The Workbook.Sheets property returns a Sheets collection representing all sheets in Workbook. The Sheets collection can, generally, contain both:
- Chart objects, where each Chart object represents an individual chart sheet; or
- Worksheet objects, where each Worksheet object represents an individual worksheet.
SheetIndexNumber is the index number of the sheet you refer to. This index number represents the position of the sheet in the tab bar of Workbook, from left to right. For these purposes, the count usually includes:
- Hidden sheets; and
- Both chart sheets and worksheets.
Therefore, Sheets(SheetIndexNumber) usually returns an individual Chart or Worksheet object representing the chart sheet or worksheet whose index number is SheetIndexNumber.
Macro example to refer to sheet by index number
The following macro example activates (Activate) the fifth sheet (Sheets(5)) in the workbook where the macro is stored (ThisWorkbook).
Effects of executing macro example to refer to sheet by index number
The following GIF illustrates the results of executing the macro example.
When the macro is executed, the active sheet is Sheet1. As expected, Excel activates the fifth sheet (Chart1).

#5: Refer to worksheet by index number
VBA code to refer to worksheet by index number
To refer to a worksheet by its index number with VBA, use an object reference with the following structure:
Process to refer to worksheet by index number
To refer to a worksheet by its index number with VBA, follow these steps:
- Identify the workbook containing the worksheet (Workbook).
- Identify the worksheet by its index number (Worksheets(WorksheetIndexNumber)).
VBA statement explanation
Item: Workbook
Workbook object representing the Excel workbook containing the worksheet you refer to.
You can usually work with one of the following properties to refer to this Workbook object:
- Application.ActiveWorkbook.
- Application.ThisWorkbook.
- Application.Workbooks.
Item: Worksheets(WorksheetIndexNumber)
The Workbook.Worksheets property returns a Sheets collection representing all worksheets in Workbook.
WorksheetIndexNumber is the index number of the worksheet you refer to. This index number represents the position of the worksheet in the tab bar of Workbook, from left to right. For these purposes, the count usually:
- Includes hidden worksheets; but
- Doesn’t include chart sheets.
Therefore, Worksheets(WorksheetIndexNumber) returns an individual Worksheet object representing the worksheet whose index number is WorksheetIndexNumber.
Macro example to refer to worksheet by index number
The following macro example activates (Activate) the first worksheet (Worksheets(1)) in the workbook where the macro is stored (ThisWorkbook).
Effects of executing macro example to refer to worksheet by index number
The following GIF illustrates the results of executing the macro example.
When the macro is executed, the active sheet is Sheet5. As expected, Excel activates the first worksheet (Sheet1).

#6: Refer to sheet by name
VBA code to refer to sheet by name
To refer to a sheet by its name with VBA, use an object reference with the following structure:
Process to refer to sheet by name
To refer to a sheet by its name with VBA, follow these steps:
- Identify the workbook containing the sheet (Workbook).
- Identify the sheet by its name (Sheets(“SheetName”)).
VBA statement explanation
Item: Workbook
Workbook object representing the Excel workbook containing the sheet you refer to.
You can usually work with one of the following properties to refer to this Workbook object:
- Application.ActiveWorkbook.
- Application.ThisWorkbook.
- Application.Workbooks.
Item: Sheets(“SheetName”)
The Workbook.Sheets property returns a Sheets collection representing all sheets in Workbook. The Sheets collection can, generally, contain both:
- Chart objects, where each Chart object represents an individual chart sheet; or
- Worksheet objects, where each Worksheet object represents an individual worksheet.
“SheetName” is a string representing the name of the sheet you refer to, as displayed in the sheet’s tab. If you explicitly declare a variable to represent “SheetName”, you can usually declare it as of the String data type.
Therefore, Sheets(“SheetName”) usually returns an individual Chart or Worksheet object representing the chart sheet or worksheet whose name is SheetName.
Macro example to refer to sheet by name
The following macro example activates (Activate) the sheet named “Chart1” (Sheets(“Chart1”)) in the workbook where the macro is stored (ThisWorkbook).
Effects of executing macro example to refer to sheet by name
The following GIF illustrates the results of executing the macro example.
When the macro is executed, the active sheet is Sheet1. As expected, Excel activates Chart1.

#7: Refer to worksheet by name
VBA code to refer to worksheet by name
To refer to a worksheet by its name with VBA, use an object reference with the following structure:
Process to refer to worksheet by name
To refer to a worksheet by its name with VBA, follow these steps:
- Identify the workbook containing the worksheet (Workbook).
- Identify the worksheet by its name (Worksheets(“WorksheetName”)).
VBA statement explanation
Item: Workbook
Workbook object representing the Excel workbook containing the worksheet you refer to.
You can usually work with one of the following properties to refer to this Workbook object:
- Application.ActiveWorkbook.
- Application.ThisWorkbook.
- Application.Workbooks.
Item: Worksheets(“WorksheetName”)
The Workbook.Worksheets property returns a Sheets collection representing all worksheets in Workbook.
“WorksheetName” is a string representing the name of the worksheet you refer to, as displayed in the worksheet’s tab. If you explicitly declare a variable to represent “WorksheetName”, you can usually declare it as of the String data type.
Therefore, Worksheets(“WorksheetName”) returns an individual Worksheet object representing the worksheet whose name is WorksheetName.
Macro example to refer to worksheet by name
The following macro example activates (Activate) the worksheet named “Sheet1” (Worksheets(“Sheet1”)) in the workbook where the macro is stored (ThisWorkbook).
Effects of executing macro example to refer to worksheet by name
The following GIF illustrates the results of executing the macro example.
When the macro is executed, the active sheet is Chart1. As expected, Excel activates Sheet1.

#8: Refer to sheet by code name
VBA code to refer to sheet by code name
To refer to a sheet by its code name with VBA, use the sheet’s code name:
Process to refer to sheet by code name
To refer to a sheet by its code name with VBA, use the sheet’s code name.
VBA statement explanation
Item: SheetCodeName
SheetCodeName is the code name of the sheet you refer to.
You can use a sheet’s code name instead of an object reference (such as the ones I explain in other sections of this VBA Tutorial) returning the Chart or Sheet object you refer to.
Macro example to refer to sheet by code name
The following macro example activates (Activate) the worksheet whose code name is Sheet1 (Sheet1).
Effects of executing macro example to refer to sheet by code name
The following GIF illustrates the results of executing the macro example.
When the macro is executed, the active sheet is Sheet5. As expected, Excel activates Sheet1 (both the name and code name are Sheet1).

#9: Refer to several sheets
VBA code to refer to several sheets
To refer to several sheets with VBA, use an object reference with the following structure:
Process to refer to several sheets
To refer to several sheets with VBA, follow these steps:
- Identify the workbook containing the sheets (Workbook).
- Obtain an array with the index numbers or names of the sheets you refer to (Array(SheetList)).
- Identify the sheets (Sheets(Array(SheetList))).
VBA statement explanation
Item: Workbook
Workbook object representing the Excel workbook containing the sheets you refer to.
You can usually work with one of the following properties to refer to this Workbook object:
- Application.ActiveWorkbook.
- Application.ThisWorkbook.
- Application.Workbooks.
Item: Sheets(Array(SheetList))
The Workbook.Sheets property returns a Sheets collection representing all sheets in Workbook. The Sheets collection can, generally, contain both:
- Chart objects, where each Chart object represents an individual chart sheet; or
- Worksheet objects, where each Worksheet object represents an individual worksheet.
The Array function (Array(SheetList)) returns a Variant containing an array with the index numbers or names of the sheets you refer to.
SheetList is the argument list of the Array function, which contains a comma-delimited list of the values you assign to each of the elements in the array returned by Array. When referring to several sheets, you can usually identify the specific objects in the Sheets collection you work with using the appropriate index number or sheet name, as follows:
- The index number represents the position of a sheet in the tab bar of Workbook, from left to right. For these purposes, the count usually includes:
- Hidden sheets; and
- Both chart sheets and worksheets.
- The sheet name is that displayed in the sheet’s tab.
Therefore, Sheets(Array(SheetList)) represents the chart sheets or worksheets you specify in SheetList.
Macro example to refer to several sheets
The following macro example moves (Move) the first sheet, the sheet named “Sheet3” and the sheet named “Chart1” (Sheets(Array(1, “Sheet3”, “Chart1”))) in the workbook where the macro is stored (ThisWorkbook) to the end of the workbook (After:=ThisWorkbook.Sheets(ThisWorkbook.Sheets.Count)).
Effects of executing macro example to refer to several sheets
The following GIF illustrates the results of executing the macro example. As expected, Sheet1 (the first sheet), Sheet3 and Chart1 are moved to the end of the workbook.

#10: Refer to several worksheets
VBA code to refer to several worksheets
To refer to several worksheets with VBA, use an object reference with the following structure:
Process to refer to several worksheets
To refer to several worksheets with VBA, follow these steps:
- Identify the workbook containing the worksheets (Workbook).
- Obtain an array with the index numbers or names of the worksheets you refer to (Array(WorksheetList)).
- Identify the worksheets (Sheets(Array(WorksheetList))).
VBA statement explanation
Item: Workbook
Workbook object representing the Excel workbook containing the worksheets you refer to.
You can usually work with one of the following properties to refer to this Workbook object:
- Application.ActiveWorkbook.
- Application.ThisWorkbook.
- Application.Workbooks.
Item: Worksheets(Array(WorksheetList))
The Workbook.Worksheets property returns a Sheets collection representing all worksheets in Workbook.
The Array function (Array(WorksheetList)) returns a Variant containing an array with the index numbers or names of the worksheets you refer to.
WorksheetList is the argument list of the Array function, which contains a comma-delimited list of the values you assign to each of the elements in the array returned by Array. When referring to several worksheets, you can usually identify the specific objects in the Worksheets collection you work with using the appropriate index number or sheet name, as follows:
- The index number represents the position of a worksheet in the tab bar of Workbook, from left to right. For these purposes, the count usually:
- Includes hidden sheets; but
- Doesn’t include chart sheets.
- The worksheet name is that displayed in the worksheet’s tab.
Therefore, Sheets(Array(WorksheetList)) represents the chart sheets or worksheets you specify in WorksheetList.
Macro example to refer to several worksheets
The following macro example moves (Move) the worksheets named “Sheet1”, “Sheet2” and “Sheet3” (Worksheets(Array(“Sheet1”, “Sheet2”, “Sheet3”))) in the workbook where the macro is stored (ThisWorkbook) after the last worksheets in the workbook (After:=ThisWorkbook.Worksheets(ThisWorkbook.Worksheets.Count)).
Effects of executing macro example to refer to several worksheets
The following GIF illustrates the results of executing the macro example. As expected, Sheet1, Sheet2 and Sheet3 are moved after the last worksheet in the workbook (Sheet5).

#11: Loop through all sheets in workbook with For Each… Next
VBA code to loop through all sheets in workbook with For Each… Next
To loop through all sheets in a workbook with a For Each… Next VBA loop, use a macro with the following statement structure:
Process to loop through all sheets in workbook with For Each… Next
To loop through all sheets in a workbook with a For Each… Next VBA loop, follow these steps:
- Identify the workbook containing the sheets (Workbook).
- Identify the Sheets collection representing all sheets in Workbook (Sheets).
- Use an object variable to iterate through the Sheets in Workbook (Sheet).
- Execute a set of Statements for each Sheet in Workbook.
VBA statement explanation
Lines #1 and #3: For Each Sheet In Workbook.Sheets | Next Sheet
Item: For Each … In … | Next …
The For Each… Next statement repeats the Statements for each Sheet in Workbook.Sheets.
Item: Sheet
Object variable used to iterate through the Sheets in Workbook.
If you explicitly declare an object variable to represent Sheet, you can usually declare it as of the Variant or Object data type.
Item: Workbook.Sheets
Sheets collection through which the For Each… Next statement loops through.
Workbook is a Workbook object representing the Excel workbook containing the sheets you loop through.
You can usually work with one of the following properties to refer to this Workbook object:
- Application.ActiveWorkbook.
- Application.ThisWorkbook.
- Application.Workbooks.
The Workbook.Sheets property returns a Sheets collection representing all sheets in Workbook. The Sheets collection can, generally, contain both:
- Chart objects, where each Chart object represents an individual chart sheet; or
- Worksheet objects, where each Worksheet object represents an individual worksheet.
Therefore, For Each… Next loops through all sheets in Workbook.
Line #2: Statements
Statements that are executed for each Sheet in Workbook.Sheets.
Macro example to loop through all sheets in workbook with For Each… Next
The following macro example:
- Loops through each sheet in the workbook where the macro is stored (For Each iSheet In ThisWorkbook.Sheets | Next iSheet).
- Displays a message box (MsgBox) with the name (Name) of the current sheet (iSheet).
Effects of executing macro example to loop through all sheets in workbook with For Each… Next
The following GIF illustrates the results of executing the macro example. As expected, Excel displays a message box with the name of each sheet (both worksheets and chart sheets) in the workbook.

#12: Loop through all worksheets in workbook with For Each… Next
VBA code to loop through all worksheets in workbook with For Each… Next
To loop through all worksheets in a workbook with a For Each… Next VBA loop, use a macro with the following statement structure:
Process to loop through all worksheets in workbook with For Each… Next
To loop through all worksheets in a workbook with a For Each… Next VBA loop, follow these steps:
- Identify the workbook containing the worksheets (Workbook).
- Identify the Sheets collection representing all worksheets in Workbook (Worksheets).
- Use an object variable to iterate through the worksheets in Workbook (Worksheet).
- Execute a set of Statements for each worksheet in Workbook.
VBA statement explanation
Lines #1 and #3: For Each Worksheet In Workbook.Worksheets | Next Worksheet
Item: For Each … In … | Next …
The For Each… Next statement repeats the Statements for each Worksheet in Workbook.Worksheets.
Item: Worksheet
Object variable used to iterate through the worksheets in Workbook.
If you explicitly declare an object variable to represent Worksheet, you can usually declare it as of the Worksheet object data type.
Item: Workbook.Worksheets
Sheets collection through which the For Each… Next statement loops through.
Workbook is a Workbook object representing the Excel workbook containing the worksheets you loop through.
You can usually work with one of the following properties to refer to this Workbook object:
- Application.ActiveWorkbook.
- Application.ThisWorkbook.
- Application.Workbooks.
The Workbook.Worksheets property returns a Sheets collection representing all worksheets in Workbook.
Therefore, For Each… Next loops through all worksheets in Workbook.
Line #2: Statements
Statements that are executed for each worksheet in Workbook.
Macro example to loop through all worksheets in workbook with For Each… Next
The following macro example:
- Loops through each worksheet in the workbook where the macro is stored (For Each iWorksheet In ThisWorkbook.Worksheets | Next iWorksheet).
- Displays a message box (MsgBox) with the name (Name) of the current sheet (iSheet).
Effects of executing macro example to loop through all worksheets in workbook with For Each… Next
The following GIF illustrates the results of executing the macro example. As expected, Excel displays a message box with the name of each worksheet in the workbook.

#13: Loop through all sheets in workbook with For… Next
VBA code to loop through all sheets in workbook with For… Next
To loop through all sheets in a workbook with a For… Next VBA loop, use a macro with the following statement structure:
Process to loop through all sheets in workbook with For… Next
To loop through all sheets in a workbook with a For… Next VBA loop, follow these steps:
- Identify the workbook containing the sheets (Workbook).
- Identify the Sheets collection representing all sheets in Workbook (Sheets).
- Count the number of sheets in the Sheets collection (Count).
- Execute a set of Statements a number of times equal to the number of Sheets in Workbook (For Counter = 1 To Workbook.Sheets.Count).
VBA statement explanation
Lines #1 and #3: For Counter = 1 To Workbook.Sheets.Count | Next Counter
Item: For … To … | Next …
The For… Next statement repeats the statements a number of times equal to the number of Sheets in Workbook.
Item: Counter
Numeric variable used as loop counter. If you explicitly declare Counter, you can usually declare it as of the Long data type.
Item: = 1
Counter’s initial value.
Item: Workbook.Sheets.Count
Counter’s end value, which is equal to the number of Sheets in Workbook.
Workbook is a Workbook object representing the Excel workbook containing the sheets you loop through.
You can usually work with one of the following properties to refer to this Workbook object:
- Application.ActiveWorkbook.
- Application.ThisWorkbook.
- Application.Workbooks.
The Workbook.Sheets property returns a Sheets collection representing all sheets in Workbook. The Sheets collection can, generally, contain both:
- Chart objects, where each Chart object represents an individual chart sheet; or
- Worksheet objects, where each Worksheet object represents an individual worksheet.
The Sheets.Count property returns the number of objects in the Sheets collection.
- Workbook.Sheets.Count returns the number of Sheets in Workbook; and
- For… Next loops through all Sheets in Workbook (From Counter = 1 To Workbook.Sheets.Count).
Line #2: Statements
Statements that are executed a number of times equal to the number of Sheets in Workbook.
Macro example to loop through all sheets in workbook with For… Next
The following macro example:
- Loops through each sheet in the workbook where the macro is stored (For iCounter = 1 To ThisWorkbook.Sheets.Count | Next iCounter).
- Displays a message box (MsgBox) with the name (Name) of the current sheet (ThisWorkbook.Sheets(iCounter)).
Effects of executing macro example to loop through all sheets in workbook with For… Next
The following GIF illustrates the results of executing the macro example. As expected, Excel displays a message box with the name of each sheet (both worksheets and chart sheets) in the workbook.

#14: Loop through all worksheets in workbook with For… Next
VBA code to loop through all worksheets in workbook with For… Next
To loop through all worksheets in a workbook with a For… Next VBA loop, use a macro with the following statement structure:
Process to loop through all worksheets in workbook with For… Next
To loop through all worksheets in a workbook with a For… Next VBA loop, follow these steps:
- Identify the workbook containing the worksheets (Workbook).
- Identify the Sheets collection representing all worksheets in Workbook (Worksheets).
- Count the number of worksheets in the Sheets collection (Count).
- Execute a set of Statements a number of times equal to the number of worksheets in Workbook (For Counter = 1 To Workbook.Worksheets.Count).
VBA statement explanation
Lines #1 and #3: For Counter = 1 To Workbook.Worksheets.Count | Next Counter
Item: For … To … | Next …
The For… Next statement repeats the statements a number of times equal to the number of worksheets in Workbook.
Item: Counter
Numeric variable used as loop counter. If you explicitly declare Counter, you can usually declare it as of the Long data type.
Item: = 1
Counter’s initial value.
Item: Workbook.Worksheets.Count
Counter’s end value, which is equal to the number of worksheets in Workbook.
Workbook is a Workbook object representing the Excel workbook containing the worksheets you loop through.
You can usually work with one of the following properties to refer to this Workbook object:
- Application.ActiveWorkbook.
- Application.ThisWorkbook.
- Application.Workbooks.
The Workbook.Worksheets property returns a Sheets collection representing all worksheets in Workbook.
The Worksheets.Count property returns the number of objects in the Sheets collection returned by the Worksheets property.
- Workbook.Worksheets.Count returns the number of worksheets in Workbook; and
- For… Next loops through all worksheets in Workbook (From Counter = 1 to Workbook.Worksheets.Count).
Line #2: Statements
Statements that are executed a number of times equal to the number of worksheets in Workbook.
Macro example to loop through all worksheets in workbook with For… Next
The following macro example:
- Loops through each worksheet in the workbook where the macro is stored (For iCounter = 1 To ThisWorkbook.Worksheets.Count | Next iCounter).
- Displays a message box (MsgBox) with the name (Name) of the current worksheet (ThisWorkbook.Worksheets(iCounter)).
Effects of executing macro example to loop through all worksheets in workbook with For… Next
The following GIF illustrates the results of executing the macro example. As expected, Excel displays a message box with the name of each worksheet in the workbook.

#15: Loop through all sheets in reverse order
VBA code to loop through all sheets in reverse order
To loop through all sheets in a workbook in reverse order with VBA, use a macro with the following statement structure:
Process to loop through all sheets in reverse order
To loop through all sheets in a workbook in reverse order with VBA, follow these steps:
- Identify the workbook containing the sheets (Workbook).
- Identify the Sheets collection representing all sheets in Workbook (Sheets).
- Count the number of sheets in the Sheets collection (Count).
- Execute a set of Statements a number of times equal to the number of Sheets in Workbook while clarifying that the looping occurs in reverse order (For Counter = Workbook.Sheets.Count To 1 Step -1).
VBA statement explanation
Lines #1 and #3: For Counter = Workbook.Sheets.Count To 1 Step -1 | Next Counter
Item: For … To …. | Next …
The For… Next statement repeats the statements a number of times equal to the number of worksheets in Workbook.
Item: Counter
Numeric variable used as loop counter. If you explicitly declare Counter, you can usually declare it as of the Long data type.
Item: = Workbook.Sheets.Count
Counter’s initial value, which is equal to the number of Sheets in Workbook.
Workbook is a Workbook object representing the Excel workbook containing the sheets you loop through.
You can usually work with one of the following properties to refer to this Workbook object:
- Application.ActiveWorkbook.
- Application.ThisWorkbook.
- Application.Workbooks.
The Workbook.Sheets property returns a Sheets collection representing all sheets in Workbook. The Sheets collection can, generally, contain both:
- Chart objects, where each Chart object represents an individual chart sheet; or
- Worksheet objects, where each Worksheet object represents an individual worksheet.
The Sheets.Count property returns the number of objects in the Sheets collection. Therefore, Workbook.Sheets.Count returns the number of Sheets in Workbook.
Item: 1
Counter’s end value.
Item: Step -1
Amount Counter changes each loop iteration.
When looping through all sheets in reverse order:
- Counter’s initial value is equal to the number of Sheets in Workbook (Workbook.Sheets.Count).
- Counter’s end value is 1.
- Counter decreases by 1 each iteration.
Therefore, For… Next loops through all Sheets in Workbook in reverse order (From Counter = Workbook.Sheets.Count To 1 Step -1).
Line #2: Statements
Statements that are executed a number of times equal to the number of Sheets in Workbook.
Macro example to loop through all sheets in reverse order
The following macro example:
- Loops through each sheet in the workbook where the macro is stored in reverse order (For iCounter = ThisWorkbook.Sheets.Count To 1 Step -1 | Next iCounter).
- Displays a message box (MsgBox) with the name (Name) of the current sheet (ThisWorkbook.Sheets(iCounter)).
Effects of executing macro example to loop through all sheets in reverse order
The following GIF illustrates the results of executing the macro example. As expected, Excel displays a message box with the name of each sheet (both worksheets and chart sheets) in the workbook in reverse order.

#16: Loop through all worksheets in reverse order
VBA code to loop through all worksheets in reverse order
To loop through all worksheets in a workbook in reverse order with VBA, use a macro with the following statement structure:
Process to loop through all worksheets in reverse order
To loop through all worksheets in a workbook in reverse order with VBA, follow these steps:
- Identify the workbook containing the worksheets (Workbook).
- Identify the Sheets collection representing all worksheets in Workbook (Worksheets).
- Count the number of worksheets in the Sheets collection (Count).
- Execute a set of Statements a number of times equal to the number of worksheets in Workbook while clarifying that the looping occurs in reverse order (For Counter = Workbook.Worksheets.Count To 1 Step -1).
VBA statement explanation
Lines #1 and #3: For Counter = ThisWorkbook.Worksheets.Count To 1 Step -1 | Next Counter
Item: For … To … | Next …
The For… Next statement repeats the statements a number of times equal to the number of worksheets in Workbook.
Item: Counter
Numeric variable used as loop counter. If you explicitly declare Counter, you can usually declare it as of the Long data type.
Item: = Workbook.Worksheets.Count
Counter’s initial value, which is equal to the number of worksheets in Workbook.
Workbook is a Workbook object representing the Excel workbook containing the worksheets you loop through.
You can usually work with one of the following properties to refer to this Workbook object:
- Application.ActiveWorkbook.
- Application.ThisWorkbook.
- Application.Workbooks.
The Workbook.Worksheets property returns a Sheets collection representing all worksheets in Workbook.
The Worksheets.Count property returns the number of objects in the Sheets collection returned by the Worksheets property. Therefore, Workbook.Worksheets.Count returns the number of worksheets in Workbook.
Item: 1
Counter’s end value.
Item: Step -1
Amount Counter changes each loop iteration.
When looping through all worksheets in reverse order:
- Counter’s initial value is equal to the number of worksheets in Workbook (Workbook.Worksheets.Count).
- Counter’s end value is 1.
- Counter decreases by 1 each iteration.
Therefore, For… Next loops through all worksheets in Workbook in reverse order (From Counter = Workbook.Worksheets.Count To 1 Step -1).
Line #2: Statements
Statements that are executed a number of times equal to the number of worksheets in Workbook.
Macro example to loop through all worksheets in reverse order
The following macro example:
- Loops through each worksheet in the workbook where the macro is stored in reverse order (For iCounter = ThisWorkbook.Worksheets.Count To 1 Step -1 | Next iCounter).
- Displays a message box (MsgBox) with the name (Name) of the current worksheet (ThisWorkbook.Worksheets(iCounter)).
Effects of executing macro example to loop through all worksheets in reverse order
The following GIF illustrates the results of executing the macro example. As expected, Excel displays a message box with the name of each worksheet in the workbook in reverse order.

Learn more about working with sheets and worksheets in VBA
You can get immediate free access to the example workbook that accompanies this VBA Tutorial by subscribing to the Power Spreadsheets Newsletter.
Alternatively, you can access all the files that accompany my Tutorials here.
The following Books are referenced in this Excel VBA sheets and worksheets Tutorial:
- Alexander, Michael (2015). Excel Macros for Dummies. Hoboken, NJ: John Wiley & Sons Inc.
- Alexander, Michael and Kusleika, Dick (2016). Excel 2016 Power Programming with VBA. Indianapolis, IN: John Wiley & Sons Inc.
- Jelen, Bill and Syrstad, Tracy (2015). Excel 2016 VBA and Macros. United States of America: Pearson Education, Inc.
- Walkenbach, John (2015). Excel VBA Programming for Dummies. Hoboken, NJ: John Wiley & Sons Inc.
I publish a lot of Tutorials and Training Resources about Microsoft Excel and VBA. Here are some of my most popular Excel Training Resources:
Источник
Return to VBA Code Examples
In this Article
- ActiveSheet
- Activate Worksheet (Setting the ActiveSheet)
- ActiveSheet Name
- Selected Sheets vs ActiveSheet
- Select Worksheet
- Select Worksheet by Tab Name
- Select Worksheet by Index Number
- Select Worksheet With VBA Code Name
- Select Current Worksheet
- More Activate / Select Sheet Examples
- Set ActiveSheet to Variable
- Change ActiveSheet Name
- With ActiveSheet
- Loop Through Selected Sheets
- GoTo Next Sheet
- VBA Coding Made Easy
This article will discuss the ActiveSheet object in VBA. It will also discuss how to activate, select, and go to Worksheets (& much more). Read our full VBA Worksheets Guide for more information about working with worksheets in VBA.
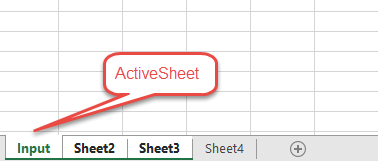
ActiveSheet
In VBA, ActiveSheet refers to the currently active Worksheet. Only one Sheet may be active at a time.
Activate Worksheet (Setting the ActiveSheet)
To set the ActiveSheet use Worksheet.Activate:
Worksheets("Input").ActivateThe Activate Sheet command will actually “go to” the sheet, changing the visible Sheet.
![]()
The above example uses the Sheet (Tab) name. Instead you can use the VBA code name for the worksheet:
Sheet1.Activate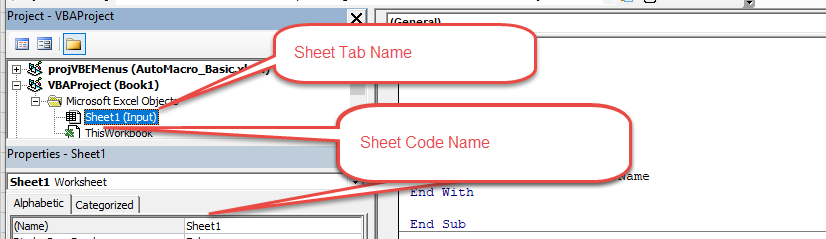
ActiveSheet Name
To get the ActiveSheet Name:
msgbox ActiveSheet.nameSelected Sheets vs ActiveSheet
At any point in time, only one Sheet can be the ActiveSheet. However, multiple Worksheets can be selected at once.
When multiple Worksheets are selected only the “top-most” Worksheet is considered active (the ActiveSheet).
Select Worksheet
If you would like to select a worksheet instead of activating it. Use .Select instead.
Select Worksheet by Tab Name
This selects a Worksheet based on it’s Sheet Tab Name
Sheets("Input").Select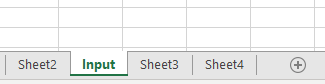
Select Worksheet by Index Number
This selects a Worksheet based on it’s position relative to other tabs
Worksheets(1).Select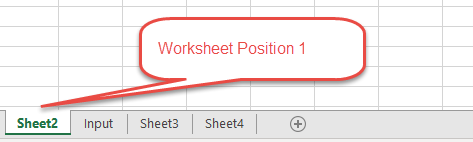
Select Worksheet With VBA Code Name
Sheet1.SelectSelecting worksheets by code name can prevent errors caused by worksheet name changes.
Select Current Worksheet
To select the current Worksheet, use the ActiveSheet object:
ActiveSheet.SelectMore Activate / Select Sheet Examples
VBA Programming | Code Generator does work for you!
Set ActiveSheet to Variable
This will assign the ActiveSheet to a Worksheet Object Variable.
Dim ws As Worksheet

Set ws = ActiveSheet
Change ActiveSheet Name
This will change the ActiveSheet Name.
ActiveSheet.Name = "NewName"With ActiveSheet
Using the With Statement allows you to streamline your code when working with objects (such as Sheets or ActiveSheet).
With ActiveSheet
    .Name = "StartFresh"
    .Cells.Clear
    .Range("A1").Value = .Name
End With
Notice how you don’t need to repeat “ActiveSheet” before each line of code. This can be a huge time saver when working with a long list of commands.
Loop Through Selected Sheets
The following macro will Loop through all selected sheets, displaying their names.
Sub GetSelectedSheetsName()
    Dim ws As Worksheet

    For Each ws In ActiveWindow.SelectedSheets
         MsgBox ws.Name
    Next ws

End Sub
GoTo Next Sheet
This code will go to the next Sheet. If the ActiveSheet is the last Sheet, then it will go to the first Sheet in the Workbook.
If ActiveSheet.Index = Worksheets.Count Then
    Worksheets(1).Activate
Else
    ActiveSheet.Next.Activate
End If
VBA Coding Made Easy
Stop searching for VBA code online. Learn more about AutoMacro – A VBA Code Builder that allows beginners to code procedures from scratch with minimal coding knowledge and with many time-saving features for all users!
Learn More!
<<Return to VBA Examples
Создание, копирование, перемещение и удаление рабочих листов Excel с помощью кода VBA. Методы Sheets.Add, Worksheet.Copy, Worksheet.Move и Worksheet.Delete.
Создание новых листов
Создание новых рабочих листов осуществляется с помощью метода Sheets.Add.
Синтаксис метода Sheets.Add
expression.Add [Before, After, Count, Type]
где expression — переменная, представляющая собой объект Sheet.
Компоненты метода Sheets.Add
- Before* — необязательный параметр типа данных Variant, указывающий на лист, перед которым будет добавлен новый.
- After* — необязательный параметр типа данных Variant, указывающий на лист, после которого будет добавлен новый.
- Count — необязательный параметр типа данных Variant, указывающий, сколько листов будет добавлено (по умолчанию — 1).
- Type — необязательный параметр типа данных Variant, указывающий тип листа: xlWorksheet** (рабочий лист) или xlChart (диаграмма), по умолчанию — xlWorksheet.
*Если Before и After не указаны, новый лист, по умолчанию, будет добавлен перед активным листом.
**Для создания рабочего листа (xlWorksheet) можно использовать метод Worksheets.Add, который для создания диаграмм уже не подойдет.
Примеры создания листов
|
1 2 3 4 5 6 7 8 9 10 11 12 13 14 15 16 17 18 19 20 |
‘Создание рабочего листа: Sheets.Add Worksheets.Add ThisWorkbook.Sheets.Add After:=ActiveSheet, Count:=2 Workbooks(«Книга1.xlsm»).Sheets.Add After:=Лист1 Workbooks(«Книга1.xlsm»).Sheets.Add After:=Worksheets(1) Workbooks(«Книга1.xlsm»).Sheets.Add After:=Worksheets(«Лист1») ‘Создание нового листа с заданным именем: Workbooks(«Книга1.xlsm»).Sheets.Add.Name = «Мой новый лист» ‘Создание диаграммы: Sheets.Add Type:=xlChart ‘Добавление нового листа перед ‘последним листом рабочей книги Sheets.Add Before:=Sheets(Sheets.Count) ‘Добавление нового листа в конец Sheets.Add After:=Sheets(Sheets.Count) |
- Лист1 в After:=Лист1 — это уникальное имя листа, указанное в проводнике редактора VBA без скобок.
- Лист1 в After:=Worksheets(«Лист1») — это имя на ярлыке листа, указанное в проводнике редактора VBA в скобках.
Создаваемый лист можно присвоить объектной переменной:
|
Dim myList As Object ‘В активной книге Set myList = Worksheets.Add ‘В книге «Книга1.xlsm» Set myList = Workbooks(«Книга1.xlsm»).Worksheets.Add ‘Работаем с переменной myList.Name = «Listok1» myList.Cells(1, 1) = myList.Name ‘Очищаем переменную Set myList = Nothing |
Если создаваемый лист присваивается объектной переменной, он будет помещен перед активным листом. Указать дополнительные параметры невозможно.
Копирование листов
Копирование рабочих листов осуществляется с помощью метода Worksheet.Copy.
Синтаксис метода Worksheet.Copy
expression.Copy [Before, After]
где expression — переменная, представляющая собой объект Worksheet.
Компоненты метода Worksheet.Copy
- Before* — необязательный параметр типа данных Variant, указывающий на лист, перед которым будет добавлена копия.
- After* — необязательный параметр типа данных Variant, указывающий на лист, после которого будет добавлена копия.
*Если Before и After не указаны, Excel создаст новую книгу и поместит копию листа в нее. Если скопированный лист содержит код в проекте VBA (в модуле листа), он тоже будет перенесен в новую книгу.
Примеры копирования листов
|
1 2 3 4 5 6 7 8 9 10 11 12 13 14 15 16 17 18 19 20 21 22 23 |
‘В пределах активной книги ‘(уникальные имена листов) Лист1.Copy After:=Лист2 ‘В пределах активной книги ‘(имена листов на ярлычках) Worksheets(«Лист1»).Copy Before:=Worksheets(«Лист2») ‘Вставить копию в конец Лист1.Copy After:=Sheets(Sheets.Count) ‘Из одной книги в другую Workbooks(«Книга1.xlsm»).Worksheets(«Лист1»).Copy _ After:=Workbooks(«Книга2.xlsm»).Worksheets(«Лист1») ‘Один лист активной книги в новую книгу Лист1.Copy ‘Несколько листов активной книги в новую книгу* Sheets(Array(«Лист1», «Лист2», «Лист3»)).Copy ‘Все листы книги с кодом в новую книгу ThisWorkbook.Worksheets.Copy |
* Если при копировании в новую книгу нескольких листов хотя бы один лист содержит умную таблицу — копирование невозможно. Один лист, содержащий умную таблицу, копируется в новую книгу без проблем.
Если рабочие книги указаны как элементы коллекции Workbooks, в том числе ActiveWorkbook и ThisWorkbook, листы нужно указывать как элементы коллекции Worksheets, использование уникальных имен вызовет ошибку.
Перемещение листов
Перемещение рабочих листов осуществляется с помощью метода Worksheet.Move.
Синтаксис метода Worksheet.Move
expression.Move [Before, After]
где expression — переменная, представляющая собой объект Worksheet.
Компоненты метода Worksheet.Move
- Before* — необязательный параметр типа данных Variant, указывающий на лист, перед которым будет размещен перемещаемый лист.
- After* — необязательный параметр типа данных Variant, указывающий на лист, после которого будет размещен перемещаемый лист.
*Если Before и After не указаны, Excel создаст новую книгу и переместит лист в нее.
Примеры перемещения листов
Простые примеры перемещения листов:
|
1 2 3 4 5 6 7 8 9 10 11 12 13 14 15 16 17 |
‘В пределах активной книги ‘(уникальные имена листов) Лист1.Move After:=Лист2 ‘В пределах активной книги ‘(имена листов на ярлычках) Worksheets(«Лист1»).Move Before:=Worksheets(«Лист2») ‘Размещение после последнего листа: Лист1.Move After:=Sheets(Sheets.Count) ‘Из одной книги в другую Workbooks(«Книга1.xlsm»).Worksheets(«Лист1»).Move _ After:=Workbooks(«Книга2.xlsm»).Worksheets(«Лист1») ‘В новую книгу Лист1.Move |
Если рабочие книги указаны как элементы коллекции Workbooks, в том числе ActiveWorkbook и ThisWorkbook, листы нужно указывать как элементы коллекции Worksheets, использование уникальных имен вызовет ошибку.
Перемещение листа «Лист4» в позицию перед листом, указанным как по порядковому номеру, так и по имени ярлыка:
|
Sub Peremeshcheniye() Dim x x = InputBox(«Введите имя или номер листа», «Перемещение листа «Лист4»») If IsNumeric(x) Then x = CLng(x) Sheets(«Лист4»).Move Before:=Sheets(x) End Sub |
Удаление листов
Удаление рабочих листов осуществляется с помощью метода Worksheet.Delete
Синтаксис метода Worksheet.Delete
expression.Delete
где expression — переменная, представляющая собой объект Worksheet.
Примеры удаления листов
|
‘По уникальному имени Лист1.Delete ‘По имени на ярлычке Worksheets(«Лист1»).Delete ‘По индексу листа Worksheets(1).Delete ‘В другой книге Workbooks(«Книга1.xlsm»).Worksheets(«Лист1»).Delete |
Если рабочие книги указаны как элементы коллекции Workbooks, в том числе ActiveWorkbook и ThisWorkbook, листы нужно указывать как элементы коллекции Worksheets, использование уникальных имен вызовет ошибку.
Как обратиться к рабочему листу, переименовать, скрыть или отобразить его с помощью кода VBA Excel, смотрите в этой статье.
Всё о работе с ячейками в Excel-VBA: обращение, перебор, удаление, вставка, скрытие, смена имени.
Содержание:
Table of Contents:
- Что такое ячейка Excel?
- Способы обращения к ячейкам
- Выбор и активация
- Получение и изменение значений ячеек
- Ячейки открытой книги
- Ячейки закрытой книги
- Перебор ячеек
- Перебор в произвольном диапазоне
- Свойства и методы ячеек
- Имя ячейки
- Адрес ячейки
- Размеры ячейки
- Запуск макроса активацией ячейки
2 нюанса:
- Я почти везде стараюсь использовать ThisWorkbook (а не, например, ActiveWorkbook) для обращения к текущей книге, в которой написан этот код (считаю это наиболее безопасным для новичков способом обращения к книгам, чтобы случайно не внести изменения в другие книги). Для экспериментов можете вставлять этот код в модули, коды книги, либо листа, и он будет работать только в пределах этой книги.
- Я использую английский эксель и у меня по стандарту листы называются Sheet1, Sheet2 и т.д. Если вы работаете в русском экселе, то замените Thisworkbook.Sheets(«Sheet1») на Thisworkbook.Sheets(«Лист1»). Если этого не сделать, то вы получите ошибку в связи с тем, что пытаетесь обратиться к несуществующему объекту. Можно также заменить на Thisworkbook.Sheets(1), но это менее безопасно.
Что такое ячейка Excel?
В большинстве мест пишут: «элемент, образованный пересечением столбца и строки». Это определение полезно для людей, которые не знакомы с понятием «таблица». Для того, чтобы понять чем на самом деле является ячейка Excel, необходимо заглянуть в объектную модель Excel. При этом определения объектов «ряд», «столбец» и «ячейка» будут отличаться в зависимости от того, как мы работаем с файлом.
Объекты в Excel-VBA. Пока мы работаем в Excel без углубления в VBA определение ячейки как «пересечения» строк и столбцов нам вполне хватает, но если мы решаем как-то автоматизировать процесс в VBA, то о нём лучше забыть и просто воспринимать лист как «мешок» ячеек, с каждой из которых VBA позволяет работать как минимум тремя способами:
- по цифровым координатам (ряд, столбец),
- по адресам формата А1, B2 и т.д. (сценарий целесообразности данного способа обращения в VBA мне сложно представить)
- по уникальному имени (во втором и третьем вариантах мы будем иметь дело не совсем с ячейкой, а с объектом VBA range, который может состоять из одной или нескольких ячеек). Функции и методы объектов Cells и Range отличаются. Новичкам я бы порекомендовал работать с ячейками VBA только с помощью Cells и по их цифровым координатам и использовать Range только по необходимости.
Все три способа обращения описаны далее
Как это хранится на диске и как с этим работать вне Excel? С точки зрения хранения и обработки вне Excel и VBA. Сделать это можно, например, сменив расширение файла с .xls(x) на .zip и открыв этот архив.
Пример содержимого файла Excel:
Далее xl -> worksheets и мы видим файл листа
Содержимое файла:
То же, но более наглядно:
<?xml version="1.0" encoding="UTF-8" standalone="yes"?>
<worksheet xmlns="http://schemas.openxmlformats.org/spreadsheetml/2006/main" xmlns:r="http://schemas.openxmlformats.org/officeDocument/2006/relationships" xmlns:mc="http://schemas.openxmlformats.org/markup-compatibility/2006" mc:Ignorable="x14ac xr xr2 xr3" xmlns:x14ac="http://schemas.microsoft.com/office/spreadsheetml/2009/9/ac" xmlns:xr="http://schemas.microsoft.com/office/spreadsheetml/2014/revision" xmlns:xr2="http://schemas.microsoft.com/office/spreadsheetml/2015/revision2" xmlns:xr3="http://schemas.microsoft.com/office/spreadsheetml/2016/revision3" xr:uid="{00000000-0001-0000-0000-000000000000}">
	<dimension ref="B2:F6"/>
	<sheetViews>
		<sheetView tabSelected="1" workbookViewId="0">
			<selection activeCell="D12" sqref="D12"/>
		</sheetView>
	</sheetViews>
	<sheetFormatPr defaultRowHeight="14.4" x14ac:dyDescent="0.3"/>
	<sheetData>
		<row r="2" spans="2:6" x14ac:dyDescent="0.3">
			<c r="B2" t="s">
				<v>0</v>
			</c>
		</row>
		<row r="3" spans="2:6" x14ac:dyDescent="0.3">
			<c r="C3" t="s">
				<v>1</v>
			</c>
		</row>
		<row r="4" spans="2:6" x14ac:dyDescent="0.3">
			<c r="D4" t="s">
				<v>2</v>
			</c>
		</row>
		<row r="5" spans="2:6" x14ac:dyDescent="0.3">
			<c r="E5" t="s">
				<v>0</v></c>
		</row>
		<row r="6" spans="2:6" x14ac:dyDescent="0.3">
			<c r="F6" t="s"><v>3</v>
		</c></row>
	</sheetData>
	<pageMargins left="0.7" right="0.7" top="0.75" bottom="0.75" header="0.3" footer="0.3"/>
</worksheet>
Как мы видим, в структуре объектной модели нет никаких «пересечений». Строго говоря рабочая книга — это архив структурированных данных в формате XML. При этом в каждую «строку» входит «столбец», и в нём в свою очередь прописан номер значения данного столбца, по которому оно подтягивается из другого XML файла при открытии книги для экономии места за счёт отсутствия повторяющихся значений. Почему это важно. Если мы захотим написать какой-то обработчик таких файлов, который будет напрямую редактировать данные в этих XML, то ориентироваться надо на такую модель и структуру данных. И правильное определение будет примерно таким: ячейка — это объект внутри столбца, который в свою очередь находится внутри строки в файле xml, в котором хранятся данные о содержимом листа.
Способы обращения к ячейкам
Выбор и активация
Почти во всех случаях можно и стоит избегать использования методов Select и Activate. На это есть две причины:
- Это лишь имитация действий пользователя, которая замедляет выполнение программы. Работать с объектами книги можно напрямую без использования методов Select и Activate.
- Это усложняет код и может приводить к неожиданным последствиям. Каждый раз перед использованием Select необходимо помнить, какие ещё объекты были выбраны до этого и не забывать при необходимости снимать выбор. Либо, например, в случае использования метода Select в самом начале программы может быть выбрано два листа вместо одного потому что пользователь запустил программу, выбрав другой лист.
Можно выбирать и активировать книги, листы, ячейки, фигуры, диаграммы, срезы, таблицы и т.д.
Отменить выбор ячеек можно методом Unselect:
Selection.UnselectОтличие выбора от активации — активировать можно только один объект из раннее выбранных. Выбрать можно несколько объектов.
Если вы записали и редактируете код макроса, то лучше всего заменить Select и Activate на конструкцию With … End With. Например, предположим, что мы записали вот такой макрос:
Sub Macro1()
' Macro1 Macro
    Range("F4:F10,H6:H10").Select 'выбрали два несмежных диапазона зажав ctrl
    Range("H6").Activate          'показывает только то, что я начал выбирать второй диапазон с этой ячейки (она осталась белой). Это действие ни на что не влияет
    With Selection.Interior
        .Pattern = xlSolid
        .PatternColorIndex = xlAutomatic
        .Color = 65535            'залили желтым цветом, нажав на кнопку заливки на верхней панели
        .TintAndShade = 0
        .PatternTintAndShade = 0
    End With
End Sub
Почему макрос записался таким неэффективным образом? Потому что в каждый момент времени (в каждой строке) программа не знает, что вы будете делать дальше. Поэтому в записи выбор ячеек и действия с ними — это два отдельных действия. Этот код лучше всего оптимизировать (особенно если вы хотите скопировать его внутрь какого-нибудь цикла, который должен будет исполняться много раз и перебирать много объектов). Например, так:
Sub Macro11()
'
' Macro1 Macro
    Range("F4:F10,H6:H10").Select '1. смотрим, что за объект выбран (что идёт до .Select)
    Range("H6").Activate
    With Selection.Interior       '2. понимаем, что у выбранного объекта есть свойство interior, с которым далее идёт работа
        .Pattern = xlSolid
        .PatternColorIndex = xlAutomatic
        .Color = 65535
        .TintAndShade = 0
        .PatternTintAndShade = 0
    End With
End Sub


Sub Optimized_Macro()
    With Range("F4:F10,H6:H10").Interior '3. переносим объект напрямую в конструкцию With вместо Selection
' ////// Здесь я для надёжности прописал бы ещё Thisworkbook.Sheet("ИмяЛиста") перед Range,
' ////// чтобы минимизировать риск любых случайных изменений других листов и книг
' ////// With Thisworkbook.Sheet("ИмяЛиста").Range("F4:F10,H6:H10").Interior
        .Pattern = xlSolid               '4. полностью копируем всё, что было записано рекордером внутрь блока with
        .PatternColorIndex = xlAutomatic
        .Color = 55555                   '5. здесь я поменял цвет на зеленый, чтобы было видно, работает ли код при поочерёдном запуске двух макросов
        .TintAndShade = 0
        .PatternTintAndShade = 0
    End With
End Sub
Пример сценария, когда использование Select и Activate оправдано:
Допустим, мы хотим, чтобы во время исполнения программы мы одновременно изменяли несколько листов одним действием и пользователь видел какой-то определённый лист. Это можно сделать примерно так:
Sub Select_Activate_is_OK()
Thisworkbook.Worksheets(Array("Sheet1", "Sheet3")).Select 'Выбираем несколько листов по именам
Thisworkbook.Worksheets("Sheet3").Activate 'Показываем пользователю третий лист
'Далее все действия с выбранными ячейками через Select будут одновременно вносить изменения в оба выбранных листа

'Допустим, что тут мы решили покрасить те же два диапазона:
Range("F4:F10,H6:H10").Select
    Range("H6").Activate
    With Selection.Interior
        .Pattern = xlSolid
        .PatternColorIndex = xlAutomatic
        .Color = 65535
        .TintAndShade = 0
        .PatternTintAndShade = 0
    End With

End Sub
Единственной причиной использовать этот код по моему мнению может быть желание зачем-то показать пользователю определённую страницу книги в какой-то момент исполнения программы. С точки зрения обработки объектов, опять же, эти действия лишние.
Получение и изменение значений ячеек
Значение ячеек можно получать/изменять с помощью свойства value.
'Если нужно прочитать / записать значение ячейки, то используется свойство Value
a = ThisWorkbook.Sheets("Sheet1").Cells (1,1).Value 'записать значение ячейки А1 листа "Sheet1" в переменную "a"
ThisWorkbook.Sheets("Sheet1").Cells (1,1).Value = 1  'задать значение ячейки А1 (первый ряд, первый столбец) листа "Sheet1"

'Если нужно прочитать текст как есть (с форматированием), то можно использовать свойство .text:
ThisWorkbook.Sheets("Sheet1").Cells (1,1).Text = "1"
a = ThisWorkbook.Sheets("Sheet1").Cells (1,1).Text

'Когда проявится разница:
'Например, если мы считываем дату в формате "31 декабря 2021 г.", хранящуюся как дата
a = ThisWorkbook.Sheets("Sheet1").Cells (1,1).Value 'эапишет как "31.12.2021"
a = ThisWorkbook.Sheets("Sheet1").Cells (1,1).Text  'запишет как "31 декабря 2021 г."
Ячейки открытой книги
К ячейкам можно обращаться:
'В книге, в которой хранится макрос (на каком-то из листов, либо в отдельном модуле или форме)
ThisWorkbook.Sheets("Sheet1").Cells(1,1).Value        'По номерам строки и столбца
ThisWorkbook.Sheets("Sheet1").Cells(1,"A").Value      'По номерам строки и букве столбца
ThisWorkbook.Sheets("Sheet1").Range("A1").Value       'По адресу - вариант 1
ThisWorkbook.Sheets("Sheet1").[A1].Value              'По адресу - вариант 2
ThisWorkbook.Sheets("Sheet1").Range("CellName").Value 'По имени ячейки (для этого ей предварительно нужно его присвоить)

'Те же действия, но с использованием полного названия рабочей книги (книга должна быть открыта)
Workbooks("workbook.xlsm").Sheets("Sheet1").Cells(1,1).Value 'По номерам строки и столбца
Workbooks("workbook.xlsm").Sheets("Sheet1").Cells(1,"A").Value                'По номерам строки и букве столбца
Workbooks("workbook.xlsm").Sheets("Sheet1").Range("A1").Value                 'По адресу - вариант 1
Workbooks("workbook.xlsm").Sheets("Sheet1").[A1].Value                        'По адресу - вариант 2
Workbooks("workbook.xlsm").Sheets("Sheet1").Range("CellName").Value           'По имени ячейки (для этого ей предварительно нужно его присвоить)
Ячейки закрытой книги
Если нужно достать или изменить данные в другой закрытой книге, то необходимо прописать открытие и закрытие книги. Непосредственно работать с закрытой книгой не получится, потому что данные в ней хранятся отдельно от структуры и при открытии Excel каждый раз производит расстановку значений по соответствующим «слотам» в структуре. Подробнее о том, как хранятся данные в xlsx см выше.
Workbooks.Open Filename:="С:closed_workbook.xlsx"    'открыть книгу (она становится активной)
a = ActiveWorkbook.Sheets("Sheet1").Cells(1,1).Value  'достать значение ячейки 1,1
ActiveWorkbook.Close False                            'закрыть книгу (False => без сохранения)
Скачать пример, в котором можно посмотреть, как доставать и как записывать значения в закрытую книгу.
Код из файла:
Option Explicit
Sub get_value_from_closed_wb() 'достать значение из закрытой книги
Dim a, wb_path, wsh As String
wb_path = ThisWorkbook.Sheets("Sheet1").Cells(2, 3).Value 'get path to workbook from sheet1
wsh = ThisWorkbook.Sheets("Sheet1").Cells(3, 3).Value
Workbooks.Open Filename:=wb_path
a = ActiveWorkbook.Sheets(wsh).Cells(3, 3).Value
ActiveWorkbook.Close False
ThisWorkbook.Sheets("Sheet1").Cells(4, 3).Value = a
End Sub

Sub record_value_to_closed_wb() 'записать значение в закрытую книгу
Dim wb_path, b, wsh As String
wsh = ThisWorkbook.Sheets("Sheet1").Cells(3, 3).Value
wb_path = ThisWorkbook.Sheets("Sheet1").Cells(2, 3).Value 'get path to workbook from sheet1
b = ThisWorkbook.Sheets("Sheet1").Cells(5, 3).Value 'get value to record in the target workbook
Workbooks.Open Filename:=wb_path
ActiveWorkbook.Sheets(wsh).Cells(4, 4).Value = b 'add new value to cell D4 of the target workbook
ActiveWorkbook.Close True
End Sub
Перебор ячеек
Перебор в произвольном диапазоне
Скачать файл со всеми примерами
Пройтись по всем ячейкам в нужном диапазоне можно разными способами. Основные:
- Цикл For Each. Пример:
Sub iterate_over_cells() For Each c In ThisWorkbook.Sheets("Sheet1").Range("B2:D4").Cells MsgBox (c) Next c End SubЭтот цикл выведет в виде сообщений значения ячеек в диапазоне B2:D4 по порядку по строкам слева направо и по столбцам — сверху вниз. Данный способ можно использовать для действий, в который вам не важны номера ячеек (закрашивание, изменение форматирования, пересчёт чего-то и т.д.).
- Ту же задачу можно решить с помощью двух вложенных циклов — внешний будет перебирать ряды, а вложенный — ячейки в рядах. Этот способ я использую чаще всего, потому что он позволяет получить больше контроля над исполнением: на каждой итерации цикла нам доступны координаты ячеек. Для перебора всех ячеек на листе этим методом потребуется найти последнюю заполненную ячейку. Пример кода:
Sub iterate_over_cells() Dim cl, rw As Integer Dim x As Variant 'перебор области 3x3 For rw = 1 To 3 ' цикл для перебора рядов 1-3 For cl = 1 To 3 'цикл для перебора столбцов 1-3 x = ThisWorkbook.Sheets("Sheet1").Cells(rw + 1, cl + 1).Value MsgBox (x) Next cl Next rw 'перебор всех ячеек на листе. Последняя ячейка определена с помощью UsedRange 'LastRow = ActiveSheet.UsedRange.Row + ActiveSheet.UsedRange.Rows.Count - 1 'LastCol = ActiveSheet.UsedRange.Column + ActiveSheet.UsedRange.Columns.Count - 1 'For rw = 1 To LastRow 'цикл перебора всех рядов ' For cl = 1 To LastCol 'цикл для перебора всех столбцов ' Действия ' Next cl 'Next rw End Sub - Если нужно перебрать все ячейки в выделенном диапазоне на активном листе, то код будет выглядеть так:
Sub iterate_cell_by_cell_over_selection() Dim ActSheet As Worksheet Dim SelRange As Range Dim cell As Range Set ActSheet = ActiveSheet Set SelRange = Selection 'if we want to do it in every cell of the selected range For Each cell In Selection MsgBox (cell.Value) Next cell End SubДанный метод подходит для интерактивных макросов, которые выполняют действия над выбранными пользователем областями.
- Перебор ячеек в ряду
Sub iterate_cells_in_row() Dim i, RowNum, StartCell As Long RowNum = 3 'какой ряд StartCell = 0 ' номер начальной ячейки (минус 1, т.к. в цикле мы прибавляем i) For i = 1 To 10 ' 10 ячеек в выбранном ряду ThisWorkbook.Sheets("Sheet1").Cells(RowNum, i + StartCell).Value = i '(i + StartCell) добавляет 1 к номеру столбца при каждом повторении Next i End Sub - Перебор ячеек в столбце
Sub iterate_cells_in_column() Dim i, ColNum, StartCell As Long ColNum = 3 'какой столбец StartCell = 0 ' номер начальной ячейки (минус 1, т.к. в цикле мы прибавляем i) For i = 1 To 10 ' 10 ячеек ThisWorkbook.Sheets("Sheet1").Cells(i + StartCell, ColNum).Value = i ' (i + StartCell) добавляет 1 к номеру ряда при каждом повторении Next i End Sub
Свойства и методы ячеек
Имя ячейки
Присвоить новое имя можно так:
Thisworkbook.Sheets(1).Cells(1,1).name = "Новое_Имя"Для того, чтобы сменить имя ячейки нужно сначала удалить существующее имя, а затем присвоить новое. Удалить имя можно так:
ActiveWorkbook.Names("Старое_Имя").DeleteПример кода для переименования ячеек:
Sub rename_cell()

old_name = "Cell_Old_Name"
new_name = "Cell_New_Name"

ActiveWorkbook.Names(old_name).Delete
ThisWorkbook.Sheets(1).Cells(2, 1).Name = new_name
End Sub

Sub rename_cell_reverse()

old_name = "Cell_New_Name"
new_name = "Cell_Old_Name"

ActiveWorkbook.Names(old_name).Delete
ThisWorkbook.Sheets(1).Cells(2, 1).Name = new_name
End Sub
Адрес ячейки
Sub get_cell_address() ' вывести адрес ячейки в формате буква столбца, номер ряда
  '$A$1 style
  txt_address = ThisWorkbook.Sheets(1).Cells(3, 2).Address
  MsgBox (txt_address)
End Sub

Sub get_cell_address_R1C1()' получить адрес столбца в формате номер ряда, номер столбца
  'R1C1 style
  txt_address = ThisWorkbook.Sheets(1).Cells(3, 2).Address(ReferenceStyle:=xlR1C1)
  MsgBox (txt_address)
End Sub

  'пример функции, которая принимает 2 аргумента: название именованного диапазона и тип желаемого адреса
  '(1- тип $A$1 2- R1C1 - номер ряда, столбца)
Function get_cell_address_by_name(str As String, address_type As Integer)
  '$A$1 style
  Select Case address_type
    Case 1
      txt_address = Range(str).Address
    Case 2
      txt_address = Range(str).Address(ReferenceStyle:=xlR1C1)
    Case Else
      txt_address = "Wrong address type selected. 1,2 available"
    End Select
  get_cell_address_by_name = txt_address
End Function

'перед запуском нужно убедиться, что в книге есть диапазон с названием,
'адрес которого мы хотим получить, иначе будет ошибка
Sub test_function() 'запустите эту программу, чтобы увидеть, как работает функция
  x = get_cell_address_by_name("MyValue", 2)
  MsgBox (x)
End Sub
Размеры ячейки
Ширина и длина ячейки в VBA меняется, например, так:
Sub change_size()
Dim x, y As Integer
Dim w, h As Double

'получить координаты целевой ячейки
x = ThisWorkbook.Sheets("Sheet1").Cells(2, 2).Value
y = ThisWorkbook.Sheets("Sheet1").Cells(3, 2).Value

'получить желаемую ширину и высоту ячейки
w = ThisWorkbook.Sheets("Sheet1").Cells(6, 2).Value
h = ThisWorkbook.Sheets("Sheet1").Cells(7, 2).Value

'сменить высоту и ширину ячейки с координатами x,y
ThisWorkbook.Sheets("Sheet1").Cells(x, y).RowHeight = h
ThisWorkbook.Sheets("Sheet1").Cells(x, y).ColumnWidth = w


End Sub
Прочитать значения ширины и высоты ячеек можно двумя способами (однако результаты будут в разных единицах измерения). Если написать просто Cells(x,y).Width или Cells(x,y).Height, то будет получен результат в pt (привязка к размеру шрифта).
Sub get_size()
Dim x, y As Integer
'получить координаты ячейки, с которой мы будем работать
x = ThisWorkbook.Sheets("Sheet1").Cells(2, 2).Value
y = ThisWorkbook.Sheets("Sheet1").Cells(3, 2).Value

'получить длину и ширину выбранной ячейки в тех же единицах измерения, в которых мы их задавали
ThisWorkbook.Sheets("Sheet1").Cells(2, 6).Value = ThisWorkbook.Sheets("Sheet1").Cells(x, y).ColumnWidth
ThisWorkbook.Sheets("Sheet1").Cells(3, 6).Value = ThisWorkbook.Sheets("Sheet1").Cells(x, y).RowHeight

'получить длину и ширину с помощью свойств ячейки (только для чтения) в поинтах (pt)
ThisWorkbook.Sheets("Sheet1").Cells(7, 9).Value = ThisWorkbook.Sheets("Sheet1").Cells(x, y).Width
ThisWorkbook.Sheets("Sheet1").Cells(8, 9).Value = ThisWorkbook.Sheets("Sheet1").Cells(x, y).Height

End Sub
Скачать файл с примерами изменения и чтения размера ячеек
Запуск макроса активацией ячейки
Для запуска кода VBA при активации ячейки необходимо вставить в код листа нечто подобное:
3 важных момента, чтобы это работало:
1. Этот код должен быть вставлен в код листа (здесь контролируется диапазон D4)
2-3. Программа, ответственная за запуск кода при выборе ячейки, должна называться Worksheet_SelectionChange и должна принимать значение переменной Target, относящейся к триггеру SelectionChange. Другие доступные триггеры можно посмотреть в правом верхнем углу (2).
Скачать файл с базовым примером (как на картинке)
Скачать файл с расширенным примером (код ниже)
Option Explicit

Private Sub Worksheet_SelectionChange(ByVal Target As Range)

        ' имеем в виду, что триггер SelectionChange будет запускать эту Sub после каждого клика мышью (после каждого клика будет проверяться:
          '1. количество выделенных ячеек и
          '2. не пересекается ли выбранный диапазон с заданным в этой программе диапазоном.
        ' поэтому в эту программу не стоит без необходимости писать никаких других тяжелых операций

    If Selection.Count = 1 Then 'запускаем программу только если выбрано не более 1 ячейки


    'вариант модификации - брать адрес ячейки из другой ячейки:
    'Dim CellName as String
    'CellName = Activesheet.Cells(1,1).value 'брать текстовое имя контролируемой ячейки из A1 (должно быть в формате Буква столбца + номер строки)
    'If Not Intersect(Range(CellName), Target) Is Nothing Then
    'для работы этой модификации следующую строку надо закомментировать/удалить


        If Not Intersect(Range("D4"), Target) Is Nothing Then
        'если заданный (D4) и выбранный диапазон пересекаются
        '(пересечение диапазонов НЕ равно Nothing)

        'можно прописать диапазон из нескольких ячеек:
        'If Not Intersect(Range("D4:E10"), Target) Is Nothing Then
        'можно прописать несколько диапазонов:
        'If Not Intersect(Range("D4:E10"), Target) Is Nothing or Not Intersect(Range("A4:A10"), Target) Is Nothing Then

            Call program 'выполняем программу
        End If
    End If
End Sub

Sub program()

MsgBox ("Program Is running") 'здесь пишем код того, что произойдёт при выборе нужной ячейки


End Sub
In this VBA Tutorial, you learn how to refer to, and work with, sheets and worksheets in macros. This includes:
- How to refer to all sheets in a workbook.
- How to refer to all worksheets in a workbook.
- How to refer to the active sheet.
- How to refer to a sheet by its index number.
- How to refer to a worksheet by its index number.
- How to refer to a sheet by its name.
- How to refer to a worksheet by its name.
- How to refer to a sheet by its code name.
- How to refer to several sheets.
- How to refer to several worksheets.
- How to loop through all sheets in a workbook with the For Each… Next loop.
- How to loop through all worksheets in a workbook with the For Each… Next loop.
- How to loop through all sheets in a workbook with the For… Next loop.
- How to loop through all worksheets in a workbook with the For… Next loop.
- How to loop through all sheets in a workbook in reverse order.
- How to loop through all worksheets in a workbook in reverse order.
This VBA Tutorial is accompanied by an Excel workbook containing the macros I use in the examples below. You can get immediate free access to this example workbook by subscribing to the Power Spreadsheets Newsletter.
Alternatively, you can access all the files that accompany my Tutorials here.
Related Excel VBA and Macro Tutorials
The following VBA and Macro Tutorials may help you better understand and implement the contents below:
- General VBA constructs and structures:
- Learn the basics of working with macros here.
- Learn about basic VBA terms and constructs here.
- Learn how to enable or disable macros here.
- Learn how to work with the Visual Basic Editor here.
- Learn how to create Sub procedures here.
- Learn how to create object references here.
- Learn how to work with object properties here.
- Learn how to work with object methods here.
- Learn how to declare and work with variables here.
- Learn about VBA data types here.
- Learn how to work with arrays here.
- Learn how to work with loops here.
- Practical VBA applications and macro examples:
- Learn how to delete sheets and worksheets here.
You can find additional VBA and Macro Tutorials in the Archives.
#1: Refer to all sheets in workbook
VBA code to refer to all sheets in workbook
To refer to all sheets in a workbook with VBA, use an object reference with the following structure:
Workbook.Sheets
Process to refer to all sheets in workbook
To refer to all sheets in a workbook with VBA, follow these steps:
- Identify the workbook containing the sheets (Workbook).
- Refer to the Sheets collection representing all sheets in Workbook (Sheets).
VBA statement explanation
Item: Workbook
Workbook object representing the Excel workbook containing the sheets you refer to.
You can usually work with one of the following properties to refer to this Workbook object:
- Application.ActiveWorkbook.
- Application.ThisWorkbook.
- Application.Workbooks.
Item: Sheets
The Workbook.Sheets property returns a Sheets collection representing all sheets in Workbook. The Sheets collection can, generally, contain both:
- Chart objects, where each Chart object represents an individual chart sheet; or
- Worksheet objects, where each Worksheet object represents an individual worksheet.
Macro example to refer to all sheets in workbook
The following macro example displays a message box (MsgBox) with the number of sheets (Sheets.Count) in the workbook where the macro is stored (ThisWorkbook).
Sub referToSheetsCollection()
    'source: https://powerspreadsheets.com/
    'displays a message box with the number of sheets in this workbook
    'for further information: https://powerspreadsheets.com/excel-vba-sheets-worksheets/

    'display message box with number of sheets in this workbook
    MsgBox ThisWorkbook.Sheets.Count

End Sub
Effects of executing macro example to refer to all sheets in workbook
The following GIF illustrates the results of executing the macro example. The workbook where the macro is stored contains 5 worksheets (Sheet1 through Sheet5) and 5 chart sheets (Chart1 through Chart5). Therefore, Excel displays a message box with the number 10.
#2: Refer to all worksheets in workbook
VBA code to refer to all worksheets in workbook
To refer to all worksheets in a workbook with VBA, use an object reference with the following structure:
Workbook.Worksheets
Process to refer to all worksheets in workbook
To refer to all worksheets in a workbook with VBA, follow these steps:
- Identify the workbook containing the worksheets (Workbook).
- Refer to the Sheets collection representing all worksheets in Workbook (Worksheets).
VBA statement explanation
Item: Workbook
Workbook object representing the Excel workbook containing the worksheets you refer to.
You can usually work with one of the following properties to refer to this Workbook object:
- Application.ActiveWorkbook.
- Application.ThisWorkbook.
- Application.Workbooks.
Item: Worksheets
The Workbook.Worksheets property returns a Sheets collection representing all worksheets in Workbook.
Macro example to refer to all worksheets in workbook
The following macro example displays a message box (MsgBox) with the number of worksheets (Worksheets.Count) in the workbook where the macro is stored (ThisWorkbook).
Sub referToWorksheetsCollection()
    'source: https://powerspreadsheets.com/
    'displays a message box with the number of worksheets in this workbook
    'for further information: https://powerspreadsheets.com/excel-vba-sheets-worksheets/

    'display message box with number of worksheets in this workbook
    MsgBox ThisWorkbook.Worksheets.Count

End Sub
Effects of executing macro example to refer to all worksheets in workbook
The following GIF illustrates the results of executing the macro example. The workbook where the macro is stored contains 5 worksheets (Sheet1 through Sheet5). Therefore, Excel displays a message box with the number 5.
#3: Refer to active sheet
VBA code to refer to active sheet
To refer to the active sheet with VBA, use an object reference with the following structure:
Workbook.ActiveSheet
Process to refer to active sheet
To refer to the active sheet with VBA, follow these steps:
- Identify the workbook containing the sheet (Workbook). If you don’t identify Workbook, VBA works with the active workbook.
- Refer to the active sheet in Workbook (ActiveSheet).
VBA statement explanation
Item: Workbook
Workbook object representing the Excel workbook containing the active sheet you refer to.
You can usually work with one of the following properties to refer to this Workbook object:
- Application.ActiveWorkbook.
- Application.ThisWorkbook.
- Application.Workbooks.
If you don’t specify Workbook when referring to the active sheet with ActiveSheet, VBA works with the active workbook (the workbook on top).
Item: ActiveSheet
The ActiveSheet returns an object representing the active sheet (the sheet on top) in Workbook, as follows:
- If you specify Workbook, ActiveSheet returns an object representing the active sheet in Workbook.
- If you don’t specify Workbook, ActiveSheet returns an object representing the active sheet in the active workbook (the workbook on top).
Macro example to refer to active sheet
The following macro example displays a message box (MsgBox) with the name (Name) of the active sheet in the active workbook (ActiveSheet).
Sub referToActiveSheet()
    'source: https://powerspreadsheets.com/
    'displays a message box with the name of the active sheet
    'for further information: https://powerspreadsheets.com/excel-vba-sheets-worksheets/

    'display message box with name of active sheet
    MsgBox ActiveSheet.Name

End Sub
Effects of executing macro example to refer to active sheet
The following GIF illustrates the results of executing the macro example. As expected, Excel displays a message box with the name of the active sheet (Sheet1).
#4: Refer to sheet by index number
VBA code to refer to sheet by index number
To refer to a sheet by its index number with VBA, use an object reference with the following structure:
Workbook.Sheets(SheetIndexNumber)
Process to refer to sheet by index number
To refer to a sheet by its index number with VBA, follow these steps:
- Identify the workbook containing the sheet (Workbook).
- Identify the sheet by its index number (Sheets(SheetIndexNumber)).
VBA statement explanation
Item: Workbook
Workbook object representing the Excel workbook containing the sheet you refer to.
You can usually work with one of the following properties to refer to this Workbook object:
- Application.ActiveWorkbook.
- Application.ThisWorkbook.
- Application.Workbooks.
Item: Sheets(SheetIndexNumber)
The Workbook.Sheets property returns a Sheets collection representing all sheets in Workbook. The Sheets collection can, generally, contain both:
- Chart objects, where each Chart object represents an individual chart sheet; or
- Worksheet objects, where each Worksheet object represents an individual worksheet.
SheetIndexNumber is the index number of the sheet you refer to. This index number represents the position of the sheet in the tab bar of Workbook, from left to right. For these purposes, the count usually includes:
- Hidden sheets; and
- Both chart sheets and worksheets.
Therefore, Sheets(SheetIndexNumber) usually returns an individual Chart or Worksheet object representing the chart sheet or worksheet whose index number is SheetIndexNumber.
Macro example to refer to sheet by index number
The following macro example activates (Activate) the fifth sheet (Sheets(5)) in the workbook where the macro is stored (ThisWorkbook).
Sub referToSheetIndex()
    'source: https://powerspreadsheets.com/
    'activates the fifth sheet in this workbook
    'for further information: https://powerspreadsheets.com/excel-vba-sheets-worksheets/

    'activate fifth sheet in this workbook
    ThisWorkbook.Sheets(5).Activate

End Sub
Effects of executing macro example to refer to sheet by index number
The following GIF illustrates the results of executing the macro example.
When the macro is executed, the active sheet is Sheet1. As expected, Excel activates the fifth sheet (Chart1).
#5: Refer to worksheet by index number
VBA code to refer to worksheet by index number
To refer to a worksheet by its index number with VBA, use an object reference with the following structure:
Workbook.Worksheets(WorksheetIndexNumber)
Process to refer to worksheet by index number
To refer to a worksheet by its index number with VBA, follow these steps:
- Identify the workbook containing the worksheet (Workbook).
- Identify the worksheet by its index number (Worksheets(WorksheetIndexNumber)).
VBA statement explanation
Item: Workbook
Workbook object representing the Excel workbook containing the worksheet you refer to.
You can usually work with one of the following properties to refer to this Workbook object:
- Application.ActiveWorkbook.
- Application.ThisWorkbook.
- Application.Workbooks.
Item: Worksheets(WorksheetIndexNumber)
The Workbook.Worksheets property returns a Sheets collection representing all worksheets in Workbook.
WorksheetIndexNumber is the index number of the worksheet you refer to. This index number represents the position of the worksheet in the tab bar of Workbook, from left to right. For these purposes, the count usually:
- Includes hidden worksheets; but
- Doesn’t include chart sheets.
Therefore, Worksheets(WorksheetIndexNumber) returns an individual Worksheet object representing the worksheet whose index number is WorksheetIndexNumber.
Macro example to refer to worksheet by index number
The following macro example activates (Activate) the first worksheet (Worksheets(1)) in the workbook where the macro is stored (ThisWorkbook).
Sub referToWorksheetIndex()
    'source: https://powerspreadsheets.com/
    'activates the first worksheet in this workbook
    'for further information: https://powerspreadsheets.com/excel-vba-sheets-worksheets/

    'activate first worksheet in this workbook
    ThisWorkbook.Worksheets(1).Activate

End Sub
Effects of executing macro example to refer to worksheet by index number
The following GIF illustrates the results of executing the macro example.
When the macro is executed, the active sheet is Sheet5. As expected, Excel activates the first worksheet (Sheet1).
#6: Refer to sheet by name
VBA code to refer to sheet by name
To refer to a sheet by its name with VBA, use an object reference with the following structure:
Workbook.Sheets("SheetName")
Process to refer to sheet by name
To refer to a sheet by its name with VBA, follow these steps:
- Identify the workbook containing the sheet (Workbook).
- Identify the sheet by its name (Sheets(“SheetName”)).
VBA statement explanation
Item: Workbook
Workbook object representing the Excel workbook containing the sheet you refer to.
You can usually work with one of the following properties to refer to this Workbook object:
- Application.ActiveWorkbook.
- Application.ThisWorkbook.
- Application.Workbooks.
Item: Sheets(“SheetName”)
The Workbook.Sheets property returns a Sheets collection representing all sheets in Workbook. The Sheets collection can, generally, contain both:
- Chart objects, where each Chart object represents an individual chart sheet; or
- Worksheet objects, where each Worksheet object represents an individual worksheet.
“SheetName” is a string representing the name of the sheet you refer to, as displayed in the sheet’s tab. If you explicitly declare a variable to represent “SheetName”, you can usually declare it as of the String data type.
Therefore, Sheets(“SheetName”) usually returns an individual Chart or Worksheet object representing the chart sheet or worksheet whose name is SheetName.
Macro example to refer to sheet by name
The following macro example activates (Activate) the sheet named “Chart1” (Sheets(“Chart1”)) in the workbook where the macro is stored (ThisWorkbook).
Sub referToSheetName()
    'source: https://powerspreadsheets.com/
    'activates the sheet named "Chart1" in this workbook
    'for further information: https://powerspreadsheets.com/excel-vba-sheets-worksheets/

    'activate Chart1 in this workbook
    ThisWorkbook.Sheets("Chart1").Activate

End Sub
Effects of executing macro example to refer to sheet by name
The following GIF illustrates the results of executing the macro example.
When the macro is executed, the active sheet is Sheet1. As expected, Excel activates Chart1.
#7: Refer to worksheet by name
VBA code to refer to worksheet by name
To refer to a worksheet by its name with VBA, use an object reference with the following structure:
Workbook.Worksheets("WorksheetName")
Process to refer to worksheet by name
To refer to a worksheet by its name with VBA, follow these steps:
- Identify the workbook containing the worksheet (Workbook).
- Identify the worksheet by its name (Worksheets(“WorksheetName”)).
VBA statement explanation
Item: Workbook
Workbook object representing the Excel workbook containing the worksheet you refer to.
You can usually work with one of the following properties to refer to this Workbook object:
- Application.ActiveWorkbook.
- Application.ThisWorkbook.
- Application.Workbooks.
Item: Worksheets(“WorksheetName”)
The Workbook.Worksheets property returns a Sheets collection representing all worksheets in Workbook.
“WorksheetName” is a string representing the name of the worksheet you refer to, as displayed in the worksheet’s tab. If you explicitly declare a variable to represent “WorksheetName”, you can usually declare it as of the String data type.
Therefore, Worksheets(“WorksheetName”) returns an individual Worksheet object representing the worksheet whose name is WorksheetName.
Macro example to refer to worksheet by name
The following macro example activates (Activate) the worksheet named “Sheet1” (Worksheets(“Sheet1”)) in the workbook where the macro is stored (ThisWorkbook).
Sub referToWorksheetName()
    'source: https://powerspreadsheets.com/
    'activates the worksheet named "Sheet1" in this workbook
    'for further information: https://powerspreadsheets.com/excel-vba-sheets-worksheets/

    'activate Sheet1 in this workbook
    ThisWorkbook.Worksheets("Sheet1").Activate

End Sub
Effects of executing macro example to refer to worksheet by name
The following GIF illustrates the results of executing the macro example.
When the macro is executed, the active sheet is Chart1. As expected, Excel activates Sheet1.
#8: Refer to sheet by code name
VBA code to refer to sheet by code name
To refer to a sheet by its code name with VBA, use the sheet’s code name:
SheetCodeName
Process to refer to sheet by code name
To refer to a sheet by its code name with VBA, use the sheet’s code name.
VBA statement explanation
Item: SheetCodeName
SheetCodeName is the code name of the sheet you refer to.
You can use a sheet’s code name instead of an object reference (such as the ones I explain in other sections of this VBA Tutorial) returning the Chart or Sheet object you refer to.
Macro example to refer to sheet by code name
The following macro example activates (Activate) the worksheet whose code name is Sheet1 (Sheet1).
Sub referToSheetCodeName()
    'source: https://powerspreadsheets.com/
    'activates Sheet1 in this workbook
    'for further information: https://powerspreadsheets.com/excel-vba-sheets-worksheets/

    'activate Sheet1 in this workbook
    Sheet1.Activate

End Sub
Effects of executing macro example to refer to sheet by code name
The following GIF illustrates the results of executing the macro example.
When the macro is executed, the active sheet is Sheet5. As expected, Excel activates Sheet1 (both the name and code name are Sheet1).
#9: Refer to several sheets
VBA code to refer to several sheets
To refer to several sheets with VBA, use an object reference with the following structure:
Workbook.Sheets(Array(SheetList))
Process to refer to several sheets
To refer to several sheets with VBA, follow these steps:
- Identify the workbook containing the sheets (Workbook).
- Obtain an array with the index numbers or names of the sheets you refer to (Array(SheetList)).
- Identify the sheets (Sheets(Array(SheetList))).
VBA statement explanation
Item: Workbook
Workbook object representing the Excel workbook containing the sheets you refer to.
You can usually work with one of the following properties to refer to this Workbook object:
- Application.ActiveWorkbook.
- Application.ThisWorkbook.
- Application.Workbooks.
Item: Sheets(Array(SheetList))
The Workbook.Sheets property returns a Sheets collection representing all sheets in Workbook. The Sheets collection can, generally, contain both:
- Chart objects, where each Chart object represents an individual chart sheet; or
- Worksheet objects, where each Worksheet object represents an individual worksheet.
The Array function (Array(SheetList)) returns a Variant containing an array with the index numbers or names of the sheets you refer to.
SheetList is the argument list of the Array function, which contains a comma-delimited list of the values you assign to each of the elements in the array returned by Array. When referring to several sheets, you can usually identify the specific objects in the Sheets collection you work with using the appropriate index number or sheet name, as follows:
- The index number represents the position of a sheet in the tab bar of Workbook, from left to right. For these purposes, the count usually includes:
- Hidden sheets; and
- Both chart sheets and worksheets.
- The sheet name is that displayed in the sheet’s tab.
Therefore, Sheets(Array(SheetList)) represents the chart sheets or worksheets you specify in SheetList.
Macro example to refer to several sheets
The following macro example moves (Move) the first sheet, the sheet named “Sheet3” and the sheet named “Chart1” (Sheets(Array(1, “Sheet3”, “Chart1”))) in the workbook where the macro is stored (ThisWorkbook) to the end of the workbook (After:=ThisWorkbook.Sheets(ThisWorkbook.Sheets.Count)).
Sub referToSeveralSheets()
    'source: https://powerspreadsheets.com/
    'moves several sheets to end of this workbook
    'for further information: https://powerspreadsheets.com/excel-vba-sheets-worksheets/

    'move the first sheet, "Sheet3" and "Chart1" to end of this workbook
    ThisWorkbook.Sheets(Array(1, "Sheet3", "Chart1")).Move After:=ThisWorkbook.Sheets(ThisWorkbook.Sheets.Count)

End Sub
Effects of executing macro example to refer to several sheets
The following GIF illustrates the results of executing the macro example. As expected, Sheet1 (the first sheet), Sheet3 and Chart1 are moved to the end of the workbook.
#10: Refer to several worksheets
VBA code to refer to several worksheets
To refer to several worksheets with VBA, use an object reference with the following structure:
Workbook.Worksheets(Array(WorksheetList))
Process to refer to several worksheets
To refer to several worksheets with VBA, follow these steps:
- Identify the workbook containing the worksheets (Workbook).
- Obtain an array with the index numbers or names of the worksheets you refer to (Array(WorksheetList)).
- Identify the worksheets (Sheets(Array(WorksheetList))).
VBA statement explanation
Item: Workbook
Workbook object representing the Excel workbook containing the worksheets you refer to.
You can usually work with one of the following properties to refer to this Workbook object:
- Application.ActiveWorkbook.
- Application.ThisWorkbook.
- Application.Workbooks.
Item: Worksheets(Array(WorksheetList))
The Workbook.Worksheets property returns a Sheets collection representing all worksheets in Workbook.
The Array function (Array(WorksheetList)) returns a Variant containing an array with the index numbers or names of the worksheets you refer to.
WorksheetList is the argument list of the Array function, which contains a comma-delimited list of the values you assign to each of the elements in the array returned by Array. When referring to several worksheets, you can usually identify the specific objects in the Worksheets collection you work with using the appropriate index number or sheet name, as follows:
- The index number represents the position of a worksheet in the tab bar of Workbook, from left to right. For these purposes, the count usually:
- Includes hidden sheets; but
- Doesn’t include chart sheets.
- The worksheet name is that displayed in the worksheet’s tab.
Therefore, Sheets(Array(WorksheetList)) represents the chart sheets or worksheets you specify in WorksheetList.
Macro example to refer to several worksheets
The following macro example moves (Move) the worksheets named “Sheet1”, “Sheet2” and “Sheet3” (Worksheets(Array(“Sheet1”, “Sheet2”, “Sheet3”))) in the workbook where the macro is stored (ThisWorkbook) after the last worksheets in the workbook (After:=ThisWorkbook.Worksheets(ThisWorkbook.Worksheets.Count)).
Sub referToSeveralWorksheets()
    'source: https://powerspreadsheets.com/
    'moves several worksheets after the last worksheet in this workbook
    'for further information: https://powerspreadsheets.com/excel-vba-sheets-worksheets/

    'move "Sheet1", "Sheet2" and "Sheet3" after the last worksheet in this workbook
    ThisWorkbook.Worksheets(Array("Sheet1", "Sheet2", "Sheet3")).Move After:=ThisWorkbook.Worksheets(ThisWorkbook.Worksheets.Count)

End Sub
Effects of executing macro example to refer to several worksheets
The following GIF illustrates the results of executing the macro example. As expected, Sheet1, Sheet2 and Sheet3 are moved after the last worksheet in the workbook (Sheet5).
#11: Loop through all sheets in workbook with For Each… Next
VBA code to loop through all sheets in workbook with For Each… Next
To loop through all sheets in a workbook with a For Each… Next VBA loop, use a macro with the following statement structure:
For Each Sheet In Workbook.Sheets
    Statements
Next Sheet
Process to loop through all sheets in workbook with For Each… Next
To loop through all sheets in a workbook with a For Each… Next VBA loop, follow these steps:
- Identify the workbook containing the sheets (Workbook).
- Identify the Sheets collection representing all sheets in Workbook (Sheets).
- Use an object variable to iterate through the Sheets in Workbook (Sheet).
- Execute a set of Statements for each Sheet in Workbook.
VBA statement explanation
Lines #1 and #3: For Each Sheet In Workbook.Sheets | Next Sheet
Item: For Each … In … | Next …
The For Each… Next statement repeats the Statements for each Sheet in Workbook.Sheets.
Item: Sheet
Object variable used to iterate through the Sheets in Workbook.
If you explicitly declare an object variable to represent Sheet, you can usually declare it as of the Variant or Object data type.
Item: Workbook.Sheets
Sheets collection through which the For Each… Next statement loops through.
Workbook is a Workbook object representing the Excel workbook containing the sheets you loop through.
You can usually work with one of the following properties to refer to this Workbook object:
- Application.ActiveWorkbook.
- Application.ThisWorkbook.
- Application.Workbooks.
The Workbook.Sheets property returns a Sheets collection representing all sheets in Workbook. The Sheets collection can, generally, contain both:
- Chart objects, where each Chart object represents an individual chart sheet; or
- Worksheet objects, where each Worksheet object represents an individual worksheet.
Therefore, For Each… Next loops through all sheets in Workbook.
Line #2: Statements
Statements that are executed for each Sheet in Workbook.Sheets.
Macro example to loop through all sheets in workbook with For Each… Next
The following macro example:
- Loops through each sheet in the workbook where the macro is stored (For Each iSheet In ThisWorkbook.Sheets | Next iSheet).
- Displays a message box (MsgBox) with the name (Name) of the current sheet (iSheet).
Sub loopThroughAllSheetsForEachNext()
    'source: https://powerspreadsheets.com/
    'loops through all sheets in this workbook, and displays a message box with each sheet name
    'for further information: https://powerspreadsheets.com/excel-vba-sheets-worksheets/

    'declare variable to iterate through all sheets
    Dim iSheet As Object

    'loop through all sheets in this workbook
    For Each iSheet In ThisWorkbook.Sheets

        'display message box with name of current sheet
        MsgBox iSheet.Name

    Next iSheet

End Sub
Effects of executing macro example to loop through all sheets in workbook with For Each… Next
The following GIF illustrates the results of executing the macro example. As expected, Excel displays a message box with the name of each sheet (both worksheets and chart sheets) in the workbook.
#12: Loop through all worksheets in workbook with For Each… Next
VBA code to loop through all worksheets in workbook with For Each… Next
To loop through all worksheets in a workbook with a For Each… Next VBA loop, use a macro with the following statement structure:
For Each Worksheet In Workbook.Worksheets
    Statements
Next Worksheet
Process to loop through all worksheets in workbook with For Each… Next
To loop through all worksheets in a workbook with a For Each… Next VBA loop, follow these steps:
- Identify the workbook containing the worksheets (Workbook).
- Identify the Sheets collection representing all worksheets in Workbook (Worksheets).
- Use an object variable to iterate through the worksheets in Workbook (Worksheet).
- Execute a set of Statements for each worksheet in Workbook.
VBA statement explanation
Lines #1 and #3: For Each Worksheet In Workbook.Worksheets | Next Worksheet
Item: For Each … In … | Next …
The For Each… Next statement repeats the Statements for each Worksheet in Workbook.Worksheets.
Item: Worksheet
Object variable used to iterate through the worksheets in Workbook.
If you explicitly declare an object variable to represent Worksheet, you can usually declare it as of the Worksheet object data type.
Item: Workbook.Worksheets
Sheets collection through which the For Each… Next statement loops through.
Workbook is a Workbook object representing the Excel workbook containing the worksheets you loop through.
You can usually work with one of the following properties to refer to this Workbook object:
- Application.ActiveWorkbook.
- Application.ThisWorkbook.
- Application.Workbooks.
The Workbook.Worksheets property returns a Sheets collection representing all worksheets in Workbook.
Therefore, For Each… Next loops through all worksheets in Workbook.
Line #2: Statements
Statements that are executed for each worksheet in Workbook.
Macro example to loop through all worksheets in workbook with For Each… Next
The following macro example:
- Loops through each worksheet in the workbook where the macro is stored (For Each iWorksheet In ThisWorkbook.Worksheets | Next iWorksheet).
- Displays a message box (MsgBox) with the name (Name) of the current sheet (iSheet).
Sub loopThroughAllWorksheetsForEachNext()
    'source: https://powerspreadsheets.com/
    'loops through all worksheets in this workbook, and displays a message box with each worksheet name
    'for further information: https://powerspreadsheets.com/excel-vba-sheets-worksheets/

    'declare variable to iterate through all worksheets
    Dim iWorksheet As Worksheet

    'loop through all worksheets in this workbook
    For Each iWorksheet In ThisWorkbook.Worksheets

        'display message box with name of current worksheet
        MsgBox iWorksheet.Name

    Next iWorksheet

End Sub
Effects of executing macro example to loop through all worksheets in workbook with For Each… Next
The following GIF illustrates the results of executing the macro example. As expected, Excel displays a message box with the name of each worksheet in the workbook.
#13: Loop through all sheets in workbook with For… Next
VBA code to loop through all sheets in workbook with For… Next
To loop through all sheets in a workbook with a For… Next VBA loop, use a macro with the following statement structure:
For Counter = 1 To Workbook.Sheets.Count
    Statements
Next Counter
Process to loop through all sheets in workbook with For… Next
To loop through all sheets in a workbook with a For… Next VBA loop, follow these steps:
- Identify the workbook containing the sheets (Workbook).
- Identify the Sheets collection representing all sheets in Workbook (Sheets).
- Count the number of sheets in the Sheets collection (Count).
- Execute a set of Statements a number of times equal to the number of Sheets in Workbook (For Counter = 1 To Workbook.Sheets.Count).
VBA statement explanation
Lines #1 and #3: For Counter = 1 To Workbook.Sheets.Count | Next Counter
Item: For … To … | Next …
The For… Next statement repeats the statements a number of times equal to the number of Sheets in Workbook.
Item: Counter
Numeric variable used as loop counter. If you explicitly declare Counter, you can usually declare it as of the Long data type.
Item: = 1
Counter’s initial value.
Item: Workbook.Sheets.Count
Counter’s end value, which is equal to the number of Sheets in Workbook.
Workbook is a Workbook object representing the Excel workbook containing the sheets you loop through.
You can usually work with one of the following properties to refer to this Workbook object:
- Application.ActiveWorkbook.
- Application.ThisWorkbook.
- Application.Workbooks.
The Workbook.Sheets property returns a Sheets collection representing all sheets in Workbook. The Sheets collection can, generally, contain both:
- Chart objects, where each Chart object represents an individual chart sheet; or
- Worksheet objects, where each Worksheet object represents an individual worksheet.
The Sheets.Count property returns the number of objects in the Sheets collection.
Therefore:
- Workbook.Sheets.Count returns the number of Sheets in Workbook; and
- For… Next loops through all Sheets in Workbook (From Counter = 1 To Workbook.Sheets.Count).
Line #2: Statements
Statements that are executed a number of times equal to the number of Sheets in Workbook.
Macro example to loop through all sheets in workbook with For… Next
The following macro example:
- Loops through each sheet in the workbook where the macro is stored (For iCounter = 1 To ThisWorkbook.Sheets.Count | Next iCounter).
- Displays a message box (MsgBox) with the name (Name) of the current sheet (ThisWorkbook.Sheets(iCounter)).
Sub loopThroughAllSheetsForNext()
    'source: https://powerspreadsheets.com/
    'loops through all sheets in this workbook, and displays a message box each sheet name
    'for further information: https://powerspreadsheets.com/excel-vba-sheets-worksheets/

    'declare variable to hold loop counter
    Dim iCounter As Long

    'loop through all sheets in this workbook
    For iCounter = 1 To ThisWorkbook.Sheets.Count

        'display message box with name of current sheet
        MsgBox ThisWorkbook.Sheets(iCounter).Name

    Next iCounter

End Sub
Effects of executing macro example to loop through all sheets in workbook with For… Next
The following GIF illustrates the results of executing the macro example. As expected, Excel displays a message box with the name of each sheet (both worksheets and chart sheets) in the workbook.
#14: Loop through all worksheets in workbook with For… Next
VBA code to loop through all worksheets in workbook with For… Next
To loop through all worksheets in a workbook with a For… Next VBA loop, use a macro with the following statement structure:
For Counter = 1 To Workbook.Worksheets.Count
    Statements
Next Counter
Process to loop through all worksheets in workbook with For… Next
To loop through all worksheets in a workbook with a For… Next VBA loop, follow these steps:
- Identify the workbook containing the worksheets (Workbook).
- Identify the Sheets collection representing all worksheets in Workbook (Worksheets).
- Count the number of worksheets in the Sheets collection (Count).
- Execute a set of Statements a number of times equal to the number of worksheets in Workbook (For Counter = 1 To Workbook.Worksheets.Count).
VBA statement explanation
Lines #1 and #3: For Counter = 1 To Workbook.Worksheets.Count | Next Counter
Item: For … To … | Next …
The For… Next statement repeats the statements a number of times equal to the number of worksheets in Workbook.
Item: Counter
Numeric variable used as loop counter. If you explicitly declare Counter, you can usually declare it as of the Long data type.
Item: = 1
Counter’s initial value.
Item: Workbook.Worksheets.Count
Counter’s end value, which is equal to the number of worksheets in Workbook.
Workbook is a Workbook object representing the Excel workbook containing the worksheets you loop through.
You can usually work with one of the following properties to refer to this Workbook object:
- Application.ActiveWorkbook.
- Application.ThisWorkbook.
- Application.Workbooks.
The Workbook.Worksheets property returns a Sheets collection representing all worksheets in Workbook.
The Worksheets.Count property returns the number of objects in the Sheets collection returned by the Worksheets property.
Therefore:
- Workbook.Worksheets.Count returns the number of worksheets in Workbook; and
- For… Next loops through all worksheets in Workbook (From Counter = 1 to Workbook.Worksheets.Count).
Line #2: Statements
Statements that are executed a number of times equal to the number of worksheets in Workbook.
Macro example to loop through all worksheets in workbook with For… Next
The following macro example:
- Loops through each worksheet in the workbook where the macro is stored (For iCounter = 1 To ThisWorkbook.Worksheets.Count | Next iCounter).
- Displays a message box (MsgBox) with the name (Name) of the current worksheet (ThisWorkbook.Worksheets(iCounter)).
Sub loopThroughAllWorksheetsForNext()
    'source: https://powerspreadsheets.com/
    'loops through all worksheets in this workbook, and displays a message box with each worksheet name
    'for further information: https://powerspreadsheets.com/excel-vba-sheets-worksheets/

    'declare variable to hold loop counter
    Dim iCounter As Long

    'loop through all worksheets in this workbook
    For iCounter = 1 To ThisWorkbook.Worksheets.Count

        'display message box with name of current worksheet
        MsgBox ThisWorkbook.Worksheets(iCounter).Name

    Next iCounter

End Sub
Effects of executing macro example to loop through all worksheets in workbook with For… Next
The following GIF illustrates the results of executing the macro example. As expected, Excel displays a message box with the name of each worksheet in the workbook.
#15: Loop through all sheets in reverse order
VBA code to loop through all sheets in reverse order
To loop through all sheets in a workbook in reverse order with VBA, use a macro with the following statement structure:
For Counter = Workbook.Sheets.Count To 1 Step -1
    Statements
Next Counter
Process to loop through all sheets in reverse order
To loop through all sheets in a workbook in reverse order with VBA, follow these steps:
- Identify the workbook containing the sheets (Workbook).
- Identify the Sheets collection representing all sheets in Workbook (Sheets).
- Count the number of sheets in the Sheets collection (Count).
- Execute a set of Statements a number of times equal to the number of Sheets in Workbook while clarifying that the looping occurs in reverse order (For Counter = Workbook.Sheets.Count To 1 Step -1).
VBA statement explanation
Lines #1 and #3: For Counter = Workbook.Sheets.Count To 1 Step -1 | Next Counter
Item: For … To …. | Next …
The For… Next statement repeats the statements a number of times equal to the number of worksheets in Workbook.
Item: Counter
Numeric variable used as loop counter. If you explicitly declare Counter, you can usually declare it as of the Long data type.
Item: = Workbook.Sheets.Count
Counter’s initial value, which is equal to the number of Sheets in Workbook.
Workbook is a Workbook object representing the Excel workbook containing the sheets you loop through.
You can usually work with one of the following properties to refer to this Workbook object:
- Application.ActiveWorkbook.
- Application.ThisWorkbook.
- Application.Workbooks.
The Workbook.Sheets property returns a Sheets collection representing all sheets in Workbook. The Sheets collection can, generally, contain both:
- Chart objects, where each Chart object represents an individual chart sheet; or
- Worksheet objects, where each Worksheet object represents an individual worksheet.
The Sheets.Count property returns the number of objects in the Sheets collection. Therefore, Workbook.Sheets.Count returns the number of Sheets in Workbook.
Item: 1
Counter’s end value.
Item: Step -1
Amount Counter changes each loop iteration.
When looping through all sheets in reverse order:
- Counter’s initial value is equal to the number of Sheets in Workbook (Workbook.Sheets.Count).
- Counter’s end value is 1.
- Counter decreases by 1 each iteration.
Therefore, For… Next loops through all Sheets in Workbook in reverse order (From Counter = Workbook.Sheets.Count To 1 Step -1).
Line #2: Statements
Statements that are executed a number of times equal to the number of Sheets in Workbook.
Macro example to loop through all sheets in reverse order
The following macro example:
- Loops through each sheet in the workbook where the macro is stored in reverse order (For iCounter = ThisWorkbook.Sheets.Count To 1 Step -1 | Next iCounter).
- Displays a message box (MsgBox) with the name (Name) of the current sheet (ThisWorkbook.Sheets(iCounter)).
Sub loopThroughAllSheetsBackwards()
    'source: https://powerspreadsheets.com/
    'loops through all sheets in this workbook (in reverse order), and displays a message box with each sheet name
    'for further information: https://powerspreadsheets.com/excel-vba-sheets-worksheets/

    'declare variable to hold loop counter
    Dim iCounter As Long

    'loop through all sheets in this workbook (in reverse order)
    For iCounter = ThisWorkbook.Sheets.Count To 1 Step -1

        'display message box with name of current sheet
        MsgBox ThisWorkbook.Sheets(iCounter).Name

    Next iCounter

End Sub
Effects of executing macro example to loop through all sheets in reverse order
The following GIF illustrates the results of executing the macro example. As expected, Excel displays a message box with the name of each sheet (both worksheets and chart sheets) in the workbook in reverse order.
#16: Loop through all worksheets in reverse order
VBA code to loop through all worksheets in reverse order
To loop through all worksheets in a workbook in reverse order with VBA, use a macro with the following statement structure:
For Counter = Workbook.Worksheets.Count To 1 Step -1
    Statements
Next Counter
Process to loop through all worksheets in reverse order
To loop through all worksheets in a workbook in reverse order with VBA, follow these steps:
- Identify the workbook containing the worksheets (Workbook).
- Identify the Sheets collection representing all worksheets in Workbook (Worksheets).
- Count the number of worksheets in the Sheets collection (Count).
- Execute a set of Statements a number of times equal to the number of worksheets in Workbook while clarifying that the looping occurs in reverse order (For Counter = Workbook.Worksheets.Count To 1 Step -1).
VBA statement explanation
Lines #1 and #3: For Counter = ThisWorkbook.Worksheets.Count To 1 Step -1 | Next Counter
Item: For … To … | Next …
The For… Next statement repeats the statements a number of times equal to the number of worksheets in Workbook.
Item: Counter
Numeric variable used as loop counter. If you explicitly declare Counter, you can usually declare it as of the Long data type.
Item: = Workbook.Worksheets.Count
Counter’s initial value, which is equal to the number of worksheets in Workbook.
Workbook is a Workbook object representing the Excel workbook containing the worksheets you loop through.
You can usually work with one of the following properties to refer to this Workbook object:
- Application.ActiveWorkbook.
- Application.ThisWorkbook.
- Application.Workbooks.
The Workbook.Worksheets property returns a Sheets collection representing all worksheets in Workbook.
The Worksheets.Count property returns the number of objects in the Sheets collection returned by the Worksheets property. Therefore, Workbook.Worksheets.Count returns the number of worksheets in Workbook.
Item: 1
Counter’s end value.
Item: Step -1
Amount Counter changes each loop iteration.
When looping through all worksheets in reverse order:
- Counter’s initial value is equal to the number of worksheets in Workbook (Workbook.Worksheets.Count).
- Counter’s end value is 1.
- Counter decreases by 1 each iteration.
Therefore, For… Next loops through all worksheets in Workbook in reverse order (From Counter = Workbook.Worksheets.Count To 1 Step -1).
Line #2: Statements
Statements that are executed a number of times equal to the number of worksheets in Workbook.
Macro example to loop through all worksheets in reverse order
The following macro example:
- Loops through each worksheet in the workbook where the macro is stored in reverse order (For iCounter = ThisWorkbook.Worksheets.Count To 1 Step -1 | Next iCounter).
- Displays a message box (MsgBox) with the name (Name) of the current worksheet (ThisWorkbook.Worksheets(iCounter)).
Sub loopThroughAllWorksheetsBackwards()
    'source: https://powerspreadsheets.com/
    'loops through all worksheets in this workbook (in reverse order), and displays a message box with each worksheet name
    'for further information: https://powerspreadsheets.com/excel-vba-sheets-worksheets/

    'declare variable to hold loop counter
    Dim iCounter As Long

    'loop through all worksheets in this workbook (in reverse order)
    For iCounter = ThisWorkbook.Worksheets.Count To 1 Step -1

        'display message box with name of current worksheet
        MsgBox ThisWorkbook.Worksheets(iCounter).Name

    Next iCounter

End Sub
Effects of executing macro example to loop through all worksheets in reverse order
The following GIF illustrates the results of executing the macro example. As expected, Excel displays a message box with the name of each worksheet in the workbook in reverse order.
Learn more about working with sheets and worksheets in VBA
You can get immediate free access to the example workbook that accompanies this VBA Tutorial by subscribing to the Power Spreadsheets Newsletter.
Alternatively, you can access all the files that accompany my Tutorials here.
The following Books are referenced in this Excel VBA sheets and worksheets Tutorial:
- Alexander, Michael (2015). Excel Macros for Dummies. Hoboken, NJ: John Wiley & Sons Inc.
- Alexander, Michael and Kusleika, Dick (2016). Excel 2016 Power Programming with VBA. Indianapolis, IN: John Wiley & Sons Inc.
- Jelen, Bill and Syrstad, Tracy (2015). Excel 2016 VBA and Macros. United States of America: Pearson Education, Inc.
- Walkenbach, John (2015). Excel VBA Programming for Dummies. Hoboken, NJ: John Wiley & Sons Inc.
|
Использование конструкции «With Sheets(«Лист1″)» |
||||||||
Ответить |
||||||||
Ответить |
||||||||
Ответить |
||||||||
Ответить |


Время на прочтение
7 мин
Количество просмотров 312K
Приветствую всех.
В этом посте я расскажу, что такое VBA и как с ним работать в Microsoft Excel 2007/2010 (для более старых версий изменяется лишь интерфейс — код, скорее всего, будет таким же) для автоматизации различной рутины.

VBA (Visual Basic for Applications) — это упрощенная версия Visual Basic, встроенная в множество продуктов линейки Microsoft Office. Она позволяет писать программы прямо в файле конкретного документа. Вам не требуется устанавливать различные IDE — всё, включая отладчик, уже есть в Excel.
Еще при помощи Visual Studio Tools for Office можно писать макросы на C# и также встраивать их. Спасибо, FireStorm.
Сразу скажу — писать на других языках (C++/Delphi/PHP) также возможно, но требуется научится читать, изменять и писать файлы офиса — встраивать в документы не получится. А интерфейсы Microsoft работают через COM. Чтобы вы поняли весь ужас, вот Hello World с использованием COM.
Поэтому, увы, будем учить Visual Basic.
Чуть-чуть подготовки и постановка задачи
Итак, поехали. Открываем Excel.
Для начала давайте добавим в Ribbon панель «Разработчик». В ней находятся кнопки, текстовые поля и пр. элементы для конструирования форм.

Появилась вкладка.
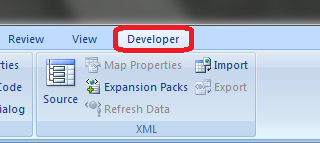
Теперь давайте подумаем, на каком примере мы будем изучать VBA. Недавно мне потребовалось красиво оформить прайс-лист, выглядевший, как таблица. Идём в гугл, набираем «прайс-лист» и качаем любой, который оформлен примерно так (не сочтите за рекламу, пожалуйста):

То есть требуется, чтобы было как минимум две группы, по которым можно объединить товары (в нашем случае это будут Тип и Производитель — в таком порядке). Для того, чтобы предложенный мною алгоритм работал корректно, отсортируйте товары так, чтобы товары из одной группы стояли подряд (сначала по Типу, потом по Производителю).
Результат, которого хотим добиться, выглядит примерно так:

Разумеется, если смотреть прайс только на компьютере, то можно добавить фильтры и будет гораздо удобнее искать нужный товар. Однако мы хотим научится кодить и задача вполне подходящая, не так ли?
Кодим
Для начала требуется создать кнопку, при нажатии на которую будет вызываться наша програма. Кнопки находятся в панели «Разработчик» и появляются по кнопке «Вставить». Вам нужен компонент формы «Кнопка». Нажали, поставили на любое место в листе. Далее, если не появилось окно назначения макроса, надо нажать правой кнопкой и выбрать пункт «Назначить макрос». Назовём его FormatPrice. Важно, чтобы перед именем макроса ничего не было — иначе он создастся в отдельном модуле, а не в пространстве имен книги. В этому случае вам будет недоступно быстрое обращение к выделенному листу. Нажимаем кнопку «Новый».


И вот мы в среде разработки VB. Также её можно вызвать из контекстного меню командой «Исходный текст»/«View code».
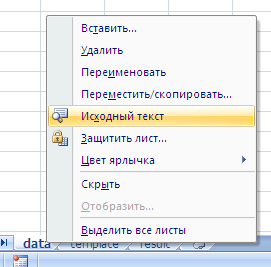

Перед вами окно с заглушкой процедуры. Можете его развернуть. Код должен выглядеть примерно так:
Sub FormatPrice()End Sub
Напишем Hello World:
Sub FormatPrice()

    MsgBox "Hello World!"

End Sub
И запустим либо щелкнув по кнопке (предварительно сняв с неё выделение), либо клавишей F5 прямо из редактора.
Тут, пожалуй, следует отвлечься на небольшой ликбез по поводу синтаксиса VB. Кто его знает — может смело пропустить этот раздел до конца. Основное отличие Visual Basic от Pascal/C/Java в том, что команды разделяются не ;, а переносом строки или двоеточием (:), если очень хочется написать несколько команд в одну строку. Чтобы понять основные правила синтаксиса, приведу абстрактный код.
Примеры синтаксиса
' Процедура. Ничего не возвращает

' Перегрузка в VBA отсутствует

Sub foo(a As String, b As String)

    ' Exit Sub ' Это значит "выйти из процедуры"

    MsgBox a + ";" + b

End Sub' Функция. Вовращает Integer

Function LengthSqr(x As Integer, y As Integer) As Integer

    ' Exit Function

    LengthSqr = x * x + y * y

End FunctionSub FormatPrice()

    Dim s1 As String, s2 As String

    s1 = "str1"

    s2 = "str2"

    If s1 <> s2 Then

        foo "123", "456" ' Скобки при вызове процедур запрещены

    End IfDim res As sTRING ' Регистр в VB не важен. Впрочем, редактор Вас поправит

    Dim i As Integer

    ' Цикл всегда состоит из нескольких строк

    For i = 1 To 10

        res = res + CStr(i) ' Конвертация чего угодно в String

        If i = 5 Then Exit For

    Next iDim x As Double

    x = Val("1.234") ' Парсинг чисел

    x = x + 10

    MsgBox xOn Error Resume Next ' Обработка ошибок - игнорировать все ошибки

    x = 5 / 0

    MsgBox xOn Error GoTo Err ' При ошибке перейти к метке Err

    x = 5 / 0

    MsgBox "OK!"

    GoTo ne
Err:
MsgBox
"Err!"
ne:
On Error GoTo 0 ' Отключаем обработку ошибок
' Циклы бывает, какие захотите
Do While True
Exit DoLoop 'While True
Do 'Until False
Exit Do
Loop Until False
' А вот при вызове функций, от которых хотим получить значение, скобки нужны.
' Val также умеет возвращать Integer
Select Case LengthSqr(Len("abc"), Val("4"))
Case 24
MsgBox "0"
Case 25
MsgBox "1"
Case 26
MsgBox "2"
End Select' Двухмерный массив.
' Можно также менять размеры командой ReDim (Preserve) - см. google
Dim arr(1 to 10, 5 to 6) As Integer
arr(1, 6) = 8Dim coll As New Collection
Dim coll2 As Collection
coll.Add "item", "key"
Set coll2 = coll ' Все присваивания объектов должны производится командой Set
MsgBox coll2("key")
Set coll2 = New Collection
MsgBox coll2.Count
End Sub
Грабли-1. При копировании кода из IDE (в английском Excel) есь текст конвертируется в 1252 Latin-1. Поэтому, если хотите сохранить русские комментарии — надо сохранить крокозябры как Latin-1, а потом открыть в 1251.
Грабли-2. Т.к. VB позволяет использовать необъявленные переменные, я всегда в начале кода (перед всеми процедурами) ставлю строчку Option Explicit. Эта директива запрещает интерпретатору заводить переменные самостоятельно.
Грабли-3. Глобальные переменные можно объявлять только до первой функции/процедуры. Локальные — в любом месте процедуры/функции.
Еще немного дополнительных функций, которые могут пригодится: InPos, Mid, Trim, LBound, UBound. Также ответы на все вопросы по поводу работы функций/их параметров можно получить в MSDN.
Надеюсь, что этого Вам хватит, чтобы не пугаться кода и самостоятельно написать какое-нибудь домашнее задание по информатике. По ходу поста я буду ненавязчиво знакомить Вас с новыми конструкциями.
Кодим много и под Excel
В этой части мы уже начнём кодить нечто, что умеет работать с нашими листами в Excel. Для начала создадим отдельный лист с именем result (лист с данными назовём data). Теперь, наверное, нужно этот лист очистить от того, что на нём есть. Также мы «выделим» лист с данными, чтобы каждый раз не писать длинное обращение к массиву с листами.
Sub FormatPrice()

    Sheets("result").Cells.Clear

    Sheets("data").Activate

End Sub
Работа с диапазонами ячеек
Вся работа в Excel VBA производится с диапазонами ячеек. Они создаются функцией Range и возвращают объект типа Range. У него есть всё необходимое для работы с данными и/или оформлением. Кстати сказать, свойство Cells листа — это тоже Range.
Примеры работы с Range
Sheets("result").Activate

Dim r As Range

Set r = Range("A1")

r.Value = "123"

Set r = Range("A3,A5")

r.Font.Color = vbRed

r.Value = "456"

Set r = Range("A6:A7")

r.Value = "=A1+A3"
Теперь давайте поймем алгоритм работы нашего кода. Итак, у каждой строчки листа data, начиная со второй, есть некоторые данные, которые нас не интересуют (ID, название и цена) и есть две вложенные группы, к которым она принадлежит (тип и производитель). Более того, эти строки отсортированы. Пока мы забудем про пропуски перед началом новой группы — так будет проще. Я предлагаю такой алгоритм:
- Считали группы из очередной строки.
- Пробегаемся по всем группам в порядке приоритета (вначале более крупные)
- Если текущая группа не совпадает, вызываем процедуру AddGroup(i, name), где i — номер группы (от номера текущей до максимума), name — её имя. Несколько вызовов необходимы, чтобы создать не только наш заголовок, но и всё более мелкие.
- После отрисовки всех необходимых заголовков делаем еще одну строку и заполняем её данными.
Для упрощения работы рекомендую определить следующие функции-сокращения:
Function GetCol(Col As Integer) As String

    GetCol = Chr(Asc("A") + Col)

End FunctionFunction GetCellS(Sheet As String, Col As Integer, Row As Integer) As Range

    Set GetCellS = Sheets(Sheet).Range(GetCol(Col) + CStr(Row))

End FunctionFunction GetCell(Col As Integer, Row As Integer) As Range

    Set GetCell = Range(GetCol(Col) + CStr(Row))

End Function
Далее определим глобальную переменную «текущая строчка»: Dim CurRow As Integer. В начале процедуры её следует сделать равной единице. Еще нам потребуется переменная-«текущая строка в data», массив с именами групп текущей предыдущей строк. Потом можно написать цикл «пока первая ячейка в строке непуста».
Глобальные переменные
Option Explicit ' про эту строчку я уже рассказывал

Dim CurRow As Integer

Const GroupsCount As Integer = 2

Const DataCount As Integer = 3
FormatPrice
Sub FormatPrice()

    Dim I As Integer ' строка в data

    CurRow = 1

    Dim Groups(1 To GroupsCount) As String

    Dim PrGroups(1 To GroupsCount) As String
Sheets(
"data").Activate
I = 2
Do While True
If GetCell(0, I).Value = "" Then Exit Do
' ...
I = I + 1
Loop
End Sub
Теперь надо заполнить массив Groups:
На месте многоточия
Dim I2 As Integer

For I2 = 1 To GroupsCount

    Groups(I2) = GetCell(I2, I)

Next I2

' ...

For I2 = 1 To GroupsCount ' VB не умеет копировать массивы

    PrGroups(I2) = Groups(I2)

Next I2

I =  I + 1
И создать заголовки:
На месте многоточия в предыдущем куске
For I2 = 1 To GroupsCount

    If Groups(I2) <> PrGroups(I2) Then

        Dim I3 As Integer

        For I3 = I2 To GroupsCount

            AddHeader I3, Groups(I3)

        Next I3

        Exit For

    End If

Next I2
Не забудем про процедуру AddHeader:
Перед FormatPrice
Sub AddHeader(Ty As Integer, Name As String)

    GetCellS("result", 1, CurRow).Value = Name

    CurRow = CurRow + 1

End Sub
Теперь надо перенести всякую информацию в result
For I2 = 0 To DataCount - 1

    GetCellS("result", I2, CurRow).Value = GetCell(I2, I)

Next I2
Подогнать столбцы по ширине и выбрать лист result для показа результата
После цикла в конце FormatPrice
Sheets("Result").Activate

Columns.AutoFit
Всё. Можно любоваться первой версией.

Некрасиво, но похоже. Давайте разбираться с форматированием. Сначала изменим процедуру AddHeader:
Sub AddHeader(Ty As Integer, Name As String)

    Sheets("result").Range("A" + CStr(CurRow) + ":C" + CStr(CurRow)).Merge

    ' Чтобы не заводить переменную и не писать каждый раз длинный вызов

    ' можно воспользоваться блоком With

    With GetCellS("result", 0, CurRow)

        .Value = Name

        .Font.Italic = True

        .Font.Name = "Cambria"

        Select Case Ty

        Case 1 ' Тип

            .Font.Bold = True

            .Font.Size = 16

        Case 2 ' Производитель

            .Font.Size = 12

        End Select

        .HorizontalAlignment = xlCenter

    End With

    CurRow = CurRow + 1

End Sub
Уже лучше:

Осталось только сделать границы. Тут уже нам требуется работать со всеми объединёнными ячейками, иначе бордюр будет только у одной:

Поэтому чуть-чуть меняем код с добавлением стиля границ:
Sub AddHeader(Ty As Integer, Name As String)

    With Sheets("result").Range("A" + CStr(CurRow) + ":C" + CStr(CurRow))

        .Merge

        .Value = Name

        .Font.Italic = True

        .Font.Name = "Cambria"

        .HorizontalAlignment = xlCenterSelect Case Ty

        Case 1 ' Тип

            .Font.Bold = True

            .Font.Size = 16

            .Borders(xlTop).Weight = xlThick

        Case 2 ' Производитель

            .Font.Size = 12

            .Borders(xlTop).Weight = xlMedium

        End Select

        .Borders(xlBottom).Weight = xlMedium ' По убыванию: xlThick, xlMedium, xlThin, xlHairline

    End With

    CurRow = CurRow + 1

End Sub

Осталось лишь добится пропусков перед началом новой группы. Это легко:
В начале FormatPrice
Dim I As Integer ' строка в  data

CurRow = 0 ' чтобы не было пропуска в самом начале

Dim Groups(1 To GroupsCount) As String
В цикле расстановки заголовков
If Groups(I2) <> PrGroups(I2) Then

    CurRow = CurRow + 1

    Dim I3 As Integer

В точности то, что и хотели.
Надеюсь, что эта статья помогла вам немного освоится с программированием для Excel на VBA. Домашнее задание — добавить заголовки «ID, Название, Цена» в результат. Подсказка: CurRow = 0 CurRow = 1.
Файл можно скачать тут (min.us) или тут (Dropbox). Не забудьте разрешить исполнение макросов. Если кто-нибудь подскажет человеческих файлохостинг, залью туда.
Спасибо за внимание.
Буду рад конструктивной критике в комментариях.
UPD: Перезалил пример на Dropbox и min.us.
UPD2: На самом деле, при вызове процедуры с одним параметром скобки можно поставить. Либо использовать конструкцию Call Foo(«bar», 1, 2, 3) — тут скобки нужны постоянно.
На чтение 16 мин. Просмотров 14.8k.

Malcolm Gladwell
Мечтатель начинает с чистого листа бумаги и переосмысливает мир
Эта статья содержит полное руководство по использованию Excel
VBA Worksheet в Excel VBA. Если вы хотите узнать, как что-то сделать быстро, ознакомьтесь с кратким руководством к рабочему листу VBA ниже.
Если вы новичок в VBA, то эта статья — отличное место для начала. Мне нравится разбивать вещи на простые термины и объяснять их на простом языке.
Вы можете прочитать статью от начала до конца, так как она написана в логическом порядке. Или, если предпочитаете, вы можете использовать оглавление ниже и перейти непосредственно к теме по вашему выбору.
Содержание
- Краткое руководство к рабочему листу VBA
- Вступление
- Доступ к рабочему листу
- Использование индекса для доступа к рабочему листу
- Использование кодового имени рабочего листа
- Активный лист
- Объявление объекта листа
- Доступ к рабочему листу в двух словах
- Добавить рабочий лист
- Удалить рабочий лист
- Цикл по рабочим листам
- Использование коллекции листов
- Заключение
Краткое руководство к рабочему листу VBA
В следующей таблице приведен краткий обзор различных методов
Worksheet .
Примечание. Я использую Worksheet в таблице ниже, не указывая рабочую книгу, т.е. Worksheets, а не ThisWorkbook.Worksheets, wk.Worksheets и т.д. Это сделано для того, чтобы примеры были понятными и удобными для чтения. Вы должны всегда указывать рабочую книгу при использовании Worksheets . В противном случае активная рабочая книга будет использоваться по умолчанию.
| Задача | Исполнение |
| Доступ к рабочему листу по имени |
Worksheets(«Лист1») |
| Доступ к рабочему листу по позиции слева |
Worksheets(2) Worksheets(4) |
| Получите доступ к самому левому рабочему листу |
Worksheets(1) |
| Получите доступ к самому правому листу |
Worksheets(Worksheets.Count) |
| Доступ с использованием кодового имени листа (только текущая книга) |
Смотри раздел статьи Использование кодового имени |
| Доступ по кодовому имени рабочего листа (другая рабочая книга) |
Смотри раздел статьи Использование кодового имени |
| Доступ к активному листу | ActiveSheet |
| Объявить переменную листа | Dim sh As Worksheet |
| Назначить переменную листа | Set sh = Worksheets(«Лист1») |
| Добавить лист | Worksheets.Add |
| Добавить рабочий лист и назначить переменную |
Worksheets.Add Before:= Worksheets(1) |
| Добавить лист в первую позицию (слева) |
Set sh =Worksheets.Add |
| Добавить лист в последнюю позицию (справа) |
Worksheets.Add after:=Worksheets(Worksheets.Count) |
| Добавить несколько листов | Worksheets.Add Count:=3 |
| Активировать рабочий лист | sh.Activate |
| Копировать лист | sh.Copy |
| Копировать после листа | sh1.Copy After:=Sh2 |
| Скопировать перед листом | sh1.Copy Before:=Sh2 |
| Удалить рабочий лист | sh.Delete |
| Удалить рабочий лист без предупреждения |
Application.DisplayAlerts = False sh.Delete Application.DisplayAlerts = True |
| Изменить имя листа | sh.Name = «Data» |
| Показать/скрыть лист | sh.Visible = xlSheetHidden sh.Visible = xlSheetVisible sh.Name = «Data» |
| Перебрать все листы (For) | Dim i As Long For i = 1 To Worksheets.Count Debug.Print Worksheets(i).Name Next i |
| Перебрать все листы (For Each) | Dim sh As Worksheet For Each sh In Worksheets Debug.Print sh.Name Next |
Вступление
Три наиболее важных элемента VBA — это Рабочая книга, Рабочий лист и Ячейки. Из всего кода, который вы пишете, 90% будут включать один или все из них.
Наиболее распространенное использование Worksheet в VBA для доступа к его ячейкам. Вы можете использовать его для защиты, скрытия, добавления, перемещения или копирования листа.
Тем не менее, вы будете в основном использовать его для выполнения некоторых действий с одной или несколькими ячейками на листе.
Использование Worksheets более простое, чем использование рабочих книг. С книгами вам может потребоваться открыть их, найти, в какой папке они находятся, проверить, используются ли они, и так далее. С рабочим листом он либо существует в рабочей книге, либо его нет.
Доступ к рабочему листу
В VBA каждая рабочая книга имеет коллекцию рабочих листов. В этой коллекции есть запись для каждого рабочего листа. Эта коллекция называется просто Worksheets и используется очень похоже на коллекцию Workbooks. Чтобы получить доступ к рабочему листу, достаточно указать имя.
Приведенный ниже код записывает «Привет Мир» в ячейках A1 на листах: Лист1, Лист2 и Лист3 текущей рабочей книги.
Sub ZapisVYacheiku1()

    ' Запись в ячейку А1 в листе 1, листе 2 и листе 3
    ThisWorkbook.Worksheets("Лист1").Range("A1") = "Привет Мир"
    ThisWorkbook.Worksheets("Лист2").Range("A1") = "Привет Мир"
    ThisWorkbook.Worksheets("Лист3").Range("A1") = "Привет Мир"

End Sub
Коллекция Worksheets всегда принадлежит книге. Если мы не
указываем рабочую книгу, то активная рабочая книга используется по умолчанию.
Sub ZapisVYacheiku1()

    ' Worksheets относятся к рабочим листам в активной рабочей книге.
    Worksheets("Лист1").Range("A1") = "Привет Мир"
    Worksheets("Лист2").Range("A1") = "Привет Мир"
    Worksheets("Лист3").Range("A1") = "Привет Мир"

End Sub
Скрыть рабочий лист
В следующих примерах показано, как скрыть и показать лист.
ThisWorkbook.Worksheets("Лист1").Visible = xlSheetHidden

ThisWorkbook.Worksheets("Лист1").Visible = xlSheetVisible
Если вы хотите запретить пользователю доступ к рабочему
листу, вы можете сделать его «очень скрытым». Это означает, что это может быть
сделано видимым только кодом.
' Скрыть от доступа пользователя
ThisWorkbook.Worksheets("Лист1").Visible = xlVeryHidden

' Это единственный способ сделать лист xlVeryHidden видимым
ThisWorkbook.Worksheets("Лист1").Visible = xlSheetVisible
Защитить рабочий лист
Другой пример использования Worksheet — когда вы хотите защитить его.
ThisWorkbook.Worksheets("Лист1").Protect Password:="Мойпароль"

ThisWorkbook.Worksheets("Лист1").Unprotect Password:="Мойпароль"
Индекс вне диапазона
При использовании Worksheets вы можете получить сообщение об
ошибке:
Run-time Error 9 Subscript out of Range

Это означает, что вы пытались получить доступ к рабочему листу, который не существует. Это может произойти по следующим причинам:
- Имя Worksheet , присвоенное рабочим листам, написано неправильно.
- Название листа изменилось.
- Рабочий лист был удален.
- Индекс был большим, например Вы использовали рабочие листы (5), но есть только четыре рабочих листа
- Используется неправильная рабочая книга, например Workbooks(«book1.xlsx»).Worksheets(«Лист1») вместо
Workbooks(«book3.xlsx»).Worksheets («Лист1»).
Если у вас остались проблемы, используйте один из циклов из раздела «Циклы по рабочим листам», чтобы напечатать имена всех рабочих листов коллекции.
Использование индекса для доступа к рабочему листу
До сих пор мы использовали имя листа для доступа к листу.
Указатель относится к положению вкладки листа в рабочей книге. Поскольку
положение может быть легко изменено пользователем, не рекомендуется
использовать это.
В следующем коде показаны примеры использования индекса.
' Использование этого кода является плохой идеей, так как
' позиции листа все время меняются
Sub IspIndList()

    With ThisWorkbook
        ' Самый левый лист
        Debug.Print .Worksheets(1).Name
        ' Третий лист слева
        Debug.Print .Worksheets(3).Name
        ' Самый правый лист
        Debug.Print .Worksheets(.Worksheets.Count).Name
    End With

End Sub
В приведенном выше примере я использовал Debug.Print для печати в Immediate Window. Для просмотра этого окна выберите «Вид» -> «Immediate Window » (Ctrl + G).


Использование кодового имени рабочего листа
Лучший способ получить доступ к рабочему листу —
использовать кодовое имя. Каждый лист имеет имя листа и кодовое имя. Имя листа
— это имя, которое отображается на вкладке листа в Excel.
Изменение имени листа не приводит к изменению кодового имени, что означает, что ссылка на лист по кодовому имени — отличная идея.
Если вы посмотрите в окне свойств VBE, вы увидите оба имени.
На рисунке вы можете видеть, что кодовое имя — это имя вне скобок, а имя листа
— в скобках.

Вы можете изменить как имя листа, так и кодовое имя в окне
свойств листа (см. Изображение ниже).

Если ваш код ссылается на кодовое имя, то пользователь может
изменить имя листа, и это не повлияет на ваш код. В приведенном ниже примере мы
ссылаемся на рабочий лист напрямую, используя кодовое имя.
Sub IspKodImya2()

    ' Используя кодовое имя листа
    Debug.Print CodeName.Name
    CodeName.Range("A1") = 45
    CodeName.Visible = True

End Sub
Это делает код легким для чтения и безопасным от изменения
пользователем имени листа.
Кодовое имя в других книгах
Есть один недостаток использования кодового имени. Он относится только к рабочим листам в рабочей книге, которая содержит код, т.е. ThisWorkbook.
Однако мы можем использовать простую функцию, чтобы найти
кодовое имя листа в другой книге.
Sub ИспЛист()

    Dim sh As Worksheet
    ' Получить рабочий лист под кодовым именем
    Set sh = SheetFromCodeName("CodeName", ThisWorkbook)
    ' Используйте рабочий лист
    Debug.Print sh.Name

End Sub

' Эта функция получает объект листа из кодового имени
Public Function SheetFromCodeName(Name As String, bk As Workbook) As Worksheet

    Dim sh As Worksheet
    For Each sh In bk.Worksheets
        If sh.CodeName = Name Then
           Set SheetFromCodeName = sh
           Exit For
        End If
    Next sh

End Function
Использование приведенного выше кода означает, что если
пользователь изменит имя рабочего листа, то на ваш код это не повлияет.
Существует другой способ получения имени листа внешней
рабочей книги с использованием кодового имени. Вы можете использовать элемент
VBProject этой Рабочей книги.
Вы можете увидеть, как это сделать, в примере ниже. Я включил это, как дополнительную информацию, я бы рекомендовал использовать метод из предыдущего примера, а не этот.
Public Function SheetFromCodeName2(codeName As String _
                             , bk As Workbook) As Worksheet

    ' Получить имя листа из CodeName, используя VBProject
    Dim sheetName As String
    sheetName = bk.VBProject.VBComponents(codeName).Properties("Name")

    ' Используйте имя листа, чтобы получить объект листа
    Set SheetFromCodeName2 = bk.Worksheets(sheetName)

End Function
Резюме кодового имени
Ниже приведено краткое описание использования кодового имени:
- Кодовое имя рабочего листа может быть
использовано непосредственно в коде, например. Sheet1.Range - Кодовое имя будет по-прежнему работать, если имя
рабочего листа будет изменено. - Кодовое имя может использоваться только для
листов в той же книге, что и код. - Везде, где вы видите ThisWorkbook.Worksheets
(«имя листа»), вы можете заменить его кодовым именем рабочего листа. - Вы можете использовать функцию SheetFromCodeName
сверху, чтобы получить кодовое имя рабочих листов в других рабочих книгах.
Активный лист
Объект ActiveSheet ссылается на рабочий лист, который в данный момент активен. Вы должны использовать ActiveSheet только в том случае, если у вас есть особая необходимость ссылаться на активный лист.
В противном случае вы должны указать рабочий лист, который
вы используете.
Если вы используете метод листа, такой как Range, и не
упоминаете лист, он по умолчанию будет использовать активный лист.
' Написать в ячейку A1 в активном листе
ActiveSheet.Range("A1") = 99

' Активный лист используется по умолчанию, если лист не используется
Range("A1") = 99
Объявление объекта листа
Объявление объекта листа полезно для того, чтобы сделать ваш
код более понятным и легким для чтения.
В следующем примере показан код для обновления диапазонов
ячеек. Первый Sub не объявляет объект листа. Вторая подпрограмма объявляет
объект листа, и поэтому код намного понятнее.
Sub NeObyavObektList()

    Debug.Print ThisWorkbook.Worksheets("Лист1").Name
    ThisWorkbook.Worksheets("Лист1").Range("A1") = 6
    ThisWorkbook.Worksheets("Лист1").Range("B2:B9").Font.Italic = True
    ThisWorkbook.Worksheets("Лист1").Range("B2:B9").Interior.Color = rgbRed

End Sub
Sub ObyavObektList()

    Dim sht As Worksheet
    Set sht = ThisWorkbook.Worksheets("Лист1")

    sht.Range("A1") = 6
    sht.Range("B2:B9").Font.Italic = True
    sht.Range("B2:B9").Interior.Color = rgbRed

End Sub
Вы также можете использовать ключевое слово With с объектом
листа, как показано в следующем примере.
Sub ObyavObektListWith()

    Dim sht As Worksheet
    Set sht = ThisWorkbook.Worksheets("Лист1")

    With sht
        .Range("A1") = 6
        .Range("B2:B9").Font.Italic = True
        .Range("B2:B9").Interior.Color = rgbRed
    End With

End Sub
Доступ к рабочему листу в двух словах
Из-за множества различных способов доступа к рабочему листу вы можете быть сбитыми с толку. Так что в этом разделе я собираюсь разбить его на простые термины.
- Если вы хотите использовать тот лист, который активен в данный момент, используйте ActiveSheet.
ActiveSheet.Range("A1") = 55
2. Если лист находится в той же книге, что и код, используйте кодовое имя.
3. Если рабочая таблица находится в другой рабочей книге, сначала получите рабочую книгу, а затем получите рабочую таблицу.
' Получить рабочую книгу
Dim wk As Workbook
Set wk = Workbooks.Open("C:ДокументыСчета.xlsx", ReadOnly:=True)
' Затем получите лист
Dim sh As Worksheet
Set sh = wk.Worksheets("Лист1")
Если вы хотите защитить пользователя от изменения имени листа, используйте функцию SheetFromCodeName из раздела «Имя кода».
' Получить рабочую книгу
Dim wk As Workbook
Set wk = Workbooks.Open("C:ДокументыСчета.xlsx", ReadOnly:=True)

' Затем получите лист
Dim sh As Worksheet
Set sh = SheetFromCodeName("sheetcodename",wk)
Добавить рабочий лист
Примеры в этом разделе показывают, как добавить новую
рабочую таблицу в рабочую книгу. Если вы не предоставите никаких аргументов для
функции Add, то новый
рабочий лист будет помещен перед активным рабочим листом.
Когда вы добавляете рабочий лист, он создается с именем по умолчанию, например «Лист4». Если вы хотите изменить имя, вы можете легко сделать это, используя свойство Name.
В следующем примере добавляется новый рабочий лист и изменяется имя на «Счета». Если лист с именем «Счета» уже существует, вы получите сообщение об ошибке.
Sub DobavitList()

    Dim sht As Worksheet

    ' Добавляет новый лист перед активным листом
    Set sht = ThisWorkbook.Worksheets.Add
    ' Установите название листа
    sht.Name = "Счета"

    ' Добавляет 3 новых листа перед активным листом
    ThisWorkbook.Worksheets.Add Count:=3

End Sub
В предыдущем примере вы добавляете листы по отношению к
активному листу. Вы также можете указать точную позицию для размещения листа.
Для этого вам нужно указать, какой лист новый лист должен
быть вставлен до или после. Следующий код показывает вам, как это сделать.
Sub DobavitListPervPosl()

    Dim shtNew As Worksheet
    Dim shtFirst As Worksheet, shtLast As Worksheet

    With ThisWorkbook

        Set shtFirst = .Worksheets(1)
        Set shtLast = .Worksheets(.Worksheets.Count)

        ' Добавляет новый лист на первую позицию в книге
        Set shtNew = Worksheets.Add(Before:=shtFirst)
        shtNew.Name = "FirstSheet"

        ' Добавляет новый лист к последней позиции в книге
        Set shtNew = Worksheets.Add(After:=shtLast)
        shtNew.Name = "LastSheet"

    End With

End Sub
Удалить рабочий лист
Чтобы удалить лист, просто вызовите Delete.
Dim sh As Worksheet
Set sh = ThisWorkbook.Worksheets("Лист12")
sh.Delete
Excel отобразит предупреждающее сообщение при удалении листа. Если вы хотите скрыть это сообщение, вы можете использовать код ниже:
Application.DisplayAlerts = False
sh.Delete
Application.DisplayAlerts = True
Есть два аспекта, которые нужно учитывать при удалении таблиц.
Если вы попытаетесь получить доступ к рабочему листу после
его удаления, вы получите ошибку «Subscript out of Range», которую мы видели в
разделе «Доступ к рабочему листу».
Dim sh As Worksheet
Set sh = ThisWorkbook.Worksheets("Лист2")
sh.Delete

' Эта строка выдаст «Subscript out of Range», так как «Лист2» не существует
Set sh = ThisWorkbook.Worksheets("Лист2")
Вторая проблема — когда вы назначаете переменную листа. Если вы попытаетесь использовать эту переменную после удаления листа, вы получите ошибку автоматизации, подобную этой:
Run-Time error -21147221080 (800401a8′) Automation Error
Если вы используете кодовое имя рабочего листа, а не
переменную, это приведет к сбою Excel,
а не к ошибке автоматизации.
В следующем примере показано, как происходят ошибки автоматизации.
sh.Delete

' Эта строка выдаст ошибку автоматизации
Debug.Assert sh.Name
Если вы назначите переменную Worksheet действительному рабочему листу, он будет работать нормально.
sh.Delete

' Назначить sh на другой лист
Set sh = Worksheets("Лист3")

' Эта строка будет работать нормально
Debug.Assert sh.Name
Цикл по рабочим листам
Элемент «Worksheets» — это набор рабочих листов, принадлежащих рабочей книге. Вы можете просмотреть каждый лист в коллекции рабочих листов, используя циклы «For Each» или «For».
В следующем примере используется цикл For Each.
Sub CiklForEach()

    ' Записывает «Привет Мир» в ячейку A1 для каждого листа
    Dim sht As Worksheet
    For Each sht In ThisWorkbook.Worksheets
         sht.Range("A1") = "Привет Мир"
    Next sht

End Sub
В следующем примере используется стандартный цикл For.
Sub CiklFor()

    ' Записывает «Привет Мир» в ячейку A1 для каждого листа
    Dim i As Long
    For i = 1 To ThisWorkbook.Worksheets.Count
         ThisWorkbook.Worksheets(i).Range("A1") = "Привет Мир"
    Next sht

End Sub
Вы видели, как получить доступ ко всем открытым рабочим книгам и как получить доступ ко всем рабочим листам в ThisWorkbook. Давайте сделаем еще один шаг вперед — узнаем, как получить доступ ко всем рабочим листам во всех открытых рабочих книгах.
Примечание. Если вы используете код, подобный этому, для записи на листы, то сначала сделайте резервную копию всего, так как в итоге вы можете записать неверные данные на все листы.
Sub NazvVsehStr()

    ' Печатает рабочую книгу и названия листов для
    ' всех листов в открытых рабочих книгах
    Dim wrk As Workbook
    Dim sht As Worksheet
    For Each wrk In Workbooks
        For Each sht In wrk.Worksheets
            Debug.Print wrk.Name + ":" + sht.Name
        Next sht
    Next wrk

End Sub
Использование коллекции листов
Рабочая книга имеет еще одну коллекцию, похожую на Worksheets под названием Sheets. Это иногда путает пользователей. Чтобы понять, в первую очередь, вам нужно знать о типе листа, который является диаграммой.
В Excel есть возможность создать лист, который является диаграммой. Для этого нужно:
- Создать диаграмму на любом листе.
- Щелкнуть правой кнопкой мыши на графике и выбрать «Переместить».
- Выбрать первый вариант «Новый лист» и нажмите «ОК».
Теперь у вас есть рабочая книга, в которой есть типовые листы и лист-диаграмма.
- Коллекция «Worksheets » относится ко всем рабочим листам в рабочей книге. Не включает в себя листы типа диаграммы.
- Коллекция Sheets относится ко всем листам, принадлежащим книге, включая листы типовой диаграммы.
Ниже приведены два примера кода. Первый проходит через все
листы в рабочей книге и печатает название листа и тип листа. Второй пример
делает то же самое с коллекцией Worksheets.
Чтобы опробовать эти примеры, вы должны сначала добавить лист-диаграмму в свою книгу, чтобы увидеть разницу.
Sub KollSheets()

    Dim sht As Variant
    ' Показать название и тип каждого листа
    For Each sht In ThisWorkbook.Sheets
        Debug.Print sht.Name & " is type " & TypeName(sht)
    Next sht

End Sub

Sub KollWorkSheets()

    Dim sht As Variant
    ' Показать название и тип каждого листа
    For Each sht In ThisWorkbook.Worksheets
        Debug.Print sht.Name & " is type " & TypeName(sht)
    Next sht

End Sub
Если у вас нет листов диаграмм, то использование коллекции Sheets — то же самое, что использование коллекции WorkSheets.
Заключение
На этом мы завершаем статью о Worksheet VBA. Я надеюсь, что было полезным.
Три наиболее важных элемента Excel VBA — это рабочие книги, рабочие таблицы, диапазоны и ячейки.
Эти элементы будут использоваться практически во всем, что вы делаете. Понимание их сделает вашу жизнь намного проще и сделает изучение VBA увлекательнее.