
When attempting to apply shading to tables, you may meet with the problem that one or more cells are not totally filled with the shading color – white space occurs, e.g. at the bottom of the cell.
This article explains what can cause problems with white space instead of the expected shading color and how to repair it.
About applying shading
You can apply shading to selected table cells via the Borders and Shadingdialog box which you can open via Format > Borders and Shading (see Figure 1 below).
In case of Word 2007 or later version, you can open the dialog box as follows: Home tab > Paragraph group, click the arrow next to the bottom-right icon in the group and select Borders and Shading. You may also find Borders and Shading in the right-click menu.
On the Shading tab, you must select the color to apply. In addition, you must always remember to make the appropriate selection in the Apply to field. In relation to tables, you can apply the shading to:
- Text (only available if you have selected text in the table)
- Paragraph
- Cell
- Table
Select the Table option if you want to apply shading to the entire table. If you want to apply shading to only some of the cells, select the Cell option whenever you want the shading to fill the entire cell. As you will see below, the Paragraph option may also in some situations result in filled cells.

Figure 1. The Borders and Shading dialog box with the four Apply to options.
Paragraph shading – what are the results?
If you apply shading to the paragraphs in a table cell, the shading will fill the entire cell if all of the following paragraph settings apply:
- Left and right indent = 0
- Paragraph space before = 0
- Paragraph space after = 0
- All cells in the same row have no cell margins
If one or more of the settings listed above do not apply, white space will occur in the table cell.
Space before and after and left and right indentation are defined via Format > Paragraph > Indents and Spacing tab.
In case of Word 2007 or later version, you can open the Paragraph dialog box as follows: Home tab > Paragraph group > click the little icon in the bottom-right corner of the group.

Figure 2. The Paragraph dialog box.
In case of Word 2007 or later version, you can open the Table Propertiesdialog box as follows: while the insertion point is in a table, select the Layout tab > Table group > Properties. You may also find Table Properties in the right-click menu when the selection is in a table.
Cell margins for the entire table can be set via Table > Table Properties > Table tab > Options.

Figure 3. The Table Options dialog box (opened from the Table tab).
Cell margins for individual cells can be set via Table > Table Properties > Celltab > Options.

Figure 4. The Cell Options dialog box (opened from the Cell tab).
When will white space occur in table cells with paragraph shading?
As illustrated in the examples below, white space occurs in the table cell in the following situations:
- Left and/or right indent is added to the paragraph(s)
- Space is added before and/or after the paragraph(s)
- Left and/or right cell margins are applied to the cell
- Top and/or bottom margins are applied to at least one cell in the row

Figure 5. Paragraph shading – examples. Note that the text in the upper-left cell consists of one paragraph which has been applied the listed settings.
Cell shading – what are the results?
If you apply shading to a cell in a table, the shading will fill the entire cell if the following settings apply:
- All cells in the same row have the same bottom cell margin
Cell margins for the entire table can be set via Table > Table Properties > Table tab > Options. See Figure 3 above.
Cell margins for individual cells can be set via Table > Table Properties > Celltab > Options. See Figure 4 above.
When will white space occur in table cells with cell shading?
NOTE: The white space issues illustrated below seem to apply only to Word 2003 and earlier versions. In Word 2007 and later versions, table cells seem to be filled correctly.
As illustrated in the examples below, white space occurs in the table cell in the following situation:
- Different bottom cell margins are applied to the cells in the same row
As can be seen from the examples below, space added before and/or after the paragraphs do not result in white space in the cell.
Note that left and/or right indentation of the paragraph(s) does not result in white space to the left and/or right. Also, any left and/or right margins added to the table cell via Table > Table Properties will not result in white space.

Figure 6. Cell shading – examples. Note that the text in the upper-left cell consists of one paragraph which has been applied the listed settings. As mentioned above, the cell shading white space issues only seem to occur in Word 2003 and earlier versions.
What happens if you apply mixed shading to a cell?
Not only can you apply different types of shading to table cells. You can also apply different types of shading to the same cell at the same time. This may make it more difficult to find out what causes white space in cells.
Imagine you have applied shading to the paragraphs in a table cell. The cell has white space so you find out that you should have applied the shading to the cell, not the paragraphs. Therefore, you select the cell, open the Borders and Shading dialog box, select the same color as applied to the paragraphs, select Cell in the Apply to field and click OK. You may then find that your table cell still has white space because the shading of the paragraphs is still in effect.
In Figure 7 below, this is illustrated by applying different colors. The upper-left cell is shaded yellow. The pink text is in a separate paragraph that has been applied text shading. The green and blue texts are individual paragraphs that have been applied paragraph shading. Since space has been added above/below those paragraphs, white space occurs even if shading has been applied to the entire cell.
NOTE: The white space issues illustrated below seem to apply only to Word 2010 and earlier versions. In Word 2013 and later versions, table cells seem to be filled correctly.

Figure 7. Example of the result if a mixture of shading types is applied to the same cell.
If the same shading color is used for all shading in the example above, the result is as illustrated in Figure 8 below:

Figure 8. The same example as in Figure 7 with the difference that only one color is used. In this case, it is difficult to find out what causes the white space.
Cell shading and paragraph styles with border(s)
White space in shaded table cells may also appear if you apply a paragraph style with one or more borders and space before/after. If that problem occurs, you need to remove the border(s) in order to solve the problem.
For details about how and when the white space appears when a bordered paragraph style is used, study the examples illustrated in Figure 9 below.
NOTE: The white space issues illustrated below seem to apply only to Word 2010 and earlier versions. In Word 2013 and later versions, table cells seem to be filled correctly.
Each example shows only a single table cell wth a black table border. The text in each table cell has been applied a paragraph style with one or more borders. The paragraph borders are red and blue. See the text in each example for further details.
 may cause white space")
Figure 9. Using a paragraph style with border(s) may cause white space in table cells. As mentioned above, the cell shading white space issues in relation to borders only seem to occur in Word 2010 and earlier versions.
Tips on how to repair the shading if white space occurs
As illustrated above, you may find confusing results if you have a mixture of shading types applied to the same table cell.
Therefore, if you have problems with shading that does not fill one or more cells as expected, it would be an idea to:
- First remove all shading from the cell in question
- Reapply shading to the table cell
In case of Word 2003 or earlier version:
- Make sure that all the cells in the row have the same bottom margin
Since the problem may also be caused by using paragraph styles with border(s), check for such paragraph borders and remove them if needed.
Related information
You will find details about working with tables in the article Table basics found at the Word MVP site.


Did you know that…
DocTools Word Add-Ins
can help you save time in Word
On my website wordaddins.com you will find some of the Word Add-Ins I have developed, ready for use:
Generate complete documents in seconds from re-usable text or graphics — read more…
helps you manage comments in Word fast and easy – review comments, extract comments, etc. — read more…
Makes it easier than ever to work with cross-references in Word documents — read more…
Lets you manage document data efficiently with custom document properties and DocProperty fields — read more…
Lets you extract insertions, deletions and comments in full context and including headings — read more..
Lets you apply or remove any highlight color by the click of a button — read more…
Browse pages, headings, tables, graphic, etc. and find text in Word with a single click — read more…
Browse pages, headings, tables, graphic, etc. and find text in Word with a single click — read more…
Lets you quickly and easily create screen tips in Word with up to 2040 characters — read more…
Show or Hide White Space in Microsoft Word Documents
by Avantix Learning Team | Updated February 9, 2022
Applies to: Microsoft® Word® 2010, 2013, 2016, 2019 or 365 (Windows)
You can show or hide white space at the top and bottom of pages in Microsoft Word documents. If you hide white space, you won’t be able to see headers, footers or top and bottom margins in Print Layout View. The gray space that typically appears at the top and bottom of pages as you scroll through your document will also disappear. If you want to show or hide spaces between words, you’ll need to click Show/Hide ¶ on the Home tab in the Ribbon.
Print Layout View is the default view in Word. You can click the View tab in the Ribbon and select Print Layout in the Views group to go to this view if necessary.
In Word documents, margins are set for the top and bottom of pages by default and can be changed on the Layout tab in the Ribbon. Headers and footers appear in the top and bottom margin areas (with the exception of floating objects) so if white space is hidden, headers and footers may seem to be missing.
Recommended article: How to Hide Comments in Word (or Display Them)
Do you want to learn more about Microsoft Word? Check out our virtual classroom or live classroom Word courses >
Showing or hiding white space using a shortcut
To show or hide white space in Word using a shortcut:
- Position the cursor at the top of the document (you can press Ctrl + Home to move the cursor to the top of the document).
- Move the pointer into the gray area just above the first page (below the Ruler) until the pointer turns into an up and down arrow. A message appears to Double-click to show white space or Double-click to hide white space.
- Double-click. If you are hiding white space, you can also position the pointer in the gray area between pages and then double-click.
If you show or hide white space, this setting will continue in any new documents you create. When white space is hidden, the setting affects not just the white space between pages but anything that is part of the header or footer (including watermarks and other graphics anchored to the header or footer). When you save and close a document, the setting is retained in the document.
If you hide white space, page breaks are still visible in the document. If you print the document, the headers and footers will print even if white space is hidden.
Showing or hiding white space using the Options dialog box
To show or hide white space using the Word Options dialog box:
- Open a Word document where you want to show or hide white space.
- Click the File tab in the Ribbon.
- Select Options. A dialog box appears.
- In the categories on the left, select Display.
- In the pane on the right, check or uncheck Show whitespace between pages in Print Layout view.
- Click OK.
The Options dialog box, with the Display category selected, appears as follows:

Because this feature isn’t obvious, it can cause problems for users if areas in their document seem to be missing (such as headers or footers).
Subscribe to get more articles like this one
Did you find this article helpful? If you would like to receive new articles, join our email list.
More resources
14+ Word Selection Shortcuts to Quickly Select Text
How to Remove Hard Returns in Word Documents
How to Superscipt or Subscript in Word (with Shortcuts)
How to Insert the Not Equal Sign in Word (5 Ways to Type or Insert ≠)
How to Insert or Type the Degree Symbol in Word (5 Ways to Insert °)
Related courses
Microsoft Word: Intermediate / Advanced
Microsoft Excel: Intermediate / Advanced
Microsoft PowerPoint: Intermediate / Advanced
Microsoft Word: Long Documents Master Class
Microsoft Word: Styles, Templates and Tables of Contents
Microsoft Word: Designing Dynamic Word Documents Using Fields
VIEW MORE COURSES >
To request this page in an alternate format, contact us.
Our instructor-led courses are delivered in virtual classroom format or at our downtown Toronto location at 18 King Street East, Suite 1400, Toronto, Ontario, Canada (some in-person classroom courses may also be delivered at an alternate downtown Toronto location). Contact us at info@avantixlearning.ca if you’d like to arrange custom instructor-led virtual classroom or onsite training on a date that’s convenient for you.
Copyright 2023 Avantix® Learning
Microsoft, the Microsoft logo, Microsoft Office and related Microsoft applications and logos are registered trademarks of Microsoft Corporation in Canada, US and other countries. All other trademarks are the property of the registered owners.
Avantix Learning |18 King Street East, Suite 1400, Toronto, Ontario, Canada M5C 1C4 | Contact us at info@avantixlearning.ca
On the Page Layout or Layout tab, click Columns. At the bottom of the list, choose More Columns. In the Columns dialog box, adjust the settings under Width and spacing to choose your column width and the spacing between columns.
Contents
- 1 How do I change the column width in Word without affecting other cells?
- 2 How do I reduce the space between rows in a table in Word?
- 3 How do I remove spaces after columns in Word?
- 4 How do I increase the space between two columns?
- 5 How do I format a section into two columns in Word?
- 6 How do you change the width of a column without changing the whole?
- 7 How do you change the width and height of a column in Word?
- 8 How do you change column width in pages?
- 9 How do I fix the spacing between words in Word?
- 10 How do I get rid of the white space after a table in Word?
- 11 How do you get rid of extra spaces in Word?
- 12 How do I remove spaces from a column?
- 13 How do you do a section break?
- 14 What can I use instead of a grid gap?
- 15 What is the space between two columns called?
- 16 How do you add space between columns in CSS?
- 17 How do you change the column style of the paragraph to two columns?
- 18 How do I fix columns in Word?
- 19 How do I resize individual cell size in a Word table separately from the other cells?
- 20 How do I change the width of only one cell in Word?
How do I change the column width in Word without affecting other cells?
Case 1: Adjust the Width of One Column without Affecting Others
- First, click “View” tab and then check the “Ruler” box in “Show” group.
- Next you can see the ruler on the top of the document. And there are tabs on the ruler above each column border. Click on one of these tabs to adjust a specific column.
How do I reduce the space between rows in a table in Word?
Follow these steps:
- Select the entire table. (You can choose Select Table from the Table menu.)
- Choose Cell Height and Width from the Table menu. This displays the Cell Height and Width dialog box.
- Make sure the Column tab is selected.
- Adjust the Space Between Columns setting, as desired.
- Click on OK.
How do I remove spaces after columns in Word?
Main Menu > Format > Columns. when window opens you can adjust the spacing between the columns and put a divider lines between each as well.
How do I increase the space between two columns?
- Specify a 40 pixels gap between the columns: div { column-gap: 40px; } Try it Yourself »
- Divide the text in a element into three columns: div { column-count: 3; } Try it Yourself »
- Specify the width, style, and color of the rule between columns: div { column-rule: 4px double #ff00ff; } Try it Yourself »
How do I format a section into two columns in Word?
On the Layout tab, click Columns, then click the layout you want.
- To apply columns to only part of your document, with your cursor, select the text that you want to format.
- On the Layout tab, click Columns, then click More Columns.
- Click Selected text from the Apply to box.
How do you change the width of a column without changing the whole?
To use AutoFit, click a cell in the row or column you want to change. Within the ribbon menu, click “Home.” Under “Cells,” click the “Format” button. Under “Cell Size” click “AutoFit Column Width” or “AutoFit Row Height” as desired.
How do you change the width and height of a column in Word?
Resize rows, columns, or cells
- Select the table. The contextual tabs, Table Design and Layout, appear in the ribbon.
- On the Layout tab, you can specify the custom height and width. To resize specific rows or column, click on a cell and then adjust the row/column.
How do you change column width in pages?
Click a cell in the row or column you want to resize. In the Format sidebar, click the Table tab. In Row & Column Size, click the Height and Width arrows to set the size you want. The entire row or column is resized.
How do I fix the spacing between words in Word?
Change the spacing between characters
- Select the text that you want to change.
- On the Home tab, click the Font Dialog Box Launcher, and then click the Advanced tab.
- In the Spacing box, click Expanded or Condensed, and then specify how much space you want in the By box.
How do I get rid of the white space after a table in Word?
Go to Format | Paragraph. Click the Indents And Spacing tab. In the Spacing section, change any spacing before or after the paragraph to 0. Click in the Line Spacing box, select Single and then click OK.
How to remove multiple extra spaces between words in Word
- Please press Ctrl + H to display the Find and Replace dialog.
- Press More button to show more options.
- After finish the settings, click Replace All to remove all extra spaces between words from the whole document.
How do I remove spaces from a column?
Remove all spaces between numbers
- Press Ctrl + Space to select all cells in a column.
- Press Ctrl + H to open the “Find & Replace” dialog box.
- Press Space bar in the Find What field and make sure the “Replace with” field is empty.
- Click on the “Replace all” button, and then press Ok. Voila! All spaces are removed.
How do you do a section break?
Add a section break
- Select where you want a new section to begin.
- Go to Layout > Breaks.
- Choose the type of section break you want: Next Page Section break starts the new section on the following page. Continuous Section break starts the new section on the same page.
What can I use instead of a grid gap?
‘grid-gap’ has been deprecated in favor of ‘gap’. In a similar vein ‘grid-row-gap‘ and ‘grid-column-gap’ have been deprecated in favor of ‘row-gap’ and ‘column-gap’.
What is the space between two columns called?
Column gutter: The space between columns of type.
How do you add space between columns in CSS?
The space between two rows in a
can be added by using the CSS border-spacing and border-collapse properties
How do you change the column style of the paragraph to two columns?
Select the Page Layout tab, then click the Columns command. A drop-down menu will appear. Select the number of columns you want to create. The text will format into columns.
How do I fix columns in Word?
To fit the columns to the text (or page margins if cells are empty), click [AutoFit] > select “AutoFit Contents.” To fit the table to the text, click [AutoFit] > select “AutoFit Window.” To keep Word from automatically adjusting your column size, click [AutoFit] > select “Fixed Column Width.”
How do I resize individual cell size in a Word table separately from the other cells?
If you’re using windows, you can resize individual table cells by using ctrl+alt+left or right arrow keys.
How do I change the width of only one cell in Word?
I may have it! If you right click the cell to the left of the one you want to extend, choose Column > Width and change the number in in the “Width” box. This will free up the edge of your cell and allow you to drag it to where you want it.
. The border-spacing property is used to set the spaces between cells of a table, and the border-collapse property specifies whether the border of the table is collapsed or not.
- Remove From My Forums
-
Question
-
Hi,
One of my coworkers just gave me a document in which she had somehow managed to add extra white space above and below text in table cells. I cannot find any way to remove this space.
- It’s not cell margins (all set to 0).
- It’s not paragraph-based line spacing.
- It’s not any kind of bordering or shading (okay, I was getting a little desperate even checking this…).
Can anyone tell me how to delete this extra space? Or even recognize what this is, for that matter?
Here’s a pic of the table with the cell text all highlighted:

Here’s a copy of the file on SkyDrive: http://sdrv.ms/KVCvwK
We work in .doc files in Word 2010 and 2003.
Thank you!
Answers
-
The first cell (with rotated text) has top and bottom margins of 0.19 cm and this somehow affects the entire table (no idea why — looks like a bug). If you reduce the top and bottom margins for this cell to 0, the rest of the table will behave normally.
Regards, Hans Vogelaar
-
Marked as answer by
Tuesday, June 5, 2012 4:44 AM
-
Marked as answer by
Cell Margins and Cell Spacing are two important settings in any Microsoft Word Table but they aren’t used much and not well understood.
Cell margins are the spaces between your text and the edge of the cell. They can be set separately for the top, bottom, and either side of the cells.
To change the cell margins, we again click in the table and go to the Layout tab on the right. Then click Cell Margins in the Alignment group.
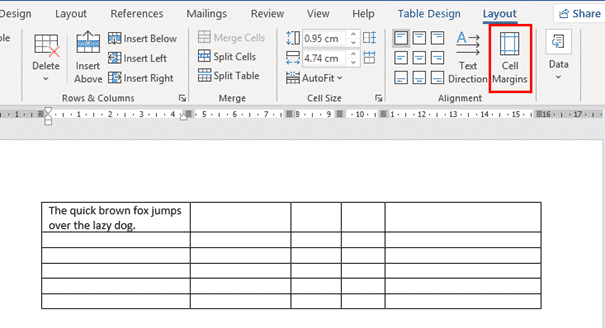
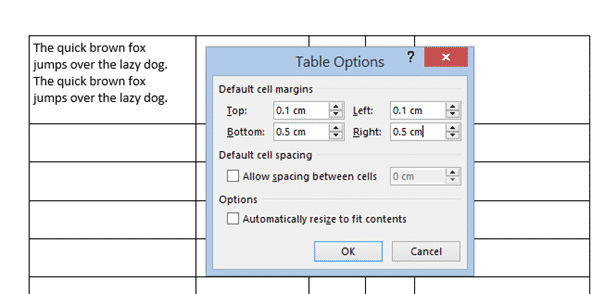
In the Table Options dialog that opens, use the spinners to incrementally change each of the four margins, or simply type in the margin that you want into each field; Top, Bottom, Left or Right.

The margins we’ve selected above are quite large, just to show you clearly how his setting changes your table. Here’s the large cell margins (left) compared to zero cell margins (right).

You can, of course have different margins on different sides:
Individual, Row or Column Cell Margins
Table cell margins can be changed for a row, column or even a single cell, but it’s nowhere near the main Cell Margins ribbon button.
Select the column, row or cell you want to change then go to Table Layout | Table | Properties | Cell | Options. UNcheck the box ‘Same at the whole table’ then change the margin settings.

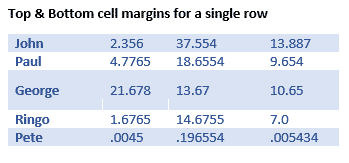
Here’s a single row, highlighted a little by increasing the top & bottom cell margins.
Why Adjust Table Cell Margins?
Cell margins are useful to separate lines in a table, especially when there’s no gridlines. Change the Top & Bottom cell margins to separate the lines and improve readability.

When space is tight, reducing the default left & right cell margins can help fit a table or contents into the available space.
Cell Spacing Tricks in Word Tables
Word’s Table Options have an interesting choice, Cell Spacing. While cell margins are the space between the text and the edge of the cell, cell spacing puts space around each of the cells.
Cell spacing has a surprising effect on the look of a Word Table with single line borders.
Go to Table | Alignment | Cell Margins | Default cell spacing | Allow spacing between cells.
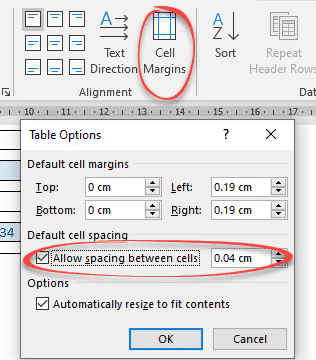
The default is OFF with no spacing.
Here’s how a Table looks using a standard single line border but increasing the cell spacing from the default, Zero.

Changes to Table Borders
As you can see, the single line table border becomes a twin gridline just by adding cell spacing to the same table.

Word table with Footnotes
Merge Cells in Word tables
Word tables for formatting magic
Indexing ‘bug’ in Word tables