
On a touch-enabled device, draw with your finger, a digital pen, or a mouse.
Available inking features depend on the type of device you’re using and which version of Office you’re using.
Please start by choosing your version of Office:

|
If your device is touch-enabled, the Draw tab is turned on automatically. Otherwise, turn it on by selecting File > Options > Customize Ribbon > Draw. |
Write, draw, or highlight text
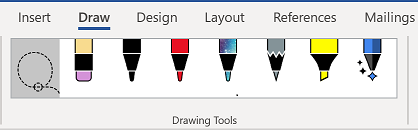
The new pen set is customizable and portable. You define the pens you want to have, and they are then available in Word, Excel, and PowerPoint.
-
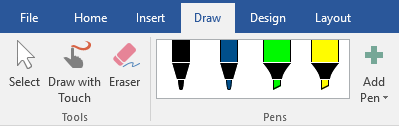
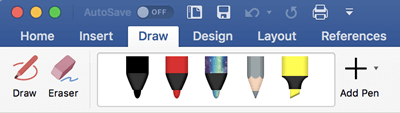
On the Draw tab of the Ribbon, tap a pen to select it.

In Word, you must be in Print layout to draw with ink. If the Draw tab is grayed out so that you can’t select a pen, go the View tab and select Print Layout.
In Outlook, first tap the body of the message and insert a drawing canvas
; then you can select a pen to draw with. -
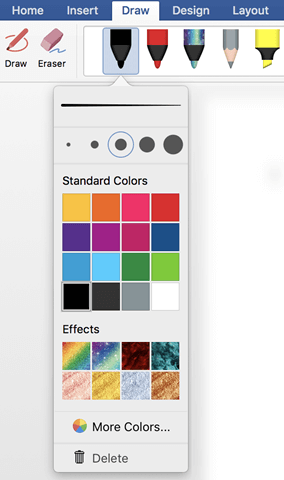
Tap again to open the menu of Thickness and Color options for the pen. Select your preferred size and color.
-
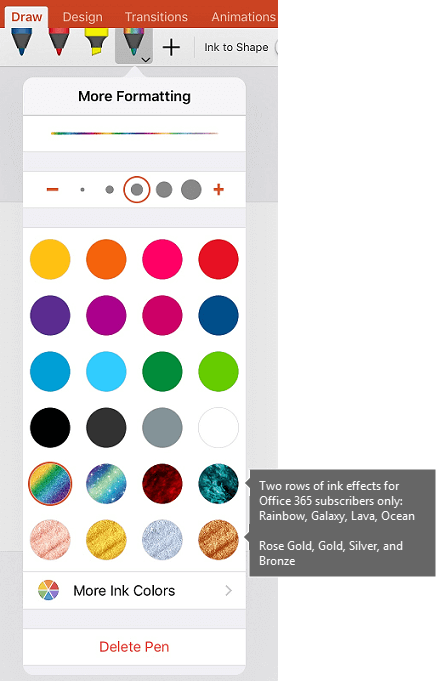
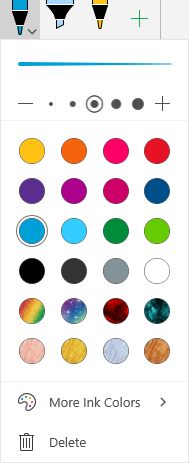
There are five pen thickness settings ranging from .25 mm to 3.5 mm. Select a thickness or use the plus or minus sign to make your pen thicker or thinner.
-
Sixteen solid colors are available on the menu, with more available when you tap More Colors.
-
Eight effects are also available: Rainbow, Galaxy, Lava, Ocean, Rose Gold, Gold, Silver, and Bronze.
-
-
A Pencil texture is also available:
When you draw with the Pencil texture while using a supported digital stylus, you can tilt the stylus to get a «shading» effect, just like you would get with a real pencil.
-
On the touch screen, begin writing or drawing.
Once you have drawn an ink shape, it behaves like any shape that you are used to working with in Office. You can select the shape, then you can move or copy it, change its color, pivot its position, and so on.
-
To stop inking and select your annotations, press the Esc key.
 ; then you can select a pen to draw with.
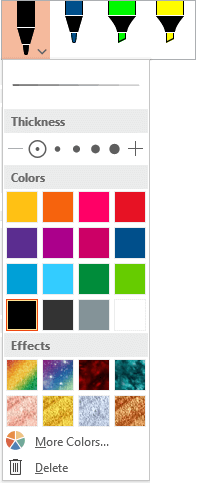
Convert ink to text or shapes
Word or Excel: See Convert ink to shapes in Office
PowerPoint: See Convert ink to text or shapes in PowerPoint for Microsoft 365.
More features
Select a heading below to open it and see the detailed instructions.
-
Under Draw > Tools, tap the Eraser.
(In PowerPoint for Microsoft 365, you can choose from different sizes of erasers. Word has three eraser options. Tap the down arrow on the Eraser button to pick the eraser that you want.)
-
With your pen or finger, drag the eraser over the ink you want to remove.
With the Segment Eraser in PowerPoint, you can simply tap a segment of ink or drag across it to remove it (rather than having to thoroughly wipe away the entire segment). Dragging across segments is an easy way to erase several at once.
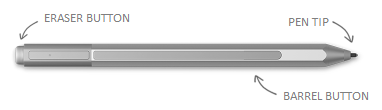
Some active pens, such as the Surface pen, have an eraser that you can also use to erase digital ink.
All apps include a Draw tool on the Draw tab of the Ribbon for switching between inking mode and selection mode.
There is also an ink selection tool, Lasso Select,  or
or  for specifically for selecting objects drawn with ink. It’s most useful when you have a mixture of standard and ink objects and you only want to select an ink object.
Applies only to Word, PowerPoint, and Excel:
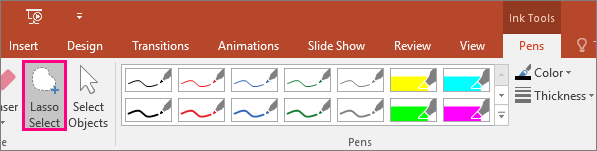
To select part of a drawing or words written in ink, use the Lasso Select tool. (This tool can’t select non-ink objects—that is, shapes, pictures, etc.)
-
Under Draw > Tools on the Ribbon, tap Lasso Select
or . -
With your pen or finger, drag to draw a circle around the part of the drawing or word that you want to select. A faded, dashed selection region appears around it, and when you’re done, the portion you lassoed is selected. Then you can manipulate that object as you wish: move it, change its color, and so on.

In both Excel and PowerPoint, with a digital pen, you can select an area without even tapping the selection tool on the ribbon. Use the supported digital pen button to Lasso Select ink without visiting the ribbon. Then you can use the pen to move, resize, or rotate the ink object.
-
On the File menu, select Options, and then select Advanced.
-
In the Pen section, select the box next to Use pen to select and interact with content by default.
This setting only applies to the app in which you make it, so, for example, you can have automatic inking turned on in Visio and turned off in Word.

|
If your device is touch-enabled, the Draw tab is turned on automatically. Otherwise, turn it on by selecting File > Options > Customize Ribbon > Draw. |
Write, draw, or highlight text
The new pen set is customizable and portable. You define the pens you want to have, and they are then available in Word, Excel, and PowerPoint.
-
On the Draw tab of the Ribbon, tap a pen to select it.
In Word, you must be in Print layout to draw with ink. If the Draw tab is grayed out so that you can’t select a pen, go the View tab and select Print Layout.
-
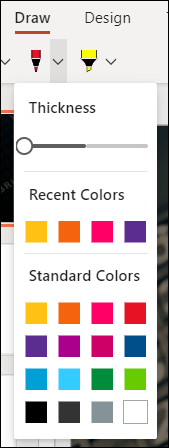
Tap again to open the menu of Thickness and Color options for the pen. Select your preferred size and color.
-
There are five pen thickness settings ranging from .25 mm to 3.5 mm. Select a thickness or use the plus or minus sign to make your pen thicker or thinner.
-
Sixteen solid colors are available on the menu, with more available when you tap More Colors.
-
-
A Pencil texture is also available:
When you draw with the Pencil texture while using a supported digital stylus, you can tilt the stylus to get a «shading» effect, just like you would get with a real pencil.
-
On the touch screen, begin writing or drawing.
Once you have drawn an ink shape, it behaves like any shape that you are used to working with in Office. You can select the shape, then you can move or copy it, change its color, pivot its position, and so on.
-
To stop inking and select your annotations, either to modify or move them, pick Select
on the Draw tab.
Convert ink to text or shapes
See Convert ink to text or shapes in PowerPoint for Microsoft 365.
More features
Select a heading below to open it and see the detailed instructions.
-
Under Draw > Tools, tap the Eraser.
(In PowerPoint for Microsoft 365, you can choose from four erasers. Tap the down arrow on the Eraser button to pick the eraser that you want.)
-
With your pen or finger, drag the eraser over the ink you want to remove.
With the Segment Eraser in PowerPoint, you can simply tap a segment of ink or drag across it to remove it (rather than having to thoroughly wipe away the entire segment). Dragging across segments is an easy way to erase several at once.
Some active pens, such as the Surface pen, have an eraser that you can also use to erase digital ink.
When you’ve been drawing with ink, you can use Stop Inking  on the Draw tab to change the mouse pointer back to a standard selection tool
  . The selection tool can select digital ink drawings and any other kind of objects.
PowerPoint and Excel also have an ink selection tool, Lasso Select,  specifically for selecting objects drawn with ink. It’s most useful when you have a mixture of standard and ink objects and you only want to select an ink object.
Applies only to PowerPoint and Excel:
To select part of a drawing or words written in ink, use the Lasso Select tool. (This tool can’t select non-ink objects—that is, shapes, pictures, etc.)
-
Under Draw > Tools on the Ribbon, tap Lasso Select
. -
With your pen or finger, drag to draw a circle around the part of the drawing or word that you want to select. A faded, dashed selection region appears around it, and when you’re done, the portion you lassoed is selected. Then you can manipulate that object as you wish: move it, change its color, and so on.
In both Excel and PowerPoint, with a digital pen, you can select an area without even tapping the selection tool on the ribbon. Use the supported digital pen button to Lasso Select ink without visiting the ribbon. Then you can use the pen to move, resize, or rotate the ink object.
-
Select File > Options > Advanced.
-
In the Pen section, select the box next to Use pen to select and interact with content by default.
This setting only applies to the app in which you make it. So, for example, you can have automatic inking turned on in Visio and turned off in Word.
Find the drawing tools
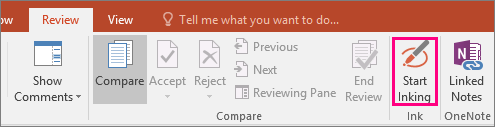
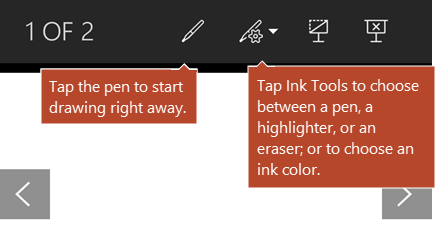
Go to the Review tab and select Start Inking to display the Ink Tools and Pens tab.
Write or draw
-
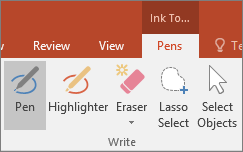
Under Ink Tools >Pens choose Pen.
-
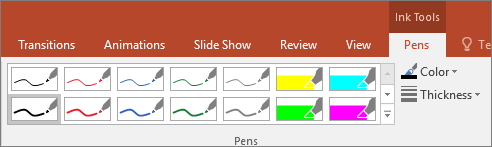
To change the ink color and stroke width, point to the color and width (0.35mm — 0.5mm) you want.
-
On the touch screen, begin writing or drawing.
Highlight text
-
Under Ink Tools, on the Pens tab, click Highlighter, and then pick a highlight color.
-
Point and drag your pen or finger over the text that you want to highlight.
You can highlight text in Excel, Word, and Outlook, but PowerPoint doesn’t support highlighting text.

Delete whole written words or ink drawings
-
Under Ink Tools, on the Pens tab, click the arrow below Eraser, and then pick an eraser size.
-
With your pen or finger, select the word or ink drawing that you want to erase.

Drawing in OneNote
If you’re using OneNote and want to draw, see these other articles:
 OneNote for Windows 10: Write notes and draw in OneNote
 OneNote: Draw and sketch notes on a page
Extra features in PowerPoint
Select parts of an ink drawing or written words (PowerPoint only)
To select part of a drawing or some written words, use the Lasso tool. (You cannot use the Lasso tool to select non-ink objects (shapes, pictures, etc.).
-
Under Ink Tools, on the Pens tab, click Lasso Select.
-
With your pen or finger, drag to draw a circle around the part of the drawing or word that you want to select. A faded, dashed selection region appears around it, and when you’re done, the portion you lassoed will be selected.
Delete parts of an ink drawing or parts of written words (PowerPoint only)
-
Under Ink Tools, on the Pens tab, click the arrow below Eraser, and then pick an eraser size.
-
With your pen or finger, select parts of the ink drawing or text that you want to erase.
Convert ink drawings to shapes (PowerPoint only)
You can convert ink drawings on a touch screen into common shapes.
-
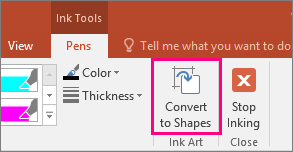
Under Ink Tools > Pens, select Convert to Shapes.
-
With a pen or your finger, draw a shape on the slide, and PowerPoint automatically converts your drawing to the shape that looks most like it.
To stop converting shapes, click Convert to Shapes again.
Which shapes can PowerPoint convert?
When you create an ink drawing, PowerPoint can convert it to the shape that is most like it.
|
Ink drawing |
Corresponding shape |
|---|---|
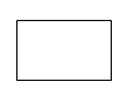
|
Rectangle
|
Rectangle
|
|
Square
|
Rectangle with all sides equal
|
|
Diamond
|
Diamond
|
|
Parallelogram
|
Parallelogram
|
|
Trapezoid
|
Trapezoid
|
|
Irregular quadrilateral
|
Closed freeform shape with four sides
|
|
Regular pentagon
|
Pentagon with all sides equal
|
|
Regular hexagon
|
Hexagon with all sides equal
|
|
Ellipse
|
Ellipse
|
|
Circle
|
Ellipse with shape height and width equal
|
|
Single-headed arrow
|
Arrow
|
|
Double-headed arrow
|
Double arrow
|
|
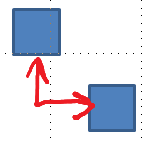
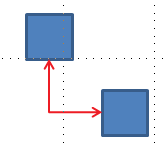
Arrows connecting two shapes
|
Arrow connectors
|
|
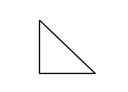
Right triangle
|
Triangle with right angle
|
|
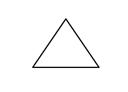
Equilateral triangle
|
Triangle with all sides equal
|
|
Isosceles triangle
|
Triangle with two equal sides
|
|
Irregular triangle
|
Closed freeform with three sides. |


For more information about using Office with Windows touch devices, see the following:
-
Office Touch Guide
-
Read documents in Word
Write, draw, or highlight text
 On the Mac, these features are only available in Microsoft 365 and Office 2019 for Mac.
-
On the Draw tab of the Ribbon, tap a pen to select it.
-
Tap again to open the menu of Thickness and Color options for the pen. Select your preferred size and color.
-
There are five pen thickness settings ranging from .25 mm to 3.5 mm. Select a thickness to make your pen thicker or thinner.
-
Sixteen solid colors are available on the menu, with more available when you tap More Colors.
-
Eight effects are also available: Rainbow, Galaxy, Lava, Ocean, Rose Gold, Gold, Silver, and Bronze.
-
-
A Pencil texture is also available:
When you draw with the Pencil texture while using a supported digital stylus, you can tilt the stylus to get a «shading» effect, just like you would get with a real pencil.
-
Once you have drawn an ink shape, it behaves like any shape that you are used to working with in Office. You can select the shape, then you can move or copy it, change its color, pivot its position, and so on.
-
To stop inking and select your annotations, press the Esc key.
Touch drawing with a trackpad
Rather than drawing ink with your mouse, you can draw on a trackpad with your finger. See Use your trackpad for «touch» drawing for more information.
Erase ink
-
Under Draw > Tools, tap the Eraser.
(In PowerPoint for Microsoft 365 for Mac, you can choose from different sizes of erasers. Word has three eraser options (version 16.28 or newer). Tap the down arrow on the Eraser button to pick the eraser that you want.)
-
With your mouse, pen, or finger, drag the eraser over the ink you want to remove.
Additional procedures
Select a heading below to open it and see the detailed instructions.
PowerPoint and Excel also have an ink selection tool, Lasso Select, specifically for selecting objects drawn with ink. It’s most useful when you have a mixture of standard and ink objects and you only want to select an ink object.
Applies only to PowerPoint and Excel:
To select part of a drawing or words written in ink, use the Lasso Select tool. (This tool can’t select non-ink objects—that is, shapes, pictures, etc.)
-
Under Draw > Tools on the Ribbon, tap Lasso Select
. -
With your mouse, pen, or finger, drag to draw a circle around the part of the drawing or word that you want to select. A faded, dashed selection region appears around it, and when you’re done, the portion you lassoed is selected. Then you can manipulate that object as you wish: move it, change its color, and so on.
-
On the PowerPoint, Word, or Excel menu, select Preferences > Authoring and Proofing Tools > General.
-
In the Pen section, clear the box next to Use pen to select and interact with content by default.
This setting only applies to the current app. So, for example, you can have automatic inking turned on in Excel and turned off in Word.
Basic inking tools
Word for iOS, Excel for iOS, and PowerPoint for iOS all come with basic inking options on the Draw tab: a selection tool, a draw-with-touch tool, a stroke eraser, pens, multiple ink colors, and ink thickness options:

 If you’re working in OneNote on your iPad, see Handwrite, draw, and sketch.
Draw or write
By default, Draw with Mouse or Touch (or «Inking mode») is turned on when you are using a mobile device. Just tap the Draw tab, select a pen  , and you can begin drawing ink on a slide.
To change the settings on a pen:
-
Tap again to open the menu of thickness and color options for the pen. Select your preferred size and color:
-
There are five pen thickness settings ranging from .25 mm to 3.5 mm. Select a thickness or use the plus or minus sign to make your pen thicker or thinner.
-
Sixteen solid colors are available on the menu, with more available when you tap More Ink Colors.
-
(For Microsoft 365 subscribers only) Eight effects are also available: Rainbow, Galaxy, Lava, Ocean, Rose Gold, Gold, Silver, and Bronze.
A Pencil texture is now available:
The Apple Pencil is sensitive to pressure, which allows you to vary line thickness. It’s also sensitive to tilt, which allows you to create shading, as you can with a tilted lead pencil.
-
-
On the touch screen, begin writing or drawing.
Once you have drawn an ink shape, it behaves like any shape that you are used to working with in Office. You can select the shape, then you can move or copy it, change its color, pivot its position, and so on.
-
To stop inking and select your annotations, either to modify or move them, turn off Draw with Touch on the Draw tab. Turning off this feature also keeps you from making accidental ink marks when your hand touches the screen.

Watch a video overview of the inking features in iPhone and iPad:

2:47
Select
On an iOS device, Inking mode is turned on when you have selected a pen or highlighter on the Draw tab. Otherwise, you are in Select mode, and you can tap to select an object.
(If you’re using an Apple Pencil on an iPad Pro device, you can make Select mode the default by going to app settings.)
PowerPoint and Excel have an ink selection tool, Lasso Select,  specifically for selecting objects drawn with ink. It’s most useful when you have a mixture of standard and ink objects on a slide and you only want to select an ink object.
To select part of a drawing or words written in ink in PowerPoint or Excel, use the Lasso Select tool:
-
On the Draw tab on the Ribbon, tap Lasso Select
. -
With your pen or finger, drag to encircle the ink that you want to select.
A faded, dashed selection region appears as you drag, and when you’re done, the portion you’ve lassoed is selected. Then you can manipulate that object as you wish: move it, copy it, delete it, and so on.
Erase
-
On the Draw tab, tap the Eraser.
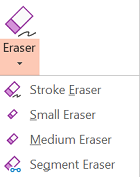
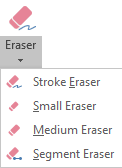
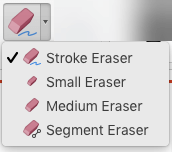
Word has three erasers to choose from—a stroke eraser, a small eraser, or a medium eraser. Tap the down arrow on the Eraser button to pick the eraser that you want.
PowerPoint has those three erasers plus one more: With the Segment Eraser, you can simply tap a segment of ink or drag across it to remove it (rather than having to thoroughly wipe away the entire segment). Dragging across segments is an easy way to erase several at once.
-
Drag the eraser over the ink you want to remove.
Switch tools with the new Apple Pencil
Office for iOS supports the 2nd-generation Apple Pencil and its double-tap gesture. By default, the double-tap gesture switches from the current tool to the eraser, but the System settings on your device allow you to choose a different behavior for this gesture. This feature is available to Microsoft 365 subscribers in Word, Excel, and PowerPoint on iPad version 2.22.19020201 and later.
Turn off automatic inking
-
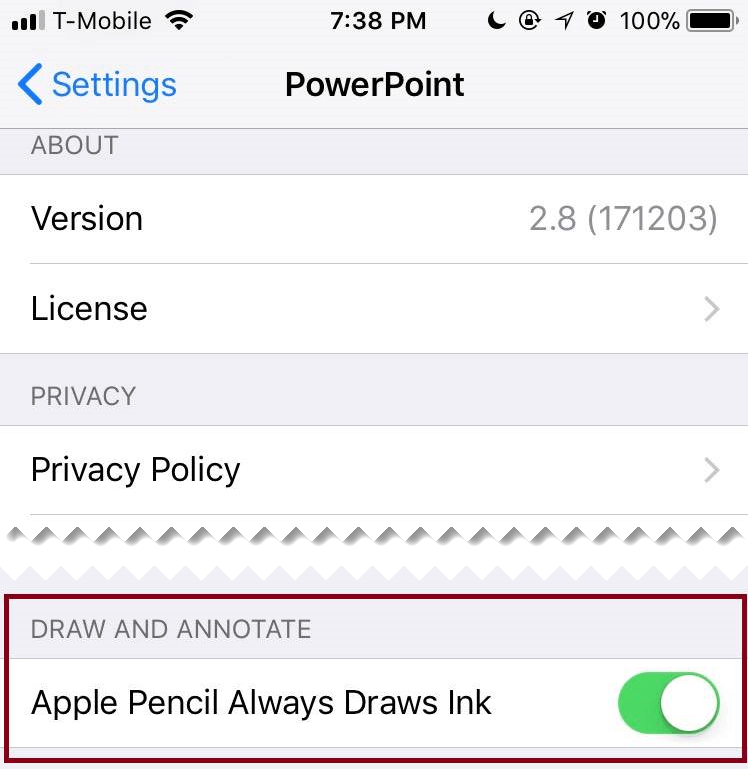
Open the Settings app from the home screen of your iOS device.
-
Scroll through the list of apps at the bottom of the Settings page to find your Microsoft 365 app, and tap to open its Settings.
-
In the app settings on the right side, at the bottom under Draw and Annotate, toggle Apple Pencil Always Draws Ink.
For more information, see Turn off automatic inking on iOS.
Convert ink drawings to standard shapes in PowerPoint
In PowerPoint, you can convert ink drawings on a touch screen into common shapes:
-
Ensure that Draw with Mouse or Touch
is turned on. -
Tap Ink to Shapes
-
With a pen or your finger, draw a shape on the slide. When you finish drawing, PowerPoint automatically converts your drawing to the shape that looks most like it.
To stop converting shapes, tap Ink to Shapes again.
 is turned on.
Basic inking tools
Word for Android, Excel for Android, and PowerPoint for Android all come with basic inking options on the Draw tab: a selection tool, a draw-with-touch tool, a stroke eraser, pens, ink colors and a color wheel, and ink thickness options:

Draw or write
By default, Draw with Mouse or Touch (or «Inking mode») is turned on when you are using a mobile device. Just tap the Draw tab, select a pen  , and you can begin drawing ink on a slide.
Select
On an Android device, Inking mode is turned on when you have selected a pen or highlighter on the Draw tab. Otherwise, you are in Select mode, and you can tap to select an object.
PowerPoint and Excel have an ink selection tool, Lasso Select, specifically for selecting ink drawings. It’s most useful when you have a mixture of standard and ink objects and you only want to select an ink object.
To select part of a drawing or words written in ink in PowerPoint or Excel, use the Lasso Select tool.
-
On the Draw tab on the Ribbon, tap Lasso Select
. -
With your pen or finger, drag to encircle the ink that you want to select.
A faded, dashed selection region appears as you drag, and when you’re done, the portion you’ve lassoed is selected. Then you can manipulate that object as you wish: move it, copy it, delete it, and so on.
Erase
-
On the Draw tab, tap the Eraser.
(In PowerPoint, you can choose from three erasers—a stroke eraser, or a small or medium eraser. Tap the down arrow on the Eraser button to pick the eraser that you want.)
-
Drag the eraser over the ink you want to remove.
Some active pens, such as the Surface pen, have an eraser that you can also use to erase digital ink without having to select an eraser from the Ribbon.
Convert ink drawings to standard shapes in PowerPoint
In PowerPoint, you can convert ink drawings on a touch screen into common shapes:
-
Ensure that Draw with Mouse or Touch
is turned on. -
Tap Ink to Shapes
-
With a pen or your finger, draw a shape on the slide. When you finish drawing, PowerPoint automatically converts your drawing to the shape that looks most like it.
To stop converting shapes, tap Ink to Shapes again.
Annotate with ink while showing a presentation
In PowerPoint, you can add ink markings to a slide while you are presenting:
Basic inking tools
Word Mobile, Excel Mobile, and PowerPoint Mobile all come with basic inking options on the Draw tab: a selection tool, a draw-with-touch tool, a stroke eraser, pens, multiple ink colors, and ink thickness options:

If you’re working in OneNote for Windows 10, see Write notes and draw in OneNote for Windows 10.
Draw or write
By default, Draw with Touch (or «Inking mode») is turned on when you are using a mobile device. Just tap the Draw tab, select a pen  , and you can begin drawing ink on a slide.
The Draw tab in Word Mobile, Excel Mobile, and PowerPoint Mobile for Windows 10 is similar to the desktop versions of each app. Before you can use the drawing features, be sure to update to the latest version of Windows 10. To do this, select the Windows button in the lower-left corner of your screen, and select Settings > Update & security > Windows Update. Click Check for updates to get the latest updates.
To change the settings on a pen:
-
Tap again to open the menu of thickness and color options for the pen. Select your preferred size and color:
-
There are five pen thickness settings ranging from .25 mm to 3.5 mm. Select a thickness or use the plus or minus sign to make your pen thicker or thinner.
-
Sixteen solid colors are available on the menu, with more available when you tap More Ink Colors.
-
Eight effects are also available: Rainbow, Galaxy, Lava, Ocean, Rose Gold, Gold, Silver, and Bronze.
-
-
On the touch screen, begin writing or drawing.
Once you have drawn an ink shape, it behaves like any shape that you are used to working with in Office. You can select the shape, then you can move or copy it, change its color, pivot its position, and so on.
-
To stop inking and select your annotations, either to modify or move them, turn off Draw with Touch on the Draw tab. Turning off this feature also keeps you from making accidental ink marks when your hand touches the screen.
Select
Inking mode is turned on when you have selected a pen or highlighter on the Draw tab. Otherwise, you are in Select mode, and you can tap to select an object.
PowerPoint Mobile and Excel Mobile also have an ink selection tool, Lasso Select, , specifically for selecting objects drawn with ink. It’s most useful when you have a mixture of standard and ink objects and you only want to select an ink object.
To select part of a drawing or words written in ink in PowerPoint or Excel:
-
On the Draw tab on the Ribbon, tap Lasso Select
. -
With your pen or finger, drag to encircle the ink that you want to select.
A faded, dashed selection region appears as you drag, and when you’re done, the portion you’ve lassoed is selected. Then you can manipulate that object as you wish: move it, copy it, delete it, and so on.
Erase
-
On the Draw tab, tap the Eraser.
(In PowerPoint, you can choose from three erasers—a stroke eraser, or a small or medium eraser. Tap the down arrow on the Eraser button to pick the eraser that you want.)
-
Drag the eraser over the ink you want to remove.
Convert ink drawings to standard shapes in PowerPoint
In PowerPoint, you can convert ink drawings on a touch screen into common shapes:
-
Ensure that Draw with Mouse or Touch
is turned on. -
Tap Ink to Shapes
-
With a pen or your finger, draw a shape on the slide. When you finish drawing, PowerPoint automatically converts your drawing to the shape that looks most like it.
To stop converting shapes, tap Ink to Shapes again.
Open the Draw tab on Windows 10 Mobile phones
Here’s how to see the Draw tab in Word, Excel, and PowerPoint on Windows 10 Mobile phones.
-
Select the More button
in the lower-right corner of the screen. -
Pick the Draw tab.
 in the lower-right corner of the screen.
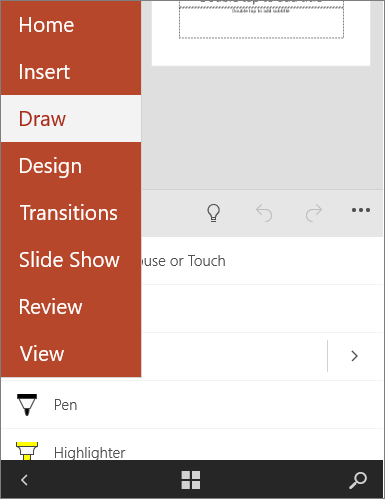
Write, draw, or highlight text in PowerPoint
-
On the Draw tab of the ribbon tap a pen to select it.
-
If you want to customize the pen tap the drop arrow next to the pen on the ribbon and select the thickness, and color, you want.
The Draw menu lets you have two separate pens available, plus a highlighter.
Stop inking
After you’ve drawn what you want, you can stop inking and return to selection mode by pressing the Esc key.
Erase ink
Select the eraser from the pens gallery on the Draw tab, then swipe your cursor across the ink you want to erase. This is a stroke eraser, which means it will erase entire ink strokes at a time.
See Also
Languages supported for ink-to-text conversion
Turn off automatic inking on Windows or iOS
You define the pens you want to have, and they are then available in Word, Excel, and PowerPoint.
- On the Draw tab of the Ribbon, tap a pen to select it.
- Tap again to open the menu of Thickness and Color options for the pen.
- A Pencil texture is also available:
- On the touch screen, begin writing or drawing.
How do I draw on a pencil in Word?
How to draw in Word
- Click the ‘Shapes’ button and select ‘Scribble’ Open up your Microsoft Word document.
- Hold down your mouse to draw. Click and hold down your mouse to draw.
- Release the mouse. As soon as you release your mouse, the drawing will be finished.
- Edit your drawing. Double-click your drawing.
Where is the Draw tool in Word?
Adding the Draw tab to the Ribbon
- Right-click the Ribbon and select Customize the Ribbon.
- Check the box next to Draw, then click OK.
- The Draw tab will now be available in the Ribbon.
Can I use my Apple pencil on a Word document?
In a document, tap Apple Pencil in the body of a word-processing document where you want to write. Or tap in a text box, shape, or in a table cell in a word-processing or page layout document. Tap the Scribble tool in the toolbar at the bottom of the screen, then start writing.
Is there a pencil option in Microsoft Word?
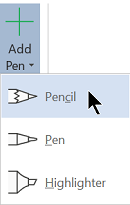
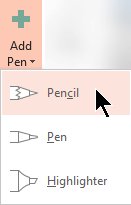
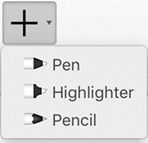
Press Draw with Touch to begin drawing with one of the pen tools, Eraser to switch to the eraser tool, or Select to select your drawings as objects to move, copy, or delete them. A list of available pens to draw with is shown under the Pens category. There are three drawing pens available—Pencil, Pen, and Highlighter.
Can I draw on a Word document?
Click in your document where you want to create the drawing. On the Insert tab, in the Illustrations group, click Shapes. When you find the shape you want to insert, double-click to insert it automatically, or click and drag to draw it in your document.
Can you draw a signature in Word?
Use the Draw Tool to Sign the Word Document If you don’t have an image of your signature, you can use Word’s Draw tab to create your signature using your mouse or touchpad. Place your cursor on the spot in your document where you want your signature. Use your mouse or touchpad to sign your name inside the canvas.
Why is draw disabled in Word?
In Word, you must be in Print layout to draw with ink. If the Draw tab is grayed out so that you can’t select a pen, go the View tab and select Print Layout. Tap again to open the menu of Thickness and Color options for the pen. Select your preferred size and color.
Can you annotate Word documents on iPad?
You can also draw and annotate with your finger on iPhone, iPad, or iPod touch. You can also use Select and Scroll with Apple Pencil to select objects and scroll in your document.
Can I draw freehand in Word?
While it hasn’t been designed with drawing in mind, you can still use shapes, lines, and freehand pen drawings to create simplistic images in Microsoft Word. You can use shapes to create a flow chart or diagram or use free-hand drawings to show your artistic drawing skills.
How do you draw on Microsoft Word 2010?
Add a drawing to a document
- Insert a shape. On the Format tab, in the Insert Shapes group, click a shape, and then click somewhere in the document.
- Change a shape.
- Add text to a shape.
- Group selected shapes.
- Draw in the document.
- Adjust the size of the shapes.
- Apply a style to a shape.
- Add flow charts with connectors.
How do you draw with a pen in Microsoft Word?
Three drawing options are available under the Tools section. Press Draw with Touch to begin drawing with one of the pen tools, Eraser to switch to the eraser tool or Select to select your drawings as objects to move, copy, or delete them. A list of available pens to draw with are shown under the Pens category.
What did Electric Pencil do to the word processor?
Electric Pencil was the first program for microcomputers to implement a basic feature of word processors: word wrap, in which lines are adjusted as words are inserted and deleted. Electric Pencil’s market dominance might have continued had Shrayer continued to update it.
How do you draw with ink in Microsoft Office?
To select part of a drawing or words written in ink, use the Lasso Select tool. (This tool can’t select non-ink objects—that is, shapes, pictures, etc.) Under Draw > Tools on the Ribbon, tap Lasso Select or .
Where do I find the draw tab on Microsoft Office?
If your device is touch-enabled, the Draw tab is turned on automatically. Otherwise, turn it on by selecting File > Options > Customize Ribbon > Draw. The new pen set is customizable and portable. You define the pens you want to have, and they are then available in Word, Excel, and PowerPoint.
Click in your document where you want to create the drawing. On the Insert tab, in the Illustrations group, click Shapes.
Add a drawing to a document
- Insert a shape.
- Change a shape.
- Add text to a shape.
- Group selected shapes.
- Draw in the document.
- Adjust the size of the shapes.
Contents
- 1 How do I get the drawing toolbar in Word?
- 2 Does Word have drawing tools?
- 3 How do you turn on Draw in Word?
- 4 Where is the drawing toolbar in Microsoft Word 2010?
- 5 Where is drawing toolbar in open office?
- 6 How do I draw diagrams in Word?
- 7 How do I use Apple pencil in Word?
- 8 How do you draw in docs?
- 9 How do you draw a freehand in Word?
- 10 How do I turn off drawing tools in Word?
- 11 What is illustration in MS Word?
- 12 Where is the Drawing toolbar in Word 2013?
- 13 Can you draw in open office?
- 14 How do you draw on Open Office?
- 15 Where is the Drawing toolbar in Word 2007?
- 16 How do you draw a diagram on the computer?
- 17 What is the use of drawing canvas in a Word document?
- 18 How do I label a diagram in Word?
- 19 How do I use pencil in Word?
- 20 Can you use scribble on Word?
How do I get the drawing toolbar in Word?
Click View > Toolbars > Drawing. The Drawing toolbar is displayed or hidden. The Drawing toolbar contains a collection of icon buttons that allows the user to draw shapes and images in the document. Provides a number of features for drawing.
Does Word have drawing tools?
You can draw freely in Microsoft Word using the “Draw” feature whether you have Word for Mac or Windows. You can also insert customizable shapes into your document, or draw using the “Scribble” feature. The process of drawing in Word varies based on which version of Word and device you’re using.
How do you turn on Draw in Word?
If your device is touch-enabled, the Draw tab is turned on automatically. Otherwise, turn it on by selecting File > Options > Customize Ribbon > Draw.
Where is the drawing toolbar in Microsoft Word 2010?
In Word 2010, there are no toolbars; they have been replaced with ribbons at the top of the screen. Note: If you do not see the Drawing Tools tab, make sure that you have inserted/selected a shape, line, or drawing object. You may have to double-click the object.
Where is drawing toolbar in open office?
To begin using the drawing tools, select View > Toolbars > Drawing. The drawing toolbar appears at the bottom of the screen. You can tear off this toolbar and move it to a convenient place on the window.
How do I draw diagrams in Word?
Click in your document where you want to create the drawing. On the Insert tab, in the Illustrations group, click Shapes.
Add a drawing to a document
- Insert a shape.
- Change a shape.
- Add text to a shape.
- Group selected shapes.
- Draw in the document.
- Adjust the size of the shapes.
How do I use Apple pencil in Word?
In a document, tap Apple Pencil in the body of a word-processing document where you want to write. Or tap in a text box, shape, or in a table cell in a word-processing or page layout document. Tap the Scribble tool in the toolbar at the bottom of the screen, then start writing.
How do you draw in docs?
What to Know
- Open a document in Google Docs. Place the cursor where you want the drawing to appear.
- Select Insert > Drawing. Choose New to open the Drawing window.
- Choose a drawing type from the Actions menu. Options include word art, shapes, arrows, callouts, and equations.
How do you draw a freehand in Word?
Draw a freeform shape
Click anywhere in the document, and then drag to draw. To draw a straight segment with the Freeform tool, click one location, move your pointer to a different location, and then click again; to draw a curved segment, keep your mouse button pressed as you drag to draw.
How do I turn off drawing tools in Word?
To turn off the drawing canvas, do the following:
- From the Tools menu, choose Options.
- Click the General tab.
- Uncheck Automatically Create Drawing Canvas When Inserting AutoShapes in the General Options section.
- Click OK.
What is illustration in MS Word?
Illustrations Quick Reference
The Microsoft Illustrations group allows you to insert pictures, shapes, smart art, and charts into your document. These options will enhance the layout and appearance of your documents. Drawing Tools and Picture Tools tabs only appear when a graphic image is selected.
Where is the Drawing toolbar in Word 2013?
Click Insert. Click the Shapes button, then click the Scribble icon in the Lines section. Click and hold down the mouse button, then move the mouse cursor to draw. Click the Format tab under Drawing Tools to make any changes to your drawing.
Can you draw in open office?
You can use Writer’s drawing tools to create graphics, such as simple diagrams using rectangles, circles, lines, text, and other objects.You can use the drawing tools to place drawing objects directly on a page in your document, or you can insert the drawing objects into a frame.
How do you draw on Open Office?
To use a drawing tool:
- Click in the document where you want the drawing to be anchored.
- Select the tool from the Drawing toolbar.
- Move the cross-hair pointer to the place in the document where you want the graphic to appear and then click-and-drag to create the drawing object.
Where is the Drawing toolbar in Word 2007?
Accessing the Drawing Toolbar
From the View menu, select Toolbars » Drawing. The Drawing toolbar appears.
How do you draw a diagram on the computer?
8 Online Tools to Draw Diagrams and Flowcharts
- Lucidchart. Lucidchart allows you to create diagrams and flowcharts without installing any software easily.
- Draw.io. Draw.io is a completely free online tool for creating diagrams of all types.
- Cacoo.
- Gliffy.
- Sketchboard.
- Creately.
- DrawAnywhere.
- Google Drawings.
What is the use of drawing canvas in a Word document?
A drawing canvas is an object, a bounding box to contain graphics. Use it to provide a background or shading behind AutoShapes and images, group graphics, or to create a wider area for a text wrap. Because the drawing canvas is mostly obsolete, you have to turn it on in Word’s options.
How do I label a diagram in Word?
On the References tab, in the Captions group, click Insert Caption. In the Label list, select the label that best describes the object, such as a figure or equation. If the list doesn’t provide the label you want, click New Label, type the new label in the Label box, and then click OK.
How do I use pencil in Word?
Start Microsoft Word and click “File” and “Open” if you want to add handwriting to an existing document. Choose your file and press “Enter” or click “Open” to open it. Select “Insert” from the top menu bar and choose “Shape.” Choose the “Scribble” tool to change the cursor to a pencil with which you can draw.
Can you use scribble on Word?
Turn handwriting into text with Scribble
In a document, tap Apple Pencil in the body of a word-processing document where you want to write. Or tap in a text box, shape or in a table cell in a word-processing or page layout document. Tap the Scribble tool in the toolbar at the bottom of the screen, then start writing.
Answer
- There are a few ways to draw on Microsoft Word. One way is to use the drawing toolbar, which is located above the ribbon. To use the drawing toolbar, select the “Drawing Tools” tab and then select the “Insert Shapes” button. You can then use the shapes on the toolbar to create drawings.
- Another way to draw on Microsoft Word is to use the “Drawing Canvas.
How to Enable pen/draw tab|How to draw in MS WORD
How to DRAW in MS WORD | Microsoft Word Tutorial
How do you draw in Microsoft Word 2019?
There are a few ways to draw in Microsoft Word 2019. You can use the drawing tools on the ribbon, or you can use the drawing canvas. To use the drawing tools on the ribbon, select the insert tab, and then select the drawing tools. The drawing tools will open up a toolbar with different options for drawing. To use the drawing canvas, select the insert tab, and then select the drawing canvas. The drawing canvas will open up a new page where you can draw.
How do I turn on draw in Word 2007?
To turn on Draw in Microsoft Word 2007, click on the “Office” button in the top left corner of the screen, and select “Word Options”. Click on “Advanced” in the menu on the left hand side of the window that opens, and then check the box next to “Enable drawing tools”. Click on “OK” to save your changes.
How do you draw in Word 2021?
There are several ways to draw in Word 2021. One way is to use the drawing tools on the ribbon. Another way is to use the drawing canvas.
Where is pen in MS Word 2016?
The pen is located in the upper right-hand corner of the screen.
Where is the drawing toolbar?
The drawing toolbar is located at the top of the screen, next to the main menu. It contains a variety of tools for drawing and editing shapes.
How do you draw on Microsoft Word 2010?
To draw on Microsoft Word 2010, you first need to open a document and then click on the “Drawing Tools” tab. Next, select the “Shapes” button and choose the shape you want to draw. After that, you can use the drawing tools to customize your shape.
Where can I find drawing tools in Word 2010?
There are a few different ways to find drawing tools in Word 2010. One way is to go to the Insert tab and click on the Drawing Tools button. This will open up a toolbar with all of the drawing tools. Another way is to use the keyboard shortcut Ctrl+Shift+M. This will open up a menu with all of the drawing tools.
How do you use pencil in Word 2016?
To use a pencil in Word 2016, first open the program and then click on the “Insert” tab. Next, select the “Drawing” section and then choose the “Pencil” tool. After that, you can start drawing on your document by clicking and dragging your mouse.
Where is the pencil in Word?
The pencil is in the toolbar at the top of the screen.
Why is Draw disabled in Word?
There are a few reasons why Draw might be disabled in Word. One possibility is that the feature has been turned off by an administrator or someone else with permissions to make changes to the software. Another possibility is that there may be a problem with your computer’s graphics card or driver that is preventing Draw from functioning properly.
Why can’t I Draw on Microsoft Word?
There are a few reasons why you might not be able to draw on Microsoft Word. One possibility is that you don’t have a graphics tablet or pen. Another possibility is that your computer doesn’t have the necessary software installed. Finally, your version of Microsoft Word might not be compatible with drawing tools.
Is there a pen tool in Word?
Yes, there is a pen tool in Word. It’s used to draw shapes and lines.
How do you add a pen in Word?
To add a pen in Word, first open the program and create a new document. Then, click on the “Insert” tab and select the “Drawing” option. This will open up a menu of different shapes that you can add to your document. Select the “Pen” shape and then click on the location in your document where you want it to appear. You can then use the toolbar at the top of the screen to change the color and thickness of your pen.
How do I use pencil in Word?
To use pencil in Word, you can select the pencil tool from the toolbar. This will allow you to draw or write on your document.
How do you Draw on Microsoft Word step by step?
Open Microsoft Word.
Click on the “Insert” tab at the top of the screen.
Choose “Drawing” from the menu on the left-hand side of the screen.
Select the shape you want to draw from the menu on the right-hand side of the screen.
Click and drag on your document to draw the shape.
6.
How do I draw freehand on a Word document?
Draw a freeform shape Click anywhere in the document, and then drag to draw. To draw a straight segment with the Freeform tool, click one location, move your pointer to a different location, and then click again; to draw a curved segment, keep your mouse button pressed as you drag to draw.
How do I use pencil in Word?
You define the pens you want to have, and they are then available in Word, Excel, and PowerPoint. On the Draw tab of the Ribbon, tap a pen to select it. Tap again to open the menu of Thickness and Color options for the pen. A Pencil texture is also available: On the touch screen, begin writing or drawing.
How do you paint on Microsoft Word?
Use the Format Painter Select the text or graphic that has the formatting that you want to copy. On the Home tab, click Format Painter. Use the brush to paint over a selection of text or graphics to apply the formatting. To stop formatting, press ESC.
Is there a drawing tool on word?
You can draw freely in Microsoft Word using the “Draw” feature whether you have Word for Mac or Windows. You can also insert customizable shapes into your document, or draw using the “Scribble” feature. The process of drawing in Word varies based on which version of Word and device you’re using.
How do I use drawing tools in Word?
Add a drawing to a document Click in your document where you want to create the drawing. On the Insert tab, in the Illustrations group, click Shapes. When you find the shape you want to insert, double-click to insert it automatically, or click and drag to draw it in your document.
How do you insert a draw tab in Word?
Adding the Draw tab to the Ribbon Right-click the Ribbon and select Customize the Ribbon. Check the box next to Draw, then click OK. The Draw tab will now be available in the Ribbon.
Is there a pencil option in Microsoft Word?
There are three drawing pens available—Pencil, Pen, and Highlighter. As you’d expect, using the Pencil tool inserts a finer, less precise drawing line to your document.
How do I insert pen tool in Word?
Click on File tab and select Options from the menu Page 2 3. Select All Tabs under Choose Commands from: 4. Select Pens under the Ink Tools and click the Add button to add the Pens tab as a main tab on the ribbon.
How do you draw in docs?
What to Know Open a document in Google Docs. Place the cursor where you want the drawing to appear. Select Insert > Drawing. Choose New to open the Drawing window. Choose a drawing type from the Actions menu. Options include word art, shapes, arrows, callouts, and equations.
Where is the Drawing toolbar in Word?
Accessing the Drawing Toolbar The View menu gives the option of viewing any toolbar for your particular needs. From the View menu, select Toolbars » Drawing. The Drawing toolbar appears at the bottom of the screen.
Where is the Drawing toolbar in Word 2019?
Click View > Toolbars > Drawing. The Drawing toolbar is displayed or hidden. The Drawing toolbar contains a collection of icon buttons that allows the user to draw shapes and images in the document.
Where is the Drawing toolbar in Word 2013?
Click Insert. Click the Shapes button, then click the Scribble icon in the Lines section. Click and hold down the mouse button, then move the mouse cursor to draw. Click the Format tab under Drawing Tools to make any changes to your drawing.
How do I insert an ink shape in Word?
Convert your ink drawings to shapes On the Draw tab, select Ink to Shape. (This mode must be turned on before you draw the shape.) Draw the shape of your choice. To continue inking but stop having your drawings automatically converted to shapes, select Ink to Shape once again.
How do I use the pencil in Word 2016?
To use inking in Word 2016, go to the Review tab and click on the Start inking icon. When you do that, Word will display a Pens tab, similar to the one shown in the previous figure. You can use this tab to choose ink color, pen thickness, etc.
Can you draw on docs?
You can draw in Google Docs by using the built-in Drawing tool. The Drawing tool allows you to create and manipulate lines, shapes, colors, text, and more to add an artistic touch to your documents.
How do you draw on a picture in Google Docs?
Just follow these steps: From your Google Doc, select the Insert menu and choose Drawing. In the drawing click on the Insert Image icon and upload your image or choose one from other options. Once the image uploads, click on it to select it and you can now crop and edit the image.
How do I turn on the Drawing toolbar in Word 2010?
In Word 2010, there are no toolbars; they have been replaced with ribbons at the top of the screen. Note: If you do not see the Drawing Tools tab, make sure that you have inserted/selected a shape, line, or drawing object. You may have to double-click the object.
What is Picture toolbar?
The Picture toolbar contains a collection of icon buttons to allow the user to insert and manage pictures and clip art in the document.
Where is drawing toolbar in open office?
To begin using the drawing tools, select View > Toolbars > Drawing. The drawing toolbar appears at the bottom of the screen. You can tear off this toolbar and move it to a convenient place on the window.
What is ink in MS Word?
Your finger or a digital pen gives you freedom from a keypad when you’re working on a touch device. In addition to drawing, writing and highlighting, Ink Editor lets you use natural gestures like circling to select and crossing out to delete.
How do I insert OneNote ink into a shape?
Try it! Tap Draw with Mouse or Touch. Tap Ink to Shape. Draw a shape. Your hand-drawn shapes automatically turn into shapes with straight lines and clean corners. When you’re done drawing, tap Select Objects or Type Text.
How do you draw in Word 2020?
How to draw in Word Click the ‘Shapes’ button and select ‘Scribble’ Open up your Microsoft Word document. Hold down your mouse to draw. Click and hold down your mouse to draw. Release the mouse. As soon as you release your mouse, the drawing will be finished. Edit your drawing. Double-click your drawing.
How do you use the Pen tool in Google Docs?
Press p or select the Pen tool from the toolbar. (If you’ve used one of the shape tools, you may need to click and hold the shape tool icon to select the Pen tool from a pop-up menu.) Click the stage where you want the curve to begin and hold down the mouse button. Drag the cursor to create a control handle.
Приложение Word — компонент пакета Office, разработанного корпорацией Microsoft. В первую очередь это текстовый редактор, а во вторую — графический. В стандартном наборе средств для рисования не так много, а удобство работы с рисунками уступает специализированным программам. Однако для решения простых задач функционал подходит.
Не всем пользователям известно, как рисовать в Ворде. Для этого в приложении применяется ручной метод и шаблонный. В первом случае изображение создается примерно так же, как и в Paint, только еще проще. Второй вариант подразумевает использование готовых образцов.
Содержание
- Включаем панель рисования в Word 2019
- Панель инструментов рисования для Word 2016 и ниже
- Инструменты для рисования
- Рисование карандашом
- Рисование фигурами
- Рисование блок схемами
- Редактирование фигур
Включаем панель рисования в Word 2019
Для работы с графикой в приложении 2019 г. выпуска на компьютере без сенсорного экрана средства рисования нужно добавить через ленту настроек.
Чтобы это сделать, необходимо:
- Открыть слева сверху вкладку «Файл».

- Перейти к пункту «Параметры».

- Открыть настройки ленты.

- В окне «Основные вкладки» поставить галочку напротив пункта «Рисование», чтобы включить указанную вкладку.

- Подтвердить добавление, нажав кнопку «ОК».


После этого в блоке инструментов появится вкладка «Рисование».
Панель инструментов рисования для Word 2016 и ниже
Рисование в Word происходит по тому же принципу, что и в растровом редакторе Windows — Paint. При этом многие пользователи не знают о существовании такой функции по той причине, что графического интерфейса нет в основном меню приложения.
Для добавления инструментов применяется следующая инструкция:
- Открываем сверху вкладку «Вставка».

- Переходим в категорию «Иллюстрации» и нажимаем на треугольник под пунктом «Фигуры».

- Перемещаемся в низ выпадающего списка и щелкаем мышкой по кнопке «Новое полотно».


После этого появится панель «Средства рисования» и станут доступны соответствующие инструменты.
Инструменты для рисования
Встроенный графический редактор в MS Word оснащен базовыми функциями. С его помощью можно создавать картинки и чертить линии, применяя шаблоны или карандаш. Ниже рассмотрим каждое средство подробнее.
Рисование карандашом
Пользователи могут рисовать в Ворде пером или карандашом. Инструмент используется также, чтобы обвести текст и подчеркнуть фразы или слова.
Для применения этого графического средства следует:
- В разделе «Вставка» кликнуть мышкой по кнопке «Фигуры».

- Найти категорию «Линии».
- Выбрать «Рисованную кривую».


Инструмент позволяет создать рисунки от руки в Ворд, линию и дугу. Однако двигать мышку рукой нужно очень плавно, чтобы у такой фигуры, как прямоугольник или куб получились ровные края. Нарисованную картинку можно заливать цветом. С помощью кривой можно также обводить слова в тексте.
Чтобы нарисовать спираль, зажимаем левую клавишу мышки в том месте, где будет находиться центр кривой. Далее ведем линию дугой, поворачивая в нужных местах, до конечной точки. Кнопку отпускаем только в конце.
Если нужно залить фигуру, ее необходимо щелкнуть по ней правой клавишей мыши и открыть в выпадающем меню пункт «Формат». Либо сразу выбрать соответствующую функцию.
В настройках переходим в раздел «Заливка», выбираем тип заполнения и цвет.
Там же в настройках формата можно выбрать другой тип и цвет линий, наложить эффекты (тень, подсветка, рельеф), а также добавить текст.
Рисование фигурами
В Ворде можно рисовать фигуры по готовым шаблонам.
Для этого следует в верхней ленте открыть раздел «Вставка» и в категории «Иллюстрации» щелкнуть по пункту «Фигуры».
В появившемся списке можно увидеть доступные типы изображений:
- Линии. Все виды линий, стрелок и их гибриды.

- Прямоугольники: стандартные, со скругленными и вырезанными углами.
- Основные фигуры: смайлики, сердечки, геометрические формы, скобки, уголки, рамки и т. д.

- Фигурные стрелки. Всевозможные вариации стрелок.
- Знаки для уравнений.
- Блок-схемы. Это фигуры для создания графических алгоритмов, изображающие последовательность выполнения процесса или решения задачи.
- Звезды и ленты.
- Выноски. Разнообразные средства, которые используются для примечаний, иллюстрации мыслей или речи.


В том же диалоговом окне снизу можно создать полотно, чтобы сделать рисунок на нем. При его использовании автоматически добавится раздел «Средства рисования», где добавление фигур можно будет найти в левом верхнем углу.
Для поворота фигуры нужно щелкнуть по ней, зажать соответствующий значок левой клавишей мышки и вращать изображение, пока оно не примет нужное положение.
Рисование блок схемами
Сделать чертеж в Ворде с помощью специальных графических моделей тоже можно. Блок-схема — отображение алгоритма либо процесса на картинке.
Чтобы нарисовать такие элементы, следует:
- Перейти в верхней панели на вкладку «Вставка» и в разделе «Иллюстрации» нажать на кнопку «Фигуры».
- В выпадающем списке перейти в категорию «Блок-схема» и кликнуть по нужному элементу.

- Выбранная форма добавится в документ.


Одновременно с этим для работы с созданным объектом в ленте сверху появится вкладка «Формат» с инструментами рисования и форматирования.
Редактирование фигур
Чтобы изменить созданную фигуру, необходимо использовать средства раздела «Формат». Там доступно изменение заливки объекта, контура, перемещение и наложение эффектов.
Для смены заливки следует:
- Нажать сверху на кнопку «Заливка».

- Далее нужно выбрать тип заполнения объекта из предложенных вариантов. Пользователям доступны цвета из стандартного набора или спектра, наложение рисунка, градиентная и текстурная заливки. Указываем нужный вариант.

- Параметры фигуры сразу поменяются.


Для изменения стиля в верхней панели ищем категорию «Стили» и щелкаем по кнопке с понравившимися характеристиками. Если навести на нее мышкой, снизу появится подсказка с описанием формата.
Цвет, толщина и стиль контура тоже настраиваются в верхней ленте после нажатия на параметр «Контур».
Аналогичным образом накладываются эффекты. Среди доступных: заготовка, тень, подсветка, рельеф, отражение, сглаживание и поворот.
Функция перемещения находится в разделе «Упорядочивание». Там же можно настроить положение объекта относительно текста: отдельно либо с обтеканием. Пользователь может переместить фигуру на передний или задний план, выше или ниже по уровню, за текстом либо перед ним. А еще доступно выставление точных размеров.
Where is pencil in Word?
Is there a pencil symbol in Word?
To manually insert a symbol in Microsoft Word 2010, select the symbol from the Insert menu. The pencil (the next symbol beside the dark blue box) is character code 33. The scissors (next to the pencil) is character code 34.
How do I draw on a pencil in Word?
Related Question Where is the pencil in Microsoft Word?
How do I use the pencil in Word 2016?
To use inking in Word 2016, go to the Review tab and click on the Start inking icon. When you do that, Word will display a Pens tab, similar to the one shown in the previous figure. You can use this tab to choose ink color, pen thickness, etc.
How do you put a pen in Word?
Click on File tab and select Options from the menu Page 2 3. Select All Tabs under Choose Commands from: 4. Select Pens under the Ink Tools and click the Add button to add the Pens tab as a main tab on the ribbon.
How do I insert a pen symbol in Word?
How do I use pencil in Word 2010?
Where do I find symbols in Word?
Go to Insert > Symbol. Pick a symbol, or choose More Symbols. Scroll up or down to find the symbol you want to insert. Different font sets often have different symbols in them and the most commonly used symbols are in the Segoe UI Symbol font set.
How do I find symbols in Word?
How do you write over in Word?
How do you use pencils in Google Docs?
Use a stylus with your virtual keyboard
Open any text box or app that you can type in, like Docs or Gmail. Tap into the text box. The handwriting pad should appear. If you don’t see Handwrite: At the top of the virtual keyboard, tap the Right arrow , then Handwrite .
Where is the draw tab in Outlook?
Where is the pen in Microsoft Word 2013?
You may add the Pen option by going to File, Options, Custom ribbon, from the drop drown select All Commands, in the list look for PenPen style and Add. Now you will see the Pen option added to the quick access bar.
What is word art in MS Word?
WordArt is a gallery of text styles that you can add to your publications to create decorative effects, such as shadowed or mirrored (reflected) text. You can use WordArt to add special text effects to your document. You can modify or add to the text in an existing WordArt object whenever you want.
How do I find symbols on my keyboard?
Click «Start | All Programs | Accessories | System Tools | Character Map» to open the Character Map window. Click the symbol you want to use. The symbol’s code will be displayed in the lower right corner of the window.
How do I find special characters in Windows?
How do I find and replace special characters in Word?
Have you ever wondered what you can do to make corrections to a document digitally, without having to print? If this is your case, stay and we will teach you how you can write with the function of «ink» in a Word document easily and quickly.
Due to the global pandemic, society has found it necessary to take other ways to continue carrying out its work or educational activities; one of the ones that stands out the most today is information transfer via internet.
If you are a teacher or facilitator and you need to correct a large number of assignments that your students send you; or if you are a consultant and need to make some observations about a job; below you will learn how to use a useful pencil tool that will help you achieve this without having to print a single sheet.
How to Activate the Word Pen Tool in Windows
As this option is not widely used, it can be a bit complicated to know where the function is activated, in some versions of Office it is even deactivated by default, so below we present the procedure to access to this tool in the different versions.
Office 2013-2016
You may also be interested in:
The first thing we must do is open the Word document that we want to correct; once inside, we will look at our «Ribbon», where we will proceed to verify if you have the tab that says «Feathers».
In general, as this tool is not used regularly, it is disabled, that is why if we do not have it, we must go to the file tab and select «Options».

Following that, a window will open in which we will choose the option that says on the left side «Customize Ribbon». Then, in the window that will open after having chosen the option, we will select in the command drop-down the option that says «Tools tab».
Therefore we will have 2 columns of options with a box in the middle that says «Add». In the left column we will select the option that says «Feathers», then we will click on «Add» and later on «Accept». Finally, we only check our «ribbon options» by observing if the «Pens» tab is enabled.
Office 2019
Fortunately in Office 2019 the process is much simplerIf our device has a touch function then no action will be necessary since the draw tab will be visible automatically.
In case it does not have the touch function then we must go to the file tab, there select ‘options’ then click on ‘customize ribbon’ and finally in ‘draw’.
office 365
To close with the Windows versions we have the Office 365 version, which is free for all students, where we have the same scenario as 2019 version; That is, the function will already be integrated if our device has a touch function and if we do not activate it in ‘customize ribbon’.
Activate the stylus in macOS
In computers with MacOS operating system we have a little more of the same, the only difference is that the pencil function it is only available in the Office 2019 and 365 versions and we can access it by following the steps described in the previous point, if you have a previous version it will not be possible to use the function.

Activate the Word pen on mobile
We finally have mobile devicesAs we currently know, they all have touch screens, which will allow us to enjoy the pencil function in a comfortable and simple way.
Android
On Android devices, the ink input mode activated when selecting a pencil on the Draw tab. In the unlikely case of not seeing it there then you will be in selection mode and when you press we will select the objects.
ios
As in Android, you only have to press the Draw tab, there we must select a pencil and ready we can use the function. In case of wanting Change settings of a pencil we will simply select the thickness and color options menu where we can make the modifications.

Disadvantages of Word with the Pencil tool
- The first disadvantage that we have to use this pen tool in Word, is that if we want to apply it with all its properties fully, that is, with its variety of colors, erasers, markers, among others, we must buy a license of the Microsoft Office package.
- The second disadvantage is that if we have a copy of the program, when we enable the «pens» option, we can only use the black one with its variation in thickness, which is not ideal if you want to give an observation or if you want to highlight an idea with a specific color.
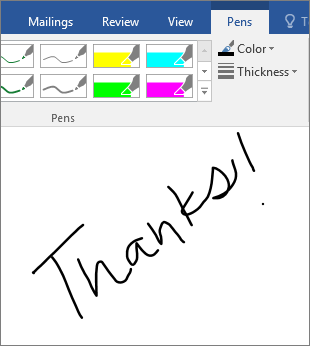
How to write with ink or pens in Word
Writing with ink in Word is so easy how to take a pen and write down what we want on a sheet. To begin, the first thing we must do is choose the pen or pencil, as indicated in the following illustration.

After that, we will notice that the pointer of our mouse will turn into a black point, which indicates that it is representing the tip of a pencil in digital form.
Now, depending on what we are going to correct in the document and the lines that we will give, what we must do is position the pointer where we will write the observation.
Finally, we press and hold the right click and proceed to perform leisurely movements with our hand on the mouse to give the shape of the strokes that we are shaping, either of some phrase, sentence or figure.
Thus, in an easy and fast way, you could learn how to write with ink in a Word document, in addition to knowing how to activate the tool and knowing 2 disadvantages that it has.
If you liked this article, don’t forget to share and leave us your commentRemember that your opinion motivates us to provide you with top quality information.
На чтение 8 мин Просмотров 1.8к. Опубликовано 27.03.2019
Содержание
- MS Word 2016: поиск ластика
- Стерка в 2013 Ворде
- Резинка в Word 2010
- Стерка в версии 2007
- Резинка в Ворде 2003
- Местонахождение
- Для чего он нужен
- Что такое Word
- Как создать таблицы
- Применение
- Заключение
Обычный пользователь ПК обладает не малым багажом знаний, связанных с настройками программ, установкой драйверов, но бывает такое, что не можешь найти обычный ластик в Ворде. «Стерка – простой элемент, но существует ли он в данной программе и если да, то где?» — вероятно, так подумали многие из вас. Давайте найдём этот хорошо скрываемый инструмент.
MS Word 2016: поиск ластика
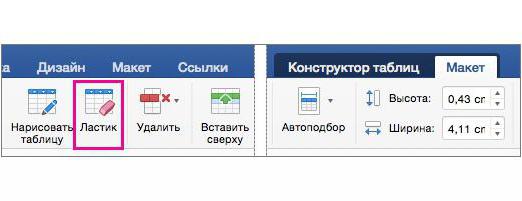
Если нужно удалить какое-то значение в таблице, устанавливаем курсор мыши на место, где надо удалить число, переходим во вкладку «Макет», в открывшемся меню в разделе «Рисование», находится инструмент «Ластик», осталось только нажать на него. Также с помощью ластика можно удалить лишние линии таблицы – просто навести стрелку мыши и кликнуть.

Стерка в 2013 Ворде
Чтобы найти ластик в Ворде 2013 нужно: установить указатель мыши в таблице и открыть вкладку «Работа с таблицами» — «Макет». В меню ниже будет доступен ластик.
Резинка в Word 2010
Для начала необходимо установить курсор в одну из ячеек в таблице. Только после этого действия появится ластик. Далее нужно перейти во вкладку «Работа с таблицами» — «Конструктор» — «Ластик».

Стерка в версии 2007
В Ворде 2007 нужно установить курсор в ячейку таблицы (точно также как и для версии 2010). Затем, появится вкладка «Конструктор» в которой находится ластик.

Резинка в Ворде 2003
По большей части резинки пользуются спросом для удаления таблиц и всё, что в них. В 2003 Ворде нужно перейти во вкладку «Вид», «Панель инструментов», «Таблицы и границы».

Программа «Майкрософт Ворд» — это отличный текстовый редактор, которым пользуется большая часть населения целой планеты. Но редактор способен работать не только с текстом, а и с таблицами наподобие «Экселя». Во время работы с ними может понадобиться полезный инструмент «Ластик». В статье мы поговорим о том, где в «Ворде» «Ластик» и зачем он нужен.
Местонахождение
Сейчас мы разберемся, где в «Ворде» «Ластик», так как многие пользователи попросту не замечают данный инструмент при работе с документом.
Итак, открыв программу, вы не сможете обнаружить искомый инструмент, так как он предназначен лишь для работы с таблицами, следовательно, нам необходима таблица. Откройте документ с таблицей или же создайте ее самостоятельно в новом документе.
Чтобы появилась специальная панель с дополнительными инструментами, предназначенными для работы с таблицами, вам необходимо навести курсор мыши на одну из ячеек и нажать левую кнопку мыши (ЛКМ). После этого курсор начнет мигать, давая понять, в каком месте будет происходить набор текста или же его редактирование, а сверху панели с инструментами появятся еще две вкладки: «Конструктор» и «Макет». Необходимо перейти во вкладку «Макет».
Теперь на панели появились новые инструменты, среди которых и можно будет обнаружить «Ластик». Теперь вы знаете, где в «Ворде» «Ластик». Как видно, найти его проще простого, главное — знать, где искать.
Для чего он нужен
Зная, где найти ластик в «Ворде», рядовой пользователь может задаться резонным вопросом: «А зачем он нужен?» Сейчас мы постараемся дать ответ на него.
Как можно понять, данный инструмент используется лишь при взаимодействии с таблицами в «Ворде», следовательно, он является инструментом для их редактирования. По принципу настоящего ластика, который используется для стирания карандаша, ластик «Вордовский» стирает таблицу и содержимое в ячейках. Это очень удобно, если вам необходимо удалить часть таблицы.
По итогу прочтения вы знаете, где в «Ворде» «Ластик» и зачем он нужен, теперь смело можно взаимодействовать с этим инструментом при работе с таблицами.

Сегодня мы рассмотрим проблему многих людей начинающих работать в Microsoft Word 2010, как в ворде найти ластик?
Многие люди, начинающие знакомится с Word’ом а в частности работающие с таблицами задаются вопросом, как их редактировать? И где найти ластик в ворде 2010?
Что такое Word
В 1983 году Ричард Броди написал первую версию программы для первых IBM PC, он придумывал свой текстовый процессор чтобы облегчить жизнь другим людям, и вскоре после выхода на рынок программа «Выстрелила» и получила широкое распространение, что мотивировало создателя улучшать свое программное обеспечение. Но не всем нужен был большой функционал в ущерб простоте, некоторые офисные работники просто не могли запомнить сложные комбинации клавиш и предпочли уйти к конкуренту, но их процент был так мал, что развитию программы ничего не могло помешать. Первая версия для системы Windows продавалась по внушительной цене в 500$, этим ходом Microsoft показала, что может компания на рынке программного обеспечения. И вновь это ПО получило немалый спрос, послужили этому и функции паролей на документ, и работа с таблицами, и ещё много других инструментов которые не могли предложить конкуренты простому пользователю на тот момент. Самые популярные версии Word были созданы в 2007 и 2010 году. Разработка этого продукта не прекращается по сей день, и после прочтения этой статьи вы узнаете, как найти ластик в ворде 2010.
Как создать таблицы
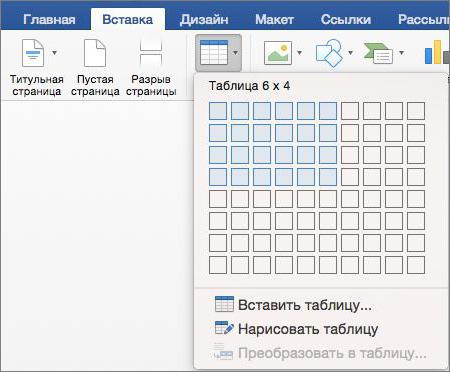
Для начала давайте разберемся, зачем и кому в ворде нужны таблицы? Несомненно, это очень важная функция этой программы, её используют бухгалтеры, люди составляющие новостные статьи, отчеты, и многое другое.Вы можете не замечать, но это несомненно полезное изобретение используется чуть ли не везде в повседневной жизни. Да и для того чтобы панель с заветным инструментом появилась, нужно создать таблицу. Но как создать таблицу, если ты работаешь в этой программе впервые, и потерялся среди всего функционала? Что бы сделать таблицу нам нужно перейти во вкладку вставить> Таблица> Вставка таблицы. Смотрим на фото внизу.

После этого вам нужно будет указать число столбцов, число строк, и еще некоторые параметры, и данный элемент впишется в вашу работу, осталось только заполнить его.
Если вам нужна более точная настройка, будь то форма, размер, или количество столбцов не беда! Можно сделать и это, вам нужно нажать Вставить> Таблица> Нарисовать таблицу.
Далее нарисовать простейший прямоугольник и уже в нем разграничивать таблицу как угодно, с любой шириной, и длиной.
Применение
Часто задаются довольно известные вопросы. Как найти ластик? И для чего применить? В обычном мире стирательную резинку в основном используют художники чтобы убирать след от карандаша, так же повсеместно используется в школе для тех же целей.
Ластик и карандаш используются только для взаимодействия с таблицами, и пока вы их не создадите, данный элемент интерфейса не появится.Так где же найти ластик в ворде? После создания таблицы вы увидите заветную панель:

Что же делает ластик в Ворде? Что делать если допустил ошибку в таблице, или к концу работы понял, что присутствуют лишние поля?Этот инструмент выполняет обычную функцию “стиралки” с его помощью вы можете редактировать саму таблицу, и содержимое её ячеек, стирая или вовсе удаляя их. Если вы хотите убрать линию, то просто выберите ластик и нажмите по нужной линии. Хотелось мне ещё уточнить один вопрос, как-то спросили меня, а можно сделать ластик больше. Насколько я знаю ворде это сделать нельзя. Лично мне неизвестны такие способы. Но точно могу сказать, что это делается в другой программе Paint. В ней вы можете легко увеличить ластик и даже доступно 4 варианта его размера, поэтому именно в этой программе вы сможете сделать ластик меньше или больше, там есть такая возможность.
Заключение
Итак, сегодня вы узнали кто и зачем создал данную программу, и как облегчить себе жизнь используя весь её функционал.
Так же вы узнали где находится ластик в ворде, надеемся, что статья была полезной, и помогла вам разобраться во всех интересующих вопросах.
Ластик будет очень полезным инструментом если вы часто работаете с таблицами, он несомненно поможет вам в исправлении ошибок. Но существуют и отрицательные стороны использования этого инструмента, вы легким движением руки можете стереть целый блок, или столбец, что конечно же вас не обрадует. Для таблиц он является, как инструмент работы с ними. Думаю теперь это понятно и до новых встреч на моём сайте, ждите новых статей от меня. Всем удачи!

While Microsoft Word isn’t the best drawing tool, you can create basic drawings or scribbles in Word directly. Here’s how.
Microsoft Word isn’t essential software for graphics designers, and for a good reason. It’s true—Microsoft Word isn’t best suited for drawing, but it does have some built-in drawing tools you can use, should you need to.
For simple drawings, you can draw in Word directly using shapes, lines, or pen tools. If you want to draw in Microsoft Word, here’s what you’ll need to do.
These instructions have been designed with Microsoft Office 2019 in mind. Note that Microsoft 365 (formerly O365) is the Office suite with 1 TB of OneDrive per user. While the steps may work for older versions of Word, there may be some variations or missing features.
Using Microsoft Word Drawing Tools
There are two sets of drawing tools available to Microsoft Word users. If you want to draw basic, block-like images, you can insert shapes or lines into your Word document and group them together. You might want to do this if you’re creating a diagram or flow chart, for instance.
Alternatively, you can turn Word into your own personal canvas using pen drawing tools. If you have a touchscreen device or a graphics tablet, you can create freehand drawings.
To insert shapes, you’ll need to press the Insert tab on the ribbon bar. For freehand drawings, press the Draw tab instead.

Inserting Shapes into Microsoft Word
If you’re not confident of your freehand drawing ability, or you want to create diagrams in Word, you can insert shapes.
There are hundreds of pre-set shapes available. You can draw typical shapes like squares or circles or insert arrows, stars, speech bubbles, and more. To insert a shape, press the Insert tab on the ribbon bar, then press the Shapes button.
This will list the various shape options in a drop-down menu for you to choose from.

Press on one of the pre-set shapes or line options to select it—your cursor will change at this point.
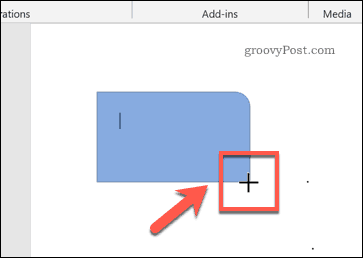
Once this happens, draw onto your Word document directly to insert the shape or line you selected. This allows you to select the appropriate size for your shape.
With the shape inserted and selected, Word will switch to the Format tab on the ribbon bar. From here, you can format your shape.

For instance, add text to your shape and begin typing with the shape selected–the text will be inserted inside the shape.

You can also change the color and style of your shape, as well as the position and alignment of any inserted text, using the options listed in the Format tab.

Creating Freehand Drawings in Word
If you want to create more original Word drawings, you can use various pen drawing tools to draw onto a Word document. You can do this using a mouse or trackpad, or more precisely, using a touchscreen device or graphics tablet.
To start, press the Draw tab on the ribbon bar. This will display the pen drawing tool options for you to use.

Three drawing options are available under the Tools section. Press Draw with Touch to begin drawing with one of the pen tools, Eraser to switch to the eraser tool, or Select to select your drawings as objects to move, copy, or delete them.
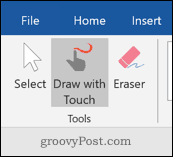
A list of available pens to draw with is shown under the Pens category. There are three drawing pens available—Pencil, Pen, and Highlighter.
As you’d expect, using the Pencil tool inserts a finer, less precise drawing line to your document. The Pen tool is the opposite—lines are clearer, thicker, and more defined. The Highlighter tool can be used for emphasis, adding color to your drawings.
Several pre-set colors and designs are available already in the Pens category—select one of these to begin drawing. Alternatively, you can create your own by pressing the Add Pen button and selecting one of the tools listed in the drop-down menu.

This will add a new pen design to the Pens category, with a settings drop-down menu. From here, you can set the thickness and color of the pen tool, with a preview of the pen design at the top.
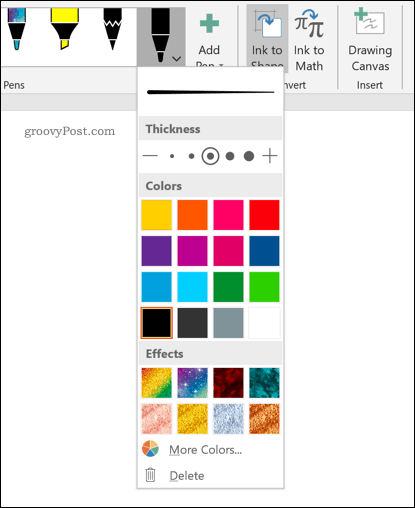
You can edit these in the future by hovering over a pen design and press the arrow icon in the bottom-left corner.
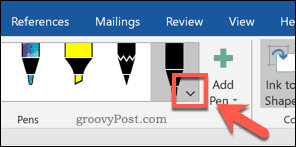
With your drawing pen tool selected and configured, you can begin drawing onto your Word document directly.
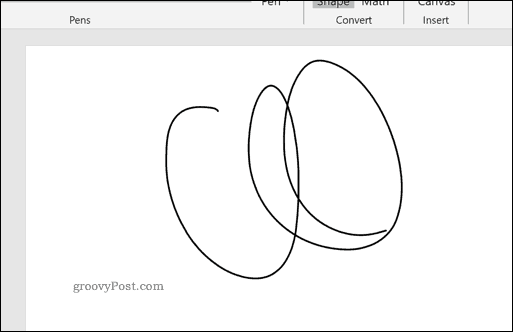
Creating a Drawing Canvas in Word
Word allows you to draw onto a Word document without constraints. If you’d prefer to draw onto a much smaller area of your Word document, however, you can insert a drawing canvas.
A drawing canvas groups your drawing into a single object which can then be moved, resized, or copied elsewhere. To do this, press the Drawing Canvas button in the Insert section of the Draw tab.

This will insert the canvas into your Word document. You will only be able to draw inside the canvas object’s borders– anything drawn outside of this will be ignored.

Designing Microsoft Word Documents
While it hasn’t been designed with drawing in mind, you can still use shapes, lines, and freehand pen drawings to create simplistic images in Microsoft Word. You can use shapes to create a flow chart or diagram or use free-hand drawings to show your artistic drawing skills.
You can insert and edit images in Microsoft Word too, but don’t forget Word’s main purpose. If you’re designing new documents, you may prefer to use building blocks to help you create them more quickly.
![]()