
Excel for Microsoft 365 Excel 2021 Excel 2019 Excel 2016 Excel 2013 Excel 2010 Excel 2007 More…Less
To select all cells on a worksheet, use one of the following methods:
-
Click the Select All button.

-
Press CTRL+A.
Note If the worksheet contains data, and the active cell is above or to the right of the data, pressing CTRL+A selects the current region. Pressing CTRL+A a second time selects the entire worksheet.
Tip If you want to select all cells in the active range, press CTRL+SHIFT+*.
Need more help?
Содержание
- Where is select all in excel
- Where is Select All in Microsoft Office 2007, 2010, 2013, 2016, 2019 and 365?
- Method A: Classic Menu help you find out Select All command easily
- Method B: If you do not have Classic Menu for Office
- Where is Select All in Microsoft Excel, Project, and OneNote?
- More tips for Microsoft Office 2007, 2010, 2013 and 365
- Classic Menu for Office
- Classic Menu for Office
- Classic Menu for Office 2007
- Find and select cells that meet specific conditions
- Need more help?
- Select cell contents in Excel
- Select one or more cells
- Select one or more rows and columns
- Select table, list or worksheet
- Need more help?
Where is select all in excel
![]()
Where is Select All in Microsoft Office 2007, 2010, 2013, 2016, 2019 and 365?
- Method A: Classic Menu help you find out Select All command easily
- Method B: If you do not have Classic Menu for Office
How to Bring Back Classic Menus and Toolbars to Office 2007, 2010, 2013, 2016, 2019 and 365?
Just download Classic Menu for Office 2007 or Classic Menu for Office
Kutools for Excel: 120 Powerful New Features for Excel.
Office Tab: Tabbed Editing and Browsing in Office, Just Like Chrome, Firefox, IE 8/9/10.
Classic Menu for Office are designed to restore classic menus and toolbars in Microsoft Office 2007/2010/2013/2016/2019 (includes Office 365) Ribbons interface. Here we will guide you to find out the Select All command in Microsoft Office 2007/2010/2013.
- Click the Edit menu under Menus tab;
- Move mouse over the Select item, and you will view the Select All command. See screenshot (Fig. 1).
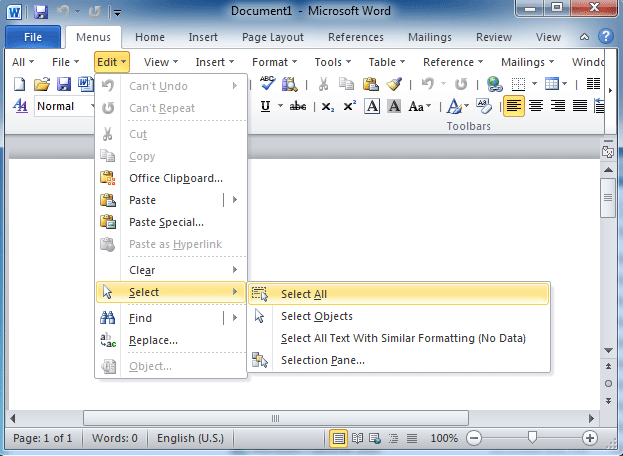
Fig. 1: Select All in Word 2010’s classic menu
Click to know more information and free download Classic Menu for Office suites and programs.
As long as you have Classic Menu for Office installed, you can follow this method to find out Select All command in most of Office 2007/2010/2013/2016/2019 applications, including Word, PowerPoint, Publisher, InfoPath, and Visio.
1. In Publisher 2010, you can find out the Select All Objects command with this way.
2. You won’t find out the Select All command in Outlook 2007/2010/2013/2016/2019 until you get into the Message Window. You can get into Message Window by double clicking existing emails or creating a new email.

If you do not have Classic Menu for Office, you can access the Select All command in Ribbon inteface of Office 2007/2010/2013/2016/2019 as follows.
In Word/PowerPoint 2007/2010/2013, and Publisher/Visio/InfoPath 2010/2013
- Click the Home tab;
- Go to the Editing group;
- Click the Select button, and you will get the Select All item in the drop down list. See screenshot (Fig. 2).
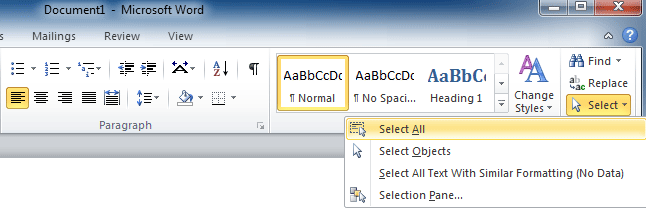
Fig. 2: Select All in Word 2010’s Ribbon
Please note that you can find out the Select All Objects in Publisher 2010/2013/2016/2019 with this way.
Click to know more information and free download Classic Menu for Office 2007 / 2010 suites and programs.
Select All command in Outlook 2007/2010/2013/2016/2019 Ribbon
- Get into the Message Window;
- Click the Format Text Tab;
- Get into the Editing group;
- Click the Select button, and you will view the Select All item in the drop down list.

Fig. 3: Select All in Outlook 2010’s Ribbon
Select All command in Access 2007/2010/2013/2016/2019 Ribbon
- Click the Home tab;
- Go to the Find group;
- Click the Select button, and you will see the Select All item in the drop down list.
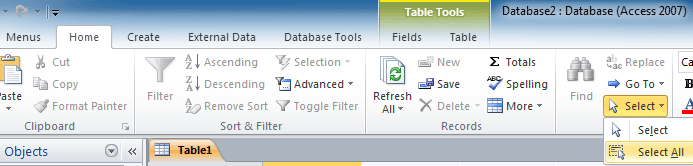
Fig. 4: Select All in Access 2010’s Ribbon
Where is Select All in Microsoft Excel, Project, and OneNote?
There is no Select All command in Microsoft Excel, OneNote, and Project 2007/2010/2013. You can select all contents by pressing Ctrl + A keys, but you will not find out the Select All command in these Microsoft Office applications.
Click to know more information and free download Classic Menu for Office suites and programs.
More tips for Microsoft Office 2007, 2010, 2013 and 365
Brings your familiar old menus and toolbars of Office 2003 (2002, 2000) back to Microsoft Office 2007, 2010, 2013 and 365. You can use Office 2007/2010/2013/2016 (includes Office 365) immediately and efficiently, and don’t need any trainings or tutorials when upgrading to Microsoft Office (includes Word, Excel, and more . ) 2007, 2010 or 2013.
Screen Shot of Classic Menu for Word

It includes Classic Menu for Word, Excel, PowerPoint, Access, Outlook, OneNote, Publisher, InfoPath, Visio and Project 2010, 2013, 2016, 2019 and 365 (includes Office 365).
It includes Classic Menu for Word, Excel, PowerPoint, Access and Outlook 2007.
Источник
Find and select cells that meet specific conditions
Use the Go To command to quickly find and select all cells that contain specific types of data, such as formulas. Also, use Go To to find only the cells that meet specific criteria,—such as the last cell on the worksheet that contains data or formatting.
Follow these steps:
Begin by doing either of the following:
To search the entire worksheet for specific cells, click any cell.
To search for specific cells within a defined area, select the range, rows, or columns that you want. For more information, see Select cells, ranges, rows, or columns on a worksheet.
Tip: To cancel a selection of cells, click any cell on the worksheet.
On the Home tab, click Find & Select > Go To (in the Editing group).
Keyboard shortcut: Press CTRL+G.
In the Go To Special dialog box, click one of the following options.
Cells that contain comments.
Cells that contain constants.
Cells that contain formulas.
Note: The check boxes below Formulas define the type of formula.
The current region, such as an entire list.
An entire array if the active cell is contained in an array.
Graphical objects, including charts and buttons, on the worksheet and in text boxes.
All cells that differ from the active cell in a selected row. There is always one active cell in a selection—whether this is a range, row, or column. By pressing the Enter or Tab key, you can change the location of the active cell, which by default is the first cell in a row.
If more than one row is selected, the comparison is done for each individual row of that selection, and the cell that is used in the comparison for each additional row is located in the same column as the active cell.
All cells that differ from the active cell in a selected column. There is always one active cell in a selection, whether this is a range, row, or column. By pressing the Enter or Tab key, you can change the location of the active cell—which by default is the first cell in a column.
When selecting more than one column, the comparison is done for each individual column of that selection. The cell that is used in the comparison for each additional column is located in the same row as the active cell.
Cells that are referenced by the formula in the active cell. Under Dependents, do either of the following:
Click Direct only to find only cells that are directly referenced by formulas.
Click All levels to find all cells that are directly or indirectly referenced by the cells in the selection.
Cells with formulas that refer to the active cell. Do either of the following:
Click Direct only to find only cells with formulas that refer directly to the active cell.
Click All levels to find all cells that directly or indirectly refer to the active cell.
The last cell on the worksheet that contains data or formatting.
Visible cells only
Only cells that are visible in a range that crosses hidden rows or columns.
Only cells that have conditional formats applied. Under Data validation, do either of the following:
Click All to find all cells that have conditional formats applied.
Click Same to find cells that have the same conditional formats as the currently selected cell.
Only cells that have data validation rules applied. Do either of the following:
Click All to find all cells that have data validation applied.
Click Same to find cells that have the same data validation as the currently selected cell.
Need more help?
You can always ask an expert in the Excel Tech Community or get support in the Answers community.
Источник
Select cell contents in Excel
In Excel, you can select cell contents of one or more cells, rows and columns.

Note: If a worksheet has been protected, you might not be able to select cells or their contents on a worksheet.
Select one or more cells
Click on a cell to select it. Or use the keyboard to navigate to it and select it.
To select a range, select a cell, then with the left mouse button pressed, drag over the other cells.
Or use the Shift + arrow keys to select the range.
To select non-adjacent cells and cell ranges, hold Ctrl and select the cells.
Select one or more rows and columns
Select the letter at the top to select the entire column. Or click on any cell in the column and then press Ctrl + Space.
Select the row number to select the entire row. Or click on any cell in the row and then press Shift + Space.
To select non-adjacent rows or columns, hold Ctrl and select the row or column numbers.
Select table, list or worksheet
To select a list or table, select a cell in the list or table and press Ctrl + A.
To select the entire worksheet, click the Select All button at the top left corner.

Note: In some cases, selecting a cell may result in the selection of multiple adjacent cells as well. For tips on how to resolve this issue, see this post How do I stop Excel from highlighting two cells at once? in the community.
Click the cell, or press the arrow keys to move to the cell.
A range of cells
Click the first cell in the range, and then drag to the last cell, or hold down SHIFT while you press the arrow keys to extend the selection.
You can also select the first cell in the range, and then press F8 to extend the selection by using the arrow keys. To stop extending the selection, press F8 again.
A large range of cells
Click the first cell in the range, and then hold down SHIFT while you click the last cell in the range. You can scroll to make the last cell visible.
All cells on a worksheet
Click the Select All button.
To select the entire worksheet, you can also press CTRL+A.
Note: If the worksheet contains data, CTRL+A selects the current region. Pressing CTRL+A a second time selects the entire worksheet.
Nonadjacent cells or cell ranges
Select the first cell or range of cells, and then hold down CTRL while you select the other cells or ranges.
You can also select the first cell or range of cells, and then press SHIFT+F8 to add another nonadjacent cell or range to the selection. To stop adding cells or ranges to the selection, press SHIFT+F8 again.
Note: You cannot cancel the selection of a cell or range of cells in a nonadjacent selection without canceling the entire selection.
An entire row or column
Click the row or column heading.
2. Column heading
You can also select cells in a row or column by selecting the first cell and then pressing CTRL+SHIFT+ARROW key (RIGHT ARROW or LEFT ARROW for rows, UP ARROW or DOWN ARROW for columns).
Note: If the row or column contains data, CTRL+SHIFT+ARROW key selects the row or column to the last used cell. Pressing CTRL+SHIFT+ARROW key a second time selects the entire row or column.
Adjacent rows or columns
Drag across the row or column headings. Or select the first row or column; then hold down SHIFT while you select the last row or column.
Nonadjacent rows or columns
Click the column or row heading of the first row or column in your selection; then hold down CTRL while you click the column or row headings of other rows or columns that you want to add to the selection.
The first or last cell in a row or column
Select a cell in the row or column, and then press CTRL+ARROW key (RIGHT ARROW or LEFT ARROW for rows, UP ARROW or DOWN ARROW for columns).
The first or last cell on a worksheet or in a Microsoft Office Excel table
Press CTRL+HOME to select the first cell on the worksheet or in an Excel list.
Press CTRL+END to select the last cell on the worksheet or in an Excel list that contains data or formatting.
Cells to the last used cell on the worksheet (lower-right corner)
Select the first cell, and then press CTRL+SHIFT+END to extend the selection of cells to the last used cell on the worksheet (lower-right corner).
Cells to the beginning of the worksheet
Select the first cell, and then press CTRL+SHIFT+HOME to extend the selection of cells to the beginning of the worksheet.
More or fewer cells than the active selection
Hold down SHIFT while you click the last cell that you want to include in the new selection. The rectangular range between the active cell and the cell that you click becomes the new selection.
Need more help?
You can always ask an expert in the Excel Tech Community or get support in the Answers community.
Источник
Adblock
detector

In this article you’ll learn all of the different Select All shortcuts in Word, Excel and PowerPoint, and how to use Select All to quickly grab things like:
- Objects (PowerPoint)
- Text with similar formatting (Word)
- Formulas (Excel)
- Constants (Excel)
- Comments (Excel)
- And more!
This allows you to quickly grab EXACTLY what you need in each of the programs when you need it. This saves you from otherwise having to manually selecting everything yourself, one-by-one.
Select All shortcut (A Must Know)
The universal Select All shortcut for most program (Mac or PC) is:

Select All shortcut (PC Users): Ctrl + A
Select All shortcut (Mac Users) Cmd + A
That said there are a variety of different ways you can use the shortcut in Word, Excel and PowerPoint to finish your tasks faster and get you to Happy Hour (all discussed below).
How to best use the Select All command?
In short, this command is best used to quickly grab all the text, numbers, objects, formulas etc. that you want to quickly format or work with.
This allows you to quickly make changes to everything at once. For example:
- Change the font style of all the text in a Word document
- Grab all the formulas or constants in an Excel spreadsheet to change their font color
- Grab all your PowerPoint objects on a slide to change their shape fill
Which makes sense, right?
Why bother doing things manually (one-by-one) when you can select all your objects at once.
And it’s this kind of know-how why one person leaves the office at a decent hour, while another wastes away at the office all night.
How to Select All in Word

You have 4 different types of selection options in Microsoft Word.
And if you are on a PC, you can additionally shortcut all of these using your Ribbon Guides (details below).

1. Select All (Ctrl + A)
Selects everything within your document so that you can make all the formatting edits that you want at the same time.
Clicking this command with your mouse is the same as hitting Ctrl + A on your keyboard (Cmd + A on a Mac).
2. Select Objects
Changes your mouse cursor into an arrow symbol that allows you to select an element (chart, picture, SmartArt graphic, etc.) as an object.
This is different than when you click things with your mouse. When you click with your mouse, you normally click into the object as if you are going to edit it.
The Select Objects command ensures that you select the object itself. That way you can cut and paste it, or move it around within your document.
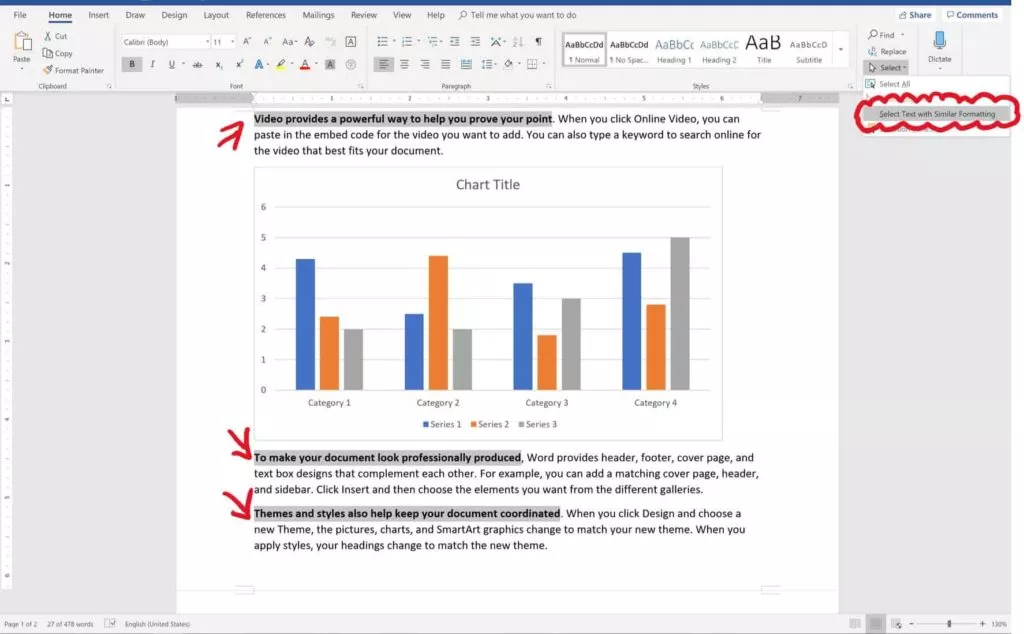
3. Select Text with Similar Formatting
Selects all of the text within a Word document that matches the formatting of the text that you have already selected.
This is one of the coolest features in Microsoft Word that hardly anyone knows about. This command grabs all of the same formatted text within a document, so you can change it’s formatting all at once.
Ahem… amazing!
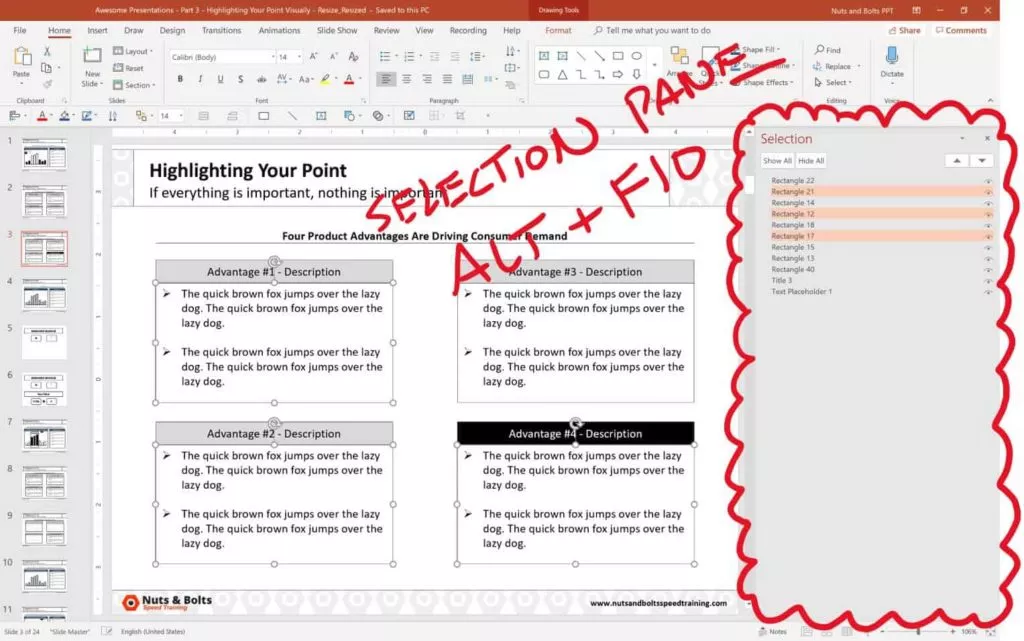
4. The Selection Pane in Word (Alt + F10)
Opens or closes the Selection Pane in Microsoft Word.
Inside the Selection Pane you can see (and quickly manipulate) all the objects in a Word document.
Similar to the Selection Pane in PowerPoint, it only only shows you the objects on the current page you are currently working on.
That means that if you have 100 charts in your Word document but only 1 chart on your current page, you will only see 1 chart in the Selection Pane.
Select All Shortcuts in Word (Ribbon Guides)
Instead of using your mouse to access the selection commands, on a PC you can use your Ribbon Guides.
To use these shortcuts, simply hit the Alt key on your keyboard. Hitting the Alt key, you will see alphabetical sequences to the commands across your Ribbon.

On a PC, your select all Ribbon Guide shortcuts are:
- Select All: Alt, H, SL, A
- Select Objects: Alt, H, SL, O
- Select Text with Similar Formatting: Alt, H, SL, S
- Selection Pane: Alt, H, SL, P
Note: When using your Ribbon Guide shortcuts in Word, you do not need to hold them down. Instead, simply hit and let go of them one at a time (following the letters forward).
To learn more about the Microsoft Office ribbon, see this guide by Microsoft here.
Select All in Excel
Because there are so many more inputs that can go into an Excel spreadsheet, there are 7 different selection commands in Excel (all covered below)
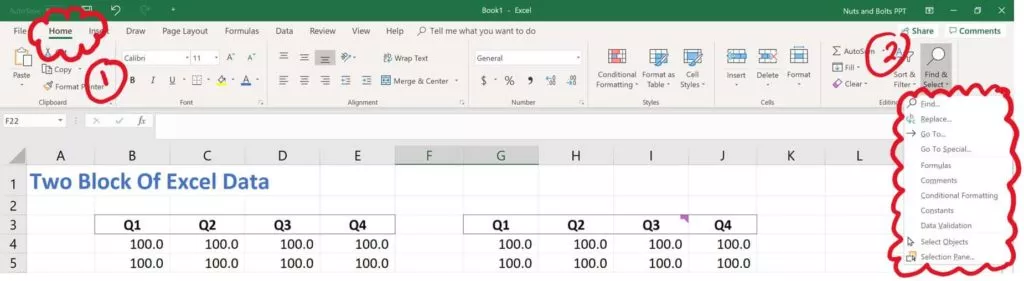
1. Select All (Ctrl + A)
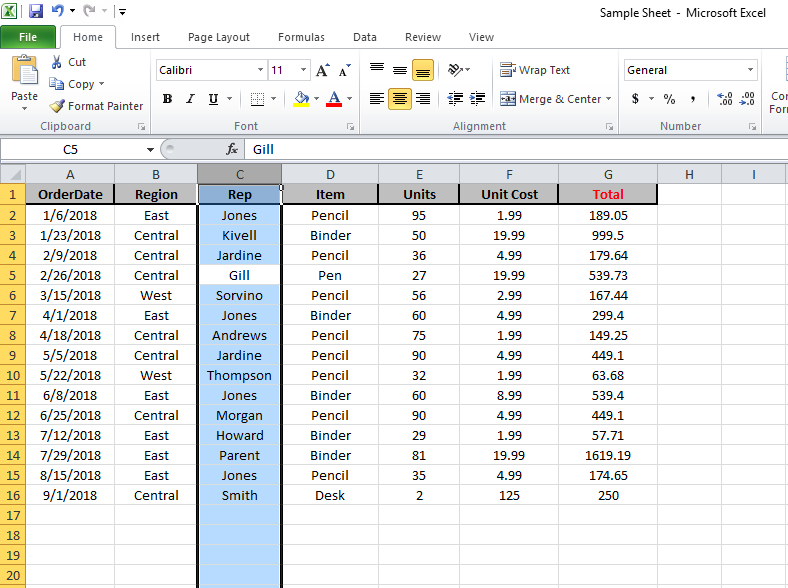
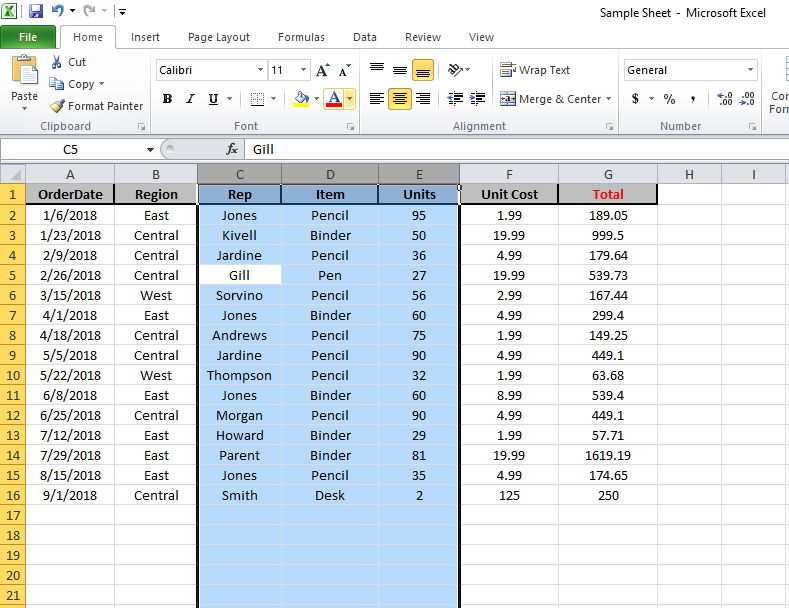
Hitting Ctrl + A triggers the Select All command (which is otherwise not up in your Excel ribbon.
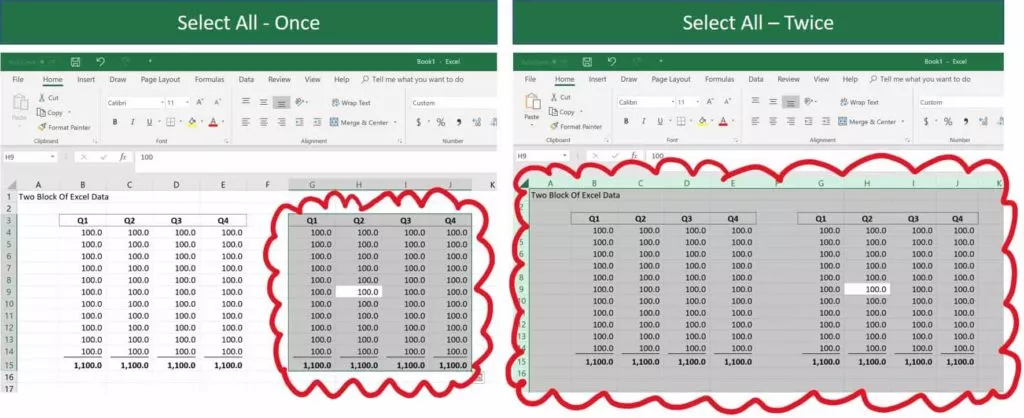
It’s also important to note that the Select All command works a little bit differently in Excel.
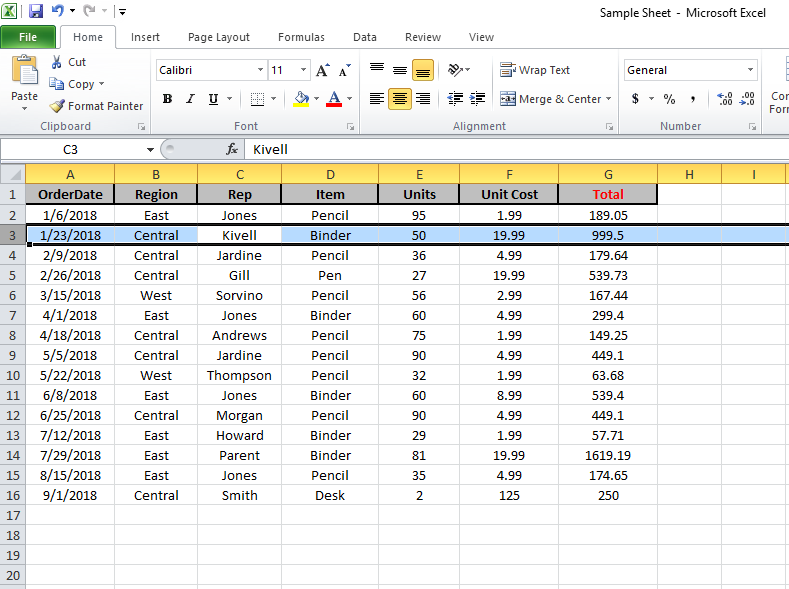
Using the command once, first selects the block of cells that you are currently active in.
Using the command a second time, then selects everything within your spreadsheet.
See images above for hitting it once, then twice.
2. Select Formulas
Clicking Formulas will grab all the formulas in your current spreadsheet (pictured below).
This is a fast way and easy way to quickly identify and change the formatting of any formulas in your spreadsheet.

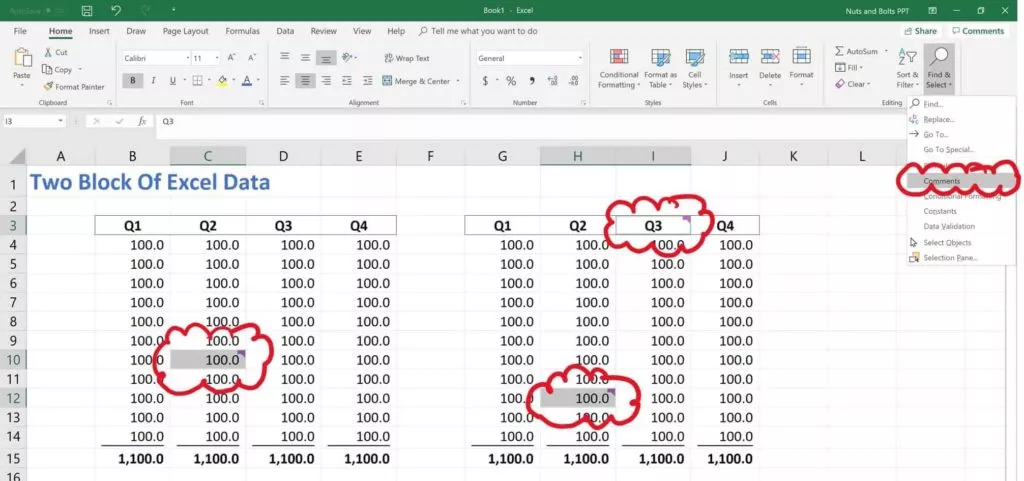
3. Select Comments
Clicking Comments automatically selects all of the comments in your spreadsheet (pictured below).
Comments show up in your spreadsheet as little markers in the upper-right hand corner of your cells. If you don’t want to waste time searching for them, simply use these command.
This allows you to quickly grab all the comments in your spreadsheet and format the cells.
4. Select Conditional Formatting
Clicking Conditional Formatting selects any cells within your spreadsheet that have conditional formatting in them.
This allows you to spot check or change the conditional formatting rules for those specific cells.
To learn more about conditional formatting rules, and how to use them, see this article by Microsoft here.
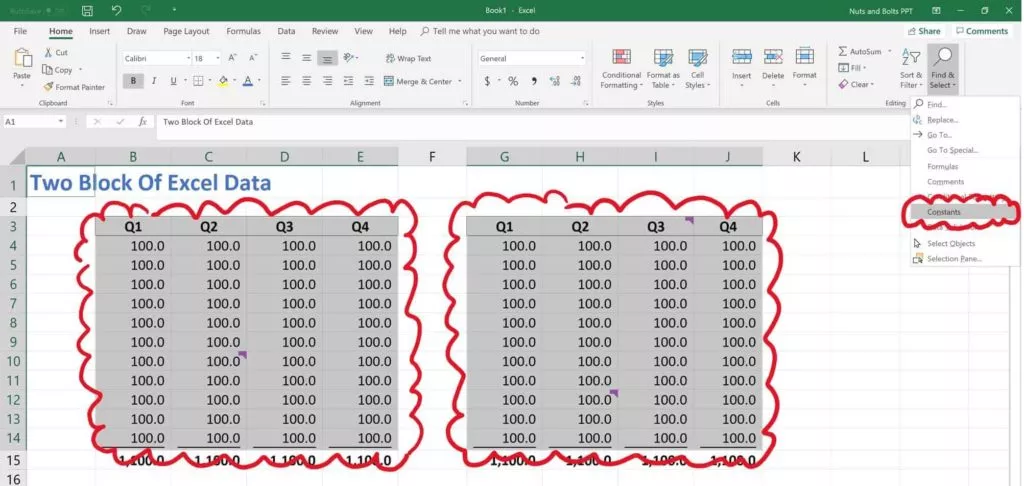
5. Select Constants
Selects all the constant values in your spreadsheet (i.e. values that are not formula-driven).
This is a fast and easy way to find all of the inputs that someone is using in their financial model or spreadsheet so that you can double-check their assumptions (pictured below).
6. Select Objects
Turns your cursor into an arrow that allows you to select objects that are within your spreadsheet (charts, pictures, SmartArt graphics etc.).
This is useful when you have a large spreadsheet or dashboard and you want to just select a single graphic without accidentally selecting the cells around it.
7. The Selection Pane in Excel (Alt + F10)
Opens the Selection Pane in Excel, showing you all of the charts, pictures, SmartArt graphics, etc., that are currently within your active spreadsheet.
Just keep in mind that the Selection Pane will only show you objects that are within the current sheet you are on. It will not show you objects that are on other sheets within your Excel file.
Select All Shortcuts in Excel (Ribbon Guides):
On top of using your mouse to activate the different Select commands in Excel, if you are on a PC, you can also use your Ribbon Guides to shortcut these commands (see key combinations below).
If you use any of these selection commands A LOT when working in Excel and are on a PC, I highly recommend learning these key combinations to save you time.

On a PC, your Ribbon Guide Shortcuts to these different commands are:
- Formulas: Alt, H, FD, U
- Comments: Alt, H, FD, M
- Conditional Formatting: Alt, H, FD, C
- Constants: Alt, H, FD, N
- Data Validation: Alt, H, FD, V
- Select Objects: Alt, H, FD, O
- Selection Pane: Alt, H, FD, P
Note: When using your Ribbon Guide shortcuts, you do not need to hold down the keys to make them work. Instead, simply hit and let go of them one at a time.
Select All in PowerPoint

You have 3 different types of selection options in PowerPoint (all of which you can shortcut on a PC using your Ribbon Guide shortcuts as discussed further below).

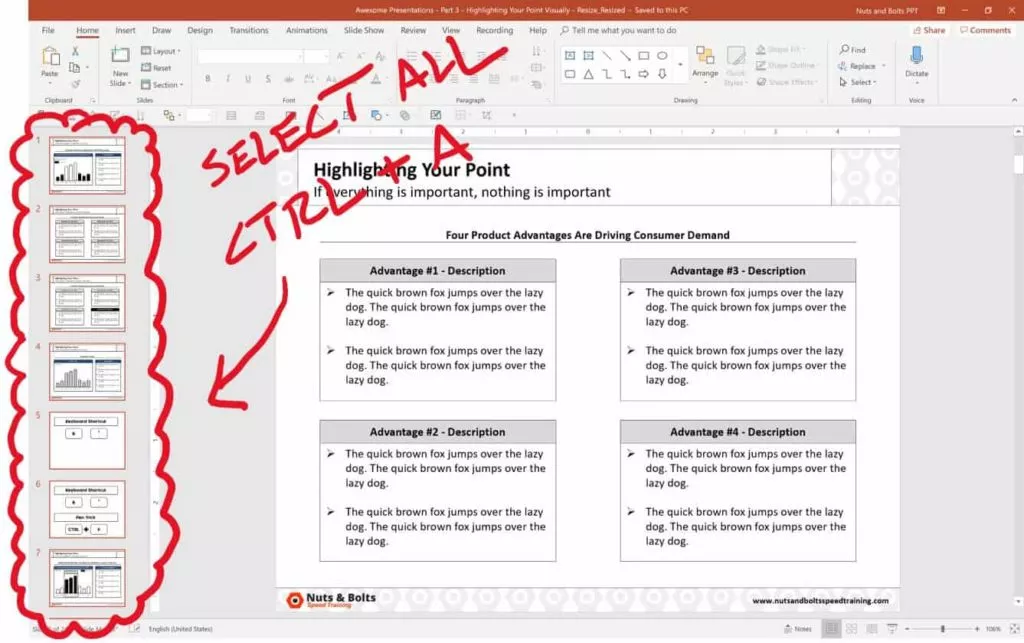
1. Select All (Ctrl + A)
Selects all of the objects that are currently on your slide.
This shortcut works in all of the different PowerPoint views including:
- The Normal View
- The Slide Master View
- The Handout Master View
- The Notes Master View, etc.
To learn more about setting up these different views in PowerPoint, see our guide on custom PowerPoint templates here.
On top of that, if you first click into the thumbnail view (pictured below) you can use the command to grab all of your slides. This allows you to copy and paste those slides, apply a new layout, reset the slides, etc.
2. Select Objects
This is the default selection option in PowerPoint, allowing you to select objects (shapes, text boxes, charts, SmartArt graphics, etc.) which is what all of your slides are made of.
3. Selection Pane in PowerPoint (Alt + F10)
Opens the Selection Pane in PowerPoint, giving you a bird’s eye view of everything that is on your slide (even if it is buried beneath something else).
To learn other useful PowerPoint shortcuts like this to save you time in the program, see our guide here.
Selection Pane Shortcuts in PowerPoint
To learn more about how to use the Selection Pane shortcuts in PowerPoint, watch the short video below.
Inverse selected objects in PowerPoint
Another way to cleverly use the Select All command in PowerPoint is to ‘inverse-select’ your objects.
For example, let’s say you want to select EVERYTHING on your slide except for the title.
To do so, follow these steps:
- Hit Ctrl + A to select everything on your slide
- While holding the Shift key or the Ctrl key, select your Title to un-select it
Doing so leaves you with everything on your slide selected except for your slide title (or whatever else you unselected by holding the Shift or Ctrl key).
Select All shortcuts in PowerPoint (Ribbon Guides)
Besides navigating these selection commands using your mouse, you can also use your Ribbon Guide shortcuts to access them if you are on a PC.
To use your Ribbon Guide shortcuts, simply hit and let go of the Alt key, and then follow the alphabetical or numerical queues to find your command (all shortcut combinations are listed below).

On a PC, your Select All Ribbon Shortcuts are:
- Select All: Alt, H, SL, A
- Select Objects: Alt, H, SL, O
- Selection Pane: Alt, H, SL, P
Note: When using your Ribbon Guide shortcuts, you do not need to hold down the keys to make them work. Instead, simply hit and let go of them one at a time.
Conclusion
So those all the different ways you can Select All in Word, Excel and PowerPoint, and the different Select All shortcuts available to you if you are on a PC version of Microsoft Office.
Knowing how to properly use these, allows you to quickly grab exactly what you’re looking for so you can format it. This saves you time and gets you once step closer to Happy Hour.
If you are interested in taking your PowerPoint skills to the next level, you can learn more about our online courses and training here.
What’s next?
Last updated: January 12, 2017
When you need to make changes that affect multiple cells in Excel, the best way to do so is typically to use your mouse to select all of the cells that you want to modify. But if you need to make a change that affects every cell in your spreadsheet, that is not always the fastest way to select all of the cells. This is especially true when you are working with very large spreadsheets.
But there is a helpful button on an Excel spreadsheet that can help you to select all of the cells in your worksheet very quickly. Out short tutorial below will show you where to find this button.
The steps in this article are going to show you how to select every cell in your spreadsheet. Once all of the cells are selected, you can universally apply changes, such as clearing formatting from the worksheet, or copying all of your data so that it can be pasted into a different spreadsheet. If you need to select all of the worksheets in a workbook, instead of all the cells in a worksheet, then you can continue to the next section.
Step 1: Open your spreadsheet in Excel 2010.
Step 2: Click the button at the top-left corner of the spreadsheet, between the 1 and the A.
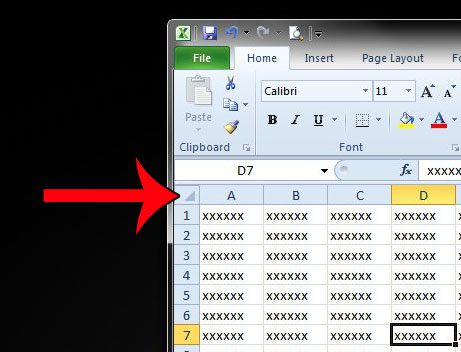
You can also select all of the cells in your spreadsheet by clicking on one of the cells in the spreadsheet, then pressing the Ctrl + A keys on your keyboard.
How to Select All in Excel 2010 – How to Select All of the Worksheets in a Workbook
While the above method provides two options for selecting all of the cells in Excel, you might find that you need to select all of the worksheets in a workbook instead. This is helpful when you have a workbook with a lot of different sheets, and you need to make a change that will apply to all of them. Selecting all of the sheets allows you to do perform that change one time, instead of individually for each sheet.
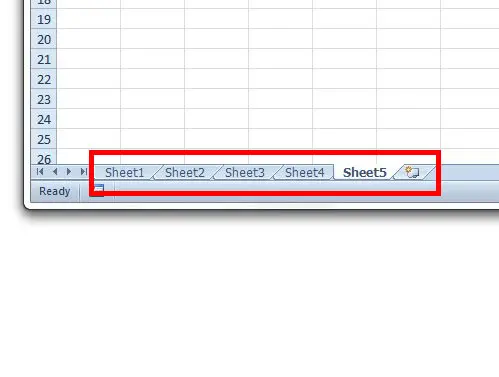
Step 1: Locate the worksheet tabs at the bottom of the window.
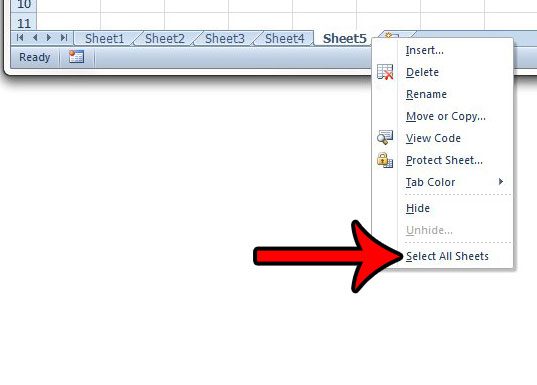
Step 2: Right-click on one of the worksheet tabs, then click the Select All Sheets option.
Is Excel only printing part of your spreadsheet, and you can’t figure out why? Read here to learn about a setting that you should check.

Matthew Burleigh has been writing tech tutorials since 2008. His writing has appeared on dozens of different websites and been read over 50 million times.
After receiving his Bachelor’s and Master’s degrees in Computer Science he spent several years working in IT management for small businesses. However, he now works full time writing content online and creating websites.
His main writing topics include iPhones, Microsoft Office, Google Apps, Android, and Photoshop, but he has also written about many other tech topics as well.
Read his full bio here.
In this article, we will learn how to select an entire column in excel and how to select whole row or a table using keyboard shortcut keys. While preparing reports and dashboard in Excel, it’s time-consuming to select an entire column using the mouse. These excel shortcuts are useful to save time and help you do your work faster using the keyboard shortcut keys. How to select row with the Excel shortcut?
Selecting cells is a very common function in Excel. It performs many tasks like addition, deletion and width adjustment of multiple rows and columns while applying the formula on data in Excel. Shortcut keys to select all rows and columns can provide an easier and quicker method of using MS Excel 2016. We have a data set here, let’s understand with the example.
How to Select Column in Excel Using Keyboard Shortcuts (CTRL+SPACE)
While navigating on an excel sheet with large data, excel column selection is very basic yet important task. Let’s see how easy is selecting columns in excel.
- Select any cell in any column.
- Press Ctrl + Space shortcut keys on the keyboard. The whole column will be highlighted in excel to show the selected column, as shown below in the picture. You can also say that this is a shortcut to highlight column in excel.
If you wish to select the adjacent columns with the selected column, use Shift + Left/Right arrow key(s) to select entire columns left or right of that column. You can go either way but can’t select both sides of column.
Let’s Select Entire Columns C to E
- To Select Column C:E, Select any cell of the 3rd column.
- Use Ctrl + Space shortcut keys from your keyboard to select column E (Leave the keys if the column is selected).
- Now use Shift + Right (twice) arrow keys to select columns D and E, simultaneously.
- You can select columns C:A by using shortcut Shift + Left (twice) arrow keys.
- You can select columns to the end of sheet using Ctrl+Shift + Left shortcut.
- To select to end of column from a cell, use excel shortcut Ctrl+Shift + Down arrow.
You can’t select columns A:E if you start from any column in between. I am repeating, you can only select entire columns in Excel from left or right of initial column.
How to Select Entire Row Using Keyboard Shortcuts in Excel (SHIFT+SPACE)
This command is used for selecting rows in excel. This is also a shortcut to highlight a row in excel.
- Select the cell in the row you wish to select.
- Press Shift+ Space key to select the row on the selected cell (release the keys, if the row is selected).
- If you wish to select the adjacent rows with the selected row, press Shift+ Up/down arrow key(s) to select the UP or DOWN to that row. You can go either way but can’t access both sides of it.
Selecting 3rd to 5th whole rows of the sheet can be done in two ways:
- Select any cell of the 3rd row, press Shift + Space key to select the row.
- Now use Shift + Down(twice) arrow key to select the 4th and the 5th row.
- Or you could go another way from 5th to 3rd row but you won’t be able to select 3rd and 5th row both, starting from the 4th row.

Select multiple rows and columns of a table with shortcut keys and perform your tasks efficiently.
Frequently Asked Question:
How to apply formula to entire column?
Easy, write a formula in the first cell of column and press CTRL + SPACE to select entire column and then CTRL+D to apply formula to entire column.
How to select all in excel?
To select all data press CTRL+A.
How to highlight a row in excel?
Just select any cell in the row you want to highlight and Press Shift+ Space.
How to select multiple cells in Excel mac?
Hold down the command key and scroll over the cells to select. If the cells are not adjacent then click on the cells while holding the command key.
Hope you understood how to select columns and rows with shortcuts in Excel. You can perform these tasks in 2013 and 2010. Explore more links on shortcut keys here. If you have any query, please mention in the comment box below. We will help you.
If you liked our blogs, share it with your friends on Facebook. And also you can follow us on Twitter and Facebook.
We would love to hear from you, do let us know how we can improve, complement or innovate our work and make it better for you. Write us at info@exceltip.com