
To insert an object, click Object on the Insert tab.
Contents
- 1 Where is the Insert Object tool in Word?
- 2 How do you insert an object in Word?
- 3 Where is the insert object in Word o365?
- 4 What is insert in MS Word?
- 5 How do I open an OLE file in Word?
- 6 How do you insert an object?
- 7 How do I insert multiple objects in Word?
- 8 What are objects in MS Word?
- 9 Which tab is used to insert action button?
- 10 What are the 2 options when inserting an object?
- 11 Why can’t I see insert object in Powerpoint?
- 12 How do I insert an object in Word 2016?
- 13 What object Cannot be insert in a Word document from Insert tab?
- 14 How do I insert an attachment into an icon in Word?
- 15 Where is the Insert tab on the ribbon bar?
- 16 Where on the Insert tab could you add a symbol?
- 17 Where can I find OLE objects in Word?
- 18 How do I fix Ole action in Word?
- 19 Which of the following object can be inserted in your document?
- 20 How do I insert multiple boxes in Word?
You can insert an existing file into a Word document and insert text in Word around it.
- Open Document and Click “Insert”
- Open the Word document and click the “Insert” tab on the ribbon menu at the top of the screen.
- Click the “Object” Button.
- Click the “Object” button in the Text group to open the Object dialog box.
How do you insert an object in Word?
Link or Embed a file
- Go to Insert > Object.
- Select Create from File.
- Select Browse and choose the file you want to use.
- Select Insert.
- Choose Display as icon to embed, or Link to file for a link.
- Select OK.
Where is the insert object in Word o365?
Make sure you have the file you want to attach present on your system. Once the document is open, go to the Insert tab on the ribbon and on the Text toolbox, select the Object button. From the menu that opens, select ‘Object’. A new window will open.
What is insert in MS Word?
Insert is a file menu and Ribbon section in software that allows the user to add something (e.g., picture) into a document or file. For example, in Microsoft Word, the user may use the Insert tab in the Ribbon to insert a picture of themselves into their document. Tip.
How do I open an OLE file in Word?
You have an Excel embedded OLE object inserted into a formal module as an icon.
- Then, export the module to Word using File -> Export -> Microsoft Office -> Word.
- Then, open the Excel OLE.
- It opens on the same Microsoft Word document instead of opening into a ‘new’ window.
How do you insert an object?
Embed an object in a worksheet
- Click inside the cell of the spreadsheet where you want to insert the object.
- On the Insert tab, in the Text group, click Object .
- In the Object dialog box, click the Create from File tab.
- Click Browse, and select the file you want to insert.
How do I insert multiple objects in Word?
2 Answers
- Copy all your files to clipboard (Ctrl + C)
- Open the word document you would like to embed your files and click the keyboard combinatin Ctrl + Alt + V [Paste Special] and choose files option and click OK.
What are objects in MS Word?
An object is a combination of data and the application needed to modify that data. You can thus embed objects in or link them to documents created with a different application. For instance, an Excel spreadsheet can be embedded within a Microsoft Word document using OLE.
Which tab is used to insert action button?
Put an action button on your slide
On the Insert tab, click Shapes, and then under Action Buttons at the bottom of the menu, click the button shape that you want to add.
What are the 2 options when inserting an object?
There are two options to insert objects: Create New: Insert object directly. Select the type of the object you want to insert in the Object type roll-down list. WPS Spreadsheets supports a variety of object types, such as WPS Spreadsheets Workbook, WordPad document, and Microsoft Excel among others.
Why can’t I see insert object in Powerpoint?
When you see only the frames of the object but not the icon, it’s probably because you have turned on the “Show picture placeholders” option. Click “File” tab then “Options” to open the “Word Options” dialog box. Then click “Advanced” on the left pane.
How do I insert an object in Word 2016?
Microsoft Word 2016
- Open the first document.
- Place the cursor where you want the second document to be inserted.
- From the Insert tab, Text group, click on the down arrow next to Object and choose Text from file.
- Select the file to be inserted.
- Click on Insert.
What object Cannot be insert in a Word document from Insert tab?
Discussion Forum
| Que. | Which type of file cannot be inserted in a word document via Insert Object option |
|---|---|
| b. | Bitmap Image |
| c. | MP3 file |
| d. | Video Clip |
| Answer:MP3 file |
How do I insert an attachment into an icon in Word?
On the Insert tab, click the Object button near the right end. In the dialog that opens, click the Create From File tab. Click the Browse button and locate the document file to insert. Check the box for Display As Icon, and click OK.
Where is the Insert tab on the ribbon bar?
second tab
Insert tab:
Insert Tab is the second tab in the Ribbon.
Where on the Insert tab could you add a symbol?
From the Insert command tab, in the Symbols group, click SYMBOL » select More Symbols… The Symbol dialog box appears. The special character appears in your document.
Where can I find OLE objects in Word?
The Document Inspector detects OLE Objects or packages that have been inserted from the Object dialog box (click Insert > Object in your Office application), or by using copy and paste commands.
How do I fix Ole action in Word?
Solution. The solution is generally simple — switch to MathType and close the dialog box. Sometimes it’s not that simple though. What if you see MathType’s icon in the Windows Taskbar, but clicking it doesn’t bring the window up so you can close the dialog?
Which of the following object can be inserted in your document?
The Insert tab contains various items that you may want to insert into a document. These items include such things as tables, word art, hyperlinks, symbols, charts, signature line, date & time, shapes, header, footer, text boxes, links, boxes, equations and so on.
How do I insert multiple boxes in Word?
Go to Insert > Text Box, and then select one of the pre-formatted text boxes from the list, select More Text Boxes from Office.com, or select Draw Text Box.
Last Updated: February 6, 2022 | Author: Leroy Roberts
What is an object in Word?
An object is a combination of data and the application needed to modify that data. You can thus embed objects in or link them to documents created with a different application. For instance, an Excel spreadsheet can be embedded within a Microsoft Word document using OLE.
How do you insert an object in Word 365?
Make sure you have the file you want to attach present on your system. Once the document is open, go to the Insert tab on the ribbon and on the Text toolbox, select the Object button. From the menu that opens, select ‘Object’. A new window will open.
How do I insert text into an object in Word?
Right-click anywhere in your shape and click the “Add Text” command. This places an insertion point in the shape where you can type your text. Once you’ve added whatever you want to write, the “Format” tab has tools you can use to give your text a little pop with things like text styles and shading.
How do we insert and format objects in Microsoft Word?
Under “Insert” tab on the ribbon menu, select “Pictures” from the ribbon. 2. A new window will open and from there you’ll be able to select the picture you want to add to your document. Navigate the folders on your computer to the left until you find the picture, select it, and click “Insert.”
Where is the object button in Word 2020?
To insert an object, click Object on the Insert tab.
How do you insert an object in Word Online?
Microsoft Word 2016
- Open the first document.
- Place the cursor where you want the second document to be inserted.
- From the Insert tab, Text group, click on the down arrow next to Object and choose Text from file.
- Select the file to be inserted.
- Click on Insert.
Where is object in insert?
On the Insert tab, in the Text group, click Object. Click the Create from File tab. In the File name box, type the name of the file, or click Browse to select from a list.
Where is the object button arrow in Word?
What kind of objects can be inserted in Word document?
Answer: We can insert pictures, clipart images, a variety of shapes, symbols, special characters and tables etc.,in a document and manipulate them to be placed with the text on a page.
How do I make headers different in Word?
Click anywhere in the section of your document for which you want to create a different header or footer. In Word 2010 and 2007, select the Insert tab, and then select either Header or Footer. Then, select Edit Header or Edit Footer. In earlier versions of Word, from the View menu, select Header and Footer.
Which of the following object can be inserted in your document?
The Insert tab contains various items that you may want to insert into a document. These items include such things as tables, word art, hyperlinks, symbols, charts, signature line, date & time, shapes, header, footer, text boxes, links, boxes, equations and so on.
How do I add a hanging indent in Word?
Create a hanging indent
- Select the text where you want to add a hanging indent.
- Go to Home > Paragraph dialog launcher. > Indents and Spacing.
- Under Special, select Hanging. You can adjust the depth of the indent using the By field.
- Select OK.
How do you make each page have a different Header in Word?
Using sections, you can have a different header on each page of your document or on different groups of pages. When you want a different header on a page, go to the Breaks menu on the Page Layout tab and select Next Page. With the cursor in the new section, activate the page header and add content.
How do you set up a table of contents in Word?
On the toolbar ribbon, select References. Near the left end, select Insert Table of Contents. (Or select Table of Contents > Insert Table of Contents. The table of contents is inserted, showing the headings and page numbering in your document.
How do I insert multiple pictures into Word?
Inserting Multiple Graphics in a Document
- Place the insertion point at the place in the document where you want the graphics inserted.
- Display the Insert tab of the ribbon.
- Click the Picture tool. …
- Use the controls in the dialog box to locate the folder that contains the images.
- Press Ctrl+A. …
- Click Insert.
Select objects, shapes, pictures or text boxes, to change or move them. Sizing handles indicate that a shape or object has been selected.
Click or tap the object to select it. If that doesn’t select it, go to Home > Select and do one of the following:
-
To select all of the text in the document, choose Select All.
-
To select objects that are hidden, stacked, or behind text, choose Select Objects. To select an object, click or tap when your pointer becomes a selection arrow
 as it moves over an object. To select multiple objects, press and hold Ctrl while you click or tap the objects that you want.
 -
To select text with similar formatting, choose Select All Text with Similar Formatting.
-
To open the task pane where you can select, multi-select, show, hide, or change the order of objects, choose Selection Pane, and then select the options that you want.
 as it moves over an object. To select multiple objects, press and hold Ctrl while you click or tap the objects that you want.

Tips for selecting shapes and objects
|
To do this |
Do the following |
|---|---|
|
Select multiple objects. |
Press and hold Shift or Ctrl while you select the objects. |
|
Select an object that is under other objects and cycle forward through the stack of objects. |
Select the top object, and then press Tab. |
|
Select an object that is under other objects and cycle backward through the stack of objects. |
Select the top object, and then press Shift+Tab. |
|
Select objects that are part of a group. |
Select the group, and then do one of the following:
|
|
Cancel the selection of one object at a time. |
Press and hold Shift or Ctrl while you click or tap each object. |
See Also
Group or ungroup shapes, pictures, or other objects
Select objects, shapes, pictures or text boxes, to change or move them. Sizing handles indicate that a shape or object has been selected.
Using the Selection Pane
If you can’t select an object or there many objects to select, use the Selection pane.
-
Select one of the objects you want to manage.
-
Go to Shape Format or Picture Format> Arrange
> Selection Pane.
-
The Selection Pane opens with all your objects listed, and you can do any of the following:
-
Drag an item up or down in the list to change the order. If you have objects that cover each other, this will bring an object to the front, or put it behind another object.
-
Choose to show or hide objects from the Selection Pane. To hide an object, select the eye icon in the Selection Pane indicating that the object is Showing
. The icon changes to a simple icon indicating that the object is Hidden from view. To show the object once again, select the Hidden icon , and the object reappears. -
Group or ungroup objects listed in the Selection Pane. If you select multiple objects by using Command + Click, you can then group them or ungroup them by selecting Format Shape or Format Picture > Arrange
> Group Objects.
-
 > Selection Pane.
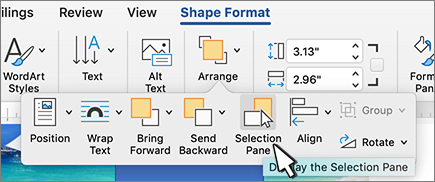
 . The icon changes to a simple icon indicating that the object is Hidden
  from view. To show the object once again, select the Hidden icon
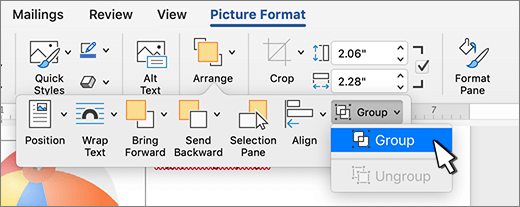

Word processing applications have never had it better!
Objects in Ms Word – a few decades ago, a typewriter qualified as a functional word processing tool. As the personal computer gained popularity, people were able to dispose of their beloved typewriter and switch to “electronic” editing. This came with one BIG difference: you could easily alter/ erase what you’d already typed without re-doing the whole page. Cool!
Today, the big players have taken word processing ms world software tools to another level altogether, as they’ve gone well beyond the objects “text” in words. Graphics, vector shapes, clip-art, data charts and graphs, varied image files, animated pictures, sound files and media files – you name it, you’ve got it, all making the humble word processing ms world software a powerful desktop-publishing tool!
This post teaches you to play with “objects” in MS Word, arguably the most popular word processing software available in the market. With its large variety of object-editing features, you can create whole books, magazines, web pages, etc., all from the comfort of your home.
Objects in MS Word, who?
At this point, you may wonder what an object in MS Word is. As we said, it’s no longer about the text. And so, an object is any non-text component that is supported objects in MS Word.
This could include:
- Screenshots from other applications.
- Pictures, lots of them, in several varieties and formats. Again, this includes photos, graphics, vector images, pixelated images, and any sort of image file that is compatible with objects in MS Word (Eg. jpeg, bmp, gif, png, tiff, etc.).
- Animated pictures, too (typically supported with animated gif files).
- Clipart images (includes vector drawings, cartoons, shapes, smart-art and their lot).
- Sound files (typically in wav format).
- Data charts (includes those created in MS Word compatible software like MS World Excel).
- Fancy word-art (which is really visually-enhanced text).
- Text boxes, which are a lot more flexible than plain text.
- Text copied from other applications. (Yes, they become objects once they’re imported in MS Word.)
…and plenty more!
In fact, you can take a look at the large variety of objects in MS Word available for use through the “Insert” tab screen.

In most cases, the object is locally created within your Ms Word document (like in the case of tables, shapes, etc.). But in some cases, you can also import an object from an external application or file. Here, don’t forget to explore the Insert-Object command (highlighted in the above pic) that allows you to import compatible components from other applications (like image files, sound files, pdf files, Excel worksheets, PowerPoint presentations, xml and html files, etc.).
Understanding OLE
Another term to get familiar with when working with objects in MS Word is OLE: Object linking and embedding. This is the protocol used by MS Word to insert, edit and work with external objects when you import them into your local Ms Word document. So how does this happen? Here are your options…
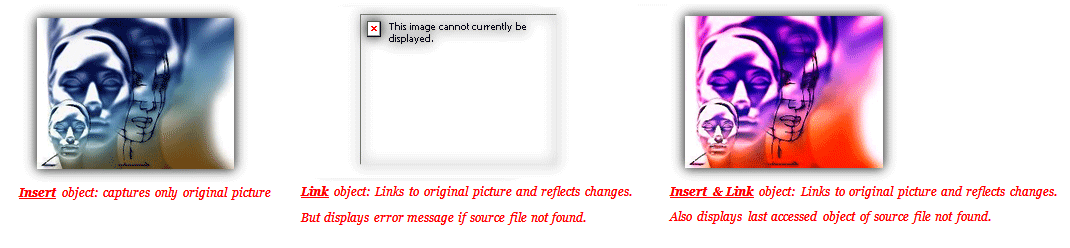
- Insert (embed) the entire object:
Here, the external object is inserted into your local MS Word document in its present state. Any further changes external to MS Word are not reflected in your document. This is the default option and happens seamlessly when you copy and paste images, text, charts and other compatible objects in MS Word from external applications. This is also the default option when you explicitly “insert” an object (picture, clipart, shapes, files, etc.) through a file.
- Link to the original object:
This links to the original document, so you have a live version in your local MS Word document. Any external changes are also reflected in your document. But, the source file must be accessible in the path you “linked”. If not, Word displays an error message.
- Insert and link to the original object:
This is like option (2) with one critical difference: if the source file is no longer accessible to Word, it displays the last captured version.
Advanced Tip: Let us assume you do this:
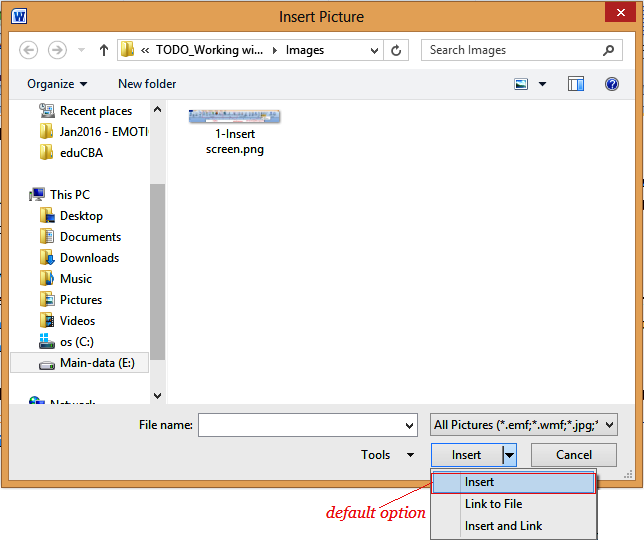
- Insert an existing picture through a file (Click on Insert-Picture and use any of the above options).
- Edit the original picture file.
- At this point, changes will be reflected with options (2) and (3).
- Delete the original picture file.
- Now, option (2) will display an error message, while option (3) will display the last available version.
With this knowledge in place, you are now equipped to explore working with objects in MS Word in greater detail.
Working with Pictures (Pixelated Images)
You’ve heard the old adage that says, “a picture’s worth a thousand words”. There’s no wonder then that pictures remain the most popular object with MS Word users! You’ve already had a small glimpse into using picture objects in MS Word in the above illustration, but there’s a LOT more you can do with it. Here’s how it goes…
- Insert a picture:
You can do this in any of the following ways.
- Click on Insert-Picture and choose your image file. Word supports a large variety of standard image file formats like jpeg, png, bmp, tiff, gif, etc.
- Copy a picture from another application and paste it into your Word document (Control + V).
- Paste a picture directly from a file through the Home-Paste-Paste Special
Advanced Tip: MS Word version 2013 and above also support the insertion of “online” pictures. This is essentially the same thing but allows you to source pictures from the web. Accordingly, you are provided options to pick image files from online sources like:
- com (useful to source royalty-free images and clip art)
- A Bing-powered search
- MS’s own OneDrive
- Your Flickr and Facebook profiles.
- Edit the picture:
You’d be surprised to know that versions 2010 and above provide powerful image-editing tools right within your MS Word software. To access them, simply click on your picture. This should automatically reveal the potent “Picture Tools” tab. (Note: You should explicitly click on the tab to access its features.)
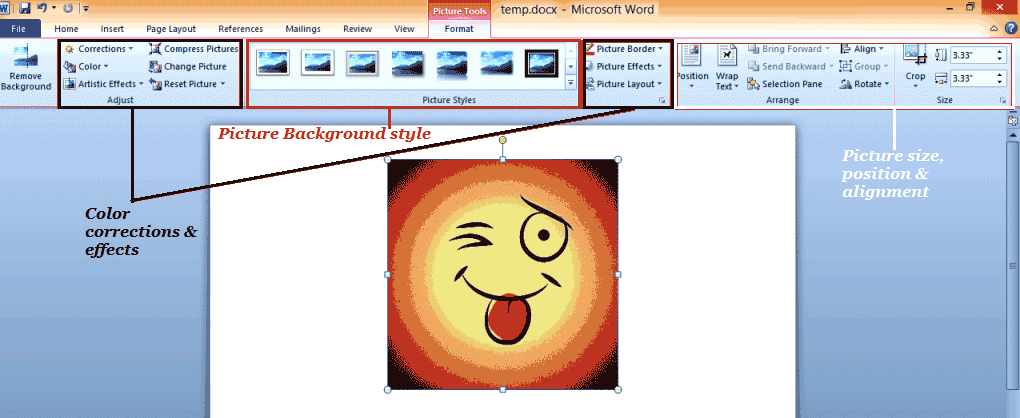
As you can see, this reveals a host of one-click image-editing tools, most of which also provide a preview. A few key settings are explained below.
- Remove background
As the name indicates, this can provide you with an almost transparent background. MS Word provides you options to set markers to define the area you want to remove from your image when you select this option. Do note that this option is not supported for Windows media files that capture vector.
- Corrections, Color
Together, they help you apply color corrections to your picture (includes hue, saturation, color tone, brightness and contrast settings).
- Artistic effects, Picture Effects
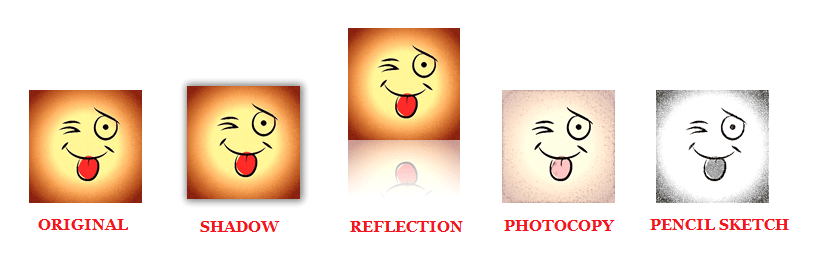
These are much like the “filters” provided with other fancy image editing applications. For instance, you can add a shadow, create a reflection, turn an image into a gray-scale pencil sketch, and do a lot more fun stuff with a single mouse click. A few effects are illustrated below.
- Picture Styles
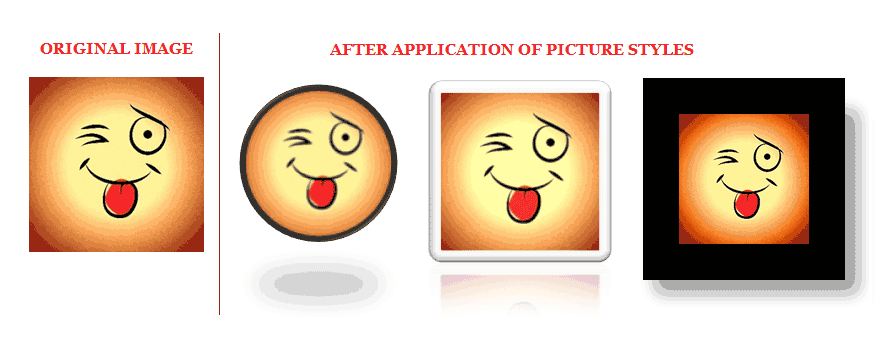
These are much like frames, adding a canvas to your image with a single mouse click. Again, this is better explained through an illustration.
- Position, Wrap text and Align settings.
Together, they help you control your picture’s sizing, alignment, and placement in the overall page layout. For instance, you could choose to center your picture around the rest of the text in your document or capture it in the right-top corner like a page marker, or simply have the picture in line with text (much like a magazine layout). Again, MS Word provides a preview for easy selection.
Working with Vector Images
Unlike pixelated images, which focus on the dynamics of color, vector images focus more on the shapes and forms captured in the image. MS Word supports clipart images, basic shapes, flow charts, callouts and banners.
Let us try a simple exercise here to understand more on this.
- Click on Insert-Shapes.
- This will bring up the shapes dialog boxes with several sub-categories.
- Scroll to “Stars and Banners” and choose the “Curved Up Ribbon” shape.
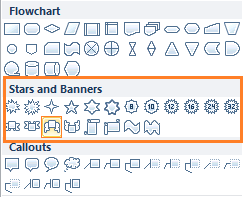
- Click on the spot where you want to draw the shape, and drag your mouse till you get a reasonable size.
- Type “STAR Of the Year 2016”.
- Change the font as you please and set the font color to a bright yellow. (You can additionally use the Format-Font settings (Control + D) to add a shadow text effect to the text.)
- Once you’re done, click on the shape. This will bring up the resourceful “Drawing Tools” tab (the vector equivalent of the Picture Tools tab).
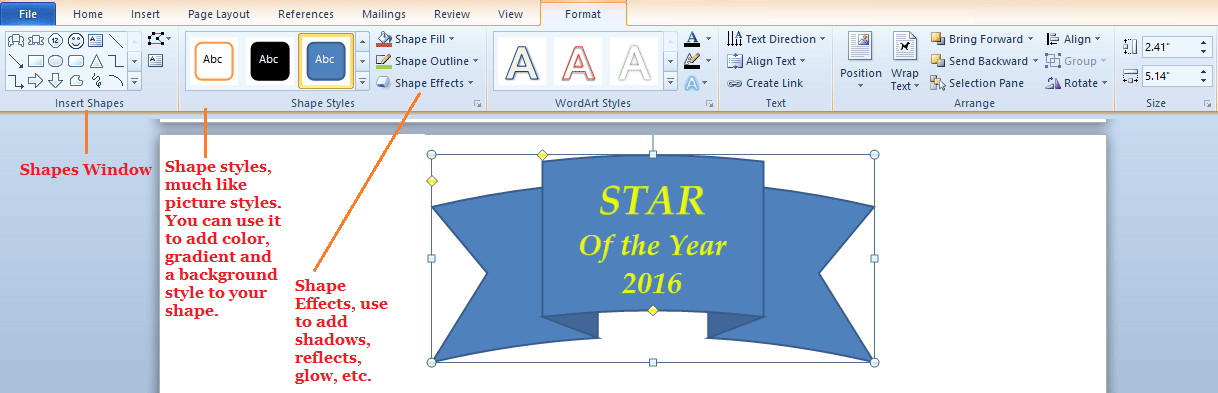
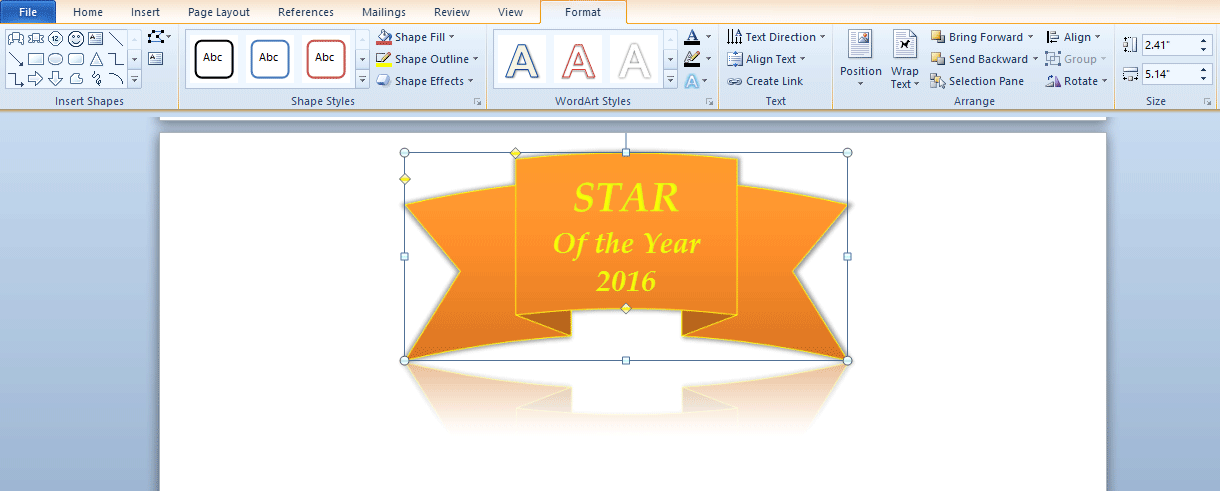
- Next, scroll through the Shape Styles dialog until you find an intense, eye-catching color for your banner.
- Click on the “Shape Effects” command to explicitly add a Shadow and (Use the default settings and click ok.)
And voila, you have an eye-catching shape!
See how easy that was?
MS Word also comes loaded with several interesting shapes. Take time to explore them as you learn to:
- Insert a Text Box. This allows you to have greater control over a slice of text that you can then separate (and copy, duplicate, etc.) from the rest of the document.
- Explore basic shapes, block arrows and flow chart shapes to create a complex process flow diagram for your organization.
- Use Callouts, Stars and Banners to highlight important messages in your document.
- Use multiple shapes (like a basic triangle and circle) and order them using the Arrange commands in the Drawing Tools tab.
Advanced Tip: The Drawing Tools tab is revealed each time you click on a vector image. If clicking on a picture reveals this tab, then Word considers it a vector image. To fix this, you must convert the picture into a compatible pixel-image format (like jpeg, bmp, png, tiff, etc.) and insert it into your document again to access the Picture Tools.
Working with Smart Art
Recent versions of Word also come empowered with “SmartArt,” an object type that literally puts the “smarts” into shape art! SmartArt shapes are essentially complex shapes and can facilitate the easy drawing of organizations charts, lifecycle processes, pyramid charts, lists, and plenty more. We will explore this with a simple exercise to create an organizational hierarchy chart.
- Click on Insert-SmartArt.
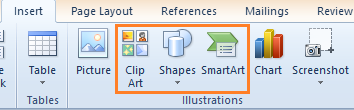
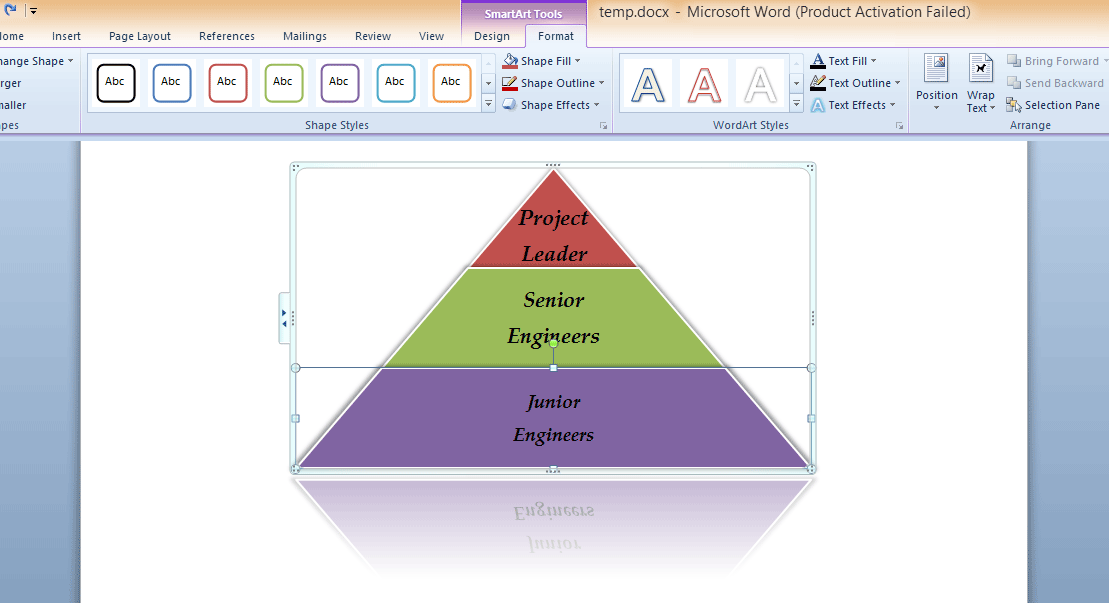
- In the dialog box that opens, click on “Pyramid” and choose “Basic Pyramid”.
- This will create a pyramid with 3 rungs. In each rung, click on the text and type “Project Leader”, “Senior Engineers”, and “Junior Engineers” from top to bottom.
- Once you’re done, click on the SmartArt to reveal the “Smart Tools” tab.
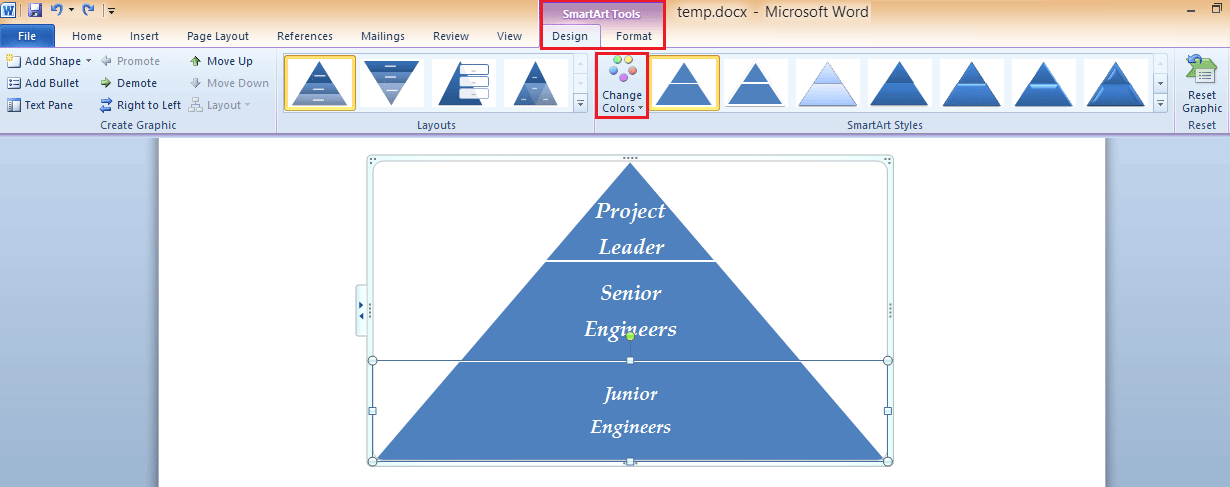
Unlike the previous tabs, the Smart Tools tab has 2 sub-tabs:
- The Design tab:
This reveals settings that are specific to the SmartArt shape you’ve chosen. Again, it has a style you can use, a layout, and settings to edit your pyramid shape (like add a rung, alter the order, etc.).
- In our example, we will use this to “Change Colors”. Click on this button and choose a set that offers different colors for each rung of the pyramid.
- The Format tab:
This is much like the Drawing Tools tab and allows you to control each component of your SmartArt. For instance, our pyramid is treated as a combination of simpler shapes, and each shape can be individually selected (by clicking on it) and altered using this Format tab.
- Select all parts of the pyramid and use the “Shape Effects” command to add a shadow effect and reflection effect to the pyramid (just like you did in the previous exercise.) Your final shape should look a bit like this:
Nice work!
Advanced Tip: While we’ve explored a basic sample here, you can explore SmartArt to:
- Create organization charts and hierarchies.
- Capture a decision-making process (like a process flow).
- Illustrate a workflow in your company.
- Note the dynamics between departments through a relationship diagram.
- List important contents.
- Show a matrix of information.
Working with Tables
If you’re familiar with Microsoft Excel, then you know the superior value a well-placed table or chart can provide to your document. They are an excellent format to seamlessly communicate information on data and numbers. A table is used to captures data information as a collection of rows and columns.
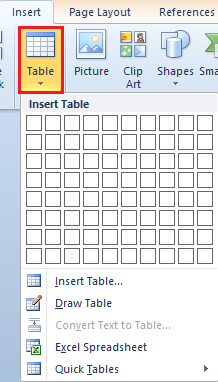
- To insert one in MS word, use the Insert tab screen, and click on the Table A dialog box will allow you to create the table in multiple ways.
- Drag the cursor across the number of rows and columns you want to insert to create a new table. OR…
- Click on the “Insert Table…” option and key in your table’s dimensions. OR…
- Manually create the table from scratch, much like you would do on paper. You first draw the border and then start filling in rows and columns. (This option comes in handy when you are still exploring ideas and wish to create a work-in-progress draft of a table.) OR Objects
- Import a table from an existing Microsoft Excel file (much like importing a picture file). Again, you can choose to simply embed the file (through an Insert) or additionally link to the file, so your data remains updated at all times.
- In our example, use the “Insert Table…” option to create a new table with 3 rows and 3 columns and add data into it as given below. When you complete data for row 3, click on the tab key to create a new row.
| # | NAME | DESCRIPTION |
| 1 | Item 1 | This is a sample description for Item 1 |
| 2 | Item 2 | This is a sample description for Item 2 |
| 3 | Item 3 | This is a sample description for Item 3 |
| 4 | Item 4 | This is a sample description for Item 4 |
- Once you’re done, click on any part of the table. This will reveal the “Table Tools” tab.
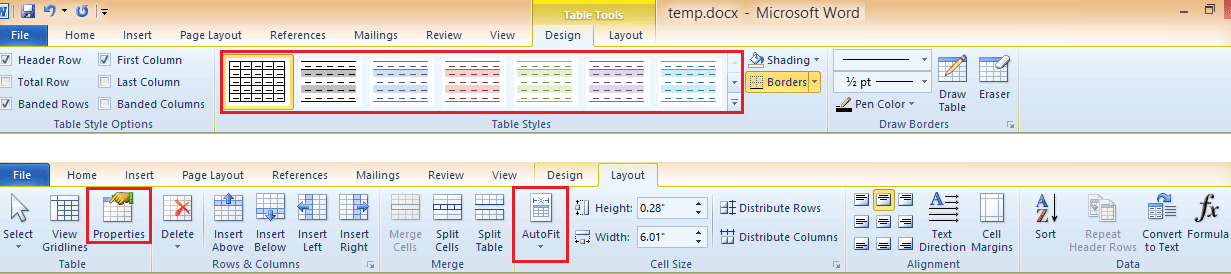
This is the tab that controls table settings and contains 2 sub-tabs.
- The Design tab is used to control the overall look of the table: the background image and color, the headings of individual columns, table borders settings, etc.
- In our example, use the Table Styles (highlighted in red in the pic above) to add color and a black Border to the table.
| # | NAME | DESCRIPTION |
| 1 | Item 1 | This is a sample description for Item 1 |
| 2 | Item 2 | This is a sample description for Item 2 |
| 3 | Item 3 | This is a sample description for Item 3 |
| 4 | Item 4 | This is a sample description for Item 4 |
- The Layout tab is used to control the dynamics between individual cells, rows and columns of the table, and data placement within them.
- Click on the Properties command in this tab and set alignment to center. Click ok.
- Shrink the table to fit its contents using the Autofit command: Autofit-Autofit Contents.
| # | NAME | DESCRIPTION |
| 1 | Item 1 | This is a sample description for Item 1 |
| 2 | Item 2 | This is a sample description for Item 2 |
| 3 | Item 3 | This is a sample description for Item 3 |
| 4 | Item 4 | This is a sample description for Item 4 |
With this, you have used some of the basic table-editing features of Objects in MS Word. We suggest that you explore the Design and Layout tabs in more detail with live data for a thorough understanding of its features.
Working with Charts
While tables are a straightforward representation of data, Charts are used to highlight properties of data pictorially. For instance, you can use a bar graph to illustrate how the data changes over time. Or use a pie graph to capture the percentage of your data. The key lies in understanding which property you want to highlight and then choosing an appropriate chart type to illustrate this.
To test this,
- Click on the Insert tab screen and then click on the Chart
- Choose the type of chart you want. In our example, we will use a Pie chart.
- Click ok.
And your chart gets created instantly! It’s that simple!
Or maybe not!
The chart makes sense in your document only when the data makes sense. Hence, it is advisable to have Microsoft Excel installed on your computer as Word automatically opens Excel to edit the data for your chart. In fact, if this is already installed on your system, you will have it open up in a side window the moment you create a chart in Word.
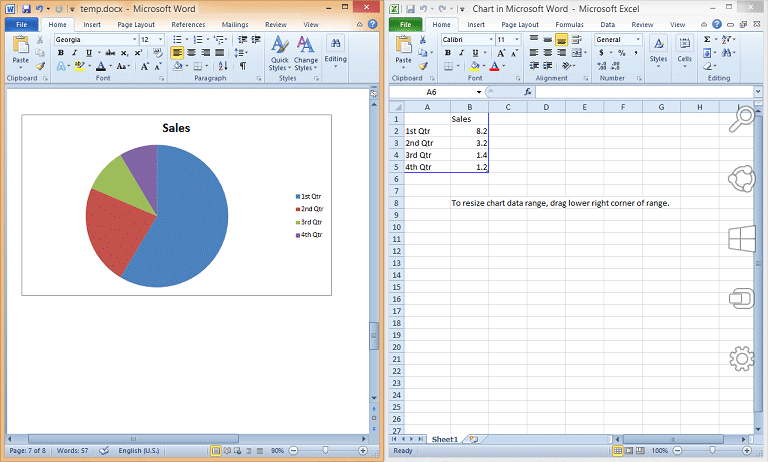
As per the above screenshot, chart-editing remains with Word while data-editing is handled in Microsoft excel (displayed on a side screen).
Once you have created the chart, you want (with proper data), click anywhere on the chart to bring up the “Chart Tools” tab.

As you can see, the features are very similar to other object-design tabs (with settings for style, layout, type, etc.). Use this tab to add visual effects to your pie chart.
Again, we’ve provided a basic understanding of chart features here. It’s best for you to experiment with real data for a more detailed understanding of Word’s powerful chart-editing features.
In closing, we encourage you to actively explore the Insert tab screen, as this is the screen that houses various object types that can be used in your document. We leave you with hints to explore these simpler features, so you get the best out of the ms world software.
- Type some text and use the WordArt command to change it into a visual text object.
- Explore Text Box
- Add a Header and Footer to alternate pages in your document.
- Use the DropCap on the first letter of every page.
- Manually type a website address (http://somewebsiteaddress.com) and explicitly use the Hyperlink command to link it to the original page.
Happy exploring!
Related Articles:-
Here are some articles that will help you to get more detail about the Objects in Ms Word Software, so just go through the link.
- Microsoft Office Application
- Powerful Features of Microsoft Access
- Excel Skills
- CSV Files into Excel
 Please Note:
This article is written for users of the following Microsoft Word versions: 2007 and 2010. If you are using an earlier version (Word 2003 or earlier), this tip may not work for you. For a version of this tip written specifically for earlier versions of Word, click here: Using the Object Browser.
![]()
Written by Allen Wyatt (last updated March 30, 2023)
This tip applies to Word 2007 and 2010
Word includes a feature that allows you to look at your document in totally new ways. For lack of a better term, this feature is called the object browser, and it is manifested by three small tools just below the vertical scroll bar, in the lower-right corner of the screen. One of the tools looks like a double up arrow, and another like a double down arrow. The third tool looks like a small ball, and it is located between the other two tools.
If you click on the tool that looks like a ball, you will see a graphical menu with twelve options. These options allow you to change what the double arrow tools look for when you click on them. The twelve options are as follows:
- Go To
- Find
- Browse by Edits
- Browse by Heading
- Browse by Graphic
- Browse by Table
- Browse by Field
- Browse by Endnote
- Browse by Footnote
- Browse by Comment
- Browse by Section
- Browse by Page
The default use is Browse by Page. With this option chosen, the double arrows jump from one page to another through your document. However, the other options allow you to browse through your document looking for other items, as indicated. This can be a great time-saver.
Note that not all options begin with the term «Browse by.» If you choose Go To, then the Find and Replace dialog box appears with the Go To tab selected. If you chose Find, then the Find and Replace dialog box appears with the Find tab selected. After performing a Find, then the double-arrows function as a «Find Next» or «Find Previous» tool.
WordTips is your source for cost-effective Microsoft Word training.
(Microsoft Word is the most popular word processing software in the world.)
This tip (10079) applies to Microsoft Word 2007 and 2010. You can find a version of this tip for the older menu interface of Word here: Using the Object Browser.
Author Bio
With more than 50 non-fiction books and numerous magazine articles to his credit, Allen Wyatt is an internationally recognized author. He is president of Sharon Parq Associates, a computer and publishing services company. Learn more about Allen…
MORE FROM ALLEN
Sorting by Five Columns
Excel allows you to sort but up to three columns, but you may want to sort by more than that. This tip provides ways you …
Discover More
Assigning a Macro to a Shortcut Key
Do you have a macro that you use frequently? Using the File menu to access the macro can be time consuming. This tip …
Discover More
Determining the Number of Bookmarks Defined in a Document
If you develop a macro that needs to work with bookmarks defined in a document, it is inevitable that you will need a way …
Discover More