
Excel for Microsoft 365 Word for Microsoft 365 Outlook for Microsoft 365 PowerPoint for Microsoft 365 Access for Microsoft 365 Project Online Desktop Client Visio Plan 2 Excel 2021 Word 2021 Outlook 2021 PowerPoint 2021 Access 2021 Project Professional 2021 Project Standard 2021 Visio Professional 2021 Excel 2019 Word 2019 Outlook 2019 PowerPoint 2019 Access 2019 Project Professional 2019 Project Standard 2019 Visio Professional 2019 Excel 2016 Word 2016 Outlook 2016 PowerPoint 2016 Access 2016 Project Professional 2016 Project Standard 2016 Visio Professional 2016 More…Less
Looking for help with a feature? You can access the product Help in three different ways:
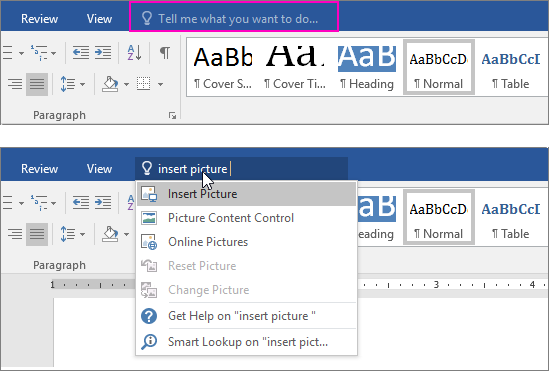
-
Just type your query in the Tell me what you want to do box. From the search results, you can quickly get to features you want to use or actions you want to perform. For help content on your search phrase, click the option Get Help on «search phrase».

-
You can also access Help from the File menu. In any Office app, click File and in the top right corner, click the familiar ? button.
-
Or use the F1 function key anytime to open the Help Viewer window for the Office app you are working on.

Add a help shortcut to the Quick Access Toolbar
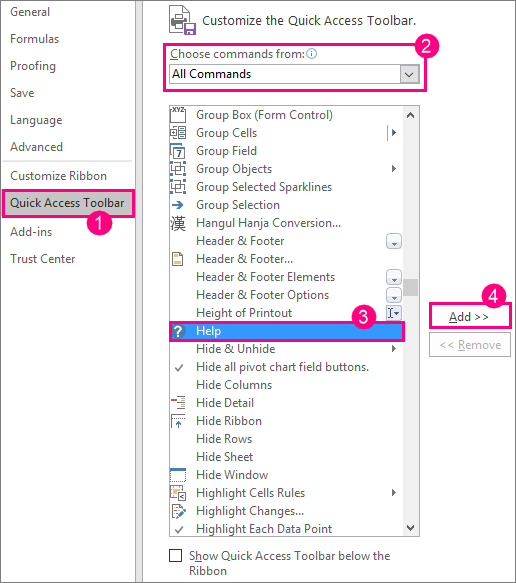
You can also add a help shortcut to your Quick Access Toolbar if you want to be able to get to it easily. Here’s how:
-
Select File > Options > Quick Access Toolbar.
-
Under the dropdown where it says Choose commands from, select All Commands.
-
Select Help from the list of commands to add to the Quick Access Toolbar.
-
Click Add.
-
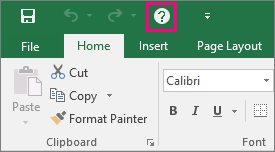
When you’re done, click OK. The shortcut to help will be added to your Quick Access Toolbar in the upper-left corner.
Need more help?
Want more options?
Explore subscription benefits, browse training courses, learn how to secure your device, and more.
Communities help you ask and answer questions, give feedback, and hear from experts with rich knowledge.
Find solutions to common problems or get help from a support agent.
Guest
-
#1
I just upgraded from Office 2002 to Office 2007 Home & Student and I can’t
find any help. The box mentions an «improved help system», but I can’t find
how to ask a question. Thanks. Harriet
Advertisements
Dawn Crosier, Word MVP
-
#2
At this point you need to be connected to the internet to get most help.
An easy method is to press the F1 function key. Another option that you
can use to access help is to click on the small question mark surrounded
in a blue circle in the upper right area of the window.
—
Dawn Crosier
Microsoft MVP
«Education Lasts a Lifetime»
This message is posted to a newsgroup. Please post replies and questions
to the newsgroup so that others can learn as well.
I just upgraded from Office 2002 to Office 2007 Home & Student and I can’t
find any help. The box mentions an «improved help system», but I can’t find
how to ask a question. Thanks. HarrietNo virus found in this incoming message.
Checked by AVG Free Edition.
Version: 7.5.488 / Virus Database: 269.13.36/1041 — Release Date: 10/1/2007 10:20 AM
No virus found in this outgoing message.
Checked by AVG Free Edition.
Version: 7.5.488 / Virus Database: 269.13.36/1041 — Release Date:
10/1/2007 10:20 AM
Guest
-
#3
Thank you so much for taking the time to answer. I actually have one further
question — about this site. After posting my question, I discovered the
answer myself. I wonder if there is any way to withdraw a question once it
has been posted? Thanks again for the help. Harriet Hahn
Advertisements
Dawn Crosier, Word MVP
-
#4
Not as far as I know. Especially if you are using the Website to post
the message. Perhaps you could catch it if you were using dial-up.
—
Dawn Crosier
Microsoft MVP
«Education Lasts a Lifetime»
This message is posted to a newsgroup. Please post replies and questions
to the newsgroup so that others can learn as well.
No virus found in this outgoing message.
Checked by AVG Free Edition.
Version: 7.5.488 / Virus Database: 269.13.39/1044 — Release Date:
10/2/2007 11:10 AM
located at the top-right side. Excel provides online help as a first line of assistance, but if you are not able to access the web then there is limited support via the Excel help function, available on your hard drive. From within Help, you can click on “Table of Contents” to easily navigate and search for topics.
Contents
- 1 Where is the help menu on Excel?
- 2 Where is help on Excel Mac?
- 3 What is the Help button?
- 4 What is help in Excel?
- 5 What is the keyboard shortcut to launch the Help system?
- 6 Where is my help button?
- 7 Where do I put the Help icon?
- 8 Where is help button in computer?
- 9 Where is help in MS Word?
- 10 What is the shortcut to open the full help file?
- 11 What key on the keyboard do you press to access the help menu?
- 12 What are the shortcuts in Excel?
- 13 At which button is help menu available?
- 14 What does the icon under the window Help button do?
- 15 What is the Quick Access Toolbar?
- 16 How do you put a question mark in HTML?
- 17 What is the use of F11 key?
- 18 How do I open Excel shortcuts?
- 19 What is Ctrl N?
- 20 What are the 20 shortcut keys?
Here’s how:
- Select File > Options > Quick Access Toolbar.
- Under the dropdown where it says Choose commands from, select All Commands.
- Select Help from the list of commands to add to the Quick Access Toolbar.
- Click Add.
- When you’re done, click OK.
To browse Help
Choose Help > Excel Help Contents (Figure 32). The Microsoft Office Help contents window appears (Figure 38).
What is the Help button?
The Help Button is a control that the user can click to display the application help system.
What is help in Excel?
The Help function is one of the best tools that Excel provides for users. The universal shortcut to using help is of course the F1 function key on your keyboard. Text can be printed or copied into an application such as an Excel worksheet.
What is the keyboard shortcut to launch the Help system?
Use keyboard shortcuts in the Help window
| To do this | Press |
|---|---|
| Open the Help window. | F1 |
| Close the Help window. | ALT+F4 |
| Switch between the Help window and the active program. | ALT+TAB |
| Go back to PowerPoint Help and How-to table of contents. | ALT+HOME |
Where is my help button?
Actually the Help button stays in the top right corner of the window. The button looks like a question mark surrounded by a circle. The following picture shows its position. Or you can use the shortcut key F1 to enable the Help window.
Where do I put the Help icon?
A help button, link, or icon relating to the whole form or screen function should be located on the top right corner of the screen but below the global header (see Figure 3). Help relating to the entire application or website, such as phone help, support numbers, or global tips, should be placed in the global header.
Where is help button in computer?
Windows Key + F1 opens the Microsoft Windows help and support centre. Open the Task Pane.
Where is help in MS Word?
The help feature within Microsoft Office applications is usually the fastest and easiest way to get help. In Windows, access it by pressing F1 from within the application. In macOS, if you’re in Word, for example, you can select Word Help from the Help menu.
What is the shortcut to open the full help file?
Press Alt+F to open the File menu.
Frequently used shortcuts
| To do this | Press |
|---|---|
| Open the Replace tab in the Find and Replace dialog box in the Datasheet view or Form view | Ctrl+H |
| Add a new record in Datasheet view or Form view | Ctrl+Plus Sign (+) |
| Open the Help window | F1 |
| Exit Access | Alt+F4 |
What are the shortcuts in Excel?
Microsoft Excel keyboard shortcuts
- Ctrl + N: To create a new workbook.
- Ctrl + O: To open a saved workbook.
- Ctrl + S: To save a workbook.
- Ctrl + A: To select all the contents in a workbook.
- Ctrl + B: To turn highlighted cells bold.
- Ctrl + C: To copy cells that are highlighted.
- Ctrl + D:
Help menu is available at Start button.
What does the icon under the window Help button do?
App menu: Click the three little lines in an app’s upper-left corner, choose Settings from the drop-down menu, and then click the Help button, if available, on the pane that appears along the app’s right edge.
What is the Quick Access Toolbar?
The Quick Access Toolbar is located to the right of the Microsoft Office. Button . It contains commands that are used most often, for example Redo, Undo and Save. Word 2007 allows you to customize the Quick Access Toolbar, meaning that you can add and remove commands as you like.
How do you put a question mark in HTML?
Question Mark
- UNICODE. U+0003F.
- HEX CODE. ?
- HTML CODE. ?
- HTML ENTITY. ?
- CSS CODE. 03F. // html example. <span>?</span> // css example. span { content: “03F”; }
What is the use of F11 key?
The F11 key allows you to activate full-screen mode in your browser. By pressing it again, you will return to the standard view with the menu bar. In Microsoft Excel, you can use the Shift key with F11 to quickly create a new spreadsheet in a new tab.
How do I open Excel shortcuts?
Excel Shortcuts For Opening Workbooks
- Open Workbook (keyboard): Ctrl+O (this requires the right hand but I’m unaware of any left-hand only shortcut)
- Open Recent Files (keyboard): Alt-F-R.
- Save (keyboard #1): Ctrl+S (very fast, easy to memorize and hard to beat)
- Save (keyboard #): Alt-F-S.
- Save As (keyboard #1): Alt-F-A.
What is Ctrl N?
Alternatively referred to as Control+N and C-n, Ctrl+N is a keyboard shortcut most often used to create a new document, window, workbook, or other type of file.Ctrl+N in Word and other word processors.
What are the 20 shortcut keys?
Basic Windows keyboard shortcuts
- Ctrl+Z: Undo. No matter what program you’re running, Ctrl+Z will roll back your last action.
- Ctrl+W: Close.
- Ctrl+A: Select all.
- Alt+Tab: Switch apps.
- Alt+F4: Close apps.
- Win+D: Show or hide the desktop.
- Win+left arrow or Win+right arrow: Snap windows.
- Win+Tab: Open the Task view.
Posted by: Minal Agarwal ,
on 5/20/2007,
in Category Word 2007
Abstract: Microsoft Word is the world’s leading word processing application. It can be used to work with a wide range of documents like letters, memos, newsletters, forms and now with blogs too with Word 2007.
In this article we will explore the new interface of Microsoft Word 2007.
Microsoft Word is the world’s leading word processing application. It can be used to work with a wide range of documents from simple letters, memos to complex documents like newsletters, forms and now with blogs too with Word 2007.
User Interface
Before getting into the details of the interface of Word 2007, it is necessary to mention that launching Word in Microsoft Windows Vista would seem a little different only because the interface of Windows Vista is different. For more information on Windows Vista you can go through the articles in Windows Vista section.
But the procedure is just the same; click on the Start button (looks different in Windows Vista) on the taskbar, then click on All Programs and find Microsoft Office. When you click on Microsoft Office the folder expands and you will find Microsoft Office Word 2007. Once you launch Word on your machine, you will find that it doesn’t bear a resemblance to any of the previous versions. Though there are some similarities. Let’s begin from the top of the window.
1. Title bar:
Title bar looks similar to the older versions. It displays the name of the current document in the centre. If the document is new and is not saved, the name of the document is Document1. The number suffixed by the word document depends upon the number of new documents created in a particular session. The format of the name displayed in the title bar is ‘Document Name – Microsoft Word’.
The new feature in the title bar is the Quick Access Toolbar to the left corner of the title bar. This Quick Access Toolbar is totally customizable. Customizing the Quick Access Toolbar will be explored in a future article.

2. Office Button:
Right next to this toolbar is the main button of them all – the Office button. This Office button is similar to what we were used to as the File Menu. When you click on this Office button, you can see various file commands as shown in the figure.

The options like New, Open, Save and others are quite familiar.
Next to the menu list we have Recent Documents list. The documents that you have been working with overtime would be displayed under this section. Next to each document name in the list is a small pin icon, which allows you to pin your document permanently to this list in case you don’t want the document to disappear from the list when new recent documents get added to this list. Just click on this pin and it turns green to indicate that the document is now pinned to the Recent Documents List.
Options like Save As, Print and others have a small arrow next to them which indicates that there are sub-options for these. When you hover over your mouse on these options, their sub-options will be displayed in the area where previously recent documents were displayed.

On the lower right hand corner there are two buttons:-
Word Options: In earlier versions of Microsoft Office, you set your preferences for view, display, save, proofing and editing settings in the Options dialog box under Tools menu. In the new interface of Microsoft Office, speaking of Word over here this is available as Word Options under Microsoft Office button.
Exit Word: Exit Word will allow you to close your documents and totally exit from Word.
3. Ribbon
When you launched Microsoft Word 2007 for the first time, you must have noticed a totally different composition in the place of Menus and Toolbars, because the menus and toolbars have been replaced by a context sensitive ribbon. This is the major change in Word 2007.

The ribbon spreads across the screen from left to right and contains all the commands and the difference here is; it is context sensitive. This means that it is going to change as you work with your documents in Word. For example, if you are working with a table, the ribbon displays the various table commands and tools.

If you are working with pictures, the ribbon displays various options available for pictures.

The Ribbon is broken into various tabs like Home, Insert, Page Layout, Review, and View and so on. These tabs are organized according to the category of commands. If the Page Layout tab is selected, we can find some groups in it, like Themes, Page Setup, Page Background, Paragraph and Arrange. All these groups are related to Page Layout. So these are easy to locate. Like we had mentioned earlier, the ribbon changes as you work on your document. So the Home tab is selected we would find a different set of groups like Clipboard group, Font group, Paragraph group, and so on.
Each of this group in the tab has some buttons that represent some commands that you may want to use in that group. In Page Layout, the Page Setup group has buttons like Margins, Columns and so on. As you hover over them we get a small description of what these commands would do.
What if you are not able to find a command that you are looking for? That is because there are only a few commands that are always visible in the group at a glance. You can notice that some of these groups have a diagonal arrow icon at the bottom right hand corner. 
This little arrow launches a dialog box, so we can call it a dialog box launcher.

The dialog box will have another set of options which you can set. This will be similar to the dialog boxes we used in the previous versions of Word. The dialog has its own help button and a close button in the top right hand corner apart from the usual OK and Cancel buttons.
The older version menu bar is replaced by the new ribbon which contains tabs similar to the menu. We all are always used to seeing the last menu as Help. But if you have observed carefully, there is no such help menu in the new interface, not even a tab or any option on any of the tabs. Help can be launched by clicking on the question mark icon ![]() provided on the rightmost corner of the Ribbon. As you hover your mouse over this icon, screen tip says Microsoft Office Word Help (F1), indicating the keyboard shortcut for help. So you can launch help alternatively by F1.
provided on the rightmost corner of the Ribbon. As you hover your mouse over this icon, screen tip says Microsoft Office Word Help (F1), indicating the keyboard shortcut for help. So you can launch help alternatively by F1.

As you can make out, the Home page for Help is a little different too. It displays the categories on which you can search for a specific topic. For example if you click on Tables category, you would traverse to another page that displays the topics in this category like, Insert a blank line before a table, Delete a table or clear its contents and so on. Then you can select the specific topic of help.
4. Shortcuts
You all must be aware of the shortcut F1 to launch Help, but each and every item on the ribbon has its own shortcut. If you press the ALT key on the keyboard brings up all the numbers and letters on the ribbon. For example F for the Office button, 1 for Save, H for Home and so on.

Then you can press the shortcut like H to expand the Home tab and then you can see that each of the commands on t he ribbon have their own shortcuts.

Now in the similar way you can select the commands by pressing the shortcut key associated with it. If you don’t want to work with the shortcuts you can turn it off just like you turned it on, that is by pressing the ALT key again.
5. Mini Toolbar
Mini Toolbar is another new feature in Word 2007 and a very useful tool too. There are times when you are working on a complex document where a lot of formatting needs to be done as and when you are typing your document. Every time going to the ribbon to the formatting tools may be tedious, so you may feel you may finish typing the whole document and then sit and do the formatting, it is a nightmare. What if this is possible right away as and when you type your document? Yes with the new Word it is possible. To use this feature, just select the text from the document and as you hover over your mouse over the text you would be able to see a faint toolbox in the top right hand corner.

As you move over to it, it is clearly visible as it is no longer faint as it becomes active.

Now you can use the formatting tools from here like, bold the text or change the font type right at your finger tips, you don’t have to go searching for these font commands on the ribbon, they are right there in this mini toolbar.
6. Scrollbars and Status Bar
You must be familiar with the scrollbars and the Status bar from the previous version of Word. The scrollbar is just the same. In the top of the scroll bar you have a small button
to choose the option to view the Ruler.
The status bar displays the page numbers, number of words in the document, buttons to change the views and the Zoom tool.
Conclusion:
In this article we have explored the all new interface of Microsoft Word 2007. We learnt about the ribbon, the quick access toolbar, the Office button. With this basic introduction, you should be feeling somewhat comfortable with the interface. In the next article we would go through the Navigation Tools.
This article has been editorially reviewed by Suprotim Agarwal.

C# and .NET have been around for a very long time, but their constant growth means there’s always more to learn.
We at DotNetCurry are very excited to announce The Absolutely Awesome Book on C# and .NET. This is a 500 pages concise technical eBook available in PDF, ePub (iPad), and Mobi (Kindle).
Organized around concepts, this Book aims to provide a concise, yet solid foundation in C# and .NET, covering C# 6.0, C# 7.0 and .NET Core, with chapters on the latest .NET Core 3.0, .NET Standard and C# 8.0 (final release) too. Use these concepts to deepen your existing knowledge of C# and .NET, to have a solid grasp of the latest in C# and .NET OR to crack your next .NET Interview.
Click here to Explore the Table of Contents or Download Sample Chapters!

Minal Agarwal, Expression Web MVP, MCDST, works as a freelance web designer (SaffronStroke) working on Expression Web, Photoshop and other Graphical tools. As a hobby, she also runs a famous Food site called Foodatarian.com. Follow her on twitter @ saffronstroke
Содержание
- 1 Немного истории
- 2 Варианты проверки
- 2.1 Как проверить текст на ошибки онлайн
- 2.2 Автоматическая
- 2.3 Проверка по умолчанию
- 3 Установка пакета
- 3.1 Настройки языка
- 4 Видео
- 4.1 Where is the Spell Check in Microsoft Word 2007, 2010, 2013 and 2016
- 4.1.1 A: Activate the Spell Check Setting
- 4.1.2 B: Using the Keyboard Shortcut
- 4.1.3 C: If the Classic Menu for Office installed
- 4.1.4 D: If the Classic Menu for Office not installed
- 4.2 What is Classic Menu for Office
- 4.2.1 Classic Menu for Office
- 4.2.2 Classic Menu for Office 2007
- 4.1 Where is the Spell Check in Microsoft Word 2007, 2010, 2013 and 2016
- 5 Для MS Word 2007 (2010)
- 6 Для MS Word 2003
- 7 Check Spelling and Grammar using Review tab
- 8 Check Spelling and Grammar using Right Click
Здравствуйте. Многим пользователям приходится часто набирать текст для составления документов, написания контента для сайтов, оформления писем и т.д. Очень важно писать правильно, чтобы не показать себя глупым и невежественным человеком. Я рекомендую программу Word из офисного пакета Microsoft Office. В данной статье хочу рассказать, как проверить текст на ошибки онлайн и в Word 2010 или других версиях этого текстового редактора.
Немного истории
Еще в 2010 году я создал развлекательный ресурс о кино, где публиковал рецензии на фильмы, обзоры премьер, биографии актеров. Спустя четыре года на сайте было размещено более трех тысяч статей. Однажды я решил посмотреть свои первые записи, и был ошеломлен. Обнаружил массу ошибок грамматических и пунктуационных, предложения состояли из множества оборотов, читать их было непросто. На то время я не проверял их на правописание, а зря. Первые дни я не мог успокоиться и редактировал старые тексты, чтобы довести их до ума.
Вывод напрашивался сам: следовало предварительно набирать обзоры в Ворде, чтобы автоматически исправлять ошибки.
В этой программе встроен очень полезный функционал, который выделяет (подчеркивает) некорректный ввод красной или зеленой волнистой линией. Но не всегда проверка срабатывает автоматически. Возможно, её предварительно нужно включить в настройках приложения. Как это сделать – Вы сейчас узнаете!
Варианты проверки
Существует несколько способов «сканирования» документов на наличие ошибок. Перейдем к их рассмотрению.
Как проверить текст на ошибки онлайн
Сервисов существует немало, но самыми распространенными являются Спеллер от Яндекса и Text.ru. Достаточно перейти по указанным ссылкам и вставить в поле ввода нужный текстовый фрагмент.

Автоматическая
Срабатывает по ходу набора текста, чтобы можно было сразу внести изменения. К примеру, Вы пропустили букву в слове, или не поставили пробел после знака препинания. Word сразу же предупредит о необходимости исправления.
Но если Вы вводите заведомо некорректные слова, а система никак на это не реагирует, значит, автоматическая проверка не включена. Как её активировать?
- Заходим в главное меню приложения, кликнув по кнопке в левом верхнем углу.
- Теперь следует нажать на «Параметры Word» (этот элемент может находиться в разных местах, в зависимости от версии программы). У меня это выглядит так:

- Для Ворд 2013 с обновленным интерфейсом меню имеет следующий вид:

- Дальнейшие опции одинаковы для разных выпусков офисного редактора. Слева выбираем пункт «Правописание». А справа находим строчку «Автоматически проверять…» и ставим возле неё галочку.

В самом низу можно задать набор правил для проверки. По умолчанию выбрано значение «для деловой переписки», но можно указать более строгий алгоритм, если хотите устранить максимум ошибок и убрать разговорные фразы.
Проверка по умолчанию
Если во время набора текста начинают подчеркиваться правильные слова, скорее всего они отсутствуют в словаре программы. Нужно их туда добавить. Как это сделать правильно?
- Выделяем необходимое слово / фразу / фрагмент документа;
- Переходим в раздел «Рецензирование», затем – «Правописание» (для Ворд 2007 и выше). Для более ранних версий следует зайти в меню «Сервис». Или проще нажать на клавиатуре «F7». Откроется следующее окно:

Здесь можно либо пропустить ошибку, либо исправить её (могут быть предложены варианты замены), либо добавить её в словарь (если считаете, что слово является правильным и не содержит ошибок).
С этим разобрались.
Но что делать, если Вы пытаетесь выполнить вышеуказанные действия, но перед Вами появляется сообщение «Средства проверки не установлены»? Или же просто отображается окошко, что «Проверка окончена», но красное / зеленое подчеркивание не убирается? В таком случае, необходимо перейти к следующим шагам.
Установка пакета
Речь идет о пакете проверки правописания, который по каким-то причинам не вошел в состав приложения. Возможно, Вы забили указать его во время инсталляции. Решение следующее:
- Переходим в «Панель управления» и открываем раздел «Программы и компоненты»:

- В появившемся окне отобразятся все установленные программы. Следует найти Word, выделить его и кликнуть по кнопке «Изменить»:

- После короткой паузы должно отобразиться окно с предложением добавить новые компоненты / удалить существующие. Жмем «Продолжить» (Далее).
- Теперь следует раскрыть ветку «Общие средства». В ней должны быть «Средства проверки правописания». Кликаем по элементу и выбираем опцию «Запускать всё с моего ПК»:

Вот и всё! Осталось дождаться установки выбранного компонента. После этого рекомендую перезапустить компьютер.
Настройки языка
Бывает, что для одного языка проверка производится корректно, а для другого – вообще не работает. Например, если нужно проверить текст на английском на ошибки. В таком случае, следует перейти во вкладку «Рецензирование» (она есть и в Ворде 2016 года), нажать на изображение глобуса. Это меню выбора языка, где следует снять отметку напротив опции «Не проверять правописание»:

Видео
Если не хотите читать много букв, то можете откинуться на спинку кресла (или стула) и посмотреть обучающее видео, как включить проверку орфографии в Word:
Как видите, всё очень просто. Буквально несколько кликов – и проблема устранена. Теперь знаете, как проверить английский текст на ошибки онлайн (или на любом другом языке). Даже если Ваша ситуация сугубо индивидуальна и не может быть решена с помощью моей инструкции, рекомендую задавать вопросы в комментариях. Я обязательно на них отвечу.
С уважением, Виктор
Where is the Spell Check in Microsoft Word 2007, 2010, 2013 and 2016
- Method A — Activate the spell check setting.
- Method B — The fastest way to process.
- Method C — If the Classic Menu for Office is installed (classic interface).
- Method D — If the Classic Menu for Office is not installed (ribbon interface).
The Spell Check function in Word can help you quickly find out the spelling and grammar mistakes in the Word document. There are four simple ways to call Spell Check function in Word 2007, 2010, 2013 and 2016.
A: Activate the Spell Check Setting
The automatic Spell Check function might be disabled sometimes and users could reactivate it. Please click File tab in Word 2010 and 2013 (or click the Office button in Word 2007) > Word Options > Proofing. If you are using Classic Menu for Office, click Tools > Word Options > Proofing.
See following:
B: Using the Keyboard Shortcut
If you need, just press F7 to call Spelling and Grammar function.
If you want to locate its position on ribbon, please see following content.
If you have installed Classic Menu for Office to bring back the familiar user interface and make it look like Word 2003/XP(2002)/2000, just click Tools > Spelling and Grammar.
If the
Classic Menu for Office
is not installed, please click
Review tab >
Proofing group >
Spelling and Grammar .
The software Classic Menu for Office is designed for the people who are accustomed to the old interface of Microsoft Office 2003, XP (2002) and 2000. It brings back the classic menus and toolbars to Microsoft Office (includes Word) 2007, 2010, 2013 and 2016. The classic view helps the people to smoothly upgrade to the latest version of Office, and work with Office 2007/2010/2013/2016 as if it were Office 2003 (and 2002, 2000).
Screen Shot of Classic Menu for Word
- All new features and commands of Office 2007, 2010, 2013 and 2016 have been added to the menus and toolbars;
- Without any training or tutorials after upgrading, users can work with Office 2007/2010/2013/2016 immediately;
- Easy to find any command items you want to process;
- Easy to show or hide the classic menus, toolbars and ribbon tabs;
- Easy to install and use. Supports all languages. Free download!
|
It includes Classic Menu for Word, Excel, PowerPoint, OneNote, Outlook, Publisher, Access, InfoPath, Visio and Project 2010, 2013 and 2016. |
||
|
It includes Classic Menu for Word, Excel, PowerPoint, Access and Outlook 2007. |
Для MS Word 2007 (2010)
1) Выделить весь текст документа (ctrl+a)
2) Кликнуть на язык в левом нижнем углу в строке состояния:
3) Выделить нужный язык (например, Русский (Россия)) > Убрать выделение со строки «Не проверять правописание» > нажать ОК:
Если это не помогает, необходимо включить функцию проверки правописания в принципе.
1) Нажать круглую кнопку в левом верхнем углу экрана > Параметры Word:
2) Зайти в раздел «Правописание», проставить необходимые галочки, нажать ОК:
Для MS Word 2003
Сервис > Параметры > Правописание. Установите флажок «Автоматически проверять орфографию»:
Advertisements
In this chapter, we will discuss how to check spelling and grammar in Word 2010. Microsoft Word provides a decent Spelling and Grammar Checker which enables you to search for and correct all spelling and grammar mistakes in your document. Word is intelligent enough to identify misspelled or misused, as well as grammar errors and underlines them as follows.
- A red underline beneath spelling errors.
- A green underline beneath grammar errors.
- A blue line under correctly spelled but misused words.
Check Spelling and Grammar using Review tab
Here is the simple procedure to find out the spelling mistakes and fix them −
Step 1 − Click the Review tab and then click the Spelling & Grammar button.
Step 2 − A Spelling and Grammar dialog box will appear and will display the wrong spellings or errors in grammar. You will also get suggestions to correct as shown below −
Now you have following options to fix the spelling mistakes −
-
Ignore − If you are willing to ignore a word, then click this button and Word ignores the word throughout the document.
-
Ignore All − Like Ignore, but this ignores all occurrences of the same misspelling, not just once but throughout the document.
-
Add to Dictionary − Choose Add to Dictionary to add the word to the Word spelling dictionary.
-
Change − This will change the wrong word using the suggested correct word.
-
Change All − Like Change, but this changes all occurrences of the same misspelling, not just once but throughout the document.
-
AutoCorrect − If you select a suggestion, Word creates an AutoCorrect entry that automatically corrects this spelling error from now on.
Following are the different options in case you have grammatical mistake −
-
Next Sentence − You can click Next Sentence to direct the grammar checker to skip ahead to the next sentence.
-
Explain − The grammar checker displays a description of the rule that caused the sentence to be flagged as a possible error.
-
Options − This will open the Word Options dialog box to allow you to change the behavior of the grammar checker or spelling options.
-
Undo − This will undo the last grammar changed.
Step 3 − Select one of the given suggestions you want to use and click the Change option to fix the spelling or grammar mistake and repeat the step to fix all the spelling or grammar mistake.
Step 4 − Word displays a dialog box when it finishes checking for spelling and grammar mistakes, finally Click OK.
Check Spelling and Grammar using Right Click
If you will right-click the mouse button over a misspelled word, then it will show you the correct suggestions and the above mentioned options to fix the spelling or grammar mistake. Try it yourself.