
Для автоматизации повторяющихся задач в Microsoft Excel можно быстро записать макрос. Предположим, у вас есть даты в различном формате и вы хотите применить ко всем из них один формат. Это можно сделать с помощью макроса. Вы можете записать макрос, который применяет нужный формат, а затем запускать его при необходимости.
При записи макроса все действия в записи макроса записываются Visual Basic для приложений (VBA) коде. Эти действия могут включать ввод текста или чисел, выбор ячеек или команд на ленте или в меню, форматирование ячеек, строк или столбцов или даже импорт данных из внешнего источника, скажем, Microsoft Access. Visual Basic Приложение (VBA) — это подмножество мощного Visual Basic программирования, которое входит в большинство Office приложений. Хотя VBA позволяет автоматизировать процессы как в приложениях, так и между Office, необязательно знать код VBA или программирование на компьютере, если оно делает то, что вам нужно.
Важно знать, что при записи макроса регистрируются почти все ваши действия. Поэтому если вы допустите ошибку, например нажмете не ту кнопку, средство записи макросов зарегистрирует это действие. В таком случае можно снова записать всю последовательность или изменить код VBA. Поэтому перед записью процесса следует хорошо проработать его. Чем точнее вы запишете последовательность, тем более эффективно будет работать макрос.
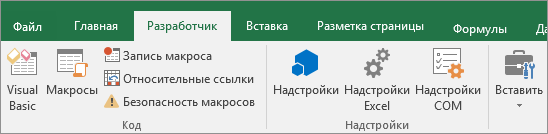
Макросы и средства VBA находятся на вкладке Разработчик, которая по умолчанию скрыта, поэтому сначала нужно включить ее. Дополнительные сведения см. в статье Отображение вкладки «Разработчик».
Запись макроса
Перед записью макросов полезно знать следующее:
-
Макрос, записанный для работы с диапазоном Excel, будет выполняться только для ячеек этого диапазона. Поэтому если вы добавите в диапазон новую строку, макрос не будет применяться к ней.
-
Если вам нужно записать длинную последовательность задач, советуем вместо этого использовать несколько более мелких макросов.
-
В макросе могут содержаться и задачи, не относящиеся к Excel. Процесс макроса может охватывать прочие приложения Office и другие программы, которые поддерживают Visual Basic для приложений (VBA). Например, вы можете записать макрос, который сначала обновляет таблицу в Excel, а затем открывает Outlook для ее отправки по электронной почте.
Чтобы записать макрос, следуйте инструкциям ниже.
-
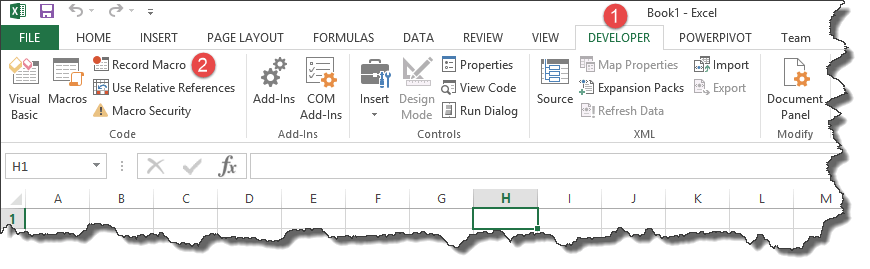
На вкладке Разработчик в группе Код нажмите кнопку Запись макроса.
-ИЛИ-
Нажмите ALT+T+M+R.

-
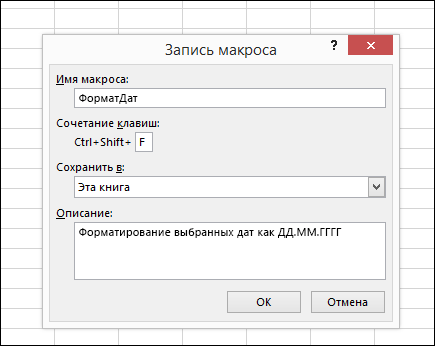
В поле Имя макроса введите название макроса. Сделайте имя понятным, чтобы можно было быстро найти нужный макрос.
Примечание: Первым символом имени макроса должна быть буква. Последующие символы могут быть буквами, цифрами или знаками подчеркивания. В имени макроса не должно содержаться пробелов; в качестве разделителей слов следует использовать знаки подчеркивания. Если используется имя макроса, являющееся ссылкой на ячейку, может появиться сообщение об ошибке, указывающее на недопустимое имя макроса..
-
Чтобы назначить сочетание клавиш для запуска макроса, в поле Сочетание клавиш введите любую строчную или прописную букву. Рекомендуется использовать сочетания клавиш с CTRL+SHIFT, так как они будут заменять собой совпадающие с ними стандартные сочетания клавиш в Excel, пока открыта книга, содержащая макрос. Например, если назначить сочетание клавиш CTRL+Z (Отменить), вы не сможете использовать его для функции «Отменить» в данном экземпляре Excel.
-
В списке Сохранить в выберите книгу, в которой вы хотите сохранить макрос.
Как правило, макрос сохраняется в расположении Эта книга, но если вы хотите, чтобы макрос был доступен при использовании Excel, выберите Личная книга макроса . При выборе личнойкниги макроса Excel создает скрытую личную книгу макроса (Personal.xlsб), если она еще не существует, и сохраняет макрос в этой книге.
-
В поле Описание при необходимости введите краткое описание действий макроса.
Хотя поле «Описание» является необязательным, рекомендуется его заполнить. Кроме того, желательно ввести понятное описание, которое будет полезно вам и всем, кто запускает макрос. Если у вас много макросов, описания помогут быстро определить, для чего они нужны.
-
Чтобы начать запись макроса, нажмите кнопку ОК.
-
Выполните действия, которые нужно записать.
-
На вкладке Разработчик в группе Код нажмите кнопку Остановить запись
.-ИЛИ-
Нажмите ALT+T+M+R.
 .
.Работа с макросами, записанными в Excel
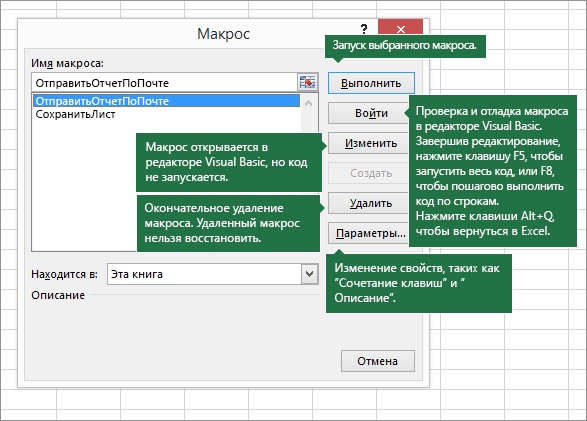
На вкладке Разработчик щелкните Макросы, чтобы просмотреть макросы, связанные с книгой. Кроме того, можно нажать клавиши ALT+F8. При этом откроется диалоговое окно Макрос.
Внимание: Макросы нельзя отменить. Прежде чем впервые запускать записанный макрос, сохраните книгу или создайте ее копию, чтобы предотвратить внесение нежелательных изменений. Если вас не устраивают результаты выполнения макроса, вы можете закрыть книгу, не сохраняя ее.
Ниже приведены дополнительные сведения о работе с макросами в Excel.
|
Задача |
Описание |
|
Изменение параметров безопасности макросов в Excel |
Сведения о параметрах безопасности макросов и их значении. |
|
Запуск макроса |
Макросы можно запускать различными способами, например с помощью сочетания клавиш, графического объекта, панели быстрого доступа, кнопки или даже при открытии книги. |
|
Изменение макроса |
С помощью редактора Visual Basic можно изменять макросы, присоединенные к книге. |
|
Копирование модуля макроса в другую книгу |
Если книга содержит макрос VBA, который нужно использовать где-либо еще, этот модуль можно скопировать в другую книгу с помощью редактора Microsoft Visual Basic. |
|
Назначение макроса объекту, фигуре или графическому элементу |
|
|
Назначение макроса кнопке |
Вы можете назначить макрос значку и добавить его на панель быстрого доступа или ленту. |
|
Назначение макроса для элемента управления на листе |
Вы можете назначать макросы формам и элементам ActiveX на листе. |
|
Включение и отключение макросов в файлах Office |
Узнайте, как включать и отключать макросы в файлах Office. |
|
Открытие редактора Visual Basic |
Нажмите клавиши ALT+F11. |
|
Поиск справки по использованию редактора Visual Basic |
Узнайте, как найти справку по элементам Visual Basic. |
Работа с записанным кодом в редакторе Visual Basic (VBE)
С помощью редактора Visual Basic (VBE) вы можете добавлять в записанный код собственные переменные, управляющие структуры и другие элементы, которые не поддерживает средство записи макросов. Так как средство записи макросов фиксирует почти каждый шаг, выполняемый во время записи, может также потребоваться удалить ненужный код. Просмотр записанного кода — отличный способ научиться программировать на VBA или отточить свои навыки.
Пример изменения записанного кода можно найти в статье Начало работы с VBA в Excel.
Запись макроса
Перед записью макросов полезно знать следующее:
-
Макрос, записанный для работы с диапазоном Excel, будет выполняться только для ячеек этого диапазона. Поэтому если вы добавите в диапазон новую строку, макрос не будет применяться к ней.
-
Если вам нужно записать длинную последовательность задач, советуем вместо этого использовать несколько более мелких макросов.
-
В макросе могут содержаться и задачи, не относящиеся к Excel. Процесс макроса может охватывать прочие приложения Office и другие программы, которые поддерживают Visual Basic для приложений (VBA). Например, вы можете записать макрос, который сначала обновляет таблицу в Excel, а затем открывает Outlook для ее отправки по электронной почте.
Макросы и средства VBA находятся на вкладке Разработчик, которая по умолчанию скрыта, поэтому сначала нужно включить ее.
-
Перейдите в Excel > параметры…> ленты & панель инструментов.
-
В категории Настроить ленту в списке Основные вкладки установите флажок Разработчик, а затем нажмите кнопку Сохранить.
Чтобы записать макрос, следуйте инструкциям ниже.
-
На вкладке Разработчик нажмите кнопку Запись макроса.
-
В поле Имя макроса введите название макроса. Сделайте имя понятным, чтобы можно было быстро найти нужный макрос.
Примечание: Первым символом имени макроса должна быть буква. Последующие символы могут быть буквами, цифрами или знаками подчеркивания. В имени макроса не должно содержаться пробелов; в качестве разделителей слов следует использовать знаки подчеркивания. Если используется имя макроса, являющееся ссылкой на ячейку, может появиться сообщение об ошибке, указывающее на недопустимое имя макроса..
-
В списке Сохранить в выберите книгу, в которой вы хотите сохранить макрос.
Как правило, макрос сохраняется в расположении Эта книга, но если вы хотите, чтобы макрос был доступен при использовании Excel, выберите Личная книга макроса. При выборе личнойкниги макроса Excel создает скрытую личную книгу макроса (PERSONAL.XLSB), если она еще не существует, и сохраняет макрос в этой книге. Книги в этой папке открываются автоматически при Excel, и любой код, сохраненный в личной книге макроса, будет указан в диалоговом окну Макрос, которое объясняется в следующем разделе.
-
Чтобы назначить сочетание клавиш для запуска макроса, в поле Сочетание клавиш введите любую строчную или прописную букву. Рекомендуется использовать сочетания клавиш, которые еще не назначены другим командам, так как они будут переопределять совпадающие с ними стандартные сочетания клавиш в Excel, пока открыта книга, содержащая макрос.
-
В поле Описание при необходимости введите краткое описание действий макроса.
Хотя поле «Описание» является необязательным, рекомендуется его заполнить. Полезно ввести содержательное описание со всеми сведениями, которые могут быть полезны вам или другим пользователям, которые будут запускать макрос. Если у вас много макросов, описания помогут быстро определить, для чего они нужны.
-
Чтобы начать запись макроса, нажмите кнопку ОК.
-
Выполните действия, которые нужно записать.
-
На вкладке Разработчик щелкните Остановить запись.
Работа с макросами, записанными в Excel
На вкладке Разработчик щелкните Макросы, чтобы просмотреть макросы, связанные с книгой. При этом откроется диалоговое окно Макрос.
Примечание: Макросы нельзя отменить. Прежде чем впервые запускать записанный макрос, сохраните книгу или создайте ее копию, чтобы предотвратить внесение нежелательных изменений. Если вас не устраивают результаты выполнения макроса, вы можете закрыть книгу, не сохраняя ее.
Ниже приведены дополнительные сведения о работе с макросами в Excel.
|
Задача |
Описание |
|
Включение и отключение макросов |
Узнайте, как включать и отключать макросы в Excel для Mac. |
|
Копирование модуля макроса в другую книгу |
Если книга содержит макрос VBA, который нужно использовать где-либо еще, этот модуль можно скопировать в другую книгу с помощью редактора Microsoft Visual Basic. |
|
Назначение макроса объекту, фигуре или графическому элементу |
|
|
Назначение макроса кнопке |
Вы можете назначить макрос значку и добавить его на панель быстрого доступа или ленту. |
|
Назначение макроса для элемента управления на листе |
Вы можете назначать макросы формам и элементам ActiveX на листе. |
|
Открытие редактора Visual Basic |
На вкладке Разработчик щелкните Visual Basic или выберите Сервис > Макрос > Редактор Visual Basic. |
|
Поиск справки по использованию редактора Visual Basic |
Узнайте, как найти справку по элементам Visual Basic. |
Дополнительные сведения
Вы всегда можете задать вопрос специалисту Excel Tech Community или попросить помощи в сообществе Answers community.
Bottom line: Learn 5 ways to use VBA macros to automate Excel tasks you do frequently at work.
Skill level: Beginner
Download the Excel File
Download the Excel file to follow along with the video.
What Can I Use Macros For in My Job?
This is a question I hear often. You might have heard you need to learn macros, but you’re not exactly sure how they will help you. In the video above I explain 5 different ways to use macros to automate tasks in Excel.
We can use VBA macros to automate everything from simple tasks to complex reporting processes with multiple files. Here are the 5 topics covered in the video, along with the links mentioned to other articles and resources.
1. Data Related Tasks
Data related tasks include everyday Excel tasks to cleanup and format data. Examples covered in the video include.
- Remove Duplicates – Create a List of Unique Values
- Select or Delete Blank Rows

- Create formulas with macros – Percentage Change Formula
- Find the Last Used cell, row, or column in a sheet
- Apply formatting to raw data exports – Format Copier

2. Workbook Tasks
We can also automate tasks across worksheets and workbooks. This includes things like listing all the sheets, creating a table of contents, hiding specific sheets, opening and closing workbooks, and more. Here are some examples covered in the video.
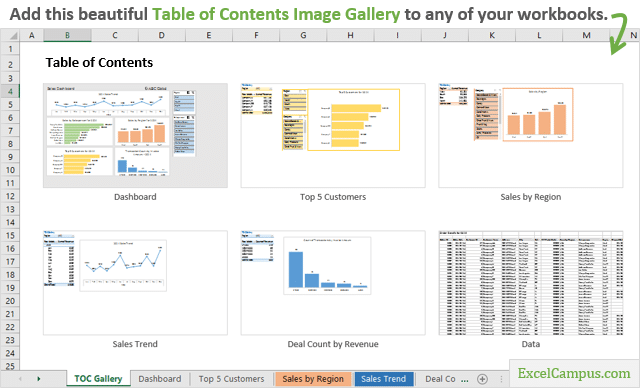
- Table of Contents and TOC Gallery

- Save and Close All Open Workbooks
3. Pivot Table Tasks
Pivot tables are an amazing tool in Excel. They can also be time consuming to create, format, update, and maintain. Fortunately, we can automate just about every property and action with pivot tables using VBA macros. Here are a few examples from the video.
- Show Details Macro
- Automatic Default Number Formatting in Excel Pivot Tables

- Expand and Collapse Entire Pivot Table Fields
- How to Change Date Formatting for Grouped Pivot Table Fields
- The PivotPal Add-in – The entire add-in was built with VBA, and automates many repetitive pivot table tasks.
4. Userforms & Add-ins
Userforms are windows that open over Excel with interactive controls. They make our spreadsheets easier for other users to use. The userforms can be created and modified in the VB Editor.
Add-ins are installed on the users computer and usually contain custom ribbon tabs with buttons. This allows other users to run our macros on any open workbook. Checkout the Excel Campus Add-ins page for examples.
5. Process Automation
We can also automate more complex processes with macros & VBA. This includes creating systems to create, update, or modify several Excel files. I created many systems like this for forecasting and budgeting processes. Here is a link to an overview video of an application I call the File Manager. The File Manager allows you to run multiple macros on sets of files.
I explain how to create and use the File Manager step-by-step in module 11 of The VBA Pro Course.
Free Webinar on Macros & VBA
If you are interested in learning more about macros, I’m currently running my free webinar called “The 7 Steps to Getting Started with Macros & VBA”. It’s running all this week, and it’s absolutely free to register.
During the webinar I explain why you might want to learn VBA, and a lot of the basic coding concepts that will help you get started. I jump into Excel and the VB Editor and walk through how to write and run our first macro. Even if you have been using VBA for awhile, I’m sure you will learn some new tips.
Click here to learn more and register for the webinar
What Else Can We Use Macros For?
We can use macros for just about every task we do in Excel. This video doesn’t even scratch the surface of what’s possible, but hopefully it gets you thinking about some repetitive Excel tasks that you might want to automate.
Please leave a comment below with any questions or suggestions. Thank you! 🙂
![]()
Download Article
![]()
Download Article
This wikiHow teaches you how to enable, create, run, and save macros in Microsoft Excel. Macros are miniature programs which allow you to perform complex tasks, such as calculating formulas or creating charts, within Excel. Macros can save significant amounts of time when applied to repetitive tasks, and thanks to Excel’s «Record Macro» feature, you don’t have to know anything about programming in order to create a macro.
Things You Should Know
- Macros make it easy to automatic tasks in Microsoft Excel.
- To create macros yourself, you’ll need to enable macros in the Developer menu of Excel.
- Saving a macro-enabled spreadsheet is a little different than saving a spreadsheet without macros.
-
1
Open Excel. Double-click the Excel app icon, which resembles a white «X» on a green box, then click Blank workbook.
- If you have a specific file which you want to open in Excel, double-click that file to open it instead.
-
2
Click File. It’s in the upper-left side of the Excel window.
- On a Mac, click Excel in the upper-left corner of the screen to prompt a drop-down menu.
Advertisement
-
3
Click Options. You’ll find this on the left side of the Excel window.
- On a Mac, you’ll click Preferences… in the drop-down menu.
-
4
Click Customize Ribbon. It’s on the left side of the Excel Options window.[1]
- On a Mac, click instead Ribbon & Toolbar in the Preferences window.
-
5
Check the «Developer» box. This box is near the bottom of the «Main Tabs» list of options.
-
6
Click OK. It’s at the bottom of the window. You can now use macros in Excel.
- On a Mac, you’ll click Save here instead.


Advertisement
-
1
Enter any necessary data. If you opened a blank workbook, enter any data which you want to use before proceeding.
- You can also close Excel and open a specific Excel file by double-clicking it.
-
2
Click the Developer tab. It’s at the top of the Excel window. Doing so opens a toolbar here.
-
3
Click Record Macro. It’s in the toolbar. A pop-up window will appear.
-
4
Enter a name for the macro. In the «Macro name» text box, type in the name for your macro. This will help you identify the macro later.
-
5
Create a shortcut key combination if you like. Press the ⇧ Shift key along with another letter key (e.g., the E key) to create the keyboard shortcut. You can use this keyboard shortcut to run the macro later.
- On a Mac, the shortcut key combination will end up being ⌥ Option+⌘ Command and your key (e.g., ⌥ Option+⌘ Command+T).
-
6
Click the «Store macro in» drop-down box. It’s in the middle of the window. Doing so prompts a drop-down menu.
-
7
Click This Workbook. This option is in the drop-down menu. Your macro will be stored inside your spreadsheet, making it possible for anyone who has the spreadsheet to access the macro.
-
8
Click OK. It’s at the bottom of the window. Doing this saves your macro settings and begins recording.
-
9
Perform the macro’s steps. Any step you perform between clicking OK and clicking Stop Recording while be added to the macro. For example, if you wanted to create a macro which turns two columns’ worth of data into a chart, you would do the following:
- Click and drag your mouse across the data to select it.
- Click Insert
- Select a chart shape.
- Click the chart that you want to use.
-
10
Click Stop Recording. It’s in the Developer toolbar. This will save your macro.


Advertisement
-
1
Understand why you have to save the spreadsheet with macros enabled. If you don’t save your spreadsheet as a macro-enabled spreadsheet (XLSM format), the macro won’t be saved as part of the spreadsheet, meaning that other people on different computers won’t be able to use your macro if you send the workbook to them.
-
2
Click File. It’s in the upper-left corner of the Excel window (Windows) or the screen (Mac). Doing so will prompt a drop-down menu.
-
3
Click Save As. This option is on the left side of the window (Windows) or in the drop-down menu (Mac).
-
4
Double-click This PC. It’s in the column of save locations near the left side of the window. A «Save As» window will open.
- Skip this step on a Mac.
-
5
Enter a name for your Excel file. In the «Name» text box, type in the name for your Excel spreadsheet.
-
6
Change the file format to XLSM. Click the «Save as type» drop-down box, then click Excel Macro-Enabled Workbook in the resulting drop-down menu.[2]
- On a Mac, you’ll replace the «xlsx» at the end of the file’s name with xlsm.
-
7
Select a save location. Click a folder in which you want to save the Excel file (e.g., Desktop).
- On a Mac, you must first click the «Where» drop-down box.
-
8
Click Save. It’s at the bottom of the window. Doing so will save your Excel spreadsheet to your selected location, and your macro will be saved along with it.


Advertisement
-
1
Open the macro-enabled spreadsheet. Double-click the spreadsheet that has the macro in it to open the spreadsheet in Excel.
-
2
Click Enable Content. It’s in a yellow bar at the top of the Excel window. This will unlock the spreadsheet and allow you to use the macro.
- If you don’t see this option, skip this step.
-
3
Click the Developer tab. This option is at the top of the Excel window.
- You can also just press the key combination you set for the macro. If you do so, the macro will run, and you can skip the rest of this method.
-
4
Click Macros. You’ll find it in the Developer tab’s toolbar. A pop-up window will open.
-
5
Select your macro. Click the name of the macro which you want to run.
-
6
Click Run. It’s on the right side of the window. Your macro will begin running.
-
7
Wait for the macro to finish running. Depending on how large your macro is, this can take several seconds.


Advertisement
Add New Question
-
Question
Can I use a macro that I create in other spreadsheets and future spreadsheets on the same pc?

Yes, you can use a macro that you crate in other spreadsheets and future spreadsheets on the same pc.
-
Question
How can I write macros that will change a spreadsheet as soon as I create it?
You will first need a basic understanding of VBA. There are many tutorials on this.
Ask a Question
200 characters left
Include your email address to get a message when this question is answered.
Submit
Advertisement
Video
-
Macros are generally useful for automating tasks which you must perform often, such as calculating payroll at the end of the week.
Thanks for submitting a tip for review!
Advertisement
-
Although most macros are benign, some macros can maliciously change or delete information on your computer. Never open a macro from a source which you don’t trust.
Advertisement
About This Article
Article SummaryX
1. Enable Developer options in Excel.
2. Click the Developer tab.
3. Click Record Macro.
4. Enter the macro name and details.
5. Click OK.
6. Perform the macro’s steps.
7. Click Stop Recording.
Did this summary help you?
Thanks to all authors for creating a page that has been read 710,423 times.
Is this article up to date?
Excel Macro is a record and playback tool that simply records your Excel steps and the macro will play it back as many times as you want. VBA Macros save time as they automate repetitive tasks. It is a piece of programming code that runs in an Excel environment but you don’t need to be a coder to program macros. Though, you need basic knowledge of VBA to make advanced modifications in the macro.
In this Macros in Excel for beginners tutorial, you will learn Excel macro basics:
- What is an Excel Macro?
- Why are Excel Macros Used in Excel?
- What is VBA in a Layman’s Language?
- Excel Macro Basics
- Step by Step Example of Recording Macros in Excel
Why are Excel Macros Used in Excel?
As humans, we are creatures of habit. There are certain things that we do on a daily basis, every working day. Wouldn’t it be better if there were some magical way of pressing a single button and all of our routine tasks are done? I can hear you say yes. Macro in Excel helps you to achieve that. In a layman’s language, a macro is defined as a recording of your routine steps in Excel that you can replay using a single button.
For example, you are working as a cashier for a water utility company. Some of the customers pay through the bank and at the end of the day, you are required to download the data from the bank and format it in a manner that meets your business requirements.
You can import the data into Excel and format. The following day you will be required to perform the same ritual. It will soon become boring and tedious. Macros solve such problems by automating such routine tasks. You can use a macro to record the steps of
- Importing the data
- Formatting it to meet your business reporting requirements.
What is VBA in a Layman’s Language?
VBA is the acronym for Visual Basic for Applications. It is a programming language that Excel uses to record your steps as you perform routine tasks. You do not need to be a programmer or a very technical person to enjoy the benefits of macros in Excel. Excel has features that automatically generated the source code for you. Read the article on VBA for more details.
Excel Macro Basics
Macros are one of the developer features. By default, the tab for developers is not displayed in Excel. You will need to display it via customize report
Excel Macros can be used to compromise your system by attackers. By default, they are disabled in Excel. If you need to run macros, you will need to enable running macros and only run macros that you know come from a trusted source
If you want to save Excel macros, then you must save your workbook in a macro-enabled format *.xlsm
The macro name should not contain any spaces.
Always fill in the description of the macro when creating one. This will help you and others to understand what the macro is doing.
Step by Step Example of Recording Macros in Excel
Now in this Excel macros tutorial, we will learn how to create a macro in Excel:
We will work with the scenario described in the importance of macros Excel. For this Excel macro tutorial, we will work with the following CSV file to write macros in Excel.

You can download the above file here
Download the above CSV File & Macros
We will create a macro enabled template that will import the above data and format it to meet our business reporting requirements.
Enable Developer Option
To execute VBA program, you have to have access to developer option in Excel. Enable the developer option as shown in the below Excel macro example and pin it into your main ribbon in Excel.
Step 1)Go to main menu “FILE”
Select option “Options.”


Step 2) Now another window will open, in that window do following things
- Click on Customize Ribbon
- Mark the checker box for Developer option
- Click on OK button

Step 3) Developer Tab
You will now be able to see the DEVELOPER tab in the ribbon

Step 4) Download CSV
First, we will see how we can create a command button on the spreadsheet and execute the program.
- Create a folder in drive C named Bank Receipts
- Paste the receipts.csv file that you downloaded

Step 5) Record Macro
- Click on the DEVELOPER tab
- Click on Record Macro as shown in the image below
You will get the following dialogue window

- Enter ImportBankReceipts as the macro name.
- Step two will be there by default
- Enter the description as shown in the above diagram
- Click on “OK” tab
Step 6) Perform Macro Operations/Steps you want to record
- Put the cursor in cell A1
- Click on the DATA tab
- Click on From Text button on the Get External data ribbon bar
You will get the following dialogue window

- Go to the local drive where you have stored the CSV file
- Select the CSV file
- Click on Import button
You will get the following wizard

Click on Next button after following the above steps

Follow the above steps and click on next button

- Click on Finish button
- Your workbook should now look as follows

Step 7) Format the Data
Make the columns bold, add the grand total and use the SUM function to get the total amount.

Step  Stop Recording Macro
Now that we have finished our routine work, we can click on stop recording macro button as shown in the image below

Step 9) Replay the Macro
Before we save our work book, we will need to delete the imported data. We will do this to create a template that we will be copying every time we have new receipts and want to run the ImportBankReceipts macro.
- Highlight all the imported data
- Right click on the highlighted data
- Click on Delete
- Click on save as button
- Save the workbook in a macro enabled format as shown below

- Make a copy of the newly saved template
- Open it
- Click on DEVELOPER tab
- Click on Macros button
You will get the following dialogue window

- Select ImportBankReceipts
- Highlights the description of your macro
- Click on Run button
You will get the following data

Congratulations, you just created your first macro in Excel.
Summary
Macros simplify our work lives by automating most of the routine works that we do. Macros Excel are powered by Visual Basic for Applications.
You work in Excel every day and do the same things again and again. Why not automate those tasks? Or, maybe, you want Excel to do most of the work for you? Read on to learn what Excel macros are and how they can help you.
What are macros in Excel?
Excel is an extremely powerful tool for processing data in the form of spreadsheets. While most users use formulas, there is another way to manipulate data in Excel.
Excel macros are pieces of code that describe specific actions or contain a set of instructions. Every time you launch the macro, Excel follows those instructions step-by-step.
Why learn macros in Excel?
Macros are a must-have tool for an advanced Excel user. By using Excel macros you can avoid dull, repetitive actions or even create your own order management system for free.
Simple macros in Excel that will make things easier
There are lots of simple Excel macros that take just a few lines of code, but can save you hours. Excel can perform certain operations instantly, where it would take you a very long time to do the job manually.
For example, this macro will sort all worksheets alphabetically:
Sub SortSheetsTabName()
Application.ScreenUpdating = False
Dim ShCount As Integer, i As Integer, j As Integer
ShCount = Sheets.Count
For i = 1 To ShCount - 1
For j = i + 1 To ShCount
If Sheets(j).Name < Sheets(i).Name Then
Sheets(j).Move before:=Sheets(i)
End If
Next j
Next i
Application.ScreenUpdating = True
End Sub
The following code will unhide all hidden worksheets:
Sub UnhideAllWoksheets()
Dim ws As Worksheet
For Each ws In ActiveWorkbook.Worksheets
ws.Visible = xlSheetVisible
Next ws
End Sub
To unhide all rows and columns on a worksheet, use:
Sub UnhideRowsColumns()
Columns.EntireColumn.Hidden = False
Rows.EntireRow.Hidden = False
End Sub
Advanced Excel macros that can significantly improve your workflow
If you are running a business, you have to store and manipulate data. Small companies can keep records by hand and large enterprises can buy specialized software (which is rather expensive). But what about medium-sized businesses that can no longer settle for manual record-keeping, but still cannot afford costly software? This is where Excel with macros shines.
By combining advanced Excel macros you can create a CRM (Customer Relationship Management) system which will help you provide better services. If you sell goods, you need an inventory management tool and Excel spreadsheets enhanced with macros will fit your needs.
If your data is contained in multiple Excel workbooks, you can use Coupler.io to move them around. You can even add third-party sources, like Google Sheets, Airtable, BigQuery, etc. Data integration with Coupler.io does not require any programming skills and can be done in just a few clicks.
Check out the available integrations with Excel.
Other Excel macros examples
Below are a few examples of useful Excel macros.
Sometimes you might accidentally add extra spaces to the data in cells. This mistake will cause errors, thereby preventing you from making correct calculations. To remove unnecessary spaces from the selected cells, use the following code:
Sub TrimTheSpaces()
Dim MyRange As Range
Dim MyCell As Range
Set MyRange = Selection
For Each MyCell In MyRange
If Not IsEmpty(MyCell) Then
MyCell = Trim(MyCell)
End If
Next MyCell
End Sub
It is often the case that you need to protect your workbook with a password. You can do that in the user interface of Excel. However, if you use the same password for all of your workbooks, you have to re-enter it every time. This macro will do the job for you (don’t forget to replace “1234” with your own password!):
Sub ProtectSheets()
Dim ws As Worksheet
For Each ws In ActiveWorkbook.Worksheets
ws.Protect Password:="1234"
Next ws
End Sub
Using macros in Excel
As macros are programs that can do literally anything on your computer, using macros from untrusted sources is very risky. That’s why, when you open a workbook with macros in Excel, they will be disabled and you will see the following notification:
![]()
If you trust the source of the file, click Enable Content. That will add the workbook to the list of trusted documents and turn on its macros. The next time you open that workbook, there will be no warning.
You will see the above notification each time you open a workbook if it has been saved to an untrusted location. That can be a folder for temporary files or browser downloads. To avoid that, move the file to another folder or enable macros in the Excel Trust Center.
How to enable macros in Excel
If you do not want to see the security warning when opening Excel workbooks, you can permanently enable macros in the Trust Center.
To enable macros in the Excel Trust Center:
- In the upper-left corner, click the File tab and then select Options:

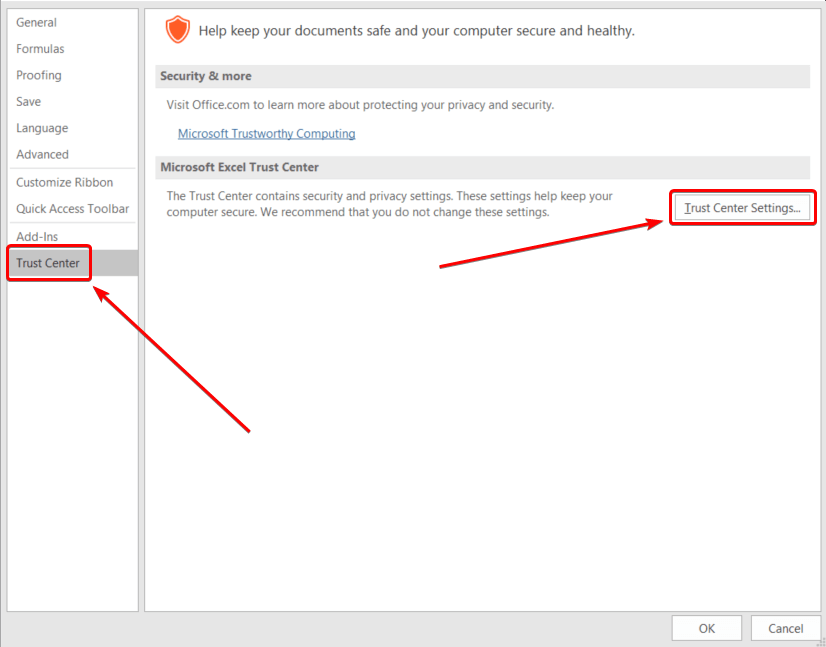
- In the Excel Options window, select Trust Center and then click Trust Center Settings:
- In the Trust Center, go to Macro Settings and then select Enable all macros:

Warning! Enabling macros for all workbooks is potentially risky because files from external sources may contain malicious code. If you open such a workbook, the macros may run automatically and corrupt your data or even cause hardware malfunctions.
How to use macros in Excel
If your workbook contains macros, you can run them by pressing Alt+F8. In the Macro window that opens, select the macro you need and click Run:

If you want to create new macros, you need to enable the Developer tab first.
To enable the Developer tab:
- In the upper-left corner, click the File tab and then select Options.
- In the Excel Options window, select Customize Ribbon and then enable the Developer checkbox in the Main Tabs area:

- Click OK to apply the changes.
In the Developer tab you can run existing macros by clicking the Macros button or create a new macro. For details on creating macros in Excel, see the following sections.

How to delete macros in Excel
To delete a macro in Excel:
- Open the Macro window in one of the following ways:
- Press Alt+F8.
- Select the Developer tab and click Macros.
- Select the macro that you want to delete and click Delete.

- Click Yes in the confirmation window that opens.
How to disable macros in Excel
Enabling Excel macros can make your computer vulnerable. Some macros will run when you open a workbook, which is especially dangerous if you have downloaded the workbook from an untrusted source. To prevent that, you can disable macros in Excel either with or without a notification.
To disable macros in Excel:
- In the upper-left corner, click the File tab and then select Options.
- In the Excel Options window, select Trust Center and then click Trust Center Settings.
- In the Trust Center, go to Macro Settings and then select one of the following options:
- Disable all macros without notification. Macros will be disabled and you will not see a security warning when opening a workbook with macros.
- Disable all macros with notification. Macros will be disabled but you will see a security warning when opening a workbook with macros and will be able to allow macros, if needed.

Writing macros in Excel
In Excel you can not only run ready-to-use macros, but also write your own macros to automate your daily tasks. We will provide a few methods below for creating macros in Excel. Anyone can write macros in Excel: from a complete beginner to an advanced user with programming skills.
How to record a macro in Excel
If you are unfamiliar with programming languages, the easiest way to create your own Excel macro is to record it.
To record a macro in Excel:
- In the Developer tab, click Record Macro:

- Enter the macro name and click OK:

Excel will start recording the macro.
- Perform the actions, that need to be included in the macro, then click Stop Recording:

The macro will be saved to the workbook.
Creating VBA macros in Excel
If you can write code in any programming language, you can easily learn the basics of Visual Basic for Applications and create Excel macros in the VBA editor.
To open the editor, click Visual Basic in the Developer tab.
Each workbook is a VBA project in the editor. The project contains worksheets as objects and modules with macros:

By default, macros recorded in the Developer tab are saved to Module1. For example, here is the macro that we recorded in the previous section:
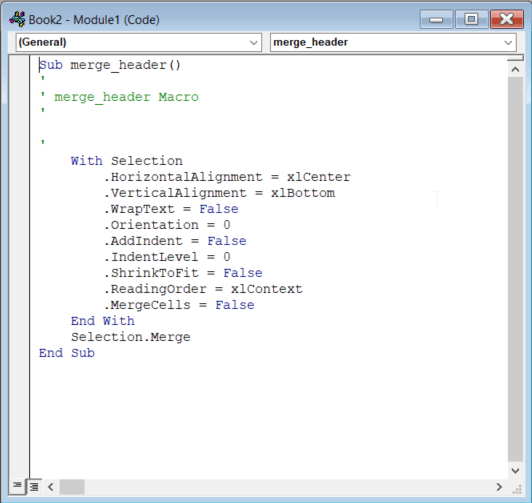
As you can see in the picture above, a macro starts with Sub followed by the macro name and (). You can insert the macro description in the comment lines. Be sure to indent the macro body for better readability. The End Sub string designates the end of the macro.
Excel macros language
Macros in Excel are written in VBA (Visual Basic for Applications). This programming language is used not only in Excel, but also in other MS office applications.
VBA provides many of the tools that are available in advanced programming languages. For example, to create Excel macros, you can use the following:
- Variables
- ‘If’ statements
- ‘For’ cycles
- Loops
- Arrays
- Events
- Functions
Being an object-oriented language, VBA lets you manipulate the following objects:
- Application object
- Workbook object
- Worksheet object
- Range object
If you decide to turn your Excel worksheet into something much more powerful, like a CRM system, you can even create a graphical user interface with message boxes and user forms. To learn more about VBA, check out the official documentation.
Editing macros in Excel VBA editor
When creating macros in Excel, it may be difficult to get the desired result on the first try. By editing Excel macros and running them again, you can resolve errors and make your system work as expected.
To edit a macro in Excel VBA editor:
- In the Developer tab, click Visual Basic:

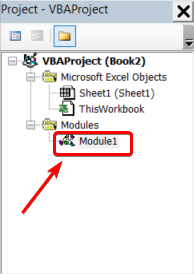
- In the VBA project tree, double-click the module with the macro that you want to edit:
- Edit the macro code, then save changes by clicking the Save button or pressing Ctrl+S.
The workbook with the macro will be saved.
You can press F5 or click Run in the editor to launch the macro:

Note: If a macro changes workbook data, those changes cannot be reversed using the Undo command in Excel.
The VBA editor has a built-in debugger that highlights errors in code. The line that follows the error is highlighted:

An easy way of learning how to create macros in Excel
In Excel you can record a macro by using the Record Macro button in the Developer tab. Then you can open the recorded macro in Excel VBA editor.
This is the easiest way to learn the VBA programming language. Just perform actions in the Excel user interface and see how they are interpreted in the macro code. Then you can change values and methods in the code to see how that affects the macro behavior.
Do I need Excel macros?
As you can see, macros can drastically enhance Excel features in many ways. By using macros, you can automate your daily operations and save yourself hours of time. Excel macros can even save you money if you decide to create an Excel-based order management system instead of buying costly software.
When you finish customizing your Excel workbook with macros, you may need to migrate your data from other sources, like Google Sheets or BigQuery.
-

A content manager at Coupler.io whose key responsibility is to ensure that the readers love our content on the blog. With 5 years of experience as a wordsmith in SaaS, I know how to make texts resonate with readers’ queries✍🏼

Back to Blog
Focus on your business
goals while we take care of your data!
Try Coupler.io