
On the Title bar, Microsoft Word displays the name of the document you are currently using. At the top of your screen, you should see name of document (Document2 in this case). The Menu bar is directly below the Title bar and it displays the menu.
What is screen layout of MS word?
The Microsoft Word screen is a simple, user-friendly and highly customizable interface for word processing. Most of the screen is composed of the document you are creating or editing, but surrounding this are toolbars, scroll bars and buttons that help you navigate and personalize your document.
What is program window?
In computing, a window is a graphical control element. It consists of a visual area containing some of the graphical user interface of the program it belongs to and is framed by a window decoration. It usually has a rectangular shape that can overlap with the area of other windows.
What are the six main parts of Word screen?
6. Microsoft Word Screen Layout
- Title bar: This lies in the middle and at the top or the window.
- Rulers: Word has two rulers – a horizontal ruler and a vertical ruler.
- Help: The Help Icon can be used to get word related help anytime you like.
- Zoom Control:
- View Buttons:
- Document Area:
- Status Bar:
What is the difference between windows and window?
window – box on a screen , that shows the activity of particular softwares and documents . windows – it is a series of operating system and GUI which is product of Microsoft .
What do the buttons on the bottom of the word window do?
This displays the document name, followed by a program name. This contains a list of options to manage and customize documents. This contains shortcut buttons for the most popular commands.
What does the default window look like in word?
When Word is launched, a new blank document, or default window, opens in Print Layout view. Although window elements are fully explained in our Windows course, here is a brief explanation of the Word window. This displays the document name, followed by a program name. This contains a list of options to manage and customize documents.
What do the buttons on the side of the document mean?
This contains shortcut buttons for the most popular commands. This contains buttons that are used for formatting. This is used to set margins, indents, and tabs. This is the location where the next character appears. This indicates the end of the document. This provides quick access to Help topics. These are used to view parts of the document.
What is the bar at the bottom of Microsoft Excel?
This bar located at the bottom of the window which shows very important information. It also shows when something is wrong, or the document is ready to be delivered or printed. This displays quick calculation of the selected digits, like sum, average, count, maximum, minimum, and etc.
https://www.youtube.com/watch?v=qknSXmFhXkE
Перевод по словам
— displayed [adjective]
adjective: показанный, выставленный, выведенный на экран, с распростертыми крыльями
- could not be displayed — не может быть отображена
- displayed with your — отображается с вашими
- copied, distributed, displayed, reproduced or transmitted — Копирование, распространение, отображается, воспроизведена или передана
- will be displayed — будет отображаться
- that displayed when — что отображается при
- text can be displayed — текст может отображаться
- all displayed — все отображаемые
- on the displayed screen — на экране отображается
- are displayed on this — отображаются на этом
- are also displayed — Также отображаются
— below [adverb]
adverb: ниже, внизу, в дальнейшем
preposition: ниже, под
- in accordance with the below — в соответствии с ниже
- significantly below average — значительно ниже среднего
- below sea level — ниже уровня моря
- see below what — см ниже, чем
- below the average — ниже среднего
- marginally below — немного ниже
- below is a chart — Ниже приведен график
- feet below sea level — футов ниже уровня моря
- below the house — под домом
- below the seabed — ниже морского дна
Предложения с «displayed below»
|
A possible reconstruction of his map is displayed below . |
Ниже представлена возможная реконструкция его карты. |
|
The two column raw diff view will still be displayed below the wikEdDiff version. |
Вид raw diff с двумя столбцами по — прежнему будет отображаться под версией wikEdDiff. |
|
It’s displayed below two days early, so it can be error-checked and made ready-to-display for all time zones. |
Он отображается ниже на два дня раньше, поэтому его можно проверить на ошибки и сделать готовым к отображению для всех часовых поясов. |
|
When available, seat projections are displayed below the percentages in a smaller font. |
Когда они доступны, проекции сидений отображаются под процентами более мелким шрифтом. |
|
There are several high quality images that we can chose from, which are displayed below . |
Есть несколько высококачественных изображений , которые мы можем выбрать, которые отображаются ниже. |
|
… indicators can be displayed either on the price chart itself, or below in a separate area. |
индикаторы могут располагаться непосредственно на графике или под ним в отдельной области; |
|
I’d have you all taken to the spire of the Tower of Commerce displayed to the crowds in the Great Marketplace below and then shoved off… one by one! |
Я бы затащил вас всех на самый верх Башни Коммерции, показал бы толпе на Священном Рынке внизу, а потом столкнул бы вас… одного за другим! |
|
Results are presented below by age and wave; total results per wave are displayed in the last column. |
Результаты представлены ниже по возрасту и волне; итоговые результаты на волну отображаются в последней колонке. |
|
The figure was designed to be seen from below and is normally displayed on a fairly high plinth, although the heights vary considerably chosen by the various owners. |
Фигура была спроектирована так, чтобы ее можно было видеть снизу, и обычно изображена на довольно высоком постаменте, хотя высота значительно варьируется по выбору различных владельцев. |
|
Hidden categories are not displayed , except as described below under Hiding categories. |
Скрытые категории не отображаются, за исключением случаев, описанных ниже в разделе скрытие категорий. |
|
To these elements, modern heraldry often adds a motto displayed on a ribbon, typically below the shield. |
К этим элементам современная геральдика часто добавляет девиз, изображенный на ленте, как правило, под щитом. |
|
When the likelihood that a result occurred by chance alone is below a certain level, one or more asterisks are displayed . |
Когда вероятность того, что результат произошел случайно, находится ниже определенного уровня, отображается одна или несколько звездочек. |
|
In the opening credits, the word House is displayed for a few seconds, and then M.D. fades in slightly to the right and below the line. |
В первых титрах слово дом отображается в течение нескольких секунд, а затем доктор медицины исчезает немного вправо и ниже линии. |

Table of Content
- 1 Which feature allows you to copy attributes of selected text and apply them to another selection?
- 2 To protect a document from accidental changes, which option should you select from the Protect Document (Windows) or Protect (Mac) menu?
- 3 You are finalizing a two-page memo. Rather than having Word decide where page 1 ends, you want the next paragraph to begin on the top of page 2. How do you achieve this?
- 4 How do you insert the content of an existing Word document into your current Word document?
- 5 You want to set a wider inside margin to accommodate binding a document where pages are printed in both sides. Which option should you choose in the Page Setup dialog box?
- 6 Which feature lets you place a ghosted logo or text behind the regular text on your document?
- 7 Where do you select the paper size for a document?
- 8 Which option lets you mark your favorite templates for quick reuse in the future?
- 9 If you want to add a caption to a table, where should you look?
- 10 How can you change the appearance of an entire table in a single step?
- 11 Which option does the Find and Replace feature NOT support? (Duplicate 1)
- 12 Which option does the Find and Replace feature NOT support? (Duplicate 2)
- 13 Which statement best describes how a bookmark is used in a Word document?
- 14 What is NOT an option when inviting a colleague to collaborate on a document?
- 15 You split a document into three sections. What happens if you change the margins in the first section?
- 16 Which ribbon tab includes commands to add various types of objects or media to your document?
- 17 What type of page is useful at the front of a large document, to identify the document title, author, and other metadata?
- 18 What happens in this SmartArt object when you press the Delete key?
- 19 Which command builds an overview of document contents based on applied headings styles?
- 20 Which statistic does the Word Count feature NOT collect?
- 21 What is the default view when you open a document or create a new document?
- 22 You are working on a local copy of a document when Word unexpectedly closes. After you relaunch Word, how can you find the most recently saved version of the document?
- 23 What can you NOT insert into a Word document from the Insert tab?
- 24 Which object can you NOT insert into a Word document from the Insert tab?
- 25 What Microsoft Word feature lets you capture a portion of your screen to be used as an image in your document?
- 26 You want to create a shortcut that replaces an acronym that you type with the acronym’s full text-for example, replacing “/mt” with “Microsoft Teams”. What Word feature do you use to create this shortcut?
- 27 Your document contains two columns of content with a vertical line between the columns, as shown. From where can you delete the line?
- 28 When you crop an image in a document, what happens to the image and the overall document file size?
- 29 When you are typing in a paragraph and reach the end of the line, Word automatically starts a new line for you. What is this feature called?
- 30 You want to create an organizational chart. Which SmartArt category should you choose?
- 31 When you insert page numbers, which position is NOT an option?
- 32 How can you quickly move an insertion point up to the start of the previous paragraph?
- 33 You send a document to two clients for review, and each client returns a separate, edited version of the document. How do you most efficiently review their feedback?
- 34 What is the difference between a footnote and an endnote?
- 35 Which formatting option was used to create the effect shown below?
- 36 What Word building block uses headings to help users identify the contents of a document?
- 37 You have been reviewing a Word document using Track Changes. There are still changes that need to be reviewed, but you cannot see them. Why is this? (Select all that apply.)
- 38 You are coordinating the update of your company’s 10-chapter operations manual. You begin by saving each chapter as a separate document. What Word feature can you use to manage all of these chapter documents?
- 39 Which is a benefit of using heading styles to format a report?
- 40 You need to add a trademark symbol to a new product name. How can you accomplish this? (Select two items.)
- 41 You are reformatting a professional document that you created previously using manual formatting. In your document, first-level headings are formatted with Arial 11 Bold. What is the fastest way to create and apply a Heading 1 style using these properties?
- 42 You are typing text in two columns. When you reach the end of a paragraph in column 1, you want to start the next paragraph in column 1 on the next page. What type of break should you insert at this point?
- 43 You want to capture all the content and design elements in your current document, so you can use them as a starting point when creating new documents. To do so, save the current document as ___.
- 44 Which file format best preserves formatting and allows editing when a Word document is transferred to another application?
- 45 How can you break a table into two parts?
- 46 What can you NOT create from a Word document?
- 47 How can you add a manual line break to a paragraph?
- 48 You want to repeat an element (such as the date<9 on all pages of the document. Which options should you choose?
- 49 A document has been shared with you from your colleague’s OneDrive library. They have given only you editing access. What can you do with this document?
- 50 In the image below, what do the red bars next to the text indicate?
- 51 What formatting must you use to use both portrait and landscape pages in the same Word document?
- 52 What is the name of the text effect that displays a large capital letter at the beginning of a paragraph?
- 53 You need to document a procedure. Which paragraph format is best to help readers follow the sequence of instructions?
- 54 How can you adjust which data in a table is used when creating a chart?
- 55 You want to be able to edit your Word document simultaneously with other Word users in your organization. Which save location should you select in the Save As dialog box? A. OneDrive B. SharePoint document library C. Google Drive D. DropBox
- 56 Why is it important to use alternative text for objects in your document?
- 57 What is a benefit of using sections in a Microsoft Word document?
- 58 How can you tell if a colleague is coauthoring a document at the same time as you? (Select all that apply.)
- 59 When you insert a picture into a document, what happens to the picture?
- 60 When working with Track Changes, what is the difference between Simple Markup and all Markup?
- 61 You want to set a wider inside margin to accommodate binding a document where pages are printed on both sides. Which option should you choose in the Page Setup diealog box?
- 62 You’re finalizing a document that contains some high-resolution images. You want to reduce the picture size while ensuring image quality is adequate for online viewing. What is a best-practice approach?
- 63 Before you send a document to an external client, you must remove personal information–including document author names, comments, and hidden text–from the doc. What tool can help you locate and clean up these details??
- 64 What chart type cannot be used for more than one data series?
- 65 What is the difference between a footnote and an endnote?
- 66 In the image below, where do you click to hide comments when a document prints?
- 67 Which page orientation should you select to accommodate a wide chart or table?
- 68 What is the first step in sharing a document that is currently saved on your local hard drive?
- 69 You are working in another application and want to move text into a Word document. How can you do it?
- 70 What is typically created as the first page of a document and contains information such as the document title and author?
- 71 Before publishing a document you want to identify issues that may make it difficult for people with disabilities to read. which feature should you use?
- 72 After selecting the entire document, what is the quickest way to find out how many paragraphs there are in your current Word document?
- 73 You want to be able to read one page in your document while editing another page in the same document. What’s the most efficient way to do this with only one monitor?
- 74 What is the purpose of adding alternative text (alt text) to an image in your document?
- 75 You are inserting several images in a document and need to include descriptive information about them. Numbering the images will also make it easier to reference them in the associated document text. Which command can help you set this up?
- 76 In this image, what do the red lines next to the text indicate?
- 77 You want an image to move with the surrounding text as you make changes to the document. Which option should you select?
- 78 You want to place a triangle shape on your page. Where do you find the shape?
- 79 When printing multiple copies of a document, which option groups consecutive pages together, making them easier to distribute?
- 80 You are sharing your computer screen to collaborate on a document. Which view should you use to minimize the ribbon and give your document the most screen space?
- 81 You want a different header and footer to appear on alternating pages. Which option should you choose?
- 82 When you start a new, blank document, you usually end up changing the font to Arial 11.5 point. How can you make these settings the default for this and all future new documents?
- 83 The form you are creating includes a field where users can either pick from a list of choices you provide, or type in a different entry. Which control type should you use?
- 84 You inserted a picture into a brochure, and you want to cut down on the background to focus only on the main part of the image. How can you accomplish this?
- 85 Before publishing a document, you want to identify issues that may make it difficult for people with disabilities to read. which feature should you use?
Which feature allows you to copy attributes of selected text and apply them to another selection?
- Merge Formatting command
- Copy and Paste Styles command
- Copy and Paste Attributes command
- Format Painter tool
- Mark as Final.
- Add a Digital Signature.
- Encrypt with Password.
- Always Open Read-Only.
You are finalizing a two-page memo. Rather than having Word decide where page 1 ends, you want the next paragraph to begin on the top of page 2. How do you achieve this?
- Change the bottom margin to your current location.
- Insert a page break.
- Press Shift + Enter (Shift + Return).
- Insert a column break.
How do you insert the content of an existing Word document into your current Word document?
- Click Layout > Text > Text from File.
- Click Insert > Text > Building Blocks Organizer.
- Click Insert > Text > Text from File.
- Click Insert > Media.
You want to set a wider inside margin to accommodate binding a document where pages are printed in both sides. Which option should you choose in the Page Setup dialog box?
- E-Book Fold.
- Different Odd & Even Pages.
- Mirror Margins.
- Landscape.
Which feature lets you place a ghosted logo or text behind the regular text on your document?
- Background.
- Watermark.
- Imagemark.
- Overlay.
Where do you select the paper size for a document?
- Design > Size.
- File > Page Setup.
- Layout > Size.
- Layout > Margins.
Which option lets you mark your favorite templates for quick reuse in the future?
- Drag to Home tab.
- Add to chooser.
- Pin to list.
- Mark as favorite.
If you want to add a caption to a table, where should you look?
- Insert tab.
- Design tab.
- References tab.
- Layout tab.
How can you change the appearance of an entire table in a single step?
- Apply a table style.
- Apply a graphic style.
- Right-click a table and choose a new style.
- Apply a cell style.
Which option does the Find and Replace feature NOT support? (Duplicate 1)
- Whole Word Only.
- Replace All.
- Check Spelling.
- Match Case.
Which option does the Find and Replace feature NOT support? (Duplicate 2)
- Match Punctuation
- Replace All
- Match Case
- Whole Word Only
Which statement best describes how a bookmark is used in a Word document?
- A bookmark is a hyperlink where the label is automatically generated.
- A bookmark works in conjunction with hyperlinks to allow you to quickly jump to a specific location in your document.
- A bookmark is a link in your document that can give you quick access to webpages, files, and other locations within your document.
- A bookmark is a color-coded graphic that appears in the navigation pane for easy access to a specific location in your document.
What is NOT an option when inviting a colleague to collaborate on a document?
- including a personalized message
- giving the collaborator the option to edit a document
- setting the collaborator’s access to view only
- granting administrator access
You split a document into three sections. What happens if you change the margins in the first section?
- The document reverts back to a single section with the new margin settings.
- The new margin settings are applied to all of the sections.
- The new margin settings are applied to the second and third sections.
- The new margin settings are applied to just the first section.
Which ribbon tab includes commands to add various types of objects or media to your document?
- Insert
- File
- Layout
- Design
What type of page is useful at the front of a large document, to identify the document title, author, and other metadata?
- cover page
- blank page
- master page
- table of contents page
What happens in this SmartArt object when you press the Delete key?
- The boxes resize to maintain the same overall height.
- The object is deleted and a hole is left behind.
- The text merges with the second box.
- The gaps between the boxes close and the boxes remain the same size.
Which command builds an overview of document contents based on applied headings styles?
- Manage Sources
- Cross-Reference
- Insert Index
- Table of Contents
Which statistic does the Word Count feature NOT collect?
- paragraphs
- lines
- page breaks
- characters (no spaces)
What is the default view when you open a document or create a new document?
- Print Layout view
- Draft view
- Edit view
- Web Layout view
You are working on a local copy of a document when Word unexpectedly closes. After you relaunch Word, how can you find the most recently saved version of the document?
- Click Open > Recent and select Recover Unsaved Documents.
- Click File > Options > Recover Unsaved Documents.
- Click File > Open > Recent > Documents.
- Click File > Recent > Recover Unsaved Documents.
What can you NOT insert into a Word document from the Insert tab?
- a sketch
- a symbol
- a 3D model
- an equation
Which object can you NOT insert into a Word document from the Insert tab?
- a 3D model
- an equation
- a sketch
- a symbol
What Microsoft Word feature lets you capture a portion of your screen to be used as an image in your document?
- Screen Clipping
- Screen Grab
- Screen Capture
- none of these answers
You want to create a shortcut that replaces an acronym that you type with the acronym’s full text-for example, replacing “/mt” with “Microsoft Teams”. What Word feature do you use to create this shortcut?
- Replace All
- AutoFormat As You Type
- Find and Replace
- AutoCorrect Options
Your document contains two columns of content with a vertical line between the columns, as shown. From where can you delete the line?
- Insert > Text
- Columns dialog box
- Insert > Line > Vertical
- Insert > Line > Remove
When you crop an image in a document, what happens to the image and the overall document file size?
- The cropped parts of the image are hidden and the overall file size increases.
- The cropped parts of the image are removed and the overall file size does not change.
- The cropped parts of the image are hidden and the overall file size does not change.
- The cropped parts of the image are removed and the overall file size decreases.
When you are typing in a paragraph and reach the end of the line, Word automatically starts a new line for you. What is this feature called?
- line wrap
- word wrap
- a new line return
- a soft return
You want to create an organizational chart. Which SmartArt category should you choose?
- Pyramid
- Relationship
- Hierarchy
- Matrix
When you insert page numbers, which position is NOT an option?
- page margins
- inset
- current position
- bottom of page
How can you quickly move an insertion point up to the start of the previous paragraph?
- Press Ctrl+Up Arrow (Windows) or Command+Up Arrow (Mac).
- Press Ctrl+Page Up (Windows) or Command+Page Up (Mac).
- Press Ctrl+Left Arrow (Windows) or Command+Left Arrow (Mac).
- Press Alt+Left Arrow (Windows) or Option+Left Arrow (Mac).
You send a document to two clients for review, and each client returns a separate, edited version of the document. How do you most efficiently review their feedback?
- Click Review > Accept.
- Turn on Track Changes.
- Click Review > Compare.
- Click Review > Smart Lookup.
What is the difference between a footnote and an endnote?
- Footnotes use Arabic numerals and endnotes use letters.
- A footnote is placed in the page footer, and an endnote is placed on a blank page at the end of the document.
- A footnote is placed at the bottom of the page, and an endnote is placed at the end of the document.
- An endnote always appears on the bottom of the same page that it references.
Which formatting option was used to create the effect shown below?
- Drop Cap
- Subscript
- Small Caps
- Superscript
What Word building block uses headings to help users identify the contents of a document?
- table of contents
- page break
- cover page
- index
You have been reviewing a Word document using Track Changes. There are still changes that need to be reviewed, but you cannot see them. Why is this? (Select all that apply.)
- A, C, D
- A, B
- D
- A, C
You are coordinating the update of your company’s 10-chapter operations manual. You begin by saving each chapter as a separate document. What Word feature can you use to manage all of these chapter documents?
- Sthe Organizer
- master document
- outline view
- versioning
Which is a benefit of using heading styles to format a report?
- You can reformat all headings by changing style sets.
- You can navigate from heading to heading in the Navigation pane.
- all of these answers
- You can easily generate a table of contents.
You need to add a trademark symbol to a new product name. How can you accomplish this? (Select two items.)
- B and D
- A and B
- B and C
- A and D
You are reformatting a professional document that you created previously using manual formatting. In your document, first-level headings are formatted with Arial 11 Bold. What is the fastest way to create and apply a Heading 1 style using these properties?
- In the Styles task pane, click New Style and select Arial 11 Bold.
- Hold the Ctrl key (Windows) or Command key (Mac) and click the Format Painter. Then select New Style.
- Select one of the first level headings. Right-click Heading 1 and update it to match the selection.
- Select the text, right-click to display the formatting bar, and select Styles > Copy.
You are typing text in two columns. When you reach the end of a paragraph in column 1, you want to start the next paragraph in column 1 on the next page. What type of break should you insert at this point?
- next page section break
- continuous section break
- column break
- page break
You want to capture all the content and design elements in your current document, so you can use them as a starting point when creating new documents. To do so, save the current document as ___.
- a template file
- a PDF
- an OpenDocument Text file
- a Rich Text Format file
Which file format best preserves formatting and allows editing when a Word document is transferred to another application?
- XML Paper Specification (XPS)
- OpenDocument Text (ODT)
- Rich Text Format (RTF)
- plain text (TXT)
How can you break a table into two parts?
- Use the Split Table command.
- Press Shift + Enter (Windows) or Sift + Return (Mac).
- Use the Section Break command.
- Use the Split Cells command.
What can you NOT create from a Word document?
- a Word macro-enabled document
- a plain text file
- a multipage website
- a Word 2003 XML document
How can you add a manual line break to a paragraph?
- Press Enter twice (Windows) or Return twice (Mac).
- Press Alt+Enter (Windows) or Option+Return (Mac).
- Press Enter (Windows) or Return (Mac).
- Press Shift+Enter (Windows) or Shift+Return (Mac)
You want to repeat an element (such as the date<9 on all pages of the document. Which options should you choose?
- Insert > Header & Footer
- Insert > Text
- Design > Header & Footer
- View > Header & Footer
A document has been shared with you from your colleague’s OneDrive library. They have given only you editing access. What can you do with this document?
- Share the document with others.
- Assume ownership of the document.
- Remove access from another user.
- Coauthor the document with your colleague.
In the image below, what do the red bars next to the text indicate?
- Draw tools were used in these areas.
- Changes were made to these areas.
- Comments were added to these areas.
- none of these answers
What formatting must you use to use both portrait and landscape pages in the same Word document?
- templates
- page
- columns
- sections
What is the name of the text effect that displays a large capital letter at the beginning of a paragraph?
- superscript
- drop cap
- subscript
- small caps
You need to document a procedure. Which paragraph format is best to help readers follow the sequence of instructions?
- line numbers
- numbered list
- columns
- bulleted list
How can you adjust which data in a table is used when creating a chart?
- Click the Select Data button.
- Click the Refresh Data button.
- Click the Switch Row/Column button.
- Click the Edit Data button.
You want to be able to edit your Word document simultaneously with other Word users in your organization. Which save location should you select in the Save As dialog box? A. OneDrive B. SharePoint document library C. Google Drive D. DropBox
- A
- A, B, C, D
- A, B, C
- A or B
Why is it important to use alternative text for objects in your document?
- Adding alternative text to an object is one way to apply a caption to an object.
- It allows you to display the text in a language other than the default language-for example, English to French, French to German.
- It helps a user with a visual impairment who is using a screen reader understand the content of the object.
- It enables you to provide another explanation of the object, in case the user does not understand what the object is.
What is a benefit of using sections in a Microsoft Word document?
- You can restrict printing for specific document sections.
- You can apply unique formatting to each section.
- You can collaborate on specific sections with other authors.
- You can restrict access to each section individually.
How can you tell if a colleague is coauthoring a document at the same time as you? (Select all that apply.)
- A, B, C
- B, C, D
- A, B, D
- A, C, D
When you insert a picture into a document, what happens to the picture?
- Word stretches the photo to fill the page.
- Word scales the image to the largest size possible to fit within the height or width of the page.
- Word converts the photo’s file format.
- Word analyzes and corrects the image for tone and color.
When working with Track Changes, what is the difference between Simple Markup and all Markup?
- Simple Markup shows the final version without inline markups; All Markups shows the final version with inline markups.
- Simple Markup shows the markup versions by one selected author; All Markup shows the combined markup version of all authors.
- Simple Markup shows the revisions of one selected author in the Review pane; All Markup shows the revisions of all authors with inline markups.
- Simple Markup shows the final version with inline markups; All Markup shows the final version without inline markups.
You want to set a wider inside margin to accommodate binding a document where pages are printed on both sides. Which option should you choose in the Page Setup diealog box?
- E-Book Fold.
- Mirror Margins
- Duplex
- Difference Odd & Even Pages
You’re finalizing a document that contains some high-resolution images. You want to reduce the picture size while ensuring image quality is adequate for online viewing. What is a best-practice approach?
- Review the images and crop as needed. Compress the images. Save the document and then compress the entire document.
- Replace the images with lower-resolution images. Save the document and then compress it.
- Review the images and crop as needed. Then compress the images and delete cropped areas.
- Review the images and crop as needed. Save document and then compress it.
Before you send a document to an external client, you must remove personal information–including document author names, comments, and hidden text–from the doc. What tool can help you locate and clean up these details??
- Accessibility Checker
- Check Compatibility
- Manage Document
- Document Inspector
What chart type cannot be used for more than one data series?
- Pie
- Column
- Line
- Bar
What is the difference between a footnote and an endnote?
- An endnote always appears on the bottom of the same page that it references
- Footnote use Arabic numerals and endnotes use letters.
- A footnote is placed at the bottom of the page, and an endnote is placed at the end of the document
- A footnote is placed in teh page footer and an endnote is placed on a blank page at the end of the document
- A
- B
- C
- D
Which page orientation should you select to accommodate a wide chart or table?
- Tall
- Portrait
- Wide
- Landscape
What is the first step in sharing a document that is currently saved on your local hard drive?
- Get a sharing link for the document.
- Create a new document in OneDrive.
- Upload the document to OneDrive.
- Send an invitation to the document.
You are working in another application and want to move text into a Word document. How can you do it?
- Export the text from the other application as a Word document.
- Use the Insert command and select the Word document.
- Select the text and save it as Word document.
- Use the Clipboard to copy and paste text into the Word document.
What is typically created as the first page of a document and contains information such as the document title and author?
- cover page
- master page
- blank page
- table of contents page
Before publishing a document you want to identify issues that may make it difficult for people with disabilities to read. which feature should you use?
- check Accessibility
- inspect document
- check compatibility
- protect document
After selecting the entire document, what is the quickest way to find out how many paragraphs there are in your current Word document?
- From the start of the document, hold down the Ctrl (Windows) or Command (Mac) key, and press the Down Arrow key repeatedly, counting each paragraph as you go.
- Click File > Properties > Content to display file information, including the number of paragraphs.
- On the status bar, select Word Count to display file information, including the number of paragraphs.
- Click File > Info > Inspect Document to display file information, including the number of paragraphs.
You want to be able to read one page in your document while editing another page in the same document. What’s the most efficient way to do this with only one monitor?
- On the View tab of the ribbon, click Split.
- Save a duplicate copy of your document, then view both documents side by side.
- On the Insert tab of the ribbon, create a bookmark for the location that you want to read.
- On the View tab of the ribbon, click New Window.
What is the purpose of adding alternative text (alt text) to an image in your document?
- Alt text improves accessibility in your document.
- all of these answers
- Alt text describes what appears in the image.
- Screen readers read the text aloud for users with visual impairments.
You are inserting several images in a document and need to include descriptive information about them. Numbering the images will also make it easier to reference them in the associated document text. Which command can help you set this up?
- Insert Footnote
- Insert Citation
- Insert Caption
- Insert Table of Figures
In this image, what do the red lines next to the text indicate?
- SmartArt
- drop-down list
- combo box
- check box
You want an image to move with the surrounding text as you make changes to the document. Which option should you select?
- Right-click the picture and select Crop.
- In Picture Tools, select Remove Background.
- In Picture Tools, select Picture Effects.
- Right-click the picture and select Size and Position.
You want to place a triangle shape on your page. Where do you find the shape?
- On the Insert tab, click SmartArt.
- On the Insert tab, click Shapes and look in the Rectangles & Triangles section.
- On the Insert tab, click Icons.
- On the Insert tab, click Shapes and look in the Basic Shapes section.
When printing multiple copies of a document, which option groups consecutive pages together, making them easier to distribute?
- Collated
- Print One-Sided
- Uncollated
- Print on Both Sides
You are sharing your computer screen to collaborate on a document. Which view should you use to minimize the ribbon and give your document the most screen space?
- Read Mode (Windows) or Focus (Mac)
- Draft view
- Web Layout view
- Outline view
You want a different header and footer to appear on alternating pages. Which option should you choose?
- Different Odd & Even Pages
- Insert Alt Header/Footer
- Display on Odd Pages Only
- Different First Page
When you start a new, blank document, you usually end up changing the font to Arial 11.5 point. How can you make these settings the default for this and all future new documents?
- Open any document, change your font settings, and save as a template.
- Create a macro that will change all fonts to Arial 11.5 point.
- In a new, blank document, from the Font dialog box, make your changes and set as default for All documents based on the Normal template.
- In a new, blank document, make your font changes and then save your document as a template.
The form you are creating includes a field where users can either pick from a list of choices you provide, or type in a different entry. Which control type should you use?
- SmartArt
- drop-down list
- combo box
- check box
You inserted a picture into a brochure, and you want to cut down on the background to focus only on the main part of the image. How can you accomplish this?
- Right-click the picture and select Crop.
- In Picture Tools, select Remove Background.
- In Picture Tools, select Picture Effects.
- Right-click the picture and select Size and Position.
Before publishing a document, you want to identify issues that may make it difficult for people with disabilities to read. which feature should you use?
- check Accessibility
- inspect document
- check compatibility
- protect document
All Linkedin Skill Assessment Answers
List of Technical Skill Assessment
- LinkedIn .NET Framework Skill Assessment Quiz Answers
- LinkedIn Agile Methodologies Skill Assessment Quiz Answers
- LinkedIn Amazon Web Services (AWS) Skill Quiz Answers
- LinkedIn Android Assessment Quiz Answers
- LinkedIn AngularJS Skill Assessment Quiz Answers
- LinkedIn AWS Lambda Skill Assessment Answers
- LinkedIn Bash Skill Assessment Quiz Answers
- LinkedIn C Skill Assessment Quiz Answers
- LinkedIn C# Skill Assessment Quiz Answers
- LinkedIn C++ Skill Assessment Quiz Answers
- LinkedIn CSS Skill Assessment Quiz Answers
- LinkedIn Cyber Security Skill Assessment Quiz Answers
- LinkedIn Django Skill Assessment Quiz Answers
- LinkedIn Eclipse Skill Assessment Quiz Answers
- LinkedIn Front End Development Skill Assessment Quiz Answers
- LinkedIn Git Skill Assessment Quiz Answers
- LinkedIn Google Analytics Skill Assessment Quiz Answers
- LinkedIn Google Cloud Platform (GCP) Skill Assessment Quiz Answers
- LinkedIn Hadoop Skill Assessment Quiz Answers
- LinkedIn HTML Skill Assessment Quiz Answers
- LinkedIn IT Operation Skill Assessment Quiz Answers
- LinkedIn Java Skill Assessment Quiz Answers
- LinkedIn JavaScript Skill Assessment Quiz Answers
- LinkedIn JQuery Skill Assessment Quiz Answers
- LinkedIn JSON Skill Assessment Quiz Answers
- LinkedIn Windows Server Skill Assessment Quiz Answers
- LinkedIn XML Skill Assessment Answers
- LinkedIn Kotlin Skill Assessment Quiz Answers
- LinkedIn Linux Skill Assessment Quiz Answers
- LinkedIn Machine Learning Skill Assessment Quiz Answers
- LinkedIn Maven Skill Assessment Quiz Answers
- LinkedIn Microsoft Azure Skill Assessment Quiz Answers
- LinkedIn MongoDB Skill Assessment Quiz Answers
- LinkedIn MySQL Skill Assessment Quiz Answers
- LinkedIn Node JS Skill Assessment Quiz Answers
- LinkedIn NoSQL Skill Assessment Quiz Answers
- LinkedIn Objective-C Skill Assessment Quiz Answers
- LinkedIn OOP (Object-Oriented Programming Skill Assessment Quiz Answers
- LinkedIn PHP Skill Assessment Quiz Answers
- LinkedIn Python Skill Assessment Quiz Answers
- LinkedIn React JS Skill Assessment Quiz Answers
- LinkedIn Rest APIs Skill Assessment Quiz Answers
- LinkedIn R (Programming Language) Skill Assessment Quiz Answers
- LinkedIn Ruby on Rails Skill Assessment Quiz Answers
- LinkedIn Scala Skill Assessment Quiz Answers
- LinkedIn Search Engine Optimization (SEO) Skill Assessment Quiz Answers
- LinkedIn Spring Framework Skill Assessment Quiz Answers
- LinkedIn Swift Skill Assessment Quiz Answers
- LinkedIn T-SQL Skill Assessment Quiz Answers
- LinkedIn Unity Skill Assessment Quiz Answers
- LinkedIn Visual Basic for Application (VBA) Skill Assessment Quiz Answers
- LinkedIn WordPress Skill Assessment Quiz Answers
List of Business Skill Assessment
- LinkedIn Accounting Skill Assessment Quiz Answers
- LinkedIn Adobe Acrobat Skill Assessment Quiz Answers
- LinkedIn Google Ads Skill Assessment Quiz Answers
- LinkedIn Microsoft Access Skill Assessment Quiz Answers
- LinkedIn Microsoft Excel Skill Assessment Quiz Answers
- LinkedIn Microsoft Outlook Skill Assessment Quiz Answers
- LinkedIn Microsoft Power BI Skill Assessment Quiz Answers
- LinkedIn Microsoft PowerPoint Skill Assessment Quiz Answers
- LinkedIn Microsoft Project Skill Assessment Quiz Answers
- LinkedIn Microsoft Word Skill Assessment Quiz Answers
- LinkedIn SharePoint Skill Assessment Quiz Answers
- LinkedIn Visio Skill Assessment Quiz Answers
List of Design Skill Assessment
- LinkedIn Adobe Illustrator Skill Assessment Quiz Answers
- LinkedIn Adobe Lightroom Skill Assessment Quiz Answers
- LinkedIn Adobe Photoshop Skill Assessment Quiz Answers
- LinkedIn Adobe Premiere Pro Skill Assessment Quiz Answers
- LinkedIn AutoCAD Skill Assessment Quiz Answers
- LinkedIn Autodesk Fusion 360 Skill Assessment Quiz Answers

If you work a lot with Word documents, you cannot avoid using fields. Fields in Word are used for many purposes such as page numbers, cross-references and tables of contents.
By default, a number of keyboard shortcuts have been assigned to operations related to Word fields. Using those shortcuts will help you save time and mouse clicks. Also, some operations on fields can only be performed using shortcuts or via code.
In this article, you will find a list of useful Word field shortcuts including descriptions of how the shortcuts work.
About field codes and field results
Any field in Word consists of a set of curly field brackets, { }. Between the field brackets, you will find the field code that tells Word what to display, i.e. the field result. You can switch between displaying the field codes or the field results. You can only see the field brackets and field codes when field codes are displayed. To make sure fields show the correct results, they must be updated.
For details about how fields are updated, see my article Updating Fields in Word — How it Works. See the Microsoft article List of field codes in Word for information about the individual types of Word fields, their syntax and how to use them.
Examples of field codes
Page number: { PAGE }
Number of pages in a section: { SECTIONPAGES ]
Table of contents: { TOC o «1-3» h z u }
Short overview of field shortcuts — with names of related Word commands
For a quick overview of the Word field shortcuts, see the list below. For a detailed list with a description of each of the shortcuts, see Overview of Word field shortcuts — with detailed descriptions (found immediately below the short list).
The rightmost column shows the names of the Word commands that are executed by the shortcuts. Those names are the ones listed the Customize Keyboard dialog box in which you can modify keyboard shortcuts. To open the dialog box, select File > Options > Customize Ribbon > click the Customize button found next to the label Keyboard shortcuts. The Word command names can also be used in VBA.
- Note that most of the keyboard shortcuts related to fields involve the F9 key.
|
Shortcut |
What happens |
Executes Word command |
|---|---|---|
|
F9 |
Updates all fields in the selection |
UpdateFields |
|
Alt+F9 |
Toggles between field codes and field results of all fields |
ViewFieldCodes |
|
Shift+F9 |
Toggles between field codes and field results of selected fields |
ToggleFieldDisplay |
|
Ctrl+F9 |
Inserts a set of field brackets |
InsertFieldChars |
|
Ctrl+Shift+F9 |
Converts selected fields to normal text (unlinks the fields) |
UnlinkFields |
|
Ctrl+F11 |
Locks selected fields |
LockFields |
|
Ctrl+Shift+F11 |
Unlocks selected fields |
UnlockFields |
Overview of Word field shortcuts — with detailed descriptions
The list below shows the same shortcuts as listed above. The rightmost column includes detailed descriptions of the individual shortcuts.
|
Shortcut |
What happens |
More details |
|---|---|---|
|
F9 |
Updates all fields in the selection. |
A Word document consists of a number of stories: Main text story, header, footer, footnotes, endnotes, etc. You can only select content in one story at a time. If fields are found in more stories, you will need to update fields in each story. Alternatively, you can use a macro to update all fields in one operation. I have created a free macro for that purpose: Macro – Update all fields. Some fields are updated automatically. Other fields need to be updated manually. Some fields update when you switch to Print Preview. For detailed information about how the different types of Word fields update, see the article Updating Fields in Word — How it Works. A field shows an error if Word cannot show the result specified by the field code. This happens, for example, if a cross-reference field refers to a heading or another target that is no longer found. You will then see a result like this:
The field can be updated to show the correct content when you have located and solved the problem. In some of the Word add-ins I have developed, I have made tools that can detect and correct some types of field errors. This is true for the add-ins DocTools CrossReferenceManager and DocTools DocPropertyManager. |
|
Alt+F9 |
Toggles between showing field codes and field results of all fields in the entire document. |
The field result is the content displayed in the final document. The field codes instruct Word in what to display. Below is an example of a field showing field result and field code:
|
|
Shift+F9 |
Toggles between showing field codes and field results of selected fields only. |
If you need to see or modify the field code in a single or a few fields only, it is often practical to only show field codes of that/those fields. You may experience that nothing happens when you press Shift+F9. This may depend on where the selection is. You can then either try to adjust the selection or you can use Alt+F9. Alternatively, right-click and select Toggle Field Codes from the context menu — the same command as executed by the Shift+F9 shortcut. NOTE: To toggle the fields code of a single field, you do not need to select the entire field. It is sufficient that the cursor be in the field. |
|
Ctrl+F9 |
Inserts a set of field brackets (an empty field), ready for manually adding the relevant field code. |
Any Word field is enclosed in a set of field brackets. You can insert nested fields, i.e. fields inside fields. The field brackets look like curly parenthesis as in the REF field shown above. Note, however, that the field brackets cannot be typed as normal characters. You must use Ctrl+F9. You can insert fields via the Field dialog box but it is often faster to create fields manually if you know the precise field code syntax. Character codes for the field brackets: The curly brackets you can type using the keyboard have character codes 123 and 125, respectively. |
|
Ctrl+Shift+F9 |
Converts selected fields to normal text. The field result of each field is preserved but the field itself is removed. This is also referred to as unlinking fields. |
You may want to convert fields to normal text in special situations. For example, this may be useful if you need to copy content with fields to a destination where the fields will fail because there is no longer access to required data such as cross-reference fields that refer to targets that are not included in the copied range. An alternative solution is to lock fields that are to be prevented from updating (see below). NOTE: There is no command in the Word user interface to unlink fields. You must either use the shortcut or use code. The following VBA code will unlink all fields in the selection: Selection.Fields.Unlink |
|
Ctrl+F11 |
Locks selected fields, thereby preventing the field results from changing even if you update fields. |
There may be situations when you want to prevent the result of a field from being updated. Note that a locked field preserves its field result (the content shown in Word) even if you have made manual changes to the field result by modifying it directly. If a field is not updated as expected, the problem may be that the field is locked. You can unlock locked fields. See below. NOTE: You cannot see on a field whether it is locked. You can check via VBA whether fields are locked. The following VBA code will return True if the first field in the selection is locked: Selection.Fields(1).Locked NOTE: There is no command in the Word user interface to lock fields. You must either use the shortcut or use code. The following VBA code will lock all fields in the selection: Selection.Fields.Locked = True |
|
Ctrl+Shift+F11 |
Unlocks selected fields. |
Locked fields will work as normally in relation to field updating once they are unlocked. NOTE: There is no command in the Word user interface to unlock fields. You must either use the shortcut or use code. The following VBA code will unlock all fields in the selection: Selection.Fields.Locked = False |

Recommendation — turn on field shading so you can distinguish fields from other content
Since the result of a Word field is determined by the field code and is often influenced by content elsewhere, it is important to be able to distinguish fields from normal text so you don’t accidentally change a field result by manually modifying its result. If you manually modify a field result, the change will disappear the next time the field is updated unless the field has been locked.
Therefore, I recommend that you set the Word option for Field shading to Always (File > Options > Advanced > Show document content group > Fields shading > Always). When field shading is set to Always, all fields are shown with gray shading on the screen as in the examples in the table above. The gray shading is only visible on the screen in Word — it does not print and it is not visible in PDF.
Related information
Learn the rules that apply to updating fields of different types in Word in the article Updating Fields in Word — How it Works.
See the Microsoft article List of field codes in Word for information about the individual types of Word fields, their syntax and how to use them.
In case of problems with cross-reference fields not being updated as expected, see my article Cross-reference Problems — Troubleshooting.
More information about Aliwal North 10 days weather forecast,
![]()
![]()
Más información acerca de Aliwal North 10 días previsión meteorológica con
![]()
With destinations on the tour already reached the note Destination reached is displayed below the destination name.
![]()
![]()
Los itinerarios ya alcanzados en la ruta se visualizan bajo el nombre de destino del aviso Llegada al destino.
![]()
More information about’Aïn Abid 10 days weather forecast,
![]()
![]()
Más información acerca de’Aïn Abid 10 días previsión meteorológica con pronóstico
![]()
For destinations already reached on the route, the note Destination reached is displayed below the destination name.
![]()
![]()
Los destinos ya alcanzados en la ruta se visualizan bajo el nombre de destino del aviso Llegada al destino.
![]()
More information about’Aïn Arnat 10 days weather forecast,
![]()
![]()
Más información acerca de’Aïn Arnat 10 días previsión meteorológica con pronóstico
![]()
More information about’Aïn Benian 10 days weather forecast,
![]()
![]()
Más información acerca de’Aïn Benian 10 días previsión meteorológica con pronóstico
![]()
More information about’Aïn Bessem 10 days weather forecast,
![]()
![]()
Más información acerca de’Aïn Bessem 10 días previsión meteorológica con pronóstico
![]()
More information about’Aïn Boucif 10 days weather forecast,
![]()
![]()
Más información acerca de’Aïn Boucif 10 días previsión meteorológica con pronóstico
![]()
More information about’Aïn Deheb 10 days weather forecast,
![]()
![]()
Más información acerca de’Aïn Deheb 10 días previsión meteorológica con pronóstico
![]()
More information about’Aïn Merane 10 days weather forecast,
![]()
![]()
Más información acerca de’Aïn Merane 10 días previsión meteorológica con pronóstico
![]()
More information about’Aïn Taya 10 days weather forecast,
![]()
![]()
Más información acerca de’Aïn Taya 10 días previsión meteorológica con pronóstico
![]()
More information about’Aïn Temouchent 10 days weather forecast,
![]()
![]()
Más información acerca de’Aïn Temouchent 10 días previsión meteorológica con pronóstico
![]()
More information about’Aïn el Bell 10 days weather forecast,
![]()
![]()
Más información acerca de’Aïn el Bell 10 días previsión meteorológica con pronóstico
![]()
More information about’Aïn el Berd 10 days weather forecast,
![]()
![]()
Más información acerca de’Aïn el Berd 10 días previsión meteorológica con pronóstico
![]()
More information about’Aïn el Hadjar 10 days weather forecast,
![]()
![]()
Más información acerca de’Aïn el Hadjar 10 días previsión meteorológica con pronóstico
![]()
More information about’Aïn el Hammam 10 days weather forecast,
![]()
![]()
Más información acerca de’Aïn el Hammam 10 días previsión meteorológica con pronóstico
![]()
More information about’Aïn el Melh 10 days weather forecast,
![]()
![]()
Más información acerca de’Aïn el Melh 10 días previsión meteorológica con
![]()
More information about’Aïn el Turk 10 days weather forecast,
![]()
![]()
Más información acerca de’Aïn el Turk 10 días previsión meteorológica con pronóstico
![]()
More information about Bogo Gobo 10 days weather forecast,
![]()
![]()
Más información acerca de Bogo Gobo 10 días previsión meteorológica con pronóstico
![]()
More information about Abong Mbang 10 days weather forecast,
![]()
![]()
Más información acerca de Abong Mbang 10 días previsión meteorológica con pronóstico
![]()
More information about Akom II 10 days weather forecast,
![]()
![]()
Más información acerca de Akom II 10 días previsión meteorológica con pronóstico
![]()
More information about
Am
Timan 10 days weather forecast,
![]()
![]()
Más información acerca de Am Timan 10 días previsión meteorológica con pronóstico
![]()
STEP 6:
Click on INSERT and make sure the weather gadget is displayed below, as shown here.
![]()
![]()
PASO 6:
![]()
By tapping the current street name if it is displayed below the current position marker on the map.
![]()
![]()
Pulsando el nombre
de
la calle actual si se muestra debajo de la marca
de
posición actual en el mapa.
![]()
If the current street is displayed below the Vehimarker(the current position on the map),
tap it to open the Where
Am
I? screen.
![]()
![]()
Si la calle actual se muestra bajo el vehimarcador(la posición actual en el mapa),
tóquela para abrir la pantalla Posición actual.
![]()
In this article, you will learn the different parts of Microsoft Word Windows 2019. This is a lesson – 03 of Microsoft Word. You may also read previous lessons to learn the complete Microsoft Word.
Microsoft Word is application software for writing texts, and different types of documents can be easily developed in a practical way.
In other words, it is a word processor that allows you to create and edit text. As long as you know what the parts of Microsoft Word are and what they are used for. With this software, the user will be able to write and design texts where they will be able to use different fonts, colors, and sizes, with the different commands of Word.
In this section, we will make references to the basic parts of Microsoft Word Windows 2019. This program is a part of the Microsoft Office package developed by Microsoft. Along with other programs, there is a number of visual appearances and program window layout that can make the work easier. Let’s understand the basic parts of Microsoft Word Windows 2019.
In the below screenshot, you can see and learn about the various important parts of Microsoft Word Windows. If you learn the name of these parts then you will be used easily MS word application.

Quick Access Toolbar:
This bar is one of the most important parts of Microsoft Word Windows 2019. It is also located at the top of the screen, in the left corner just above the File Tab. It is the place for the most frequently used commands. You can customize this Toolbar by clicking the little arrow that displays some more commands such as “New” which refers to opening a new document, “Open” which implies displaying a document that we have saved on our computer, “Undo” reverse the previous action or “Redo” do the action again, and “Save” to save the current document.
Title bar:
The title bar is also one of the parts of the Microsoft Word window. It is located at the center and top of the document window and shows the name of the program or document. There, when we open a Microsoft Word document, we can read the title as Document1 – Word. It refers to a general name displayed by the program software. When we save our document, we can replace that name with a personalized one related to our file.
In this bar, on the right side, there are three more buttons known as window controls. It allows to perform of three commands i.e., minimize, maximize, and close the document or file.
The 1st is the “X” icon that is used to close the window of the Microsoft Word document we are working on. And the 02nd component is a double box icon which is located in the center of the previous ones and used to maximize or enlarge the document. The 03rd icon is a dash “_” used to minimize the document we are working on.
File Tab:
In Microsoft Word 2019, the File tab replaces the Microsoft Office button from Word 2007. Microsoft Office button is the circular button that is located in some operating systems at the bottom and in others at the top, on the left side. You can click it to see the backstage view. In this tab, where you can see the previously opened or saved files, create a new document, print a document, and do other operations.
Ribbon of Microsoft Word:
The Ribbon is one of the basic parts of Microsoft Word widow and contains organized commands in three layers.
- Tabs or Menu: These are the horizontal menu that appears at the top of the Ribbon and contain groups of related commands, i.e., File, Home, Insert, Design, Layout, References, Mailings, Review, View, and Help are examples of ribbon tabs.
- Groups: These are the organized related commands displayed below each tab or menu. The name of each group appears below the group on the Ribbon. For example, a group of commands related to a paragraph or a group of commands related to the font, etc.
- Commands: Commands appear within each group as mentioned above. For example, when we press the “File” tab, some commands or functions such as “New”, “Open” “Save”, “Save as” etc. are displayed.
Rulers:
Microsoft Word has two rulers – one is a horizontal ruler and the second is a vertical ruler. The horizontal ruler seems just under the Ribbon. It is used to set the size of the margins and tab stop position of the document. The vertical ruler appears on the left side of the document window and is used to measure the vertical position of elements on the page.
Scrollbar:
It is one of the parts of MS Word widow, which is characterized by being a long bar that is generally located on the right side of the document. It consists of an open bar containing an arrow that allows the user to scroll up and down more quickly.
Help icon:
The Help Icon can be used to find online-related queries. This provides helpful tutorials on various functions and commands related to MS word.
Zoom Control Buttons:
The zoom slider allows you to resize the document to view it according to the user’s requirements. It allows you to zoom in or zoom out from 0% to 500% wide range. The zoom controls consist of a slider that you can slide left (zoom in) or right (zoom out); you can also click the plus or minus sign buttons to increase or minus decrease the zoom factor.
View Buttons:
It is a group of buttons located to the left of the Zoom control, and near the bottom of the screen. It lets you switch the various Word document views.
- Print Layout view− This view displays pages exactly as they will show in print.
- Read Mode− This displays a full-screen view of the document.
- Web Layout − This displays a document view that appears on a Web browser, such as Internet Explorer.
- Outline view− This lets you display your document in outline form. For this view, we will first create using Word’s standard heading styles.
- Draft view− This displays only the text of your document as it appears on the printed page. No headers and footers are shown in this view.
Document or Work Area:
If we open MS Word on the computer then we can see different parts of the MS Word window on the screen. The document or work area is the area where we can type documents, letters, memos, or simply communication will be developed. The vertical flashing bar is called Cursor and the insertion point represents the location where text can write. It is generally white and can see when we open the MS Word application. These allow giving width and flexibility to the document.
Status Bar:
It is located at the bottom of the document and displays the information related to the word document. From left to right, it shows the total number of pages, word count, language, translator, error notifications, and sections among other information.
In this bar, we can visualize the document we are working on in five ways, e.g. print layout, full-screen reading, web layout, and outline view.
Dialog Box Launcher:
We can see a small arrow in the lower-right corner of many groups on the Ribbon that display some commands. By clicking this arrow, the downward window will open that provides more options about the group.
Learn what Track Changes is, how to track changes in Word, how to remove tracked changes in Word, and much more.
Track Changes in Word is a powerful feature that makes it possible to mark changes that are made to a document. The feature includes several tools you can use to control which types of changes to track, how to display the tracked changes, and finally how to accept or remove the tracked changes.
Word has included Track Changes functionality for decades. Microsoft has changed the Track Changes features in Word 2013 and later versions compared to earlier versions.
This article covers the Track Changes feature as it works in Word 2013, Word 2016, Word 2019, Word 2021, and Word for Microsoft 365.
If you are using an older version of Word, see Shauna Kelly’s article about Track changes, covering Word 2010 and earlier versions.
Word refers to both tracked changes and comments that are added using Word’s comment feature as revisions. Some of tools discussed in this article are also used in relation to comments. I have covered the Word comment feature in detail in the article How comments in Word work. Please refer to that article for help on comments in Word.
Below, you will find a Table of Contents showing all headings in the article. Click a heading to go to the section in question. When you scroll down, a Go to Info About list will appear to the left, showing the main headings. These headings also work as hyperlinks that let you quickly go to the relevant content.
What is Track Changes in Word?
Track Changes in Word lets you keep track of the changes that are made to a document. This is useful in the editing process of a document and when you ask others for feedback.
Track Changes can be used to keep track of changes no matter whether only you or several people work on a document. Tracked changes can be displayed in a number of different ways in Word. You can also entirely hide the changes. All the different display options are explained later in this article.
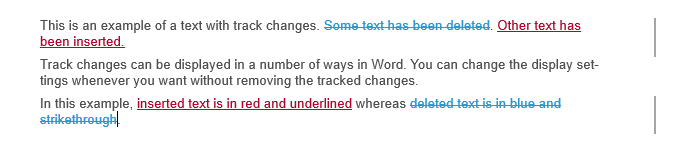
Figure 1. Example of text with tracked changes. In this example, inserted text is in red and underlined whereas deleted text is in blue and strikethrough.
You don’t need to accept all changes. You can select to either accept or reject the individual changes. You can also accept or reject all changes in one operation.
Track Changes need to be turned on for Word to mark the changes. If you email a document to somebody else for feedback, the other person can turn on Track Changes before editing the document. When the document is returned to you, you can see which changes have been made.
Don’t worry if Track Changes has not been turned on during editing. Word has a compare feature that lets you compare two versions of a document and show the differences as tracked changes. This means that you can quickly generate a copy showing all the differences between two versions of a document. For more details, see How to find the differences between two versions of a document below.
Where is track changes in Word?
The track changes tools are found on the Review tab in the Ribbon:

Figure 2. The Track Changes tools in Word are found on the Review tab in the Ribbon. The tools are marked by a colored frame here.
Terminology used in Word in relation to Track Changes
In the different commands related to Track Changes in Word, you will find a number of terms in use. It can be a bit confusing since some of the terms mean the same. Terms with the same meaning seem to be used more or less randomly. See the list below:
|
Terms |
What the terms mean |
|
Tracked changes Changes Markup Revisions |
The changes that have been marked by the Track Changes feature Note that the terms markup and revisions in most cases also cover comments inserted using Word’s comment feature |
|
Author Reviewer |
A person who has edited/made changes to a document |
|
Balloons |
Tracked changes or comments shown in the margin of a document |
|
Accept |
Incorporates a tracked change in the document, as if it belonged to the original document. |
|
Reject |
Removes (or deletes) a tracked change from the document, as if it had not been made |
|
Display Show |
The way Word visually presents the tracked changes on the screen |
In other language versions of Word than English, the confusion may be even worse since the translations may not be consistent. For example, I have found examples in Danish versions of Word where even more terms have been introduced due to inconsistent or incorrect translation.
Is Track Changes the same as redlining in Word?
You may see the terms redline, redlining, blackline, or blacklining used instead of Track Changes. I have found a number of definitions of these terms and the definitions do not say precisely the same.
Redline or redlining seems to be used in the same meaning as Track Changes. The terms indicate that red ink is used to mark changes in a document.
Blackline, blacklining, or legal blacklining seems to be used primarily if changes are marked in a separate document, showing the differences between two versions of a document, i.e. without making any changes in the source documents. You can create such document using Word’s Compare or Combine features. See How to find the differences between two versions of a document and How to create a new document that combines tracked changes from different authors while keeping existing tracked changes below.
Basic concepts – what you should know before you start using Track Changes
The are some basic concepts you should be aware of before you start using Track Changes. If you have never used Track Changes before, it can be a little confusing – but once you learn how it works, it is very powerful.
There are four steps to tracking changes
Tell Word to track changes.
If you want to track the changes you make to a document, you must first turn on Track Changes.
As long as Track Changes is turned on, information about the changes you make is registered in the document. If you turn off Track Changes, Word will stop registering new changes you make. You can turn on or of Track Changes whenever you want.
Even if Track Changes is turned off at the moment, a Word document can contain tracked changes from earlier.
Tell Word to display tracked changes.
Even if a document contains tracked changes, you may not see it. The display of tracked changes can be turned on so the changes are visible or turned off so the changes are hidden.
Even if you hide the tracked changes, they are still in the document until they are accepted or rejected.
Tell Word how to display tracked changes.
Word has a number of options you can use to control how the tracked changes are displayed.
The display options let you determine both which types of changes you see and in which way you see them.
Tell Word to accept or reject the changes.
Tracked changes in a document will remain in the document until they are accepted or rejected. That is the only way to remove them.
How to enable track changes in Word
As explained above, you must turn on Track Changes to tell Word to track all the changes you make in your document.
How to turn on Track Changes in Word
You can use different methods to turn on Track Changes to start tracking your changes.
All methods work as toggles that alternately turns Track Changes on and off. This means that you can use the same methods to turn off Track Changes.
IMPORTANT
Turning Track Changes on or off doesn’t affect whether you can see the tracked changes. See How to display tracked changes in Word below.
METHOD 1 – Use keyboard shortcut
Press Ctrl+Shift+E to turn on Track Changes.
The shortcut works as a toggle. If already turned on, the shortcut turns off Track Changes. Note that this shortcut works in all versions of Word.
This is the fastest method.
METHOD 2 – Click Track Changes icon on the Review tab
To turn on Track Changes, select the Review tab and click the Track Changes icon.
The icon works as a toggle. If you click the icon again, you turn off Track Changes.
If you click the text below the icon, a menu appears from where you can select Track Changes to turn it on.
You can see on the color of the Track Changes icon whether it is turned on or off. The icon is highlighted when Track Changes is on.
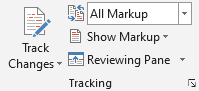
Figure 3A. Track changes is disabled: Track Changes is off.
Figure 3B. Track changes is enabled: Track Changes is on (the icon is highlighted).
METHOD 3 – Use the Quick Access Toolbar (QAT)
TIP
You can add Track Changes to the Quick Access Toolbar (QAT) for easy access. The QAT is always visible. This also makes if easy to see whether Track Changes is on or off.
To add the icon to the toolbar, right-click the Track Changes icon on the Review tab and select Add to Quick Access Toolbar.
![]()
Figure 4. Track Changes has been added to the Quick Access Toolbar (QAT) for easy access. Here marked by a colored frame. The icon is highlighted when Track Changes is on.
METHOD 4 – Use the Status Bar
On the Status Bar (in the bottom of the Word window), click the text Track Changes.
The text in the Status Bar works as a toggle. If you click it again, you turn off Track Changes.

Figure 5. Turn on Track Changes via the Status Bar. The text “Off” or “On” tells whether Track Changes is currently off or on.
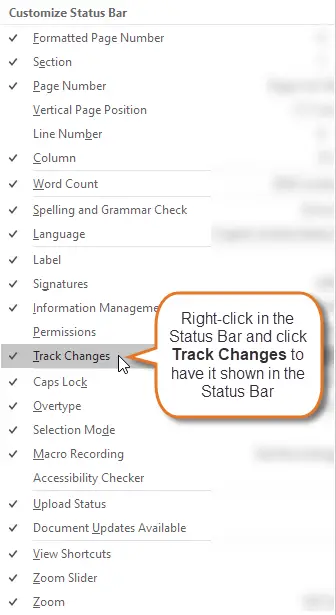
If you can’t see Track Changes, right-click in the Status Bar and select Track Changes from the Customize Status Bar menu that appears.
Figure 6. If Track Changes is not shown in the Status Bar, right-click in the Status Bar and select Track Changes from the Customize Status Bar.
How to stop tracking changes in Word
As explained above, you enable track changes by turning on Track Changes. To stop tracking changes so that Word no longer marks new edits you make, you must turn off Track Changes. Read on below.
How to turn off track changes in Word
You can turn off Track Changes using the same methods as you can use for turning it on. See How to turn on Track Changes in Word above.
IMPORTANT
Turning Track Changes on or off doesn’t affect whether you can see the tracked changes. See How to display tracked changes in Word below.
What is Track Changes Cards and how to get rid of them
Track Changes Cards are pop-up windows that may appear in Word for Microsoft 365 when you click in a change. I have written a separate article about those cards and how you can disable them using my free Word add-in DocTools StopSpellingPopUp. See the article How to disable Track Changes Cards in Word for details.
How to find out whether Track Changes is on or off
Note that tracked changes may not be visible in your document even if Track Changes is on. Tracked changes are only visible if you have set Word to display the changes. See How to display tracked changes in Word below.
IMPORTANT
Turning Track Changes on or off doesn’t affect whether you can see the tracked changes. See How to display tracked changes in Word below.
METHOD 1 – Look at the Status Bar
Look at the Status Bar at the bottom of the screen. Changes are currently being tracked if you see Track Changes: On in the Status Bar.
See METHOD 4 – Use the Status Bar above if you can’t see the text Tracked Changes: On or Tracked Changes: Off in the Status Bar.
METHOD 2 – Look at the Review tab in the Ribbon
If the Track Changes icon in the Review tab in the Ribbon is highlighted, Track Changes is on. See Figure 3 above.
METHOD 3 – Look at the Quick Access Toolbar (QAT)
This method is only relevant if you have added the Track Changes icon to the QAT. See METHOD 3 – Use the Quick Access Toolbar (QAT) above. If the Track Changes icon in the QAT is highlighted, Track Changes is on.
Displaying or hiding tracked changes
How to display tracked changes in Word
Word has a number of options that influence how tracked changes are displayed. All the options can be accessed from the Tracking group on the Review tab in the Ribbon. Below, you can learn how the individual options work.
The different options influence each other. It can be rather difficult to get an overview of all the relations. The result is determined by the combination of your settings in:
- the Display for Review menu (see Figure 7 below)
- the Show Markup menu (you can see the menu in Figure 14 below.)
- the Advanced Track Changes Options dialog box (see Figure 22 below)
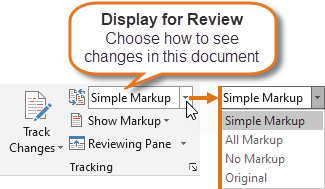
Figure 7. The Display for Review menu includes four display options that determine how tracked changes are shown. See the descriptions of the options below.
|
Display option |
How are tracked changes displayed |
|
Simple Markup |
Red vertical lines in the margin show where changes are found. See Example 1 – Simple Markup display below. In the Advanced Track Changes Options dialog box > Markup section > Changed lines, you can determine how and where the red, vertical lines are shown. TIP: You can click a red line in the margin to switch to All Markup display. |
|
All Markup |
Shows all changes with different colors and lines. The red lines from Simple Markup display turns into gray lines. The exact display depends on your settings in the Show Markup menu and in the Advanced Track Changes Options dialog box.
For an illustration of the Advanced Track Changes Options dialog box, see Figure 22 below. See Example 2 – All Markup display + Show Revisions in Balloons and Example 3 – All Markup display + Show All Revisions Inline below.. TIP: You can click a gray line in the margin to switch to Simple Markup display. |
|
No Markup |
Shows the document as if you had accepted all the tracked changes. This means that the document will look as if all the changes had been there always. Note that the tracked changes are still there – they are just hidden. |
|
Original |
Shows the document as if you had rejected all the tracked changes. This means that the document will look as it did before any of the changes were added. Note that the tracked changes are still there – they are just hidden. |
Summary of the facts from above:
- To see tracked changes, you must select either Simple Markup or All Markup from Display for Review menu.
- In addition, you must make sure that a check mark is shown in the Show Markup menu for the types of tracked changes you want to see: Comments (not handled in this article), Insertions and Deletions, and/or Formatting.
- In the Advanced Track Changes Options dialog box, set up how you want to see the tracked changes.
Example 1 – Simple Markup display

Figure 8. Example of Simple Markup. Note the red lines in the right margin. The lines show where edits are made. You can have the lines shown in the left margin instead, if you want. You can click a red line in the margin to switch to All Markup display.
In Simple Markup display, any comments will appear as small comment icons in the margin.
Example 2 – All Markup display + Show Revisions in Balloons

Figure 9. Example of All Markup in combination with Show Markup > Balloons > Show All Revisions Inline. Note the gray lines in the right margin. The lines appear in the same places as the red lines in Figure 8 above. You can click a gray line in the margin to switch to Simple Markup display.
Example 3 – All Markup display + Show All Revisions Inline

Figure 10. Example of All Markup in combination with Show Markup > Balloons > Show All Revisions Inline. Note the gray lines in the right margin. The lines appear in the same places as the red lines in Figure 8 above. You can click a gray line in the margin to switch to Simple Markup display.
IMPORTANT
Even if you have selected All Markup, you may not see all changes. You can define which types of changes you want to see.
How to hide tracked changes in Word without removing the changes
When working with tracked changes in a document, you may sometimes want to see the document without displaying the changes. You can hide tracked changes while keeping the tracked changes in the document.
If Track Changes is turned on, Word will continue to track the changes but just not show them as long as you are hiding tracked changes.
METHOD 1 – Select Review tab > Display for Review > No Markup
If you select Review tab > Display for Review > No Markup, Word will display your document as if you had accepted all the tracked changes in the document.
It hides the tracked changes but does not remove them. If another user opens the document, that user can easily display the changes.
METHOD 2 – Select Review tab > Display for Review > Original
If you select Review tab > Display for Review > Original, Word will display your document as if you had rejected all the tracked changes in the document.
It hides the tracked changes but does not remove them. If another user opens the document, that user can easily display the changes.
How to remove tracked changes in Word
As explained above, tracked changes remain in the document until they are accepted or rejected. Below, you will learn how to remove tracked changes individually or remove all tracked changes entirely from a Word document.
How to accept or reject a single tracked change
METHOD 1 – Use the right-click menu
To accept a tracked change, right-click in the change and select Accept Insertion or Accept Deletion or Accept Format Change.
To reject a tracked change, right-click in the change and select Reject Insertion or Reject Deletion or Reject Format Change.
The menu that appears when you right-click depends on the context. There are situations where the Accept or Reject commands are not available in the right-click menu. For example, that is most often the case if you right-click in text marked as a spelling error. In that case, use one of the other methods.
METHOD 2 – Click the Accept or Reject icon in the Review tab in the Ribbon
Click within the change, then click Accept or Reject in the Review tab in the Ribbon.
If you have selected text that includes more than one tracked change, all changes in the selection will be accepted or rejected.
METHOD 3 – Use the Accept or Reject menu in the Review tab in the Ribbon
To accept a change and automatically move to the next change, select Review tab > Accept > Accept and Move to Next. See Figure 11 below.
To accept a change without moving to the next, select Review tab > Accept > Accept This change. See Figure 11 below. Use this method if you want to be able to see the result before Word moves on to the next change.
To reject a change and automatically move to the next change, select Review tab > Reject > Reject and Move to Next.
To reject a change without moving to the next, select Review tab > Reject > Reject Change. Use this method if you want to be able to see the result before Word moves on to the next change.
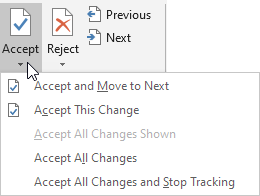
Figure 11. The menu that is displayed if you click the arrow below Accept in the Review tab. A corresponding menu is found when you click Reject.
How to accept or reject all tracked changes in a Word document at once
To accept all tracked changes in the document in one operation, select Review tab > Accept > Accept All Changes. If you want to turn off Track Changes at the same time, select Review tab > Accept > Accept All Changes and Stop Tracking. See Figure 11 above.
To reject (delete) all tracked changes in the document in one operation, select Review tab > Reject > Reject All Changes. If you want to turn off Track Changes at the same time, select Review tab > Reject > Reject All Changes and Stop Tracking.
Formatting changes – how of get rid of them and stop marking formatting changes
In many cases, you may only be interested in keeping track of content changes in the form of insertions and deletions. Changes to formatting, such as style changes or applying bold font, may be irrelevant.
Read on below to learn how to accept existing formatting changes and stop marking new formatting changes you make.
How to accept formatting changes and keep all other tracked changes
- Select Review tab > Tracking group > Show Markup and make sure to set check marks as follows:
Comments: Not checked
Insertions and Deletions: Not checked
Formatting: CheckedOnly Formatting must have a check mark.
- Select Review tab > Show Markup > Specific People and make sure All Reviewers is selected.
- Select Review tab > Changes group > Accept menu > Accept All Changes Shown.
Since only formatting changes were shown, only formatting changes will be accepted. - Select Review tab > Tracking group > Show Markup and turn on Comments and/or Insertions and Deletions again to show those types of changes when Track Changes is on.
See below if you want to stop tracking new formatting changes you make.
How to stop tracking formatting changes
When Track Changes is on, the types of changes that are tracked depend on your current settings in the Advanced Track Changes Options dialog box.
To stop tracking formatting changes:
- Open the Advanced Track Changes Options dialog box. See How to open the Advanced Track Changes Options dialog box below.
- Make sure to turn off the Track formatting check box.
- Click OK.
Note that the setting of the Track Formatting check box is document-specific. Turning on or off that setting does not influence other documents.
Turning off Track Formatting will not remove existing formatting changes that have been marked. You must accept those changes to get rid of them. See How to accept formatting changes and keep all other tracked changes above.
How to copy text with tracked changes
When copying and pasting text with tracked changed, the method to use depends on the result you want. See below.
In the following, I have used these terms:
- Source document: the document you copy from
- Target document: the document into which you paste
How to copy text to another document WITHOUT copying the track changes
- In the source document, turn ON
Track Changes (ensure that the Status Bar shows Track Changes: On). - In the target document, turn OFF
Track Changes (ensure that the Status Bar shows Track Changes: Off). - Now copy and paste.
How to copy text to another document WITH the tracked changes
- In the source document, turn OFF Track Changes (ensure that the Status Bar shows Track Changes: Off).
- In the target document, turn OFF Track Changes (ensure that the Status Bar shows Track Changes: Off).
- Now copy and paste.
Tracked changes and printing
How to print a document with tracked changes
If your document includes tracked changes, you can print it so the printout shows the tracked changes.
- Select File > Print.
- Under Settings, click the first button (shows Print All Pages or another text depending on your latest print settings).
- Select Print Markup in the menu that appears. See Figure 12 below.
- Make other selections as appropriate. Then click Print.

Figure 12. Select Print Markup to have the document printed with tracked changes. You can see the result in the preview that is shown in the window.
Note that my Word Add-in DocTools ExtractChanges Pro lets you extract tracked changes from Word documents incl. full context. If the primary goal of printing is to get an overview of the tracked changes in their context, the extracts you can make using this add-in gives a better overview of the tracked changes than the result you get by printing a document with Print Markup turned on, as described above. You can print such extract document if you want.
How to print a document without tracked changes
Even if your document includes tracked changes, you can print it so that the tracked changes are hidden in the printout. The document will print as if the changes had been accepted.
- Select File > Print.
- Under Settings, click the first button (shows Print All Pages or another text depending on your latest print settings).
- Make sure that Print Markup in the menu that appears does not have a check mark. See Figure 12 above.
- Make other selections as appropriate. Then click Print.
How to print a list of the tracked changes in a Word document
If your document includes tracked changes, you can print a list of tracked changes using Word’s built-in functionality:
- Select File > Print.
- Under Settings, click the first button (shows Print All Pages or another text depending on your latest print settings).
- Select List of Markup in the menu that appears. You can see List of Markup in Figure 12 above.
- Make other selections as appropriate. Then click Print.
The printout will include all the tracked changes, incl. formatting changes. You will see page number, date, and time for each change plus the change itself.
TIP: The free Word add-in DocTools ExtractData lets you automatically export all insertions and deletions in a document to a new document. The exported data is set up in a table. For each insertion and deletion, you will find the page number, line number, type of change, the revised text, author name and revision date.
The advanced Word add-in DocTools ExtractChanges Pro lets you export insertions, deletions and comments in full context, including headings and subheadings. In addition, the add-in includes several other features.
Printouts made from extract documents you create with ExtractData or ExtractChanges Pro do not include formatting changes. However, the extract documents include more details about each insertion and deletion and provides a better overview than the built-in feature.
Multiple authors and Track Changes
How to see who made the changes in a document in case of more than one author
Word use two terms for the people who make track changes to a document: author and reviewer.
METHOD 1 – Hover the mouse over the tracked change to see author name and more
If you have selected Display for Review > All Markup, Word displays a small screen tip, showing the change, the author name, and the date and time the change was made.
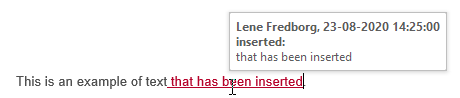
Figure 13. Example of screen tip shown when hovering the mouse over a tracked change.
If no screen tip is shown:
- Check that Review tab > Display for Review > All Markup is selected.
- Check that screen tips are set to be shown. To show screen tips on hover, turn on File > Options > Display > Show document tooltips on hover.
METHOD 2 – Show revisions in balloons
Works in Print Layout view and Web Layout view only.
Make sure that Review tab > Display for Review > All Markup is selected. Select Show Markup > Balloons > Show Revisions in Balloons. Then you will se information about each change in the balloon area.
If too many changes are found to show all information, you must click a change to see the details about that change.
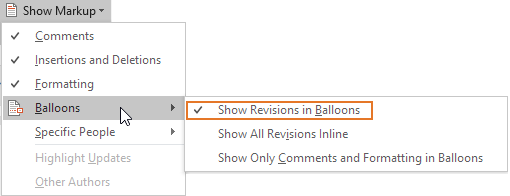
Figure 14. The Show Markup menu with the Balloons menu displayed. The Highlight Updates and Other Authors commands are usually disabled unless for shared documents.
METHOD 3 – Show the Reviewing Pane
Works in all views except Read Mode. Also works even if tracked changes are hidden.
No matter how tracked changes are displayed, you can show the Reviewing Pane to see information about each tracked change. You can turn the Reviewing Pane on and off via Review tab > Reviewing Pane. Select Reviewing Pane Vertical or Reviewing Pane Horizontal as desired.
Colors and Track Changes
How to display tracked changes with the same colors no matter who made the changes
To use the same colors for each author’s changes:
- Open the Advanced Track Changes Options dialog box (see How to open the Advanced Track Changes Options dialog box below).
- In all color boxes, make sure to select a named color instead of By Author. For example, to see all insertions as Red, click the Color field next to Insertions and select Red.
- Click OK.
How to display each author’s changes in a different color
To display each author’s changes in a different color:
- Open the Advanced Track Changes Options dialog box (see How to open the Advanced Track Changes Options dialog box below).
- In all color boxes, select By Author.
- Click OK.
The Advanced Track Changes Options dialog box offers the colors shown below.

Figure 15. The lists of colors you can select from in the color fields in the Advanced Track Changes Options dialog box.
The By Author color icon is sometimes two-colored, red and blue.
When using the By Author setting, one could think that Word would use the colors found in the lists above. However, that is not the case.
I created a macro to change the user name 100 times and for each user name insert the text User# with tracked changes in a document. I found the following:
- If By Author is selected, Word seems to use the 20 different colors illustrated below for markup types that offer the left-most list of colors illustrated above.
- However, if you have already previously added tracked changes using other settings in any document in that Word session (i.e. since you started Word), the allocation of colors seems to be random.
- The 20 different colors used are not the same as the colors found in the left-most color list above.

Figure 16. Word seems to use 20 different colors if By Author is selected. This illustration is part of the result of adding text using 100 different user names. User no. 21, 22, etc. are allocated the same colors as User no. 01, 02, etc. However, if other color settings have been used in the same Word session, the allocation of colors seems to be random.
Read on below for more details about colors and tracked changes.
How to define which color to use for each author – you can’t
If you have selected to apply color By Author as explained above, you may think you can determine which colors to use. The answer to this is: You can’t. Word allocates the colors.
As explained and illustrated above in How to display each author’s changes in a different color above, Word seems to use a total of 20 colors for different authors. If more than 20 authors are involved, the colors are reused for other authors. However, as explained above, the color allocation sometimes seems random.
Do tracked changes made by a specific author always appear with the same color?
As explained in How to display each author’s changes in a different color above, Word allocates colors to tracked changes if you have selected to color By Author.
You can’t be sure that two different users see the same colors in the same document. Also, you can’t be sure that you see the same colors each time you open the same document yourself.
How to make sure that other users see tracked changes in the same way as you do
It is the individual users’ settings of track changes options that determine how they see track changes.
You can’t control their settings unless by using e.g. a macro (programming) to force the options to be set in a specific way. It would also be possible for an IT department in a company to force specific track changes settings via Group Policy.
Track Changes and author names
Word use two terms for the people who make track changes to a document: author and reviewer.
Where does the author name shown in tracked changes come from?
The name shown in tracked changes you make is determined by the current user name set up on your computer. You can change the user name and initials. This will influence new tracked changes you add. Read on to lean how.
How to change the name shown in new tracked changes you make
As explained above, the name shown in tracked changes you make is determined by the current user name set up on your computer. You can change the user name and initials from two places – they both lead to the same dialog box:
- Select File > Options > General. Enter values in the User Name and Initials fields. Click OK.
- Open the Track Changes Options dialog box (see Figure 21 below) Click the Change User Name button. Enter values in the User Name and Initials fields. Click OK.
IMPORTANT
The changed name will apply to new tracked changes you make. Existing tracked changes will remain unchanged.
The change of user name applies to all Office applications (Word, Excel, PowerPoint, etc.)
How to change the user name in existing tracked changes
Once you have made tracked changes, there is no built-in method in Word to change the author name to another name.
However, Word lets you remove personal information from a document. This will set the name of all comments and tracked changes to “Author”. For details, see my article about how comments in Word works.
The DocTools ExtractChanges Pro add-in (from version 6.0) includes a command, Change Author & Date, that lets you change the name in existing tracked changes and comments. In addition, the command lets you remove or change the date of the tracked changes and comments. You can select whether the name and/or date changes are to be applied to all tracked changes and comments or only tracked changes and comments added by a specific author. The changes are made in copy of the document so that the original document remains unchanged.
TIP: If you want to remove the name from tracked changes and comments, you can type e.g. a non-breaking space (Ctrl+Shift+Spacebar), a hyphen or an En dash as both the author name and initials in the Change Author & Date dialog box in DocTools ExtractChanges Pro.
How to remove the name from existing tracked changes
As explained above, Word has no built-in method to change the author name of existing tracked changes except from using the tools to remove personal information.
My add-in DocTools ExtractChanges Pro has a tool that lets you remove or change the name of existing tracked changes and comments. See the information above.
How to display only the tracked changes made by specific authors
Remember that tracked changes are also called revisions – authors are also called reviewers.
To display only tracked changes made by specific authors:
- Select Review tab > Show Markup > Reviewers > select or deselect the reviewers (authors) as desired. Only tracked changes added by reviewers with a check mark will be shown.
Compare or combine Word documents
Word lets you compare two documents to find the differences between the documents no matter whether the individual documents include tracked changes. Word also lets you combine – or merge – documents and, at the same time, preserve all tracked changes and comments from the individual documents. Read on the learn how.
How to find the differences between two versions of a document
You can use Word’s Compare feature to find the differences between two versions of a document and mark the differences as tracked changes. This is also referred to a legal blackline.
You can use the feature no matter whether the documents already contain tracked changes.
The result of the compare is the same as if you had made all the changes. Your current user name will be shown as the author name on all changes.
compare two documents to find the differences between the documents
If one or both of versions you select to compare already includes tracked changes, Word will treat those changes as if they had been accepted.
If you want to preserve the changes made by individual authors so you can see who made the changes, you can instead use Word’s Combine command. See How to create a new document that combines tracked changes from different authors while keeping existing tracked changes below.
To compare two documents:
- Select Review tab > Compare > Compare to open the Compare Documents dialog box. If you can’t see all options in the dialog box, click the More >> button. See Figure 17 below.
- In the Compare Documents dialog box, select the original document and the revised document either from the two lists or by using the browse buttons besides the lists.
- Below Comparison settings, turn on check boxes as desired to specify which types of changes you want to be marked in addition to insertions and deletions, if any.
- Below Show changes, select whether to show changes at character level or word level. See the examples in Figure 18 below.
- Below Show changes in, select in which document to show the changes. The default is New document which I recommend in most situations. Then Word creates a new document with the changes, without making any changes in the existing documents.
- Click OK to execute the compare.
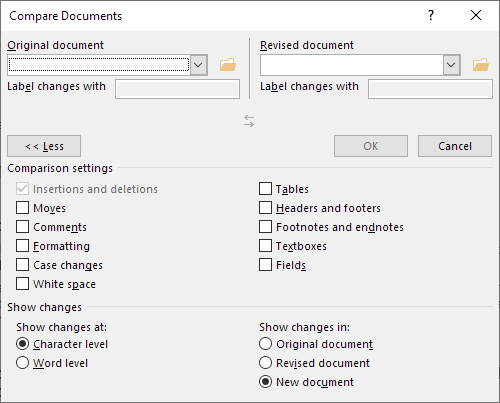
Figure 17. The Compare Documents dialog box with all options shown.
The illustration below shows the difference between selecting Character level and Word level in step 4 above.
- Character level will show changes in individual words by marking as few inserted or deleted characters as possible.
- Word level will show changes in individual words by marking the original word as deleted and the revised word as inserted.

Figure 18. Example of the difference between selecting Character level and Word level in step 4 above.
TIP: The DocTools ExtractChanges Pro add-in lets you – in one operation – compare two versions of a document and extract all changes and comments from the compared version. The DocTools ExtractChanges Pro add-in also lets you do that with multiple documents at a time. You can batch compare one document with several other versions of the same document and extract the changes and comments. Or you can batch compare documents by pairs and extract the changes and comments.
How to merge track changes from two or more documents into one document
If two or more authors have added tracked changes and comments to two or more separate copies of a document, you may want to combine those tracked changes and comments in one document and still preserve the information about who made which change and when.
Word’s Combine feature can be used for that – follow the steps below. However, it only lets you combine two documents at a time. If you want to combine more than two documents, you need to repeat the procedure steps as described in Step 8 below.
To combine two versions of a document and retain existing tracked changes:
- Select Review tab > Compare > Combine to open the Combine Documents dialog box. If you can’t see all options in the dialog box, click the More >> button. See Figure 19 below.
- In the Compare Documents dialog box, select the original document and the revised document either from the two lists or by using the browse buttons besides the lists.
- When you have selected documents, the name defined as your user name will automatically be inserted in the Label unmarked changes with fields. Change the name, if you want. The name will be used to mark any differences between the two document what are not already marked as tracked changes.
- Below Comparison settings, turn on check boxes as desired to specify which types of changes you want to be marked in addition to insertions and deletions, if any.
- Below Show changes, select whether to show changes at character level or word level. See the examples in Figure 18 above.
- Below Show changes in, select in which document to show the changes. The default is New document which I recommend in most situations. Then Word creates a new document with the changes, without making any changes in the existing documents.
- Click OK to execute the combination of tracked changes.
- If you want to combine more documents, repeat Steps 1-7 above. As the original document, you must each time select the combined result from the last Combine operation and as the revised document you must select another edited document. Repeat until you have combined all the edited documents in one document that includes all tracked changes and comments from all the documents.
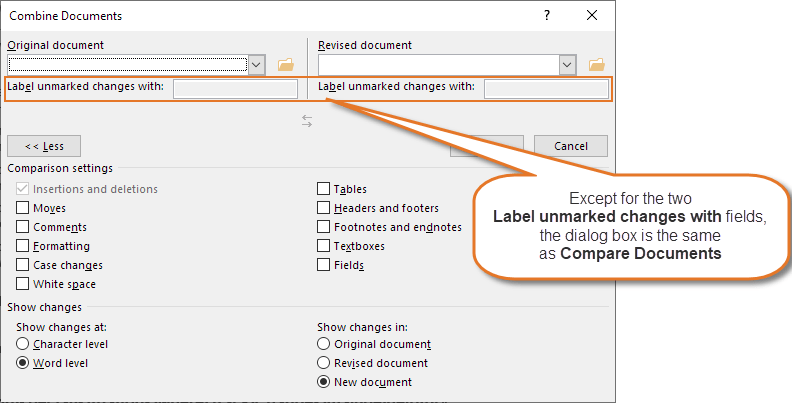
Figure 19. The Combine Documents dialog box. It is almost identical to the Compare Documents dialog box.
About the Advanced Track Changes Options dialog box
To manage the detailed setting for the display of tracked changes, you must use the Advanced Track Changes Options dialog box.
NOTE
Track Moves and Track formatting are document-specific settings that are saved in the document. All other options in the Advanced Track Changes Options dialog box apply to all Word documents.
A new Word document you create will inherit the settings of Track Moves and Track Formatting from the template.
How to open the Advanced Track Changes Options dialog box
To open the Advanced Track Changes Options dialog box:
- Select the Review tab in the Ribbon.
- Click the dialog box launcher in the Tracking group. See Figure 20 below.
This opens the Track Changes Options dialog box. - Click the Advanced Options button to open the Advanced Track Changes Options dialog box. See Figure 22 below.
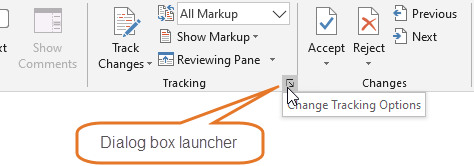
Figure 20. On the Review tab, click the dialog box launcher in the Tracking group to open the Track Changes Options dialog box.
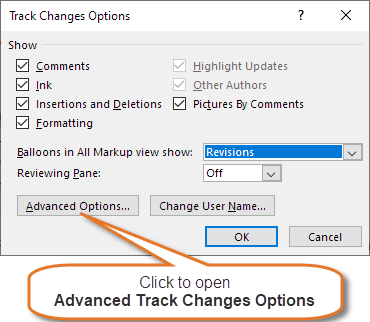
Figure 21. The Track Changes Options dialog box that opens when you click the dialog box launcher in the Tracking group on the Review tab.
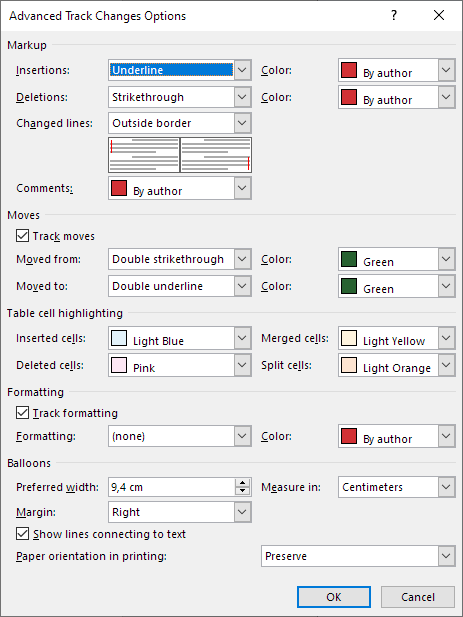
Figure 22. The Advanced Track Changes Options dialog box, here shown with the default settings. All options except Comments and Show lines connecting to text are related to the display of tracked changes. See the descriptions below for details about the options.
Overview of all options in the Advanced Track Changes Options dialog box
These general rules apply to Advanced Track Changes Options:
- You can set a specific type of markup out of function by selecting (none) from the related field.
- The settings only come into play when tracked changes are shown.
- Only the Track Moves and Track Formatting options are document-specific. All the other options apply to all Word documents.
For information about the color options (all fields with a color box), see the explanation and illustration in How to display each author’s changes in a different color above.
TIP
For an easy way to revert the settings in the Advanced Track Changes Options dialog box, you can use the ready-to-use macro found on my Word Macros & Tips website.
The table below shows information about all the options in the Advanced Track Changes Options dialog box. Where two options belong together, they are listed side by side with a +sign between.
|
Option |
Default setting |
What it does |
|
GROUP: Markup |
||
|
Insertions + Color |
Underline + By author |
Defines the formatting and color applied to insertions. If you select (none), no formatting is applied. |
|
Deletions + Color |
Strikethrough + By author |
Defines the formatting and color applied to deletions. If you select (none), no formatting is applied. |
|
Changed lines |
Outside border |
Shows vertical bars in the margin where lines with changes are found in the document. The icon below the option shows the result of the currently selected setting. The vertical bars are red in Simple Markup view and gray in All Markup view. You can switch between the displays by clicking a red/gray bar. If Page Setup > Different odd and even is turned on, Outside border shows the lines in the left side of even pages and right side of odd pages. Otherwise, it shows the lines in the left side. If you select (none), no vertical bars are shown. |
|
Comments |
By author |
Defines the color applied to the text that was commented on (the comment scope) and to other comment marks. |
|
GROUP: Moves |
||
|
Track moves |
Turned on |
When turned on, content you cut and paste will be marked. Document-specific option. |
|
Moved from |
Double strikethrough |
Defines how cut text is formatted when you paste it elsewhere. If you select (none), no formatting is applied. |
|
Moved to |
Double underline |
Defines how pasted text that was cut from elsewhere in the document is formatted. If you select (none), no formatting is applied. |
|
GROUP: Table cell highlighting |
||
|
Inserted cells |
Light blue |
Defines the color of new tables cells you insert. If you select (none), no formatting is applied. |
|
Deleted cells |
Pink |
Defines the color of deleted tables cells. If you select (none), no formatting is applied. |
|
Merged cells |
Light yellow |
Defines the color of cells that have been merged from multiple cells. If you select (none), no formatting is applied. |
|
Split cells |
Light orange |
Defines the color of table cells that have been split. If you select (none), no formatting is applied. |
|
GROUP: Formatting |
||
|
Track formatting |
Turned on |
When turned on, changes to formatting will be marked. Document-specific option. Examples of formatting changes: Apply bold, underline, color, change font, change font size. |
|
Formatting + Color |
(none) + By author |
Defines the formatting and color applied to formatting changes. It seems counter-intuitive to mark formatting changes with further formatting – this may conflict. It seems most relevant to keep the default, (none). |
|
GROUP: Balloons |
||
|
Preferred width |
Inches: 3.7″ |
Default depends on the default unit of measurement. Defines the width of the balloons area. Seems to be measured from the vertical bars showing changed lines and to the edge of the paper, provided the vertical bars are in the same side of the page as the balloons area. |
|
Margin |
Right |
Defines whether balloons are shown in the left or right side of the page. |
|
Show lines connecting to text |
Turned on |
Defines whether comments are connected to the texts that was commented on (the comment scope). |
|
Paper orientation in printing |
Preserve |
Defines the paper orientation in print when printing with tracked changes. Auto adjusts orientation based on content. Preserve keeps the actual orientation of pages. Force landscape prints all pages as landscape when printing with tracked changes. |
Special tips about tracking changes
Tips on special situations where Track Changes may be helpful
Normally, it is relevant to track changes in the reviewing process of a document or when asking others for feedback on a document. For example, tracked changes are used a lot in relation to contract work.
It may also be useful to turn on Track Changes in other situations. For example, you may turn on Track Changes before you make a big change to your document. If you don’t like the result, you can quickly reject the changes.
How to get access to the Accept or Reject Changes dialog box from older versions of Word
Long ago, in Word 2000 and earlier versions, Word had a dialog box that worked well as the control center for accepting or rejecting changes. See the illustration below:
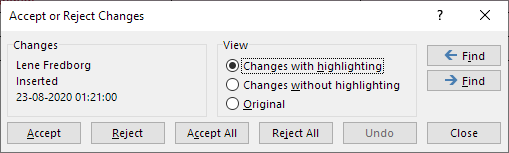
Figure 23. It is still possible to access the old Accept or Reject Changes dialog box. You can assign a keyboard shortcut to the command and/or you can add it to the Quick Access Toolbar (QAT).
The dialog box still works but you can’t access it by default. However, you can easily assign a shortcut to the command or add it to the Quick Access Toolbar (QAT). Follow the instructions below:
- To assign a keyboard shortcut to the Accept or Reject Changes command, follow the general instructions in the Microsoft article Customize keyboard shortcuts. In step 4 in the procedure, select All Commands, in step 5, select ToolsReviewRevisions.
- To add the Accept or Reject Changes to the Quick Access Toolbar (QAT), follow the general instructions in the Microsoft article Customize the Quick Access Toolbar. See the section “Add a command to the Quick Access Toolbar that isn’t on the ribbon”. Select All Commands in the left-most list. The command to find in the list is:
Accept/Reject Changes (ReviewAcceptOrRejectChangeDialog)
About the View options in the Accept or Reject Changes dialog box:
- Changes with highlighting corresponds to selecting Display for review > All Markup.
- Changes without highlighting corresponds to showing Display for review > No Markup.
- Original corresponds to showing Display for review > Original.
- If Display for review > Simple Markup is selected when you open the dialog box, click View option no. 2 or 3 and then click back to option no. 1 to have All Markup displayed.
Balloon settings are found in two places – how are they related?
Some the Track Changes commands and options can be rather confusing. Some are found in more that one place and identical options are not always named identically. This is the case for the Balloons options.
You can set Balloons options in two different places:
- In Review tab > Show Markup > Balloons menu
- In the Track Changes Options dialog box
To open the dialog box, click the dialog box launcher in Review tab > Tracking group. See Figure 20 above.
See the illustrations below:
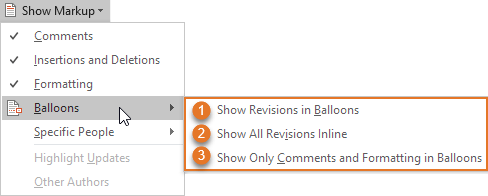
Figure 24. The options marked no. 1, 2, and 3 in the Show Markup > Balloons menu are the same as the options marked no. 1, 2, and 3 in the Track Changes Options dialog box in Figure 25 below.
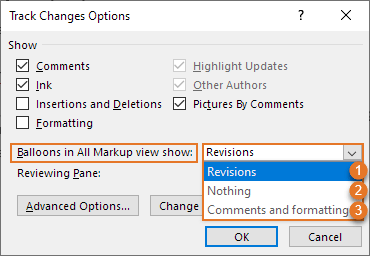
Figure 25. The options marked no. 1, 2, and 3 in the Balloons in All Markup view show list in the Track Changes Options dialog box are the same as the options marked no. 1, 2, and 3 in the Show Markup > Balloons menu in Figure 24 above.
If you select one of the options marked no. 1, 2, and 3 in Figure 24, the corresponding option marked no. 1, 2, or 3 in Figure 25 will automatically be selected and vice versa.
Security issues in relation to Track Changes
Make sure that you don’t email or publish Word documents that include tracked changes (or comments) that are not meant to be seen by others.
You can reduce the risk of revealing tracked changes unintentionally if you take the precautions described below.
How to avoid sending Word documents to others with tracked changes that should not be shared
There are many examples out there about Word documents that have been distributed to others or published with tracked changes that were indeed not meant to be seen be others.
IMPORTANT
Be careful not to distribute Word documents containing tracked changes unless the receiver needs to see the changes.
It is the Track Changes settings on the individual Word user’s computer that determine how that user sees tracked changes. Your own settings only apply to what you see on your computer.
Remember that tracked changes remain in the document until they are accepted or rejected. Even if you hide tracked changes, they are still in the document. This means that they can easily be turned on by another user who opens your document.
To make sure that you are automatically warned before printing, saving, or sending a Word document to somebody else:
- Select File > Options > Trust Center.
- Click the Trust Center Settings button to open the Trust Center dialog box.
- Click Privacy Options.
- Turn on the options:
Warn before printing, saving, or sending a file that contains tracked changes or comments
Make hidden markup visible when opening or saving - Click OK to close the dialog boxes.
See Figure 26A below. When these options are on, you are warned so you can take your precautions before you continue.
If you save often (which I recommend), you may not want to turn on the option Warn before printing, saving, or sending a file that contains tracked changes or comments since a message will open, warning you each time you save a document that includes tracked changes or comment (see Figure 26B below). You may find that too annoying.
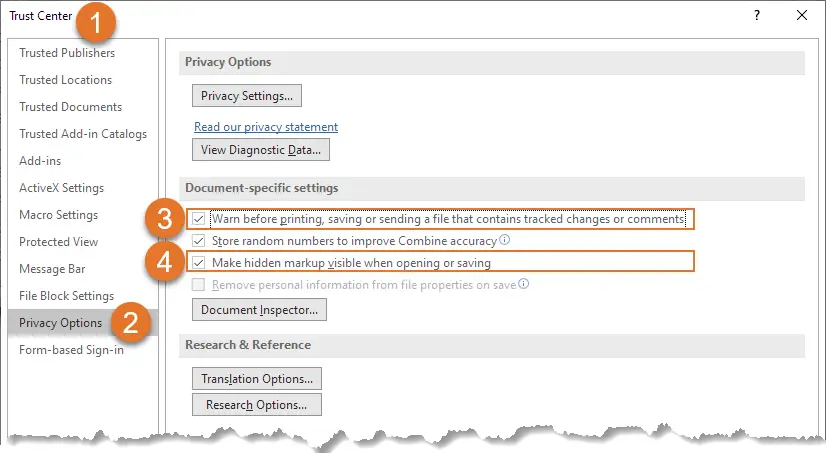
Figure 26A. Trust Center settings that can help you avoid problems with tracked changes that are distributed to others unintentionally. See also Figure 26B below.

Figure 26B. The warning that appears when saving if Warn before printing, saving, or sending a file that contains tracked changes or comments is turned on. The text in the message varies depending on the types of revisions found in the document.
How to lock tracking so Track Changes can’t be turned off
Word lets you lock Track Changes so it can’t be turned off. This way, you can make sure that the document will be shown with tracked changes and that users can’t accept or reject existing changes. User’s can only add new changes.
To lock tracking, select Review tab > click the arrow below the Track Changes icon > select Lock Tracking > enter a password > Click OK.
The Lock Tracking icon is highlighted when tracking is locked.
To unlock tracking, select the Lock Tracking command again > enter the password > click OK.
Other operations and commands, in addition to Track Changes, Accept, and Reject, may be unavailable or disabled in a document when tracking is locked.
How to find out whether there are tracked changes in your document
METHOD 1 – Try to click Previous or Next on the Review tab
To easily find out whether there are any tracked changes (or comments – another type of revision) in your document, select the Review tab and click Previous or Next in the Changes group. The message below is shown if no comments or tracked changes are found in the document.
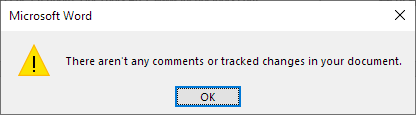
Figure 27. This message is shown if you click Previous or Next and if no comments or tracked changes are found in the document.
If revisions are found, Word will instead move to the previous or next revision.
METHOD 2 – Use Document Inspector
Note that this method may remove more data from your document than you like and it is not always totally clear what Word does.
If you use the tools on the Review tab with care and are aware of the importance of accepting or rejecting changes before you distribute documents to people who shouldn’t see the changes, you should be safe.
Personally, I never use Document Inspector to remove information.
- Select File > Info > Inspect Document > Check for Issues > Inspect Document.
- In the Document Inspector dialog box, make sure the option Comments, Revisions, and Versions is selected.
- Click Inspect.
- If comments and/or tracked changes are found, a dialog box lets you click Remove All. If you do so, Word will accept all tracked changes and remove all comments.
Note that Word doesn’t tell but “Remove All” means “Accept” in relation to tracked changes.
- Click Close.
For more details, see the Microsoft article Remove hidden data and personal information by inspecting documents, presentations, or workbooks.
How to make sure that Word always displays tracked changes when you open a document
To make sure that Word always displays tracked changes when you open a document, turn on the Trust Center setting Make hidden markup visible when opening or saving. For details, see How to avoid sending Word documents to others with tracked changes that should not be shared above.
IMPORTANT
The fact that traced changes are shown doesn’t mean that Word tracks changes when you start editing the document. To do that, you must make sure to turn on Track Changes.
How to make sure that Word warns you before emailing a document that contains tracked changes
To make sure that Word shows a warning if you attempt to email a document with tracked changes, turn on the Trust Center setting Warn before printing, saving, or sending a file that contains tracked changes or comments. For details, see How to avoid sending Word documents to others with tracked changes that should not be shared above.
I want to send my document outside the company – I want to leave tracked changes in the document, but I don’t want anyone to see who made the tracked changes or when they were made – how can I do that?
To neutralize tracked changes both as regards author names and time information, you can use the Document Inspector.
NOTE
This method may have undesired side-effects. See the CAUTIONS below.
- Select File > Info > Inspect Document > Check for Issues > Inspect Document.
- In the Document Inspector dialog box, make sure the following option is selected:
Document Properties and Personal Information
(You can leave other options checked as well – the first step will not make any changes to the document but only inspect it). - Click Inspect.
- A new dialog opens. A Remove All button is shown next to Document Properties and Personal Information. If you click the Remove All button, the name “Author” will be assigned to all tracked changes in the active document instead of the current author name(s). In addition, date and time will be removed from tracked changes.
- Click Close.
CAUTION 1
The Remove All button for Document Properties and Personal Information turns ON the Trust Center option Remove personal information from file properties on save for the document.
This means that the removal of name and properties will continue to take place also each time you save the document. That is most likely not what you want. To prevent this setting from being saved in the document, select File > Info again and click the text Allow this information to be saved in your file (shown below Inspect Document) to turn off the setting – the text you clicked disappears and the setting has now been turned off (not very intuitive, in my opinion…).
You can also turn off the setting via Trust Center: Select File > Options > Trust Center > Trust Center Settings > Privacy Options and remove the check mark from Remove personal information from file properties on save.
CAUTION 2
The Remove All button also removes all custom document properties and clears all data from built-in properties. If you have DocProperty fields in the document, they will show errors unless you have locked or unlinked the fields first.
For more details about the Document Inspector, see the Microsoft article Remove hidden data and personal information by inspecting documents, presentations, or workbooks.
What other kinds of hidden information might be saved in my Word document?
Your Word documents might contain various kinds of hidden information that could compromise your security or reveal information that you don’t want to share. The term metadata (that is, data about the data) is used to refer to this kind of information.
For details about how to reduce or remove different types of metadata from your documents, see the Microsoft article Remove hidden data and personal information by inspecting documents, presentations, or workbooks.
Troubleshooting in relation to Track Changes
PROBLEM 1 – I have turned on Track Changes but I don’t see any changes
- CHECK 1 – Make sure that you have selected either Simple Markup or All Markup in the Display for Review menu on the Review tab in the Ribbon.
If you still can’t see any changes:
- CHECK 2 – Make sure at least one of the following options in the Show Markup menu is checked: Insertions and Deletions, Formatting.
If you still can’t see any changes:
- CHECK 3 – Open the Advanced Track Changes Options dialog box and check the settings. If a setting is set to (none), that setting is put out of action.
If you still can’t see any changes:
- CHECK 4 – The reason may be that the document contains no tracked changes. To easily find out, click Previous or Next in the Changes group on the Review tab. The message below is shown if you click Previous or Next and if no comments or tracked changes are found in the document.
Figure 28. This message is shown when you click Previous or Next if there are no comments or tracked changes in the document.
PROBLEM 2 – I have turned on balloons but no balloons are shown
Make sure that you have selected All Markup in the Display for Review menu on the Review tab in the Ribbon. Balloons are only shown in All Markup view.
Also, Balloons can only be shown in Print Layout view and Web Layout view.
TIP
You can switch from Simple Markup to All Markup display by clicking a red vertical line in the margin.
PROBLEM 3 – No screen tips are shown when I hover the mouse over a tracked change
- Check that Review tab > Display for Review > All Markup is selected.
- Check that screen tips are set to be shown. To show screen tips on hover, turn on File > Options > Display > Show document tooltips on hover.
PROBLEM 4 – Why are Accept All Changes Shown and Reject All Changes Shown disabled?
In the Accept and Reject menus, the commands Accept All Changes Shown and Reject All Changes Shown are disabled if comments and all types of tracked changes by all people are already selected to be shown. The commands are only enabled if not all comments and tracked changes are selected to be shown.
If, for example, you turn off display of Formatting changes, the commands will be enabled. The commands will also be enabled if Review tab > Show Markup > Specific People isn’t set to All Reviewers.
PROBLEM 5 – I want to define which color to use for each author – how can I do that?
You can’t define which color is used for which author. Word allocates the colors. See How to define which color to use for each author – you can’t above.
PROBLEM 6 – Other users don’t see the same colors used for the individual authors as I do – how can we be sure to see the same colors?
You can’t define which color is used for which author. Word allocates the colors. See How to define which color to use for each author – you can’t above.
PROBLEM 7 – When I use Track Changes, many fields appear as both deleted and inserted – how do I fix that?
A Word document can include many types of fields. Fields include instruction to Word about which content to show. Examples of fields are tables of contents (TOC), numbers in captions, DocProperty fields that show values of custom document properties.
If tracked changes are shown, and if the All Markup display option is selected, you may see many fields twice, both as deleted and inserted. This happens for fields whose results are affected by tracked changes. This influences the layout and it may look confusing. However, Word will fix the fields as soon as you accept or reject the changes and update fields (Ctrl+A to select all, F9 to update fields).
PROBLEM 8 – When I use Track Changes, the automatic numbering of headings and lists look wrong – how do I fix that?
If you view tracked changes inline and if you have added or deleted numbered items, Word will show changes to all numbers that are affected by the changes. This may influence the layout and it may look confusing. However, Word will fix the numbering as soon as you accept or reject the changes. See the example below.
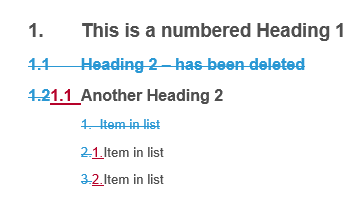
Figure 29. Example of automatic numbering with tracked changes.
PROBLEM 9 – When I open a document, Word automatically shows tracked changes – why?
Word automatically opens with tracked changes displayed if the Trust Center setting Make hidden markup visible when opening or saving is turned on. See How to avoid sending Word documents to others with tracked changes that should not be shared above.
You may turn off the setting. However, having it turned on helps you avoid security issues.
PROBLEM 10 – How can I determine how other users see tracked changes when I share my documents?
It is the Track Changes settings on the individual Word user’s computer that determine how that user sees tracked changes. Your own settings only apply to what you see on your computer.
For more details, see How to make sure that other users see tracked changes in the same way as you do above.
PROBLEM 11 – The Track Changes, Accept, and Reject commands are disabled – how can I fix that?
The problem is most likely that track changes has been locked with a password. Only users who know the password can unlock tracking. See How to lock tracking so Track Changes can’t be turned off above.
PROBLEM 12 – How to get rid of track changes in Word?
To get rid of track changes in Word, you need to remove the changes by accepting or rejecting them. See How to remove tracked changes in Word above.
PROBLEM 13 – I can’t change the user name – how to fix that?
If you can’t change the user name as described in How to change the name shown in new tracked changes you make above, the problem is most likely that your IT department has locked the user name via Group Policy. You may contact the relevant people to find out whether you will be allowed to change the name.
PROBLEM 14 – The author names of tracked changes and comments keep changing to “Author” – why does this happen and how to fix it?
If you use Word’s Inspect Document feature to remove Document Properties and Personal Information from a document, Word remembers this in that specific document by automatically turning ON the Trust Center option Remove personal information from file properties on save for that document.
As long as the Remove personal information from file properties on save option is turned ON, Word will continue to run the removal procedure each time you save the document. As a result, the author name (and date) of every tracked change and comment in the document will change to «Author» each time you save.
To prevent Word from changing the author name to «Author», you must turn OFF the Remove personal information from file properties on save option. Note that any tracked change and comment that has already been changed to show «Author» will not be changed back to show the original author name, but Word will stop changing the author name of new tracked changes and comments. To turn off the option, use one of the following two methods:
METHOD 1: Stop changing to «Author» via File > Inspect Document
Select File > Info > click the text Allow this information to be saved in your file (shown below Inspect Document) to turn off the setting – the text you clicked disappears and the setting has now been turned off (as also mentioned in “CAUTION 1” above, this is not very intuitive). See the illustration below.

Figure 30. How to turn off Remove personal information from file properties on save via Inspect Document. To close the Backstage view, press the Esc key or click the circled arrow in the top-left corner of the window.
METHOD 2: Stop changing to «Author» via Trust Center > Privacy Options
Select File > Options > Trust Center > Trust Center Settings > Privacy Options and remove the check mark from Remove personal information from file properties on save. See the illustration below.

Figure 31. How to turn off Remove personal information from file properties on save via Trust Center.
PROBLEM 15 – How to merge Word documents with comments and track changes?
If different authors have added tracked changed and comments in separate copies of a Word document, you may want to merge all those documents into one document. You can do that using Word’s Combine feature as explained in this step-by-step-procedure.
PROBLEM 16 – The Advanced Track Changes Options dialog box is smaller than normal and is missing the group headings – how to fix that?
I experienced some time ago that the Advanced Track Changes Options dialog box looked too small. I found out that it was missing the headings that are normally used to group the options.
The dialog box has a lot of options. For any user who is not familiar with all the options, the missing group headings would make it really difficult or impossible to find out what the individual options refer to.
The problem with the missing headings in the dialog box seemed to appear randomly. Sometimes the headings were there, sometimes not.
I reported the problem to Microsoft. The answer from Microsoft, after some troubleshooting, was that this specific dialog box has a minimum vertical resolution requirement. This means that the headings will not be shown if the screen resolution is below a certain level.
Even if my screen resolution was more than sufficient to allow the headings to be shown, they sometimes were not shown. I found out that zooming up in Word was what made the headings in the dialog box disappear even if zooming has nothing to do with the size of the dialog box or the screen resolution. Zooming above a certain percentage (131 % on one monitor, 151 % on another monitor) made the headings in the dialog box disappear. Microsoft is not going to fix this problem.
If you run into the problem with disappearing headings in the Advanced Track Changes Options dialog box, the solution is the following:
- Close the Advanced Track Changes Options dialog box.
- Zoom down in Word.
- Open the Advanced Track Changes Options dialog box again.
- If the headings still don’t appear, repeat the steps above.
The illustration below shows how the dialog box looks when the group headings are missing:

Figure 32. The Advanced Track Changes Options dialog box is missing headings due to too high zoom in Word. The headings Markup, Moves, Table cell highlighting, Formatting, and Balloons are missing here. You can compare it to Figure 22 above.
Acknowledgment
Thanks to Shauna Kelly who wrote an article about Track changes, covering Word 2010 and earlier versions. Shauna’s article has been visited by thousands of Word users. It is still visited many times a day. However, since that article was written and last revised when Word 2010 was the newest version of Word, it does not cover all the changes that have been made to the features since then.
This article is written in recognition of Shauna Kelly’s work. It covers all the areas that Shauna covered in her article, however updated to match newer versions of Word. This article also covers all the new and changed Track Changes features added after Word 2010.
Related information
My Word Add-ins DocTools ExtractData and DocTools ExtractChanges Pro both let you extract tracked changes from Word documents. See a comparison of the two add-ins.
For detailed information about how comments in Word work, see my article How comments in Word work.
For a ready-to-use macro to revert the settings in the Advanced Track Changes Options dialog box to default plus several VBA code snippets for handling track changes, see this article on my Word Macros & Tips website.
This article has explained how Track Changes in Word works. I hope this article helps you in your future work with tracked changes in Word.
There was a point in the not-too-distant past where monitors were not nearly as high-resolution as they are now. While higher resolutions have enhanced the computing experience for the majority of people, not everything is for the better.
With more displayed at once, programs like Microsoft Word often attempt to make things “better.” Depending on who you ask, these changes aren’t always an improvement. Just like changing to the Ribbon UI, displaying two pages at once on high-resolution displays has been controversial. Many people want to display one page at a time in Microsoft Word instead.
Luckily, it is possible to change things to suit your own preferences.
1. Change the View Layout
1. Move across the Ribbon UI to the “View” options.

2. The first three buttons on the left include “Read Layout,” “Print Layout” and “Web Layout,” with Print showing the document across virtual A4 pages. Select Web Layout.

3. The change should be apparent, as the document is no longer parsed into virtual pages, and it will run for the entire width of the window.

4. Change back to “Print Layout.” For whatever reason, this will display the document one page at a time. It’s a simple, yet effective way to display one page at a time in Microsoft Word.
2. Change the Zoom Level
1. Observe the zoom level in the lower-right corner of the Word window. Click the zoom percentage, and another window will appear providing a few more options.
2. You can choose a variety of zoom options, but “Many Pages” on the right and the button below it should attract the most attention.

3. Click to expand the button below it and select an option; 1×1 and 1×2 show one page or two pages at a time respectively.

4. Once you’ve done this, you’ll see that Word’s zoom level is going to change. Go back to the left and change it to 100%. Confirm this change.
5. If the document is not already two or more pages long, such as what happens when you open Word to try this, add another page with Ctrl + Enter. It should either appear alongside the existing page or below it, depending on what you chose.
If you’re using the online version of Microsoft Word, this is the best way to display one page at a time in Microsoft Word. The web version doesn’t have the same view options as the desktop version. The good news is Word usually defaults to the Web View anyway since you’re using it online, which typically gets rid of this issue automatically.
If you’re just looking through a document, you can also set “Read Mode” or “Reading View” to set pages to scroll versus being side by side.
Conclusion
The ability to control Word’s display of pages is invaluable; a Google search results in numerous complaints about its default handling of high-resolution monitors. While we’ve covered a few ways to improve Word, such as reintroducing the 2003-era UI and tabs, this one requires no extensions or add-ons.
Should you wish to revert your changes, it’s as simple as following Solution 2 and adjusting the “Many Pages” section to suit. The simplicity of this tweak, coupled with the polarizing nature of Word’s default approach, makes it highly valuable.
Do you also know that you can merge documents in Microsoft Word and add offline videos? If not, check it out.
Image credit: Microsoft Word Under Magnifying Glass

Crystal Crowder
Crystal Crowder has spent over 15 years working in the tech industry, first as an IT technician and then as a writer. She works to help teach others how to get the most from their devices, systems, and apps. She stays on top of the latest trends and is always finding solutions to common tech problems.
Subscribe to our newsletter!
Our latest tutorials delivered straight to your inbox