
Microsoft Excel makes it easy to import Extensible Markup Language (XML) data that is created from other databases and applications, to map XML elements from an XML schema to worksheet cells, and to export revised XML data for interaction with other databases and applications. Think of these XML features as turning Office Excel into an XML data file generator with a familiar user interface.
In this article
-
Why use XML in Excel?
-
XML data and schema files
-
Key XML and Excel scenarios
-
-
The basic process of using XML data in Excel
-
Working with XML maps
-
Using the XML Source task pane
-
Element types and their icons
-
Working with single-mapped cells
-
Working with repeating cells in XML tables
-
XML map security considerations
-
Importing XML data
-
Working with an inferred schema
-
Exporting XML data
-
Using the Excel macro-enabled Office Open XML Format file
-
Why use XML in Excel?
XML is a technology that is designed for managing and sharing structured data in a human-readable text file. XML follows industry-standard guidelines and can be processed by a variety of databases and applications. Using XML, application designers can create their own customized tags, data structures, and schemas. In short, XML greatly eases the definition, transmission, validation, and interpretation of data between databases, applications, and organizations.
XML data and schema files
Excel works primarily with two types of XML files:
-
XML data files (.xml), which contain the custom tags and structured data.
-
Schema files (.xsd), which contain schema tags that enforce rules, such as data type and validation.
The XML standard also defines Extensible Stylesheet Language Transformation (XSLT) (.xslt) files, which are used to apply styles and transform XML data into different presentation formats. You can apply these transforms before you import XML files into Excel and after you export XML files from Excel. If XSLT files are linked to XML data files that you import into Excel, you do have the option to apply or not apply the formatting before the data is added to the worksheet, but only when you open an XML file by using the Open command from within Excel. Choose the XML Files (*.xml) file type before you click the Open button to see the XML files in the folder.
Key XML and Excel scenarios
By using XML and Excel, you can manage workbooks and data in ways that were previously impossible or very difficult. By using XML maps, you can easily add, identify, and extract specific pieces of business data from Excel documents. For example, an invoice that contains the name and address of a customer or a report that contains last quarter’s financial results are no longer just static reports. You can easily import this information from databases and applications, revise it, and export it to the same or other databases and applications.
The following are key scenarios that the XML features are designed to address:
-
Extend the functionality of existing Excel templates by mapping XML elements onto existing cells. This makes it easier to get XML data into and out of your templates without having to redesign them.
-
Use XML data as input to your existing calculation models by mapping XML elements onto existing worksheets.
-
Import XML data files into a new workbook.
-
Import XML data from a Web service into your Excel worksheet.
-
Export data in mapped cells to XML data files independent from other data in the workbook.
Top of Page
The basic process of using XML data in Excel
The following diagram shows how the different files and operations work together when you use XML with Excel. Essentially, there are five phases to the process:
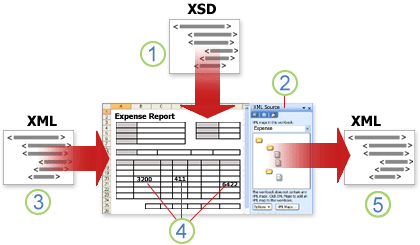
 Adding an XML schema file (.xsd) to a workbook
 Mapping XML schema elements to individual cells or XML tables
 Importing an XML data file (.xml) and binding the XML elements to mapped cells
 Entering data, moving mapped cells, and leveraging Excel functionality, while preserving XML structure and definitions
 Exporting revised data from mapped cells to an XML data file
Working with XML maps
You can create or open a workbook in Excel, attach an XML schema file (.xsd) to the workbook, and then use the XML Source task pane to map XML elements of the schema to individual cells or tables. After you map the XML elements to your worksheet, you can import and export XML data into and out of the mapped cells.
When you add an XML schema file (.xsd) to your workbook, you create an XML map. In general, XML maps are used to create mapped cells and to manage the relationship between mapped cells and individual elements in the XML schema. In addition, these XML maps are used to bind the contents of mapped cells to elements in the schema when you import or export XML data files (.xml).
There are two kinds of mapped cells that you can create: single-mapped cells and repeating cells (which appear as XML tables). To make designing your worksheet more flexible, you can drag the mapped cells anywhere on a worksheet and into any order — even one different from the XML schema. You can also choose which elements to map and not map.
The following rules about using XML maps are important to know:
-
A workbook can contain one or more XML maps.
-
You can only map one element to one location in a workbook at a time.
-
Each XML map is an independent entity, even if multiple XML maps in the same workbook refer to the same schema.
-
An XML map can only contain one root element. If you add a schema that defines more than one root element, you are prompted to choose the root element to use for the new XML map.
Using the XML Source task pane
You use the XML Source task pane to manage XML maps. To open it, on the Developer tab, in the XML group, click Source. The following diagram shows the main features of this task pane.
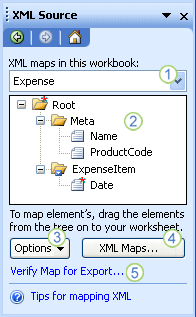
1. Lists XML maps that were added to the workbook
2. Displays a hierarchical list of XML elements in the currently listed XML map
3. Sets options when working with the XML Source task pane and the XML data, such as how to preview the data and control headings
4. Opens the XML Maps dialog box, which you can use to add, delete, or rename XML maps
5. Verifies whether you can export XML data through the current XML map
Top of Page
Element types and their icons
The following table summarizes each type of XML element that Excel can work with and the icon that is used to represent each type of element.
|
Element type |
Icon |
|---|---|
|
Parent element |
|
|
Required parent element |
|
|
Repeating parent element |
|
|
Required repeating parent element |
|
|
Child element |
|
|
Required child element |
|
|
Repeating child element |
|
|
Required repeating child element |
|
|
Attribute |
|
|
Required attribute |
|
|
Simple content in a complex structure |
|
|
Required simple content in a complex structure |
|


Top of Page
Working with single-mapped cells
A single-mapped cell is a cell that has been mapped to a nonrepeating XML element. You create a single-mapped cell by dragging a nonrepeating XML element from the XML Source task pane onto a single cell in your worksheet.
When you drag a nonrepeating XML element onto the worksheet, you can use a smart tag to choose to include the XML element name as a heading above or just to the left of the single-mapped cell, or you can use an existing cell value as a heading.
You can also use a formula in a single-mapped cell, if the cell is mapped to an XML element with an XML Schema Definition (XSD) data type that Excel interprets as a number, date, or time.
Top of Page
Working with repeating cells in XML tables
XML tables are similar in appearance and functionality to Excel tables. An XML table is an Excel table that has been mapped to one or more XML repeating elements. Each column in the XML table represents an XML element.
An XML table is created when you:
-
Use the Import command (in the XML group on the Developer tab) to import an XML data file.
-
Use the Open command from within Excel to open an XML data file — and then select As an XML table in the Open XML dialog box.
-
Use the From XML Data Import command (from the From Other Sources command button, in the Get External Data group, on the Data tab) to import an XML data file — and then select XML table in existing worksheet or New worksheet in the Import Data dialog box.
-
Drag one or more repeating elements from the XML Source task pane to a worksheet.
When you create an XML table, the XML element names are automatically used as column headings. You can change these to any column headings that you want. However, the original XML element names are always used when you export data from the mapped cells.
Two options under the Options button in the XML Source task pane are useful when you work with XML tables:
-
Automatically Merge Elements When Mapping
When selected, Excel creates one XML table from multiple fields as they are dropped onto the worksheet. This option works as long as the multiple fields are dropped on the same row, one adjacent to the other. When this option is cleared, each element appears as its own XML table. -
My Data Has Headings
When selected, existing heading data is used as column headings for repeating elements that you map to your worksheet. When this option is cleared, the XML element names are used as column headings.
Using XML tables, you can easily import, export, sort, filter, and print data based on an XML data source. However, XML tables do have some limitations regarding how they can be arranged on the worksheet.
-
XML tables are row-based, meaning that they grow from the header row down. You cannot add new entries above existing rows.
-
You cannot transpose an XML table so that new entries will be added to the right.
You can use formulas in columns that are mapped to XML elements with an XML Schema Definition (XSD) data type that Excel interprets as a number, date, or time. Just as in an Excel table, formulas in an XML table are filled down the column when new rows are added to the table.
XML map security considerations
An XML map and its data source information are saved with the Excel workbook, not a specific worksheet. A malicious user can view this map information by using a Microsoft Visual Basic for Applications (VBA) macro. Furthermore, if you save your workbook as a macro-enabled Excel Office Open XML Format File, this map information can be viewed through Microsoft Notepad or through another text-editing program.
If you want to keep using the map information but remove the potentially sensitive data source information, you can delete the data source definition of the XML schema from the workbook, but still export the XML data, by clearing the Save data source definition in workbook check box in the XML Map Properties dialog box, which is available from the Map Properties command in the XML group on the Developer tab.
If you delete a worksheet before you delete a map, the map information about the data sources, and possibly other sensitive information, is still saved in the workbook. If you are updating the workbook to remove sensitive information, make sure that you delete the XML map before you delete the worksheet, so that the map information is permanently removed from the workbook.
Top of Page
Importing XML data
You can import XML data into an existing XML map in your workbook. When you import data, you bind the data from the file to an XML map that is stored in your workbook. This means that each data element in the XML data file has a corresponding element, in the XML schema, that you mapped from an XML Schema file or inferred schema. Each XML map can only have one XML data binding, and an XML data binding is bound to all of the mappings that were created from a single XML map.
You can display the XML Map Properties dialog box (Click Map Properties in the XML group on the Developer tab.), which has three options, all selected by default, that you can set or clear to control the behavior of an XML data binding:
-
Validate data against schema for import and export Specifies whether Excel validates data against the XML map when importing data. Click this option when you want to ensure that the XML data that you import conforms to the XML schema.
-
Overwrite existing data with new data Specifies whether data is overwritten when you import data. Click this option when you want to replace the current data with new data, for example, when up-to-date data is contained in the new XML data file.
-
Append new data to existing XML tables Specifies whether the contents of the data source are appended to the existing data on the worksheet. Click this option, for example, when you are consolidating data from several similar XML data files into an XML table, or you do not want to overwrite the contents of a cell that contains a function.
When you import XML data, you may want to overwrite some mapped cells but not others. For example, some mapped cells may contain formulas and you don’t want to overwrite the formula when you import an XML file. There are two approaches that you can take:
-
Unmap the elements that you don’t want overwritten, before you import the XML data. After you import the XML data, you can remap the XML element to the cells containing the formulas, so that you can export the results of the formulas to the XML data file.
-
Create two XML maps from the same XML schema. Use one XML map for importing the XML data. In this «Import» XML map, don’t map elements to the cells that contain formulas or other data that you don’t want overwritten. Use another XML map for exporting the data. In this «Export» XML map, map the elements that you want to export to an XML file.
Note: The ability to import XML data from a Web service by using a Data Retrieval Service Connection (.uxdc) file to connect to a data source is no longer supported in versions later than Excel 2003 through the user interface. If you open a workbook that was created in Excel 2003, you can still view the data, but you cannot edit or refresh the source data.
Working with an inferred schema
If you import XML data without first adding a corresponding XML schema to create an XML map, Excel tries to infer a schema for you based on the tags that are defined in the XML data file. The inferred schema is stored with the workbook, and the inferred schema allows you to work with XML data if an XML schema file isn’t associated with the workbook.
When you work with imported XML data that has an inferred schema, you can also customize the XML Source task pane. Select the Preview Data in Task Pane option from the Options button to display the first row of data as sample data in the element list, if you imported XML data associated with the XML map in the current session of Excel.
You cannot export the Excel inferred schema as a separate XML schema data file (.xsd). Although there are XML schema editors and other methods for creating an XML schema file, you may not have convenient access to them or know how to use them. As an alternative, you can use the Excel 2003 XML Tools Add-in Version 1.1, which can create a schema file from an XML map. For more information, see Using the Excel 2003 XML Tools Add-in Version 1.1.
Exporting XML data
You export XML data by exporting the contents of mapped cells on the worksheet. When you export data, Excel applies the following rules to determine what data to save and how to save it:
-
Empty items are not created when blank cells exist for an optional element, but empty items are created when blank cells exist for a required element.
-
Unicode Transformation Format-8 (UTF-8) encoding is used to write the data.
-
All namespaces are defined in the Root XML element.
-
Excel overwrites existing namespace prefixes. The default namespace is assigned a prefix of ns0. Successive namespaces are designated ns1, ns2 to ns<count> where <count> is the number of namespaces written to the XML file.
-
Comment nodes are not preserved.
You can display the XML Map Properties dialog box (Click Map Properties in the XML group on the Developer tab.) and then use the Validate data against schema for import and export option (active by default) to specify whether Excel validates data against the XML map when exporting data. Click this option when you want to ensure that the XML data you export conforms to the XML schema.
Using the Excel Macro-enabled Office Open XML Format File
You can save an Excel workbook in a variety of file formats, including the Excel macro-enabled Office Open XML Format File (.xlsm). Excel has a defined XML schema that defines the contents of an Excel workbook, including XML tags that store all workbook information, such as data and properties, and define the overall structure of the workbook. Custom applications can use this Excel macro-enabled Office XML Format File. For example, developers may want to create a custom application to search for data in multiple workbooks that are saved in the this format and create a reporting system based on the data found.
Top of Page
Need more help?
You can always ask an expert in the Excel Tech Community or get support in the Answers community.
See Also
Import XML data
Map XML elements to cells in an XML Map
Export XML data
Append or overwrite mapped XML data
From Wikipedia, the free encyclopedia
| Filename extension | .XML (XML document) |
|---|---|
| Developed by | Microsoft |
| Type of format | Document file format |
| Extended from | XML, DOC |
| Filename extension | .VDX (XML Drawing),.VSX (XML Stencil),.VTX (XML Template) |
|---|---|
| Developed by | Microsoft |
| Type of format | Diagramming vector graphics |
| Extended from | XML, VSD, VSS, VST |
| Filename extension | .XML (XML Spreadsheet) |
|---|---|
| Developed by | Microsoft |
| Type of format | Spreadsheet |
| Extended from | XML, XLS |
The Microsoft Office XML formats are XML-based document formats (or XML schemas) introduced in versions of Microsoft Office prior to Office 2007. Microsoft Office XP introduced a new XML format for storing Excel spreadsheets and Office 2003 added an XML-based format for Word documents.
These formats were succeeded by Office Open XML (ECMA-376) in Microsoft Office 2007.
File formats[edit]
- Microsoft Office Word 2003 XML Format — WordProcessingML or WordML (.XML)
- Microsoft Office Excel 2002 and Excel 2003 XML Format — SpreadsheetML (.XML)
- Microsoft Office Visio 2003 XML Format — DataDiagramingML (.VDX, .VSX, .VTX)
- Microsoft Office InfoPath 2003 XML Format — XML FormTemplate (.XSN) (Compressed XML templates in a Cabinet file)
- Microsoft Office InfoPath 2003 XML Format — XMLS FormTemplate (.XSN) (Compressed XML templates in a Cabinet file)
Limitations and differences with Office Open XML[edit]
Besides differences in the schema, there are several other differences between the earlier Office XML schema formats and Office Open XML.
- Whereas the data in Office Open XML documents is stored in multiple parts and compressed in a ZIP file conforming to the Open Packaging Conventions, Microsoft Office XML formats are stored as plain single monolithic XML files (making them quite large, compared to OOXML and the Microsoft Office legacy binary formats). Also, embedded items like pictures are stored as binary encoded blocks within the XML. In case of Office Open XML, the header, footer, comments of a document etc. are all stored separately.
- XML Spreadsheet documents cannot store Visual Basic for Applications macros, auditing tracer arrows, chart and other graphic objects, custom views, drawing object layers, outlining, scenarios, shared workbook information and user-defined function categories.[1] In contrast, the newer Office Open XML formats support full document fidelity.
- Poor backward compatibility with the version of Word/Excel prior to the one in which they were introduced. For example, Word 2002 cannot open Word 2003 XML files unless a third-party converter add-in is installed.[2] Microsoft has released a Word 2003 XML Viewer which allows WordProcessingML files saved by Word 2003 to be viewed as HTML from within Internet Explorer.[3] For Office Open XML, Microsoft provides converters for Office 2003, Office XP and Office 2000.
- Office Open XML formats are also defined for PowerPoint 2007, equation editing (Office MathML), vector drawing, charts and text art (DrawingML).
Word XML format example[edit]
<?xml version="1.0" encoding="utf-8" standalone="yes"?>
<?mso-application progid="Word.Document"?>
<w:wordDocument
   xmlns:w="http://schemas.microsoft.com/office/word/2003/wordml"
   xmlns:wx="http://schemas.microsoft.com/office/word/2003/auxHint"
   xmlns:o="urn:schemas-microsoft-com:office:office"
   w:macrosPresent="no"
   w:embeddedObjPresent="no"
   w:ocxPresent="no"
   xml:space="preserve">
  <o:DocumentProperties>
    <o:Title>This is the title</o:Title>
    <o:Author>Darl McBride</o:Author>
    <o:LastAuthor>Bill Gates</o:LastAuthor>
    <o:Revision>1</o:Revision>
    <o:TotalTime>0</o:TotalTime>
    <o:Created>2007-03-15T23:05:00Z</o:Created>
    <o:LastSaved>2007-03-15T23:05:00Z</o:LastSaved>
    <o:Pages>1</o:Pages>
    <o:Words>6</o:Words>
    <o:Characters>40</o:Characters>
    <o:Company>SCO Group, Inc.</o:Company>
    <o:Lines>1</o:Lines>
    <o:Paragraphs>1</o:Paragraphs>
    <o:CharactersWithSpaces>45</o:CharactersWithSpaces>
    <o:Version>11.6359</o:Version>
  </o:DocumentProperties>
  <w:fonts>
    <w:defaultFonts
       w:ascii="Times New Roman"
       w:fareast="Times New Roman"
       w:h-ansi="Times New Roman"
       w:cs="Times New Roman" />
  </w:fonts>

  <w:styles>
    <w:versionOfBuiltInStylenames w:val="4" />
    <w:latentStyles w:defLockedState="off" w:latentStyleCount="156" />
    <w:style w:type="paragraph" w:default="on" w:styleId="Normal">
      <w:name w:val="Normal" />
      <w:rPr>
        <wx:font wx:val="Times New Roman" />
        <w:sz w:val="24" />
        <w:sz-cs w:val="24" />
        <w:lang w:val="EN-US" w:fareast="EN-US" w:bidi="AR-SA" />
      </w:rPr>
    </w:style>
    <w:style w:type="paragraph" w:styleId="Heading1">
      <w:name w:val="heading 1" />
      <wx:uiName wx:val="Heading 1" />
      <w:basedOn w:val="Normal" />
      <w:next w:val="Normal" />
      <w:rsid w:val="00D93B94" />
      <w:pPr>
        <w:pStyle w:val="Heading1" />
        <w:keepNext />
        <w:spacing w:before="240" w:after="60" />
        <w:outlineLvl w:val="0" />
      </w:pPr>
      <w:rPr>
        <w:rFonts w:ascii="Arial" w:h-ansi="Arial" w:cs="Arial" />
        <wx:font wx:val="Arial" />
        <w:b />
        <w:b-cs />
        <w:kern w:val="32" />
        <w:sz w:val="32" />
        <w:sz-cs w:val="32" />
      </w:rPr>
    </w:style>
    <w:style w:type="character" w:default="on" w:styleId="DefaultParagraphFont">
      <w:name w:val="Default Paragraph Font" />
      <w:semiHidden />
    </w:style>
    <w:style w:type="table" w:default="on" w:styleId="TableNormal">
      <w:name w:val="Normal Table" />
      <wx:uiName wx:val="Table Normal" />
      <w:semiHidden />
      <w:rPr>
        <wx:font wx:val="Times New Roman" />
      </w:rPr>
      <w:tblPr>
        <w:tblInd w:w="0" w:type="dxa" />
        <w:tblCellMar>
          <w:top w:w="0" w:type="dxa" />
          <w:left w:w="108" w:type="dxa" />
          <w:bottom w:w="0" w:type="dxa" />
          <w:right w:w="108" w:type="dxa" />
        </w:tblCellMar>
      </w:tblPr>
    </w:style>
    <w:style w:type="list" w:default="on" w:styleId="NoList">
      <w:name w:val="No List" />
      <w:semiHidden />
    </w:style>
  </w:styles>
  <w:docPr>
    <w:view w:val="print" />
    <w:zoom w:percent="100" />
    <w:doNotEmbedSystemFonts />
    <w:proofState w:spelling="clean" w:grammar="clean" />
    <w:attachedTemplate w:val="" />
    <w:defaultTabStop w:val="720" />
    <w:punctuationKerning />
    <w:characterSpacingControl w:val="DontCompress" />
    <w:optimizeForBrowser />
    <w:validateAgainstSchema />
    <w:saveInvalidXML w:val="off" />
    <w:ignoreMixedContent w:val="off" />
    <w:alwaysShowPlaceholderText w:val="off" />
    <w:compat>
      <w:breakWrappedTables />
      <w:snapToGridInCell />
      <w:wrapTextWithPunct />
      <w:useAsianBreakRules />
      <w:dontGrowAutofit />
    </w:compat>
  </w:docPr>
  <w:body>
    <wx:sect>
      <w:p>
        <w:r>
          <w:t>This is the first paragraph</w:t>
        </w:r>
      </w:p>
      <wx:sub-section>
        <w:p>
          <w:pPr>
            <w:pStyle w:val="Heading1" />
          </w:pPr>
          <w:r>
            <w:t>This is a heading</w:t>
          </w:r>
        </w:p>
        <w:sectPr>
          <w:pgSz w:w="12240" w:h="15840" />
          <w:pgMar w:top="1440"
		   w:right="1800"
		   w:bottom="1440"
		   w:left="1800"
		   w:header="720"
		   w:footer="720"
		   w:gutter="0" />
          <w:cols w:space="720" />
          <w:docGrid w:line-pitch="360" />
        </w:sectPr>
      </wx:sub-section>
    </wx:sect>
  </w:body>
</w:wordDocument>
Excel XML spreadsheet example[edit]
<?xml version="1.0" encoding="UTF-8"?>
<?mso-application progid="Excel.Sheet"?>
<Workbook xmlns="urn:schemas-microsoft-com:office:spreadsheet" xmlns:x="urn:schemas-microsoft-com:office:excel" xmlns:ss="urn:schemas-microsoft-com:office:spreadsheet" xmlns:html="https://www.w3.org/TR/html401/">
<Worksheet ss:Name="CognaLearn+Intedashboard">
<Table>
<Column ss:Index="1" ss:AutoFitWidth="0" ss:Width="110"/>
<Row>
<Cell><Data ss:Type="String">ID</Data></Cell>
<Cell><Data ss:Type="String">Project</Data></Cell>
<Cell><Data ss:Type="String">Reporter</Data></Cell>
<Cell><Data ss:Type="String">Assigned To</Data></Cell>
<Cell><Data ss:Type="String">Priority</Data></Cell>
<Cell><Data ss:Type="String">Severity</Data></Cell>
<Cell><Data ss:Type="String">Reproducibility</Data></Cell>
<Cell><Data ss:Type="String">Product Version</Data></Cell>
<Cell><Data ss:Type="String">Category</Data></Cell>
<Cell><Data ss:Type="String">Date Submitted</Data></Cell>
<Cell><Data ss:Type="String">OS</Data></Cell>
<Cell><Data ss:Type="String">OS Version</Data></Cell>
<Cell><Data ss:Type="String">Platform</Data></Cell>
<Cell><Data ss:Type="String">View Status</Data></Cell>
<Cell><Data ss:Type="String">Updated</Data></Cell>
<Cell><Data ss:Type="String">Summary</Data></Cell>
<Cell><Data ss:Type="String">Status</Data></Cell>
<Cell><Data ss:Type="String">Resolution</Data></Cell>
<Cell><Data ss:Type="String">Fixed in Version</Data></Cell>
</Row>
<Row>
<Cell><Data ss:Type="Number">0000033</Data></Cell>
<Cell><Data ss:Type="String">CognaLearn Intedashboard</Data></Cell>
<Cell><Data ss:Type="String">janardhana.l</Data></Cell>
<Cell><Data ss:Type="String"></Data></Cell>
<Cell><Data ss:Type="String">normal</Data></Cell>
<Cell><Data ss:Type="String">text</Data></Cell>
<Cell><Data ss:Type="String">always</Data></Cell>
<Cell><Data ss:Type="String"></Data></Cell>
<Cell><Data ss:Type="String">GUI</Data></Cell>
<Cell><Data ss:Type="String">2016-10-14</Data></Cell>
<Cell><Data ss:Type="String"></Data></Cell>
<Cell><Data ss:Type="String"></Data></Cell>
<Cell><Data ss:Type="String"></Data></Cell>
<Cell><Data ss:Type="String">public</Data></Cell>
<Cell><Data ss:Type="String">2016-10-14</Data></Cell>
<Cell><Data ss:Type="String">IE8 browser_Modules screen tool tip text is shown twice</Data></Cell>
<Cell><Data ss:Type="String">new</Data></Cell>
<Cell><Data ss:Type="String">open</Data></Cell>
<Cell><Data ss:Type="String"></Data></Cell>
</Row>
</Table>
</Worksheet>
</Workbook>
See also[edit]
- List of document markup languages
- Comparison of document markup languages
References[edit]
- ^ «Features and limitations of XML Spreadsheet format (broken)». Archived from the original on 2007-10-09. Retrieved 2007-11-01.
- ^ «Polar WordML add-in (broken)». Archived from the original on 2009-04-11. Retrieved 2007-11-01.
- ^ Word 2003 XML Viewer
- Overview of Office 2003 Developer Technologies
- Office 2003 XML. ISBN 0-596-00538-5
External links[edit]
- MSDN: XML Spreadsheet Reference
- MSDN: Word 2003 XML Reference
- Lawsuit about XML patent
XML in Excel – Extensible Markup Language
XML are the files used in the databases which are shared over the web. Excel has made it easier for us to import the data in XML to Excel in the form of tables or databases. XML is external data that can be imported to Excel from the “Data” tab under the “Get Data” tab from the data from other sources.
Data is the platform that almost all business entities revolve around. In the modern world, all businesses use different platforms and programs to store data for analysis and decision-making purposes.
XML – extensible markup language is the most common format to work and analyze data in this modern world. Excel allows us to convert spreadsheet data into XML files, and getting started is strange for common Excel users.
XML is structured data and one of the external data sources. We create a link or import data from outside where data resides outside the spreadsheet. We have many external databases like PayrollPayroll refers to the overall compensation payable by any organization to its employees on a certain date for a specific period of services they have provided in the entity. This total net pay comprises salary, wages, bonus, commission, deduction, perquisites, and other benefits.read more, POS (Point of Sale), Inventory Software, SQL Servers, etc.
You are free to use this image on your website, templates, etc, Please provide us with an attribution linkArticle Link to be Hyperlinked
For eg:
Source: XML in Excel (wallstreetmojo.com)
Like every other database software, XML has its own rules and regulations. Below are some of the common rules for XML.
- While writing the code data, both the head (start) and tail (end) should have similar tag names. For example:
<TableName> Data </TableName>
- Both head and tail are case sensitive.
Table of contents
- XML in Excel – Extensible Markup Language
- How to Import XML Data into Excel? (with Examples)
- Example #1 – Website (XML data) Data Download
- Example #2 – Add XML (Markup Schema) to Excel
- Things to Remember
- Recommended Articles
- How to Import XML Data into Excel? (with Examples)
How to Import XML Data into Excel? (with Examples)
Let us see how to import XML data into Excel.
Example #1 – Website (XML data) Data Download
When searching the internet, we may find some useful information on the web. However, we need that data dumped into the worksheet of Excel. This article will show you how to download the data from the web server to a worksheet in Excel.
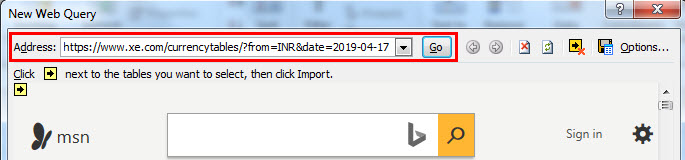
Assume you are working with foreign markets regularly and need the data of all the currency exchange rates for INR. Usually, we rely on XE.com for all the historical currency rates.
Follow the steps below to download the currency rates for 17th Jan 2019.
- Open the XE.com website.
- Search for “Historical Currency Rates.”
- Select the currency and date which you want the data for. For example, we have selected INR and 17-04-2019.
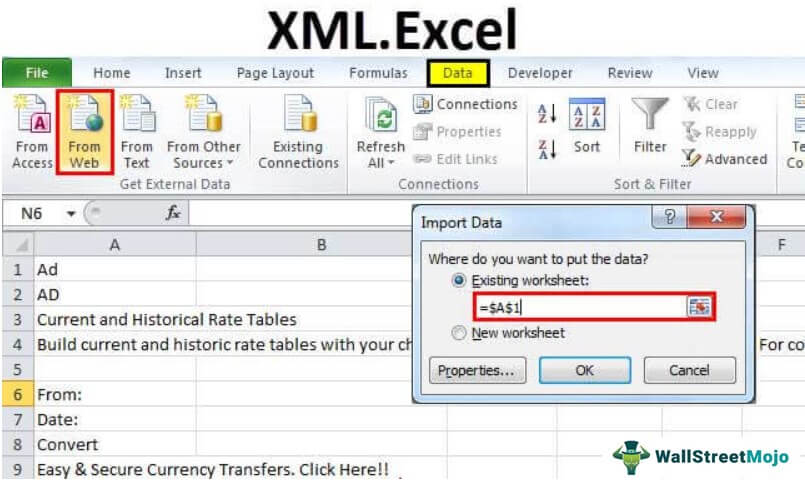
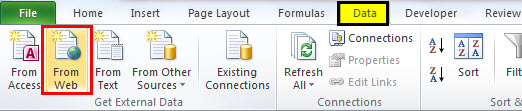
- Go to the “Data” tab in Excel, and under “Get Data,” select the “From Web” option.

- Once you click on this, you will see this window.

- Now, copy the URL you have created in XE.com and paste it into the “Address” section and click on “Go.”

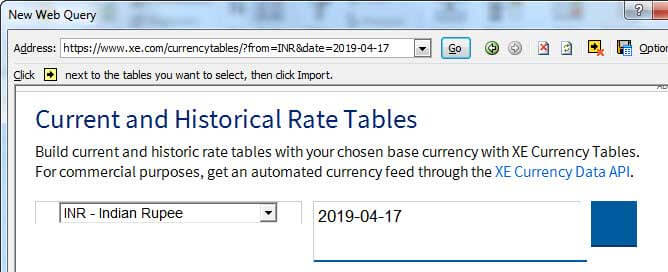
- After clicking on “Go,” you will see the webpage.

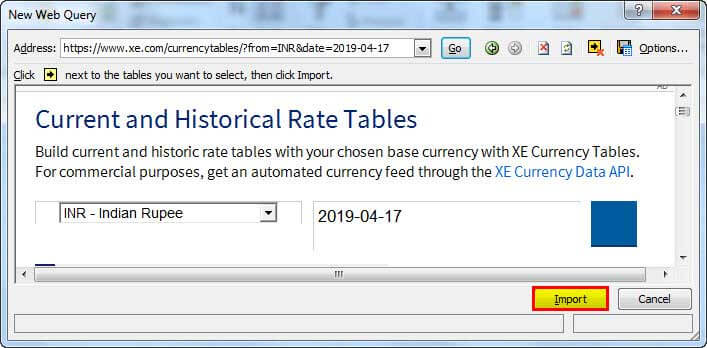
- Once you see the result click on “Import.”

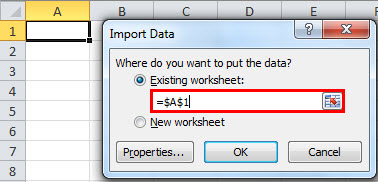
- After clicking the “IMPORT” button, Excel will ask you where to store the data. Select A1 as the cell reference.

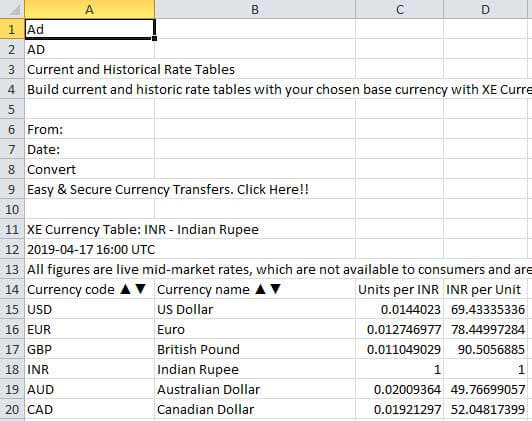
- After selecting the cell reference, excel will store the XML data as it is on the website and will take a few seconds to complete it.

This way, we can download the data from web servers and have our data in the spreadsheet.

Example #2 – Add XML (Markup Schema) to Excel
To add “XML Schema,” we need perfect column headings. We can create an XML Schema by using column headings.
- Step 1: Open Notepad and copy the below code and paste.
<?xml version="1.0" encoding="UTF-8" standalone="yes"?>
<data-set xmlns:xsi="http://www.w3.org/2001/XMLSchema-instance">
<record>
<Name>Amar Jyothi</Name>
<Salary>14051</Salary>
<Department>Sales</Department>
</record>
<record>
<Name>Radha</Name>
<Salary>17061</Salary> <Department>Marketing</Department>
</record>
</data-set>
- Step 2: Save this as data-set.xml

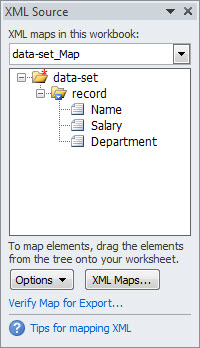
It is important to ask two pieces of information from the data. First, we have added two names’ data to the list. It is an indication of the Excel to repeat throughout the worksheet.
- Step 3: Ensure the “Developer” tab is enabled in your Excel ribbonThe ribbon is an element of the UI (User Interface) which is seen as a strip that consists of buttons or tabs; it is available at the top of the excel sheet. This option was first introduced in the Microsoft Excel 2007.read more and select “Source” from the “Developer” tab.

- Step 4: Under “XML Source” right-click on the “XML Maps.”
- Step 5: Select the file you want to add.
- Step 6: Select the desired file and click on the “OK” button.
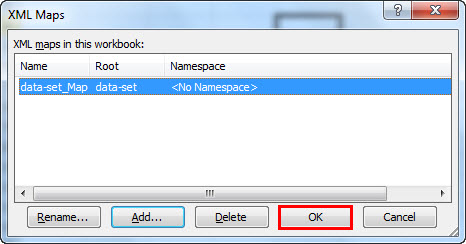
Once you click on the “OK” button, you will see the following output.
Things to Remember
- XML is one of the structured languages for a database.
- XML is an extensible markup language.
- We can import and export under XML to the spreadsheet and spreadsheet to the XML.
- Head and tails should be the same under notepad coding.
- You need to save the file as.XML
- XML is available as add-ins too. Search on the internet for more information regarding this.
Recommended Articles
This article is a guide to the XML in Excel. We discuss importing and adding XML Markup Schema to Excel and practical examples here. You can learn more about Excel from the following articles: –
- Open XML File in ExcelXML (Extensible Markup Language) is a text-based mark-up language that stores & organizes data in a human & machine-readable format. As it follows a specific script, you need to fulfill a particular set of prerequisites for importing the data into Excel or opening Excel Data into this format. read more
- VBA LENThe Len function is a common function for both worksheet and VBA. In both platforms, the arguments to this function are the same, which is a string. This function returns the length of a string.read more
- File Formats in ExcelExcel extensions represent the file format. It helps the user to save different types of excel files in various formats. For instance, .xlsx is used for simple data, and XLSM is used to store the VBA code.read more
- How to Import Data into Excel?
- Share an Excel WorkbookUnder the Review menu tab, there is a Share Excel Workbook option that allows the other user to review the document and make changes as well.read more
How to Convert Excel to XML – Step-by-Step Tutorial (2023)
We all know basic excel skills that help us work in excel spreadsheets with extensive data. But what if you need to transfer the excel file somewhere and change it into other formats?
The extensible markup language or XML comes in handy for this. Simply put, it is a markup language that helps store data in an excel spreadsheet and changes its format.
You can easily convert excel data into XML data – but how do you do that?
For that, download our FREE Exercise Workbook here and continue reading the article below. 😀
What is the XML file format?
The XML file format is a way to write text in a document using tags. These tags are customizable and represent the structure of the document.
It also tells how the XLS file can be converted to an XML file and transferred to another application.
XML format uses the DOM or Document Object Model as its basic structure and can help separate text in HTML.
For instance, XML data for a company employee might be:

The tags ‘Name, ID No., Post, Salary, and Status’ consist of the document’s data. You can customize the tags as we did here for an employee’s data.
Create the Excel File
To convert Excel to XML, you need to create an XLS file containing all the data. I have created an example below that lists the members of a company and their details.

Each field contains certain information about every employee.
How to Create the XML Schema?
The XML Schema will structure each spreadsheet field and its appearance in the XML file.
Our spreadsheet has five columns with different data types setting the base for our XML file.
1. To create the XML file, open any text editor and begin entering the standard XML elements.

Don’t fret just yet; We’ll explain all the alien-like items in this image one by one. 😄
The first line in the image is the standard XML line. It is used each time you create XML documents.
The version 1.0 encoding UTF specifies that it is an XML format.
The second line indicates the type of text. For example, this data was about employees of a company, hence <employee-data>. The remaining line is the default.
Since this statement starts with <employee-data>, it is the root element here. The remaining elements of the argument make up for the child element.

The third line, containing the record tag, indicates the beginning and end of a single field. It consists of the information in each field of the spreadsheet.
For instance, the first field is about Alice A. So it will include all the information about Alice on each tag.

The TAG NAME specifies the items in each column, whereas the data contains the corresponding value.
You don’t have to manually input the exact and each column name; they just need to be in the correct order. Excel can help us do the rest.

For the TAG NAME, say we want the first employee’s name.
So, we will write – <Name>Alice A.</Name> – Similarly, for her ID, we will write – <ID No.>2854</ID No.> – .
Pro Tip!
Must note the opening and closing tag identified by a forward slash (/).
These are to be used at the beginning and each of each statement. Also, the closing and opening tags must be in the correct order, as the data between the two tags make for the XML elements.

The last closing tag </employee-data> marks the end of the file. In the last step, save the XML data file as “employee-data.xml.”
Enable the Developer Tab
Now that your schema markup is prepared, let’s add it to Excel.
1. Make sure the developer tab is enabled on your Excel spreadsheet. If it is not visible, right-click on the ribbon and select Customize the ribbon.

2. A dialog box will appear on the screen. On the bottom right side, mark the develop option as shown and click ok.

3. Now, you should be able to view the developer’s tab on the ribbon like this:

That’s it – now what? Now we add the Schema file to Microsoft Excel. 😃
Open the XML Source Task Pane & Add XML Maps
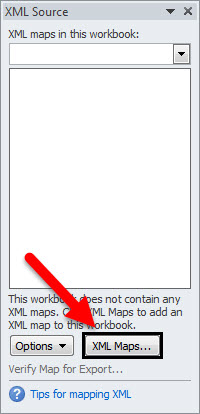
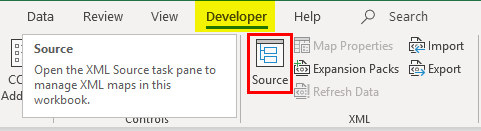
1. Click on Developer from the ribbon, and you will see a number of options. Select the Source icon:

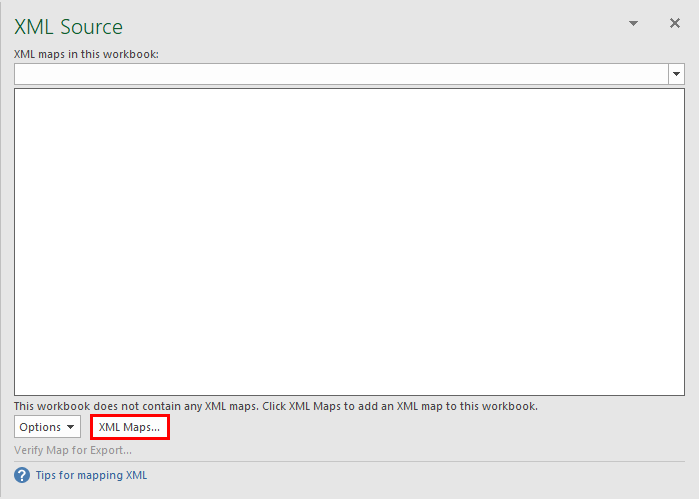
The XML source pane will appear on the Excel spreadsheet.
2. Click XML Maps at the bottom right corner.

It shows a dialog box that searches for the XML map in the workbook.
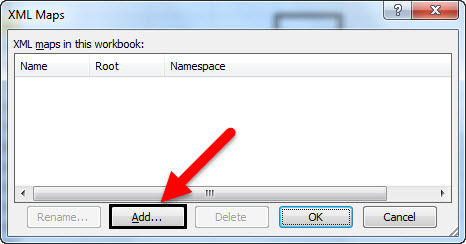
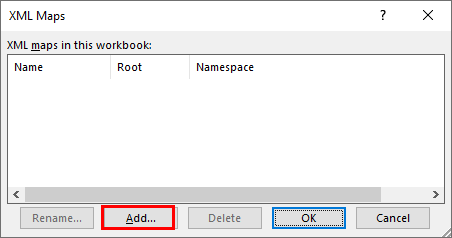
3. Click the add button and select the XML map stored on your desktop.
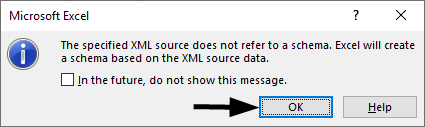
You will see a warning like this one below from Microsoft Excel upon adding the map.

There’s nothing to worry about.
4. Simply press ‘Ok’.
5. You will now see the XML map in the workbook.

6. Click ‘Okay’ and move to the XML source pane, which looks like this.

7. Now, mark the data on the XML Map.
Assign XML Elements
Now that you have the XML schema and the XLSX ready, mark the XML tags to the spreadsheets’ data.
All you need to do now is drag one XML element from the source pane. Then drop it on the corresponding spreadsheets’ column name.
For instance, I will drop the “Name” XML element on the “Name” column, and a blue table will appear.

Apply the same process to the remaining columns. If you have been successful till now, your spreadsheet will look like this:

If you’ve achieved this form, it means all your data is perfectly mapped with XML tags.
Now that we’ve come this far, it is only fair we export it. So, onto the next step.
Export the XML File
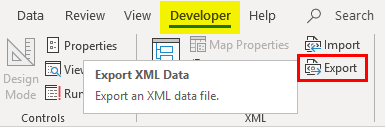
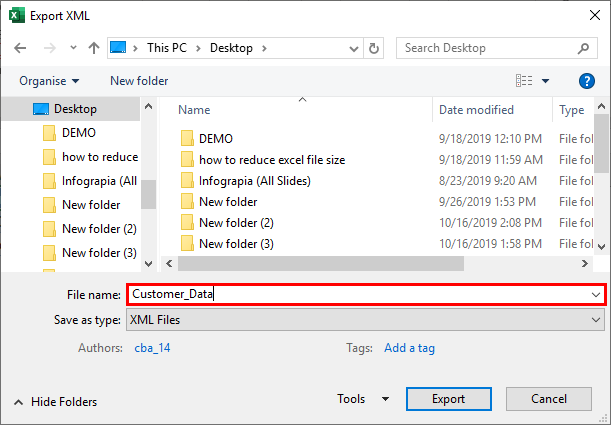
1. To convert Excel to XML file formats, open the developer tab and click the export command.

A dialog box will appear, asking the location to save the file. The file type should be set by default.
2. Select a location, enter the name and click export.
The file is now saved on your desktop with all your XML data. You can open the file from the XML section on a Wordpad or other apps.
The XML file will show up like this:

You might receive a warning from Microsoft office. Exporting the file may cause loss of pictures, formatting, or other non-XML objects.
That’s not an issue. Go ahead and hit ‘Ok’. 🙂
That’s it — Now What
Beginning to convert Excel to XML files can be challenging at the start. But once you get hold of it, you can do it with your eyes closed.
In the above article, we not only learned about creating an XML schema but also to convert an Excel file into XML format and export it.
But that’s only about creating and retaining your Excel file in different formats. There’s so much more to Excel that you’d still want to learn like the VLOOKUP, SUMIF and IF functions.
Want to learn them all? Click here to sign up for my free 30-minute email course to master these functions.
Kasper Langmann2023-01-19T12:23:02+00:00
Page load link
XML in Excel (Table of Contents)
- Definition of XML & XSD
- How to Import XML File in Excel?
Introduction to Extensible Markup Language (.XML)
Designed for storing and transporting data. It is a markup language similar to HTML. XML File appears as below mentioned, where it is a note to John from Craig.
XML File type & structure appears as below mentioned:
<note>
<to> John</to>
<from> Craig</from>
<heading>Reminder</heading>
<body>Don’t forget me this weekend!</body>
</note>
- XML is just a piece of information wrapped in tags, just like the above-mentioned note.
- Usually, most of the XML applications work as expected even if you add new data (or it is removed).
- XML Simplifies tasks like data transport, data sharing, data availability & platform changes.
- The XML standard is a flexible & easy way to create information formats.
- XML helps out in electronically sharing structured data via the public Internet or through a corporate network.
- XML is a hierarchical structure.
Definition of XML & XSD
- XML Schema language is also referred to as XML Schema Definition (XSD).
- XSD defines the structure of the XML file, which needs to be created and also it indicates where the columns need to be mapped in the tabular excel data.
- It is also referred to as Extensible Stylesheet Language Transformation (XSLT) or (.xslt file).
- XSD implement data type and validation to file.
- XSD allows you to create elements, Data relationships & Data validation is defined in XML.
- XML data files (.xml), which contains custom tags and structured data.
How to Import XML File in Excel?
You can import the XML file in Excel from the source option in the Developer tab. If the Developer tab is not available in the Ribbon, you need to add the developer tab with the mentioned steps or procedure.
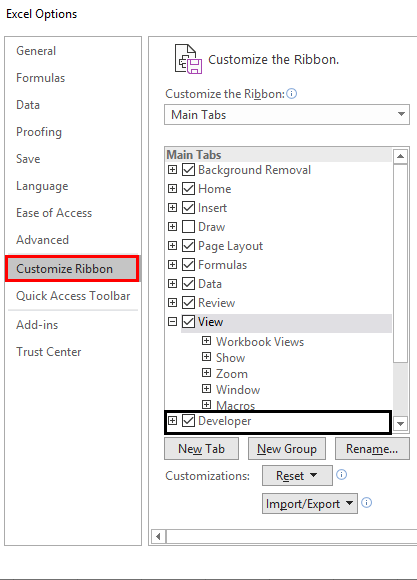
Go to “File” and select “Options.” and select “Customize the Ribbon”, or you can right-click on the Home tab and select “Customize Ribbon”, as shown below.
In Excel Options –
When you return to the main Excel page, you will see the Developer tab next to the view tab at the top. In that, if you need to select the source tool to map elements in your XML to your spreadsheet.
Let’s check out the steps available to convert an excel file to an XML data file & vice versa.
Step 1 – To Convert your Spreadsheet into XML, you need a Markup Schema
This markup schema defines each field that you’ll use in your XML file, i.e. the structure of the XML file. We have to do this outside Excel, in the other filetype.
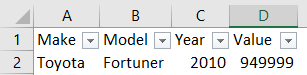
In the below-mentioned spreadsheet, I have four types of column & information, i.e. Car makes, Car model, its year of manufacture, and at last, Car cost or value. So, in our Excel schema will have four different tags, and we need to create them.
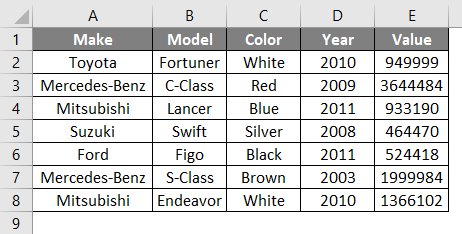
In the above spreadsheet, it contains four columns, each of which will become an element. The car data in the above cells of excel are not independent. For example, I have four cells in a row; all that row data is related to each other, it provides details about a car type and its information, i.e., the brand name, model name, and year of purchase it is cost or value at present.
Open Notepad and add the following two lines; they are the standard pieces of information that XML files need at the beginning. (Note: It is optional ).
<?xml version="1.0" encoding="UTF-8" standalone="yes"?>

<data-set xmlns:xsi="http://www.w3.org/2001/XMLSchema-instance">
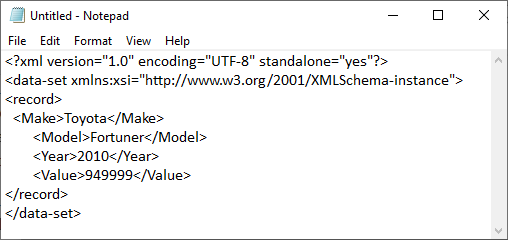
The element is declared from line three onwards. The record tags, i.e. < >, defines a single record described in our spreadsheet. Whereas other tags define the relevant pieces of information under that for that record. i.e.
<record>

<Make>Toyota</Make>

<Model>Fortuner</Model>

<Year>2010</Year>

<Value>949999</Value>

</record>
Finally, add the closing </record> tag at the end of the file in the note pad.
NOTE: The tags (< >) in the above notepad under the record refers to the column names; you have an option to give them any name you want apart from the original name mentioned in the excel tabular data! For example, instead of ‘’Value”, you can use “Cost”.
I just added the first-row data for the explanation purpose. You can add as many rows, based on your choice. Again, you can start with <record>, after the </record> tag. Once you entered the data in the notepad, you can save it as test.xml in the file name and save it on the desktop.
Later, you can create a new excel file with filename XML.xlsx
As you have noticed, we entered one car detail (one record) in the XML file (NOTEPAD). Now, you have created a markup schema and saved it on your desktop.
Step 2 – How to Add this Markup Schema to New Excel File
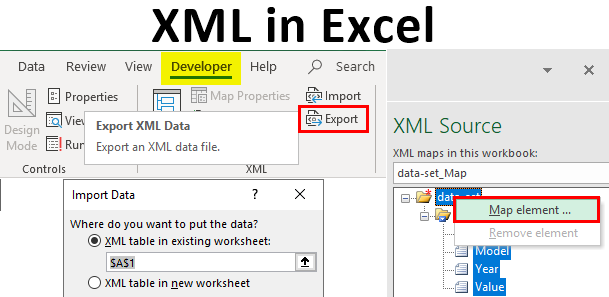
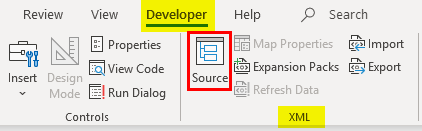
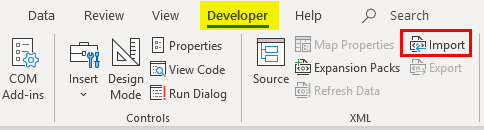
In the Developer tab, click on Source in the XML section.
XML window pane appears; click on XML Maps.
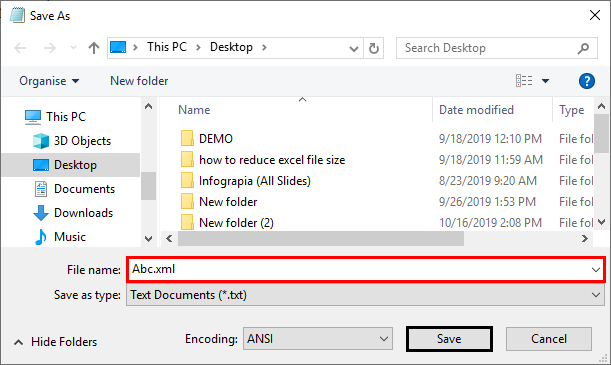
XML Maps window appears; in that, Click Add in the resulting window.
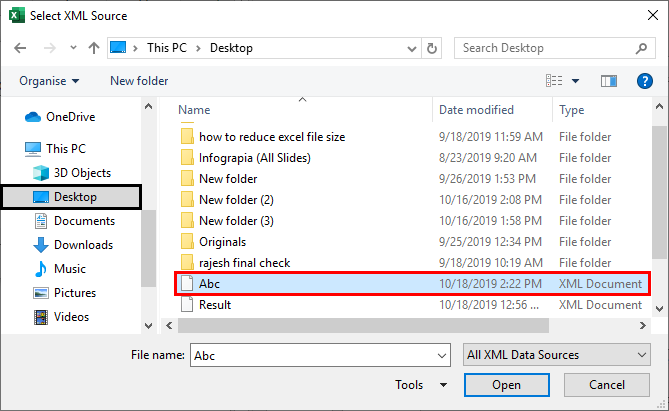
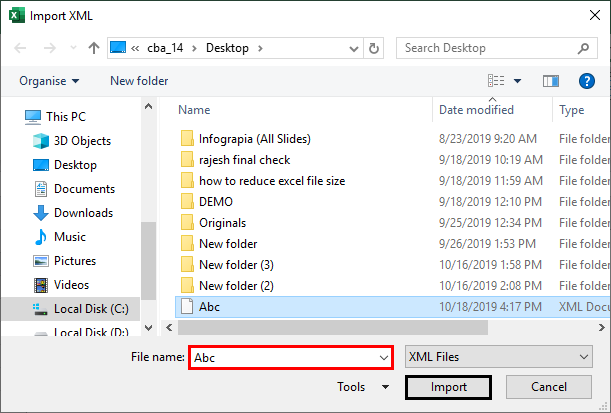
Then you can navigate to your XML file on the desktop, which you saved as Abc.xml, and you can select it.
Due to excel version issues in my system, I am uploading other .xml file with another option. The other option in the developer tab is to select Import in the Home tab.
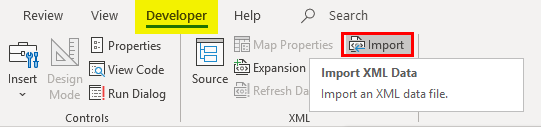
Once you select a .xml file on the desktop, a popup appears; click Ok.
Now to import this excel data, right-click on the XML file name and select the MAP Element option.
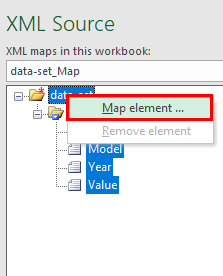
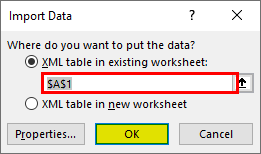
Then you will see the following popup, select the location to where you want your data.
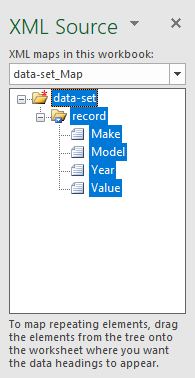
Then you will see the table headers in your excel sheet.

Now under the developer tab, click on Import.
It will open a window to select the file.
Output:
Another popup appears asking for cell reference, where you want the data to be placed.
The import .xml file type appears as shown earlier. Similarly, the Export feature in the developer option will be available in your spreadsheet contains XML file data; otherwise, an export option will be greyed out.
Here, I opened an excel file containing XML file data; I can export it and save it as a .xml file type anywhere with an export option in the Developer tab.
Things to Remember About XML in Excel
- Every bit of data you enter has to start and end with an identical tag, i.e. start with < Record> Data </Record> (End with).
- Tag names are case sensitive, i.e. capitalization in the end tag should be the same as the beginning tag.
- The XML file should always begin and end with a root tag. There can only be one root tag in a file. In the example above, the root tag is <Record>.
- You can have an empty tag, i.e. you can mention or put the slash at the end of the tag instead of the beginning: <Record> </Record>.
Recommended Articles
This is a guide to XML in Excel. Here we discuss How to Import & Export XML Data files along with practical examples and downloadable excel template. You can also go through our other suggested articles –
- Database Function in Excel
- Excel Hacks
- Excel Import Data
- Power Query in Excel