WordArt is a quick way to make text stand out with special effects. You begin by picking a WordArt style from the WordArt gallery on the Insert tab, and then customize the text as you wish.
Try it!
-
Click Insert > WordArt, and pick the WordArt style you want.
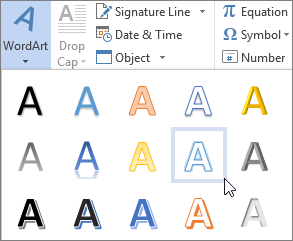
In the WordArt gallery, the letter A represents the different designs that are applied to all text you type.
Note: The WordArt icon is located in the Text group, and it may appear different depending on the program you’re using and the size of your screen. Look for one of these icons:
-
The placeholder text «Your text here» appears, with the text highlighted.
Enter your own text to replace the placeholder text.
Tips:
-
You can enter entire sentences, and even paragraphs, as WordArt. (You may have to change the font size for longer text.) And in Word, you can also convert existing text to WordArt in Word.
-
You can include symbols as WordArt text. Click the location for the symbol, and on the Insert tab, click Symbol, and pick the symbol you want.
Do more things with WordArt
Select a heading below to open it and see the detailed instructions.
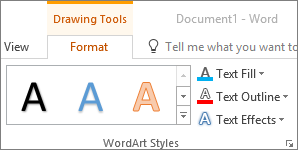
You might have tried using shape styles to change the shape of WordArt and then were puzzled that the text didn’t change. Use the text options in the WordArt Styles group instead. Shape styles and effects apply to the box and background surrounding your WordArt, not to the WordArt text. So, to add effects to your WordArt, such as shadows, rotation, curves, and fill and outline colors, you use the options in the WordArt Styles group, including Text Fill, Text Outline, and Text Effects.
Note: Depending on your screen size, you might only see the icons for WordArt Styles.

-
Select the WordArt text or letters to change.
The Drawing Tools Format tab appears.
-
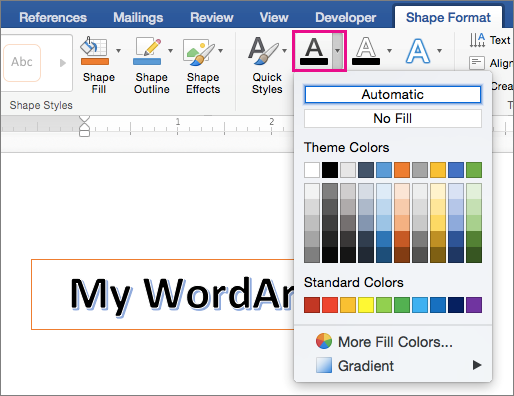
On the Drawing Tools Format tab, click Text Fill or Text Outline, and pick the color you want.
-
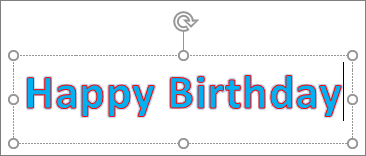
Click outside of your text box to see the effect.
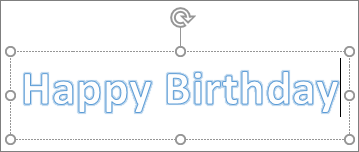
In this example, a light blue text fill and a red text outline were applied.
You can curve text around a circular object.
90 seconds
-
Select the WordArt text or letters to change.
The Drawing Tools Format tab appears.
-
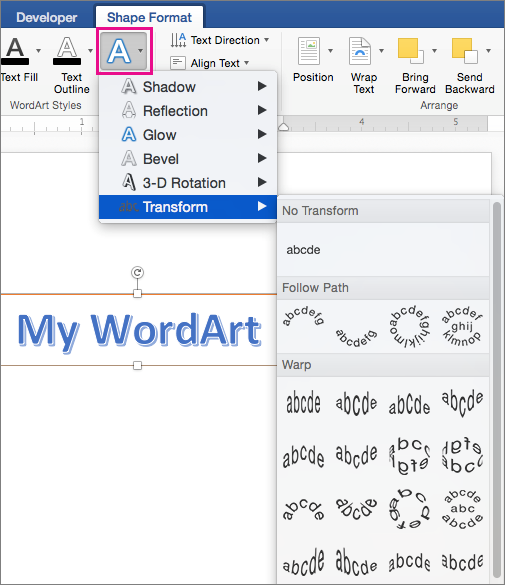
To create a curved effect, on the Drawing Tools Format tab, click Text Effects >Transform and pick the one you want.
Important: The Text Effects
menu is not the same as the Shape Effects
menu. If you don’t see Transform at the bottom of the menu, make sure you’ve clicked the Text Effects menu.
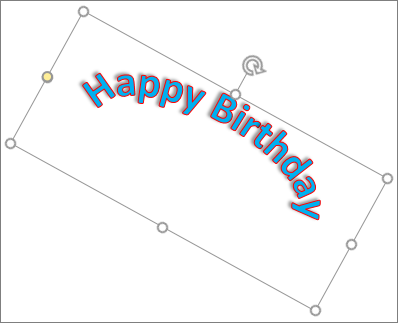
In this example, the first curved transform effect is selected.
-
Click outside of your text box to see the effect.
Use the Text Effects menu to create other effects, such as shadow, reflection, glow, bevels, and 3-D rotation. This example shows WordArt with a curved transform effect and a shadow applied.
-
To rotate WordArt text to any angle, select it, and then drag the circular rotation handle at the top of the box.
-
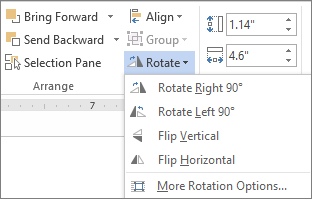
To flip WordArt or rotate it 90 degrees, click the Drawing Tools Format tab, click Rotate in the Arrange group, and then select an option.
To change the font size or style of your WordArt text:
-
Select the WordArt text or letters to change.
-
On the Home tab, select options in the Font group, such as font style, font size, or underline.
-
In your Word document, select the text to convert to WordArt.
-
On the Insert tab, click WordArt, and then pick the WordArt you want.
Double-click the WordArt that you want to remove, and then press Delete.
Insert WordArt
-
Click where you want to insert decorative text in a document.
-
On the Insert tab, in the Text group, click WordArt.
-
Click any WordArt style, and start to type.
Do more things with WordArt
Select a heading below to open it and see the detailed instructions.
-
Click anywhere in the WordArt text that you want to change.
-
Under Drawing Tools, on the Format tab, click any option.
For example, you can change the direction of the WordArt text by clicking Text Direction in the Text group and choosing a new direction for the text.
Double-click the WordArt that you want to remove, and then press Delete.
Add WordArt
Excel
-
On the Insert tab, in the Text group, click WordArt, and then click the WordArt style that you want.
-
Enter your text.
-
You can add a fill or effect to a shape or text box as well as the text in the WordArt.
-
If you have a chart in your 2007 Office release document, you can replace the chart title with WordArt to give the title additional emphasis.
-
Outlook
-
On the Insert tab, in the Text group, click WordArt, and then click the WordArt style that you want.
-
Type your text in the Text box.
You can add a fill or effect to a shape or text box as well as the text in the WordArt.
PowerPoint
-
On the Insert tab, in the Text group, click WordArt, and then click the WordArt style that you want.
-
Enter your text.
-
You can add a fill or effect to a shape or text box as well as the text in the WordArt.
-
If you have a chart in your 2007 Office release document, you can replace the chart title with WordArt to give the title additional emphasis.
-
Publisher
-
On the Objectstoolbar, click Insert WordArt
.
-
In the WordArt Gallery, click the WordArt that you want, and then click OK.
-
Type your text in the Text box.
If you want to change the text in the WordArt, double-click the WordArt that you want to change, and then type the new text in the Text box.
Word
-
On the Insert tab, in the Text group, click WordArt, and then click the WordArt style that you want.
-
Type your text in the Text box.
You can add a fill or effect to a shape or text boxas well as the text in the WordArt.
Do more things with WordArt
Select a heading below to open it and see the detailed instructions.
Excel
Do one or more of the following:
-
To change the text, select it, and then make the changes that you want.
-
To change the font, see Change the font or font size in Excel or Change the color of text in a worksheet.
-
To add an effect to WordArt, see Add or delete a fill, outline, or effect for text or WordArt.
-
To rotate the WordArt, see Rotate or flip a picture, shape, text box, or WordArt in Excel 2007.
-
To resize the WordArt, see Change the size of a picture, shape, text box, or WordArt.
-
To align the WordArt, see Align or arrange a picture, shape, text box, or WordArt.
-
To move the WordArt, see Move a picture, shape, text box, or WordArt.
For more information about selecting WordArt, see Select a shape or other object.
Outlook
Do one or more of the following:
-
To change the text, select it, and then make the changes that you want.
-
To change the font, see Change the size or formatting of text.
-
To add an effect to WordArt, see Add or delete a fill, outline, or effect for text or WordArt.
-
To rotate the WordArt, see Rotate or flip a picture, shape, text box, or WordArt in Outlook 2007.
-
To resize the WordArt, see Change the size of a picture, shape, text box, or WordArt.
-
To align the WordArt, see Align or arrange a picture, shape, text box, or WordArt.
-
To move the WordArt, see Move a picture, shape, text box, or WordArt.
For more information about selecting WordArt, see Select a shape or other object.
PowerPoint
Do one or more of the following:
-
To change the text, select it, and then make the changes that you want.
-
To add an effect to WordArt, see Add or delete a fill, outline, or effect for text or WordArt.
-
To rotate the WordArt, see Rotate or flip a picture, shape, text box, or WordArt in PowerPoint 2007.
-
To resize the WordArt, see Change the size of a picture, shape, text box, or WordArt.
-
To align the WordArt, see Align or arrange a picture, shape, text box, or WordArt.
-
To move the WordArt, see Move a picture, shape, text box, or WordArt.
For more information about selecting WordArt, see Select a shape or other object.
Publisher
Do one or more of the following:
-
To change the text, select it, and then make the changes that you want.
-
To change the font, see Change the font size or Change the color of text.
-
To add an effect to WordArt, see Add or delete a fill, outline, or effect for text or WordArt.
-
To resize the WordArt, see Change the size of a picture, shape, text box, or WordArt.
-
To align the WordArt, see Align or arrange a picture, shape, text box, or WordArt.
-
To move the WordArt, see Move a picture, shape, text box, or WordArt.
For more information about selecting WordArt, see Select a shape or other object.
Word
Do one or more of the following:
-
To change the text, select it, and then make the changes that you want.
-
To change the font, see Change the font size.
-
To add an effect to WordArt, see Add or delete a fill, outline, or effect for text or WordArt.
-
To rotate the WordArt, see Rotate or flip a picture, shape, or WordArt.
-
To resize the WordArt, see Change the size of a picture, shape, text box, or WordArt.
-
To align the WordArt, see Align or arrange a picture, shape, text box, or WordArt.
-
To move the WordArt, see Move a picture, shape, text box, or WordArt.
For more information about selecting WordArt, see Select a shape or other object.
Excel
When you remove the WordArt style from your text, the text remains and changes to plain text.
-
Select the WordArt text that you want to remove the WordArt style from.
-
Under Drawing Tools, on the Format tab, in the WordArt Styles group, click the More button
, and then click Clear WordArt.
To remove the WordArt style from part of your text, select the text that you want to remove the WordArt style from, and then follow the steps above.
PowerPoint
When you remove the WordArt style from your text, the text remains and changes to plain text.
-
Select the WordArt text that you want to remove the WordArt style from.
-
Under Drawing Tools, on the Format tab, in the WordArt Styles group, click the More button
, and then click Clear WordArt.
To remove the WordArt style from part of your text, select the text that you want to remove the WordArt style from, and then follow the steps above.
Do the following for all programs listed in the Applies To at the top of the article.
-
Double-click the WordArt that you want to remove to select it, and then press Delete.
-
In Office for Mac 2016 or later, select the Insert tab on the Ribbon.
or
In Office for Mac 2011, select Insert on the toolbar.
-
Select WordArt, and pick the WordArt style you want.
In the WordArt gallery, the letter A represents the different designs that are applied to all text you type.
-
Enter your text.
Tip: You can also include symbols as WordArt text. To do so, click the location in your document for the symbol, and on the Insert tab, click Advanced Symbol, and pick the symbol you want.
Do more things with WordArt
Select a heading below to open it and see the detailed instructions.
To create curved or circular WordArt text, you add a Transform text effect.
-
Select the WordArt.
When you do that, the Shape Format tab appears.
-
Click Text Effects > Transform and pick the effect you want.
To change the color of the WordArt text, you change the Text Fill.
-
Select the WordArt text or letters to change.
When you do that, the Shape Format tab appears.
-
Click Text Fill, and pick the color you want.
Tip: To change the outline of the WordArt text, on the Shape Format tab, click Text Outline.
-
Select the text to convert to WordArt.
-
On the Insert tab, click WordArt, and then pick the WordArt style you want.
In Microsoft 365 for the web you can see WordArt that’s already in your document, presentation, or worksheet, but to add more WordArt you need to open or edit the doc in the desktop version of Word, PowerPoint, or Excel.
In Microsoft 365 for the web, you can use the Font features on the Home tab to change the font color and size, and apply bolding, italics, or underlines to your text.
If you don’t have the desktop version of Word or PowerPoint, you can try it or buy it in the latest version of Office now.
WordArt is a gallery of text styles that you can add to your publications to create decorative effects, such as shadowed or mirrored (reflected) text. You can use WordArt to add special text effects to your document.You can modify or add to the text in an existing WordArt object whenever you want.
Contents
- 1 How do you use WordArt in Word?
- 2 Where is the WordArt in Word?
- 3 What is WordArt and how should it be used?
- 4 What is a WordArt title?
- 5 What is WordArt in MS PowerPoint?
- 6 What are the WordArt features in Word?
- 7 Why would you use WordArt?
- 8 On which tab WordArt button is present?
- 9 How do I insert WordArt into Powerpoint?
- 10 Does Office 365 have WordArt?
- 11 Is WordArt a graphic?
- 12 How do I convert WordArt to Word?
- 13 Is WordArt free?
- 14 What is WordArt quizlet?
- 15 How do you convert WordArt to PPT?
- 16 What is the use of styles?
- 17 What are the two ways to create WordArt?
- 18 What is watermark in MS Word?
- 19 What is the advantage of using MS Publisher instead of Word?
- 20 Can you use WordArt in PowerPoint?
How do you use WordArt in Word?
How to Insert and Format WordArt in Word
- Click where you want to insert WordArt.
- Click the Insert tab.
- Expand the Text group, if necessary.
- Click the WordArt button.
- Select a WordArt style from the gallery.
- Type to replace the text.
Where is the WordArt in Word?
On the Insert tab, in the Text group, click WordArt, and then click the WordArt style that you want.
What is WordArt and how should it be used?
WordArt is a program that allows you to treat text as a graphic. You can use the program to add special effects and flourishes to text, and then insert the text in your document. It is useful for creating special text elements such as logos, mastheads, or titles.
What is a WordArt title?
WordArt titles are simple to create and can enhance the look of any Word document. To add a WordArt title, simply pull down the Insert menu, click on Picture, then click on WordArt.Type your title and click OK. Your WordArt title will appear with small boxes (called handles) around it.
What is WordArt in MS PowerPoint?
WordArt is a special feature that allows the users to give special effects to the text such as curved text, 3D text, color gradiants, and more. To insert a WordArt you just need to click at Insert > WordArt.You can WordArt in any PowerPoint slide where you need to make nice text effects.
What are the WordArt features in Word?
WordArt is a text modifying feature in Microsoft Word, a popular word processing program. It includes effects such as shadows, outlines, colors, gradients, and 3D effects that can be added to a word or phrase. WordArt can also bend, stretch, skew, or otherwise modify the shape of the text.
Why would you use WordArt?
WordArt helps in dealing with text by providing different styles to the letters and their typographic arrangement.It can modify the look of the text by bending, skewing or stretching the shape. It can help in enhancing the look and feel of the text used in the Microsoft Office applications, especially in Word.
On which tab WordArt button is present?
Insert command tab
WordArt can be added to your document using a button on the Insert command tab. The WordArt Gallery dialog box appears.
How do I insert WordArt into Powerpoint?
To insert WordArt:
- Click the WordArt button on the Drawing toolbar.
- The WordArt Gallery appears.
- Choose the WordArt that best fits your slide presentation.
- Click OK.
- The WordArt appears in your slide. You can drag it wherever you want it to appear on your slide.
- Type any text you want to display.
- Click OK.
Does Office 365 have WordArt?
Office 365/2013 most certainly does have the WordArt feature. However, if you are looking for the same WordArt as in Word 97-2003 or 2007, then you will need to save the document in Word 97-2003 format. Otherwise, the WordArt is the same as in Word 2010.
Is WordArt a graphic?
A category of fine art, graphic art covers a broad range of visual artistic expression, typically two-dimensional, i.e. produced on a flat surface.Graphic art further includes calligraphy, photography, painting, typography, computer graphics, and bindery.
How do I convert WordArt to Word?
To convert regular text into WordArt:
Select the text you want to convert, then click the Insert tab. Click the WordArt drop-down arrow in the Text group. A drop-down menu of WordArt styles will appear. Select the style you want to use.
Is WordArt free?
WordArt offers a freemium model but you’ll need to upgrade to the paid version of the word cloud generator if you want to download high-quality word art, which might be useful if you are planning to print your word cloud.
What is WordArt quizlet?
Word art. Decorative text that you can add to a document; makes text pop or standout. From new or by converting existing text. Ways to create word art.
How do you convert WordArt to PPT?
Select the WordArt you want to change. Go to Shape Format or Drawing Tools Format > Text Effects. Select Transform, and then choose the effect you want.
What is the use of styles?
Styles allow you to easily apply consistent formatting to documents, as well as to quickly change existing formatting. In addition, the use of styles provides a structure to your document that can be discerned by a screen reader.
What are the two ways to create WordArt?
There are two ways to apply WordArt to text. You can select existing text and then select a style from the WordArt gallery, at which point Word will copy and insert the text into a text box. Or you can select a WordArt style first and then type the text into the text box that appears.
What is watermark in MS Word?
A watermark is an image or text that appears behind the main text of the document. It is usually a lighter shade than the text, so you can read the document easily. Text Watermarks are often used to categorize or to show the purpose of a document with words such as DRAFT.
What is the advantage of using MS Publisher instead of Word?
Publisher Advantages
Publisher works more like an image editing program than Word does. Use Publisher, and you can select shapes and graphics and drag them to precise locations within your document. You can’t do that in Word, but you can resize shapes, tables and images using your mouse.
Can you use WordArt in PowerPoint?
1On the slide on which you want to insert WordArt, click the Insert tab on the Ribbon and then click the WordArt button in the Text group. 2Select the WordArt style you want to use. 3Click the WordArt text box and then type the text you want to use.
Download Article
Download Article
Most people who use Microsoft Word for designing creative printouts know about the WordArt feature and it’s many features. If you don’t know about it yet, follow the directions in this article to help you achieve these same techniques to make your printouts look spectacular.
Steps
-
1
Open your Microsoft Word document, with whatever method you prefer to open the program with.
-
2
Decide in which document, you’d like to start adding/using the WordArt feature in. You can either start a new document, or open an existing document, depending on where you would like to add the WordArt to.
Advertisement
-
3
Locate the place that you’d like to insert your first WordArt piece of text on your page.
- Type the previous text.
- You can either continue on that line (rarely used), or press enter to start a new line.
-
4
Open your menu toolbar. For quick access if this toolbar isn’t available, press and release Alt on your keyboard.
-
5
Click the «Insert» option from this toolbar.
-
6
Click the «Picture» button.This should open a drop-down list.
-
7
Click the «WordArt» option from the drop-down that results. This should open a new window, along with adding a toolbar to the display window, that you can later move into a position on the screen near all the toolbars at the top of the screen. For now, you’ll be concentrated on the dialog box that Microsoft Word brought up when you clicked the option to Insert a new piece of WordArt.
-
8
Click to select the WordArt style that looks the best to you.
-
9
Click the «OK» button. This will open a new dialog box that will help you type the text you want to be inserted to become a piece of WordArt.
-
10
Type your text using proper formatting (such as correct capitalization, grammar, etc.). The text «Your text here» is automatically selected, which means as soon as you start typing, the former pre-filled text will be removed in place for the text you will type.
-
11
Select alternate formatting (bold, italic, font size, font type) from the buttons above the box you type your stuff in.
-
12
Learn how to move your WordArt text. This can be achieved for most viewers by clicking to select and either centering the text like most centering of any other text, or, for some versions (2007 and up) by right-clicking and dragging the text to a new location.
-
13
Learn how to color your WordArt text. Use the same styles to color other text, as you would for this WordArt text. Just be sure the WordArt piece has been selected, before you begin to select your color. If you do end up selecting your color, you’ll be selecting a font color for any additional text near the insertion «I» point on the screen.
- Learn how to copy the piece of WordArt to an alternate location, if you’d like. Use the Copy and Paste technique to copy and paste the item from one area to another, through the use of Windows clipboard (which is where all copy and pasted items are temporarily stored).
Advertisement
Add New Question
-
Question
What is Microsoft Word insert?
Microsoft Word «insert» is used to insert any element or object into a document.
Ask a Question
200 characters left
Include your email address to get a message when this question is answered.
Submit
Advertisement
Video
-
The steps in this article are based on the 2003 version of Microsoft Word.
-
You can also select the text in the original page. You then can select the style, and it will pre-fill the words for you into the boxes.
Show More Tips
Thanks for submitting a tip for review!
Advertisement
Things You’ll Need
- Microsoft Word program
- computer mouse and keyboard
About This Article
Thanks to all authors for creating a page that has been read 115,502 times.
Reader Success Stories
-
«What helped me was the ‘Create Word Art’ video was graphic/demonstrative. It put ‘here/now’ words and directions…» more
Is this article up to date?
Of course, although we are talking about text editors, the truth is that Word is an application that goes much further in terms of available functions. How could it be otherwise, from here we can carry out a multitude of tasks of all kinds, not just write texts as such. It must be taken into account that the program also allows us to work with a multitude of additional elements that will be very useful in our day-to-day office automation program .
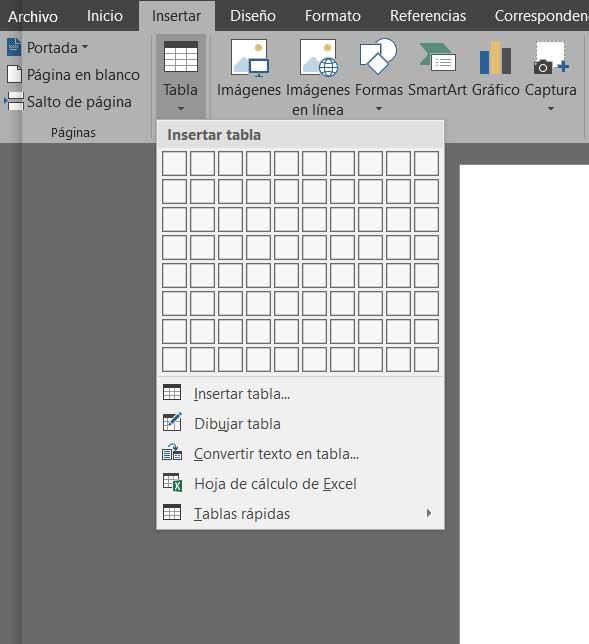
In this way, from the Insert menu we have the possibility to add to the documents all kinds of content such as photos, tables, graphics, screenshots, etc.
But along these lines we are going to focus on a specific element that will probably be very familiar to many of you. Specifically, we refer to WordArt , something that some veterans will surely remember from a few years ago. Well, it is worth mentioning that we can continue to use these design texts in Word , which surely makes many happy.
What is and how to access WordArt in Microsoft Word
First of all, the first thing we will tell you is that when we talk about WordArt, we are specifically referring to a feature that we can find included in the text editor . It allows us to work with the characters, numbers and words to assign them a more original and striking appearance and design. This is something that we used long ago independently to create original and striking texts, and that we now see in the Redmond editor.
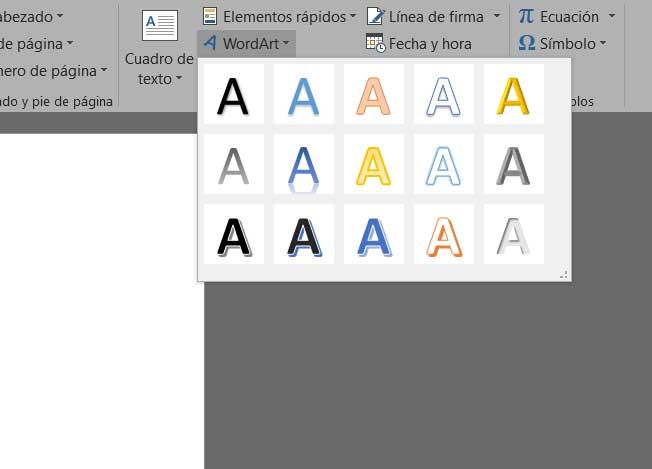
For all this, what the functionality does is offer us the possibility of creating texts using various special effects. Among these we can opt for the use of special contours and textures among many other things. In the same way, we can create shadows in the texts, as well as bend, rotate or deform them to our liking. To give us an idea, here we are going to find up to 15 different predefined styles . Then we will only have to put a little ingenuity to customize them, so the possibilities are enormous.
For those of you who do not know, say that to take advantage of all this, the first thing we have to do is open Word in a conventional way. Once in its main interface, we go to the tab called Insert, and on the right side of the options that we are offered we find Insert WordArt.
How to start using WordArt in the text editor
Once we know how to access the functionality as such, as soon as we go to that menu option we will immediately see all the possibilities that it presents us. Therefore, here we are going to find 15 samples in the form of icons with the letter A so that we can choose the one that best suits our needs.
It is worth mentioning, something that we are going to verify first-hand, that the texts that we create with this function are not treated as conventional Word texts . Specifically, we are going to have to work with them more as an image than as a text, at least in view of Word and the way to configure it. Thus, once we have selected the sample we want to use, a series of new options will appear in the main menu of Word. Specifically, we find a tab that appears and from which we will have the possibility to customize this element that we are going to create.
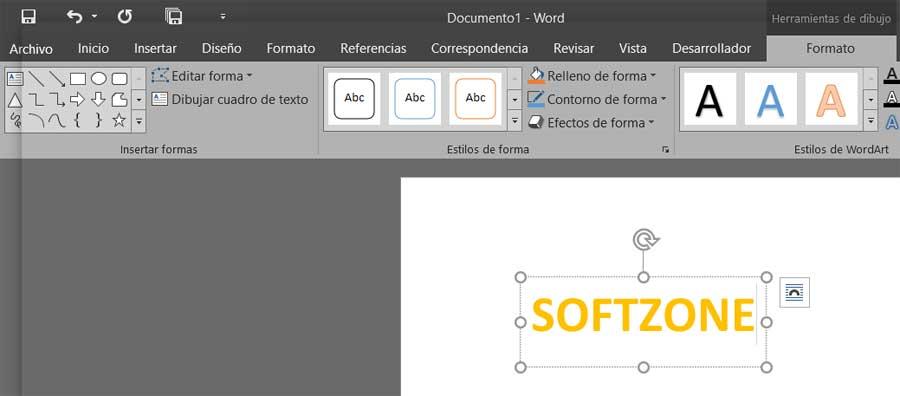
As we can see, the first thing that is created is a box that houses the text that we want to add, with the style selected before. In addition, this is a box that, as with images, we can move, stretch or resize from its corners. This will help us to make the area larger to continue adding more characters.
Available functions for customizing WordArt
As we mentioned before, we have a wide variety of functions that will allow us to fully customize the texts we create here. Therefore, we are going to describe each of them so that you can get an idea of the possibilities that this useful functionality presents us.
Frames and padding
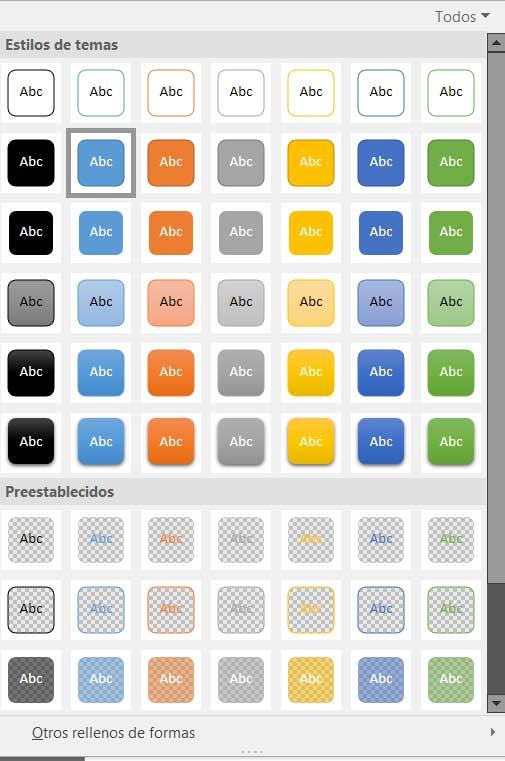
Starting from the left of the new Format menu that we find when marking the WordArt box, we find the possibility of framing or filling the designed text. Although at first we only see three samples, we must move with the small arrows that appear to the right of this section. This way we will see all the colors that we can choose from to fill or frame the work with WordArt. We also have an arrow to see them all at the same time.
Shape fill and outline
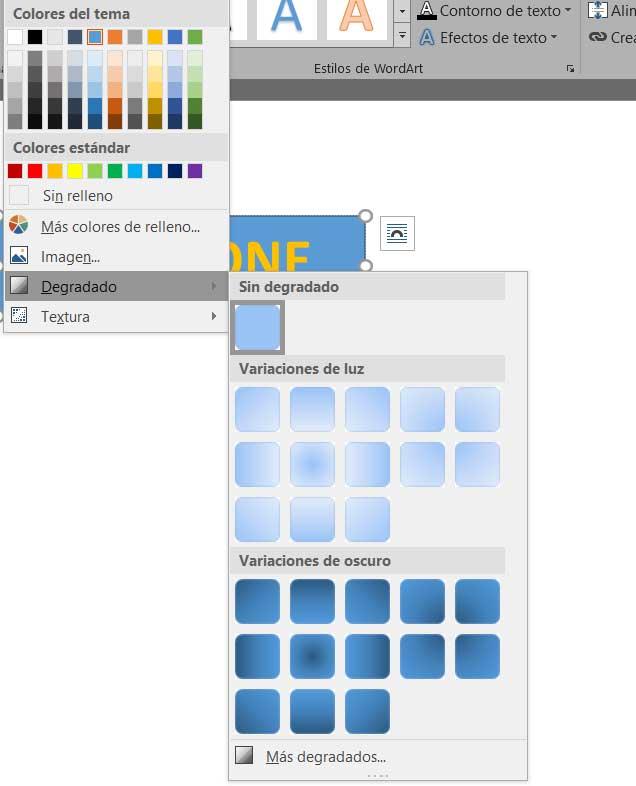
As its name suggests, in the Shape Fill parameter, we can specify a specific tonality for the box that houses the WordArt text. It should be noted that from here we will also have the possibility of adding gradients or even textures to the color we have chosen.
Say that in the Contour section of shape we can also customize the tonality, but in this case of the frame that surrounds the text if we choose one previously.
Shape effects
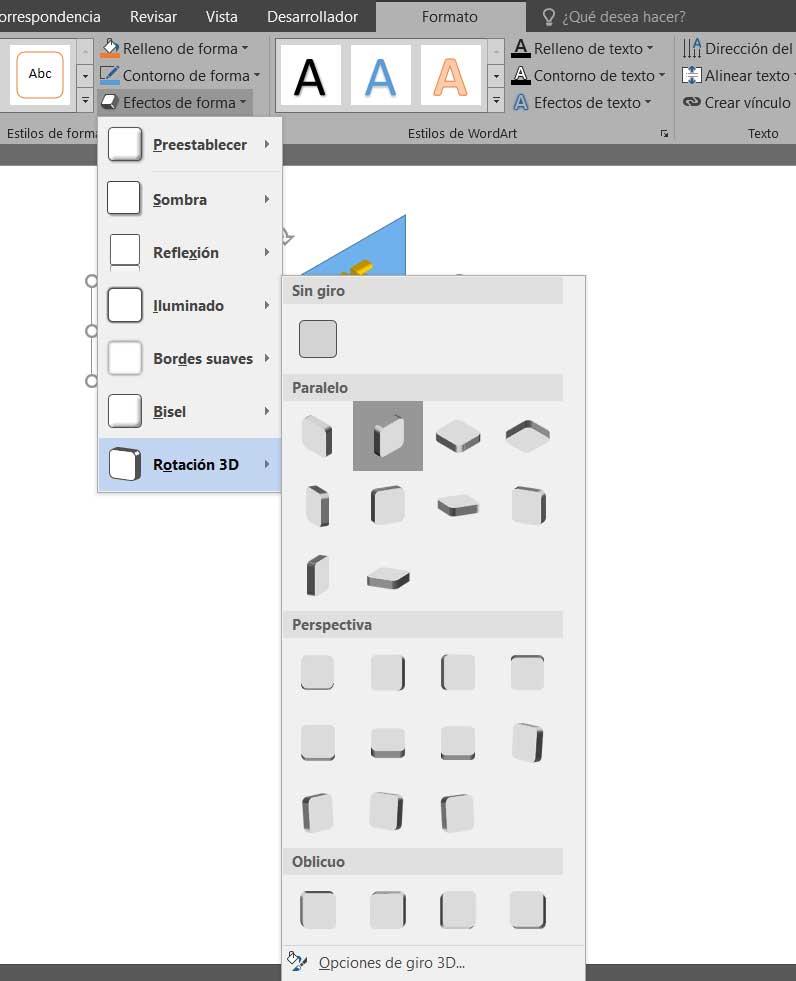
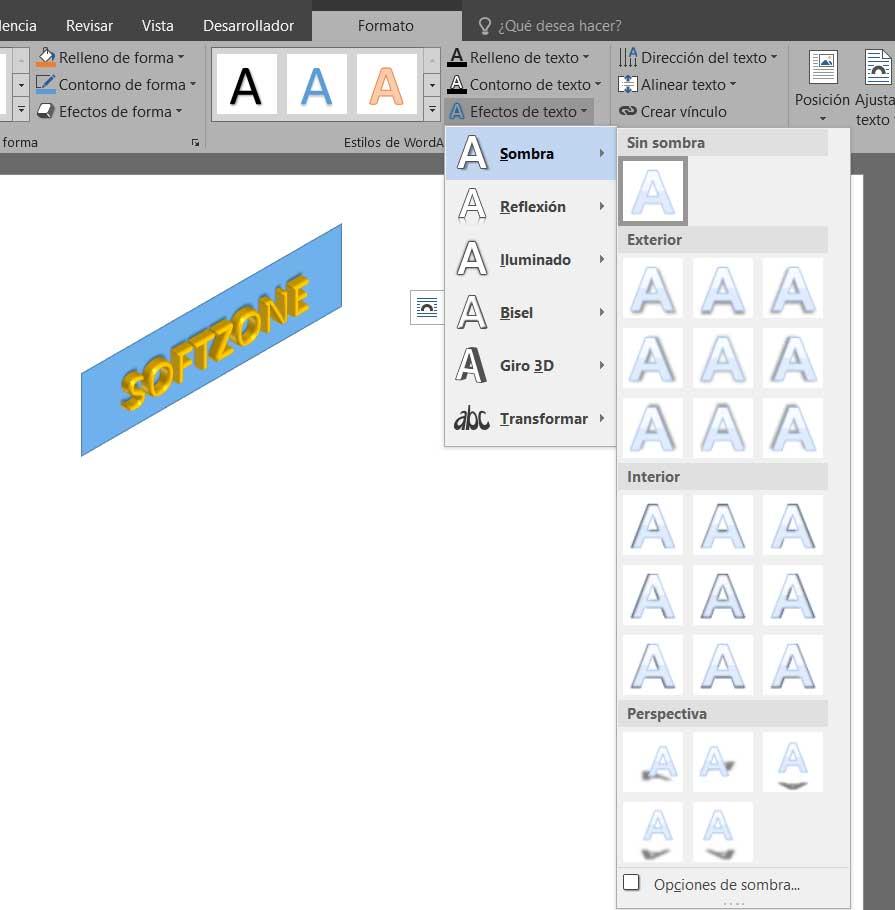
On the other hand we find the section called Shape Effects, which may be one of the most striking for this design. We tell you this because from this section we will have the possibility of integrating a series of attractive effects to the WordArt design that we are creating at this time. For all this we have a multitude of effects related to shading, lighting, edge smoothing, adding a bevel , even a 3D look.
Fill, outline, and text effects
As we have seen in the parameters described above, Word presents us with a good number of elements to customize the box that houses the text. But of course, just as important in this case, or more, is the text as such. That is why in the same way the Microsoft program presents us with three other customizable options that will allow us to adapt the characters of our WordArt to what we need.
We will find all this in the section called WordArt Styles, where we can change the style chosen at the beginning, and much more. Thus, as in the previous case with the shape parameters, here we can modify the fill of the text, its outline or add an effect. For this we will have three other drop-down lists that, in a simple way, will allow us to modify these visual aspects of the design .
Adapt the WorArt to the Word document
As it may happen to you on many occasions, when integrating a new element of this type in Word, we will do it while working on a normal text document. Therefore we might think that it will be a bit complicated to adapt this table added with WordArt, to the whole document . But in reality it is not like that, since we found some other functions that will be very helpful in this.
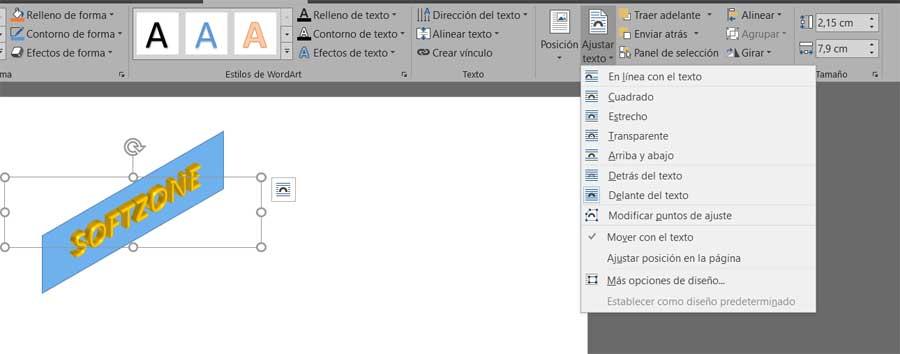
In this way we can place the new design in the foreground, or place it behind the original text of the document itself. We can also rotate or adjust it to the page. All these options are found in the Organize section. In this way and being a bit creative, we will ensure that the WordArt does not clash at all with the rest of the work we are carrying out.
Word — высокофункциональный текстовый редактор, который постоянно растет и развивается. Здесь можно писать не только тексты, но и реализовывать иные задачи, к примеру, добавлять фотографии, таблицы, снимки экрана, графику и прочее. Все это находится во вкладке “Вставка”.
В данной статье мы поговорим о таком элементе, как WordArt. Многие пренебрегают его возможностями, хотя он позволяет эффектно украсить документ интересными дополнениями. Более того, это хороший вариант приятно провести время.
- Что такое WordArt и как получить доступ к нему в Microsoft Word
- Как начать использовать WordArt в текстовом редакторе
- Доступные функции для настройки WordArt
- Адаптируйте WordArt к документу Word
Что такое WordArt и как получить доступ к нему в Microsoft Word
Думаю, всем известно, что это коллекция текстовых стилей, которые позволяют создавать оригинальные яркие текста, используя отраженный текст, тени; можно работать с символами, цифрами или словами. Можно добавлять специальные контуры и текстуры, изгибать, вращать или деформировать тени. Все это помогает интересно преподнести текст или презентацию. В общем сложности WordArt содержит до 15 различных стилей, поэтому, проявив немного изобретательности, можно создать оригинальный, интересный текст.
Для тех, кто решил воспользоваться им в первый раз или просто желает освежить в памяти его возможности, для начала выполняем следующее:
- запускаем Word;
- переходим во вкладку “Вставить” и находим надпись “Вставить WordArt”.
Как начать использовать WordArt в текстовом редакторе
После того, как вы нажмете на “Вставить WordArt”, вы увидите 15 образцов в виде буквы “А”. Это позволяет определиться с типом оформления, который подходит под наши потребности.
Работая с WordArt, стоит учитывать, что это не просто текст, а работа с изображением. После того, как вы выбрали нужный образец, появится ряд новых параметров. Выбираем вкладку, где мы будем осуществлять настройку. Появится текст с выбранным стилем, который мы можем вращать, растягивать, изменять размер и т.д.
Доступные функции для настройки WordArt
Существует обширный список функций, которые позволяет настраивать текст в соответствии с нашими задачами. Рассмотрим каждую из них, чтобы вы имели представление как это работает:
- Рамки и обивка.
Перемещаясь по представленным стилям, мы увидим все цвета, которые можно использовать в работе по оформлению текста.
- Площадь поверхность сверла (соединяющаяся со сверлильной головкой) более увеличенная, что позволяет существенно увеличить надежность и точность крепления;
- хорошо держат заточку;
- высокая вязкость;
- ударопрочность (держат высокие нагрузки, не боятся вибраций);
- используется сплав из карбида вольфрама, что обеспечивает чрезвычайную прочность;
- Заливка и контур фигуры.
Выбрав значение Shape Fill, появляется возможность придать необходимый тон для заднего фона текста. Здесь мы также можем добавлять градиенты, менять текстуру;
- Эффекты формы.
В данном вкладке можно добавить к тексту такие эффекты, как затемнение, освещение, сглаживание, скос или даже 3D отображение;
- Заливка, контур и текстовые эффекты.
Перейдя в раздел “Стили WordArt”, можно изменить первоначальный стиль, поменять заливку текста, настроить контур или добавить эффекты;
Адаптируйте WordArt к документу Word
Может показаться, что процесс адаптации текст из WordArt в Word довольно сложный, но на самом деле это не так, вот некоторые полезные функции:
Как мы видим, можно разместить форму, созданную в WordArt на переднем плане или за исходным текстом. Можно изменить размеры, подогнав по страницу. Все это находится в разделе “Организовать”. Если вы проявите немного смекалки и усидчивости, то сможете создать интересный и продающий текст без особых трудностей.






 menu is not the same as the Shape Effects
  menu. If you don’t see Transform at the bottom of the menu, make sure you’ve clicked the Text Effects menu.


 .
. , and then click Clear WordArt.

