
If you want to know who created a Word document, or you want to know the title and word count, then you can answer those questions in the file’s metadata. There are two simple ways of finding the metadata of a Word document, and we’ll run you through both steps in this article.
How to find metadata in Word:
- Open your Word document.
- Click on ‘File’ in the top menu.
- Then go to ‘Info’ on the flyout menu.
- Finally, click on ‘Show All Properties’ in the bottom right corner.
Please continue reading our visual, step-by-step guide on finding metadata in Microsoft Word.
 Windows guide
What is metadata?
Metadata is data that is derived from other data. For example, if your data is a car, the metadata could be price, registration, model, color, etc. You could also say that metadata describes data. In the example below, the data is a person who is described by the metadata.
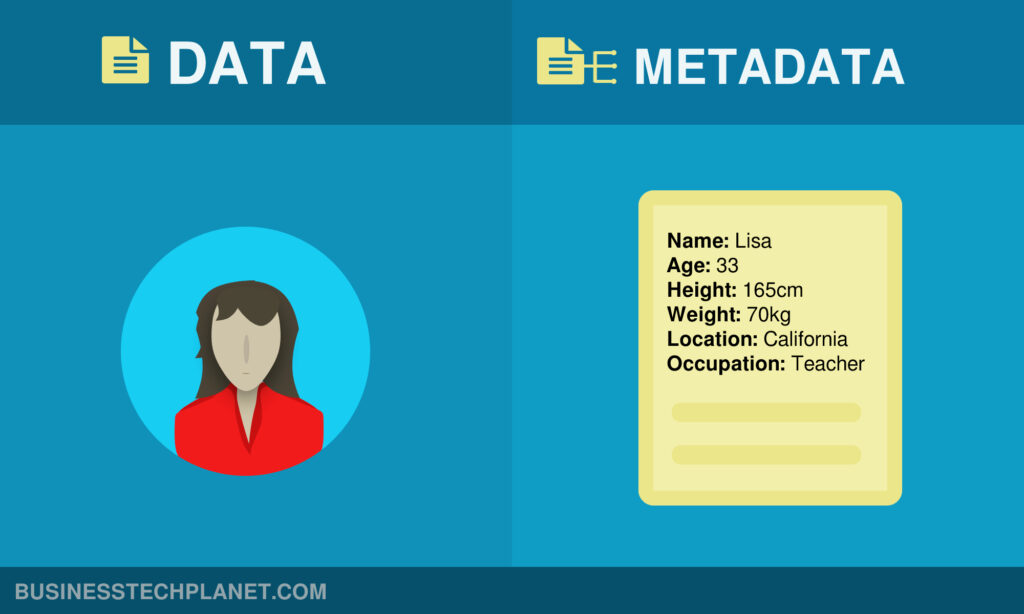
You may have heard of the Metaverse, a portmanteau word that combines ‘meta’ and ‘universe’ to mean a universe within our universe. As the Metaverse exists inside our universe, it can describe or represent our universe while being distinct from it.
In this context, meta means ‘after’ — it refers to something separate from it. As such, metadata is not the car, the person, or the website, but rather it describes those objects or systems.
Now that we’ve defined metadata let’s look at what sort of metadata can be retrieved from a Word document.
Please view the following table, which contains all the metadata available from both methods presented in this article.
| Metadata | Description | Method1 | Method2 |
|---|---|---|---|
| Key Points | The user can add key points to summarize the content. | ||
| Size | Size of the document in bytes. | ||
| Pages | Number of pages in the document. | ||
| Words | Number of words in the document (word count). | ||
| Total Editing Time | Amount of time spent editing the document. | ||
| Title | Title of the document will be the words. | ||
| Tags | Tags or keywords are added by the user to improve searchability. | ||
| Comments | Comments added by the user. | ||
| Template | The default template name is ‘Normal.’ | ||
| Status | Users can add a content status such as ‘In progress’ or ‘Completed.’ | ||
| Categories | Categories added by the user. | ||
| Subject | Subject added by the user. | ||
| Hyperlink Base | Path added by the user, forming the base of all hyperlinks in the document. | ||
| Company | Name of the company added by the user. | ||
| Last Modified | Date and time when the document was last modified. | ||
| Date created | Date and time when the document was first created. | ||
| Last Printed | Date and time when the document was last printed. | ||
| Manager | Name of the manager added by the user. | ||
| Author | Name of the user who first created the document. | ||
| Last Modified By | Name of the user who last modified the document. | ||
| Revision Number | Number of times the document was changed. | ||
| Program Name | The program name will either be Microsoft Office Word or Microsoft Word for the web. | ||
| Content Type | Application content type. | ||
| Character Count | Number of text characters in the document. | ||
| Line Count | Number of lines in the document. | ||
| Paragraph Count | Number of paragraphs in the document. | ||
| Links Dirty? | Shows ‘Yes’ if the document contains any links that are broken. | ||
| Language | Language of the content is added by user. | ||
| Date Accessed | Date and time the document was last accessed. | ||
| Availability | Shows if the file is available. | ||
| Offline Status | Shows if the document is offline or online. | ||
| Shared With | Who the file is shared with. |
Method 1 – Get metadata from inside the app
To demonstrate how metadata works in Microsoft Word, we’ll first create a new document and add some content. Please open up either your web or app version of Word to begin this guide.
Word on the desktop app
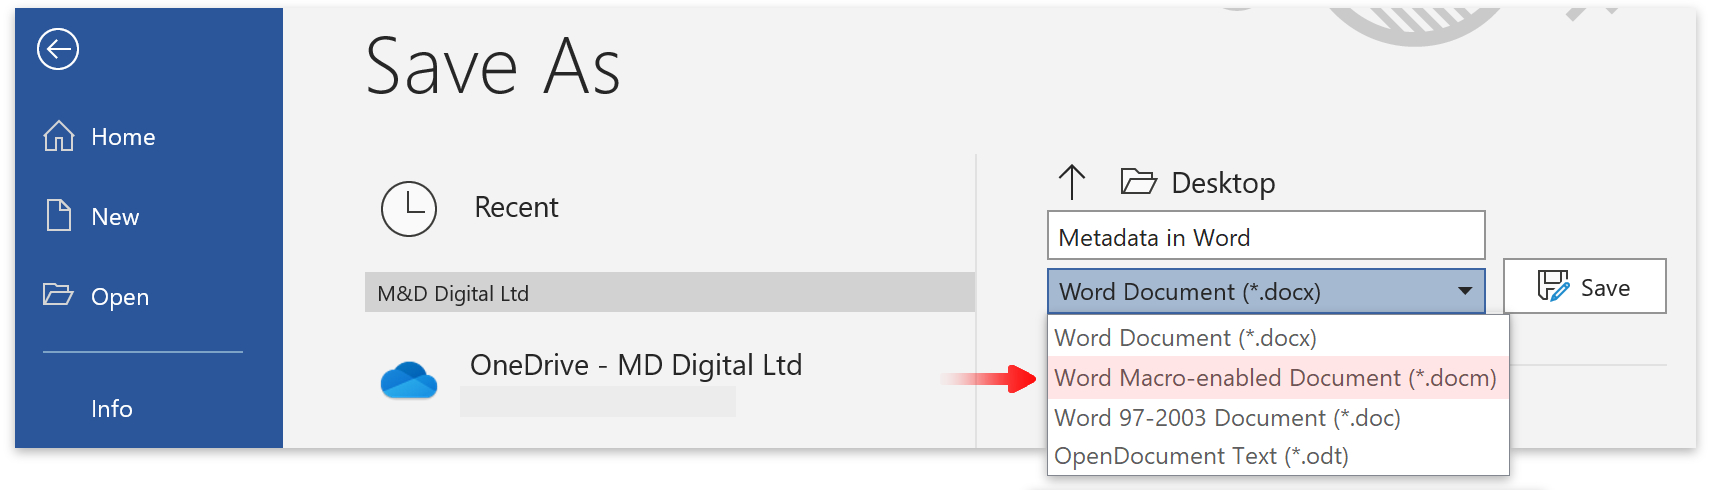
- Write some content in Word.
- Then click File in the top menu.

- Click on Save As and save the document to a location on your PC.
- Next, click on Info in the blue flyout menu. (1)
- Then click on Show All Properties. (2)
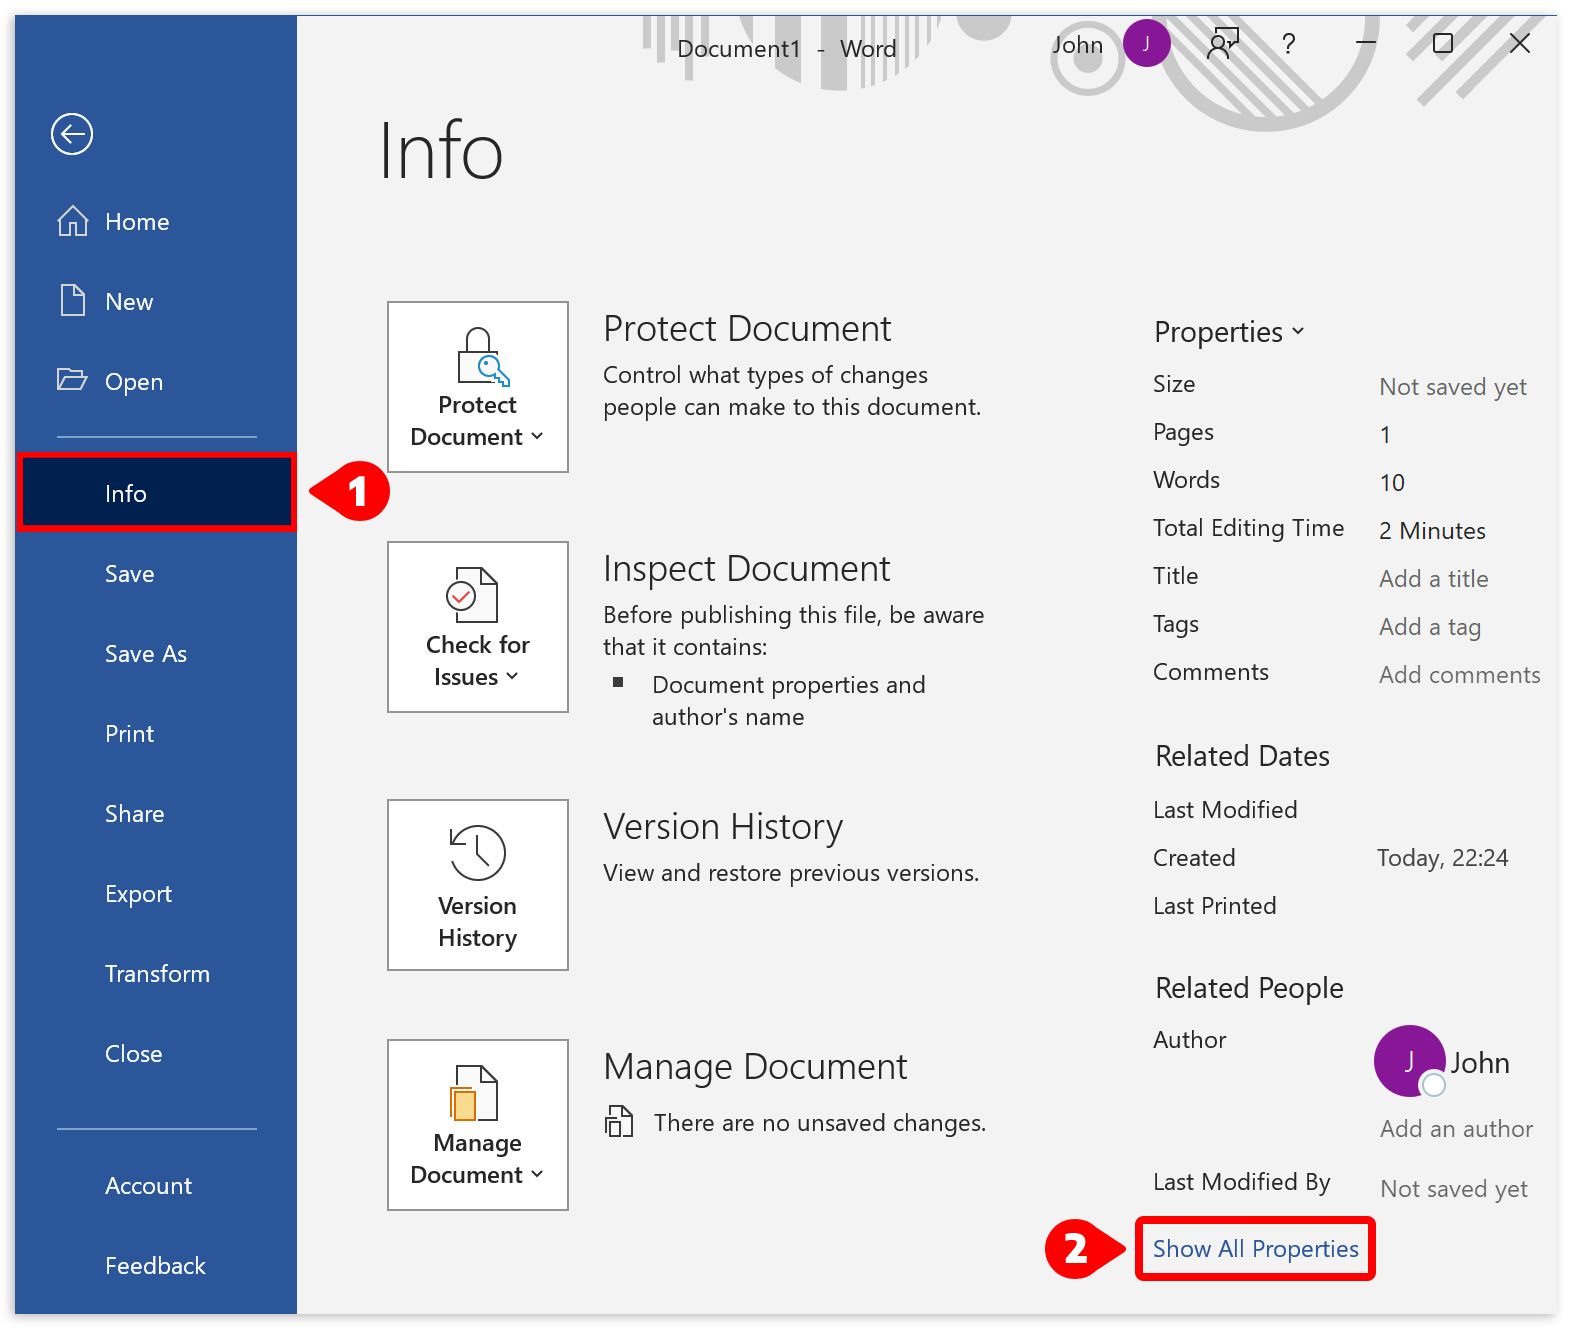
- All editable fields have been highlighted in red.
- Word will automatically update all other metadata.
- Word will save the title automatically if you are saving your file in OneDrive.
![]() Note: The title of a Word document is the text with the ‘Title’ style.
Note: The title of a Word document is the text with the ‘Title’ style.

Word on the web
- Open a blank document in Word and add some content.
- Then click on File in the top menu.
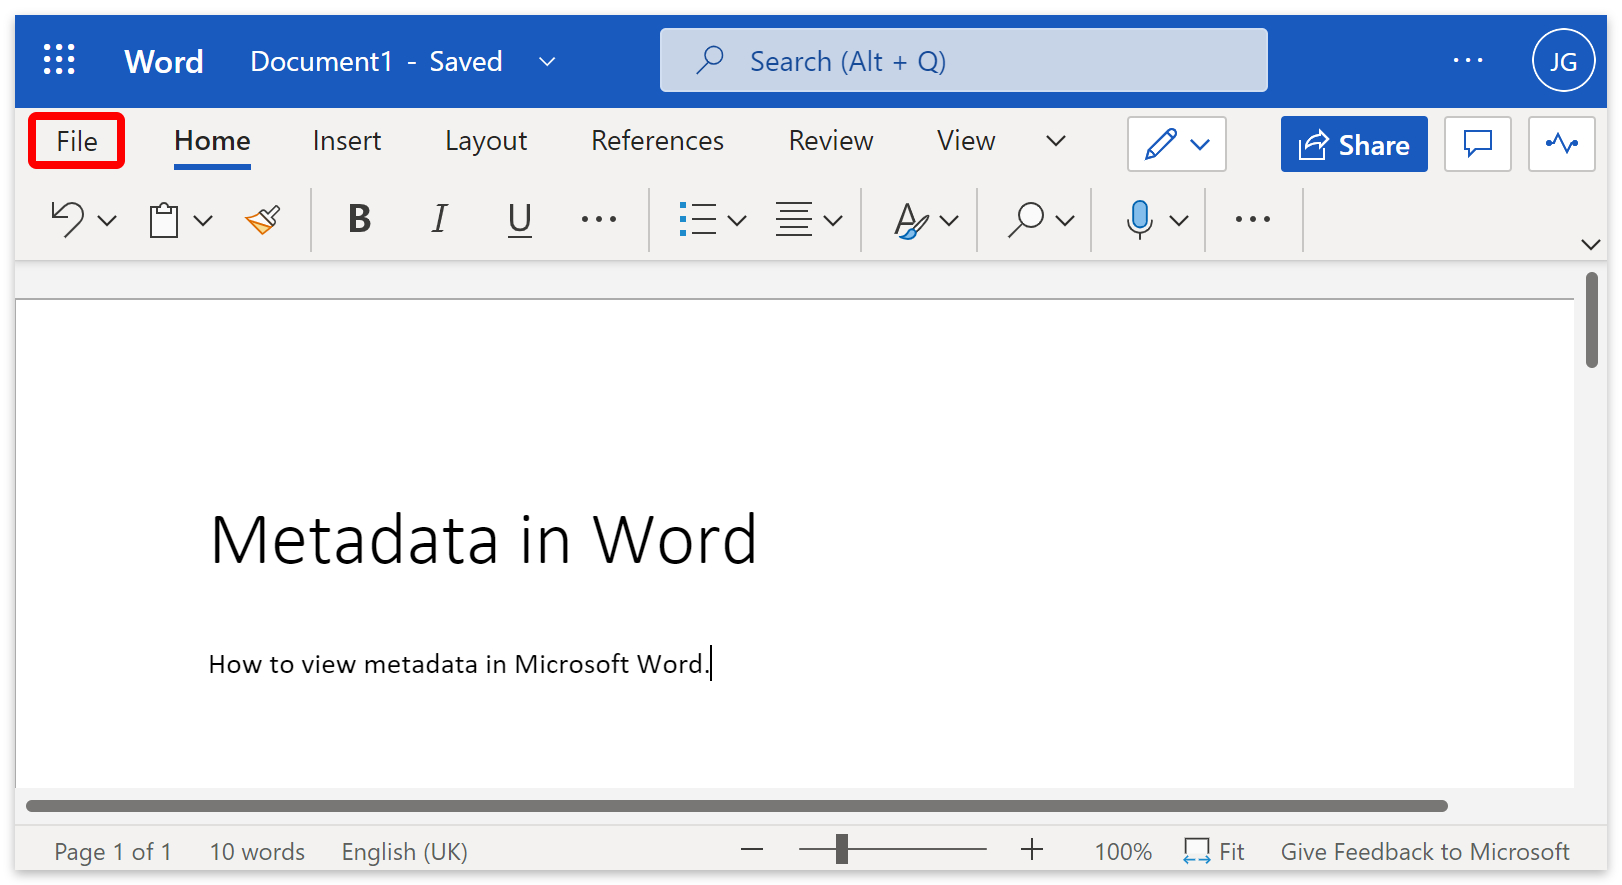
- Click Save As on the blue flyout menu.
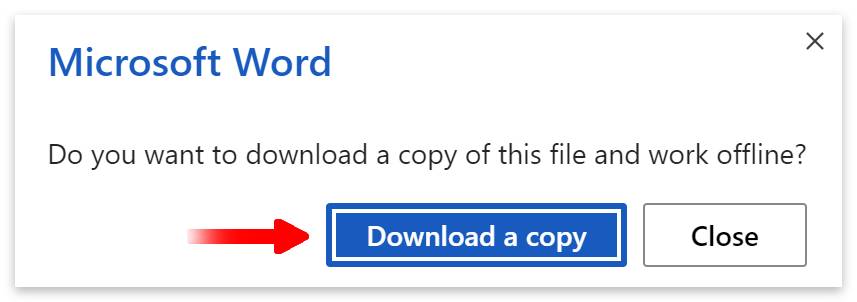
- Then choose to Download a Copy.
- Click the Download a copy button on the confirmation box.
- By default, the file will save to your downloads folder.
- If you don’t have the desktop version of Word, choose to view the file in read only.
- Open the document and go to File > Info.
- Then click on Show all properties.
Method 2 – Get metadata from outside the app
To start this method, you will need to download the document. Please skip this part if you already have a downloaded Word document on your computer. Otherwise, please open Word or Office to download the file.
- Click the three dots
 next to your document’s name.
 - Then select Download from the popup menu.
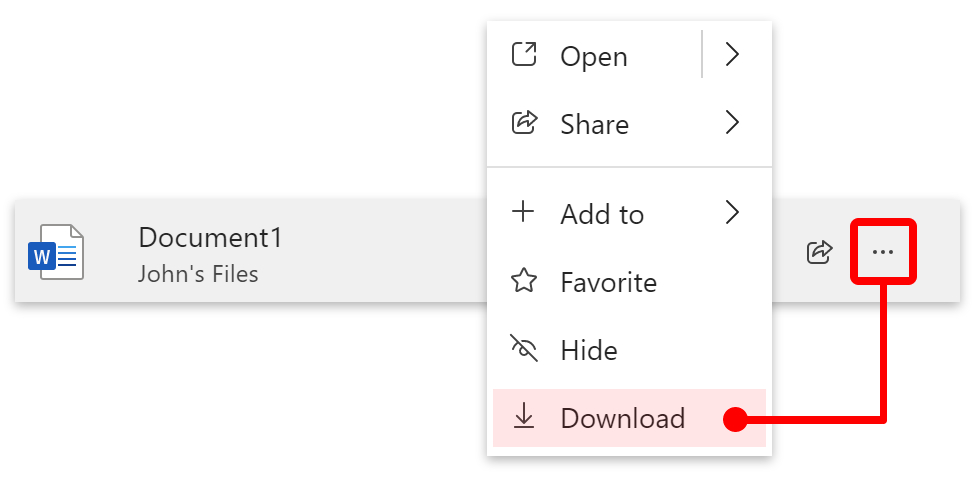
- By default, Office will save the file into your downloads folder.
- Locate and right-click your downloaded file.
- Then select Properties from the menu.
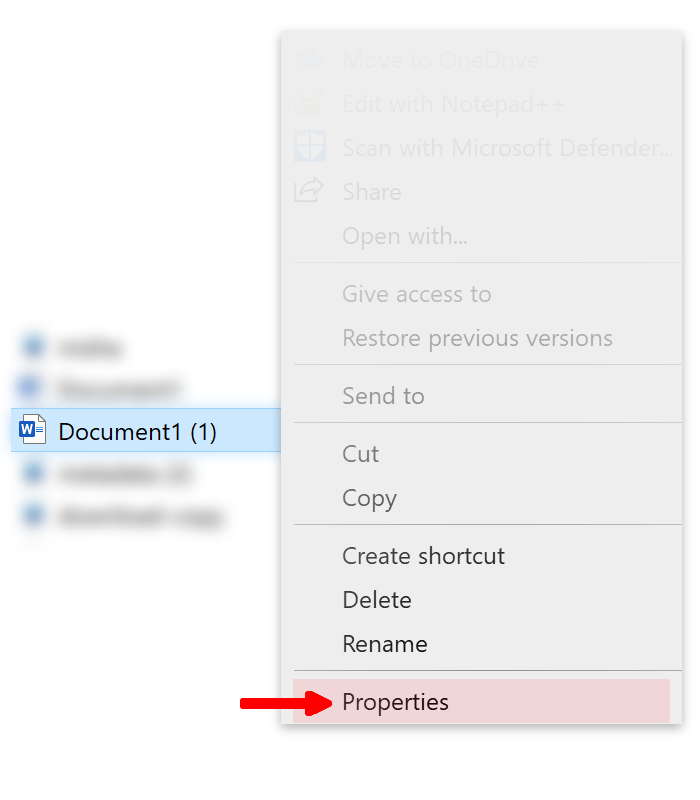
- Click on Details in the properties box.
- There you will find a list of metadata for the file.
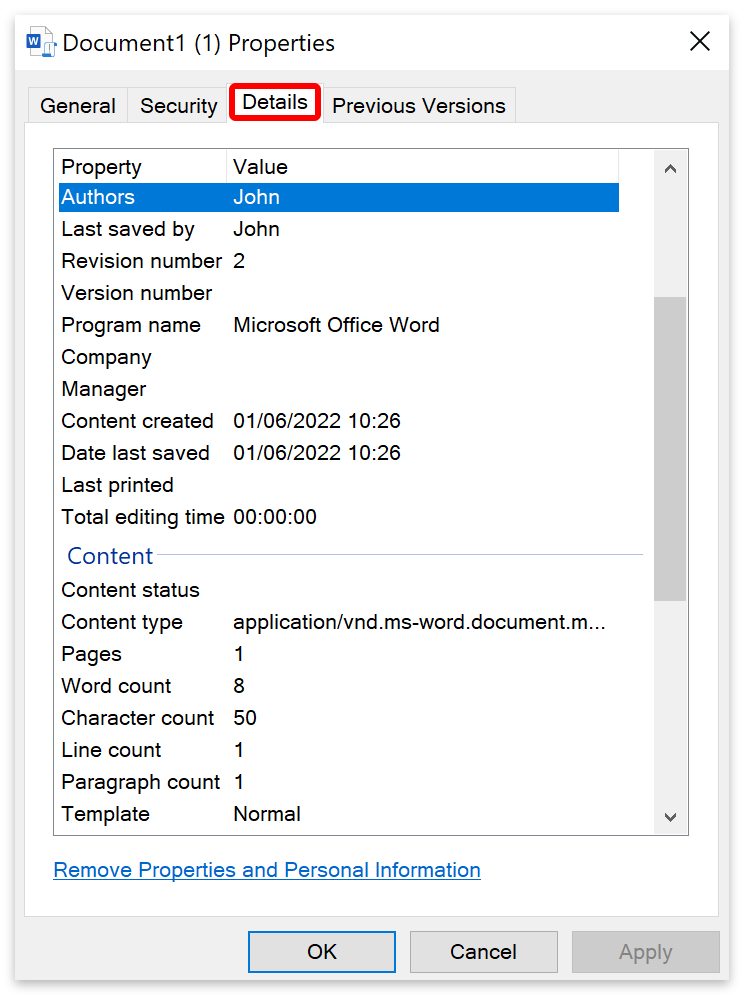
- If you can’t see any information there, try saving the file as a docm.
How to add custom metadata in Word
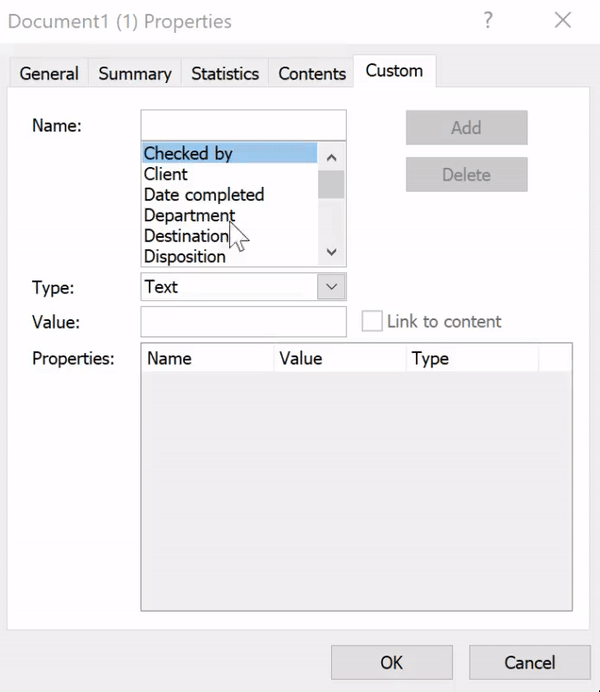
You will need the app version of Word to add custom metadata to a document. To start, open your Word document and go to File > Info.
- From Info, click on Properties.
- Then select Advanced Properties from the popup box.

- Click on Custom on the properties box.
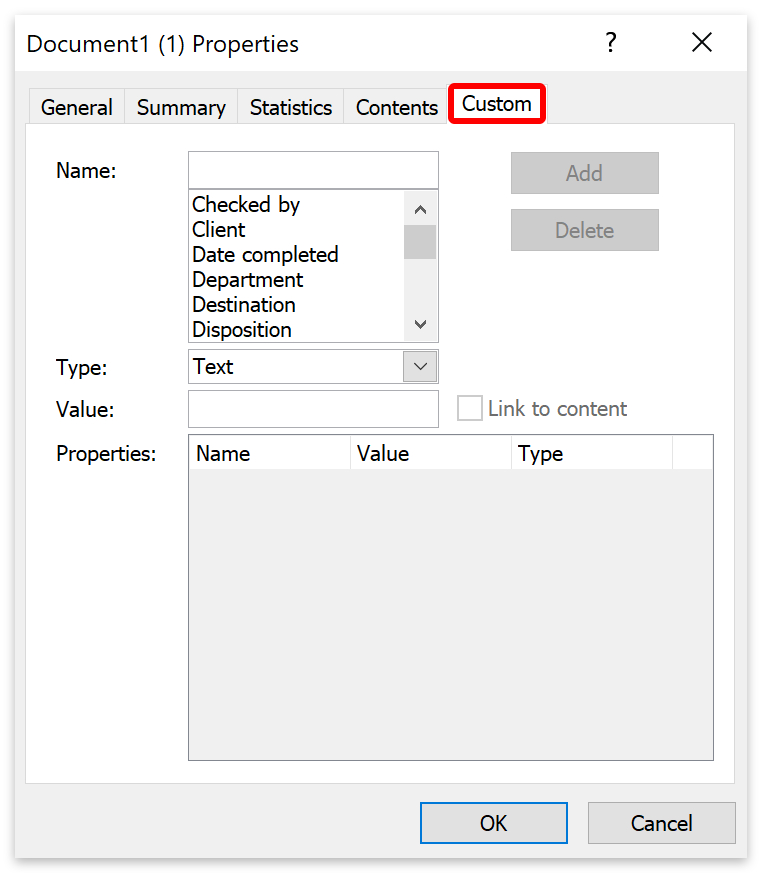
| Input | Description |
|---|---|
| Name | You can enter a custom name for the metadata or select a preset from the list. |
| Type | There are four types of data you can store: text, date, number, or yes/no. |
| Value | The value of the metadata is like the answer to the question. If the name of the data is ‘Date completed,’ the value would be the date. |
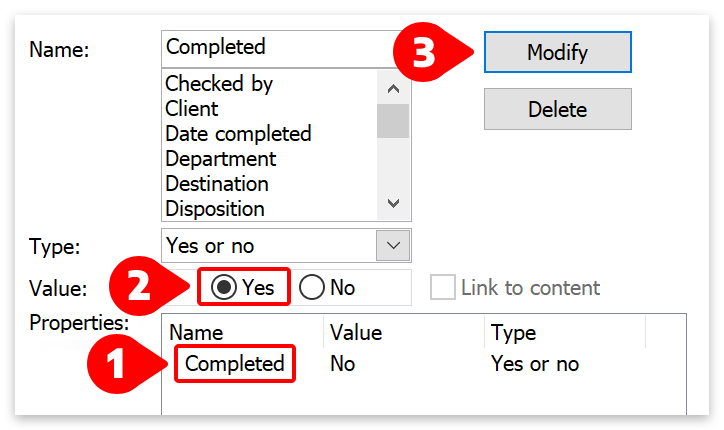
| To know if a document has been completed or is still in progress, you could create a custom name that says ‘Completed.’ You can then select ‘Yes or no‘ as your data type. When the author has finished working on the document, they can set ‘Completed’ to Yes so that anyone viewing the metadata can know if the file is ready. The initial value of ‘Completed’ would be No. |
- To change the value, click on the name of the data in the Properties box. (1)
- Then change the Value. (2)
- Finally, click the Modify button. (3)
Conclusion
If you don’t have the app version of Microsoft Word, the best solution is Method two. Download the Word document, right-click and view properties, and find all available metadata in the details tab. If you have the word document, we advise using method one as you may have to save the file as a docm to view the metadata for method two.
Thanks for reading.
John Gleave
John Gleave has been a researcher, content writer, and senior editor at Business Tech Planet since 2022. John was formerly a data analyst and web designer with expertise in several programming languages, such as JavaScript, JQuery, PHP, CSS, SQL, and more! With a passion for writing and technology, he has now focused his skills on crafting tech guides for BTP. You can connect with John on LinkedIn.
Recent Posts
Microsoft Loop: All You Need to Know
Microsoft Loop was first announced back in November 2021 as an addition to Microsoft’s 365 applications. From today, Loop is being rolled out as a public preview to anyone with a Microsoft 365…
Click the File tab. Click Info to view the document properties. To add or change properties, hover your pointer over the property you want to update and enter the information. Note that for some metadata, such as Author, you’ll have to right-click on the property and choose Remove or Edit.
- How do I scrub metadata in Word?
- How do I view metadata in a Word document?
- Do Word documents have metadata?
- What is metadata in Word documents?
- How do I hide metadata in a Word document?
- How do I remove metadata from Word 2020?
- Where is metadata stored?
- Can you see the editing history of a Word document?
- How do I view the metadata of a file?
How do I scrub metadata in Word?
How to Remove Metadata from Microsoft Word Files
- Select the File menu tab and then select Info , if necessary.
- Select Check for Issues and then select Inspect Document .
- In the Document Inspector dialog box, check the boxes to inspect for certain data and then click Inspect .
- In the results, select Remove All to remove any found data.
How do I view metadata in a Word document?
You can access a document’s metadata from within Word by clicking on File, followed by Info. Doing so takes you to a screen like the one shown in Figure 2. As you can see in the figure, this screen displays much of the same information that was shown back in Figure 1. [Click on image for larger view.]
Do Word documents have metadata?
Word documents can contain the following types of hidden data and personal information: … Document properties and personal information Document properties, or metadata, include details about your document such as author, subject, and title.
What is metadata in Word documents?
Most Word documents contain hidden metadata that shows the history of the document. Metadata is data about the document or file that is embedded within the file’s details. That data shows when the document was first created, who authored the document, total editing time, and the last time the document was modified.
How do I hide metadata in a Word document?
Remove Metadata From Word
- Click the File Tab in 2010 and click on Info, then Check for Issues and select Inspect Document. To view the Personal Information click on Show All Properties to the right. …
- Select content you want Word to check for metadata.
- If Word finds metadata, it will prompt you to Remove All.
How do I remove metadata from Word 2020?
Click on Word and then Preferences. Click on Security. Make sure the checkbox is checked for «Remove personal information from this file on save.»
Where is metadata stored?
Storage. Metadata can be stored either internally, in the same file or structure as the data (this is also called embedded metadata), or externally, in a separate file or field from the described data.
Can you see the editing history of a Word document?
Open the file you want to view. Go to File > History. Note: If you don’t see History on your navigation pane it’s possible that you actually have a subscription version of Office. Select the Info button on the navigation pane and see if you can access Version History there.
How do I view the metadata of a file?
Go to the bottom of the right-click menu and click or tap Properties. You can also select the file and then press ALT+Enter on your keyboard. This will bring up the properties of the file, but go ahead and go to the Details tab to get into the nitty-gritty of the metadata.
How often do you open a previously used document and do a File, Save As to save a copy of the original document and amend the new copy?
It saves a lot of time and a lot of hassle, but did you know that there could be some private information in the original copy that has now travelled into the saved copy? This is the document properties in Word also known as metadata.
I once paid a lawyer to draft a legal agreement for my business. The document was fabulous and given to me as a Microsoft® Word file so that I could easily add additional information each time I used the document. When I received the file, I noticed that the Word document’s metadata (document properties) held the name of another law firm, not the law firm that this document had been sent from. Not a good look at all.
How did this happen? Simple. My document was a copy of a document from another law firm. When the copy was made, possibly using File, Save As, the Word document’s metadata was carried over into my file.
The lawyer may not have been aware that Word files store metadata, information that can reveal details of the author and organisation from which it originated. Even though my lawyer had indeed drafted the document, the original template of the file had been created at another law firm. So even though it was his work, it looked as though it had originated elsewhere.
Metadata isn’t a word you hear used that often in normal business conversation. In fact, you may be asking “what is it” and “how do I find it”?
What is Metadata in Word (document properties)?
Each Word document has specific details (properties) that are captured. For example, properties can be the document title and the author’s name.
Sounds harmless enough. Don’t be fooled. Metadata in Word is hidden from sight. Unless you know where to locate and edit or remove it you could possibly be endangering the privacy of your clients, team members or even be accused of plagiarism.
This extra information (document metadata) can travel from an original document into a copy. Removing Word metadata from the copy ensures you can feel safe that transferred information doesn’t stay in the new document.
Therefore, if you are going to share an electronic copy of a document with clients or another organisation it is a good idea to review and, if required, remove metadata in Word prior to sharing.
In this blog, we will cover how to easily check and remove metadata from Word documents and remove metadata from a PDF.
Check and remove metadata from Word
Let’s look at an example.
In this example, an email has been sent to Anne containing an attached quote that has already been used for the company ABC Ltd.
Annes been told to open the quote document and do a File, Save As then use it as a template to create a quote for another company. In this example, the new company is XYZ Ltd.
To do this, open the Quote document and select File.
Select Save as.
Change the name of the document to your new document name. In this example, it is XYZ Ltd Quote.
Select Save.
You should now have the same document but saved with a new name.
However, information can travel from the original document and this needs to be removed before sending it to new clients.
How to check the document properties in Word (Metadata)
Metadata is stored in most files. Essentially what you need to be looking for is the document ‘properties’ information for your Word file.
Go to the File tab and come down to Info.
The Properties area contains the metadata and this travels with the Word document.
Even though the Word document has been saved with a new name, the metadata is showing that the Title is still ABC Ltd Quote and the Tags are ABC Ltd.
Metadata removal
It is important to remove the information (metadata) in Word as it wouldn’t look great if another company’s name came through on your quote. Especially if they are competing companies.
To do this, highlight the information you want to change.
Press your Delete key to remove the information.
Metadata removal (How to delete Author information)
The file may also hold onto the author information.
To change this, right-click on the author’s name and then select Remove Person.
Check all document properties in Word
By default, you won’t see all the properties for the file, just a shortened list. Many of the properties are still hidden from view.
In my opinion the best place to check the document properties is by clicking the drop-down arrow next to the Properties list at the top of the pane and then selecting Advanced Properties.
This will then open a dialog box where you can navigate through several tabs to view an even fuller list of properties to make sure there isn’t any unwanted information in your document.
If there is any information you don’t want in the properties just select the information and delete it. Be sure to check every tab and then click OK. If you are unable to remove some data please see the steps for ‘Further check document properties in Word using the Inspect document feature’ below.
Now do a Save to update your document.
Go back to File, Info, Properties, Advanced Properties.
All the information that you deleted should now be gone.
Further check document properties in Word using the Inspect document feature
Many of the file’s properties can easily be edited or removed simply by editing or deleting the content from a property field.
However, if you are unable to remove some of the data manually, you may like to check out the Inspect Document feature.
This feature finds and reveals any hidden data within your file that could be potentially sensitive. This includes document Properties that may have been generated and embedded into the document via a Document Management System, Template or custom macro.
Once Inspect Document has performed the check you can then choose to remove or leave the data.
Note: You might like to create a copy of your file prior to using the Inspector as it isn’t possible to restore the data once the Document Inspector removes it. To remind yourself which version no longer contains sensitive data you might like to add a tag or even detail this in the name of the document, e.g. “filename” – Inspected.docx.
Step 1: Open the file you want to inspect and then from the File tab click the Info tab.
Step 2: Click Check for Issues and then select Inspect Document.
Step 3: The Document Inspector dialog box will be displayed.
Step 4: Select the check boxes for the content you would like inspected.
Note: Please refer to the ‘Document Inspector options’ at the end of this post for a full list of what the Inspector finds and removes.
Step 5: Click Inspect.
Step 6: The results of the inspection will be displayed. Click Remove All next to the data you want removed from the document.
The unwanted data will be removed from your document.
Word Document Inspector Options
The table below displays a full list of what the Inspector finds and removes.
|
Document Inspector Options |
Action |
|---|---|
|
Comments, Revisions, Versions and Annotations |
Removes Comments, Revision marks from tracked changes, |
|
Document Properties and Personal Information |
Document properties, including information from the Summary, Statistics, and Custom tabs of the Document Properties dialog box, Content type info, the User (author) name and Template name. |
|
Task Pane Apps |
If your organisation uses customised Task Pane Apps the |
|
Embedded documents |
Identifies if a document has been embedded into your document. |
|
Macros, Forms and Active X controls |
Identifies where macros, forms and Active X controls |
|
Collapsed Headings |
Identifies where text is hidden by collapsed Headings. |
|
Custom XML Data |
If your organisation utilises customised XML data this could hold information that will travel with the document. If Inspector finds XML |
|
Headers, Footers and Watermarks |
Information in headers and footers and any Watermarks. |
|
Invisible Content |
Objects that are not visible because they have been |
|
Hidden Text |
Removes any text that has been formatted as Hidden Text |
Remove metadata from PDF
Sometimes when you save the document as a PDF the original name of the document stays within the title of the file.
Let’s look at an example of this in Word.
The image below shows a document saved as ‘MS Office Essential Skills – Stage 1.docx’. This document has been created from a copy of an existing document called ‘Excel Getting Started Step 1.docx’.
When we go to the File tab and select Info.
In the Properties area you can see the Title of the original document saved into the Properties as ‘Excel Getting Started Step 1’.
Even though the document has been saved as a copy and renamed, the original file name is still embedded into the document Properties.
Therefore, when we come to save the file as a PDF, the original file name travels into the PDF properties too.
Let’s walk through this.
To save the Word document as a PDF, from the File tab we can select Save a Copy.
From the Save as drop-down options box, select PDF.
And then click Save.
Now when you open the PDF file you will see that the document has held onto Document Properties Title and its now in the PDF settings.
I’m sure you will agree that this could look bad if your original Title has a customer’s name in it and you were sending the new copy to another customer.
To ensure the original Title doesn’t travel into the PDF, before you save the document as a PDF, in Word, go to File and select Info.
In the Title box, highlight the original title.
Press your Delete key to remove the Title or insert a different title.
Select Save to update the file. Now from the File tab select Save a Copy.
Follow the steps above to save as a PDF. You should now have removed the metadata from the PDF and have the correct new title for your PDF.
Note: if you don’t have the PDF available as a Word document you may need to use a PDF editing application like Adobe Acrobat Pro or Sejda.com to remove or edit the PDF metadata.
Was this blog helpful? Let us know in the Comments below.
If you enjoyed this post check out the related posts below.
Hidden metadata provides useful file information, but it could also endanger the privacy of your clients or employees. Microsoft Word’s metadata, or document properties, stores details about files. Common metadata entries include the document’s author, company, title and subject. Each time someone edits and saves a file, Word updates the document’s metadata. Comments and revisions logged in the metadata are helpful when several people are collaborating on a document. Reviewing the document’s properties or using the Document Inspector to see if metadata is present and will help you verify what information Word has recorded; remember, though, that the Document Inspector locates the types of metadata recorded in the document but does not reveal what that data contains.
View Document Properties
-
Open a Word document.
-
Click the File tab.
-
Click “Info” and then click “Show all Properties” to view the metadata entries for the file.
Use Document Inspector
-
Open a Word document and then click the “File” tab and look under “Preparing for Sharing.”
-
Select “Check for Issues” and then click on “Inspect Document” to launch the Document Inspector.
-
Click the check boxes to select the types of metadata the Document Inspector scans for and then click “Inspect.” Microsoft Word will display the results of the inspection and provide an option to remove the metadata.
Do you want to know how to remove metadata from Word? Whether it is for a college essay or for work, there are times you need to clear metadata from your Word files. After all, you have to protect your personal information when submitting public files.
If you’re not sure why this is important or how to do it right, don’t fret. We’ve got you covered.
Read on below to see how you can erase metadata from your documents before you submit them:
1. What is Metadata in Word?
All over the world, we use more than 400 million metric tons of paper every year for paperwork and school work. Using paper offers more hassle when it comes to storing documents. They take up more space, are vulnerable to many substances, and more.
This is why many offices and schools are advocating the paperless movement. Or if not, they’re encouraging a paper-light environment in the least. It’s a great use of modern technology but going digital that has its disadvantages as well.
For example, metadata in Word documents can display property information. There’s more but we’ll discuss it in the next segment. For now, let’s talk about what metadata is.
Take a close look at a Word document with your file explorer. Open the details pane and select any Word document that you didn’t clean of metadata. You can also view some of the information if you are using the details layout or view.
Among the details will be information about the document itself. These pieces of information include the date of creation, versions, and revision marks. Any comments, headers, and footers are some other types of hidden data in Word documents.
Metadata can also be personal information. These include the author and the person who last saved the document. If you used some specific features, it may be possible to view your email headers, routing slips, and more.
When it comes to taking up space, metadata can take up some weight in files. In Word, the space it takes up is very minuscule. So, there is often no need to clear out metadata to save space.
Microsoft Word is useful for many small businesses. It has the best tools to write, edit, and share documents. And while some people feel safer to remove them, metadata in Word has benefits too.
Metadata offers benefits to teachers, editors, and others who receive files to analyze. It is only unfortunate that these benefits can become weaknesses or evidence against you. This is why it is important to remove metadata from Word documents if you’re not going to use them.
All Word documents contain hidden data or personal information in the document itself. As you save them, Word has an automatic function to store corresponding hidden data. If you want to remove metadata, you must do it with every Word document you save.
It is important to remove metadata from Word documents before you submit them. This will ensure that now only are your hidden and personal files erased but also revisions. In the past, there have been some prominent cases that involve the metadata risk.
In 2005, the United Nations had not noticed the changes made to a report on a murder case. It was the Lebanese Prime Minister Rafik Hariri’s murder report that had revisions. UN Secretary-General Kofi Annan doctored it, removing some names before submitting the report to the Security Council.
Another incidence was the UK’s “Dodgy Dossier”. This document served to support the Iraq invasion. Later, upon closer inspection, authorities found that the document was from a student paper written in 1991.
As you can see, metadata can be a powerful weapon in the wrong hands. This is also great for anybody who is paranoid. Data protection will help you cover your tracks in this digital world.
3. How to Remove Metadata from Word
There is a way to remove metadata from your Word documents. That is using the Document Inspector on Word. This handy tool removes properties and personal information from your Word files.
Before you start removing metadata, inspect the document first. There are several ways to do this with the different versions of Microsoft Word. If you use MS Word 2013, click on File > Info > Check for Issues > Inspect Document.
On MS Word 2010, open the File tab > Info > Check for Issues > Inspect Document. If you want to view the personal information, click Show All Properties to the right of the Check for Issues button. If you have Word 2007, click the Office Button then choose Prepare, followed by Inspect Document.
When you inspect the document, the Document Inspector box should appear. Depending on what information you want to view, put check marks next to the types of hidden data in the list. Afterward, click Inspect.
If you are inspecting a document, you can also use the information you see to look for any suspicious actions. This is important to do with auditing records, important letters, and more.
Now, let’s go back to the Document Inspector.
After you select Inspect on the information you want, there will be a Remove All button next to the results. Click on the Remove All button to erase traces of metadata on your document file. Note that once you click this button, removed data isn’t restorable anymore.
Remember to erase metadata on the original copy of a document. If you must avoid keeping metadata on many files, you must do it with every single one. Or, you can convert them to a PDF file and use PDF instead.
You Now Know How to Remove Metadata from Document Files
That’s it for our quick guide on how to remove metadata from Word files.
Remember: metadata removed is not something you can restore. Even the Undo button has no capacity to bring it back.
Did you find this post useful and informative? Check out our other blog posts by visiting our blog.
Do you need to convert your files to document format? Are you in need of a way to convert your Word files to different other formats? Check out our list of free online converters, like this JPG to PDF converter.