
Font formatting is also known as text formatting. It is used to format the text, which entails changing the font style, size, color, and some or all of these qualities, as well as making the selected text bold, italic, and underlined.
It is also used to change how the title, subtitle, header, subheading, body of text, and other text styles look in a Word document.


Table of Contents
- Font Family
- Change Font Size
- Text Formatting in ms word
- Increase/Grow Font Size:
- Decrease/Shrink Font Size:
- Bold the text:
- Italicize the Text for Formatting Text:
- Underline the Text for Formatting Text:
- Strikethrough:
- Subscript:
- Superscript:
- Change case – Text Formatting
- Text Highlight Color to Format the Font:
- Text Effects and Typography:
- Font Color:
- Clear Formatting:
- Font Dialogue Box:
- Steps to follow in Formatting the Text:
As explained above, bold, italic, underline, strike through, subscript, superscript, change case, text highlight color, and font color are just a few of the buttons that can be used to deliver commands for font formatting.
These commands may be found under the Font group. These are covered in the following section.
Font Family
The first command in the “font group,” “font,” is used to modify the chosen font’s formatting into the desired styles. Calibri is the default font and size in Word.

Change Font Size
The second command in the font group, “font size,” is used to increase or decrease the selected font size. Word’s standard font size is 11. Below are keyboard shortcuts for adjusting the text size.
Shortcut Keys for Increasing or Decreasing the Font Size:
- Ctrl + Shift + > → To increase the selected font size (2 or more than 2 points)
- Ctrl + Shift + < → To decrease the chosen font size (2 or more than 2 points)
- Ctrl + }] → To increase the chosen font size (1 point)
- Ctrl + {[ → To increase the chosen font size (1 point).

Increase/Grow Font Size:
To increase the selected font size as shown in the picture above, do the following:
Firstly, select the text that you want to increase the font size
Then click the drop-down arrow of the font size to expand the numbers as in the picture above
Now select one of the sizes you want.
Keyboard shortcuts: Ctrl + Shift + > (To increase 2 or more than 2 points size)
Ctrl +] (To increase the size of one point).
Decrease/Shrink Font Size:
To decrease the selected font size as shown in the picture above, do the following:
Select the text that you want to decrease the font size
Then click the drop-down arrow of the font size to expand the numbers as in the picture above
Now select one of the sizes you want.
Keyboard Shortcuts → Ctrl + Shift + < (To decrease 2 or more than 2 points size)
→ Ctrl + [{ (To decrease 1 point size).
Bold the text:
Make the text Bold where it is selected. Making text bold means changing the font thicker.
Keyboard Shortcut → Ctrl + B
Italicize the Text for Formatting Text:
Italicize the selected text. This means that the body of the font leans forward. This formatting can be used for unique fonts in content.
Keyboard Shortcut → Ctrl + I
Underline the Text for Formatting Text:
Underlining is used to highlight the selected text. It is used on the main text in a heading, subheading, or text body. In contrast to everything else in the text, it seems to be just as good as the header.
Keyboard Shortcut → Ctrl + U
Strikethrough:
Strikethrough means adding a line through the middle of the text where you select.
Subscript:
Subscript means making the selected letter or number smaller to the base of any text or number/s in the Font Group in a Microsoft Word Document.
Superscript:
Superscript means making the selected letter or number smaller to the power of any text or number/s in Font Group in Microsoft Word Document.
Change case – Text Formatting
Change the selected text to Sentence Case, Lower Case, Upper Case, or Toggle Case and Capitalize Each Word.
Keyboard Shortcut → Shift + F3.
Sentence Case: In a Sentence Case, each Letter and Noun in a Sentence begins with a capital letter. Sentence case is the general and widely used written content/paragraph format.
Lower Case: Changing all the selected text too small letters, called lower case.
Upper case: Changing all the selected text to the CAPITAL LETTERS, called UPPER CASE.
Capitalize Each Word: Capitalize the first letter of each word in a sentence, called Capitalize Each Word.
Toggle Case: In the Toggle Case, the first letter of a word is small and the remaining are Capital.
Text Highlight Color to Format the Font:
It highlights the selected text with colour. To do so, select the font /text that you want to increase highlight → Then click the drop-down arrow of the text highlight colour to expand the numbers → Now select one of the colours you want.
Text Effects and Typography:
By providing the text with various shapes, such as a glow, outline, shadow, or reflection, text effects can be created. Text effects are the name of this procedure. The process of altering the type’s layout is known as typography. Modifying the quantity of styles, ligatures, and stylistic sets falls under this category.
Font Color:
Change the text in different colours where it is selected
Clear Formatting:
Clear all the selected text formatting (Formatted text means making the selected text Bold, Italic, Underline, Font Style, Different Font sizes, Font Color, etc.).
Font Dialogue Box:
In this, you can add different effects and character spacing to the font in addition to the Font group.
Steps to follow in Formatting the Text:
Go to the Home tab
Type or keep some text you want
Then select the text you want to apply the formatting
In the Font group, click any Command to apply Formatting. For example Bold, Italics, Size, Color, etc.
What is Text or Font Formatting in MS Word?
Font formatting is also alternatively known as text formatting. It is used to format the text means to make the selected text Bold, Italic, and Underline and change the Font Style, Size, Color and some of these or all of these.
What are the Tools and Commands of Font Group in Word?
The Font formatting group includes various commands such as a Font, Font Size, Grow Font, Shrink Font, Clear Formatting, Bold, Italic, Underline, Strike Through, Subscript, Superscript, etc.
Once you have written your basic document you can spruce it up with a just few clicks.
The process for formatting text is:
1. Select the text you want to format.
2. Apply the formatting.
Most of the tools that you need to make your document look professional are on the Home ribbon. They are collected together into the Font group.
Here’s a quick breakdown and each of these will be covered in this post.

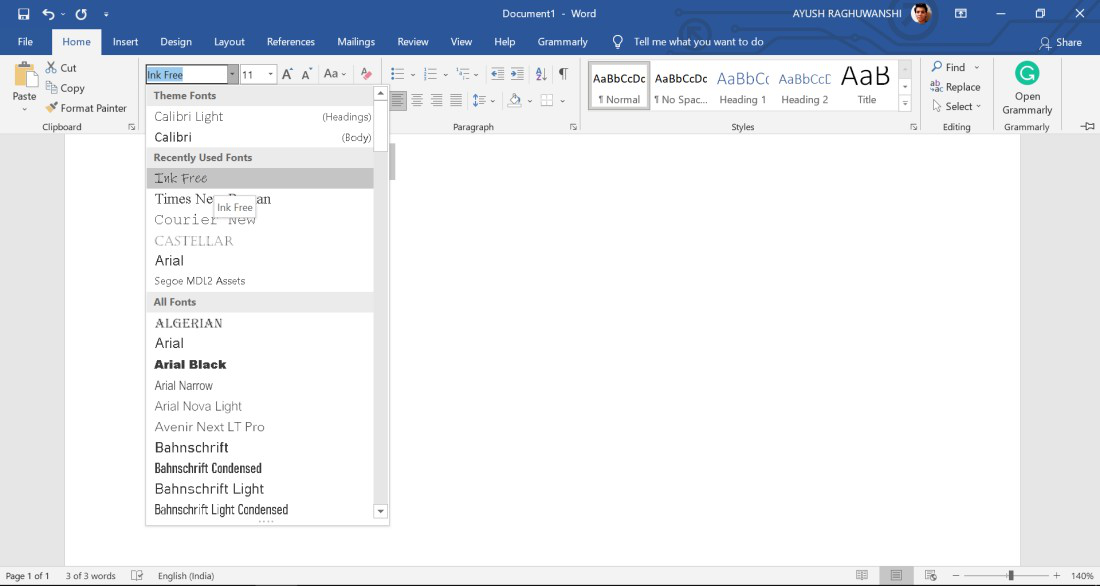
2. Changing the font
The font is the name given to the text style — what the text looks like. Many newspapers and magazines use a font like Times New Roman for a formal look but there are other simpler fonts available like Calibri.
To change the font:
1. Select the text you want to apply the font to.
2. Single-left-click the Home tab.
3. Single-left-click the Font drop-down list then single-left-click the font you want to use.

A sample of some popular fonts are provided below.
![]()
![]()
![]()
![]()
3. Changing the font size
To change the size of your selected text:
1. Single-left-click the Home tab
2. Click the Font Size drop-down list on the Font group.
3. Choose a font size.

You can also click one of the two ‘A‘ icons, situated next to the font size drop down list.
![]()
The first A increases the text size by one standard size.
The second A decreases the text size by one standard size.
4. Adding bold, italic or underline for emphasis
To apply emphasis to a word or phrase, bold and italic are the quickest techniques to use. Here is a comparison:
- Regular text
- Bold text
- Italic text
- Underlined text
- Bold italic underlined text
There are 3 standard icons that you will find in every Microsoft Office program.
![]()
- To bold a selection of text, click the B icon, or press Ctrl B on the keyboard..
- To italicise a selection of text, click the I icon, or press Ctrl I on the keyboard..
- To underline a selection of text, click the U icon, or press Ctrl U on the keyboard..
To change the underline style:
1. Click the drop-down arrow next to the U icon.
2. Select the underline type that you want – single, double, thick, dotted, dashed etc.

To change the underline colour:
3. Click Underline Color (at the bottom of the menu).
4. Choose a colour from the palette.
5. Changing the font colour
To change the colour of your text
1. First, select the text that you want to change the colour for.
2. Single-left-click the Home tab.
3. Single-left-click the Font drop-down list in the Font group.
4. Single-left-click a colour from the palette.

Paragraph formatting tools in Microsoft Word
6. Striking through the text
Strikethrough puts a line through your text like this.
This is an example of text that has been struck through.
You can use this when you need to keep the text for historical reasons but clearly mark it as out of date, obsolete, no longer stocked of one of many other reasons.
To apply strikethrough to your text:
1. Select the text.
2. Single-left-click the Home tab.
3. Single-left-click the Strikethrough icon in the Font group.
![]()
7. Superscripting or subscripting text
Superscripted text is little text that sits above the baseline, e.g. 360o, 42 or 16th.
Subscripted text is little text that sits below the baseline, e.g. H2O, CO2, H2SO4.
![]()
To apply superscript:
1. Select the text.
2. Single-left-click the Home tab.
3. Single-left-click the Superscript icon in the Font group.
4. The keyboard short cut is Ctrl Shift +.
To apply subscript:
1. Select the text.
2. Single-left-click the Home tab.
3. Single-left-click the Subscript icon in the Font group.
4. The keyboard short cut is Ctrl Shift =.
8. Changing the case
UPPER CASE WORDS stand out on a page. Some people describe it as SHOUTING. To change the case of your text:
1. Single-left-click the Home tab.
2. Click the Aa icon in the Font group.
3. Choose from Sentence case, lower case, UPPER CASE, Capitalise Each Word and tOGGLE cASE

Pressing Shift F3 cycles through the UPPERCASE, lowercase and Capitalise Each Word options. The other two options are not included in the cycle.
Here are what the different case options mean:
Sentence Case
Capitalise the first letter of the first word in the sentence.
lowercase
Make all the selected text lower case (i.e. un-capitalise everything).
UPPERCASE
CAPITALISE all selected text.
Capitalise Each Word
Capitalise the first letter of EVERY word.
tOGGLE cASE
Convert UPPER CASE letters to lower case and convert lower case letters to UPPER CASE.
The Toggle Case feature seems like an odd one and under normal circumstances you would never use it.
However, back in the day (gee, I sound old) guys like me who look at their keyboard as they type and only look up once every 30 minutes used to curse loudly when we found our CAPS LOCK had been on the whole time!
You may still stumble across an old legacy document where the case is all screwed up. If you do, you canquickly fix it with Toggle Case.
Fast forward to today.
Microsoft Word detects when the CAPS LOCK is on. After typing something in reverse case, as soon as you press space or ENTER, Word corrects the incorrect case and turns the CAPS LOCK off. Whatever you type next is in correct case.
10. Highlighting text
Just as you would take a highlighter pen to highlight certain portions of text in a book or report, you can add highlight to any section of text in Microsoft Word. Highlighting attracts attention.
Perhaps you have prepared a document for somebody and need to point out the important sections.
Perhaps you are reviewing somebody else’s work (or even your own) and want to mark sections to revisit later.
There are 2 ways to use the highlighter tool.
Method 1 (for a one-off highlight):
1. Select the text you want to highlight.
2. Single-left-click the Home tab.
3. Click the ab Highlight icon in the Font group (to use default yellow).
4. If you want to choose your own highlight colour, click the drop-down arrow on the icon, then choose one of the highlight colours in the palette. Stick with the lighter colours.

Method 2 (for multiple highlights)
1. Single-left-click the Home tab.
2. Double-left-click the ab Highlight icon in the Font group.
3. The regular mouse pointer will change to a highlighter icon.
4. Select the first portion of text that you wish to highlight. The highlight is added but the highlighter tool is still active.
5. Select as many other portions of text as you want.
6. When you are done, press Escape or single-left-click the the ab Highlight icon again

Reset highlighted text
1. Select the highlighted text.
2. Single-left-click the Home tab.
3. Click the drop-down arrow on the ab Highlight icon in the Font group and choose No Color.
11. Creating a pretty title or heading
WordArt is a feature that has been around for many years. The conventional way to create WordArt is to choose the tools from the Insert ribbon, choose a style, type some text and then play with the settings.
In Word, there is a second tool that lets you select some existing text and apply WordArt Styling to it.
Here’s the process:
- Select your text (normally a title or heading).
- Click the blue A icon (called Text Effects and Typography).
- Select one of the thumbnail images from the gallery to apply the effect to your text.
- You can switch the style at any time.
 tool in Word")
- Using the options underneath, you can also change the outline (colour, thickness and style), shadows, reflection and glow settings. You don’t have to stick with the default settings in the main gallery.
 settings in Word")
Here are some samples of text effects and typography:
 in Word")
12. Key Takeaways
- The most commonly used text formatting tools in Word are found on the Home ribbon in the Font group.
- To access even more text formatting tools in Word, click the launcher icon in the bottom-right corner of the Font group (on the Home ribbon). This displays the Font dialog which not only displays the tools found on the ribbon but also additional tools.
- Common text formatting includes the font, font size, font colour, empasis tools like bold, italic and underline, strikethrough, superscript, subscript, WordArt and the highlighter tool.
13. what next?
I hope you found plenty of value in this post. I’d love to hear your biggest takeaway in the comments below together with any questions you may have.
Have a fantastic day.


About the author
Jason Morrell
Jason loves to simplify the hard stuff, cut the fluff and share what actually works. Things that make a difference. Things that slash hours from your daily work tasks. He runs a software training business in Queensland, Australia, lives on the Gold Coast with his wife and 4 kids and often talks about himself in the third person!
SHARE
In MS Word there are multiple types of formatting we can apply to a given text such as Fonts, Font Styles, Font Colors, Font Sizes, Text Highlight Colors, Clearing Formats, Change Cases, etc. Let us apply these techniques to some texts in the Word Processor and see what result it produces.
Font
Fonts are used to change the display of the text or Word Document, look more appealing, and as per the requirement of the situation. There are multiple types of fonts available in MS Word-like: Calibri, Times New Roman, Algerian, Arial, Century, etc.
Steps to Apply:
Step 1: Select the text you want to change the font of.

Step 2: Now, select the font of your choice from the Home menu bar in MS Word.
Result:

Font Style
Font Styles are used to change the Look ability of the text or give more emphasis on some texts in the Word Document. There are three types of font styles in MS Word: Bold, Italics, and Underline.
Steps to Apply Bold Font Style:
Step 1: Select the text you want to change the Font Style.

Step 2: Now, select the Font Style of your choice from the Font Style bar under the Home menu bar.

Result:

Steps to Apply Italics Font Style:
Step 1: Now, select the Font Style of your choice from the Font Style bar under the Home menu bar.

Result:

Steps to Apply Underline Font Style:
Step 1: Now, select the Font Style of your choice from the Font Style bar under the Home menu bar.

Result:

You could also use the shortcuts like:
- CTRL+B for Bold
- CTRL+I for Italics
- CTRL+U for Underline
Font Color
Font Colors have wide use in real life when using the Word Document. Be it highlighting the main points of the document or want to convey some important information. There are multiple types of Font Colors available in MS Word-like: Red, Blue, Yellow, Orange, Light blue, etc.
Steps to Apply:
Step 1: Select the text you want to change the Font Color.

Step 2: Now, select the Font Color of your choice from the Font Color bar under the Home menu bar.

Result:

Font Size
Font Sizes are used to display the text in the Word Document larger or smaller according to our needs. We generally display a heading with a Font Size of 15, Subheadings with a Font Size of 14 or 13, and paragraphs with a Font Size of 12. Many Font Sizes are available in MS Word-like: 8, 9, 10, 11, 12, 14, 16, etc.
Steps to Apply:
Step 1: Select the text you want to change the Font Size.

Step 2: Now, select the Font Size of your choice from the Font Size bar under the Home menu bar.

Result:

Text Highlight Color
As the name itself suggests, the Text Highlight Color is used to highlight text in the Word Document. There are many Text Highlight Colors available in MS Word-like: Yellow, Bright Green, Turquoise, Pink, Red, etc.
Steps to Apply:
Step 1: Select the text you want to change the Highlight Colors.

Step 2: Now, select the Color of your choice from the Text Highlight Color bar under the Home menu bar.

Result:

Clear Formats
MS Word provides a feature to clear the pre-formatted text. When we copy some text or information from somewhere it has some formatting applied already, so to remove it and use it according to our need in our Word Document we have to clear the Formatting.
Steps to Apply:
Step 1: Select the text you want to clear the formatting.

Step 2: Now, select the Clear All Formatting bar under the Home menu bar.
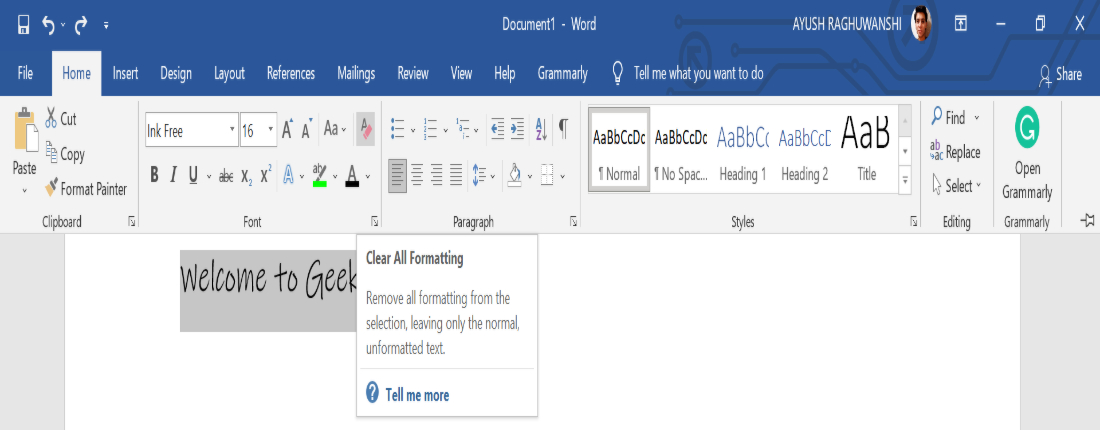
Result:

Change Case
Change Case is used to display the text in the way we want in our Word Document. There are five types of Change Cases available in MS Word-like: Sentence case, Lowercase, Uppercase, Capitalize each word, and toggle case.
Steps to Apply:
Step 1: Select the text you want to change the Case.

Step 2: Now, select the case of your choice from the Change Case bar under the Home menu bar.

Result:

Одна из задач, для которой используется редактор Microsoft Word, — форматирование шрифта. Это процесс обработки текста, введенного с клавиатуры. Его целью является создание документа, соответствующего принятым правилам оформления. Во всех версиях редактора от Microsoft присутствует несколько инструментов для выполнения этой задачи. Какие и как их использовать – расскажет эта статья.
Виды форматирования шрифта
Рассматриваемый текстовый редактор позволяет использовать следующие возможности форматирования:
- Изменение типа и размера шрифта.
- Изменение способа начертания символов.
- Изменение цвета символов и областей под ними.
Все эти параметры сосредоточены в окне «Шрифт», которое можно вызвать с помощью «горячих клавиш» (Ctrl + D; Ctrl + Shift + F; Ctrl + Shift + P) или с помощью графического интерфейса:
- Версия 2003 и раньше: «Формат» =>»Шрифт».

- Версия 2007 и позже: вкладка «Главная» => блок «Шрифт».
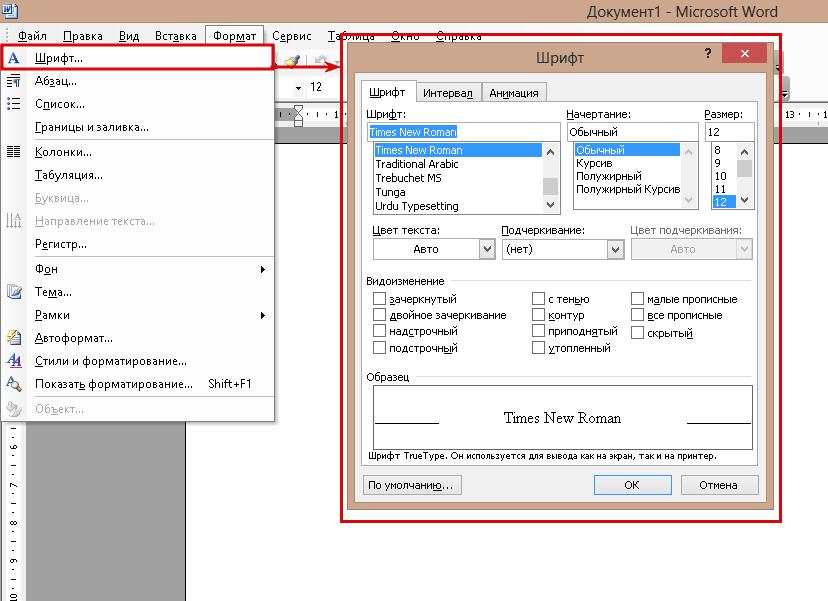
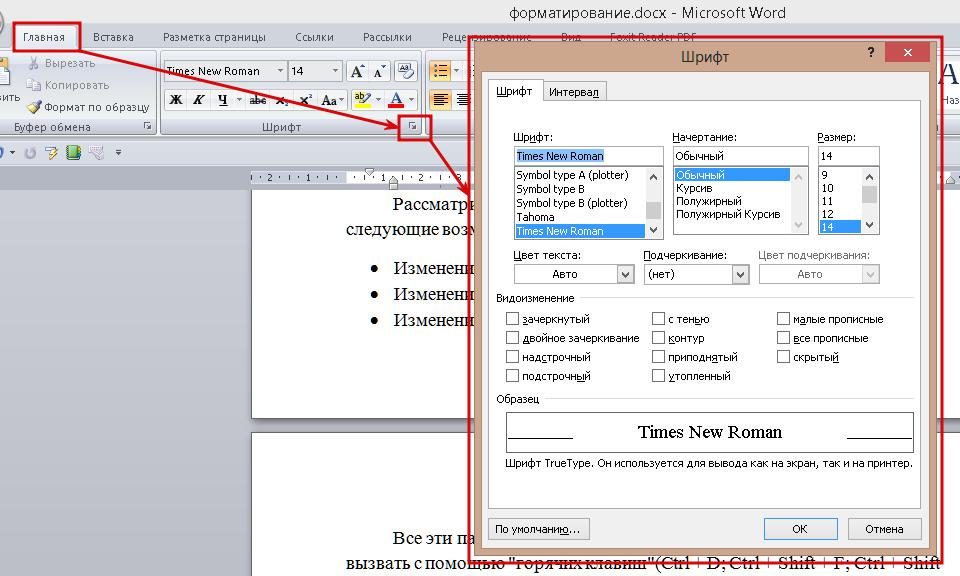
Оно позволяет применять к выделенному тексту несколько параметров одновременно.
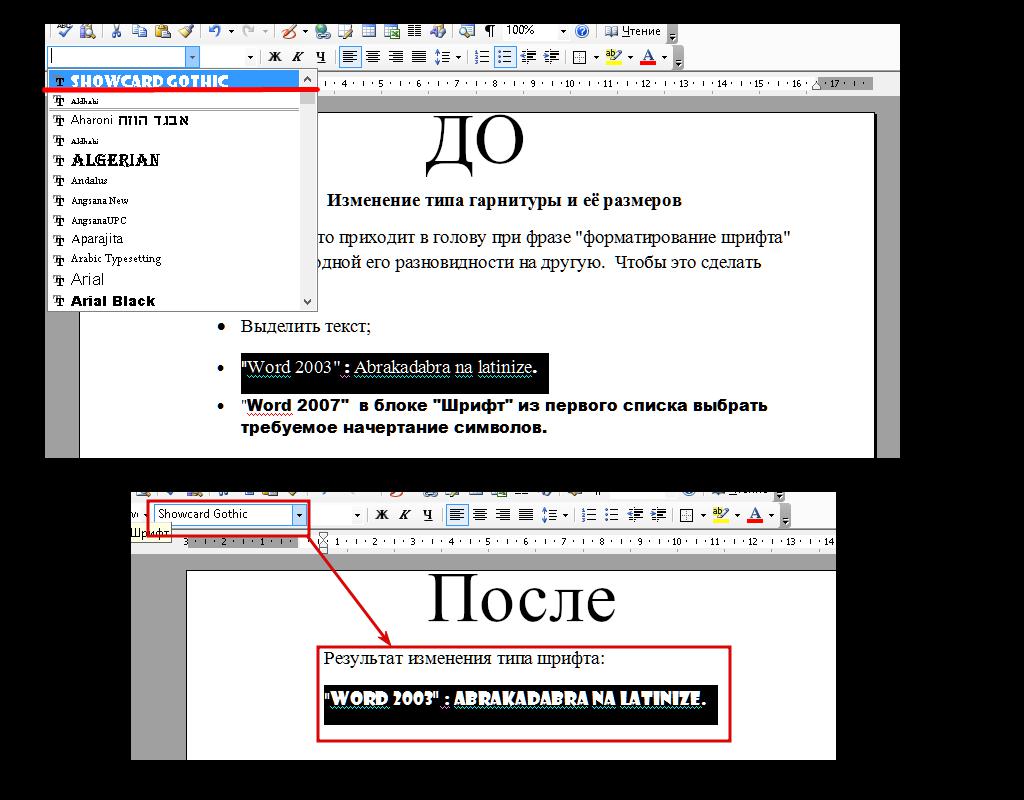
Изменение типа гарнитуры и ее размеров
Первое, что приходит в голову при фразе «форматирование шрифта», -это изменение одной его разновидности на другую. Чтобы сделать это, нужно:
- Выделить текст.
- «Word 2003»: на панели «Форматирование» во втором выпадающем списке выбрать желаемый вариант.
- «Word 2007»: в блоке «Шрифт» из первого списка выбрать требуемый тип начертания символов.
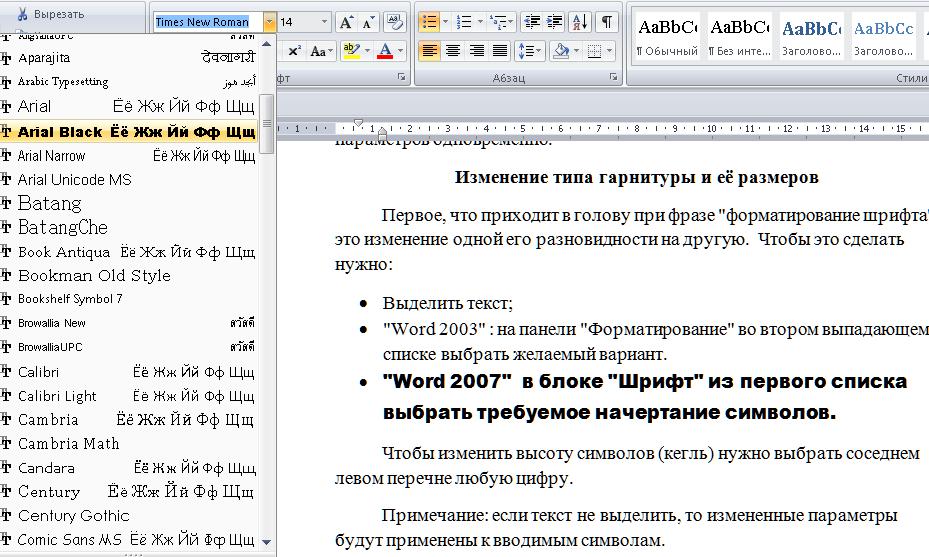
Чтобы изменить высоту символов (кегль), нужно выбрать в соседнем (правом) перечне нужную цифру.
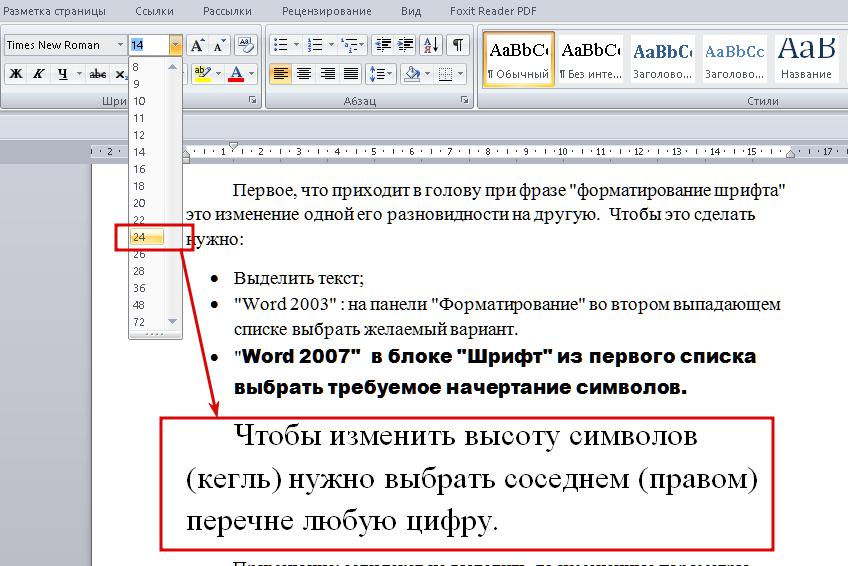
Примечание:
- Если текст не выделить, то измененные параметры будут применены к вводимым символам.
- В версии 2007 года и более новых присутствует возможность автоматического предварительного просмотра этих параметров. Также эта функция отображает изменения подчеркиваний, цвета и стилей.
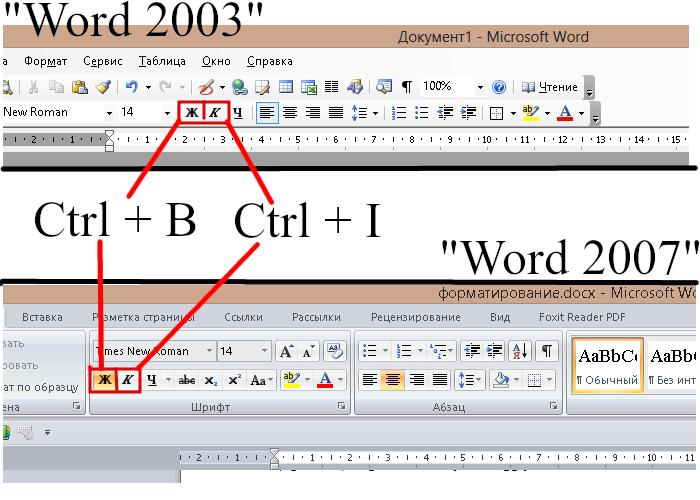
Изменение начертания текста
Второй способ форматирования шрифта — это изменение начертания символов. Оно может сделать буквы толстыми (жирными) или похожими на рукописные (курсив). Чтобы применить к тексту эти изменения, нужно нажать на кнопки «Ж» или «К» на панели «Форматирование» (2003) или в блоке «Шрифт» (2007). Их «горячие клавиши» – Ctrl + B и Ctrl + I соответственно.
Кроме курсива и полужирного начертания, символы можно изменить с помощью других элементов, доступных в окне «Шрифт»:
- Подчеркнутый – добавляет черту снизу.
- Зачеркнутый и двойное зачеркивание – поперек символа проводится одинарная или двойная черта.
- Надстрочный и подстрочный – уменьшает размер шрифта и смещает символ вверх или вниз относительно других. Подходит для добавления индексов в математические, физические и химические формулы.
- Скрытый – делает символ невидимым при просмотре и печати, но оставляет его в документе.
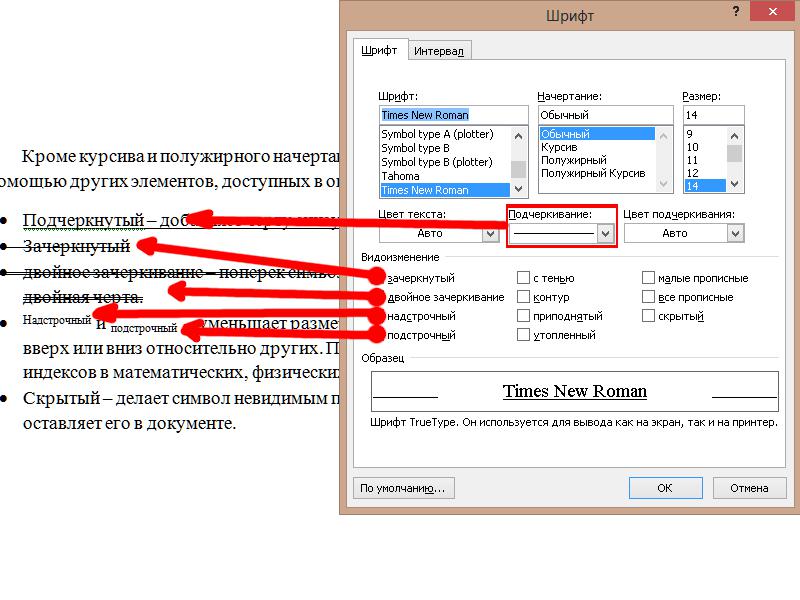
Некоторые из них можно сочетать между собой. Например зачеркнутый и подчеркнутый. Если же параметры противоположны друг другу, как надстрочный и подстрочный, то одновременно использовать их нельзя.
Изменение цвета
Третий вариант форматирования шрифта — это изменение цвета. Оно может быть применено к тексту или пространству вокруг него. В первом случае нужно выделить текст, и далее:
- в «Word 2003»: нажать на быстрой панели «Форматирование» последний инструмент «Цвет шрифта» и выбрать нужный.
- в «Word 2007»: в блоке «Шрифт» нажать на «Цвет текста» (второй ряд, последняя кнопка).
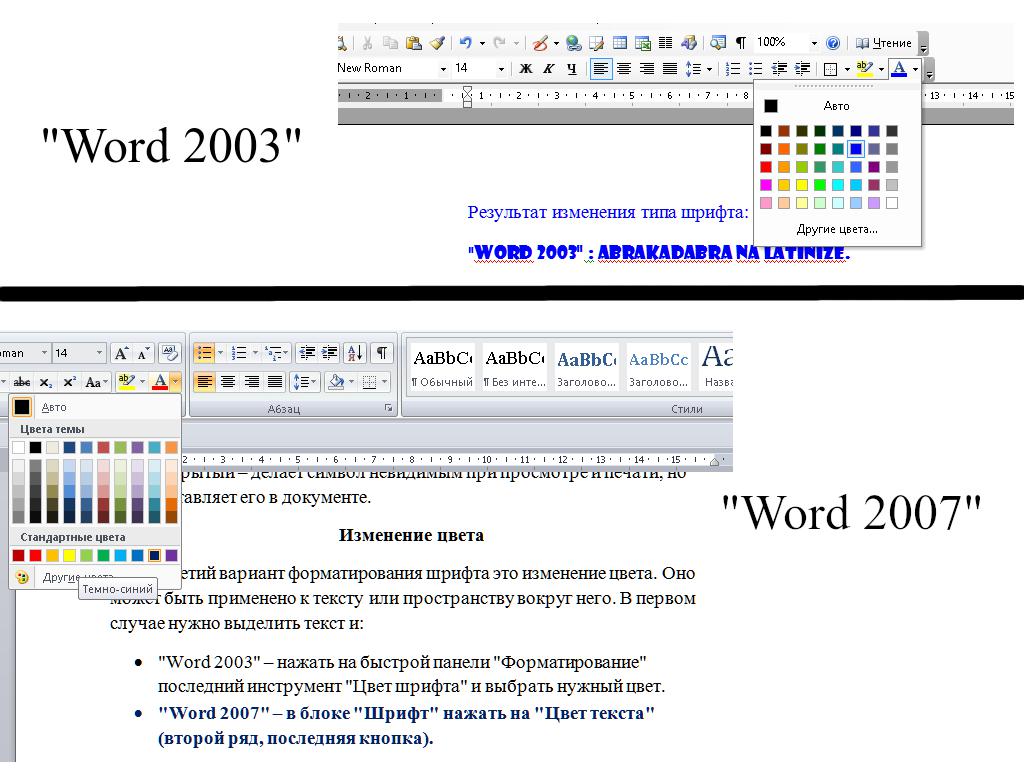
Для выбора нового цвета для шрифта нужно нажать на маленький треугольник справа от кнопки основного инструмента.
Изменение цвета вокруг текста не изменяет отображение букв, но помогает лучше ориентироваться в тексте. Инструмент для выполнения этой операции в обеих версиях находится слева от кнопки изменения цвета шрифта.
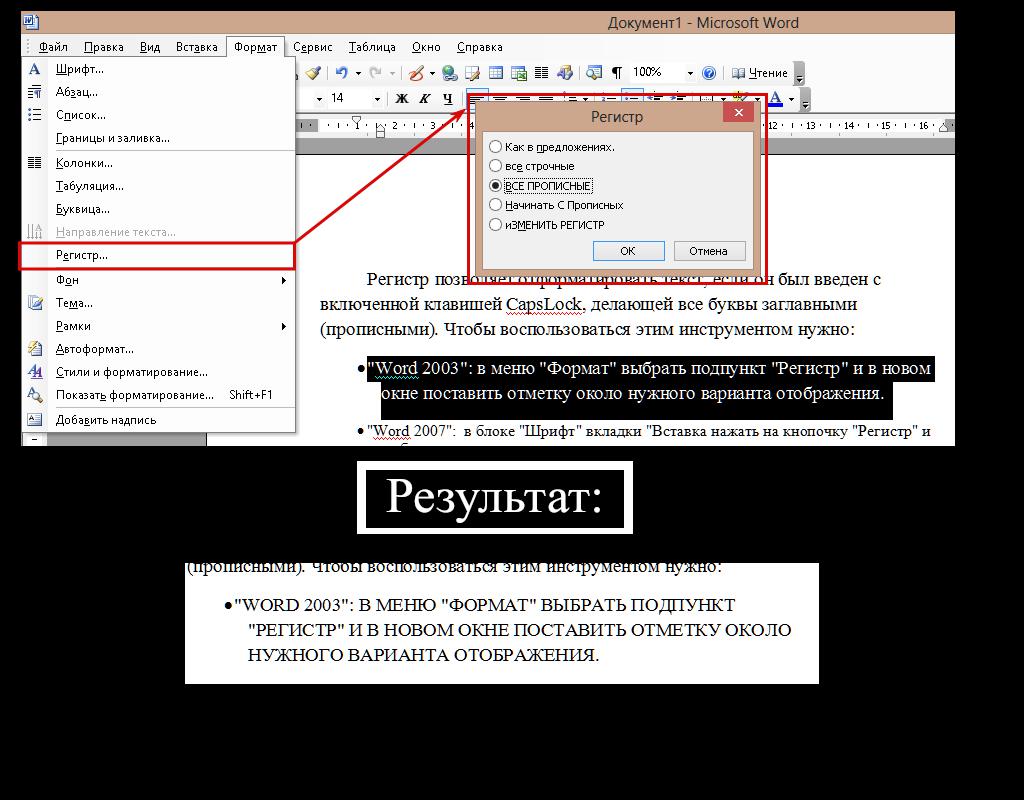
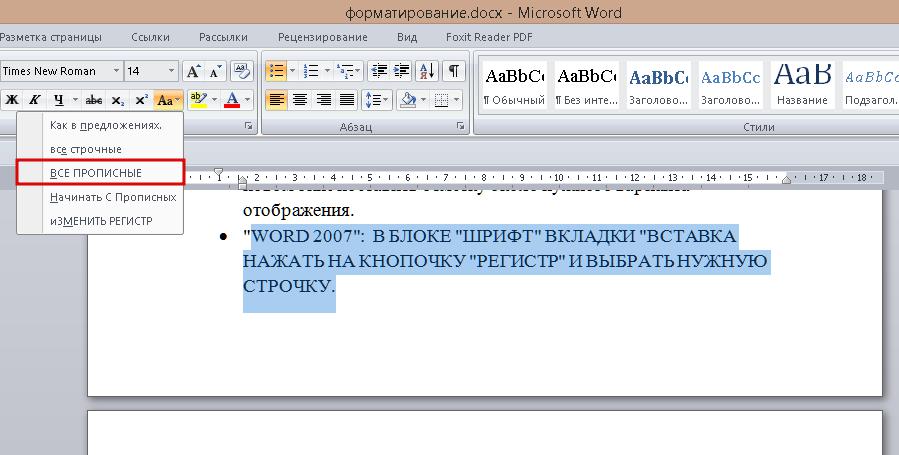
Изменение регистра
Он позволяет отформатировать текст, если он был введен с включенной клавишей CapsLock, делающей все буквы заглавными (прописными). Чтобы воспользоваться этим инструментом, нужно:
- «Word 2003»: в меню «Формат» выбрать подпункт «Регистр» и в новом окне поставить отметку около нужного варианта отображения.
- «Word 2007»: в блоке «Шрифт» (вкладка «Вставка») нажать на кнопочку «Регистр» и выбрать нужную строчку.
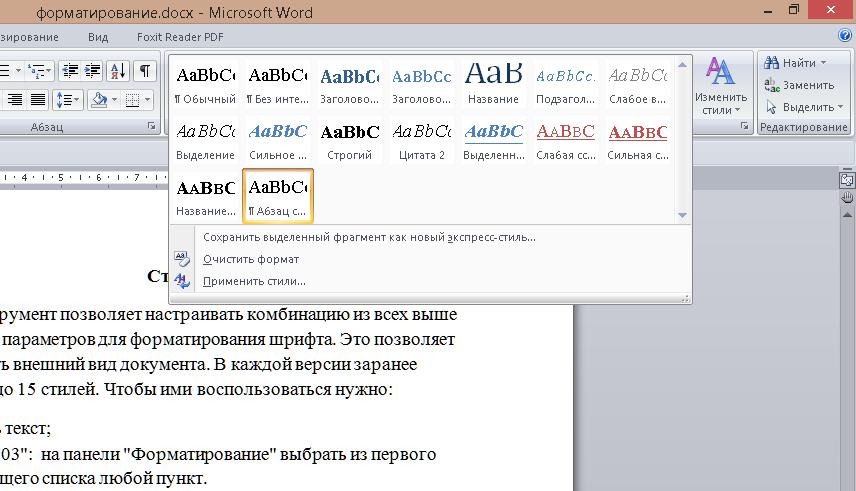
Стили
Этот инструмент позволяет настраивать комбинацию из всех выше перечисленных параметров для форматирования шрифта. Это позволяет быстро изменять внешний вид документа. В рассматриваемых версиях заранее настроено от 3 до 15 стилей. Чтобы ими воспользоваться, нужно:
- выделить текст;
- в «Word 2003»: на панели «Форматирование» выбрать из первого выпадающего списка любой пункт;
- «Word 2007»: в блоке «Стили» нажать на кнопку в правой нижней части субблока. В открывшемся списке выбрать желаемый вариант.

Для изменения настроек стилей нужно:
- «Word 2003»: в меню «Формат» выбрать подпункт «Автостили и форматирование». В блоке в правой части окна нажать на любой из стандартных стилей ПКМ и выбрать подпункт «Изменить».
- «Word 2007»: в блоке «Стили» нажать правой кнопкой мыши на любой из прямоугольников и перейти в подпункт «Изменить».
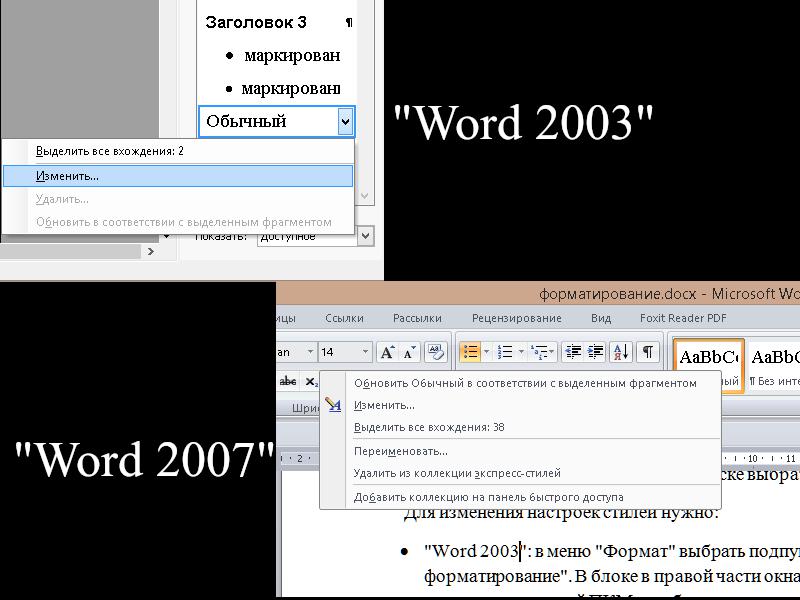
Чтобы сделать отредактированный стиль доступным для дальнейшего использования в других документах, нужно поставить отметку около «Добавить в шаблон» (2003) или «в новых документах, использующих этот шаблон» (2007).
Перенос форматирования
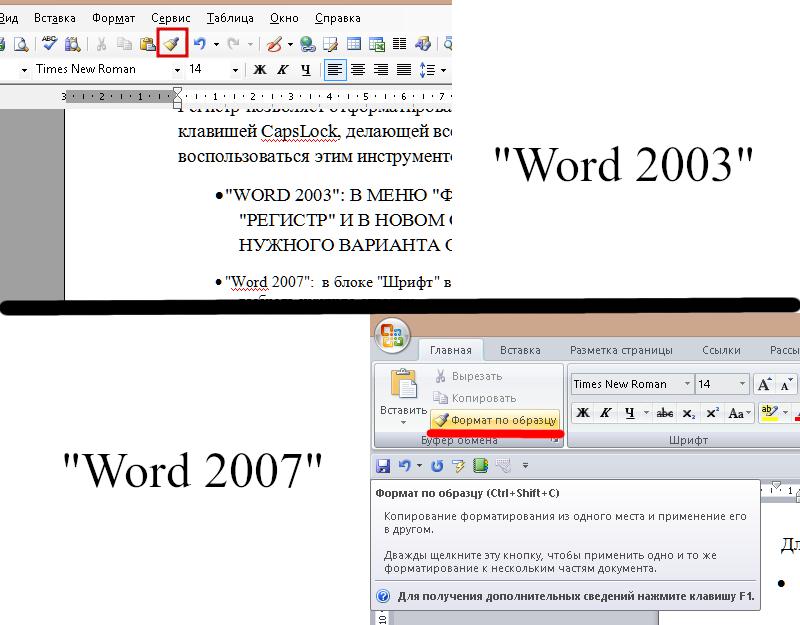
Иногда при форматировании шрифтов в «Word” проще скопировать готовый вариант, чем делать все «с нуля». В этом может помочь инструмент под названием «Формат по образцу». Используется он следующим образом:
- Выделить участок текста с нужным форматированием.
- Нажать на кнопку инструмента. Она похожа на малярную кисточку.
- Выделить текст, нуждающийся в преобразовании.
Также для этого инструмента существует пара «горячих клавиш»: Ctrl + Shift + C и Ctrl + Shift + V. Первая копирует вариант форматирования, а вторая применяет его.
Форматирование шрифта — это процесс оформления текстовой информации с целью соответствия правилам, предъявляемым к внешнему виду документов. Лучше всего с этой задачей справляется редактор Microsoft Word, так как в нем присутствуют все необходимые для этого инструменты.
|
 |
|
||||||||
|
|
|||||||||||||||||||||||||||||||||||||||||||||||||||||||||||
|
2010г. © «Catalog-kd» Веб-разработка, графический дизайн, реклама. По вопросам обращайтесь: ICQ 612947903, либо пишите на E-mail: Catalog-kd@yandex.ru |


![]()