
When you want your text to standout and look different in your PowerPoint presentation, WordArt is a great place to start! But, what exactly is WordArt in PowerPoint and how should we used it?
WordArt in PowerPoint is a tool that provides a quick way to make the text standout by adding special effects such as glow effect, 3D effect, shadow, rotation and even curved text! To add WordArt in PowerPoint, simply click on “Insert”, and then “WordArt”.
Once you have added the WordArt in PowerPoint, it is good to know how to customize WordArt in PowerPoint. So, in this article, I will be providing you all the details on how to add WordArt (in a step-by-step manner), how to customize it to make it look nice, and how to clear the WordArt effect from the text!
So, let’s get started!
A Quick Note Before We Begin – For the purpose of this article, I shall be using a presentation template from Envato. With Envato, you get access to thousands of presentation designs so you never run out of options again. Not only is Envato very affordable, but it is also the best in the business when it comes to templates!
1. What is WordArt in PowerPoint?
WordArt is a fun and attractive way to make your text stand out in your PowerPoint presentation. It allows you to make your text appear in different effects such as a 3-D effect, curved text effect, color gradients, etc.
To use the WordArt feature in the PowerPoint presentation, you have to select the “Insert WordArt” button in the “Text” section of the “Insert” tab of the ribbon.
2. Why is WordArt Used in PowerPoint?
The main purpose of using WordArt in PowerPoint is to grab the attention of the audience by emphasizing the text in an eye-catching manner! The WordArt feature gives users the option to insert effects by customizing the shadows, outline, texture, etc. to selected texts in PowerPoint.
WordArt has been used ever since PowerPoint became a household name! In fact, WordArt was one of the key features that made PowerPoint popular initially.
As more and more people used WordArt without any discretion, over the years, more design options were added to presentation applications making WordArt a bit redundant.
Today, WordArt in PowerPoint is just one of the features available and it is not talked about that often. Nevertheless, there is still a huge merit in using WordArt as long as it is used discretely!
3. How to Insert WordArt in PowerPoint?
The process of inserting WordArt in your PowerPoint presentation is described in 2 easy steps below.
Step-1: Click on the “Insert WordArt” button
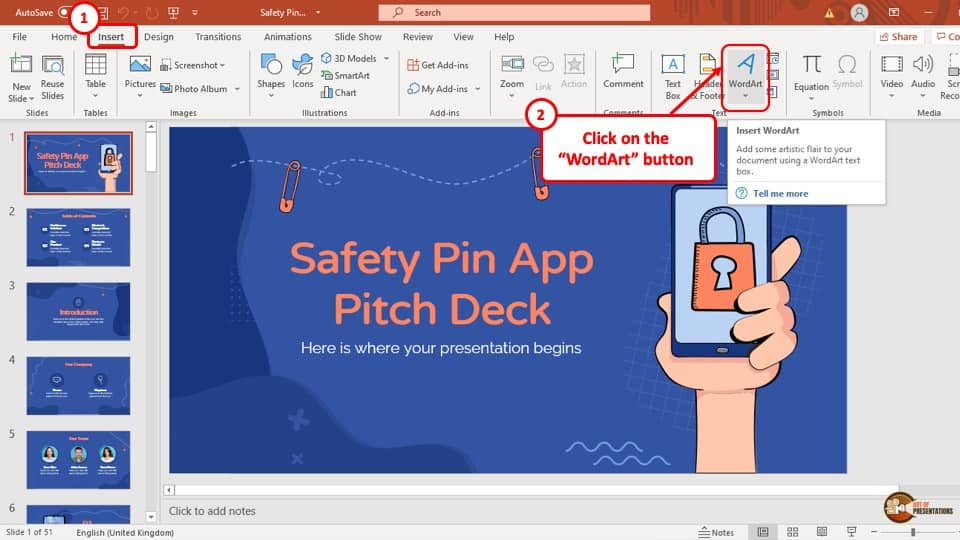
The first step of inserting WordArt to text in your PowerPoint presentation is to go to the “Insert” tab. In the “Text” section of the “Insert” tab, select the icon that looks like a tilted letter ‘A’ (check the image above), which is the “Insert WordArt” button.
A drop-down menu will appear on screen after click on the button.
Step-2: Select the preferred WordArt effect

The drop-down menu will give you a range of WordArt style options to choose from.
Simply select the effect you want to give to the text and a placeholder with the effect of the WordArt will automatically appear in the middle of the screen.
Clear the sentence ‘Your Text Here’ and type in the text to insert a Word art in your PowerPoint presentation.
4. How to Convert Existing Text to WordArt in PowerPoint?
To convert an existing text to WordArt in your PowerPoint presentation, you can use the method described above. But, let me show you another way to add WordArt to the text in PowerPoint.
You can use the “WordArt Style” section of the “Shape Format” tab. The whole process is described step-by-step below.
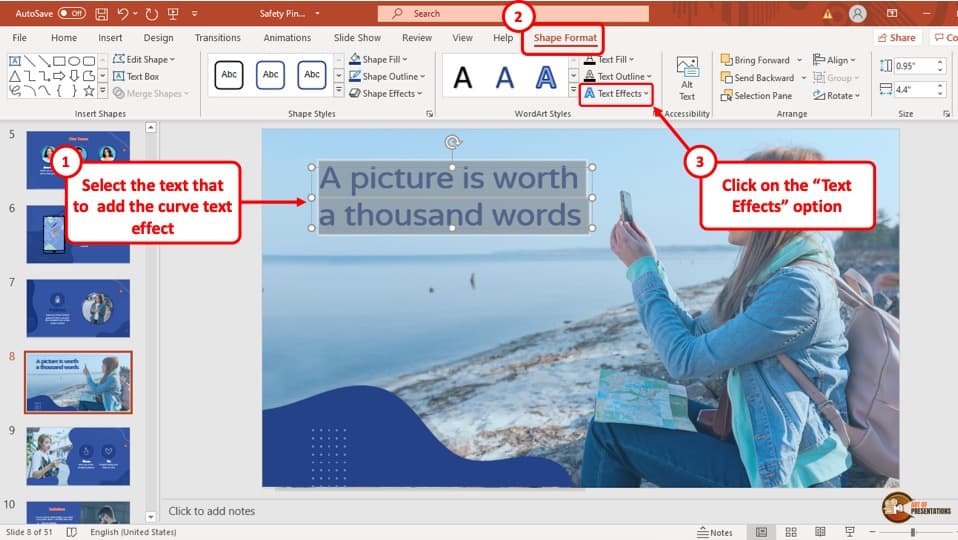
Step-1: Select the text and go to the “Shape Format” tab
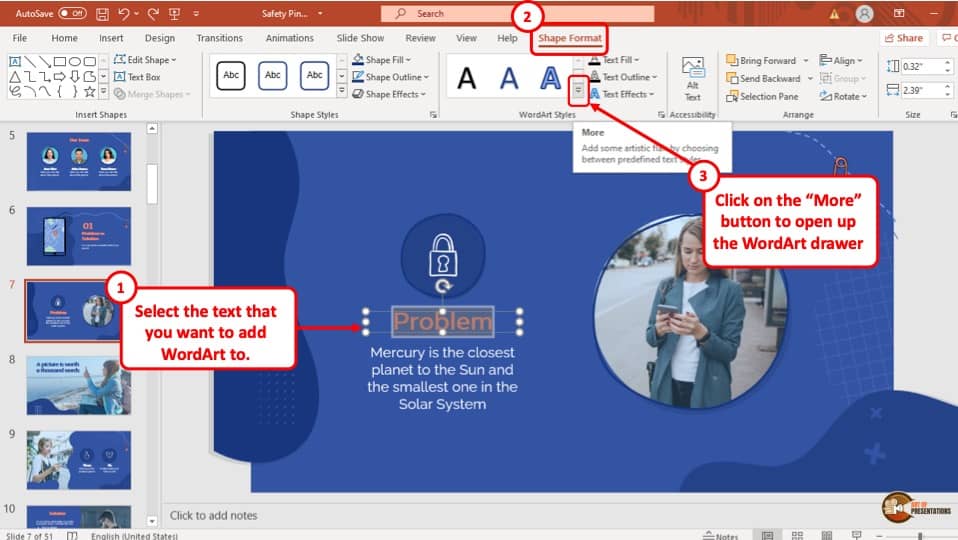
The first step of the process is to select the text that you want to convert into a WordArt and go to the “Shape Format” tab of the ribbon.
Step-2: Click on the “More” button
After going to the “Shape Format” tab, you will be able to see the “WordArt” section, which is the third section of the “Shape Format” tab.
Click on the “More” button which has the icon of a small arrow pointing downwards with a horizontal line over it. After selecting the “More” button, a drop-down menu will appear. (please refer to the image in step 1)
Step-3: Select you preferred WordArt style.
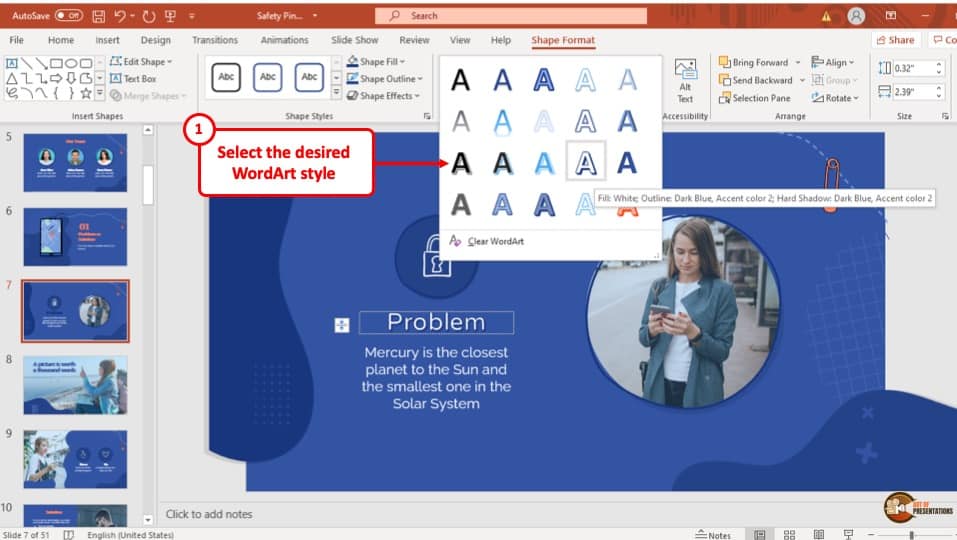
Now all you have to do is click on the preferred WordArt style that you want the selected text to convert to. After picking and clicking on your desired WordArt style, the selected existing text will be changed into the preferred WordArt style.
5. How to Edit WordArt in PowerPoint?
The first thing to know is that you can apply all the formatting options to WordArt text just the way you can format the text in PowerPoint. That means you can apply the bold, italics, underline, and other font formatting options to your WordArt Text!
I have written a detailed article on how to format text in PowerPoint correctly. So, make sure you check out that article as well!
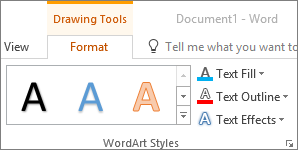
Furthermore, the WordArt feature allows you to edit the WordArt style of texts to a great extent. Users can change the style of a WordArt by using the “Text Fill” option, the “Text Outline” option, and the “Text Effect” option.
A description of all the tools that you can use in the WordArt feature are described below –
Text Fill
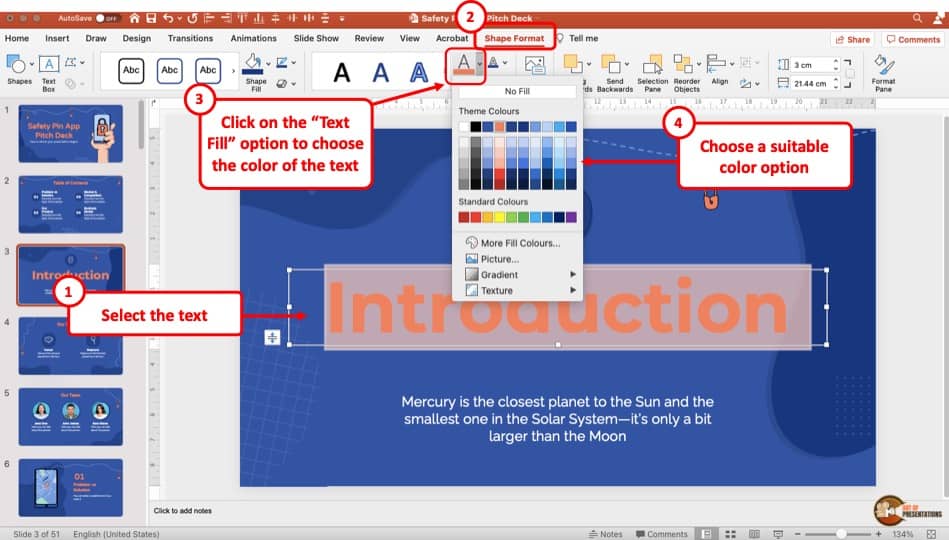
Text fill is a tool that you can use to fill the WordArt with colors, texture, gradient or even pictures. The “Text Fill” tool is the first option in the “WordArt Styles” section of the “Shape Format” tab.
To use a “Text Fill” in your WordArt text, select the text you want to fill and then select your preferred text fill and the text will change accordingly.
Text Outline

The “Text Outline” tools allows users to customize the outline of the WordArt and change the color, line style and width. It is the second option in the “WordArt Style” section of the “Shape Format” tab.
To customize the outline of your WordArt, select the WordArt text you want to customize the outline of and then select your preferred style of outline from the drop-down menu of the “Text Outline” option and the outline of the WordArt will change accordingly.
Text Effect
The “Text Effect” tool is the most fun to use among the three tools of the “WordArt Style” section. It allows users to insert various effects to the WordArt such as shadows, reflection, glow, 3-D rotation, etc. This is the last option of the “WordArt Style” section.
To insert an effect to you WordArt text, select the text you want to add an effect to and then simply select the preferred effect from the “Text Effect” drop-down menu and the WordArt text will change accordingly.
There are 6 types of text effects that you can add. Let’s take a look at each of these in detail below –
1. Shadow Text Effect

The shadow text effect will add a shadow to the text that you have selected. You can apply the shadow to the outer or the inner part of the text. Plus, you can also add perspective shadow that will be visible below the text.
You can also adjust the direction of the shadow as per your liking. There are ton of different options that you can play with. Simply click on “Shadow Options” to open up the details of the shadow.
2. Reflection Text Effect
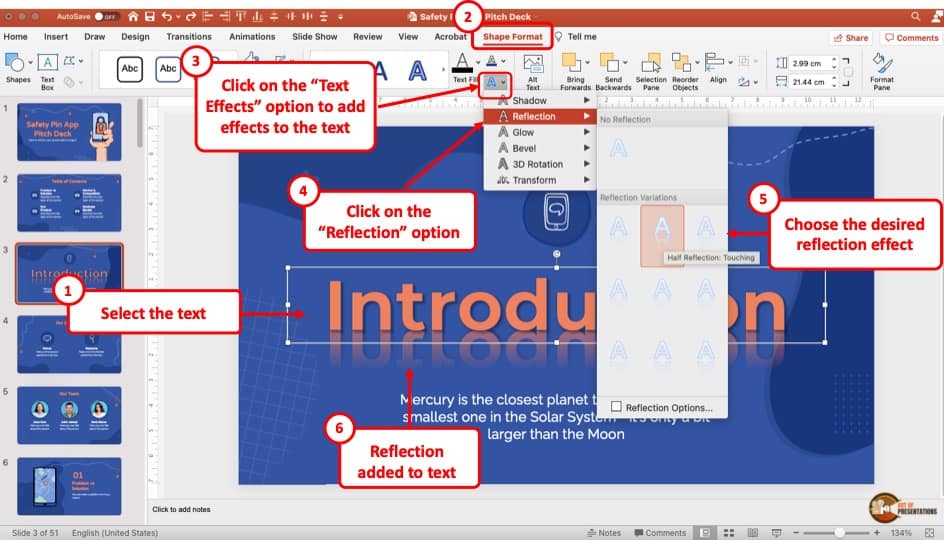
The reflection text effect will add the reflection effect to the text. This adds an effect to the text as if the text is floating over water.
There are various options to choose from the dropdown. Each of these options may look quite similar but add a subtle and a distinct reflection!
You can also click on the “Reflection Options”
3. Glow Text Effect
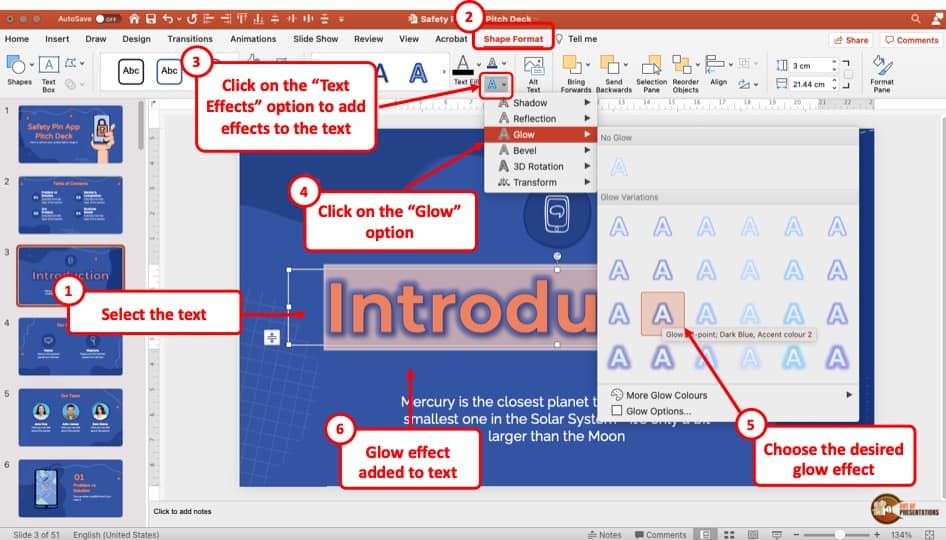
It is easy to get confused between the “Shadow Text Effect” option and the “Glow Text Effect” option. However, these are two different effects!
The “Glow Text Effect” will add a glow to the text. Think of it as a neon shop sign at night when seen from far. You can see the text but you will also see the glow around the text.
Again, there are multiple different options to choose. Furthermore, you can also customize the glow effect further by clicking on the “Glow Options”. You can change the blur, distance, or the direction of the glow effect.
You can also choose a different color for the glow around the text.
4. Bevel Text Effect
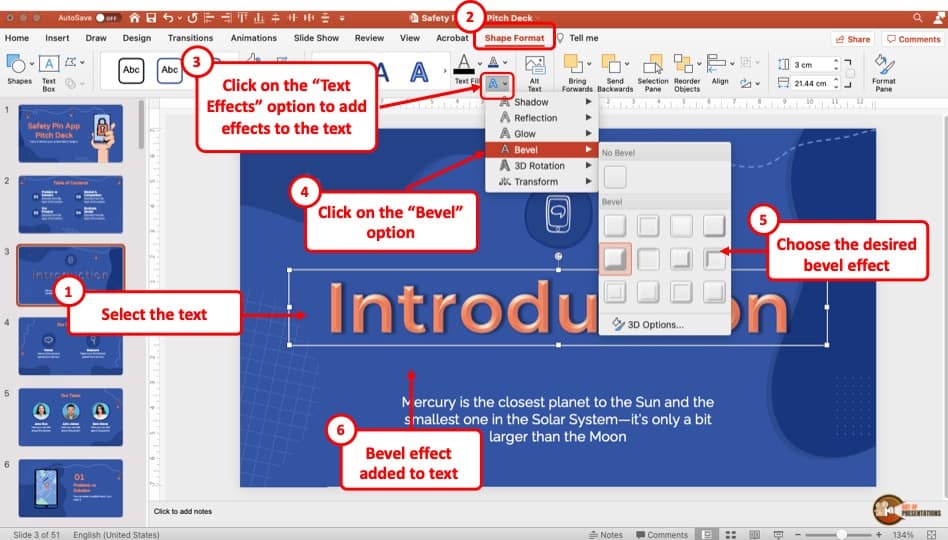
The next option is the “Bevel Text Effect“. This option adds a bevel to the text. You can adjust the bevels but I must admit – this is one of my least favorite text effect option. In my opinion, it doesn’t really add any modern style to the text design.
That said, it is just my opinion and there are vary many ways you can use this text effect! It is especially useful when you want to add nostalgic touch to your text in PowerPoint!
5. 3D Rotation Text Effect
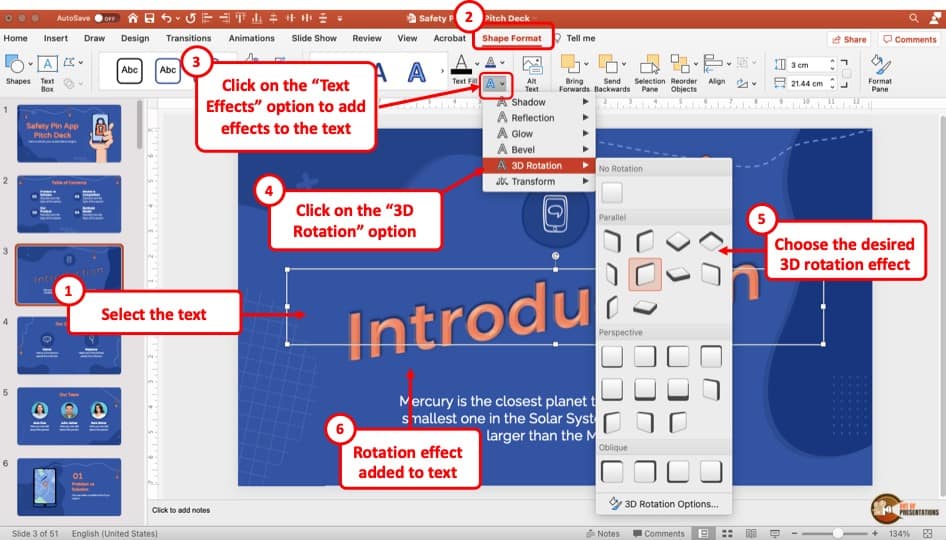
The “3D Rotation Text Effect” does exactly what the name sounds like. It allows you to rotate the text. Furthermore, this option also allows you to make the text look 3 dimensional.
There are several default options that are already ready to use as is. However, you can also further tinker with the rotation angle and adjust it as per your requirement by clicking on the “3D Rotation Options“
You can also make the text look 3-dimensional by adding “Depth“, “Depth Color” and “Contour” options available “3D Format” settings under the “3D Rotation Options“
6. Transform Text Effect
The “Transform Text Effect” can help you transform the text by changing the direction of flow of text. Using this option, you can also curve text in PowerPoint (discussed in detail in the next section).
The transform text effect option will transform the overall shape of the text.
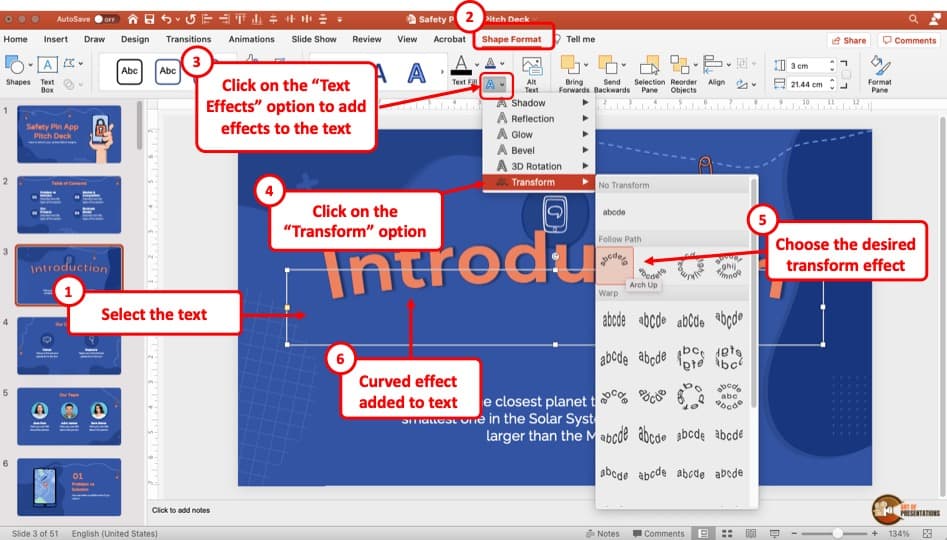
6. How to Curve Text in PowerPoint?
To curve text in your PowerPoint presentation, you have to use the “Transform” effect in the WordArt “Text Effect” tool drop-down menu. Here’s how to do it in a step-by-step process.
Step-1: Go to the “Shape Format” tab
To begin, select the WordArt text that you want to curve, and you will see that it will automatically take you to the “Shape Format” tab in the ribbon of the PowerPoint presentation.
Step-2: Go to the “Transform” option.
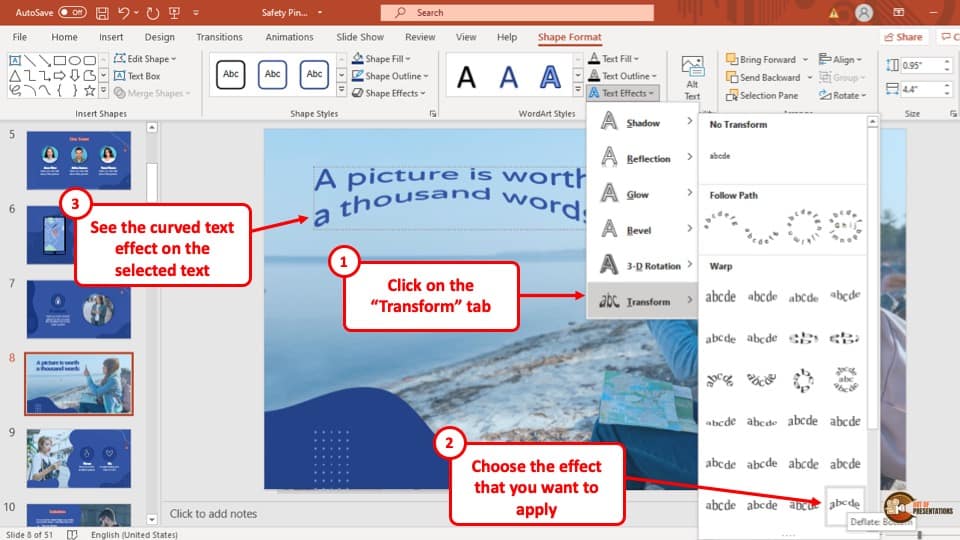
The next step is to select the “Transform” option from the “Text effect” tool in the “WordArt Style” section which is located in the “Shape Format” tab. After selecting the “Transform” option, another drop-down menu will appear on your screen.
Step-3: Select your preferred style of WordArt curve
The new drop-down menu of the “Transform” option has numerous transformation styles to choose from. Simply select your preferred text curve and the selected text will curve accordingly (check the image above in step 2 for visual reference).
7. How to Clear WordArt in PowerPoint?
If you don’t like how the effect looks on the text and you would like to start from scratch, then you can use the “Clear WordArt” option. The whole process is described in 3 simple steps below.
Step-1: Go to the “Shape Format” tab
The first thing that you have to do is to select the WordArt text in your PowerPoint presentation. After that head on to the “Shape Format” tab located in the ribbon.
Step-2: Click on the “More” button
With the WordArt text selected and after accessing the “Shape Format” tab, click on the “More” button in the “WordArt Style” section. It will open a drop-down menu.
Step-3: Select the “Clear WordArt” button
In the final step, all you have to do is select the “Clear WordArt” button at the bottom of the drop-down of the “More” button. After selecting the “Clear WordArt” button, the text will be cleared of WordArt immediately.
Credit to Katemangostar (on Freepik) for the Featured Image (further edited) of this article
WordArt is a quick way to make text stand out with special effects. You begin by picking a WordArt style from the WordArt gallery on the Insert tab, and then customize the text as you wish.


Try it!
-
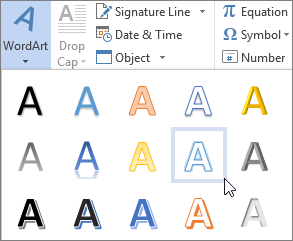
Click Insert > WordArt, and pick the WordArt style you want.

In the WordArt gallery, the letter A represents the different designs that are applied to all text you type.
Note: The WordArt icon is located in the Text group, and it may appear different depending on the program you’re using and the size of your screen. Look for one of these icons:
-
The placeholder text «Your text here» appears, with the text highlighted.
Enter your own text to replace the placeholder text.


Tips:
-
You can enter entire sentences, and even paragraphs, as WordArt. (You may have to change the font size for longer text.) And in Word, you can also convert existing text to WordArt in Word.
-
You can include symbols as WordArt text. Click the location for the symbol, and on the Insert tab, click Symbol, and pick the symbol you want.
Do more things with WordArt
Select a heading below to open it and see the detailed instructions.
You might have tried using shape styles to change the shape of WordArt and then were puzzled that the text didn’t change. Use the text options in the WordArt Styles group instead. Shape styles and effects apply to the box and background surrounding your WordArt, not to the WordArt text. So, to add effects to your WordArt, such as shadows, rotation, curves, and fill and outline colors, you use the options in the WordArt Styles group, including Text Fill, Text Outline, and Text Effects.
Note: Depending on your screen size, you might only see the icons for WordArt Styles.

-
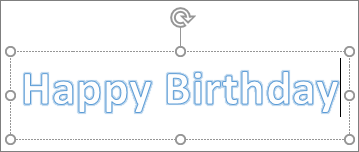
Select the WordArt text or letters to change.
The Drawing Tools Format tab appears.
-
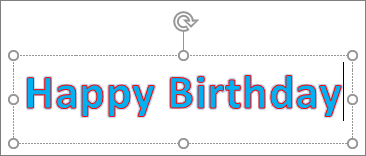
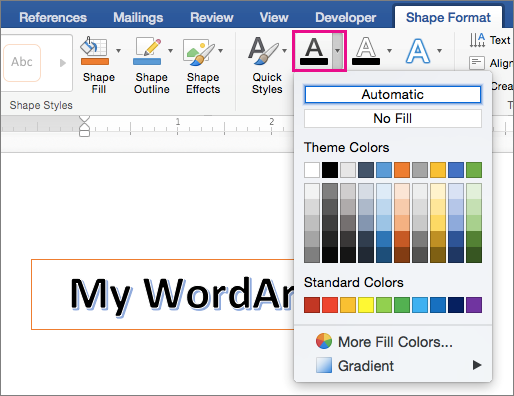
On the Drawing Tools Format tab, click Text Fill or Text Outline, and pick the color you want.
-
Click outside of your text box to see the effect.
In this example, a light blue text fill and a red text outline were applied.

You can curve text around a circular object.
90 seconds
-
Select the WordArt text or letters to change.
The Drawing Tools Format tab appears.
-
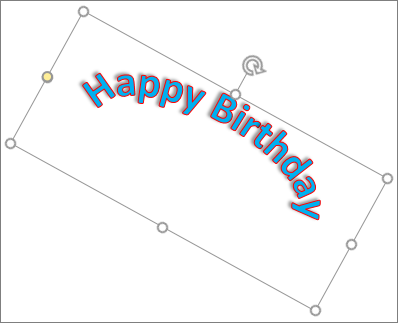
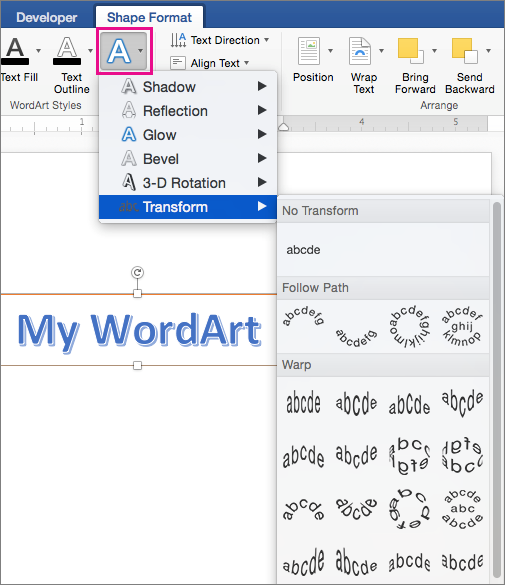
To create a curved effect, on the Drawing Tools Format tab, click Text Effects >Transform and pick the one you want.
Important: The Text Effects
menu is not the same as the Shape Effects menu. If you don’t see Transform at the bottom of the menu, make sure you’ve clicked the Text Effects menu.In this example, the first curved transform effect is selected.
-
Click outside of your text box to see the effect.
Use the Text Effects menu to create other effects, such as shadow, reflection, glow, bevels, and 3-D rotation. This example shows WordArt with a curved transform effect and a shadow applied.
 menu is not the same as the Shape Effects
  menu. If you don’t see Transform at the bottom of the menu, make sure you’ve clicked the Text Effects menu.

-
To rotate WordArt text to any angle, select it, and then drag the circular rotation handle at the top of the box.
-
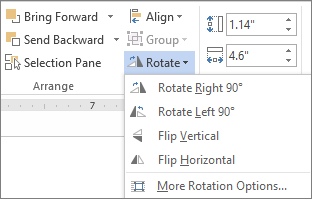
To flip WordArt or rotate it 90 degrees, click the Drawing Tools Format tab, click Rotate in the Arrange group, and then select an option.
To change the font size or style of your WordArt text:
-
Select the WordArt text or letters to change.
-
On the Home tab, select options in the Font group, such as font style, font size, or underline.
-
In your Word document, select the text to convert to WordArt.
-
On the Insert tab, click WordArt, and then pick the WordArt you want.
Double-click the WordArt that you want to remove, and then press Delete.
Insert WordArt
-
Click where you want to insert decorative text in a document.
-
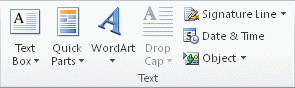
On the Insert tab, in the Text group, click WordArt.
-
Click any WordArt style, and start to type.
Do more things with WordArt
Select a heading below to open it and see the detailed instructions.
-
Click anywhere in the WordArt text that you want to change.
-
Under Drawing Tools, on the Format tab, click any option.
For example, you can change the direction of the WordArt text by clicking Text Direction in the Text group and choosing a new direction for the text.
Double-click the WordArt that you want to remove, and then press Delete.
Add WordArt
Excel
-
On the Insert tab, in the Text group, click WordArt, and then click the WordArt style that you want.
-
Enter your text.
-
You can add a fill or effect to a shape or text box as well as the text in the WordArt.
-
If you have a chart in your 2007 Office release document, you can replace the chart title with WordArt to give the title additional emphasis.
-
Outlook
-
On the Insert tab, in the Text group, click WordArt, and then click the WordArt style that you want.
-
Type your text in the Text box.
You can add a fill or effect to a shape or text box as well as the text in the WordArt.
PowerPoint
-
On the Insert tab, in the Text group, click WordArt, and then click the WordArt style that you want.
-
Enter your text.
-
You can add a fill or effect to a shape or text box as well as the text in the WordArt.
-
If you have a chart in your 2007 Office release document, you can replace the chart title with WordArt to give the title additional emphasis.
-
Publisher
-
On the Objectstoolbar, click Insert WordArt
. -
In the WordArt Gallery, click the WordArt that you want, and then click OK.
-
Type your text in the Text box.
If you want to change the text in the WordArt, double-click the WordArt that you want to change, and then type the new text in the Text box.
 .
.Word
-
On the Insert tab, in the Text group, click WordArt, and then click the WordArt style that you want.
-
Type your text in the Text box.
You can add a fill or effect to a shape or text boxas well as the text in the WordArt.
Do more things with WordArt
Select a heading below to open it and see the detailed instructions.
Excel
Do one or more of the following:
-
To change the text, select it, and then make the changes that you want.
-
To change the font, see Change the font or font size in Excel or Change the color of text in a worksheet.
-
To add an effect to WordArt, see Add or delete a fill, outline, or effect for text or WordArt.
-
To rotate the WordArt, see Rotate or flip a picture, shape, text box, or WordArt in Excel 2007.
-
To resize the WordArt, see Change the size of a picture, shape, text box, or WordArt.
-
To align the WordArt, see Align or arrange a picture, shape, text box, or WordArt.
-
To move the WordArt, see Move a picture, shape, text box, or WordArt.
For more information about selecting WordArt, see Select a shape or other object.
Outlook
Do one or more of the following:
-
To change the text, select it, and then make the changes that you want.
-
To change the font, see Change the size or formatting of text.
-
To add an effect to WordArt, see Add or delete a fill, outline, or effect for text or WordArt.
-
To rotate the WordArt, see Rotate or flip a picture, shape, text box, or WordArt in Outlook 2007.
-
To resize the WordArt, see Change the size of a picture, shape, text box, or WordArt.
-
To align the WordArt, see Align or arrange a picture, shape, text box, or WordArt.
-
To move the WordArt, see Move a picture, shape, text box, or WordArt.
For more information about selecting WordArt, see Select a shape or other object.
PowerPoint
Do one or more of the following:
-
To change the text, select it, and then make the changes that you want.
-
To add an effect to WordArt, see Add or delete a fill, outline, or effect for text or WordArt.
-
To rotate the WordArt, see Rotate or flip a picture, shape, text box, or WordArt in PowerPoint 2007.
-
To resize the WordArt, see Change the size of a picture, shape, text box, or WordArt.
-
To align the WordArt, see Align or arrange a picture, shape, text box, or WordArt.
-
To move the WordArt, see Move a picture, shape, text box, or WordArt.
For more information about selecting WordArt, see Select a shape or other object.
Publisher
Do one or more of the following:
-
To change the text, select it, and then make the changes that you want.
-
To change the font, see Change the font size or Change the color of text.
-
To add an effect to WordArt, see Add or delete a fill, outline, or effect for text or WordArt.
-
To resize the WordArt, see Change the size of a picture, shape, text box, or WordArt.
-
To align the WordArt, see Align or arrange a picture, shape, text box, or WordArt.
-
To move the WordArt, see Move a picture, shape, text box, or WordArt.
For more information about selecting WordArt, see Select a shape or other object.
Word
Do one or more of the following:
-
To change the text, select it, and then make the changes that you want.
-
To change the font, see Change the font size.
-
To add an effect to WordArt, see Add or delete a fill, outline, or effect for text or WordArt.
-
To rotate the WordArt, see Rotate or flip a picture, shape, or WordArt.
-
To resize the WordArt, see Change the size of a picture, shape, text box, or WordArt.
-
To align the WordArt, see Align or arrange a picture, shape, text box, or WordArt.
-
To move the WordArt, see Move a picture, shape, text box, or WordArt.
For more information about selecting WordArt, see Select a shape or other object.
Excel
When you remove the WordArt style from your text, the text remains and changes to plain text.
-
Select the WordArt text that you want to remove the WordArt style from.
-
Under Drawing Tools, on the Format tab, in the WordArt Styles group, click the More button
, and then click Clear WordArt.To remove the WordArt style from part of your text, select the text that you want to remove the WordArt style from, and then follow the steps above.
 , and then click Clear WordArt.
PowerPoint
When you remove the WordArt style from your text, the text remains and changes to plain text.
-
Select the WordArt text that you want to remove the WordArt style from.
-
Under Drawing Tools, on the Format tab, in the WordArt Styles group, click the More button
, and then click Clear WordArt.To remove the WordArt style from part of your text, select the text that you want to remove the WordArt style from, and then follow the steps above.
Do the following for all programs listed in the Applies To at the top of the article.
-
Double-click the WordArt that you want to remove to select it, and then press Delete.
-
In Office for Mac 2016 or later, select the Insert tab on the Ribbon.
or
In Office for Mac 2011, select Insert on the toolbar.
-
Select WordArt, and pick the WordArt style you want.
In the WordArt gallery, the letter A represents the different designs that are applied to all text you type.
-
Enter your text.

Tip: You can also include symbols as WordArt text. To do so, click the location in your document for the symbol, and on the Insert tab, click Advanced Symbol, and pick the symbol you want.
Do more things with WordArt
Select a heading below to open it and see the detailed instructions.
To create curved or circular WordArt text, you add a Transform text effect.
-
Select the WordArt.
When you do that, the Shape Format tab appears.
-
Click Text Effects > Transform and pick the effect you want.

To change the color of the WordArt text, you change the Text Fill.
-
Select the WordArt text or letters to change.
When you do that, the Shape Format tab appears.
-
Click Text Fill, and pick the color you want.
Tip: To change the outline of the WordArt text, on the Shape Format tab, click Text Outline.
-
Select the text to convert to WordArt.
-
On the Insert tab, click WordArt, and then pick the WordArt style you want.
In Microsoft 365 for the web you can see WordArt that’s already in your document, presentation, or worksheet, but to add more WordArt you need to open or edit the doc in the desktop version of Word, PowerPoint, or Excel.
In Microsoft 365 for the web, you can use the Font features on the Home tab to change the font color and size, and apply bolding, italics, or underlines to your text.
If you don’t have the desktop version of Word or PowerPoint, you can try it or buy it in the latest version of Office now.
Microsoft PowerPoint имеет широкий спектр инструментов, которые позволяют нам разнообразить наши презентации. Одним из наиболее часто используемых инструментов является WordArt .
WordArt — это коллекция стилей текста и специальная функция, которая позволяет пользователям применять специальные эффекты к тексту, такие как объемный 3D текст, цвет, градиент и многое другое.
Добавление WordArt в презентацию PowerPoint
Чтобы вставить объект WordArt нужно перейти на вкладку Вставка и нажать на WordArt .

Теперь можно изучить галерею WordArt , в которой существует широкое разнообразие конструкций, с помощью которых возможно сделать дизайн презентации более интересным.

После того, как выбран подходящий эффект, его всегда можно усилить как с помощью стандартных функций работы с текстом — сделать его жирным или курсивом, изменить шрифт, размер, и т.д., так и с помощью стилей Word Art — заливка текста, контур текста, текстовые эффекты — тень, отражение, свечение, рельеф, поворот объемной фигуры, преобразование.

Поэкспериментировав с различными вариантами, можно научиться создавать очень красивые текстовые эффекты.
Где можно использовать WordArt?
WordArt можно использовать в любой презентации и на любом слайде, где нужен красивый оригинальный дизайн текста.
Например:
— Титульные слайды
— Заголовки слайдов
— Создание 3D текста для диаграмм
Главное, чтобы этот эффект соответствовал дизайну вашего шаблона и содержанию презентации.
Давайте посмотрим на реальном примере. Для сравнения на слайде ниже вы видите слово «презентация», написанное в двух вариантах. Первый — с применением стилей WordArt, второй — без.

Грамотное применение функции WordArt позволяет создавать красивые текстовые эффекты как начинающим пользователям PowerPoint, так и продвинутым мастерам.
Источник: ProPowerPoint.Ru
Пожалуйста, проголосуйте за статью и поделитесь с друзьями в социальных сетях!
Microsoft PowerPoint had a wider variety of tools which allows us to enhance our presentations, one of the most used tools are the WordArt.
WordArt is a special feature that allows the users to give special effects to the text such as curved text, 3D text, color gradiants, and more.
To insert a WordArt you just need to click at Insert > WordArt.
Now you will be browsing the WordArt gallery, in which you can see a wider variety of designs. You can always modify the text, get it bold or italic, change the size, etc.
Where you can use WordArt? You can WordArt in any PowerPoint slide where you need to make nice text effects. Here are a few ideas:
- Titles for your PowerPoint slides
- Create 3D text and decorate your diagrams
- Create titles for your boxes inside PowerPoint slide
- Make 3D text with perspective to match a given 3D PowerPoint template or slide design
Finally, let’s see a real example. In this slide below created in Microsoft PowerPoint, we have used WordArt feature to create a nice text effect using a 3D Style. You can play with the WordArt options to reproduce the same style or apply other nice styles. The feature works very well for 3D text and 2D text effects and styles, making it possible to create nice text effects in PowerPoint for beginners but also for advanced users.
If you enjoyed to use WordArt, you are welcome to check our free PPT templates and resources. You can download free PowerPoint backgrounds and templates for your presentations.
Содержание
- 0.1 Добавление WordArt в презентацию PowerPoint
- 0.2 Где можно использовать WordArt?
- 1 Кнопки на вкладке Формат инструмента чертежа WordArt
- 2 Добавление элементов WordArt в MS Word
- 3 Оформление элементов WordArt в MS Word
- 3.1 Первый пример изменения направления текста:
- 3.2 Второй пример изменения направления текста:
- 3.3 В этом видео показано как вставить фигуры WordArt в MS Word:
- 3.4 Понравилась статья? Поделитесь ею с друзьями и напишите отзыв в комментариях!
Microsoft PowerPoint имеет широкий спектр инструментов, которые позволяют нам разнообразить наши презентации. Одним из наиболее часто используемых инструментов является WordArt .
WordArt — это коллекция стилей текста и специальная функция, которая позволяет пользователям применять специальные эффекты к тексту, такие как объемный 3D текст, цвет, градиент и многое другое.
Добавление WordArt в презентацию PowerPoint
Чтобы вставить объект WordArt нужно перейти на вкладку Вставка и нажать на WordArt .

Теперь можно изучить галерею WordArt , в которой существует широкое разнообразие конструкций, с помощью которых возможно сделать дизайн презентации более интересным.

После того, как выбран подходящий эффект, его всегда можно усилить как с помощью стандартных функций работы с текстом — сделать его жирным или курсивом , изменить шрифт, размер, и т.д., так и с помощью стилей Word Art — заливка текста, контур текста, текстовые эффекты — тень, отражение, свечение, рельеф, поворот объемной фигуры, преобразование..

Поэкспериментировав с различными вариантами, можно научиться создавать очень красивые текстовые эффекты.
Где можно использовать WordArt?
WordArt можно использовать в любой презентации и на любом слайде, где нужен красивый оригинальный дизайн текста.
Например:
— Титульные слайды
— Заголовки слайдов
— Создание 3D текста для диаграмм
Главное, чтобы этот эффект соответствовал дизайну вашего шаблона и содержанию презентации.
Давайте посмотрим на реальном примере. Для сравнения на слайде ниже вы видите слово «презентация», написанное в двух вариантах. Первый — с применением стилей WordArt, второй — без.

Грамотное применение функции WordArt позволяет создавать красивые текстовые эффекты как начинающим пользователям PowerPoint, так и продвинутым мастерам.
Источник: ProPowerPoint.Ru
Пожалуйста, проголосуйте за статью и поделитесь с друзьями в социальных сетях!
VN:F
Rating: 10.0/ (4 votes cast)
Что такое WordArt в PowerPoint?, 10.0 out of 10 based on 4 ratings

В предыдущих версиях PowerPoint появилась функция под названием WordArt , который позволяет вставлять специальные объекты, которые могут включать причудливые текстовые эффекты, такие как заливки градиента или кривые пути. Для PowerPoint 2016 Microsoft интегрировала WordArt в PowerPoint, так что вы можете применить форматирование WordArt к любому фрагменту текста в презентации, просто выделив текст и применяя форматы WordArt.
На рисунке показан пример того, что вы можете сделать с WordArt всего за пару минут.
Вы также можете создавать причудливые текстовые эффекты, подобные этому, используя WordArt.
Выполните следующие шаги, чтобы преобразовать мирский текст во что-то стоящее:
-
Выберите текст, к которому вы хотите применить форматирование WordArt.
Текст может быть в любом месте презентации. Например, вы можете применить форматирование WordArt к заголовку слайда или основному тексту.
-
Перейдите на вкладку «Формат чертежных инструментов».
На вкладке «Формат чертежных инструментов» показана группа стилей WordArt, показанная здесь. Как вы можете видеть, эта ленточная группа включает в себя несколько предварительно настроенных стилей WordArt, а также кнопки, которые позволяют вам управлять заполнением текста, контурным стилем и текстовыми эффектами, такими как тени и сияние.
Группа стилей WordArt на вкладке Формат инструментов чертежа.
-
Нажмите кнопку «Дополнительно», расположенную в нижней части полосы прокрутки справа от предопределенных стилей WordArt.
Появится галерея быстрых стилей WordArt, как показано здесь.
Галерея стилей WordArt Quick Styles.
-
Выберите стиль WordArt, который наиболее похож на форматирование, которое вы хотите применить.
Не беспокойтесь, если ни один из вариантов галереи не соответствует желаемому эффекту; вы можете изменить внешний вид текста позже.
-
Окунитесь в другие элементы управления WordArt в группе стилей WordArt на вкладке «Формат инструментов чертежа».


Ниже приведены другие элементы управления в группе стилей WordArt. Поэкспериментируйте с этими элементами управления столько, сколько хотите, пока не получите текст, который будет выглядеть правильно.
-
Text Fill: Устанавливает цвет заливки. Заполнение может быть простым цветом, градиентом (который смешивает два или более цвета), картиной, рисунком или текстурой.
-
Структура текста: Устанавливает свойства контура текста. Вы можете выбрать цвет, узор и толщину.
-
Текстовые эффекты: Позволяет применять причудливые текстовые эффекты, такие как тени, отражения, светящийся текст, скошенный текст, трехмерные вращения и преобразования.
Кнопка «Текстовые эффекты» — это ключ к созданию модных логотипов, таких как текст, который обтекает круги или текст, который имеет трехмерный вид.Когда вы нажимаете эту кнопку, появляется меню с различными вариантами форматирования текста:
-
Тень: Добавляет тень к тексту. Тень может быть непосредственно за текстом или может отображаться под текстом, что создает впечатление, что текст плавает над невидимой поверхностью.
-
Отражение: Создает слабое отражение на невидимой поверхности под текстом.
-
Glow: Добавляет светящийся эффект к тексту.
-
Bevel: Добавляет эффект скоса в текст, что создает впечатление, что текст был выточен из твердого объекта.
-
3-D Rotation: Поворот текста вокруг трех измерений.
-
Трансформация: Преобразует общую форму текста.
-
Элементы WordArt – это декоративный текст, применяемый, как правило, для красивого оформления статей в MS Word. Вставить такой текст можно в любую часть статьи, также можно изменять угол наклона текста и прочие параметры.
Добавление элементов WordArt в MS Word
Для того, чтобы добавить фигуры WordArt в MS Word, переходим во вкладку «Вставка» и выбираем пункт «WordArt». Ставим курсор мыши в то место, где хотим разместить фигуры WordArt (их можно перенести, если Вы уже вставили их в другом месте) и в появившемся поле пишем все, что нашей душе угодно.
 Например, нам нужно сделать красивый заголовок для статьи о животных.

Оформление элементов WordArt в MS Word
Для данного типа текста применимы те же виды форматирования, что и для обычного, т.е. его также можно сделать курсивом, жирным, подчеркнутым, можно изменять шрифт и регистр букв – разница лишь в самом внешнем виде текста (наличие тени, бликов, переходов и пр.). Для того, чтобы изменить направление текста, чтобы надпись была, скажем, сверху вниз или сбоку, достаточно просто выделить набранный Вами текст в указанном поле, после чего мы автоматически попадаем на вкладку форматирования и жмем на иконку «Направление текста», далее из приведенных вариантов, выбираем необходимый нам.
 На этой же вкладке можно изменить и оформление уже набранного в WordArt текста, и добавить фон, а также добавить интересные эффекты.
Первый пример изменения направления текста:
Второй пример изменения направления текста:
Если Вы хотите, чтоб текст был под некоторым углом и предложенные варианты Вас не устраивают, можно повернуть текст вручную. Для этого жмем на поле с текстом и зажав зеленый маячок вверху границы поля, поворачиваем в нужную сторону на нужный угол. Этим же способом можно и передвинуть текст в любое другое место, только перемещение начинаем зажав курсор мыши в виде крестика из стрелочек.

Как упоминалось выше, Вы можете выбрать любую форму, вид и направление текста, добавить/убрать тень и зеркальное отражение и пр. в меню «Текстовые эффекты» на вкладке средств рисования, появляющейся при нажатии на поле с текстом WordArt.
В этом видео показано как вставить фигуры WordArt в MS Word:
Рекомендуем смотреть видео в полноэкранном режиме, в настойках качества выбирайте 1080 HD, не забывайте подписываться на канал в YouTube, там Вы найдете много интересного видео, которое выходит достаточно часто. Приятного просмотра!
С уважением, авторы сайта Компьютерапия
Понравилась статья? Поделитесь ею с друзьями и напишите отзыв в комментариях!
Объекты «WordArt» в Microsoft® Office PowerPoint® 2010
Для создания оригинальных заголовков в документах рекомендуется использовать художественные заголовки «WordArt®», которые существенно расширяют художественные возможности в оформлении документов. Художественные заголовки «WordArt®» – это текстовые объекты, созданные с помощью готовых эффектов, к которым можно применить дополнительные параметры форматирования, то есть их свойства можно менять, используя различные цвета, узоры, границы и другие эффекты.
Рассмотрим, как работать с объектами «WordArt®».
Для того чтобы на слайд поместить заголовок «WordArt®»,перейдите на вкладку «Вставка» и в группе «Текст» откройте ниспадающее меню кнопки «WordArt®».
В предложенной коллекции шаблонов заголовков «WordArt®» щелкните по нужному шаблону. На слайде, в месте, где отображается фраза «Поместите здесь ваш текст», наберите нужный текст заголовка. После окончания ввода текста заголовка щелкните по свободному месту слайда.
Для того чтобы изменить текст заголовка «WordArt®», дважды щелкните курсором по заголовку «WordArt®» и наберите новый текст заголовка.
Также вы можете изменить стиль созданного заголовка «WordArt®». Для этого щелкните курсором по заголовку «WordArt®».
Перейдите на вкладку «Формат» и в группе «Стили WordArt®» раскройте меню кнопки «Дополнительные параметры».
В предложенной коллекции стилей щелкните по значку нового стиля.
Также вы можете форматировать текст созданной надписи. Для этого выделите введенный в объект «WordArt®» текст и перейдите на вкладку «Главная».
Как вы можете заметить, здесь располагаются инструменты для форматирования текста. В группе «Шрифт» меняется размер текста и стиль его написания, устанавливаются жирность и курсив шрифта. В группе абзац вы сможете назначить выравнивание текста, установить межстрочный интервал, создать список, а также поставить маркеры.
Все остальные методы работы с объектами «WordArt®» полностью соответствуют описанным ранее принципам работы для инструмента «Надпись».
Table of Contents
- Can you get word art on PowerPoint?
- How do I make text fancy in PowerPoint?
- How do you curve word art in PowerPoint?
- How do I make Word art curve?
- Where is transform in PowerPoint?
- What is the transform Gallery in PowerPoint?
- What is word art and why use it?
- What is word art with example?
- What is the purpose of using word art?
- What is word art called?
- How many types of word art are there?
- What is an artist’s best work called?
- What do you call an artist’s masterpiece?
- Who gets to decide what is a masterpiece?
PowerPoint, Word and Excel all offer many ways to edit and format text, but WordArt offers additional effects that the program otherwise applies only to images. These configurations outline text and fill them with color or a gradient. Some add 3D effects, such as bevel, and some add shadows.
Can you get word art on PowerPoint?
1On the slide on which you want to insert WordArt, click the Insert tab on the Ribbon and then click the WordArt button in the Text group. 2Select the WordArt style you want to use. 3Click the WordArt text box and then type the text you want to use.
How do I make text fancy in PowerPoint?
How to Create Fancy Text with WordArt in PowerPoint 2016
- Select the text you want to apply WordArt formatting to.
- Click the Drawing Tools Format tab.
- Click the More button found at the bottom of the scroll bar to the right of the predefined WordArt styles.
How do you curve word art in PowerPoint?
Create curved or circular WordArt
- Go to Insert > WordArt.
- Pick the WordArt style you want.
- Type your text.
- Select the WordArt.
- Go to Shape Format > Text Effects > Transform and pick the effect you want.
How do I make Word art curve?
Click the Insert tab. Choose the Word Art option, then click the text icon that looks the way you want your curved text to look. Click the Drawing Tools Format tab at the top of the window. Choose the Text Effects option, click Transform, then click a curve type from the options on the menu.
Where is transform in PowerPoint?
Right-click the top line, then click the Text Effects icon in the WordArt Styles group under the Drawing/Format tab. Select Transform from the drop menu, then choose one of the 40 Path or Warp presets from the list.
What is the transform Gallery in PowerPoint?
WordArt is one of the features available in PowerPoint that let you format a text or paragraph with different styles. You can apply a text transformation to change the way a text or paragraph look on the slide.
What is word art and why use it?
WordArt is a program that allows you to treat text as a graphic. You can use the program to add special effects and flourishes to text, and then insert the text in your document. It is useful for creating special text elements such as logos, mastheads, or titles.
What is word art with example?
WordArt Overview WordArt is a gallery of text styles that you can add to your publications to create decorative effects, such as shadowed or mirrored (reflected) text. For example, you can stretch a title, skew text, make text fit a preset shape, or apply a gradient fill.
What is the purpose of using word art?
WordArt is simple to create and use and easy to access. It can modify the look of the text by bending, skewing or stretching the shape. It can help in enhancing the look and feel of the text used in the Microsoft Office applications, especially in Word.
What is word art called?
Word art or text art is a form of art that includes text, forming words or phrases, as its main component; it is a combination of language and visual imagery.
How many types of word art are there?
There are two basic types of “word art”: (1) First, artworks that include words or phrases because of their ideological meaning, iconic status or significance as advertising copy. (That is, where the word-content is crucial.)
What is an artist’s best work called?
: a great work especially : the greatest achievement of an artist or writer.
What do you call an artist’s masterpiece?
Masterpiece, magnum opus (Latin, great work) or chef-d’œuvre (French, master of work, plural chefs-d’œuvre) in modern use is a creation that has been given much critical praise, especially one that is considered the greatest work of a person’s career or to a work of outstanding creativity, skill, profundity, or …
Who gets to decide what is a masterpiece?
It becomes just a pretty word that has lost its original meaning. Anyone can say a piece of art is a masterpiece as long as they are connected to the art elite, and then the piece is stamped as a masterpiece even if it is not. That is what should determine if it is a masterpiece or not.
Слова на начальном слайде презентации или слова, которые нужно выделить в презентации Powerpoint, можно выделить с помощью художественного текста. Если вы не знаете, как создавать ворд-арт в Powerpoint, предложите вам подписаться на статью ниже.
Вот как создать ворд-арт в PowerPoint, пригласить вас учиться и выступать в автономном режиме.
Шаг 1. На слайде, на котором вы хотите создать художественные слова, выберите «Вставить» -> «WordArt» -> выберите стиль художественного шрифта, который вы хотите создать.
Шаг 2: Появится рамка текстового поля шрифта, введите слова, которые вы хотите написать.
Шаг 3. Отредактируйте текстовое изображение
Выберите текстовое поле, в котором вы только что написали художественное слово, или вы также можете выбрать текстовое поле (текстовое поле, добавленное путем выбора Вставить -> Текстовое поле), содержащее слово, которое вы хотите написать художественное слово, затем выберите другой стиль художественного шрифта в стилях WordArt.
Чтобы раскрасить художественный текст, выберите «Формат» -> «Заливка текста» -> выберите нужный цвет шрифта.
Если вы хотите добавить цвета, вы выбираете «Другие цвета заливки», если вы хотите получить цвета из другого цвета на слайде, вы выбираете «Пипетка».
Заполните границы, вы также выберите текст и выберите «Формат» -> «Контур текста» -> выберите цвет границы для текста.
Отредактируйте эффекты для Word Art, выбрав «Формат» -> «Текстовые эффекты» -> «Выбор типа эффекта» -> «Выбор эффектов». Есть много типов эффектов на выбор:
- Тень: эффект тени текста.
- Отражение: эффект отражения.
- Свечение: световой эффект.
- 3-D Rotation: вращайте трехмерные буквы.
- Преобразовать: изменить стиль шрифта.
В дополнение к редактированию вышеуказанного рисунка вы также можете редактировать размер шрифта, шрифт, стиль шрифта в разделе «Шрифт» на вкладке «Главная».
Чтобы переместить текст, наведенный на текстовый фрейм, появится значок четырехмерной стрелки, которую вы удерживаете, и переместите художественное слово в нужное положение.
Итак, вы создали слово «искусство» в Powerpoint.
Выше TipsMake.vn поделился с вами тем, как создавать ворд-арт в Powerpoint. Надеюсь, после прочтения этой статьи вы сможете легко создать наиболее впечатляющее художественное слово для вашего PowerPoint, сделав его более живым и привлекательным. Удачи!