
Insert a watermark

-
On the Design tab, select Watermark.
-
Choose a pre-configured watermark, like DRAFT, CONFIDENTIAL, or DO NOT COPY.
-
For placing a logo or image, Select Watermark > Custom Watermark > Picture watermark > Select Picture. On the same menu you can create a custom text watermark.
Want more?
Insert a picture watermark
Use a custom text watermark
See all our content about watermarks
On the Design tab, select Watermark.
-
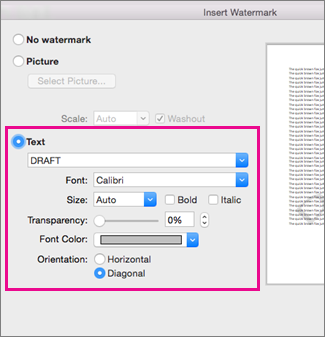
In the Insert Watermark dialog, select Text and either type your own watermark text or select one, like DRAFT, from the list. Then, customize the watermark by setting the font, layout, size, colors, and orientation.

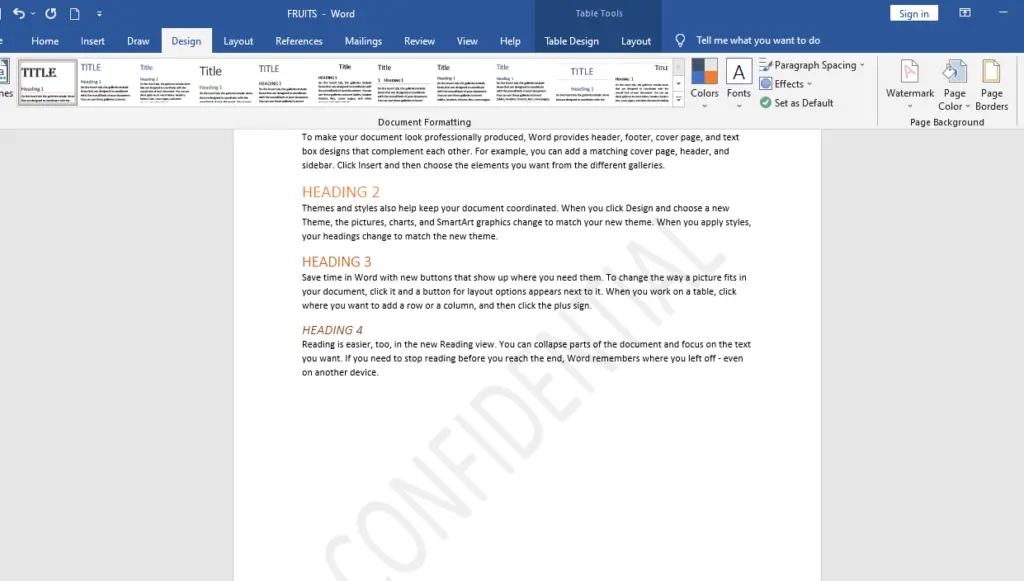
If you don’t see the watermark, click View > Print Layout. This also shows how the printed watermark will look.
-
Select OK.
Important:
Office 2010 is no longer supported. Upgrade to Microsoft 365 to work anywhere from any device and continue to receive support.
Upgrade now
-
On the Page Layout tab, select Watermark.
-
Choose a pre-configured watermark, like DRAFT or CONFIDENTIAL.
Important:
Office for Mac 2011 is no longer supported. Upgrade to Microsoft 365 to work anywhere from any device and continue to receive support.
Upgrade now
-
On the Layout tab, under Page Background, select Watermark.
-
Choose Text.
-
Type or edit your text for the watermark, or select a text watermark from the drop down menu, and then select the text formatting that you want.
Tips:
-
If the text watermark makes it difficult to read the text on the page, increase the transparency of the watermark text, or select a lighter color for the watermark text.
-
You can use the Size drop down menu to change the size of the watermark text.
-
In Word for the web, you can see watermarks that are already in a document, but you can’t change them or insert new ones.
If you have the Word desktop application, use the Open in Word command to open the document and insert or change a watermark there. When you’re done and you save the document, it will continue to be stored where you opened it in Word for the web. When you reopen it, you’ll see the watermarks in the doc.
Need more help?
Want more options?
Explore subscription benefits, browse training courses, learn how to secure your device, and more.
Communities help you ask and answer questions, give feedback, and hear from experts with rich knowledge.
This chapter describes how to set a watermark in MS Word. It also works in MS word 2013, 2016 and higher version. A watermark is a faint image that appears behind the text in a Word document.
Draft documents can be watermarked with the Draft Copy stamp, while duplicate documents can be watermarked with the Duplicate stamp. You can add a watermark to a Microsoft Word document by following the steps in this chapter.
Table of contents
- What is Watermark in Word?
- Types of watermark in MS Word
- How To Set Watermark In MS Word
- How to Insert a Custom Watermark
- How to Make Custom Picture Watermarks
- How to Remove a Watermark
- Summary
What is Watermark in Word?
A watermark is a faint image in the background of a document that shows up behind the text. You can use them to show the status of a document (confidential, draft, etc.), add a subtle company logo, or even add some artistic flair.
The use of watermarks in Microsoft Word creates an image or text that shows up behind the main text of a document. It is usually lighter than the text, so the document is easy to read. Text watermarks are often used to classify or explain the purpose of a document.
Types of watermark in MS Word
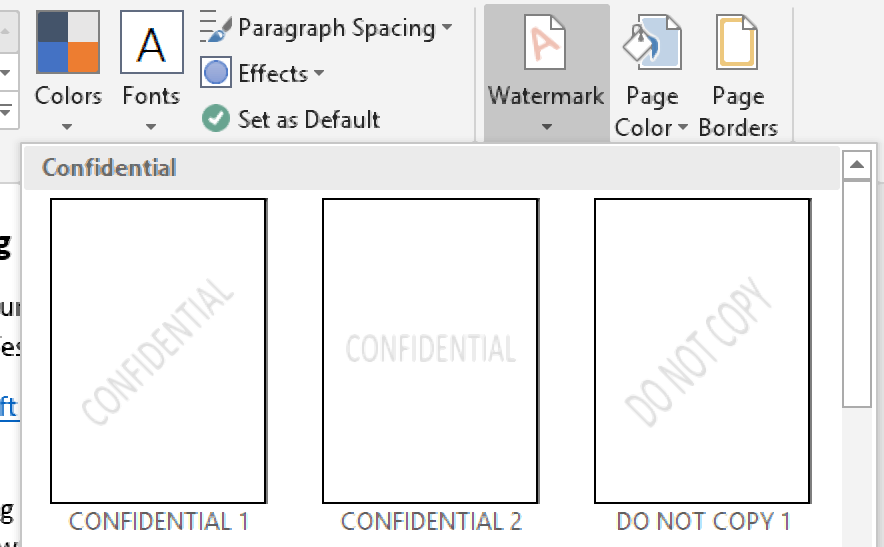
Word has six basic pale-gray watermarks:
- Confidential.
- Do Not Copy.
- Draft.
- Sample.
- ASAP.
- Urgent.
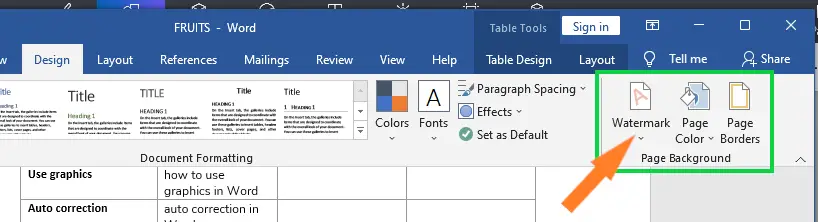
These watermarks can be placed in two different ways: horizontally or diagonally. These are good enough for most papers. To add a pre-made watermark, go to the Design tab and click on the Page Background group.
Time needed: 1 minute.
Here’s how to add watermarks to your Word document and change them.
- With your document open, switch over to the “Design” tab.

- In the Page Background group on that tab, select “Watermark” button.

- On the drop-down menu, click any of the built-in watermarks to insert it into your document.

- Word places the watermark behind the text.


How to Insert a Custom Watermark
A custom watermark is one that lets you change the text, as well as its font, size, and color, among other things. You can also use text or images to make your own watermarks. Follow these steps to add a custom watermark to a Word document.
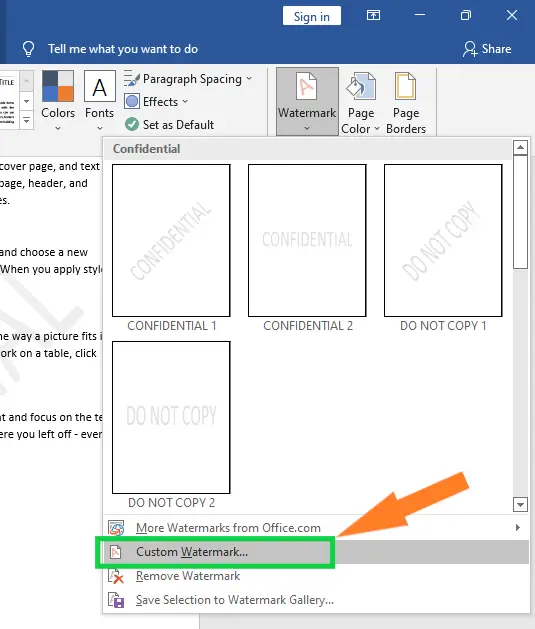
To do this, go to the “Watermark” drop-down menu and choose “Custom Watermark.”
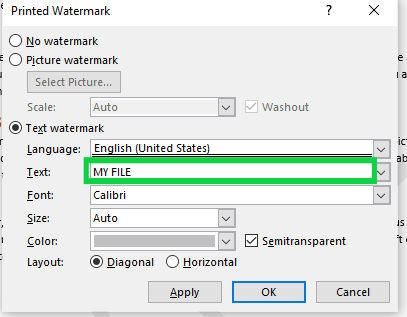
In the window that opens called “Printed Watermark,” choose “Text Watermark.” Type the text you want to use into the Text box, and then choose the language, font, size, color, and orientation. When you’re done, click “OK.”
Word puts a watermark with your custom text behind the text.
How to Make Custom Picture Watermarks
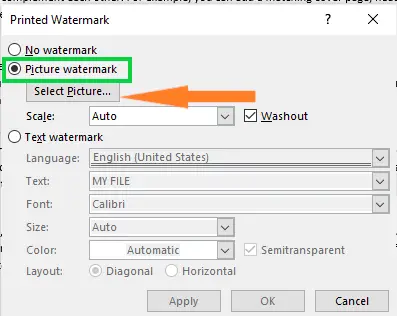
- Choose “Picture Watermark” and then click Select Picture if you want to use a picture as a watermark,

- You can use a picture file on your computer, search for an image on Bing, or choose an image from your OneDrive storage. Click the “Insert” button and then choose an image from the list. We are using a picture that is on our computer.

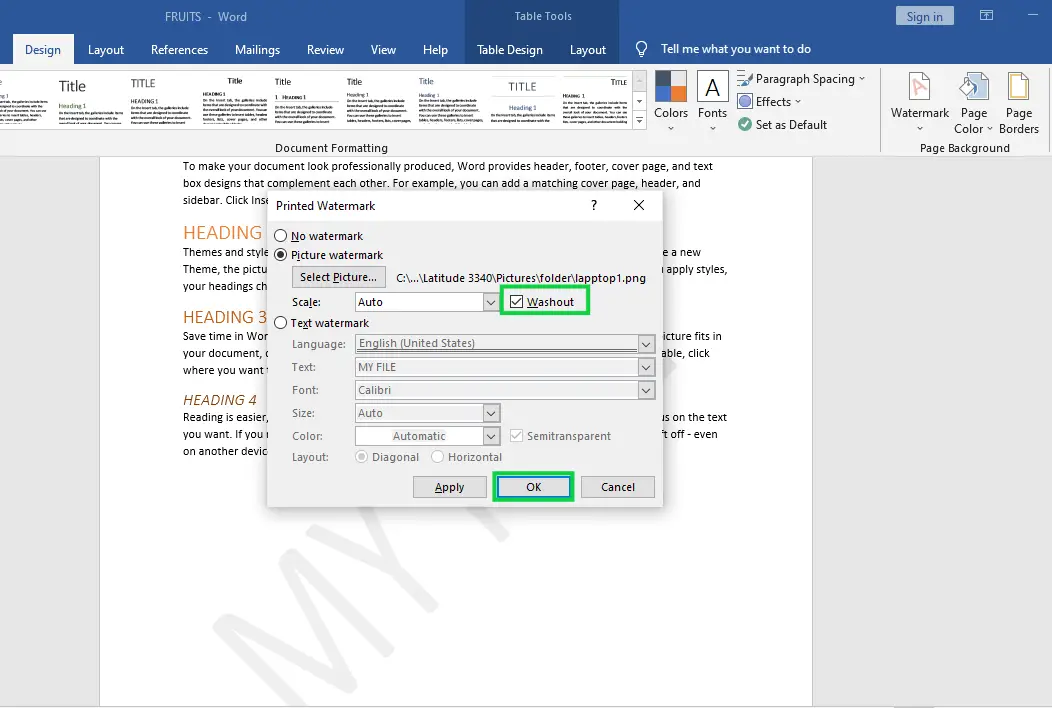
- You can adjust your photo’s appearance in the Printed Watermark window. “Scale” is set to “auto” by default, but you can modify it. “Washout” adds a light-colored watermark on the image. Click “OK” when you’re done.

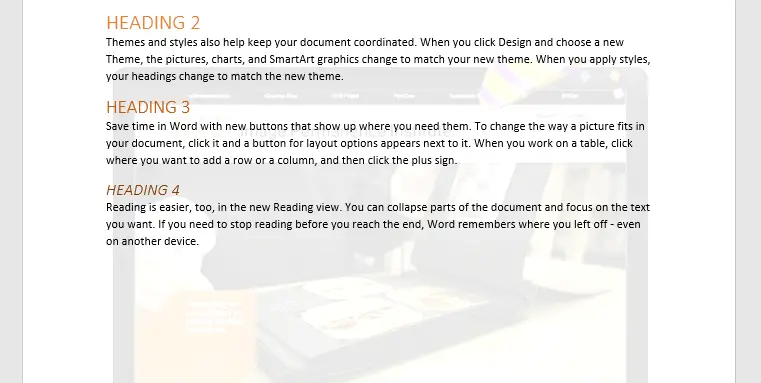
- Word inserts the image behind the text in your document.


How to Remove a Watermark
You can get rid of a watermark in two ways.
- The first way is to open the Header/Footer area, select the image, and press the Delete key. This is the same method we talked about in the last section.
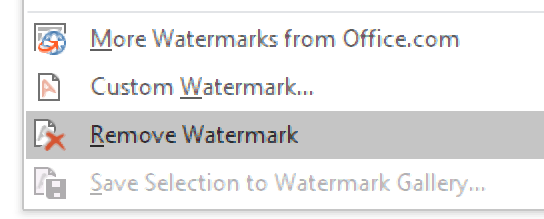
- You can also go to the “Design” tab, click the “Watermark” button, and then choose the “Remove Watermark” command. It works fine either way.

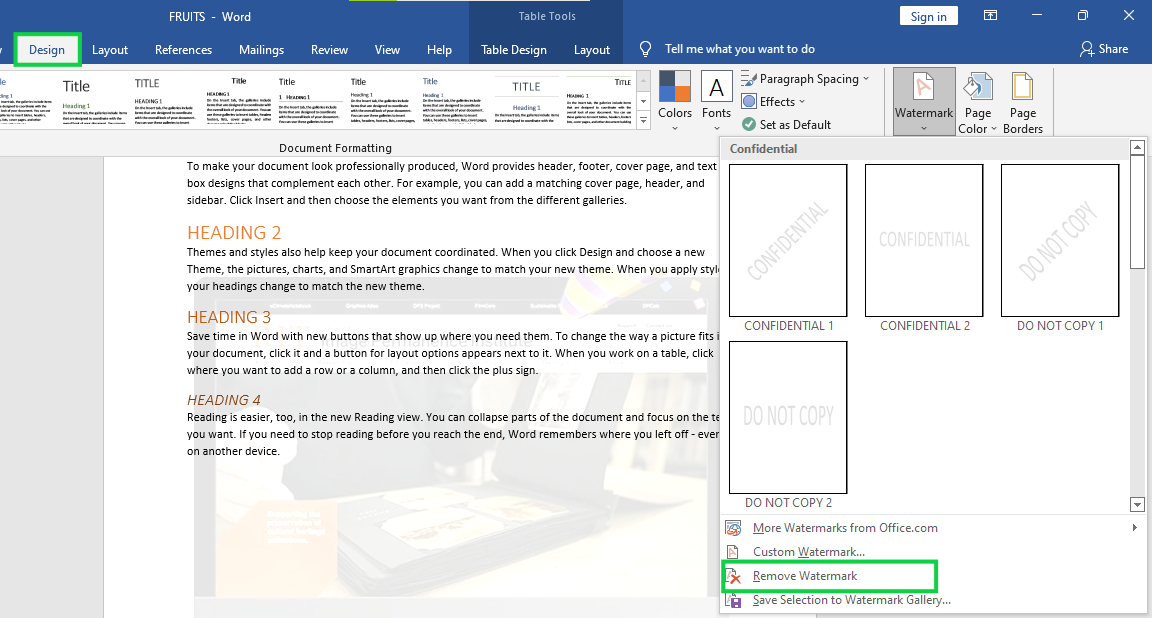
And just like with moving or resizing a watermark, deleting one removes it from every page of your document.
Summary
In the end, we’ve learned how to set watermark in Word and what those terms mean. We also know that there are different ways to make and customize watermarks, which we can use in our documents to make them look more professional and presentable.
Meanwhile, if you want to learn more about working on tables, see the previous tutorial on how to resize tables and how to merge and split table in Microsoft Word. You can browse those guides if you are having a hard time working with your tables in a document
We hope this tutorial helps you as you format your documents in MS Word.
PREVIOUS

To create and save a custom watermark in Word, use these steps:
- Open Word.
- Click the Blank document option in the Home section.
- Click the Design tab.
- In the “Page Background” section, click the Watermark option.
- Click the Custom Watermark option.
- Select the Picture watermark or Text watermark option.
Contents
- 1 How do I insert a watermark in Word 2020?
- 2 How do I insert watermark in Word 2010?
- 3 How do I insert a watermark in Word 2016?
- 4 Where is watermark in Word 2019?
- 5 How do you put a watermark in front of a Word document?
- 6 Why can’t I insert a watermark in Word?
- 7 How do I insert watermark in Word 2013?
- 8 What is watermark in MS Word?
- 9 How do I create a watermark logo?
- 10 How do I add a watermark in Word Online?
- 11 How do I add watermark to text?
- 12 How do I add a built-in watermark?
- 13 How do you insert a non breaking hyphen?
- 14 Why won’t watermark go away word?
- 15 Why does my watermark not appear?
- 16 What is watermark in MS Word 2013?
- 17 How do I insert watermark in Word 2007?
- 18 Can you create your own template in Word?
- 19 Why is watermarking important?
- 20 Which of the following can be set as watermark *?
How do I insert a watermark in Word 2020?
Use a custom watermark
- On the Design tab, select Watermark > Custom Watermark.
- Choose Picture Watermark and select a picture, or choose Text watermark and type your watermark text in the Text box.
- Click OK.
How do I insert watermark in Word 2010?
How to create watermarks in Microsoft Word 2010
- Click on the Page Layout tab.
- In the ribbon, click on Watermark. A vertical scroll list of six watermarks will appear (Confidential, Do Not Copy, Draft, Sample, ASAP and Urgent)
- Select the watermark that you wish to use.
How do I insert a watermark in Word 2016?
How to Add a Watermark in Word 2016
- Click the Design tab.
- In the Page Background group, click the Watermark button. A menu plops down with a host of predefined watermarks that you can safely duck behind the text on your document’s pages.
- Choose a watermark from the menu.
Where is watermark in Word 2019?
Inserting Watermark in Word (Office 365 and Word 2019)
- Open Word.
- Click on the ‘Design’ tab.
- Click on ‘Watermark’ at the far-right. Depending on the version of the word, you will see a few templates that you can choose from.
- Click on one.
- The watermark should appear on the page.
How do you put a watermark in front of a Word document?
You’ll need to open the header to select the watermark.
- Double-click near the top of the page to open the header.
- Click the watermark to select it. (Try moving the cursor over the watermark until the cursor displays a four-headed arrow.)
- Drag the watermark where you want it on the page.
Why can’t I insert a watermark in Word?
Open an existing Word document and make sure the view is set to “Print Layout” or “Full-Screen Reading.” You won’t be able to set a watermark if the view is set to “Web Layout” or “Outline View.” 2. Click the “Page Layout” tab, then navigate to the “Page Background Group” section and click the “Watermark” button.
How do I insert watermark in Word 2013?
To insert a watermark, open the document to which you want to add a watermark and click the Design tab on the Ribbon. In the Page Background section of the Design tab, click the Watermark button. Different built-in watermarks display. Click the desired watermark sample.
What is watermark in MS Word?
A watermark is an image or text that appears behind the main text of the document. It is usually a lighter shade than the text, so you can read the document easily. Text Watermarks are often used to categorize or to show the purpose of a document with words such as DRAFT.
How do I create a watermark logo?
How to make a watermark in 5 easy steps
- Open your logo, or make one with graphics and/or text.
- Create a transparent background for your watermark.
- Your image autosaves in PicMonkey’s cloud storage, or save it as a PNG to download.
- To use, add the watermark image on top of a photo.
How do I add a watermark in Word Online?
Just upload a Word document you need to protect and specify a watermark to embed, which could be an image or text. You are provided with full control over the watermark’s visualization parameters, including font, color, zoom-factor and orientation. Once the configuration is done, click the “Add Watermark” button.
How do I add watermark to text?
Using text
- Open Word.
- Click the Blank document option in the Home section.
- Click the Design tab.
- In the “Page Background” section, click the Watermark option.
- Click the Custom Watermark option.
- Select the Text watermark option.
- In the Text box, type the text as you want it to appear in the document.
How do I add a built-in watermark?
How to Insert a Built-In Watermark. With your document open, switch over to the “Design” tab. In the Page Background group on that tab, click the “Watermark” button. On the drop-down menu, click any of the built-in watermarks to insert it into your document.
How do you insert a non breaking hyphen?
Insert a nonbreaking hyphen
On the Insert tab, in the Symbols group, click Symbol. In the box that opens, click More Symbols. In the Symbol dialog box, on the Special Characters tab, click the Nonbreaking Hyphen row to highlight it, and then click Insert. Click Close.
Why won’t watermark go away word?
Remove a watermark by clicking the header area
If you can’t delete a watermark using Remove Watermark, try this: Double-click near the top of the page to open the header area. Put your cursor over the watermark until you see a 4-way arrow.Repeat as necessary to remove all watermarks.
Why does my watermark not appear?
However, sometimes a watermark may not be displayed. The most common reason for this is that by default watermarks are displayed in the background, behind the document’s content.The solution is to change the z-order of the watermark to a positive value to make sure it is displayed in front of the content.
What is watermark in MS Word 2013?
A watermark is an image or text that appears behind the main text of the document. It is usually a lighter shade than the text, so you can read the document easily. Picture Watermarks add visual attention and a professional look with the use of imagery such as logos.
How do I insert watermark in Word 2007?
Workaround
- Open the Word 2007 document to which you want to add a watermark.
- On the Page Layout tab, click Watermark, and then click Printed Watermark.
- In the Printed Watermark dialog box, click either Picture watermark or Text watermark.
- Select the picture or the text that you want to use, and then click OK.
Can you create your own template in Word?
In Microsoft Word, you can create a template by saving a document as a .Browse to the Custom Office Templates folder that’s under My Documents. Click your template, and click Open. Make the changes you want, then save and close the template.
Why is watermarking important?
Why are Watermarks Important? The purpose of watermarks is to protect content and to claim ownership of an asset. Without watermarks, valuable digital assets can be susceptible to content theft or unauthorized use.
Which of the following can be set as watermark *?
It is important to note that watermarks can be inserted in all pages of a word document all at once. The following steps shows how watermark can be inserted in Word documents. Under the “Page Background” menu, go to “Watermark”.
In today’s date creating a handwritten and lengthy document is very time-consuming and also difficult to store for a longer time. Microsoft overcomes this problem and comes with a software called MS Word. Microsoft Word is an application writing software that allows you to create documents, letters, articles in the very simplest and attractive manner within very little time. It is a user-friendly software that comes with lots of features like editing, deleting, texting, adding designs, images, fonts to your document, and many more.
It has a wide range of users worldwide, and mostly it is used in the business or school field.
Features of MS Word
- Images: MS Word provides inserting of various images in our document.
- Videos: We can insert videos in our document
- Fonts Styles: It has a wide range of font styles for our text.
- Colors: It also has different types of colors to make our document more attractive.
- Page number and size: You can set the size of the page of your document
- WordArt: It provides various writing styles for our documents.
- Tables: Tables in MS Word are used to represent data in Tabular form
- Graph and Charts: These are used to represent statistical data
- Animations and Designs: MS Word allows the creation of Animations and designs as per user needs
- Page border/color: MS Word allows adding borders and colors to pages.
What is a Watermark in MS Word?
Microsoft Word has a special feature called a watermark. A watermark is a light and faded image of text, picture, and logo that appears behind the main content of the document. Basically, it is a lighter shade in the text, so that reader can read the document very easily. Watermark is used to indicate the purpose of a document such as CONFIDENTIAL, DO NOT COPY, DRAFT, ASAP, URGENT, SAMPLE, etc. Microsoft Word allows you to add a watermark to your document.
Use of watermark– It is used to make the document more difficult for the original picture or image to be copied by others or used without permission.

Steps to Add Watermark in our Document
Step 1: On the navigation menu click on the Design option.

Step 2: On the right side of the navigation menu click on the watermark option as shown:

Step 3: A menu will open where you can select different types of watermarks, or also you can create your own watermark.

Step 4: There the three sections in watermark:
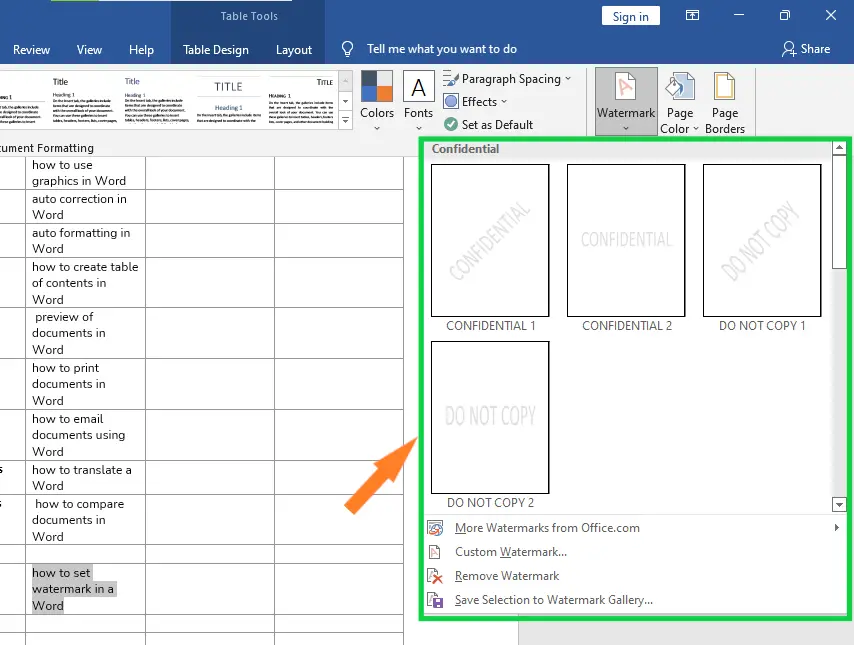
Confidential Section

Disclaimers Section

Urgent Section

Step 5: Select the watermark of your choice or requirement according to your document.
Some different types of watermark are:
- CONFIDENTIAL
- DO NOT COPY
- DRAFT
- ASAP
- URGENT
- SAMPLE
Finally, the watermark is set in our document as shown

Note: You can also select different types of watermarks from the office.com website as shown:

How to Create a Watermark in MS Word
Step 1: On the navigation menu click on Design option.

Step 2: On the right side of the navigation menu click on the watermark option as shown:

Step 3: A menu will open where you can create your own watermark.

Step 4: Now select custom watermark as shown in figure:

Step 5: A printed Watermark dialog box will open.

Step 6: Click on the Text Watermark option as shown in figure:

Step 7: Next select the language of your watermark.

Step 8: Now enter the text of your watermark in the text box as shown in figure:

Step 9: Select the Font of your watermark.

Step 10: Now select the size and color of your watermark.

Step 11: Select the layout option of your choice.

Step 12: Click on Apply and then OK option.

Finally, our custom watermark is added to your document.
Example:

How to Remove a Watermark from a Document?
Step 1: Follow the above steps from 1 to 3.
Step 2: Then select the Remove Watermark option as shown in figure:

Finally, the watermark will remove from our document.

UPDATED ✅ Do you want to know more about how to make watermarks for Microsoft Word documents? ⭐ ENTER HERE ⭐ and learn everything FROM ZERO!
Word will allow you protect the intellectual property of your documents through a watermark. Which you can establish in a simple way and with a few steps.
In this article we will show you how to work with the “Watermark” tool that this word processor offers. We will present you all the secrets so that you become an expert.
But this is not the only thing you will find in this post, We will also talk about the steps you will take to build your own watermark and you can use it in your documents. Let’s not waste any more time and start.
What is a watermark and what is it for in a Microsoft Word document?
The watermark is an image, a word, a sentence, a mark or a set of all these which is placed as a graphic on every page of a Word document. Do not interfere with the text, since the mark is located behind the paragraphs.
It can take the size that the user wants and can be repeated once or several times according to the needs of the author of the writing. This prevents the text from being copied by people not authorized by the owner. This is because every time you want to copy the document, the watermark will appear without being able to remove it.
Advantages of using a watermark in Word Why should I have one for my documents?
When you use a watermark in Word you will be sure that you will be minimizing the use of your document to people who are not authorized by you. By this we mean that the text may not be copied and therefore intellectual property will be protected.
It is useful when you want to promote a brand. When you share documents with other people and there is a certain added value of technical knowledge in your texts, it will be much easier for your brand to grow and be recognized by other users.
Also, you will be able to use the watermark as a signature. In this way, when you have a certain fame, it will be much easier for other people to recognize your texts and put their trust in them.
What to keep in mind before creating a watermark for my documents?
Although the use of the watermark is recommended in Word texts, you will also have to take into account that you must not spoil the wording of your document. Many people use a watermark that is strong, too large, or has too many details that divert the reader’s attention.
Also, you have to know that the watermark must increase the value to the text. Therefore, if the image or phrase that you have incorporated as a personal stamp does not match the argument of the document, you will have to consider another method of safeguarding intellectual property.
Steps to insert a watermark in a Microsoft Word document

When you need to insert a watermark in your Microsoft Word document you will have to follow this procedure:
- On the ribbon, click the tab “Design”.
- Choose the group “page background” and click on the function “Watermark”.
- You will see a window with default watermarks. If you want, choose one of them and the work will be finished. On the other hand, if you want to create your own brand you will have to click on the option “Custom watermarks...”.
Now, you will have to choose if you want to add a text to an image as a watermark. In case you want to incorporate a text, you will do the following:
- When you click on “Custom watermarks…”you will have to activate the box “Text watermark”.
- You will have to click on “Idiom” and then complete all the fields that the system asks you for.
- In the countryside “Text”you will have to write the words that you want to appear as a watermark.
- Do not forget that you will have to choose the type of font and the size. Then if you want it to be semi-transparent and to be oriented horizontally or diagonally.
- When you have finished you will have to click on “Apply” and then click on “To accept”.
If what you need is to add an image as a watermark, you should do this:
- The moment you thought of “Custom watermarks…”you will have to choose “Image Watermark”.
- squeeze in “Select image…”.
- Pick the chart from its location.
- Then you must choose the scale. To do this you will have to try the size you need or directly choose the option “Auto.”.
- If you want the image to be transparent you will have to activate the box “bleach”.
- Click on “To accept”.
In case you need to remove the watermark, you will have to go to “Design”find the group “page background” and click on “Watermark”. Next, you will have to choose the option “Remove watermark”.
Learn how to create your custom watermarks for Microsoft Word

If what you need is to create your own watermark, you will have to use an editing program. In this case We will teach you how to handle Photoshop in a basic way so that you can have the best watermark.

Follow these steps:
- Open the image editor.
- Go to the menu “File, Archive” and then choose the option “New…”.
- Enter the name you want to give the file.
- Sets the width and height measurements. You can use any size, since in Word you can adjust it automatically. In this case we will take as an example that the image will have a width of 800 pixels and a height of 400.
- Click on “Okay”.
- If you are skilled at drawing, you will need to use a stylus pen tool that will help you have a professional design. In our case we will search for an image on the Internet for our watermark.
- Open that image from the place where you downloaded it.
- Select the one with the function “rectangular frame”then copy and paste it into the new file.
- When you have this job ready, you will have to go to the function “File, Archive” and then “Save as…”. Then, you will have to choose the PNG format and just save it.

Software

A watermark is a faded background image that displays behind the text in a document. You can use them to indicate a document’s state (confidential, draft, etc.), add a subtle company logo, or even for a bit of artistic flair. Here’s how to add and manipulate watermarks to your Word document.
How to Insert a Built-In Watermark
With your document open, switch over to the “Design” tab.

In the Page Background group on that tab, click the “Watermark” button.
On the drop-down menu, click any of the built-in watermarks to insert it into your document.
Word places the watermark behind the text.
How to Insert a Custom Watermark
You can also create custom watermarks from text or images. To do this, select the “Custom Watermark” from the “Watermark” drop-down menu.
Using Custom Text Watermarks
In the Printed Watermark window that opens, select the “Text Watermark” option. Type the text you want to use into the “Text” box and then configure the options for language, font, size, color, and orientation the way you want them. Click “OK” when you’re done.
Word inserts your custom text watermark behind the text.
Using Custom Picture Watermarks
If you want to use a picture as a watermark, select the “Picture Watermark” option and then click the “Select Picture” button.
You can use a picture file on your computer, search for an image on Bing, or select an image from your OneDrive storage.
Select an image from the results and then click the “Insert” button. We’re using an image from our computer.
Back in the Printed Watermark window, you have a couple of options for how your picture appears. The “Scale” is set to automatic by default, but you can change the size of your image if you want. The “Washout” option inserts the image with pale colors the way most watermarks appear. You can disable that option to have the image presented in its full glory. Click “OK” when you’ve set it up the way you want.
Word inserts the image behind the text in your document.
How to Move or Resize a Watermark
To move a watermark after inserting it, you’ll need to open the Header/Footer area in your document. Do so by double-clicking anywhere in the header or footer area.
When you do that, the watermark becomes editable. This is true whether you’re using a text or picture watermark. You can drag the image around to move it, or you can grab and drag any of its handles to resize it—just like you would with any other image.
Since the same watermark appears on all pages, resizing or moving it on one page means those same changes are made everywhere else.
How to Remove a Watermark
There are two ways to remove a watermark. The first is by opening the Header/Footer area, so the image is accessible (the same way we talked about in the previous section), selecting the image, and hitting the Delete key.
You can also switch to the “Design” tab, click the “Watermark” button, and then select the “Remove Watermark” command. Either way works just fine.
And just like with moving or resizing a watermark, deleting one removes it from every page of your document.
READ NEXT
- › How to Insert an Image Watermark in Google Docs
- › How to Use Watermarks in PowerPoint
- › You Can Now Add a Text Watermark to Your Google Docs
- › How to Remove a Watermark in Microsoft Word
- › How to Remove a Background or Watermark in PowerPoint
- › How to Add a Watermark in Google Docs
- › Save Hundreds on Elegoo’s New PHECDA Laser Engraver Through Kickstarter
- › This 64 GB Flash Drive From Samsung Is Just $8 Right Now
If you need a document to look professional, or to clearly mark it as confidential or unfinished, you might want to add a watermark. But what exactly does this involve? To answer this question, we’re taking a look at how to add watermarks in Microsoft Word.
What Are Watermarks?
Originally, a ‘watermark’ was an image added to paper during production to show where it came from or identify the paper type. Nowadays, though, watermarks are used for various things, including:
- Adding a logo to the background of each page in a company document
- Showing that something is unfinished (e.g. ‘DRAFT’ or ‘IN PROGRESS’)
- Showing that information should not be shared (e.g. ‘CONFIDENTIAL’)

It’s also much easier to add a watermark to a document these days. You don’t even need a paper mill! All you need is a copy of Microsoft Word and a few moments to read our advice.
Adding a Watermark
Microsoft Word comes with default watermarks for common uses, such as labelling a document as ‘URGENT’ or ‘DO NOT COPY’.
To use one of these in your work:
- Go to Design > Page Background on the ribbon
- Click Watermark to open a dropdown menu
- Choose a watermark from the options in the gallery
This will then add your chosen watermark to the background of every page.
Custom Watermarks
If the default watermarks aren’t suitable for your needs, you can use a custom watermark instead. To do this, go to Design > Page Background > Watermark on the ribbon and select Custom Watermark. This opens a new window where you can pick the type of watermark to add. The options are:
Find this useful?
Subscribe to our newsletter and get writing tips from our editors straight to your inbox.
- Picture watermark – Lets you use an image (e.g. a company logo) as a watermark. You can also choose the size of the image on the page and whether to add a ‘Washout’ effect.
- Text watermark – Lets you set a word or phrase as a watermark. You will also find options to control its angle, font, size, colour and transparency.
All you need to do is select a watermark type, adjust the settings as required, and click OK or Apply. Your custom watermark will then appear on every page in the document.
If you only want to add images on certain pages, you can:
- Insert a picture manually on the page where you need it to appear
- Use text wrapping to place the image behind the text
- Adjust the colour of the image to create a ‘washout’ effect
You can then copy and paste the image if you need to use it on another page later in the document.
Removing a Watermark
Finally, to remove a watermark from a document, all you need to do is:
- Go to Design > Page Background
- Click Watermark
- Select Remove Watermark
This will remove the watermark from throughout your document in one fell swoop. Nice and easy!
Summary: How Do Watermarks Work in Microsoft Word?
- To add a watermark in Microsoft Word, go to Design > Page Background > Watermark and select a watermark from the dropdown menu (or choose Custom Watermark)
- To remove a watermark in Microsoft Word, meanwhile, simply go to Design > Page Background > Watermark and select Remove Watermark
This content has been archived, and is no longer maintained by Indiana University. Information here may no longer be accurate, and links may no longer be available or reliable.
A watermark is a low-contrast image that appears on a page underneath
overlying text. To create a watermark in Word, follow the appropriate
steps below:
Word 2007
While viewing a document in Print Layout, from the tab, choose (found in the «Page
Background» section) and then . This opens a
window where you can choose a picture or text and format it as you
wish for use as a watermark.
Word 2002 or 2003
While viewing a document in either Normal, Print Layout, or Outline view,
from the menu, choose , and then
. This opens a window where you can
choose a picture or text and format it as you wish for use as a
watermark.
Word 97, 98, 2000, 2001, v.X, 2004, or 2008
- From the menu, select .
- To create a text box where you will place the watermark image, from the
menu, select . The cursor will
resemble a plus sign (+), which you can use to draw a
box of the desired size and shape. - Click inside the text box you just created. The borders of the
box should become highlighted. From the menu, select
. - Click the tab. In the «Line» section
next to «Color:», select . This will remove the
border placed around the text box. - In Word 2000, 2001, v.X, 2004, or 2008, click the tab, and
then click the box.In Word 97 and 98, click the tab, and then in the
«Wrapping style» section, click the box for . - Click to close the text box formatting window.
- From the menu, select , and then
. TheInsert Picturedialog
box will appear. - Choose the desired picture file. The dialog box will provide a
preview of most images. You may need to browse for your desired
picture. - Click the image if you need to resize it. Notice the dark squares
on the corners and sides of the box. Place your cursor over one of
these boxes until it turns into a two-headed arrow. Then drag the
mouse until the box is reshaped to the size you wish. - To «screen back» the picture so that text will be visible over it,
click the image, and then from the menu, select
. Click the tab in the
window that appears, and then in the «Image Control» section, next to
«Color:», select or . Click the
button to apply the change.
This is document adbj in the Knowledge Base.
Last modified on 2018-01-18 10:48:29.

Watermarks are semitransparent words, phrases, or images that identify ownership (e.g., Copyright Generic Brand, LLC), indicate confidentiality (e.g., Confidential, Do Not Copy), or show status (e.g., Urgent, Draft). Last week, we added watermarks to PDFs with Adobe Acrobat. Inserting watermarks in Microsoft Word is more complex than in Acrobat, so we are going to divide the topic into three separate tutorials.
In this first tutorial, we are going to insert, modify, and delete text watermarks in Word. In the second tutorial, we will insert and modify image watermarks in Word. In the third tutorial, we will insert text and image watermarks on specific pages in Word.
Quick Links:
- How to Insert Text Watermarks
- How to Modify Text Watermarks
- How to Delete Text Watermarks
This tutorial is available as a YouTube video showing all the steps in real time.
Watch more than 150 other writing-related software tutorials on my YouTube channel.
The images below are from Word for Microsoft 365. These steps will also work in Word 2021, Word 2019, Word 2016, and Word 2013. However, your interface may look slightly different in those older versions of the software.
The following steps show how to insert built-in and custom text watermarks on every page of your document.
- Select the Design tab in the ribbon.

- Select Watermark in the Page Background group.

- Select a built-in watermark (i.e., Confidential, Do not copy, Sample, ASAP, or Urgent) or Custom Watermark from the drop-down menu.

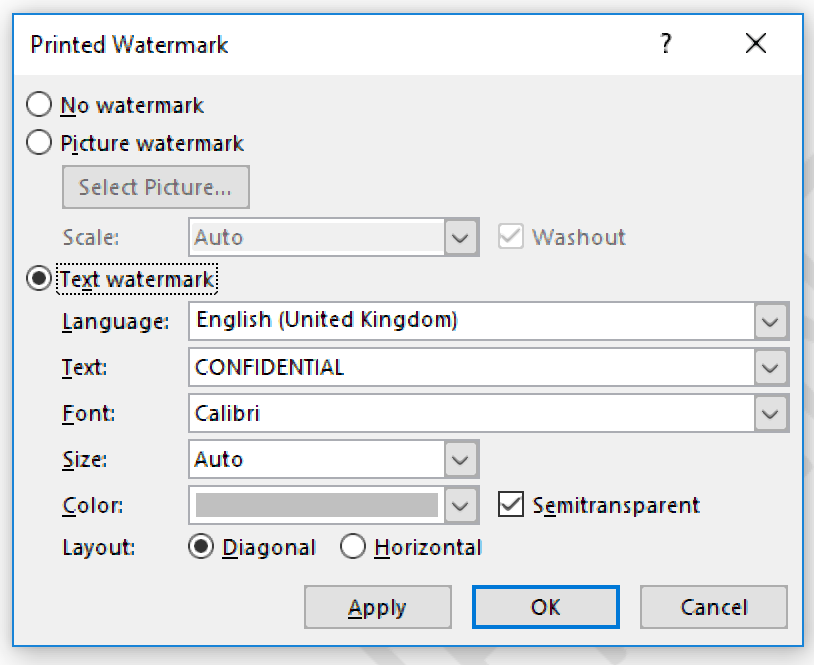
- If you chose Custom Watermark, select the Text watermark button in the Printed Watermark dialog box.

- Enter your custom text into the text box.

- (Optional) Adjust the font, size, color, and diagonal or horizontal layout, as necessary.

- Ensure the Semitransparent is checked if you want your text and images to be visible through the watermark. (The transparency can be customized, as shown in steps 7 and 8 in the modification section below.)

- Select the OK button.

The Printed Watermark dialog box should close, and your text watermark should appear in your document.
How to Modify Text Watermarks in Microsoft Word
The following steps show how to modify the size, position, text, color, font style, and transparency of an existing text watermark.
Important Note: If you want to replace your watermark, repeat all the steps in the section above. Every time you add a watermark, it replaces the existing watermark.
- Double-click the top of any page to open the Header & Footer tab. (In Word, watermarks are part of the header even though they typically appear in the middle of the page.)

- Hover your cursor over the watermark until your cursor becomes two crossed arrows. Then, select the watermark.
![]()
Small, gray adjustment handles (squares and circles) will appear when the watermark is selected.

Resizing and Repositioning
- Select, hold, and drag the adjustment handles to change the size of your watermark. (The top, center handle tilts the watermark to the left and right.)
- To reposition your watermark, hover your cursor over the watermark until the cursor becomes two crossed arrows (see figure 10). Then, click, hold, and drag your watermark to a new position.
Text, Color, and Font Style
- Right-click the watermark with the crossed-arrow cursor, and then select Edit Text from the shortcut menu.

- Edit the text, font style, font size, boldness, and italics in the Edit WordArt Text dialog box. Then, select the OK button.

Transparency
- Right-click the watermark with the crossed-arrow cursor, and then select Format Autoshape/Picture from the shortcut menu.

- Adjust the transparency in the Format WordArt dialog box. (The higher the number, the greater the transparency.)

Pro Tip: Explore the rest of the Format WordArt dialog box, particularly the Fill Effect button, for additional customization options.
- Select the OK button to close the Format WordArt dialog box.

Additional WordArt Options
- (Optional) Explore the WordArt tab for additional options such as Shadow Effects and 3-D Effects. (Note that this tab only appears when a watermark or piece of WordArt is selected.)

Finalize Your Modifications
- Select the Header & Footer tab (see figure 9).
- Select the Close Header and Footer button.

Your watermark modifications should take effect immediately.
How to Delete Watermarks in Microsoft Word
These steps will delete text and image watermarks.
- Select the Design tab in the ribbon (see figure 1).
- Select Watermark in the Page Background group (see figure 2).
- Select Remove Watermark from the drop-down menu.

Your watermark should be removed immediately.
Related Resources
How to Restrict Editing in Adobe Acrobat
How to Redact PDFs in Adobe Acrobat Pro
How to Insert and Modify Images in PDFs with Adobe Acrobat
Updated March 06, 2022