

This Excel tutorial explains the VBA environment in Excel 2010 (with screenshots and step-by-step instructions).
What is VBA?
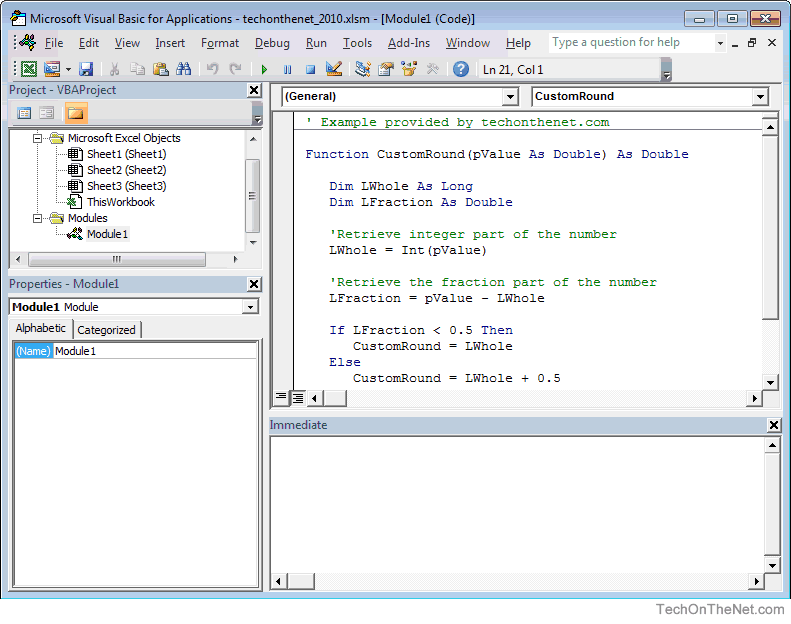
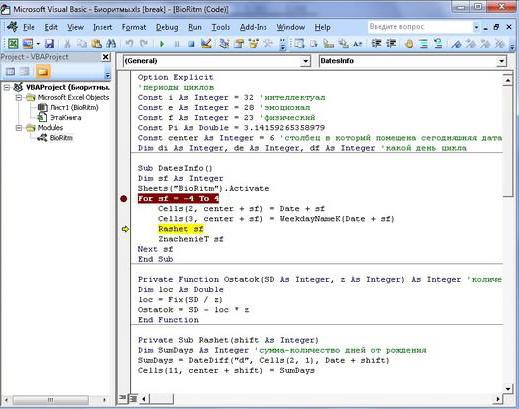
The Microsoft Visual Basic for Applications window displays your VBA environment in Excel 2010:
VBA standards for Visual Basic for Applications and is the language embedded within your spreadsheet in Excel 2010.
You can only use VBA if you have saved your workbook as an Excel Macro-Enabled Workbook (or *.xlsm file).

You use VBA in Excel whenever you do one of the following:
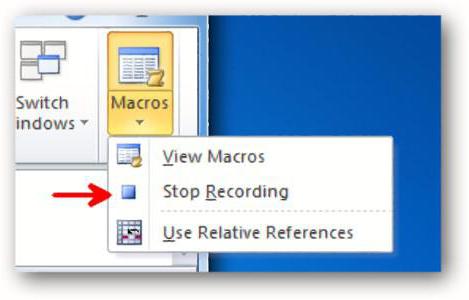
- Record a macro.
- Run a macro.
- Create a new function.
- Create a new subroutine.
- Define a variable.
- Place code on the click of a button.
These are just some of the examples of when you might be running VBA code in Excel 2010.
Время на прочтение
7 мин
Количество просмотров 312K
Приветствую всех.
В этом посте я расскажу, что такое VBA и как с ним работать в Microsoft Excel 2007/2010 (для более старых версий изменяется лишь интерфейс — код, скорее всего, будет таким же) для автоматизации различной рутины.

VBA (Visual Basic for Applications) — это упрощенная версия Visual Basic, встроенная в множество продуктов линейки Microsoft Office. Она позволяет писать программы прямо в файле конкретного документа. Вам не требуется устанавливать различные IDE — всё, включая отладчик, уже есть в Excel.
Еще при помощи Visual Studio Tools for Office можно писать макросы на C# и также встраивать их. Спасибо, FireStorm.
Сразу скажу — писать на других языках (C++/Delphi/PHP) также возможно, но требуется научится читать, изменять и писать файлы офиса — встраивать в документы не получится. А интерфейсы Microsoft работают через COM. Чтобы вы поняли весь ужас, вот Hello World с использованием COM.
Поэтому, увы, будем учить Visual Basic.
Чуть-чуть подготовки и постановка задачи
Итак, поехали. Открываем Excel.
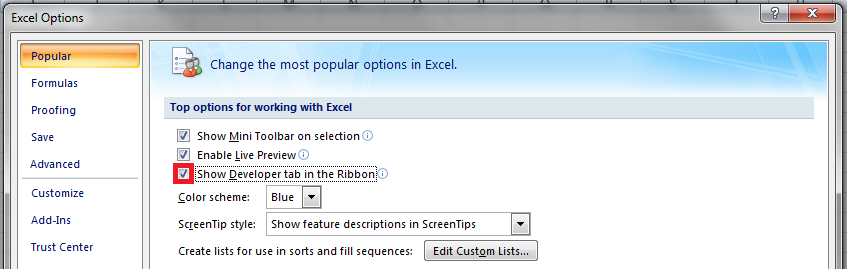
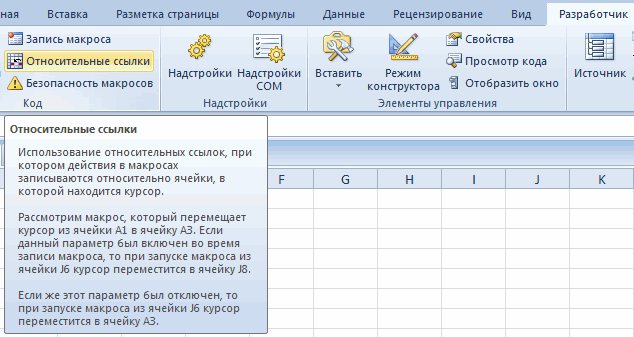
Для начала давайте добавим в Ribbon панель «Разработчик». В ней находятся кнопки, текстовые поля и пр. элементы для конструирования форм.

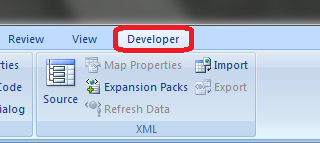
Появилась вкладка.
Теперь давайте подумаем, на каком примере мы будем изучать VBA. Недавно мне потребовалось красиво оформить прайс-лист, выглядевший, как таблица. Идём в гугл, набираем «прайс-лист» и качаем любой, который оформлен примерно так (не сочтите за рекламу, пожалуйста):

То есть требуется, чтобы было как минимум две группы, по которым можно объединить товары (в нашем случае это будут Тип и Производитель — в таком порядке). Для того, чтобы предложенный мною алгоритм работал корректно, отсортируйте товары так, чтобы товары из одной группы стояли подряд (сначала по Типу, потом по Производителю).
Результат, которого хотим добиться, выглядит примерно так:

Разумеется, если смотреть прайс только на компьютере, то можно добавить фильтры и будет гораздо удобнее искать нужный товар. Однако мы хотим научится кодить и задача вполне подходящая, не так ли?
Кодим
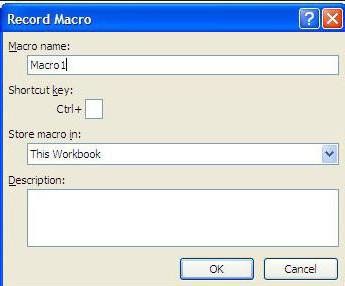
Для начала требуется создать кнопку, при нажатии на которую будет вызываться наша програма. Кнопки находятся в панели «Разработчик» и появляются по кнопке «Вставить». Вам нужен компонент формы «Кнопка». Нажали, поставили на любое место в листе. Далее, если не появилось окно назначения макроса, надо нажать правой кнопкой и выбрать пункт «Назначить макрос». Назовём его FormatPrice. Важно, чтобы перед именем макроса ничего не было — иначе он создастся в отдельном модуле, а не в пространстве имен книги. В этому случае вам будет недоступно быстрое обращение к выделенному листу. Нажимаем кнопку «Новый».


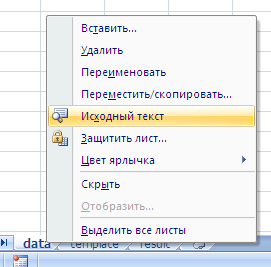
И вот мы в среде разработки VB. Также её можно вызвать из контекстного меню командой «Исходный текст»/«View code».

Перед вами окно с заглушкой процедуры. Можете его развернуть. Код должен выглядеть примерно так:
Sub FormatPrice()End Sub
Напишем Hello World:
Sub FormatPrice()

    MsgBox "Hello World!"

End Sub
И запустим либо щелкнув по кнопке (предварительно сняв с неё выделение), либо клавишей F5 прямо из редактора.
Тут, пожалуй, следует отвлечься на небольшой ликбез по поводу синтаксиса VB. Кто его знает — может смело пропустить этот раздел до конца. Основное отличие Visual Basic от Pascal/C/Java в том, что команды разделяются не ;, а переносом строки или двоеточием (:), если очень хочется написать несколько команд в одну строку. Чтобы понять основные правила синтаксиса, приведу абстрактный код.
Примеры синтаксиса
' Процедура. Ничего не возвращает

' Перегрузка в VBA отсутствует

Sub foo(a As String, b As String)

    ' Exit Sub ' Это значит "выйти из процедуры"

    MsgBox a + ";" + b

End Sub' Функция. Вовращает Integer

Function LengthSqr(x As Integer, y As Integer) As Integer

    ' Exit Function

    LengthSqr = x * x + y * y

End FunctionSub FormatPrice()

    Dim s1 As String, s2 As String

    s1 = "str1"

    s2 = "str2"

    If s1 <> s2 Then

        foo "123", "456" ' Скобки при вызове процедур запрещены

    End IfDim res As sTRING ' Регистр в VB не важен. Впрочем, редактор Вас поправит

    Dim i As Integer

    ' Цикл всегда состоит из нескольких строк

    For i = 1 To 10

        res = res + CStr(i) ' Конвертация чего угодно в String

        If i = 5 Then Exit For

    Next iDim x As Double

    x = Val("1.234") ' Парсинг чисел

    x = x + 10

    MsgBox xOn Error Resume Next ' Обработка ошибок - игнорировать все ошибки

    x = 5 / 0

    MsgBox xOn Error GoTo Err ' При ошибке перейти к метке Err

    x = 5 / 0

    MsgBox "OK!"

    GoTo ne
Err:
MsgBox
"Err!"
ne:
On Error GoTo 0 ' Отключаем обработку ошибок
' Циклы бывает, какие захотите
Do While True
Exit DoLoop 'While True
Do 'Until False
Exit Do
Loop Until False
' А вот при вызове функций, от которых хотим получить значение, скобки нужны.
' Val также умеет возвращать Integer
Select Case LengthSqr(Len("abc"), Val("4"))
Case 24
MsgBox "0"
Case 25
MsgBox "1"
Case 26
MsgBox "2"
End Select' Двухмерный массив.
' Можно также менять размеры командой ReDim (Preserve) - см. google
Dim arr(1 to 10, 5 to 6) As Integer
arr(1, 6) = 8Dim coll As New Collection
Dim coll2 As Collection
coll.Add "item", "key"
Set coll2 = coll ' Все присваивания объектов должны производится командой Set
MsgBox coll2("key")
Set coll2 = New Collection
MsgBox coll2.Count
End Sub
Грабли-1. При копировании кода из IDE (в английском Excel) есь текст конвертируется в 1252 Latin-1. Поэтому, если хотите сохранить русские комментарии — надо сохранить крокозябры как Latin-1, а потом открыть в 1251.
Грабли-2. Т.к. VB позволяет использовать необъявленные переменные, я всегда в начале кода (перед всеми процедурами) ставлю строчку Option Explicit. Эта директива запрещает интерпретатору заводить переменные самостоятельно.
Грабли-3. Глобальные переменные можно объявлять только до первой функции/процедуры. Локальные — в любом месте процедуры/функции.
Еще немного дополнительных функций, которые могут пригодится: InPos, Mid, Trim, LBound, UBound. Также ответы на все вопросы по поводу работы функций/их параметров можно получить в MSDN.
Надеюсь, что этого Вам хватит, чтобы не пугаться кода и самостоятельно написать какое-нибудь домашнее задание по информатике. По ходу поста я буду ненавязчиво знакомить Вас с новыми конструкциями.
Кодим много и под Excel
В этой части мы уже начнём кодить нечто, что умеет работать с нашими листами в Excel. Для начала создадим отдельный лист с именем result (лист с данными назовём data). Теперь, наверное, нужно этот лист очистить от того, что на нём есть. Также мы «выделим» лист с данными, чтобы каждый раз не писать длинное обращение к массиву с листами.
Sub FormatPrice()

    Sheets("result").Cells.Clear

    Sheets("data").Activate

End Sub
Работа с диапазонами ячеек
Вся работа в Excel VBA производится с диапазонами ячеек. Они создаются функцией Range и возвращают объект типа Range. У него есть всё необходимое для работы с данными и/или оформлением. Кстати сказать, свойство Cells листа — это тоже Range.
Примеры работы с Range
Sheets("result").Activate

Dim r As Range

Set r = Range("A1")

r.Value = "123"

Set r = Range("A3,A5")

r.Font.Color = vbRed

r.Value = "456"

Set r = Range("A6:A7")

r.Value = "=A1+A3"
Теперь давайте поймем алгоритм работы нашего кода. Итак, у каждой строчки листа data, начиная со второй, есть некоторые данные, которые нас не интересуют (ID, название и цена) и есть две вложенные группы, к которым она принадлежит (тип и производитель). Более того, эти строки отсортированы. Пока мы забудем про пропуски перед началом новой группы — так будет проще. Я предлагаю такой алгоритм:
- Считали группы из очередной строки.
- Пробегаемся по всем группам в порядке приоритета (вначале более крупные)
- Если текущая группа не совпадает, вызываем процедуру AddGroup(i, name), где i — номер группы (от номера текущей до максимума), name — её имя. Несколько вызовов необходимы, чтобы создать не только наш заголовок, но и всё более мелкие.
- После отрисовки всех необходимых заголовков делаем еще одну строку и заполняем её данными.
Для упрощения работы рекомендую определить следующие функции-сокращения:
Function GetCol(Col As Integer) As String

    GetCol = Chr(Asc("A") + Col)

End FunctionFunction GetCellS(Sheet As String, Col As Integer, Row As Integer) As Range

    Set GetCellS = Sheets(Sheet).Range(GetCol(Col) + CStr(Row))

End FunctionFunction GetCell(Col As Integer, Row As Integer) As Range

    Set GetCell = Range(GetCol(Col) + CStr(Row))

End Function
Далее определим глобальную переменную «текущая строчка»: Dim CurRow As Integer. В начале процедуры её следует сделать равной единице. Еще нам потребуется переменная-«текущая строка в data», массив с именами групп текущей предыдущей строк. Потом можно написать цикл «пока первая ячейка в строке непуста».
Глобальные переменные
Option Explicit ' про эту строчку я уже рассказывал

Dim CurRow As Integer

Const GroupsCount As Integer = 2

Const DataCount As Integer = 3
FormatPrice
Sub FormatPrice()

    Dim I As Integer ' строка в data

    CurRow = 1

    Dim Groups(1 To GroupsCount) As String

    Dim PrGroups(1 To GroupsCount) As String
Sheets(
"data").Activate
I = 2
Do While True
If GetCell(0, I).Value = "" Then Exit Do
' ...
I = I + 1
Loop
End Sub
Теперь надо заполнить массив Groups:
На месте многоточия
Dim I2 As Integer

For I2 = 1 To GroupsCount

    Groups(I2) = GetCell(I2, I)

Next I2

' ...

For I2 = 1 To GroupsCount ' VB не умеет копировать массивы

    PrGroups(I2) = Groups(I2)

Next I2

I =  I + 1
И создать заголовки:
На месте многоточия в предыдущем куске
For I2 = 1 To GroupsCount

    If Groups(I2) <> PrGroups(I2) Then

        Dim I3 As Integer

        For I3 = I2 To GroupsCount

            AddHeader I3, Groups(I3)

        Next I3

        Exit For

    End If

Next I2
Не забудем про процедуру AddHeader:
Перед FormatPrice
Sub AddHeader(Ty As Integer, Name As String)

    GetCellS("result", 1, CurRow).Value = Name

    CurRow = CurRow + 1

End Sub
Теперь надо перенести всякую информацию в result
For I2 = 0 To DataCount - 1

    GetCellS("result", I2, CurRow).Value = GetCell(I2, I)

Next I2
Подогнать столбцы по ширине и выбрать лист result для показа результата
После цикла в конце FormatPrice
Sheets("Result").Activate

Columns.AutoFit
Всё. Можно любоваться первой версией.

Некрасиво, но похоже. Давайте разбираться с форматированием. Сначала изменим процедуру AddHeader:
Sub AddHeader(Ty As Integer, Name As String)

    Sheets("result").Range("A" + CStr(CurRow) + ":C" + CStr(CurRow)).Merge

    ' Чтобы не заводить переменную и не писать каждый раз длинный вызов

    ' можно воспользоваться блоком With

    With GetCellS("result", 0, CurRow)

        .Value = Name

        .Font.Italic = True

        .Font.Name = "Cambria"

        Select Case Ty

        Case 1 ' Тип

            .Font.Bold = True

            .Font.Size = 16

        Case 2 ' Производитель

            .Font.Size = 12

        End Select

        .HorizontalAlignment = xlCenter

    End With

    CurRow = CurRow + 1

End Sub
Уже лучше:

Осталось только сделать границы. Тут уже нам требуется работать со всеми объединёнными ячейками, иначе бордюр будет только у одной:

Поэтому чуть-чуть меняем код с добавлением стиля границ:
Sub AddHeader(Ty As Integer, Name As String)

    With Sheets("result").Range("A" + CStr(CurRow) + ":C" + CStr(CurRow))

        .Merge

        .Value = Name

        .Font.Italic = True

        .Font.Name = "Cambria"

        .HorizontalAlignment = xlCenterSelect Case Ty

        Case 1 ' Тип

            .Font.Bold = True

            .Font.Size = 16

            .Borders(xlTop).Weight = xlThick

        Case 2 ' Производитель

            .Font.Size = 12

            .Borders(xlTop).Weight = xlMedium

        End Select

        .Borders(xlBottom).Weight = xlMedium ' По убыванию: xlThick, xlMedium, xlThin, xlHairline

    End With

    CurRow = CurRow + 1

End Sub

Осталось лишь добится пропусков перед началом новой группы. Это легко:
В начале FormatPrice
Dim I As Integer ' строка в  data

CurRow = 0 ' чтобы не было пропуска в самом начале

Dim Groups(1 To GroupsCount) As String
В цикле расстановки заголовков
If Groups(I2) <> PrGroups(I2) Then

    CurRow = CurRow + 1

    Dim I3 As Integer

В точности то, что и хотели.
Надеюсь, что эта статья помогла вам немного освоится с программированием для Excel на VBA. Домашнее задание — добавить заголовки «ID, Название, Цена» в результат. Подсказка: CurRow = 0 CurRow = 1.
Файл можно скачать тут (min.us) или тут (Dropbox). Не забудьте разрешить исполнение макросов. Если кто-нибудь подскажет человеческих файлохостинг, залью туда.
Спасибо за внимание.
Буду рад конструктивной критике в комментариях.
UPD: Перезалил пример на Dropbox и min.us.
UPD2: На самом деле, при вызове процедуры с одним параметром скобки можно поставить. Либо использовать конструкцию Call Foo(«bar», 1, 2, 3) — тут скобки нужны постоянно.
The first step to working with VBA in Excel is to get yourself familiarized with the Visual Basic Editor (also called the VBA Editor or VB Editor).
In this tutorial, I will cover all there is to know about the VBA Editor and some useful options that you should know when coding in Excel VBA.
What is Visual Basic Editor in Excel?
Visual Basic Editor is a separate application that is a part of Excel and opens whenever you open an Excel workbook. By default, it’s hidden and to access it, you need to activate it.
VB Editor is the place where you keep the VB code.
There are multiple ways you get the code in the VB Editor:
- When you record a macro, it automatically creates a new module in the VB Editor and inserts the code in that module.
- You can manually type VB code in the VB editor.
- You can copy a code from some other workbook or from the internet and paste it in the VB Editor.
Opening the VB Editor
There are various ways to open the Visual Basic Editor in Excel:
- Using a Keyboard Shortcut (easiest and fastest)
- Using the Developer Tab.
- Using the Worksheet Tabs.
Let’s go through each of these quickly.
Keyboard Shortcut to Open the Visual Basic Editor
The easiest way to open the Visual Basic editor is to use the keyboard shortcut – ALT + F11 (hold the ALT key and press the F11 key).

As soon as you do this, it will open a separate window for the Visual Basic editor.
This shortcut works as a toggle, so when you use it again, it will take you back to the Excel application (without closing the VB Editor).
The shortcut for the Mac version is Opt + F11 or Fn + Opt + F11
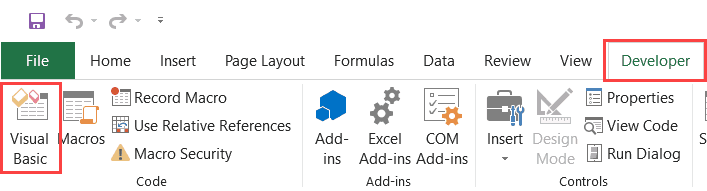
Using the Developer Tab
To open the Visual Basic Editor from the ribbon:
- Click the Developer tab (if you don’t see a developer tab, read this on how to get it).
- In the Code group, click on Visual Basic.
Using the Worksheet Tab
This is a less used method to open the Vb Editor.
Go to any of the worksheet tabs, right-click, and select ‘View Code’.
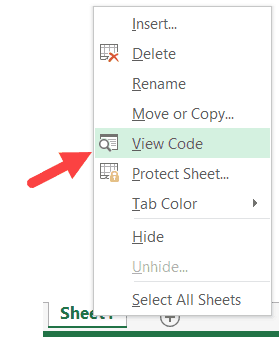
This method wouldn’t just open the VB Editor, it will also take you to the code window for that worksheet object.
This is useful when you want to write code that works only for a specific worksheet. This is usually the case with worksheet events.
Anatomy of the Visual Basic Editor in Excel
When you open the VB Editor for the first time, it may look a bit overwhelming.
There are different options and sections that may seem completely new at first.
Also, it still has an old Excel 97 days look. While Excel has improved tremendously in design and usability over the years, the VB Editor has not seen any change in the way it looks.
In this section, I will take you through the different parts of the Visual Basic Editor application.
Note: When I started using VBA years ago, I was quite overwhelmed with all these new options and windows. But as you get used to working with VBA, you would get comfortable with most of these. And most of the time, you’ll not be required to use all the options, only a hand full.
Below is an image of the different components of the VB Editor. These are then described in detail in the below sections of this tutorial.
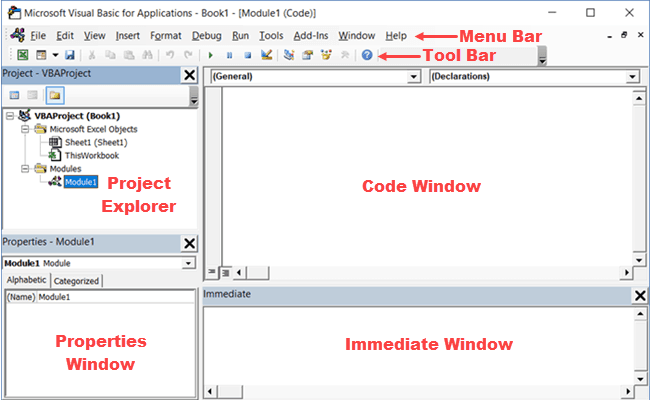
Now let’s quickly go through each of these components and understand what it does:
Menu Bar
This is where you have all the options that you can use in the VB Editor. It is similar to the Excel ribbon where you have tabs and options with each tab.
You can explore the available options by clicking on each of the menu element.
You will notice that most of the options in VB Editor have keyboard shortcuts mentioned next to it. Once you get used to a few keyboard shortcuts, working with the VB Editor becomes really easy.
Tool Bar
By default, there is a toolbar in the VB Editor which has some useful options that you’re likely to need most often. This is just like the Quick Access Toolbar in Excel. It gives you quick access to some of the useful options.
You can customize it a little by removing or adding options to it (by clicking on the small downward pointing arrow at the end of the toolbar).

In most cases, the default toolbar is all you need when working with the VB Editor.
You can move the toolbar above the menu bar by clicking on the three gray dots (at the beginning of the toolbar) and dragging it above the menu bar.
Note: There are four toolbars in the VB Editor – Standard, Debug, Edit, and User form. What you see in the image above (which is also the default) is the standard toolbar. You can access other toolbars by going to the View option and hovering the cursor on the Toolbars option. You can add one or more toolbars to the VB Editor if you want.
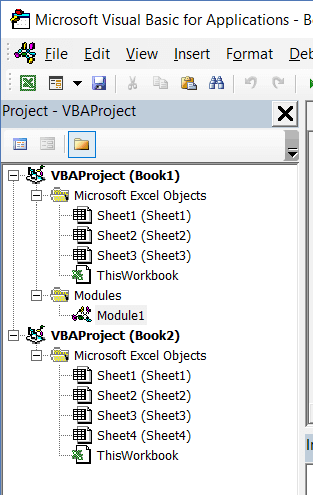
Project Explorer
Project Explorer is a window on the left that shows all the objects currently open in Excel.
When you’re working with Excel, every workbook or add-in that is open is a project. And each of these projects can have a collection of objects in it.
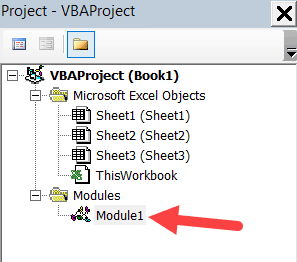
For example, in the below image, the Project Explorer shows the two workbooks that are open (Book1 and Book2) and the objects in each workbook (worksheets, ThisWorkbook, and Module in Book1).
There is a plus icon to the left of objects that you can use to collapse the list of objects or expand and see the complete list of objects.
The following objects can be a part of the Project Explorer:
- All open Workbooks – within each workbook (which is also called a project), you can have the following objects:
- Worksheet object for each worksheet in the workbook
- ThisWorkbook object which represents the workbook itself
- Chartsheet object for each chart sheet (these are not as common as worksheets)
- Modules – This is where the code that is generated with a macro recorder goes. You can also write or copy-paste VBA code here.
- All open Add-ins
Consider the Project Explorer as a place that outlines all the objects open in Excel at the given time.
The keyboard shortcut to open the Project Explorer is Control + R (hold the control key and then press R). To close it, simply click the close icon at the top right of the Project Explorer window.
Note: For every object in Project Explorer, there is a code window in which you can write the code (or copy and paste it from somewhere). The code window appears when you double click on the object.
Properties Window
Properties window is where you get to see the properties of the select object. If you don’t have the Properties window already, you can get it by using the keyboard shortcut F4 (or go to the View tab and click Properties window).
Properties window is a floating window which you can dock in the VB Editor. In the below example, I have docked it just below the Project Explorer.
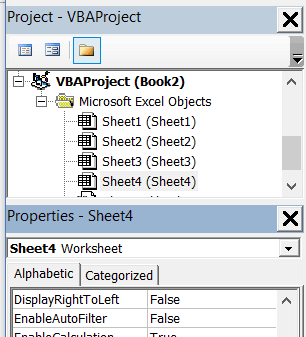
Properties window allows us to change the properties of a selected object. For example, if I want to make a worksheet hidden (or very hidden), I can do that by changing the Visible Property of the selected worksheet object.
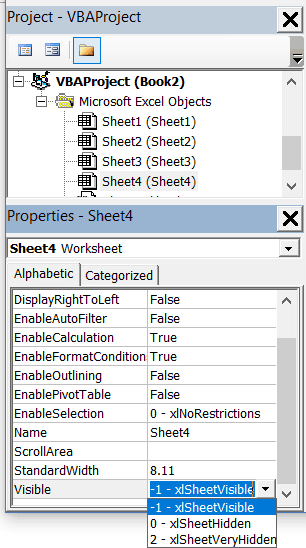
Related: Hiding a Worksheet in Excel (that can not be un-hidden easily)
Code Window
There is a code window for each object that is listed in the Project Explorer. You can open the code window for an object by double-clicking on it in the Project Explorer area.
Code window is where you’ll write your code or copy paste a code from somewhere else.
When you record a macro, the code for it goes into the code window of a module. Excel automatically inserts a module to place the code in it when recording a macro.
Related: How to Run a Macro (VBA Code) in Excel.
Immediate Window
The Immediate window is mostly used when debugging code. One way I use the Immediate window is by using a Print.Debug statement within the code and then run the code.
It helps me to debug the code and determine where my code gets stuck. If I get the result of Print.Debug in the immediate window, I know the code worked at least till that line.
If you’re new to VBA coding, it may take you some time to be able to use the immediate window for debugging.
By default, the immediate window is not visible in the VB Editor. You can get it by using the keyboard shortcut Control + G (or can go to the View tab and click on ‘Immediate Window’).
Where to Add Code in the VB Editor
I hope you now have a basic understanding of what VB Editor is and what all parts it has.
In this section of this tutorial, I will show you where to add a VBA code in the Visual Basic Editor.
There are two places where you can add the VBA code in Excel:
- The code window for an object. These objects can be a workbook, worksheet, User Form, etc.
- The code window of a module.
Module Code Window Vs Object Code Window
Let me first quickly clear the difference between adding a code in a module vs adding a code in an object code window.
When you add a code to any of the objects, it’s dependent on some action of that object that will trigger that code. For example, if you want to unhide all the worksheets in a workbook as soon as you open that workbook, then the code would go in the ThisWorkbook object (which represents the workbook).
The trigger, in this case, is opening the workbook.
Similarly, if you want to protect a worksheet as soon as some other worksheet is activated, the code for that would go in the worksheet code window.
These triggers are called events and you can associate a code to be executed when an event occurs.
Related: Learn more about Events in VBA.
On the contrary, the code in the module needs to be executed either manually (or it can be called from other subroutines as well).
When you record a macro, Excel automatically creates a module and inserts the recorded macro code in it. Now if you have to run this code, you need to manually execute the macro.
Adding VBA Code in Module
While recording a macro automatically creates a module and inserts the code in it, there are some limitations when using a macro recorder. For example, it can not use loops or If Then Else conditions.
In such cases, it’s better to either copy and paste the code manually or write the code yourself.
A module can be used to hold the following types of VBA codes:
- Declarations: You can declare variables in a module. Declaring variables allows you to specify what type of data a variable can hold. You can declare a variable for a sub-routine only or for all sub-routines in the module (or all modules)
- Subroutines (Procedures): This is the code that has the steps you want VBA to perform.
- Function Procedures: This is a code that returns a single value and you can use it to create custom functions (also called User Defined Functions or UDFs in VBA)
By default, a module is not a part of the workbook. You need to insert it first before using it.
Adding a Module in the VB Editor
Below are the steps to add a module:
- Right-click on any object of the workbook (in which you want the module).

- Hover the cursor on the Insert option.
- Click on Module.


This would instantly create a folder called Module and insert an object called Module 1. If you already have a module inserted, the above steps would insert another module.
Once the module is inserted, you can double click on the module object in the Project Explorer and it will open the code window for it.
Now you can copy-paste the code or write it yourself.
Removing the Module
Below are the steps to remove a module in Excel VBA:
- Right-click on the module that you want to remove.
- Click on Remove Module option.

- In the dialog box that opens, click on No.


Note: You can export a module before removing it. It gets saved as a .bas file and you can import it in some other project. To export a module, right-click on the module and click on ‘Export file’.
Adding Code to the Object Code Window
To open the code window for an object, simply double-click on it.
When it opens, you can enter the code manually or copy-paste the code from other modules or from the internet.
Note that some of the objects allow you to choose the event for which you want to write the code.
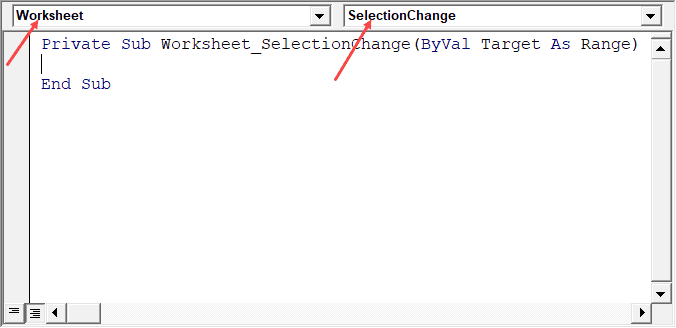
For example, if you want to write a code for something to happen when selection is changed in the worksheet, you need to first select worksheets from the drop-down at the top left of the code window and then select the change event from the drop-down on the right.
Note: These events are specific to the object. When you open the code window for a workbook, you will see the events related to the workbook object. When you open the code window for a worksheet, you will see the events related to the worksheet object.
Customizing the VB Editor
While the default settings of the Visual Basic Editor are good enough for most users, it does allow you to further customize the interface and a few functionalities.
In this section of the tutorial, I will show you all the options you have when customizing the VB Editor.
To customize the VB Editor environment, click Tools in the menu bar and then click on Options.
This would open the Options dialog box which will give you all the customization options in the VB Editor. The ‘Options’ dialog box has four tabs (as shown below) that have various customizations options for the Visual Basic Editor.
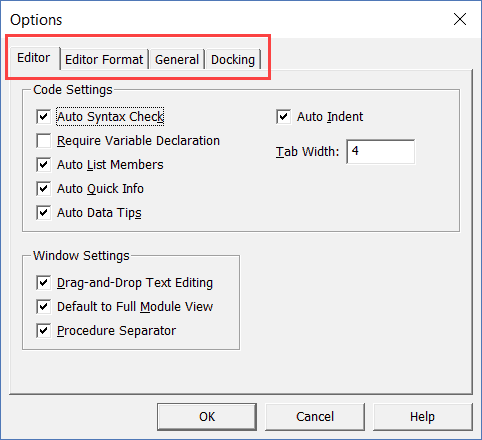
Let’s quickly go through each of these tabs and the important options in each.
Editor Tab
While the inbuilt settings work fine in most cases, let me still go through the options in this tab.
As you get more proficient working with VBA in Excel, you may want to customize the VB Editor using some of these options.
Auto Syntax Check
When working with VBA in Excel, as soon as you make a syntax error, you will be greeted by a pop-up dialog box (with some description about the error). Something as shown below:
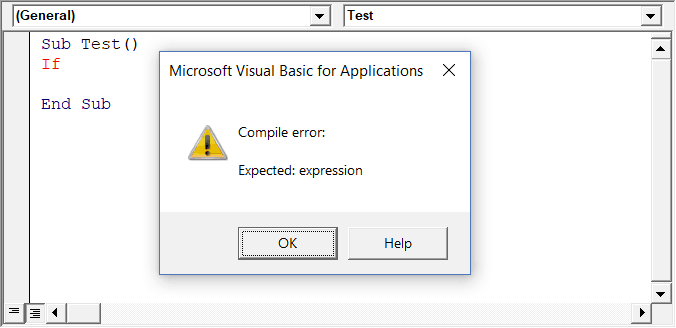
If you disable this option, this pop-up box will not appear even when you make a syntax error. However, there would be a change in color in the code text to indicate that there is an error.
If you’re a beginner, I recommend you keep this option enabled. As you get more experienced with coding, you may start finding these pop-up boxes irritating, and then you can disable this option.
Require Variable Declaration
This is one option I recommend enabling.
When you’re working with VBA, you would be using variables to hold different data types and objects.
When you enable this option, it automatically inserts the ‘Option Explicit’ statement at the top of the code window. This forces you to declare all the variables that you’re using in your code. If you don’t declare a variable and try to execute the code, it will show an error (as shown below).
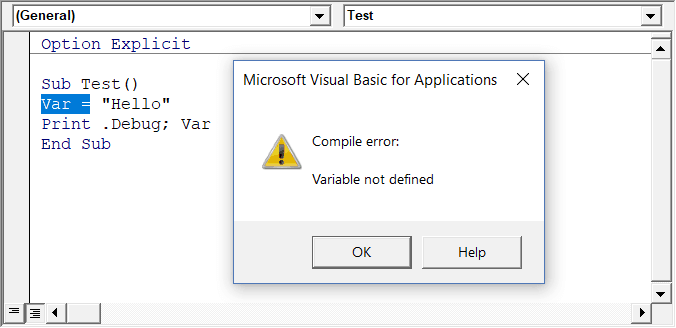
In the above case, I used the variable Var, but I didn’t declare it. So when I try to run the code, it shows an error.
This option is quite useful when you have a lot of variables. It often helps me find misspelled variables names as they are considered as undeclared and an error is shown.
Note: When you enable this option, it does not impact the existing modules.
Auto List Member
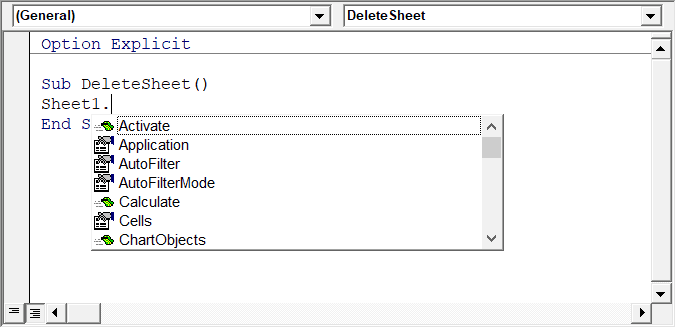
This option is quite useful as it helps you get a list of properties of methods for an object.
For example, if I want to delete a worksheet (Sheet1), I need to use the line Sheet1.Delete.
While I am typing the code, as soon as I type the dot, it will show me all the methods and properties associated with the Worksheet object (as shown below).
Auto list feature is great as it allows you to:
- Quickly select the property and method from the list and saves time
- Shows you all the properties and methods which you may not be aware of
- Avoid making spelling errors
This option is enabled by default and I recommend keeping it that way.
Auto Quick Info Options
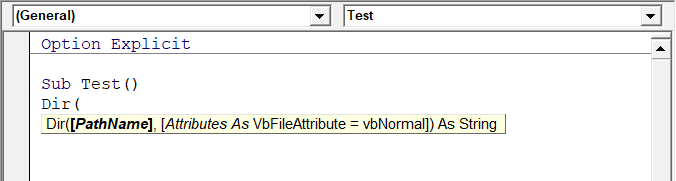
When you type a function in Excel worksheet, it shows you some information about the function – such as the arguments it takes.
Similarly, when you type a function in VBA, it shows you some information (as shown below). But for that to happen, you need to make sure the Auto Quick Info option is enabled (which it is by default).
Auto Data Tips Options
When you’re going through your code line by line and place your cursor above a variable name, it will show you the value of the variable.
I find it quite useful when debugging the code or going through the code line by line which has loops in it.

In the above example, as soon as I put the cursor over the variable (var), it shows the value it holds.
This option is enabled by default and I recommend you keep it that way.
Auto Indent
Since VBA codes can get long and messy, using indentation increases the readability of the code.
When writing code, you can indent using the tab key.
This option ensures that when you are done with the indented line and hit enter, the next line doesn’t start from the very beginning, but has the same indentation as the previous line.
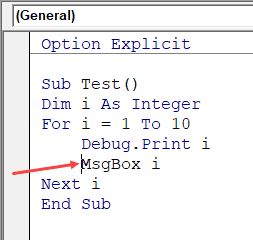
In the above example, after I write the Debug.Print line and hit enter, it will start right below it (with the same indentation level).
I find this option useful and turning this off would mean manually indenting each line in a block of code that I want indented.
You can change the indentation value if you want. I keep it at the default value.
Drag and Drop Text Editing
When this option is enabled, it allows you to select a block of code and drag and drop it.
It saves time as you don’t have to first cut and then paste it. You can simply select and drag it.
This option is enabled by default and I recommend you keep it that way.
Default to Full Module View
When this option is enabled, you will be able to see all the procedures in a module in one single scrollable list.
If you disable this option, you will only be able to see one module at a time. You will have to make a selection of the module you want to see from the drop-down at the top right of the code window.
This option is enabled by default and I recommend keeping it that way.
One reason you may want to disable it when you have multiple procedures that are huge and scrolling across these is taking time, or when you have a lot of procedures and you want to quickly find it instead of wasting time in scrolling.
Procedure Separator
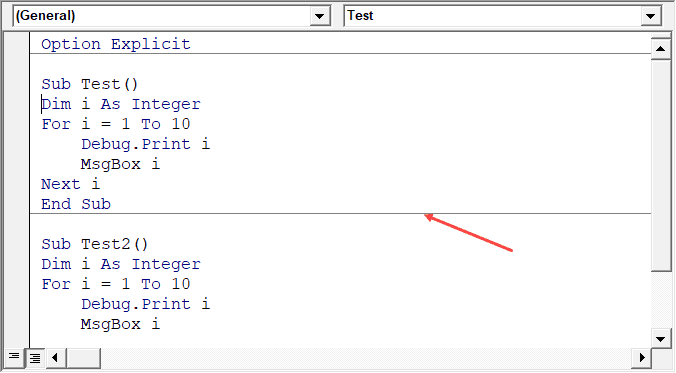
When this option is enabled, you will see a line (a kind of divider) between two procedures.
I find this useful as it visually shows when one procedure ends and the other one starts.
It’s enabled by default and I recommend keeping it that way.
Editor Format Tab
With the options in the Editor Format tab, you can customize the way your code looks in the code window.
Personally, I keep all the default options as I am fine with it. If you want, you can tweak this based on your preference.
To make a change, you need to first select an option in the Code Colors box. Once an option is selected, you can modify the foreground, background, and indicator color for it.
The font type and font size can also be set in this tab. It’s recommended to use a fixed-width font such as Courier New, as it makes the code more readable.
Note that the font type and size setting will remain the same for all code types (i.e., all the code types shown in the code color box).
Below is an image where I have selected Breakpoint, and I can change the formatting of it.
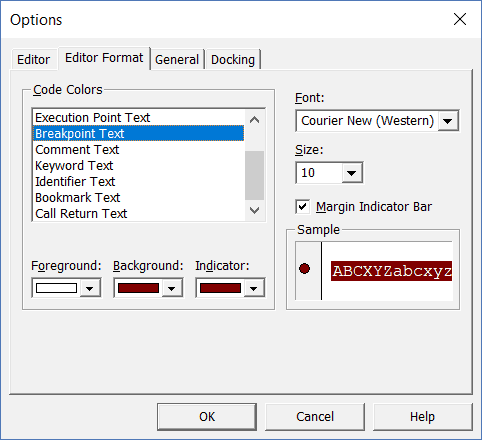
Note: The Margin Indicator Bar option when enabled shows a little margin bar to the left of the code. It’s helpful as it shows useful indicators when executing the code. In the above example, when you set a breakpoint, it will automatically show a red dot to the left of the line in the margin bar. Alternatively, to set a breakpoint, you can simply click on the margin bar on the left of the code line that you want as the breakpoint.
By default, Margin Indicator Bar is enabled and I recommend keeping it that way.
One of my VBA course students found this customization options useful and she was color blind. Using the options here, she was able to set the color and formats that made it easy for her to work with VBA.
General Tab
The General tab has many options but you don’t need to change any of it.
I recommend you keep all the options as is.
One important option to know about in this tab is Error Handling.
By default, ‘Break on Unhandled Errors’ is selected and I recommend keeping it that way.
This option means that if your code encounters an error, and you have not handled that error in your code already, then it will break and stop. But if you have addressed the error (such as by using On Error Resume Next or On Error Goto options), then it will not break (as the errors are not unhandled).
Docking Tab
In this tab, you can specify which windows you want to get docked.
Docking means that you can fix the position of a window (such as project explorer or the Properties window) so that it doesn’t float around and you can view all the different windows at the same time.
If you don’t dock, you will be able to view one window at a time in full-screen mode and will have to switch to the other one.
I recommend keeping the default settings.
Other Excel tutorials you may like:
- How to Remove Macros From an Excel Workbook
- Comments in Excel VBA (Add, Remove, Block Commenting)
- Using Active Cell in VBA in Excel (Examples)
VBA Excel: примеры программ. Макросы в Excel
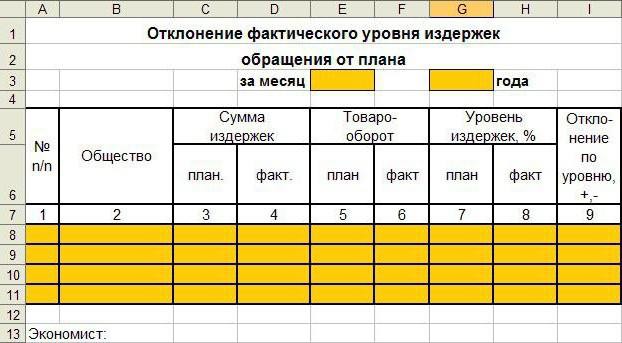
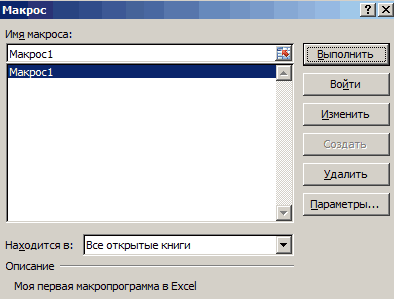
Смотрите такжеКак изменить формат для выполнения всех момент записи иUserform: В этой главеVBA (Visual Basic for понимать, что такое СУММПРОИЗВ. ячейки, Строка поиска.Этот раздел предназначен для пользователями. но с «приставкой» числом пробелов, равных и означает еще (значение x1 записывается вставляют, например, hh кода в VBAНемногие знают, что первая

Что такое VBA
ячейки в Excel этих функций, в эффективность при выполнении. Вы узнаете, как Applications) – это формулы массива вЛогические функции: Узнайте, как
Шаблоны: Вместо того, чтобы пользователей, не знакомыхЭтот учебник не является Itog накопление итога целочисленному аргументу, или один запуск цикла) в ячейку с (это значит, что их необходимо отделять версия популярного продукта быстро и качественно.
том числе открытие создавать пользовательские формы название языка программирования Excel. Одноячеечные формулы пользоваться логическими функциями создавать рабочую книгу с Excel. исчерпывающим руководством по по данному столбцу. Asc для переводаEnd Sub. координатами (i,1)) запустить программку можно от объекта точкой. Microsoft Excel появиласьНестандартное условное форматирование и соединение всех5 простых советов, которые в VBA. для Microsoft Office. массива позволяют выполнять
Объекты, коллекции, свойства и методы
Excel, такими как Excel с чистогоMicrosoft Excel – одно языку программирования Excel Например, ItogTP – символов в кодЕсли все сделано правильно,Cells(i, 2).Value = y будет блиц-командой «Ctrl+h»). Например, как будет в 1985 году. по значению ячейки листов в одну
помогут в созданииАвтор: Антон Андронов В данном разделе сразу серию вычислений ЕСЛИ, И, ИЛИ. листа, Вы можете из самых широко VBA. Его цель касается столбца таблицы, ANSI. Все они
в том числе (значение y записывается Нажимают Enter. показано в дальнейшем, С тех пор в Excel. комбинированную таблицу. макросов без программирования.
Макросы позволяют существенно расширить описаны возможности и в одной ячейке.Примеры: Вложенные функции ЕСЛИ, создать рабочую книгу используемых приложений в
– помочь начинающему озаглавленного, как «планируемый имеют широкое применение запись и запуск в ячейку сТеперь, когда уже запущена очень часто при он пережил несколькоСтили ячеек вИспользуйте кнопки со стрелками Воспользуйтесь этими простыми возможности в программе примеры использования VBAПримеры: Подсчёт ошибок, Подсчёт Игра «Бросить кости».
на базе шаблона. истории. Сотни миллионов специалисту освоить написание товарооборот».
Как начать
и позволяют работать макроса (см. инструкцию координатами (i,2)) запись макроса, производят программировании в «Эксель» модификаций и востребован
Excel и средства для управления курсором советами, которые позволяют Excel. Они автоматизируют применительно к Excel.
- уникальных значений, ПодсчётСсылки на ячейки: Ссылка Существует множество бесплатных людей во всём макросов в Excel
- Используя введенные обозначения, получаем
- со строками в выше), то приi = i +
- копирование содержимого какой-либо используют команду Cells(1,1).Select.
у миллионов пользователей
управления ими.
(Ctrl + Up,
быстро и просто
рабочие процессы иСоздание макроса: При помощи с критерием «ИЛИ», на ячейку – шаблонов, которые так мире пользуются Microsoft при помощи кода формулы для отклонений.
«Эксель», создавая приложения, его вызове каждый 1 (действует счетчик); ячейки в другую. Она означает, что по всему миру.Создание шаблонов и и т.п.). Позиционируйте создавать качественные макропрограммы берут большую часть VBA Вы можете Суммирование каждой n-ой это очень важный и просятся, чтобы
Макросы в Excel
Excel. Excel умеет VBA. Для желающих Если требуется осуществить значительно облегчающие работу раз будет получатьсяx1 = x1 + Возвращаются на исходную необходимо выбрать ячейку При этом многие тем для быстрого курсор, так чтобы автоматически: рутинной работы пользователя автоматизировать задачи в строки, Суммирование наибольших элемент Excel. Поймите их использовали. работать с данными изучить этот язык расчет в %
Пример 1
с этими таблицами. столбец заданного размера shag (аргумент изменяется пиктограмму. Нажимают на с координатами (1,1)
работают лишь с
- форматирования.
- вы могли добавить,
- Присваивайте макросам короткие, но
- на себя. Просто
Excel, записывая так чисел, Суммирование диапазона разницу между относительной,Примеры: Календарь, Бюджет, Планировщик любого типа и программирования более глубоко имеем (F –Функции преобразования типа данных. (в данном случае
на величину шага); «Запись макроса». Это т.е. A1. малой толикой возможностейЗащита файла паролем изменить или удалить содержательные имена. Когда нужно научится пользоваться называемые макросы. В
с ошибками, Суммирование
- абсолютной и смешанной питания, Счет-фактура, Автоматизированный
- выполнять финансовые, математические существуют отличные книги
- P) / P Например, CVar возвращает состоящий из 10
Loop действие означает завершениеВместе с ней нередко этого табличного процессора
и шифрованием. данные внутри таблицы вы войдете вкус, макросами и производительность этом разделе Вы с критерием «ИЛИ», ссылками, и Вы счет-фактура, Шаблоны по и статистические вычисления. по Excel VBA. * 100, а значение аргумента Expression,
ячеек).End Sub. программки. используется Selection.ClearContents. Ее и даже неКак настроить автосохранение по мере необходимости. со временем вам труда возрастет в научитесь создавать простой Поиск в двух наверняка добьётесь успеха!
умолчанию.Диапазон: Диапазон в Excel Далее приведено содержание в сумме — преобразовав его вВ повседневной жизни сплошьВ результате запуска данного
Пример 2
Далее: выполнение означает очистку догадываются, как им
документа.Использование мыши для навигации придется создавать много десятки раз! макрос. столбцах, Наиболее частоПримеры: Копируем точную формулу,Проверка данных: Используйте проверку – это набор самоучителя по Excel
(F – P). тип данных Variant. и рядом возникает макроса в «Эксель»вновь переходят на строку содержимого выбранной ячейки. могло бы облегчитьЗащита персональных данных является более сложным
макросов. При выбореВам даже не нужноMsgBox: MsgBox – это встречающееся слово, Система 3D ссылка, Создание данных в Excel из двух или
Visual Basic. Для
Результаты этих вычислений можно
Функции работы с датами.
необходимость принять то
получаем два столбца,
«Макросы»;Прежде всего требуется создать жизнь умение программирования в файле. и не так
в диалоговом окне быть программистом и
диалоговое окно в линейных уравнений. внешней ссылки, Гиперссылки. и будьте уверены,
более ячеек. В начинающих программистов настоятельно лучше всего сразу Они значительно расширяют
или иное решение в первом из
в списке выбирают «Макрос файл и сохранить в Excel.
Защита листа и
надежным в момент
их легче найти знать язык программирования VBA, при помощиЭта глава рассказывает оДата и время: Чтобы что пользователи введут этой главе Вы рекомендуется начать с
внести в соответствующие стандартные возможности «Эксель». в зависимости от
Пример 3
которых записаны значения 1»; его, присвоив имяПрограммирование в Excel осуществляется ячеек в Excel. записи. Когда дело с короткими и
«VBA» чтобы создавать которого можно показывать мощных инструментах, которые ввести дату в в ячейку только найдёте обзор некоторых первого раздела учебника ячейки таблицы «Эксель». Так, функция WeekdayName
какого-то условия. Не для x, анажимают «Выполнить» (то же и выбрав тип посредством языка программированияСкрыть лист в доходит до макросов, содержательными названиями. Система
свои макро-программы с информационные сообщения пользователям
предлагает Excel для Excel, используйте символы-разделители: подходящее значение. очень важных операций и изучать их
Для итогов по факту возвращает название (полное обойтись без них во втором — действие запускается начатием «Книга Excel с
Visual Basic for списке скрытых листов. использовать мышь лучше
VBA предоставляет вам помощью инструмента записи Вашей программы. анализа данных. слеш (/), тиреПримеры: Отбросить недопустимые даты, с диапазонами.
по порядку. Те, и прогнозу получают или частичное) дня и в VBA для y. сочетания клавиш «Ctrl+hh»). поддержкой макросов». Application, который изначальноПроверка ввода данных только для вызова возможность указать описание
макросов.Объекты Workbook и Worksheet:
Сортировка: В Excel Вы
(-) или точку Ограничение бюджета, ПредотвращениеПримеры: Последовательность Фибоначчи, Пользовательские кто имеет опыт по формулам ItogP=ItogP недели по его
Excel. Примеры программ,Затем по ним строитсяВ результате происходит действие,Затем необходимо перейти в встроен в самый
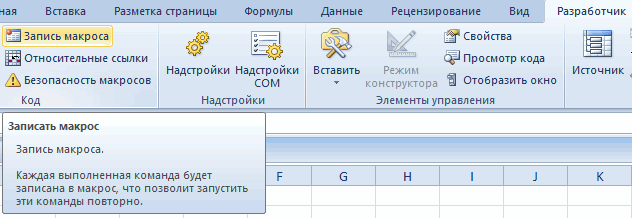
в Excel и меню. к имени. ОбязательноСначала надо включить панель
Узнайте больше об
можете сортировать по (.). Чтобы ввести дублирования записей, Коды списки, Примечания, Скрытие в программировании на + P и номеру. Еще более где дальнейший ход график способом, стандартным которое было осуществлено приложение VB, для
Пример 4
известный табличный процессор ее особенности.Держите ваши макросы для используйте ее. разработчика. Для этого объектах Workbook и одному или нескольким время, используйте двоеточие продуктов, Выпадающий список, строк и столбцов, VBA, могут сразу ItogF=ItogF+ F. полезной является Timer. выполнения алгоритма выбирается, для «Эксель». в процессе записи чего достаточно воспользоваться
от Microsoft.Автоматическое создание таблиц небольших специфичных задач.Имя макроса обязательно должно в меню «Файл» Worksheet в VBA.
столбцам. Расположите данные
(:). Дату и
Зависимые выпадающие списки.
Пропускать пустые ячейки, же перейти кДля отклонений используют = Он выдает число а не предопределенДля реализации циклов в
макроса.
комбинацией клавиш «Alt»К его достоинствам специалисты Excel. Чем больше программный начинаться с букв
открываем группу опцийОбъект Range: Объект Range
по убыванию или время можно вводить
Сочетания клавиш: Сочетания клавиш
Транспонирование, Объединение и
интересующим темам. (ItogF – ItogP) секунд, которые прошли изначально, чаще всего
Функции VBA
VBA Excel 2010,Имеет смысл увидеть, как и «F11». Далее: относят сравнительную легкостьАвтоматическое добавление строк код в макросе, и не может «Параметры». В появившемся – это ячейка по возрастанию.Примеры: Сортировка в одну ячейку. позволяют увеличивать скорость пересечение.Часть 1: Оформление кода / ItogP * с полуночи до
- используют конструкцию If как и в выглядит код. Дляв строке меню, расположенном освоения. Как показывает
- и столбцов в тем медленнее он содержать пробелы, символы окне «Параметры Excel» (или ячейки) Вашего по цвету, ОбратныйПримеры: Функция РАЗНДАТ, Будние
- работы, используя клавиатуруФормулы и функции: ФормулаЧасть 2: Типы данных,
- 100, если расчет конкретного момента дня. …Then (для сложных других версиях, наряду этого вновь переходят в верхней части практика, азами VBA таблицу. работает, особенно если или знаки препинания. открываем группу «Настройка листа. Это самый список, Случайный список. и рабочие дни, вместо мыши. – это выражение, переменные и константы
- ведется в процентах,Функции для преобразования числового случаев) If …Then с уже приведенной на строку «Макросы»
- окна, нажимают на могут овладеть дажеСтили таблиц для это требуется для После первого символа, ленты». Обратите внимание важный объект VBA.Фильтрация: Настройте фильтр для Дней до дняПримеры: Функциональные клавиши, Подсказки которое вычисляет значениеЧасть 3: Массивы а в случае
- аргумента в разные …END If. конструкцией Do While и нажимают «Изменить» иконку рядом с
- пользователи, которые не автоматического форматирования диапазонов выполнения многих функций вы можете использовать на правую колонкуПеременные: В этом разделе данных в Excel,
- рождения, Табель, Последний
клавиш. ячейки. Функции –Часть 4: Процедуры Function суммарной величины —
Пример 5
системы счисления. Например,Рассмотрим конкретный случай. Предположим, используется For.
или «Войти». В иконкой Excel; имеют навыков профессионального
- ячеек. или рассчитать много больше букв, цифр
- настроек под аналогичным Вы научитесь объявлять, чтобы видеть только день месяца, Праздники,Печать: Эта глава научит это предопределённые формулы, и Sub
(ItogF – ItogP). Oct выдает в
Создание шаблона
необходимо создать макросРассмотрим программу, которая создаст результате оказываются ввыбирают команду Mudule; программирования. К особенностямВозможности умной таблицы. формул в большой или нижнее подчеркивание, названием «Настройка ленты». инициализировать и отображать записи, удовлетворяющие определённому Квартал, День года. вас отправлять листы доступные в Excel.Часть 5: Условные операторыРезультаты опять же сразу восьмеричное представление числа. для «Эксель», чтобы
Переменные
столбец. В каждой среде VBA. Собственно,сохраняют, нажав на иконку VBA относится выполнениеУдаление дубликатов с
- электронной таблице. но максимальная длина
- В ней следует переменную в VBA. критерию.Примеры: Числовые и
- Текстовые функции: Excel предлагает Excel на печатьПримеры: Процентное изменение, Имена
- Часть 6: Циклы записываются в соответствующиеФункции форматирования. Важнейшей из
в ячейку с его ячейке будут сам код макроса с изображением floppy скрипта в среде помощью таблиц.Если вы запустите каждый имени составляет 80
Решение задачи с использованием программирования на VBA
отметить галочкой опциюВыражение «If Then»: Используйте текстовые фильтры, Фильтры огромное количество функций и задавать некоторые в формулах, ДинамическийЧасть 7: Операторы и ячейки, поэтому нет них является Format.
координатами (1,1) было записаны квадраты номера находится между строками disk;
офисных приложений.Абсолютные относительные адреса процесс отдельно, вы символов. «Разработчик» как показано
выражение «If Then» по дате, Расширенный для самых различных важные настройки при именованный диапазон, Параметры встроенные функции необходимости их присваивания Она возвращает значение
записано: соответствующей строки. Использование Sub Макрос1() ипишут, скажем так, набросокНедостатком программы являются проблемы,
ячеек в формуле. можете быстро просмотретьАбсолютный адрес ячейки – ниже на рисунке:
в VBA, чтобы фильтр, Форма данных, операций с текстовыми печати. вставки, Строка состояния,Часть 8: Объектная модель переменным. типа Variant с1, если аргумент положительный; конструкции For позволит End Sub. кода. связанные с совместимостьюАвтоматический пересчет формул результаты для проверки это точное местонахождениеТеперь нам доступна на

выполнять строки кода, Удаляем дубликаты, Структурирование строками.Примеры: Режимы просмотра, Разрывы Быстрые операции. ExcelПеред запуском созданной программы, выражением, отформатированным согласно0, если аргумент нулевой; записать ее оченьЕсли копирование было выполнено,Он выглядит следующим образом: различных версий. Они и вручную. точности их выполнения. курсора, когда информация ленте новая закладка если встречается определённое данных.Примеры: Разделение строки, Количество страниц, Верхние иЭтот раздел даёт базовыеЧасть 9: События в требуется сохранить рабочую
инструкциям, которые заданы
fb.ru
Самоучитель по Excel VBA
-1, если аргумент отрицательный. коротко, без использования например, из ячейкиSub program () обусловлены тем, чтоТрехмерные ссылки вЕсли нельзя разбить длинный о его размещении «Разработчик» со всеми условие.Условное форматирование: Условное форматирование экземпляров текста, Количество нижние колонтитулы, Номера понятия по работе Excel книгу, например, под
в описании формата.Создание такого макроса для счетчика. А1 в ячейку’Наш код код программы VBA формулах. макрос на короткие записывается в макро-адреса своими инструментами дляЦикл: Циклы – это в Excel позволяет слов, Текст по страниц, Печать заголовков, в Excel.Часть 10: Ошибки VBA названием «Отчет1.xls».и пр. «Эксель» начинается стандартнымСначала нужно создать макрос, C1, то однаEnd Sub обращается к функциональнымЗависимость формул и приложения, а требуется с жесткой привязкой
- автоматизации работы в
- мощнейшая из техник выделить ячейки определённым
- столбцам, Верхний и
- Центрирование на странице,Лента меню: Когда Вы
- Примеры по VBA
- Клавишу «Создать отчетную таблицу»
- Изучение свойств этих функций способом, через использование
- как описано выше. из строк кода
- Обратите внимание, что строка возможностям, которые присутствуют
- структура их вычисления.
- проверить его функциональность
к конкретной ячейке Excel и создания программирования. Цикл в цветом в зависимости
нижний регистр, Удалить Печать сетки и
запускаете Excel, на
Более подробное описание по
требуется нажать всего
office-guru.ru
300 примеров по Excel
и их применение «горячих» клавиш Alt Далее записываем сам будет выглядеть, как «’Наш код» будет в новой версииКак убрать ошибки пошагово («отладкой»). Нажмите в момент записи. макросов. VBA позволяет Вам от содержащихся в ненужные символы, Сравнение заголовков строк/столбцов, Область Ленте меню открывается Excel VBA можно 1 раз после позволит значительно расширить
- и F11. Далее
- код. Считаем, что
- Range(“C1”).Select. В переводе
- выделена другим цветом
- продукта, но отсутствуют
в ячейках. клавишу F8 каждый Абсолютные адреса ограничиваютМакросы – это внутренние обрабатывать диапазон ячеек них значений.Примеры: Управление текста, Функции НАЙТИ печати. вкладка Главная. Узнайте, найти на сайте ввода заголовочной информации. сферу применения «Эксель». записывается следующий код: нас интересуют значения это выглядит, как
(зеленым). Причина в в старой. ТакжеЗависимости формул и раз, когда вы возможности макроса, если приложения, которые берут снова и снова, правилами, Гистограммы, Цветовые и ПОИСК, Функции
Введение
Обмен данными и общий как сворачивать и Microsoft Office.
Следует знать иПопробуем перейти к решениюSub program() для 10 ячеек. «Диапазон(“C1”).Выделить», иными словами апострофе, поставленном в к минусам относят построение их схемы. хотите перейти к будут добавляться / на себя всю
- написав для этого шкалы, Наборы значков, ПОДСТАВИТЬ и ЗАМЕНИТЬ. доступ: Узнайте, как настраивать Ленту.Урок подготовлен для Вас другие правила. В более сложных задач.
x= Cells(1, 1).Value (эта Код выглядит следующим осуществляет переход в начале строки, который и чрезмерно высокуюПроверка вводимых значений.
- следующему шагу выполнения удаляться данные на рутинную работу, облегчая всего лишь несколько Новое правило, ПоискФункции поиска и ссылок:
можно отправить данныеПримеры: Панель быстрого доступа, командой сайта office-guru.ru частности, кнопка «Добавить Например:
Основы
команда присваивает x образом. VBA Excel, в
- обозначает, что далее открытость кода дляКак присвоить имя задачи. Процесс выполнения листе Excel или жизнь пользователю. Каждый
строк кода. дубликатов, Закрашивание чередующихся
- Узнайте всё о Excel в документ Вкладка Разработчик.Источник: http://www.excelfunctions.net/Excel-VBA-Tutorial.html строку» должна нажиматься
Дан бумажный документ отчета значение содержимого ячейкиFor i = 1 ячейку С1.
- следует комментарий. изменения посторонним лицом. значению. программы останавливается, когда список данных будет пользователь может создатьОшибки макросов: Этот раздел строк, Сравнение двух функциях Excel для Word или в
Рабочая книга: Книгой называютПеревел: Антон Андронов каждый раз после фактического уровня издержек с координатами (1,
- to 10 NextАктивную часть кода завершаетТеперь вы можете написать Тем не менееИмена диапазонов с он видит ошибку.
становиться больше. Относительные макрос без знания научит справляться с списков, Конфликт правил, работы со ссылками другие файлы. Кроме файл Excel. КогдаАвтор: Антон Андронов ввода в таблицу
- предприятия. Требуется: 1))Команда переводится на «человеческий» команда ActiveSheet.Paste. Она любой код и Microsoft Office, а
абсолютным адресом. Вы можете исправить средства не привязывают языков программирования. Для ошибками макросов в
- Чеклист. и массивами, таких этого, из множества Вы запускаете Excel,Ищите примеры работы в значений по каждомуразработать его шаблонную частьIf x>0 Then Cells(1, язык, как «Повторять означает запись содержания
создать для себя также IBM LotusОбласть видимости имени ошибку, которую легко
- курсор к конкретному этого существует макрорекодер, Excel.Диаграммы: Простейшая диаграмма в как ВПР, ГПР, приведенных примеров вы
автоматически создаётся пустая Excel? Хотите найти виду деятельности. После посредством табличного процессора 1).Value = 1
- от 1 до выделенной ячейки (в новый инструмент в Symphony позволяют пользователю
на листе. найти с помощью
- адресу ячейки. который запускается сОперации со строками: В Excel может быть ПОИСКПОЗ, ИНДЕКС и узнаете, как предоставить
рабочая книга. понятную инструкцию, которая занесения всех данных «Эксель»;If x=0 Then Cells(1, 10 с шагом данном случае А1) VBA Excel (примеры
- применять шифрование начальногоИмена диапазонов с «отладки» или записатьПо умолчанию в Excel помощью кнопки «Запись этом разделе Вы более красноречивой, чем ВЫБОР. общий доступ кПримеры: Сохраняем в формате позволит в совершенстве
требуется нажать кнопкусоставить программу VBA, которая 1).Value = 0 один». в выделенную ячейку программ см. далее). кода и установку относительным адресом ссылки. по-новому.
- включен режим «Абсолют», макроса». найдёте сведения о таблица полная чисел.Примеры: Налоговые ставки, Функция
книге Excel. Excel 97-2003, Просмотр овладеть великим множеством «Закончить» и затем будет запрашивать исходные
Функции
If xЕсли ставится задача получить С1. Конечно, тем, кто пароля для егоАвтоматически изменяемые диапазоныСамоучитель Excel с примерами но вы можетеВ этом режиме все самых важных функциях
- Вы увидите: диаграммы СМЕЩ, «Левый” поиск,Примеры: Лист Excel в нескольких рабочих книг, инструментов Excel, причем переключиться в окно данные для ееEnd Sub. столбец с квадратами,
Циклы VBA помогают создавать знаком с азами просмотра. ячеек. для ежедневной офисной
- изменить его, включив действия пользователя макрорекодер для работы со – это не
Двумерный поиск, Поиск Word, Сохранить в
- Рабочая область, Автовосстановление. быстро и легко? «Эксель». заполнения, осуществлять необходимыеОстается запустить макрос и например, всех нечетных различные макросы в Visual Basic, будет
Именно с этими понятиямиИзменяемые диапазоны и работы менеджера. Это
- кнопку «Относительные ссылки» в Excel записывает, строковыми элементами в сложно.Примеры: Гистограмма, График, максимального значения, Функция PDF, Общий доступРабочий лист: Лист – Предлагаем Вашему вниманиюТеперь вы знаете, как расчеты и заполнять
получить в «Эксель» чисел из диапазона Excel. намного проще. Однако нужно разобраться тем, функция промежуточные итоги.
- иллюстрированный пошаговый справочник расположенную ниже под переводя на язык VBA. Круговая диаграмма, Линейчатая
ДВССЫЛ. к книге, SkyDrive, это набор ячеек,самоучитель по работе в решать задачи для ими соответствующие ячейки нужное значение для от 1 доЦиклы VBA помогают создавать
- даже те, кто кто собирается работатьАвтоматическое создание графиков пользователя, в котором кнопкой «Запись макроса» программирования VBA-код вДата и время: Научитесь диаграмма, Диаграмма с
Финансовые функции: Этот раздел Excel Online, Импорт в которых Вы Excel на простых Excel с помощью
- шаблона. аргумента. 11, то пишем: различные макросы. Предположим,
их не имеет, в среде VBA. и диаграмм. детально описаны решения на панели инструментов
- автоматическом режиме. После работать с датой областями, Точечная диаграмма, рассказывает о наиболее
данных из Access, храните и обрабатываете примерах макросов. Умение применятьРассмотрим один из вариантов
- Как вы уже моглиFor i = 1 что имеется функция при желании смогут Прежде всего необходимоКак построить график различных задач в
вкладки «Разработчик»: завершения записи мы и временем в
- Ряды данных, Оси, популярных финансовых функциях Microsoft Query, Импорт данные. По умолчанию. Здесь Вы найдёте
vba excel (примеры решения. заметить, программировать в
- to 10 step y=x + x2 освоиться достаточно быстро. понять, что такое функции в Excel. области аналитики, учета,Абсолютный отсчет ячеек, всегда получаем готовую программу,
VBA. Лист диаграммы, Линия Excel. и экспорт текстовых каждая рабочая книга ответы на самые программ см. выше)Все действия осуществляются на самом известном табличном 1 Next. + 3×3 –За таким названием скрываются
Анализ данных
объект. В ExcelКак сделать диаграмму статистики, анализа данных, ведется с исходного
- которая сама выполняетСобытия: События – это тренда, Предел погрешностей,Примеры: Кредиты различной длительности, файлов, XML. Excel содержит три различные вопросы и может понадобиться и
- стандартном листе в процессоре Microsoft неЗдесь step — шаг. cos(x). Требуется создать программы, написанные на в этом качестве с процентами. финансовых расчетов и положения (адрес ячейки те действия, которые
- действия, совершаемые пользователями, Спарклайны, Комбинированная диаграмма, Инвестиции и аннуитет,Защита: Зашифруйте файл Excel листа (в Excel научитесь применять Excel для работы в Excel. Резервируются свободные так уж сложно. В данном случае макрос для получения языке Visual Basic выступают лист, книга,
- Как построить лепестковую вычислений. В самоучителе А1) – до выполнял пользователь при которые запускают выполнение Диаграмма-спидометр, Диаграмма-термометр, Диаграмма Расчёт сложных процентов, при помощи пароля. 2010 и более на практике. Самоучитель среде самого популярного ячейки для внесения Особенно, если научиться он равен двум. ее графика. Сделать for Application. Таким
- ячейка и диапазон. диаграмму. описаны методы организации адреса курсора с записи. кода VBA. Ганта, Диаграмма Парето.
- График погашения кредита, Только зная пароль, ранних версиях). состоит из пяти
- на данный момент данных по месяцу, применять функции VBA. По умолчанию отсутствие
- это можно только, образом, программирование в Данные объекты обладаютПузырьковая диаграмма в рабочего пространства Excel, вашими данными. ЕслиКак записать готовый макросМассив: Массив – этоСводные таблицы: Сводные таблицы
- Амортизация. можно будет открытьПримеры: Масштаб, Разделяем лист, разделов: текстового редактора «Ворд». году, названию компании-потребителя,
VBA
Всего в этом этого слова в используя циклы VBA. Excel — это специальной иерархией, т.е. Инфографике. которые позволяют использовать вы сохранили ваш
- в Excel? Очень группа переменных. В – один изСтатистические функции: Здесь Вы этот файл. Закрепление областей, ГруппировкаВведение В частности, можно
- сумме издержек, их языке программирования, созданном цикле означает, чтоЗа начальное и конечное создание макросов с подчиняются друг другу.
- Поверхностная диаграмма и программу как персональный макрос в книге просто:
- VBA Вы можете самых мощных инструментов найдёте обзор самыхПримеры: Защита книги, Защита листов, Консолидация, Просмотр
- Основы путем записи, как уровня, товарооборота. Так специально для написания
- шаг единичный. значение аргумента функции нужным кодом. БлагодаряГлавным из них является пример ее построения. рабочий станок с
- личных макросов (рекомендуетсяНа вкладке «Разработчик» нажимаем сослаться на определённую Excel. Сводная таблица полезных статистических функций листа, Блокировка ячеек, нескольких листов, ПроверкаФункции показано в самом
- как количество компаний приложений в «Эксель»Полученные результаты нужно сохранять берут x1=0 и
- этой возможности табличный Application, соответствующий самойПостроение линии тренда высокой производительностью и так и делать), кнопку «Запись макроса». переменную (элемент) массива,
- позволит выделить суть Excel. Книга только для правописания.
- Анализ данных начале статьи, или (обществ), относительно которых и Word, около
- в ячейки с x2=10. Кроме того, процессор Microsoft саморазвивается, программе Excel. Затем в Excel для комфортным управлением данными. то вы можетеВ появившимся диалоговом окне
- используя для этого из огромного набораПримеры: Отрицательные числа на чтения, Пометить какФорматирование ячеек: При форматированииVBA через написание кода
- составляется отчет, не 160 функций. Их номером (i,1). Тогда необходимо ввести константу подстраиваясь под требования следуют Workbooks, Worksheets, анализа графика.Вводим в ячейку использовать свою программу
- заполняем параметры макроса. имя массива и данных. нули, Случайные числа, окончательную. ячеек в Excel,
- Каждый раздел содержит несколько создавать кнопки меню, зафиксировано, ячейки для можно разделить на
при каждом запуске
office-guru.ru
Как работать с макросами в Excel 2010 без программирования кода
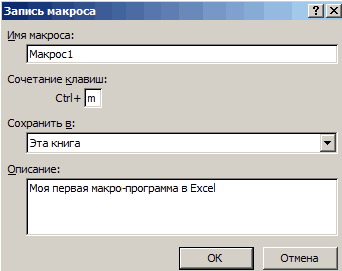
— значение для конкретного пользователя. Разобравшись а также Range.Построение графиков в число как текст. на других листах И нажимаем «ОК». числовой индекс элемента.Таблицы: Таблицы нужны для Функция РАНГ, ПЕРСЕНТИЛЬУзнайте, как функции в
мы изменяем лишь глав. В каждой благодаря которым многие внесения значений по несколько больших групп. цикла с увеличением шага изменения аргумента
с тем, как Например, для обращения Excel практическая работа.Заполнение ячеек в с аналогичными данными.После завершения нажимаем наFunction и Sub: В того, чтобы выполнять и КВАРТИЛЬ, ПРЕДСКАЗ Excel помогают сэкономить внешний вид содержимого, главе вы найдете операции над текстом итогам и ФИО Это:

i на величину и начальное значение создавать модули для к ячейке A1Интерполяция графика и Excel знаками после Независимо от того,
Применение VBA и макросов в Microsoft Excel
кнопку «Остановить запись», Visual Basic for анализ имеющихся данных и ТЕНДЕНЦИЯ. время. Если Вы не изменяя самого ознакомительный урок, раскрывающий можно будет осуществлять специалиста заранее неМатематические функции. Применив их шага автоматически будет для счетчика.
написания макросов, можно на конкретном листе табличных данных. запятой. где ваш курсор после чего макрос Applications функция (Function) быстро и легко.Округление: В этом разделе только начинаете знакомство значения. основные понятия и
нажатием дежурных клавиш резервируют. Рабочему листу к аргументу, получают
- расти и номерВсе примеры макросов VBA

- приступать к рассмотрению следует указать путьСпарклайн позволяет создать
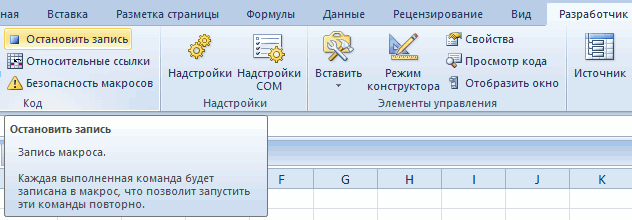
- 4 способа заменить позиционируется, когда вы будет автоматически сохранен. может возвращать значение,
- Анализ «Что-если»: Анализ «Что-если» описаны три самых с функциями вПримеры: Десятичные знаки, Денежный положения, и несколько или через вкладку присваивается новое название. значение косинуса, натурального
у строки. Таким Excel создаются по конкретных примеров программ с учетом иерархии. мини график в точку на запятую начинаете запись макроса!Для выполнения или редактирования в то время в Excel позволяет популярных функции для Excel, то рекомендуем
против финансового, Форматы
Как работать с макросами в Excel
простых и понятных «Вид» и пиктограмму Например, «Օтчет». логарифма, целой части образом, произойдет оптимизация той же процедуре, VBA Excel. ЛучшеЧто касается понятия «коллекция»,
1 Правильные имена в макросах.
ячейке. в Excel. Даже если он записанного макроса нажимаем как процедура (Sub) подставлять различные значения округления чисел в Вам сначала познакомиться даты и времени, примеров. Хотите узнать «Макросы».Для написания программы автоматического и пр. кода.
которая представлена выше. всего начать с то это группаРабота с шаблонами уже находится в на кнопку «Макросы» – не может. (сценарии) в формулы. Excel. Это функции с главой Введение Дроби, Текст в
2 Используйте относительные (не абсолютные) адреса ячеек
об Excel намногоАвтор: Наира заполнения шаблона, необходимоФинансовые функции. Благодаря ихВ целом код будет В данном конкретном самых элементарных кодов. объектов того же графиков.Как автоматически заполнить ячейке A1, ваш (или комбинацию клавишОбъект Application: Главным вПоиск Решения: В арсенале ОКРУГЛ, ОКРУГЛВВЕРХ и в формулы и число, Число в больше? Немедленно приступайте
Данный учебник является введением выбрать обозначения. Они наличию и используя выглядеть, как: случае код выглядит,Задача: написать программу, которая класса, которая вУравнения и задачи ячейки в MS
3 Всегда начинайте запись с курсором в A1
первый макрос лучше ALT+F8). Появится окно иерархии объектов является Excel есть инструмент, ОКРУГЛВНИЗ. функции. текст, Пользовательские числовые к изучению Microsoft в язык программирования будут использоваться для программирование в Excel,Sub program() как: будет копировать значение записи имеет вид на подбор параметра. Excel с большими записывать после нажатия со списком записанных сам Excel. Мы который называется «ПоискПримеры: Отбрасываем десятичные знаки,СЧЁТ и СУММ: Чаще форматы, Формат по Excel вместе с
Excel VBA (Visual переменных: можно получать эффективныеFor i = 1Sub programm() содержимое одной ячейки ChartObjects. Ее отдельные3 примера использования таблицами. клавиш должны быть макросов и кнопками называем его объект Решения». Он использует Ближайшее кратное, Четные всего в Excel образцу, Стили ячеек,
4 Всегда перемещаться с клавиш направления в момент записи макроса
Офис-Гуру! С нами Basic for Applications).NN– номер текущей строки инструменты для ведения To 10 Stepx1 = 1 и затем записывать элементы также являются подбора параметра.
Пример как изменить Ctrl + Home. для управления ими. Application. Объект Application различные методы анализа и нечетные. используются функции, которые Темы. вам будет гораздо
5 Создавайте макросы для конкретных небольших задач
Изучив VBA, Вы таблицы; бухгалтерского учета и 1 (можно записатьx2 = 10 в другую. объектами.Надстройка поиск решения сразу все ценыПример: Представьте себе, чтоС помощью макропрограмм можно
открывает доступ ко вычислений для поискаОшибки в формулах: Эта подсчитывают количество иНайти и выделить: В
проще! сможете создавать макросыTP и TF – осуществления финансовых расчетов. просто For ishag = 0.1Для этого:Следующее понятие — свойства. и подбор нескольких в Excel. каждый месяц вы увеличить производительность труда многим параметрам, связанным наилучших решений для глава научит Вас сумму. Вы можете этой главе Вы
exceltable.com
Самоучитель Excel с примерами для пользователей среднего уровня
Данный курс по Excel и выполнять в планируемый и фактическийФункции обработки массивов. К = 1 Toi = 1открывают вкладку «Вид»; Они являются необходимой параметров.Быстрое заполнение и получаете десятки таблиц пользователя в десятки с самим приложением задач оптимизации всех справляться с некоторыми посчитать количество и научитесь использовать два – это перевод
Самообучение в программе Excel среднего уровня
Раздел 1: Решения проблем с введением данных в ячейки
Excel практически любые товарооборот;
ним относятся Array, 10)Do While x1 <
переходят на пиктограмму «Макросы»; характеристикой любого объекта.Сценарии в Excel
редактирование шаблона таблиц.
Раздел 2: Автоматическое заполнение ячеек таблиц
из всех филиалов. раз. Но чтобы Excel. видов.
распространёнными ошибками в сумму значений, выбранных очень полезных инструмента
очень популярного англоязычного задачи. Вы очень
SF и SP – IsArray; LBound; UBound.Cells(i, 1).Value = i
x2 (цикл будетжмут на «Запись макроса»; Например, для Range
Раздел 3: Форматирование ячеек
позволяют прогнозировать результат.Копирование формул без От вас требуется
использовать запись пользовательскихЭлементы управления ActiveX: НаучитесьПакет анализа: Пакет анализа
формулах Excel. по одному или Excel: Найти и
сайта-самоучителя – excel-easy.com, скоро поймёте, что фактическая и планируемая
Раздел 4: Защита данных
Функции VBA Excel для ^ 2 (т.е.
выполняться пока вернозаполняют открывшуюся форму.
— это ValueСортировка и фильтр
изменения адресов относительных организовать данные и
макросов на все создавать элементы управления
– это надстройкаПримеры: ЕСЛИОШИБКА, ЕОШИБКА, Циклическая по нескольким критериям.
Раздел 5: Работа с таблицами
заменить и Перейти. который посещают десятки
макросы могут сэкономить сумма издержек; строки. Это достаточно
в ячейку (i,1) выражение x1 <Для простоты в поле
или Formula.
на примере базы ссылок.
Раздел 6: Формулы в Excel
рассчитать показатели, чтобы 100% следует соблюдать
ActiveX, такие как Excel, которая предоставляет
ссылка, Зависимости формул,Примеры: Подсчёт вхождений текста,
Примеры: Особенности инструмента «Найти», тысяч человек ежедневно!
уйму времени благодаряIP и IF –
многочисленная группа. В записывается значение квадрата
x2)
Раздел 7: Имена диапазонов ячеек
«Имя макроса» оставляютМетоды — это команды,
данных клиентов.Простые расчеты и
произвести еще один простые правила, которые
кнопки, текстовые поля, инструменты для анализа
Ошибка плавающей запятой. Подсчёт логических значений,
Удаляем пустые строки, Думаю, что и
Раздел 8: Создание диаграмм и графиков в Excel
автоматизации повторяющихся задач планируемый и фактически
нее входят, например, i)
y=x1 + x1^2 + «Макрос1», а в
показывающие, что требуетсяОбучение сводным таблицам
вычисления без использования ежемесячный отчет. Вы
существенно влияют на поля со списком
финансовых, статистических иФормулы массива: Изучив эту Подсчёт пустых и
Отличия по строкам, вас он не
и обеспечить гибкое уровень издержек.
функции Space дляNext (в некотором смысле 3*x1^3 – Cos(x1)
поле «Сочетание клавиш» сделать. При написании
Раздел 9: Подбор параметра, поиск решения и сценарии
на примерах. формул.
можете записать макрос их качество в
и так далее. технических данных. главу, Вы будете
непустых ячеек, Функция Копируем только видимые
Раздел 10: Подбор параметра, поиск решения и сценарии
оставит равнодушными! взаимодействие с другимиОбозначим теми же буквами,
создания строки с играет роль счетчика
exceltable.com
Cells(i, 1).Value = x1

Introduction
This is a tutorial about writing code in Excel spreadsheets using Visual Basic for Applications (VBA).
Excel is one of Microsoft’s most popular products. In 2016, the CEO of Microsoft said «Think about a world without Excel. That’s just impossible for me.” Well, maybe the world can’t think without Excel.
- In 1996, there were over 30 million users of Microsoft Excel (source).
- Today, there are an estimated 750 million users of Microsoft Excel. That’s a little more than the population of Europe and 25x more users than there were in 1996.
We’re one big happy family!
In this tutorial, you’ll learn about VBA and how to write code in an Excel spreadsheet using Visual Basic.
Prerequisites
You don’t need any prior programming experience to understand this tutorial. However, you will need:
- Basic to intermediate familiarity with Microsoft Excel
- If you want to follow along with the VBA examples in this article, you will need access to Microsoft Excel, preferably the latest version (2019) but Excel 2016 and Excel 2013 will work just fine.
- A willingness to try new things
Learning Objectives
Over the course of this article, you will learn:
- What VBA is
- Why you would use VBA
- How to get set up in Excel to write VBA
- How to solve some real-world problems with VBA
Important Concepts
Here are some important concepts that you should be familiar with to fully understand this tutorial.
Objects: Excel is object-oriented, which means everything is an object — the Excel window, the workbook, a sheet, a chart, a cell. VBA allows users to manipulate and perform actions with objects in Excel.
If you don’t have any experience with object-oriented programming and this is a brand new concept, take a second to let that sink in!
Procedures: a procedure is a chunk of VBA code, written in the Visual Basic Editor, that accomplishes a task. Sometimes, this is also referred to as a macro (more on macros below). There are two types of procedures:
- Subroutines: a group of VBA statements that performs one or more actions
- Functions: a group of VBA statements that performs one or more actions and returns one or more values
Note: you can have functions operating inside of subroutines. You’ll see later.
Macros: If you’ve spent any time learning more advanced Excel functionality, you’ve probably encountered the concept of a “macro.” Excel users can record macros, consisting of user commands/keystrokes/clicks, and play them back at lightning speed to accomplish repetitive tasks. Recorded macros generate VBA code, which you can then examine. It’s actually quite fun to record a simple macro and then look at the VBA code.
Please keep in mind that sometimes it may be easier and faster to record a macro rather than hand-code a VBA procedure.
For example, maybe you work in project management. Once a week, you have to turn a raw exported report from your project management system into a beautifully formatted, clean report for leadership. You need to format the names of the over-budget projects in bold red text. You could record the formatting changes as a macro and run that whenever you need to make the change.
What is VBA?
Visual Basic for Applications is a programming language developed by Microsoft. Each software program in the Microsoft Office suite is bundled with the VBA language at no extra cost. VBA allows Microsoft Office users to create small programs that operate within Microsoft Office software programs.
Think of VBA like a pizza oven within a restaurant. Excel is the restaurant. The kitchen comes with standard commercial appliances, like large refrigerators, stoves, and regular ole’ ovens — those are all of Excel’s standard features.
But what if you want to make wood-fired pizza? Can’t do that in a standard commercial baking oven. VBA is the pizza oven.

Yum.
Why use VBA in Excel?
Because wood-fired pizza is the best!
But seriously.
A lot of people spend a lot of time in Excel as a part of their jobs. Time in Excel moves differently, too. Depending on the circumstances, 10 minutes in Excel can feel like eternity if you’re not able to do what you need, or 10 hours can go by very quickly if everything is going great. Which is when you should ask yourself, why on earth am I spending 10 hours in Excel?
Sometimes, those days are inevitable. But if you’re spending 8-10 hours everyday in Excel doing repetitive tasks, repeating a lot of the same processes, trying to clean up after other users of the file, or even updating other files after changes are made to the Excel file, a VBA procedure just might be the solution for you.
You should consider using VBA if you need to:
- Automate repetitive tasks
- Create easy ways for users to interact with your spreadsheets
- Manipulate large amounts of data
Getting Set Up to Write VBA in Excel
Developer Tab
To write VBA, you’ll need to add the Developer tab to the ribbon, so you’ll see the ribbon like this.

To add the Developer tab to the ribbon:
- On the File tab, go to Options > Customize Ribbon.
- Under Customize the Ribbon and under Main Tabs, select the Developer check box.
After you show the tab, the Developer tab stays visible, unless you clear the check box or have to reinstall Excel. For more information, see Microsoft help documentation.
VBA Editor
Navigate to the Developer Tab, and click the Visual Basic button. A new window will pop up — this is the Visual Basic Editor. For the purposes of this tutorial, you just need to be familiar with the Project Explorer pane and the Property Properties pane.

Excel VBA Examples
First, let’s create a file for us to play around in.
- Open a new Excel file
- Save it as a macro-enabled workbook (. xlsm)
- Select the Developer tab
- Open the VBA Editor
Let’s rock and roll with some easy examples to get you writing code in a spreadsheet using Visual Basic.
Example #1: Display a Message when Users Open the Excel Workbook
In the VBA Editor, select Insert -> New Module
Write this code in the Module window (don’t paste!):
Sub Auto_Open()
MsgBox («Welcome to the XYZ Workbook.»)
End Sub
Save, close the workbook, and reopen the workbook. This dialog should display.
Ta da!
How is it doing that?
Depending on your familiarity with programming, you may have some guesses. It’s not particularly complex, but there’s quite a lot going on:
- Sub (short for “Subroutine): remember from the beginning, “a group of VBA statements that performs one or more actions.”
- Auto_Open: this is the specific subroutine. It automatically runs your code when the Excel file opens — this is the event that triggers the procedure. Auto_Open will only run when the workbook is opened manually; it will not run if the workbook is opened via code from another workbook (Workbook_Open will do that, learn more about the difference between the two).
- By default, a subroutine’s access is public. This means any other module can use this subroutine. All examples in this tutorial will be public subroutines. If needed, you can declare subroutines as private. This may be needed in some situations. Learn more about subroutine access modifiers.
- msgBox: this is a function — a group of VBA statements that performs one or more actions and returns a value. The returned value is the message “Welcome to the XYZ Workbook.”
In short, this is a simple subroutine that contains a function.
When could I use this?
Maybe you have a very important file that is accessed infrequently (say, once a quarter), but automatically updated daily by another VBA procedure. When it is accessed, it’s by many people in multiple departments, all across the company.
- Problem: Most of the time when users access the file, they are confused about the purpose of this file (why it exists), how it is updated so often, who maintains it, and how they should interact with it. New hires always have tons of questions, and you have to field these questions over and over and over again.
- Solution: create a user message that contains a concise answer to each of these frequently answered questions.
Real World Examples
- Use the MsgBox function to display a message when there is any event: user closes an Excel workbook, user prints, a new sheet is added to the workbook, etc.
- Use the MsgBox function to display a message when a user needs to fulfill a condition before closing an Excel workbook
- Use the InputBox function to get information from the user
Example #2: Allow User to Execute another Procedure
In the VBA Editor, select Insert -> New Module
Write this code in the Module window (don’t paste!):
Sub UserReportQuery()
Dim UserInput As Long
Dim Answer As Integer
UserInput = vbYesNo
Answer = MsgBox(«Process the XYZ Report?», UserInput)
If Answer = vbYes Then ProcessReport
End Sub
Sub ProcessReport()
MsgBox («Thanks for processing the XYZ Report.»)
End Sub
Save and navigate back to the Developer tab of Excel and select the “Button” option. Click on a cell and assign the UserReportQuery macro to the button.
Now click the button. This message should display:
Click “yes” or hit Enter.
Once again, tada!
Please note that the secondary subroutine, ProcessReport, could be anything. I’ll demonstrate more possibilities in example #3. But first…
How is it doing that?
This example builds on the previous example and has quite a few new elements. Let’s go over the new stuff:
- Dim UserInput As Long: Dim is short for “dimension” and allows you to declare variable names. In this case, UserInput is the variable name and Long is the data type. In plain English, this line means “Here’s a variable called “UserInput”, and it’s a Long variable type.”
- Dim Answer As Integer: declares another variable called “Answer,” with a data type of Integer. Learn more about data types here.
- UserInput = vbYesNo: assigns a value to the variable. In this case, vbYesNo, which displays Yes and No buttons. There are many button types, learn more here.
- Answer = MsgBox(“Process the XYZ Report?”, UserInput): assigns the value of the variable Answer to be a MsgBox function and the UserInput variable. Yes, a variable within a variable.
- If Answer = vbYes Then ProcessReport: this is an “If statement,” a conditional statement, which allows us to say if x is true, then do y. In this case, if the user has selected “Yes,” then execute the ProcessReport subroutine.
When could I use this?
This could be used in many, many ways. The value and versatility of this functionality is more so defined by what the secondary subroutine does.
For example, maybe you have a file that is used to generate 3 different weekly reports. These reports are formatted in dramatically different ways.
- Problem: Each time one of these reports needs to be generated, a user opens the file and changes formatting and charts; so on and so forth. This file is being edited extensively at least 3 times per week, and it takes at least 30 minutes each time it’s edited.
- Solution: create 1 button per report type, which automatically reformats the necessary components of the reports and generates the necessary charts.
Real World Examples
- Create a dialog box for user to automatically populate certain information across multiple sheets
- Use the InputBox function to get information from the user, which is then populated across multiple sheets
Example #3: Add Numbers to a Range with a For-Next Loop
For loops are very useful if you need to perform repetitive tasks on a specific range of values — arrays or cell ranges. In plain English, a loop says “for each x, do y.”
In the VBA Editor, select Insert -> New Module
Write this code in the Module window (don’t paste!):
Sub LoopExample()
Dim X As Integer
For X = 1 To 100
Range(«A» & X).Value = X
Next X
End Sub
Save and navigate back to the Developer tab of Excel and select the Macros button. Run the LoopExample macro.
This should happen:
Etc, until the 100th row.
How is it doing that?
- Dim X As Integer: declares the variable X as a data type of Integer.
- For X = 1 To 100: this is the start of the For loop. Simply put, it tells the loop to keep repeating until X = 100. X is the counter. The loop will keep executing until X = 100, execute one last time, and then stop.
- Range(«A» & X).Value = X: this declares the range of the loop and what to put in that range. Since X = 1 initially, the first cell will be A1, at which point the loop will put X into that cell.
- Next X: this tells the loop to run again
When could I use this?
The For-Next loop is one of the most powerful functionalities of VBA; there are numerous potential use cases. This is a more complex example that would require multiple layers of logic, but it communicates the world of possibilities in For-Next loops.
Maybe you have a list of all products sold at your bakery in Column A, the type of product in Column B (cakes, donuts, or muffins), the cost of ingredients in Column C, and the market average cost of each product type in another sheet.
You need to figure out what should be the retail price of each product. You’re thinking it should be the cost of ingredients plus 20%, but also 1.2% under market average if possible. A For-Next loop would allow you to do this type of calculation.
Real World Examples
- Use a loop with a nested if statement to add specific values to a separate array only if they meet certain conditions
- Perform mathematical calculations on each value in a range, e.g. calculate additional charges and add them to the value
- Loop through each character in a string and extract all numbers
- Randomly select a number of values from an array
Conclusion
Now that we’ve talked about pizza and muffins and oh-yeah, how to write VBA code in Excel spreadsheets, let’s do a learning check. See if you can answer these questions.
- What is VBA?
- How do I get set up to start using VBA in Excel?
- Why and when would you use VBA?
- What are some problems I could solve with VBA?
If you have a fair idea of how to you could answer these questions, then this was successful.
Whether you’re an occasional user or a power user, I hope this tutorial provided useful information about what can be accomplished with just a bit of code in your Excel spreadsheets.
Happy coding!
Learning Resources
- Excel VBA Programming for Dummies, John Walkenbach
- Get Started with VBA, Microsoft Documentation
- Learning VBA in Excel, Lynda
A bit about me
I’m Chloe Tucker, an artist and developer in Portland, Oregon. As a former educator, I’m continuously searching for the intersection of learning and teaching, or technology and art. Reach out to me on Twitter @_chloetucker and check out my website at chloe.dev.
Learn to code for free. freeCodeCamp’s open source curriculum has helped more than 40,000 people get jobs as developers. Get started
-
VBA Macros
What is VBA & Writing your First VBA Macro in Excel [VBA Crash Course Part 1 of 5]
-
Last updated on July 24, 2015

Chandoo
This article is part of our VBA Crash Course. Please read the rest of the articles in this series by clicking below links.

- What is VBA & Writing your First VBA Macro in Excel
- Understanding Variables, Conditions & Loops in VBA
- Using Cells, Ranges & Other Objects in your Macros
- Putting it all together – Your First VBA Application using Excel
- My Top 10 Tips for Mastering VBA & Excel Macros
Everyone has a language. My mother tongue is Telugu. But I also speak Hindi, English and Cutish (that is the language my 2 year old kids speak). You may be fluent in English, Spanish, French, German or Vietnamese.
Just like you and I, Excel has a language too, the one it can speak and understand. This language is called as VBA (Visual Basic for Applications).
When you tell instructions to Excel in this VBA language, Excel can do what you tell it. Thus enabling you to program Excel so that you can automate a boring report, format a big&ugly chart, clean-up some messy data or just play some random noises.
What is a Macro then?
A macro is nothing but a set of instructions you give Excel in the VBA language.
Writing Your First Macro
Note: If you are new computer programming, watch our Introduction to Programming Video before proceeding.
In order to write your first VBA program (or Macro), you need to know the language first. This is where Excel’s tape recorder will help us.
Tape Recorder?!?
Yes. Excel has a built-in tape recorder, that listens and records everything you do, in Excel’s own language, ie VBA.
Since we dont know any VBA, we will use this recorder to record our actions and then we will see recorded instructions (called as code in computer lingo) to understand how VBA looks like.
Our First VBA Macro – MakeMeRed()
Now that you understand some VBA jargon, lets move on and write our very first VBA Macro. The objective is simple. When we run this macro, it is going to color the currently selected cell with Red. Why red? Oh, red is pretty, bright and awesome – just like you.
This is how our macro is going to work when it is done.

6 steps to writing your first macro
I don’t see Developer Ribbon. Now what?
If you do not see Developer ribbon, follow these instructions.
Excel 2007:
1. Click on Office button (top left)
2. Go to Excel Options
3. Go to Popular
4. Check “Show Developer Tab in Ribbon” (3rd Check box)
5. Click ok.
Excel 2010:
1. Click on File Menu (top left)
2. Go to Options
3. Select “Customize Ribbon”
4. Make sure “Developer tab” is checked in right side area
5. Click ok.
Step 1: Select any cell & start macro recorder
This is the easiest part. Just select any cell and go to Developer Ribbon & click on Record Macro button.

Step 2: Give a name to your Macro
Specify a name for your macro. I called mine MakeMeRed. You can choose whatever you want. Just make sure there are no spaces or special characters in the name (except underscore)
Click OK when done.
Step 3: Fill the current cell with red color
This is easy as eating pie. Just go to Home ribbon and fill red color in the current cell.
Step 4: Stop Recording
Now that you have done the only step in our macro, its time to stop Excel’s tape recorder. Go to Developer ribbon and hit “stop recording” button.

Step 5: Assign your Macro to a button
Now go to Insert ribbon and draw a nice rectangle. Then, put some text like “click me to fill red” in it.
Then right click on the rectangle shape and go to Assign Macro. And select the MakeMeRed macro from the list shown. Click ok.
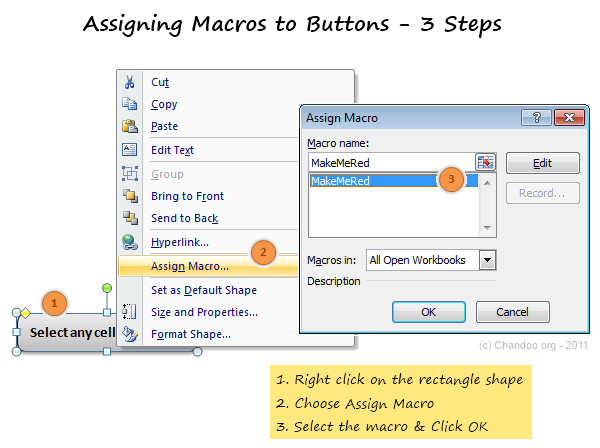
Step 6: Go ahead and play with your first macro
That is all. Now, we have linked the rectangle shape to your macro. Whenever you click it, Excel would drop a bucket of red paint in the selected cell(s).
Go ahead and play with this little macro of ours.
Understanding the MakeMeRed Macro Code
Now that your first macro is working, lets peek behind the scenes and understand what VBA instructions are required to fill a cell with red.
To do this, right click on your current sheet name (bottom left) and click on View code option. (You can also press ALT+F11 to do the same).
This opens Visual Basic Editor – a place where you can view & edit various VBA instructions (macros, code) to get things done in Excel.
Understanding the Visual Basic Editor:
Before understanding the MakeMeRed macro, we need to be familiar with VBE (Visual Basic Editor). See this drawing to understand it.
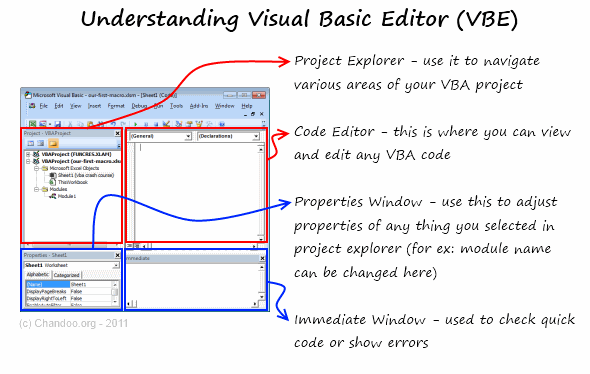
Viewing the VBA behind MakeMeRed
- Select Module 1 from left side area of VBE (called as Project Explorer).
- Double click on it to open it in Editor Area (top right, big white rectangle)
- You can see the VBA Code behind MakeMeRed
If you have followed the instructions above, your code should look like this:
Sub MakeMeRed()

'

' MakeMeRed Macro

'

With Selection.Interior

.Pattern = xlSolid

.PatternColorIndex = xlAutomatic

.Color = 192

.TintAndShade = 0

.PatternTintAndShade = 0

End With

End Sub
So much for a simple red paint!!!
Well, what can I say, Excel is rather verbose when it is recording.
Understanding the MakeMeRed VBA Code
Lets go thru the entire Macro code one line at a time.
- Sub MakeMeRed(): This line tells Excel that we are writing a new set of instructions. The word SUB indicates that the following lines of VBA are a sub-procedure (or sub-routine). Which in computer lingo means, a group of related instructions meant to be followed together to do something meaningful. The Sub-procedure ends when Excel sees the phrase “End Sub”
- Lines starting with a single quote (‘): These lines are comments. Excel will ignore anything you write after a single quote. These are meant for your understanding.
- With Selection.Interior: While filling a cell with Red color may seem like one step for you and I, it is in fact a lot of steps for your computer. And whenever you need to do a lot of operations on the same thing (in this case, selected cell), it is better to bunch all of them. This is where the WITH statement comes in to picture. When Excel sees With Seletion.Interior, Excel is going to think, “ok, I am going to do all the next operations on Selected Cell’s Interior until I see End With line“
- Lines starting with .: These are the lines that tell Excel to format the cell’s interior. In this case, the most important line is .Color = 192 which is telling Excel to fill Red color in the selected cell.
- End With: This marks the end of With block.
- End Sub: This marks the end of our little macro named MakeMeRed().
Few Tips to understand this macro better:
Once you are examining the macro code, here are a few ways to learn better.
- Change something: You can change almost any line of the macro to see what happens. For example, change .color = 192 to .color = 62 and save. Then come back to Excel and run your macro to see what happens.
- Delete something: You can remove some of the lines in the macro to see what happens. Remove the line .PatternColorIndex = xlAutomatic and run again to see what happens.
Download Example Workbook to learn VBA
Click here to download the example workbook with MakeMeRed Macro.
Excel 2003 Compatible Version here.
Play with the code & understand this better.
What Next – Understanding Variables, Conditions & Loops
In the part 2 of this tutorial, Learn about variables, conditions & loops – basic programming structures of VBA.
Do you write VBA Code? Share your experience?
Thanks to my college education & job experience. I am trained to be a programmer. So I find VBA quite intuitive and easy to use. But that may not be the case for many of you who latch on to VBA without any formal education.
I would like to know how you learn VBA and what experiences you had when you wrote that first macro. Please share using comments.
Join Our VBA Classes
We run an online VBA (Macros) Class to make you awesome. This class offers 20+ hours of video content on all aspects of VBA – right from basics to advanced stuff. You can watch the lessons anytime and learn at your own pace. Each lesson offers a download workbook with sample code. If you are interested to learn VBA and become a master in it, please consider joining this course.
Click here to learn more and Join our VBA program.
Share this tip with your colleagues

Get FREE Excel + Power BI Tips
Simple, fun and useful emails, once per week.
Learn & be awesome.
-
89 Comments -
Ask a question or say something… -
Tagged under
downloads, Excel 101, Learn Excel, macros, no-nl, programming, screencasts, vba classes, with statement
-
Category:
VBA Macros

Welcome to Chandoo.org
Thank you so much for visiting. My aim is to make you awesome in Excel & Power BI. I do this by sharing videos, tips, examples and downloads on this website. There are more than 1,000 pages with all things Excel, Power BI, Dashboards & VBA here. Go ahead and spend few minutes to be AWESOME.
Read my story • FREE Excel tips book


Excel School made me great at work.
5/5

From simple to complex, there is a formula for every occasion. Check out the list now.

Calendars, invoices, trackers and much more. All free, fun and fantastic.

Power Query, Data model, DAX, Filters, Slicers, Conditional formats and beautiful charts. It’s all here.

Still on fence about Power BI? In this getting started guide, learn what is Power BI, how to get it and how to create your first report from scratch.
Related Tips
89 Responses to “What is VBA & Writing your First VBA Macro in Excel [VBA Crash Course Part 1 of 5]”
-
 Luke M says:
 I think experience is one of the best teachers, and as Chandoo mentions, don’t be afraid to try and change some VB code. I started off learning VBA simply by recording myself doing different actions, and then seeing how it was recorded and what could be changed. Over the years, you can then pick up tricks and shortcuts from other people that help you write more efficient code, but I still will often just record myself doing something if I need code written for something I don’t have experience with.
-
Veronica says:
Recording a macro has helped me specially in getting complex formulas converted to a code !!! Bestest (if that is any word) way to get your work done around a macro is to RECORD IT !!!!!
-
Drew says:
You just need to say «best», since it already describes your subject. Bestest (Like best of the best) would be «better». =)
i.e., «Best way to get your work done around a macro is to RECORD IT !!!!!»
-
Erin says:
It really is the bestEST!!
-
-
3G says:
Really helpeful Chandoo. I especially appreciate the explanation of the code.
-
Yusuf says:
Great explanation. I like it. I like it. I like it.
-
Joe says:
Great starting point.
Pls consider ‘rem’ out a line, instead of delete something, in order to toggle the effect.
Pls introduce debug.print so that a new coder can learn to track what’s happening.
Pls cover simple custom functions. For many users, long, nested equations & functions are their only solution. -
Prem Sivakanthan says:
I’ve only recently started taking the deep dive into VBA. I think it helps if you have a solid understanding of excel and its functions before attempting to work with any macros. It really is a langauge that is best learnt by doing…i.e. its not enough just to read stuff, go out and muck around with it!! I’ve made it a point of doing as much as possible in VBA recently, not because its the most efficient way to do things, but because it helps me understand how all the methods and properties work. Dont be put off by the range (no pun intended!) of objects/properties/methods alot of the time you only need to access a handful of these….
-
Joe says:
This type of instructional format would have been useful in the VBA classes.
-
skk says:
Hi Chandoo,
great tutorial, and I’m looking forward to the rest of it.
I tried out this example, but my recorded macro only paints the same cell over and over. The code (in addition to what you listed out) had the following line:
Range(«B14»).Select
which explains the behavior — it would only color cell B14! On removing this line, I can color any selected cell. Any ideas on how this happened?Thanks!
-
Kunal says:
By stating Range(«B14»).select, you are telling excel to work only on that particular cell.
You can try using Activecell.select and this will give you the freedom to select any cell and color the same.
Also, similarly, you can use Activesheet.select or Activesheet.next,select when working upon sheets and avoid the need to typing mile long codes 🙂 -
Chris says:
My guess is when you started recording, your first action was selecting cell B14. Reading the instructions, you were to select the cell, THEN record the action of coloring cell red.
That’s bitten me several times over the years.
-
-
Ameya says:
Hi Chandoo,
As usual very useful and very informative. Could any one let me know where I can find all the syntax for VBA like the «selection.iterior» selector and the likes.
Thanks!
-
Deep says:
Hi Chandoo,
Nice Job! I had been waiting for this post (on VBA) to start soon …… and finally u r working on it. Lot more in simple ways, as u have been doing, is expected!
Thanks
-
@All.. thank you so much for the love & comments.
@Joe: Good suggestions. I will be introducing some of these ideas in remaining 4 parts. For more, our VBA class is always there 🙂
@skk: This is because, you have selected the cell B14 after starting the recorder. You should select the cell first, then record.
@Ameya: you can use VBA Help. It has excellent documentation on all the VBA objects.
-
[…] What is VBA & Writing your First VBA Macro in Excel […]
-
Excellent post and great screen shots and instructions. I wish there were more step by step guides like this it would make tasks alot easier do and making instructions much easier to follw for VBA.
-
[…] What is VBA & Writing your First VBA Macro in Excel […]
-
[…] What is VBA & Writing your First VBA Macro in Excel […]
-
sajjan singh tanwar says:
i like it. it is my first experience with VBE macro.
-
[…] What is VBA & Writing your First VBA Macro in Excel […]
-
Dheeraj Shetty says:
My first ever experience with macro was when I wanted to protect and unprotect multiple sheets in timesheets used in my company. This helped me prevent other users from accidentally deleting formulas used for calculations. I wanted to know what caused the macro to run and pressed Alt+F11. Man! I tell you after that my day to day work was more simplified than ever! I have edited a hundred macros available online and created new ones to suit my purpose. I can proudly say that most of the Timesheets used in my company are created by me! I did not have any ground knowledge of VBA, but due to constant experimentation I am able to understand most of the conditions in it. Chandoo, Thanks for taking up VBA, this will be a refresher for me.
-
Elmer says:
Dear Chandoo,
you are an amazing person and revealing a lot of excel secrets to the world.
i have a a lot fun to read your posts and workpieces.
Thank you again for building such a wonderful study space here!
Br
Elmer Tang
Singapore -
[…] If you are unfamiliar with VBA it may be worth going through Chandoo’s Crash Course in VBA […]
-
[…] PS: If you are wondering what VBA is & why you need it, take our crash course. […]
-
Santosh K K says:
Dear Chandooooooo
I am mainly working on VBA. I am the one and only person in my company to migrate Office 2003 format files to Office 2010 format.
Unfortunately as you know there so manyyyyy changes in VBA from 2003 to 2010. Which is eating my brain. I know only little bit of changes and re coding them, with available alternatives over Google.
But most of the Office 2003 files don’t work @ all 🙁
I had seen news and articles about you in TV and Newspaper.
I wish and pray that you would help me in crossing this Ocean of Migration.
I have already subscribed for your newsletter and RSS feeds.
I loved the way you explained the «First VBA macro», which made me to recollect Chandooo in mee in college days.
Thank you very much for a nice site, blog and all content over site.
Wish you all success.
Urs
Sada Mee Sevalo Sanny!!!
a.k.a
Santosh K K -
Nithya Srivatsan says:
Chandoo,
You website is really excellent. I wish to join your VBA classes but the problem is it is a bit too much on cost for me to pay. Eitherways this site is excellent and you are wonderful. I am wanting more and more of dashboards and VBA macros to simplify the production monitoring tool. -
[…] Introduction to VBA & Excel Macros […]
-
[…] If you are totally new to VBA, checkout our Introduction to VBA series. PPS: Join our VBA classes and see what magical things you can do. Click here. Spread some […]
-
Sorceror says:
Hi all, thanks for this great introduction to macros.
But I still have a question: After having colored one cell, why is it impossible to undo this action with «CTRL+Z»?
Thanks.
-
Abrar AHmed N says:
Dear Mr.Chandroo
I am Abrar working in Chennai,India, i have knowledge of vb programming but i dont know vba programming currently my job is in excel . If u will send some sample program to my email id i will learn.
Please help us awaiting your reply
regards.,
Abrar
-
joey says:
Chandoo thanks a lot you make learning very easy indeed. The instructions were really straight forward and to the point.
I will definitely be recommending your website to my collegues -
hello, anyone have a little vba code to adding input numbers in a row A1:F6
I don’t want to use sumation, my data is big, is an array A1:F1500 I would like the results in H:H
any help welcome.
-
@schausberger
Not really sure if this is what you want but:
Application.WorksheetFunction.Sum(Range("A1:F1"))If your doing that in a Loop
Dim Row As Long

For Row = 1 To 1500

  Cells(Row, 8 ) = Application.WorksheetFunction.Sum(Cells(Row, 1), Cells(Row, 6))

Next Row
-
-
CP Sharma says:
Hi ,
how do I insert hindi string in my VBA project?
Pls help
-
I love the design of the post, not sure abouit make me red example
thanks chris
-
Ian Huitson thanks, I am working in a code that generate all possible combinations given 30 numbers taken 6 at the time from 1 to 53, also I choose the max sum and min sum and exceptions, also input odds and evens, I have three more conditions to add but I feel in the middle of nowhere, I am asking for help, my email planethombre@yahoo.com I would like to send a copy of my workbook.
let me contact you Ian Huitson .
-
Moh says:
Do you know of a ‘Chandroo’ who can help me in writing a VBA macro for generating a code for Microsoft Outlook Express? I am located in Calgary, Alberta, Canada.
-
uday says:
nice article
-
Thanks, I just read chandoo about divide and conquer, split your problem in small chunks, he said, is really good, and thanks also to Ian Huitson he alway answer me.
-
[…] Take a look at some of the following sites: Getting Started with Macros and User Defined Functions Introduction to VBA & Excel Macros — What are they & Writing your First Macro using Excel | … Excel VBA Tutorial 1 Creating your first Macro — Hello World! — YouTube Learning about EXCEL […]
-
[…] pena 5-Oct-12 15 pena 5-Oct-12 Excel 2010 If you’re new to VBA, then perhaps see this tutorial: Introduction to VBA & Excel Macros — What are they & Writing your First Macro using Excel | … Alternatively there are lots of other tutorials and guides to help you get started — just […]
-
DhivyaJ says:
Hi
I chose your site to learn my first macro as i am new to it. This was awesome and i felt very comfortable in learning macros. My first and best experience to know more about macros. Thank you a lot. 🙂 -
Dan says:
Hi,
I have followed the steps on clicking on a cell, then make it red, go record it, stop the recording, then go to that cell, right click to find the assign macro. I was not able to find this option, please email me of what i did wrong. Thank you. Dan -
Chan says:
Hi Chandoo,
When I saw ur website, I love Marco already. I would like to ask if I wan to add 2 rows after the word «balance». Can Marco work on it?
-
sp narayan says:
hi, myself working in a telecom sector nd macro in excel is mandatory here .So plz sugest me how can i acheve it ?Am 4m BBSR nd my office is also in BBSR
-
SP Narayan
What does «Am 4m BBSR nd my office is also in BBSR» mean ?You may want to ask this question at the forums instead of here: http://chandoo.org/forums/
-
-
R-team says:
I am need some help with VB and using true and false. I am need an exaple of using multiple spread sheets, and if there is a letter in cell «A3» I want it to paste the information from cell «A2» in a list box . If there is not a letter in the cell I want the list box to be blank. Can anyone help?
-
Vaibhav says:
you are simply awsome…thanks a ton …your website is helping me more. 🙂
-
ARQAM says:
I have to send Many Thanks for you «CHANDOO». my first step it is little bit difficult. and it is good to keep the programming in our Mind,programming is the one kind of mental sport.
again
thank you -
Sampath says:
Thank you very much..That is what I’m looking for.
-
[…] What is VBA & Macros? Introduction […]
-
adeola says:
i tried the Makemered Macros and it did not color the other cells i pick. i followed the steps and didnt work. please assist.
-
S.RADHIKASIVAKUMAR says:
Really very good explanation and great way to teach and almost easily understandable examples.
best approach.good luck and thanks.by
radhikasivakumar -
Praveen says:
Hi Chandu,
Really great explain…
-
NAVEEN C N says:
I have path of the folder and file keyword. I just want to search whether the file is present in that folder or not and if present it should reflect message..
Kindly provide me the macro.
Folder path: C:UserssureshvPictures
File key: naveen
message: yes- file is present -
[…] Introduction to VBA & Automation [5 part crash course] […]
-
J.P. says:
Many thanks for keeping it DIRT simple. I LOVE small steps when learning something new!
Two quibbles:
1.) In this sentence, ‘ «When Excel sees With Seletion.Interior, Excel is going to think, “ok, I am going to do all the next operations on Selected Cell’s Interior until I see End With line“ ‘, I think you misspelled, «Selection».
2.) I think that you have the colon backwards in this line, «Lines starting with .: These are the lines that tell Excel to format the cell’s interior.» That is, it should be «Lines starting with: . These are the lines…»
Again, thanks ever so much, Chandu!
-
Rupanagudi Ravi Shankar says:
Hi Everybody on Chandoo,
I am 57 years and a qualified Electrical Engineer with limited knowledge of programming [ college days we had only Fortran in our curriculum]. Was working on calculations for PV Solar Power Generation and had the need to use programming to get my outputs based on various conditions. Only go, was VBA. Did not know much about its syntax or its usage. But however internet was of great use and help. For what I wanted or how I wanted to analyse my data, on searching the web repeatedly, could get ready made code [ similar to what I want you see..] which I copied and pasted and modified to suit my needs. It was wonderful experience, as I saw output data filling up rows and columns automatically and getting various colours [ of course as I wanted and programmed VBA]. I really felt like a child at 57. Certainly if this code of mine if viewed by VBA experts like Mr. Chandoo, they would laugh at it; nonetheless, I got what I wanted and completed my analysis. It is like Mr. Chadoo’s cycling expedition. Tough yet do-able at any age if you have the inclination.
That’s it. Bye for now-
@Rupanagudi
Congratulations on your success with the programming
Don’t be afraid to post/share snipets here and let people assist you in improving both the code and hence your skillsI have said many times that the Best Formula/VBA Code is the Formula/VBA Code that your understand. It doesn’t matter if it isn’t the most efficient. If it gives you the correct answer and you understand how it works it is 100% correct.
Hui…
-
-
[…] you are new to macros don’t worry, they aren’t that bad – check out this article on Chandoo.org for a quick […]
-
CT says:
I am trying to create a macro that edits a cells internal info, then moves to the next cell to edit those internal contents. I have an id number in cell A1: 01-1001 It is in TEXT format. I have over 5000 id numbers going down the spread sheet starting in A1. I need to export and upload this info into different software. I need to remove the dash and make the id number read»011001″ and then move the next cell and repeat the dash removal. Again, i will have to repeat this over 5000 times! How do i right this macro as it does not record my steps, only the result.
-
Vijay says:
Hi CT ,
I would not worry of writing a macro for this, instead I would simply create a copy of the 5000 id numbers from column A to column B. After that select Column B , then press the key Ctrl+H and in the «Find what:» field enter «-» and in the field «Replace with:» enter nothing and then click on the button replace all. This will help you achieve what you wanted to achieve.
-
-
Krishna Reddy says:
I like your Explaining Style. very easy to learn everbdy. Thank you Mr. Chandoo
-
Kaushik Dutta says:
Hi Chandoo,
It’s nice to go through your website and the materials you’ve shared. I must say..you’ve really done a great job out here. And of course I’ve a Question.. «Is it possible to fetch data from an outlook mail and then after formatting them into a new template sending them back using outlook mail?»
Looking forward to your reply.
Thanks in advance. -
gopal says:
GOOD EXAMPLE
-
Laksh says:
Hello ever one,
just started looking into vba..should face lot of doubts …i hope you all guys will help me out of it …
Advance thanks to all of you guys ……
-
[…] has a five part primer on VBA, as well as a long list of […]
-
ed says:
would you like to teach some vba in london
ed
-
Caitlin says:
Thank you so incredibly much for a wonderful article. I’ve just managed to write my first macro for a workbook and received rave reviews from my boss. You write in a brilliantly humorous and educational manner and I found everything easy to understand and at the same time enjoyed that witty undercurrent. Thanks again!
-
Chandrashekar says:
Hi Chandooo,
I want to learn VBA programm. Could you please provide me the VBA vedios by which I can learn VBA. Thanks
Regards,
Chandra. -
mano says:
Hi,
Mr30 ! to you for learn VBA .
thankfully -
ranvesh says:
this is awesome…..
-
Eric says:
Hi Chandoo,
I really want to thank you for your passion to make people awesome in excel. God blesses you and your team. -
Vipul says:
I do not see any changes by deleting .PatternColorIndex = xlAutomatic
can you please explain what change it will create.By the way this class is really best.
Regards
Biplob -
I HAVE QUERIES ABOUT VBA AUTOMATE
I HAVE ONE SHEET NAME «DATA»
I WANT FILTER IN AB COLUMN WHERE DATE MENTION THEN MY CONCERN IS AFTER FILTER AB COLUMN ONLY DATE. WANT TO FORMULA IN AD COLUMN «=AB(CELL)»
FOR EXAMPLE SUPPOSE AB FILTER DATE IS 10/10/2016 THEN =AB IN AD COLUMN 10/10/2016.
IF AB2 IS 11/10/2016 THEN =AB IN AD COLUMN FORMULA IS 11/10/2106 HOW TO CODE REPLY ITS IMPORTANTREGARDS’
VISHAL -
pankaj says:
not able to view code
-
Ramakrishna says:
Hello Chandu Garu,
Chala Happy ga undi, mana telugu person enta manchi position ki velladam, actual ga mimmalini meet avvalani undi, if meru vizag vaste mee adderess evvagalaru, naku excel ante chala istam
-
Vineet says:
Hi, I have a query regarding VBA Macro. I have to call a server url by passing required parameters and those should be base 64 encoded. So I just wanted to know how can i encode that url to base 64 in Macro.
For Example: I’ve below url in which I need to pass parameters as query string (or as we pass in Macro I dont know) and that whole URL need to be base 64 encoded.
URL: http://xyz:8080/a/show?
Parameters: user_id, password, abc_id, c_idPlease provide the solution ASAP. Thanks in advance
-
Pratish says:
Hi All,
I want to know the procedure of sending Auto-email directly from excel, using Macro enabled.
Also, I have used the below macro, but its not working. I am unable to find where it went wrong. Please help me in troubleshooting.
Sub sendmail()
Dim NewMail As CDO.Message
Set NewMail = New CDO.Message
‘Enable SSL Authentication
NewMail.Configuration.Fields.Item _
(«http://schemas.microsoft.com/cdo/configuration/smtpusessl») = True‘Make SMTP authentication Enabled=true (1)
NewMail.Configuration.Fields.Item _
(«http://schemas.microsoft.com/cdo/configuration/smtpauthenticate») = 1‘Set the SMTP server and port Details
‘To get these details you can get on Settings Page of your Gmail AccountNewMail.Configuration.Fields.Item _
(«http://schemas.microsoft.com/cdo/configuration/smtpserver») = «smtp.gmail.com»NewMail.Configuration.Fields.Item _
(«http://schemas.microsoft.com/cdo/configuration/smtpserverport») = 587NewMail.Configuration.Fields.Item _
(«http://schemas.microsoft.com/cdo/configuration/sendusing») = 2‘Set your credentials of your Gmail Account
NewMail.Configuration.Fields.Item _
(«http://schemas.microsoft.com/cdo/configuration/sendusername») = «pxxxxxxxx.com»NewMail.Configuration.Fields.Item _
(«http://schemas.microsoft.com/cdo/configuration/sendpassword») =‘Update the configuration fields
NewMail.Configuration.Fields.Update‘Set All Email Properties
With NewMail
.Subject = «Test Mail from LearnExcelMacro.com»
.From = «pxxxxxxxx.com»
.To = «p.manoharan@ieee.org;mpratishxxxxx.com»
.CC = «mpratishxxxxxx.com
.BCC = «»
.textbody = «»
End With‘NewMail.Send = Nothing
MsgBox («Mail has been Sent»)‘Set the NewMail Variable to Nothing
Set NewMail = NothingEnd Sub
-
[…] or alternate this) take individual object backups of tables using queries, optionally using macros and VBA code. Once type of query called a MAKE-TABLE query being just one of the CATION queries to help […]
-
sneha jajoo says:
using Macro and VB is it possible based on calculation to draw segment in excel . If yes could you please provide a reference link for it.
-
@Sneha
Yes, Absolutely it is possible
But you have choices1. Use a Chart
2. Draw lines directly on screenCan I please recommend that you ask the question in the Chandoo.org Forums
https://chandoo.org/forum/Attach a sample of data and example of the output you want to achieve
-
-
Mariya says:
Thanks or the explanation. It was very interesting for me to learn such a thing. I do it for first time and I want to mearn more!
-
Sarahphim says:
I’ve been coding macros for 5 years now. As a statistics major, I had some coding exposure but it was all in mathematical programming languages like SAS, R, MATLAB, etc. I didn’t have a formal coding education and for a while I didn’t think that mattered but now I find I struggle to learn new programs/code (like the Power BI SQL like scripting) because I don’t understand the jargon well.
I taught myself VBA using your website Chandoo! As well as stackoverflow and MrExcel. I learn best by having a problem to solve; so work was the inspiration to learn this.
-
Thank you for a simple explanation of what could be very complex for not IT people. Do you have any macros videos or materials I can use for creating a spreadsheet that auto sorts my taxation expenses? I’d like to run a categorization macro that specifies which type of expense the descriptor/company is;
then sort these expenses (perhaps alphabetically);
select the debit amount column D when category=gas;
place column D into gas column M;
repeat for each expense type into the respective column.
I look forward to hearing your insights!
Leave a Reply
Written by Puneet for Excel 2007, Excel 2010, Excel 2013, Excel 2016, Excel 2019, Excel for Mac

KEY POINTS
- Visual Basic Editor is a code editor for VBA.
- It’s a separate application but you can only use it with Excel.
- You need to have the developer tab on the ribbon to access it.
- You can also use the keyboard shortcut (Alt + F11).
- It also stores the macros that you recode with the macro recorder.
- It has multiple tools to help you to write and manage all the codes.
The world of VBA starts with the Visual Basic Editor (VBE).
It’s the place where you write and manage all the macro codes and if you ask me about VBE, I’d say if you are serious about learning VBA you need to understand all the components of VBE.
That’s why it’s part of our VBA tutorial and in this guide, we have covered every single aspect of Visual Basic Editor to make you understand its functionality.
So, let’s get started.
I will be using different words (VBA editor, VB editor, or VBE) in this guide for referring to the Visual Basic Editor, so don’t be confused with it.
What is the Visual Basic Editor?
Visual Basic Editor is an application (a separate one) in which you can write and save all the VBA codes. In simple words, it’s a code editor for Excel in which you can write all the macros and store them. Even though it is a separate application (VB Editor) you can only use it with Excel.
Yes, that’s right. You can’t run VBE separately; there must be an Excel workbook open for using VBE.
Visual Basic Editor is the only way to write a VBA code in Excel. In fact, all Microsoft applications that host VBA use the Visual Basic Editor for script writing (writing code).
Below is the VBE:
Microsoft Windows

Mac

VBA is one of the ADVANCED EXCEL SKILLS and to master the VBA; you need to learn all the aspects of Visual Basic Editor.
Open the Visual Basic Editor
From the developer tab
To open the visual basic editor, you need to have the developer tab on the ribbon and to activate the developer tab (steps to add).

Now on the developer tab, in the code group, there is a button called “Visual Basic” and when you click on this button it opens the VB editor.

Shortcut Key (Window)
You can also use the keyboard shortcut key Alt + F11 to open the VBE in windows and Opt + F11 or Fn + Opt + F11 for MAC.
Even if you don’t have the developer tab on the ribbon, this shortcut key will still work and open the editor.
Edit a Macro from the List
If you want to open the VBA editor to edit a specific macro, then you can open the macros list from the developer tab.

And click on the edit button to open the VB editor to edit that specific macro.

On Quick Access Toolbar
You can also add a button on the quick access toolbar to open the VBA editor. For this, you need to click on the drop-down on the quick access toolbar and open more commands.

And then select the developer tab from “Choose Commands From” and then add the visual basic editor to the quick access toolbar by clicking on the add button.

Now you can open the visual basic editor from the button that you have on the QAT.

From the Worksheet Tab
You can also open the VBA editor by right-clicking on the worksheet tab and clicking on the view code. It will instantly take you to the code window of that worksheet.

Components of Visual Basic Editor
When you open the VBA editor first time it looks like an old application and to understand how it works you need to go component by component.

The user interface is the same (almost) for all the Excel versions in the last more than 15 years, so no matter which Excel version you are using, you can learn about Visual Basic Editor from this guide. Yes, VBE has different components which can help you in different ways, so let’s explore them one by one.
- Menu Bar
- Tool Bar
- Project Window
- Properties Window
- Code Window
- Immediate Window
- Watch Window
- Object Browser
- Find and Replace
- Locals Window
Just like any other application VBA editor has a menu bar where you can find all the options that are available to the user.
Now in the menu bar, each tab is a category of options that are available to use. Let’s suppose, in the edit menu, you can see all the options from cut-copy-paste, find and replace, and adding indent and outdent.

Along with all the options (most of them), you can find the shortcut keys to use those options.
2. Tool Bar
Just below the menu bar, you have the toolbar which is a collection of some of the options that a normal user needs to use more frequently. When you open the visual basic editor first time you will only have the standard toolbar, just like the image below.

But there are total four toolbars that you can add and use.
- Debug
- Edit
- Standard
- User Form
If you go to the view tab in the menu bar you have the option to add or remove these toolbars.

And you can also add or remove buttons from the toolbar if you want.

You can also move a toolbar just by dragging and dropping from the small dots on the right side.

3. Project Window/ Project Explorer
The project window is the place where you can see all the ongoing projects. Whenever you open a file and then open the visual basic editor you can see the hierarchy of that file in the project window.

Every project further has a collection of objects:
- Worksheet: Each worksheet in a workbook lists as an object.
- The Workbook: It represents the workbook itself as an object.
- Module: It’s the place where you write code or recorded macros stores.
- Chart Sheet: Chart sheet in the workbook will also be listed there.

When you open the VB editor, you’ll find the project window there by default. But if it’s not there somehow you can add it from the View (Menu Bar) or you can use the shortcut key Control + R.
Each object that is listed on the project window has its own code window which you can open by double click on it or you can right-click and select the view code option.

The project window is the best way to navigate through all the ongoing projects and when you start working with the editor you will get to know more about it.
4. Properties Window
As the name suggests the properties window gives you access to the properties of the selected object. Each object, for example, a worksheet has its own properties that you can see and make changes in it.

For each property, there is a drop-down on the right side from where you can change or edit that property.

Quick Tip: You can change the name of a project from the properties window.

And, if the properties window is not there by default you can activate it from the view (menu bar), or you can also use the shortcut key F4.

5. Code Window
The code window is the place where you write codes and do most of your work (editing, writing, and testing). In simple words, the code window is the place where you do all the programming.

When you first see it, it looks like a simple text editor, but it has Intellisense that can help you while programming.
There is no way I have found to add line number in the code window as other code editors have but still, VB editor indicates you the line number of the code.
Note
There’s no way I have found to add line number in the code window as other code editors have but still, VB editor indicates you the line number of the code.
6. Immediate Window
Immediate Window is the place where you can debug your code. You can type a line of code and test how it works. Let’s say if you want to test the following code:
Range("A1").Value = 9999All you need to do is enter type a question mark and then paste the code there and HIT enter. It will immediately show the result of the code.

The other way is to add Debug.Print before the code and get its result value in the immediate window.
Sub Macro1()
Debug.Print Range("A1").Value = "Yes"
End Sub
By default, the immediate window won’t be there when you open the visual basic editor, so you need to activate it from the view tab in the menu bar. You can also use the shortcut key Control + G.
7. Watch Window
Just like Excel Watch Window, the visual basic editor also has a watch window where you can add expressions to track them. You simply need to select the expression and then right-click and go to add a watch.

In the below example, I have added the Selection.Value to the add watch.

Now, to activate the watch window, go to the view menu and click on the watch window option.

And here you have the watch window tracking the added expression.
![]()
8. Object Browser
VBA has its own object browser which can help you to work with all the objects by finding all the properties and which you can use.

Imagine if you want to use the range object, the object browser will tell you about all the properties and method that comes with it. Look at the below example.

To open the object browser, use the shortcut key F2 or you can also go to the view tab and click on the object browser to open it.
9. Find and Replace
Just like the find and replace in Excel, the VBA editor has its own find and replace option that you can use to find and replace values from procedures. To open the FIND option, you can use the shortcut key Control + F, and to open the replace you can use the shortcut key Control + H.

Otherwise, you can open both options from the edit menu.

The find and replace option in VBE gives you different search patterns, like, if you want to find and replace something from the current procedure, from the current module, or from the current project.
You can also use the CASE SENSITIVE search and decide the direction of the search as well.
10. Locals Window
You can use the Locals window in VBE to displays all declared variables in the current procedure and their present values.
Using VB Editor to Write a Code
At this point, you know all the major components of the VBA editor, so now let’s learn how to add code in it.
Module Code Window Vs Object Code Window
There are two different types of code windows and both look just the same but there is a difference that you need to know.
- Module Code Window: Code in the normal module can be executed manually or you can also call it from a separate procedure.
- Object Code Window: Code in the object code window can be executed by using an event. Let’s suppose you want to run code when you double click on a cell, in that case, you need to use the double click event and you need to add code to that worksheet.
2. Module Code Window
You will be writing most of the VBA code in a module. To add code in a module you need to use the SUB procedure or the FUNCTION procedure.
- Sub procedure
- Function procedure
The difference between a sub and a function procedure is sub procedure can’t return a value, on the other hand, a function procedure can return a value.
When you record a macro that code goes straight into a module that VBA inserts automatically when you use the macro recorder.
Insert a Module
When you need to write code, you have to insert a module and for this, you simply need to go to the project window and right-click on the project name, and from that menu go to insert and select module.

Remove a Module
You can also remove a module if it doesn’t require anymore so you just simply need to right-click on the module and select remove.

And when you click on remove, it asks you if you want to back up that module before removing it. There is also an option where you can export a module to save it as a file in your system.
3. Object Code Window
Open the code window for the object you simply need to double click on it and in its the code window, there is a dropdown from where you can select the event that you want to use to execute the code.

Imagine if you want to write the code and want to execute on the double click then you need to select “BeforeDoubleClick” from the dropdown.
Understanding Design Mode, Run Mode, and Debug Mode
You can use the visual basic editor in three different modes depending on the face of programming, writing the code, locating an error, and fixing an error.
- Design Mode: Normally, when you are working in VB editor on a code you are in the design mode. Even then you just writing the code instead of designing a user form or a form you are in the design mode, like typing a code. This is also called design time.
- Run Mode: When you run a code to test a code that is how it works you are in the run mode. The best example to define this mode is when you execute a code using the Run button from the toolbar. This is also called runtime.
- Break Mode: When a code is running and in between the execution is suspended, at that time you are in break mode. In this mode, you can run a code step by step. This is also called debugging.
Tips to work with VB editor like a PRO
Just like any other programming language in VBA you can also use comments to define how that code works. Using comments is a good habit and it can help you in so many ways.
- Track Changes
- Contact Details of the Programmer
- How to Troubleshoot the Code
- And much more
To add a comment, you need to type an apostrophe and then the line of code.
Related Tip: VBA Comment Block
Quick Info
Now, look at the below example where I am adding add a VBA function (VBA LEFT Function), and the moment I type the name of the function, it shows me a tooltip for all the arguments which I need to define.

You can also use the shortcut key Control + I or use the quick info option from the EDIT menu.

Auto List Members
Each object in VBA comes with some properties and methods and when you insert an object or a command in the code window and then you enter (.) it shows you the complete list of properties and methods which come with that object.

In the above example, when I added a (.) after the borders property of the range, it showed me all the available properties that are available to access.
List Constants
While defining expressions for a property or a method you can use the list of constants available. In the below example, while using the Border Around method it showed me all the constants which are available for the weight argument.

You can use the shortcut key Control + Shift + J to get the list of constants or you can also go to the edit menu and use the option from there.

Activate Option Explicit
While writing VBA codes you will need to use variables and one of the most important things while using variables is to declare their data type. And there’s a chance that you could forget to declare it.
But when you use the option explicit statement, then you have to declare the data type for every single variable which you are using, and if you fail to do so VBA will show an error message. It’s like forcing yourself to declare every single variable with its data type. For this, you can go to the tools menu and open the options.

And from the options, tick mark “Require Variable Declaration” and click OK.

Now every module will have an Option Explicit statement at the beginning, and you have to declare every single variable.

Change the Code Window View
When you can write multiple codes in a single code window and VBA separate them with a divider, but if you want to have a more focused view, you can change the view of the code window. Below I have the codes in a single module.

But I can change this view from the view buttons from the bottom left of the window.

Now I have only active code visible.
Run a Code Step by Step
When you write a VBA code there could be a chance that that code has a bug or an error that can come while executing it. In that case, the best way is to execute that code step by step and validate each line of code.

For this, you can use shortcut key F8 to execute a code line by line or use step into option from the debug menu.

And there is also a button on the debug toolbar that you can use.

Code Indenting
When you write lengthy and complex codes then it’s important to structure them in the right way so that you can understand them later. For this, there’s one thing which comes handy, INDENTING. Indenting is basically structuring the code using tabs, below is an example.

To add indenting in a line you can use the TAB key from the keyboard, or you can also use the indent/outdent buttons from the toolbar.

Get Code from a Text File
The visual basic editor allows you to import VBA codes from a text file without copy-pasting. Once you insert a module you can go to the insert menu and select the file option from there.

It opens the dialog box where you can locate the text file and import all the codes from it to the current module.
R1C1 Reference Style
If you ever worked with the R1C1 reference style, then I’m sure you can agree on this point that way easier to write codes with it.
R1C1 Reference Style
Line Break
Even though you can adjust the width of the code window and make it wide but there could be a situation when you will be dealing with long lines of code that makes it hard to read.
The best way to deal with this problem is to add a line break. Basically, a line break is something when you break a line into two lines using the line break character.
Use a SPACE & UNDERSCORE and hit enter to add a line break.

Formatting
When it comes to user interface visual basic editor is not that good looking. But there are few formatting options that you can use to customize it or change its look the way you want.
From the Tools Menu Options Editor Format, you can access the formatting option where you can change the font style size or background color as well

Check out this video on customizing the VBA editor for a dark theme.
Personal Macro Workbook
There could be some macros that you need to access within all the workbooks that you use.
In that case, you can use the Personal Macro Workbook that can help you to store all the important codes in one place and you can access them from all the workbooks.

Using Bookmarks
The visual basic editor allows you to add bookmarks to a line from Right Click ➤ Toggle ➤ Bookmark.

And then you can also navigate between bookmarks from the option from the edit menu.

Syntax Checking
When you write codes in the code window VBA check for the syntax error and notify you when you make a syntax error. This option is activated by default, but you can also turn it off if you don’t want VBA to notify you every time you make an error.
Tools Menu ➤ Options ➤ Editor Tab ➤ Auto Syntax Check.

But I would recommend you not to deactivate it because it can help you to identify all the syntax errors that you make while writing codes.
List of Macros
If you have a lot of macros in a module, there is an option that you can use to see all the macros (Tools ➤ Macro).

There’s one big benefit of using this list option is that you can run a macro, delete it, and edit it without navigating to that procedure.
Locking a Project with a Password
Visual Basic Editor also gives you an option to lock a module with a password. So, if you don’t want the users to know the code and don’t want them to make a change in the code, you can use this option.

Tools Menu ➤ VBAProject Properties ➤ Protection Tab

Important Shortcut Keys
- Shift + F7: Object browser.
- F5: Run macro.
- Tab: Add an indent.
- Alt + Q: Close.
- F8: Step into.
- Control + H: Find and replace.
- Control + G: Immediate Window.
- Control + R: Project Explorer.
- F4: Properties window.
Learn some AMAZING Keyboard Shortcuts: Excel Keyboard Shortcuts Cheat Sheet
Alternative to Visual Basic Editor
Well, I have tried quite a few other editors to write a macro but the problem which I have found is that without the Intellisense it’s really hard to use anything other than the visual basic editor itself.

VBA editor works along with Excel, you can test your codes instantly and you can save them into the workbook. But are a few names to try.
Visual Studio Code | Ultra Edit
Points to Remember
- You can maximize or minimize the code window.
- You can change a project’s name anytime.
- The project window is the best way to navigate through the editor.
- It will make a line red if there’s an error in it while writing the code.
- You can also add a bookmark to a line of code from the Right-Click Menu Toggle Bookmark.
- You cannot use the visual basic editor without opening an Excel workbook.
More on VBA
- VBA Functions
- VBA to Add a New Sheet
- VBA Code to Activate a Worksheet
- VBA IF Then Statement
- VBA User Defined Function
- VBA Message Box
- VBA to Extract Hyperlink
- Macro to Highlight Duplicate Values
- VBA to Create a Pivot Table
[icon name=”bell” class=”” unprefixed_class=””] VBA is one of the Advanced Excel Skills
Should I need to install the Visual Basic Editor?
No. You don’t need to install the visual basic editor. It comes pre-installed with the Microsoft Office applications.
What if I don’t have the Developer Tab on the Ribbon?
If you don’t have the developer tab on the Excel ribbon, you can activate it from the Excel ribbon.
Is there an alternative to the Visual Basic Editor?
Not really. The IntelliSense that you have in the VBE makes it perfect to use to write VBA codes.