
Хитрости »
1 Май 2011 133680 просмотров
Если потребовалось заиметь в Excel функцию, которой там еще нет, но она очень нужна или её применение значительно упростило бы жизнь при выполнение определенных задач, то самое время посмотреть в сторону функций пользователя.
Функция пользователя(UDF) — или в дословном переводе Функция, Определенная Пользователем, т.к. в оригинале она звучит как: User Defined Function. Так же их называют пользовательские функции.
Такие функции вызываются через Мастер функций -категория Определенные пользователем (User Defined):

Так что же это за функции такие? Функция пользователя это функция, написанная при помощи языка Visual Basic for Application (VBA) и вызываемая как любая другая функция с листа. Но т.к. эти функции пишутся самостоятельно — можно создать любую функцию, которая будет делать то, что ни одна стандартная функция делать не умеет. Естественно, теперь возникает вопрос как написать такую функцию. Для написания UDF понадобятся хотя бы базовые знания языка VBA. Я в статье опишу лишь принципы создания таких функций и после прочтения вы сможете создать простейшую функцию. Но это никак не означает, что я научу создавать функции на все случаи жизни, ибо это сводится к обучению самому языку программирования. В статье же рассмотрим основные принципы создания, некоторые нюансы и как уже написанные функции использовать в своей книге.
- Основные ограничения функций пользователя
- Как создать функцию пользователя
- Аргументы функции пользователя
- Необязательные аргументы функции пользователя
- Динамическое количество аргументов в функции пользователя(ParamArray)
- Создание формулы массива из UDF или ввод формулы сразу в несколько ячеек
- Как добавить уже созданную функцию в свою книгу
- Обновление расчетов функции пользователя UDF(автопересчет)
Самое главное, что необходимо усвоить — это определенные ограничения, накладываемые на функцию пользователя(UDF), вызываемую с листа:
- UDF не может изменять значения других ячеек (с небольшими недокументированными исключениями)
- UDF не может изменять форматы ячеек либо присваивать форматы (с небольшими недокументированными исключениями)
- UDF не может изменять так называемые объекты окружения самого Excel. Например, сменить стиль ссылок или параметры вычислений формул, вид курсора и т.п.
- UDF будет некорректно работать с такими методами как FindNext, SpecialCells, CurrentRegion, CurrentArray, Select, ShowPrecedents и ShowDependents(выделение зависимостей ячеек), Application.GoTo и т.п. Хотя методы вроде Range.End(xlUp), Range.End(xlDown), обычный Find(без FindNext) проблем не вызывают.Подробнее про работу этих методов из UDF можно узнать из статьи: Глюк работы в UDF методов SpecialCells и FindNext
- UDF может возвращать результат только в ту ячейку, в которой записана сама функция
- для работы функции пользователя(UDF) обязательно должны быть разрешены макросы
Предполагается, что Вы уже обладаете начальными навыками написания процедур в VBA и умеете создавать эти самые процедуры, хотя бы самые простые.
Т.к. функции пользователя создаются в редакторе VBA, то необходимо сначала перейти в редактор: сочетанием клавиш Alt+F11 или через вкладку Разработчик(Developer) —Visual Basic.
Однако прежде чем читать дальше советую ознакомиться так же со статьей: Что такое модуль? Какие бывают модули?
Основные моменты, которые следует помнить при создании функции пользователя:
- в отличие от процедуры(Sub) функция всегда начинается именно со слова Function, а не Sub;
- в теле функции всегда должно быть присвоение ей значения, иначе функция не вернет необходимый результат;
- функция должна располагаться в стандартном модуле или в модуле книги, если Вы планируете вызывать её непосредственно с листа Excel
- функции пользователя «привязаны» к той книге, в которой созданы и по умолчанию не будут работать в других (для этого надо будет всегда указывать имя книги с функцией). Чтобы созданные функции работали удобно и без проблем в любой книге необходимо книгу с функциями сохранить как надстройку: Как создать свою надстройку?
Самая простая функция пользователя может выглядеть так:
Function ТекущаяДата()
    'присваиваем функции значение, чтобы она вернула его на лист(обязательно!)
    ТекущаяДата = Date 'ТекущаяДата - имя функции и именно ему необходимо передать результат
End Function
Эта функция делает одно — возвращает в ячейку, в которую записана, текущую дату. В ячейке эта функция будет выглядеть так:
=ТекущаяДата()
К записи пользовательских функций в ячейку предъявляются такие же требования, как и к встроенным функциям. Это касается так же и скобок на конце функции, у которой нет аргументов. И так же это означает, что в функцию могут быть переданы наши собственные аргументы
Аргументы функции пользователя
Function MySum(vArg1 As Double, vArg2 As Double)
    Dim dblSum as Double
    'получаем сумму двух аргументов
    dblSum = vArg1 + vArg2
    'присваиваем функции значение, чтобы она вернула его на лист(обязательно!)
    MySum = dblSum 'MySum имя функции и именно ему необходимо передать результат
End Function
В приведенном выше коде я упростил стандартную функцию СУММ(SUM) до двух аргументов. Записанная на лист функция будет иметь такой вид:
=Mysum(A1;A2)
где:
A1 — первый аргумент(vArg1), ссылка на ячейку или число
A2 — второй аргумент(vArg2), ссылка на ячейку или число
Функция вернет #ЗНАЧ!(#VALUE!), если в качестве одного из аргументов передано не числовое значение.
Необязательные аргументы функции пользователя
Однако иногда бывает неизвестно, сколько аргументов будет передано в функцию: 1, 2 или 10. Для этого можно использовать ключевой параметр
Optional
перед аргументом, который укажет функции, что этот аргумент является не обязательным, т.е. указывать его в функции при вызове этой функции не обязательно. На примере приведенной выше функции мы можем сделать обязательным только один параметр, а еще 4 необязательными:
Function SumFiveArgs(arg1 As Double, Optional arg2 As Double, Optional arg3 As Double, Optional arg4 As Double, Optional arg5 As Double)
    Dim dblSum As Double
    dblSum = arg1
    dblSum = dblSum + arg2
    dblSum = dblSum + arg3
    dblSum = dblSum + arg4
    dblSum = dblSum + arg5
    SumFiveArgs = dblSum
End Function
Функция будет работать отлично, даже если передать одно или два числа. Но это только в том случае, если для аргументов у нас заданы строгие типы данных — в примере это Double. Если тип не задан — получим ошибку #ЗНАЧ! (#VALUE!):
Function SumFiveArgs(arg1 As Double, Optional arg2, Optional arg3, Optional arg4, Optional arg5)
    Dim dblSum As Double
    dblSum = arg1
    dblSum = dblSum + arg2
    dblSum = dblSum + arg3
    dblSum = dblSum + arg4
    dblSum = dblSum + arg5
    SumFiveArgs = dblSum
End Function
Можно, конечно, всегда задавать тип данных, как в первом примере. Но стоит учитывать, что для числовых типов данных(Double, Integer, Long) значение по умолчанию будет всегда 0, даже если мы аргумент не передали в функцию(для типа String значение по умолчанию нулевая строка — «»). Это нам не мешает произвести операцию сложения и вычитания. Но операция внутри функции может быть умножением или делением и в этом случае мы получим ошибку или неверный результат:
'функция деления аргументов между собой
Function DivideFiveArgs(arg1 As Double, Optional arg2 As Double, Optional arg3 As Double, Optional arg4 As Double, Optional arg5 As Double)
    Dim dblSum As Double
    dblSum = arg1
    dblSum = dblSum / arg2
    dblSum = dblSum / arg3 'уже здесь получим ошибку "на ноль делить нельзя"
    dblSum = dblSum / arg4
    dblSum = dblSum / arg5
    DivideFiveArgs = dblSum
End Function
'функция перемножения аргументов между собой
Function MultipleFiveArgs(arg1 As Double, Optional arg2 As Double, Optional arg3 As Double, Optional arg4 As Double, Optional arg5 As Double)
    Dim dblSum As Double
    dblSum = arg1
    dblSum = dblSum * arg2
    dblSum = dblSum * arg3 'здесь arg3 равен нулю, значит далее сумма будет тоже равна нулю
    dblSum = dblSum * arg4
    dblSum = dblSum * arg5
    MultipleFiveArgs = dblSum
End Function
Передав меньше аргументов в функцию =DivideFiveArgs(A1;A4) мы получим ошибку #ЗНАЧ!(#VALUE!), которую вызовет деление на ноль внутри кода на третьем аргументе.
А передав меньше аргументов в функцию умножения =MultipleFiveArgs(A1;A4)) — получим в качестве результата 0, т.к. на третьем аргументе умножим общую сумму на аргумент, который равен 0.
Проверять каждый аргумент на равенство нулю(If arg2 = 0 Then) тоже будет неверно — вдруг какой-либо реально переданный аргумент будет действительно равен 0? Будет неверный результат функции. Поэтому, чтобы функции выше заработали правильно — нужна проверка на отсутствие в аргументе значения.
Тут надо знать, что если тип аргумента не указан и сам аргумент в функцию не был передан — то ему назначается особый тип — Missing. Который и дает понять, что аргумент просто не передавался в функцию(Missing в переводе можно представить как «пропущен»). И в VBA для таких случаев есть специальная функция — IsMissing. Тогда можно более гибко манипулировать аргументами(на примере функции с умножением):
Function MultipleFiveArgs(arg1 As Double, Optional arg2, Optional arg3, Optional arg4, Optional arg5)
    Dim dblSum As Double
    dblSum = arg1
    'проверяем, что аргумент передан(NOT IsMISSING)
    If Not IsMissing(arg2) Then
        dblSum = dblSum * arg2
    End If
    If Not IsMissing(arg3) Then
        dblSum = dblSum * arg3
    End If
    If Not IsMissing(arg4) Then
        dblSum = dblSum * arg4
    End If
    If Not IsMissing(arg5) Then
        dblSum = dblSum * arg5
    End If
    MultipleFiveArgs = dblSum
End Function
Как видно — теперь Optional можно использовать вполне эффективно. Но надо помнить одно правило: аргументы, заданные в функции с ключевым Optional должны быть заданы самими последними. Т.е. после них не может идти никаких других обязательных аргументов(без ключевого Optional). Впрочем, в этом случае VBA сообщит нам об этом ошибкой «Expected: Optional», что означает: Ожидался не обязательный аргумент.
И для большего кругозора еще одна простая функция, но которая работает уже с текстом и вернет строку до первого пробела:
Function ТекстДоПервогоПробела(Текст As String) As String
    Dim i As Long
    Dim Result As String 'переменная для результата
    i = InStr(1, Текст, " ", 1) 'ищем позицию первого пробела в переданном тексте
    'если пробел есть и он не первый символ в строке
    If i > 1 Then
        Result = Mid(Текст, 1, i - 1) 'получаем текст до первого пробела
    Else
    'если пробела нет - возвращаем всю строку
        Result = Текст
    End If
    'присваиваем результат функции для возврата его на лист
    ТекстДоПервогоПробела = Result
End Function
Text — ссылка на ячейку или непосредственно текст, первое слово из которого надо извлечь. Если переданный текст не будет содержать пробелов или это будет число — функция вернет весь текст. Если ячейка будет пустая — функция вернет пусто и не выдаст ошибки.
Эту функцию можно записать и намного короче:
Function ТекстДоПервогоПробела(Текст As String) As String
    ТекстДоПервогоПробела = Split(Текст, " ")(0)
End Function
Но в таком виде функция вернет значение ошибки #ЗНАЧ!(#VALUE!), если ячейка с текстом будет пустой. Вдаваться в подробности не буду. Могу лишь написать, что функция VBA Split разбивает указанный текст на отдельные части, используя для разбиения указанный разделитель. И создает из разбитых частей одномерный массив с нижней границей, равной нулю. А функция выше просто возвращает первый элемент этого массива.
Обе функции можно дополнить не обязательным аргументом — разделитель слов. И сделать его по умолчанию пробелом. Значение по умолчанию в данном случае задается сразу при объявлении аргумента. Выглядеть это будет так:
Function ТекстДоУказанногоСимвола(Текст As String, Optional Разделитель As String = " ") As String
    ТекстДоУказанногоСимвола = Split(Текст, Разделитель)(0)
End Function
В данном примере если вызвать функцию так:
=ТекстДоУказанногоСимвола(A1)
то функция будет использовать в качестве разделителя пробел(Optional Разделитель As String = » «). Или можно задать символ разделения напрямую в функции и это может быть как пробел, так и любой другой символ:
=ТекстДоУказанногоСимвола(A1;»;»)
Сразу после некоторого использования Optional напрашивается вопрос: а если заранее неизвестно сколько аргументов будет передано? Может их будет передано 50? Или 70? Что, все перечислять? В принципе, можно сделать и так. Но можно и иначе. В VBA предусмотрен очень интересный тип данных —
ParamArray
. Он представляет собой динамический массив, размер которого зависит от количества переданных аргументов. На примере суммирования данных функция будет выглядеть следующим образом:
Function SumMultiple(ParamArray args())
    Dim dblSum As Double, arg
    On Error Resume Next
    For Each arg In args
        dblSum = dblSum + arg
    Next
    SumMultiple = dblSum
End Function
Но такая функция может выдать ошибку, если в качестве любого аргумента будет передана не одна единственная ячейка или значение — а диапазон ячеек(A1:A4) или массив({10;20;30}). В этом случае внутри функции обязательно придется определять тип данных внутри ParamArray. Сделать это можно следующим образом:
Function SumMultiple_DiffTypes(ParamArray args())
    Dim dblSum As Double, arg, rc As Range, x
    On Error Resume Next
    For Each arg In args
        Select Case TypeName(arg)
        Case "Range"                     'это диапазон
            'цикл по всем ячейкам
            For Each rc In arg.Cells
                'проверяем, что в ячейке числовой тип данных
                If IsNumeric(rc.Value) Then
                    dblSum = dblSum + rc.Value
                End If
            Next
        Case "Variant()"                 'это произвольный массив({10;20;30})
            'цикл по всем ячейкам
            For Each x In arg
                'проверяем, что это числовой тип данных
                If IsNumeric(x) Then
                    dblSum = dblSum + x
                End If
            Next
        Case "Double", "Long", "Integer" 'это любой числовой тип
            'суммируем
            dblSum = dblSum + arg
        'все остальные типы игнорируем
        End Select
    Next
    SumMultiple_DiffTypes = dblSum
End Function
И в такую функцию может быть передан любой из наиболее распространенных типов данных:
=SumMultiple_DiffTypes({10;20;30};A1:A4;10;C1)
Но и у ParamArray есть недостаток: он не может использоваться одновременно с необязательными аргументами(Optional). Вместе с ParamArray могут быть использованы только обязательные аргументы и они должны обязательно идти ДО ParamArray. Если хоть один будет указан после, то получим ошибку компилятора: «Expected: )». Т.е. ожидалась завершающая скобка функции.
Так же можно применить ParamArray, чтобы указывать «неограниченное» количество аргументов для сцепления значений из ячеек в одну строку с указанным разделителем:
Function ОбъединитьВсеСРазделителем(Разделитель As String, ParamArray Значения()) As String
    Dim result As String, arg, x, rc As Range
    For Each arg In Значения
        Select Case TypeName(arg)
        Case "Range"                     'это диапазон
            'цикл по всем ячейкам
            For Each rc In arg.Cells
                If result = "" Then
                    result = rc.Value
                Else
                    result = result & Разделитель & rc.Value
                End If
            Next
        Case "Variant()"                 'это произвольный массив({"а";"б";"в"})
            'цикл по всем ячейкам
            For Each x In arg
                If result = "" Then
                    result = x
                Else
                    result = result & Разделитель & x
                End If
            Next
        Case Else 'это любой другой тип
            'суммируем
            If result = "" Then
                result = arg
            Else
                result = result & Разделитель & arg
            End If
        End Select
    Next
    ОбъединитьВсеСРазделителем = result
End Function
Пример вызова такой функции с листа(первым обязательно передается разделитель, а далее уже что объединять — любой тип данных):
=ОбъединитьВсеСРазделителем(«; «;A1:A4;C1;»Привет»;{«а»;»б»;»в»})
Создание формулы массива из UDF или ввод формулы сразу в несколько ячеек
Иногда бывает необходимо делать вычисления таким образом, чтобы они возвращались сразу в несколько ячеек. А порой без этого вообще не обойтись. Например, если расчет значения для следующей ячейки напрямую зависит от полученного на предыдущей итерации и видеть надо одновременно значения всех итераций. Например, вывести в несколько строк и столбцов числа от 6 с шагом 2. Стандартными формулами это довольно непросто сделать — ведь придется как-то определять сколько ячеек в каждом столбце и какое последнее число в каждом из столбцов. Через функцию пользователя, созданную как формула массива(подробнее про формулы массива), это сделать проще.
Ниже представлена функция
WriteNumbers
, которая первым аргументом(Число) принимает произвольное число, с которого начать отсчет, а вторым(Шаг) задается шаг, на который надо увеличивать это число при каждой итерации.
'---------------------------------------------------------------------------------------
' Author : Щербаков Дмитрий(The_Prist)
'          Профессиональная разработка приложений для MS Office любой сложности
'          Проведение тренингов по MS Excel
'          https://www.excel-vba.ru
'          info@excel-vba.ru
' Purpose: Функция записывает в ячейки числа от первого заданного(Число) с заданным шагом(Шаг)
'          Вводится сразу в несколько ячеек и ввод завершается сочетанием клавиш Ctrl+Shift+Enter
'---------------------------------------------------------------------------------------
Function WriteNumbers(Число As Double, Шаг As Double)
    Dim aNumbers() 'массив для записи результата
    Dim rResRange As Range
    Dim lr As Long, lc As Long, dblNum As Double

    'задаем начальное значение числа - оно равно Шаг
    dblNum = Число
    'определяем кол-во выделенных ячеек, в которые надо вернуть результат
    Set rResRange = Application.Caller
    ReDim aNumbers(1 To rResRange.Rows.Count, 1 To rResRange.Columns.Count)
    'создаем массив результирующих чисел для всех выделенных ячеек
    For lc = 1 To rResRange.Columns.Count
        For lr = 1 To rResRange.Rows.Count
            aNumbers(lr, lc) = dblNum
            dblNum = dblNum + Шаг
        Next
    Next
    'возвращаем результат
    WriteNumbers = aNumbers
End Function
Чтобы правильно применить приведенную UDF, необходимо
- выделить несколько ячеек(например, A1:F10)
- в строку формул ввести нашу UDF: =WriteNumbers(6;2)
- завершить ввод формулы сразу тремя клавишами Ctrl+Shift+Enter
Главное, на что надо обратить внимание — это тип переменной, которая используется для записи результата: aNumbers(). Она обязательно должна быть задана как массив, если мы хотим, чтобы UDF возвращала результат сразу во всем выделенные ячейки и работала как привычная формула массива. В зависимости от решаемой задачи, массив может быть как одномерным горизонтальным или вертикальным, так и многомерным.
В примере выше итоговый массив определяется автоматически при помощи Application.Caller(подробнее про Caller в статье Кто вызвал функцию или процедуру?). Рекомендую всегда делать именно так, чтобы корректно задавать итоговый массив, как бы он ни был задан. Возможно, для написания правильно работающей UDF подобного плана, надо будет чуть более углубленно изучать работу с массивами.
Как добавить уже созданную функцию в свою книгу
Для начала необходимо создать стандартный модуль(Insert —Module). Затем в этот модуль вставить весь текст функции(код). Все, теперь функция доступна из диспетчера функций в категории Определенные пользователем(User defined), так же можно будет вводить эту функцию напрямую в ячейки той книги, в которой содержится код функции. Чтобы функция заработала очень важно разрешить макросы. Иначе результатом будет ошибка #ИМЯ!(#NAME!)
GIF-ка с инструкцией, как вставить функцию к себе в книгу на примере функции ТекстДоПервогоПробела из этой статьи:

Если Вы используете версию Excel 2007 и выше, то книгу необходимо будет сохранить с поддержкой макросов: Меню -Сохранить как -Книга Excel с поддержкой макросов.
По умолчанию функции пользователя не пересчитываются вместе с пересчетом листа или по нажатию
F9
(
Shift
+
F9
). Чтобы функция пользователя пересчиталась, как правило необходимо либо изменить значение любого аргумента функции(например, изменить значение участвующей в расчетах ячейки) или имитировать редактирование самой функции последовательным нажатием клавиш
F2
—
Enter
. Это не всегда удобно и часто возникает вопрос:
как заставить функцию пересчитываться при любом изменении листа
и при пересчете листа/книги клавишами(
F9
или
Shift
+
F9
). Между тем делается это довольно просто и при этом сделать можно для каждой отдельной функции. На примере простой функции записи даты-времени в ячейку:
Function ТекущаяДатаВремя()
    ТекущаяДатаВремя = Now 'Now - возвращает текущие дату и время
End Function
Если записать её в таком виде, то после записи в ячейку:
=ТекущаяДатаВремя()
при первой записи будут показаны текущие дата и время. Чтобы эксперимент был более наглядным, лучше перейти в Формат ячеек и выставить для ячейки с функцией формат «ДД.ММ.ГГ ч:мм:сс;@». С небольшим интервалом времени понажимайте клавишу F9, чтобы вызвать пересчет книги. Тогда наглядно будет видно, что при пересчете значение функции не изменяется — секунды «застынут» на том месте, где были при начальном вводе функции. Выделите ячейку с функцией — нажмите F2-Enter. Только тогда значение будет пересчитано. А теперь чуть изменим функцию — добавим ключевой параметр пересчета — Application.Volatile:
Function ТекущаяДатаВремя()
    Application.Volatile True
    ТекущаяДатаВремя = Now 'Now - возвращает текущие дату и время
End Function
Теперь при каждом пересчете листа и при любом изменении на листе функция будет пересчитываться. В некоторых случаях это делать просто необходимо(например, если применяется функция получения имени листа или книги).
Но стоит всегда учитывать тот факт, что не всегда такой автопересчет полезен. Если функция пользователя использует «тяжелые» расчеты и выполняется долго — добавление автопересчета может значительно затормозить работу с файлом. Поэтому применять параметр следует с осторожностью.
Если надо, чтобы функция пересчитывалась только при изменениях в конкретном диапазоне/ячейках, можно просто сделать необязательные параметры:
Function ТекущаяДатаВремя(Optional ДиапазонОбновления As Range = Nothing)
    ТекущаяДатаВремя = Now
End Function
тогда при любом изменении в ячейках аргумента ДиапазонОбновления функция будет пересчитана. При этом использовать хоть как-то сам этот аргумент внутри функции совершенно необязательно. Выглядеть запись такой функции будет так:
=ТекущаяДатаВремя(E:E)
при любом изменении в столбце E функция будет пересчитана.
Некоторые примеры функций пользователя можно увидеть здесь на сайте:
- Как оставить в ячейке только цифры или только текст?
- Как получить текст примечания в ячейку?
- Как скопировать картинку из примечания?
- Как получить адрес гиперссылки из ячейки
- Сцепить много ячеек с указанным разделителем
- Как сцепить несколько значений в одну ячейку по критерию? СцепитьЕсли
- Сравнение текста по части предложения
Чтобы использовать функции пользователя более удобно, их лучше размещать в специальных файлах — надстройках: Как создать свою надстройку?
Статья помогла? Поделись ссылкой с друзьями!
![]() Видеоуроки
Видеоуроки
Поиск по меткам
Access
apple watch
Multex
Power Query и Power BI
VBA управление кодами
Бесплатные надстройки
Дата и время
Записки
ИП
Надстройки
Печать
Политика Конфиденциальности
Почта
Программы
Работа с приложениями
Разработка приложений
Росстат
Тренинги и вебинары
Финансовые
Форматирование
Функции Excel
акции MulTEx
ссылки
статистика
Содержание
- Understanding Excel Services UDFs
- Создание UDF с использованием управляемого кода
- Обязательные атрибуты
- Расположение библиотеки Microsoft.Office.Excel.Server.Udf.dll
- Развертывание и безопасность
- Тип расположения развертывания
- Идентификация сборок UDF
- Включение сборок UDF
- Разрешение выполнения сборок UDF
- Перезагрузка сборки UDF
- Разрешение разграничения доступа кода по умолчанию для сборок UDF
- Ограничение разрешения разграничения доступа кода для сборок UDF
- Understanding Excel Services UDFs
- Creating Managed-Code UDFs
- Required Attributes
- Location of Microsoft.Office.Excel.Server.Udf.dll
- Deployment and Security
- Deployment Location Type
- Identification of UDF Assemblies
- Enabling UDF Assemblies
- Allowing UDF Assemblies to Run
- Reloading a UDF Assembly
- Default Code Access Security Permission for UDF Assemblies
- Restricting Code Access Security Permission for UDF Assemblies
- How to create custom user defined functions in Excel
- What is user defined function (UDF) in Excel?
- How to create a custom function in Excel?
- How to use custom functions
- Various kinds of user defined functions
- No arguments
- With one argument
- Using an array as an argument
- With multiple arguments
- With required and optional arguments
- With only optional arguments
- The return value is an array
Understanding Excel Services UDFs
User-defined functions (UDFs) are custom functions that extend the calculation and data-import capabilities of Excel. Developers create custom calculation packages to provide:
Functions that are not built into Excel.
Custom implementations to built-in functions.
Custom data feeds for legacy or unsupported data sources, and application-specific data flows.
Users who create workbooks can call UDFs from a cell through formulasfor example, «=MyUdf(A1*3.42)»just like they call built-in functions.
Службы Excel UDFs give you the ability to use formulas in cells to call custom functions written in managed code and deployed to Microsoft SharePoint Server 2010. You can create UDFs to:
Call custom mathematical functions.
загрузки на листы данных из специальных источников;
вызова веб-служб из пользовательских функций.
Создание UDF с использованием управляемого кода
An easy way to create an Службы Excel managed-code UDF is to use the Microsoft Visual Studio 2005 class library template. You will need to reference the Службы Excel UDF dynamic link library (DLL), named Microsoft.Office.Excel.Server.Udf.dll, in your managed-code UDF project.
Microsoft.Office.Excel.Server.Udf.dll has been compiled using Microsoft .NET Framework 2.0. If you use Visual Studio 2003 to create your managed-code UDF, you will not be able to reference Microsoft.Office.Excel.Server.Udf.dll. Сборка, созданная в предыдущей версии .NET Framework, не может ссылаться на сборку, созданную с помощью .NET Framework 2.0.
Обязательные атрибуты
To use custom functions in a class as an Службы Excel UDF class, you must mark your UDF class with the Microsoft.Office.Excel.Server.Udf.UdfClass attribute. Any classes that are not marked with this attribute in the UDF assembly will be ignored by Службы вычислений Excel. They are not considered to be Службы Excel UDF classes.
To use custom functions in a class as Службы Excel UDF methods, you must mark your UDF methods with the Microsoft.Office.Excel.Server.Udf.UdfMethod attribute. Any methods that are not marked with this attribute in the UDF assembly will be ignored because they are not considered to be Службы Excel UDF methods.
The Microsoft.Office.Excel.Server.Udf.UdfMethodattribute has an IsVolatile property. You use the IsVolatile property to specify a UDF method as volatile or nonvolatile. The IsVolatile property takes a Boolean value. The default value is false, which means that particular UDF method is nonvolatile.
Расположение библиотеки Microsoft.Office.Excel.Server.Udf.dll
On the computer where you have installed SharePoint Server 2010, you can find a copy of Microsoft.Office.Excel.Server.Udf.dll at:
[drive:]\Program Files\Common Files\Microsoft Shared\web server extensions\14\ISAPI
Развертывание и безопасность
Тип расположения развертывания
UDF assemblies can reside in a local directory, global assembly cache, or network share. При использовании в ферме путь к локальному каталогу должен быть одинаков для всех участников фермы.
Идентификация сборок UDF
You can expose the identity of a UDF assembly by using the full path or strong name of the assembly for Службы вычислений Excel to call.
For example, you can use:
CompanyName.Hierarchichal.MyUdfNamespace.MyUdfClassName.dll, Version=1.1.0.0, Culture=en, PublicKeyToken=e8123117d7ba9ae38
Включение сборок UDF
UDF assemblies are disabled by default.
Each Службы Excel trusted location has an AllowUdfs flag.
[!Примечание] The AllowUdfs flag is denoted by the User-defined functions allowed option on the Службы Excel Trusted File Locations page. To learn how to navigate to the Trusted File Locations page, see Step 3: Deploying and Enabling UDFs.
The default AllowUdfs value is false. If the AllowUdfs value is set to false in a particular trusted location, the workbooks in that trusted location are not allowed to call UDFs.
In order to allow UDFs to be called from a specific trusted location, you set the AllowUdfs value to true.
If the AllowUdfs value is false when a session is started on a workbook that has UDF calls in this trusted location, the UDF calls will fail. If you change the AllowUdfs value to true after a session has started, the UDF calls will also fail. This is because changes in the AllowUdfs flag take effect on the next session, after the configuration database has been updated.
Разрешение выполнения сборок UDF
If administrators want to allow UDF assemblies to run, they have to register all UDF assemblies, and enable workbooks to call UDFs by setting the AllowUdfs flag to true in the trusted locations.
Перезагрузка сборки UDF
To reload a UDF assembly, you can run iisreset or restart the Службы вычислений Excel application domain.
Осторожностью: Сброс IIS завершит все текущие сеансы. > Дополнительные сведения см. в разделе Практическое руководство. Включение определяемых пользователем функций.
Разрешение разграничения доступа кода по умолчанию для сборок UDF
По умолчанию сборки UDF выполняются с уровнем «полное доверие».
Ограничение разрешения разграничения доступа кода для сборок UDF
If you do not want a particular UDF assembly to run with full trust, you must explicitly restrict code access security permission for that UDF assembly. You can configure the code groups and restrict permission by using the .NET Framework 2.0 Configuration tool.
Developers can also use the RequestMinimum and RequestOptional methods in their code to ensure that their UDF assemblies don’t get more permission than they require.
For more information about configuring code groups, as well as the RequestMinimum and RequestOptional methods, see the following articles on MSDN:
Источник
Understanding Excel Services UDFs
User-defined functions (UDFs) are custom functions that extend the calculation and data-import capabilities of Excel. Developers create custom calculation packages to provide:
Functions that are not built into Excel.
Custom implementations to built-in functions.
Custom data feeds for legacy or unsupported data sources, and application-specific data flows.
Users who create workbooks can call UDFs from a cell through formulas—for example, «=MyUdf(A1*3.42)»вЂ”just like they call built-in functions.
Excel Services UDFs give you the ability to use formulas in cells to call custom functions written in managed code and deployed to Microsoft SharePoint Server 2010. You can create UDFs to:
Call custom mathematical functions.
Get data from custom data sources into worksheets.
Call Web services from the UDFs.
Creating Managed-Code UDFs
An easy way to create an Excel Services managed-code UDF is to use the Microsoft Visual Studio 2005 class library template. You will need to reference the Excel Services UDF dynamic link library (DLL), named Microsoft.Office.Excel.Server.Udf.dll, in your managed-code UDF project.
Microsoft.Office.Excel.Server.Udf.dll has been compiled using Microsoft .NET Framework 2.0. If you use Visual Studio 2003 to create your managed-code UDF, you will not be able to reference Microsoft.Office.Excel.Server.Udf.dll. It is not possible for an assembly created with an older version of the .NET Framework to reference an assembly created with .NET Framework 2.0.
Required Attributes
To use custom functions in a class as an Excel Services UDF class, you must mark your UDF class with the Microsoft.Office.Excel.Server.Udf.UdfClass attribute. Any classes that are not marked with this attribute in the UDF assembly will be ignored by Excel Calculation Services. They are not considered to be Excel Services UDF classes.
To use custom functions in a class as Excel Services UDF methods, you must mark your UDF methods with the Microsoft.Office.Excel.Server.Udf.UdfMethod attribute. Any methods that are not marked with this attribute in the UDF assembly will be ignored because they are not considered to be Excel Services UDF methods.
The Microsoft.Office.Excel.Server.Udf.UdfMethodattribute has an IsVolatile property. You use the IsVolatile property to specify a UDF method as volatile or nonvolatile. The IsVolatile property takes a Boolean value. The default value is false, which means that particular UDF method is nonvolatile.
Location of Microsoft.Office.Excel.Server.Udf.dll
On the computer where you have installed SharePoint Server 2010, you can find a copy of Microsoft.Office.Excel.Server.Udf.dll at:
[drive:]\Program Files\Common Files\Microsoft Shared\web server extensions\14\ISAPI
Deployment and Security
Deployment Location Type
UDF assemblies can reside in a local directory, global assembly cache, or network share. In a farm scenario, the local directory path must be identical across the farm.
Identification of UDF Assemblies
You can expose the identity of a UDF assembly by using the full path or strong name of the assembly for Excel Calculation Services to call.
For example, you can use:
CompanyName.Hierarchichal.MyUdfNamespace.MyUdfClassName.dll, Version=1.1.0.0, Culture=en, PublicKeyToken=e8123117d7ba9ae38
Enabling UDF Assemblies
UDF assemblies are disabled by default.
Each Excel Services trusted location has an AllowUdfs flag.
The AllowUdfs flag is denoted by the User-defined functions allowed option on the Excel Services Trusted File Locations page. To learn how to navigate to the Trusted File Locations page, see Step 3: Deploying and Enabling UDFs.
The default AllowUdfs value is false. If the AllowUdfs value is set to false in a particular trusted location, the workbooks in that trusted location are not allowed to call UDFs.
In order to allow UDFs to be called from a specific trusted location, you set the AllowUdfs value to true.
If the AllowUdfs value is false when a session is started on a workbook that has UDF calls in this trusted location, the UDF calls will fail. If you change the AllowUdfs value to true after a session has started, the UDF calls will also fail. This is because changes in the AllowUdfs flag take effect on the next session, after the configuration database has been updated.
Allowing UDF Assemblies to Run
If administrators want to allow UDF assemblies to run, they have to register all UDF assemblies, and enable workbooks to call UDFs by setting the AllowUdfs flag to true in the trusted locations.
Reloading a UDF Assembly
To reload a UDF assembly, you can run iisreset or restart the Excel Calculation Services application domain.
Caution: Resetting IIS will end all current sessions. > For more information, see How to: Enable UDFs.
Default Code Access Security Permission for UDF Assemblies
By default, UDF assemblies run with full trust.
Restricting Code Access Security Permission for UDF Assemblies
If you do not want a particular UDF assembly to run with full trust, you must explicitly restrict code access security permission for that UDF assembly. You can configure the code groups and restrict permission by using the .NET Framework 2.0 Configuration tool.
Developers can also use the RequestMinimum and RequestOptional methods in their code to ensure that their UDF assemblies don’t get more permission than they require.
For more information about configuring code groups, as well as the RequestMinimum and RequestOptional methods, see the following articles on MSDN:
Источник
How to create custom user defined functions in Excel
 by Alexander Trifuntov, updated on March 10, 2023
For many tasks, regular Excel functions cannot help. We’ll show you how to create new custom functions and how to use them to make your work easier. Learn how to create and use custom functions:
By the moment I started writing this article, Excel has already introduced you to over 450 different functions. With their help you can perform a vast variety of different operations. However, not any task can be solved in Excel as its developers couldn’t foresee all the issues we face. I think that many of you have met at least one of these challenges:
- Not all the data can be processed by standard functions (for example, dates before 1900).
- Formulas can be quite long and complex. They are impossible to remember, difficult to understand, and hard to change to meet new criteria.
- Not all the tasks can be solved using standard Excel functions (for example, you cannot extract URL from a hyperlink).
- It is impossible to automate frequently repeated standard operations (such as importing data from an accounting program into an Excel sheet, formatting dates and numbers, removing unnecessary columns).
How can these problems be solved?
- Some users create an archive of workbooks with examples. They copy the desired formula from there and apply it to their spreadsheet.
- There are users who prefer creating a set of VBA macros once and run them whenever is needed.
- Another way to go is to create user defined functions (further — UDF) using the VBA editor.
While the first two options sound familiar, the third one may cause some confusion. So let’s have a closer look at custom functions in Excel and decide whether they are worth a shot.
What is user defined function (UDF) in Excel?
UDF is a custom function that takes data, performs a calculation, and returns the desired result. The source data can be numbers, text, dates, booleans, and even arrays. The result of calculations can be a value of any type that Excel works with or an array of such values.
In other words, UDF is kind of an upgrade of standard Excel functions. You may use it when the capabilities of regular functions are not enough. Its main purpose is to supplement and expand the capabilities of Excel and perform actions that are impossible using standard functions.
There are several ways to create custom functions:
- Using Visual Basic for Applications (VBA). This method is described in this article.
- Using the great LAMBDAfunction that was introduced in Office 365.
- Using Office scripts. Currently, the scripts are available in Excel on the Web only.
Check out the screenshot below to see the difference between two ways of number extraction — using formula and a custom ExtractNumber() function. 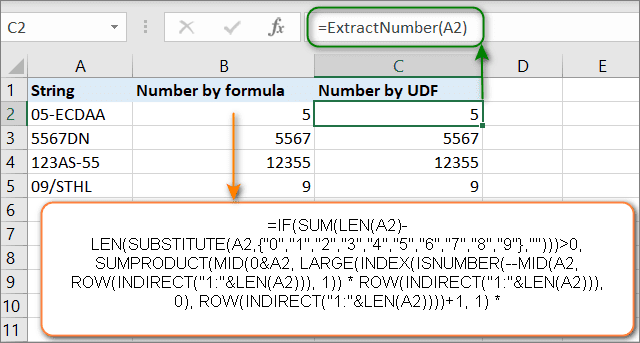
You can use UDF in any of the following ways:
- As a formula, where it can take raw data from your worksheet and return a calculated value or an array of values.
- Like part of a VBA macro or other custom function code.
- As a component of your conditional formatting formulas.
- For storing constants and lists of data.
How to create a custom function in Excel?
First of all, you need to open the Visual Basic Editor (VBE). Please keep in mind that it just opens in a new window and does not close your Excel spreadsheet.
The easiest way to open VBE is by using a keyboard shortcut — Alt + F11 . It’s fast, simple and there is no need to customize the Ribbon or Quick Access Toolbar.
Tip. Press Alt + F11 when VBE is open to go back to the Excel window.

After opening VBE, you need to add a new module where you will write your functions. Right-click on the VBA project pane and select Insert -> Module. An empty module window will appear where you are to specify your custom function.
Before we start, let’s go through the rules by which UDFs are created:
- A user defined function always begins with “Function” and ends with “End Function”.
- “Function” is followed by the name of the function. This is a title you create and give to your function so that you could identify and use it later. This name must not contain spaces. If you want to separate words, use underscores. For example, Count_Words.
- Also, the name also cannot be the same as the names of standard Excel functions. If you do this, then the standard function will always be executed.
- The name of the user defined function cannot match the addresses of the cells in the worksheet. For example, the name ABC1234 is invalid.
Tip. It is highly recommended to give the functions descriptive names. Then you can easily select them from a long list of functions. For example, the name CountWords makes it easy to understand what the function does and apply it for word counting when needed.
- Next, the arguments of the function are usually listed in parentheses. This is the data with which it will work. There can be one or several arguments. If you have multiple arguments, you need to list them separated by commas.
- If the functions inside the UDF do not use arguments (for example, NOW, TODAY, or RAND), then you can create a function with no arguments. Also, no arguments are needed if you are using a UDF to store constants (such as pi).
- After that, specify the variables that the UDF uses. The type of these variables is indicated — number, date, text, array.
- Then you put several VBA statements that perform calculations using the arguments passed to the function.
- At the end, you should write a statement that assigns the final value to a variable with the same name as the function’s. This value gets returned to the formula from which the user defined function was called.
- Custom function code can include comments. They will help you remember the purpose of a function and its operators. If you want to make any changes in the future, the comments will be very helpful.
Note. A comment always starts with an apostrophe (‘). The apostrophe tells Excel to ignore everything after it and until the end of the line.
Now let’s try creating your first custom formula. For starters, we create a custom function that will count the number of words in a range of cells. To do this, insert this code into the module window:
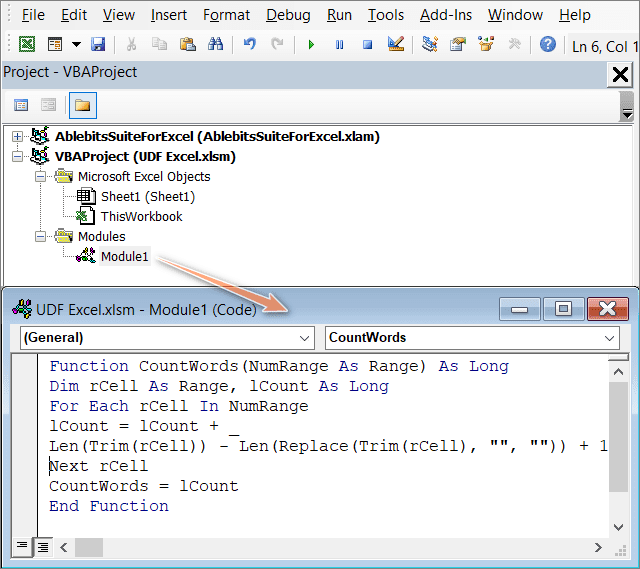
I think some clarification may be needed here. As you remember from the rules above, UDF code always starts with a word “Function”. Then we make a description of the new function and close our UDF with “End Function”.
As we indicate in parentheses the initial data it will use, NumRange As Range means that the UDF argument will be a range of values. This function needs to return only one argument — the range of cells.
In the second line of code, we are declaring variables.
As Long indicates that the result of the CountWords function will be an integer.
The Dim statement declares two variables of our function:
- rCell is the variable of the range of cells in which we will count words.
- lCount is an integer variable that will contain the number of words.
The For Each argument is designed to perform calculations on each item in a group of items (range of cells). This loop operator is used when the number of elements in the group is unknown. We start with the first element, then we take the next one and so on to repeat until the very last value. The loop repeats as many times as there are cells in the input range.
Inside this loop, an operation that calculates the number of words is applied to the value of each and every cell:
As you can see, this is a regular Excel formula that uses the standard text functions: LEN, TRIM and REPLACE. Instead of the cell reference, we use the range variable rCell. Hence, for each cell of the range, we sequentially count the number of words in it.
The counted numbers are summed up and stored in the lCount variable:
lCount = lCount + Len (Trim(rCell)) — Len(Replace(Trim(rCell), «», «»)) + 1
When the loop is finished, the value of the variable is assigned to the function.
The function returns the result of this variable to the cell of the worksheet, which is the total number of words.
It is this line of code that ensures that the function will return the lCount value to the cell from which it was called.
As you can see, it is not very difficult. Save your function by clicking the “Save” button on the VBE ribbon. After that, you can close the editor window. To do this, you can use the keyboard shortcut Alt + Q . Or just go back to the Excel sheet by pressing Alt + F11 .
Tip. You can learn more about using VBA in Excel on our blog.
You can compare working with the custom function CountWords and counting the number of words using formulas and choose a method that fits you more.
How to use custom functions
When you create a custom function, it becomes available in the same way as other standard Excel functions. Now we are going to learn how to create custom formulas.
To apply a user defined function, you have two options.
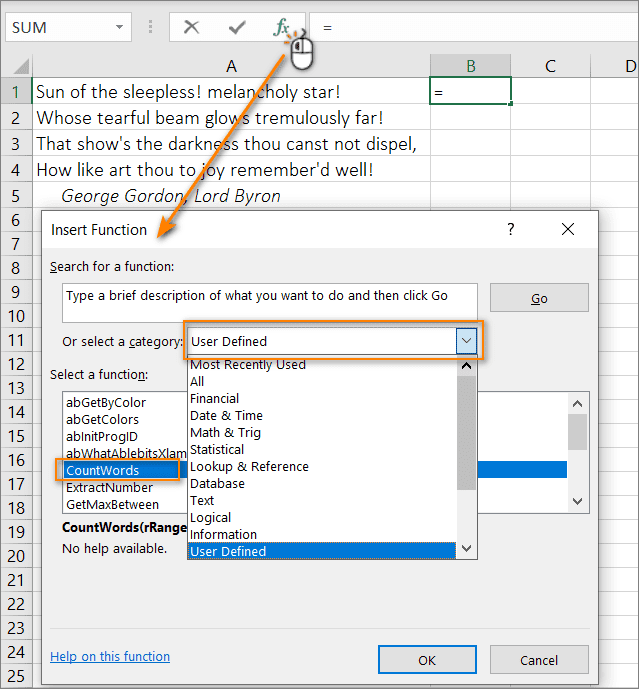
- Click the fx button on the formula bar. Among the categories of functions, you will see a new group — User Defined. And in this category, you can see our new custom function CountWords.
You can simply write this function into a cell in the same way as you do with standard functions. When you start typing a name, Excel will show you the name of the user defined function in a list of matching functions. In the example below, when I entered =cou, Excel showed me a list of matching functions, among which you see CountWords. 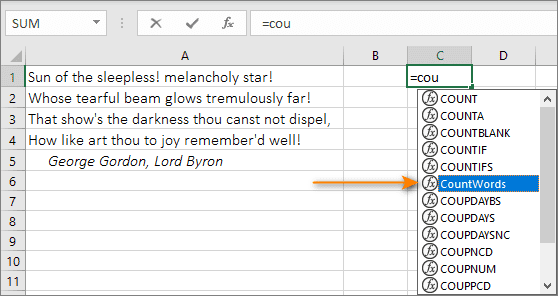
Let’s finally apply our custom formula. Write it down in any cell:
Press Enter . See, we just specified the function and set up a range and here is the result of the count: 28 words. 
Various kinds of user defined functions
Now we’ll check different UDF types depending on the arguments they use and the results they return.
No arguments
Excel has several standard functions that do not require arguments (RAND, TODAY, NOW). For example, the RAND function returns a random number between 0 and 1. The TODAY function will return the current date. You don’t need to specify any values ​​to them.
Good news is that you can create such a function in VBA as well. Below is the code that will write the name of your worksheet into a cell:
Or you can use this code instead:
Notice that there are no arguments in the parentheses after the function name. Since the result to be returned does not depend on any values ​​in your working file, the function does not require any arguments.
The above code defines the result of the function as a string data type (since the desired result is a filename, which is text). If you do not specify the data type, then Excel will determine it on its own.
With one argument
Now let’s create a simple function that works with one argument which is one cell.
Our task is to extract the last word from the text string. Here is the code we’ll use:
The_Text is the value of the selected cell. We indicate that this should be a text value (As String).
The StrReverse function returns text in reverse character order. Next, the InStr function determines the position of the first space. Using the Left function, we get all characters ending with the first space. Then we remove the spaces with Trim. Change the order of characters again using StrReverse. We get the last word from the text.
Since this function takes a cell value, we don’t need to use Application.Volatile here. As soon as the argument changes, the function will automatically update.
Using an array as an argument
Many Excel functions use arrays of values ​​as arguments. Remember the SUM, SUMIF, SUMPRODUCT functions. We already covered this situation above when we learned how to create a custom function to count the number of words in a range of cells.
The code below creates a function that sums all even numbers in a specified range of cells.
The NumRange argument is specified as Range. This means that the function will use the original data array. It should be noted that the Variant variable type can also be used. It looks like
The Variant type provides a «non-dimensional» container for storing data. Such a variable can store any of the data types allowed in VBA, including numeric values, text, dates, and arrays. Moreover, the same such variable in the same program at different times can store data of different types. Excel will determine on its own what data is passed to the function.
The code has a For Each argument. It takes each cell and checks to see if it contains a number. If it is not, then nothing happens and it moves on to the next cell. If a number is found, it checks if it is even or not (using the MOD function).
All even numbers are summed up in the Result variable.
When the loop is finished, the Result value is assigned to the SumEven variable and passed to the function.
With multiple arguments
Most Excel functions have multiple arguments. Custom functions are no exception. This is why it is so important to be able to create UDFs with multiple arguments.
The code below creates a function that selects the maximum number in a given range:
It has 3 arguments: a range of values, a lower bound for a numeric range, and an upper bound for a range. The first one is rngCells As Range. This is the range of cells to search for the maximum value in. The second and third arguments (MinNum, MaxNum) are specified without a type declaration. This means that the Variant data type will be applied to them by default.
VBA uses 6 different numeric data types. Specifying only one of them means limiting the use of the function. Therefore, it would be better if Excel determines the type of numeric data itself.
The For Each loops through all the values ​​in the selected range sequentially. The numbers that are in the range from the maximum to the minimum value are written to a special array — arrNums. Using the standard MAX function, find the largest number in this array.
With required and optional arguments
To understand what an optional argument is, remember the VLOOKUP function. Its fourth argument [range_lookup] is optional. If you omit one of the required arguments, your function will throw an error. But if you omit the optional argument, your function will work.
However, optional arguments are not useless. They allow you to choose your calculation option.
For example, in the VLOOKUP function, if you omit the fourth argument, an approximate search will be performed. If you specify the [range_lookup] argument as FALSE (or 0), an exact match will be found.
If your user defined function has at least one required argument, it must be written at the beginning. Only then there are the optional ones.
To make an argument optional, you just need to add «Optional» before it. Let’s see an example of a function with optional arguments in VBA:
This custom function retrieves text from a cell. Optional CaseText = False means the CaseText argument is optional. By default, its value is set to FALSE.
If the optional CaseText argument is TRUE, then the result is returned in uppercase. If the optional argument is FALSE or omitted, the result remains as-is, without changing the case.
You may wonder: «Can there be only optional arguments in a user-defined function?». We have an answer for you down below 🙂
With only optional arguments
As far as I know, there is no built-in Excel function that only has optional arguments. Things may have changed from the day I wrote this article, but so far such a function doesn’t exist.
Anyways, it is possible to create a UDF with only optional arguments. As a proof, here is a custom function that writes a username to a cell:
As you can see, there is only one Uppercase argument, and it is optional.
If the argument is FALSE or omitted, then the username is returned unchanged. If the function argument is TRUE, the name is returned in uppercase characters (using the Ucase VBA function). Notice the first statement of the function. It contains the IsMissing VBA function, which detects the presence of an argument. If there is no argument, the statement sets the Uppercase variable to FALSE.
Have a look at another version of this function:
In this case, the optional argument defaults to FALSE. If the function is entered without arguments, then FALSE will be used by default and the username will be obtained without changing the case. If any value other than zero is entered, then all characters will be converted to uppercase.
The return value is an array
VBA has a very useful function called Array. It returns a variant data type, which is an array (simply put, multiple values). If you are not familiar with array formulas in Excel, we suggest starting with the beginner’s guide to array functions on our blog.
UDFs that return an array are very useful when storing arrays of values. For example, the Months () function will return an array of month names:
Note. The UDF outputs data horizontally (in a row).
And what if you need a vertical array of values? It was mentioned before that UDFs can be used in Excel formulas along with standard functions. Having said that, let’s use Months() as an argument in the TRANSPOSE function:
= TRANSPOSE(Months()) 
You can use UDFs to quickly enter data into a table as shown in the screenshot above. For example, in a sales report, you do not need to manually write the names of the months.
What is more, you can get the name of the month by its number. For example, cell A1 contains the number of the month. Then the name of the month can be obtained using the formula
= INDEX (Months(), 1, A1)
An alternative version of this formula:
Agree, UDF with an array makes an Excel formula much easier.
This article will open a series of posts about user defined functions.
If I managed to convince you that this function is worth trying, I recommend that you pay attention to these articles:
Источник
In this post, we’re going to see how we can build our own custom functions in Excel with VBA, and we will look at some incredibly useful Excel User Defined Function examples that you can try in your everyday work.
VBA has a special type of procedure which allows you to build your own functions for use in the workbook. These allow you to create custom calculations that can be used repeatedly throughout your workbooks.
Let’s take a look!
Step up your Excel game
Download our print-ready shortcut cheatsheet for Excel.
What is a function?

In abstract terms, a function is something that will take an input and return an output. The function is the rule or calculation that’s applied to the input to get the output result.
Let’s take a look at a very simple example in math called the successor function. It takes any natural number {1,2,3,4,…} and returns the successor or next number in the sequence. This is usually represented by f(x)=x+1 in mathematical notation.
- For this function the input is x and the output is x+1.
- So if the input is 1 the output of the successor function will be 2.
- If the input is 9, the output will be 10.
- If the input is 100, the output will be 101. You get the point.
It’s a simple rule that can be applied to any number. You probably see examples of functions in real life all the time but just don’t think of them as functions. A function doesn’t necessarily have to have numerical inputs and outputs. They can be any type of data.
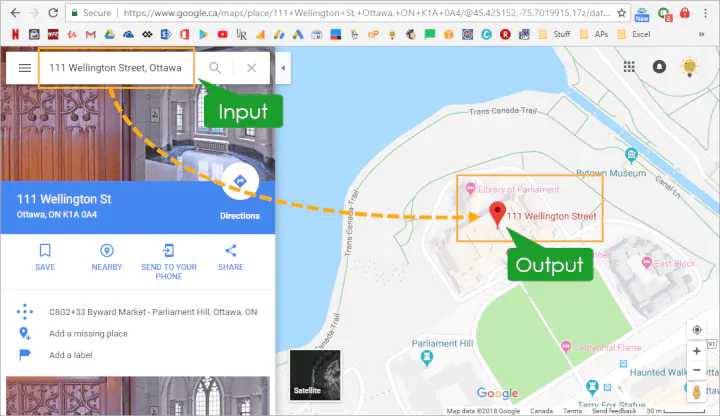
Take Google maps as an example. You can input an address and it will return a location on the map. In the abstract sense, this is exactly what a function does!
Functions in Excel
Excel has a ton of functions. Last time I counted, there were 479 functions available in Excel. That’s a lot of functions! If you’ve used Excel for any amount of time, you’re very likely to come across some of these. They allow a user to perform many types of operations such as time and date, financial, logical, lookup, statistical, or text calculations.
- Looking up related values in another table using the VLOOKUP function.
- Changing lowercase text to upper case text using the UPPER function.
- Calculating the internal rate of return from a series of cash flows using the IRR function.
- Performing a logical test using the IF function.
- Calculating the average of a set of numbers using the AVERAGE function.
Some of these functions require many inputs to return the output. In Excel and some other programming languages, the inputs are also called arguments. For Example, VLOOKUP(lookup_value, table, index_num, [lookup_type]) has 3 required arguments and 1 optional argument. These inputs determine the value that VLOOKUP will return as its result.
Excel UDF: What is a User Defined Function?
With all these functions available in Excel, there still may be a time when none of them can do the calculation you want. Excel allows us to create our own custom functions using VBA. These custom functions in Excel are known as User Defined Functions (UDF for short). They allow you to code your own functions to do just about any type of operation.
Opening the Visual Basic Editor
To create an Excel UDF, you’re going to need to open up the Visual Basic Editor (VBE for short). There are a couple ways to open the VBE.
Opening the Visual Basic Editor from the Ribbon
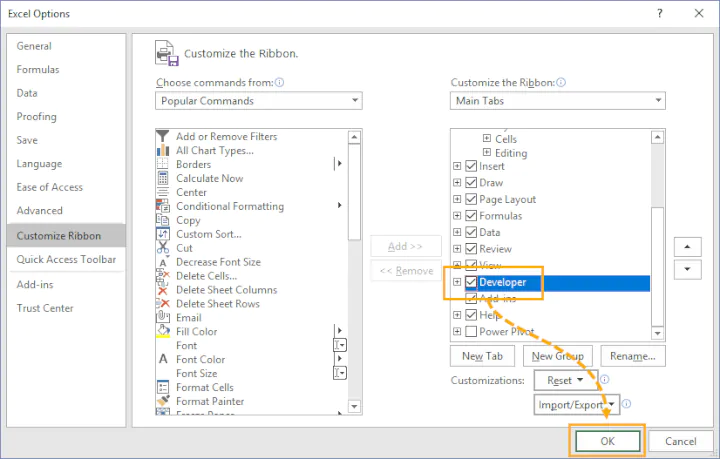
To open the VBE from the ribbon, you first need to enable the Developer tab. It’s hidden by default.
- Right-click anywhere in the ribbon.
- Select Customize Ribbon from the menu.
- In the resulting Excel Options window, check the box next to Developer listed in the Main Tabs area.
- Press the OK button.

You will now have a new tab featured in the Excel Ribbon. Click on the Developer tab then click on the Visual Basic icon to open the VBE.
Opening the Visual Basic Editor from the Quick Access Toolbar
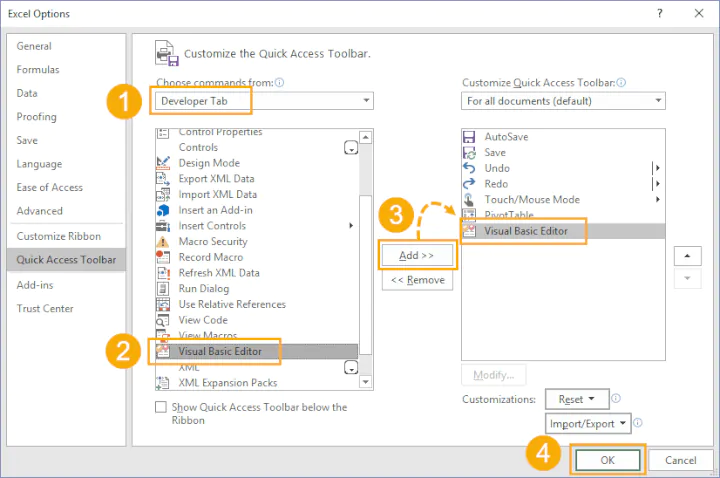
To open the VBE from the Quick Access Toolbar (QAT), you first need to add it to the QAT.
- Right-click anywhere in the Excel ribbon.
- Select Customize Quick Access Toolbar from the menu.
- In the Excel Options window, select the Developer Tab from the drop-down menu.
- Select the Visual Basic Editor command.
- Press the Add button to add the command to the QAT. You should now see it listed in the right-hand pane.
- Press the OK button.

The command will now appear in the QAT and you can click on the small icon to open the VBE.
Opening the Visual Basic Editor with a keyboard shortcut
The simplest way to open the VBE is with a keyboard shortcut. It’s quick and always available without messing around with customizing either the ribbon or the quick access toolbar. Press Alt + F11 on your keyboard to open up the VBE. Press Alt + F11 again when the VBE is open to switch back to Excel.
Inserting a Module to store your User Defined Functions
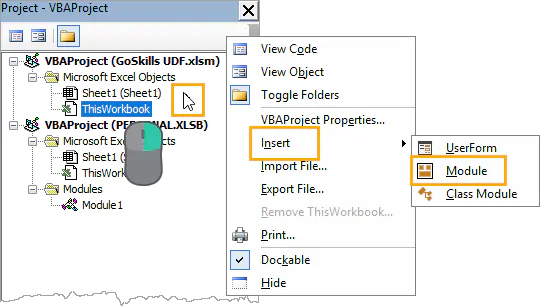
After opening the VBE, you’re going to need to add in a module. This is where you’re going to create any UDF’s in the workbook. Right-click within the VBA Project Explorer and select Insert then choose Module from the menu.
Creating your first User Defined Functions
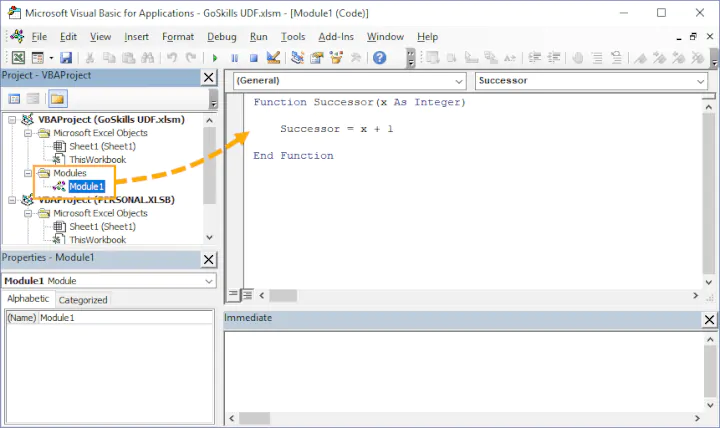
Now you can create your first user defined function. Let’s try creating our simple successor function example. Place the following code into the newly created module.
Function Successor(x As Integer)

    Successor = x + 1

End Function
Now, you can use this like any other Excel function in the workbook. Start with an equal sign like when creating a regular Excel function. When you start to type out the name of the UDF, it will appear in the function intellisense list like all the other functions.
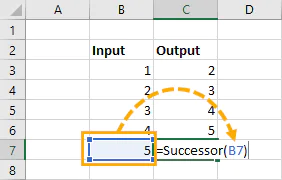
You can then reference any cell in the workbook as the input for the function. The cell which contains the function then returns the successor value.
Syntax of a User Defined Function
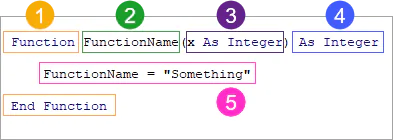
What is the syntax needed to create a UDF? There are 5 main parts:
- You need to declare the VBA code as a function. This means it has to start with the Function declaration and end with the End Function declaration.
- The function needs a name. You can use any name you want, but it can’t contain certain special characters like a space and you can’t use reserved names.
- The function will need some inputs. They are defined within parenthesis after the function name. This can be left empty as it’s possible to create a UDF with no inputs.
- You can declare the output data type of the function. This part is optional and if it’s omitted the function output will default to the Variant type.
- You will need to assign the function some sort of value to return.
Now that we know how to create a user defined function, let’s take a look at a few simple Excel user defined function examples that are actually useful.
Example #1: Get the sheet name from a referenced cell
Function SheetName(CellReference As Range)

    SheetName = CellReference.Parent.Name

End Function
While it’s possible to use a combination of functions to get the name of a worksheet, it’s definitely not an easy formula. This UDF is simple and easy to understand.
Example #2: Extract a comment from a cell
Function ExtractComment(CellReference As Range) As String

    ExtractComment = CellReference.Comment.Text

End Function
Getting the text out of a comment is a common issue, but there’s no Excel function to do this. The only way is to edit the comment then copy and paste the contents into Excel. You can use this UDF to extract and return the text of the comment for you.
Example #3: Does a file exist
Function DoesFileExist(FilePath As String) As Boolean

    DoesFileExist = Not (Dir(FilePath) = vbNullString)

End Function
With this user defined function you can tell if a file exists. This function will take a file path as a text string (complete file name) and return TRUE if the file exists at the specified location and FALSE if it doesn’t.
To see all of these examples in action, grab a sample workbook here: file download
Register a User Defined Function with Insert Function
Registering a UDF will allow you to add a description to appear in the Insert Function dialog box and categorize it with the other native Excel functions. This can be a handy way to document what your function does so that other users will know.
Sub RegisterMyFunction()

    Dim fnDesc As String
    fnDesc = "This function will return TRUE is the file exists and FALSE otherwise."

    'The various possible function categories
    '1  Financial
    '2  Date & Time
    '3  Maths & Trigonometry
    '4  Statistical
    '5  Lookup & Reference
    '6  Database
    '7  Text
    '8  Logical
    '9  Information
    '15 Engineering
    '16 Cube

    Application.MacroOptions macro:="DoesFileExist", Description:=fnDesc, Category:=9

End Sub
Place the above code in any module of the workbook and run it (Developer Tab > Macros > select the RegisterMyFunction macro > Run).
![]()
When you add a function to the workbook using the Insert Function command next to the formula bar, your UDF will appear in the resulting dialog box.

The Insert Function dialog box will show your UDF in the category selected. In our case we added the function to the Information category. The function syntax and description is also shown when the function is selected.
Creating a Volatile Function
Notice with the SheetName function from example #1, when you change the referred sheet’s name, the output of the function doesn’t update to the new name? This is because UDF’s only recalculate when a dependent cell is changed by default. If we want this function or any other UDF to update when anything is changed, we need to make it a volatile function by adding the Application.Volatile command to the UDF.
Saving the UDF in the Personal Macro Workbook
The UDF’s you create are only available for use in the workbook they were created in. If you try and use them in any other Excel workbook, they will return a #NAME? error since they are unknown to that workbook.
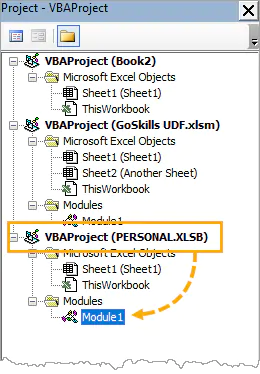
What if you want to use them in another workbook? You can do this by saving them in the personal macro workbook instead. Any VBA saved here will be available in any workbook you open up on your computer. Be aware though, anyone else that opens a workbook won’t have access to your personal macro workbook. Any UDF’s in the workbook that reference your personal macro workbook will return #NAME? errors for other users! This is one drawback of using the personal macro workbook over saving UDF in the workbook.
Conclusions
We learned what UDF are, how to create them, the syntax needed and looked at a couple useful examples. We also learned how to enhance the experience when using UDF’s by adding them to the Insert Function dialog box in a given category or turning them into volatile functions when needed.
User defined functions can be a great way to customize and extend the ability of Excel beyond Excel’s many native functions. If you’d like to learn more about creating powerful functions to automate your tasks, check out our Macros and VBA course.
Want to show off your advanced-level Excel skills? Get certified with a GoSkills Advanced Excel Certification.
Ready to start learning? Become an Excel ninja today with GoSkills

Ready to become a certified Excel ninja?
Start learning for free with GoSkills courses
Start free trial
Bottom Line: Learn how to create your own User Defined Function (UDF) when the function you need doesn’t exist in Excel.
Skill Level: Intermediate
Video Tutorial
Download the Excel File
I’ve attached my UDF examples from the video in the file below. You can view them by opening the VB Editor from the Developer tab.
Create Custom Functions in Excel
Excel is a fantastic tool with SO many capabilities and functions. But what do you do if the function you need isn’t already built in?
You write your own. When you create your own custom function for Excel, it’s called a UDF, a User Defined Function.
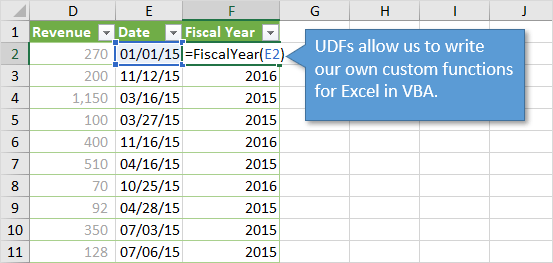
One example of a function that is not included in Excel is a function that returns the fiscal year. There are many ways to calculate the fiscal year from a date with existing functions in Excel. Here is one example for a fiscal year starting in October.
=IF(MONTH(E2)>=10,1,0)+YEAR(E2)
However, if this is a calculation you do often, you might want a shorter formula that is easier to write. So let’s write a UDF to create our own function that returns the fiscal year.
Example of a UDF for Excel
We’re going to create a Fiscal Year UDF for a company that has a fiscal year beginning in October.
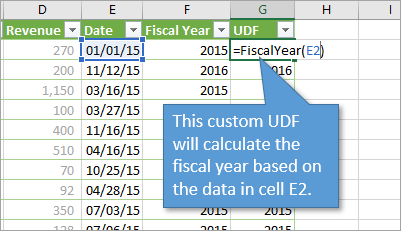
Like any other function, the UDF can be called from a cell formula. In this image, you can see that I’ve called a function named FiscalYear in order to calculate the fiscal year based on the date found in cell E2. If that date falls before October, it will return one value, and if it falls in or after October, we will get a different value.
Writing the Function in VBA
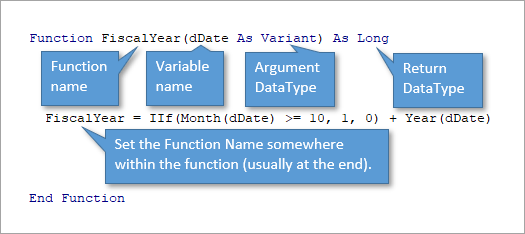
To write the function, go to the VB Editor and begin with the word Function. This will be followed by the function name, which you designate. In my example, I’ve called it FiscalYear. It can be any function name that isn’t already in use.
Next, open the parenthesis and specify the arguments. In my example I use dDate and then the data type is Variant because we might pass through text or other data that is not in date format. Then close the parenthesis.
Next, type “as” and specify the return data type. In this case, I use Long as the data type.
On the next line, we are going to set our function name. The function name always needs to be set somewhere within the function, usually at the end. For my example, I set the function like this: IIf (Month(dDate) >=10, 1, 0) + Year(dDate). This code basically tells Excel that if the date month is on or after October, use the next year as the fiscal year, and if not, leave it as the year that is found in the date.
So the entire function looks like this:
Here is the code that you can copy and paste:
Function FiscalYear(dDate As Variant) As Long
FiscalYear = IIf(Month(dDate) >= 10, 1, 0) + Year(dDate)
End Function
Syntax Guide
I’ve created a syntax guide to help you remember the order of the function’s components.

Advanced Options for UDFs
The example we just looked at is fairly straightforward. However, User Defined Functions in VBA can have multiple lines of code.
For example, if we want to add a bit of error-handling to our code so that we get the words “Date not specified” anytime the function passes through data that isn’t in date format, the code would look something like this:
Private Function FiscalYear2(dDate As Variant) As VariantDim vTemp As Variant  If IsDate(dDate) Then
    vTemp = IIf(Month(dDate) >= 10, 1, 0) + Year(dDate)
  Else
    vTemp = "Date not specified"
  End If    FiscalYear2 = vTemp  End Function
Multiple and Optional Parameters
UDFs that you create can also have multiple arguments as well as optional arguments.
For example, in the code below, I’ve added the Optional keyword so that the iStartMo argument becomes optional and does not need to be specified.
I also added an If statement to handle the scenario when the iStartMo argument is not specified. In this case the value of the variable will be zero if it is not specified since that is the default for the Long integer data type.
The If statement will change the value to 13 if it is not specified and this will calculate a fiscal year that starts in January.
The point is that you will typically need to handle the cases when the user doesn’t specify a variable if you have Optional arguments.
Function FiscalYear4(dDate As Variant, Optional iStartMo As Long) As Long If iStartMo = 0 Then
iStartMo = 13
End If
FiscalYear4 = IIf(Month(dDate) >= iStartMo, 1, 0) + Year(dDate)
End Function
Private Functions
You can also add the word “Private” before “Function” if you don’t want your UDF to be shown in the autofill dropdown menu that Excel provides when you start to type a function name.
Making a function private doesn’t mean other users cannot use it; it just means that they won’t see it as an option in the list.
Stepping Through the Code
You can add a Breakpoint anywhere in the function to pause the code and step through it.
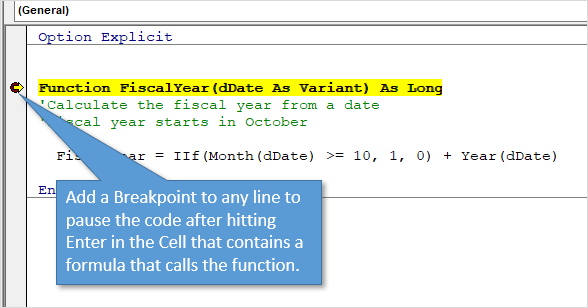
After adding the Breakpoint (keyboard shortcut: F9), go to any cell in Excel that calls the function, edit the cell, then press Enter. This will run the VBA code and pause at the line where you placed the Breakpoint.
You can then step through the code line-by-line with the F8 key to evaluate it.
Pros and Cons of UDFs
Pros
- Custom Functions in VBA help to simplify complex formulas. It’s much easier to call a function than to write, rewrite, or copy and paste entire formulas, especially when they are frequently used.
- UDFs can easily be copied to other workbooks.
- We are able to do some advanced error handling within our functions since we are customizing them to be exactly how we want them.
- The UDFs can be called from other macros, if needed.
Cons
- The function code has to be saved in the workbook that it is being used in. If you wanted to use the code in another workbook, you would have to copy the code into that workbook and save it as a macro-enabled file. If you don’t know how to copy or import code into other workbooks, you can reference this tutorial: How to Copy or Import VBA Code to Another Workbook.
- While it is possible to store the UDF in your Personal Macro Workbook or an Excel add-in, any other users who are trying to run those UDFs would have to have the same code in their Personal Macro Workbook or have the add-in installed. You also have to reference the Personal Macro Workbook when you call the function, which makes the process a little less simplified.
Here is the syntax if the function is in your PMW.=Personal.XLSB!FiscalYear(E4)
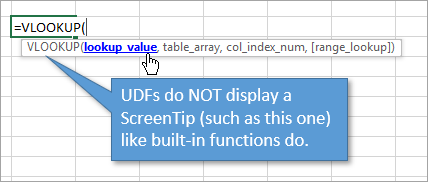
- For predefined functions, Excel provides a handy tool called a ScreenTip, which helps to walk you through each arguemnt of the function. When you create your own UDFs, you do not have the ScreenTip feature.
Conclusion
User Defined Functions are a great tool for simplifying formulas in Excel. They can also allow us to write simply functions for complex formulas, and perform calculations that can’t be achieved with built-in functions.
I hope this overview has been helpful in getting you started creating your own UDFs. In this tutorial, we only looked at creating a UDF for the purpose of defining a fiscal year, but as you can imagine, the applications are really limitless.
I’d love to hear how you plan to use (or are already using) UDFs for your projects in Excel. Write your thoughts in the comments so that we can all learn from each other. Please leave a comment with questions as well.
Thanks! 🙂

Excel UDF aka. User Defined Functions are somewhat of an underappreciated feature in Excel in my own opinion. With the recent announcement and release of the Excel LAMBDA function it almost seems like only now are we able to create our own Excel functions – leveraging on a combination of already existing Excel functions.
Let me start with explaining what Excel User Defined Functions (UDF) are.
Excel User Defined Functions are custom VBA Functions that can be made public and available as regular Excel built-in functions.
Why use Excel User Defined Functions (UDF)?
An UDF (User Defined Function) allows you to write a full-blown Macro function leverage on features that are otherwise not available via regular functions like Loops, usage of Objects likes Collections, Regular Expressions (Regex) etc. In some cases an UDF might even make more sense just because an equivalent Excel formula might be simply to complex to right (see nested IF inside nested IF….). What is more you can always Debug your UDF code instead of having to do guess work on what is failing in your Excel formula.
Pros and Cons of Excel UDF
The Pros

Excel User Defined functions have a lot of benefits worth mentioning.
Simplify complex Excel Functions
Excel formulas can be very messy and there is no code formatting in Excel. As VBA is basically a full-blown IDE for programming. You can leverage code indentation and formatting to make your code more clear manage. Additionally you can break your code down into multiple sub-functions to further reduce abstraction.
Debug / Find errors more easily
Excel formulas in cells can’t be debugged, they can only be evaluated. Meanwhile Excel Custom UDF functions allow you to easily debug your code line by line making it very easy to find mistakes and improve. Additionally you can breakdown your UDF into multiple sub-functions to reduce the level of abstractions.
Reuse your UDF is other spreadsheets
Excel formulas are usually tailored for the job and for the spreadsheet. All your hard work usually goes to waste once you move to another spreadsheet. Now UDFs can easily be copied to other workbooks. First of all you can export VBA modules to BAS files which can then be easily imported into your next workbooks. Regardless of this however User Defined Functions by definition are written in a way that is usually agnostic of the underlying spreadsheet.
The additional benefit of User Defined Functions in Excel VBA is also the opportunity to reuse your UDF in other VBA Macros, while being able to easily test it on actual data in your spreadsheet.
Cons

Now Excel User Defined Functions are not perfect probably that is why Microsoft created the LAMBDA function. So let now list some of the cons of using Excel UDF functions.
Performance
The key setback when using Excel UDF is the performance difference. If you are not aware Excel formulas are run in parallel during a refresh i.e. Excel swings up a few processes to calculate the cells. With UDF only a single thread is running.
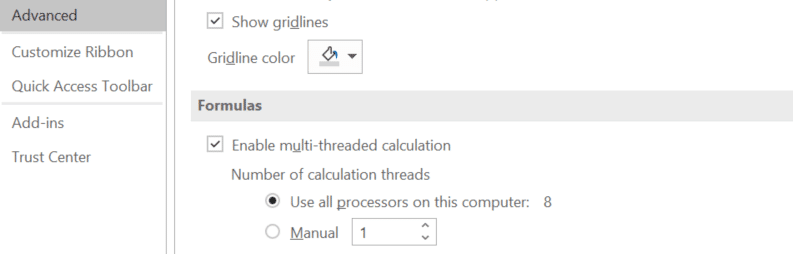
This might not usually be a big deal as probably you will notice the performance impact only when running very large files.
An Excel User Defined Function runs via VBA – hence it will not leverage on Excels multithreading capabilities and requires saving the file in a macro enabled format like XLSM
File format
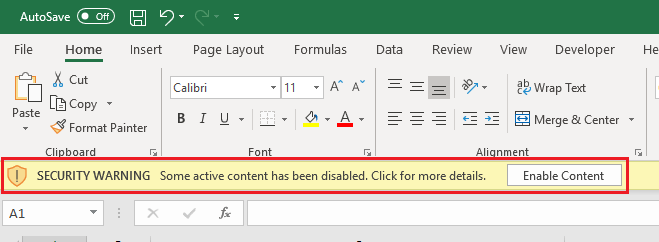
Using UDF means basically enabling Excel macros and that translates to having to save the file in a Macro enabled file format like XLSM or XLS/XLSB. When opening these files users might need to be warned they need to enable Macros – as Microsoft has included a security warning like below on all files including VBA Macros.
How to create a Excel UDF?
Now that I properly introduced what Excel User Defined Functions are it is time we show how to define them in Excel and how to use them. An Excel UDF function is not really that different from a regular VBA Function. The only difference it that it cannot be a Private function.
Any function in VBA is a potential “UDF” as long as it is not made Private
To create an UDF first open the VBA Developer ribbon, create a new Module and insert any new Function . See example below. The first example is a Custom UDF! The second function will not be. Why? As I preceded it with Private thus restricting access to it only within to the VBA Module.
'I am a UDF
Function SAY_HELLO1()
    SAY_HELLO = "Hello. I am an UDF"
End Function

'I am not an UDF
Private Function SAY_HELLO2()
    SAY_HELLO = "Hello. I am not a UDF"
End Function
Excel UDF Examples
The sky is the limit when using Excel User Defined Functions. You can leverage on the power of Excel VBA. Below are some examples – simple and more complex.
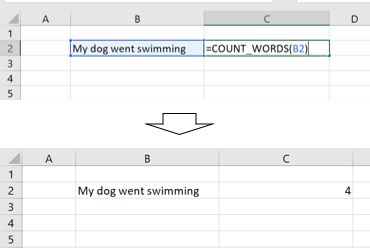
Example 1: Count words in a sentence
Below function will calculate the number of words separate by a space character.
Function COUNT_WORDS(r As Range)
    Dim s As Variant
    s = Split(r.Value, " ")
    COUNT_WORDS = UBound(s) - LBound(s) + 1
End Function
Notice I am using the VBA Split function which breaks down a string into an array of strings using a delimiter. Thanks to this the code is dead simple and short! In general User Defined Functions are great for complex text/string processing!
Example 2: Excel DateAdd Function
Ever struggled to do a simple date add operation in Excel. Well funny thing is that while VBA has a DateAdd function there isn’t such a function in Excel! However, thankfully we can simulate it using Excel User Defined Functions!
Function DATE_ADD(r As Range, c As String, add As Long) As Date
    DATE_ADD = DATEADD(c, add, r.Value)
End Function
Just one 3 lines of code! It is that simple! See example usage below.
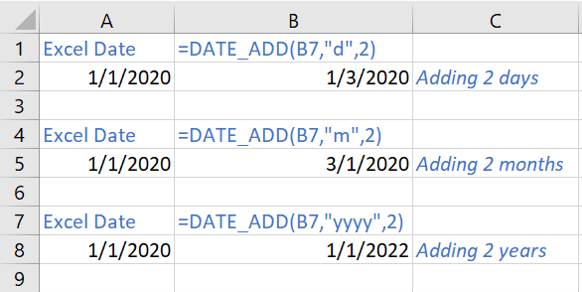
Conclusions
I hope you found this post interesting – let me know you thoughts in the comments. Go also checkout my Excel LAMBDA tutorial to see how else you will be able to create Custom Excel Functions without VBA.
With VBA, you can create a custom Function (also called a User Defined Function) that can be used in the worksheets just like regular functions.
These are helpful when the existing Excel functions are not enough. In such cases, you can create your own custom User Defined Function (UDF) to cater to your specific needs.
In this tutorial, I’ll cover everything about creating and using custom functions in VBA.
If you’re interested in learning VBA the easy way, check out my Online Excel VBA Training.
What is a Function Procedure in VBA?
A Function procedure is a VBA code that performs calculations and returns a value (or an array of values).
Using a Function procedure, you can create a function that you can use in the worksheet (just like any regular Excel function such as SUM or VLOOKUP).
When you have created a Function procedure using VBA, you can use it in three ways:
- As a formula in the worksheet, where it can take arguments as inputs and returns a value or an array of values.
- As a part of your VBA subroutine code or another Function code.
- In Conditional Formatting.
While there are already 450+ inbuilt Excel functions available in the worksheet, you may need a custom function if:
- The inbuilt functions can’t do what you want to get done. In this case, you can create a custom function based on your requirements.
- The inbuilt functions can get the work done but the formula is long and complicated. In this case, you can create a custom function that is easy to read and use.
Note that custom functions created using VBA can be significantly slower than the inbuilt functions. Hence, these are best suited for situations where you can’t get the result using the inbuilt functions.
Function Vs. Subroutine in VBA
A ‘Subroutine’ allows you to execute a set of code while a ‘Function’ returns a value (or an array of values).
To give you an example, if you have a list of numbers (both positive and negative), and you want to identify the negative numbers, here is what you can do with a function and a subroutine.
A subroutine can loop through each cell in the range and can highlight all the cells that have a negative value in it. In this case, the subroutine ends up changing the properties of the range object (by changing the color of the cells).
With a custom function, you can use it in a separate column and it can return a TRUE if the value in a cell is negative and FALSE if it’s positive. With a function, you can not change the object’s properties. This means that you can not change the color of the cell with a function itself (however, you can do it using conditional formatting with the custom function).
When you create a User Defined Function (UDF) using VBA, you can use that function in the worksheet just like any other function. I will cover more on this in the ‘Different Ways of Using a User Defined Function in Excel’ section.
Creating a Simple User Defined Function in VBA
Let me create a simple user-defined function in VBA and show you how it works.
The below code creates a function that will extract the numeric parts from an alphanumeric string.
Function GetNumeric(CellRef As String) as Long
Dim StringLength As Integer
StringLength = Len(CellRef)
For i = 1 To StringLength
If IsNumeric(Mid(CellRef, i, 1)) Then Result = Result & Mid(CellRef, i, 1)
Next i
GetNumeric = Result
End Function
When you have the above code in the module, you can use this function in the workbook.
Below is how this function – GetNumeric – can be used in Excel.
Now before I tell you how this function is created in VBA and how it works, there are a few things you should know:
- When you create a function in VBA, it becomes available in the entire workbook just like any other regular function.
- When you type the function name followed by the equal to sign, Excel will show you the name of the function in the list of matching functions. In the above example, when I entered =Get, Excel showed me a list that had my custom function.
I believe this is a good example when you can use VBA to create a simple-to-use function in Excel. You can do the same thing with a formula as well (as shown in this tutorial), but that becomes complicated and hard to understand. With this UDF, you only need to pass one argument and you get the result.
Anatomy of a User Defined Function in VBA
In the above section, I gave you the code and showed you how the UDF function works in a worksheet.
Now let’s deep dive and see how this function is created. You need to place the below code in a module in the VB Editor. I cover this topic in the section – ‘Where to put the VBA Code for a User-Defined Function’.
Function GetNumeric(CellRef As String) as Long
' This function extracts the numeric part from the string
Dim StringLength As Integer
StringLength = Len(CellRef)
For i = 1 To StringLength
If IsNumeric(Mid(CellRef, i, 1)) Then Result = Result & Mid(CellRef, i, 1)
Next i
GetNumeric = Result
End Function
The first line of the code starts with the word – Function.
This word tells VBA that our code is a function (and not a subroutine). The word Function is followed by the name of the function – GetNumeric. This is the name that we will be using in the worksheet to use this function.
- The name of the function cannot have spaces in it. Also, you can’t name a function if it clashes with the name of a cell reference. For example, you can not name the function ABC123 as it also refers to a cell in Excel worksheet.
- You shouldn’t give your function the same name as that of an existing function. If you do this, Excel would give preference to the in-built function.
- You can use an underscore if you want to separate words. For example, Get_Numeric is an acceptable name.
The function name is followed by some arguments in parenthesis. These are the arguments that our function would need from the user. These are just like the arguments that we need to supply to Excel’s inbuilt functions. For example in a COUNTIF function, there are two arguments (range and criteria)

Within the parenthesis, you need to specify the arguments.
In our example, there is only one argument – CellRef.
It’s also a good practice to specify what kind of argument the function expects. In this example, since we will be feeding the function a cell reference, we can specify the argument as a ‘Range’ type. If you don’t specify a data type, VBA would consider it to be a variant (which means you can use any data type).
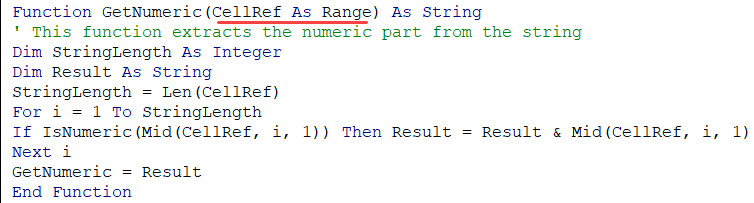
If you have more than one arguments, you can specify those in the same parenthesis – separated by a comma. We will see later in this tutorial on how to use multiple arguments in a user-defined function.
Note that the function is specified as the ‘String’ data type. This would tell VBA that the result of the formula would be of the String data type.
While I can use a numeric data type here (such as Long or Double), doing that would limit the range of numbers it can return. If I have a 20 number long string that I need to extract from the overall string, declaring the function as a Long or Double would give an error (as the number would be out of its range). Hence I have kept the function output data type as String.
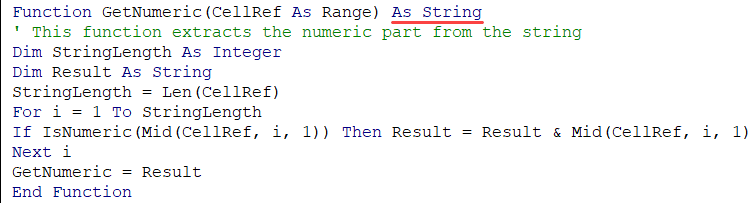
The second line of the code – the one in green that starts with an apostrophe – is a comment. When reading the code, VBA ignores this line. You can use this to add a description or a detail about the code.
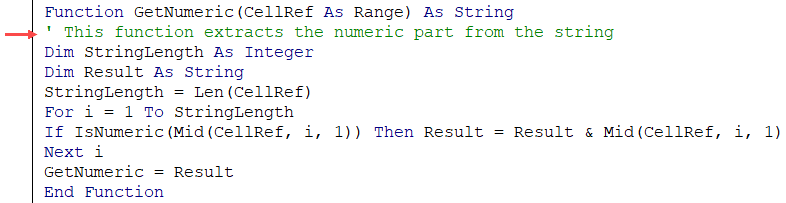
The third line of the code declares a variable ‘StringLength’ as an Integer data type. This is the variable where we store the value of the length of the string that is being analyzed by the formula.
The fourth line declares the variable Result as a String data type. This is the variable where we will extract the numbers from the alphanumeric string.

The fifth line assigns the length of the string in the input argument to the ‘StringLength’ variable. Note that ‘CellRef’ refers to the argument that will be given by the user while using the formula in the worksheet (or using it in VBA – which we will see later in this tutorial).
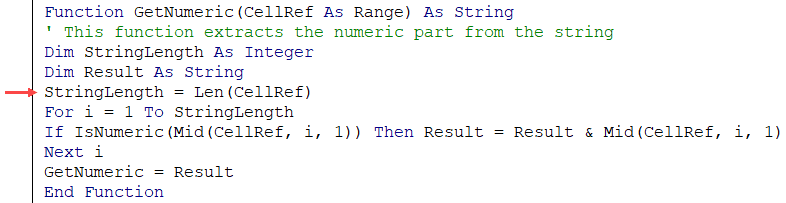
Sixth, seventh, and eighth lines are the part of the For Next loop. The loop runs for as many times as many characters are there in the input argument. This number is given by the LEN function and is assigned to the ‘StringLength’ variable.
So the loop runs from ‘1 to Stringlength’.
Within the loop, the IF statement analyzes each character of the string and if it’s numeric, it adds that numeric character to the Result variable. It uses the MID function in VBA to do this.
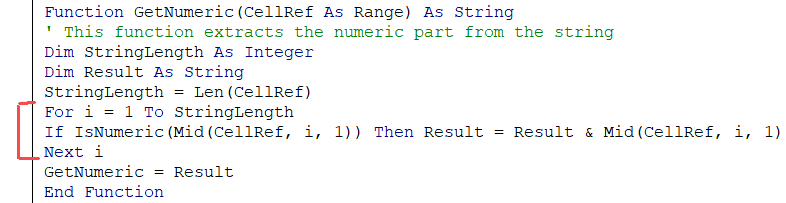
The second last line of the code assigns the value of the result to the function. It’s this line of code that ensures that the function returns the ‘Result’ value back in the cell (from where it’s called).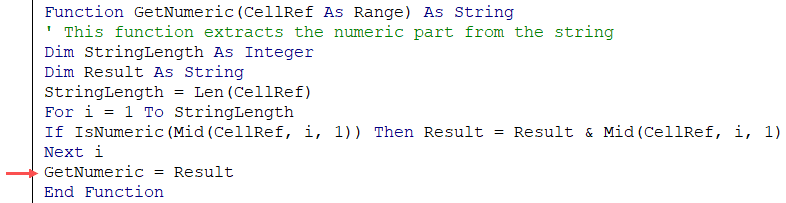
The last line of the code is End Function. This is a mandatory line of code that tells VBA that the function code ends here.
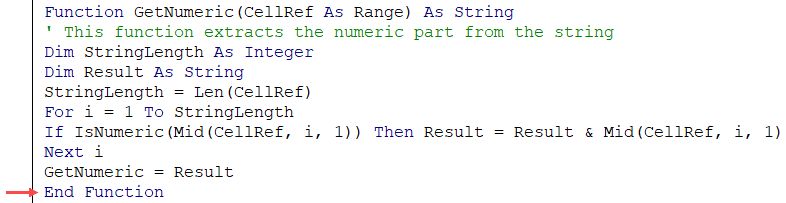
The above code explains the different parts of a typical custom function created in VBA. In the following sections, we will deep dive into these elements and also see the different ways to execute the VBA function in Excel.
Arguments in a User Defined Function in VBA
In the above examples, where we created a user-defined function to get the numeric part from an alphanumeric string (GetNumeric), the function was designed to take one single argument.
In this section, I will cover how to create functions that take no argument to the ones that take multiple arguments (required as well as optional arguments).
Creating a Function in VBA without Any Arguments
In Excel worksheet, we have several functions that take no arguments (such as RAND, TODAY, NOW).
These functions are not dependent on any input arguments. For example, the TODAY function would return the current date and the RAND function would return a random number between 0 and 1.
You can create such similar function in VBA as well.
Below is the code that will give you the name of the file. It doesn’t take any arguments as the result it needs to return is not dependent on any argument.
Function WorkbookName() As String
WorkbookName = ThisWorkbook.Name
End Function
The above code specifies the function’s result as a String data type (as the result we want is the file name – which is a string).
This function assigns the value of ‘ThisWorkbook.Name’ to the function, which is returned when the function is used in the worksheet.
If the file has been saved, it returns the name with the file extension, else it simply gives the name.
The above has one issue though.
If the file name changes, it wouldn’t automatically update. Normally a function refreshes whenever there is a change in the input arguments. But since there are no arguments in this function, the function doesn’t recalculate (even if you change the name of the workbook, close it and then reopen again).
If you want, you can force a recalculation by using the keyboard shortcut – Control + Alt + F9.
To make the formula recalculate whenever there is a change in the worksheet, you need to a line of code to it.
The below code makes the function recalculate whenever there is a change in the worksheet (just like other similar worksheet functions such as TODAY or RAND function).
Function WorkbookName() As String
Application.Volatile True
WorkbookName = ThisWorkbook.Name
End Function
Now, if you change the workbook name, this function would update whenever there is any change in the worksheet or when you reopen this workbook.
Creating a Function in VBA with One Argument
In one of the sections above, we have already seen how to create a function that takes only one argument (the GetNumeric function covered above).
Let’s create another simple function that takes only one argument.
Function created with the below code would convert the referenced text into uppercase. Now we already have a function for it in Excel, and this function is just to show you how it works. If you have to do this, it’s better to use the inbuilt UPPER function.
Function ConvertToUpperCase(CellRef As Range)
ConvertToUpperCase = UCase(CellRef)
End Function
This function uses the UCase function in VBA to change the value of the CellRef variable. It then assigns the value to the function ConvertToUpperCase.
Since this function takes an argument, we don’t need to use the Application.Volatile part here. As soon as the argument changes, the function would automatically update.
Creating a Function in VBA with Multiple Arguments
Just like worksheet functions, you can create functions in VBA that takes multiple arguments.
The below code would create a function that will extract the text before the specified delimiter. It takes two arguments – the cell reference that has the text string, and the delimiter.
Function GetDataBeforeDelimiter(CellRef As Range, Delim As String) as String
Dim Result As String
Dim DelimPosition As Integer
DelimPosition = InStr(1, CellRef, Delim, vbBinaryCompare) - 1
Result = Left(CellRef, DelimPosition)
GetDataBeforeDelimiter = Result
End Function
When you need to use more than one argument in a user-defined function, you can have all the arguments in the parenthesis, separated by a comma.
Note that for each argument, you can specify a data type. In the above example, ‘CellRef’ has been declared as a range datatype and ‘Delim’ has been declared as a String data type. If you don’t specify any data type, VBA considers these are a variant data type.
When you use the above function in the worksheet, you need to give the cell reference that has the text as the first argument and the delimiter character(s) in double quotes as the second argument.
It then checks for the position of the delimiter using the INSTR function in VBA. This position is then used to extract all the characters before the delimiter (using the LEFT function).
Finally, it assigns the result to the function.
This formula is far from perfect. For example, if you enter a delimiter that is not found in the text, it would give an error. Now you can use the IFERROR function in the worksheet to get rid of the errors, or you can use the below code that returns the entire text when it can’t find the delimiter.
Function GetDataBeforeDelimiter(CellRef As Range, Delim As String) as String
Dim Result As String
Dim DelimPosition As Integer
DelimPosition = InStr(1, CellRef, Delim, vbBinaryCompare) - 1
If DelimPosition < 0 Then DelimPosition = Len(CellRef)
Result = Left(CellRef, DelimPosition)
GetDataBeforeDelimiter = Result
End Function
We can further optimize this function.
If you enter the text (from which you want to extract the part before the delimiter) directly in the function, it would give you an error. Go ahead.. try it!
This happens as we have specified the ‘CellRef’ as a range data type.
Or, if you want the delimiter to be in a cell and use the cell reference instead of hard coding it in the formula, you can’t do that with the above code. It’s because the Delim has been declared as a string datatype.
If you want the function to have the flexibility to accept direct text input or cell references from the user, you need to remove the data type declaration. This would end up making the argument as a variant data type, which can take any type of argument and process it.
The below code would do this:
Function GetDataBeforeDelimiter(CellRef, Delim) As String
Dim Result As String
Dim DelimPosition As Integer
DelimPosition = InStr(1, CellRef, Delim, vbBinaryCompare) - 1
If DelimPosition < 0 Then DelimPosition = Len(CellRef)
Result = Left(CellRef, DelimPosition)
GetDataBeforeDelimiter = Result
End Function
Creating a Function in VBA with Optional Arguments
There are many functions in Excel where some of the arguments are optional.
For example, the legendary VLOOKUP function has 3 mandatory arguments and one optional argument.
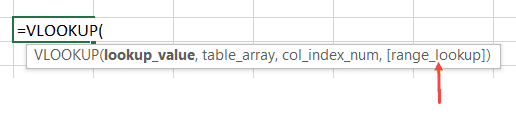
An optional argument, as the name suggests, is optional to specify. If you don’t specify one of the mandatory arguments, your function is going to give you an error, but if you don’t specify the optional argument, your function would work.
But optional arguments are not useless. They allow you to choose from a range of options.
For example, in the VLOOKUP function, if you don’t specify the fourth argument, VLOOKUP does an approximate lookup and if you specify the last argument as FALSE (or 0), then it does an exact match.
Remember that the optional arguments must always come after all the required arguments. You can’t have optional arguments at the beginning.
Now let’s see how to create a function in VBA with optional arguments.
Function with Only an Optional Argument
As far as I know, there is no inbuilt function that takes optional arguments only (I can be wrong here, but I can’t think of any such function).
But we can create one with VBA.
Below is the code of the function that will give you the current date in the dd-mm-yyyy format if you don’t enter any argument (i.e. leave it blank), and in “dd mmmm, yyyy” format if you enter anything as the argument (i.e., anything so that the argument is not blank).
Function CurrDate(Optional fmt As Variant)
Dim Result
If IsMissing(fmt) Then
CurrDate = Format(Date, "dd-mm-yyyy")
Else
CurrDate = Format(Date, "dd mmmm, yyyy")
End If
End Function
Note that the above function uses ‘IsMissing’ to check whether the argument is missing or not. To use the IsMissing function, your optional argument must be of the variant data type.
The above function works no matter what you enter as the argument. In the code, we only check if the optional argument is supplied or not.
You can make this more robust by taking only specific values as arguments and showing an error in rest of the cases (as shown in the below code).
Function CurrDate(Optional fmt As Variant)
Dim Result
If IsMissing(fmt) Then
CurrDate = Format(Date, "dd-mm-yyyy")
ElseIf fmt = 1 Then
CurrDate = Format(Date, "dd mmmm, yyyy")
Else
CurrDate = CVErr(xlErrValue)
End If
End Function
The above code creates a function that shows the date in the “dd-mm-yyyy” format if no argument is supplied, and in “dd mmmm,yyyy” format when the argument is 1. It gives an error in all other cases.
Function with Required as well as Optional Arguments
We have already seen a code that extracts the numeric part from a string.
Now let’s have a look at a similar example that takes both required as well as optional arguments.
The below code creates a function that extracts the text part from a string. If the optional argument is TRUE, it gives the result in uppercase, and if the optional argument is FALSE or is omitted, it gives the result as is.
Function GetText(CellRef As Range, Optional TextCase = False) As String
Dim StringLength As Integer
Dim Result As String
StringLength = Len(CellRef)
For i = 1 To StringLength
If Not (IsNumeric(Mid(CellRef, i, 1))) Then Result = Result & Mid(CellRef, i, 1)
Next i
If TextCase = True Then Result = UCase(Result)
GetText = Result
End Function
Note that in the above code, we have initialized the value of ‘TextCase’ as False (look within the parenthesis in the first line).
By doing this, we have ensured that the optional argument starts with the default value, which is FALSE. If the user specifies the value as TRUE, the function returns the text in upper case, and if the user specifies the optional argument as FALSE or omits it, then the text returned is as is.
Creating a Function in VBA with an Array as the Argument
So far we have seen examples of creating a function with Optional/Required arguments – where these arguments were a single value.
You can also create a function that can take an array as the argument. In Excel worksheet functions, there are many functions that take array arguments, such as SUM, VLOOKUP, SUMIF, COUNTIF, etc.
Below is the code that creates a function that gives the sum of all the even numbers in the specified range of the cells.
Function AddEven(CellRef as Range)
 Dim Cell As Range
 For Each Cell In CellRef
 If IsNumeric(Cell.Value) Then
 If Cell.Value Mod 2 = 0 Then
 Result = Result + Cell.Value
 End If
 End If
 Next Cell
 AddEven = Result
 End Function
You can use this function in the worksheet and provide the range of cells that have the numbers as the argument. The function would return a single value – the sum of all the even numbers (as shown below).
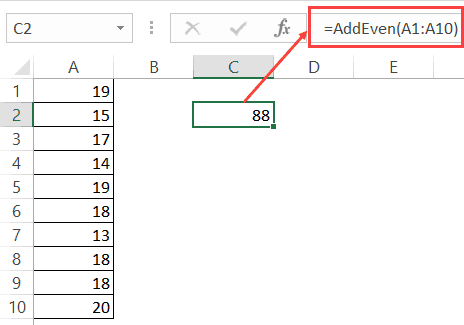
In the above function, instead of a single value, we have supplied an array (A1:A10). For this to work, you need to make sure your data type of the argument can accept an array.
In the code above, I specified the argument CellRef as Range (which can take an array as the input). You can also use the variant data type here.
In the code, there is a For Each loop that goes through each cell and checks if it’s a number of not. If it isn’t, nothing happens and it moves to the next cell. If it’s a number, it checks if it’s even or not (by using the MOD function).
In the end, all the even numbers are added and teh sum is assigned back to the function.
Creating a Function with Indefinite Number of Arguments
While creating some functions in VBA, you may not know the exact number of arguments that a user wants to supply. So the need is to create a function that can accept as many arguments are supplied and use these to return the result.
An example of such worksheet function is the SUM function. You can supply multiple arguments to it (such as this):
=SUM(A1,A2:A4,B1:B20)
The above function would add the values in all these arguments. Also, note that these can be a single cell or an array of cells.
You can create such a function in VBA by having the last argument (or it could be the only argument) as optional. Also, this optional argument should be preceded by the keyword ‘ParamArray’.
‘ParamArray’ is a modifier that allows you to accept as many arguments as you want. Note that using the word ParamArray before an argument makes the argument optional. However, you don’t need to use the word Optional here.
Now let’s create a function that can accept an arbitrary number of arguments and would add all the numbers in the specified arguments:
Function AddArguments(ParamArray arglist() As Variant)
For Each arg In arglist
AddArguments = AddArguments + arg
Next arg
End Function
The above function can take any number of arguments and add these arguments to give the result.
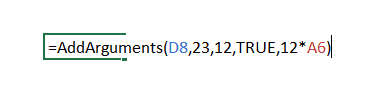
Note that you can only use a single value, a cell reference, a boolean, or an expression as the argument. You can not supply an array as the argument. For example, if one of your arguments is D8:D10, this formula would give you an error.
If you want to be able to use both multi-cell arguments you need to use the below code:
Function AddArguments(ParamArray arglist() As Variant)
For Each arg In arglist
For Each Cell In arg
AddArguments = AddArguments + Cell
Next Cell
Next arg
End Function
Note that this formula works with multiple cells and array references, however, it can not process hardcoded values or expressions. You can create a more robust function by checking and treating these conditions, but that’s not the intent here.
The intent here is to show you how ParamArray works so you can allow an indefinite number of arguments in the function. In case you want a better function than the one created by the above code, use the SUM function in the worksheet.
Creating a Function that Returns an Array
So far we have seen functions that return a single value.
With VBA, you can create a function that returns a variant that can contain an entire array of values.
Array formulas are also available as inbuilt functions in Excel worksheets. If you’re familiar with array formulas in Excel, you would know that these are entered using Control + Shift + Enter (instead of just the Enter). You can read more about array formulas here. If you don’t know about array formulas, don’t worry, keep reading.
Let’s create a formula that returns an array of three numbers (1,2,3).
The below code would do this.
Function ThreeNumbers() As Variant
Dim NumberValue(1 To 3)
NumberValue(1) = 1
NumberValue(2) = 2
NumberValue(3) = 3
ThreeNumbers = NumberValue
End Function
In the above code, we have specified the ‘ThreeNumbers’ function as a variant. This allows it to hold an array of values.
The variable ‘NumberValue’ is declared as an array with 3 elements. It holds the three values and assigns it to the ‘ThreeNumbers’ function.
You can use this function in the worksheet by entering the function and hitting the Control + Shift + Enter key (hold the Control and the Shift keys and then press Enter).
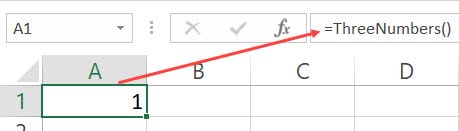
When you do this, it will return 1 in the cell, but in reality, it holds all the three values. To check this, use the below formula:
=MAX(ThreeNumbers())
Use the above function with Control + Shift + Enter. You will notice that the result is now 3, as it is the largest values in the array returned by the Max function, which gets the three numbers as the result of our user-defined function – ThreeNumbers.
You can use the same technique to create a function that returns an array of Month Names as shown by the below code:
Function Months() As Variant
Dim MonthName(1 To 12)
MonthName(1) = "January"
MonthName(2) = "February"
MonthName(3) = "March"
MonthName(4) = "April"
MonthName(5) = "May"
MonthName(6) = "June"
MonthName(7) = "July"
MonthName(8) = "August"
MonthName(9) = "September"
MonthName(10) = "October"
MonthName(11) = "November"
MonthName(12) = "December"
Months = MonthName
End Function
Now when you enter the function =Months() in Excel worksheet and use Control + Shift + Enter, it will return the entire array of month names. Note that you see only January in the cell as that is the first value in the array. This does not mean that the array is only returning one value.
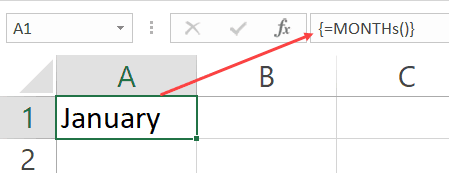
To show you the fact that it is returning all the values, do this – select the cell with the formula, go to the formula bar, select the entire formula and press F9. This will show you all the values that the function returns.

You can use this by using the below INDEX formula to get a list of all the month names in one go.
=INDEX(Months(),ROW())
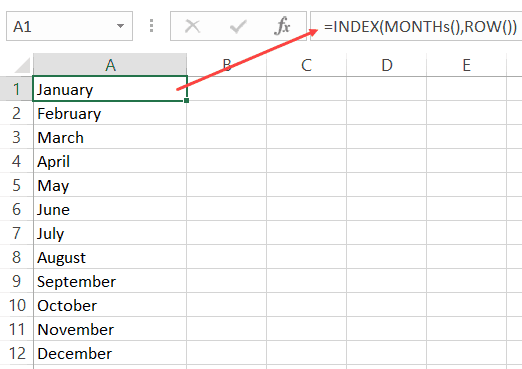
Now if you have a lot of values, it’s not a good practice to assign these values one by one (as we have done above). Instead, you can use the Array function in VBA.
So the same code where we create the ‘Months’ function would become shorter as shown below:
Function Months() As Variant
Months = Array("January", "February", "March", "April", "May", "June", _
"July", "August", "September", "October", "November", "December")
End Function
The above function uses the Array function to assign the values directly to the function.
Note that all the functions created above return a horizontal array of values. This means that if you select 12 horizontal cells (let’s say A1:L1), and enter the =Months() formula in cell A1, it will give you all the month names.

But what if you want these values in a vertical range of cells.
You can do this by using the TRANSPOSE formula in the worksheet.
Simply select 12 vertical cells (contiguous), and enter the below formula.
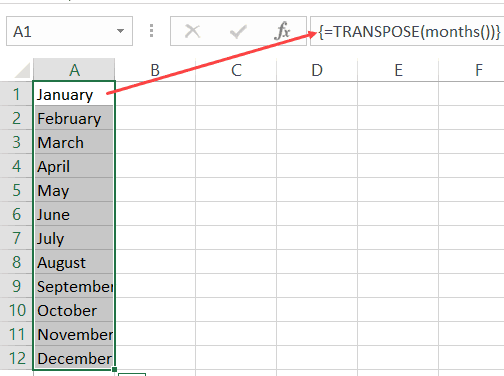
Understanding the Scope of a User Defined Function in Excel
A function can have two scopes – Public or Private.
- A Public scope means that the function is available for all the sheets in the workbook as well as all the procedures (Sub and Function) across all modules in the workbook. This is useful when you want to call a function from a subroutine (we will see how this is done in the next section).
- A Private scope means that the function is available only in the module in which it exists. You can’t use it in other modules. You also won’t see it in the list of functions in the worksheet. For example, if your Function name is ‘Months()’, and you type function in Excel (after the = sign), it will not show you the function name. You can, however, still, use it if you enter the formula name.
If you don’t specify anything, the function is a Public function by default.
Below is a function that is a Private function:
Private Function WorkbookName() As String
WorkbookName = ThisWorkbook.Name
End Function
You can use this function in the subroutines and the procedures in the same modules, but can’t use it in other modules. This function would also not show up in the worksheet.
The below code would make this function Public. It will also show up in the worksheet.
Function WorkbookName() As String
WorkbookName = ThisWorkbook.Name
End Function
Different Ways of Using a User Defined Function in Excel
Once you have created a user-defined function in VBA, you can use it in many different ways.
Let’s first cover how to use the functions in the worksheet.
Using UDFs in Worksheets
We have already seen examples of using a function created in VBA in the worksheet.
All you need to do is enter the functions name, and it shows up in the intellisense.
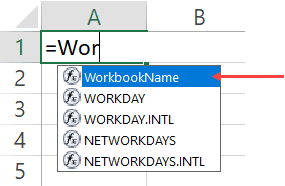
Note that for the function to show up in the worksheet, it must be a Public function (as explained in the section above).
You can also use the Insert Function dialog box to insert the user defined function (using the steps below). This would work only for functions that are Public.
The above steps would insert the function in the worksheet. It also displays a Function Arguments dialog box that will give you details on the arguments and the result.
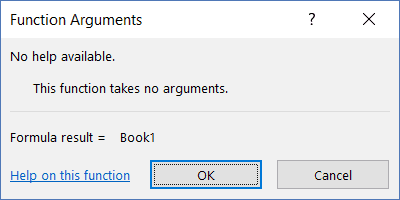
You can use a user defined function just like any other function in Excel. This also means that you can use it with other inbuilt Excel functions. For example. the below formula would give the name of the workbook in upper case:
=UPPER(WorkbookName())
Using User Defined Functions in VBA Procedures and Functions
When you have created a function, you can use it in other sub-procedures as well.
If the function is Public, it can be used in any procedure in the same or different module. If it’s Private, it can only be used in the same module.
Below is a function that returns the name of the workbook.
Function WorkbookName() As String
WorkbookName = ThisWorkbook.Name
End Function
The below procedure call the function and then display the name in a message box.
Sub ShowWorkbookName()
MsgBox WorkbookName
End Sub
You can also call a function from another function.
In the below codes, the first code returns the name of the workbook, and the second one returns the name in uppercase by calling the first function.
Function WorkbookName() As String
WorkbookName = ThisWorkbook.Name
End Function
Function WorkbookNameinUpper()
WorkbookNameinUpper = UCase(WorkbookName)
End Function
Calling a User Defined Function from Other Workbooks
If you have a function in a workbook, you can call this function in other workbooks as well.
There are multiple ways to do this:
- Creating an Add-in
- Saving function in the Personal Macro Workbook
- Referencing the function from another workbook.
Creating an Add-in
By creating and installing an add-in, you will have the custom function in it available in all the workbooks.
Suppose you have created a custom function – ‘GetNumeric’ and you want it in all the workbooks. To do this, create a new workbook and have the function code in a module in this new workbook.
Now follow the steps below to save it as an add-in and then install it in Excel.
Now the add-in has been activated.
Now you can use the custom function in all the workbooks.
Saving the Function in Personal Macro Workbook
A Personal Macro Workbook is a hidden workbook in your system that opens whenever you open the Excel application.
It’s a place where you can store macro codes and then access these macros from any workbook. It’s a great place to store those macros that you want to use often.
By default, there is no personal macro workbook in your Excel. You need to create it by recording a macro and saving it in the Personal macro workbook.
You can find the detailed steps on how to create and save macros in the personal macro workbook here.
Referencing the function from another workbook
While the first two methods (creating an add-in and using personal macro workbook) would work in all situations, if you want to reference the function from another workbook, that workbook needs to be open.
Suppose you have a workbook with the name ‘Workbook with Formula’, and it has the function with the name ‘GetNumeric’.
To use this function in another workbook (while the Workbook with Formula is open), you can use the below formula:
=’Workbook with Formula’!GetNumeric(A1)
The above formula will use the user defined function in the Workbook with Formula file and give you the result.
Note that since the workbook name has spaces, you need to enclose it in single quotes.
Using Exit Function Statement VBA
If you want to exit a function while the code is running, you can do that by using the ‘Exit Function’ statement.
The below code would extract the first three numeric characters from an alphanumeric text string. As soon as it gets the three characters, the function ends and returns the result.
Function GetNumericFirstThree(CellRef As Range) As Long
Dim StringLength As Integer
StringLength = Len(CellRef)
For i = 1 To StringLength
If J = 3 Then Exit Function
If IsNumeric(Mid(CellRef, i, 1)) Then
J = J + 1
Result = Result & Mid(CellRef, i, 1)
GetNumericFirstThree = Result
End If
Next i
End Function
The above function checks for the number of characters that are numeric, and when it gets 3 numeric characters, it Exits the function in the next loop.
Debugging a User Defined Function
There are a few techniques you can use while debugging a user-defined function in VBA:
Debugging a Custom Function by Using the Message Box
Use MsgBox function to show a message box with a specific value.
The value you display can be based on what you want to test. For example, if you want to check if the code is getting executed or not, any message would work, and if you want to check whether the loops are working or not, you can display a specific value or the loop counter.
Debugging a Custom Function by Setting the Breakpoint
Set a breakpoint to be able to go step through each line one at a time. To set a breakpoint, select the line where you want it and press F9, or click on the gray vertical area which is left to the code lines. Any of these methods would insert a breakpoint (you will see a red dot in the gray area).
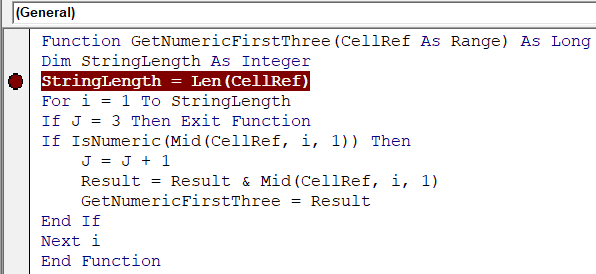
Once you have set the breakpoint and you execute the function, it goes till the breakpoint line and then stops. Now you can step through the code using the F8 key. Pressing F8 once moves to the next line in the code.
Debugging a Custom Function by Using Debug.Print in the Code
You can use Debug.Print statement in your code to get the values of the specified variables/arguments in the immediate window.
For example, in the below code, I have used Debug.Print to get the value of two variables – ‘j’ and ‘Result’
Function GetNumericFirstThree(CellRef As Range) As Long
Dim StringLength As Integer
StringLength = Len(CellRef)
For i = 1 To StringLength
If J = 3 Then Exit Function
If IsNumeric(Mid(CellRef, i, 1)) Then
 J = J + 1
 Result = Result & Mid(CellRef, i, 1)
 Debug.Print J, Result
 GetNumericFirstThree = Result
End If
Next i
End Function
When this code is executed, it shows the following in the immediate window.
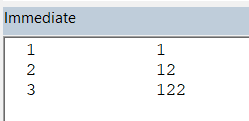
Excel Inbuilt Functions Vs. VBA User Defined Function
There are few strong benefits of using Excel in-built functions over custom functions created in VBA.
- Inbuilt functions are a lot faster than the VBA functions.
- When you create a report/dashboard using VBA functions, and you send it to a client/colleague, they wouldn’t have to worry about whether the macros are enabled or not. In some cases, clients/customers get scared by seeing a warning in the yellow bar (which simply asks them to enable macros).
- With inbuilt Excel functions, you don’t need to worry about file extensions. If you have macros or user-defined functions in the workbook, you need to save it in .xlsm.
While there are many strong reasons to use Excel in-built functions, in a few cases, you’re better off using a user-defined function.
- It’s better to use a user-defined function if your inbuilt formula is huge and complicated. This becomes even more relevant when you need someone else to update the formulas. For example, if you have a huge formula made up of many different functions, even changing a reference to a cell can be tedious and error-prone. Instead, you can create a custom function that only takes one or two arguments and does all the heavy lifting the backend.
- When you have to get something done that can not be done by Excel inbuilt functions. An example of this can be when you want to extract all the numeric characters from a string. In such cases, the benefit of using a user-defined function gar outweighs its negatives.
Where to put the VBA Code for a User-Defined Function
When creating a custom function, you need to put the code in the code window for the workbook in which you want the function.
Below are the steps to put the code for the ‘GetNumeric’ function in the workbook.
- Go to the Developer tab.

- Click on the Visual Basic option. This will open the VB editor in the backend.
- In the Project Explorer pane in the VB Editor, right-click on any object for the workbook in which you want to insert the code. If you don’t see the Project Explorer go to the View tab and click on Project Explorer.
- Go to Insert and click on Module. This will insert a module object for your workbook.

- Copy and paste the code in the module window.


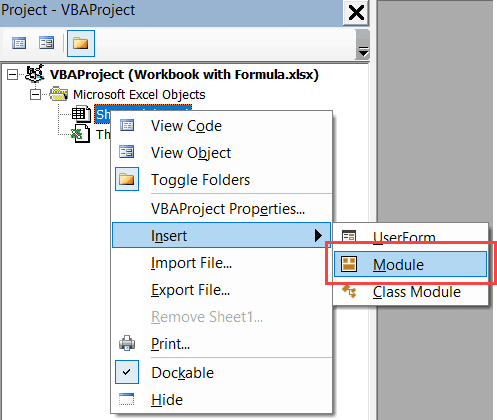

You May Also Like the Following Excel VBA Tutorials:
- Working with Cells and Ranges in Excel VBA.
- Working with Worksheets in Excel VBA.
- Working with Workbooks using VBA.
- How to use Loops in Excel VBA.
- Excel VBA Events – An Easy (and Complete) Guide
- Using IF Then Else Statements in VBA.
- How to Record a Macro in Excel.
- How to Run a Macro in Excel.
- How to Sort Data in Excel using VBA (A Step-by-Step Guide).
- Excel VBA InStr Function – Explained with Examples.
U
ser Defined functions (UDF) is also known as Custom Functions (formulas) in Excel. So far, I have created many different User Defined Functions for different purposes but never told you about How to create Custom Functions in Excel in a systematic way.. Therefore in this article I am going to teach you Step by step procedure to create your own Custom formula in Excel.
What is User Defined Function in Excel (UDF) ?
With the name it is very clear that this is a function which is defined by users 😀 . Though, Excel has thousands of Built-in formulas which makes our job lot easier. Still, sometimes while working we feel..I wish… I had a simple excel formula to do this. Your wish come true by this feature of Excel called – UDF (User Defined Function).
Therefore such functions which are defined by users for their own tasks, are called as User Defined Functions (UDF). They are also called Custom Functions.. Once they are defined in your workbook, they exactly work like a Built-in formula of Excel.
4 Simple Steps to create User Defined Functions in Excel
Follow the below steps to create your own User Defined Function:
Step 1.
Open your Workbook
Step 2.
Press ALT+F11 to Open VBE (Visual Basic Editor) of the Workbook
Step 3.
Add a Module as shown below

Step 4.
This is the step where exactly you are going to write your function.
Your function should have the following format:
Public Function FunctionName (parameter1 As type1, parameter2 As type2,….) As returnType
….. lines of code to calculate result
FunctionName = result
End Function
Important Points to Note
While writing your function make sure you follow below points:
1. A User Defined function should Start with a FUNCTION Statement
2. Function Statement usually specifies few Parameters based on the requirement. It is not mandatory though.
3. DO NOT forget to assign the result of the function (which you would like to see as a result of the formula in the Cell) in to a variable name same as the Function Name.
Note: 3rd POINT IS VERY IMPORTANT TO DISPLAY THE RESULT IN THE CELL WHERE FORMULA IS WRITTEN. IF VARIABLE NAME AND FUNCTION NAME IS NOT SAME THEN YOU WILL FIND NO RESULT IN THE CELL
Yes, you are done. Now you know how to create a custom function in excel. This was theory part.. now learn it by doing it with the following example.
Example: How to Create Custom Function
I will take an example from my previous article to explain this – UDF – to get Word Count Excel Formula.
'********************************************************
'** Cell is a veriable of a Range Type. It means user  **
'** is allowed to select a cell address as input.Value **
'** Value of that cell is used for getting the word    **
'** count.                                             **
'**  -----------------------------------------------   **
'** Result of this Function is passed in a variable    **
'** of the same name as the Function - GetWordCount    **
'********************************************************
Public Function GetWordCount(Cell As Range) As Integer
    GetWordCount = UBound(VBA.Split(Cell.Value, " ")) + 1
End Function
Explanation : How it Works ?
1. As soon as you type =GetWordCount in any cell of the same Workbook then excel will look in to the module, if there is any function defined with the same name. Excel will display the function name as soon as you start typing the Function Name as shown in beloe picture:

2. Once found then this function will get triggered.
3. Result of the function will be shown in the cell ONLY IF the variable name is same as the Function. This is important. Otherwise this function will be executed and result will be calculated but user will not be able to see any result in the cell.
List of User Defined Functions Created
You can read about some more examples and Downloadable files about User Defined Function
Probably one of the coolest benefits of learning VBA is the ability to create your own functions.
In Excel, there are more than 450 functions, and some of them are highly useful in your daily work. But Excel gives you the ability to create a custom function using VBA. Yes, you get it right. USER DEFINED Function, in short UDF, or you can also call it a Custom VBA function.
And there’s one thing that I can say with confidence every aspiring VBA user wants to learn to create a User Defined Function. Don’t you? Say “Yes” in the comment section, if you are one of those people who want to create a custom function.
I’m excited to tell you that this is a COMPLETE GUIDE to help you to create your first custom function using VBA and apart from this I have shared some examples of USER-DEFINED Functions to help you to get inspired.
- Here I’ll be using the words User Defined Function, custom function, and UDF interchangeably. So stay with me you are going to be a VBA rock star in the next couple of minutes.
- To create a code for the VBA custom function you need to write it, you can’t record it using the macro recorder.
Why You Should Create a Custom Excel Function
As I said, there are a lot of in-built functions in Excel which can help you to solve almost all the problems and do all kinds of calculations. But, sometimes, in specific situations, you need to create a UDF.
And, below I have listed some of the reasons or situations in which you need to go with a custom function.
1. When there is no Function for this
This is one of the common reasons for creating a UDF with VBA, because sometimes that you need to calculate something and there is no specific function for this. I can give you an example of counting words from a cell and for this, I found a UDF can be a perfect solution.

2. Replace a Complex Formula
If you work with formulas, I’m sure you know this thing that complex formulas are hard to read and sometimes harder to understand by others. So a custom function can a solution to this problem because once you create a UDF you don’t need to write that complex formula again and again.

3. When you don’t want to use SUB Routine
While you can use a VBA code to perform a calculation but VBA codes are not dynamic*. You need to run that code again if you want to update your calculation. But if you convert that code into a function then you don’t need to run that code again and again as you can simply insert it as a function.
How to Create Your First User Defined Function in Excel
OK so look. I have split the entire process into three steps:
- Declaring your Procedure as a Function
- Defining its Arguments and their Data Type
- Add code to Calculate the Desired Value
But let me give you can:
You need to create a function that can return the name of the day from a date value. Well, we have a function that returns the day number for the week but not the name. You got it what I’m saying? Yes?
So, let’s follow the below steps to create your first user-defined function:
- First of all, open your visual basic editor by using the shortcut key ALT + F11 or go to Developer Tab and simply click on the “Visual Basic” button.

- The next thing is to insert a module, so right-click on the VBA project window and then go to insert, and after that click “Module”. (ALERT: You need to enter a USER DEFINED FUNCTION only into standard modules. Sheet and ThisWorkbook modules both are a special type of module and if you enter a UDF in these two modules, Excel does not recognize that you are creating a UDF).
- The third thing is to define a name for the function and here I’m using “myDayName”. So you must write “Function mydayName”. Why Function before the Name? As you are creating a VBA function so the using the word “Function” tells Excel to treat this code as a function (make sure to read the scope of a UDF ahead in the post).
- After that, you need to define arguments for your function. So insert starting parentheses and write “InputDate As Date”. Here InputDate is the Argument’s name and date is its data type. It’s always better to define a data type for the argument.
- Now, close the parentheses and write “As String”. Here you are defining the data type of the result returns by the function and as you want day name which is a text so its data type should be as “String”. If you want to have the result which is other than a string make sure to define its data type according to that. (Function myDayName(InputDate As Date) As String).
- In the end, hit ENTER. At this point, your function’s name, its argument, argument’s data type, and function’s data type is defined and you have something like below in your module:
- Now within the “Function” and “End Function”, you need to define the calculation or you can say working of this UDF. In Excel, there is a worksheet function called “Text” and we are using the same here. And for this, you need to write the below code and with this code, you are defining the value which should be returned by the function. myDayName = WorksheetFunction.Text(InputDate, “dddddd”)
- Now, close your VB editor and go back to the worksheet and in the cell B2, enter “=myDayName(A2)” hit enter and you’ll have the day name.


Congratulations! You have just created your first User Defined Function. This is the moment of real Joy. Isn’t it? Type “Joy” in the comment section.
How this Function Works and Return Value in a Cell
Your first custom function is here, but the thing is, you need to understand how it works. If I say in simple words, it’s a VBA code but you have used it as a function procedure. Let’s divide it into three parts:
- You enter it in a Cell as Function and Specify the Input Value.
- Excel runs the code behind the function and uses the value which you have referred to.
- You got the result in the cell.
But you need to understand how this function works from inside. So I have split the entire process into three different parts where you can see how the code which you have written for the function actually works.

As you have specified “InputDate” as the argument for the function and when you enter the function in the cell and specify a date, VBA takes that date value and supply it to the text function which you have used in the code.
And in the example which I have mentioned above, the date you have in the cell A1 is 01-Jan-2019.
After that, the TEXT function converts that date into a day using the format code “dddddd” which you have already mentioned in the function code. And that day which is returns by the TEXT function is assigned to the “myDayName”.
So if the result of the TEXT function is Tuesday that value will be assigned to the “myDayName”.
And here the working of the function comes to an end. “myDayName” is the name of the function so any value is which is assigned to “myDayName” will be the result value and the function which you have inserted in the worksheet will return it in the cell.
When you write a code for a custom function there one thing you need to take care that the value which that code return must be assigned to the function’s name.
How to Improve a UDF for Good
Well, you know how to create a custom VBA function.
Now…
There’s one thing you need to take care that the code you have used to function should be good enough to handle all the possibilities. If you talk about the function which you just wrote above can return the day name from a date.
But…
What if the value you have specified will not a date? And if the cell you have referred is blank? There can be other possibilities but I’m sure you got my point.
Right? So, let’s try to improve this custom function which could be able to deal with the above problems. Alright. First of all, you need to change the data type of the argument and use:
InputDate As VariantWith this, your custom function can take any kind of data type as input. Next, we need to use VBA IF statement to check InputDate for some conditions. The first condition is if the cell is blank or not. And for this, you need to use below code:
If InputDate = "" Then
myDayName = ""
This will make the function return blank if the cell you have referred is blank.
One problem is solved, let’s get into the next one. Other than a date there are possibilities that you can have a number or a text. So, for this, you also need to create a condition which should check whether the value referred is an actual date or not.
The code would be:
If IsDate(InputDate) = False Then
myDateName = ""
Here I’m using a blank for both of the conditions, so that if you have large data, you could easily filter values where the input value is not valid. So, after adding the above conditions, the code would look like:
Function myDayName(InputDate As Variant) As String
If InputDate = "" Then
myDayName = ""
Else
If IsDate(InputDate) = False Then
myDateName = ""
Else
myDayName = WorksheetFunction.Text(InputDate, "dddddd")
End If
End If
End Function
And here’s how it works now: I’m sure you can still make some changes in this function but I’m sure you got my point clearly.
How to use a Custom VBA Function
At this point, you’re pretty much clear about how you can create a VBA function in Excel. But once you have it, you need to know how you can use it. And in this part of the post, I’m going to share with you how and where you can use it. So, let’s jump into it.
1. Simply within a Worksheet
Why we create a custom function? Simple. To use it in the worksheet. You can simply enter a UDF in a worksheet by using equal sign and type name of the function and then specify it’s arguments.

You can also enter a user defined function from the function library. Go to Formula Tab ➜ Insert Function ➜ User Defined.

From this list, you can choose the UDF you want to insert.
2. Using in other Sub Procedures and Functions
You can also use a function within other functions or in a “Sub” procedure. Below is a VBA code where you have used the function to get day name for the current date.
Sub todayDay()
MsgBox "Today is " & myDayName(Date)
End Sub
Make sure to read “Scope of a UDF” ahead in this post to learn more on using a function in other procedures.
3. Accessing Functions from Other Workbook
If you have a UDF in one workbook and you want to use it in another workbook or in all the workbooks, you do it by making an add-in for it. Follow these simple steps:
- First of all, to you need to save the file (in which you have the custom function code) as an add-in.
- For this, go to the File Tab ➜ Save As ➜ “Excel Add-Ins (.xalm).

- After that, double-click on the add-in you and install it.

That’s it. Now you can use all of your VBA functions in any of the workbook.
Different Ways to Create a Custom VBA Function [Advanced Level]
At this point, you know about to create a custom function in VBA. But the thing is when we use In-Built functions, they come with different type of arguments.
So in this section of this guide, you gonna learn how to create a UDF with the different type of arguments.
- Without Any Arguments
- With Just One Argument
- With Multiple Arguments
- Using Array as the Argument
…let’s move ahead.
1. Without Any Arguments
Do you remember about functions like NOW and TODAY where you don’t need to enter any argument?
Yes. You can create a User Defined Function where you don’t need to enter an argument. Let’s do it with an example:
Let’s create a custom function which can return the location of the current file. And here’s the code:
Function myPath() As String
Dim myLocation As String
Dim myName As String
myLocation = ActiveWorkbook.FullName
myName = ActiveWorkbook.Name
If myLocation = myName Then
myPath = "File is not saved yet."
Else
myPath = myLocation
End If
End Function
This function returns the path of the location where the current file is stored and if the workbook is not stored anywhere, it will show a message says “File is not saved yet”.

Now, if you pay close attention to the code of this function, you don’t have defined any argument (within the bracket). You have just defined the data type for the function’s result.
The basic rule of creating a function without argument is a code where you don’t need to input anything.
In simple words, the value you want to have in return from the function should be calculated automatically.
And in this function, you have the same thing.
This code ActiveWorkbook.FullName returns the location of the file and this one ActiveWorkbook.Name returns the name. You don’t need to input anything.
2. With Just One Argument
We have already covered this thing while learning how to create a user-defined function. But let’s dig a bit deeper and create a different function. This is the function which I had created a few months back to extract URL from a hyperlink.
Function giveMeURL(rng As Range) As String
On Error Resume Next
giveMeURL = rng.Hyperlinks(1).Address
End Function
Now in this function, you have just one argument.

When you enter this in a cell and then specify the cell where you have a hyperlink, and it will return the URL from the hyperlink. Now in this function, the main work is done by:
rng.Hyperlinks(1).AddressBut the rng is what you need to specify. Say “Easy” in the comment section if you find creating a UDF easy.
3. With Multiple Arguments
Normally, most of the Excel’s In-Built Functions have multiple arguments. So it’s a must for you to learn how you create a custom function with multiple arguments.
Let’s take an example: You want to remove particular letters from a text string and want to have the rest of the part.
Well, you have functions like RIGHT and LEN which you are going to use in this custom function. But here we don’t need this. All we need is a custom function using VBA.
So, here’s the function:
Function removeFirstC(rng As String, cnt As Long) As String
removeFirstC = Right(rng, Len(rng) - cnt)
End Functio
OK so look:

In this function, you two arguments:
- rng: In this argument, you need to specify the cell from where you want to remove the first character of a text.
- cnt: And in the argument, you need to specify the count of the characters to remove (If you want to remove more than one character from the text).
When you enter it in a cell it works something like below:
3.1 Creating a User Defined Function with Optional as well as Required Argument
If you think about the function we have just created in the above example where you have two different arguments, well, both of them are required. And, if you miss any of these you’ll get an error like this.
Now if you think logically, the function we have created is to remove the first character. But here you need to specify the count of the characters to remove. So my point is this argument should be optional and must take one as a default value.
What do you think?
Say “Yes” in the comment section if you agree with me on this.
OK so look. To make an argument optional you just need to add “Optional” before it. Just like this:
But the important thing is to make your code to work with or without the value for that argument. So, our new code for the same function would be like this: Now in the code, if you skip specifying the second argument.
4. Using Array as the Argument
There are few In-built functions which can take arguments as an array and you can also make your custom VBA function to do this.
Let’s do with a simple example where you need to create a function where you sum values from a range where you have numbers and text. Here we go.
Function addNumbers(CellRef As Range)
Dim Cell As Range
For Each Cell In CellRef
If IsNumeric(Cell.Value) = True Then
Result = Result + Cell.Value
End If
Next Cell
addNumbers = Result
End Function
In the above code of the function, we have used an entire range A1:A10 instead of a single value or a cell reference.

By using FOR EACH loop, it will check every cell of the range and sum the value if the cell has a number in it.
The scope of a User Defined Function
In simple words, the scope of a function means if it can be called from other procedures or not. A UDF can have two different types of scopes.
1. Public
You can make your custom function public so that you can call it in all the worksheets of the workbook. To make a Function public you just need to use the word “Public”, just like below.

But a function is a public function by default if you don’t make it private. In all examples we have covered, all are public.
2. Private
When you make a function private you can use it in the procedures of the same module.

Let’s say if you have your UDF in “Module1” you can only use it in procedures you have in “Module1”. And it won’t appear in the function list of the worksheet (when you use = sign and try to type the name) but you can still use it by typing its name and specifying arguments.
Limitations of User Defined Function [UDF]
UDFs are super useful. But they are limited in some of the situations. Here are the few things which I want you to note down and remember while creating a custom function in VBA.
- You can’t change, delete, or format cells and a range by using a custom function.
- Also, can’t move, rename, delete, or add worksheets to a workbook.
- Make a change to another cell’s value.
- It also can’t make changes to any of the environment options,
…click here read more details from Microsoft’s website.
Is there any difference between an In-Built Function and a User Defined Function?
I’m glad you asked. Well, to answer this question I want to share some of the points which I believe are important for you to know.
- Slower Than In-Built: If you compare the speed of inbuilt functions and VBA function, you’ll find earlier is fast. The reason behind this is that the in-built functions are written using C++ or FORTRAN.
- Hard to Share Files: We often share files over email and cloud so if you are using any of the custom function you require to share that file in “xlam” format so that other person can also use your custom function.
But as I said above in “Why You Should Create a Custom Excel Function” there are some specific situations when you can go for a VBAcustom function.
Conclusion
Creating a User Defined Function is simple. All you need to do it use “Function” before the name to define it as a function, add arguments, define arguments data type and then define the data type for the return value.

In the end, add code to calculate the value which you want to get in return from the function. This guide which I have shared with your today is the simplest one to learn how to create a custom function in VBA and I’m sure you have found it useful.
But now, tell me one thing.
UDFs are useful, what do you think?
Please share your views with me in the comment section. I’d love to hear from you, and please, don’t forget to share this post with your friends, I am sure they will appreciate it.
- VBA Functions List – Explained with Examples
- How to Run a Macro in Excel
- How to use IF Statement in VBA
- How to Work with Ranges and Cells in VBA
- VBA Comment
- Add New Sheet using a VBA Code
VBA is one of the Advanced Excel Skills, and if you are getting started with VBA, make sure to check out there (What is VBA and Useful Macro Examples and VBA Codes).