
A toolbar is just a collection of icons that provides a shortcut to using the drop-down menu. Toolbars offer quick shortcuts to commonly used commands.When you first open Word there are two toolbars displayed, the Standard and Formatting toolbars.
Contents
- 1 Where is the toolbar on word?
- 2 How do I use the toolbar in Word?
- 3 What is toolbar and menu bar?
- 4 Why is my toolbar not showing in Word?
- 5 What is the function of the toolbar?
- 6 What is the difference between taskbar and toolbar?
- 7 Which toolbar is on the title bar?
- 8 How do I make my toolbar open in Word?
- 9 How do I get the toolbar back?
- 10 What are the two types of toolbar?
- 11 What is the role of toolbar in MS Word write different toolbars and their functions?
- 12 What are the tools in the toolbar?
- 13 What is standard toolbar?
- 14 What is menu bar short answer?
- 15 Why can’t I see my toolbar?
- 16 Why is my taskbar not working?
- 17 Where is the browser toolbar?
- 18 What is the toolbar across the top called?
- 19 Where is toolbar in Chrome?
- 20 What is formatting toolbar in MS Word?
Where is the toolbar on word?
Toolbars provide shortcuts to menu commands. Toolbars are generally located just below the Menu bar.
How do I use the toolbar in Word?
Click the appropriate ribbon tab to display the menu ribbon with the command you want to add to the “Quick Access” toolbar. Right-click the command you want to add to the toolbar. A popup menu will appear. Select “Add to Quick Access toolbar” on the popup menu.
What is toolbar and menu bar?
The toolbar, also called bar or standard toolbar, is a row of buttons, often near the top of an application window, that controls software functions. The boxes are below the menu bar and often contain images corresponding with the function they control, as demonstrated in the image below.
Why is my toolbar not showing in Word?
To restore the toolbars and menus, simply turn full-screen mode off. From within Word, press Alt-v (this will display the View menu), and then click Full-Screen Mode. You may need to restart Word for this change to take effect.
What is the function of the toolbar?
The toolbar, also called a bar or standard toolbar (originally known as ribbon) is a graphical control element on which on-screen icons can be used. A toolbar often allows for quick access to functions that are commonly in the program.
What is the difference between taskbar and toolbar?
is that toolbar is (graphical user interface) a row of buttons, usually marked with icons, used to activate the functions of an application or operating system while taskbar is (computing) the application desktop bar which is used to launch and monitor applications in microsoft windows 95 and later operating systems.
Which toolbar is on the title bar?
It lies next to the Quick Access Toolbar. It displays the title of the currently open document or application. It is present on almost all windows displayed on your computer.
How do I make my toolbar open in Word?
Press Ctrl+F1 (this is an on/off toggle). Double-click any of the tabs (Home, View, etc.). Right-click any of the tabs or the Quick Access Toolbar and uncheck “Minimize the ribbon”.
How do I get the toolbar back?
To do so:
- Click View (on Windows, press the Alt key first)
- Select Toolbars.
- Click a toolbar that you want to enable (e.g., Bookmarks Toolbar)
- Repeat for remaining toolbars if needed.
What are the two types of toolbar?
System toolbars. Application toolbars. User-defined toolbars.
What is the role of toolbar in MS Word write different toolbars and their functions?
The toolbar included in Microsoft Word permits us to open, print, and save documents and we can also change the style, font and size of the text. Just like several programs, we can customize the Word toolbar by adding or deleting the options. We can also move the toolbar to the various portions of the screen.
What are the tools in the toolbar?
2. The Standard Toolbar. The standard toolbar is shown in Figure 4-32. The Standard Toolbar gives the user access to file operations, printing, movement of data blocks, the undo system, and to some of the powerful tools like the function creator and the graphing system.
What is standard toolbar?
The Standard toolbar is located just below the menu bar. It contains buttons representing commands such as New, Open, Save, and Print.It contains buttons representing text modifying commands, such as font, text size, bold, numbering, and bullets.
A menu bar is a graphical control element which contains drop-down menus. The menu bar’s purpose is to supply a common housing for window- or application-specific menus which provide access to such functions as opening files, interacting with an application, or displaying help documentation or manuals.
Why can’t I see my toolbar?
Press the Windows key on the keyboard to bring up the Start Menu. This should also make the taskbar appear. Right-Click on the now-visible taskbar and select Taskbar Settings.The taskbar should now be permanently visible.
Why is my taskbar not working?
First Fix: Restart the Explorer Process
Restarting it can thus clear up any minor hiccups, such as your taskbar not working. To restart this process, press Ctrl + Shift + Esc to launch the Task Manager. Click More details at the bottom if you only see the simple window.Right-click it and choose Restart.
Where is the browser toolbar?
Where Is My Browser Toolbar? The browser toolbar is on the bottom of your web browser. Take Google Chrome as an example, you can see the extensions you have installed on your web browser and the bookmarks you save.
What is the toolbar across the top called?
Menu bar. This toolbar contains various commands that often lead to dialog menus (covered later on this page). Windows computers have this bar at the top of windows; Macs have this bar at the top of the screen instead.
Where is toolbar in Chrome?
How to get your toolbar back in Google Chrome
- Open Google Chrome.
- Select “More Tools” from the drop-down menu, toward the center of the list, and then “Extensions.”
- Find the extension you’d like to make visible on the toolbar again — it should have a small switch icon at the bottom-right of its box.
What is formatting toolbar in MS Word?
The formatting toolbar provides access to several text formatting functions such as font size and color, text alignment, lists, and the like.Makes the selected text italic. Makes the selected text underlined. Removes all formatting from the selected text.
In most programs and even in operating systems there are so-called standard Word toolbars. Well, believe it or not, it is one of the most useful , but least appreciated of all Word tools. Since from them a great variety of options and functions are triggered that are necessary to take advantage of 100% of said program.
But as with most things, we don’t have a very broad understanding of this one. That is why today in see how it is done we will give you a brief, but complete explanation about the standard Word toolbar. Also, what functions and parts does it have , so that you can make use of it.
Index( )
- What is the Microsoft Word toolbar for?
- What does it contain and what is the function of this toolbar?
- New
- Open
- Save
- Search
- To print
- Cut, copy and paste
- undo and redo
- zoom
- Aid
- What is the Word toolbar
- What is the toolbar for?
- What are the parts of the Word menu and what function does each one have?
- File, Archive
- Start
- Insert
- Design
- Provision
- References
- Correspondence
- Check
- View
- Aid
- How to use the bar or menu in Word?
- How to identify Word tools from the computer?
- How to know which is the Word options bar from my mobile?
What is the Microsoft Word toolbar for?
In general, people are always wondering why this menu is so important. And it is one of the parts with the most focus, since all the Word tools are seen here. This dialog box contains all the information and tasks that we can apply to the sheet. All in order to carry out an adequate job with the different tabs using the mouse.
What does it contain and what is the function of this toolbar?
Well, this Word toolbar has the information buttons and tabs used for all the so- called standard commands. One of the companies that has used it the most is Microsoft . However, it is not the only one, there are different operating systems that also use this tool or dialog box.
This, in general, Microsoft Word has a flat design to the point where our mouse is placed on one of the buttons. Taking this a more 3D aspect. Among the buttons, parts, menu, information, dialog box or options you have:
New
This is used to create a new blank document using a template as default. In this way a ” new file ” is obtained , which could soon be editable.
Open
This button tells us that from it it is possible to open any file that has already been created and use it within the software, if it is compatible with it.
Save
This is one of the simplest to explain, it serves to secure the document or file that you are working on, in this way it will not be lost when you close the program. If it is a new file, it will ask you to locate the folder in which you want to save it, but if you only modified the existing file, when you press the button this file will replace the previous one.
Search
From this section of the toolbar you will be able to search for any file or document that is recent or that you need to find easily. Also if you want you can remove or disable search bar.
To print
This button has a printer icon, and is used to directly print said document without even being able to see a preview of it (at least before), because today it is possible to verify the entire document.
Cut, copy and paste
These three points are one of the most used, because from them, you will be able to cut or copy a text and paste it in a different place.
Although these functions can be done using the keyboard, this Word toolbar is to simplify everything related to it.
undo and redo
Most of the programs have a list of the actions that we carry out in it, it is through them that it is possible to undo an error that has occurred or redo something that we liked, this is a very useful function.
zoom
You can add or add a Zoom button to your bar, this option will allow you to increase what is in the file, to be able to visualize much better, you can increase the view from 10% to 500%
Aid
This is one of the last options that this bar has, since it is necessary to receive help for whatever reason. There are other buttons with different functions such as tables, drawings, and columns, but their use is not as prominent in most programs, with the aforementioned being the most used functions in these standard Word tools.
What is the Word toolbar
This is nothing more than a tool that is represented on our screen in a linear way, either horizontally or vertically , which is found in most programs and operating systems , since from there it is possible to perform different functions.
This is widely used and also has different variants, which can become more comfortable. This Word toolbar has been used since the first operating system was installed, it is a tool that has endured over time.
What is the toolbar for?
This function is used to gain access to programs already installed or applications available in our operating system. This facilitates the search process and in turn minimizes the range of error in the search. Similarly, it is a shortcut to check the running tasks instantly.
What are the parts of the Word menu and what function does each one have?
In the first instance it is composed of the quick launch bar . This allows access to all the tabs installed in the operating system in a simpler and more organized way. Then there are the icons to access applications such as Google, Mozilla Firefox and the music player of our choice.
From that window you can also control the applications you have open and running. In case your PC gets stuck, this may be the solution to close the programs and avoid it.
File, Archive
In this Toolbar you will be able to create a new blank document using a template as default. This way you get a “new file” , which could then be editable.
Start
In this section you will have access to one of the most used tools in Word. Here you will find the option to create a new file , select the type of font you want to work with, the font size, the alignment required on your sheet, and options such as bold and underline, which are usually the most outstanding and common.
Insert
Here you can insert a series of useful elements for your work. Tables, covers, images, and even editions of the sheets as I leave the page and header. In addition to being able to divide the document into columns and sections according to your preference.
Design
In this Word toolbar, you will be able to configure document specifications. Elements that range from the background color of your sheet, the types of margins, the orientation of the document, and the organization of elements.
Provision
In this section you will get everything related to the layout of the text . Here you will find options such as setting page, paragraph and organize. In a definitive way, it is one of the essentials when giving the final touch of neatness to work.
References
Here, as the name suggests, you will get everything based on the text references. Author citations, index or footnotes. It is made up of elements such as: Table of contents, footnotes, research, citation and bibliography, indexes and title.
Correspondence
Word Toolbar designed for creating letters and envelopes . It facilitates its design and provides its measurements. It is composed of the menu: Create, write and insert fields, results preview and finish.
Check
Here you will find the options to improve the writing of a text. Options like: Review, Voice, Accessibility, Language, Comments, Tracking, Changes, Compare, Protect, and Ink.
View
From here you can find everything related to the document interface . In this section Microsoft Word gives options of: view, immersive, page movement, show, zoom, screen, macros and SharePoint.
Aid
As its name indicates, here you will find help through a search bar that corresponds to the program. And you can somehow or another clear any kind of doubt in one step.
How to use the bar or menu in Word?
The way to use the Word toolbar is very easy. You can use both mouse and keyboard commands. However, with the mouse it is much easier, since you only go to the tasks and menu with it.
How to identify Word tools from the computer?
Microsoft Word on computers has a toolbar at the top of the screen. Here the menu and tasks that you can use and use in order to carry out the work will be displayed.
How to know which is the Word options bar from my mobile?
If you are one of those who use it on mobile, this Word Toolbar is in a different part. This will be in a tab in the lower left area.
In this article, you will learn the different parts of Microsoft Word Windows 2019. This is a lesson – 03 of Microsoft Word. You may also read previous lessons to learn the complete Microsoft Word.
Microsoft Word is application software for writing texts, and different types of documents can be easily developed in a practical way.
In other words, it is a word processor that allows you to create and edit text. As long as you know what the parts of Microsoft Word are and what they are used for. With this software, the user will be able to write and design texts where they will be able to use different fonts, colors, and sizes, with the different commands of Word.
In this section, we will make references to the basic parts of Microsoft Word Windows 2019. This program is a part of the Microsoft Office package developed by Microsoft. Along with other programs, there is a number of visual appearances and program window layout that can make the work easier. Let’s understand the basic parts of Microsoft Word Windows 2019.
In the below screenshot, you can see and learn about the various important parts of Microsoft Word Windows. If you learn the name of these parts then you will be used easily MS word application.

Quick Access Toolbar:
This bar is one of the most important parts of Microsoft Word Windows 2019. It is also located at the top of the screen, in the left corner just above the File Tab. It is the place for the most frequently used commands. You can customize this Toolbar by clicking the little arrow that displays some more commands such as “New” which refers to opening a new document, “Open” which implies displaying a document that we have saved on our computer, “Undo” reverse the previous action or “Redo” do the action again, and “Save” to save the current document.
Title bar:
The title bar is also one of the parts of the Microsoft Word window. It is located at the center and top of the document window and shows the name of the program or document. There, when we open a Microsoft Word document, we can read the title as Document1 – Word. It refers to a general name displayed by the program software. When we save our document, we can replace that name with a personalized one related to our file.
In this bar, on the right side, there are three more buttons known as window controls. It allows to perform of three commands i.e., minimize, maximize, and close the document or file.
The 1st is the “X” icon that is used to close the window of the Microsoft Word document we are working on. And the 02nd component is a double box icon which is located in the center of the previous ones and used to maximize or enlarge the document. The 03rd icon is a dash “_” used to minimize the document we are working on.
File Tab:
In Microsoft Word 2019, the File tab replaces the Microsoft Office button from Word 2007. Microsoft Office button is the circular button that is located in some operating systems at the bottom and in others at the top, on the left side. You can click it to see the backstage view. In this tab, where you can see the previously opened or saved files, create a new document, print a document, and do other operations.
Ribbon of Microsoft Word:
The Ribbon is one of the basic parts of Microsoft Word widow and contains organized commands in three layers.
- Tabs or Menu: These are the horizontal menu that appears at the top of the Ribbon and contain groups of related commands, i.e., File, Home, Insert, Design, Layout, References, Mailings, Review, View, and Help are examples of ribbon tabs.
- Groups: These are the organized related commands displayed below each tab or menu. The name of each group appears below the group on the Ribbon. For example, a group of commands related to a paragraph or a group of commands related to the font, etc.
- Commands: Commands appear within each group as mentioned above. For example, when we press the “File” tab, some commands or functions such as “New”, “Open” “Save”, “Save as” etc. are displayed.
Rulers:
Microsoft Word has two rulers – one is a horizontal ruler and the second is a vertical ruler. The horizontal ruler seems just under the Ribbon. It is used to set the size of the margins and tab stop position of the document. The vertical ruler appears on the left side of the document window and is used to measure the vertical position of elements on the page.
Scrollbar:
It is one of the parts of MS Word widow, which is characterized by being a long bar that is generally located on the right side of the document. It consists of an open bar containing an arrow that allows the user to scroll up and down more quickly.
Help icon:
The Help Icon can be used to find online-related queries. This provides helpful tutorials on various functions and commands related to MS word.
Zoom Control Buttons:
The zoom slider allows you to resize the document to view it according to the user’s requirements. It allows you to zoom in or zoom out from 0% to 500% wide range. The zoom controls consist of a slider that you can slide left (zoom in) or right (zoom out); you can also click the plus or minus sign buttons to increase or minus decrease the zoom factor.
View Buttons:
It is a group of buttons located to the left of the Zoom control, and near the bottom of the screen. It lets you switch the various Word document views.
- Print Layout view− This view displays pages exactly as they will show in print.
- Read Mode− This displays a full-screen view of the document.
- Web Layout − This displays a document view that appears on a Web browser, such as Internet Explorer.
- Outline view− This lets you display your document in outline form. For this view, we will first create using Word’s standard heading styles.
- Draft view− This displays only the text of your document as it appears on the printed page. No headers and footers are shown in this view.
Document or Work Area:
If we open MS Word on the computer then we can see different parts of the MS Word window on the screen. The document or work area is the area where we can type documents, letters, memos, or simply communication will be developed. The vertical flashing bar is called Cursor and the insertion point represents the location where text can write. It is generally white and can see when we open the MS Word application. These allow giving width and flexibility to the document.
Status Bar:
It is located at the bottom of the document and displays the information related to the word document. From left to right, it shows the total number of pages, word count, language, translator, error notifications, and sections among other information.
In this bar, we can visualize the document we are working on in five ways, e.g. print layout, full-screen reading, web layout, and outline view.
Dialog Box Launcher:
We can see a small arrow in the lower-right corner of many groups on the Ribbon that display some commands. By clicking this arrow, the downward window will open that provides more options about the group.
Table of Contents
- What is mini toolbar in MS Word?
- How do I add the Open command to the Quick Access toolbar in Word?
- How do I access tools in Word?
- What are the tools in Microsoft Word?
- What is Microsoft Word menu bar?
- What is Microsoft Word toolbar?
- What is the difference between menu bar and toolbar?
- How many menu bars are there in Microsoft Word?
- What are the different types of toolbar in MS Word?
- What is the function of the quick access toolbar in Microsoft Word?
- What are the different types of tool bar?
- What is title bar?
- What is title bar short answer?
- Is present on the title bar?
- What is the use of title bar?
- What is a title bar and how is it helpful?
- What is the top bar on a computer screen called?
- Where is the title bar in Windows 10?
- How do I change the color of the menu bar in Windows 10?
- How do I change the color of the top bar in Windows 10?
- Which is not a part of title bar?
- Where is status bar located?
- Which button is present at right corner of title bar?
- What do we call the bar that displays the program name and file name?
- What does blue title bar indicate?
- What is the program name?
- Which bar is present at the bottom of Word 2010 window?
The mini toolbar appears whenever you right-click text in Word, Excel or PowerPoint. The mini toolbar provides a quick-access version of the Font group on the Home tab, plus a few extra buttons from other groups. Hover your mouse over each button to find out what it does.
Add commands to the Quick Access Toolbar
- Click Customize the Quick Access Toolbar, and then click More Commands.
- In the Choose commands from list, click File Tab.
- Choose the command, and then click Add.
- Remember to click OK.
So just going to the Tools drop down menu, you will view all familiar tools menu commands. Classic Menu for Office 2007 will bring Tools menu into Microsoft Word, Excel, PowerPoint, Outlook, and Access 2007.
- Indexes.
- Mail Merge.
- Microsoft Chart.
- Object Browser.
- Spelling and Grammar Checking.
- Thesaurus.
- Track Changes.
- Word Count.
The Menu bar is directly below the Title bar and it displays the menu. The menu begins with the word File and continues with Edit, View, Insert, Format, Tools, Table, Window, and Help. It demonstrates using the Microsoft Word menu.
A toolbar is a set of icons or buttons that are part of a software program’s interface or an open window. Microsoft Word has a toolbar with icons that allow you to open, save, and print documents, as well as change the font, text size, and style of the text. …
The Toolbar contains buttons for frequently-used commands. The Menu bar displays the available menus and commands. For detailed information on the commands, see Linecalc Menus and Commands.
one menu bar
The Standard and Formatting toolbars are the two most common toolbars in Microsoft Office 2000. The Standard toolbar is located just below the menu bar. It contains icons representing universal commands such as New, Open, and Save. The Formatting toolbar is located just below the Standard toolbar.
Quick Access Toolbar lies next to the Microsoft Office Button. It is a customizable toolbar that comes with a set of independent commands. It gives you quick access to commonly used commands such as Save, Undo, Redo, etc. When you click the drop-down arrow next to toolbar it offers more commands.
Toolbars differ from menu bars; menu bars tend to group similar commands that you need to click to access while toolbar commands are always visible.
- Application Toolbar. An application toolbar (appbar) works like the Windows taskbar.
- Quick access toolbar.
- Search Toolbar.
- Thumbnail Toolbar.
What is title bar?
A title bar is a small strip that extends across the top of a window. It displays the title of the window and typically includes the close, minimize, and maximize buttons. In macOS, these buttons are on the left side of the title bar, while in Windows, they are on the right.
What is title bar short answer?
The title bar is a horizontal bar located at the top of a window in a GUI. It displays the title of the software, name of the current document, or other text identifying the contents of that window.
Is present on the title bar?
A horizontal bar which is present at the top of your window is known as Title Bar. This bar shows the title of the software along with the name of the currently opened document.
What is the use of title bar?
The title bar at the top of a window displays an application-defined icon and line of text. The text specifies the name of the application and indicates the purpose of the window. The title bar also makes it possible for the user to move the window using a mouse or other pointing device.
What is a title bar and how is it helpful?
Title bar is a graphical control element and part of the window decoration. The title bar is typically used to display the name of the application, or the name of the open document, and may provide title bar buttons for minimizing, maximizing, closing or rolling up of application windows.
What is the top bar on a computer screen called?
Menu bar. This toolbar contains various commands that often lead to dialog menus (covered later on this page). Windows computers have this bar at the top of windows; Macs have this bar at the top of the screen instead. The options contained in this toolbar vary greatly from program to program. Title bar.
Where is the title bar in Windows 10?
The title bar is at the top of every window in Windows 10. This includes three buttons at the top right corner of the window and a title for each open window.
How to change taskbar color, while keeping Start and Action Center dark
- Open Settings.
- Click on Personalization.
- Click on Colors.
- Pick an accent color, which will be the color you want to use in the taskbar.
- Turn on the Show color on Start, taskbar, and action center toggle switch.
How do I change the color of the top bar in Windows 10?
Change title bar color via Settings in Windows 10
- Step 1: Navigate to Settings > Personalization > Colors.
- Step 2: Select Title bars and window borders checkbox.
- Step 3: To change the color, on the same page, either click on of the color tiles or click the Custom option to create a color of your choice.
Which is not a part of title bar?
Answer. Answer: Tips is not a part of Title Bar.
Where is status bar located?
A status bar is located at the bottom of Internet browser windows and many application windows and displays the current state of the web page or application being displayed.
Which button is present at right corner of title bar?
Explanation: Located on the far right side of the Title Bar, this middle button expands the program to a full screen.
What do we call the bar that displays the program name and file name?
Title bar
What does blue title bar indicate?
BLUE TITLE BAR : The title bar contains the name of the file or application. In many graphical user interfaces, including the Macintosh and Microsoft Windows interfaces, you move (drag) a window by grabbing the title bar.
What is the program name?
The name or title of a program consists of the degree (e.g., BS) and the discipline or field of study (e.g., Business Administration). It is also called academic program, degree program, or curricular program. A subject is a collection of topics that forms a coherent whole, intended to be taught by a faculty member.
Which bar is present at the bottom of Word 2010 window?
status bar
In this post, you’ll learn about the quick access tool bar in Word and how to use it in your Word document..
Quick Access Toolbar lies next to the Microsoft Office Button. It is a customizable toolbar that comes with a set of independent commands. It gives you quick access to commonly used commands such as Save, Undo, Redo, etc.
How to Customize the Microsoft Office Quick Access Toolbar
Quick Access Toolbar offers a variety of customization features. Let’s see them in detail.
Add a Command to the Quick Access Toolbar
To Add a Command to the Quick Access Toolbar.
- Click the down arrow button on the right side of the Quick Access Toolbar
![]()
- Select More Commands.
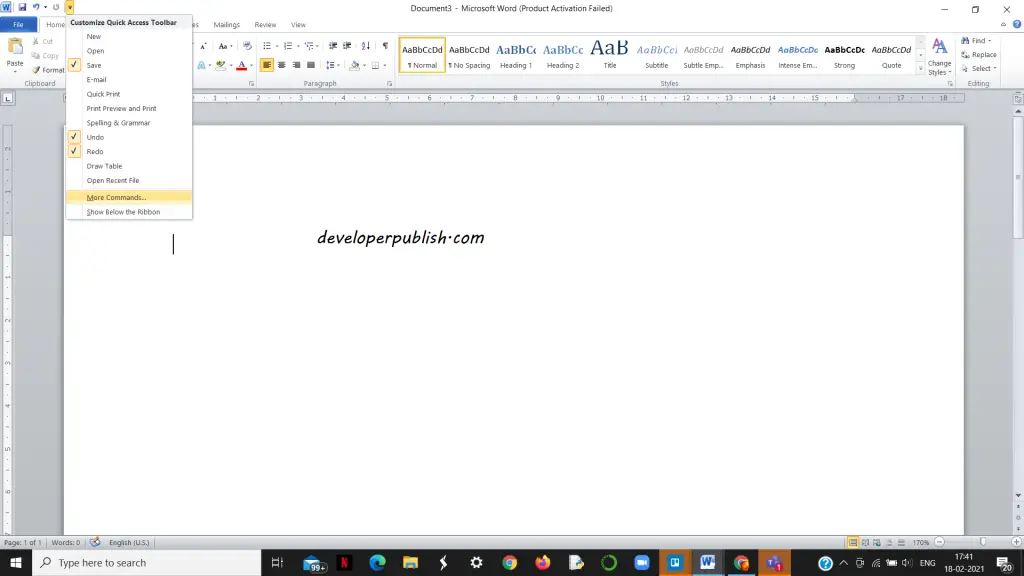
- You can also right-click on the ribbon and select Customize Quick Access Toolbar.
- The Options dialog box opens to the Customize the Quick Access Toolbar screen.
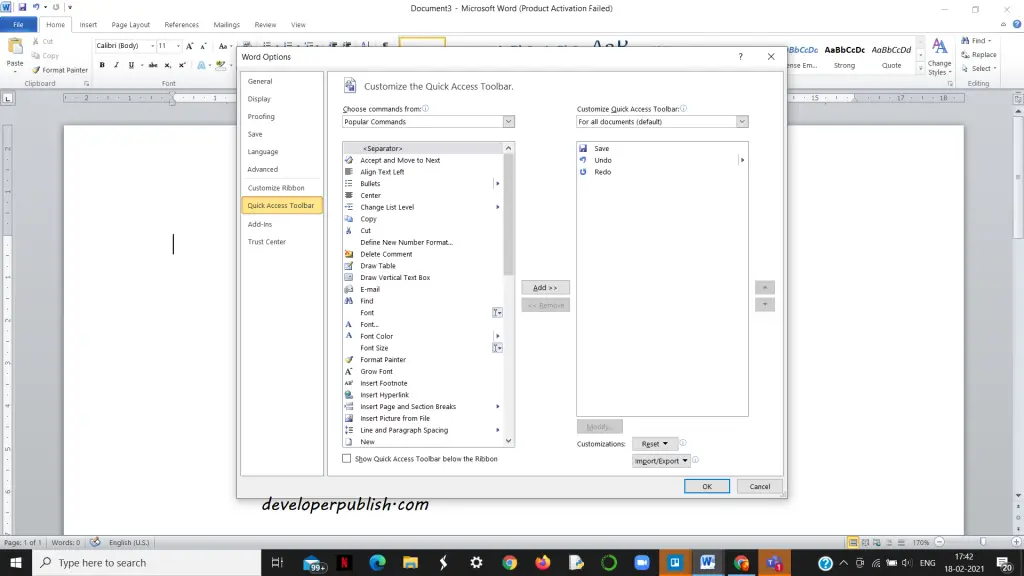
- All the Popular Commands are listed by default on the left.
- The list on the right side shows all the commands currently on the Quick Access Toolbar.
- To add a command to the toolbar, scroll down the list of commands on the left and select the one you want to add. Then, either double-click on the command or click Add to add it to the list on the right.
Rearrange and Remove Commands on the Quick Access Toolbar
You can change the order of the commands on the Quick Access Toolbar.
- To move a command, select it in the list on the right.
- Then, click the up or down arrow button to the right of the list to move it up or down the list.
To remove a command from the Quick Access Toolbar,
- Select the command and click Remove.
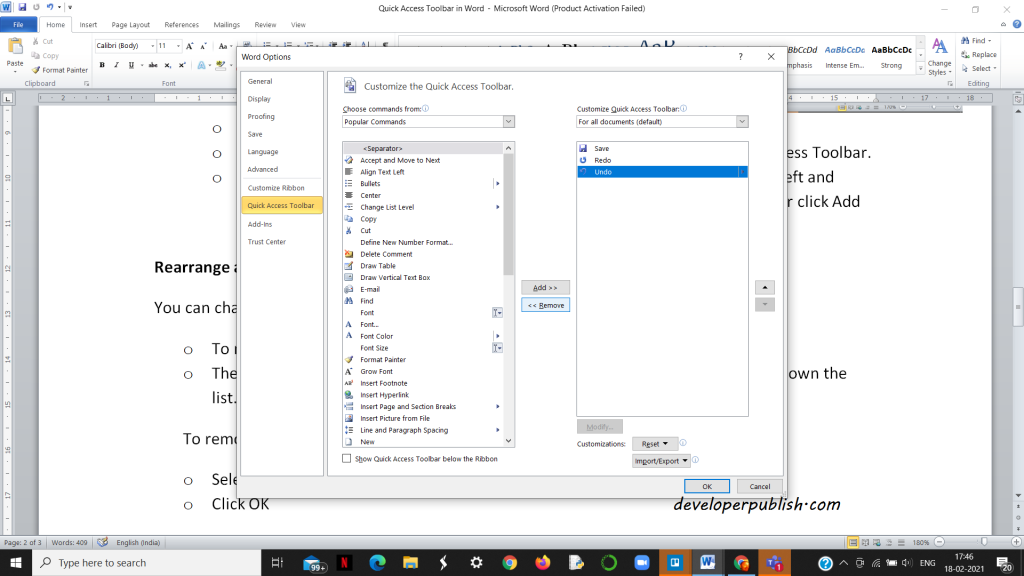
- Click OK
Reset the Quick Access Toolbar
If you’ve customized the Quick Access Toolbar and want to return to the default setup, you can do that without manually removing each command.
- Open the Customize the Quick Access Toolbar screen on the Options dialog box.
- Click the down arrow on the right side of the Quick Access Toolbar.
- Click the Reset button in the lower-right corner of the dialog box
- select Reset only Quick Access Toolbar.
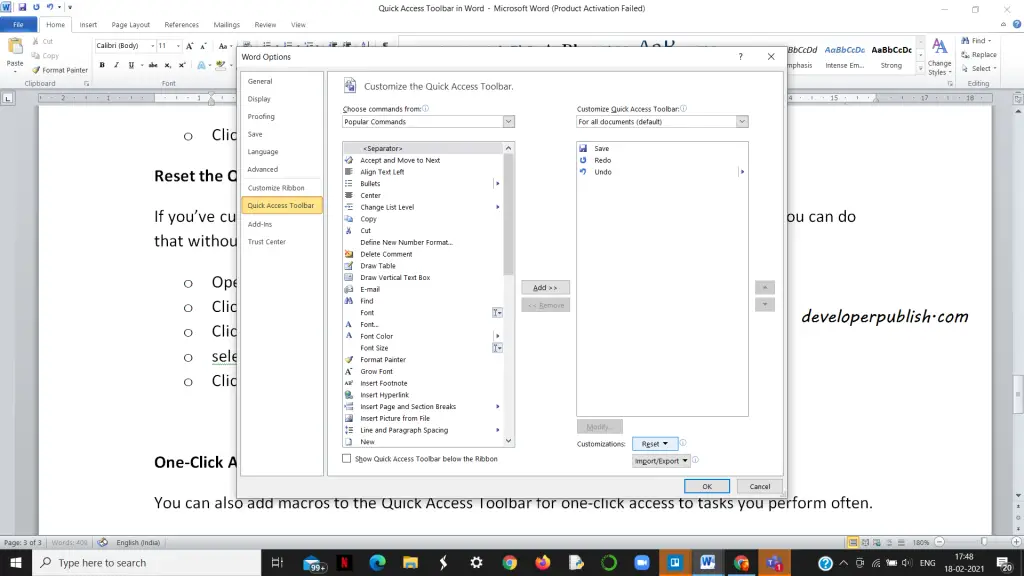
- Click Yes on the confirmation dialog box
One-Click Access to Commands and More
You can also add macros to the Quick Access Toolbar for one-click access to tasks you perform often.
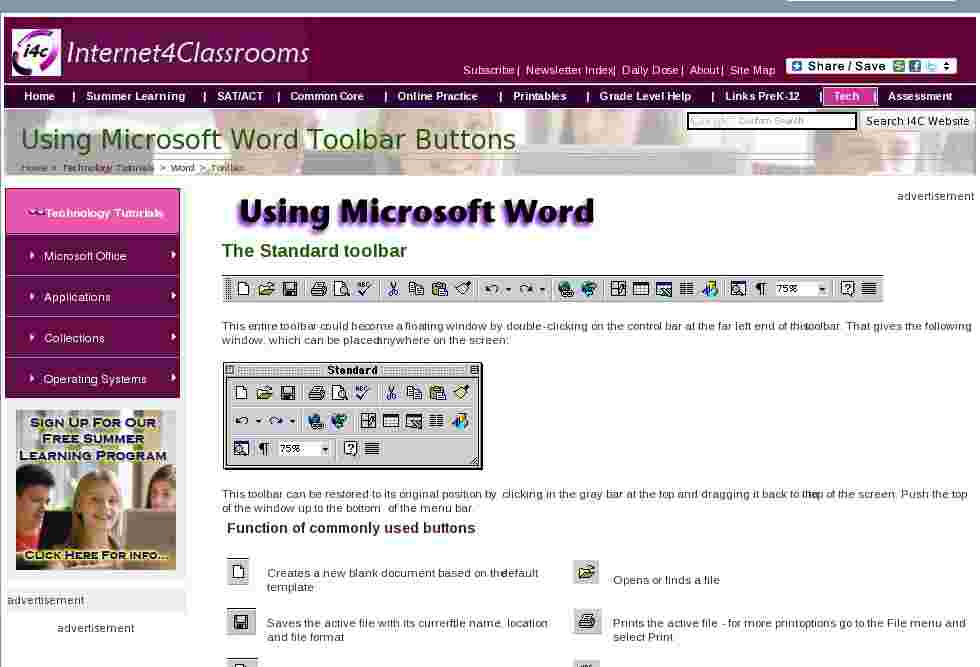
The Standard toolbar
This entire toolbar could become a floating window by
double-clicking on the control bar at the far left end of this
toolbar. That gives the following window, which can be placed
anywhere on the screen:
This toolbar can be restored to its original position by
clicking in the gray bar at the top and dragging it back to the
top of the screen. Push the top of the window up to the bottom
of the menu bar.
Function of commonly used buttons

Creates a new blank document based on the
default template

Opens or finds a file

Saves the active file with its current
file name, location and file format

Prints the active file — for more print
options go to the File menu and select Print

Print preview — Shows how the document
will look when you print it.

Spelling, grammar and writing style
checker
Cut — Removes the selection from the
document and places it on the clipboard
Copy — Copies the selected item(s) to the
clipboard
Paste — Places the content of the
clipboard at the insertion point

Format painter — Copies the format from a
selected object or text and applies to other objects or
text

Undo — Reverses the last command, use
pull-down menu to undo several steps
Redo — Reverses the action of the Undo
button, use the pull-down menu to redo several
steps

Displays the Tables and Borders
toolbar

Insert a table into the document, or make
a table of selected text

Insert an Excel spreadsheet into the Word
document
Columns — Changes the number of columns
in a document

Displays or hides the Drawing
toolbar
Zoom — Enlarge or reduce the display of
the active document
The Formatting toolbar
This entire toolbar could become a floating window by
double-clicking on the control bar at the far left end of this
toolbar. That gives the following window, which can be placed
anywhere on the screen:
This toolbar can be restored to its original position by
clicking in the gray bar at the top and dragging it back to the
top of the screen. Push the top of the window up to the bottom
of the menu bar.
Function of commonly used buttons

Select the style to apply to
paragraphs

Changes the font of the selected
text

Changes the size of selected text and
numbers
Makes selected text and numbers
bold
Makes selected text and numbers
italic

Underlines selected text and
numbers
Aligns to the left with a ragged right
margin

Centers the selected text

Aligns to the right with a ragged left
margin
Aligns the selected text to both the left
and right margins
Makes a numbered list or reverts back to
normal

Add, or remove, bullets in a selected
paragraph
Decreases the indent to the previous tab
stop
Indents the selected paragraph to the
next tab stop

Adds or removes a border around selected
text or objects

Marks text so that it is highlighted and
stands out

Formats the selected text with the color
you click
The Drawing toolbar
This entire toolbar could become a floating window by
double-clicking on the control bar at the far left end of this
toolbar. That gives the following window, which can be placed
anywhere on the screen:
This toolbar can be restored to its original position by
clicking in the gray bar at the top and dragging it back to the
top of the screen. Push the top of the window up to the bottom
of the menu bar.
Function of commonly used buttons

A pull down menu with several
drawing options

Changes the pointer to a selection
arrow

Rotates the selected object to any
degree

A pull down menu with several libraries of
shapes

Draws a line where you click and drag.
Hold the Shift key down to make the line straight
Inserts a line with an arrowhead where
you click and drag
Draws a rectangle where you click and
drag. Hold down Shift to draw a square
Draws an oval where you click and drag.
Hold down Shift to draw a circle
Draws a text box where you click and

Create text effects with
Word Art

Add, modify, or remove fill color from a
selected object

Add, modify, or remove line
color
Formats the selected text with the color

Changes the thickness of lines

Selects dash style for dashed
lines
Select arrow style; placement and shape
of arrowhead

A pull down menu offers shadow
choices

Add 3-d effects to rectangles or
ovalsCustomize the toolbars
Removing items
from active toolbarsIf any item on the toolbar is not useful to you it can be
removed. I am going to use a floating copy of the Standard
toolbar as an example:
In the above toolbar I plan to remove the Insert Hyperlink
button
- From the
View
menu select
Toolbar- From the
Toolbar
submenu select
Customize- Click on the button you want to remove
- Click and drag the button until you see an x attached to
the pointer- Let go of the button and it is removed from the
toolbar� The same procedure can be used
to move a toolbar button to a new location on any toolbarRestoring items to an active toolbar
To restore any buttons that you removed from a toolbar
follow this procedure:
- From the
View
menu select
Toolbar- From the
Toolbar
submenu select
Customize- Choose the
Toolbars
tab- Click on the name of the toolbar
- Select the
Reset
button- Click
OK
in the
Reset
Toolbar
windowAdding buttons to a toolbar
A large number of toolbars can be added to the window from
the View/Toolbar window. However, you may wish to add only a
button or two to the open toolbars. There are some actions that
I used regularly in Microsoft Works which are not listed on the
commonly used toolbars in Word, such as:
- Insert date
- 1.5 space and double space
If you browse in the Customize window you may find other
examples. In the example below I add the
Date
button
from the
Insert
menu. The following steps will allow you
to add any buttons to any menu:
- From the
View
menu select
Toolbar- From the
Toolbar
submenu select
Customize- Choose the
Commands
tab- Select the name of the menu (I used
Insert
)- Scroll in the right window to find the button
- Click and drag the button to the space on the toolbar
where you want the button- Release the mouse and the button is placed.
Changing the size of the window displaying the selected font
If I am using the font Arial there is more than enough room
to display the font name on the Formatting toolbar. If more
room is needed, the size of that window can be decreased. On
the other hand, if I am using the font Times New Roman MT Extra
Bold the size of the window will be too small to display the
entire font name. Using the Customize menu, the window can be
re-sized using the following steps:
- From the
View
menu select
Toolbar- From the
Toolbar
submenu select
Customize- When the Customize window appears click on the font name
window- When the black box outlines the window put your cursor
on the right edge of the window- When your cursor changes to a double-headed arrow click
and dragUsing the Symbol toolbar button
I often use symbol characters in documents I produce. On my
Macintosh I use Keycaps to find the symbols, and on my IBM I
use the Character Map. However, Word has a toolbar button which
is easier to use than either of those two applications.Using the steps outlined above I added the symbol button
(Greek letter Omega) from the Insert menu. One click on this
button brings up a window with all available characters in a
given font. Click once on a character to see an enlarged view.
Double-click a character to insert it into the document
If you perform any task repetitively in Word, there is
probably a button to use for the task. Search the
Customize/Commands window to find what you are looking for.
Internet4classrooms is a collaborative effort by
Susan Brooks and Bill Byles.
![]()
The mini toolbar appears whenever you right-click text in Word, Excel or PowerPoint. The mini toolbar provides a quick-access version of the Font group on the Home tab, plus a few extra buttons from other groups. Hover your mouse over each button to find out what it does.
Which button is on the Mini toolbar?, The mini toolbar is a context toolbar that is often displayed when you use the right mouse button. It provides access to some of the most common formatting commands and is displayed above the shortcut drop-down menu.
Furthermore, What is the toolbar in Word?, A toolbar is a set of icons or buttons that are part of a software program’s interface or an open window. … Microsoft Word has a toolbar with icons that allow you to open, save, and print documents, as well as change the font, text size, and style of the text.
Finally, Where is the Mini toolbar?, The mini toolbar appears whenever you right-click text in Word, Excel or PowerPoint. The mini toolbar provides a quick-access version of the Font group on the Home tab, plus a few extra buttons from other groups. Hover your mouse over each button to find out what it does.
Frequently Asked Question:
Where is the Mini toolbar toggle checkbox found?
How to turn on or off Mini Toolbar
- On the File tab, click the Options button:
- In the Outlook Options dialog box, on the General tab, check or uncheck Show Mini Toolbar on selection:
- Click OK.
Which button is present on the Standard toolbar?
The Standard toolbar is located just below the menu bar. It contains buttons representing commands such as New, Open, Save, and Print.
How do I use the toolbar in Word?
Click the appropriate ribbon tab to display the menu ribbon with the command you want to add to the “Quick Access” toolbar. Right-click the command you want to add to the toolbar. A popup menu will appear. Select “Add to Quick Access toolbar” on the popup menu.
What is the toolbar?
A toolbar is part of a window, often a bar across the top, that contains buttons that execute commands when you click them. Many applications contain toolbars that you can customize so the commands you use frequently are readily available and easily identifiable. Many dialog boxes also contain toolbars.
Where is the toolbar button?
Start by looking up to the left-hand corner of your screen. You should see a toolbar with about six buttons on it, and, just below that, another toolbar with two buttons.
How do I show the Mini toolbar?
To Display or Hide the Mini-Toolbars
- On the ribbon, View panel User Interface panel Mini-toolbar.
- Deselect/Select the Mini-Toolbar checkbox to display only the dialog box. If selected, both the dialog box and mini-toolbar display when you access one of the above commands, as shown in the following figure:
What is Mini toolbar Class 10?
The Mini Toolbar is a floating toolbar that appears above the shortcut menu when you right-click a cell or other objects like a shape or chart. It is a small version of the full toolbar that displays commonly used formatting commands like Bold, Italics, Font Size and Font Color.
Where is the Mini toolbar toggle checkbox found in Excel?
In your Office application, click File > Options > General. Clear the Show Mini Toolbar on selection check box. Click OK.
Where is the Mini toolbar located?
In Microsoft Word, Excel, PowerPoint, and Outlook, the mini toolbar is a smaller version of the full toolbar found near the top of the application window. The mini toolbar appears when you highlight text and either move your mouse cursor over the highlighted text or right-click the highlighted text.
How do you access the Mini toolbar?
The mini toolbar appears whenever you right-click text in Word, Excel or PowerPoint. The mini toolbar provides a quick-access version of the Font group on the Home tab, plus a few extra buttons from other groups. Hover your mouse over each button to find out what it does.
How do I get the Mini toolbar in Excel?
To display the mini-toolbar, select the cells that need formatting and then right-click somewhere in the cell selection. The mini-toolbar then appears immediately below or above the cell selection’s shortcut menu.
Which tools are available on standard toolbar?
The Standard Toolbar gives the user access to file operations, printing, movement of data blocks, the undo system, and to some of the powerful tools like the function creator and the graphing system. New File.
What are the parts of standard toolbar?
The Standard toolbar is located just below the menu bar. It contains icons representing universal commands such as New, Open, and Save. The Formatting toolbar is located just below the Standard toolbar. It contains icons representing text-modifying commands like text size, bold, and ordered lists.
Which button in the Standard toolbar is used to open Drawing toolbar?
Click View > Toolbars > Drawing. The Drawing toolbar is displayed or hidden. The Drawing toolbar contains a collection of icon buttons that allows the user to draw shapes and images in the document. Provides a number of features for drawing.
Why can’t I use Word toolbar?
To restore the toolbars and menus, simply turn full-screen mode off. From within Word, press Alt-v (this will display the View menu), and then click Full-Screen Mode. You may need to restart Word for this change to take effect. If Alt-v does not reveal the View menu, continue with the following steps.
How do I access the toolbar?
Use the down menu arrow on the toolbar and click or tap “Show below the Ribbon.” Alternatively, you can right-click or press-and-hold any button on the ribbon or the toolbar to access the “Show Quick Access Toolbar below the Ribbon” option.
Where is the toolbar menu in Word?
The Menu bar is directly below the Title bar and it displays the menu. The menu begins with the word File and continues with Edit, View, Insert, Format, Tools, Table, Window, and Help. You use the menu to give instructions to the software.
![]()
Download Article
![]()
Download Article
Do you want to add, hide, show, or personalize the toolbars at the top of Microsoft Word so you can access stuff quickly? The ribbon toolbar at the top of the screen, which contains icons, tabs, and menus, is highly customizable—you can add or remove tabs, group icons, and more. You can also personalize the Quick Access toolbar, which is just below the ribbon above your document, so the buttons you use the most are only one click away. This wikiHow article covers how to customize the Quick Access and ribbon toolbars in any modern version Microsoft Word, from Office 2010 to Microsoft 365.
Things You Should Know
- Customize the Quick Access Toolbar by clicking the downwards-pointing arrow and selecting «More Commands».
- To customize the ribbon on a Mac, go to Word > Preferences > Ribbon and Toolbar.
- To customize the ribbon on Windows, right-click a blank area of the toolbar and select «Customize the Ribbon.
-

1
Show or hide the ribbon. The «ribbon» is another name for the main toolbar at the top of Microsoft Word. If you’re using a PC, you can show or hide the ribbon as needed.
- If the toolbar at the top of Word is missing and you want to get it back, just press Ctrl + F1 to bring it back.[1]
On some keyboards, you’ll need to press Ctrl + Fn + F1 to activate the function key.- If you still can’t see the ribbon, you might be in full-screen mode. Click the three dots at the top-right corner to bring the ribbon back, click the down-arrow at the bottom-right corner of the ribbon, and choose Always show Ribbon.
- If you want to hide the ribbon to give yourself more space to work with in your document, right-click any of the tabs on the ribbon and select Collapse the ribbon.
- If the toolbar at the top of Word is missing and you want to get it back, just press Ctrl + F1 to bring it back.[1]
-
2
Open the Customize the Ribbon menu. If you want to add tabs or customize the options on your toolbar, right-click an empty area on the toolbar and select Customize the Ribbon…
Advertisement
-
3
Change the order of the tabs. If you want to reorder the Home, Insert, Draw, Layout, and other tabs, it’s easy:
- Select a tab on the right panel under «Customize the Ribbon.»
- Click the up arrow button to move that tab ahead in the list, or the down arrow to move it further down.
- Click OK to save your changes.
-
4
Choose which tabs appear. Each tab at the top of the ribbon (except for the File tab) has a corresponding checkbox under «Customize the ribbon.» You can remove a checkmark to hide that tab from the ribbon, or add a checkmark if it’s missing.
- If you want to rename a tab, you can just select the tab in the right panel and click Rename. Some tabs cannot be renamed.
-
5
Add a new tab to the toolbar. Want to make your own custom tab at the top of Word? Just click New tab below the «Customize the ribbon» column on the right side and enter a name for your tab. Once you have a new tab, you can add any functions and icons to it from the left panel.
-
6
Add or remove commands and icons on a tab. You can choose which commands and icons appear on each tab.
- Click the + next to any of the tab names under «Customize the ribbon» to display all functions and groups on that tab.
- Click + next to a group to see which functions and icons are in that group.
- To see available commands and icons you can add to any tab, use the drop-down menu above the left column «Choose commands from.»
- To add a new function to a group, select the group. Then, click a command on the left panel and select Add.
- To remove a command from a toolbar, click the command, then click Remove.
- To create a new group on a tab, select a tab, then click New Group. You can then add commands to this group.


Advertisement
-
1
Open your Ribbon and Toolbar preferences. If you want to add new items to your Word toolbar, you can do so from the preferences panel. To get there, click the Word menu, select Preferences, then click Ribbon and Toolbar.[2]
-
2
Change the order of the tabs. If you want to reorder the Home, Insert, Draw, Layout, and other tabs, it’s easy. Just click and drag any of the tabs in the right panel up or down the list until you’ve created the desired order.
-
3
Choose which tabs appear. Each tab at the top of the ribbon (except for the File tab) has a corresponding checkbox under «Customize the ribbon.» You can remove a checkmark to hide that tab from the ribbon, or add a checkmark if it’s missing.
- If you want to rename a tab, you can just select the tab in the right panel, click the gear icon, and then click Rename.
-
4
Add a new tab to the toolbar. Want to make your own custom tab at the top of Word? Just click + under the «Customize the ribbon» panel on the right side, select New tab, and enter a name for your tab.
-
5
Add, remove, or group commands on a tab. You can choose which commands and icons appear on each tab.
- Click the arrow next to any of the tab names under «Customize the ribbon» to display all functions and groups on that tab.
- Click the arrow next to a group to see which functions and icons are in that group.
- To see available commands and icons you can add to any tab, use the drop-down menu above the left column «Choose commands from.»
- To add a new command to a group, select the group in the right panel. Then, click a command on the left panel and click the right-arrow to move it over.
- To remove a command from a toolbar, click the command, then click the left arrow.
- To create a new group on a tab, select a tab, click +, and select New Group.


Advertisement
-
1
Show or hide the Quick Access Toolbar. If you don’t see the Quick Access Toolbar on Windows, you may have hidden it.
- To show it, right-click a blank area of the ribbon and select Show Quick Access Toolbar.
- To hide the toolbar, right-click it and select Hide Quick Access Toolbar.
-
2
Open the Customize Quick Access Toolbar menu. Just click the line with a down-arrow on the left side of the toolbar to view a list of commands.
- On a Mac, you can also go to the Word menu, select Preferences, and click Quick Access Toolbar.
- By default, this toolbar displays the «Save», «Undo», and «Redo» icons. You can add more icons to the Quick Access Toolbar or move it to a new location.
-
3
Click More Commands. This opens your Quick Access Toolbar settings, where you can add and remove commands.
- You can opt to add a command that’s already listed but does not have a checkmark in front of it («Save» has a checkmark in front of it because that icon is already displayed in the toolbar).
-
4
Find the command you want to add to the Quick Access Toolbar. You can use the drop-down menu above the left column («Choose commands from») to browse available commands.
-
5
Select a command and click Add or >. This adds the selected command to Quick Access.
- You can also click and drag commands to re-order them. The list is shown vertically but the Quick Access Toolbar is horizontal with the topmost command in the list showing as the leftmost icon in the toolbar.
- Add as many buttons as you’d like. Since the buttons are pretty small, you can add the <separator> command to add a line or empty space.
- You won’t see any changes in your toolbar until you’ve clicked Ok.
-
6
Click OK or Save when you’re done. You’ll be able to see the changes you’ve made to the Quick Access Toolbar.
- Click the «Customize» button again and select «Show Below the Ribbon» to have the Quick Access Toolbar below the editing ribbon. To put it back, click «Show Above the Ribbon.»[3]
- To reset the toolbar to default, click the drop-down next to «Customizations» and select Reset only Quick Access Toolbar.[4]
- Click the «Customize» button again and select «Show Below the Ribbon» to have the Quick Access Toolbar below the editing ribbon. To put it back, click «Show Above the Ribbon.»[3]
-
7
Move the Quick Access Toolbar. By default, the Quick Access Toolbar appears below the ribbon. If you want to move the toolbar above the ribbon, just click the icon with a line and a down-arrow on the Quick Access Toolbar and select Show Above Ribbon. easy icons can appear above or below the ribbon.


Advertisement
Ask a Question
200 characters left
Include your email address to get a message when this question is answered.
Submit
Advertisement
Video
Thanks for submitting a tip for review!
About This Article
Thanks to all authors for creating a page that has been read 162,931 times.
Is this article up to date?

Introduction to Microsoft Word Editing Tools
The Microsoft word editing tools are defined as the editing toolbar, in which the content can be added or edited by using the toolbar, and it allows to access the toolbar that adds the functionality of it in their content, it provides access to the commonly used functionalities in word processing application and powerful documentation software, where making changes like editing, formatting, inserting or deleting text, copying or moving text, replacing text, resizing the window, linking with other web pages, creating a new document, etc, operations can performed and by moving the mouse over icons it will show a description about its functionality.
Tools for Microsoft Word Editing
Microsoft word provides commonly used functionalities that are given below:
1. Format text
The Formatted text has commands to perform formatting tasks which are found on the home tab in the font group. When we want to format the text then first we have to select the text which we want to format, if want to format a single word then double click on it, we can also select a line of text, and then select an option to change the font, font size and we can make the text bold or italic or underline. In formatting text, head style, can make words bold text or italic text, also can underline the text, highlight the text, can make an unordered list and ordered list, we can change alignment as left or right or at the center.
2. Insert hyperlink(link)
The hyperlink in a document has a different color than other texts and it is underlined. A hyperlink in a document helps the reader to jump from one place in the document to a different file or website or go to the new emails.
We can add or delete hyperlinks in the word document. If we want to add a link in the document, first we have to select text or image which want to link, then right-click on the selected text or image choose the ‘Hyperlink’ option, link or hyperlink is depend on the version, after that, we have to select the type of destination which we want to link, it has some information that has to fill correctly, choose an option ‘Existing file or Web page’, go to the ‘Address’ text box then enter URL, then choose ‘Place in this document and select a location within the document, so now click on ‘Create new document’ go to the text box ‘Name of the document’ and enter the name, there is an edit section in which we can choose whether we want to edit the document now or later.
Then choose ‘Email address’ and click on the text box of ‘Email address’ then we can enter the email address to which the reader can send an email. There is also a ‘Type of subject’ option we can subject type and then click on ‘Ok’. The text now shows up as a hyperlink in the document.
3. Edit and Remove links
For editing the link first select the link which we want to edit and then select the Insert/edit link option, update the web address and then click on the ‘Create link’. We can remove or delete the existing hyperlink, for deleting the hyperlink right-click on it and click on the ‘Remove hyperlink’.
4. Copy and paste from word
The copy and paste function from the word we can use to remove the hidden Microsoft characters which may affect how our document will appear. To select and copy the word content, click on the ‘Paste’ special function button, select or tick on the bullet ‘Paste from Microsoft word’ then paste our word text in the text box and then click on ‘Complete paste’.
5. Add a table
A table is a combination of rows and columns and the intersection of rows and columns is called a cell. To create or insert a table in the document click on the ‘Insert’ tab which is on the ribbon then click on ‘Table’, the insert table window will be opened, we have to select the size of the table in columns and rows, and then click on ‘Ok’. When the table is created the ‘Tab’ key can be used to move from one cell to the other, by pressing the tab key new row is created, if we want to move one cell back in the table then we can ‘Shift+Tab’ keys, the arrow keys allow we to go up, down, left, right.
6. Edit a table
Microsoft word editing tools allow us to edit a table, if we want to edit a table then first we have to select a cell in which we want to edit then click on the table icon it will give some options out of them select ‘Edit table’ so that we can change the general setting of the table. While editing if we want to add a new row then click on the insert below or insert above, for adding the column click on the insert left or insert the right column button. We can also delete columns or rows from the table.
7. Html editor
We can also edit our text by using Html editor, this function is also provided by Microsoft word editing tools. To get the Html view and to edit text, click on the ‘File’ tab then click on ‘Open’, then we can browse the web page file, double click on the file name, our web file opens as a plain text file which has Html code.
8. Resize the edit window
We can also resize the edit window, it has resized button. By clicking on the resize button we will get the full-screen view of the edit window, to return its normal view, click on the same button.
Conclusion
In this article, we conclude that Microsoft Word is a powerful word processing application that has wonderful tools to get reader’s attention, also it has various features where we can do formatting, editing, searching, insertion of images as per the user’s requirement, which keeps track of our various commands that we use to create the document.
Recommended Articles
This is a guide to Microsoft Word Editing Tools. Here we discuss the various tools for editing in Microsoft word in a detailed explanation. You may also have a look at the following articles to learn more –
- Video Editing Tools
- Microsoft Word Shortcut Keys
- Microsoft Word Features
- VMware Tools