
The ribbon is a set of toolbars at the top of the window in Office programs designed to help you quickly find the commands that you need to complete a task.
Show Ribbon options
-
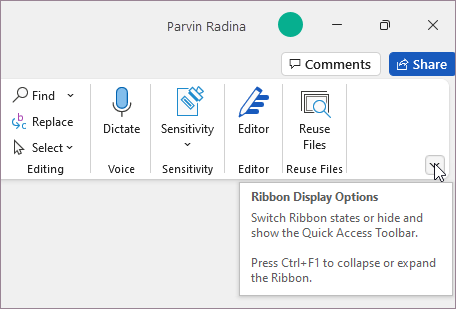
When the ribbon is visible, in the lower-right corner of the ribbon, click the Ribbon Display Options icon.

-
Choose a state for the ribbon:
-
Full-screen mode hides the ribbon for the best view of your document, and only shows the ribbon when you select More , or press the ALT key.
-
Show tabs only shows only the ribbon tabs, so you see more of your document, and you can still quickly switch among the tabs.
-
Always show Ribbon keeps all the tabs and commands on the ribbon visible all the time.
Expand or collapse the ribbon
You can toggle between having the ribbon expanded or collapsed in multiple ways.
If the ribbon is collapsed, expand it by doing do one of the following:
-
Double-click any of the ribbon tabs.
-
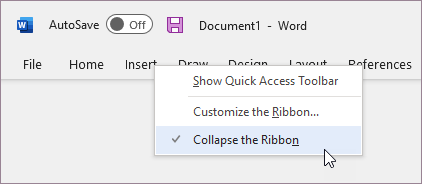
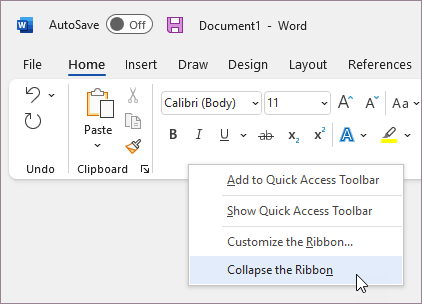
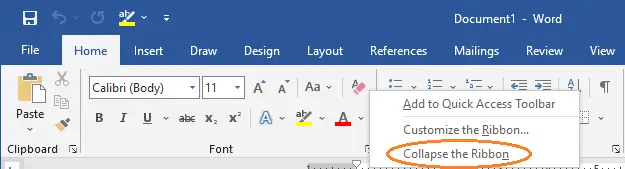
Right-click any of the ribbon tabs, and then select Collapse the ribbon.
-
Press CTRL+F1.
If the ribbon is expanded, collapse it by doing do one of the following:
-
Double-click any of the ribbon tabs.
-
Right-click any of the ribbon tabs, and then select Collapse the ribbon.
-
Right-click Ribbon display options in the lower right of the ribbon, and then select Collapse the ribbon.
-
Press CTRL+F1.
If the ribbon isn’t visible at all
If the ribbon isn’t visible at all (no tabs are showing), then you probably have the state set to Full-screen mode. Select More at the top right of the screen. This will temporarily restore the ribbon.
When you return to the document, the ribbon will be hidden again. To keep the ribbon displayed, select a different state from the Ribbon Display Options menu.
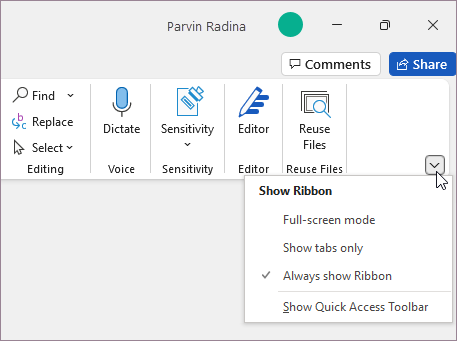
The ribbon is a set of toolbars at the top of the window in Office programs designed to help you quickly find the commands that you need to complete a task.
Show Ribbon options
-
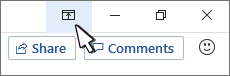
At the top-right corner, select the Ribbon Display Options icon
. -
Choose an option for the ribbon:
-
Show Tabs and Commands keeps all the tabs and commands on the ribbon visible all the time.
-
Show tabs shows only the ribbon tabs, so you see more of your document, and you can still quickly switch among the tabs.
-
Auto-Hide ribbon hides the ribbon for the best view of your document, and only shows the ribbon when you select More
, or press the ALT key.
-
 .
.

Collapse the ribbon or expand it again
Double-click any of the ribbon tabs or press CTRL+F1 to collapse the ribbon if you need to see more of your document.
To see the ribbon again, just double-click any ribbon tab, or press CTRL+F1.
If the ribbon isn’t visible at all
If the ribbon isn’t visible at all (no tabs are showing), then you probably have it set to Auto-hide. Select More  at the top right of the screen. This will temporarily restore the ribbon.
When you return to the document, the ribbon will be hidden again. To keep the ribbon displayed, select one of the Show options above.
See also
Customize the ribbon in Office
Important:
Office 2010 is no longer supported. Upgrade to Microsoft 365 to work anywhere from any device and continue to receive support.
Upgrade now
Minimize the ribbon
You can minimize the ribbon if you need to see more of the document you are creating. To collapse the ribbon, select the Minimize the Ribbon arrow at the top right.

To see the ribbon again, select the arrow again.
See also
Customize the ribbon in Office
The ribbon is a set of toolbars at the top of the window in Office programs designed to help you quickly find the commands that you need to complete a task.
Show ribbon options
-
At the right corner of the ribbon, select the Ribbon Display Options icon
.Note: If you don’t see the ribbon or the Ribbon Display Options icon, it may be hidden. Move your cursor to the top of the browser window to make the ribbon appear as well as the icon.
-
Choose an option in the menu:
 .
. 
-
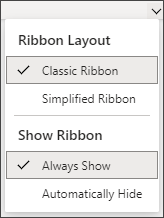
Classic Ribbon displays the full ribbon you may be used to from previous versions of Office.
-
Simplified Ribbon displays a more compact version that takes up less space.
-
Always Show will always have the ribbon visible.
-
Automatically Hide will hide the ribbon until you move your cursor to the top and it will reappear.
Notes:
-
For keyboard users, you can use CTRL + F6 or WIN + ALT to invoke the ribbon.
-
For touch users, simply scroll back up or tap the title bar to bring it back. Scrolling up and down quickly will also trigger showing and hiding the ribbon.
-
See also
Customize the ribbon in Office
24
24 people found this article helpful
Explore the Ribbon and learn how to use it
The Ribbon is the toolbar that runs across the top of Microsoft Word, PowerPoint, Excel, and other Microsoft 365/Office applications. The Ribbon consists of tabs that keep related tools organized and accessible no matter what kind of project or device you’re working on. The Ribbon can be hidden completely, shown in various capacities, or customized to meet your needs.
Instructions in this article apply to Word for Microsoft 365, Word 2019, Word 2016, Word 2013, and Word 2010.
Explore View Options for the Ribbon
Depending on your current settings, the Ribbon will be in one of three forms:
- The Show Tabs setting displays the tabs (File, Home, Insert, Draw, Design, Layout, References, Mailings, Review, and View).
- The Show Tabs and Commands setting displays the tabs and the command icons.
- The Auto-Hide Ribbon setting hides the tabs and commands.
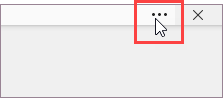
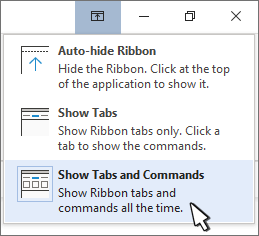
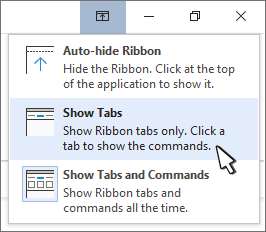
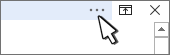
If the Ribbon is currently hidden, a three-dot icon displays in the upper-right corner of the Word window.
-
Select the Ribbon Display Options icon (which is located in the upper-right corner and is a small box with an upward-pointing arrow inside).
-
Select Auto-Hide Ribbon to hide the ribbon. Select the bar located at the top of the window to display the ribbon.
-
Select Show Tabs to display ribbon tabs only. Choose a tab to display the related commands.
-
Select Show Tabs and Ribbon to display ribbon tabs and commands at all times.
To collapse the Ribbon to see more of a document, double-click any ribbon tab or press CTRL+F1. To expand the Ribbon, double-click any ribbon tab or press CTRL+F1.
Using the Ribbon
Each tab on the Word Ribbon has commands and tools underneath it. Change the view to Show Tabs and Commands to see these commands. If the Ribbon is set to Show Tabs, select a tab to see the related commands.
To use a command, find the command you want, then select it. If you aren’t sure what an icon on the Ribbon stands for, hover the mouse over it to see a description of the command.
Here are a few examples:
- To insert a picture into a Word document, select the Insert tab and choose Pictures. Browse to the picture you want to insert, then select Open.
- To start a bulleted list, select the Home tab and choose the Bullets icon.
- To start a numbered list, select the Home tab and choose the Numbering icon.
- To choose a design for the entire document, select the Design tab and choose the design you want to use.
- To check spelling and grammar, select the Review tab and choose Spelling & Grammar.
Many tools work differently when text or an object is selected. To select text, drag the mouse over it. When text is selected, any text-related tool (such as Bold, Italic, Underline, or Font Color) is applied only to the selected text. If no text is selected, those attributes are applied to the subsequent text you type.
Customize the Quick Access Toolbar
The Quick Access Toolbar is located above the Ribbon. By default, it contains shortcuts to the Save, Undo, and Redo commands. Save time and become more productive by adding shortcuts to the commands you use most. For example, make it easier to work with documents by adding shortcuts to the New, Print, and Email commands.
To add items to the Quick Access Toolbar:
-
On the Quick Access Toolbar, select Customize Quick Access Toolbar (the down arrow icon located to the right of the last item).
-
To add a command, choose any command that does not have a checkmark.
-
To remove a command, choose any command that does have a checkmark beside it.
-
To see more commands and add items, select More Commands to open the Word Options dialog box.
-
In the left pane, choose the command you want to add to the Quick Access Toolbar.
-
Select Add.
-
Repeat these steps to add as many commands as you want, then choose OK.
Customize the Ribbon
Add or remove tabs from the Ribbon and add or remove items on those tabs to customize the Ribbon to meet your needs. As a precaution, don’t make too many changes until you are familiar with how the Ribbon is set up by default.
Advanced users might want to add the Developer tab and other tabs to streamline Word so that it only shows exactly what they use and need.
To access the options to customize the Ribbon:
-
Select File, then choose Options to display the Word Options dialog box.
-
Choose Customize Ribbon.
-
To remove a tab, go to the Main Tabs list and clear the checkbox next to the tab.
To add a tab, select the check box next to the tab to put a checkmark in it.
-
To remove a command from a tab, go to the Main Tabs list and select the plus sign to expand the tab.
-
Select the command.
You might have to expand a section again to find the command.
-
Select Remove.
To add a command, go to the left pane, choose the command, then select Add.
-
Select OK to save the changes.
Thanks for letting us know!
Get the Latest Tech News Delivered Every Day
Subscribe
The ribbon is a set of toolbars at the top of the window in Office programs designed to help you quickly find the commands that you need to complete a task.
Contents
- 1 Where is the ribbon on word?
- 2 How do I use ribbon in Word?
- 3 What is ribbon with example?
- 4 Where is ribbon display options?
- 5 How do I show the full ribbon in Word?
- 6 What is ruler in MS Word?
- 7 What is ribbon menu system?
- 8 What is ribbon in Outlook?
- 9 What is ribbon in MS Excel?
- 10 What is status bar in MS Word?
- 11 How many rulers are in MS Word?
- 12 How do you measure shapes in Word?
- 13 What is ribbon technology?
- 14 What is Layout ribbon?
- 15 Where is the ribbon in Office 365 Outlook?
- 16 Where is the ribbon in Outlook email?
- 17 What is simplified ribbon?
- 18 What is ribbon display?
- 19 What are the 7 ribbons available in Office 365 Word?
Where is the ribbon on word?
The Ribbon is located close to the top of the Word window. The Ribbon is organized into a set of task-oriented tabs, and each tab on the Ribbon contains groups of commands. The Home Tab contains the most frequently used commands in Word.
How do I use ribbon in Word?
Select the bar located at the top of the window to display the ribbon. Select Show Tabs to display ribbon tabs only. Choose a tab to display the related commands. Select Show Tabs and Ribbon to display ribbon tabs and commands at all times.
What is ribbon with example?
The ribbon is a user interface element created by Microsoft, which was introduced with Microsoft Office 2007. For example, the Microsoft Word ribbon includes Home, Insert, Page Layout, References, and other tabs that each display a different set of commands when selected.
Where is ribbon display options?
Click the Ribbon Display Options icon on the top-right corner of your document. It is to the left of the Minimize icon. In the menu that opens, click Show Tabs and Commands to show the Ribbon with all tabs and full commands. This option is the default view.
How do I show the full ribbon in Word?
Displaying the Full Ribbon
- Double-click any ribbon tab.
- Press Ctrl+F1.
- Right-click any ribbon tab and clear the check mark beside the Minimize the Ribbon option.
- Right-click any ribbon tab and click on Collapse the Ribbon (Word 2013 or a later version.)
What is ruler in MS Word?
The Ruler is located below the Ribbon around the edge of the document. It is used to change the format of the document, i.e. it helps you align the text, tables, graphics and other elements of your document. It uses inches or centimeters as the measurements unit and gives you an idea about the size of the document.
A ribbon menu is a portion of a graphical user interface where a set of toolbars are placed on tabs in a tab bar. Microsoft software released since 2007 have popularized a form of modular ribbon as their main interface, where large toolbars filled with graphical button and other controls are grouped by functionality.
What is ribbon in Outlook?
The Outlook Ribbon contains all of the options and commands that you use to accomplish tasks in Outlook. For example, you can click buttons on the ribbon to create a new email, delete emails, open a new meeting request, or assign a category to an item.
What is ribbon in MS Excel?
First introduced in Excel 2007, the ribbon is the strip of buttons and icons located above the work area. The ribbon replaces the menus and toolbars found in earlier versions of Excel. Instructions in this article apply to Excel for Microsoft 365, Excel 2019, Excel 2016, Excel 2013, and Excel 2010.
What is status bar in MS Word?
The status bar is the area at the bottom of the Word window that indicates information about the current document. It displays information about what page you are on, as well as your line number on the page and character number on the line.
How many rulers are in MS Word?
Answer: Word displays a horizontal ruler at the top of your document in most views; however, a ruler is only available only in Print Layout view.
How do you measure shapes in Word?
Select the picture, shape, WordArt, or other object to resize. Under Picture Tools or Drawing Tools, on the Format tab, in the Size group, enter the measurements that you want into the Height and Width boxes.
What is ribbon technology?
RIBBON TECHNOLOGY means a technique in which a thin sheet of silicon, typically polycrystalline silicon, is grown directly from molten silicon.
What is Layout ribbon?
The ‘Layout’ ribbon can be used to create sophisticated views of a model alignment of elements and sections to create high-quality diagrams.The appearance of elements in diagrams can be completely changed by adding border, fill and text colors, creating meaning and appeal.
Where is the ribbon in Office 365 Outlook?
If you’re using desktop Outlook, there will be several icons at the right end of the title bar: the X to close, the Maximize button, the minimize button, and the left-most will be the ribbon control. Click that and choose “Show tabs and commands”. That should bring the ribbon out.
Where is the ribbon in Outlook email?
To show the Ribbon, click on View.
You’ll see a little pin in the upper right. Click it and now your Ribbon will always show in Outlook (unless you decide to hide it again.) You can personalize your Ribbon to order the tabs and commands the way you want them.
What is simplified ribbon?
The simplified ribbon is the default ribbon mode and shows your commands in a single line.If a button on the simplified ribbon has a downward pointing arrow next to it, click that arrow to see other, similar commands. For example, the classic ribbon has buttons for both Find and Replace.
What is ribbon display?
Called Ribbon Display Options, this feature lets you toggle the ribbon between three different states. The Ribbon Display Options button appears in the top right of each Office 2013 application, to the left of the window control buttons. When you tap this button, you’re presented with three display choices via a menu.
What are the 7 ribbons available in Office 365 Word?
However rather than having a selection of menus, when you change the Tab, you will see a different command set on the Ribbon. In Word there are eight tabs along the top; File, Home, Insert, Page Layout, References, Mailings, Review, and View.
TheTechieSenior.com is reader supported. We may earn a commission if you buy through links on this site. As an Amazon Associate, we earn from qualifying purchases. Learn more here.
If you’ve just begun using Microsoft Word, you may have read or heard instructions that say, “go up to the Ribbon.” What is the Ribbon in Microsoft Word? Can you customize the Ribbon? I’ll tell you what the Word Ribbon is and how you can customize it to help you work faster.
Table of Contents
Readers who are already familiar with the versions of Word that have been released since 2007 will be familiar with the Ribbon.
If you are new to the Microsoft Office suite of apps, you’ll learn the basics of using the Ribbon.
In a short while, you should be comfortable using it.
What is a Ribbon in Microsoft Word?
In the simplest terms, the Ribbon in any Microsoft Office app is a visually oriented menu. It is situated across the top of the work area in a way that groups tools and features with a similar focus together.
For most people who have touchscreen computers, they are easier to use than standard menus.
Traditional top menus have a group of headings such as File, Edit, and Tools. When you click on one of those headings, you see a list of tools and other options.
The Ribbon replaces those lists of items with an assortment of buttons or icons arranged under tabs.
Those tabs correspond closely to the menu headings you might find at the top of the window in other similar apps.
Under each tab, you’ll see buttons with labels that are similar to the items you’d see in the older, more familiar top menus. Those buttons are arranged in groups.
Note: The dark mode images in this article are from MS Word for Windows. The light mode images are from Word for Macs. Features are the same except where noted.
How to use the Microsoft Word Ribbon
It’s worth noting that Word in Office 365 for Macs has both the traditional menu across the top and the Ribbon. The File menu is in the top menu bar. The first tab in the Ribbon is the Home tab.
In Word for Windows, the Ribbon replaced the traditional top menu. The first tab is the File tab which opens a familiar-looking menu. The Home tab is the second one by default.
In the Ribbon there are three things that will help you understand how it works.
Across the top of the Ribbon, you’ll find the Tabs.
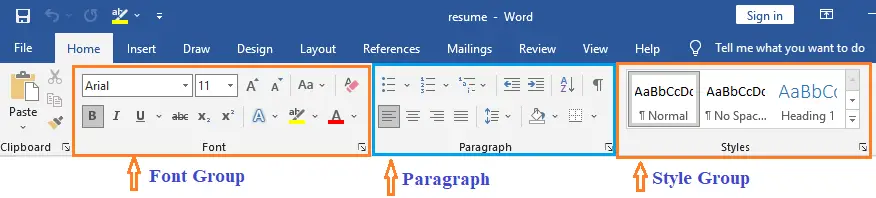
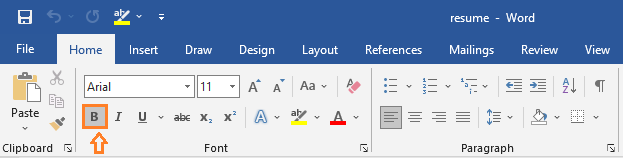
Each of those tabs is divided into Groups. Groups are a collection of Commands that are similar in nature. For example, font, font size, font color, bold, italic, etc., are all found in the Font group of the Home tab.
The buttons, icons, dropdown lists, checkboxes, etc., within the groups, are the Commands.
The process of using Ribbon Commands is basically the same as using commands in a traditional menu.
In most cases, such as changing a selection of text to bold, you would first select the words you want to be bold. Then go to the Ribbon, find the command you want and click on it.
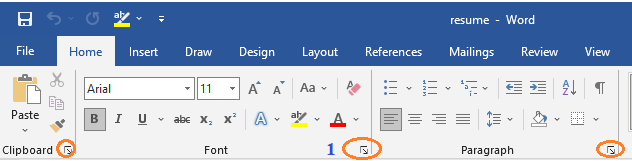
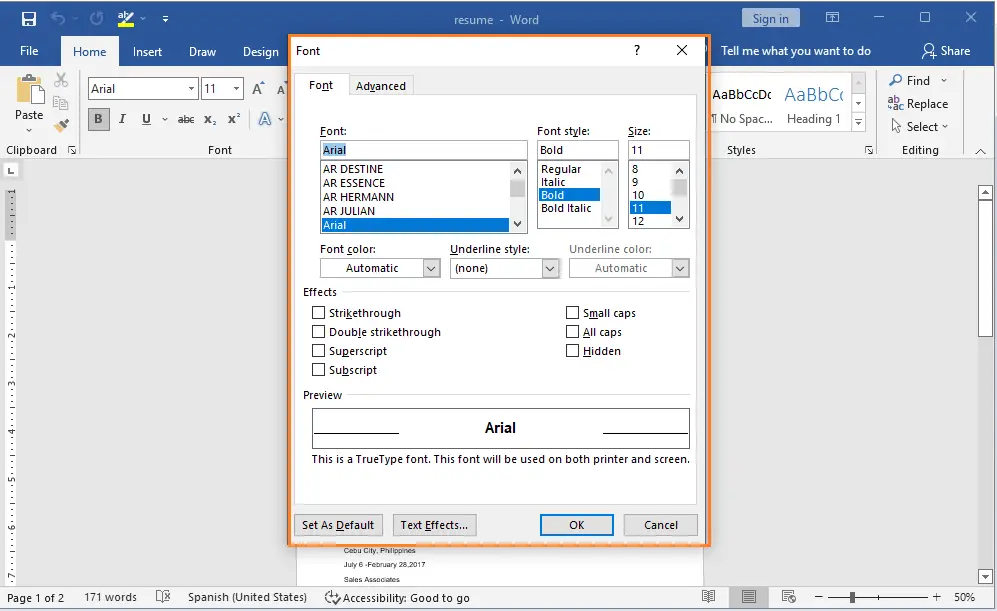
In Word for Windows, you can click the arrow in the lower right corner of most Groups to open a panel that contains all of the settings that are in the Ribbon for that Group.
In the case of bolding text, the bold button is in the Font group under the Home tab.
Some commands have an immediate effect, such as when you bold text.
Other commands that involve settings that you want to apply may open a dialog box or panel. You would make the appropriate settings in the dialog box before they show up in your document.
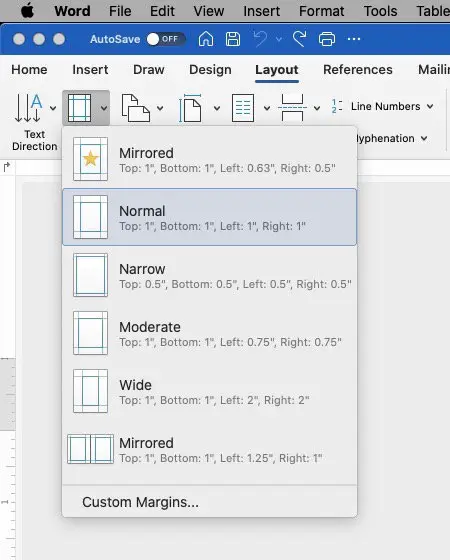
An easy example of a command that can pop up a settings panel is the Margins command in the Page Setup group under the Layout tab.
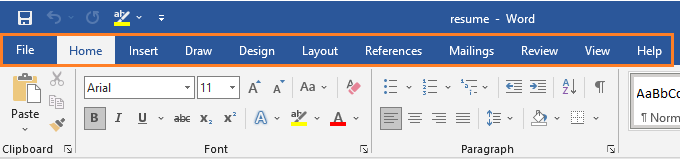
The basic tabs in the MS Word Ribbon
When you first open Word, you should see the following tabs in the Ribbon area.
- Home
- Insert
- Draw
- Design
- Layout
- References
- Mailings
- Review
- View
The Home tab includes the following Groups:
- Clipboard
- Font
- Paragraph
- Styles
- Voice
- Sensitivity
- Editor
- Add-ins such as Grammarly, ProWritingAid, and Adobe Acrobat will appear in the Home tab if they are installed.
The Insert Tab includes these Groups:
- Pages
- Tables
- Illustrations
- Add-ins
- Media
- Links
- Comments
- Header & Footer
- Text
- Symbols
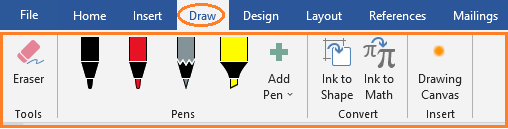
The Draw tab contains these Groups:
- Tools (normal)
- Pens
- Mode
The Design tab includes these Groups:
- Document Formatting
- Page Background
The Layout tab includes these Groups:
- Page Setup
- Paragraph
- Arrange
The References tab contains these Groups:
- Table of Contents
- Footnotes
- Research
- Citations & Bibliography
- Captions
- Index
- Table of Authorities
The Mailings Tab includes these Groups:
- Create
- Start Mail Merge
- Write & Insert Fields
- Preview Results
- Finish
The Review tab contains these Groups:
- Proofing
- Speech
- Accessibility
- Language
- Comments
- Tracking
- Changes
- Compare
- Protect
- Ink
- Resume
The View tab contains these Groups:
- Views
- Focus
- Dark mode
- Show
- Zoom
- Macros
Customizing the Microsoft Word Ribbon
Some Microsoft Word users work under the assumption that they are stuck with the Ribbon as they see it when they first open Word.
Actually, the Ribbon in Word is highly customizable.
Collapse or lock open the MS Word Ribbon
The Ribbon is always open in Word for Macs. But in Word for Windows, it can collapse so that only the tab names show. You can also set it to stay open.
In Word for Windows, if the Ribbon is closed so that you see only the tab names, open any tab other than the File tab. The Ribbon will open. If you then click on other tabs, the Groups and Commands within the tab will change.

In the lower right corner of the Ribbon, you will see a downward-pointing arrow. Click that arrow to open a small menu that allows you set the Ribbon always to stay open.
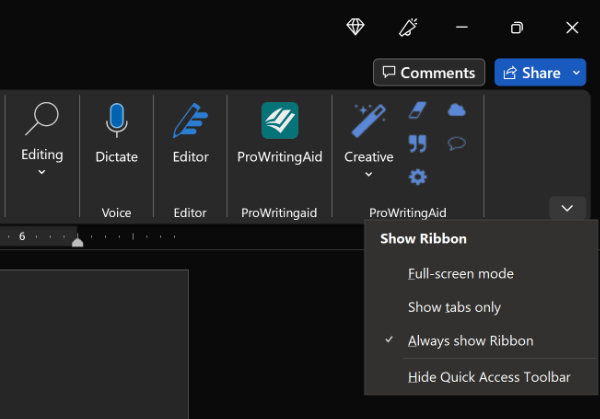
If you want the Ribbon to stay collapsed when not in use, click the option to Show tabs only.
Toggle Group titles on or off in the Word Ribbon
Each group has a title that will be displayed, centered at the bottom of the group. In Word for Windows, the Group titles are visible by default.
If you don’t have titles under your Ribbon groups in Word for Macs, you can activate them.
In Word for Macs:
- Go to the Word menu and select Preferences.
- In Preferences, open the View tab.
- In the bottom section labeled Ribbon, check the box beside Show group titles.
Where to customize the Ribbon in Microsoft Word
You can create your own groups under tabs and place commands that don’t show by default in them.
You can also create your own tabs and set them up with a special selection of groups and commands.
To customize the Ribbon in Word for Macs, first, open the Ribbon settings:
- Go to the Word menu and choose Preferences.
- Open the Ribbon and Toolbar tab.
- Open the Ribbon tab.
To customize the Ribbon in Word for Windows, there are two ways to open the Ribbon settings.
You can Right-click in the Ribbon somewhere in an area where there are no buttons, etc. Click Customize Ribbon. (It works best for me if I click somewhere in the middle of the blank area between the button and the right-side edge.) Or…
You can get there via the File menu.
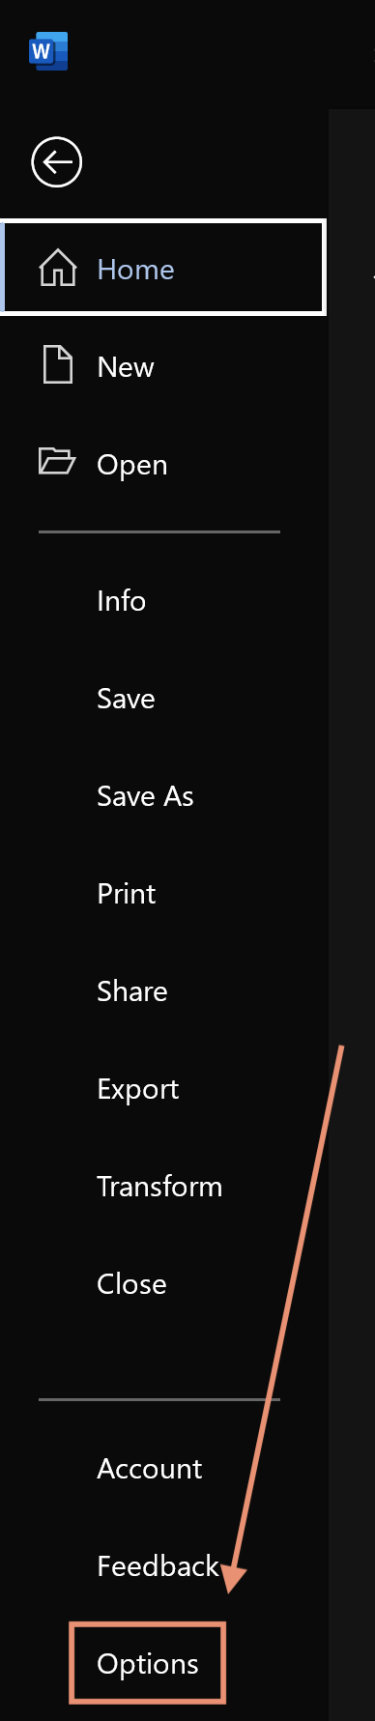
- Open the File tab.
- At the bottom of the window, click Options.
- Select Customize Ribbon.
A large panel will open that is divided into two columns.
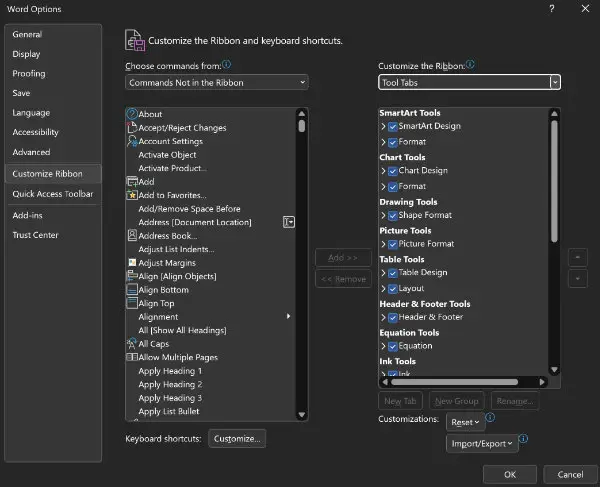
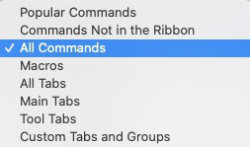
The left column contains all of the available commands and tabs. A drop-down list at the top of the column lets you choose from the following:
- Popular Commands
- Commands Not in the Ribbon
- All Commands
- Macros
- All Tabs
- Main Tabs
- Tool Tabs
- Custom Tabs and Groups
If you look in the right column, you’ll see a list of tabs with their groups and commands listed beneath each of them.
A drop-down list at the top of the right column lets you see all of the tabs. You can choose from the following:
- All tabs
- Main tabs
- Tool tabs
Main tabs are those that are available when you open a new or existing document.
Tool tabs are those that appear only when you are working on something that requires specialized commands.
An example of a Tool tab would be the Picture Format tab that is available when you have inserted an image in your document and it is selected. When the image is not selected, the Picture Format tab is not available in the Ribbon.
If a tab has a check beside it, it should be visible in your Ribbon.
You can simplify your Ribbon by removing the tabs that you don’t use. Just click the checkmark beside the tab name so that the check box is blank.
If you don’t see the actual groups or commands in the right column, click the arrow to the left of the tab name. A list of groups in that tab will open.
Click the arrow beside a group name to see the commands that are currently present inside that group.
How to add custom tabs to the Ribbon in Word
You can add your own custom tabs in Word. At the bottom of the right column, click the + symbol.
Select New Tab. A new tab will be inserted and named New Tab (custom).
How to rename a tab in MS Word’s Ribbon
You rename any existing or new tab in Word.
- Select the tab in the right column of the Ribbon settings panel.
- Open the Gear icon at the bottom of the column.
- Choose Rename.
- Type the new tab name in the selected tab.
Add custom groups to tabs in Microsoft Word
Adding custom groups to tabs in Word is very similar to adding new tabs.
- First, in the Ribbon settings panel, select the name of the tab where you want the group to appear.
- Click the + symbol at the bottom of the right column.
- Select New Group
Groups can only be added to tabs, but Word allows you to add new groups to both existing and custom tabs.
The procedure to rename a new or existing group is the same as renaming tabs in the previous section. Just select the group before you open the Gear icon at the bottom of the column.
Add new commands to the MS Word Ribbon
Microsoft Word only allows you to add commands to custom groups. Therefore, the first step in adding new commands will be to add a custom group to an existing or custom tab.
You learned in the previous section of this article how to add groups.
Once you have added a custom group to the Ribbon, click the name of that group in the right column to select it.
Select the command that you want from the list in the left column of the Ribbon setting panel.
Between the left and right columns, there are two arrows—one pointing to the right and one to the left. Click the right-pointing arrow to add a command that is listed in the left column over to your custom group in the right column.
Remove commands from the Ribbon in Word
You can remove commands from custom groups by reversing the procedure you used to add them.
Just select the command in the custom group. Then click the left-pointing arrow between the columns to remove the command.
Word does not allow us to remove single commands from normal groups. Instead, you’ll have to remove the entire group that includes the command.
For example, if you want to remove the Strikethrough command from the Font group under the Home tab, you’ll have to remove the entire Font group.
In that case, you’d probably choose to live with the Strikethrough command staying in place.
A workaround, if you just want a simpler Font group in your Ribbon, would be to create a custom Font group under whichever tab you wish. Then add the commands that you want to keep to that custom group. Remove the existing Font group.
How to reset the Microsoft Word Ribbon to default settings
If you find that the changes you made to the Ribbon aren’t working for you, you can easily reset any part of the Ribbon.
To reset the entire Ribbon to default:
- Place a check in the box beside every tab in the right column.
- Click the Gear icon at the bottom of the right column.
- Select Reset Customizations.
The entire Ribbon will be reset to its default state.
If you only want to reset one or a few tabs:
- Check the box beside those tabs.
- Click the Gear icon at the bottom of the right column.
- Select Reset only selected Ribbon tab.
Note: Resetting tabs will not remove custom tabs. To remove a custom tab from the Ribbon, select the tab and use the left-pointing arrow between the columns to remove it. It will remain in the left column under Custom tabs and groups in case you want to return it to the Ribbon.
Where is Visual Basic in the Word Ribbon?
Visual Basic is under the Developer tab. Follow the instructions given above for adding items to the Ribbon. Just place a check beside Developer in the list of tabs.
In Word for Macs, you can also go to the Word menu and open the View tab. Check the box beside Show Developer tab under the Ribbon label in the lower left corner.
Adjust the size of the MS Word Ribbon
In MS Word for Windows, you can adjust the size of the controls in the Ribbon. You do that by setting your Ribbon for touch screens.
The icons, buttons, and other controls are larger when the Ribbon is set for touch screens. That is because the fingertips are larger than the mouse arrow.
In the Quick Access Toolbar above the Ribbon, look for a button that represents a fingertip on a button. Tap or click that button and select For Touch Screens.
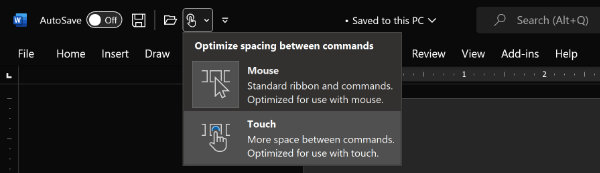
The Ribbon will take up more space on the screen, but it will be easier to use with fingers. Also, the larger Ribbon controls could be beneficial to sight-challenged users.

You can use either the normal Ribbon or the larger Ribbon with your finger or a mouse. If your eyesight is good and you never use your computer as a touch device, you can set the Ribbon for use with a mouse.

If you are one who prefers to use the old-style menus instead of the Ribbon, there is an addin available from AddInTools.com that adds the menus to Microsoft Word for Windows.
I have never used the addin and therefore cannot vouch for it personally. However the addin has been around for years and is highly recommended by CNET and others. It may be just what you’re looking for. Classic Menu for Office. (Not an affiliate link.)
In this tutorial, we’ll talk about what is MS Word Ribbon. As you go over, you will learn and understand their parts and uses.
The Ribbon is an important part of how Word works. It is where most of Word’s commands live, and it is also where settings are made. These things look like buttons, text fields, and menus.
Table of contents
- What is Ribbon in Microsoft Word ?
- Parts of Ribbon in Microsoft Word
- 1. MS Word Quick Access Toolbar
- 2. MS Word Ribbon Tabs
- 3. Ribbon Groups
- 4. Command Buttons
- 5. Dialog Launcher of MS Word Ribbon
- Microsoft Word Ribbon Tabs and Commands
- What is Ribbon tab in MS Word?
- List of the Names of the Tabs on the Ribbon
- 1. Home Tab
- 2. Insert Tab
- 3. Draw Tab
- 4. Design Tab
- 5. Layout Tab
- 6. References Tab
- 7. Mailings Tab
- 8. Review Tab
- 9. View Tab
- 10. Help tab
- How to Show or Hide MS Word Ribbon
- Summary
The Ribbon in Microsoft Word is the window’s uppermost bar. Additionally, it is a part of the user interface that was added to Microsoft Office 2007 by Microsoft. It is between the Title Bar and the Quick Access Toolbar. It provides a number of tab-organized tools for editing and formatting documents.
The ribbon is a set of toolbars at the top of the window in Office programs designed to help you quickly find the commands that you need to complete a task.
It has ten tabs: Home, Insert, Draw, Layout, References, Mailing, Review, View and Help. Each tab has a set of commands that work together. It makes it easy to get to the commands you use most often and need to finish a task.
Parts of Ribbon in Microsoft Word
A MS Word Ribbon has five main parts: the Quick Access Toolbar, the tabs, the command buttons, the groups of command buttons, and the dialog launchers.
1. MS Word Quick Access Toolbar
The Quick Access Toolbar, is a set of the most-used commands that are always available, no matter what MS Word Ribbon command set is being used. By default, the QAT comes with three commands: Quick Save, Undo, and Redo. But many people change the QAT to add print, copy, and paste to the default commands.
2. MS Word Ribbon Tabs
The Tabs of MS word 2019 are like the old way of making menus. But instead of a list of menus, when you switch Tabs, you’ll see a different set of commands on the Ribbon. Along the top of Word 2019, there are 11 tabs: File, Home, Insert, Draw, Layout, References, Mailings, Review, View and Help.
3. Ribbon Groups
Each tab on the Ribbon has many command groups as we’ve notice. When selecting the Home tab in Word, for instance, the following groups are displayed: Clipboard, Font, Paragraph, Styles, and Editing.
Each group contains the most frequently used command buttons for that category; for instance, the Font group contains the Bold, Italic, and Underline command buttons.
4. Command Buttons
The command buttons are the components that are responsible for doing all of the work. If you want certain words to stand out more, for instance, you would use the Bold button to make that change.
5. Dialog Launcher of MS Word Ribbon
Dialog Launcher is a set of command buttons that cannot fit on the Ribbon due to lack of space. If there is an additional command set, an arrow in the bottom right corner of the group will be visible, which will allow you to see the complete command set.
Microsoft Word Ribbon Tabs and Commands
Here are the Microsoft Word Ribbon Tabs and Commands.
| Ribbon Tab Name | Command Groups | Dialog Box Shortcut Key |
| Home | Clipboard, Font, Paragraph, Styles, and Editing | Ctrl+D (Font) Alt+Ctrl+Shift+S (Styles) |
| Insert | Pages, Tables, Illustrations, Add-ins, Media, Links, Comments, Header & Footer, Text, and Symbols | |
| Draw | Tools, Pens, and Convert | |
| Design | Document Formatting and Page Background | |
| Layout | Page Setup, Paragraph, and Arrange | |
| References | Table of Contents, Footnotes, Research, Citations & Bibliography, Captions, Index, and Table of Authorities | |
| Mailings | Create, Start Mail Merge, Write & Insert Fields, Preview Results, and Finish | |
| Review | Proofing, Speech, Accessibility, Language, Comments, Tracking, Changes, Compare, Protect, and OneNote | |
| View | Views, Immersive, Page Movement, Show, Zoom, Window, Macros, and SharePoint |
What is Ribbon tab in MS Word?
The MS Word Ribbon Tabs are composed of groups of closely related commands designed to help users quickly find desired commands, and each ribbon has a bar line across the page.
Further, it allows users to quickly access all of the program’s features and commands with a minimal number of mouse clicks. The main tabs are in Word are File, Home, Insert, Design, Page Layout, References, Mailings, Review, View, and Help.
List of the Names of the Tabs on the Ribbon
Here are the list of the names of tabs on the ribbon.
1. Home Tab
The Home tab commands are put together in groups called Clipboard, Font, Paragraph, and Styles. There is a vertical line between these parts that you can see. Under some of these areas, there are more options that can be chosen from a drop-down menu.

2. Insert Tab
Using the Insert tab you can add pictures, shapes, pages, symbols, and other things to a document. These choices are shown with icons and text. Most of these choices have a drop-down menu where you can find more options. Pages, Tables, Illustrations, Add-ins, Media, Links, Comments, Header and Footer, Text, and Symbols are the groups of commands that make up the Insert menu.

3. Draw Tab
With the Draw tab ribbon, you can draw in a Word document. The draw tab is part of Office 365, and if it’s not on your ribbon, it may need to be added. On the Draw tab, you can choose what you want to do (draw or erase), what kind of pen tool you want to use, and if you want to draw with the trackpad.
4. Design Tab
The design tab lets you change your document’s format, background, color scheme, page borders, etc. If the Design tab is not in your ribbon and you want it to be, go to File > Options > Customize Ribbon and check the box next to Design.

5. Layout Tab
The Layout tab permits the user to customize the page orientation, margins, etc. The Layout options are categorized into Page Setup, Margins, and Arrangement commands.

6. References Tab
The Reference tab allows the user to enter document sources and citations, create a table of contents, and add an index, among other things. The Reference tab is organized by the following groups of commands: Table of Contents, Footnotes, Research, Citations, Captions, Index, and Table Authorities are included.

7. Mailings Tab
The Mailings Tab allows the user to merge emails, write and insert different fields, etc., and is the least frequently used tab. This commands on the Mailings tab are arranged into the following groups: Address, Start Mail Merge, Insert Fields, Preview, Merge Range, and Finish.

8. Review Tab
The Review Tab allows users to proofread, add or remove comments, track changes, enable Read Aloud, verify accessibility, etc.

9. View Tab
The View tab lets users to toggle between several document views, such as viewing multiple pages, boundaries, grids, and rulers. Focus, Immersive Reader, and Zoom are now available in the View Tab’s accessibility options. The View Tab of Word ribbon contains commands divided into the following categories: Document View, Accessibility, Show/Hide, Zoom, Window, and Macros.
The Focus option will hide everything at the top of the Word document, leaving just the blank (or written text) on the page. Focus mode was designed to remove any distractions from the document so that students can focus on their writing (or reading). When in Word and using a Mac, Control + Shift + Command + F will toggle Focus on and off.

10. Help tab

- Help – Gets help with Microsoft Word.
- Contact Support – Gets help from a Microsoft support agent.
- Feedback – Provides feedback to Microsoft.
- Show Training – Shows online training and learning content.
- What’s New – Showcases the latest upgrades from Microsoft.
How to Show or Hide MS Word Ribbon
Time needed: 1 minute.
Here, I’ll talk about how to hide or show the Word ribbon. When editing a long document on a small laptop with Microsoft Word, the ribbon can take up almost half of the content area. Try these tips if you want to get rid of the ribbon area to make more space.
- Shortcut Key
By pressing [Ctrl] + [F1], you can hide or show the ribbon.
- Shortcut Menu
Just right-click anywhere on the ribbon and choose Collapse the Ribbon in the dialog box.

- Double Click Any Tab
Just double-click any tab on the ribbon. For this example, I’ll choose “Insert.”

- Command Button
To do so, simply select the arrow in the right-hand corner of the ribbon. This way, only the tab titles will be displayed.

- Ribbon Display Options
Just click the button in the top right corner of the ribbon and choose either Auto-hide Ribbon or Show Tabs.


Summary
In summary, we’ve talked about the MS word ribbon as well as what those terms mean, their parts, and their uses. Also, we learn how to use the components of MS Word Ribbon. We also gain insight into why it’s important to familiarize commands with ribbon tabs in creating documents.
Furthermore, we also picked up some skills on what the shortcut keys are to hide and show the ribbons if we have a small space on our screen.
We hope this tutorial helps you as you plan to create a document in MS Word.
PREVIOUS
NEXT
Updated: 07/31/2022 by powerpoint-home-slides.png
In Microsoft Office applications, the Ribbon is the menu bar at the top of the window. It contains a variety of tools, organized by tabs, that help you edit and format a document.
This page provides an overview of the options and tools on each tab of the Ribbon for Microsoft Word, Excel, and PowerPoint.
Microsoft Word Ribbon
The following are the different options and tools listed in the Microsoft Word Ribbon for each of the tabs. Each section below is outlined first by the tab name, then by each section on the tab.
Home tab
![]()
Undo
- Undo Typing — Removes the last thing you typed.
- Repeat Typing — If you accidentally hit undo typing, you can re-enter the previous text.

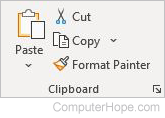
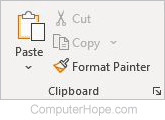
Clipboard
- Paste — Pastes information from the clipboard.
- Cut — Removes information from the document and puts it in the clipboard.
- Copy — Copies information from the document for the clipboard.
- Format Painter — Applies formatting from another section of a document.
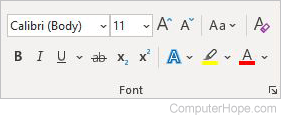
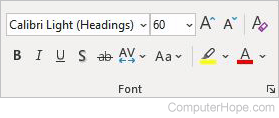
Font
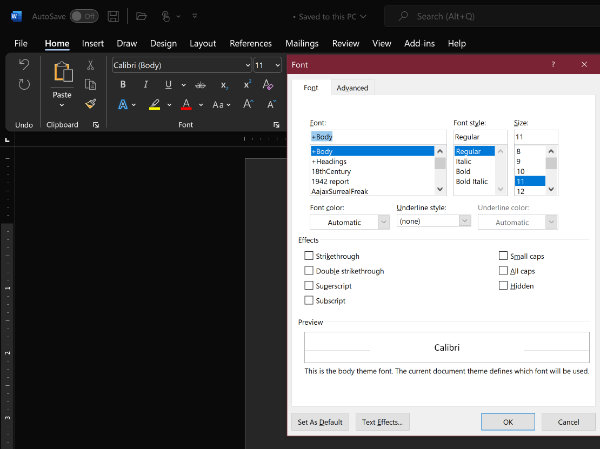
- Font — Changes the font.
- Font Size — Selects the desired font size.
- Increase Font Size — Makes the font size one size larger.
- Decrease Font Size — Makes the font size one size smaller.
- Clear all formatting — Clears all formatting, leaving plain text.
- Bold — Makes the text bold.
- Italicize — Makes the text italicized.
- Underline — Underlines the text.
- Strikethrough — Crosses out the text.
- Subscript — Types small letters below the text. e.g., H20
- Superscript — Types small letters above the text. e.g., X2
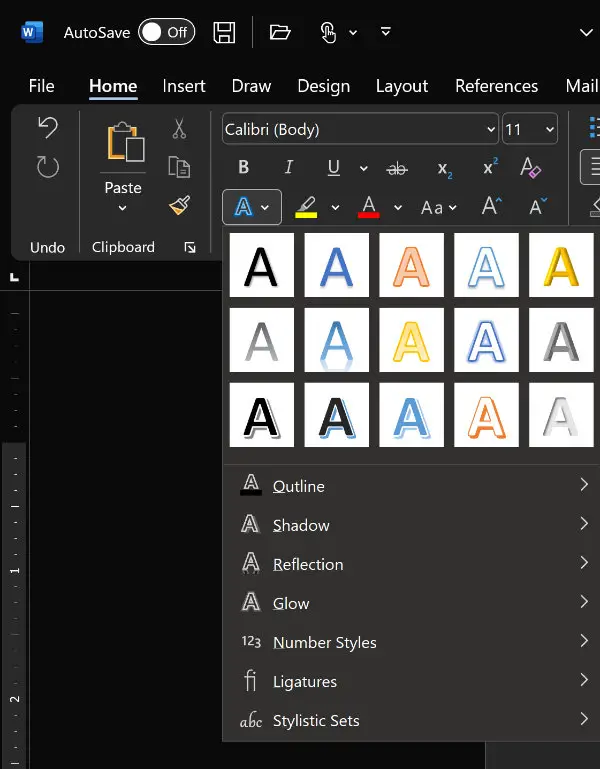
- Text Effects and Typography — Adds effects like outline or shadow to the text.
- Text Highlight Color — Highlights text. e.g., ComputerHope.com
- Font Color — Changes the color of the font.
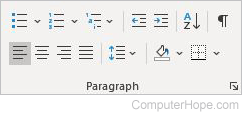
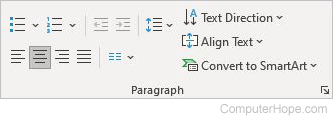
Paragraph
- Bullets — Creates a bulleted list.
- Numbering — Creates a numbered list.
- Multilevel List — Creates an outline.
- Decrease Indent — Moves the indentation of the paragraph closer to the left margin.
- Increase Indent — Moves the indentation of the paragraph closer to the right margin.
- Sort — Arranges information in alphabetical order.
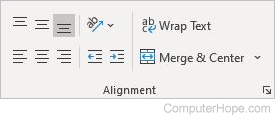
- Show/Hide Paragraph Marks — Shows marks where the paragraphs begin and end.
- Align Left — Aligns text with the left margin.
- Center — Centers text in the document.
- Align Right— Aligns text with the right margin.
- Line and Paragraph Spacing — Changes the spacing between lines and paragraphs.
- Shading — Changes the color behind the text.
- Borders — Creates lines around the text.
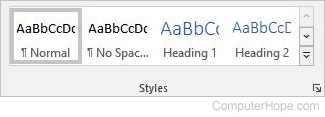
Styles
- Page Formatting Styles — Creates different styles and previews the styles in your text.

Editing
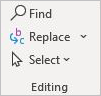
- Find — Finds words in the document.
- Replace — Searches for text in the document and replaces it.
- Select — Selects all or some text in the document.
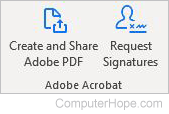
Adobe Acrobat
Note
The Adobe Acrobat section is only displayed if Adobe Acrobat is installed on your computer.
- Create and Share Adobe PDF — Saves the document as a PDF and lets you share it with others.
- Request Signatures — Saves the document as a PDF, and requests others to sign it if necessary.
![]()
Voice
- Dictate — Enables voice-to-text, using Microsoft Speech Services.

Editor
- Editor — Checks for spelling, grammar, and writing suggestions.
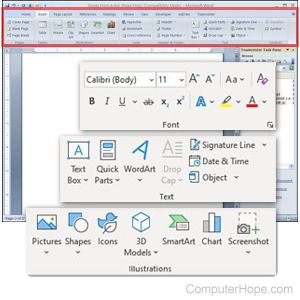
Insert tab
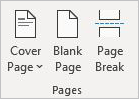
Pages
- Cover Page — Creates a cover page for a document.
- Blank Page — Inserts a blank page anywhere specified in the document.
- Page Break — Ends the current page where specified, moving the rest of the text to the next page.

Tables
- Table — Creates a new table, or inserts a previously-created table in your document.
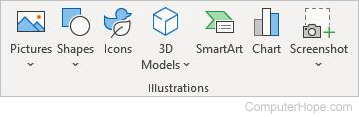
Illustrations
- Pictures — Inserts pictures in your document.
- Shapes — Insert shapes in your document.
- Icons — Inserts icons in your document.
- 3D Models — Inserts a 3d model in your document.
- SmartArt — Inserts a SmartArt graph or list in your document.
- Chart — Creates a chart to display your data.
- Screenshot — Inserts a screenshot in your document.
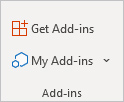
Add-ins
- Get Add-ins — Add additional functionality to Word.
- My Add-ins — Inserts add-ins obtained from Get Add-ins.

Media
- Online Video — Adds a video in your document.
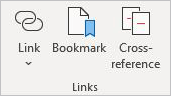
Links
- Link — Inserts a link for web pages in your document.
- Bookmark — Creates a specific spot in your document that can be jumped to without having to scroll.
- Cross-reference — Refers to a specific place in the document, such as a heading or table.

Comments
- Comments — Adds notes in specific places in the document.
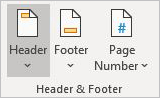
Header & Footer
- Header — Adds repeat content to the top of every page in the document.
- Footer — Adds repeat content to the bottom of every page in the document.
- Page Number — Adds page numbers to each page of your document.
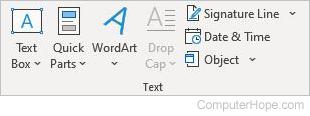
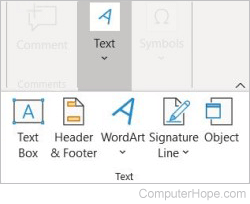
Text
- Text Box — Adds a custom box for text, bringing attention to it.
- Quick Parts — Inserts pre-saved text or formatting to a document.
- WordArt — Adds artistic touches to the text in this box.
- Drop Cap — Creates a large letter at the beginning of each paragraph.
- Signature Line — Adds a custom signature line to the document.
- Date & Time — Adds the date and time to the document with different options.
- Object — Adds another document or chart to the existing document.

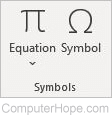
Symbols
- Equation — Adds mathematical equations to the document.
- Symbol — Adds symbols to the document, such as currency and trademark.

Media
- Insert Media — Inserts Flash media in your document. Flash must be installed for this to work.
Design tab
Document Formatting

- Themes — Adds custom formatting to the document.
- Colors — Changes the entire color palette of the document to a color scheme of your choice.
- Fonts — Changes the font of the document.
- Paragraph Spacing — Changes the line and paragraph spacing of the document.
- Effects — Changes the overall look of objects with shading and other options.
- Set as Default — Sets the current formatting as the default for new documents.
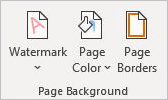
Page background
- Watermark — Adds a faint image behind the text of your document.
- Page Color — Changes the background color of the document.
- Page Borders — Adds a border around the document.
Layout tab
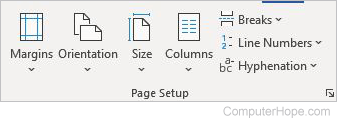
Page Setup
- Margins — Sets the margin sizes for the document.
- Orientation — Changes the orientation of the document to portrait or landscape mode.
- Size — Selects the size of paper for printing.
- Columns — Splits the page into up to 13 columns.
- Breaks — Ends the current page at your desired location, and starts the remainder of the information on the next page.
- Line Numbers — Adds numbers to each line for easy reference to a specific location.
- Hyphenation — Automatically hyphenates words that extend beyond the end of a line. Hyphenation is placed at syllable boundaries.
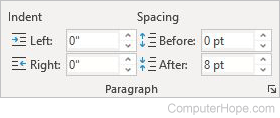
Paragraph
- Indent Left — Moves the paragraph away from the left margin.
- Indent Right — Moves the paragraph away from the right margin.
- Spacing Before — Changes how much spacing is before the selected paragraph.
- Spacing After — Changes how much spacing is after the selected paragraph.
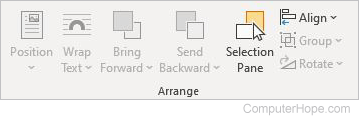
Arrange
- Position — Moves the placement of the selected item to the desired location on the page.
- Wrap Text — Selects how the text on the page wraps around the object.
- Bring Forward — Moves the selected object forward in front of other objects.
- Send backward — Moves the selected object behind other objects.
- Selection pane — Displays a listing of all objects on the page.
- Align — Sets the alignment of the object on the page.
- Group — Joins objects together, making them appear as one object.
- Rotate — Rotates the selected image.
References tab
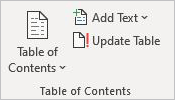
Table of Contents
- Table of Contents — Provides an overview of the document’s contents.
- Add Text — Includes an editable heading in the table of contents.
- Update Table — If changes are made to the document, this refreshes the table of contents to reflect the correct page numbers.
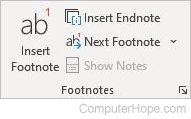
Footnotes
- Insert Footnote — Adds a note to the bottom of the current page.
- Insert Endnote — Adds a comment or citation to the end of the page. Used in conjunction with superscript numbers placed in the text.
- Next Footnote — Moves to the next footnote.
- Show Notes — Moves to the footnotes or endnotes of the page.

Research
- Smart Lookup — Selects text in the document to search for a definition or more information online.
- Researcher — Assists in finding information and pictures that you can cite in your document.
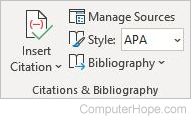
Citations & Bibliography
- Insert Citation — Credits a source of information.
- Manage Sources — Organizes the sources of the information cited.
- Style — Choose the citation style from APA, Chicago, or MLA.
- Bibliography — Displays a list of all cited sources.
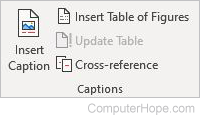
Captions
- Insert Caption — Labels your object or picture.
- Insert Table of Figures — Adds a listing of captions for easy reference.
- Update Table — If changes are made to the table of figures, this updates the changes.
- Cross-reference — Refers to a source of information elsewhere in your document, such as a table of figures. If the source information changes, the reference is updated automatically.
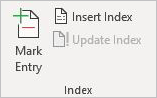
Index
- Mark Entry — Adds selected text to the index.
- Insert Index — Adds a list of keywords and the page number where they appear.
- Update Index — If any changes are made to the document, this updates it if necessary.
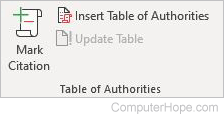
Table of Authorities
- Mark Citation — Adds selected text to the Table of Authorities.
- Insert Table of Authorities — Adds a list of authorities, cases, or statutes noted in the document.
- Update Table — If any changes are made to the document, this updates the Table of Authorities if necessary.
Mailings tab
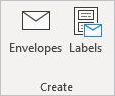
Create
- Envelopes — Set up printer for printing envelopes.
- Labels — Set up printer for printing labels.
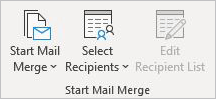
Start Mail Merge
- Start Mail Merge — Create one document, and send it to multiple recipients, personalizing it for each person.
- Select Recipients — Choose the list of people to receive the document.
- Edit Recipient List — Enables changes to be made to the recipient list.
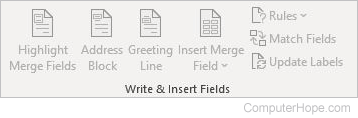
Write & Insert Fields
- Highlight Merge Fields — Highlights specific fields in the document.
- Address Block — Adds an address block to your document.
- Greeting Line — Adds a greeting line to your document.
- Insert Merge Field — Adds a field from the recipient list, such as last name or phone number.
- Rules — Specifies rules for the merge.
- Match Fields — Defines the different fields in the recipient list.
- Update Labels — Uses information from the recipient list to update the label fields.
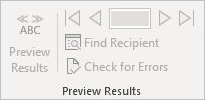
Preview Results
- Preview Results — Verify the mail merge information is entered correctly before finalizing the document.
- First Record — Jumps to the first recipient.
- Previous Record — Jumps to the previous recipient.
- Next Record — Jumps to the next recipient.
- Last Record — Jumps to the last recipient.
- Find Recipient — Searches for a specific recipient.
- Check for Errors — Checks the mail merge for errors before it is applied.

Finish
- Finish & Merge — Choose how to complete the mail merge.

Acrobat
- Merge to Adobe PDF — Merges the document to a PDF file, allowing you to send it digitally.
Review tab
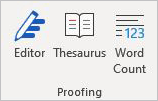
Proofing
- Editor — Checks for spelling, grammar, and writing suggestions.
- Thesaurus — Suggests another word to use for the selected word.
- Word Count — Tells you the words, lines, and characters in the document.

Speech
- Read Aloud — Uses text-to-speech software to read the text out loud.

Accessibility
- Check Accessibility — Checks your document to make sure it is easily legible.
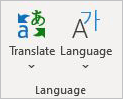
Language
- Translate — Translates your text into another language.
- Language — Chooses the language for proofing tools like spellcheck.
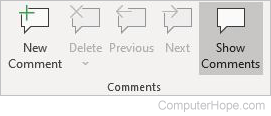
Comments
- New Comment — Adds a note to the document.
- Delete — Deletes a note from the document.
- Previous — Skips to the previous note.
- Next — Skips to the next note.
- Show Comments — Makes all comments in the document visible.
![]()
Tracking
- Track Changes — Keeps track of all changes made to the document.
- Simple Markup — Select how you want to see changes.
- Show Markup — Choose which types of markup you want to see.
- Reviewing Pane — Lists all document changes.
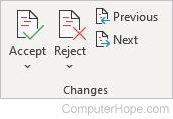
Changes
- Accept — Keeps the current change, and advances to the next.
- Reject — Undoes current change, and advances to the next.
- Previous — Jumps to the previous tracked change.
- Next — Jumps to the next tracked change.

Compare
- Compare — Compares two documents for differences.
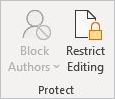
Protect
- Block Authors — Keeps others from making changes to selected text.
- Restrict Editing — Limits the changes that others can make to the document.

Ink
- Hide Ink — On touch-enabled computers, lets you hide any drawings made with Draw or Ink.

Resume
- Resume Assistant — Shows hints from LinkedIn to update your resume.
View tab
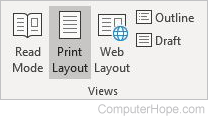
Views
- Read Mode — Displays the pages in book format for easier reading.
- Print Layout — Previews how the page looks if printed.
- Web Layout — Previews how the page would look if it were a website.
- Outline — Previews your document in an outline form.
- Draft — Previews your document without any formatting marks, headers, or footers.
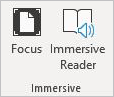
Immersive
- Focus — Hides buttons and UI elements so you can focus on the document.
- Immersive Reader — Helps with reading skills.
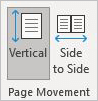
Page Movement
- Vertical — Scrolls up and down to move between pages.
- Side to Side — Scrolls from side-to-side to move between pages.
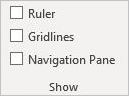
Show
- Ruler — Shows a ruler on the side of the document.
- Gridlines — Shows gridlines over the document.
- Navigation Pane — Shows a side pane with a search function.
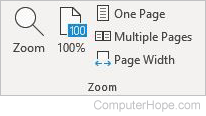
Zoom
- Zoom — Increases the viewing size of the document.
- 100% — Displays the document at actual size.
- One Page — Zooms the document so you can see the entire page.
- Multiple Pages — Zooms the document so you can see multiple pages at once.
- Page Width — Zooms the page, so the width matches the window.
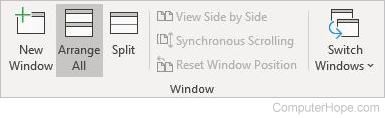
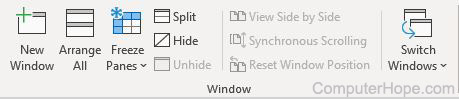
Window
- New Window — Opens a window of your document so you can work in multiple places.
- Arrange All — Stacks your documents so you can see them all at once.
- Split — Displays two sections of your document at one time.
- View Side by Side — Displays different documents side-by-side for comparison.
- Synchronous Scrolling — Displays two documents at the same time.
- Reset Window Position — Displays two documents side-by-side so they are equally sized on the screen.
- Switch Windows — Quickly switches to another open document window.

Macros
- Macros — Create custom macros, or choose from predefined macros, to perform a sequence of actions all at once. To run a macro, you can click the button on the Quick Access Toolbar, press the keyboard shortcut, or run it from the Macros list.
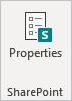
SharePoint
- Properties — View and edit SharePoint documents.
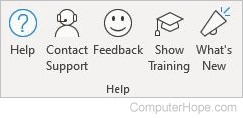
Help tab
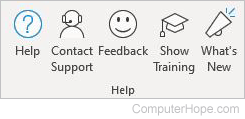
Help
- Help — Gets help with Microsoft Word.
- Contact Support — Gets help from a Microsoft support agent.
- Feedback — Provides feedback to Microsoft.
- Show Training — Shows online training and learning content.
- What’s New — Showcases the latest upgrades from Microsoft.
Acrobat tab
Note
The Acrobat tab is only available if Adobe Acrobat is installed on your computer.
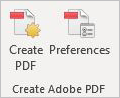
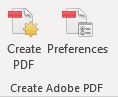
Create Adobe PDF
- Create PDF — Turns your document into a PDF format.
- Preferences — Configures PDF creation settings.
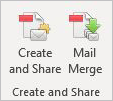
Create and Share
- Create and Share — Creates a PDF and lets you share it online.
- Mail Merge — Merges document to a PDF file and sends it by e-mail.
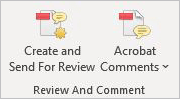
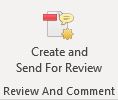
Review and Comment
- Create and Send For Review — Creates a PDF and sends it for review.
- Acrobat Comments — Imports comments from PDF file into the current document.
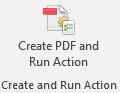
Create and Run Action
- Create PDF and Run Action — Creates a PDF and lets you select an action to run.
Microsoft Excel Ribbon
The following are the different options and tools listed in the Microsoft Excel Ribbon for each of the tabs. Each section below is outlined first by the tab name, then by each section on the tab.
Home tab
![]()
Undo
- Undo Typing — Removes the last thing you typed.
- Repeat Typing — If you accidentally hit undo typing, you can re-enter the previous text.
Clipboard
- Paste — Pastes information from the clipboard.
- Cut — Removes information from the document and puts it in the clipboard.
- Copy — Copies information from the document for the clipboard.
- Format Painter — Applies formatting from another section of a document.
Font
- Font — Changes the font.
- Font Size — Selects the desired font size.
- Increase Font Size — Makes the font size one size larger.
- Decrease Font Size — Makes the font size one size smaller.
- Bold — Makes the text bold.
- Italicize — Makes the text italicized.
- Underline — Underlines the text.
- Borders — Creates lines around cells.
- Fill Color — Changes the color inside the cell.
- Font Color — Changes the color of the font.
Alignment
- Top Align — Aligns text to the top of the cell.
- Middle Align — Aligns text to the middle of the cell.
- Bottom Align — Aligns text to the bottom of the cell.
- Orientation — Rotates text diagonally or vertically.
- Wrap Text — Wraps long text into multiple lines so you can see all the text in the cell.
- Align Left — Aligns the content of the cell to the left.
- Center — Aligns the content of the cell to the center.
- Align Right — Aligns the content of the cell to the right.
- Decrease Indent — Moves the text closer to the left side of the cell.
- Increase Indent — Moves the text away from the left side of the cell.
- Merge and Center — Combines two cells, merging them into one, keeping information from the left cell only, then centers the information.
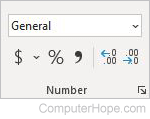
Number
- Number Format — Choose the format of your numbers, like percent, date, time, or currency.
- Accounting Number Format — Formats as currency.
- Percent Style — Formats as a percentage.
- Comma Style — Formats with a thousands separator.
- Increase Decimal — Increases the number of decimal places shown.
- Decrease Decimal — Decreases the number of decimal places shown.
Styles
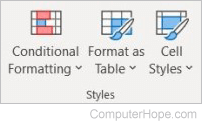
- Conditional Formatting — Shows trends and patterns in your data, highlighting important values.
- Format as Table — Converts a selected range of data to a table.
- Cell Styles — Uses cell coloring and other formatting to create a cell style.
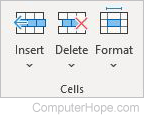
Cells
- Insert — Adds new cells, columns, or rows to your worksheet.
- Delete — Deletes cells, columns, or rows from your worksheet.
- Format — Offers several formatting options, including adjusting cell height and width, protecting cells, and organizing sheets.

Editing
- AutoSum — Auto-adds data from selected cells.
- Fill — Continues a series from to neighboring cells.
- Clear — Clears the contents of the cell, or clears the formatting of the cell.
- Sort & Filter — Organizes your data.
- Find & Select — Displays options for finding text in the worksheet.

Analyze Data
- Analyze Data, formerly known as Excel Ideas — Provides personalized suggestions based on your data.
Insert tab
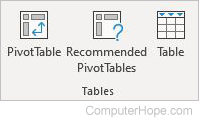
Tables
- PivotTable — Arranges complex data into a PivotTable.
- Recommended PivotTables — Lets Excel suggest a PivotTable based on your data.
- Table — Creates a table to organize your data.
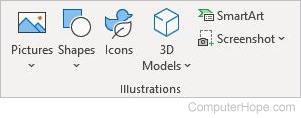
Illustrations
- Pictures — Inserts pictures to your document.
- Shapes — Chooses from different shapes to add to your document.
- Icons — Inserts icons in your document.
- 3D Models — Inserts a 3d model in your document.
- SmartArt — Inserts a SmartArt graph or list in your document.
- Screenshot — Inserts a screenshot in your document.
Add-ins
- Get Add-ins — Add functionality to Excel.
- My Add-ins — Inserts add-ins obtained from Get Add-ins.
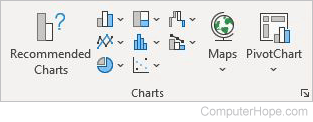
Charts
- Recommended Charts — Excel recommends a chart type to use with your data.
- Insert Column or Bar Chart — Inserts a column or bar chart using your data.
- Insert Hierarchy Chart — Inserts a hierarchy chart using your data.
- Insert Waterfall, Funnel, Stock, Surface, or Radar Chart — Choose from different chart options.
- Insert Line or Area Chart — Inserts a line or area chart using your data.
- Insert Statistics Chart — Inserts a statistics chart using your data.
- Insert Combo Chart — Highlights different types of data.
- Insert a Pie or Doughnut Chart — Inserts a pie or doughnut chart using your data.
- Insert Scatter(X, Y) or Bubble Chart — Inserts a scatter or bubble chart using your data.
- Maps — Shows categories of different geographical data.
- Pivot Chart — Geographically summarizes data.
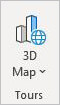
Tours
- 3D Map — Shows geographic data on a 3D map.
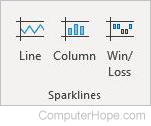
Sparklines
- Line — Inserts a mini line chart in a single cell representing a row of data.
- Column — Inserts a mini bar chart in a single cell representing a row of data.
- Win/Loss — Inserts a mini win/loss chart in a single cell representing a row of data.
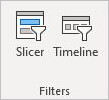
Filters
- Slicer — Filters data visually.
- Timeline — Filters dates interactively.

Links
- Link — Creates a link to a website.

Comments
- Comments — Adds notes in specific places in the document.
Text
- Text Box — Draw a text box anywhere in your data.
- Header & Footer — Provides an editable content area that is presented at the top or bottom of each printed page.
- WordArt — Inserts WordArt to your worksheet.
- Signature Line — Adds a signature line to your document.
- Object — Embeds objects, documents, or other files into the worksheet.
Symbols
- Equation — Adds mathematical equations to your worksheet.
- Symbol — Adds special symbols not found on the keyboard.
Page Layout tab

Themes
- Themes — Adds custom formatting to the document.
- Colors — Changes the entire color palette of the document to a color scheme of your choosing.
- Fonts — Changes the font of the document.
- Effects — Changes the overall look of objects with visual effects, such as shading.
Page Setup
- Margins — Sets the margin sizes for the document.
- Orientation — Changes from portrait to landscape modes.
- Size — Selects the size of paper for printing.
- Print Area — Selects the area for printing.
- Breaks — Ends the current page at the desired location, and starts the remainder of the information on the next page.
- Backgrounds — Chooses a background for your worksheet.
- Print Titles — Chooses rows or columns with labels or headers to repeat on each printed page.
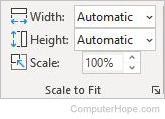
Scale to Fit
- Width — Shrinks the width of the printout to fit a certain number of printed pages.
- Height — Shrinks the height of the printout to fit a certain number of printed pages.
- Scale — Stretches or shrinks the size of the printout to a percentage of its size.
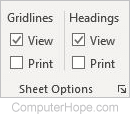
Sheet options
- Gridlines View — Shows the lines between rows and columns.
- Gridlines Print — Prints the gridlines. Gridlines will not print unless this box is checked.
- Headings View — Shows the column letters (A, B, C, etc.) and row numbers (1, 2, 3, etc.)
- Headings Print— Prints the column and row headings. These will not print unless this box is checked.
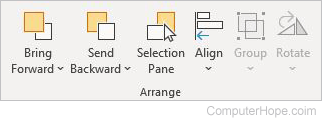
Arrange
- Bring Forward — Moves the selected object forward in front of other objects.
- Send backward — Moves the selected object behind other objects.
- Selection pane — Displays listing of all objects on the page.
- Align — Sets the alignment of the object on the page.
- Group — Joins objects together, making them appear as one object.
- Rotate — Rotates the selected image.
Formulas tab
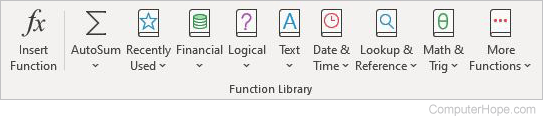
Function Library
- Insert Function — Pulls up a formula selection box to insert a function into the current cell.
- AutoSum — Automatically adds up selected cells.
- Recently Used — Selects recently used functions to add to your cell.
- Financial — Adds a financial function to the current cell.
- Logical — Adds a logical function to the current cell.
- Text — Adds a text function to the current cell.
- Date & Time — Adds a date or time function to the current cell.
- Lookup & Reference — Adds a financial function to the current cell.
- Math & Trig — Adds a mathematical function to the current cell.
- More Functions — Browse and select from predefined functions.
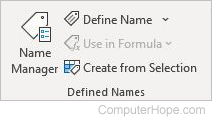
Defined Names
- Name Manager — Creates, edits, deletes, or finds names used in the workbook.
- Define Name — Defines and applies names.
- Use in Formula — Chooses a name from the workbook, and inserts it into a formula.
- Create from Selection — Automatically generates names from the selected cells.
Formula Auditing
- Trace Precedents — Shows which cells affect the current cell value.
- Trace Dependents — Displays arrows indicating the cells that affect the value of the current cell.
- Remove Arrows — Removes the arrows from Trace Precedents or Trace Dependents.
- Show Formulas — Displays the formula instead of the resulting value of the formula.
- Error Checking — Checks for common errors in formulas.
- Evaluate Formula — Steps through complex formulas to verify it is calculating correctly.
- Watch Window — Displays the values of selected cells as you update other parts of the worksheet.
Calculation
- Calculation Options — Toggle between automatic and manual formula calculation.
- Calculate Now — Calculates the entire workbook.
- Calculate Sheet — Calculates the current worksheet.
Data tab
Get & Transform Data
- Get Data — Discovers, connects, and combines data from other sources, and refine it to meet your needs.
- From Text/CSV — Imports data from an existing text or CSV file.
- From Web — Imports data from a web page.
- From Table/Range — Creates a new query linked to the selected Excel table or named range.
- Recent Sources — Manages and connects to recent sources.
- Existing Connections — Imports data from common sources.
Queries & Connections
- Refresh All — Gets the latest data by refreshing all sources in the workbook.
- Queries & Connections — Displays and manages the queries and connections in this workbook.
- Properties — Specifies how cells connected to a data source are updated and shown.
- Edit Links — Displays all files linked to the spreadsheet, so you can update or remove the links.
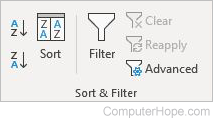
Sort & Filter
- Sort A to Z — Sorts from lowest to highest.
- Sort Z to A — Sorts from highest to lowest.
- Sort — Specifies which cells to sort, and choose different sorting options.
- Filter — Creates a filter of one or more columns to sort items quickly.
- Clear — Clears the filter for the current range of data.
- Reapply — Reapplies the filter for the current range of data.
- Advanced — Displays options for advanced filtering.
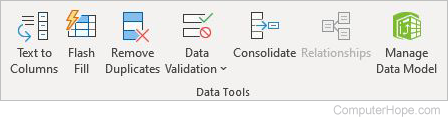
Data Tools
- Text to Columns — Splits a single column of text into multiple columns.
- Flash Fill — Automatically fills cells with values based on what is entered.
- Remove Duplicates — Removes duplicate cells from selected columns.
- Data Validation — Select from a list of rules that limit the types of data that can be entered in a cell.
- Consolidate — Summarizes data from separate ranges, consolidating the results in a single output range.
- Relationships — Creates or edits relationships between tables to show related data from different tables on the same report.
- Manage Data Model — Adds and prepares data, or lets you continue working on data already in the workbook.
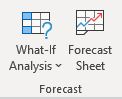
Forecast
- What-if Analysis — Try out different values for the formulas in your sheet.
- Forecast Sheet — Creates a new worksheet to predict data trends.
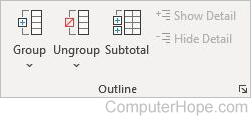
Outline
- Group — Groups rows or columns, or automatically creates an outline.
- Ungroup — Ungroups a range of cells previously grouped.
- Subtotal — Quickly calculates rows of related data by inserting totals and subtotals.
- Show Detail — Expands a collapsed group of cells.
- Hide Detail — Collapses a group of cells.
Review tab
Proofing
- Spelling — Spellchecker.
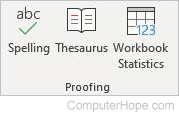
- Thesaurus — Checks for alternate words.
- Workbook Statistics — Counts cells, formulas, sheets, and tables.

Accessibility
- Check Accessibility — Checks your document to make sure it is easily legible.

Insights
- Smart Lookup — Selects text in the document to search for a definition or more information online.
Language
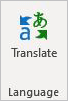
- Translate — Translates your text into another language.
Comments
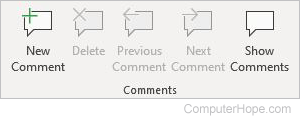
- New Comment — Adds a note to the document.
- Delete — Deletes a note from the document.
- Previous — Skips to the previous note.
- Next — Skips to the next note.
- Show Comments — Displays all comments in the document.

Notes
- Notes — Adds a note about this part of the document.
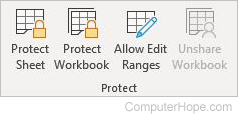
Protect
- Protect Sheet — Limits others from editing the worksheet.
- Protect Workbook — Keeps others from deleting, moving, or adding sheets to the current workbook.
- Allow Edit Ranges — Sets up password protection on a selection of cells, and select who can make changes to those cells.
- Unshare Workbook — Unshares a workbook.

Ink
- Hide Ink — On touch-enabled computers, lets you hide any drawings made with Draw or Ink.
View tab
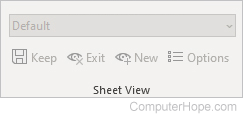
Sheet View
- Default — Switches sheet view.
- Keep — Keeps sheet view.
- Exit — Exits sheet view.
- New — New sheet view.
- Options — Sheet view options.
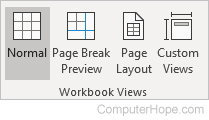
Workbook Views
- Normal — Displays your document in a standard view.
- Page Break Preview — Reveals where the page breaks would be if the document were printed.
- Page Layout — Displays how the printed document looks.
- Custom Views — Saves your current display and print settings as a custom view that you can apply in the future.
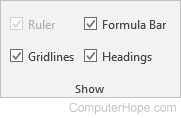
Show
- Ruler — Shows rulers next to your document.
- Gridlines — Shows gridlines over the document.
- Formula Bar — Displays and hides the formula bar.
- Headings — Displays and hides column letters and row numbers.
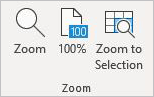
Zoom
- Zoom — Increases the viewing size of the document.
- 100% — Displays the document at actual size.
- Zoom to Selection — Zooms the sheet so the entire selected area fills the window.
Window
- New Window — Opens a window of your document so you can work in multiple places.
- Arrange All — Stacks your documents so you can see them all at once.
- Freeze Panes — Freezes selected rows or columns to keep them visible when scrolling.
- Split — Displays two sections of your document at one time.
- Hide — Hides the current window.
- Unhide — Unhides any windows currently hidden.
- View Side by Side — Displays different documents side-by-side for comparison.
- Synchronous Scrolling — Scrolls two documents at the same time.
- Reset Window Position — Displays two documents side-by-side, so they are equally sized on the screen.
- Switch Windows — Quickly switches to another open document window.

Macros
- Macros — Create custom macros, or choose from predefined macros, to perform a sequence of actions all at once. To run a macro, click the button on the Quick Access Toolbar, press the keyboard shortcut, or run it from the Macros list.
Help tab
Help
- Help — Open help for Microsoft Excel.
- Contact Support — Get help from a Microsoft support agent.
- Feedback — Provide feedback to Microsoft.
- Show Training — Shows online training and learning content.
- What’s New — Showcases the latest upgrades from Microsoft.
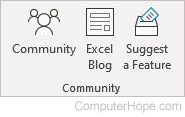
Community
- Community — Connects you with experts and other users of the software.
- Excel Blog — Displays the Excel blog, where you can find news and content related to Excel.
- Suggest a Feature — Provide suggestions for features you’d like to see in future versions of Excel.
Acrobat tab
Note
The Acrobat tab is only available if Adobe Acrobat is installed on your computer.
Create Adobe PDF
- Create PDF — Turns your document into a PDF format.
- Preferences — Configures PDF creation settings.

Create and Share
- Create and Share — Creates a PDF and lets you share it with others.
Review and Comment
- Create and Send For Review — Creates a PDF and sends it for review.
Create and Run Action
- Create PDF and Run Action — Creates a PDF and selects an action to run.
Microsoft PowerPoint Ribbon
The following are the different options and tools listed in the Microsoft PowerPoint Ribbon for each of the tabs. Each section below is outlined first by the tab name, then by each section on the tab.
Home tab
![]()
Undo
- Undo Typing — Removes the last thing you typed.
- Repeat Typing — If you accidentally hit undo typing, you can re-enter the previous text.
Clipboard
- Paste — Pastes information to the slide from the clipboard.
- Cut — Removes information from the slide and puts it in the clipboard.
- Copy — Copies information from the slide.
- Format Painter — Applies formatting from another section of the presentation.
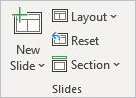
Slides
- New Slide — Adds a slide to the presentation.
- Layout — Changes the layout of the slide.
- Reset — Resets the position, size, and formatting of the slide placeholders to the default settings.
- Section — Organizes your slides into sections.
Font
- Font — Changes the font.
- Font Size — Select the desired font size.
- Increase Font Size — Makes the font size one size larger.
- Decrease Font Size — Makes the font size one size smaller.
- Clear all formatting — Clears all formatting, leaving plain text.
- Bold — Makes the text bold.
- Italicize — Makes the text italicized.
- Underline — Underlines the text.
- Text Shadow — Adds a shadow behind the selected text.
- Strikethrough — Crosses out the text.
- Character Spacing — Adjusts the spacing between characters.
- Change Case — Changes the text to uppercase or lowercase.
- Text Highlight Color — Highlights text. e.g., ComputerHope.com
- Font Color — Changes the color of the font.
Paragraph
- Bullets — Creates a bulleted list.
- Numbering — Creates a numbered list.
- Decrease List Level — Decreases the indent level.
- Increase List Level — Increases the indent level.
- Line spacing — Changes how much spacing appears between rows of text.
- Align Left — Aligns text with the left margin.
- Center — Centers text in the document.
- Align Right— Aligns text with the right margin.
- Justify — Distributes the text evenly between margins.
- Add or Remove Columns — Splits text into two or more columns, up to 16.
- Text Direction — Changes the text orientation to vertical, stacked, or rotated.
- Align Text — Changes how your text is aligned in the text box.
- Convert to SmartArt — Changes your text into a chart or graphic.
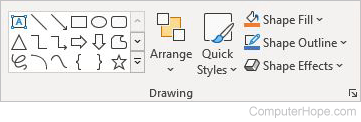
Drawing
- Insert Shapes — Inserts pre-existing shapes.
- Arrange — Arranges objects by changing their positions and shapes.
- Quick Styles — Adds styling to the selected shape or line.
- Shape Fill — Fills in the shape with coloring.
- Shape Outline — Changes the line thickness and color of the outline of the selected shape.
- Shape Effects — Applies a visual effect to the shape, such as shadowing or 3D rotation.
Editing
- Find — Finds words in the presentation.
- Replace — Searches for text in the presentation and replaces it.
- Select — Selects all or some text in the presentation.
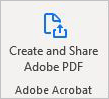
Adobe Acrobat
Note
The Adobe Acrobat section is only displayed if Adobe Acrobat is installed on your computer.
- Create and Share Adobe PDF — Saves the presentation as a PDF and lets you share it with others.

Voice
- Dictate — Enables voice-to-text, using Microsoft Speech Services.
Insert tab

Slides
- New Slide — Adds a slide to your presentation.

Tables
- Table — Adds a table to your presentation.
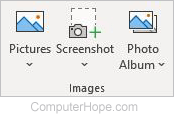
Images
- Pictures — Inserts pictures in the slide.
- Screenshot — Inserts a screenshot in the slide.
- Photo Album — Creates a presentation for your photo collection.
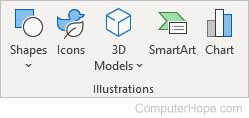
Illustrations
- Shapes — Inserts shapes in the slide.
- Icons — Inserts icons in the slide.
- 3D Models — Inserts a 3D model in the slide.
- SmartArt — Inserts a SmartArt graph or list in the slide.
- Chart — Creates a chart using your information.
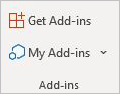
Add-ins
- Get Add-ins — Add functionality to PowerPoint.
- My Add-ins — Inserts add-ins obtained from Get Add-ins.
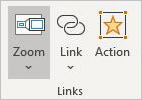
Links
- Zoom — Creatively presents your content in a non-linear way.
- Link — Creates a link to a web page.
- Action — Gives the object an action to perform when the mouse hovers over it.

Comments
- Comment — Adds notes in specific places in the presentation.
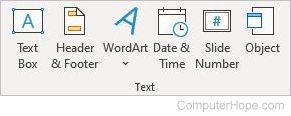
Text
- Text Box — Adds a custom box for text, bringing attention to it.
- Header & Footer — Provides an editable content area that is presented at the top or bottom of each printed page.
- WordArt — Adds artistic touches to the text in this box.
- Date & Time — Adds the date and time to the document with different options.
- Slide Number — Numbers the slides in your presentation.
- Object — Adds another document or chart to the existing slide.
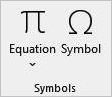
Symbols
- Equation — Adds mathematical equations to the slide.
- Symbol — Adds symbols to the slide, such as currency and trademark.
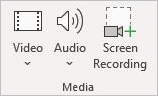
Media
- Video — Adds a video to your slide.
- Audio — Inserts audio to your slide.
- Screen Recording — Records your computer screen as a video and adds it to the slide.

Media
- Insert Media — Inserts media.
Design tab
Themes

- Themes — Choose from pre-made themes for the slide.
Variants
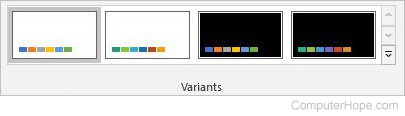
- Variants — Choose a variant of the selected theme for the slide.
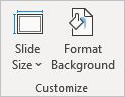
Customize
- Slide Size — Changes the size of the slides in the current presentation.
- Format Background — Fine-tunes the formatting for the background, or hides design elements from the current design.

Designer
- Design Ideas — Suggests designs to use in the slide.
Transitions tab

Preview
- Preview — Plays the transition to this slide.

Transition to This Slide
- Transitions — Select from several transitions to use in the presentation.
Timing
- Sound — Choose a sound to use during the transition from the previous slide to the current slide.
- Duration — Specifies the length of the transition.
- Apply To All — Applies the current slide’s transition and settings to the entire presentation.
- Advance Slide — Choose how to advance each slide of the presentation.
- On Mouse Click — Choose to advance each slide with a mouse click.
- After — Moves to the next slide after a specified time frame.
Animations tab

Preview
- Preview — Plays the animations on the current slide.

Animation
- Animations — Choose from several animations to use in the slide.
Advanced Animation
- Add Animation — Specify an animation effect for the slide.
- Animation Pane — View or edit the animation timeline for the slide.
- Trigger — Sets a particular start condition for an animation.
- Animation Painter — Applies the animation of one object to another.
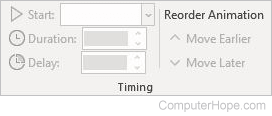
Timing
- Start — Choose when the animation should play.
- Duration — Specify the length of the selected animation.
- Delay — Plays the animation after a certain number of seconds.
- Reorder Animation — Choose from the following where the animation should appear.
- Move Earlier — Moves the current animation to play earlier.
- Move Later — Moves the current animation to play later.
Slide Show tab
Start Slide Show
- From Beginning — Displays the slides beginning with the first.
- From Current Slide — Plays the presentation from the current slide.
- Present Online — Selects a service to show the presentation online.
- Custom Slide Show — Tailors your presentation to show only the slides you choose.
Set up
- Set Up Slide Show — Shows advanced options for setting up the slide show.
- Hide Slide — Hides the current slide from showing in the presentation.
- Rehearse Timings — Plays the current slide show to practice the delivery timing.
- Record Slide Show — Decide where to start recording the slide show.
- Keep Slides Updated -Decide whether to synchronize changes that occur when you’re presenting.
- Play Narrations — Choose whether to playback audio narrations and laser pointer gestures during the slide show.
- Use Timings — Decide whether to play animation timings during the slide show.
- Show Media Controls — Choose whether to show the controls for playing audio and video clips when you hover over the clips during the slide show.
Monitors
- Monitor — Choose which monitor shows the presentation.
- Use Presenter View — Shows the full-screen slide show on one monitor and the «speaker view» on another monitor. If you only have one monitor, you can use Alt+F5 to try out Presenter View.
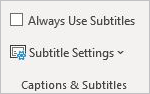
Captions & Subtitles
- Always Use Subtitles — Decide whether to allow subtitles.
- Subtitle Settings — Choose settings for the captions and subtitles, like language, microphone, position, and style.
Review tab
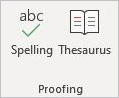
Proofing
- Spelling — Spellchecker.
- Thesaurus — Checks for alternate words.

Accessibility
- Check Accessibility — Checks the presentation to make sure it is easily legible.

Insights
- Smart Lookup — Selects text in the slide to search for a definition or more information online.
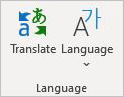
Language
- Translate — Translates text into another language.
- Language — Choose the language for proofing tools, like spellcheck.
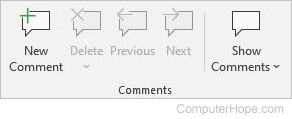
Comments
- New Comment — Adds a note to the slide.
- Delete — Deletes a note from the slide.
- Previous — Skips to the previous note.
- Next — Skips to the next note.
- Show Comments — Displays all comments in the slide.
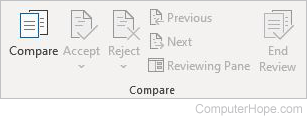
Compare
- Compare — Compares and combines another presentation with yours.
- Accept — Accepts the changes.
- Reject — Rejects the current change.
- Previous — Jumps to the previous tracked change.
- Next — Jumps to the next tracked change.
- Reviewing Pane — Shows the reviewing pane when reviewing changes.
- End Review — Ends the presentation review, applying the current accept and reject decisions.

Ink
- Hide Ink — On touch-enabled computers, lets you hide any drawings made with Draw or Ink.
View tab
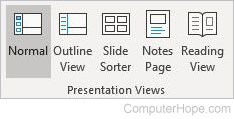
Presentation Views
- Normal — Edits your presentation slide-by-slide in the default view.
- Outline View — Edits and jumps between slides in the outline pane.
- Slide Sorter — Displays thumbnails of the slides in the presentation to rearrange them quickly.
- Notes Page — Shows how the presentation looks when printed with notes.
- Reading View — Plays the slide show in the PowerPoint window to see animations and transitions without switching to a full-screen view.
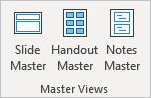
Master Views
- Slide Master — Controls the look of the entire presentation.
- Handout Master — Customizes how the presentation looks as a handout.
- Notes Master — Customizes how the presentation looks printed with notes.
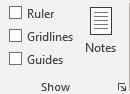
Show
- Ruler — Shows a ruler on the top and left side of the slide.
- Gridlines — Shows gridlines over the slide.
- Guides — Shows adjustable drawing guides to align objects on the slide.
- Notes — Adds speaker notes to the slides for a quick reference during a presentation.
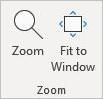
Zoom
- Zoom — Zooms the presentation interactively.
- Fit to Window — Zooms the presentation so the slide fills the entire window.
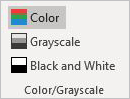
Color/Grayscale
- Color — Displays the presentation in color.
- Grayscale — Displays the presentation in shades of gray.
- Black and White — Displays the presentation in black and white.
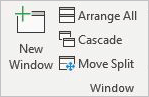
Window
- New Window — Opens a second window of the current presentation so you can work in two different places simultaneously.
- Arrange All — Stacks the open windows you can see them all at once.
- Cascade — Shows all open windows overlapped on the screen.
- Move Split — Adjust the border line between different panes of the window.
- Switch Windows — Quickly switches to another open window.

Macros
- Macros — Create custom macros, or choose from predefined macros, to perform a sequence of actions all at once. To run a macro, click the button on the Quick Access Toolbar, press the keyboard shortcut, or run it from the Macros list.
Help tab

Help
- Help — Get help with Microsoft PowerPoint.
- Contact Support — Request help from a Microsoft support agent.
- Feedback — Provide feedback to Microsoft.
- Show Training — Shows online training and learning content.
- What’s New — Showcases the latest upgrades from Microsoft.
Acrobat tab
Note
The Acrobat tab is only available if Adobe Acrobat is installed on your computer.
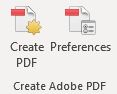
Create Adobe PDF
- Create PDF — Turns the presentation into a PDF format.
- Preferences — Configures PDF creation settings.

Create and Share
- Create and Share — Creates a PDF and lets you share it online.
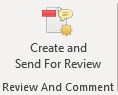
Review And Comment
- Create and Send For Review — Creates a PDF and sends it for review.
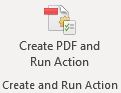
Create and Run Action
- Create PDF and Run Action — Creates a PDF and lets you select an action to run.

Media
- Insert Media — Inserts media.

Contents
- 1 How to Show the Ribbon in Word, Excel, PowerPoint, and Outlook
- 2 How to Customize the Ribbon in Word, PowerPoint, Excel, or Outlook
- 3 How to Customize Ribbon Tab Groups in Microsoft Office
- 4 How to Customize Group Commands in the Outlook, PowerPoint, Excel, or Word Ribbon
For many years now, Microsoft Office has used an intuitive ribbon system to help users easily find and organize the tools they require. Though many are familiar with the interface, fewer realize that you can actually customize the ribbon in MS Word, PowerPoint, Excel, and Outlook.
What is the ribbon in Word?
Before we show you how to use the Office ribbon editor to achieve this customization, let’s quickly cover what the ribbon is, how it works, and why you might want to change things up.
To put it simply, the Microsoft Word ribbon is a UI element at the top of your document that provides access to most of its tools, which Microsoft calls “Commands”. For ease of use, there are ribbon tabs, which break up these commands into different sections, and groups within that. All other Office components such as Excel and PowerPoint and most of many modern Windows Applications use a ribbon interface.
However, while these default categories clearly made sense to the designer, they may not make sense to you. For example, the “Review” tab doesn’t contain a button to mark a document up with digital ink.
With a few clicks, you can use the Office ribbon editor to adjust which tabs show, or even create your own tab with the tools you use most. As you can imagine, this can have quite a positive effect on productivity.
First, though, let’s cover how to show the ribbon in Word, PowerPoint, Excel, or Outlook in case you’ve hit that pesky auto-hide button.
How to Show the Ribbon in Word, Excel, PowerPoint, and Outlook
Though Microsoft doesn’t particularly advertise it, the Office ribbon menu has two modes: pinned and collapsed. The default, which many are used to, is pinned, which constantly displays it at the top of the screen. If you prefer a more minimal look, however, the collapsed mode shows only the tab headings. Here’s how you can switch between them:
- Collapse the ribbon in Microsoft Word
You can minimize the ribbon in Word or any Office app by simply pressing the arrow in its bottom-right corner.

- Access your ribbon by clicking on a tab
You can just click one of the tab headings at the top of your document to view the ribbon again. It will stay visible until you click back on your main document, at which point it will minimize again.

- How to show the ribbon in Word
If your Office ribbon keeps auto-hiding, you can click one of the tabs, then press the pin button in the bottom-right corner. This will ensure it stays stuck to the top of your screen.

- How to reset the Office ribbon
If your Microsoft Office or Word ribbon tabs have disappeared or have some other issue, you can reset them via the options menu.
Press “File” in your ribbon, or Ctrl + F3 on your keyboard, then click “Options” at the bottom of the screen.

- Reset your Office Ribbon in Options
Click “Customize Ribbon” in the sidebar, then look for the heading towards the bottom that says “Customizations: Reset”. Press the “Reset” button, then click “Reset all customizations”

- Delete all Ribbon and Quick Access Toolbar customizations
Press “Yes” to the warning prompt that appears. This will simply reset your ribbon in Microsoft Word to its default state, and won’t cause any kind of damage to your install.

- Press “OK” in the Word Options window
If you previously made customizations to your Word, PowerPoint, Excel, or Outlook ribbon, you should now see that they’re back to normal.


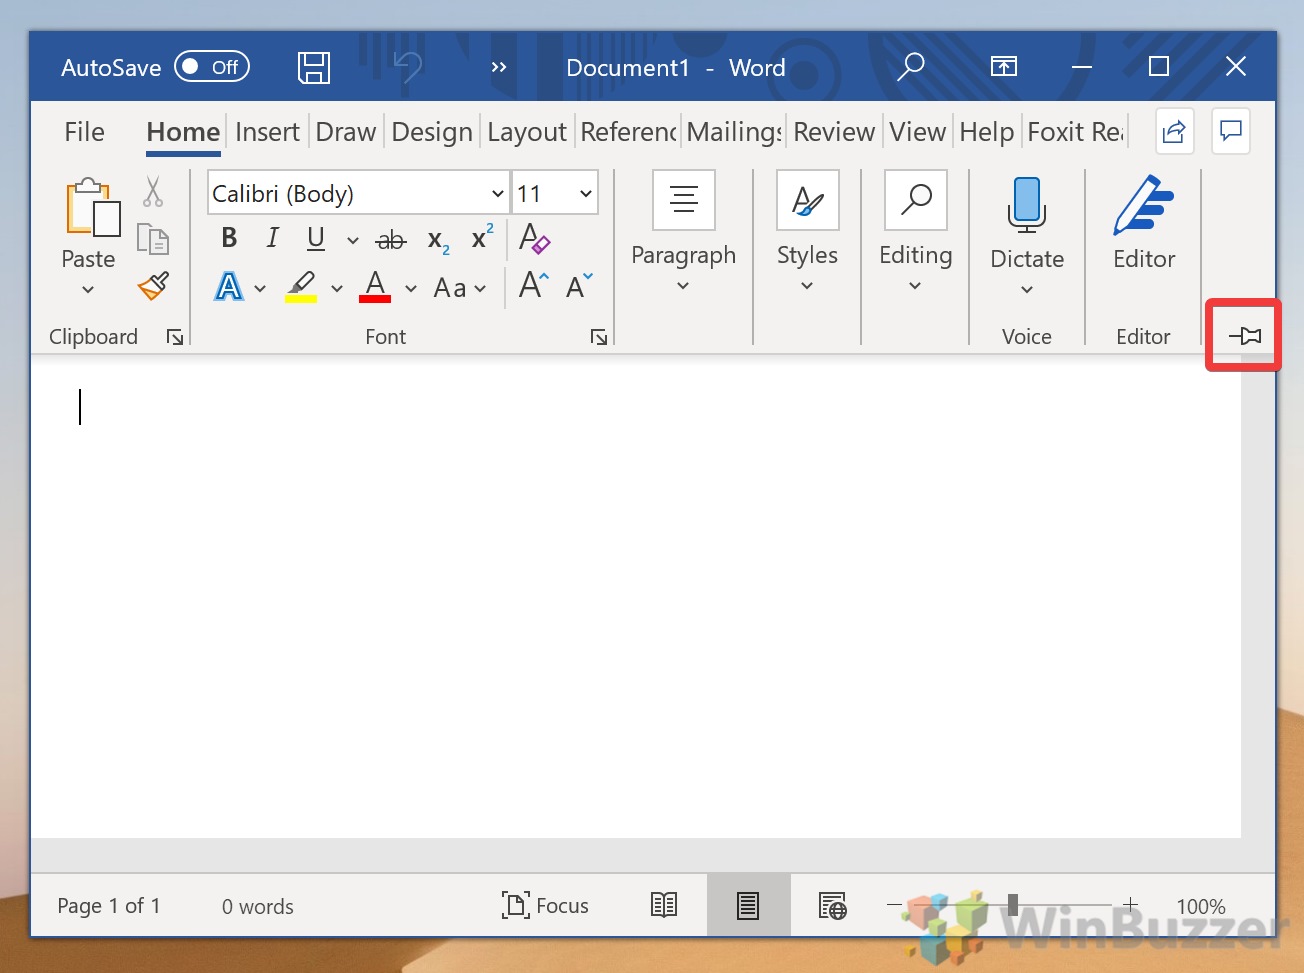

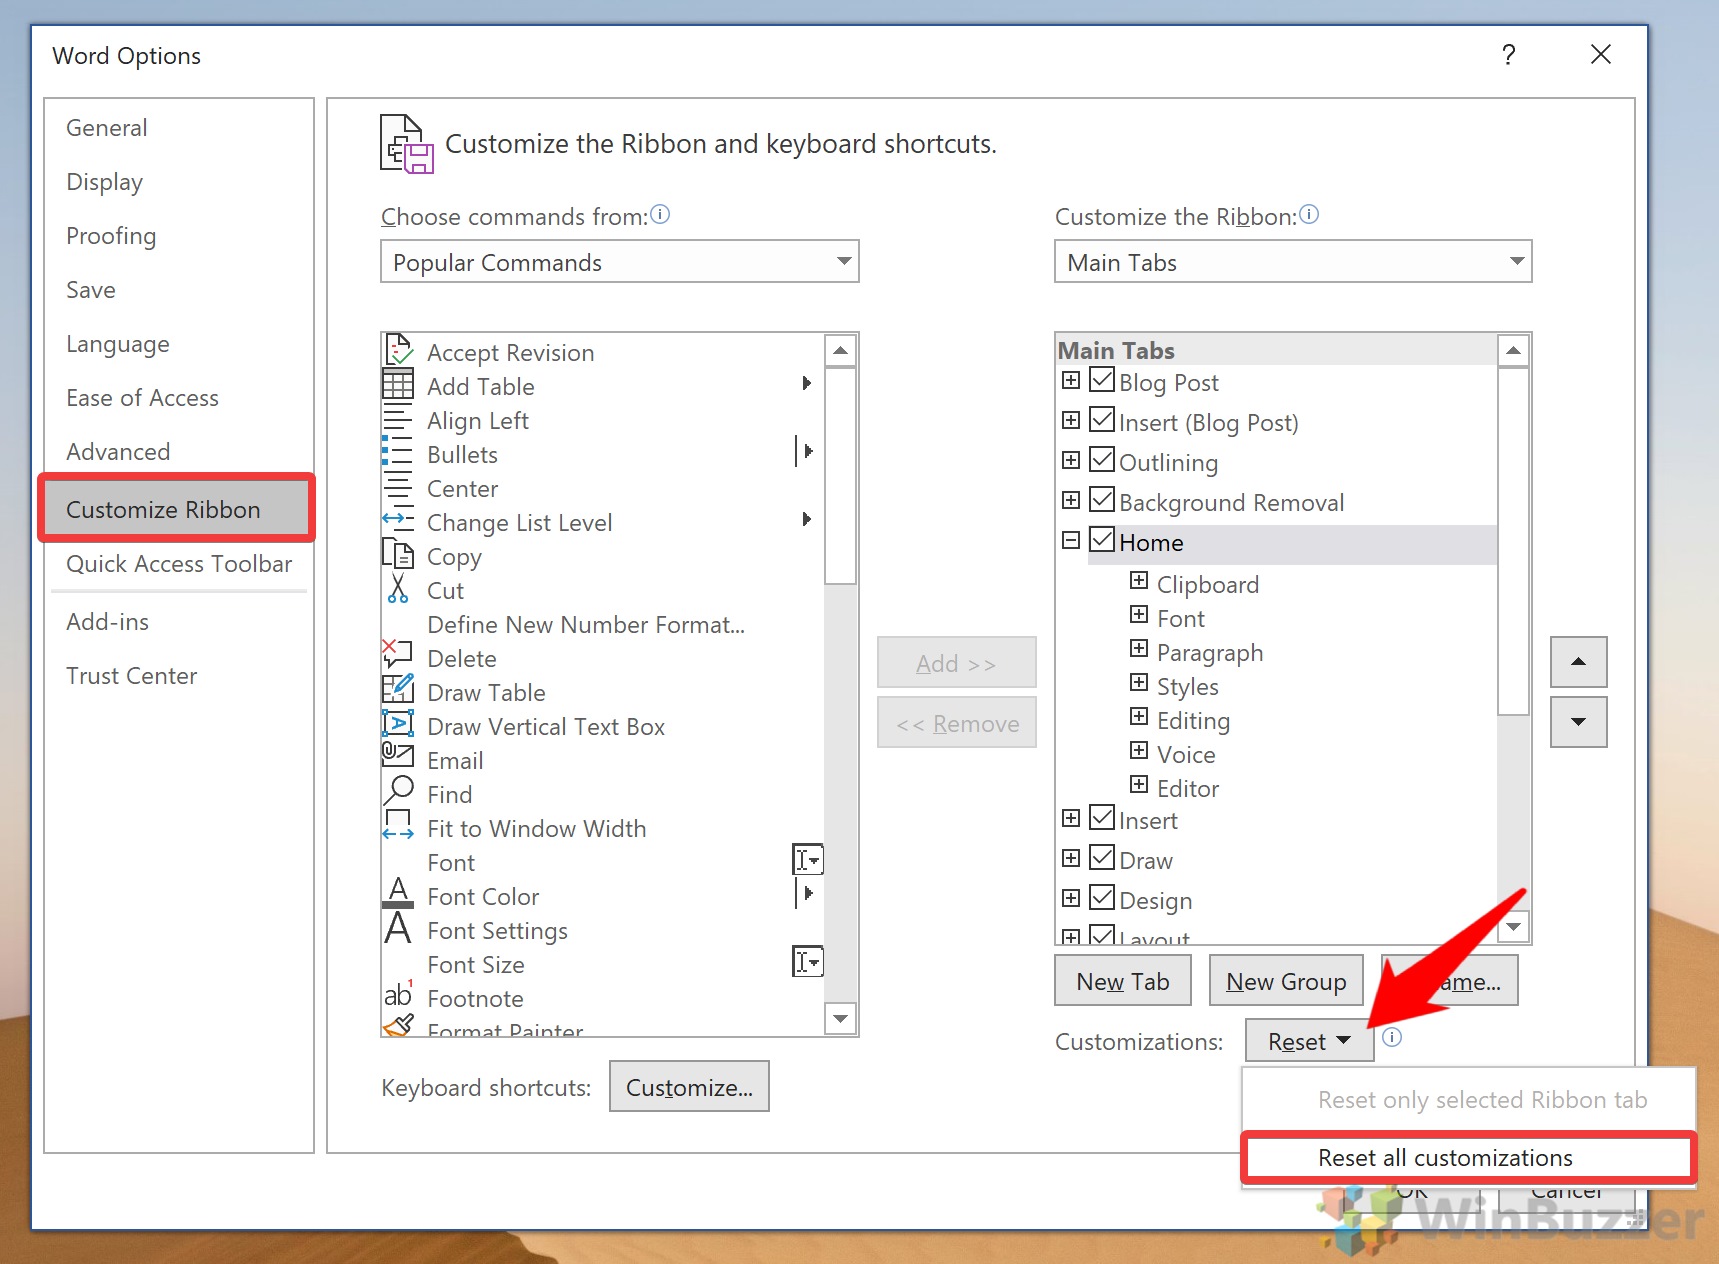
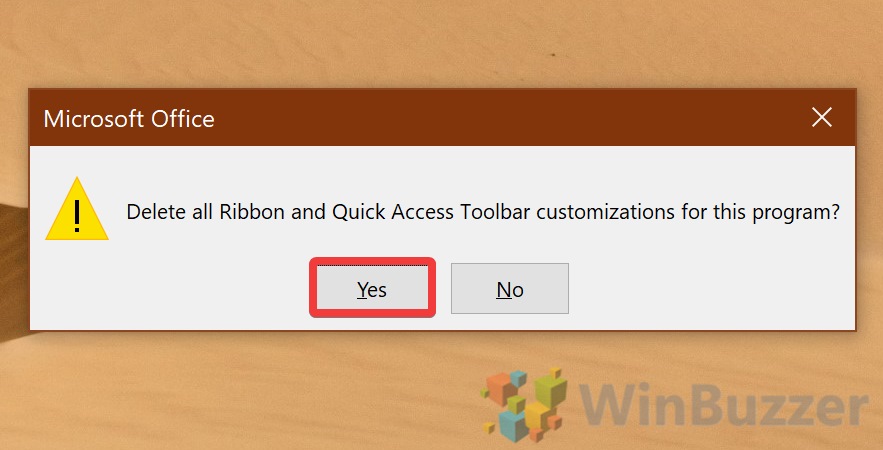
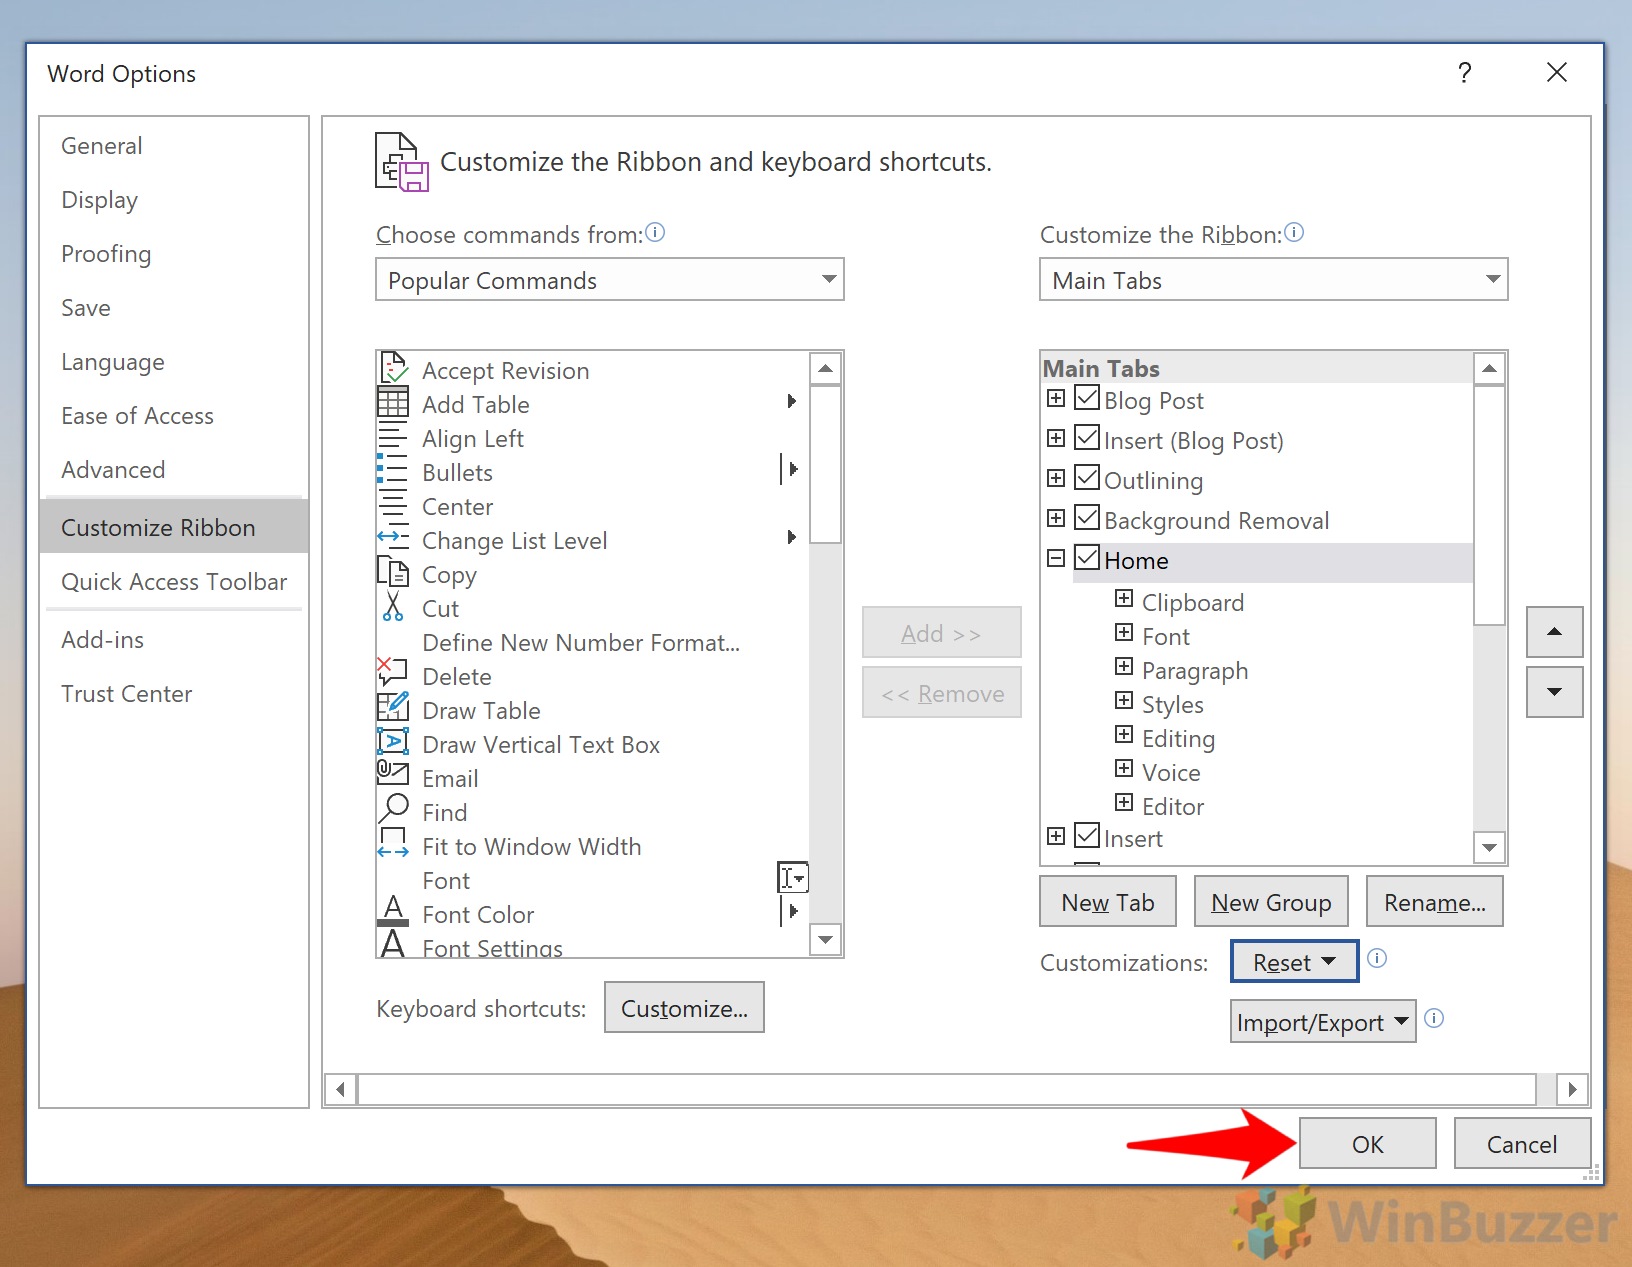
How to Customize the Ribbon in Word, PowerPoint, Excel, or Outlook
So, how do you change which ribbon tabs show up, or the positions of existing tabs? Quite easily, it turns out. The built-in Office ribbon editor lets you quickly chop and change to suit your preferences.
- Open the options menu
Press the “File” button in your ribbon and then click “Options” in the bottom-left corner.
- Create a new ribbon tab
Click “Customize Ribbon” on the left-hand side, then press “New tab” underneath the right-hand column in the Office Ribbon editor.

- Rename your new Ribbon tab
By default, your new tab will be called “MyTab (Custom)”. We don’t want that, so find it in the list, click it, then press “Rename…”. If you’re curious, you can also use this method to change the name of any of Word’s existing tabs. Quite nice if you want to change “Review” to something like “Editing”, for example.

- Change the order of your Ribbon tabs
If you’re like me, the “Review” tab is one of your most used, yet it’s right near the end of the Word Ribbon menu. You can change this, or move your newly created tab, by clicking “File > Options”.
- Customize your Ribbon tab order
Click “Customize ribbon” in the sidebar, then click the tab you’d like to move in the right-hand column and press the up and down arrows to the right of it to move its position. The higher up it is, the further to the right it will be in your Office ribbon. Press “OK” to apply the changes.

- Hide or show a ribbon tab
If there are tabs you don’t use or ones that aren’t showing up, you can untick them to hide or show them.
- Tick or Untick a Ribbon Tab in the Ribbon Editor
Click “Customize Ribbon” in the sidebar, then tick or untick the tabs you want to display. Note that Office has some built-in tabs that will be disabled by default, such as the “Developer” tab.
Press “OK” when you’re done with your changes.

- Delete a Microsoft Office Ribbon tab
If you made a custom tab that you no longer need, you can completely delete it. Bear in mind that you can’t delete default Ribbon tabs, though, only hide them.
First, press “File > Options” to open the ribbon tab.
- Right-click the tab and press “Remove” in the Ribbon editor
Click “Customize Ribbon” in the sidebar, then right-click your custom tab and press “Remove” to delete it.


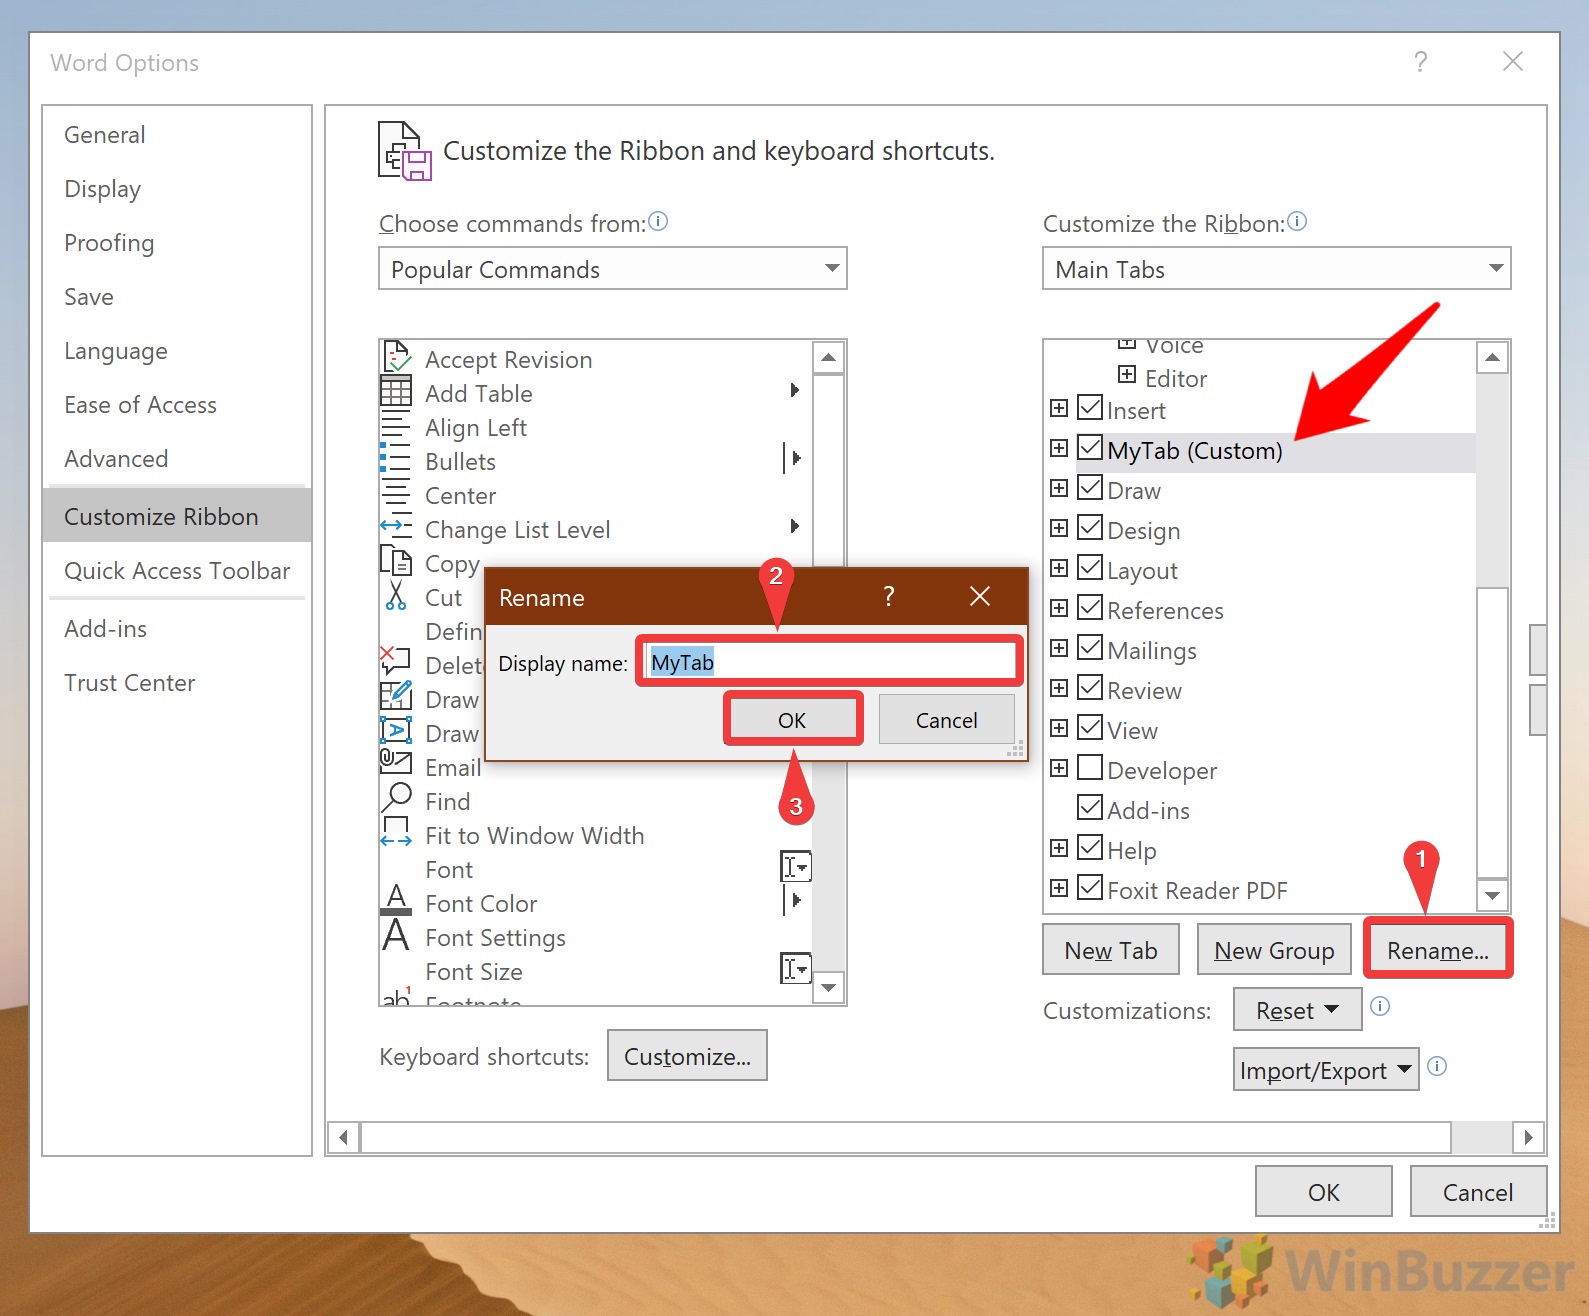
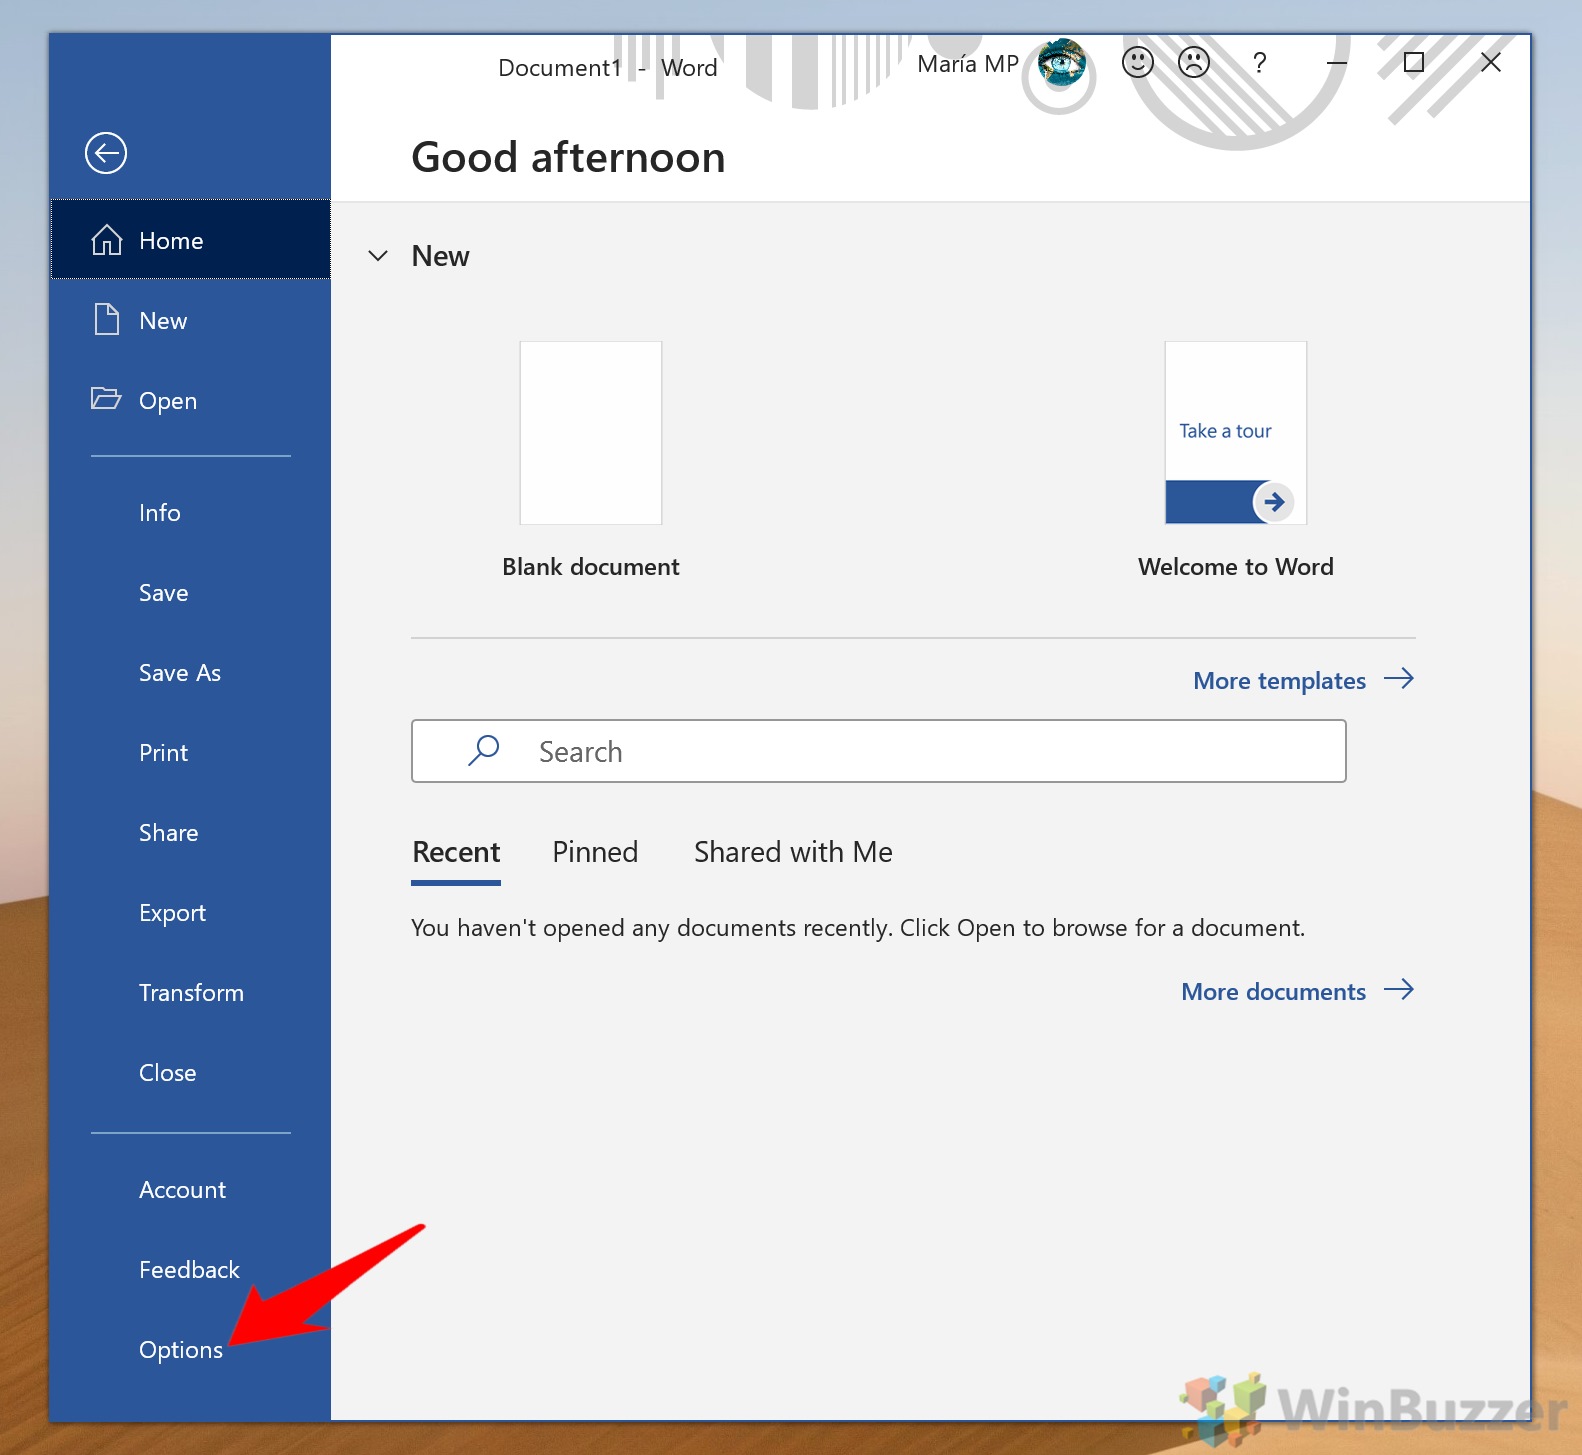


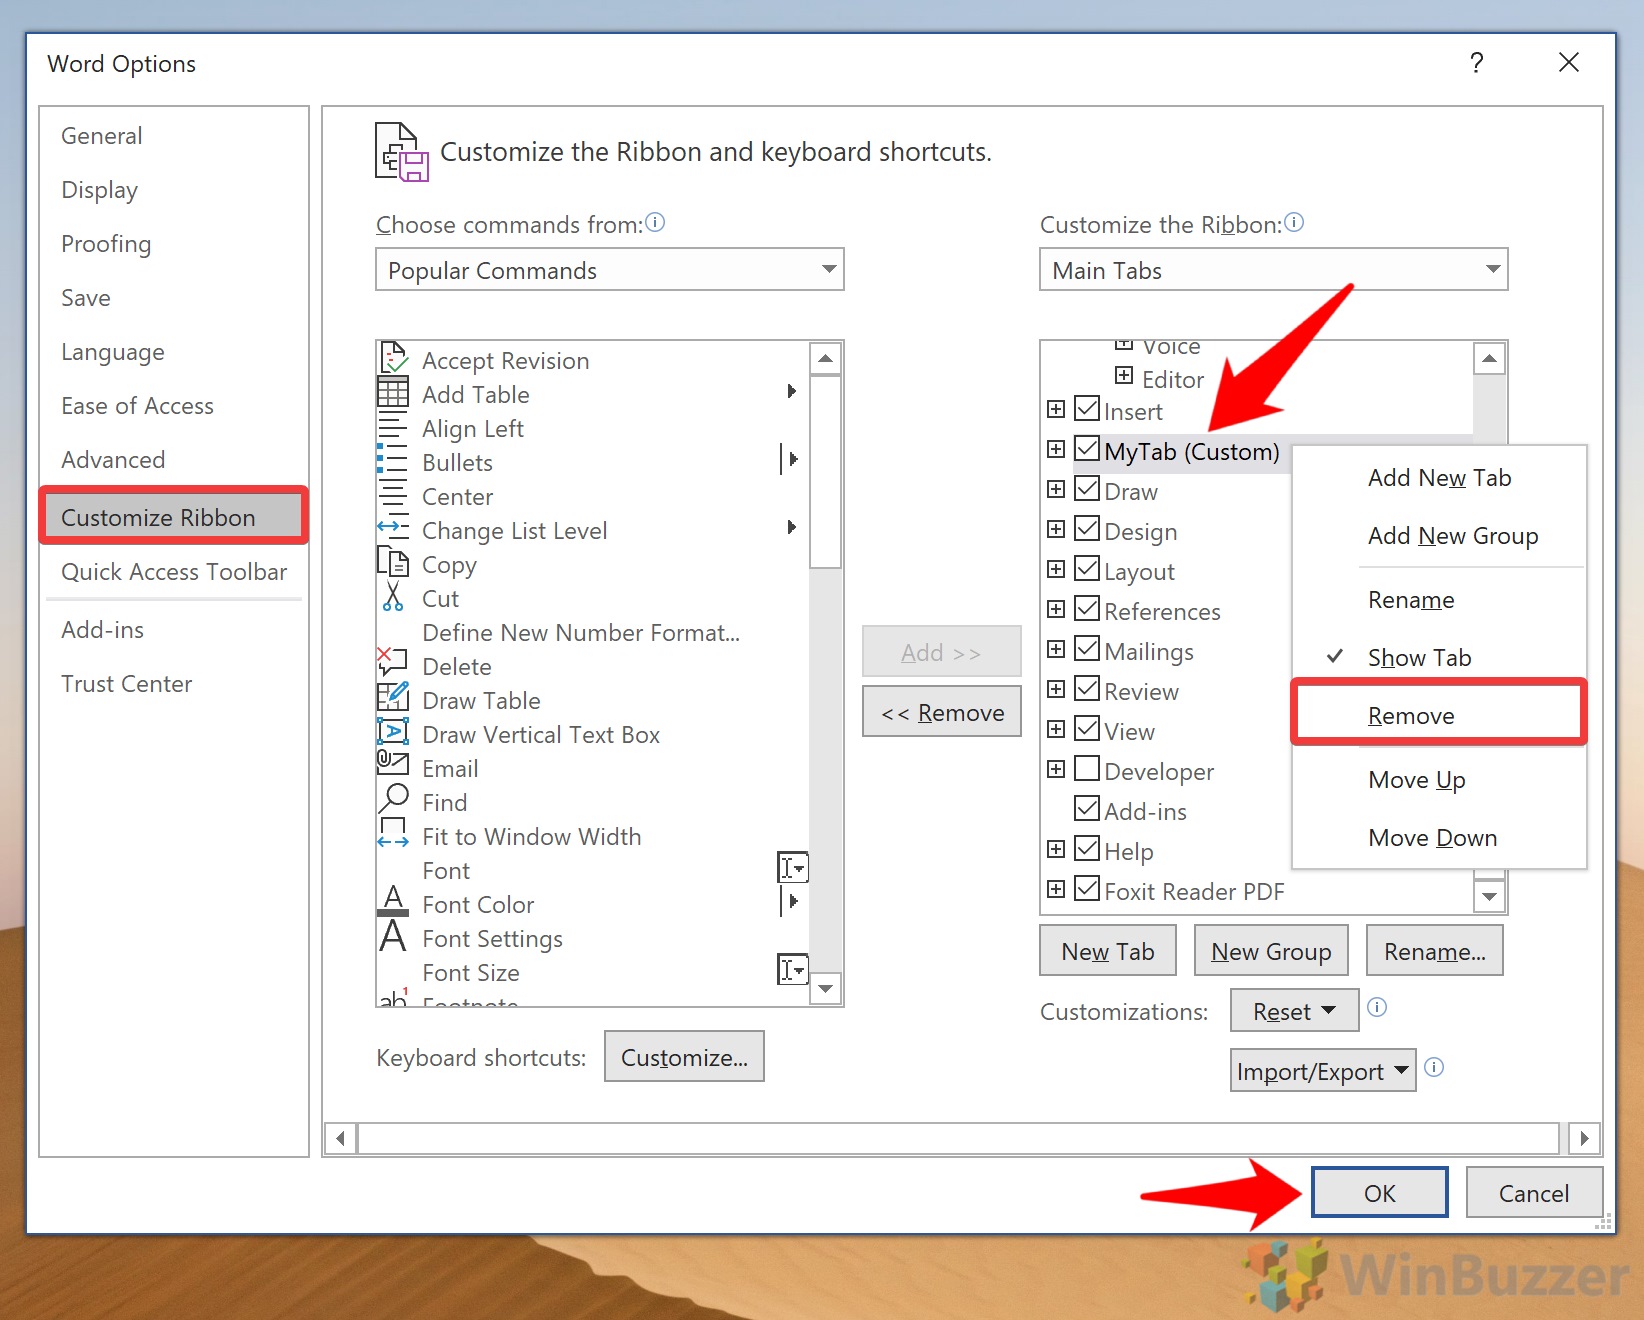
You may have noticed that each of your Ribbon tabs is split into its own sections, separated by a single vertical line with different headings underneath. These are referred to as “Command groups”, and you can create, rename, or change the icon of them in your custom tabs.
- Press “File > Options”
- Create a New Group
Click “Customize Ribbon” in the sidebar, then a tab you’d like to modify. Below the right-hand column, click “New Group”.

- Rename your group
By default, your group will be called “New Group (Custom)”. That’s not particularly descriptive, so you’ll want to click it immediately and press “Rename…” at the bottom of the right-hand column.
Call it something that makes a bit more sense and choose a symbol if you wish. Press “OK”.

- How to re-order your command groups
Just like tabs, you can re-order your ribbon groups, with the highest group displaying on the left-hand side.
To start, click “File > Options”.
- Move your command group up or down
In the Office Ribbon editor sidebar, click “Customize Ribbon”, then select the group you’d like to move in the right-hand column. Click the arrows beside it to move it up or down. It’s worth noting that you can do this with any group, including the default ones.Once you’re finished, don’t forget to hit “OK”.

- How to remove a command group
To start removing a group of commands from the ribbon in MS Word, press “File > Options”.
- Remove the command group via right-click
Click “Customize Ribbon” in the sidebar, then select the command group you want to remove in the right-hand column. Bear in mind that it must be a custom group or you won’t be able to delete it.
Right-click your command group and then press “Remove” and “OK”.


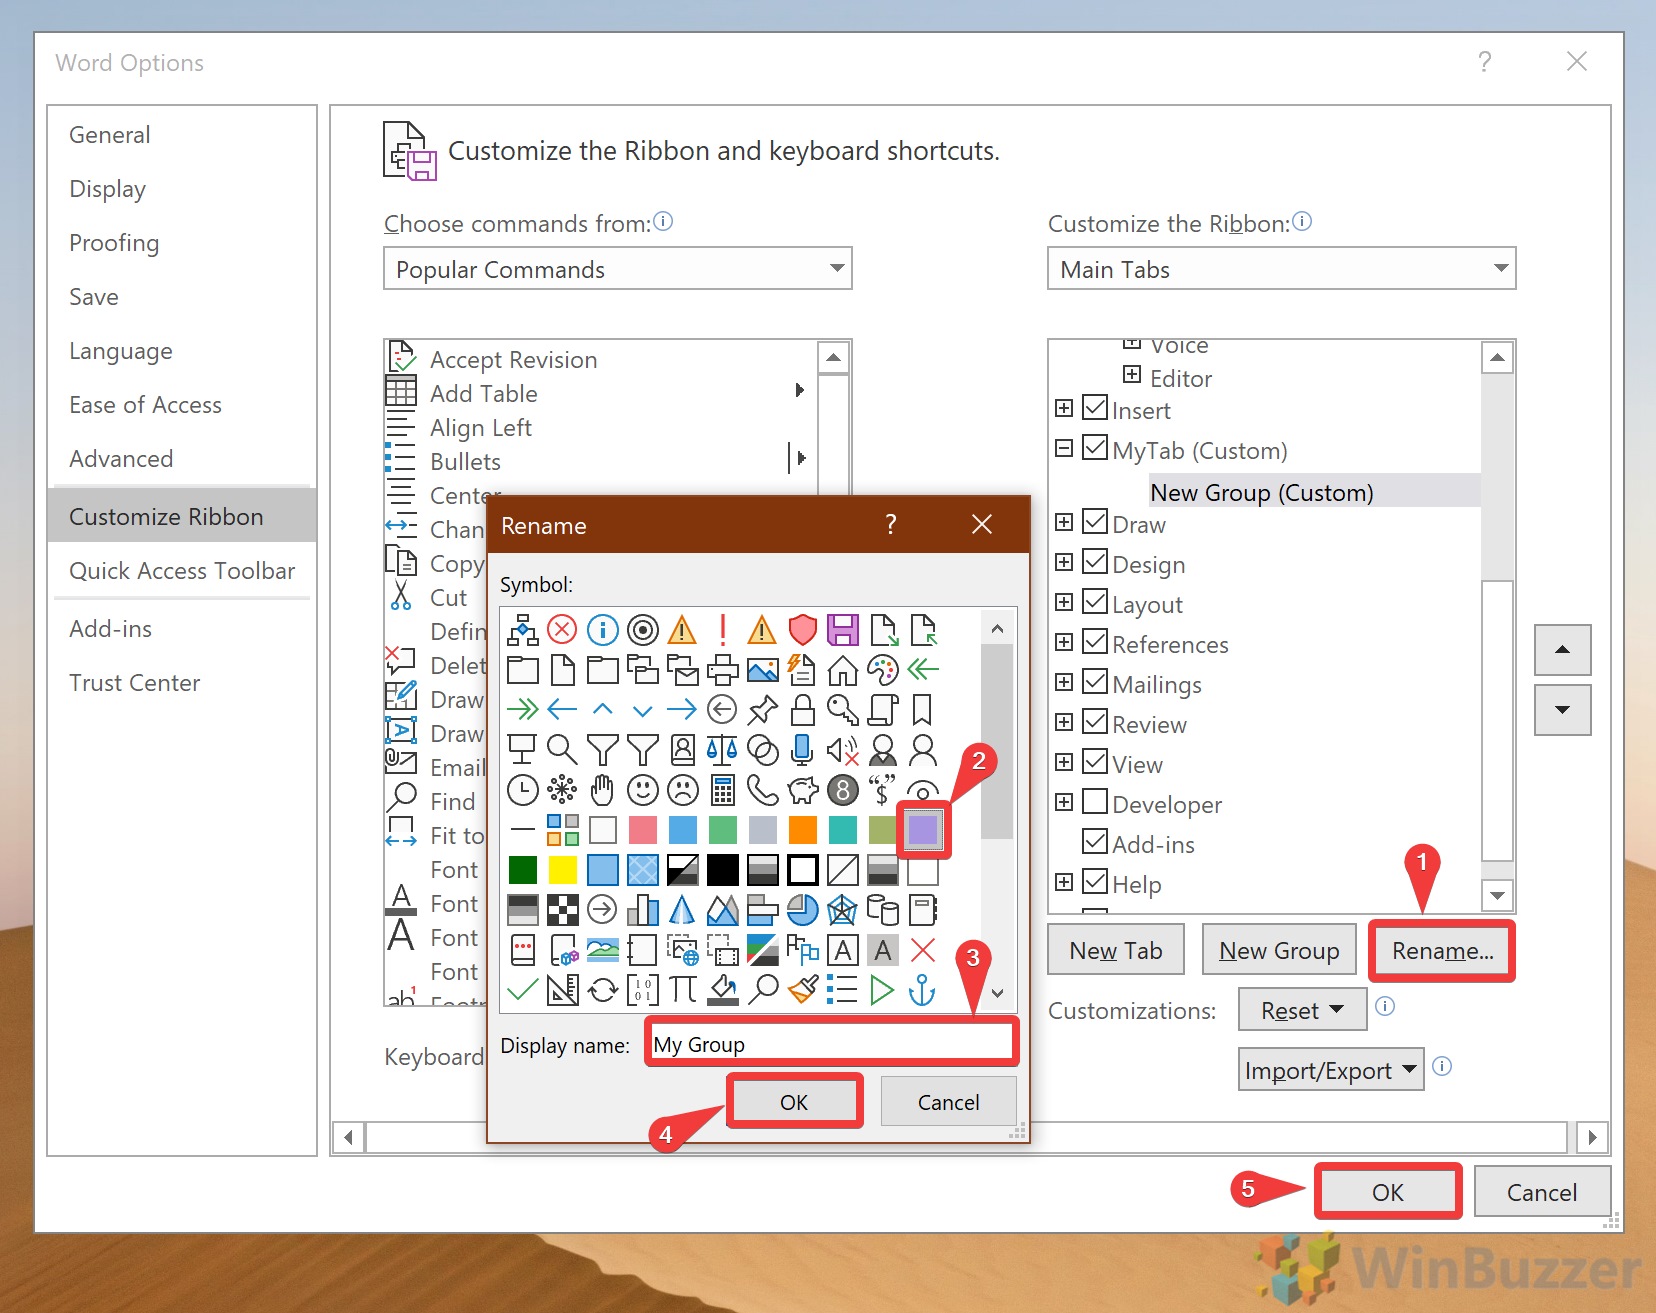

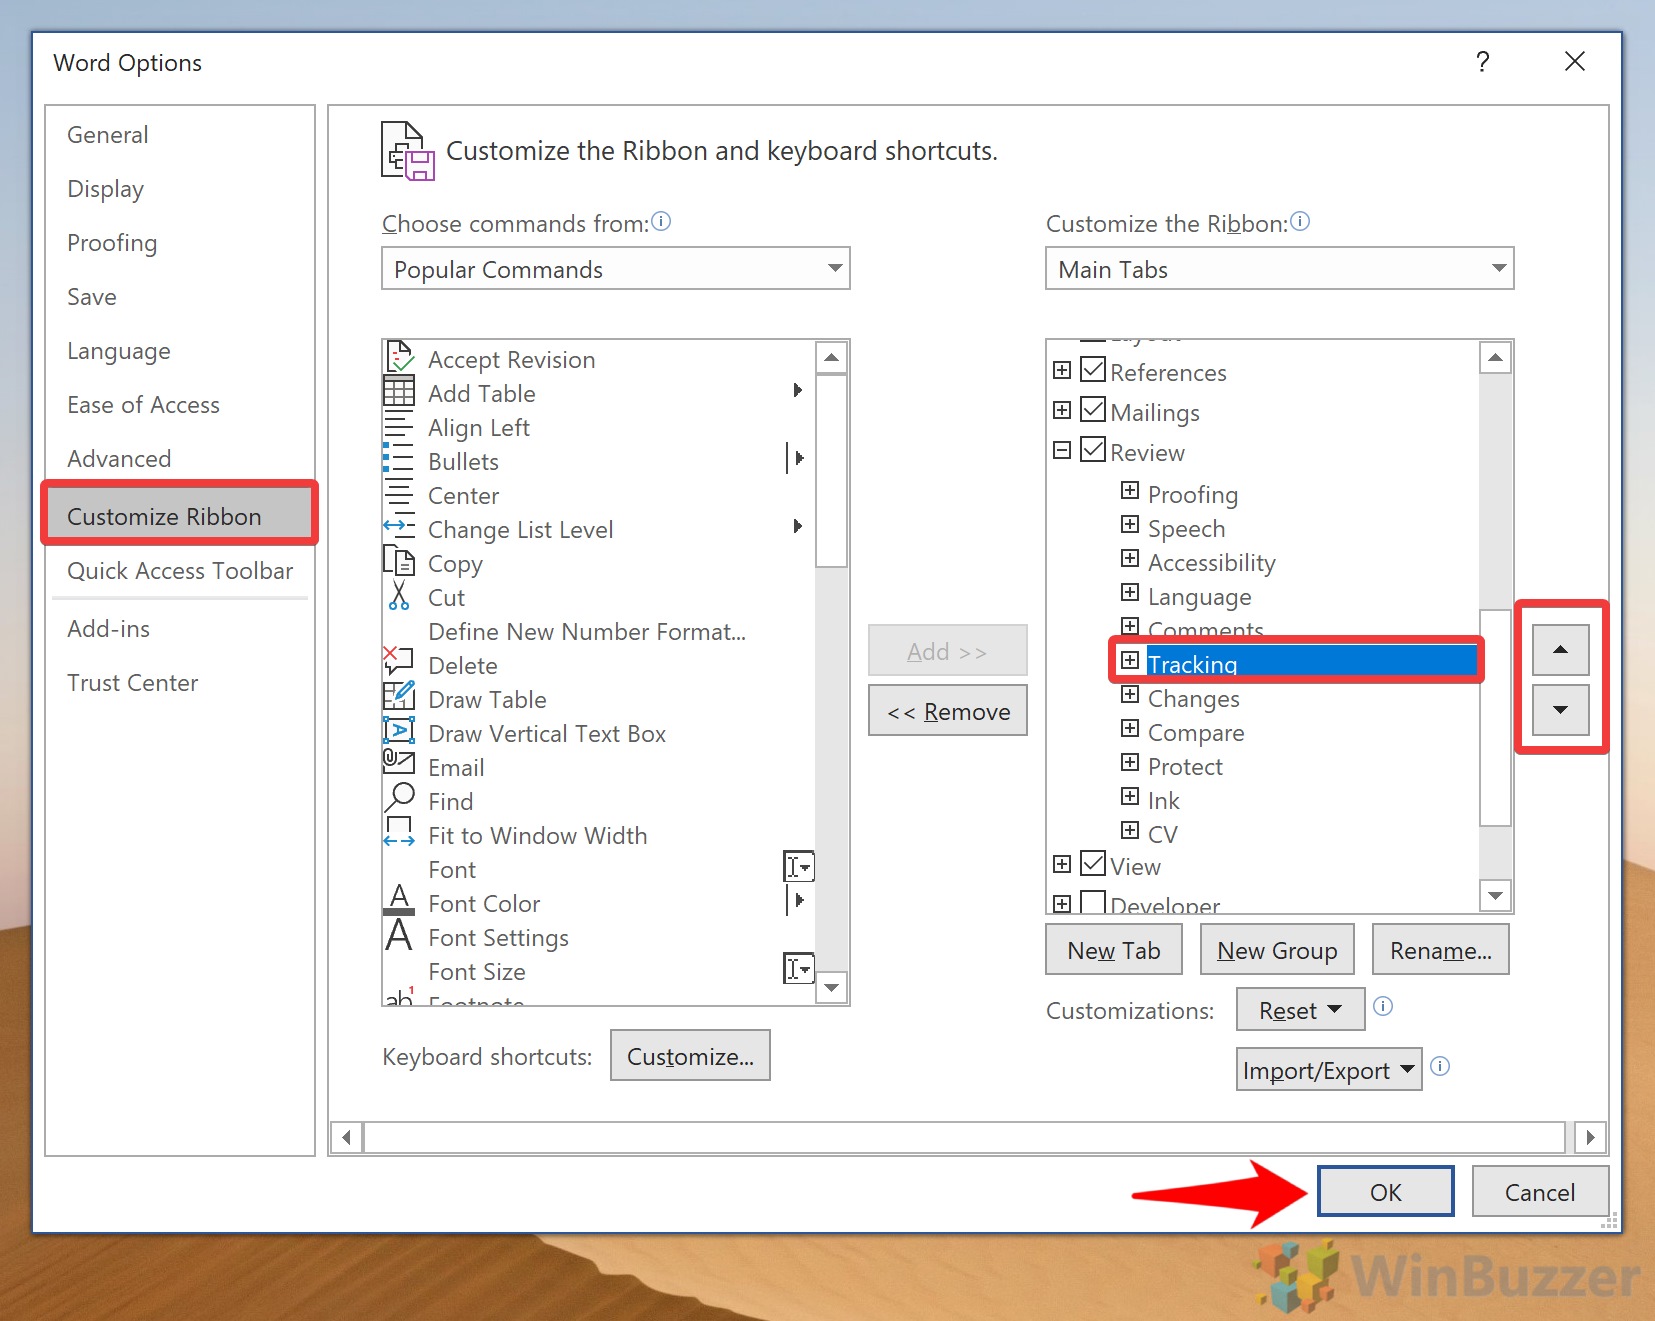

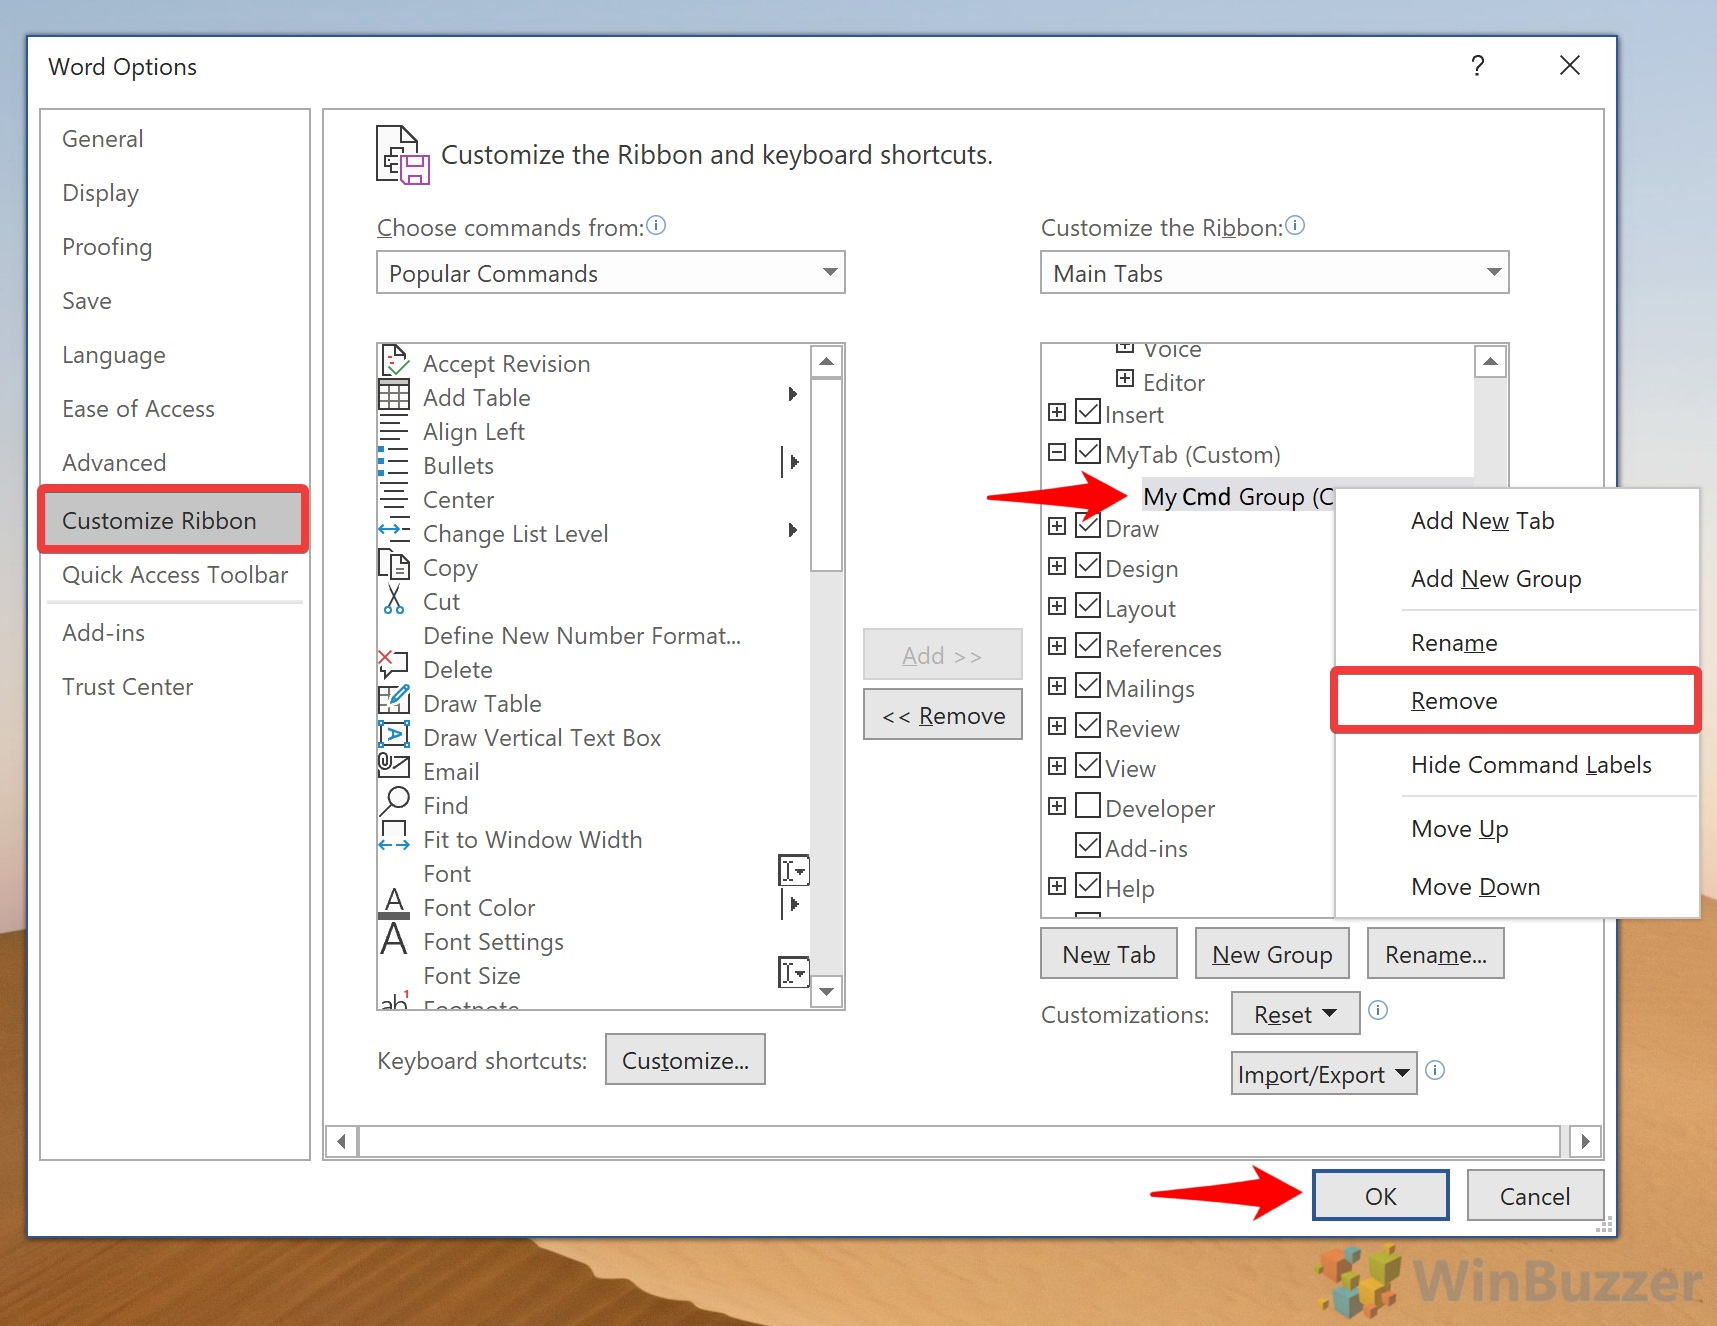
How to Customize Group Commands in the Outlook, PowerPoint, Excel, or Word Ribbon
One of the most useful ways you can customize your ribbon in Microsoft Word is by changing which commands (Ribbon icons) show in which tab. With the Ribbon editor, you can add specific tools to your custom tab or change which tools show in the default tabs. Here’s how:
- Open Microsoft Office Options
In your Office app of choice (in our case Word), click “File > Options”.
- Add ribbon commands to your command group
In the sidebar, click “Customize Ribbon”. Then, in the left-hand column click the ribbon icon you’d like to add to your group. Select the command group in the right-hand tab, then click “Add >>” to move it across. Repeat this process for each command you’d like to add to your ribbon tab.

- Remove a ribbon icon from your custom ribbon tab
Sadly, you can only remove commands from command groups/ribbon tabs that you have created. However, you can always hide a default ribbon tab and recreate it minus the icons you don’t want.
Anyway, to remove a ribbon icon, click on it in the right-hand column and then press the “<< Remove” button between the two columns.

- How to change the order of your Office Ribbon commands
You can also change the position of your Ribbon commands inside their groups, moving them left or right. To get started, press “File > Options“.
- Move your Office/Word Ribbon commands up and down in the editor
Click “Customize Ribbon” in the word options window, then select the command you want to move by expanding its group and clicking on it. Press the up and down arrows to its right to move it. Unfortunately, you won’t be able to do this for Word’s default tabs, but you can always recreate them in a different order and hide the original.
Press “OK” to save the changes.

- How to rename a Ribbon group command
If you find a tool’s default description confusing, you can modify it to something more memorable. You could also use this to translate options to your native language.
To get started, press “File > Options”.
- Rename your Ribbon icons
Press “Customize Ribbon” in the options sidebar, then select each command you’d like to change in the right-hand column and press “Rename…”. Call it anything you like, then press “OK”, and “OK” again in the main Word options page.

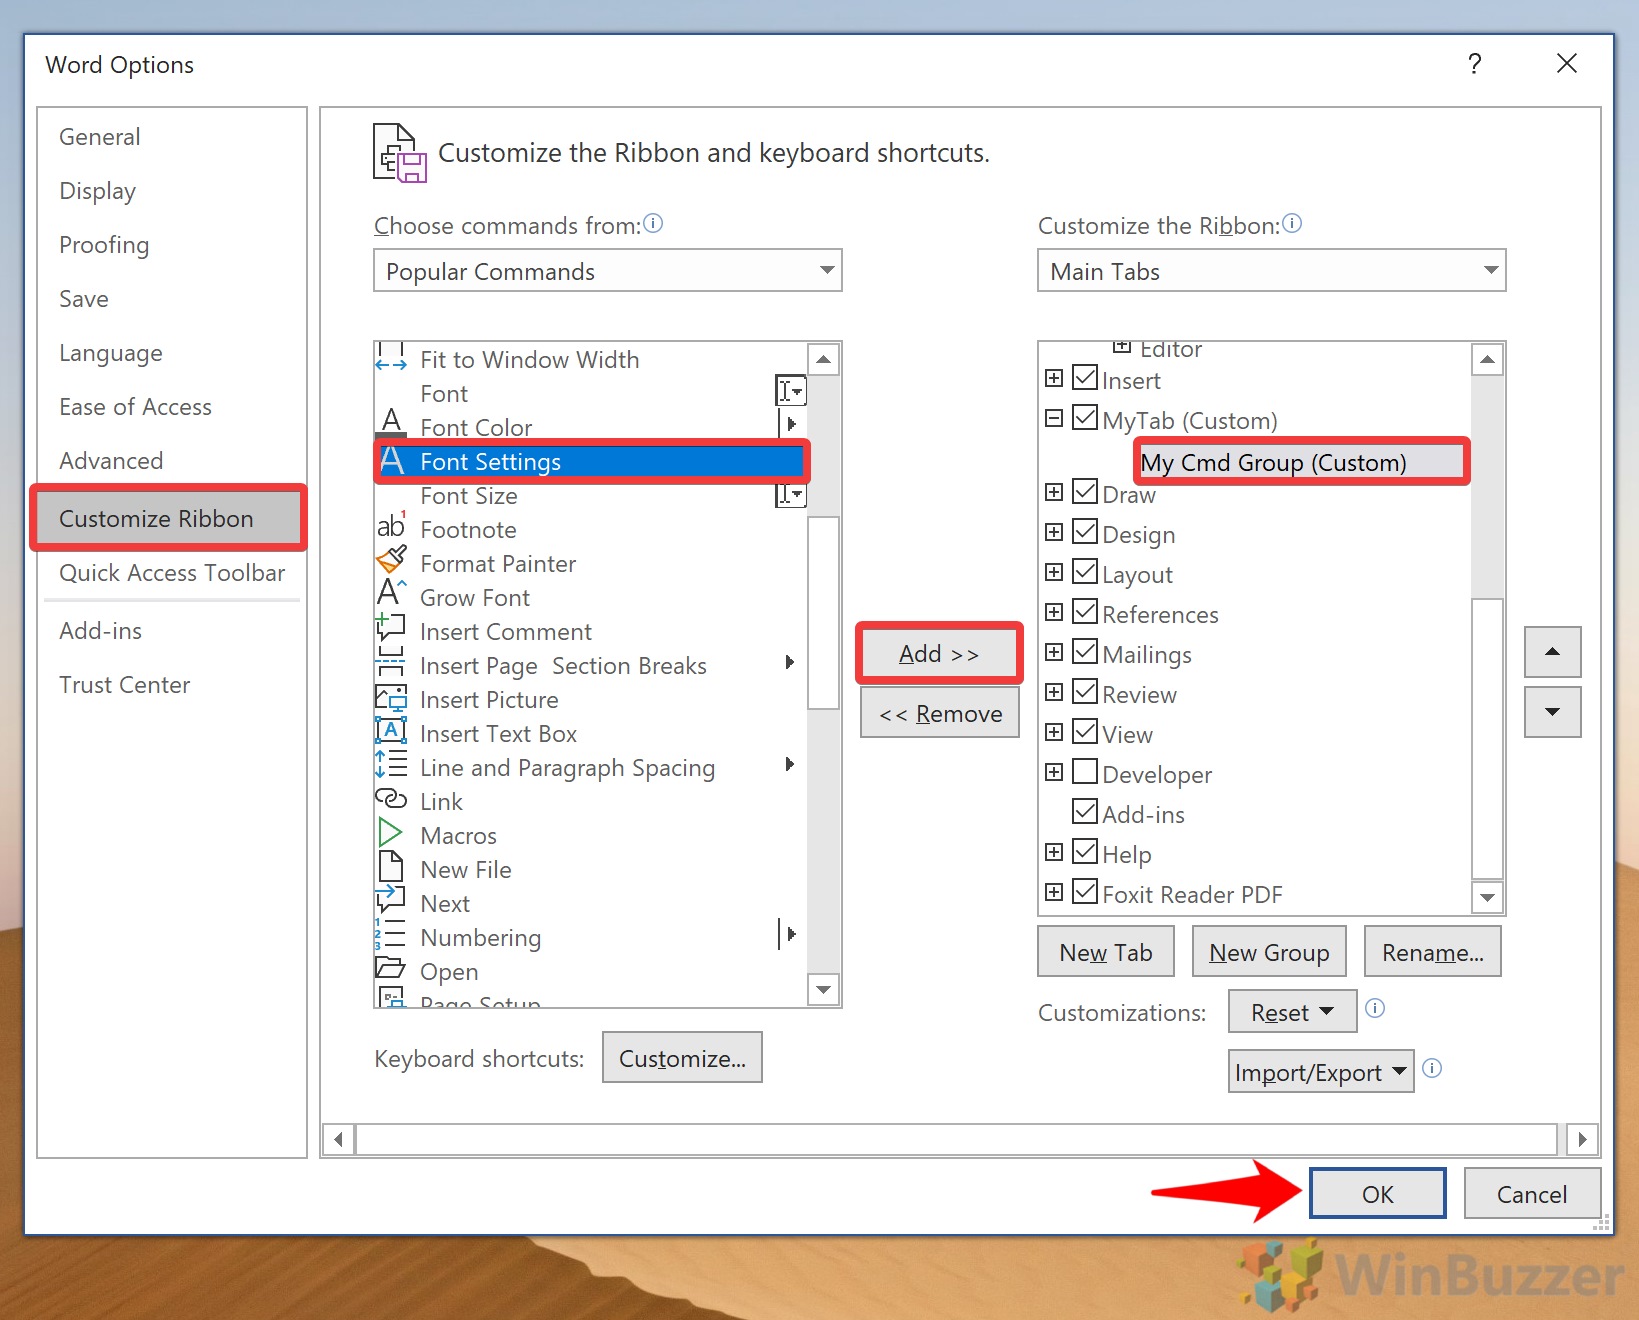


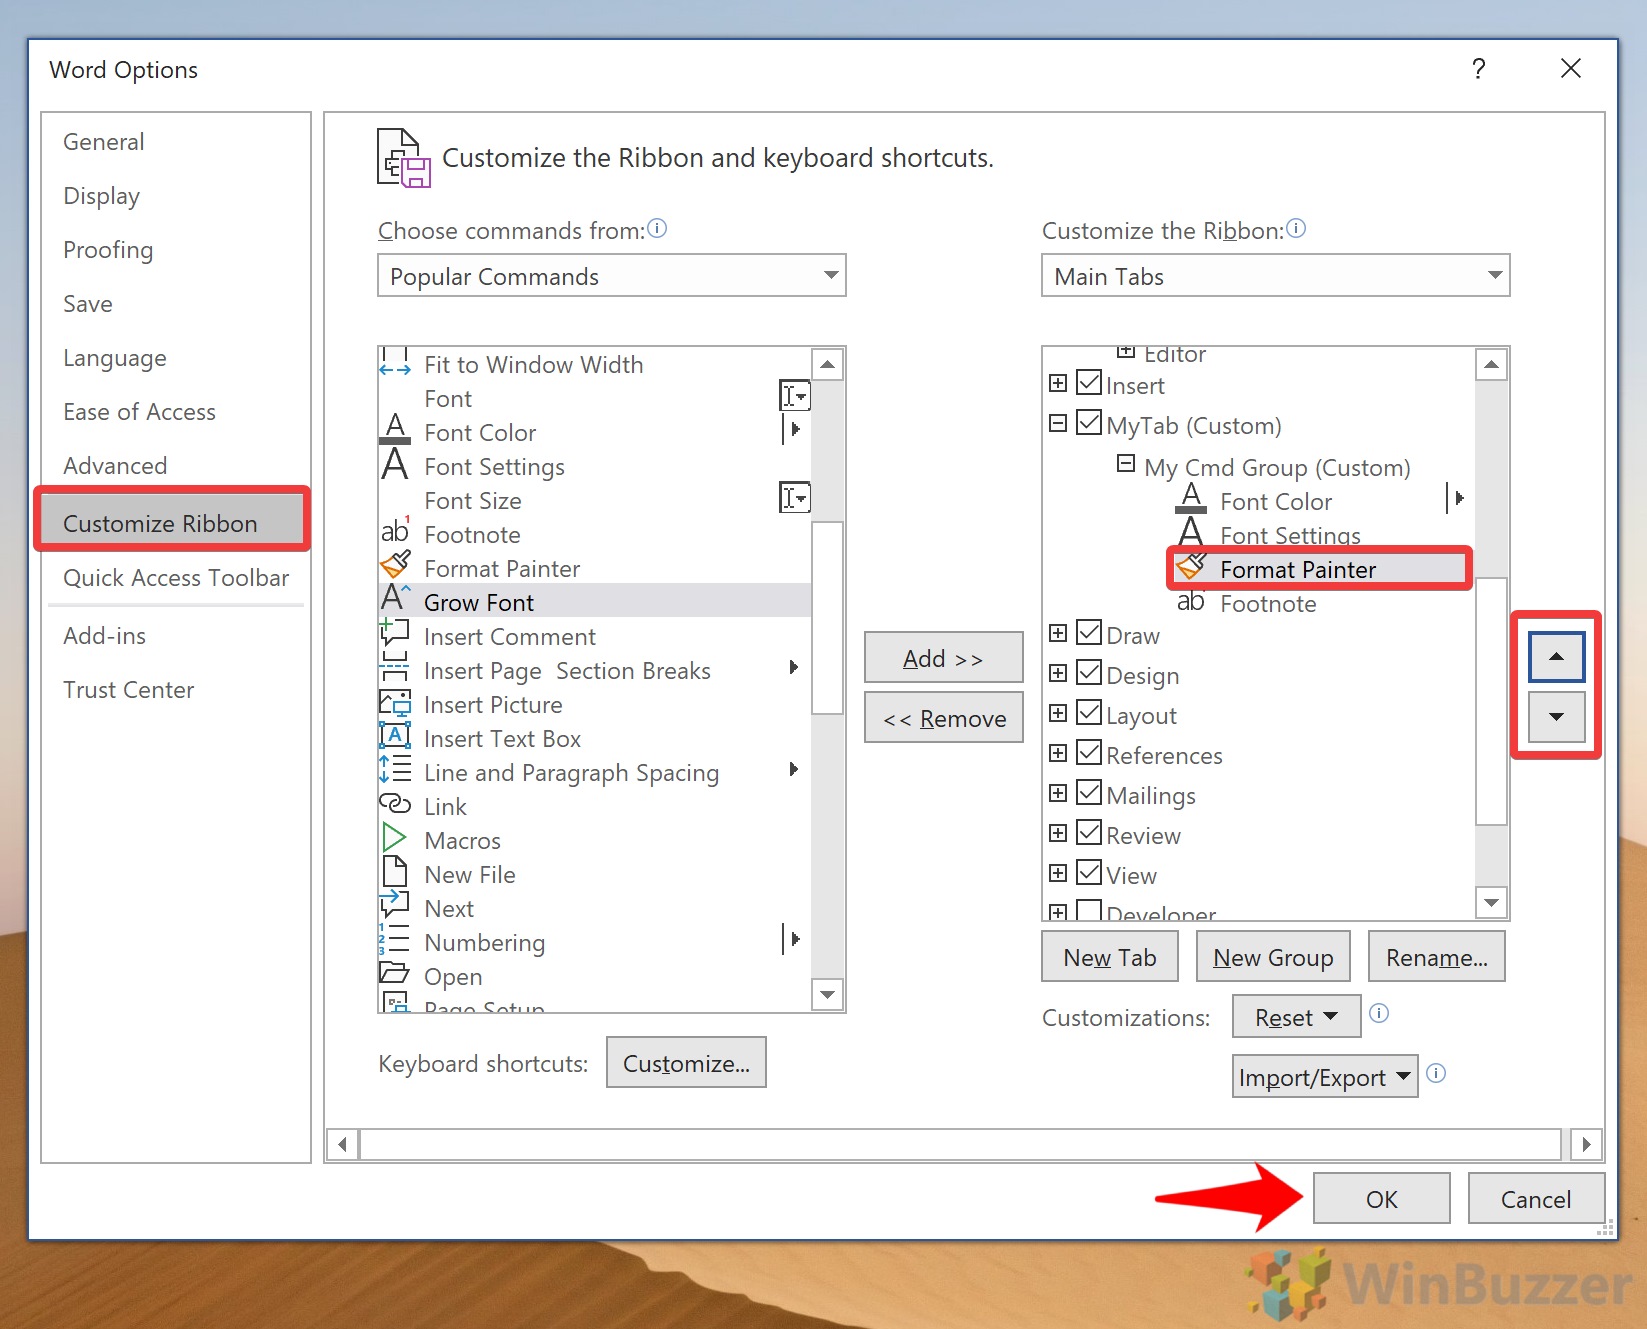

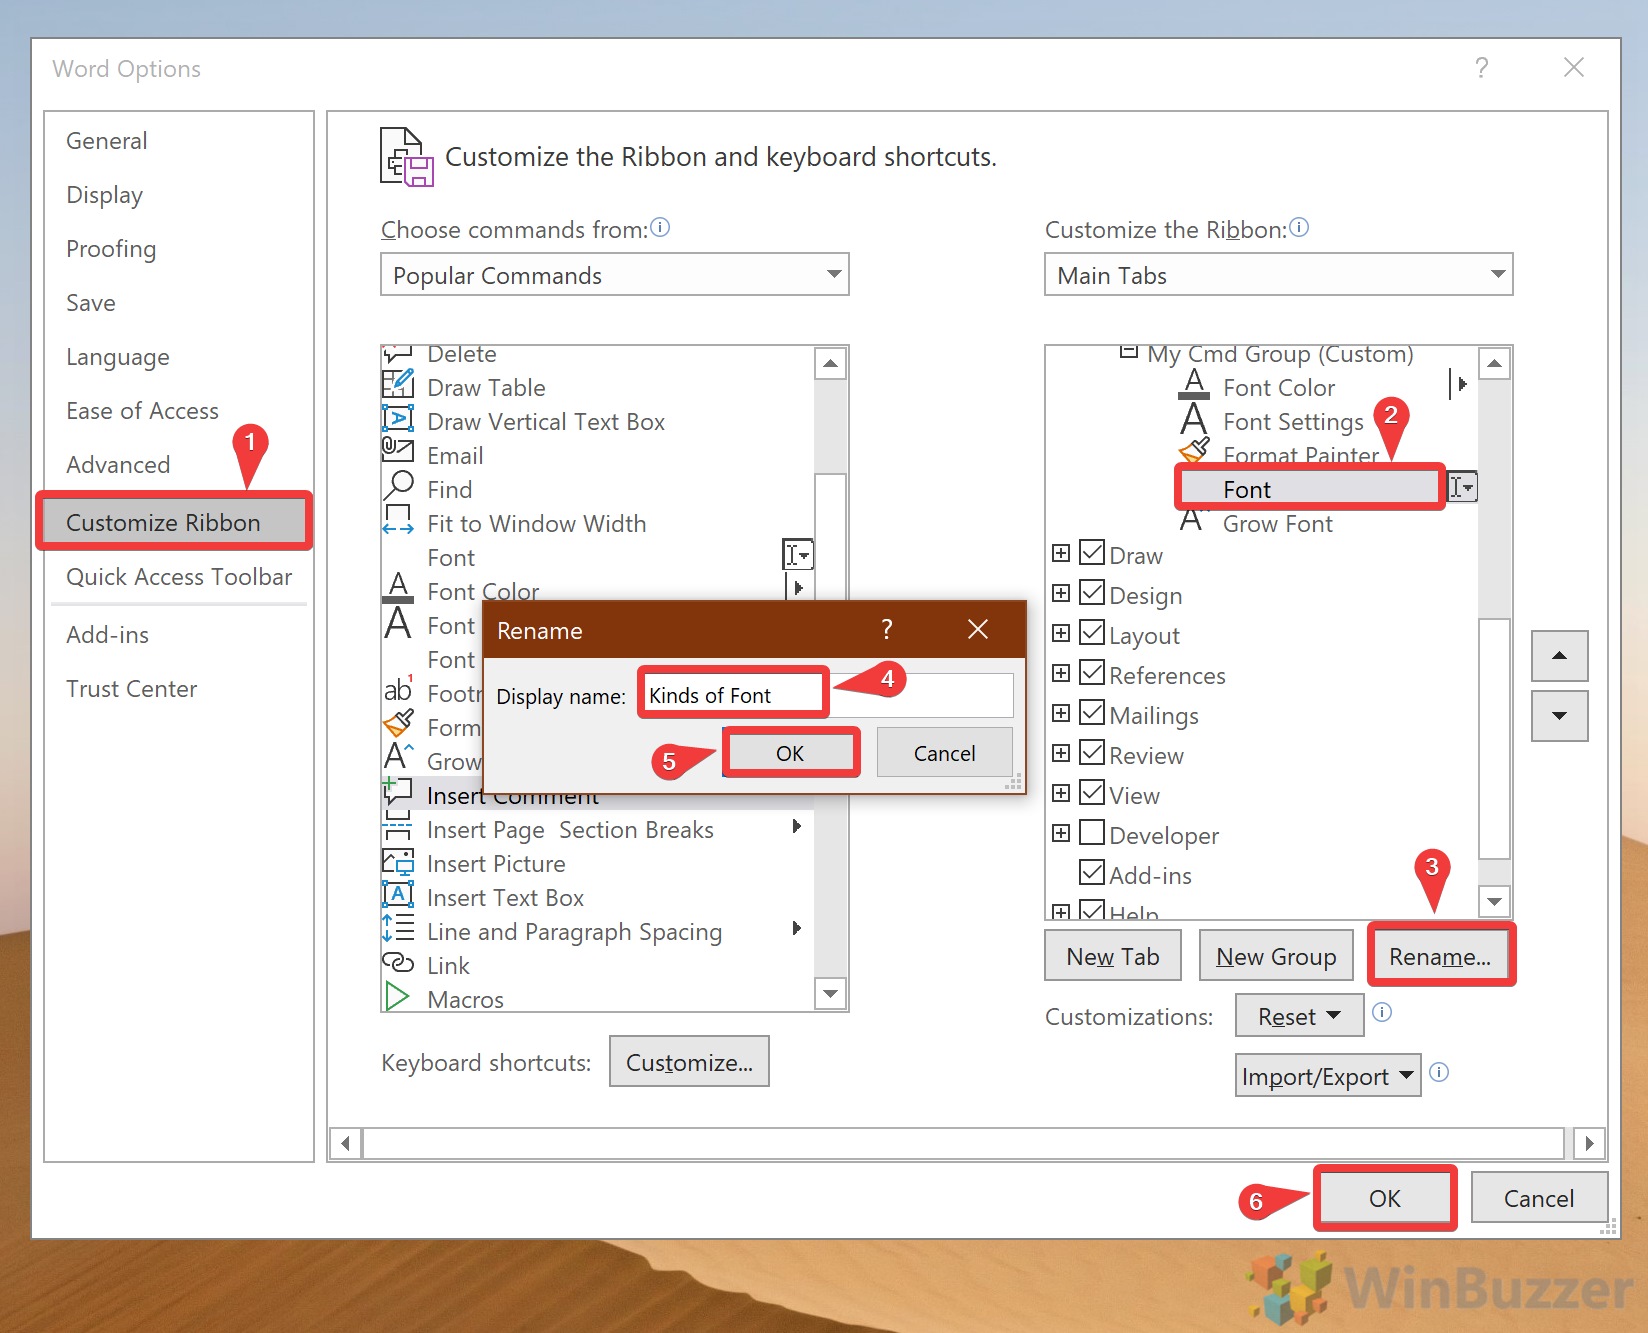
That brings this lengthy tutorial to a close. You should now know everything you know about the MS Word ribbon, including how to show it, create new tabs, and modify items within those tabs. You can repeat these steps to customize the ribbon of any Office application for a more bespoke experience.
However, there’s more you can do yet to customize your Office install. Why not check our guides on how to enable dark mode for the suite or change background color in Word?
A free Office suite fully compatible with Microsoft Office
The ribbon in word refers to the toolbar on the top of our interface. We can quickly apply the features of WPS Office with the ribbon.
There are several major tabs for choice: Home, Insert, Page Layout, References, Review, View Section and Tools. In each tab, we can find more tools.
You are welcome to explore the ribbon in WPS Academy.
For all, easy your work with WPS office suite. Free download WPS Office for PC, Mobile, Windows, Mac, Android, iOS online.
Trending Tutorials
- 1.
How to compare two excel sheets and highlight differences
- 2.
Quickly download and install WPS Office on Windows 10
- 3.
How to download files in WPS Cloud
- 4.
WPS Office vs. Microsoft Office: Which fits you better?
- 5.
How to check and update WPS Office version
- 6.
How to add a hyperlink
In order for your student to be a “Tech Power User”, he/she must fully understand the different parts of the screen and how to navigate in and around these parts. This post will focus on ribbon concepts; including JAWS navigating commands. Before diving into the ribbon, it is important that students understand where the ribbon is physically located. At the very top of the Microsoft Word document is the Title and just below the title are two ribbons. Let’s take a closer look at the “ribbon” in Microsoft Word.

Keep in mind that the National Technology Standards dictate that students should be introduced to Word Processing in kindergarten and should master basic word processing skills by second grade and higher skills (such as formatting and copy/paste) by third or fourth grade.
What is the ribbon?
The ribbon is a command bar that organizes a program’s features into a series of tabs at the top of the screen. Ribbon tabs are composed of groups of closely related commands, designed to help users quickly find desired commands. Each ribbon is a bar (line) across the page.
Upper Ribbon Tabs
The upper ribbon, also known as the menu bar. The current upper ribbon tabs are:
- Home
- Insert
- Draw
- Design
- Layout
- References
- Mailings
- Review
- View
- Tell Me
On the far right side of the bar are two buttons:
- Share
- Comments

File Folder Tab Activity 1: Upper Ribbon
Materials: 10 file folders, brailled sheets (or large print sheets)
Prep: Braille the 10 ribbon tabs (Home, Insert, Draw, Design, Layout, References, Mailings, Review, View and Tell Me). Places a braille label on the tab of each file folder. Ideally, the file folder tabs will be in descending order, meaning that the physical tab for Home file folder will be on the very left side of the file folder, the physical tab for the Insert file folder will be next position tab, slightly to the right, etc. so that when the folders are stacked on top of each other, the braille labels will seen in the same order as the ribbon bar on the computer.
Activity: With the folders stacked in order, ask the student to read the labels starting with the top folder (tab is far left with the braille and/or print label, “Home”). Shuffle the folders and ask the student to put them in order. If appropriate, ask the student to guess what types of commands might be under each tab. Call out a couple of commands and ask what tab that command might fall under. Next, in Microsoft Word, ask the student to navigate through the tabs in the upper ribbon. Can the student recite the tabs in order?
Navigating the Upper Ribbon with JAWS
When Word is opened, the JAWS focus is on the content of the Word document.
- Alt key jumps the focus to the Upper Ribbon
- Right arrow to navigate across the Upper Ribbon to the next tab
- Left arrow to navigate across the Upper Ribbon to the previous tab
- Escape key to go back to the document content
KeyTips (Shortcut Command)
Listen carefully to the JAWS announcements, as JAWS will state the Keytip (shortcut command). Example: Alt, N (press individually) will jump from the document content to Insert.
See the video tutorial at the end of this post for step-by-step instructions.
Lower Ribbon
Below the upper ribbon is the lower ribbon, also known as the Toolbar.
The lower ribbon changes according to which tab is selected in the top ribbon – it is directly associated with a specific tab in the top ribbon.
Teacher Hint: It is overwhelming to memorize all the options/commands available under each tab, especially for young students and/or beginners with tech. Carefully consider how much information to share with your student according to your student’s age and abilities. Some students may want to explore each and every option, while others may only be ready for one option under the Home tab. The tab descriptions below are middle of the road – providing general information about each tab without going into nitty-gritty details. As an educator, read the entire post to understand the big picture and then break down the concepts to fit your student’s needs. For young or beginner tech users, start with the description of the upper ribbon and then do the beginning File Folder Tab Lesson before introducing the overview of each tab.
Keep in mind that options available in the ribbon may change with software updates – and that’s OK! This post is a guide that can be adapted to accommodate any updates that might impact the ribbon!
Home Tab
The Home tab is organized into commands that fall under these “groupings”: Clipboard, Font, Paragraph, and Styles. (Visually, there is a vertical line between these sections.) There are additional options (available in a drop down menu) under each of some of these areas.
Note: Use the term “groupings” as that is the word that JAWS uses.

Students with low vision will be particularly interested in these formatting options, which enable users to change the font type, size, and spacing between lines, as well as change the color themes.
Students who rely on screen readers will want to use the Styles (Headings) options which provides screen reader navigating options within the Word document. Students (and educators) should use Heading 1 for the title of the document, Heading 2 is for main ideas, headings 3 for subtopics, etc. (Example: In this post, the title of the post is Heading 1, “What is a Ribbon” (a main idea) is Heading 2, “Home tab” (a subtopic) is Heading 3, and “Resources” (a subtopic under the Home Tab heading) is Heading 4. Students using a screen reader can use a Heading command to skim this post or use Heading 4 to jump directly to a specific area – Resources.
When creating documents, students (and educators) should always use the Paragraph Styles options to create bullet points or number items to make these lists accessible with a screen reader.
Resources
- Creating Headings for a Screen Reader: Lesson Plan post (Explains Headings and has Heading-related lesson activities)
- Reading Efficiently with a Screen reader: Headings post (This post explains Headings and has activities – it is specifically about using the Rotor for Headings in iOS; the Headings concepts pertains to laptops too)
- Common Core State Standards K-12 Technology Skills Scope and Sequence (break down of tech skills by grade level)
Insert Tab
The Insert tab is used to insert or add extra features to the document, such as pictures, shapes, pages, symbols, etc. Icons and text are used to identify these options. Most of these options have a drop down menu for additional features. The Insert commands are organized by commands that fall into these groupings: Pages, Tables, Illustrations, Add-ins, Media, Links,Comments, Header and Footer, Text and Symbols.

Draw Tab
The Draw tab enables the user to draw in the Word document. The Draw tab is available with Office 365 and if available, may need to be added to your ribbon. The Draw tab has options for choosing what you want to do (draw/eraser), type of pen tool, and draw with trackpad.

Design Tab
The design tab provides format themes, backgrounds, color schemes, page borders, etc. for your document. If you do not see the Design tab and you would like it in your ribbon, go to File > Options > Customize Ribbon and check the box beside Design.

Layout Tab
The Layout tab enables the user to control the layout, including the page orientation, margins, etc. The Layout options are organized by commands that fall under: Page Setup, Margins, and Arrangement.

References Tab
The Reference tab enables the user to enter document sources and citations, create a table of contents, add an index, etc. The Reference tab is organized by commands that fall under these groupings: Table of Contents, Footnotes, Research, Citations, Captions, Index, and Table Authorities,

Mailings Tab
The Mailings Tab enables the user to merge emails, writing and inserting different fields, etc. and is the least used tab. The Mailings tab is organized by commands that fall under these groupings: Address, Start Mail Merge, Insert Fields, Preview, Merge Range, and Finish.

Review Tab
The Review Tab enables users to proofread, add or remove comments, track changes, Read Aloud, check accessibility, etc.
Students with low vision who are not using a screen reader can access Read Aloud.
Educators who are creating Word documents for classroom use should use the Check Accessibility to check their documents for common accessibility errors.
Students are often involved in group projects that require tracking as peers provide comments to the documents and teachers often provide comments directly in the digital document. After learning the basic Word processing skills (such as copy and paste), the next step for students is to learn to use features in the Review tab in order to work on group projects.
The Review tab is organized by commands that fall under these groupings: Proofreading, Read Aloud, Accessibility, Translate, Comments, Tracking, Reviewing, Accept, Compare, Protect, Ink, and Resume Assistance.

View Tab
The View tab enables users to switch between different views of the document such as seeing more than one page at a time, boundaries, grids and rulers. The View Tab now includes accessibility features such as Focus, Immersive Reader, and Zoom. The View Tab is organized by commands that fall under these groupings: Document View, Accessibility, Show/Hide, Zoom, Window, and Macros.
The Focus option will hide everything at the top of the Word document, leaving just the blank (or written text) on the page. Focus mode was designed to remove any distractions from the document so that students can focus on their writing (or reading). When in Word and using a Mac, Control + Shift + Command + F will toggle Focus on and off.

Resources
- Microsoft Immersive Reader Update post (Immersive Reader is a built-in accessibility tool for users with low vision)
- Microsoft Immersive Reader Review post
Tell Me
Tell Me is a help textbox that enables users to type in keywords to ask a question about Word.
Teaching the Ribbon
As you teach students to use items in the ribbon, use the National Technology Standards Scope and Sequence as a guideline of what skills should be taught when. Students should also be taught the same skills at the before or with their peers.
Note: The terms “menu”, “toolbar” and “ribbon” are sometimes interchanged; however, when teaching students, it is best to use the proper terminology. Upper Ribbon and Lower Ribbon is very clear, while “menu” and “toolbar” are often used generically to mean any part of the ribbon.
File Folder Tab Activity 2: Lower Ribbon
The following activity will help build the ribbon concept. Initially, start with a few of the most common commands under the Home tab, before introducing additional tabs.
Materials and Prep:
- File Folders from Activity 1
-
Braille (or large print) the list of options under each Tab by category in the order that it appears in Word. Braille a separate page for each folder/tab. Therre are lots of options, depending on your student’s ability:
- Braille the groupings labels (Clipboard, Font, Paragraph and Styles for the Home tab)
- Braille all the details information (Paste, Cut, Copy, apply style to all, font, size, etc.)
- Braille only include the most important options under that tab.
- Braille only the commands that you want your student to know (add to list as more commands are learned)
- Customized combination!
Activity: Stack the folders in order, with the Home tab on top. Ideally, students should see each brailled tab, slightly to the right of the previous tab. Ask the student to open the Home folder and read the list of groupings and/or command options on the braille sheet. For a young or beginner student, talk about the list of items under the Home tab. Then, move to Word on the computer and navigate to the Home button and find a specific item in the lower ribbon. For older students, you might choose to have the student read the braille sheets in two or more folders. Quiz the student by naming a command and asking which tab that command is listed under. Move to the computer and find specific lower ribbon commands.
Navigating the Upper Ribbon with JAWS
When Word is opened, the JAWS focus is on the content of the Word document.
- Alt key jumps the focus to the Upper Ribbon
- Right arrow to navigate across the Upper Ribbon to the next tab
- Left arrow to navigate across the Upper Ribbon to the previous tab
- Escape key to go back to the document content
- Tab key jumps to Lower Ribbon (from Upper Ribbon) and then Tab key navigates across the items in the Lower Ribbon
- Shift Tab key moves to the previous item in the Lower Ribbon
KeyTips (Shortcut Command)
Listen carefully to the JAWS announcements, as JAWS will state the Keytip (shortcut command). Example: Alt, N (press individually) will jump from the document content to Insert. Alt, N, T is the shortcut command to jump directly to Table in the Insert, Lower Ribbon.
Step-by-Step Screen Reader Navigation for the Parts of the Ribbon video below (JAWS)
Note: As the student’s JAWS skills progress, the student should learn the Keyboard shortcut commands (such as copy and paste) rather than relying on accessing these features in the Ribbon. Here is the Keyboard Shortcut Command For Word (there are device options, so be sure to select Windows if using a Windows Computer. There are an overwhelming number of shortcut commands! The ribbon’s purpose is to have a quick and organized way to access all of these commands without requiring that the student memorize every command.

By Diane Brauner