Содержание
- Use a command button to start an action or a series of actions
- What do you want to do?
- Add a command button to a form by using a wizard
- View or edit a macro embedded in a command button
- Create a button by dragging a macro to a form
- Create a command button without using a wizard
- Customize a command button
Use a command button to start an action or a series of actions
You use a command button on an Access form to start an action or a set of actions. For example, you can create a command button that opens another form. To make a command button perform an action, you write a macro or event procedure and attach it to the command button’s On Click property. You can also embed a macro directly into the On Click property of the command button. This makes it possible to copy the command button to other forms without losing the functionality of the button.
What do you want to do?
Add a command button to a form by using a wizard
By using the Command Button Wizard, you can quickly create command buttons that do a variety of tasks, such as closing the form, opening a report, finding a record, or running a macro.
Right-click the form in the Navigation Pane, and then click Design view on the shortcut menu.
On the Design tab, in the Controls group, ensure that Use Control Wizards  is selected.

On the Design tab, in the Controls group, click Button.

In the design grid, click where you want the command button to be inserted.
The Command Button Wizard starts.
Follow the directions in the wizard. On the last page, click Finish.
The wizard creates the command button and embeds a macro in the button’s On Click property. The macro contains actions that perform the task you chose in the wizard.
View or edit a macro embedded in a command button
In the Navigation Pane, right-click the form that contains the command button, and then click Design View  or Layout View
  on the shortcut menu.
Click the command button to select it, and then press F4 to display its property sheet.
On the Event tab of the property sheet, [Embedded Macro] should be displayed in the On Click property box. Click anywhere in the property box, and then click  in the right side of the box.
The Macro Builder is displayed, showing the action or actions that make up the embedded macro.
Create a button by dragging a macro to a form
If you have already created and saved a macro, you can easily create a command button that runs the macro by dragging the macro from the Navigation Pane to a form that is open in Design view.
Open the form in Design view by right-clicking the form in the Navigation Pane, and then clicking Design View on the shortcut menu.
In the Navigation Pane, locate the macro that you want the new command button to run, and then drag the macro to the form.
Access automatically creates a command button and uses the macro name as the button’s caption. Access also inserts the macro name in the On Click property of the command button so that the macro runs when you click the button. Access uses a generic name for the button, so it is a good idea to type a more meaningful name in the button’s Name property. To display the property sheet for the command button while the form is open in Design view, click the button, and then press F4.
For more information about creating macros, see the article Create a user interface macro.
Create a command button without using a wizard
You can create a command button without using the Command Button Wizard. The process involves placing the button on the form and then setting a few properties.
Right-click the form in the Navigation Pane, and then click Design View on the shortcut menu.
On the Design tab, in the Controls group, ensure that Use Control Wizards is not selected.

On the Design tab, in the Controls group, click Button.
Click the location on the form where you want to place the command button.
Access places the command button on the form.
Because Use Control Wizards was not selected, Access does not perform any further processing. If the Command Button Wizard starts when you place the command button on the form, you can click Cancel in the wizard.
With the command button selected, press F4 to display its property sheet.
Click the All tab to display all the properties for the command button.
Set the properties to complete the design of the command button, as shown in the following table.
By default, Access gives a new command button the name Command, followed by a number; for example, Command34. Although it is not required, it is a good idea to change the name to something that reflects the function of the button (for example, cmdSalesReport or CloseFormButton). This helps you later, if you need to refer to the button in a macro or event procedure.
Type the label that you want displayed on the command button. For example, Sales Report or Close Form.
Note: The caption is not displayed if a picture is specified in the Picture property.
Use this property to specify what happens when the command button is clicked. To set the property, click in the property box and then do one of the following:
To make the command button run an existing saved macro, click the drop-down arrow and click the macro name.
To make the command button run an existing built-in function or VBA function, type an equal sign ( =) followed by the function name; for example, = MsgBox ( «Hello World») or = MyFunction (arguments).
To build an expression, click and then click Expression Builder.
To begin building an event procedure that uses Visual Basic for Applications (VBA) code, click and then click Code Builder.To build a new embedded macro containing the actions that you want the command button to perform, click and then click Macro Builder.
Note: Access databases which contain VBA code must be granted trusted status before the code can be run.
For help with other properties not mentioned here, place the cursor in a property box and press F1.
Customize a command button
Access provides many ways to customize command buttons so that you can have the appearance and functionality you want on your form. For example, you can create a row of command buttons in a tabular or stacked arrangement, or you can make command buttons appear more like hyperlinks.
Right-click the form in the Navigation Pane, and then click Design View .
Do one of the following:
Create a horizontal (tabular) or vertical (stacked) layout of command buttons
You can add command buttons to a tabular or stacked layout to create a row or column of precisely aligned buttons. You can then reposition the buttons as a group, which makes it easier to modify forms. You can also apply formatting styles to the entire row or column of command buttons at the same time, and you can separate the buttons by using grid lines.
Right-click one of the command buttons that you want to add to the layout, and then point to Layout on the shortcut menu.
Click Tabular  to start a horizontal row of buttons, or click Stacked
  to create a vertical column of buttons.
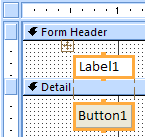
Access draws borders around the command button to indicate the layout. Each button is paired with a label that you cannot delete — however, you can shrink the label to a very small size, if it is not needed.
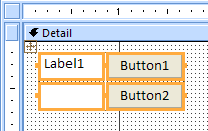
The following illustration shows a command button and its associated label in a tabular layout. Note how the label is in the next higher section — this keeps the labels from repeating for each detail record.
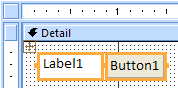
The following illustration shows a command button and its associated label in a stacked layout. In a stacked layout, the label and the button are always in the same section.
Add more command buttons to the layout by dragging them to the layout area. As you drag a command button over the layout area, Access draws a horizontal insertion bar (for a tabular layout) or a vertical insertion bar (for a stacked layout) to indicate where the command button will be placed when you release the mouse button.
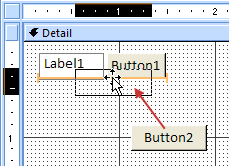
When you release the mouse button, the control is added to the layout.
Move command buttons up a section or down a section within a tabular layout If you want to keep a command button in a tabular layout but want to move the command button to a different section of the form (for example, from the Detail section to the Form Header section), do the following:
Select the command button.
Click either Move Up or Move Down on the Arrange tab.
The command button moves up or down to the next section, but remains within the tabular layout. If there is a control already in the position that you are moving this control to, the two controls exchange places.
Note: The Move Up and Move Down commands are disabled for stacked layouts.
Move an entire layout of command buttons
Click any of the command buttons in the layout.
A layout selector appears at the upper left corner of the layout.
Drag the layout selector to move the layout to a new location.
Add gridlines to a layout of command buttons
Select any of the command buttons in the layout.
Click the Gridlines command on the Arrange tab, and then click the style of gridlines you want.
Make a command button transparent
By making a command button transparent, you can place it over any object on your form and give that object the functionality of a command button. For example, you have an image that you want to divide into separate, clickable areas, each of which starts a different macro. You can do this by placing multiple, transparent command buttons on top of the image.
Click the command button you want to make transparent, and then press F4 to display the command button’s property sheet.
On the Format tab of the property sheet, click in the Transparent property box.
Select Yes in the drop-down list.
You can still see the outline of the command button in Design view, but the button is invisible in Form view.
Note: Setting a command button’s Transparent property to Yes is not the same as setting its Visible property to No. Both operations hide the command button, but setting the Transparent property to Yes leaves the button enabled. Setting the Visible property to No disables the button.
Make a command button appear as a hyperlink
If you want, you can hide a command button but leave the caption visible. The result is something that looks like a label, but functions as a command button. You can also underline the text in the caption and change its color to make it appear as a hyperlink.
Click the command button to select it and press F4 to display its property sheet.
On the Format tab of the property sheet, click in the Back Style property box.
In the drop-down list, select Transparent.
The body of the command button is hidden, but its caption remains visible.
To underline or change the color of the text in the caption, use the tools in the Font group on the Design tab.
Create a Cancel button
Click the command button, and then press F4 to open its property sheet.
In the Cancel property box, click Yes.
When a command button’s Cancel property is set to Yes, and the form is the active form, a user can select the command button by clicking it, pressing the ESC key, or pressing ENTER when the command button has focus. When the Cancel property is set to Yes for any one command button, that property is automatically set to No for all other command buttons on the form.
To make a Cancel button cancel all the actions that have taken place in a form or dialog box, you need to write a macro or event procedure and attach it to the On Click property of the button.
Note: For a form that allows irreversible operations (such as deletions), it is a good idea to make the Cancel button the form’s default command button. To do this, set both the Cancel property and the Default property to Yes.
Display a picture on a command button In the command button’s Picture property box, type the path and file name for a picture file (such as a .bmp, .ico, or .dib file). If you are not sure of the path or file name, click to open the Picture Builder.
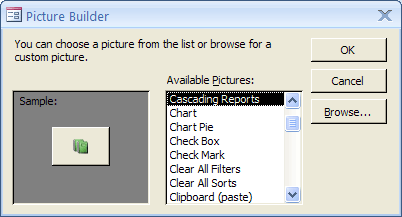
Click Browse to find the picture that you want to use or, alternatively, click one of the pictures in the Available Pictures list to preview the professionally-created pictures that you can use. If you find a picture you want, click OK to add it to the command button.
By default, Access sets the Picture Type property to Embedded. When you assign a graphic to a command button’s Picture property, using this setting creates a copy of the picture and stores it in the Access database file. Any subsequent changes to the original picture will not be reflected in the command button. To create a link to the original picture so that any changes to the picture will be reflected in the command button, change the Picture Type property to Linked. You must keep the original picture file in its original location. If you move or rename the picture file, Access displays an error message when you open the database, and the command button displays its caption instead of the picture.
Display both a picture and a caption on a command button
You can display both a caption and a picture on a command button. Use the following procedure:
Add a picture to the command button by using the procedure outlined earlier in this section.
Select the command button. If the property sheet is not already displayed, press F4 to display it.
On the Format tab of the property sheet, type the caption you want in the Caption property box.
Click the drop-down arrow in the Picture Caption Arrangement property box, and then select the arrangement you want. For example, to display the caption below the picture, select Bottom. To display the caption to the right of the picture, select Right. To make the arrangement dependent on the system locale, select General. By using this setting, the caption will appear on the right for languages that read from left to right, and it will appear on the left for languages that read from right to left.
Источник
Add a command button (ActiveX control)
- On the Developer tab, in the Controls group, click Insert, and then under ActiveX Controls, click Command Button .
- Click the worksheet location at which you want the upper-left corner of the command button to appear.
- In the Controls group, click View Code.
Contents
- 1 How do I get a command button?
- 2 How do I add a button to my toolbar in Excel?
- 3 How do I add a button in Excel without the Developer tab?
- 4 How do I change the command button in Excel?
- 5 How do you use command buttons?
- 6 What are the command buttons?
- 7 How do I add a button to the Quick Access Toolbar?
- 8 How do I add a new command to the Quick Access Toolbar?
- 9 What is launch button in Excel?
- 10 How do I create a command button to copy and paste data in Excel?
- 11 How do I create a Save button in Excel?
- 12 How do I select a button in Excel?
- 13 How do you add text to a button in Excel?
- 14 Where is command button Wizard in Access?
- 15 How do I add a submit Button to an Access form?
- 16 Where is command button keyboard?
- 17 What is command button control?
- 18 What are navigation buttons?
- 19 What is command button in laptop?
- 20 What is the command key on Windows 10?
How do I get a command button?
To add a command button to a form:
- In Form Layout view, select the Design tab, then locate the Controls group.
- Click the Button command.
- Choose the desired location for the command button, then click the mouse.
- The Command Button Wizard will appear.
How do I add a button to my toolbar in Excel?
Add a macro button to the Quick Access Toolbar
- Click File > Options > Quick Access Toolbar.
- In the Choose commands from list, click Macros.
- Select the macro you want to assign a button to.
- Click Add to move the macro to the list of buttons on the Quick Access Toolbar.
How do I add a button in Excel without the Developer tab?
Here are the steps to create the macro button:
- Draw a shape on the sheet (Insert tab > Shapes drop-down > Rectangle shape).
- Add text to the shape (Right-click > Edit Text | or double-click in the shape).
- Assign the macro (Right-click the border of the shape > Assign Macro…)
- Select the macro from the list.
- Press OK.
How do I change the command button in Excel?
Edit the text in a Form control
- Select the Form control. For more information, see Select or deselect controls on a worksheet.
- Right-click the selection, and then click Edit Text.
- Edit the text for the control.
- After you have finished editing the text, right-click the selection, and then click Exit Edit Text.
How do you use command buttons?
You use a command button on an Access form to start an action or a set of actions. For example, you can create a command button that opens another form. To make a command button perform an action, you write a macro or event procedure and attach it to the command button’s On Click property.
What are the command buttons?
A command button is a clickable image object used with graphical operating systems. For example, in Microsoft Windows, when clicking the close button (the X in the top-right of the window), Windows closes that open window.
How do I add a button to the Quick Access Toolbar?
On the ribbon, click the appropriate tab or group to display the command that you want to add to the Quick Access Toolbar. Right-click the command, and then click Add to Quick Access Toolbar on the shortcut menu.
How do I add a new command to the Quick Access Toolbar?
Click Customize the Quick Access Toolbar, and then click More Commands. In the Choose commands from list, click File Tab. Choose the command, and then click Add. Click OK.
What is launch button in Excel?
You can add up to 64 launch buttons to a custom toolbar. You can configure each button to run a different program or macro. For example, you are the manager of a government department. You keep the data source files for your reports in Microsoft Excel spreadsheets.
How do I create a command button to copy and paste data in Excel?
Create a Command Button to copy and paste data with VBA code
- Insert a Command Button by clicking Developer > Insert > Command Button (ActiveX Control).
- Draw a Command Button in your worksheet and right click it.
How do I create a Save button in Excel?
Adding “Save” Button in Excel
If you want to add a VBA save as button in Excel, you can do so using the “Developer” tab in the ribbon menu. Make sure you have enabled it by customizing the ribbon, and then click the “Insert” button; under “ActiveX Controls,” click the word “Button.”
How do I select a button in Excel?
On the Home tab, in the Editing group, click Find & Select, and then do either of the following:
- Click Select Objects, and then use the mouse pointer to draw a rectangle around the objects that you want to select.
- Click Selection Pane, and then use the pane to select one or more objects.
How do you add text to a button in Excel?
Link Button Text to a Cell
Click in the Formula Bar, and type an equal sign: = Click on cell E2, which has the text for the button, and press Enter.
Where is command button Wizard in Access?
In Form Layout view, select the Design tab, then locate the Controls group. Click the Button command. Choose the desired location for the command button, then click the mouse. The Command Button Wizard will appear.
How do I add a submit Button to an Access form?
Add a command button to your Access form without programming
- Open the form in design view.
- Click the Command button in the Toolbox.
- Click and drag in the form where you want the button to be located.
- Select Form Operations under categories.
- Select Close Form under Actions.
- Click Next.
Where is command button keyboard?
On a PC keyboard the Command key is either the Windows key or the Start key.
What is command button control?
Command buttons are used to issue commands in a form. The OK and Cancel buttons often seen in Windows dialogs are command buttons, for example.
What are navigation buttons?
Each button corresponds to the direction that you can move in a menu.For example, to move right in a menu, press the navigation button that is located on the right side. If you want to move down in a menu, press the navigation button that is located on the bottom.
What is command button in laptop?
The Command key’s purpose is to allow the user to enter keyboard commands in applications and in the system. An “extended” Macintosh keyboard—the most common type—has two command keys, one on each side of the space bar; some compact keyboards have one only on the left.
What is the command key on Windows 10?
The Most Important (NEW) Keyboard Shortcuts for Windows 10
| Keyboard shortcut | Function / Operation |
|---|---|
| Windows key + CTRL + F4 | Close the current virtual desktop |
| Windows key + A | Open Action center on the right of the screen |
| Windows key + S | Open Search and place the cursor in the input field |
Элемент управления пользовательской формы CommandButton, используемый в VBA Excel для запуска процедур и макросов. Свойства кнопки, примеры кода с ней.
UserForm.CommandButton – это элемент управления пользовательской формы, предназначенный исключительно для запуска процедур и макросов VBA Excel.

Для запуска процедур и макросов обычно используется событие кнопки – Click.
Свойства элемента CommandButton
| Свойство | Описание |
|---|---|
| AutoSize | Автоподбор размера кнопки. True – размер автоматически подстраивается под длину введенной надписи (заголовка). False – размер элемента управления определяется свойствами Width и Height. |
| BackColor | Цвет элемента управления CommandButton. |
| Caption | Надпись (заголовок) – текст, отображаемый на кнопке. |
| ControlTipText | Текст всплывающей подсказки при наведении курсора на кнопку. |
| Enabled | Возможность взаимодействия пользователя с элементом управления CommandButton. True – взаимодействие включено, False – отключено (цвет надписи становится серым). |
| Font | Шрифт, начертание и размер текста надписи. |
| Height | Высота элемента управления. |
| Left | Расстояние от левого края внутренней границы пользовательской формы до левого края элемента управления. |
| Picture | Добавление изображения вместо текста заголовка или дополнительно к нему. |
| PicturePosition | Выравнивание изображения и текста на кнопке. |
| TabIndex | Определяет позицию элемента управления в очереди на получение фокуса при табуляции, вызываемой нажатием клавиш «Tab», «Enter». Отсчет начинается с 0. |
| Top | Расстояние от верхнего края внутренней границы пользовательской формы до верхнего края элемента управления. |
| Visible | Видимость элемента управления CommandButton. True – элемент отображается на пользовательской форме, False – скрыт. |
| Width | Ширина элемента управления. |
| WordWrap | Перенос текста заголовка на новую строку при достижении ее границы. True – перенос включен, False – перенос выключен. |
В таблице перечислены только основные, часто используемые свойства кнопки. Все доступные свойства отображены в окне Properties элемента управления CommandButton.

Пример кнопки с надписью и изображением
Примеры кода VBA Excel с кнопкой
Изначально для реализации примеров на пользовательскую форму UserForm1 добавлена кнопка CommandButton1.
Пример 1
Изменение цвета и надписи кнопки при наведении на нее курсора.
Условие примера 1
- Действия при загрузке формы: замена заголовка формы по умолчанию на «Пример 1», замена надписи кнопки по умолчанию на «Кнопка», запись цвета кнопки по умолчанию в переменную уровня модуля.
- Сделать, чтобы при наведении курсора на кнопку, она изменяла цвет на зеленый, а надпись «Кнопка» менялась на надпись «Нажми!»
- Добавление кода VBA Excel, который будет при удалении курсора с кнопки возвращать ей первоначальные настройки: цвет по умолчанию и надпись «Кнопка».
Решение примера 1
1. Объявляем в разделе Declarations модуля пользовательской формы (в самом начале модуля, до процедур) переменную myColor:
2. Загружаем пользовательскую форму с заданными параметрами:
|
Private Sub UserForm_Initialize() Me.Caption = «Пример 1» With CommandButton1 myColor = .BackColor .Caption = «Кнопка» End With End Sub |
3. Меняем цвет и надпись кнопки при наведении на нее курсора мыши:
|
Private Sub CommandButton1_MouseMove(ByVal _ Button As Integer, ByVal Shift As Integer, _ ByVal X As Single, ByVal Y As Single) With CommandButton1 .BackColor = vbGreen .Caption = «Нажми!» End With End Sub |
4. Возвращаем цвет и надпись кнопки при удалении с нее курсора мыши:
|
Private Sub UserForm_MouseMove(ByVal _ Button As Integer, ByVal Shift As Integer, _ ByVal X As Single, ByVal Y As Single) With CommandButton1 .BackColor = myColor .Caption = «Кнопка» End With End Sub |

Все процедуры размещаются в модуле пользовательской формы. Переменная myColor объявляется на уровне модуля, так как она используется в двух процедурах.
Пример 2
Запуск кода, размещенного внутри процедуры обработки события Click элемента управления CommandButton:
|
Private Sub CommandButton1_Click() MsgBox «Код внутри обработки события Click» End Sub |
Пример 3
Запуск внешней процедуры из процедуры обработки события Click элемента управления CommandButton.
Внешняя процедура, размещенная в стандартном модуле проекта VBA Excel:
|
Sub Test() MsgBox «Запуск внешней процедуры» End Sub |
Вызов внешней процедуры из кода обработки события Click
- с ключевым словом Call:
|
Private Sub CommandButton1_Click() Call Test End Sub |
- без ключевого слова Call:
|
Private Sub CommandButton1_Click() Test End Sub |
Строки вызова внешней процедуры с ключевым словом Call и без него – равнозначны. На ключевое слово Call можно ориентироваться как на подсказку, которая указывает на то, что эта строка вызывает внешнюю процедуру.
What Is The Command Ribbon?
The Ribbon is Excel’s command menu interface. It organizes commonly used actions together in an intuitive and visual way. These are the main parts of the Ribbon.
- Tabs organize related groups of commands together.
- Groups organize related commands together.
- Command Buttons allows you to perform actions or open menus with further related actions.
- Command Menu some command buttons will have a small down arrow located to the right or below the button. This indicates that a menu is available with sub-commands under the command button.
- Dialog Box certain groups in the ribbon will contain a small icon in the lower right hand corner that will launch a dialog box with further options available.
- Pin or Unpin Toggle allows you to remove the ribbon from view to create more workbook space.
What Tabs Are In The Ribbon?
There are 7 Tabs in Excel’s default setup.
- Home contains commands related to creating, formatting, and editing a spreadsheet.
- Insert contains commands related to adding items to a spreadsheet such as graphics, tables, pivot tables, charts, headers and footers, hyperlinks etc…
- Page Layout contains commands related to printing a spreadsheet.
- Fomulas contains commands related to adding and error checking formulas in a spreadsheet.
- Data contains commands related to importing and querying data in a spreadsheet.
- Review contains commands related to proof reading, commenting, protecting or tracking changes in the spreadsheet.
- View contains commands related to the display area of a spreadsheet.
In addition to these 7 Tabs, there is an 8th one called the Developer tab that is hidden by default. You can read this post to find out How To Enable The Developer Tab. The Developer tab contains commands related to recording macros and writing visual basic for application (VBA) code. This tab is hidden by default as most people will likely never want or need to use it.
Excel also has Contextual Tabs. These tabs only appear when a particular type of object is selected in the worksheet. For example, if we select a table object in our workbook, the Table Tools Design tab will appear which contains commands only related to tables.
Selecting Commands From The Ribbon Using Keyboard Shortcuts
Commands can be accessed in the regular way by using the mouse or by touch on touch screen devices, but they can also be accessed with keyboard shortcuts. To use any command in the ribbon with a keyboard shortcut, start by pressing the Alt key. This will display letters underneath the tabs that represent the next step in the shortcut. If we wanted to use a command in the Home tab we would press H next. Now each command in the ribbon will have a letter(s) or number next to it again representing the next step in the shortcut. If we wanted to perform the indent command, we would press 6 on the keyboard. Every command is accessible in this way, but some of the most used commands in Excel have much simpler keyboard shortcuts in addition to these. For Example, using this method to access the bold command results in Alt + H + 1, but it also has the much easier to execute and remember shortcut Ctrl + B.
Customizing The Ribbon
You can customize your Ribbon in a few different ways.
- Rearrange the order of tabs or groups within tabs or rename any tab or group.
- Remove groups from existing tabs or remove entire tabs from the ribbon.
- Add a custom group of commands of your choice to an existing tab in the ribbon.
- Add your own custom tabs with custom groups of commands of your choice. These can be commands that are already available in the default ribbon, but you can also add hidden commands that aren’t available in the default ribbon. This is great for creating a personalized menu of your most frequently used commands.
To customize the ribbon in any of these ways right click anywhere on the ribbon and select Customize the Ribbon from the menu.
Move Or Rename Tabs And Groups
Move Or Rename Tabs And Groups.
- Make sure you’re in the Customize Ribbon section of the Excel Options window.
- Select the Tab you want to move.
- Use the Up or Down arrows to move the tab.
- Select the Group you want to move and use the Up or Down arrows to move it.
- The Tab and/or Group should now appear in a different order in the Main Tabs box.
- Rename any Tab or Group by selecting it and either right click on it then choose Rename from the menu or press the Rename button.
- Change the display name and press the OK button.
- Press the OK button to implement all your changes.
Remove Tabs Or Groups
Remove Tabs or Groups from the Ribbon.
- Make sure you’re in the Customize Ribbon section of the Excel Options window.
- Remove a Tab from the Ribbon by unchecking it.
- Remove a Group from the Ribbon by selecting it then either right click and choose Remove from the menu or press the Remove button.
- Press the OK button to implement all your changes.
Add Custom Tabs And Groups
Add custom Tabs and Groups to the Ribbon.
- Make sure you’re in the Customize Ribbon section of the Excel Options window.
- Press the New Tab button to add a new Tab (Excel will add one Group to any new tab) or press the New Group button to add a new Group.
- Select your new tab and press the Rename button to give it a meaningful name.
- Change the display name and press the OK button.
- Repeat this with any new Groups. Select the Group and press the Rename button.
- Change the display name and press the OK button.
- You new Group will not have any commands, so you’ll need to add some. Select a command you want to add to your Group.
- Press the Add button to add it to your Group.
- Press the OK button to implement all your changes.
About the Author
John is a Microsoft MVP and qualified actuary with over 15 years of experience. He has worked in a variety of industries, including insurance, ad tech, and most recently Power Platform consulting. He is a keen problem solver and has a passion for using technology to make businesses more efficient.
The Buttons in Excel Ribbon are of different types and they behave differently. The command buttons in Excel Ribbon can be classified into following types.
If you keep the cursor over a Ribbon Button, a small popup box will be shown. The popup box contains a brief description about the command.
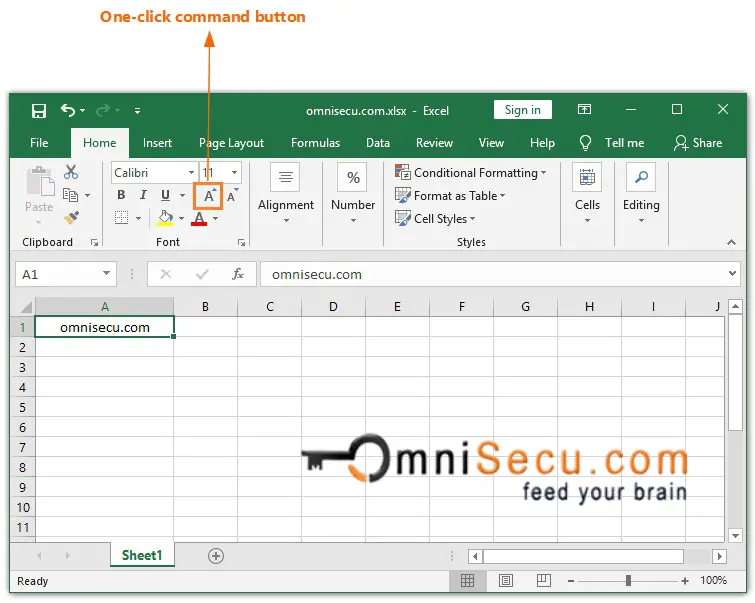
One-click Command Buttons
One-click Command Button is a normal button type in Excel Ribbon, which executes the command everytime when it is clicked.
Example : «Increase Font Size» Button (Home tab > Font). When you click on «Increase Font Size» Command button everytime, it executes the command and the size of the font is increased.
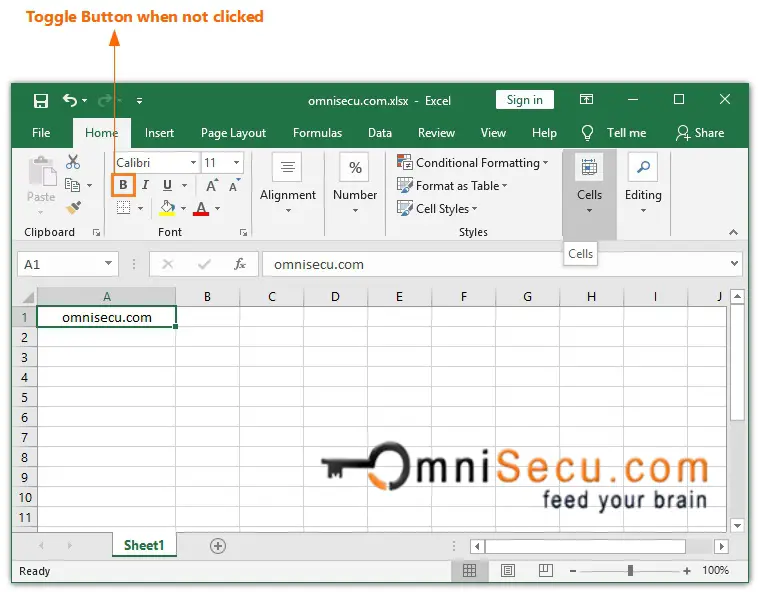
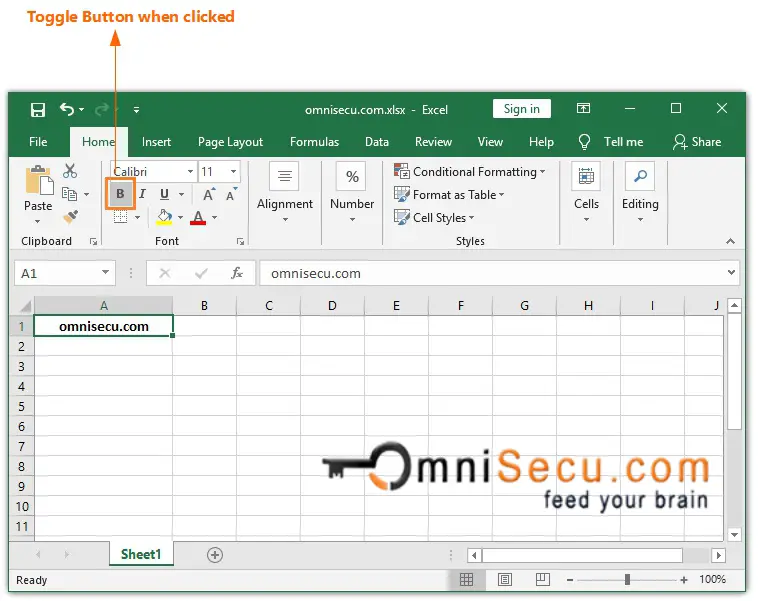
Toggle Buttons
Toggle button is another type of Excel Ribbon Button. An Excel Ribbon Toggle button can stay in two states. Excel Ribbon Toggle button allows the user to change a setting between two states.
Toggle button is desgined in such a way that when clicked on a Toggle button, it’s color is changed to let you know that the state of the Toggle button is changed.
Example : Bold button (Home tab > Font).
Below image shows «Bold» Toggle button, when not clicked. You can see the Active Cell is A1. The text omnisecu.com is not Bold.
Below image shows the same «Bold» Toggle button in Excel Ribbon, when clicked on it. The color of «Bold» Toggle button is changed now. The text omnisecu.com is now changed to Bold.
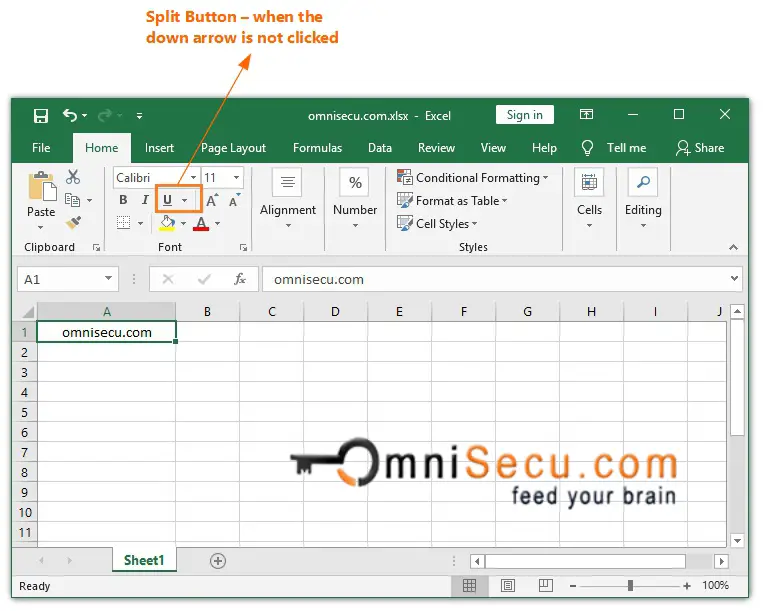
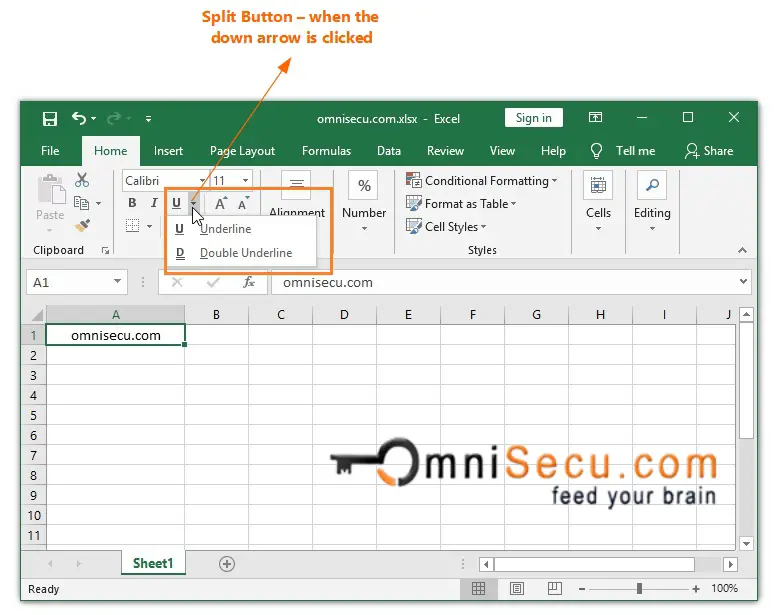
Split Buttons
Split buttons are another type of buttons with a Drop-down menu in Excel Ribbon. Split Buttons have a small down arrow at its end. Excel Ribbon Split button has a Button part and a Menu part. When clicked on the button part, it acts like a regular button and execute the command. When clicked on the menu part, Drop-down list of related commands are displayed.
Example : Underline Split Button (Home tab > Font).
Below image shows Underline Split Button when not clicked.
Below image shows when the down arrow in Excel Ribbon Split button is clicked.
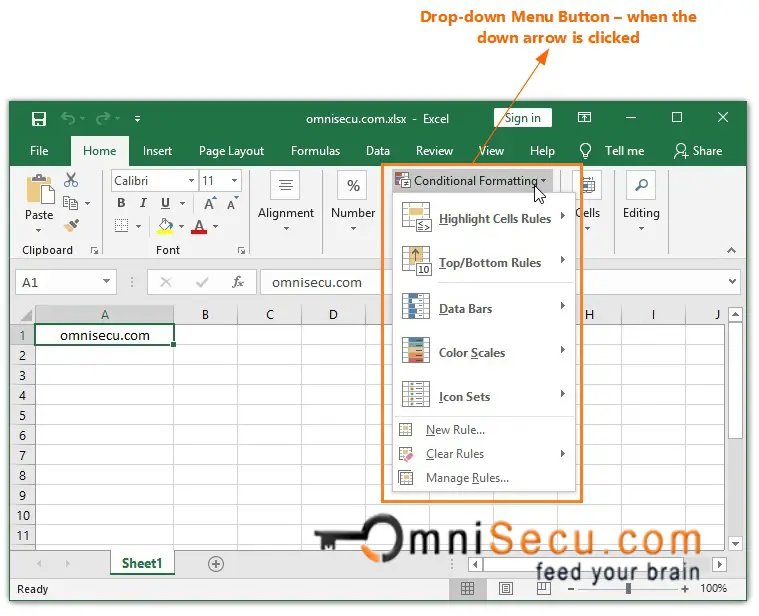
Drop-down menu buttons
Excel Ribbon Drop-down menu buttons also buttons, with a Drop-down menu. Drop-down Menu Buttons also have a small down arrow at its end. Drop-down menu buttons drop down a menu when clicked. Drop-down Menu buttons don’t run a command directly, but they just display a Drop-down menu. Unlike Split button, when you click on the button, no command will be run. It will just display a menu with more options.
Example : «Conditional Formatting» Drop-down Menu Button. (Home tab > Styles)
Below image shows «Conditional Formatting» Drop-down Menu button.
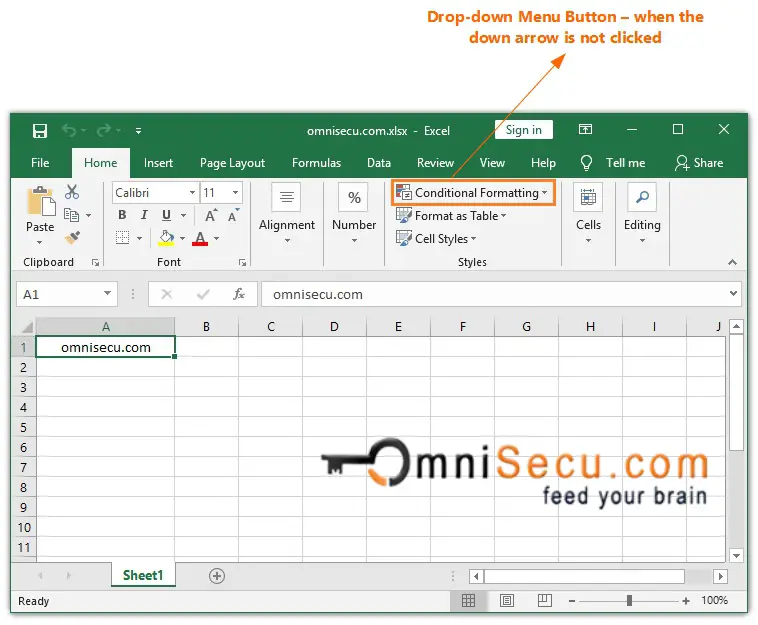
Drop-down Menu button looks same as Split button. But when you click on it no command is run, but will display a menu list of related commands. You need to click on the menu item to perform the task.
Below image shows «Conditional Formatting» Drop-down Menu button, when clicked on the down arrow.
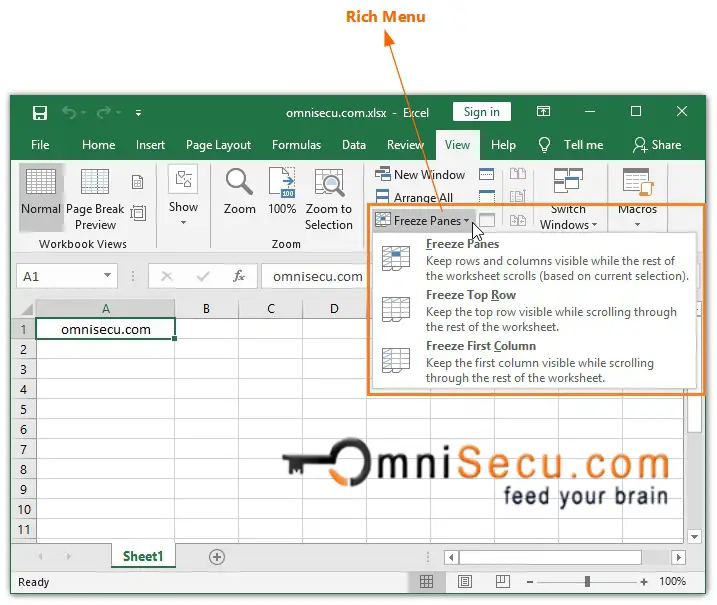
Rich menu
The Rich menu in Excel Ribbon is a type of Drop-down button with more information about the menu item. These additional help information explain more clearly what is the purpose of each menu item.
Example : «Freeze Panes» Menu Button. (Vew tab > Window)
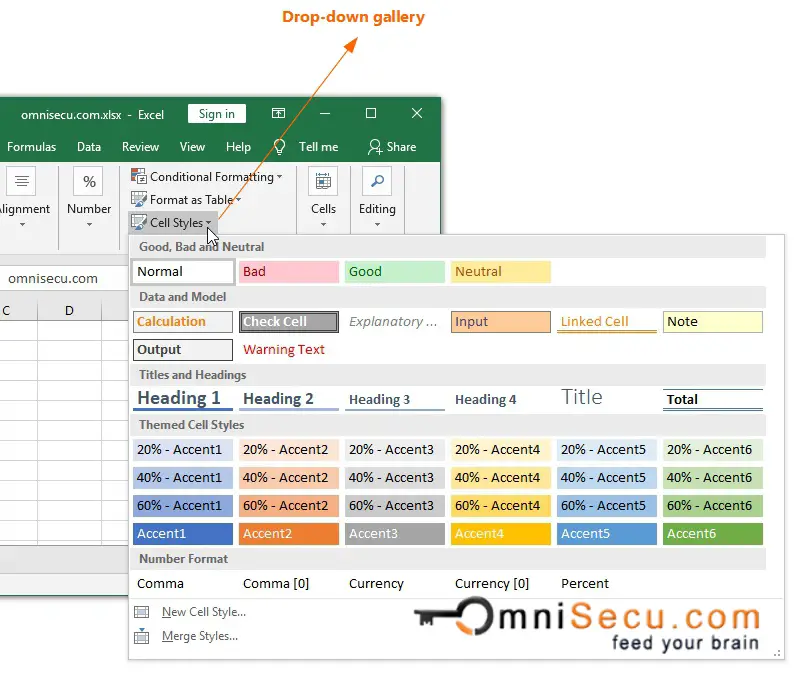
Drop-down gallery
A Drop-down gallery in Excel Ribbon has more options than a normal Drop-down menu. The items inside Drop-down gallery can visually demonstrate the effect of menu items inside Drop-down gallery.
When mouse hover an item in Drop-down gallery, the related style is applied on Excel Worksheet, so that you can view the effect of the item on Excel Worksheet without applying it.
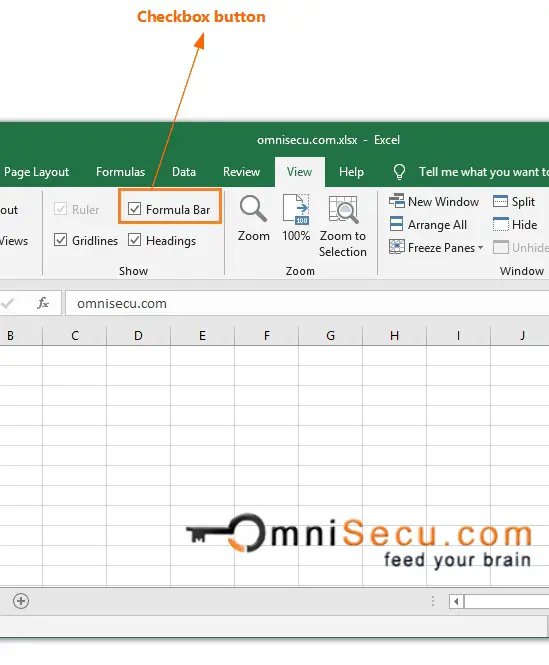
Check box buttons
An Excel Ribbon Check box button can stay in two states. Excel Ribbon Check box buttons are used for settings possible in two states, either «on» or «off».
Example : «Formula Bar» Check box in View tab, which can be used to make the Formula bar visible or hidden.