
In other words, Word treats the image like it would treat any word or letter of text. You can change this by applying a text wrap. Text wrap causes all of the text to wrap around the image so that the image does not interfere with line spacing.
Contents
- 1 What is wrapping text in Computer?
- 2 What is text wrapping in MS Word 2010?
- 3 What is text wrapping in MS word 2007?
- 4 What is wrap text explain with example?
- 5 Where is word wrap in MS word?
- 6 What is text wrapping break?
- 7 What are the text wrapping options?
- 8 What is in line with text wrapping?
- 9 How do I remove text wrapping in word?
- 10 How do I fix text wrapping in word?
- 11 What is wrapped text in Excel?
- 12 How do you wrap the text in a cell *?
- 13 How do you wrap text in a cell?
- 14 What is word wrap Why is it important in MS word?
- 15 What is word wrapping class 9?
- 16 What is the difference between word wrap and word break?
- 17 What is the default text wrapping in word 2016?
- 18 What is wrap CSS?
- 19 What is text wrapping and anchoring?
- 20 What is wrapping style?
Word wrapping is when a line of text automatically “wraps” to the next line when it gets to the end of a page or text field.Most programs that incorporate word wrap take the first word that does not fit on a line of text and move it to the beginning of the next line.
What is text wrapping in MS Word 2010?
To control how an image and text interact in Word 2010, click the image to select it. When the image is selected, Word displays a Format tab, from which you can choose the Text Wrapping menu, found in the Arrange group: In Line with Text: The image is treated like text — specifically, like a large, single character.
What is text wrapping in MS word 2007?
Word 2007’s new text wrapping feature lets you wrap a paragraph around the text in a text box, not just around the boundaries.
What is wrap text explain with example?
1. In Microsoft Excel and other spreadsheet programs, Wrap Text is a feature that shows all information in a cell, even if it overflows the cell boundary. For example, the image shows that cell G2 has text that is cut off because the adjacent cell H2 has text.
Where is word wrap in MS word?
Wrap text around a picture or drawing object
- Select the picture or object.
- Select Format and then under Arrange, select Wrap Text.
- Choose the wrapping option that you want to apply.
What is text wrapping break?
A text-wrapping break breaks a line of text and moves the text to the next line. This type of break is intended for use with text that wraps around graphics.
What are the text wrapping options?
What are the Text Wrapping Options?
- Square, Tight, and Through: These three options are all variations on the same thing.
- Top and Bottom: This option keeps the text above and below the object, but not to its sides.
- Behind Text and In Front Of Text: These two options don’t affect the text at all.
What is in line with text wrapping?
Text Wrap Options
The text wrap you will probably use the most is the square text wrap, but there are other text wraps too. Tight/Through—Text wraps around image, regardless of what shape the image is. This text wrap works best with images that have no background.Text will cover image.
How do I remove text wrapping in word?
Enable or disable text wrapping for a text box, rich text box, or expression box
- Right-click the control for which you want to enable or disable text wrapping, and then click Control Properties on the shortcut menu.
- Click the Display tab.
- Select or clear the Wrap text check box.
How do I fix text wrapping in word?
You can control this feature by following these steps:
- Display the Word Options dialog box.
- Click Advanced at the left side of the dialog box.
- Scroll in the window until you see the Show Document Content section.
- Make sure the Show Text Wrapped Within the Document Window check box is cleared.
What is wrapped text in Excel?
“Wrapping text” means displaying the cell contents on multiple lines, rather than one long line. This will allow you to avoid the “truncated column” effect, make the text easier to read and better fit for printing. In addition, it will help you keep the column width consistent throughout the entire worksheet.
How do you wrap the text in a cell *?
Answer: Select the cells that you wish to wrap text in.
- Right-click and then select “Format Cells” from the popup menu.
- When the Format Cells window appears, select the Alignment tab. Check the “Wrap text” checkbox.
- Now when you return to the spreadsheet, the selected text should be wrapped.
- NEXT.
How do you wrap text in a cell?
Wrap text automatically
On the Home tab, in the Alignment group, click Wrap Text. (On Excel for desktop, you can also select the cell, and then press Alt + H + W.) Notes: Data in the cell wraps to fit the column width, so if you change the column width, data wrapping adjusts automatically.
What is word wrap Why is it important in MS word?
In word processing, a feature that causes the word processor to force all text to fit within the defined margins. When you fill one line with text, the word processor automatically jumps to the next line so that you are not required to keep track of line lengths and to press the Return key after each line.
What is word wrapping class 9?
Answer: Word wrapping is a process by which the word which comes at the end of the line. is automatically moved onto a line in order to keep the text within the margins.
What is the difference between word wrap and word break?
The two properties ( word-break and word-wrap ) differ rules and overflow of words: as mentioned earlier, word-wrap is used to break words that overflow their container, while the word-break property breaks all words at the end of a line, even those that would normally wrap onto another line and wouldn’t overflow their
What is the default text wrapping in word 2016?
By default, Word sets text wrapping to In line with text when you insert or paste a new picture into a document. In line with text may not be what you prefer, so here’s how to change the default.
What is wrap CSS?
The word-wrap property in CSS is used to break long word and wrap into the next line. It defines whether to break words when the content exceeds the boundaries of its container.
What is text wrapping and anchoring?
Text wrapping is a feature that enables you to surround a picture or diagram with a text. 2. Anchoring is the use of irrelevant information, such as the purchase price of a security, as a reference for evaluating an unknown value of a financial instrument.
What is wrapping style?
Wrapping text around figures, also called graphic objects or images, can give your documents a more polished look and help focus attention on the most important content.Word has several wrapping styles that give you control over how the image integrates with the document.
Microsoft 365, Microsoft Office, Microsoft Office for Mac, Microsoft Word, Office 2007, Office 2010, Office 2013, Office 2016, Office 2019, Office 2021 / Office LTSC, Office 365 /
24 September 2022
When including images or other objects in a Microsoft Word document, it can sometimes be a bit fiddly getting the text to flow around them in the way you want. The text wrapping break lets you specify the point where the text should drop down below the picture.
When you have text wrapping around a picture, you may be tempted to just put in extra line breaks or paragraph breaks when you want to shift text down below the picture, as below.
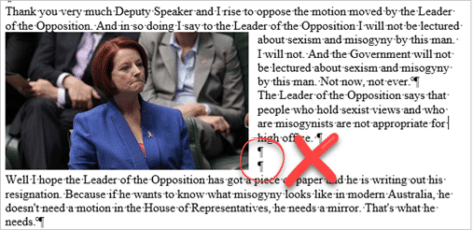
The problem with this method is that if you later make changes such as moving the picture or adding or removing text, the text wrap will no longer be in the place you wanted it. Below I have removed some of the text, and now the “Well I hope…” text is no longer below the image.

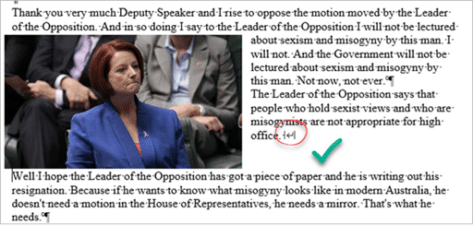
That’s why we have the text wrapping break – to ensure that when we put a break in text around an image, it stays where we want it.
To insert a text wrapping break, put your cursor where you want the text to break, and go to Layout | Page Setup | Breaks, and select Text Wrapping.

Now the text has dropped below the picture without using any superfluous paragraph breaks.
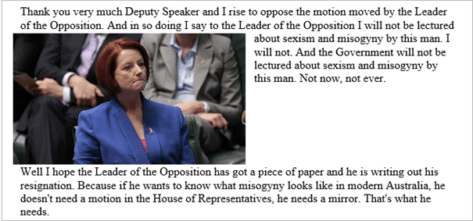
This time if we delete some of the text or make other changes, the paragraph will still drop below the picture at the same point as before.
Removing a Text Wrapping Break
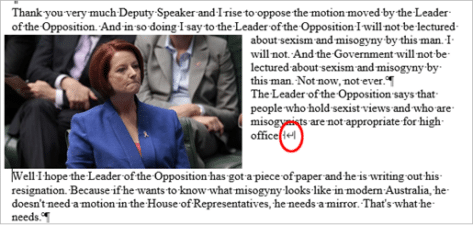
It’s easiest to remove a text wrapping break if you can see it, and to see it you need to turn on Show Hidden Characters under Home | Paragraph.

Now you can see the text wrapping break, just click before the break symbol and hit Delete.
Column Breaks in Word
Section Breaks in Microsoft Word
Text formatting in Excel with wrapping, line breaks and merging
Add a Manual Page Break in Word
Let’s talk about the various ways we can control how text wraps (or doesn’t wrap) on a web page. CSS gives us a lot of tools to make sure our text flows the way we want it to, but we’ll also cover some tricks using HTML and special characters.

Protecting Layout
Normally, text flows to the next line at “soft wrap opportunities”, which is a fancy name for spots you’d expect text to break naturally, like between words or after a hyphen. But sometimes you may find yourself with long spans of text that don’t have soft wrap opportunities, such as really long words or URLs. This can cause all sorts of layout issues. For example, the text may overflow its container, or it might force the container to become too wide and push things out of place.
It’s good defensive coding to anticipate issues from text not breaking. Fortunately, CSS gives us some tools for this.
Getting Overflowing Text to Wrap
Putting overflow-wrap: break-word on an element will allow text to break mid-word if needed. It’ll first try to keep a word unbroken by moving it to the next line, but will then break the word if there’s still not enough room.
See the Pen overflow-wrap: break-word by Will Boyd (@lonekorean) on CodePen.
There’s also overflow-wrap: anywhere, which breaks words in the same manner. The difference is in how it affects the min-content size calculation of the element it’s on. It’s pretty easy to see when width is set to min-content.
.top {
  width: min-content;
  overflow-wrap: break-word;
}.bottom {
  width: min-content;
  overflow-wrap: anywhere;
}
See the Pen overflow-wrap + min-content by Will Boyd (@lonekorean) on CodePen.
The top element with overflow-wrap: break-word calculates min-content as if no words are broken, so its width becomes the width of the longest word. The bottom element with overflow-wrap: anywhere calculates min-content with all the breaks it can create. Since a break can happen, well, anywhere, min-content ends up being the width of a single character.
Remember, this behavior only comes into play when min-content is involved. If we had set width to some rigid value, we’d see the same word-breaking result for both.
Breaking Words without Mercy
Another option for breaking words is word-break: break-all. This one won’t even try to keep words whole — it’ll just break them immediately. Take a look.
See the Pen word-break: break-all by Will Boyd (@lonekorean) on CodePen.
Notice how the long word isn’t moved to the next line, like it would have been when using overflow. Also notice how “words” is broken, even though it would have fit just fine on the next line.
word-break: break-all has no problem breaking words, but it’s still cautious around punctuation. For example, it’ll avoid starting a line with the period from the end of a sentence. If you want truly merciless breaking, even with punctuation, use line-break: anywhere.
See the Pen word-break: break-all vs line-break: anywhere by Will Boyd (@lonekorean) on CodePen.
See how word-break: break-all moves the “k” down to avoid starting the second line with “.”? Meanwhile, line-break: anywhere doesn’t care.
Excessive Punctuation
Let’s see how the CSS properties we’ve covered so far handle excessively long spans of punctuation.
See the Pen Excessive Punctuation by Will Boyd (@lonekorean) on CodePen.
overflow-wrap: break-word and line-break: anywhere are able to keep things contained, but then there’s word-break: break-all being weird with punctuation again — this time resulting in overflowing text.
It’s something to keep in mind. If you absolutely do not want text to overflow, be aware that word-break: break-all won’t stop runaway punctuation.
Specifying Where Words Can Break
For more control, you can manually insert word break opportunities into your text with <wbr>. You can also use a “zero-width space”, provided by the ​ HTML entity (yes, it must be capitalized just as you see it!).
Let’s see these in action by wrapping a long URL that normally wouldn’t wrap, but only between segments.
<!-- normal -->
<p>https://subdomain.somewhere.co.uk</p> <!-- <wbr> -->
<p>https://subdomain<wbr>.somewhere<wbr>.co<wbr>.uk</p>
<!-- ​ -->
<p>https://subdomain​.somewhere​.co​.uk</p>
See the Pen Manual Word Break Opportunities by Will Boyd (@lonekorean) on CodePen.
Automatic Hyphenation
You can tell the browser to break and hyphenate words where appropriate by using hyphens: auto. Hyphenation rules are determined by language, so you’ll need to tell the browser what language to use. This is done by specifying the lang attribute in HTML, possibly on the relevant element directly, or on <html>.
<p lang="en">This is just a bit of arbitrary text to show hyphenation in action.</p> p {
-webkit-hyphens: auto; /* for Safari */
hyphens: auto;
}See the Pen hyphens: auto by Will Boyd (@lonekorean) on CodePen.
Manual Hyphenation
You can also take matters into your own hands and insert a “soft hyphen” manually with the ­ HTML entity. It won’t be visible unless the browser decides to wrap there, in which case a hyphen will appear. Notice in the following demo how we’re using ­ twice, but we only see it once where the text wraps.
<p lang="en">Magic? Abraca­dabra? Abraca­dabra!</p>See the Pen Soft Hyphen by Will Boyd (@lonekorean) on CodePen.
hyphens must be set to either auto or manual for ­ to display properly. Conveniently, the default is hyphens: manual, so you should be good without any additional CSS (unless something has declared hyphens: none for some reason).
Preventing Text from Wrapping
Let’s switch things up. There may be times when you don’t want text to wrap freely, so that you have better control over how your content is presented. There are a couple of tools to help you with this.
First up is white-space: nowrap. Put it on an element to prevent its text from wrapping naturally.
See the Pen white-space: nowrap by Will Boyd (@lonekorean) on CodePen.
Preformatting Text
There’s also white-space: pre, which will wrap text just as you have it typed in your HTML. Be careful though, as it will also preserve spaces from your HTML, so be mindful of your formatting. You can also use a <pre> tag to get the same results (it has white-space: pre on it by default).
<!-- the formatting of this HTML results in extra whitespace! -->
<p>
What's worse, ignorance or apathy?
I don't know and I don't care.
</p><!-- tighter formatting that "hugs" the text -->
<p>What's worse, ignorance or apathy?
I don't know and I don't care.</p>
<!-- same as above, but using <pre> -->
<pre>What's worse, ignorance or apathy?
I don't know and I don't care.</pre>
p {
  white-space: pre;
}pre {
  /* <pre> sets font-family: monospace, but we can undo that */
  font-family: inherit;
}
See the Pen Preformatted Text by Will Boyd (@lonekorean) on CodePen.
A Break, Where Words Can’t Break?
For line breaks, you can use <br> inside of an element with white-space: nowrap or white-space: pre just fine. The text will wrap.
But what happens if you use <wbr> in such an element? Kind of a trick question… because browsers don’t agree. Chrome/Edge will recognize the <wbr> and potentially wrap, while Firefox/Safari won’t.
When it comes to the zero-width space (​) though, browsers are consistent. None will wrap it with white-space: nowrap or white-space: pre.
<p>Darth Vader: Nooooooooooooo<br>oooo!</p><p>Darth Vader: Nooooooooooooo<wbr>oooo!</p>
<p>Darth Vader: Nooooooooooooo​oooo!</p>
See the Pen white-space: nowrap + breaking lines by Will Boyd (@lonekorean) on CodePen.
Non-Breaking Spaces
Sometimes you may want text to wrap freely, except in very specific places. Good news! There are a few specialized HTML entities that let you do exactly this.
A “non-breaking space” ( ) is often used to keep space between words, but disallow a line break between them.
<p>Something I've noticed is designers don't seem to like orphans.</p><p>Something I've noticed is designers don't seem to like orphans.</p>
See the Pen Non-Breaking Space by Will Boyd (@lonekorean) on CodePen.
Word Joiners and Non-Breaking Hyphens
It’s possible for text to naturally wrap even without spaces, such as after a hyphen. To prevent wrapping without adding a space, you can use ⁠ (case-sensitive!) to get a “word joiner”. For hyphens specifically, you can get a “non-breaking hyphen” with ‑ (it doesn’t have a nice HTML entity name).
<p>Turn right here to get on I-85.</p> <p>Turn right here to get on I-⁠85.</p>
<p>Turn right here to get on I‑85.</p>
See the Pen Word Joiners and Non-Breaking Hyphens by Will Boyd (@lonekorean) on CodePen.
CJK Text and Breaking Words
CJK (Chinese/Japanese/Korean) text behaves differently than non-CJK text in some ways. Certain CSS properties and values can be used for additional control over the wrapping of CJK text specifically.
Default browser behavior allows words to be broken in CJK text. This means that word-break: normal (the default) and word-break: break-all will give you the same results. However, you can use word-break: keep-all to prevent CJK text from wrapping within words (non-CJK text will be unaffected).
Here’s an example in Korean. Note how the word “자랑스럽게” does or doesn’t break.
See the Pen CJK Text + word-break by Will Boyd (@lonekorean) on CodePen.
Be careful though, Chinese and Japanese don’t use spaces between words like Korean does, so word-break: keep-all can easily cause long overflowing text if not otherwise handled.
CJK Text and Line Break Rules
We talked about line-break: anywhere earlier with non-CJK text and how it has no problem breaking at punctuation. The same is true with CJK text.
Here’s an example in Japanese. Note how “。” is or isn’t allowed to start a line.
See the Pen CJK Text + line-break by Will Boyd (@lonekorean) on CodePen.
There are other values for line-break that affect how CJK text wraps: loose, normal, and strict. These values instruct the browser on which rules to use when deciding where to insert line breaks. The W3C describes several rules and it’s possible for browsers to add their own rules as well.
Worth Mentioning: Element Overflow
The overflow CSS property isn’t specific to text, but is often used to ensure text doesn’t render outside of an element that has its width or height constrained.
.top {
  white-space: nowrap;
  overflow: auto;
}.bottom {
  white-space: nowrap;
  overflow: hidden;
}
See the Pen Element Overflow by Will Boyd (@lonekorean) on CodePen.
As you can see, a value of auto allows the content to be scrolled (auto only shows scrollbars when needed, scroll shows them always). A value of hidden simply cuts off the content and leaves it at that.
overflow is actually shorthand to set both overflow-x and overflow-y, for horizontal and vertical overflow respectively. Feel free to use what suits you best.
We can build upon overflow: hidden by adding text-overflow: ellipsis. Text will still be cut off, but we’ll get some nice ellipsis as an indication.
p {
  white-space: nowrap;
  overflow: hidden;
  text-overflow: ellipsis;
}
See the Pen text-overflow: ellipsis by Will Boyd (@lonekorean) on CodePen.
Bonus Trick: Pseudo-Element Line Break
You can force a line break before and/or after an inline element, while keeping it as an inline element, with a little bit of pseudo-element trickery.
First, set the content of a ::before or ::after pseudo-element to 'A', which will give you the new line character. Then set white-space: pre to ensure the new line character is respected.
<p>Things that go <span>bump</span> in the night.</p>span {
background-color: #000;
}span::before, span::after {
content: 'A';
white-space: pre;
}
See the Pen Pseudo-Element Line Breaks by Will Boyd (@lonekorean) on CodePen.
We could have just put display: block on the <span> to get the same breaks, but then it would no longer be inline. The background-color makes it easy to see that with this method, we still have an inline element.
Bonus Notes
- There’s an older CSS property named
word-wrap. It’s non-standard and browsers now treat it as an alias foroverflow-wrap. - The
white-spaceCSS property has some other values we didn’t cover:pre-wrap,pre-line, andbreak-spaces. Unlike the ones we did cover, these don’t prevent text wrapping. - The CSS Text Module Level 4 spec describes a
text-wrapCSS property that looks interesting, but at the time of writing, no browser implements it.
Time to “Wrap” Things Up
There’s so much that goes into flowing text on a web page. Most of the time you don’t really need to think about it, since browsers handle it for you. For the times when you do need more control, it’s nice to know that you have a lot of options.
Writing this was definitely a rabbit hole for me as I kept finding more and more things to talk about. I hope I’ve shown you enough to get your text to break and flow just the way you want it.
Thanks for reading!
Microsoft Word 2013 Tutorial
Page Numbers | Tutorial Main Menu | Training Homepage | Illustrations/Drawing
This section of the tutorial will cover document breaks, as well as the different kinds of page and section breaks that one may create.
In composing a document with multiple pages, particularly one with many chapter headings, it is sometimes difficult to format the text in such a way that some chapters do not begin at the bottom of a page (such as in the example of Fig. 3-6 below).
It also happens that when writing a paper, report, article, or book with multiple sections, difficulties with headers, footers, footnotes, and page numbers present themselves. As mentioned above in the section on Headers and Footers, Word 2013 does not automatically separate a document into sections. As a consequence, the program will duplicate the same headers and footers on each page, as well as continue page numbering and footnotes throughout the document.
For instance, when writing a paper with several sections, the header of the first section will automatically appear in the second as well (see Fig. 3-1 below).

Figure 3-1
In order to remedy this, it will be necessary to create a document break, which will indicate to Word how the document is to be partitioned. There are two types of document breaks, namely page breaks and section breaks. These two types are further subdivided into several different kinds of page and section breaks. The page breaks partition only the body text of the document, whereas the section breaks partition both the body text of the document, as well as partition page margins, headers and footers, page numbers, and the like.
Among the kinds of page breaks, there are simple page breaks, column breaks, and text wrapping breaks. The different kinds of section breaks include next page, continuous, even page, and odd page breaks. To learn more about the different kinds of page and section breaks, see their separate headings below, where they are covered in greater detail.
[Back to Top]
Inserting a Document Break

Figure 3-2
Step 1. To insert a document break, first select the place where you would like it to begin by clicking on it within the body of the document. If your section begins on the next page, as is the case in the example above (Fig. 3-2), it is best to point your cursor and click on the very beginning of the next section.

Figure 3-3
Step 2. Then in the drop-down menu, select the type of break that you want. The difference between each of these different kinds of breaks will be discussed below. For now, we will just select Continuous under Section Breaks. Note that you may not be able ordinarily to see the break itself, although its presence will be made evident in the next step.

Figure 3-4
Tip. If you want to quickly add a simple page break to your document, click on the INSERT tab above the ribbon menu, and then select the Page Break option.

Fig. 3-5
Step 3. Confirm that your break has in fact been inserted by double-clicking on the header area above the body text. On the left under the header area, you should see a grey box which says Header -Section 2-. If you see this, then the break has successfully been created.
Note. To learn how to insert or format headers now that you have made your document break, see Section 1: Headers and Footers. To learn how to insert or format page numbers, see Section 2: Page Numbers.
[Back to Top]
The Different Kinds of Document Breaks
Having covered the basics of how to create a document break, we will now turn our attention to the types of document breaks which may be created in Microsoft Word 2013.
The first type of document break is the page break, which partitions only the body text of the document. Of this type there are three kinds: simple page breaks, column page breaks, and text wrapping page breaks.
Simple Page Breaks
A simple page break will force all the text behind the cursor onto the next page. Below (Fig 3-6) is an example of what what two pages of a document might look like before inserting a simple page break.

Figure 3-6
As can be seen in the example above, Chapter One begins at the end of a page, causing the reader to turn the page two lines in. The work would read more easily if the beginning of the chapter began at the top of the next page, so a page break needs to be inserted into the document.
After the page break has been inserted, the pages will look like Fig. 3-7 below.

Figure 3-7
Column Breaks
If your document utilizes columns, when inserting a column break, any text to the right of the cursor where the break is inserted is forced into the next column. In the two examples below, Fig 3-8 shows the text before the column break, while Fig 3-9 is what the page looks like after the break has been created.
|
Figure 3-8 |
Figure 3-9 |


Text Wrapping Breaks
A text wrapping break moves any text to the right of the cursor to the next line. This kind of break may be particularly useful when your document contains images. Below are examples of a page before and after a text-wrapping break is created (Fig. 3-10 and 3-11, respectively).
|
Figure 3-10 |
Figure 3-11 |


[Back to Top]
The Different Kinds of Section Breaks
The second type of document break is the section break, which partitions both the body text of the document and its associated formatting, such as headers and footers, page numbers, footnotes, margins, etc. Of this type there are four kinds: next page section breaks, continuous section breaks, even page section breaks, and odd page section breaks.
Next Page Breaks
A next page break forces the text to the right of the cursor to the following page, as well as partitions the document into sections, allowing for a change in margins, headers and footers, as well as differently numbered pages and footnotes. This is most useful when your document must be divided into chapters or sections. Below is an example of a paper with two sections, before (Fig. 3-12) and after (Fig. 3-13) a next page break.

Figure 3-12
After the next page break is created, the new section may be formatted separately from the first, and vice versa, while still remaining part of the same document.

Figure 3-13
Note. When formatting page numbers which will begin anew for each section, it will be necessary to right-click on the page number itself, and select Format Page Numbers, to bring up the formatting window (Fig. 2-4).
[Back to Top]
Continuous Breaks
A continuous break allows for the partition of a document, allowing the user to change headers and footers, page numbers, margins, etc., yet without having to alter or otherwise move the body text of the document. This kind of section break is most useful when a document has already been composed in part or in full, but still requires different formatting such as to footnotes, headings, or pagination in separate sections of the work. This allows for one section of a document to end and another to begin on the same page.
Even Page Breaks
An even page break will shift all the text to the right of the cursor to the top of the next even page.
Odd Page Breaks
An odd page break will move the text to the right of the cursor to the top of the next odd page.
[Back to Top]
Occasionally text in paragraphs is not aligned correctly or cannot be positioned as you like. This problem could be a line break, also called soft return or text wrapping break.
A paragraph is created by entering text and pressing the Enter key. It can contain only one word or one sentence, or multiple sentences. Each paragraph ends with a paragraph mark that looks like a reverse P (¶).
The line break moves the next word to the beginning of a new line without starting a new paragraph. A line break character looks like a right-angle arrow pointing to the left ![]() .
.
For example:
- Text with two paragraphs where lines end with paragraph breaks:

- Text with two paragraphs where lines end with line breaks:

Note: You can also see a right-angle arrow between two vertical lines ![]() . This symbol shows the line break that separate text around an object, wrapping text such as a caption text or an image from the body text:
. This symbol shows the line break that separate text around an object, wrapping text such as a caption text or an image from the body text:
![]()
A line break character and other structural characters, such as spaces, paragraph marks, and tabs (also known as Whitespace characters in typography, nonprinting characters, or formatting marks) are usually hidden, but you can display them.
To insert a line break, do the following:
1. Position the cursor in front of the word you want to move to a new line.
2. Do one of the following:
- On the Layout tab, in the Page Setup group, click Breaks, and then click Text Wrapping:

- Press Shift+Enter.

Line breaks are used to delimit a specific text or break a line before a word that would otherwise be hyphenated (see more about automatic hyphenation and manual hyphenation).
To remove line breaks, follow the two-step procedure:
I. Replace two consecutive line breaks with one paragraph break:
1. Open the Find and Replace dialog box by doing one of the following:
- On the Home tab, in the Editing group, click the Find list and then choose Advanced Find…:

- Click Ctrl+H.
- On the Home tab, in the Editing group, click the Replace button:


2. In the Find and Replace dialog box, on the Replace tab:

- In the Find what field, type ^l^l (the caret symbol plus the lowercase Ls twice).
- In the Replace with field, type ^p (the code for a paragraph break).
3. Click the Replace All button.
II. Replace line breaks with spaces or remove them:
1. Open the Find and Replace dialog box.
2. In the Find and Replace dialog box, on the Replace tab:
- In the Find what field, type ^l (the caret symbol plus the lowercase Ls).
- In the Replace with field:
- Type a space if you need to place a space instead of each line break.
- Leave empty if you already have a space at the end of each line.
3. Click the Replace All button.
See more about replacing special characters.
Note: Word offers a helpful feature named AutoFormat that can format selected text with a paragraph break at the end of each full line to delete all the paragraph breaks but the last. In some cases, it can determine where the “real” paragraph breaks are and leave them intact. To run AutoFormat, click Alt+Ctrl+K.