
WordArt is a quick way to make text stand out with special effects. You begin by picking a WordArt style from the WordArt gallery on the Insert tab, and then customize the text as you wish.


Try it!
-
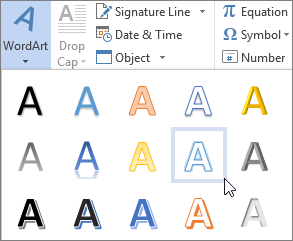
Click Insert > WordArt, and pick the WordArt style you want.

In the WordArt gallery, the letter A represents the different designs that are applied to all text you type.
Note: The WordArt icon is located in the Text group, and it may appear different depending on the program you’re using and the size of your screen. Look for one of these icons:
-
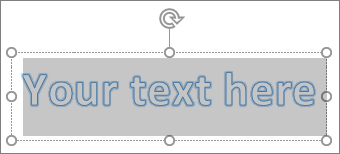
The placeholder text «Your text here» appears, with the text highlighted.
Enter your own text to replace the placeholder text.


Tips:
-
You can enter entire sentences, and even paragraphs, as WordArt. (You may have to change the font size for longer text.) And in Word, you can also convert existing text to WordArt in Word.
-
You can include symbols as WordArt text. Click the location for the symbol, and on the Insert tab, click Symbol, and pick the symbol you want.
Do more things with WordArt
Select a heading below to open it and see the detailed instructions.
You might have tried using shape styles to change the shape of WordArt and then were puzzled that the text didn’t change. Use the text options in the WordArt Styles group instead. Shape styles and effects apply to the box and background surrounding your WordArt, not to the WordArt text. So, to add effects to your WordArt, such as shadows, rotation, curves, and fill and outline colors, you use the options in the WordArt Styles group, including Text Fill, Text Outline, and Text Effects.
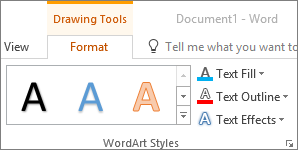
Note: Depending on your screen size, you might only see the icons for WordArt Styles.

-
Select the WordArt text or letters to change.
The Drawing Tools Format tab appears.
-
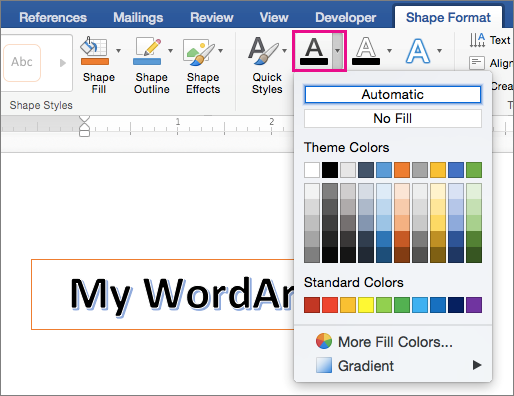
On the Drawing Tools Format tab, click Text Fill or Text Outline, and pick the color you want.
-
Click outside of your text box to see the effect.
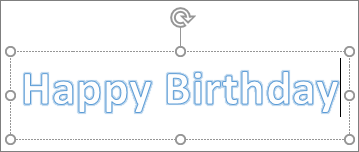
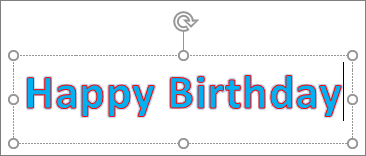
In this example, a light blue text fill and a red text outline were applied.

You can curve text around a circular object.
90 seconds
-
Select the WordArt text or letters to change.
The Drawing Tools Format tab appears.
-
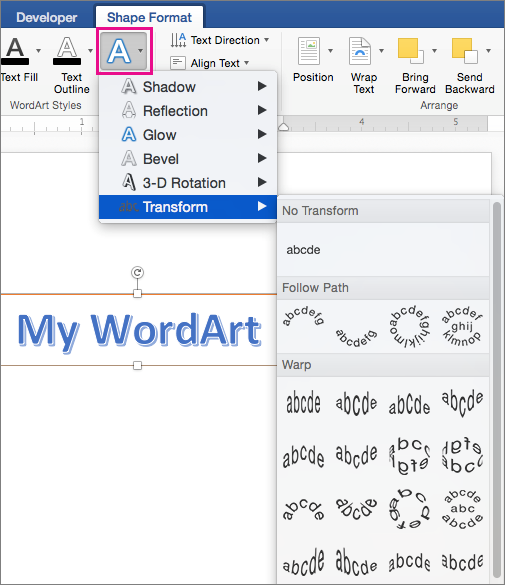
To create a curved effect, on the Drawing Tools Format tab, click Text Effects >Transform and pick the one you want.
Important: The Text Effects
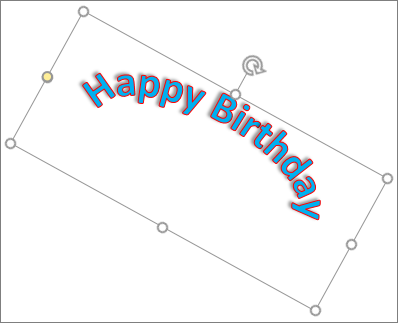
menu is not the same as the Shape Effects menu. If you don’t see Transform at the bottom of the menu, make sure you’ve clicked the Text Effects menu.In this example, the first curved transform effect is selected.
-
Click outside of your text box to see the effect.
Use the Text Effects menu to create other effects, such as shadow, reflection, glow, bevels, and 3-D rotation. This example shows WordArt with a curved transform effect and a shadow applied.
 menu is not the same as the Shape Effects
  menu. If you don’t see Transform at the bottom of the menu, make sure you’ve clicked the Text Effects menu.

-
To rotate WordArt text to any angle, select it, and then drag the circular rotation handle at the top of the box.
-
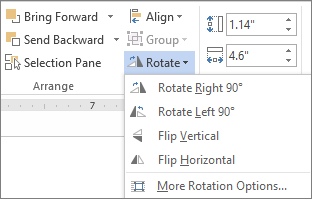
To flip WordArt or rotate it 90 degrees, click the Drawing Tools Format tab, click Rotate in the Arrange group, and then select an option.
To change the font size or style of your WordArt text:
-
Select the WordArt text or letters to change.
-
On the Home tab, select options in the Font group, such as font style, font size, or underline.
-
In your Word document, select the text to convert to WordArt.
-
On the Insert tab, click WordArt, and then pick the WordArt you want.
Double-click the WordArt that you want to remove, and then press Delete.
Insert WordArt
-
Click where you want to insert decorative text in a document.
-
On the Insert tab, in the Text group, click WordArt.
-
Click any WordArt style, and start to type.
Do more things with WordArt
Select a heading below to open it and see the detailed instructions.
-
Click anywhere in the WordArt text that you want to change.
-
Under Drawing Tools, on the Format tab, click any option.
For example, you can change the direction of the WordArt text by clicking Text Direction in the Text group and choosing a new direction for the text.
Double-click the WordArt that you want to remove, and then press Delete.
Add WordArt
Excel
-
On the Insert tab, in the Text group, click WordArt, and then click the WordArt style that you want.
-
Enter your text.
-
You can add a fill or effect to a shape or text box as well as the text in the WordArt.
-
If you have a chart in your 2007 Office release document, you can replace the chart title with WordArt to give the title additional emphasis.
-
Outlook
-
On the Insert tab, in the Text group, click WordArt, and then click the WordArt style that you want.
-
Type your text in the Text box.
You can add a fill or effect to a shape or text box as well as the text in the WordArt.
PowerPoint
-
On the Insert tab, in the Text group, click WordArt, and then click the WordArt style that you want.
-
Enter your text.
-
You can add a fill or effect to a shape or text box as well as the text in the WordArt.
-
If you have a chart in your 2007 Office release document, you can replace the chart title with WordArt to give the title additional emphasis.
-
Publisher
-
On the Objectstoolbar, click Insert WordArt
. -
In the WordArt Gallery, click the WordArt that you want, and then click OK.
-
Type your text in the Text box.
If you want to change the text in the WordArt, double-click the WordArt that you want to change, and then type the new text in the Text box.
 .
.Word
-
On the Insert tab, in the Text group, click WordArt, and then click the WordArt style that you want.
-
Type your text in the Text box.
You can add a fill or effect to a shape or text boxas well as the text in the WordArt.
Do more things with WordArt
Select a heading below to open it and see the detailed instructions.
Excel
Do one or more of the following:
-
To change the text, select it, and then make the changes that you want.
-
To change the font, see Change the font or font size in Excel or Change the color of text in a worksheet.
-
To add an effect to WordArt, see Add or delete a fill, outline, or effect for text or WordArt.
-
To rotate the WordArt, see Rotate or flip a picture, shape, text box, or WordArt in Excel 2007.
-
To resize the WordArt, see Change the size of a picture, shape, text box, or WordArt.
-
To align the WordArt, see Align or arrange a picture, shape, text box, or WordArt.
-
To move the WordArt, see Move a picture, shape, text box, or WordArt.
For more information about selecting WordArt, see Select a shape or other object.
Outlook
Do one or more of the following:
-
To change the text, select it, and then make the changes that you want.
-
To change the font, see Change the size or formatting of text.
-
To add an effect to WordArt, see Add or delete a fill, outline, or effect for text or WordArt.
-
To rotate the WordArt, see Rotate or flip a picture, shape, text box, or WordArt in Outlook 2007.
-
To resize the WordArt, see Change the size of a picture, shape, text box, or WordArt.
-
To align the WordArt, see Align or arrange a picture, shape, text box, or WordArt.
-
To move the WordArt, see Move a picture, shape, text box, or WordArt.
For more information about selecting WordArt, see Select a shape or other object.
PowerPoint
Do one or more of the following:
-
To change the text, select it, and then make the changes that you want.
-
To add an effect to WordArt, see Add or delete a fill, outline, or effect for text or WordArt.
-
To rotate the WordArt, see Rotate or flip a picture, shape, text box, or WordArt in PowerPoint 2007.
-
To resize the WordArt, see Change the size of a picture, shape, text box, or WordArt.
-
To align the WordArt, see Align or arrange a picture, shape, text box, or WordArt.
-
To move the WordArt, see Move a picture, shape, text box, or WordArt.
For more information about selecting WordArt, see Select a shape or other object.
Publisher
Do one or more of the following:
-
To change the text, select it, and then make the changes that you want.
-
To change the font, see Change the font size or Change the color of text.
-
To add an effect to WordArt, see Add or delete a fill, outline, or effect for text or WordArt.
-
To resize the WordArt, see Change the size of a picture, shape, text box, or WordArt.
-
To align the WordArt, see Align or arrange a picture, shape, text box, or WordArt.
-
To move the WordArt, see Move a picture, shape, text box, or WordArt.
For more information about selecting WordArt, see Select a shape or other object.
Word
Do one or more of the following:
-
To change the text, select it, and then make the changes that you want.
-
To change the font, see Change the font size.
-
To add an effect to WordArt, see Add or delete a fill, outline, or effect for text or WordArt.
-
To rotate the WordArt, see Rotate or flip a picture, shape, or WordArt.
-
To resize the WordArt, see Change the size of a picture, shape, text box, or WordArt.
-
To align the WordArt, see Align or arrange a picture, shape, text box, or WordArt.
-
To move the WordArt, see Move a picture, shape, text box, or WordArt.
For more information about selecting WordArt, see Select a shape or other object.
Excel
When you remove the WordArt style from your text, the text remains and changes to plain text.
-
Select the WordArt text that you want to remove the WordArt style from.
-
Under Drawing Tools, on the Format tab, in the WordArt Styles group, click the More button
, and then click Clear WordArt.To remove the WordArt style from part of your text, select the text that you want to remove the WordArt style from, and then follow the steps above.
 , and then click Clear WordArt.
PowerPoint
When you remove the WordArt style from your text, the text remains and changes to plain text.
-
Select the WordArt text that you want to remove the WordArt style from.
-
Under Drawing Tools, on the Format tab, in the WordArt Styles group, click the More button
, and then click Clear WordArt.To remove the WordArt style from part of your text, select the text that you want to remove the WordArt style from, and then follow the steps above.
Do the following for all programs listed in the Applies To at the top of the article.
-
Double-click the WordArt that you want to remove to select it, and then press Delete.
-
In Office for Mac 2016 or later, select the Insert tab on the Ribbon.
or
In Office for Mac 2011, select Insert on the toolbar.
-
Select WordArt, and pick the WordArt style you want.
In the WordArt gallery, the letter A represents the different designs that are applied to all text you type.
-
Enter your text.

Tip: You can also include symbols as WordArt text. To do so, click the location in your document for the symbol, and on the Insert tab, click Advanced Symbol, and pick the symbol you want.
Do more things with WordArt
Select a heading below to open it and see the detailed instructions.
To create curved or circular WordArt text, you add a Transform text effect.
-
Select the WordArt.
When you do that, the Shape Format tab appears.
-
Click Text Effects > Transform and pick the effect you want.

To change the color of the WordArt text, you change the Text Fill.
-
Select the WordArt text or letters to change.
When you do that, the Shape Format tab appears.
-
Click Text Fill, and pick the color you want.
Tip: To change the outline of the WordArt text, on the Shape Format tab, click Text Outline.
-
Select the text to convert to WordArt.
-
On the Insert tab, click WordArt, and then pick the WordArt style you want.
In Microsoft 365 for the web you can see WordArt that’s already in your document, presentation, or worksheet, but to add more WordArt you need to open or edit the doc in the desktop version of Word, PowerPoint, or Excel.
In Microsoft 365 for the web, you can use the Font features on the Home tab to change the font color and size, and apply bolding, italics, or underlines to your text.
If you don’t have the desktop version of Word or PowerPoint, you can try it or buy it in the latest version of Office now.
Add WordArt
- On the Insert tab, in the Text group, click WordArt, and then click the WordArt style that you want.
- Enter your text. You can add a fill or effect to a shape or text box as well as the text in the WordArt.
Contents
- 1 What is WordArt and how should it be used?
- 2 Why is WordArt used?
- 3 How is adding WordArt useful for you?
- 4 How do you do WordArt prints?
- 5 How do you turn WordArt into shapes?
- 6 How do you animate WordArt?
- 7 What is WordArt called?
- 8 Is WordArt a graphic?
- 9 What is WordArt explain?
- 10 What happened to WordArt in Word?
- 11 Is Word Art copyrighted?
- 12 Is word art free?
- 13 Are motion effects to text?
- 14 What is the difference between animation and transition?
- 15 Can we add animation in MS Word?
- 16 How do you write word art?
- 17 What is an example of word art?
- 18 What is art with text called?
- 19 How do I make a Word picture?
- 20 What are the types of word art?
What is WordArt and how should it be used?
WordArt is a program that allows you to treat text as a graphic. You can use the program to add special effects and flourishes to text, and then insert the text in your document. It is useful for creating special text elements such as logos, mastheads, or titles.
Why is WordArt used?
WordArt Overview
You can use WordArt to add special text effects to your document. For example, you can stretch a title, skew text, make text fit a preset shape, or apply a gradient fill. This WordArt becomes an object that you can move or position in your document to add decoration or emphasis.
How is adding WordArt useful for you?
WordArt is a program that allows you to treat text as a graphic. You can use the program to add special effects and flourishes to text, and then insert the text in your document. It is useful for creating special text elements such as logos, mastheads, or titles.
How do you do WordArt prints?
To achieve that do the following:
- Select the square shape in the Geometric category in the Shapes section.
- Click on the gear at the bottom right corner.
- Set aspect ratio to 0.67 and click OK.
- Visualize.
- Download your word art image in PNG format and print it.
How do you turn WordArt into shapes?
Go to Insert > WordArt, and pick the WordArt style you want. Replace the WordArt placeholder text with your own text. Select your WordArt text. Go to Shape Format or Drawing Tools Format, select Text Effects >Transform and pick the look you want.
How do you animate WordArt?
Select animation on the Animation Pane and choose Effect Options from the drop-down menu. Go to the Effect tab and choose the Animate Text option: “All at once”, “By word” or “By Letter”. You can also set delay between animations in percentage for the last two start animation types.
What is WordArt called?
Word art or text art is a form of art that includes text, forming words or phrases, as its main component; it is a combination of language and visual imagery.
Is WordArt a graphic?
A category of fine art, graphic art covers a broad range of visual artistic expression, typically two-dimensional, i.e. produced on a flat surface.Graphic art further includes calligraphy, photography, painting, typography, computer graphics, and bindery.
What is WordArt explain?
WordArt is a text modifying feature in Microsoft Word, a popular word processing program. It includes effects such as shadows, outlines, colors, gradients, and 3D effects that can be added to a word or phrase. WordArt can also bend, stretch, skew, or otherwise modify the shape of the text.
What happened to WordArt in Word?
WordArt pasted in Word 2010 documents retains its classic properties and can be further edited or refined using the WordArt Tools Format contextual tab. Both Word 2003 and Word 2007 documents containing classic WordArt opened in Word 2010 can be converted to Word 2010 format documents.
Is Word Art copyrighted?
Yes. Generally, Microsoft clip art is only licensed for personal, educational, and non-commercial uses. For specifics, read the End User License Agreement (EULA) that you agreed to when you installed the software.
Is word art free?
WordArt offers a freemium model but you’ll need to upgrade to the paid version of the word cloud generator if you want to download high-quality word art, which might be useful if you are planning to print your word cloud.
Are motion effects to text?
Effects can make an object appear, disappear, or move. They can change an object’s size or color. There’s also a related video about animating text.
Change how the animation effect starts.
| Select | To start the animation effect |
|---|---|
| On Click | When you click the slide |
What is the difference between animation and transition?
Transitions – A transition is the normal motions that happen as you move through one slide to the other in the slide show vision. Animations – The movement in either path of the slide of the elements of a presentation, including text, photographs, charts, and so on., is called Animation.
Can we add animation in MS Word?
To add an animation, you first select what you want to animate, choose an animation, and then modify it with effect options. Click the text. Then go to the ANIMATIONS tab, open the Animation gallery, and select one.
How do you write word art?
Add WordArt
- On the Insert tab, in the Text group, click WordArt, and then click the WordArt style that you want.
- Type your text in the Text box. You can add a fill or effect to a shape or text box as well as the text in the WordArt.
What is an example of word art?
Word Art: Text-based Painting, Prints, Sculpture. Painting, Sculpture or Photolithography Using Words and Phrases.
What is art with text called?
Text art, also called ASCII art or keyboard art is a copy-pasteable digital age art form. It’s about making text pictures with text symbols. As we now live in informational societies, I bet you’ve already encountered those ASCII-painted pics somewhere on Internet.
How do I make a Word picture?
Open up a new image in a picture editor such as Paint or Photoshop. Press Ctrl and V at the same time, or click edit and then select paste from the drop-down menu to insert the screen capture of your Word document from your clipboard into the new image file [source: Microsoft Windows].
What are the types of word art?
Art can be a verb or a noun – Word Type.
![]()
Download Article
![]()
Download Article
Most people who use Microsoft Word for designing creative printouts know about the WordArt feature and it’s many features. If you don’t know about it yet, follow the directions in this article to help you achieve these same techniques to make your printouts look spectacular.
Steps
-
1
Open your Microsoft Word document, with whatever method you prefer to open the program with.
-
2
Decide in which document, you’d like to start adding/using the WordArt feature in. You can either start a new document, or open an existing document, depending on where you would like to add the WordArt to.
Advertisement
-
3
Locate the place that you’d like to insert your first WordArt piece of text on your page.
- Type the previous text.
- You can either continue on that line (rarely used), or press enter to start a new line.
-
4
Open your menu toolbar. For quick access if this toolbar isn’t available, press and release Alt on your keyboard.
-
5
Click the «Insert» option from this toolbar.
-
6
Click the «Picture» button.This should open a drop-down list.
-
7
Click the «WordArt» option from the drop-down that results. This should open a new window, along with adding a toolbar to the display window, that you can later move into a position on the screen near all the toolbars at the top of the screen. For now, you’ll be concentrated on the dialog box that Microsoft Word brought up when you clicked the option to Insert a new piece of WordArt.
-
8
Click to select the WordArt style that looks the best to you.
-
9
Click the «OK» button. This will open a new dialog box that will help you type the text you want to be inserted to become a piece of WordArt.
-
10
Type your text using proper formatting (such as correct capitalization, grammar, etc.). The text «Your text here» is automatically selected, which means as soon as you start typing, the former pre-filled text will be removed in place for the text you will type.
-
11
Select alternate formatting (bold, italic, font size, font type) from the buttons above the box you type your stuff in.
-
12
Learn how to move your WordArt text. This can be achieved for most viewers by clicking to select and either centering the text like most centering of any other text, or, for some versions (2007 and up) by right-clicking and dragging the text to a new location.
-
13
Learn how to color your WordArt text. Use the same styles to color other text, as you would for this WordArt text. Just be sure the WordArt piece has been selected, before you begin to select your color. If you do end up selecting your color, you’ll be selecting a font color for any additional text near the insertion «I» point on the screen.
- Learn how to copy the piece of WordArt to an alternate location, if you’d like. Use the Copy and Paste technique to copy and paste the item from one area to another, through the use of Windows clipboard (which is where all copy and pasted items are temporarily stored).


Advertisement
Add New Question
-
Question
What is Microsoft Word insert?

Microsoft Word «insert» is used to insert any element or object into a document.
Ask a Question
200 characters left
Include your email address to get a message when this question is answered.
Submit
Advertisement
Video
-
The steps in this article are based on the 2003 version of Microsoft Word.
-
You can also select the text in the original page. You then can select the style, and it will pre-fill the words for you into the boxes.
Show More Tips
Thanks for submitting a tip for review!
Advertisement
Things You’ll Need
- Microsoft Word program
- computer mouse and keyboard
About This Article
Thanks to all authors for creating a page that has been read 115,502 times.
Reader Success Stories
-

«What helped me was the ‘Create Word Art’ video was graphic/demonstrative. It put ‘here/now’ words and directions…» more
Is this article up to date?
Word Art в Microsoft Office — это текстовое поле, которое предлагает множество стилей, которые придают художественный вид вашему тексту, чтобы привлечь внимание. Пользователи могут использовать WordArt при создании листовок, рекламных объявлений и других творений, потому что WordArt выделяется.
Текстовый эффект и WordArt
Вы можете настроить текст WordArt, изменив цвет, размер и шрифт текста WordArt. В Microsoft Office вы также можете настроить текстовый эффект текста WordArt.
В этом уроке мы будем использовать Microsoft Word.
Создать Текст WordArt.
Убедитесь, что Текстовое поле WordArt выбрано.
Нажмите Текстовые эффекты в Стили WordArt группа.
Вы можете выбрать такие эффекты, как Тень, Отражение, Светиться, Скос, 3-D вращение, и Преобразовать в его раскрывающемся списке.
В Эффект тени добавляет эффект тени к вашему тексту. Вы можете выбрать эффект тени, который состоит из Нет тени, Внешний, Внутренний, Перспектива, и щелкните Параметры тени флажок внизу списка.
А Форматировать фигуру справа появится окно, в котором вы можете выполнить дальнейшую настройку, например Пресеты, Цвет, Прозрачность, Размер, Размытие, Угол и Расстояние.
В Эффект отражения придает тексту отражающий эффект. В Отражение эффект состоит без отражения и Варианты отражения.
Когда вы нажимаете Параметры отражения флажок, A Форматировать фигуру Окно появится справа. Которые состоят из Пресеты, Тпрозрачность, Размер, Размытие, и Расстояние для настройки эффекта отражения.
В Эффект свечения позволяет тексту иметь эффект свечения. Эффект свечения состоит из Нет свечения, Вариация свечения, и Больше свечения Цвета которые позволяют пользователю выбрать любой цвет в своем тексте свечения.
Когда вы нажимаете Параметры свечения флажок внизу списка, Форматировать фигуру справа появится окно, состоящее из Пресеты, Тпрозрачность, Размер, Размытие, и Расстояние для настройки эффекта свечения.
В Эффект скоса придает тексту скошенный вид. Эффект скоса состоит из Без скоса и Скос.
Когда пользователь нажимает 3-D параметры, а Форматировать фигуру Появится окно, отображающее дальнейшую настройку эффекта скоса. К ним относятся выбор Верхний скос и Нижний скос, то Ширина и Высота обоих скосов, Глубина и Контур цвет и размер, Материал, выбор Освещение, и Молния Угол и Перезагрузить, который позволяет сбросить настройки Bevel.
В Эффект трехмерного вращения придает тексту эффект трехмерного вращения. Эффект трехмерного вращения состоит из Нет трехмерного вращения, Параллельный, Перспектива, и Косой.
Вы увидите Вариант трехмерного вращения; если щелкнуть по нему, Форматировать фигуру появится окно с такими параметрами, как Пресеты, X вращения, Y вращения, Z вращения, Оставить ровный текст поворота, Расстояние от земли, и Перезагрузить.
В Эффект трансформации придает тексту эффект кривой. Эффект трансформации состоит из Без преобразования, Следовать по пути, и Деформация.
Выберите любой из этих Последствия, и текст в документе изменится.
Надеюсь, это поможет; если у вас есть вопрос, прокомментируйте его ниже.
Читать дальше: Как создать штрих-код в Microsoft Word.
Most of your Word documents are likely set in standard, drab Times New Roman or Calibri typography, perhaps with the occasional cheesy Word Art thrown in for variety. Yet Word actually includes a number of text effect tools that give you everything you need to make beautiful art from your words.
In this tutorial, I’ll show you how to create the cool text effects you want in every modern version of Microsoft Word, using its advanced type and typography formatting features. Once you’re done, you’ll know the tricks that I used to make Word templates that look great.
How to Make a Stylish Text Effect in MS Word (Quick Video)
In this quick screencast video, you’ll learn how to go beyond default Word Art options and make a cool text effect in Microsoft Word, using text formatting tools to create stylish typography:
For more detailed information on how to make beautiful Word text effects, review the step-by-step instructions below.
How to Make MS Word Text Effects (Step by Step)
Learn how to apply both standard text effects and more advanced options inside Microsoft Word’s Format pane, such as Drop Shadow and Reflection. Discover how to transform your text into cool typography art. Let’s get started:
1. Set Up a New Page in MS Word
Start by creating a new document by either clicking File > New or pressing the Control-N shortcut. To set properties like the page orientation and the page size, jump into the Layout tab.
.jpg)
.jpg)
.jpg)
If you plan to print your document and you already know the final paper size, it is important to set it as a first step. Why? Microsoft Word lets you easily scale any object, but
some properties, like the outline width, remain unchanged. Font size also
stays the same during the resizing, and has to be updated manually. Working in
the final paper size right from the beginning helps save time in the
future.
There are two things you need to know about the Layout tab before we set the final page size values. First, the Size drop-down menu contains only the paper sizes which are possible to print with the currently selected printer. In other words, you cannot set an A3 paper size when your printer can only print up to A4 documents. To fix that, you can jump to the File > Print menu and change the printer to a different one for a second, for example the Microsoft XPS Document Writer, which is a «virtual printer» that only saves files locally to your computer.
.jpg)
.jpg)
.jpg)
Don’t print anything, but once you’ve chosen a different printer, go back (using the left arrow in the top left corner), and open Layout > Size again. The list of available sizes should be much larger now.
.jpg)
.jpg)
.jpg)
Then, the other thing worth noting is that the drop-down menus for Margins, Orientation and Size may not be enabled all the time. If you have a Text Box placed and selected inside the document, some Layout options will be disabled. I’m specifically pointing this out because we will use Text Box objects all the time, and jumping to the Layout tab and seeing those options disabled can be quite frustrating.
.jpg)
.jpg)
.jpg)
Now you know how to always be able to set a page Size. Set the size to A4
and the Orientation to Landscape. Your page is now set up the way you’ll want for your custom Word text effect art, and you’ll know how to tweak it again next time.
.jpg)
.jpg)
.jpg)
2. Change the Font and the Font Size
Now, it’s time to add your text and start tweaking it. Type anything you want, select the text, and pick the font and size you want. Most of the text effects look best in large sizes, so don’t be afraid to
use either the Increase Font Size button
or the font size drop-down menu to make the text really big.
If the maximum
value of 72 pt is not enough, type in any number you want, for example
250 pt (only type the number). You can also use non-integer values, such as 198.5, if you want to get the largest possible text without wrapping.
.jpg)
.jpg)
.jpg)
3. What Is Kerning? (How to Set It in Word)
Let’s look at an important concept for setting typography in Word. When a type designer creates a font, every letter has its own width set to make sure the gaps between the letters are even. This works fine in most cases, except for the combination
of letters with less «rectangular» shapes, like «V» and «A».
Thus, type designers add “kerning” features, which specify that those two letters when placed next to each other will have the gap smaller (or bigger). In a perfect world, an application uses this kerning and everything looks fine. Well, not everything functions as expected in the real world.
.jpg)
.jpg)
.jpg)
If you only need to know one thing about kerning, remember this—it should always be enabled, but it is off by default in Microsoft Word. To turn it on, open the Font dialog (Control-D) Advanced tab, and check Kerning for fonts X points and above.
When you check this checkbox, a current font size is filled into the edit box, but you probably want to change it to 1 pt instead—just to make sure it will be really enabled all the time for
any text. Then click the Set as Default button. For more information about kerning, see Quick Tip: Typography Skills, Basic Kerning.
.jpg)
.jpg)
.jpg)
It is important to know that the kerning also has to be enabled this way for every text box in the document. If you accidentally or on purpose delete everything in your document
(Control-A > Delete), the kerning is again turned off.
4. Apply Standard Text Effects in Microsoft Word
Before we start adding our own text effect, let’s briefly take a look what Word offers us in the Text Effect and Typography drop-down menu on the Home tab on the ribbon. There are 15 pre-defined text effects with different outlines, fills, and shadow effects, and some of the presets also include 3D effects. The colors of those presets always reflect the selected color theme.
.jpg)
.jpg)
.jpg)
You can jump to the Design tab and select a different color scheme from the Colors drop-down menu. Jump back to the Home tab, open the Text Effects and Typography drop-down menu, and it should look a bit different.
.jpg)
.jpg)
.jpg)
This is nice, but unfortunately there’s no way to adjust those presets. The items in this list cannot be edited or deleted, and you cannot add new presets. Those 15 presets can be helpful
if you need a nice looking header and you only have two minutes of your time, but you will learn nothing new about the text
effects just by using them.
5. Body Text vs. a Text Box
The text can be placed in a document in two different ways. The usual way is to create a new document and start typing. We can call this type of text «body text«. While the text effects can be added to this body text quite easily, they are limited, and thus using body text is not a preferred option.
The second way is to use a Text Box object and write into this text box. To insert a new Text Box, select Insert > Shapes > Text Box, and draw a new text box the same way you draw for example a rectangle.
.jpg)
.jpg)
.jpg)
The text placed inside a text
box has several advantages. It can be moved around the document freely without
any restrictions (even off the document or over the margins), and it can be
rotated. Moreover, some additional text effects like the 3D rotate options are
available.
If you do not like the default appearance of the text box—especially the white fill and the black outline—both can be easily set to none on the Format tab. Use the Shape Fill and the Shape Outline drop-down menus.
.jpg)
.jpg)
.jpg)
To select a text box with no fill and no outline, click over the text, which will show the text box
borders as a dotted line. Clicking over this dotted line to select a text box should be easy now.
6. Change Your Page Background in Word
The standard white paper color may seem a little bit boring for our text effect, and it may be a good idea to set it to a different color. Go to the Design tab, and from the Page Color drop-down menu, select a dark gray color. As for any other color
drop-down, the first two columns with grays are still the same, but the eight columns on the right side change depending on the chosen color palette. After changing the background, the black text inside the text box is almost invisible now, but that’s fine—we’ll fix it in a minute.
.jpg)
.jpg)
.jpg)
7. Master the Almighty Format Pane
The Format tab in Word allows us to format the text box as well as the text itself. There are drop-down menus for the text fill, outline, and all the other possible effects, and there are submenus and submenus and submenus. It is definitively not an easy way to tweak the effects,
and we only have access to a limited number of presets and options. There is
a better place to adjust the setting—the Format Pane.
The Format Pane is an essential pane for setting all the advanced options, yet there is no standard way to display this pane. In short, every «More…» item on the Format tab (More Lines, More Gradients, More Textures) opens the Format Pane,
but since we have the Text Box inside our document, we might as well right click
the text box border and select Format Shape.
.jpg)
.jpg)
.jpg)
Before we move on, remember there is only one Format Pane,
but the content of this pane changes depending on the selected content. It’s
different for the text box, for body text, and for an image.
I say it to
prevent any confusion, because the name of this Format Pane also changes—it
can be Format Shape, Format Text Effects or Format Picture. Because this will
be our base station for setting all the effect, it is a good habit to keep this
pane open all the time.
8. Set the Text Fill and the Outline
With the background color set and a Format Pane still open,
select the text box and type in any word, for example “Effect”. Keep the font set to
Calibri and set the size to 72 pt. In the Format Pane, select Text Options,
open the Text Fill settings, and change the Text fill from the Solid Fill to the
Gradient Fill. From the Preset Gradients drop-down menu, select a yellow top
spotlight. This will create a subtle shading, as if there was a light source
shining from the top.
.jpg)
.jpg)
.jpg)
To make the text a little bit more interesting, we will also add an outline. Change the Text
Outline from No Line to Solid Line, raise the Width to a bigger number,
for example 3 pt, and change the Color to white.
.jpg)
.jpg)
.jpg)
The outline is nice, but too
strong. We can open the Compound Type drop-down menu and select Double, which
will split the outline into two: one visible over the text, and one outside the
text. To get rid of the ugly joins, change the Join type to Round instead of the default Bevel.
.jpg)
.jpg)
.jpg)
All we need to do now
is to increase the Transparency to make this outline less visible. A value
around 60% seems to be just fine.
.jpg)
.jpg)
.jpg)
9. Add More Cool Word Text Effects
With the text box
still selected and the Format Pane still open, switch to the Text Effects
tab. As a first effect, we will add a simple drop shadow below the text. Open
the Shadow effect properties, and from the presets drop-down menu, select Outer:
Offset Bottom. Because the page background color is quite dark, the effect is
quite subtle, which is fine, and probably does not need any additional tweaking.
.jpg)
.jpg)
.jpg)
If you want, you can
also try to add a Reflection effect. Select any preset, but increase the Blur
value to make the reflection less visible and not too distracting.
.jpg)
.jpg)
.jpg)
In just a few steps, we have a nice looking text effect, and we can call it done.
.jpg)
.jpg)
.jpg)
10. Share the Document (.docx vs .pdf)
When sharing your
document with your friends, you can choose between two main formats: the Word
native .docx, or Adobe Acrobat .pdf file. The document saved in .docx format
keeps the effects fully dynamic, but depending on the effects used, the other
person often needs to have the latest version of Microsoft Word installed.
Otherwise, the document can look different (and most likely ugly).
The biggest advantage
of the document saved in a .pdf format is that it will look exactly the same on
every device, in any application. However, you lose the ability to edit the
text effects, and probably also the ability to edit the text. Microsoft Word
can export as well as import the .pdf files, but the ability to edit the text with the applied effects is in most cases lost. For more information, please read this helpful tutorial:
To save the document
in the .docx format, simply hit the save button—it should be the default
format. To save the document as a .pdf file, select File > Export >
Create PDF/XPS, and then choose PDF in the file type drop-down when saving the file.
.jpg)
.jpg)
.jpg)
Key Takeaways: For Making Your Own MS Word Text Effects
We’ve only scratched
the surface of the text effects in Microsoft Word, but you should have a solid
knowledge of the Word basics needed for future effects. Here is a list of
the main takeaways:
- When possible, set
the paper size as a first step. Resizing the objects afterwards can bring
unexpected complications. - Most text effects look best in very large sizes.
- Always be sure to enable kerning and good typography practices when working with text in Word.
- There is a
difference between «body text» and text placed inside a
Text Box. For text effects, text placed inside a Text Box is preferred. - The Format Pane is the
best place to change any formatting—make sure to have this pane
visible all the time. - Share your creations
in Word .docx format to keep the ability to edit, or Adobe Acrobat .pdf format to
make sure everything will look the same at all times.
Enjoy creating your own text effects using these steps, and leave a comment below if you have any trouble making your own text effects in Word!
To learn more about Microsoft Word, study the
following tutorials:
Editorial Note: This post was originally published in 2014. It has been comprehensively revised by our staff to make it current, accurate, and up to date—with special assistance from Laura Spencer.
Did you find this post useful?
![]()
Hello, I’m Vaclav, graphics designer from Czech Republic, mainly focused on GUI design. Despite everything I’ve created in Photoshop, my most well-known creation is a viral video «Was iOS7 created in Microsoft Word?».