
Содержание
- VBA Target.Address
- Target.Address
- VBA Code Examples Add-in
- Excel VBA Events – An Easy (and Complete) Guide
- Excel VBA Events – Introduction
- Different Types of Excel VBA Events
- Where to Put the Event-Related Code
- In Worksheet Code Window
- In ThisWorkbook Code Window
- In Userform Code Window
- In Chart Code Window
- In Class Module
- Understanding the Event Sequence
- Understanding the Role of Arguments in VBA Events
- Workbook Level Events (Explained with Examples)
- Workbook Open Event
- Workbook NewSheet Event
- Workbook BeforeSave Event
- Workbook BeforeClose Event
- Workbook BeforePrint Event
- Worksheet Level Events (Explained with Examples)
- Worksheet Activate Event
- Worksheet Change Event
- Workbook SelectionChange Event
- Workbook DoubleClick Event
- Excel VBA OnTime Event
- Excel VBA OnKey Event
- Disabling Events in VBA
- Impact of Events Undo Stack
VBA Target.Address
This article will demonstrate the use of VBA Target.Address.

Target.Address
Target is the given name of the Range object variable that is contained in the argument of Worksheet Object Events, such as Worksheet_SelectionChange.
This event is triggered when you move from one cell to another in your worksheet.
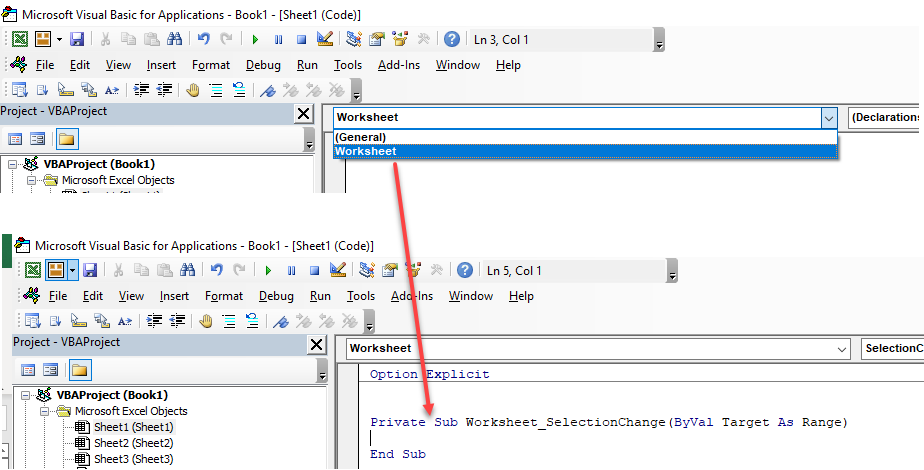
To create a Worksheet Event, on the VBE Editor, select the appropriate worksheet and then, in the Object drop down box, select Worksheet.
Consider the following code:
Whenever you move your cursor this event will run and the IF Statement will test if the selected cell is F2. If it is, the cell will be set to Bold.
NOTE: The Target.Address is an absolute ($F$2), so when checking to see if you are on the appropriate cell, you must use $ signs in your string (“$F$2”).
The Target Range (and therefore the Target.Address method) is also avaialable with the Worksheet_Change; Worksheet_BeforeDoubleClick and Worksheet_BeforeRightClick event procedures in your Worksheet object.

VBA Code Examples Add-in
Easily access all of the code examples found on our site.
Simply navigate to the menu, click, and the code will be inserted directly into your module. .xlam add-in.
Источник
Excel VBA Events – An Easy (and Complete) Guide
When you create or record a macro in Excel, you need to run the macro to execute the steps in the code.
A few ways of running a macro includes using the macro dialog box, assigning the macro to a button, using a shortcut, etc.
Apart from these user-initiated macro executions, you can also use VBA events to run the macro.
This Tutorial Covers:
Excel VBA Events – Introduction
Let me first explain what is an event in VBA.
An event is an action that can trigger the execution of the specified macro.
For example, when you open a new workbook, it’s an event. When you insert a new worksheet, it’s an event. When you double-click on a cell, it’s an event.
There are many such events in VBA, and you can create codes for these events. This means that as soon as an event occurs, and if you have specified a code for that event, that code would instantly be executed.
Excel automatically does this as soon as it notices that an event has taken place. So you only need to write the code and place it in the correct event subroutine (this is covered later in this article).
For example, if you insert a new worksheet and you want it to have a year prefix, you can write the code for it.
Now, whenever anyone inserts a new worksheet, this code would automatically be executed and add the year prefix to the worksheet’s name.
Another example could be that you want to change the color of the cell when someone double-clicks on it. You can use the double-click event for this.
Similarly, you can create VBA codes for many such events (as we will see later in this article).
Below is a short visual that shows the double-click event in action. As soon as I double click on cell A1. Excel instantly opens a message box that shows the address of the cell.
Double-click is an event, and showing the message box is what I have specified in the code whenever the double-click event takes place.
While the above example is a useless event, I hope it helps you understand what events really are.
Different Types of Excel VBA Events
There are different objects in Excel – such as Excel itself (to which we often refer to as the application), workbooks, worksheets, charts, etc.
Each of these objects can have various events associated with it. For example:
- If you create a new workbook, it’s an application level event.
- If you add a new worksheet, it’s a workbook level event.
- If you change the value in a cell in a sheet, it’s a worksheet level event.
Below are the different types of Events that exist in Excel:
- Worksheet Level Events: These are the types of events that would trigger based on the actions taken in the worksheet. Examples of these events include changing a cell in the worksheet, changing the selection, double-clicking on a cell, right-clicking on a cell, etc.
- Workbook Level Events: These events would be triggered based on the actions at the workbook level. Examples of these events include adding a new worksheet, saving the workbook, opening the workbook, printing a part or the entire workbook, etc.
- Application Level Events: These are the events that occur in the Excel application. Example of these would include closing any of the open workbooks or opening a new workbook.
- UserForm Level Events: These events would be triggered based on the actions in the ‘UserForm’. Examples of these include initializing a UserForm or clicking a button in the UserForm.
- Chart Events: These are events related to the chart sheet. A chart sheet is different than a worksheet (which is where most of us are used to work in Excel). A chart sheets purpose is to hold a chart. Examples of such events would include changing the series of the chart or resizing the chart.
- OnTime and OnKey Events: These are two events that don’t fit in any of the above categories. So I have listed these separately. ‘OnTime’ event allows you to execute a code at a specific time or after a specific time has elapsed. ‘OnKey’ event allows you to execute a code when a specific keystroke (or a combination of keystrokes) is used.
In the above section, I covered the different types of events.
Based on the type of event, you need to put the code in the relevant object.
For example, if it’s a worksheet related event, it should go in the code window of the worksheet object. If it’s workbook related, it should go in the code window for a workbook object.
The following sections cover the places where you can put the event code:
In Worksheet Code Window
When you open the VB Editor (using keyboard shortcut ALT + F11), you would notice the worksheets object in the Project Explorer. For each worksheet in the workbook, you will see one object.
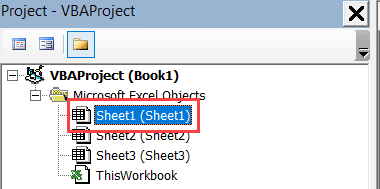
When you double-click on the worksheet object in which you want to place the code, it would open the code window for that worksheet.
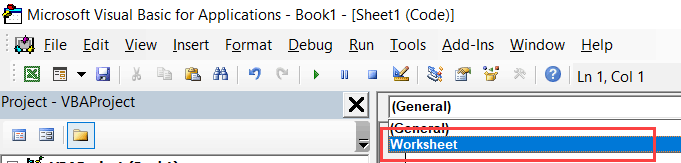
While you can start writing the code from scratch, it’s much better to select the event from a list of options and let VBA automatically insert the relevant code for the selected event.
To do this, you need to first select worksheet from the drop down at the top-left of the code window.
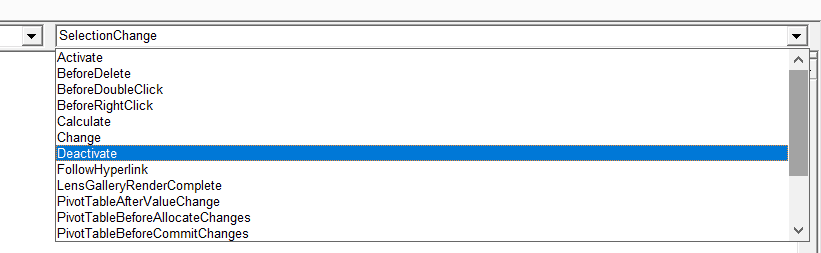
After selecting worksheet from the drop down, you get a list of all the events related to the worksheet. You can select the one you want to use from the drop-down at the top right of the code window.
As soon as you select the event, it would automatically enter the first and last line of the code for the selected event. Now you can add your code in between the two lines.

Note: As soon as you select Worksheet from the drop-down, you would notice two lines of code appear in the code window. Once you have selected the event for which you want the code, you can delete the lines that appeared by default.
Note that each worksheet has a code window of its own. When you put the code for Sheet1, it will only work if the event happens in Sheet1.
In ThisWorkbook Code Window
Just like worksheets, if you have a workbook level event code, you can place it in ThisWorkbook code window.
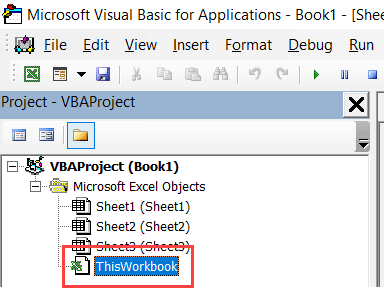
When you double-click on ThisWorkbook, it will open the code window for it.
You need to select Workbook from the drop-down at the top-left of the code window.
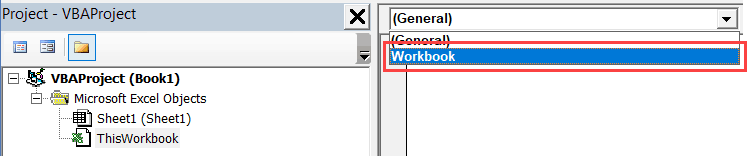
After selecting Workbook from the drop down, you get a list of all the events related to the Workbook. You can select the one you want to use from the drop-down at the top right of the code window.
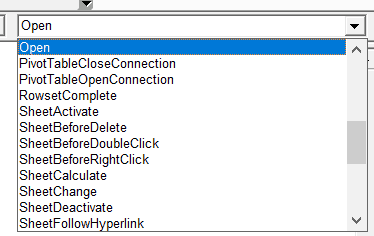
As soon as you select the event, it would automatically enter the first and last line of the code for the selected event. Now you can add your code in between the two lines.
Note: As soon as you select Workbook from the drop-down, you would notice two lines of code appear in the code window. Once you have selected the event for which you want the code, you can delete the lines that appeared by default.
In Userform Code Window
When you’re creating UserForms in Excel, you can also use UserForm events to executes codes based on specific actions. For example, you can specify a code that is executed when the button is clicked.
While the Sheet objects and ThisWorkbook objects are already available when you open the VB Editor, UserForm is something you need to create first.
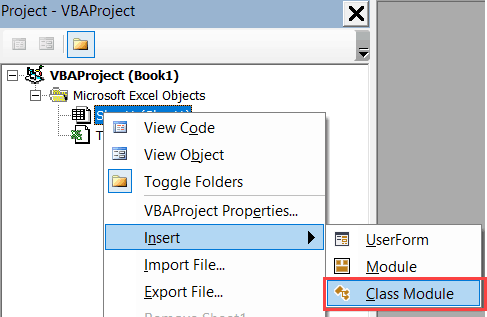
To create a UserForm, right-click on any of the objects, go to Insert and click on UserForm.

This would insert a UserForm object in the workbook.
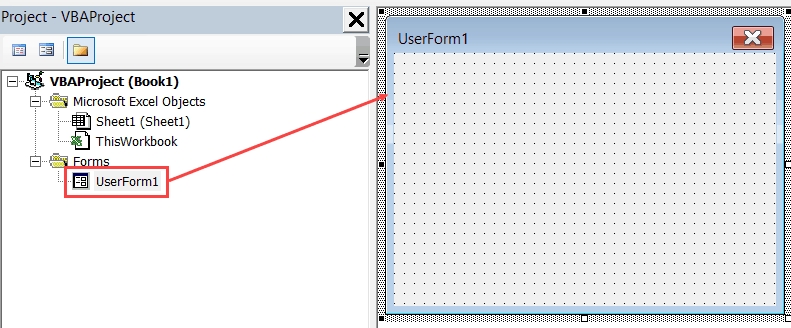
When you double-click on the UserForm (or any of the object that you add to the UserForm), it would open the code window for the UserForm.
Now just like worksheets or ThisWorkbook, you can select the event and it will insert the first and the last line for that event. And then you can add the code in the middle of it.
In Chart Code Window
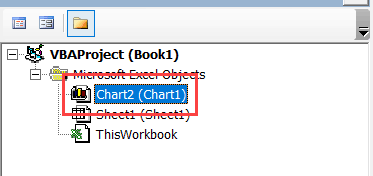
In Excel, you can also insert Chart sheets (which are different then worksheets). A chart sheet is meant to contain charts only.
When you have inserted a chart sheet, you will be able to see the Chart sheet object in the VB Editor.
You can add the event code to the chart sheet code window just like we did in the worksheet.
Double click on the Chart sheet object in the Project Explorer. This will open the code window for the chart sheet.
Now, you need to select Chart from the drop-down at the top-left of the code window.
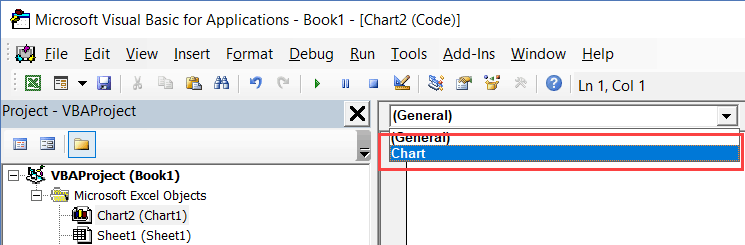
After selecting Chart from the drop-down, you get a list of all the events related to the Chart sheet. You can select the one you want to use from the drop-down at the top right of the code window.
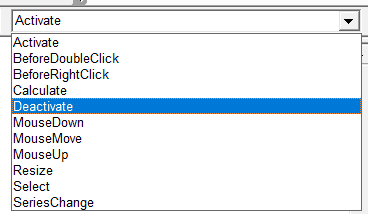
Note: As soon as you select Chart from the drop-down, you would notice two lines of code appear in the code window. Once you have selected the event for which you want the code, you can delete the lines that appeared by default.
In Class Module
Class Modules need to be inserted just like UserForms.
A class module can hold code related to the application – which would be Excel itself, and the embedded charts.
I will cover the class module as a separate tutorial in the coming weeks.
Understanding the Event Sequence
When you trigger an event, it doesn’t happen in isolation. It may also lead to a sequence of multiple triggers.
For example, when you insert a new worksheet, the following things happen:
- A new worksheet is added
- The previous worksheet gets deactivated
- The new worksheet gets activated
While in most cases, you may not need to worry about the sequence, if you’re creating complex codes that rely on events, it’s better to know the sequence to avoid unexpected results.
Understanding the Role of Arguments in VBA Events
Before we jump to Event examples and the awesome things you can do with it, there is one important concept I need to cover.
In VBA events, there would be two types of codes:
- Without any arguments
- With arguments
And in this section, I want to quickly cover the role of arguments.
Below is a code that has no argument in it (the parenthesis are empty):
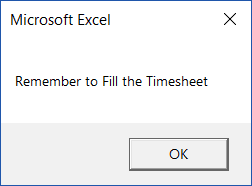
With the above code, when you open a workbook, it simply shows a message box with the message – “Remember to fill the Timesheet”.
Now let’s have a look at a code that has an argument.
The above code uses the Sh argument which is defined as an object type. The Sh argument could be a worksheet or a chart sheet, as the above event is triggered when a new sheet is added.
By assigning the new sheet that is added to the workbook to the object variable Sh, VBA has enabled us to use it in the code. So to refer to the new sheet name, I can use Sh.Name.
The concept of arguments will be useful when you go through the VBA events examples in the next sections.
Workbook Level Events (Explained with Examples)
Following are the most commonly used events in a workbook.
| EVENT NAME | WHAT TRIGGERS THE EVENT |
| Activate | When a workbook is activated |
| AfterSave | When a workbook is installed as an add-in |
| BeforeSave | When a workbook is saved |
| BeforeClose | When a workbook is closed |
| BeforePrint | When a workbook is printed |
| Deactivate | When a workbook is deactivated |
| NewSheet | When a new sheet is added |
| Open | When a workbook is opened |
| SheetActivate | When any sheet in the workbook is activated |
| SheetBeforeDelete | When any sheet is deleted |
| SheetBeforeDoubleClick | When any sheet is double-clicked |
| SheetBeforeRightClick | When any sheet is right-clicked |
| SheetCalculate | When any sheet is calculated or recalculated |
| SheetDeactivate | When a workbook is deactivated |
| SheetPivotTableUpdate | When a workbook is updated |
| SheetSelectionChange | When a workbook is changed |
| WindowActivate | When a workbook is activated |
| WindowDeactivate | When a workbook is deactivated |
Note that this is not a complete list. You can find the complete list here.
Remember that the code for Workbook event is stored in the ThisWorkbook objects code window.
Now let’s have a look at some useful workbook events and see how these can be used in your day-to-day work.
Workbook Open Event
Let’s say that you want to show the user a friendly reminder to fill their timesheets whenever they open a specific workbook.
You can use the below code to do this:
Now as soon as you open the workbook that has this code, it will show you a message box with the specified message.
There are a few things to know when working with this code (or Workbook Event codes in general):
- If a workbook has a macro and you want to save it, you need to save it in the .XLSM format. Else the macro code would be lost.
- In the above example, the event code would be executed only when the macros are enabled. You may see a yellow bar asking for permission to enable macros. Until that is enabled, the event code is not executed.
- The Workbook event code is placed in the code window of ThisWorkbook object.
You can further refine this code and show the message only of Friday.
The below code would do this:
Note that in the Weekday function, Sunday is assigned the value 1, Monday is 2 and so on.
Hence for Friday, I have used 6.
Workbook Open event can be useful in many situations, such as:
- When you want to show a welcome message to the person when a workbook is opened.
- When you want to display a reminder when the workbook is opened.
- When you want to always activate one specific worksheet in the workbook when it’s opened.
- When you want to open related files along with the workbook.
- When you want to capture the date and time stamp every time the workbook is opened.
Workbook NewSheet Event
NewSheet event is triggered when you insert a new sheet in the workbook.
Let’s say that you want to enter the date and time value in cell A1 of the newly inserted sheet. You can use the below code to do this:
The above code uses ‘On Error Resume Next’ to handle cases where someone inserts a chart sheet and not a worksheet. Since chart sheet doesn’t have cell A1, it would show an error if ‘On Error Resume Next’ is not used.
Another example could be when you want to apply some basic setting or formatting to a new sheet as soon as it is added. For example, if you want to add a new sheet and want it to automatically get a serial number (up to 100), then you can use the code below.
The above code also does a bit of formatting. It gives the header cell a blue color and makes the font white. It also applies a border to all the filled cells.
The above code is an example of how a short VBA code can help you steal a few seconds every time you insert a new worksheet (in case this is something that you have to do every time).
Workbook BeforeSave Event
Before Save event is triggered when you save a workbook. Note that the event is triggered first and then the workbook is saved.
When saving an Excel workbook, there could be two possible scenarios:
- You’re saving it for the first time and it will show the Save As dialog box.
- You’ve already saved it earlier and it will simply save and overwrite the changes in the already saved version.
Now let’s have a look at a few examples where you can use the BeforeSave event.
Suppose you have a new workbook that you’re saving for the first time, and you want to remind the user to save it in the K drive, then you can use the below code:
In the above code, if the file has never been saved, SaveAsUI is True and brings up the Save As dialog box. The above code would display the message before the Save As dialog box appear.
Another example could be to update the date and time when the file is saved in a specific cell.
The below code would insert the date & time stamp in cell A1 of Sheet1 whenever the file is saved.
Note that this code is executed as soon as the user saves the workbook. If the workbook is being saved for the first time, it will show a Save As dialog box. But the code is already executed by the time you see the Save As dialog box. At this point, if you decide to cancel and not save the workbook, the date and time would already be entered in the cell.
Workbook BeforeClose Event
Before Close event happens right before the workbook is closed.
The below code protects all the worksheets before the workbook is closed.
Remember that the event code is triggered as soon as you close the workbook.
One important thing to know about this event is that it doesn’t care whether the workbook is actually closed or not.
In case the workbook has not been saved and you’re shown the prompt asking whether to save the workbook or not, and you click Cancel, it will not save your workbook. However, the event code would have already been executed by then.
Workbook BeforePrint Event
When you give the print command (or Print Preview command), the Before Print event is triggered.
The below code would recalculate all the worksheets before your workbook is printed.
When the user is printing the workbook, the event would be fired whether he/she is printing the entire workbook or only a part of it.
Another example below is of the code that would add the date and time to the footer when the workbook is printed.
Worksheet Level Events (Explained with Examples)
Worksheet events take place based on the triggers in the worksheet.
Following are the most commonly used events in a worksheet.
| Event Name | What triggers the event |
| Activate | When the worksheet is activated |
| BeforeDelete | Before the worksheet is deleted |
| BeforeDoubleClick | Before the worksheet is double-clicked |
| BeforeRightClick | Before the worksheet is right-clicked |
| Calculate | Before the worksheet is calculated or recalculated |
| Change | When the cells in the worksheet are changed |
| Deactivate | When the worksheet is deactivated |
| PivotTableUpdate | When the Pivot Table in the worksheet is updated |
| SelectionChange | When the selection on the worksheet is changed |
Note that this is not a complete list. You can find the complete list here.
Remember that the code for Worksheet event is stored in the worksheet object code window (in the one in which you want the event to be triggered). There can be multiple worksheets in a workbook, and your code would be fired only when the event takes place in the worksheet in which it is placed.
Now let’s have a look at some useful worksheet events and see how these can be used in your day-to-day work.
Worksheet Activate Event
This event is fired when you activate a worksheet.
The below code unprotects a sheet as soon as it is activated.
You can also use this event to make sure a specific cell or a range of cells (or a named range) is selected as soon as you activate the worksheet. The below code would select cell D1 as soon as you activate the sheet.
Worksheet Change Event
A change event is fired whenever you make a change in the worksheet.
Well.. not always.
There are some changes that trigger the event, and some that don’t. Here is a list of some changes that won’t trigger the event:
- When you change the formatting of the cell (font size, color, border, etc.).
- When you merge cells. This is surprising as sometimes, merging cells also removes content from all the cells except the top-left one.
- When you add, delete, or edit a cell comment.
- When you sort a range of cells.
- When you use Goal Seek.
The following changes would trigger the event (even though you may think it shouldn’t):
- Copy and pasting formatting would trigger the event.
- Clearing formatting would trigger the event.
- Running a spell check would trigger the event.
Below is a code would show a message box with the address of the cell that has been changed.
While this is a useless macro, it does show you how to use the Target argument to find out what cells have been changed.
Now let’s see a couple of more useful examples.
Suppose you have a range of cells (let’s say A1:D10) and you want to show a prompt and ask the user if they really wanted to change a cell in this range or not, you can use the below code.
It shows a prompt with two buttons – Yes and No. If the user selects ‘Yes’, the change is done, else it is reversed.
In the above code, we check whether the Target cell is in first 4 columns and the first 10 rows. If that’s the case, the message box is shown. Also, if the user selected No in the message box, the change is reversed (by the Application.Undo command).
Note that I have used Application.EnableEvents = False before the Application.Undo line. And then I reversed it by using Application.EnableEvent = True in the next line.
This is needed as when the undo happens, it also triggers the change event. If I don’t set the EnableEvent to False, it will keep on triggering the change event.
You can also monitor the changes to a named range using the change event. For example, if you have a named range called “DataRange” and you want to show a prompt in case user makes a change in this named range, you can use the code below:
The above code checks whether the cell/range where you have made the changes has any cells common to the Data Range. If it does, it shows the message box.
Workbook SelectionChange Event
The selection change event is triggered whenever there is a selection change in the worksheet.
The below code would recalculate the sheet as soon as you change the selection.
Another example of this event is when you want to highlight the active row and column of the selected cell.
Something as shown below:
The following code can do this:
The code first removes the background color from all the cells and then apply the one mentioned in the code to the active row and column.
And that’s the problem with this code. That it removes color from all cells.
If you want to highlight the active row/column while keeping the color in other cells intact, use the technique shown in this tutorial.
Workbook DoubleClick Event
This is one of my favorite worksheet events and you’ll see a lot of tutorials where I have used this (such as this one or this one).
This event is triggered when you double-click on a cell.
Let me show you how awesome this is.
With the below code, you can double-click on a cell and it will apply a background color, change the font color, and make the text in the cell bold;
This can be useful when you’re going through a list of cells and want to highlight a few selected ones. While you can use the F4 key to repeat the last step, it would only be able to apply one kind of formatting. With this double-click event, you can apply all three with just a double-click.
Note that in the above code, I have made the value of Cancel = True.
This is done so that the default action of double-click is disabled – which is to get into the edit mode. With Cancel = True, Excel would not get you into Edit mode when you double-click on the cell.
Here is another example.
If you have a to-do list in Excel, you can use double-click event to apply the strikethrough format to mark the task as completed.
Something as shown below:
Here is the code that will do this:
Note that in this code, I have made double-click as a toggle event. When you double-click on a cell, it checks if the strikethrough format has already been applied. If it has been, double-click removes the strikethrough format, and if it hasn’t been, then the strikethrough format is applied.
Excel VBA OnTime Event
The events that we have seen so far in this article were associated with one of the Excel objects, be it the workbook, worksheet, chart sheet, or UserForms, etc.
OnTime event is different than other events as it can be stored in the regular VBA module (while the others were to be placed in the code window of objects such as ThisWorkbook or Worksheets or UserForms).
Within the regular VBA module, it is used as a method of the application object.
The reason this is considered an event is that it can be triggered based on the time you specify. For example, if I want the sheet to recalculate every 5 minutes, I can use the OnTime event for it.
Or, if I want to show a message/reminder at a specific time of the day, I can use the OnTime event.
Below is a code that will show a message at 2 pm every day.
Remember you need to place this code in the regular VBA module,
Also, while the OnTime event would be triggered at the specified time, you need to run the macro manually at any time.
Once you run the macro, it will wait till it’s 2 PM and then call the ‘ShowMessage’ macro.
The ShowMessage macro would then display the message.
The OnTime event takes four arguments:
Application. OnTime (EarliestTime, Procedure, LatestTime, Schedule)
- EarliestTime: The time when you want to run the procedure.
- Procedure: The name of the procedure that should be run.
- LatestTime (Optional): In case another code is running and your specified code can’t be run at the specified time, you can specify the LatestTime for which it should wait. For example, it could be EarliestTime + 45 (which means it will wait for 45 seconds for the other procedure to get completed). If even after 45 seconds the procedure is not able to run, it gets abandoned. If you don’t specify this, Excel would wait until the code can be run, and then run it.
- Schedule (Optional): If set to True, it schedules new time procedure. If False, then it cancels the previously set procedure. By default, this is True.
In the above example, we only used the first two arguments.
Let’s look at another example.
The below code would refresh the worksheet every 5 min.
The above code would refresh the worksheet every 5 minutes.
It uses the Now function to determine the current time and then adds 5 minutes to the current time.
The OnTime event would continue to run until you stop it. If you close the workbook and Excel application is still running (other workbooks are open), the workbook that has the OnTime event running in it would reopen itself.
This is better handled by specifically stopping the OnTime event.
In the above code, I have the StopRefresh code, but you need to execute it to stop the OnTime event. You can do this manually, assign it to a button and do this by pressing the button or call it from the Workbook Close event.
The above ‘BeforeClose’ event code goes in ThisWorkbook code window.
Excel VBA OnKey Event
When you’re working with Excel, it keeps monitoring the keystrokes you use. This allows us to use keystrokes as the trigger for an event.
With OnKey event, you can specify a keystroke (or a combination of keystrokes) and the code that should be executed when that keystroke is used. When these keystrokes are pressed, it will execute the code for it.
Just like OnTime event, you need to have a way to cancel the OnKey event. Also, when you set the OnKey event for a specific keystroke, it becomes available in all the open workbooks.
Before I show you an example of using the OnKey event, let me first share the key codes that are available to you in VBA.
| KEY | CODE |
| Backspace | or |
| Break | |
| Caps Lock | |
| Delete | or |
| Down Arrow | |
| End | |
| Enter | |
| Enter (on the nueric keypad) | |
| Escape | or |
| Home | |
| Ins | |
| Left Arrow | |
| NumLock | |
| PageDown | |
| PageUp | |
| RightArrow | |
| Scroll Lock | |
| Tab | |
| Up Arrow | |
| F1 through F15 | through |
When you need to use any onkey event, you need to use the code for it.
The above table has the codes for single keystrokes.
You can also combine these with the following codes:
- Shift: + (Plus Sign)
- Control: ^ (Caret)
- Alt: % (Percentage)
For Example, for Alt F4, you need to use the code: “% ” – where % is for the ALT key and is for the F4 key.
Now let’s have a look at an example (remember the code for OnKey events are placed in the regular VBA module).
When you hit the PageUp or PageDown key, it jumps 29 rows above/below the active cell (at least that’s what it’s doing on my laptop).
If you want it to jump only 5 rows at a time, you can use the below code:
When you run the first part of the code, it will run the OnKey events. Once this is executed, using the PageUp and the PageDown key would only make the cursor jump 5 rows at a time.
Note that we have used ‘On Error Resume Next’ to make sure errors are ignored. These errors can occur when you press the PageUp key even when you’re at the top of the worksheet. Since there are no more rows to jump, the code would show an error. But since we have used ‘On Error Resume Next’, it will be ignored.
To make sure these OnKey events are available, you need to run the first part of the code. In case you want this to be available as soon as you open the workbook, you can place this in the ThisWorkbook code window.
The below code will return the keys to their normal functionality.
When you don’t specify the second argument in the OnKey method, it will return the keystroke to its regular functionality.
In case you want to cancel the functionality of a keystroke, so that Excel does nothing when that keystroke is used, you need to use a blank string as the second argument.
In the below code, Excel would do nothing when we use the PageUp or PageDown keys.
Disabling Events in VBA
Sometimes you may need to disable events to make your code work properly.
For example, suppose I have a range (A1:D10) and I want to show a message whenever a cell is changed in this range. So I show a message box and asks the user whether they are sure that they want to make the change. If the answer is Yes, the change is made, and if the answer is No, then VBA would undo it.
You can use the below code:
The problem with this code is that when the user selects No in the message box, the action is reversed (as I have used Application.Undo).
When the undo happens and the value is changed back to the original one, the VBA change event is again triggered, and the user is again shown the same message box.
This means that you can continue to click NO on the message box and it will keep showing up. This happens as you have got stuck in the infinite loop in this case.
To avoid such cases, you need to disable events so that the change event (or any other event) is not triggered.
The following code would work well in this case:
In the above code, right above the Application.Undo line, we have used – Application.EnableEvents = False.
Setting EnableEvents to False would not trigger any event (in the current or any open workbooks).
Once we have completed the undo operation, we can switch back the EnableEvents property to True.
Keep in mind that disabling events impacts all the workbooks that are currently opened (or opened while EnableEvents is set to False). For example, as a part of the code, if you open a new workbook, then the Workbook Open event would not work.
Impact of Events Undo Stack
Let me first tell you what an Undo Stack is.
When you work in Excel, it keeps monitoring your actions. When you make a mistake, you can always use Control + Z to go back to the previous step (i.e., undo your current action).
If you press Control + Z twice, it will take you back two steps. These steps that you have performed are stored as a part of the Undo stack.
Any event that changes the worksheet destroys this Undo stack. This means that if I have done 5 things before I trigger an event, I will not be able to use Control + Z to go back to those previous steps. Triggering the event has destroyed that stack for me.
In the below code, I use VBA to enter the timestamp in cell A1 whenever there is a change in the worksheet.
Since I am making a change in the worksheet, this will destroy the undo stack.
Also, note that this is not limited to events only.
If you have a code that is stored in regular VBA module, and you make a change in the worksheet, it would also destroy the undo stack in Excel.
For example, the below code simply enter the text “Hello” in cell A1, but even running this would destroy the undo stack.
You May Also Like the Following Excel VBA Tutorials:
Источник
Return to VBA Code Examples
This article will demonstrate the use of VBA Target.Address.
Target.Address
Target is the given name of the Range object variable that is contained in the argument of Worksheet Object Events, such as Worksheet_SelectionChange.
This event is triggered when you move from one cell to another in your worksheet.
To create a Worksheet Event, on the VBE Editor, select the appropriate worksheet and then, in the Object drop down box, select Worksheet.
Consider the following code:
Private Sub Worksheet_SelectionChange(ByVal Target As Range)
  If Target.Address = "$F$2" Then
    Range(Target.Address).Font.Bold = True
  End If
End Sub
Whenever you move your cursor this event will run and the IF Statement will test if the selected cell is F2. If it is, the cell will be set to Bold.
NOTE: The Target.Address is an absolute ($F$2), so when checking to see if you are on the appropriate cell, you must use $ signs in your string (“$F$2”).
The Target Range (and therefore the Target.Address method) is also avaialable with the Worksheet_Change; Worksheet_BeforeDoubleClick and Worksheet_BeforeRightClick event procedures in your Worksheet object.
Automatically Run Excel Macros When a Cell Changes
VBA Change to a Single Cell
In Excel a Worksheet Change Event is a trigger for a macro when a cell or group of cells change. I will start out by showing how a change to a single cell can trigger an action. The following will colour cell B2 Red whenever the cell changes. The following uses the(ByVal Target As Range) line which uses the Variable named Target. The Target is the Range which will trigger an action. You assign the Range within the code itself.
The following YouTube video takes you the cell change event, both a single cell and multiple cells. The following Excel file goes with the video.
Change Cell.xlsm
Before you fill your boots with the following it is worth mentioning that when you employ the use of the VBA change events you lose the ability to undo in Excel. Normally Excel keeps a record of a number of actions.
The VBA code to perform this action needs to go in the sheet object you want to perform the event. If you wanted to put the code in Sheet1 then you would double click on the sheet you wish to run the code from.
The following is an example of Excel VBA coding you could put in Sheet1 or any of the other sheet objects.
In the example above you need to keep the $ (absolute sign) or the code will not work. So when referencing a single cell the range reference needs to be absolute.
«$B$2”
The following VBA performs the same action as the above example. It is a little more flexible if you wish to add to the range. Once Inside the Worksheet Change Event, if the Target falls within the defined Range and the cell contents change, it will trigger an action inside VBA.
Option Explicit
Private Sub Worksheet_Change(ByVal Target As Range) ‘Excel VBA with more cells in the range.
If Not Intersect(Target, Range(«B2»)) Is Nothing Then
Target.EntireRow.Interior.ColorIndex=15
End If
End Sub
Disable Events
Occasionally one of the things you may wish to do with the cell that is changing is delete, copy, cut or some other action which triggers a circular loop. For example, if you wanted to move a line to another sheet which met a condition, when the condition was met you would trigger the Change Event and when you deleted the row you would start another change event. This second change event would cause a debug error. To get around this you can turn Events off at the start of the procedure and turn them back on at the end of the procedure.
The line of code is;
Application.EnableEvents=False
and the following is an example of how it might be used.
Private Sub Worksheet_Change(ByVal Target As Range) ‘Excel VBA change event test for close.
If Not Intersect(Target, Range(«A2», Range(«A» & Rows.Count).End(xlUp))) Is Nothing Then
Application.EnableEvents=False
If Target=»Closed» Then
Target.EntireRow.Copy Sheet2.Range(«A1»).End(xlDown)(2)
Target.EntireRow.Delete
End If
End If
Application.EnableEvents=True
End Sub
The VBA macro will copy the entire row from one sheet to another and delete the row which was just copied. The example is shown in the file below.
VBA Worksheet Change Event Multiple Cells
When we want to perform an action when more than one cell is changed we can use the following VBA code to change a larger range. It focuses on shifting the range within the Target. The following is an example of a change event where if the cells from A2:A10 change the procedure will trigger an action.
Option Explicit ‘Excel worksheet change event Range A1 to A10
Private Sub Worksheet_Change(ByVal Target As Range)
If Not Intersect(Target, Range(«A2:A10»)) Is Nothing Then
Target.EntireRow.Interior.ColorIndex=15
End If
End Sub
VBA Double Click Event
A double click event in Excel VBA is self explanatory. It will occur on double click of a cell in the Target range. So if you have a range between C13 and O26 where you want to perform an action on Double click, the following should help.
‘Excel worksheet double click change event Range C13 to O26
Private Sub Worksheet_BeforeDoubleClick(ByVal Target As Range, Cancel As Boolean)
If Not Intersect(Target, Range(«C13:O26»)) Is Nothing Then
Target.Value=ActiveCell.Offset(19, 0).Value
End If
End Sub
VBA Before Save Event
This event is triggered as the name suggests before each Save. So as the save Excel file icon is clicked the code which is associated with this event will trigger.
The before Save event needs to go into the ThisWorkbook Object in order for it to run.
The following Excel VBA macro will put the word False in Cell A1 before the file is saved.
Option Explicit
Private Sub Workbook_BeforeSave(ByVal SaveAsUI As Boolean, Cancel As Boolean)
Sheet1.Cells(1, 1)=False
End Sub

- Forum
- Microsoft Office Application Help — Excel Help forum
- Excel Programming / VBA / Macros
- What is «target?»

-
LinkBack
-
Thread Tools
- Show Printable Version
-
Subscribe to this Thread…
-
Rate This Thread
-
Display
- Linear Mode
- Switch to Hybrid Mode
- Switch to Threaded Mode
-
01-13-2014, 05:44 PM
#1
Forum Contributor
- Join Date
- 12-15-2009
- Location
- Herndon, VA
- MS-Off Ver
- Excel 2010
- Posts
- 163
What is «target?»
There is a word called ‘target’ that appears in VBA code. I’m trying to find some information on it. What is target? Is it an object, property or a method?
-
01-13-2014, 05:48 PM
#2
Re: What is «target?»
Please ensure you mark your thread as Solved once it is. Click here to see how.
If a post helps, please don’t forget to add to our reputation by clicking the star icon in the bottom left-hand corner of a post.
-
01-13-2014, 05:48 PM
#3
Re: What is «target?»
Usually it is a Range. You are probably referring to something like the Worksheet_Change event. With this event the macro will be triggered whenever there is a change in the worksheet which you can further specify using the predefined variable, Target


Thread Information
Users Browsing this Thread
There are currently 1 users browsing this thread. (0 members and 1 guests)
Similar Threads
-
Replies: 4
Last Post: 11-17-2013, 12:05 PM
-
Replies: 7
Last Post: 10-09-2013, 06:14 AM
-
Replies: 1
Last Post: 01-02-2013, 07:15 PM
-
Replies: 2
Last Post: 12-04-2012, 08:08 PM
-
Replies: 6
Last Post: 09-30-2006, 05:16 AM
Tags for this Thread
Bookmarks
Bookmarks
- Contact Us
- ExcelForum.com
- Archive
- Top
You may want to run your macro/VBA snippet when a cell changes its value, when a double click happens, when a sheet is selected, etc. In all these cases we use Worksheet Event Handler. The Event Handler helps us run VBA code whenever a certain event occurs.
In this article, we will learn briefly about each Worksheet Event Handler.
What is a Worksheets Event Handler?
A worksheet event handler is a subroutine that is local to a worksheet module.
Where to write Worksheet Event Handler Code?
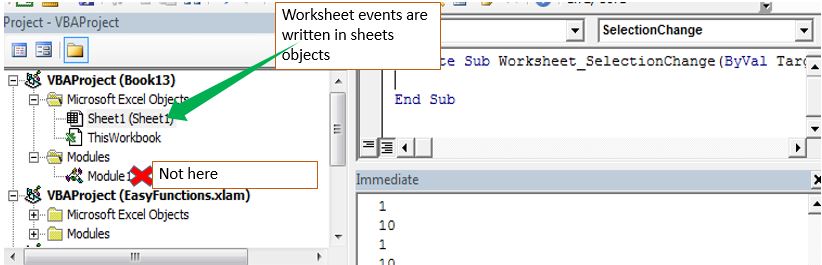
The worksheet Events are written in sheets objects only. If you write a worksheet event in some module or class module, there will be no error but they will just won’t work.
To write in the sheet object. Double click on it or right-click and click on view code. The code writing area will be shown.
How to write code for a specific event on the worksheet?
Now when you are in the editing mode, in the top-left corner dropdown menu you will see general. Click on the drop-down and select worksheet. Now in the top-right corner dropdown, all events will show. Choose whichever you need and a skeletal code for that event will be written for you.
Each event has a fixed procedure name. These are the reserved subroutine names. You can’t use them for other subroutines on a sheet. In a module, they will work as a normal subroutine.
Important: Each subroutine from that list will run on the specified event.
One type of worksheet event procedure can be written only once on one sheet. If you write two same event handling procedures on one sheet, it will result in an error and none of them will be executed. Of course, the error will be ambiguous subroutines.
Let’s learn briefly about each of the events.
1. The Worksheet_Change (ByVal Target As Range) Event
This event triggers when we make any change to containing worksheets (formatting excluded). If you want to do something if any change made in the entire sheet then the code will be:
Private Sub Worksheet_Change(ByVal Target As Range)
  'do somehting
  Msgbox "done something"
End Sub
The «Target» is the Active cell always.
Another example: You may want to put date and time in Cell B1 if A1 changes. In that case, we use the worksheet_change event. The code would look like this:
Private Sub Worksheet_Change(ByVal Target As Range)
 If Target.Address = "$A$1" Then
  Range("B1").Value2 = Format(Now(), "hh:mm:ss")
 End If
End Sub
This will target only the cell A1.
If you want to target a range then use the below example:
Run Macro If Any Change Made on Sheet in Specified Range
2. The Worksheet_SelectionChange(ByVal Target As Range) Event
As the name suggests, this event triggers when the selection changes. In other words, if your cursor is in Cell A1 and it moves to some other cell, the code in this subroutine will run.
The below code will change the active cells color if whenever it changes and if it is an even row.
Private Sub Worksheet_SelectionChange(ByVal Target As Range)
 If Target.Row Mod 2 = 0 Then
    Target.Interior.ColorIndex = 22
 End If
End Sub
Now, whenever my cursor will move on even row, it will be colored. Odd row cells will be spared.

Another Example of the Worksheet_SelectionChange event:
Simplest VBA Code to Highlight Current Row and Column Using
3. The Worksheet_Activate() Event
This event is triggered when the event code containing sheet activates. The skeletal code for this event is:
Private Sub Worksheet_Activate()

End Sub
A simple example is showing the sheet name when it gets selected.
Private Sub Worksheet_Activate()

  MsgBox "You are on " & ActiveSheet.Name

End Sub
As soon as you will come on the sheet that contains this code, the event will run and will be shown a message that «You are on sheet name» (sheet2 is in my case).
4. The Worksheet_Deactivate() Event
This event triggers when leaving the code containing sheet. In other words, if you want to do something, like hiding rows or anything when you leave the sheet, use this VBA event. The syntax is:
Private Sub Worksheet_Deactivate()
'your code
'
End Sub
The below example Worksheet_Deativate event will simply pop up a message that you have left the master sheet, when you will leave this sheet.
Private Sub Worksheet_Deactivate()
  MsgBox "You Left The Master Sheet"
End Sub

5. The Worksheet_BeforeDelete() Event
This event triggers when you confirm the deletion of the VBA event containing sheet. The syntax is simple:
Private Sub Worksheet_BeforeDelete()

End Sub
The below code will ask you if you want to copy the content of the about-to-delete sheet.
Private Sub Worksheet_BeforeDelete()
    ans = MsgBox("Do you want to copy the content of this sheet to a new sheet?", vbYesNo)
    If ans = True Then
    'code to copy
 End If
End Sub
6. The Worksheet_BeforeDoubleClick(ByVal Target As Range, Cancel As Boolean) Event
This event triggers when you double click on the targeted cell. The syntax of this VBA Worksheet Event is:
Private Sub Worksheet_BeforeDoubleClick(ByVal Target As Range, Cancel As Boolean)

End Sub
If you don’t set the target cell or range, it will fire on every double click on the sheet.
The Cancel variable is a boolean variable. If you set it True, the default action won’t happen. It means if you double click on the cell it won’t get into editing mode.
The below code will make the cell fill with a color if you double click on any cell.
Private Sub Worksheet_BeforeDoubleClick(ByVal Target As Range, Cancel As Boolean)

Cancel = True
Target.Interior.ColorIndex = 7

End Sub
The below code targets the cell A1. If it is already filled with the specified color then it will vanish the color. It is much like a like button or check box.
Private Sub Worksheet_BeforeDoubleClick(ByVal Target As Range, Cancel As Boolean)
   If Target.Address = "$A$1" Then

   Cancel = True
    If Target.Interior.ColorIndex = 4 Then
        Target.Interior.ColorIndex = xlColorIndexNone
    Else
        Target.Interior.ColorIndex = 4
    End If

   End If

End Sub

7. The Worksheet_BeforeRightClick(ByVal Target As Range, Cancel As Boolean) Event
This event triggers when you Right-Click on the targeted cell. The syntax of this VBA Worksheet Event is:
Private Sub Worksheet_BeforeRightClick(ByVal Target As Range, Cancel As Boolean)
   Cancel = True
   '
   'your code
   '
End Sub
The below code will fill the cell with value 1 if you right-click on it. It won’t show the default right-click options since we have set the «Cancel» Operator to True.
Private Sub Worksheet_BeforeRightClick(ByVal Target As Range, Cancel As Boolean)
   Cancel = True
   Target.Value = 1
End Sub
8. The Worksheet_Calculate() Event
If you want something to happen when a excel calculates a sheet, use this event. It will trigger whenever excel calculates a sheet. The syntax is simple:
Private Sub Worksheet_Calculate()
  '
   'your code
   '
End Sub
6. The Worksheet_FollowHyperlink(ByVal Target As Hyperlink) Event
This procedure will run when you click on a hyperlink on the sheet. The basic syntax of this event handler is:
Private Sub Worksheet_FollowHyperlink(ByVal Target As Hyperlink)
    '
   'your code
   '

End Sub
You can set the target hyperlink if you want. If you don’t set the target hyperlink, it will get executed if you click on any hyperlink on the code containing sheet.
So yeah guys, these were some basic worksheet events that will be handy if you know about them. Below are some related articles that you may like to read.
If you have any doubts regarding this article or any other excel/VBA related article, let us know in the comments section below.
Related Articles:
Using Worksheet Change Event To Run Macro When any Change is Made | So to run your macro whenever the sheet updates, we use the Worksheet Events of VBA.
Run Macro If Any Change Made on Sheet in Specified Range | To run your macro code when the value in a specified range changes, use this VBA code. It detects any change made in the specified range and will fire the event.
Simplest VBA Code to Highlight Current Row and Column Using | Use this small VBA snippet to highlight the current row and column of the sheet.
Popular Articles:
50 Excel Shortcuts to Increase Your Productivity | Get faster at your task. These 50 shortcuts will make your work even faster on Excel.
The VLOOKUP Function in Excel | This is one of the most used and popular functions of excel that is used to lookup value from different ranges and sheets.
COUNTIF in Excel 2016 | Count values with conditions using this amazing function. You don’t need to filter your data to count specific value. Countif function is essential to prepare your dashboard.
How to Use SUMIF Function in Excel | This is another dashboard essential function. This helps you sum up values on specific conditions.