
Word for Microsoft 365 Outlook for Microsoft 365 Word 2021 Outlook 2021 Word 2019 Outlook 2019 Word 2016 Outlook 2016 Word 2013 Outlook 2013 Word 2010 Word 2007 More…Less
You can use styles to quickly apply a set of formatting choices consistently throughout your document. If you want formatting choices that are not available from the built-in styles and themes available in Word, you can modify an existing style and customize it to suit your needs. You can change the formatting (such as font size, color, and text indentation) in styles applied to titles, headings, paragraphs, lists, and so on. You can also select formatted text in your document to create a new style in the Styles gallery.
The styles covered in this article are located in the Styles gallery, a visual menu located on the Home tab. To apply a style, simply select the text you want to format, and then click the style you want in the Styles gallery. To learn more, see Apply a style to text in Word.

Modify an existing style
You can modify an existing style in the Styles gallery in two ways:
-
Modify a style by updating it to match formatting in your document
-
Modify a style manually in the Modify Style dialog box
Modify a style by updating it to match formatting in your document
If you have text in your document that already has a style applied, you can change the formatting of that text and apply it to the style in the Styles gallery.
-
Select text in your document that has the style applied, such as Heading 1.
When you select text that has a style applied, that style is highlighted in the Styles gallery.

-
Format the selected text with the new attributes that you want.
For example, you might want to change the point size for the Heading 1 style from 16 points to 14 points.
-
On the Home tab, in the Styles group, right-click the style that you want to change, and then click Update [Style Name] to Match Selection.
Note: All text with the style that you changed will automatically change to match the new style that you defined.
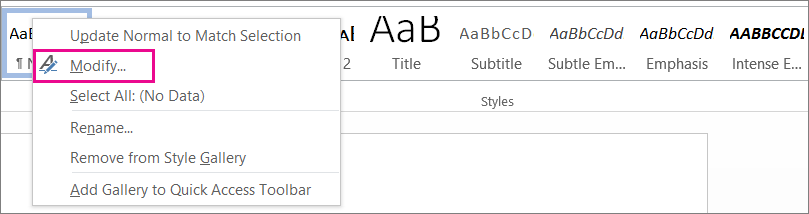
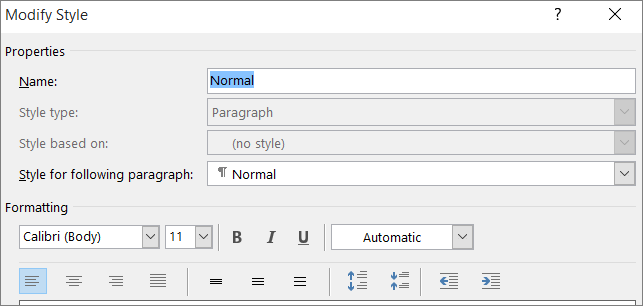
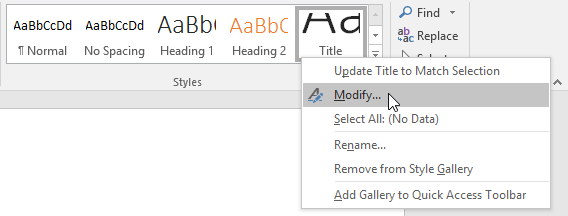
Modify a style manually in the Modify Style dialog box
You can modify a style directly in the Styles gallery, without using the text in your document.
-
On the Home tab, right-click any style in the Styles gallery and click Modify.
-
In the Formatting section, make any formatting changes you want, such as font style, size, or color, alignment, line spacing, or indentation.
-
Choose whether the style change applies to the current document or to all future documents.

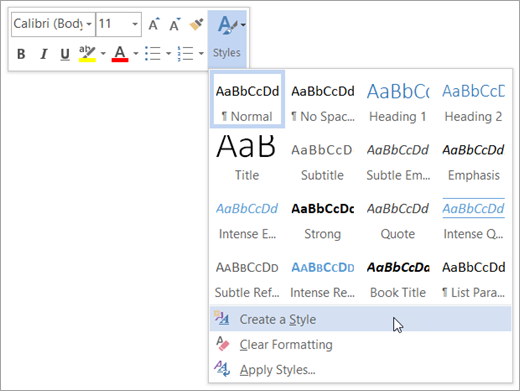
Create a new style based on document formatting
You can select formatted text in your document to create a new style that you add to the Styles gallery.
-
Right-click the text on which you want to base a new style.
-
In the mini toolbar that appears, click Styles, and then click Create a Style.
-
In the Create New Style from Formatting dialog box, give your style a name and click OK.
Your new style will now appear in the Styles gallery.
Note: If you want your new style to appear in all new Word documents, right-click it in the Styles gallery, click Modify, and then select New documents based on this template at the bottom of the dialog box.
-
Right-click the text on which you want to base a new style, point to Styles, and then click Save Selection as a New Quick Style.
-
In the Create New Style from Formatting dialog box, give your style a name and click OK.
Your new style will now appear in the Styles gallery.
Note: If you want your new style to appear in all new Word documents, right-click it in the Styles gallery, click Modify, and then select New documents based on this template at the bottom of the dialog box.
See also
Apply a style to text in Word
Need more help?
A style is a set of formatting characteristics that you can apply to text, tables, and lists in your document to quickly change their appearance.Styles are used for creating a Table of Contents which is an overview of the topics discussed in a document.
Contents
- 1 What is a styles in Microsoft Word?
- 2 Where is style in MS Word?
- 3 What is a style format?
- 4 What is style based on in Word?
- 5 What are styles?
- 6 What is style in MS Word class 10?
- 7 How do you create a style in Word?
- 8 How do you apply styles in Word?
- 9 Why do you use styles in a document?
- 10 What are paragraph styles?
- 11 What is style in open office?
- 12 What is style and its types?
- 13 What is an example of style in writing?
- 14 What are styles Class 9?
- 15 What do you mean by style your answer?
- 16 What do you understand by name style?
- 17 How do you organize styles in Word?
- 18 How many types of styles are there in MS Word?
- 19 What is the difference between styles and templates?
- 20 How are styles useful in any Word processing document?
What is a styles in Microsoft Word?
What are Styles? Built-in styles are combinations of formatting characteristics that you can apply to text to quickly change its appearance. For example, applying the Heading 1 style might make text bold, Arial, and 16 point, and applying the Heading 2 style makes text bold, italic, Arial, and 14 point.
Where is style in MS Word?
On the Home tab, click the Styles Dialog Box Launcher, and then click Options. Under Select styles to show, click All styles. All styles are displayed in the Styles task pane. Select text in your document and then click the style in the Styles task pane.
What is a style format?
Formatting style includes things like where the paper’s title and author’s name will go, the spacing between lines, and how sources are cited in-text, among other things. Formatting styles are important because they provide consistency, as well as information about the sources used in the document.
What is style based on in Word?
If a style is based on another style, it takes on the formatting of its parent, unless you specify otherwise. Microsoft Word uses styles to control formatting.There are several kinds of styles in Word. The most commonly used are paragraph styles and character styles.
What are styles?
A style is a set of formatting attributes that define the appearance of an element in the document. For example, a character style will contain font or font face attributes, while a paragraph style will contain paragraph alignment and line spacing attributes.
What is style in MS Word class 10?
A style is a predefined combination of font style, color, and size of text that can be applied to selected text. A theme is a set of formatting choices that can be applied to an entire document and includes theme colors, fonts, and effects.
How do you create a style in Word?
Right-click the text on which you want to base a new style. In the mini toolbar that appears, click Styles, and then click Create a Style. In the Create New Style from Formatting dialog box, give your style a name and click OK. Your new style will now appear in the Styles gallery.
How do you apply styles in Word?
How to Apply Styles and Style Sets in Word 2019
- Click your mouse anywhere in the paragraph you want to change.
- Click the Home tab.
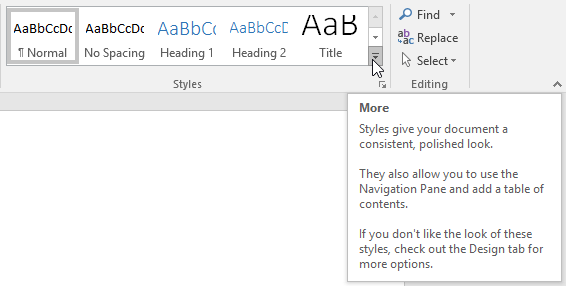
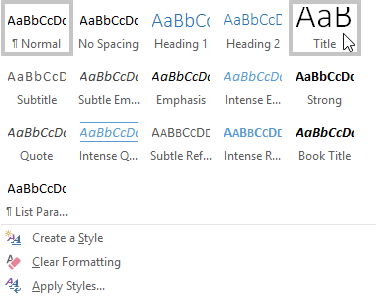
- Click the More arrow (the down arrow with the horizontal line above it) to the right of the Styles gallery, opening the full list of the Styles gallery styles.
- Click the style you want.
Why do you use styles in a document?
Styles allow you to easily apply consistent formatting to documents, as well as to quickly change existing formatting. In addition, the use of styles provides a structure to your document that can be discerned by a screen reader.
What are paragraph styles?
A paragraph style is a set of attributes—like a font size and color—that determines how the text in a paragraph looks. You can use paragraph styles in your document to:Generate a table of contents: Pages automatically creates a table of contents (TOC) based on paragraph styles applied to your paragraphs.
What is style in open office?
OpenOffice.org styles are a way to do the same thing for your document. Using styles means that you stop saying “font size 14pt, Times New Roman, bold, centered”, and you start saying “title”. In other words, styles means that you shift the emphasis from what the text looks like, to what the text is.
What is style and its types?
Your audience and writing purpose will determine your writing style. The four main types of writing styles are persuasive, narrative, expository, and descriptive.
What is an example of style in writing?
Examples of Style. Rather than merely sharing information, style lets an author share his content in the way that he wants. For example, say an author needs to describe a situation where he witnessed a girl picking a flower: She picked a red rose from the ground.
What are styles Class 9?
Answer: Style is a collection of formatting instructions. You use styles to format the paragraphs in your document.
What do you mean by style your answer?
In general, style refers to the overall appearance or design of an object, or method of accomplishing a task. For example, in web development, a developer using CSS can quickly change the look of the headings on all of a website’s pages at the same time.
What do you understand by name style?
A style is a set of formats that you can apply to selected items in your presentation to quickly change their appearance. There are five different types of styles in Word 2007 — paragraph, character, linked, table, and list. 2. Special effects in Microsoft Word that change the appearance of text.
How do you organize styles in Word?
Click the gallery’s dialog launcher, and then click the Manage Styles icon at the bottom of the Styles panes. Click the Recommend tab in the resulting dialog. Select the style you want to move. (Use the Sort Order option to display the list alphabetically, if that’s helpful.)
How many types of styles are there in MS Word?
four style types
There are actually four style types in Word. Each has an icon that appears next to it in the Styles and Formatting task pane. When you use the New Style dialog box to create a new style, the types are available on the Style type list.
What is the difference between styles and templates?
Styles keep your formatting consistent within a document. Themes keep your look and feel consistent across multiple documents. Templates allow you to re-use text, and keep your look and feel consistent across multiple documents.
How are styles useful in any Word processing document?
A style is also what Word uses to identify different parts of your document.This is how you are able to see headings and subheadings on the Navigation Pane. It is also important in the creation of tables of contents.
Lesson 29: Applying and Modifying Styles
/en/word2016/smartart-graphics/content/
Introduction
A style is a predefined combination of font style, color, and size that can be applied to any text in your document. Styles can help your documents achieve a more professional look and feel. You can also use styles to quickly change several things in your document at the same time.
Optional: Download our practice document.
Watch the video below to learn more about using styles in Word.
To apply a style:
- Select the text you want to format, or place your cursor at the beginning of the line.
- In the Styles group on the Home tab, click the More drop-down arrow.
- Select the desired style from the drop-down menu.
- The text will appear in the selected style.
To apply a style set:
Style sets include a combination of title, heading, and paragraph styles. Style sets allow you to format all elements in your document at once instead of modifying each element separately.
- From the Design tab, click the More drop-down arrow in the Document Formatting group.
- Choose the desired style set from the drop-down menu.
- The selected style set will be applied to your entire document.


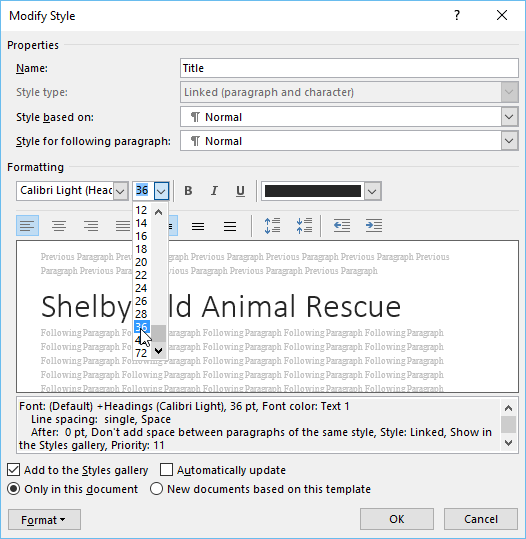
To modify a style:
- In the Styles group on the Home tab, right-click the style you want to change and select Modify from the drop-down menu.
- A dialog box will appear. Make the desired formatting changes, such as font style, size, and color. If you want, you can also change the name of the style. Click OK to save your changes.
- The style will be modified.

When you modify a style, you’re changing every instance of that style in the document. In the example below, we’ve modified the Normal style to use a larger font size. Because both paragraphs use the Normal style, they’ve been updated automatically to use the new size.
To create a new style:
- Click the arrow in the bottom-right corner of the Styles group.
- The Styles task pane will appear. Select the New Style button at the bottom of the task pane.
- A dialog box will appear. Enter a name for the style, choose the desired text formatting, then click OK.
- The new style will be applied to the currently selected text. It will also appear in the Styles group.

You can also use styles to create a table of contents for your document. To learn how, review our article on How to Create a Table of Contents in Microsoft Word.
Challenge!
- Open our practice document. If you already downloaded our practice document, be sure to download a fresh copy by clicking the link again.
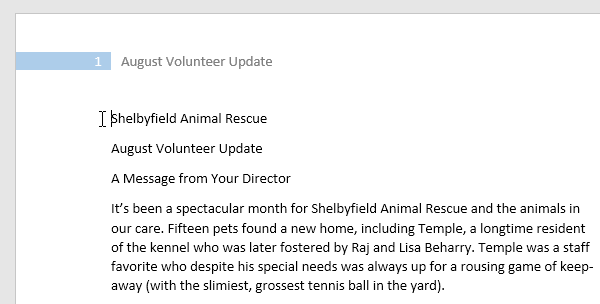
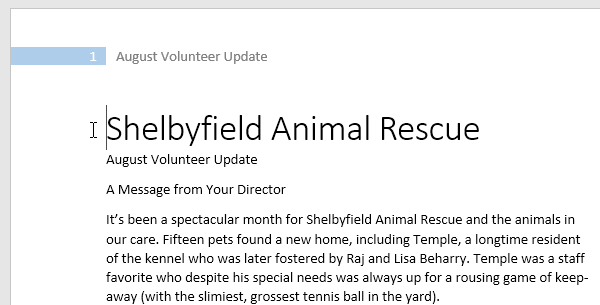
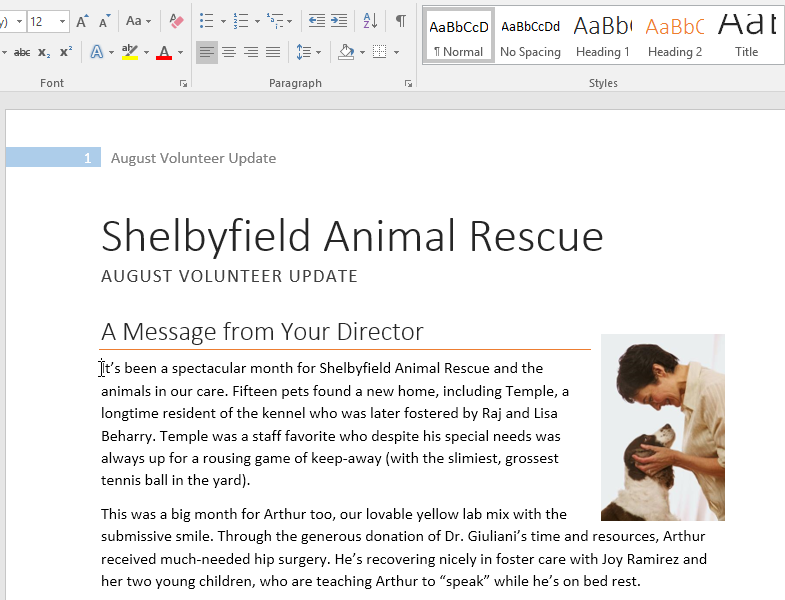
- On page 1, select the first line of text Shelbyfield Animal Rescue and change the style to Title.
- Select the second line that says August Volunteer Update and change the style to Heading 1.
- Select the third line that says A Message From Your Director and change the style to Heading 2.
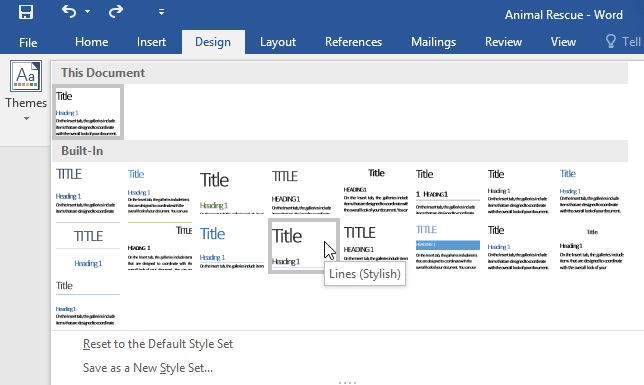
- In the Design tab, change the style set to Casual.
- Modify the Normal style so the font is Cambria and the font size is 14 pt.
- When you’re finished, the first page of your document should look like this:

- Optional: Modify the Heading 3 style any way you want. You can change the font, font size, color, and more. This heading appears throughout the document, so try to choose formatting that complements the body text.

/en/word2016/mail-merge/content/

For the last lesson in this Geek School series, we’re going to show you how to use Styles, Style Sets, and Themes to save a lot of time when formatting your documents by creating reusable settings that can be applied to all of your documents.
Up until now, you’ve been learning about how to create documents and implement formatting bit by bit. In other words, you create a document and changes you make are typically localized. In this lesson, we step back a bit and show you how styles can take the work out of creating a consistent look and feel that you can control from a central location rather than having to needlessly apply changes to each and every part.
Styles are very useful for generating a table of contents but that is but only one use for them.
The main function for styles is to allow you to quickly set titles, subheadings, section headings apart from one another by giving them unique fonts, font characteristics, and sizes. By grouping these characteristics into styles, you can create documents that have a consistent look without having to manually format each section header. Instead you set the style and you can control every heading set as that style from central location.
With styles you can:
- Apply a consistent look across the whole document instead of having to format each section individually.
- Automatically number section headers.
- Apply same font to the entire text body.
- Apply the same font to header sections.
- Use a consistent paragraph spacing.
- Pick a default color scheme for SmartArt, charts, and shapes.
- Pick from a number of pre-designed styles use them as your own and modify them.
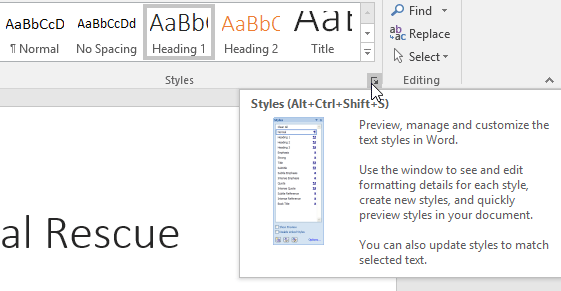
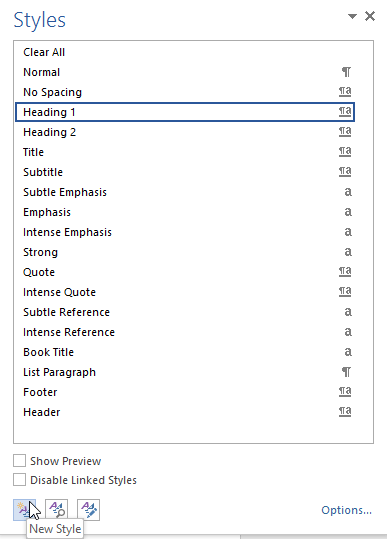
Let’s go over some examples to give you a better idea of what some of these mean. First, note the “Styles” section on the “Home” tab.

It expands to reveal more:
Click on the small arrow in the lower right corner for a floating “Styles” panel.
This windows stays visible so you can use it as you work through your documents. You can move it outside the application window, and also dock it right or left side of it.
The style dialog box like format shape floats independent of Microsoft Word. That means you can move it outside the document to make more room or even more it to a second monitor if you are using dual monitors.
Click “options” and you can select how the styles pane is shown and sorted:
Each style can be applied differently and you can hover over the symbol to the right to see exactly how it is applied.
If you click on that symbol, you are presented with a dropdown options menu, which gives you further control over the styles in your current document.
You can modify a selected style, which will apply to all instances of that style throughout the document. In this case, there are 109 of them. Here you can also select or clear all instances of that style, and remove it completely from the “style gallery.”
Along the bottom of the pane are three buttons, which have some pretty important functions.
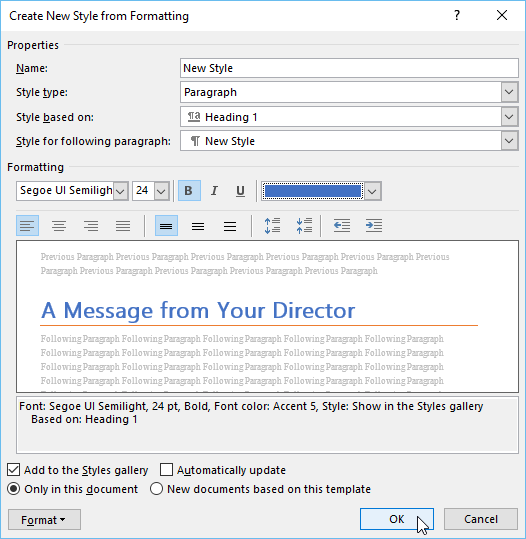
New Style
If you click “new style” the resulting dialog box will let you create a new style using existing formatting. As you apply new characteristics to the style, you can see how it will look in the preview.
You can dig into the nitty-gritty specifics of the style including the format, such as if you want it to have bullets, borders, fonts, text effects, and so on. From there, you can add the style to just that document, or you can add it to the template so every document has that style from there on.
Style Inspector
Use the style inspector to “inspect” styles throughout your document. This feature is useful for stripping formatting or further changing it.
You can also click each style for a drop-down options menu, allowing you to modify and build a new style, select all instances of that style in the document or completely clear them.
Click the bottom-left button to show the “reveal formatting” pane to see how your document is formatted. This is somewhat similar to or at least hearkens back to “Reveal Codes” in WordPerfect.
Manage Styles
The “manage styles” button allows you to quickly edit styles such as to modify their appearance, reorder their recommended order of appearance, restrict which ones are available, and set new defaults to current styles.
It’s useful to know how to take control of your styles because used well and wisely, they can give you a lot of power with your documents.
Style Sets
The “Design” tab brings all of the formatting options you can apply to a document in one place.
“Document Formatting” section shows you how the heading and text would look if you pick one of the combinations there. Each of these combinations is called a “Style Set.” If you briefly hover over each style set, the formatting of your document will change to preview how it would look. If you click on the style set, it will be applied to your current document. This is non-destructive, so if you don’t like the new style, you can just as easily change it.
Similar to other sections throughout Word, if you click the scrollbar on the right edge, it will expand to a full menu. Further options at the bottom allow you to reset your style set to the default or save your current style as a new set.
The right side of the document formatting section contains functions for changing your colors, fonts, paragraph spacing, add effects, and set your changes as the default style set.
Changing the colors simply means that shapes, SmartArt, charts, and text will affected.
There are plenty of built-in color schemes to choose from, however, if none these strike your fancy, or you have specific colors you want to use, you can click “Customize Color” at the bottom. Here you’ll have virtually limitless choices, and you can save your new custom color set and use it later.
The “Fonts” menu contains predefined schemes that you can select based on the old Office theme, or a font family.
Select “Customize Fonts” at the bottom of the menu to quickly create a new custom set based on your personal favorite font family. In the screenshot below, we see you can assign a “heading font” and “body font” and then give it a name, save it, and then apply it to your current and future documents (“set as default”).
If you choose a new font style, you can see it reflected in the font section of the “Home” tab.
“Paragraph Spacing” contains a variety of built-in styles, which should please all but the most picky. Again, to see how your document is affected by these, you can hover over each one and the changes will be previewed in your document.
Note the “Custom Paragraph Spacing” option at the bottom of this menu.
The effects menu allows you to quickly change the effect of design elements such as shapes, SmartArt, and charts.
If you want to preserve any changes to your style set permanently as the default, then you can click “set as default.” A dialog box will appear asking you to confirm.
Finally, if you want to use a custom style set in the future, but you do not want to apply it as the default. You can save it as a template file. Right-click on the style set and then “Save.”
Note, we’ll cover templates shortly. Here you should simply know that if you want to use your new custom template in the future, you would only need to double-click on the *.dotx file or open it from Word.
Note the option “Add Gallery to Quick Access Toolbar” simply means that if you want quick access to the document formatting gallery, it can be accessed from the QAT at the top of the Word window.
Modifying Styles
Suppose we only want to modify Heading 2.
For example, let’s say we want to center, bold, and italicize it. The quickest way to do this would be to change the selected style, then right-click on that style in the “Styles” section on the “Home” tab, in this case Heading 2, and select “Update Heading 2 to Match Selection.” All instances of Heading 2 will now reflect your changes throughout the document.
Themes
The style set you are greeted with when you click on the “Design” tab comprises the “Office” theme. Other themes can be accessed by clicking on the “Themes” button on the left of the “Design” tab.
A theme comprises a whole new bunch of style sets, each with its own fonts, color, spacing and anything else previously discussed.
Note at the bottom, there are further options to rest the theme to the template, browse for custom themes on your computer, as well as save the current theme, assuming you’ve altered or customized it, as a new theme. This is different from saving a style set. Remember, a style set saves as a template file (.dotx). A theme is saved as a theme file (.thmx) and each theme file:
Themes are remarkably simple and a very effective way to apply a complete look and feel to your documents in a matter of seconds.
Conclusion
And that’s it for the How-To Geek School’s Guide to Word Formatting. It’s been fun, we’ve learned a lot, and hope you did too! If you missed any part of this series, or simply want to review something again, you can easily do so by clicking any of the links in the table of contents at the beginning of the article.
READ NEXT
- › Android’s Nearby Share Has (Unofficially) Arrived on Mac
- › How to Get a Refund on the PlayStation Store
- › Save Hundreds on Elegoo’s New PHECDA Laser Engraver Through Kickstarter
- › Five Types of Phone Damage That Aren’t Covered by Your Free Warranty
- › The New Winamp Is Here, but It’s Not What You’d Expect
- › Spotify Is Shutting Down Its Free Online Game
Here’s the basics of Styles in Word for paragraph, character or both (Linked) plus Tables and Lists. I know talking about styles in Word makes eyes glaze over but they are a really useful part of Word (plus Excel, PowerPoint and Outlook).
Today I watched an ‘experienced’ Word user reformatting a document. He laboriously worked through the document, selecting paragraphs, phrases and even individual words then clicking on the ribbon to change the look. It took 10 minutes or more. With styles it would have taken a few seconds.
Styles have been around for all of Word’s history. They have changed and expanded over the years but the fundamentals are the same.
In this article we’ll explain the different types of styles including at least one that sneaked in without many people noticing. From just one type in the early days of Word, there’s five different style types in modern Microsoft Word.
What is a Style?
A style is just a collection of formatting settings under a single name.
For example ‘Heading 1’ has these default values in Word (choose Heading 1 style, right-click and choose ‘Modify Style’.
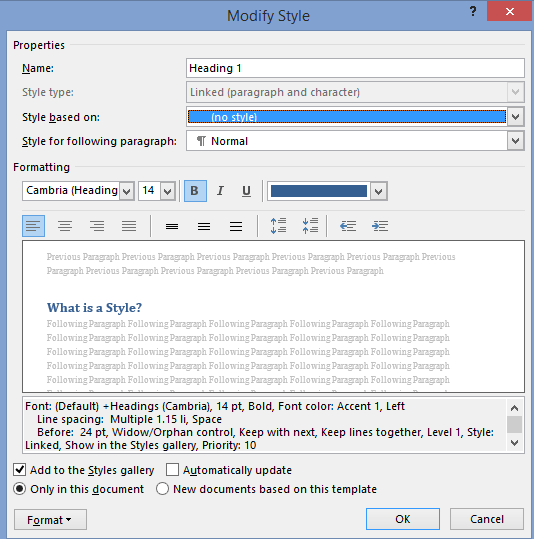
So ‘Heading 1’ means Cambria font, 14pt, Bold with a color setting, Left justified, 1.15 line spacing and 24pt line space before the text, plus other settings.
Instead of having to apply all those separate formatting options for each main heading, just apply the ‘Heading 1’ style.
Even better, if you decide to change the look of the headings, change the ‘Heading 1’ settings and all the headings with that style will be changed automatically.
Paragraph and Character styles
There are different types of style that can be applied to different parts of a document. Originally there were only Paragraph styles – styles you could apply to an entire paragraph.
That was OK but no help if you wanted consistent formatting for words in a paragraph like a product name Office-Watch.com or just emphasis.
So Microsoft added character styles. These are styles that can be applied to a word or even a single letter. A character style could be called ‘Product Name’ to ensure all references to a product or service look consistent.
Character styles have all the attributes of paragraph styles that are applicable to individual characters. Things like font, size, color, bold, italic etc are in both character and paragraph styles. Line spacing, Left/Right/Center/Justify etc. can only apply to entire paragraphs.
Linked styles
Adding character styles created a new problem. Microsoft discovered that users sometimes had two styles with the same name – one as a paragraph style, the other as a character style. Or people would have two styles such as ‘QuoteP’ and QuoteC’ with the same settings, one for paragraphs and another for word/characters.
So Word 2007 introduced ‘Linked Styles‘ which act as both a paragraph style and character style, depending on the situation.
A linked style acts like a paragraph style when a paragraph/s is selected and the style applied.
It acts like a character style when less than a paragraph (a character/word/phrase) is selected and the style applied.
Gone is the need for ‘twin’ styles – now you can have a single style that can applied to any text in a document.
The best example of a linked style is already in Word 2007 and later. All the Heading styles were changed to linked styles. Here’s an example of ‘Heading 1’ style used as both a paragraph and character style at the same time.

Both the paragraph and words were changed to the same style by selecting them and pressing the ‘Heading 1’ shortcut Ctrl + Alt + 1 . The Style Gallery or styles list could have been used to do the same thing.
In the Modify Style dialog you’ll see the style type just under the name.

‘Linked’ isn’t the best choice of terms for this type of style. Most styles are already ‘linked’ to others through style inheritance. ‘Merged’ or ‘Combined’ might have been clearer to most people – but we’re stuck with ‘Linked’.
Which is which?
On the styles list, the three types of style have their own markers.
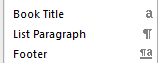
The lower case ‘a’ next to a character style.
The ‘backwards P’ or Pilcrow is used as an end of paragraph mark in Word and also serves to denote a Paragraph style.
The combined pilcrow and a is, unsurprisingly, for a linked style.
Alas, the Style Gallery on the ribbon isn’t as clear. Among various (ignored) complaints about the Style Gallery is the inconsistent marking.
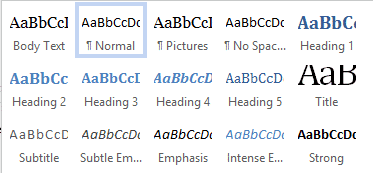
Paragraph styles (e.g. Normal, Pictures etc.) have the pilcrow next to the style name.
Linked paragraphs (Heading styles etc.) have no marking next to the name.
But neither do the character styles! In the above image there’s no way to know that ‘Subtle Emphasis’ is a character style.
Inheritance
A brief mention of style inheritance.
Styles are normally based on an existing style so only changes from the inherited style need to be made. This lets you apply broader changes to a document a lot faster.
For example, here’s settings for Heading 2

Heading 2 is based on the Heading 1 style, so all the settings for Heading 1 are used for Heading 2 as a starting point.
The settings like ’13pt, Not Bold …’ etc. are only the differences between Heading 1 and what’s been changed to the look for Heading 2.
If the font for Heading 1 is changed then the font for Heading 2 will also change due to style inheritance.
In a standard Word document, styles can usually be traced back to some base Word styles like Normal and Default Paragraph Font (paragraph and character styles respectively). However you can create a style ‘from scratch’ with no inheritance. Here’s the same Heading 2 style with the ‘Style based on’ removed.

Now you can see all the formatting attributes in detail.
Unlinking styles might seem like a good idea that makes things simpler, but experienced Word users almost never do it. Style inheritance can be a nuisance at times, but its more helpful than a hindrance.
What’s going on?
Sometimes the formatting can get confusing. What’s a paragraph setting, what’s a character style and what is directly applied with no style? WordPerfect had a ‘Reveal Codes’ feature which Microsoft resisted copying but finally added to Word.
There’s two options for exposing what Word is up to. The Style Inspector (Word 2007 and later) and Reveal Formatting. Here’s both in action side-by-side.
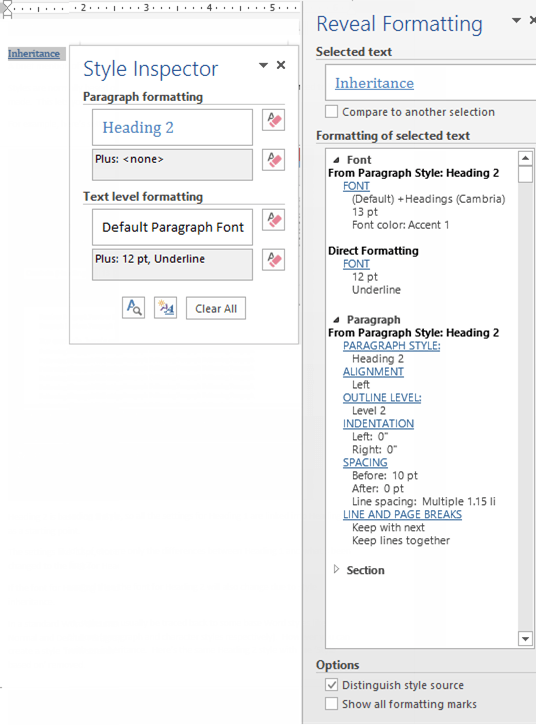
As you can see the Style Inspector is a small box that can be dragged around the screen. Open the Style Inspector from the button at the bottom of the Styles pane:

Reveal Formatting has a lot more detail and sits in the right-hand pane. There’s a button for Reveal Formatting on the Style Inspector box.
The Shift + F1 shortcut will open the Reveal Formatting pane. This shortcut has worked since Word 2002 (XP).
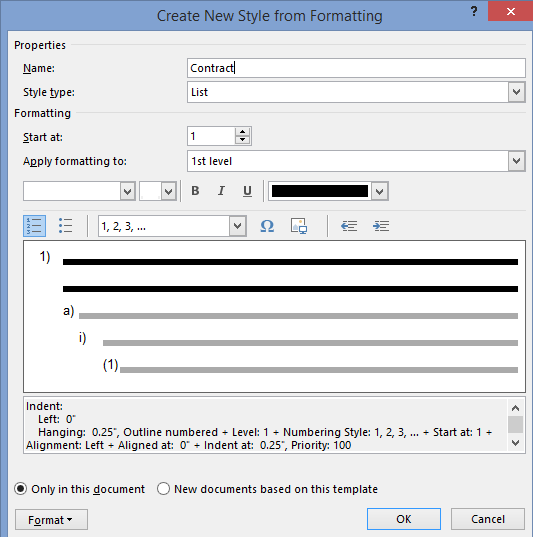
Table and List styles
Added in Word 2007 were two more styles.
Table styles, let you group together all the many formatting options for tables.
Similarly, all the options for list formatting were a nightmare until Word 2007 when List Styles were introduced. Now all the, sometimes complex, choices for lists (numbering, indenting at each level) can be more easily and consistently applied.
Fix your Word Style Gallery
Word style renaming and alias tricks
Show a Word style marked ‘Hide until used’.
What does Word style ‘Automatically update’ really mean?
Change Word style to match current paragraph