
A style is a set of formatting characteristics that you can apply to text, tables, and lists in your document to quickly change their appearance.Styles are used for creating a Table of Contents which is an overview of the topics discussed in a document.
Contents
- 1 What is a styles in Microsoft Word?
- 2 Where is style in MS Word?
- 3 What is a style format?
- 4 What is style based on in Word?
- 5 What are styles?
- 6 What is style in MS Word class 10?
- 7 How do you create a style in Word?
- 8 How do you apply styles in Word?
- 9 Why do you use styles in a document?
- 10 What are paragraph styles?
- 11 What is style in open office?
- 12 What is style and its types?
- 13 What is an example of style in writing?
- 14 What are styles Class 9?
- 15 What do you mean by style your answer?
- 16 What do you understand by name style?
- 17 How do you organize styles in Word?
- 18 How many types of styles are there in MS Word?
- 19 What is the difference between styles and templates?
- 20 How are styles useful in any Word processing document?
What is a styles in Microsoft Word?
What are Styles? Built-in styles are combinations of formatting characteristics that you can apply to text to quickly change its appearance. For example, applying the Heading 1 style might make text bold, Arial, and 16 point, and applying the Heading 2 style makes text bold, italic, Arial, and 14 point.
Where is style in MS Word?
On the Home tab, click the Styles Dialog Box Launcher, and then click Options. Under Select styles to show, click All styles. All styles are displayed in the Styles task pane. Select text in your document and then click the style in the Styles task pane.
What is a style format?
Formatting style includes things like where the paper’s title and author’s name will go, the spacing between lines, and how sources are cited in-text, among other things. Formatting styles are important because they provide consistency, as well as information about the sources used in the document.
What is style based on in Word?
If a style is based on another style, it takes on the formatting of its parent, unless you specify otherwise. Microsoft Word uses styles to control formatting.There are several kinds of styles in Word. The most commonly used are paragraph styles and character styles.
What are styles?
A style is a set of formatting attributes that define the appearance of an element in the document. For example, a character style will contain font or font face attributes, while a paragraph style will contain paragraph alignment and line spacing attributes.
What is style in MS Word class 10?
A style is a predefined combination of font style, color, and size of text that can be applied to selected text. A theme is a set of formatting choices that can be applied to an entire document and includes theme colors, fonts, and effects.
How do you create a style in Word?
Right-click the text on which you want to base a new style. In the mini toolbar that appears, click Styles, and then click Create a Style. In the Create New Style from Formatting dialog box, give your style a name and click OK. Your new style will now appear in the Styles gallery.
How do you apply styles in Word?
How to Apply Styles and Style Sets in Word 2019
- Click your mouse anywhere in the paragraph you want to change.
- Click the Home tab.
- Click the More arrow (the down arrow with the horizontal line above it) to the right of the Styles gallery, opening the full list of the Styles gallery styles.
- Click the style you want.
Why do you use styles in a document?
Styles allow you to easily apply consistent formatting to documents, as well as to quickly change existing formatting. In addition, the use of styles provides a structure to your document that can be discerned by a screen reader.
What are paragraph styles?
A paragraph style is a set of attributes—like a font size and color—that determines how the text in a paragraph looks. You can use paragraph styles in your document to:Generate a table of contents: Pages automatically creates a table of contents (TOC) based on paragraph styles applied to your paragraphs.
What is style in open office?
OpenOffice.org styles are a way to do the same thing for your document. Using styles means that you stop saying “font size 14pt, Times New Roman, bold, centered”, and you start saying “title”. In other words, styles means that you shift the emphasis from what the text looks like, to what the text is.
What is style and its types?
Your audience and writing purpose will determine your writing style. The four main types of writing styles are persuasive, narrative, expository, and descriptive.
What is an example of style in writing?
Examples of Style. Rather than merely sharing information, style lets an author share his content in the way that he wants. For example, say an author needs to describe a situation where he witnessed a girl picking a flower: She picked a red rose from the ground.
What are styles Class 9?
Answer: Style is a collection of formatting instructions. You use styles to format the paragraphs in your document.
What do you mean by style your answer?
In general, style refers to the overall appearance or design of an object, or method of accomplishing a task. For example, in web development, a developer using CSS can quickly change the look of the headings on all of a website’s pages at the same time.
What do you understand by name style?
A style is a set of formats that you can apply to selected items in your presentation to quickly change their appearance. There are five different types of styles in Word 2007 — paragraph, character, linked, table, and list. 2. Special effects in Microsoft Word that change the appearance of text.
How do you organize styles in Word?
Click the gallery’s dialog launcher, and then click the Manage Styles icon at the bottom of the Styles panes. Click the Recommend tab in the resulting dialog. Select the style you want to move. (Use the Sort Order option to display the list alphabetically, if that’s helpful.)
How many types of styles are there in MS Word?
four style types
There are actually four style types in Word. Each has an icon that appears next to it in the Styles and Formatting task pane. When you use the New Style dialog box to create a new style, the types are available on the Style type list.
What is the difference between styles and templates?
Styles keep your formatting consistent within a document. Themes keep your look and feel consistent across multiple documents. Templates allow you to re-use text, and keep your look and feel consistent across multiple documents.
How are styles useful in any Word processing document?
A style is also what Word uses to identify different parts of your document.This is how you are able to see headings and subheadings on the Navigation Pane. It is also important in the creation of tables of contents.
You might format a document while you type, or change fonts for things like headings. Here’s a better way to get your document looking smart: Quick Styles.
Don’t change fonts, use Quick Styles
-
You might format a document while you type, or change fonts, font size, or colors for things like headings. Here’s a better way to get your document looking smart: Quick Styles.
-
Give it a try by clicking the Style buttons in the ribbon on the HOME tab.
Want more?
Move around in a document using the Navigation pane
Introduction to Tables of Contents (TOCs)
Take tables of contents (TOCs) to the next level
There’s a mantra I kind of use.
I think it is attributed to Stephen King who says, “Don’t get it right (air quotes right), get it written.”
Here is another thing. Don’t get it formatted, get it written. Work on formatting your document afterwards.
It’s a little tough if you come from the old typewriter age, or if you are a kid, I know, because I have a couple of teenagers. As soon as they click this thing, and they look at fonts they’re gone for five minutes, right?
But what I am going to show you is the advantages of doing that.
So, here we have an unformatted document about the Solar system.
Here’s what I would normally do if I didn’t know about styles.
I might take my title here and okay I want to center that.
Okay, I’ll make it big. I don’t know how big.
I guess that looks good.
Here is my author thing and I am going to try to center that, and I’ll make a little smaller, I guess.
Okay, now, I have all these headings.
What should I do for a heading? Well, let’s make it a color.
I like colors.
So let’s kind of I don’t know about that.
Let’s make that a little bigger.
I don’t know…16 point font, maybe. Maybe?
Oh some spacing.
I could do a carriage return.
Carriage returns are bad, especially if you’re continuing typing because now you’re in that font.
That’s bad.
So let’s get away from the carriage return and maybe you know about, ooh, spacing.
If you go up to the paragraph in the ribbon here in this little triangle on the bottom right-hand corner, that will open your Paragraph settings.
And after I am going to put a little six point. Sure. I don’t know what that is. Sure.
Okay, that gives it a little spacing.
Now if I have to do this for each of my headings, I know about Format Painter, so I can take this format, go over up here to Format Painter in the ribbon, click on that and now everything I touch will be painted like that.
Oops. So that’s cool.
I can do that.
But if I am doing that for a lot of headings, I have to go through my entire document.
That can be kind of troublesome.
I can do all those steps: change font, change spacing, change color with headings.
I am going to go up here to the Quick Styles, which is up here in the ribbon.
The Planets here, I’m going to hit Heading 1 and it has just given me some spacing.
It has changed the font.
It has changed the color.
Kind of just what I did there with three steps, I can do with styles.
So let me click Asteroids and hit Heading 1 again.
So I can go through my document this way.
Now The Planets, that’s going to be a different heading, so I can do Heading 2 and I don’t have to worry about well it’s 16 point font for Heading 1, what should…
Should this be 14 point font? Should it be a different color? I don’t have to worry about that.
I can just go through my document and choose the heading.
So here’s a planet. That’s going to be…
Oops I hit something on the ribbon here.Heading 2. The Earth is Heading 2. Now the moons that will be another part. That’s going to be Heading 3. So you got the idea here. So Mars is Heading 2.
And the Phobos and Deimos, which are the moons of Mars. They will have Heading 3.
Here’s the basics of Styles in Word for paragraph, character or both (Linked) plus Tables and Lists. I know talking about styles in Word makes eyes glaze over but they are a really useful part of Word (plus Excel, PowerPoint and Outlook).
Today I watched an ‘experienced’ Word user reformatting a document. He laboriously worked through the document, selecting paragraphs, phrases and even individual words then clicking on the ribbon to change the look. It took 10 minutes or more. With styles it would have taken a few seconds.
Styles have been around for all of Word’s history. They have changed and expanded over the years but the fundamentals are the same.
In this article we’ll explain the different types of styles including at least one that sneaked in without many people noticing. From just one type in the early days of Word, there’s five different style types in modern Microsoft Word.
What is a Style?
A style is just a collection of formatting settings under a single name.
For example ‘Heading 1’ has these default values in Word (choose Heading 1 style, right-click and choose ‘Modify Style’.
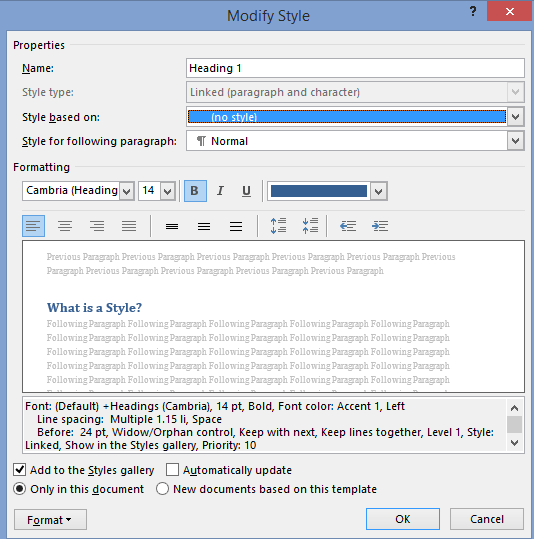
So ‘Heading 1’ means Cambria font, 14pt, Bold with a color setting, Left justified, 1.15 line spacing and 24pt line space before the text, plus other settings.
Instead of having to apply all those separate formatting options for each main heading, just apply the ‘Heading 1’ style.
Even better, if you decide to change the look of the headings, change the ‘Heading 1’ settings and all the headings with that style will be changed automatically.
Paragraph and Character styles
There are different types of style that can be applied to different parts of a document. Originally there were only Paragraph styles – styles you could apply to an entire paragraph.
That was OK but no help if you wanted consistent formatting for words in a paragraph like a product name Office-Watch.com or just emphasis.
So Microsoft added character styles. These are styles that can be applied to a word or even a single letter. A character style could be called ‘Product Name’ to ensure all references to a product or service look consistent.
Character styles have all the attributes of paragraph styles that are applicable to individual characters. Things like font, size, color, bold, italic etc are in both character and paragraph styles. Line spacing, Left/Right/Center/Justify etc. can only apply to entire paragraphs.
Linked styles
Adding character styles created a new problem. Microsoft discovered that users sometimes had two styles with the same name – one as a paragraph style, the other as a character style. Or people would have two styles such as ‘QuoteP’ and QuoteC’ with the same settings, one for paragraphs and another for word/characters.
So Word 2007 introduced ‘Linked Styles‘ which act as both a paragraph style and character style, depending on the situation.
A linked style acts like a paragraph style when a paragraph/s is selected and the style applied.
It acts like a character style when less than a paragraph (a character/word/phrase) is selected and the style applied.
Gone is the need for ‘twin’ styles – now you can have a single style that can applied to any text in a document.
The best example of a linked style is already in Word 2007 and later. All the Heading styles were changed to linked styles. Here’s an example of ‘Heading 1’ style used as both a paragraph and character style at the same time.

Both the paragraph and words were changed to the same style by selecting them and pressing the ‘Heading 1’ shortcut Ctrl + Alt + 1 . The Style Gallery or styles list could have been used to do the same thing.
In the Modify Style dialog you’ll see the style type just under the name.

‘Linked’ isn’t the best choice of terms for this type of style. Most styles are already ‘linked’ to others through style inheritance. ‘Merged’ or ‘Combined’ might have been clearer to most people – but we’re stuck with ‘Linked’.
Which is which?
On the styles list, the three types of style have their own markers.
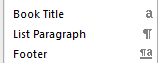
The lower case ‘a’ next to a character style.
The ‘backwards P’ or Pilcrow is used as an end of paragraph mark in Word and also serves to denote a Paragraph style.
The combined pilcrow and a is, unsurprisingly, for a linked style.
Alas, the Style Gallery on the ribbon isn’t as clear. Among various (ignored) complaints about the Style Gallery is the inconsistent marking.
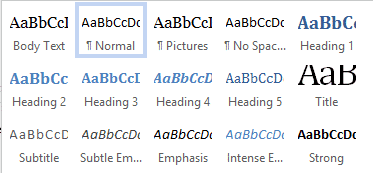
Paragraph styles (e.g. Normal, Pictures etc.) have the pilcrow next to the style name.
Linked paragraphs (Heading styles etc.) have no marking next to the name.
But neither do the character styles! In the above image there’s no way to know that ‘Subtle Emphasis’ is a character style.
Inheritance
A brief mention of style inheritance.
Styles are normally based on an existing style so only changes from the inherited style need to be made. This lets you apply broader changes to a document a lot faster.
For example, here’s settings for Heading 2

Heading 2 is based on the Heading 1 style, so all the settings for Heading 1 are used for Heading 2 as a starting point.
The settings like ’13pt, Not Bold …’ etc. are only the differences between Heading 1 and what’s been changed to the look for Heading 2.
If the font for Heading 1 is changed then the font for Heading 2 will also change due to style inheritance.
In a standard Word document, styles can usually be traced back to some base Word styles like Normal and Default Paragraph Font (paragraph and character styles respectively). However you can create a style ‘from scratch’ with no inheritance. Here’s the same Heading 2 style with the ‘Style based on’ removed.

Now you can see all the formatting attributes in detail.
Unlinking styles might seem like a good idea that makes things simpler, but experienced Word users almost never do it. Style inheritance can be a nuisance at times, but its more helpful than a hindrance.
What’s going on?
Sometimes the formatting can get confusing. What’s a paragraph setting, what’s a character style and what is directly applied with no style? WordPerfect had a ‘Reveal Codes’ feature which Microsoft resisted copying but finally added to Word.
There’s two options for exposing what Word is up to. The Style Inspector (Word 2007 and later) and Reveal Formatting. Here’s both in action side-by-side.
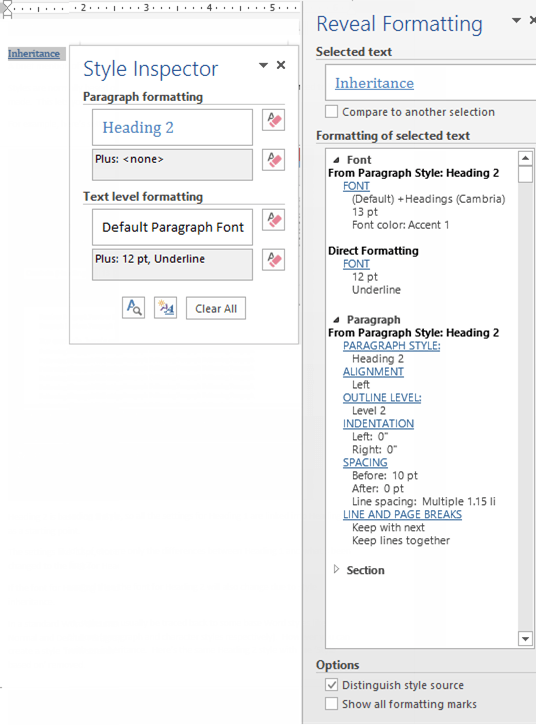
As you can see the Style Inspector is a small box that can be dragged around the screen. Open the Style Inspector from the button at the bottom of the Styles pane:

Reveal Formatting has a lot more detail and sits in the right-hand pane. There’s a button for Reveal Formatting on the Style Inspector box.
The Shift + F1 shortcut will open the Reveal Formatting pane. This shortcut has worked since Word 2002 (XP).
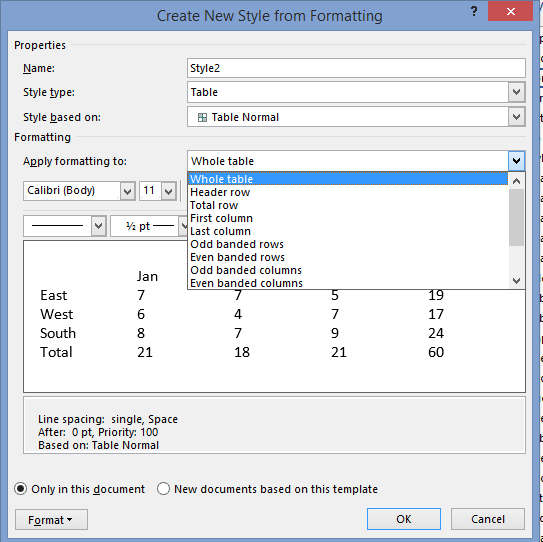
Table and List styles
Added in Word 2007 were two more styles.
Table styles, let you group together all the many formatting options for tables.
Similarly, all the options for list formatting were a nightmare until Word 2007 when List Styles were introduced. Now all the, sometimes complex, choices for lists (numbering, indenting at each level) can be more easily and consistently applied.
Fix your Word Style Gallery
Word style renaming and alias tricks
Show a Word style marked ‘Hide until used’.
What does Word style ‘Automatically update’ really mean?
Change Word style to match current paragraph
To use styles, I believe it’s helpful for one to understand their purpose,
which is to provide standardization of formatting through a document or a group
of documents. There are other benefits to using styles in Microsoft Word,
though, and you’ll learn about them here.
If you already understand styles and would like to visit our extreme
tutorial,
click
here.
What is a Style?
A style is nothing more than a specific set of formats that are saved «as a
set», which is called a «Style». For instance, when you read a paperback book,
virtually every chapter’s title looks the same. Perhaps it is Times New Roman,
Bold, 18-pt, and centered. When you read a textbook, each Tip may have the same
border around it, and each exercise may have the same red font used as its
heading. Styles help us do this. They’re so easy to use, but not quite as easy
to understand.
Gotchas
One of the biggest problems with using styles is that people create this
gorgeous template with styles, and then copy information from the web or other
external documents, and now there are 20 more styles in your document. It’s
difficult to restrict this from happening, particularly if you’re not the only
user of the template. See
this article
for more information.
Another problem is often caused because we use the default Heading 1 style
and alter it to suit us. Then someone else comes along who isn’t aware of
styles, and they decide to italicize it. Rather than changing the style, they
manually italicize each Heading 1. Someone who knows what they’re doing comes
along and doesn’t get the same result when they apply the Heading 1 style. Doh!
When and if you create styles in a template, do a final review to ensure
absolutely that all the styles have been properly created and/or changed.
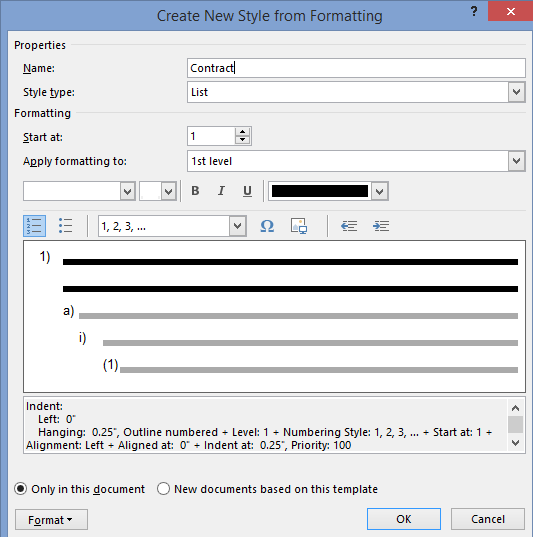
Outline numbered styles can be tricky. See
this article for more information.
Styles have a setting to Automatically update. I wish they didn’t. See
this article
for more information.
What Styles to Use?
I prefer to use the built-in styles whenever possible. Using, for instance,
the Body Text style, I can alter it. This does not affect all documents, it only
affects the active document or-documents from this template. However, you can create your own
custom styles. See this article.
Typical Styles
When I develop a template for a manual, I generally include the following
styles:
- Headings 1, 2, and 3 (sometimes 4 and 5, but more than 5 is a bit
ridiculous and should be used only for the most technical of manuals) - Body Text
- List Bullet and List Bullet 2 (for 2 different levels of bullets)
- List Number and List Number 2 (for 2 different levels of numbering)
- Note (or Tip; I usually put a border on this)
- Graphic (provides great spacing)
- Caption
- Header and Footer styles and page number styles are auto-created when you
use headers and footers, and I don’t usually alter them. - TOC styles are auto-created when you insert a Table of Contents and I
often add spacing before the TOC1 style.
Components of a Style
There are two types of styles: Paragraph and Character.
Paragraph Styles
A paragraph style has
more format possibilities than a character style. For instance, a paragraph style could be bold and also
double-spaced.
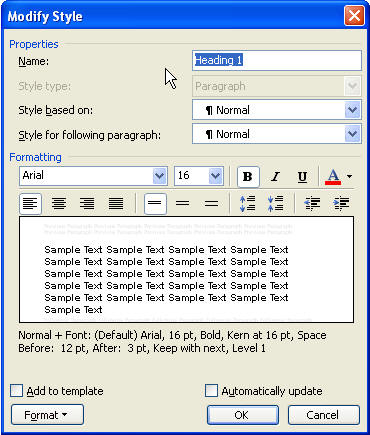
Above we show the dialog for modifying the Heading 1 style.
-
We have the Name, which I hope is self-explanatory. The
Style type in this case is Paragraph. -
Style based on tell us that Heading 1 is based on the
Normal style. Now, suppose we change the Normal Style to be red? Since you can
see that the Heading 1 style has no special font color designated, it would
indeed take on the red font we apply to the Normal style. I prefer to base my
styles on No Style, which is a choice in the drop-down. This way, each of my
styles is independent. While I may understand that styles are based on other
styles, other users of my templates may not (and it happens to be rare that I
personally use a template I have created). -
Style for the following paragraph denotes what style a
new paragraph defaults to when you hit Enter while you’re in a paragraph that
uses Heading 1. For Heading styles, I will generally make the Style for
following paragraph be Body Text. However, if you’re using outline numbered
styles, you might want it to default to Heading 2. Alternative, when I create
my Graphic style, I like the following paragraph to default to be the Caption
style because I always put Figure titles below my graphics.
For List Bullet and List Number, the likely following
paragraph would be another List Bullet or List Number, so I leave them to be
the same style.
-
I rarely use Add to template unless I am working on a
document that was created from a template, and realize I forgot to italicize
the font or something, but this does add the style to the template as well as
the document on which you are working. If your document is not based on a
template, you’ll want to avoid this setting. -
I rarely use Automatically update. The only styles I
use that have this checked are the Table of Contents (TOC) styles. If you
change a paragraph to which TOC1 is applied to become italicized, all
paragraphs with TOC1 applied to them will become italicized when this option
is checked.
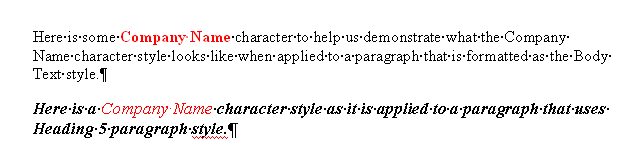
Character Styles
A character style might be any text that is bolded. For
instance, suppose we always want our company name to appear in bold red font,
regardless of the formatting of the paragraph in which that text resides. We
can create a character style for it. I’ve called it MyCharStyle in the graphic
below.
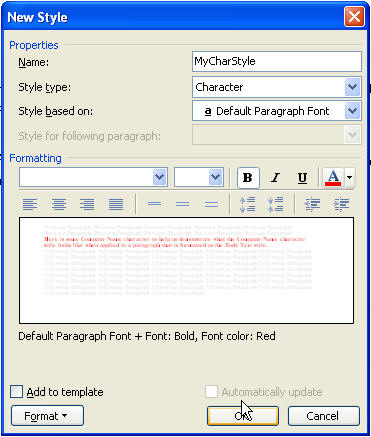
Unfortunately, when I apply the MyCharStyle style to some of the words in a
paragraph where the style is already bold, it unbolds it, as you can see below,
so be careful what font attributes you choose when creating your own character
style.
The following attributes cannot be built into Character styles: Tabs, paragraph
spacing, paragraph alignment, paragraph indents, bullets, numbering.
Word styles are very useful functions when you want to link a configuration to a certain paragraph, table or list . In this way, you can find, with very simple steps, a design that will help you save time in your work.
In addition to the existing default styles, you can also create your own . This will allow you to configure your writing according to your needs.
In this article, you will find all the information about Word styles. We will teach you how to establish your own style and how to modify it to suit your needs.
What is a style in Microsoft Word and what is it used for in my documents?
A Word style is a tool that can be used when you want to establish a set of options for different formatting in the same text in a systematic way. Like this, you will be able to change the color and font type, size and indentation of the text by simply clicking on the style you have chosen or created.
This will allow you to have a uniform criterion throughout the document, thus increasing the efficiency of your work since you will be able to select the style anywhere in the text. Urban artist you will have the possibility to quickly switch from one style to another with the push of a button.
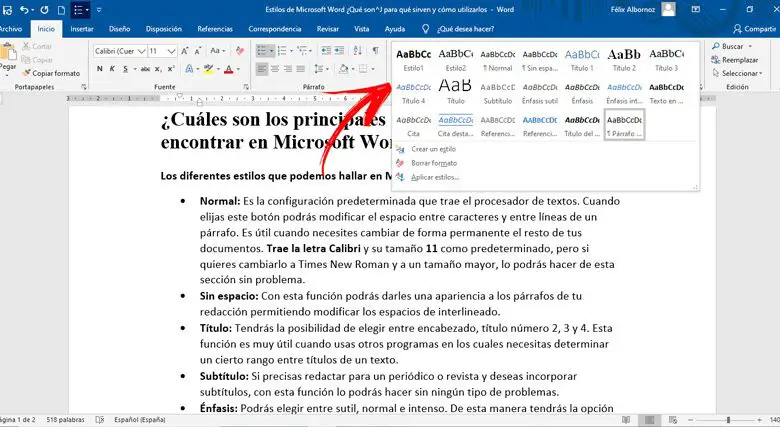
What are the main styles that we can find in Microsoft Word?
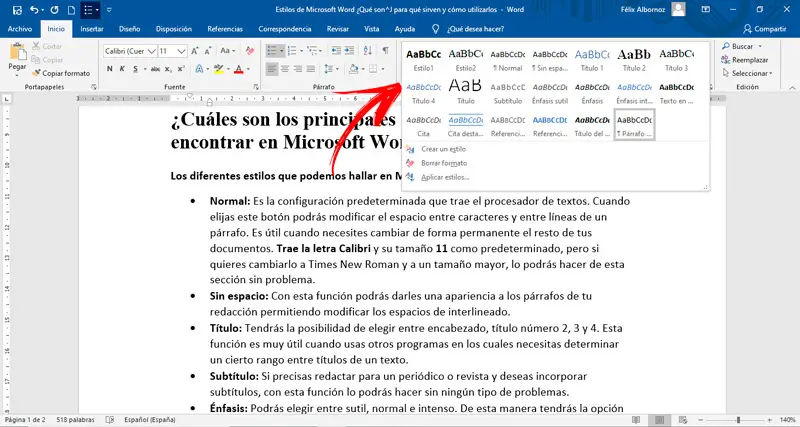
The different styles that we can find in Microsoft Word are:
- Normal: this is the default configuration provided by the word processor. When you choose this button, you will be able to change the space between characters and between lines of a paragraph. It is useful when you need to permanently edit the rest of your documents. He brings the police calibri and its size 11 by default, but if you want to change it to Times New Roman and a larger size, you can do so from this section with no problem.
- Without space: With this function you will be able to give an appearance to the paragraphs of your writing, allowing you to modify the leading spaces.
- Title: You will be able to choose between header, title number 2, 3 and 4. This function is very useful when using other programs where you need to determine a certain range between titles of a text.
- Subtitle: If you need to write for newspaper or magazine and want to incorporate subtitles, with this feature you will be able to do it without any problem.
- Emphasis: You can choose between subtle, normal and intense. In this way, you will have the possibility of having different types of format in order to give a different touch to the writing.
- Bold text: Its name says it all, by selecting this tool you will be able to give an appearance to the writing where the words are highlighted in bold.
- Quote: When you click on this style, the text you selected will appear in the center of the sheet with a different layout of the fonts. This will allow the reader to quickly understand what this part of the text is about. You will have to choose between a normal appointment and an important appointment.
- ID: The style you can give it will be subtle or intense. The result of this option will cause the words to all be written in upper case.
- Book Title: When you need to highlight a style related to books, this feature is great for choosing it. You will have a type of font that will remind the reader as if they are reading a book.
- List paragraph: this style will show you the text you selected as if it were a common paragraph.
Steps to apply a style individually or together in Word
Then we will show you the procedure to follow to apply a style individually or together in a Microsoft Word document:
Apply a style
The steps you will need to take to apply a style are as follows:
- Select the text you want to style differently. If you are about to do this with the whole paragraph, position yourself with the cursor at the end of it, it is not necessary to select it.
- Go to «Home» then in the group «Styles» .
- Click on the style you want, if you want to see all the variety you have you will have to click on the arrow at the end and the menu with all the options will be displayed.
«UPDATE ✅ Want to learn more about Microsoft Word styles and how to create one? ⭐ ENTER HERE ⭐ and learn all about it NOW! ”
You can also select the text and right click. Then you will have to click on «Styles» and choose the one you need.
Apply a set of styles
To apply a style set, you will need to select the text according to the configuration you need to give your writing. For that, you will have to follow this guide:
- Once you have selected a word or paragraph, you will need to go to «Home» , «Styles» and choose the most suitable.
- For the other style you want to incorporate, you will need to follow the same steps. Select the text then click on the style you want to give.
You will not be able to perform these steps as many times as you want . This way you will get a set of styles in the same text.
Learn step by step to create or customize Microsoft Word styles
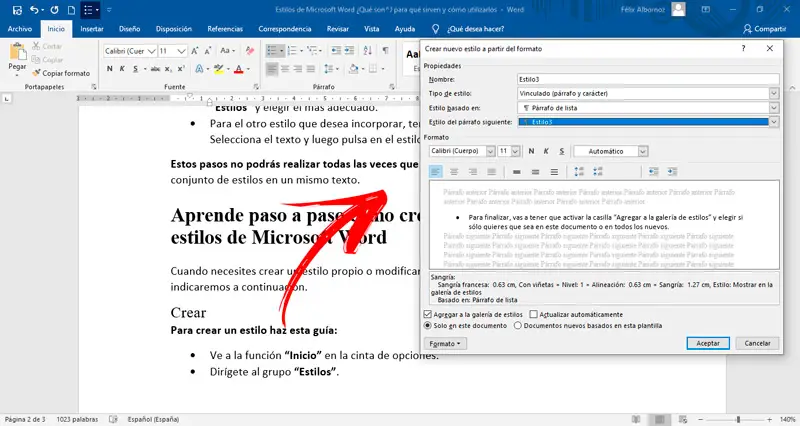
When you need to create your own style or modify it, you will have to follow the step by step which we will show you below.
Create
To create a style, follow this guide:
- Access the function «Start» on the ribbon.
- Access the group «Styles» .
- Click on the drop-down menu represented by an arrow at the end of this tool category.
- The most used settings will appear, then you will need to choose the option «Create a style» .
- Write the name of the style you want to assign.
- Click on «To modify …» .
- You will see a window in which you will have to choose the type of style, whether you want to link it to a paragraph, to a character, to both, to a table or to a list.
- Then choose whether you want the style to be based on the others you have predefined. This will help you if you are making a second creation and want to modify part of the first style you created before.
- Choose the style that the following paragraph will have . Decide if you want it normal or some other type.
- Change the font format by type, size and color.
- Select the alignment it will have. If you want it to be aligned left, center or right.
- Click the line spacing you want, as well as the type of indentation you want. To perform these two tasks, you will need to click on the icons that are in the middle of the pop-up window.
- Finally, you will have to activate the box «Add to style gallery» and choose whether you want it to be only in this document or in all new ones.
- Click on «Accept».
Edit
When you need to edit a style that you created earlier, you will need to follow these steps:
- Go to «Start» , then search «Styles».
- Click the arrow at the bottom of the styles panel to display the menu.
- Choose the option «Create a style» .
- Click on «To modify …» .
- Find the style whose settings you want to change.
- Click with the right mouse button.
- Select option «Edit».
- Make whatever changes you feel are necessary. You will need to follow the same steps required for creation.
- When done, click «OK» .
If you have any questions, please leave them in the comments, we will get back to you as soon as possible, and it will be a great help for more community members as well. Thank you!
