
Important: «Shared Workbooks» is an older feature that allows you to collaborate on a workbook with multiple people. This feature has many limitations, and has been replaced by co-authoring. Excel co-authoring is available in Microsoft 365 Apps Excel desktop client and Excel for the Web for Microsoft 365 subscribers.
Buy or try Microsoft 365
Enabling the Shared Workbook feature
-
Be certain that you want to use this method before continuing. Shared Workbooks have limitations, and one in particular is the inability to edit using Excel for the web. Therefore we highly recommend co-authoring, which is the replacement for Shared Workbooks.
-
Create a new workbook or open an existing workbook. Then place it on a network location. For example, put it on a location like \server_namefolder_name. Don’t put the file on OneDrive or SharePoint. If you prefer those locations for the file, co-author the workbook instead.
-
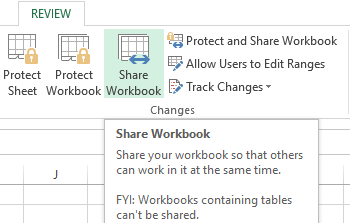
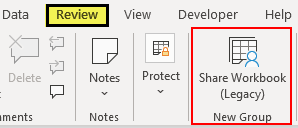
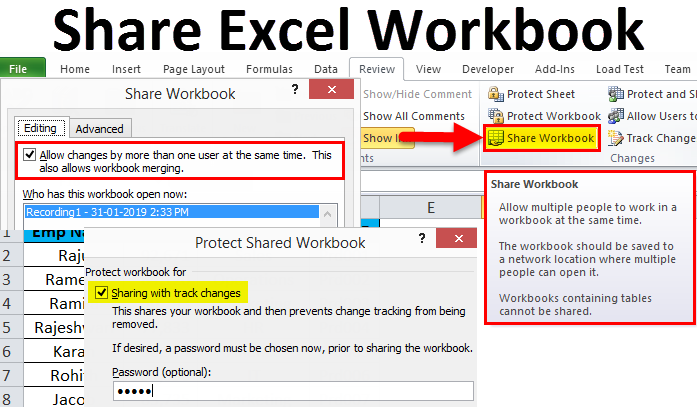
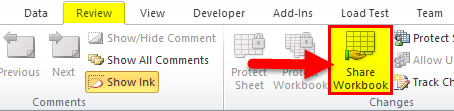
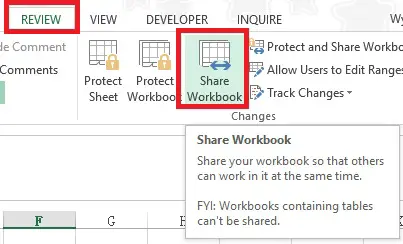
Click Review > Share Workbook.
Note that in newer versions of Excel, the Share Workbook button has been hidden. Here’s how to unhide it.
-
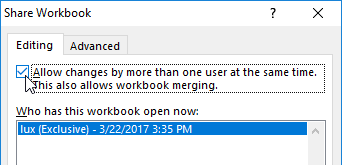
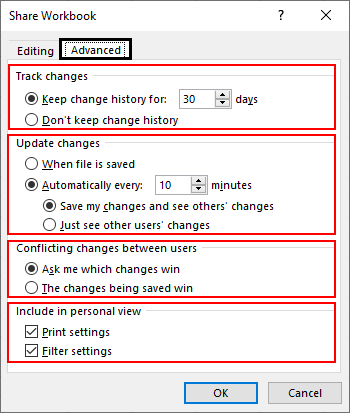
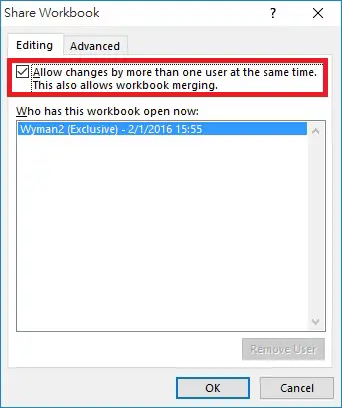
On the Editing tab, select the Allow changes by more than one user … check box.
-
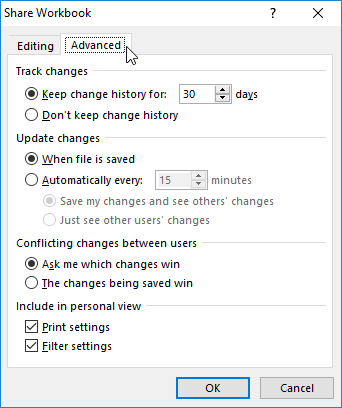
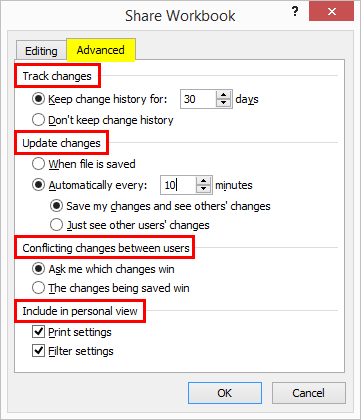
On the Advanced tab, select the options that you want to use for tracking and updating changes, and then click OK.
-
If this is a new workbook, type a name in the File name box. Or, if this is an existing workbook, click OK to save the workbook.
-
If the workbook contains links to other workbooks or documents, verify the links and update any links that are broken.
-
Click File > Save.
-
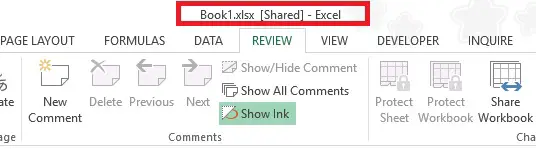
When you’re done, — Shared will appear at the top of the Excel window, next to the filename.
Additional information
Please be aware that Shared Workbooks is an older method of sharing. Therefore, many items and actions are not supported when this method is used. The table below is only a partial list of features not supported.
|
Unsupported items: |
Unsupported actions: |
|---|---|
|
Creating or inserting tables |
Inserting or deleting blocks of cells |
|
Adding or changing conditional formats |
Deleting worksheets |
|
Adding or changing data validation |
Merging cells or splitting merged cells |
|
Creating or changing charts or PivotChart reports |
Sorting or filtering by format |
|
Inserting or changing pictures or other objects |
Using drawing tools |
|
Inserting or changing hyperlinks |
Assigning, changing, or removing passwords |
|
Creating, changing, or viewing scenarios |
Protecting or unprotecting worksheets or the workbook |
|
Inserting automatic subtotals |
Grouping or outlining data |
|
Creating data tables |
Writing, recording, changing, viewing, or assigning macros |
|
Creating or changing PivotTable reports |
Changing or deleting array formulas |
|
Creating or applying slicers |
Adding, renaming, or deleting XML maps |
|
Creating or modifying sparklines |
Mapping cells to XML elements |
|
Adding or changing Microsoft Excel 4 dialog sheets |
Using the XML Source task pane, XML toolbar, or XML commands on the Data menu |
|
Using a data form to add new data |
|
|
Adding threaded comments |
Editing, or deleting threaded comments |
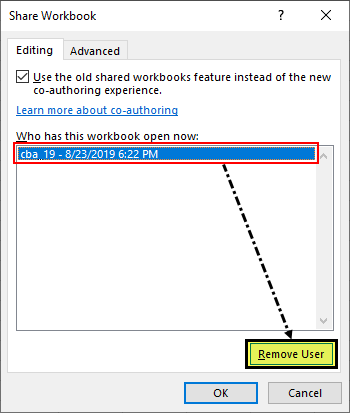
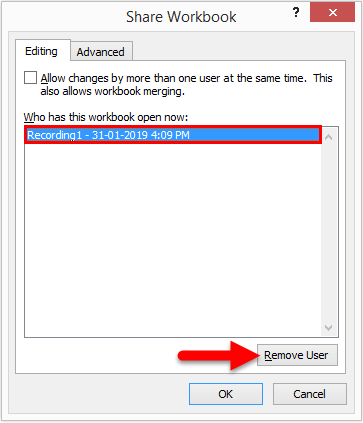
Before you disconnect users, make sure that they have completed their work on the workbook. If you remove active users, any unsaved work of theirs will be lost.
-
Click Review > Share Workbook.
Note that in newer versions of Excel, the Share Workbook button has been hidden. Here’s how to unhide it.
-
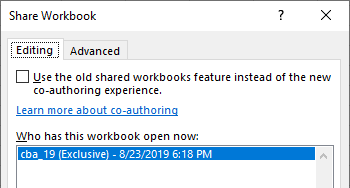
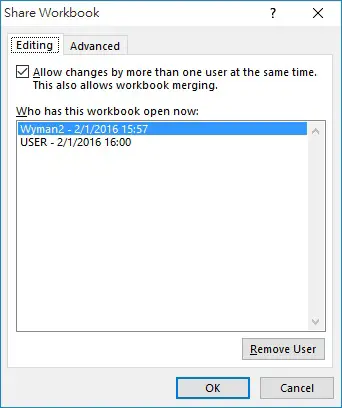
On the Editing tab, in the Who has this workbook open now list, review the names of users.
-
Select the name of the user who you want to disconnect, and then click Remove User. Please note that although this action disconnects the user from the workbook, it does not prevent that user from editing the workbook again.
-
To delete any personal view settings of the removed user, click View > Custom Views and delete any other user views.
Before you turn off this feature, you might want to make a copy of the change history. First make sure that all other users have completed their work.
-
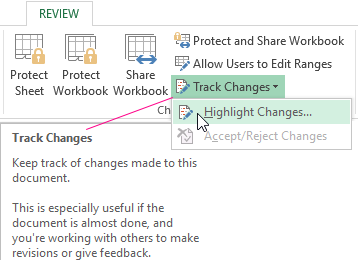
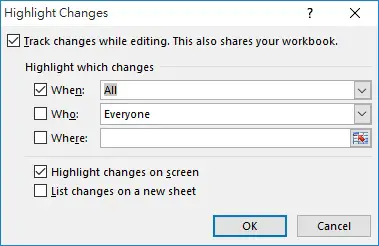
Click Review > Track Changes > Highlight Changes.
Note that in newer versions of Excel, the Track Changes button has been hidden. Here’s how to unhide it.
-
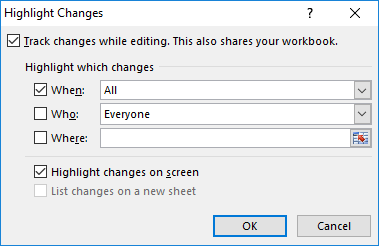
In the When list, select All.
-
Clear the Who and Where check boxes.
-
Select the List changes on a new sheet check box, and then click OK.
-
Now you can either print the History worksheet, or you can copy the history and paste it into another workbook.
-
Click Review > Share Workbook.
Note that in newer versions of Excel, the Share Workbook button has been hidden. Here’s how to unhide it.
-
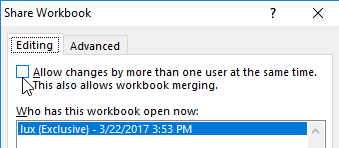
On the Editing tab, make sure that you are the only person listed in the Who has this workbook open now list.
-
Clear the Allow changes by more than one user … check box. If this check box is not available, you must first unprotect the workbook. Do the following:
-
Click OK to close the Share Workbook dialog box.
-
On the Review tab, in the Changes group, click Unprotect Shared Workbook.
-
If you are prompted, enter the password, and then click OK.
-
On the Review tab, in the Changes group, click Share Workbook.
-
On the Editing tab, clear the Allow changes by more than one user … check box.
-
When you are prompted about the effects on other users, click Yes.
-
Enabling the Shared Workbook feature
-
Be certain that you want to use this method before continuing. Shared Workbooks have limitations, and therefore we highly recommend co-authoring, which is the replacement for Shared Workbooks.
-
Create a new workbook or open an existing workbook. Then place it on a network location. Don’t put the file on OneDrive or SharePoint. If you prefer those locations for the file, co-author the workbook instead.
-
Click Review > Share Workbook.
-
On the Editing tab, select the Allow changes by more than one user … check box.
-
On the Advanced tab, select the options that you want to use for tracking and updating changes, and then click OK.
-
If this is a new workbook, type a name in the Save As box. Or, if this is an existing workbook, click OK to save the workbook.
-
If the workbook contains links to other workbooks or documents, verify the links and update any links that are broken.
-
Click File > Save.
-
When you’re done, — Shared will appear at the top of the Excel window, next to the filename.
Additional information
Please be aware that Shared Workbooks is an older method of sharing. Therefore, many items and actions are not supported when this method is used. The table below is only a partial list of features not supported.
|
Unsupported items: |
Unsupported actions: |
|---|---|
|
Creating or inserting tables |
Inserting or deleting blocks of cells |
|
Adding or changing conditional formats |
Deleting worksheets |
|
Adding or changing data validation |
Merging cells or splitting merged cells |
|
Creating or changing charts or PivotChart reports |
Sorting or filtering by format |
|
Inserting or changing pictures or other objects |
Using drawing tools |
|
Inserting or changing hyperlinks |
Assigning, changing, or removing passwords |
|
Creating, changing, or viewing scenarios |
Protecting or unprotecting worksheets or the workbook |
|
Inserting automatic subtotals |
Grouping or outlining data |
|
Creating data tables |
Writing, recording, changing, viewing, or assigning macros |
|
Creating or changing PivotTable reports |
Changing or deleting array formulas |
|
Creating or applying slicers |
Adding, renaming, or deleting XML maps |
|
Creating or modifying sparklines |
Mapping cells to XML elements |
|
Adding or changing Microsoft Excel 4 dialog sheets |
Using the XML Source task pane, XML toolbar, or XML commands on the Data menu |
|
Importing, refreshing, and exporting XML data |
Using a data form to add new data |
Before you disconnect users, make sure that they have completed their work on the workbook. If you remove active users, any unsaved work of theirs will be lost.
-
Click Review > Share Workbook.
-
On the Editing tab, in the Who has this workbook open now list, review the names of users.
-
Select the name of the user who you want to disconnect, and then click Remove User. Please note that although this action disconnects the user from the workbook, it does not prevent that user from editing the workbook again.
-
To delete any personal view settings of the removed user, click View > Custom Views and delete any other user views.
Before you turn off this feature, you might want to make a copy of the change history. First make sure that all other users have completed their work.
-
Click Review > Track Changes > Highlight Changes.
-
In the When list, select All.
-
Clear the Who and Where check boxes.
-
Select the List changes on a new sheet check box, and then click OK.
-
Now you can either print the History worksheet, or you can copy the history and paste it into another workbook.
-
Click Review > Share Workbook.
-
On the Editing tab, make sure that you are the only person listed in the Who has this workbook open now list.
-
Clear the Allow changes by more than one user … check box. If this check box is not available, you must first unprotect the workbook. Do the following:
-
Click OK to close the Share Workbook dialog box.
-
On the Review tab, click Protect Workbook.
-
If you are prompted, enter the password, and then click OK.
-
On the Review tab, Share Workbook.
-
On the Editing tab, clear the Allow changes by more than one user … check box.
-
Sharing in Microsoft Excel enables several users to work with one file. Ten to twenty people on different computers simultaneously enter some kind of data in one document.
Particular formulas work in those places where certain information is located.
The “main user” can track workgroup activities, add / remove members, and edit contradictory changes. How to set up collaboration in Excel?
Features of working with shared file
Not all tasks can be performed in an Excel workbook with shared access.
The following actions are prohibited:
- Creating Excel spreadsheets.
- Creating, changing, and viewing scenarios.
- Deleting worksheets.
- Combining or splitting cells.
- Working with XML data (importing, adding, updating, deleting, etc.)
The way out is to: disable shared access – to perform the prohibited function – to enable shared access again.
Sharing data restricts a number of tasks for users:
| It’s impossible to: | It’s possible to: |
| Insert or delete a group of cells | Add a row or a column |
| Add or change conditional formats | Work with existing formats |
| Enable or modify the «Data Validation» tool | Work with existing verification settings |
| Create or edit charts, summary reports | Work with existing charts and pivot tables |
| Insert or edit drawings and graphics | View existing drawings and graphics |
| Insert or change hyperlinks | Click through existing hyperlinks |
| Assign, edit or delete passwords | Use existing passwords |
| Put or remove the protection of worksheets and workbooks | Use existing protection |
| Group, structure data; insert sublevels | Work with existing groups, structures and sublevels |
| Record, modify, or view macros | Run existing macros that are not associated with unavailable tasks |
| Change or delete array formulas | Use existing formulas |
| Add new information to the form | Search for information in the data form |
How to share an Excel file?
First, determine which workbook you will “open” for editing by several members at the same time. Create a new file and fill it with information. Alternatively, open the existing one.
- Go to «REVIEW» tab, then to «Share Workbook» dialog box.
- In window «Share Workbook». Select check box «Allow changes by more than one user at the same time».
- Go to «Advanced» tool to configure the settings for multi-user editing.
- Click OK. If you share a new workbook, you should choose the title for it. If sharing is implies using an existing file — click OK.
- Open the Microsoft Office menu. Choose «Save as» command. Choose the save file format that will be suitable for all users ‘computers.
- Choose a network resource / network folder as a storage location that will be opened by the prospective participants. Click «Save».
It’s important! You cannot use a web server to save a file.
Now check and update the links:
- «DATA» tab, «Connections».
- «Manage Sets». If there is no such button, there are no linked files in the worksheet.
- The OK button indicates the operability of the links.
Opening a shared book
- «FILE» Click on «Open» (CTRL+O).
- Choose a shared workbook.
- When the book is open, click on the Microsoft Office button. Go to «Options» tab (at the bottom of the menu).
- «General» — «Personalize your copy of Microsoft Office» — «User name:». Enter the identification information (name, nickname).
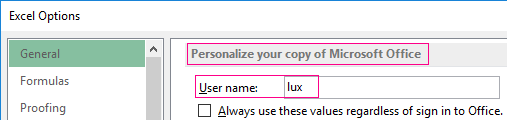
That’s all. You can edit this information, enter new one, as well as save it afterwards.
Occasionally, when you open a shared Excel workbook, «File is locked» notification appears, making saving impossible. When you later open it, it turns out that sharing is disabled. Possible causes of the problem:
- Several users edit the same part of the document. For example, they enter different data in one cell. As a result, blocking occurs.
- When a shared file is used, a change log is kept (who entered, when, what he did). As the book size increases, bugs appear.
- A user has been removed from shared access, but he/she don’t know about this. Then the blocking will be observed only on his/her computer.
- Overloading of the network resource.
If sharing is blocked, you can do the following:
- Clean or delete the change log.
- Clean the file content.
- Disable, and then re-enable shared access.
- Open the xls book in OpenOffice and save it in xls again.
It has been noticed that the notification «File is locked» appears less frequently in the latest versions of Excel.
How to delete a user
- Open «Share Workbook» menu in «REVIEW» tab.
- You can see a list of users in «Edit» section.
- Select the name — click «Remove User».
Before deleting, check whether users have finished working with the file.
How to disable shared access in Excel
All users need to save the information and close the shared file. If you need to save the log, follow the instructions:
- «REVIEW» tab — «Track Changes» — «Highlight Changes».
- Set the parameters of «Changes». When – «All». Clear checkboxes opposite «Who» and «Where». «List changes on a new sheet» check box should be selected. Click OK.
- The change log will open. It can be saved or printed.
To disable Excel file sharing, click «Share Workbook» and uncheck «Allow changes by more than one user at the same time» in «REVIEW» tab.
The single user should remain in the list. It is you.
Last Update: Jan 03, 2023
This is a question our experts keep getting from time to time. Now, we have got the complete detailed explanation and answer for everyone, who is interested!
Asked by: Mr. Rowan White IV
Score: 4.1/5
(32 votes)
Important: «Shared Workbooks» is an older feature that allows you to collaborate on a workbook with multiple people. This feature has many limitations, and has been replaced by co-authoring. Excel co-authoring is available in Microsoft 365 Apps Excel desktop client and Excel for the Web for Microsoft 365 subscribers.
How do I turn off workbook sharing in Excel?
You can turn off sharing by following these steps:
- Display the Review tab of the ribbon.
- Click the Share Workbook tool, in the Changes group. Excel displays the Share Workbook dialog box.
- Clear the Allow Changes check box.
- Click on OK.
How do I share an Excel file?
Step 2: Share it
- If you uploaded the file, click the filename to open it. …
- Click the Edit in Excel button. …
- Click Open Microsoft Excel.
- When the file opens in the Excel program, you may see a yellow bar which says the file is in Protected View. …
- Click Share in the upper-right.
- Click Invite People.
What is the advantage of sharing a workbook?
By sharing a workbook: A team can work simeltaneously on the same workbook. No multiple copies , all the data by everyone is in a single workbook. Can be used to collect information for surveys etc.
Can multiple users edit Excel at the same time?
Use Excel with Multiple Users Simultaneously
You can edit the same Excel file with multiple users through a feature called co-authoring. This feature lets multiple people make changes in a document stored on a remote, so-called cloud server with their actions highlighted in different colors.
38 related questions found
How do I enable multiple users to edit Excel 365?
Click Review > Share Workbook. On the Editing tab, select the Allow changes by more than one user … check box. On the Advanced tab, select the options that you want to use for tracking and updating changes, and then click OK.
How many users can use a shared Excel workbook?
Sharing is limited to two users.
What is the advantage of sharing?
Through sharing, you can: spread the cost of owning high quality and durable goods. reduce the cost of caring for a child or other family member. reduce the cost of food, fuel, and supplies.
What is the significance of sharing sheet?
The recent versions of Excel 2010, 2013 and 2016 make it easy to share and collaborate on workbooks. By sharing an Excel file, you are giving other users access to the same document and allow them to make edits simultaneously, which saves you the trouble of keeping track of multiple versions.
What is the purpose of sharing worksheets?
Sharing a worksheet allows users to select it as a data source and search it. When you share a worksheet, you give users or groups within your cluster access to the worksheet’s data. You share all of its columns. Sharing a worksheet does not share the underlying tables.
How do I share an Excel workbook in 2020?
Set up a shared workbook
- Click the Review tab.
- Click Share Workbook in the Changes group.
- On the Editing tab, click to select the Allow changes by more than one user at the same time. …
- In the Save As dialog box, save the shared workbook on a network location where other users can gain access to it.
How do I see who shared an Excel File?
See who a file is shared with in OneDrive or SharePoint
- In your document library, select the file or folder.
- Above the list of files, select Share. The Send link window opens.
- If the item is currently shared with anyone, a Shared with list appears at the bottom of the Send link window.
Can’t find shared workbook Excel?
Click File > Options > Quick Access Toolbar. Open the list under Choose commands from and select All Commands. Scroll down that list until you see Share Workbook (Legacy). Select that item and click Add.
What is the best practice for entering dates and times in Excel?
I recommend typing dates in the same format that your system uses. For our American readers, a full date would be in the «day/month/year» format. European style dates are «month/day/year.» When I’m typing dates, I always type in the full date with the month, day and year.
How does tracking changes related to sharing a workbook in Excel?
When you highlight changes as you work, Excel outlines any revisions (such as changes, insertions, and deletions) with a highlighting color. On the Review tab, click Track Changes, and then click Highlight Changes. Select the Track changes while editing. This also shares your workbook check box.
How will you share a sheet with other users for editing?
Sheets: Share with specific people or using a link
- Open the file you want to share (that you own or have edit access to).
- Click Share.
- Enter the email addresses or groups that you want to share with.
- Choose what kind of access you want to give people: Editor, Commenter, or Viewer.
- Click Send.
What are three advantages of sharing housing?
Advantages of Flat Sharing or House Sharing
- Shared living can save you money on rent.
- Money savings on utility costs.
- You will have company from your roommates.
- You can make good friends over time.
- You can learn from your roommates through shared living arrangements.
- Can be especially beneficial for students.
What are the disadvantages of sharing?
7 Major Disadvantages of the Sharing Economy
- Privacy or Safety Concerns.
- Little to No Guarantee.
- Risk of Fraud and Scams.
- New Form of Capitalism.
- Lack of Customer Loyalty.
- Service is Often Expensive.
What is the importance of sharing and caring?
It’s important to care and share because if you do, other people would follow in your footsteps and the world would be a happier place. It effects people in a good way because if you do something good to someone, they will feel loved and most likely do something good for someone else.
Is Excel file shared?
The recent versions of Excel 2010, 2013 and 2016 make it easy to share and collaborate on workbooks. By sharing an Excel file, you are giving other users access to the same document and allow them to make edits simultaneously, which saves you the trouble of keeping track of multiple versions.
How do I add someone to a shared Excel file?
Right click on the folder you shared the workbook, click Properties, click the Sharing tab, click the Share… button, search and add the user by type the user name in the input box, click Add and click Share, click Done.
Can multiple users edit an Excel spreadsheet at the same time in SharePoint?
With Office and OneDrive or SharePoint, multiple people can work together on a Word document, Excel spreadsheet, or PowerPoint presentation. When everyone is working at the same time, that’s called co-authoring.
How do I Unshare an Excel file for multiple users Office 365?
It’s to the right of a user’s name. Tap Stop sharing. Doing so will remove your selected user from the «share» list. Stop sharing the document with any other users.
How do I share a workbook in Excel 2016?
To share a workbook:
- Click the File tab to access Backstage view, then click Share.
- The Share pane will appear. …
- On the Share pane, if your document is saved to OneDrive, click the Share with People button.
- Excel will return to Normal view and open the Share panel on the right side of the window.
How do I turn on co authoring in Excel?
Co-author a workbook
- Select Share.
- Upload your file to OneDrive, if you haven’t already.
- Set permissions and select Apply. …
- Add the names of who to share with, and an optional message.
- Select Send.
- Select the initials in the upper right to see who else is working on the file and where they are in the file.
Procedure Involved in Sharing Excel Workbook
- Procedure Involved in Sharing Excel Workbook
- Errors in Excel Share Workbook
- Excel Share Workbook but Also Protect Changes Tracking
- Protect Sheet vs. Protect Shared Workbook
- Un-Share & Remove Users From Shared Workbooks
- Things to Remember
- Recommended Articles
Follow the below steps to learn about this option.
- First, we need to decide which workbook we want to share, so open that Excel workbook first.
- Then, we must go to the “Review” tab and click on the “Share Workbook (Legacy)” option in Excel in that workbook.

- As soon as we click on the “Share Workbook (Legacy),” it will show us the below dialog box. Below the window, we have two tabs, “Editing” and “Advanced,” under the “Editing” option. Next, select the checkbox “Use the old shared workbooks feature instead of the new co-authoring experience.”

- Under the “Editing” tab, that was the only option we had. Now choose the “Advanced” tab. Under the “Advanced” tab, we can “Track Changes,” “Update Changes,” “Conflicting changes between users,” etc.

- After all the settings we have done in the above window, we must upload the file to a network location like Dropbox from where they can access the workbook. Then, we must send the link or give the user ID password.
- After that, we can send the workbook’s stored link to the concerned person.

When we choose the option “Share Workbook,” it often shows the error message. The reason behind this is some settings in Excel.
Follow the below steps to change settings.
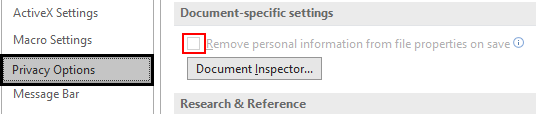
Go to “File” >>> “Options” >>> “Trust Center” >>> “Trust Centre Settings” >>> uncheck “Remove personal information from file properties on save.”
Sharing a workbook is not the only feature available. Rather, we also can foresee the changes of other users. To apply this change, we must unshare the workbook before making any changes.
To check users’ changes and have control, we must follow the below steps.
- Step 1: We must first go to the “Review” tab.
- Step 2: Next to “Share Workbook,” we have the “Protect and Share Workbook (Legacy)” option. Click on that option.
![]()
- Step 3: Once we click on the “Protect and Share Workbook (Legacy),” we can see below the dialog box. Under “Password (optional),” we must insert the password as per wish and remember it!
![]()
- Step 4: Password is not the mandatory option. However, it is always good to enter the password and share the workbook to control the changes.
Protect Sheet vs. Protect Shared Workbook
We can see two types of protection with excel, i.e., “Protect Sheet in ExcelWhen we don’t want any other user to make changes to our worksheet, we can use the Protect worksheet feature in Excel. It can be found in Excel’s Review tab. read more” and “Protect Shared Workbook.” Do not get confused with these two options. These two are not the same. Below are the differences between these two:
- “Protect Sheet” is protecting the worksheet, not the workbook.
- “Protect Shared Workbook” means we are not allowing the user the option of change tracking of the shared workbook.
We can also unshare and remove particular users from the shared workbook.
To unshare the workbook, we need to uncheck the option of “Use the old shared workbooks feature instead of the new co-authoring experience.”
If we wish to remove users, we must select the user and check the “Remove User” button, as shown below.
Consequently, it will remove the selected user from this workbook.
Things to Remember
- We need to protect the shared workbook and share to track changes option.
- “Protect Worksheet” and “Protect Shared Workbooks” are not the same.
Recommended Articles
This article is a step-by-step guide to Excel Shared Workbook. Here, we provide a step-by-step guide to sharing files in Excel and examples and explanations. You may learn more about Excel from the following articles: –
- 5 Types of Excel Auditing Tools
- Unprotect Workbook in Excel
- What is Power Query in Excel?
- How to Protect Workbook in Excel?
- Apple Numbers vs. Excel
Reader Interactions
Summary:
This post will help you out to know how to share an Excel workbook with multiple users by saving it on the local network or OneDrive.
Apart from that you will also get to know control user access to a shared Excel file and fix conflicting changes.
How Do You Change Access To Shared Excel Spreadsheet?
Here is a complete step to set permissions for a shared Excel file. So, that multiple users can work together on the Excel file simultaneously.
How To Share Your Workbook?
- Choose the Share option.
- Set permissions.
- Allow editing is automatically checked. If you un-tick this option then users can only view the file but they can’t edit it.
- Choose Apply option.

- Assign the email address and name of the users with whom you want to share your Excel file.
- You can add a message if you want to give it to your Excel users.
- Hit the Send button. OR alternatively, you can choose the Copy link to get the file link.
Check out the following video to learn how to share Excel workbook online and offline. This video will let you know how to share Excel workbook with multiple users. Here I have described how you can share your Excel file offline and online.
Co-author a workbook
Here is setting permission for shared Excel file which you must apply to work with your Excel file simultaneously.
- For a better experience, work together in Excel for the web and watch out the real-time changes.
- Within Share option, you will see the user’s name who is currently editing your file.
- Colored cell indicates how many users are currently active in your Excel workbook. Tap to the color to see who is editing that cell.
Allow Specific Users To Edit Ranges In A Protected Spreadsheet
Excel gives you the option to assign user-level privileges on a different section of a password-protected worksheet.
You can assign any specific user for editing a particular range while the Excel spreadsheet is password protected.
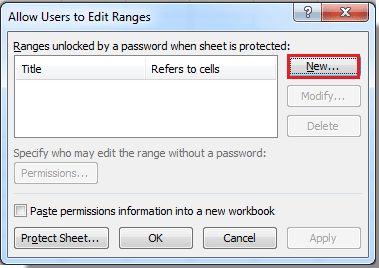
1. Hit the Review tab and then from the Changes group choose the Allow Users to Edit Ranges.

Note: This Allow Users to Edit Ranges command will appear only when the Excel workbook is not password protected.
2. Now you can perform any of the three options:
- In order to modify the already existing editable range, you need to choose the “Ranges unlocked by a password when sheet is protected” box. After then hit the “Modify” option.
- For deleting up the editable ranges choose the Ranges unlocked by a password when sheet is protected box. After that hit the Delete button.

- In case, if you need to add a new editable range then follow these steps:
3. Hit the New option to open the New range dialog box:
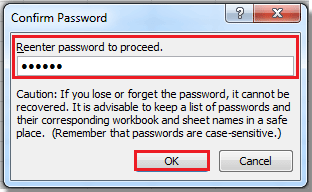
4. Within the Title box, you have to type the range name which you need to unlock.

5. Now in the box of Refers to cells you have to put an equal sign (=), and after that type the range reference which you have to unlock.
You can make a tap on the Collapse Dialog button, so make a selection for the range in your Excel spreadsheet. After that, hit the Collapse Dialog button once again to get back in the dialog box.
6. Within the Range password box, you have to enter the password which works as a key to access that particular range. Well, this password is completely optional. But if you don’t assign the password then any other user can easily edit your worksheet cells.
7. Hit the Permissions button. This will open the permission for range dialog box:
8. Add those users to whom you want to assign this edit the ranges or remove permission. And then tap to the Ok
9. After making all the changes, within the dialog box of Allow Users to Edit Ranges. Hit the Protect Sheet… option for opening up the dialog box of Protect Sheet:
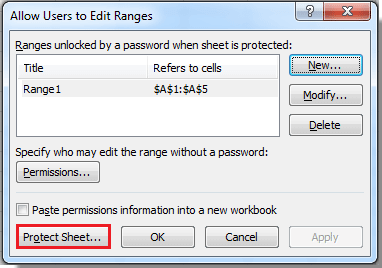
10. From the section of Allow all users of this worksheet, choose the items to assign to your users to make any changes in it.
11. Now in the Password to unprotect sheet box, enter the password for the Excel sheet and tap the OK button. Retype the password for the confirmation.
Can An Excel File Be Edited By Multiple Users?
In past, when you required to share Excel workbook with some other user. You should send it like an email attachment or just save the Excel data to PDF format for printing.
While convenient and fast, a former method created multiple versions of the same document and later on produce through non-editable copy.
A recent version of the Excel 2010/ 2013/ 2016/2019 file is quite easy to share and collaborate on the workbooks.
By sharing up the Excel file you can give other users access to the same document and allow editing simultaneously.
This saves you from the trouble of keeping track of multiple versions.
What Are Limitation Of Shared Excel Workbook?
Before sharing an Excel workbook it’s important to have knowledge about the limitations that the shared workbook doesn’t support.
So have a look over it…!
- Sorting and filtering by format
- Conditional formatting
- Merging cells
- Excel tables and PivotTable reports
- Charts and pictures
- Data validation
- Worksheet protection
- Grouping or outlining data
- Subtotals
- Slicers and sparklines
- Hyperlinks
- Array formulas
- Macros
- A few more things
Actually, you can use the existing excel features but you are not allowed to add or modify them. So, if you like to use any of the above-listed options then apply them before sharing up the Excel files.
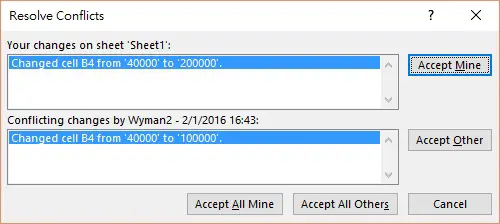
How To Fix Conflicting Changes In A Shared Excel File?
- When more than two users simultaneously start editing the same Excel workbook then it may affect the data of that particular cell.
- In that case, Excel will only save the changes of that user who has saved the workbook first.
- Whereas the other user will receive a pop message of “Resolve Conflicts”. This dialog box contains the detail about conflicting changes.
- You can perform the following procedures to fix the conflicting changes:

- To save up your made changes, tap the Accept Mine button.
- Save the changes of some other user hit the Accept Other button.
- To keep the entire changes done by you just click the Accept All Mine button.
- Save entire changes done by others, just click the Accept All Others.
Tip.
For saving up a copy of the shared workbook along with the changes hit the Cancel button within the dialog box of “Resolve Conflicts”.
After that save your excel workbook with a new name. Later on, you can also merge all the changes done by multiple users.
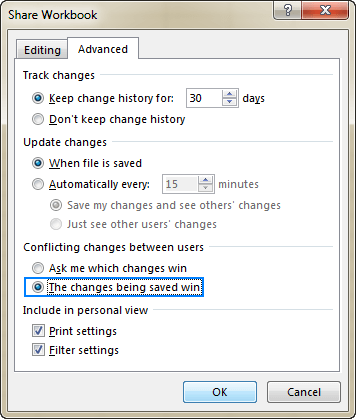
How To Force Recent Changes To Override Previous Changes Automatically?
To get the latest changes automatically by overriding all the previous changes done by any other user, without getting any “Resolve Conflicts “dialog box. In that case, you need to perform the following operation.
- Go to the Review tab and then from the Changes group hit the Share Workbook option.

- On the opened window of share, workbook hit the “Advanced” Choose the option “changes being saved win” which is present under Conflict changes between users. Hit the OK button.
To see the entire changes you have made to the shared workbook. Just use the Track Changes option present within the changes group of the Review tab.
With this, you can easily extract details like what and who have made the changes.
Wrap up:
Applying passwords in the shared workbook is optional. But if you don’t assign any password then the third person can easily unprotect your excel sheet and can make modifications to the protected Excel items.
Ensure that you have selected a password that is quite easy to remember.
If unfortunately, you lose the password, you can’t be able to access to protected element in the spreadsheet.


Priyanka is an entrepreneur & content marketing expert. She writes tech blogs and has expertise in MS Office, Excel, and other tech subjects. Her distinctive art of presenting tech information in the easy-to-understand language is very impressive. When not writing, she loves unplanned travels.
Highlight Changes | Accept/Reject Changes
If you share a workbook in Excel 2016 or older versions, you can work with other people on the same workbook at the same time. The workbook should be saved to a network location where other people can open it. You can keep track of the changes other people make and accept or reject those changes.
To share a workbook, execute the following steps.
1. Open a workbook.

2. On the Review tab, in the Changes group, click Share Workbook.

The Share Workbook dialog box appears.
3. On the Editing tab, click the check box and click OK.

Excel saves the workbook. You can now work with other people on the same workbook at the same time. The screen above shows you who has the workbook open.
Highlight Changes
You can highlight the changes on screen other users has made.
1. On the Review tab, in the Changes group, click Track Changes.

2. Click Highlight Changes.

The Highlight Changes dialog box appears.
3. Click OK.

Excel highlights the changes on screen.

Apparently, Aiden has changed the Sales of Smith from $16,753.00 to $26,753.00.
Accept/Reject Changes
You can now accept or reject this change.
1. On the Review tab, in the Changes group, click Track Changes.
2. Click Accept/Reject Changes.

3. Click OK.

4. Click Accept to accept the change or Reject to reject the change.

Note: not all features are available in a shared workbook.
How to Share an Excel File Step-by-Step (2023)
Gone are the days when you’d email an Excel file to your team members, and wait for it to be edited by them. And when received back, merge the changes to the original file manually 😫
Even sounds so tiring. With newer versions of Microsoft Excel (starting from Excel 2010 and onwards), you can share an Excel file with your team members and work on it simultaneously.
No, not kidding – you can do that. How? The guide below will teach you to do that 👇
So let’s jump right in.
To share an Excel workbook via OneDrive, you only need to save it to your OneDrive. And then allow access to the same to your colleagues.
Once this is done, you and your team members (with whom the file has been shared) can simultaneously edit it, and you can track the changes in real time 💪
There are two ways how you can share files via OneDrive:
- By logging on to OneDrive, signing in to your account, and uploading the files there.

- By downloading the OneDrive app from here.

After you have downloaded it, sign in with your Microsoft Account details. If you don’t have one already, take out 5 minutes to create one 💭
Once you’ve set up everything, you’re OneDrive Folder will appear under your Files and Folders like this.

Now let’s see how you can save a file to OneDrive to share it.
- Look out for the Share button on the top right corner of your Excel workbook (that is to be shared).

- Click on it.
You’d see the Share dialog box as follows. If you’ve already set up your account, it’d appear here.

- Select the account where you want the workbook uploaded.
You’d then see the dialog box to Send the link as follows:

- Type in the email addresses of the recipients with whom you want to share the file.
To share the file with multiple people at the same time, add the name of one recipient, then add a semicolon before you write in the name of the second recipient ✍
- Click on the Send button.
With this, the file will be shared. And the recipients will now be able to access the shared workbooks from the link sent to them (via email)📨
Here’s another easy way to share an Excel file via OneDrive:
- Launch the OneDrive Folder on your Desktop.
- Drag and drop your Excel file into this folder.

Once you have dropped the file in the OneDrive folder, you’d see this blue icon status at first 🔁
This tells us that the file is still in the process of being uploaded. Once it turns green (like the image below), the file is now uploaded to your OneDrive account ✅

Files uploaded to OneDrive are saved on the cloud. You can access them from any Excel app on another device (like Excel mobile, or another Excel desktop app). OneDrive offers each user a storage space of up to 5 GB.
With this, you are ready to share the file with anyone you like.
- Right-click on the file from your OneDrive folder to launch the context menu.
- Click on Share.

You’ll be navigated to the following window where you can type the addresses of the recipients. And the subject Excel workbook will be shared with them 👀

Excel co-authoring
Excel co-authoring is just like sharing a file via OneDrive. However, this feature of Excel and OneDrive takes sharing a level ahead.
Pro Tip!
Co-authoring is where multiple users can co-author (edit) the shared Excel file simultaneously.
No more mess of creating and saving multiple versions for the same file 😍
To co-author an Excel workbook:
- Look out for the Share button on the top right corner of your Excel workbook.

- Click on it.
- From the Share dialog box, click on the pencil icon on the right ✏
- Set the Access options to ‘Can Edit’.

- Type in the email addresses of the recipients with whom you want to share the file.
Like we have added a recipient here.

- Click on share.
The recipient will receive an email with the link to access the file.
- Again navigate to the top right of your workbook to see more profiles there. This shows who is currently co-authoring your Excel workbook 🚀

Not just that – you can also track changes being made by them to the same spreadsheet in real-time. In short, it works just like Google Sheets does.

Isn’t this just so cool 😎
Unshare an Excel file
After you’ve granted access to your team members to an Excel file, you can always withdraw the access.
To unshare Excel files, follow the steps below:
- Go to the OneDrive folder on your PC. Or log on to OneDrive from your browser.
- Right-click on the Excel shared workbook that is to be unshared.
- From the context menu that launches, select “Manage Access”.

- From the Manage Access dialog box, click on Stop Sharing ❌

Doing so, the file will be unshared. This means no other users (with whom the files were shared) will be able to access the file.
If you want to remove the sharing link only:
- From the Manager Access dialog box, click on the cross button next to the sharing link.

Anyone who has this link can access and edit the subject workbook. However, once you remove this link, other members cannot access the subject Excel file through this link 🎯
- Alternatively, if you only want to remove the file access from certain members, scroll down to see the list of people who have access to the subject file.

- Click on the cross sign to the right of the member’s name to remove his access.
If you don’t want to take away the access but only change the access settings:
- Under the Link Settings, click on the drop-down menu icon next to the access type.
- Change the access type by clicking on it.

If you don’t want to unshare it altogether, just change the access type from ‘Can Edit’ to ‘Can view’ 🙈
The members with whom the file was shared will now only be able to view the file. But won’t be able to make any changes to it. That’s how you can take away the co-authoring rights from any member.
Pro Tip!
If you want to change the access type for any specific member only (and not all members):
- Launch the Manage Access dialog box.
- Go to the list of persons who have access to the file.
- Click on the ellipsis button next to each person’s name.
- Change the access permission for that person.
Kasper Langmann2023-02-24T10:16:22+00:00
Page load link
Share Excel Workbook (Table of Contents)
- Share Excel Workbook
- How to Share Excel Workbook?
- Protect Worksheet vs Protect Shared Workbook
The share Excel Workbook option is available under the Review menu tab under the Changes section, which is used to share the worksheet with any organisation recipient if they all are connected using MS Outlook. It allows the other recipient to review the document or file and make the changes. We can also highlight the changes done by other users and accept or reject those changes if they do not match the criteria.
In this section, we will see how to Share Excel Workbook.
Follow the below steps to explore this cool option.
You can download this Share Workbook Excel Template here – Share Workbook Excel Template
Step 1: Open the Excel Workbook you want to save.
Step 2: Go to the Review tab and find the Share Workbook option.
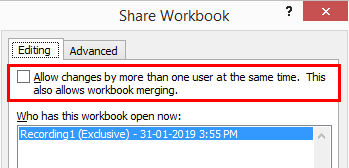
Step 3: After clicking on the Share Workbook, it will show you the new dialog box. Under the Editing option, select the checkbox ” Allow changes by more than one user at the same time. This also allows workbook merging.”

Step 4: Now select the Advanced tab under the same dialog box. This section shows the options Track changes, Update Changes, Conflicting changes between users, Include in personal view under this section.
Step 5: Now save the workbook to the network location where the authorized person can access it and give them the link to the workbook folder, and you can also pass the link to your colleagues.
Change settings if your share workbook option is showing below error:
If you click on Share Workbook and show the error message, you need to change some of the settings.
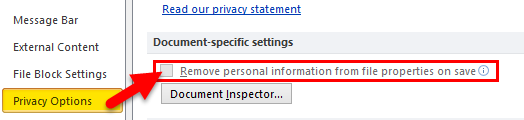
- Go to File > Options.

- Trust Center > Trust Centre Settings.
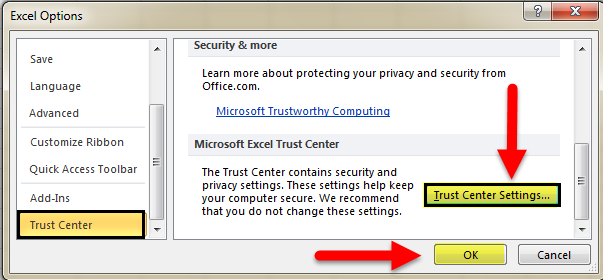
- Click on Privacy Options > Uncheck ” Remove personal information from file properties on save “.
Note: To do this, you need first to unshare the workbook and apply password settings.
Concept of controlling history changes in workbook:
If you want to share the Excel Workbook and control changes history, you can protect and share the workbook. Find the below steps to apply this function.
Step 1: Go to the Review Tab.
Step 2: Click on Protect Shared Workbook.

Step 3: It will open the dialog box. Click on the dialog box and enter your password.
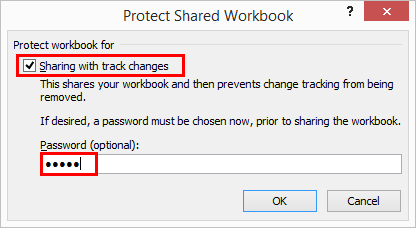
Step 4: Password is not mandatory, but it is always safe to protect and share to have control over the other person’s changes.
Protect Worksheet vs Protect Shared Workbook
- Protecting the worksheet is nothing, but you do not authorize the user except specific cells.
- Protect Shared Workbook means that you just turn off the option of tracking changes to the option of tracking changes in the shared workbook.
Merge Multiple Shared Workbooks:
- If many people or users make changes to the workbook, you can work together and merge with Excel Compare & Merge.
- Finally, you receive all the shared workbooks, save all the workbooks in a single folder. After that, select the Compare & Merge Workbooks option and individually select the workbook you want to compare and merge.
Unshare & Remove Users From Shared Workbooks:
- If you want to unshare and remove users at any point in time, you can do this.
- In order to unshare the workbook, you can go to REVIEW and click on Share Workbook.

- Now uncheck the option of Allow Changes by more than one user at the same time.
- In order to remove users in the same window, select the user you want to remove and click on the remove user option.
Things to Remember
- While performing in the Share Excel Workbook, always protect the workbook from controlling the track changes option.
- Protect Worksheet and Protect Shared Workbooks are both different from each other.
- You can select which changes you want to apply or remove at any point in time.
- It is a feature that automatically adjusts the width or height of a cell. The easiest way to adjust a column is to use the Share Excel Workbook.
Recommended Articles
This has been a guide to Share Excel Workbook. Here we discuss how to use Share Excel Workbook along with practical examples and a downloadable excel template. You can also go through our other suggested articles to learn more –
- Unprotect Excel Workbook
- Protect Excel Workbook
- VBA Workbook
- VBA Workbook Open
This Excel tutorial explains how to use Share Workbook function to allow multiple users to open the workbook at the same time.
Share Workbook function allows multiple users to open the workbook at the same time.
Assume that we have a staff list workbook that is placed in the network share drive.

Click on REVIEW > Share Workbook
Check the box “Allow changes by more than one user at the same time. This also allows workbook merging” > OK
Now you can see the workbook name has [Shared] in the suffix
Modify Share Workbook by others
Lets say the computer we just used to share workbook is called Workstation1, now we are going to open the workbook from another network computer called Workstation2.
Delete row 2 (Mary), modify Peter’s salary, add one more row of data for Joe in the last row. Save the workbook.
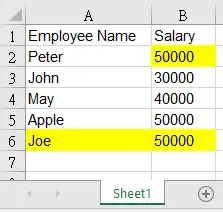
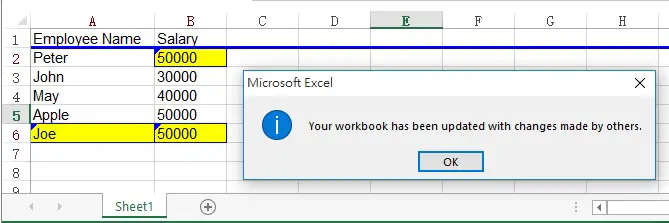
Go back to workstation1, save the workbook, now you can see the workbook is updated with values changed by workstation2. Changes are also highlighted in blue color with comments inserted.
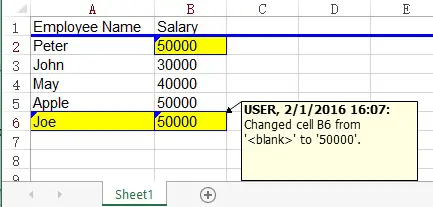
Review changes of Share Workbook made by others
Hover the mouse over the comments to see the old value and new value change.
Click on REVIEW > Track Changes > Accept/Reject Changes
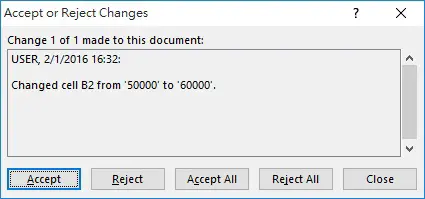
Click on Accept to accept the change the those highlighted changes will be gone.
Click on Reject to change back to the original value.
If you cannot see the highlighted changes or you want to see the historical changes, click on REVIEW > Track Changes > Highlight Changes
Now you can see the previous changes again
Other options of Share Workbook
Click on REVIEW > Shareworkbook
You can see who are currently opening the workbook. — USER is workstation2 in our case.
You can click on Remove User to kick the user out of the share workbook. Once the user being kicked save the workbook, a notification will pop up telling them no changes will be made to the the share workbook and suggest them to save the workbook as another file.
Click on the Advanced tab to see how you would like to keep the change history, and also how to deal with conflicting changes when users edit on the same cells.

Conflicting Changes for option “Ask me which changes win”
Lets say Workstation1 changes B4 value to 100000, then save the workbook. Then Workstation2 changes the value to 200000, save the workbook, a Windows will pop up in Workstation2 asking if you want to kept your change or accept other’s change.
Stop Share Workbook
Click on REVIEW > Shareworkbook > uncheck the box > OK
Disconnected from Share Workbook
No matter whether you are disconnected due to network issue or being kicked out, in that case you need to know what changes you have made but not updated in the Share Workbook.
Read my another post to compare workbook in order to find out the updates you need to move to the Share Workbook.
Excel VBA compare worksheets
Excel Compare Worksheets using Compare File
Features not supported in Share Workbook
I refer to the Microsoft documentation in the below section.
Not all features are supported in a shared workbook. If you want to include any of the following features, you should add them before you save the workbook as a shared workbook: merged cells, conditional formats, data validation, charts, pictures, objects including drawing objects, hyperlinks, scenarios, outlines, subtotals, data tables, PivotTable reports, workbook and worksheet protection, and macros. You cannot make changes to these features after you share the workbook.
Features that are not supported in a shared workbook
| In a shared workbook, you cannot | But you may be able to do the following |
| Create an Excel table | None |
| Insert or delete blocks of cells | You can insert entire rows and columns. |
| Delete worksheets | None |
| Merge cells or split merged cells | None |
| Add or change conditional formats | Existing conditional formats continue to appear as cell values change, but you can’t change these formats or redefine the conditions. |
| Add or change data validation | Cells continue to be validated when you type new values, but you can’t change existing data validation settings. |
| Create or change charts or PivotChart reports | You can view existing charts and reports. |
| Insert or change pictures or other objects | You can view existing pictures and objects. |
| Insert or change hyperlinks | Existing hyperlinks continue to work. |
| Use drawing tools | You can view existing drawings and graphics. |
| Assign, change, or remove passwords | Existing passwords remain in effect. |
| Protect or unprotect worksheets or the workbook | Existing protection remains in effect. |
| Create, change, or view scenarios | None |
| Group or outline data | You can continue to use existing outlines. |
| Insert automatic subtotals | You can view existing subtotals. |
| Create data tables | You can view existing data tables. |
| Create or change PivotTable reports | You can view existing reports. |
| Write, record, change, view, or assign macros | You can run existing macros that don’t access unavailable features. You can record shared workbook operations into a macro stored in another nonshared workbook. |
| Add or change Microsoft Excel 4 dialog sheets | None |
| Change or delete array formulas | Existing array formulas continue to calculate correctly. |
| Use a data form to add new data | You can use a data form to find a record. |
Work with XML data, including:
|
None |