
1. Microsoft Word: Working with Tables. A table is made up of rows and columns. The intersection of a row and column is called a cell.
Contents
- 1 How do you find a cell in Word?
- 2 What is row and column in MS Word?
- 3 What is the cells address?
- 4 Does cell contain text?
- 5 How many columns in MS Excel?
- 6 How do I split a cell in Word?
- 7 How many columns insert in MS Word?
- 8 What is the difference between cell and cell address?
- 9 What is a cell reference class 9?
- 10 What is cell pointer computer?
- 11 What does a cell contains?
- 12 How do I write if a cell contains text in Excel?
- 13 How do I count cells with text?
- 14 What is a cell in Excel?
- 15 What is the name of last cell address?
- 16 How many cell in MS Excel?
- 17 What is merge cells in Word?
- 18 What is merging of cells?
- 19 How do I remove a split cell in Word?
- 20 How text is deleted in MS Word?
How do you find a cell in Word?
Find cells that contain text
Select the range of cells that you want to search. To search the entire worksheet, click any cell. On the Home tab, in the Editing group, click Find & Select, and then click Find.
What is row and column in MS Word?
As discussed in the previous chapter, a table is a structure of vertical columns and horizontal rows with a cell at every intersection. A Word table can contain as many as 63 columns but the number of rows is unlimited. This chapter will teach you how to add and delete rows and columns in a table.
What is the cells address?
A cell reference, or cell address, is an alphanumeric value used to identify a specific cell in a spreadsheet. Each cell address contains ‘one or more letters’ followed by a number. The letter or letters identify the column and the number represents the row.
Does cell contain text?
To check if a cell contains specific text, use ISNUMBER and SEARCH in Excel. There’s no CONTAINS function in Excel. 1. To find the position of a substring in a text string, use the SEARCH function.
How many columns in MS Excel?
16,384 columns
Worksheet and workbook specifications and limits
| Feature | Maximum limit |
|---|---|
| Total number of rows and columns on a worksheet | 1,048,576 rows by 16,384 columns |
| Column width | 255 characters |
| Row height | 409 points |
| Page breaks | 1,026 horizontal and vertical |
How do I split a cell in Word?
Splitting Cells: Quick Menu Option
- Select the cell you want to split.
- Right click within the selected cell » select Split Cells… The Split Cells dialog box appears.
- In the Number of columns and/or Number of rows boxes, type or use the nudge buttons to select the desired number of rows and/or columns.
- Click OK.
How many columns insert in MS Word?
In Microsoft Word you can insert a table with up to 63 columns, that is the limit to the number of columns allowed in a Word document.
What is the difference between cell and cell address?
A cell is a single box in the excel spreadsheet which has only one row and one column address. In Excel, the rows are listed as numbers and the columns are named as letters.For example, if we select a 3×3 area in excel starting from the cell B2, the address of the cell range will be shown as B2:D4.
What is a cell reference class 9?
Cell Reference
A reference identifies a cell or a range of cells on a worksheet and tells MS Excel where to look for value or data to be used in a formula. Using reference, we can use data present in different parts of a worksheet or on a different worksheet or another workbook.
What is cell pointer computer?
[′sel ‚pȯint·ər] (computer science) A rectangular highlight that indicates the active cell in a spreadsheet program.
What does a cell contains?
Every cell consists of a cytoplasm enclosed within a membrane, which contains many biomolecules such as proteins and nucleic acids. Most plant and animal cells are only visible under a light microscope, with dimensions between 1 and 100 micrometres.
How do I write if a cell contains text in Excel?
Check for text
- To check if a cell contains text, select the output cell, and use the following formula: =IF(ISTEXT(cell), value_to_return, “”).
- For our example, the cell we want to check is A2, and the return value will be Yes.
How do I count cells with text?
How to Count Cells With Text in Excel 365
- Open the “Excel spreadsheet” you wish to examine.
- Click on an “empty cell” to type the formula.
- In the empty cell, type: “ =COUNTIF (range, criteria) .” This formula counts the number of cells with text in them from within your specified cell range.
Cells are the boxes you see in the grid of an Excel worksheet, like this one. Each cell is identified on a worksheet by its reference, the column letter and row number that intersect at the cell’s location. This cell is in column D and row 5, so it is cell D5. The column always comes first in a cell reference.
What is the name of last cell address?
Answer: The intersection of row 1048576 and column XFD is called XFD1048576.
How many cell in MS Excel?
NOTE: An Excel workbook can contain several worksheets.
The specifications for Excel Worksheet current versions include: Number of Rows per Worksheet: 1,048,576. Number of Rows per Worksheet: 16,384. Total cells per Worksheet: 17,179,869,184.
What is merge cells in Word?
Merge cells
You can combine two or more table cells located in the same row or column into a single cell. For example, you can merge several cells horizontally to create a table heading that spans several columns. Select the cells that you want to merge.
What is merging of cells?
Merging combines two or more cells to create a new, larger cell. This is a great way to create a label that spans several columns. For example, here cells A1, B1, and C1 were merged to create the label “Monthly Sales” to describe the information in rows 2 through 7.
How do I remove a split cell in Word?
Select the cell contents that you want to delete, and then press Delete on the keyboard. Note: When you delete the contents of a cell, you do not delete the cell. To delete the cell, you must merge table cells (as described in a section above) or delete the row or column.
How text is deleted in MS Word?
Place the cursor next to the text then press Backspace key. Place the cursor to the left of the text then press Delete key. Select the text and press the Backspace or Delete key.
In this chapter, we’ll talk about How to add rows and columns in MS Word. As we talked about in the last chapter, a table is made up of columns on the left and rows on the right, with a cell at each intersection. This chapter will show you how to add and remove rows and columns from a table.
Table of contents
- What is row and column in MS Word?
- How To Add Rows and Columns in MS Word
- Add Table Rows Using Tab
- Add a column to the table
- Use the Ribbon Menu to Add Rows or Columns
- Use Delete Key to Remove Rows and Columns
- Summary
What is row and column in MS Word?
A Word table can have up to 63 columns in a Word document. This is the maximum number of columns that can be in a Word document. In addition, you can have as many rows as you want. Word Document, specifically, allows you to put 32, 767 rows in one table.
The following are the simple steps to add rows to a table in a word document. Once you create a table in a Word document, you will be able to add additional rows to your table based on your requirements.
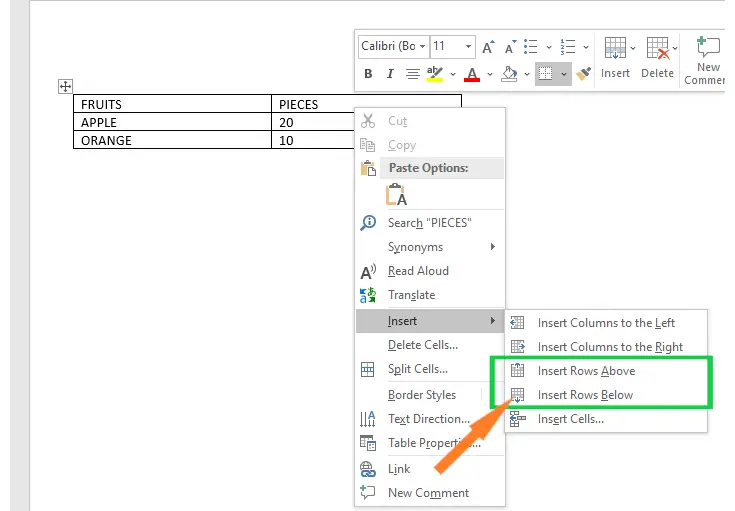
- Step 1: Place cursor in the table where you want to add a row.
- Step 2: Right-click on the selected area, the following dialog box will appear on the screen. Click on the drop-down menu associated with the Insert button.
Click on the Insert Rows Above option to add a row above the selected row.
Click on the Insert Rows Below option to add a row below the selected row.
- The screenshot below shows that a new row is added to the table.

Add Table Rows Using Tab
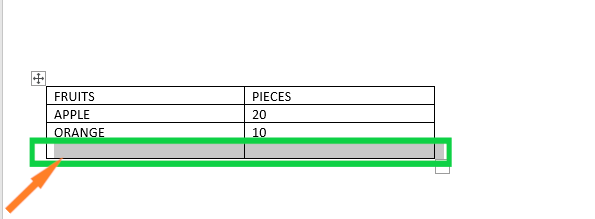
Adding rows to your table is easiest if you put your cursor in the cell in the bottom-right corner of your table and then press Tab on your keyboard.
This will add a new row. When you want to add a row, you can choose the cell at the bottom right and press Tab again. If you choose another cell and press Tab, the cursor will move to the next cell. A new row is only automatically added to the last cell.
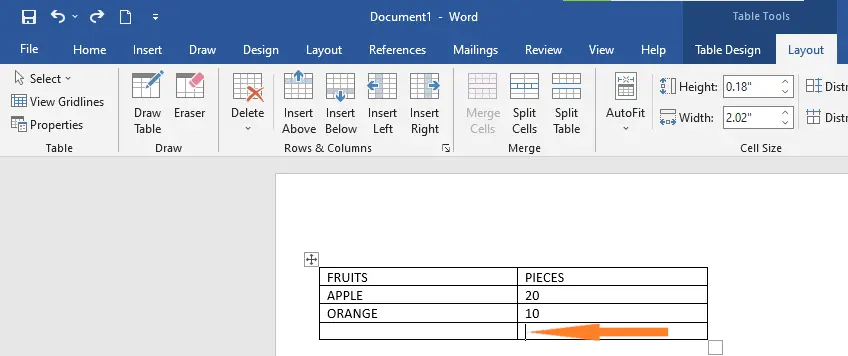
Add a column to the table
Adding more columns to a Word document is not hard for you to do. To add a column to the table, follow the steps below.
Step 1: Place the cursor where you want to add a column to the table.
Step 2: Right-click on the table, a list of options will show up. Click the drop-down arrow next to the Insert icon.
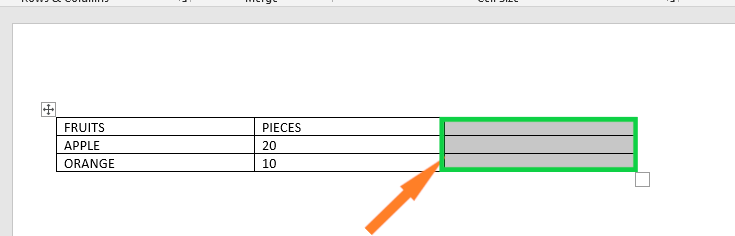
- Click on the Insert Columns to the Left to add the column left side of the table.
- Click on the Insert Column to the Right to add the column right side of the table.

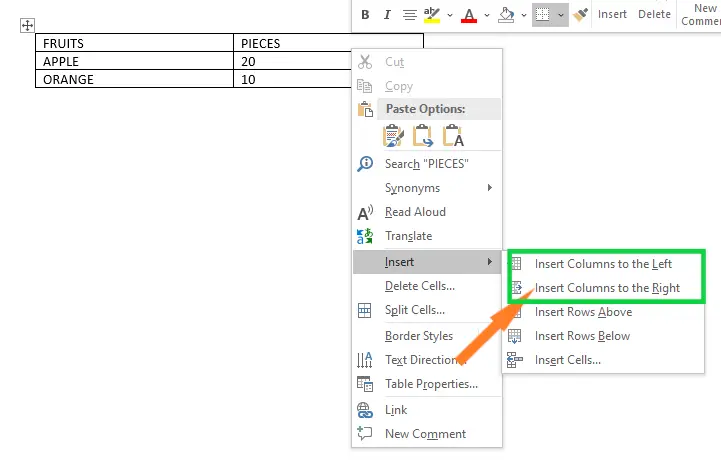
- Step 3: The screenshot below shows that column is added to the table.

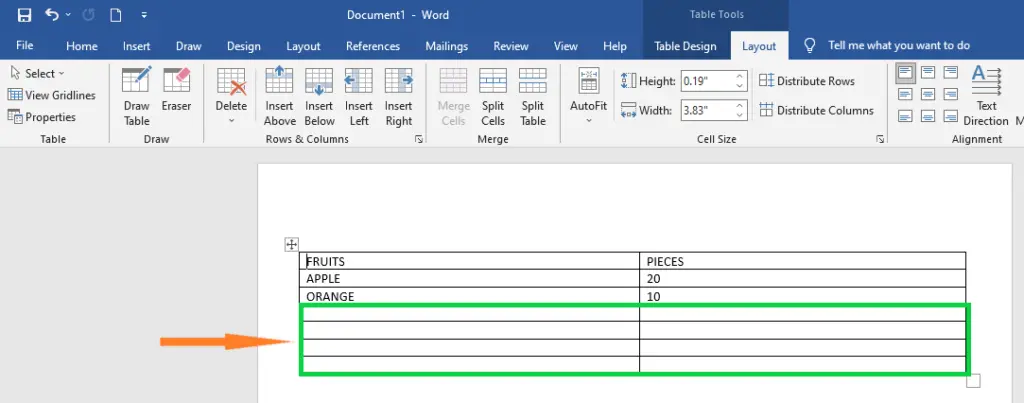
Use the Ribbon Menu to Add Rows or Columns
If you have a table in a Word document, you can use the ribbon menu to see more ways to add rows and columns.
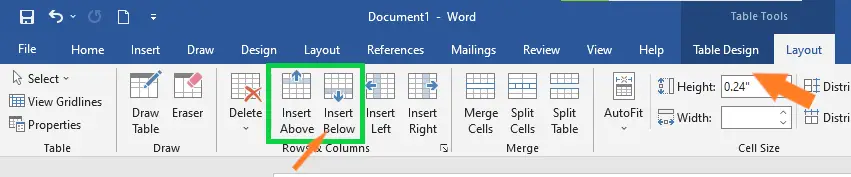
Use the Layout tab in the top ribbon menu to get to these options. The only thing that’s not clear is why there are two tabs called Layout in the menu bar. You need to click the “Layout” tab, which is next to “Table Design” on the right.

When you choose this, you’ll see a list of table-related options here. Since our goal is to add rows and columns, we’ll pay attention to the “Rows & Columns” command group.

If you want to add a row above the cell you’ve chosen in your Microsoft Word table, click “Insert Above.” To add a row below the cell you’ve chosen, click “Insert Below.” Here, we will add a row to the bottom of the cell.
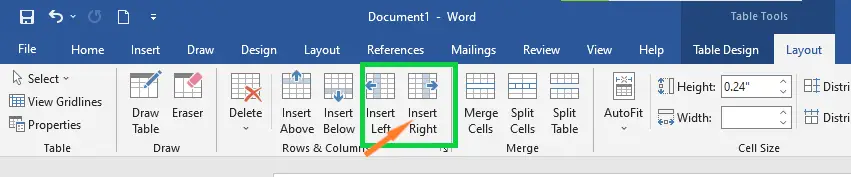
You can also quickly add columns with the buttons here. If you click “Insert Right,” a column will be added to the right of the cell. In the same way, “Insert Left” will add a column to the left of the cell that is currently selected. In our example, we are going to add a column to the right.
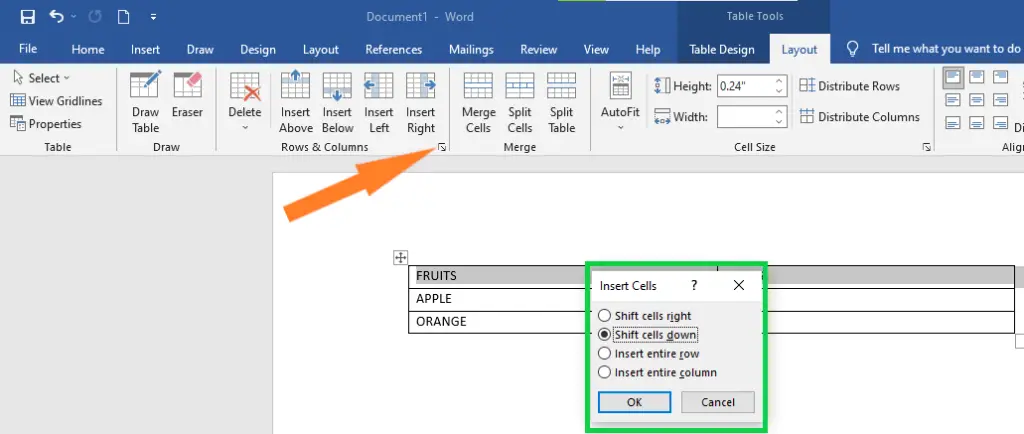
You can also click the arrow icon that’s to the right of the “Rows & Columns” command group to reveal a few more options.
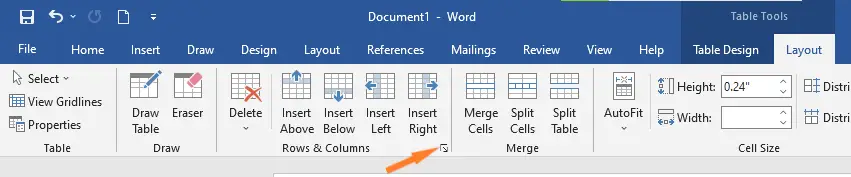
Here, you can add rows or columns by clicking “Insert entire row” or “Insert entire column.”
Use Delete Key to Remove Rows and Columns
The following steps are using Delete key to remove rows and columns in word document.
Summary
In the end, we’ve learned how to add rows and columns to a table in MS Word and what those terms mean. We also know that there are different ways to add rows and columns to a table, which we can use in our document to make it look more professional and presentable.
Meanwhile, if you want to learn more about working on tables, see the previous tutorial on how to create tables in Microsoft Word. In our format text and pages tutorial, you’ll also learn how to change page orientation and cover page etc. You can browse those guides if you are having a hard time formatting your documents.
We hope this tutorial helps you as you format your documents in MS Word.
PREVIOUS
NEXT
Last Update: Jan 03, 2023
This is a question our experts keep getting from time to time. Now, we have got the complete detailed explanation and answer for everyone, who is interested!
Asked by: Dr. Floyd Berge PhD
Score: 5/5
(66 votes)
Rows in the document model of RadSpreadProcessing are groups of cells that are on the same horizontal line. Each row is identified by a number. … Similarly, a column is a group of cells that are vertically stacked and appear on the same vertical line.
What is the definition of row and column?
Rows are a group of cells arranged horizontally to provide uniformity. … Columns are a group of cells aligned vertically, and they run from top to bottom.
What is row and column in short?
Column. A row is a series of data banks put out horizontally in a table or spreadsheet. A column is a vertical series of cells in a chart, table, or spreadsheet. Rows go across left to right. Columns are arranged from up to down.
What do you call columns or rows?
In spreadsheets specifically, a subset of the sheet is often called a range. Rows and columns are almost always just called «rows and columns», though.
How do rows look like?
With a keyboard, a row is a series of keys going horizontally from the left-side to the right-side of the keyboard. … For example, in the picture below, the row headers (row numbers) are numbered 1, 2, 3, 4, 5, etc. Row 16 is highlighted in red and cell D8 (on row  is the selected cell.
35 related questions found
How do you identify rows and columns?
Key Differences
- Rows are the horizontal lines in the worksheet, and columns are the vertical lines in the worksheet.
- In the worksheet, the total rows are 10,48,576, while the total columns are 16,384.
- In the worksheet, rows are ranging from 1 to 1,048,576, while columns are ranging from A to XFD.
What is a column in math?
An arrangement of numbers, shapes or objects, one above the other. A rectangle which has length, longer than width. Math Games for Kids.
What do you call a row of data?
In the context of a relational database, a row—also called a tuple—represents a single, implicitly structured data item in a table. In simple terms, a database table can be thought of as consisting of rows and columns. … For example, in a table that represents companies, each row would represent a single company.
What is a column writing?
A column is a recurring piece or article in a newspaper, magazine or other publication, where a writer expresses their own opinion in few columns allotted to them by the newspaper organisation. Columns are written by columnists.
What is a column in a table?
In the context of relational databases, a column is a set of data values, all of a single type, in a table. Columns define the data in a table, while rows populate data into the table. Most databases allow columns to contain complex data like images, whole documents or even video clips.
What is a column in Computer?
1. A column is a vertical series of cells in a chart, table, or spreadsheet. Below is an example of a Microsoft Excel spreadsheet with column headers (column letter) A, B, C, D, E, F, G, and H. As you can see in the image, the last column H is the highlighted column in red and the selected cell D8 is in the D column.
What is row () in Excel?
The ROWS Function is an Excel Lookup/Reference function. … The function is used to look up and provide the number of rows in each reference or array. Thus, the function, after receiving an Excel range, will return the number of rows that are contained within that range.
What is a column in Word?
Essential to formatting many documents, columns help break up the layout of a page full of text. You can set columns just about any way you like with the ability to specify the number, size, and borders. The following articles explain how to do that and more with columns in a Word document.
What is row and column in MS Word?
As discussed in the previous chapter, a table is a structure of vertical columns and horizontal rows with a cell at every intersection. … A Word table can contain as many as 63 columns but the number of rows is unlimited.
What is a column called in a database table?
And within a table, each row represents a group of related data values. A row, or record, is also known as a tuple. The columns in a table is a field and is also referred to as an attribute. You can also think of it this way: an attribute is used to define the record and a record contains a set of attributes.
Are rows called records?
Each row in a database table represents one instance of the type of object described in that table. A row is also called a record.
What are the 3 types of columns?
The three major classical orders are Doric, Ionic, and Corinthian. The orders describe the form and decoration of Greek and later Roman columns, and continue to be widely used in architecture today. The Doric order is the simplest and shortest, with no decorative foot, vertical fluting, and a flared capital.
What is an example of a column?
The definition of a column is a vertical arrangement of something, a regular article in a paper, magazine or website, or a structure that holds something up. … An example of column is a weekly recipe article. An example of column is a pillar in the front of a building.
What is the 3 column method?
The 3-Column note-taking method gives you space for your ideas, thoughts, observations… Column 1 — main subjects or topics from the text or lecture. Column 2 — details you learned from reading the text, research, or during the lecture. Column 3 — your opinions, observations, thoughts, etc.
Is column up and down?
Columns run vertically, up and down. … Rows, then, are the opposite of columns and run horizontally.
What is the grid level column and rows?
We define rows and columns on our grid with the grid-template-columns and grid-template-rows properties. These define grid tracks. A grid track is the space between any two lines on the grid. In the below image you can see a track highlighted – this is the first row track in our grid.
Which is the grid Labelled columns and rows?
A worksheet is a grid with labeled columns and rows.
What comes first in a matrix rows or columns?
Matrix Definition
By convention, rows are listed first; and columns, second. Thus, we would say that the dimension (or order) of the above matrix is 3 x 4, meaning that it has 3 rows and 4 columns. Numbers that appear in the rows and columns of a matrix are called elements of the matrix.
What is the difference between cell and column?
A cell is the intersection of a row and a column—in other words, where a row and column meet. Columns are identified by letters (A, B, C), while rows are identified by numbers (1, 2, 3). Each cell has its own name—or cell address—based on its column and row.
In this chapter, we will discuss how to work with rows and columns in Word 2010. As discussed in the previous chapter, a table is a structure of vertical columns and horizontal rows with a cell at every intersection. A Word table can contain as many as 63 columns but the number of rows is unlimited. This chapter will teach you how to add and delete rows and columns in a table.
Add a Row
Following are the simple steps to add rows in a table of a word document.
Step 1 − Click a row where you want to add an additional row and then click the Layout tab; it will show the following screen.
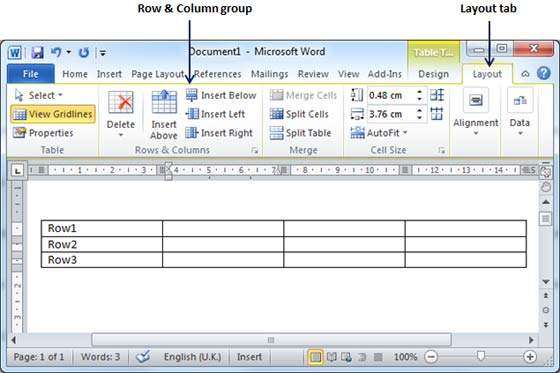
Step 2 − Now use the Row & Column group of buttons to add any row below or above to the selected row. If you click the Insert Below button, it will add a row just below the selected row as follows.
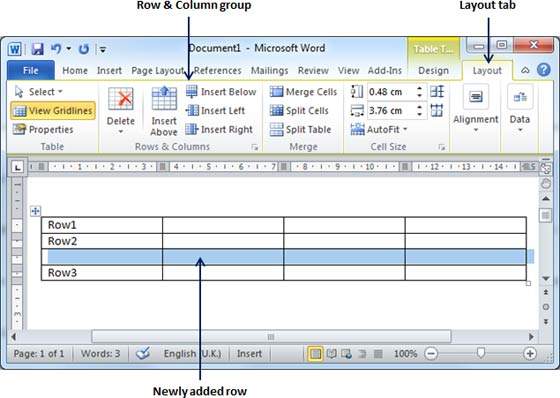
If you click the Insert Above button, it will add a row just above the selected row.
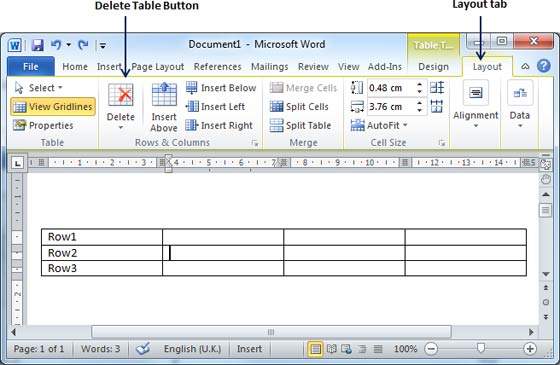
Delete a Row
The following steps will help you delete rows from a table of a Word document.
Step 1 − Click a row which you want to delete from the table and then click the Layout tab; it will show the following screen.
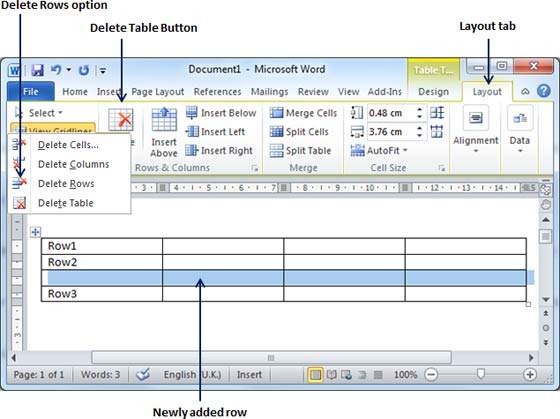
Step 2 − Click the Layout tab, and then click the Delete Rows option under the Delete Table Button to delete the selected row.
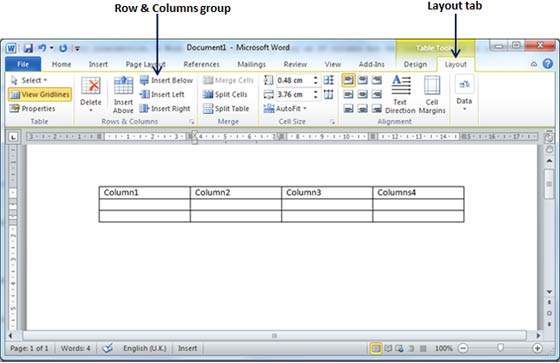
Add a Column
The following steps will help you add columns in a table of a Word document.
Step 1 − Click a column where you want to add an additional column and then click the Layout tab; it will show the following screen.
Step 2 − Now use the Row & Column group of buttons to add any column to the left or right of the selected column. If you click the Insert Left button, it will add a column just left to the selected column as follows.
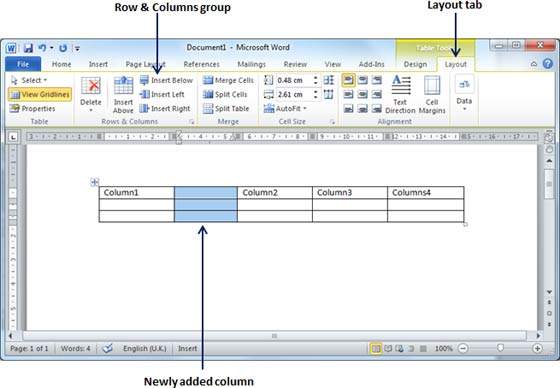
If you click the Insert Right button, it will add a column just next to the selected column.
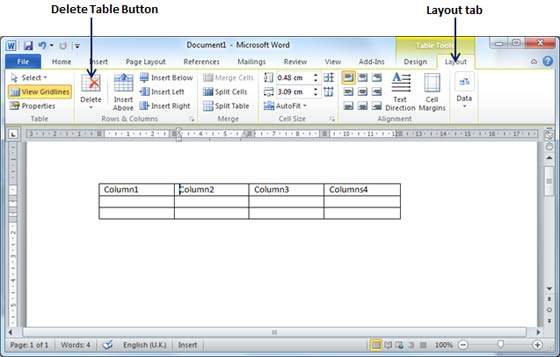
Delete a Column
Following are the simple steps to delete columns from a table of a word document.
Step 1 − Click a column which you want to delete from the table and then click the Layout tab; it will show the following screen.
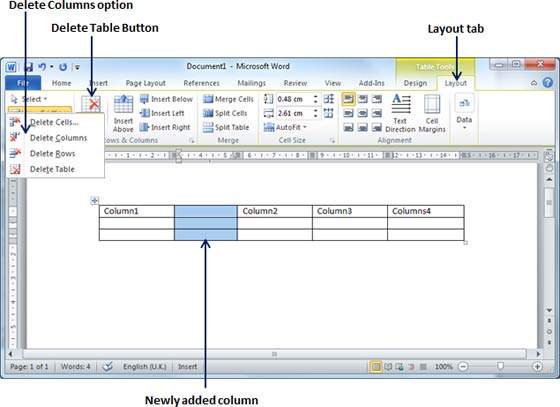
Step 2 − Click the Layout tab, and click the Delete Column option under the Delete Table Button to delete the selected column.

In this lesson, we’re going to delve into tables, which are a huge part of laying out well formatted documents. After we discuss tables, we’ll cover some other controls that will help round out your formatting prowess, including adding links, using symbols, creating math equations, and quite a bit more!
By now, you should be very well acquainted with getting your documents up to a level where you can adjust the tabbing and indenting, paragraph alignments, line spacing, and create quick, customized lists. If you need a refresher of what we’ve covered so far, you should check out Lesson 1 and Lesson 2 so you can bring yourself up to speed.
One of the most common formatting elements you will use in Microsoft Word are tables, so much so that it’s probably a surprise we aren’t covering them until now!
Tables are a tried-and-true method of presenting data in rows and columns. They are very simple to insert and manipulate in Word. When you click on the “Tables” button on the “Insert” tab, you’re given several options.

Here you see a grid that allows you to quickly spec out a table but you can also insert, draw, or pick from some predefined “Quick Tables”.
The fast way is to simply trace out the table you want using the provided grid. In the screenshot, you see we trace out a 6 x 5 table, which is previewed in the document.
With your table now placed into your document, you can set out about formatting it, which we’ll cover shortly.
Insert Table
Secondly, you can “Insert Table,” which means you just input the number of columns and rows and how you want the column to “AutoFit.” If you choose fixed column width, you can select “auto” or you can assign a size. Alternatively, you can AutoFit columns to fit the contents, or you can have the content AutoFit to the window.
Finally, if you intend to reproduce the table or you use that size frequently, you can have the “Insert Table” dialog remember those dimensions for new tables.
Draw Table
When you draw a table, the cursor is changed to a pencil and you can “draw” out the column and rows. In this way you can size the table to your liking.
Once you draw your first cell, you can then draw further cells, and create the table that is more based on how you want it to look than necessarily what it requires.
Convert Text to Table
Let’s imagine you have a bunch of text and numbers, and you realize that it would be easier to read if it were in neat columns and rows. Not to fear, text to table will allow you to quickly and easily convert all that data into a table that you can then format to your heart’s content.
So how does this work? Simply, when you want to convert a section of your document to a table, you select the section using your mouse pointer and then select “Convert Text to Table.” The resulting dialog box allows you to choose how many columns you want.
The number of rows will be automatically determined by line breaks, so for example, if you have a block of text divided with flour line breaks, your table will have four rows.
Columns are determined by commas, tabs, paragraph breaks, or another symbol you can manually assign.
Quick Tables
Quick tables are fairly easy to reason out. Let’s say you want to insert a quick calendar, matrix, or a tabular list. You can also create your own table and save it to the list for later, quick use. Simply select the table you want to save, and select “Save Selection to Quick Tables Gallery.”
There’s not a whole lot to master here. Keep in mind, when you insert a quick table, you can then edit and format as you would any table that you created from scratch. And, on that note, let’s actually dive into all that formatting information we’ve been alluding to throughout this lesson.
Formatting Tables
On the Ribbon, the “Table Tools” tabs are contextual tabs that appears whenever you create or click on a table. The functions found here give you an easier visual way of quickly manipulating tables where you might otherwise use right-click options.
The “Table Tools” are divided into two tabs. “Layout” (pictured above), which lets you add and remove columns, adjust height and width, and text alignment. Many of these controls can be accessed directly from the right-click context menu, but it’s nice to have all your options arrayed before you.
Note though, the context menu you get, will depend on where you click. If you click on the little table control in the upper-left corner:
You get a larger variety of tools at your disposal. Note also, you can delete a table easily this way:
Back to the Ribbon, on the far right side of the “Layout” tab, you’ll find some handy controls for controlling your “Alignment” and “Data.”
So, for example, if you want your headers to be perfectly centered within their cells, while having your data cells left-justified, you’d simply select the cells to affected and click the alignment you desire.
You can also “Sort” cell data, insert formulas, convert your table to plain text, and repeat header rows. The last option is useful if you have a table that spans multiple pages, you can designate “header rows,” which will persist as you scroll through the table. This is useful for keep track of what column is what in long tables.
The “Design” tab by contrast is all about how your table(s) appear.
Note when you click on the scrollbar in “Table Styles” a larger menu appears granting you greater built-in options.
At the bottom of this menu, you can modify your table’s style if the current selection of tables doesn’t suit you. When you make changes, they will be previewed so you can see them before you commit.
While formatting or modifying a table, if the built-in selections aren’t close to what you want, you may just want to start from scratch. In this case, you can you the “New Style” dialog, which will be allow you to build a new table style based on current table styles.
There’s little difference to this dialog and the modify dialog except that modifying is based off an existing table design.
In the end, formatting your tables is going to come down to what kind of data you’re presenting and personal preference. We suggest that if you want to fully master tables, you create a blank document and mess around to your heart’s content. We are certain you’ll be creating and formatting eye-catching data-sets in less than it takes to say “columns and rows!”
Excel Spreadsheet
You can actually create an Excel spreadsheet table in Word. This will act and function just like a regular Excel spreadsheet. So you can copy and paste existing spreadsheet values in, or make a new one with Excel formulas and functions.
Note, if you want to learn more about Excel formulas and functions, check out our How-to Geek School series on Excel Formulas and Functions!
Once you have inserted or filled in the spreadsheet with the values, it will appear similar to a table though it is technically known as a “workbook object.”
With your data inserted and table created, you can right-click on it and do some basic formatting like changing the borders and adjusting the shading, but it won’t be the same as formatting a traditional Word table.
Other Formatting Controls
On the right half of the Insert tab are some further formatting controls you should be aware of. Some of these may be of limited daily value to you, but we think it’s important to know about them in case you ever have need for them.
Links
Hyperlinks, bookmarks, and cross-references are all classified as “Links” on the “Insert” toolbar.
Hyperlinks allow you to link pieces of text to locations on your computer, network, or the Internet. You can also select your text, right-click and choose “Hyperlink” from the context menu. In the “Insert Hyperlink” dialog, paste or type your address in the provided space.
It doesn’t have to be an Internet URL either, it can simply refer to a location on your computer or another location in your document. Mostly though, you will probably want to refer to an Internet location, such as the best place on earth to get your geek fix!
Header, Footer, and Page Number
Headers and footers are useful for repeating the same piece of information at the top and/or bottom of each page, such as if you want to have the title of your book at the top of each page, or similarly, page numbers.
When you click on either the header or the footer button, you can choose from an assorted of predefined styles.
When you choose a style, the header or footer will open and the Ribbon will change to present you with special formatting options.
So you can type in your header or footer, and then decide where you want to position it, whether it’s the same across each page, and so on.
In the same vein, when you add page numbers, you can place it anywhere within a header or footer, picking from a pre-defined list of numbering styles.
If you want to “Format Page Numbers,” you’ll be presented with dialog box, which will allow you to change the number format, add chapter numbers, and dictate from where it starts.
Overall, the header and footer controls are quite easy to grasp and master. So, if you have an instructor who’s a bit old-fashioned and demands you include them in your paper, or you want the title of your book, or your name on every page, or simple page numbers – you should have no problem adding and manipulating them.
Equations
We’re not going to spend a great deal of time explaining the “Equation” functions in Word 2013. We’re guessing the vast majority of people using Word, will never have occasion to insert an equation into their documents.
That said, let’s explain the function exists in the first place. In Word, you can write a simple like “A=πr2” because you can insert the symbol for pi and then use superscript font to show radius squared.
However, if you want to write out anything more complicated than that, you’ll need to insert it using the “Equation” function. You can either select a pre-built equation from the dropdown list:
Alternatively, you can build your own by simply placing the cursor at your desired insertion point and clicking the “Equation” button, which will place something akin to an equation text box into your document.
Note, the Ribbon immediately changes when you insert an equation to the “Equation Tools,” which offers a wide array of math symbols and operators, so you don’t have to try to figure out how to do it on your own.
So, if you’re a bit of a math geek or you’re taking a class and need to write a paper on a mathematical theory, you can present it ϥώwith all the necessary equations to show your work.
Symbols
Symbols are characters that aren’t immediately found on your everyday, run-of-the-mill keyboard. For things like the copyright symbol and British Pounds, you need to insert the symbol using the “Symbols” function on the “Insert” tab.
Most recent and commonly-used symbols are displayed first, such as for foreign currencies (€, ₤, ¥), the aforementioned copyright symbol (©), and others. To access symbols beyond what is immediately displayed, click “More Symbols” at the bottom of the menu.
For example, if you want to write “façade” and using the cedilla (ç), you’d pick it from the “Latin” subset. Similarly, something like café with its acute accent, can be added using the “Symbol” dialog box.
Note that you can also insert foreign letters using shortcut keys. You can see which shortcut key is used for each symbol at the bottom of the “Symbol” dialog box.
If you want to change the shortcut (keep in mind, other symbols or functions might be mapped to other shortcuts), you can click the “Shortcut Key” button and change it to something else.
Note, that in the above instance, you’re not going to type “CTRL + ‘ + , + E” rather it’s “CTRL + ‘ + E.” The comma is simply there to tell you must first hold down the “CTRL” button, then press the apostrophe and “e” to insert an “é” in your document. Similarly, hold down “CTRL” plus comma and “c” to insert a “ç” and so on.
Coming up Next…
And so ends Lesson 3. We hope you enjoyed it and learned a thing or two. Knowing how to lay out tables in Word will give you a great deal of control over how you present data. Rather than simply having information in sentences or making lists, you can arrange it in neat rows and tables complete with customized colors and borders. The only limit is your creativity!
Moreover, if you’re going for a more published look and feel to your document, adding headers, footer, and page numbers is a great skill to have. Meanwhile, placing links in your documents will help readers navigate and read up on things you might otherwise have to explain with footnotes and such.
Tomorrow, in Lesson 4, we will dive into adding illustrations (such as pictures and shapes) to your documents, allowing you to create eye-popping layouts with tons of variety. You can even embed video for a true multimedia experience. We’ll end with how to add and use multiple languages, so you don’t want to miss out!
READ NEXT
- › Five Types of Phone Damage That Aren’t Covered by Your Free Warranty
- › Spotify Is Shutting Down Its Free Online Game
- › Save Hundreds on Elegoo’s New PHECDA Laser Engraver Through Kickstarter
- › Android’s Nearby Share Has (Unofficially) Arrived on Mac
- › How to Get a Refund on the PlayStation Store
- › This 64 GB Flash Drive From Samsung Is Just $8 Right Now