To prevent other users from accidentally or deliberately changing, moving, or deleting data in a worksheet, you can lock the cells on your Excel worksheet and then protect the sheet with a password. Say you own the team status report worksheet, where you want team members to add data in specific cells only and not be able to modify anything else. With worksheet protection, you can make only certain parts of the sheet editable and users will not be able to modify data in any other region in the sheet.
Important: Worksheet level protection is not intended as a security feature. It simply prevents users from modifying locked cells within the worksheet. Protecting a worksheet is not the same as protecting an Excel file or a workbook with a password. See below for more information:
-
To lock your file so that other users can’t open it, see Protect an Excel file.
-
To prevent users from adding, modifying, moving, copying, or hiding/unhiding sheets within a workbook, see Protect a workbook.
-
To know the difference between protecting your Excel file, workbook, or a worksheet see Protection and security in Excel.
The following sections describe how to protect and unprotect a worksheet in Excel for Windows.
Here’s what you can lock in an unprotected sheet:
-
Formulas: If you don’t want other users to see your formulas, you can hide them from being seen in cells or the Formula bar. For more information, see Display or hide formulas.
-
Ranges: You can enable users to work in specific ranges within a protected sheet. For more information, see Lock or unlock specific areas of a protected worksheet.
Note: ActiveX controls, form controls, shapes, charts, SmartArt, Sparklines, Slicers, Timelines, to name a few, are already locked when you add them to a spreadsheet. But the lock will work only when you enable sheet protection. See the subsequent section for more information on how to enable sheet protection.
Worksheet protection is a two-step process: the first step is to unlock cells that others can edit, and then you can protect the worksheet with or without a password.
Step 1: Unlock any cells that needs to be editable
-
In your Excel file, select the worksheet tab that you want to protect.
-
Select the cells that others can edit.
Tip: You can select multiple, non-contiguous cells by pressing Ctrl+Left-Click.
-
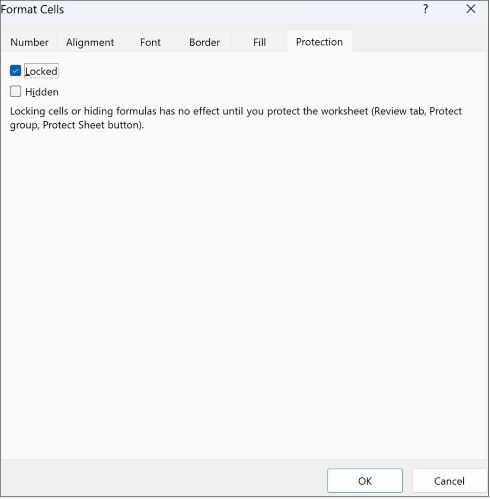
Right-click anywhere in the sheet and select Format Cells (or use Ctrl+1, or Command+1 on the Mac), and then go to the Protection tab and clear Locked.
Step 2: Protect the worksheet
Next, select the actions that users should be allowed to take on the sheet, such as insert or delete columns or rows, edit objects, sort, or use AutoFilter, to name a few. Additionally, you can also specify a password to lock your worksheet. A password prevents other people from removing the worksheet protection—it needs to be entered to unprotect the sheet.
Given below are the steps to protect your sheet.
-
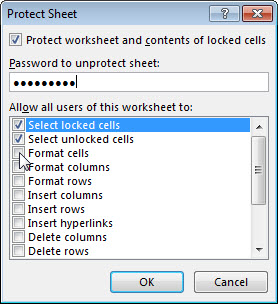
On the Review tab, click Protect Sheet.
-
In the Allow all users of this worksheet to list, select the elements you want people to be able to change.
Option
Allows users to
Select locked cells
Move the pointer to cells for which the Locked box is checked on the Protection tab of the Format Cells dialog box. By default, users are allowed to select locked cells.
Select unlocked cells
Move the pointer to cells for which the Locked box is unchecked on the Protection tab of the Format Cells dialog box. By default, users can select unlocked cells, and they can press the TAB key to move between the unlocked cells on a protected worksheet.
Format cells
Change any of the options in the Format Cells or Conditional Formatting dialog boxes. If you applied conditional formatting before you protected the worksheet, the formatting continues to change when a user enters a value that satisfies a different condition.
Format columns
Use any of the column formatting commands, including changing column width or hiding columns (Home tab, Cells group, Format button).
Format rows
Use any of the row formatting commands, including changing row height or hiding rows (Home tab, Cells group, Format button).
Insert columns
Insert columns.
Insert rows
Insert rows.
Insert hyperlinks
Insert new hyperlinks, even in unlocked cells.
Delete columns
Delete columns.
Note: If Delete columns is protected and Insert columns is not protected, a user can insert columns but cannot delete them.
Delete rows
Delete rows.
Note: If Delete rows is protected and Insert rows is not protected, a user can insert rows but cannot delete them.
Sort
Use any commands to sort data (Data tab, Sort & Filter group).
Note: Users can’t sort ranges that contain locked cells on a protected worksheet, regardless of this setting.
Use AutoFilter
Use the drop-down arrows to change the filter on ranges when AutoFilters are applied.
Note: Users cannot apply or remove AutoFilter on a protected worksheet, regardless of this setting.
Use PivotTable reports
Format, change the layout, refresh, or otherwise modify PivotTable reports, or create new reports.
Edit objects
Doing any of the following:
-
Make changes to graphic objects including maps, embedded charts, shapes, text boxes, and controls that you did not unlock before you protected the worksheet. For example, if a worksheet has a button that runs a macro, you can click the button to run the macro, but you cannot delete the button.
-
Make any changes, such as formatting, to an embedded chart. The chart continues to be updated when you change its source data.
-
Add or edit notes.
Edit scenarios
View scenarios that you have hidden, making changes to scenarios that you have prevented changes to, and deleting these scenarios. Users can change the values in the changing cells, if the cells are not protected, and add new scenarios.
-
-
Optionally, enter a password in the Password to unprotect sheet box and click OK. Reenter the password in the Confirm Password dialog box and click OK.
Important:
-
Use strong passwords that combine uppercase and lowercase letters, numbers, and symbols. Weak passwords don’t mix these elements. Passwords should be 8 or more characters in length. A passphrase that uses 14 or more characters is better.
-
It is critical that you remember your password. If you forget your password, Microsoft cannot retrieve it.
-
The Protect Sheet option on the ribbon changes to Unprotect Sheet when a sheet is protected. To view this option, click the Review tab on the ribbon, and in Changes, see Unprotect Sheet.

To unprotect a sheet, follow these steps:
-
Go to the worksheet you want to unprotect.
-
Go to File > Info > Protect > Unprotect Sheet, or from the Review tab > Changes > Unprotect Sheet.
-
If the sheet is protected with a password, then enter the password in the Unprotect Sheet dialog box and click OK.
The following sections describe how to protect and unprotect a worksheet in Excel for the Web.
-
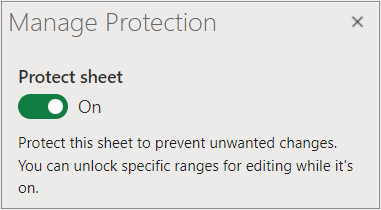
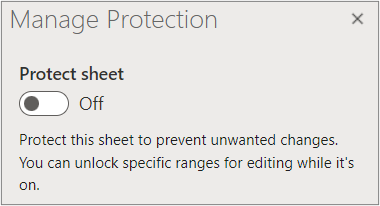
Select Review > Manage Protection.
-
To turn on protection, in the Manage Protection task pane, select Protect sheet.
Note Although you can selectively protect parts of the sheet by setting various options in the Options section, these settings only apply when the Protect sheet setting is on.
-
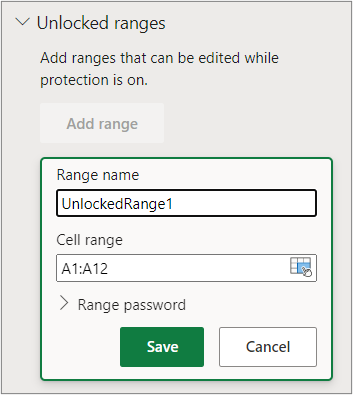
By default, the entire sheet is locked and protected. To unlock specific ranges, select Unlocked ranges, and then enter a range name and cell range. You can add more than one range.
-
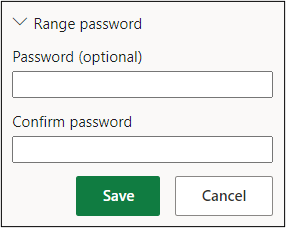
Optionally, to require a password to edit a range, select Range password, enter and confirm the password, and then select Save. Make sure sheet protection is turned on.
-
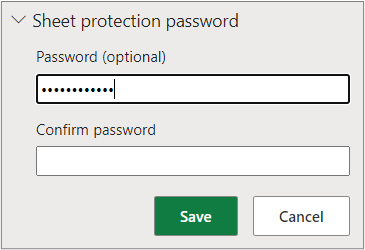
Optionally, to control the ability to edit protections for the entire sheet with a password, select Sheet protection password, enter and confirm the password, and then select Save.
Important-
Use strong passwords that combine uppercase and lowercase letters, numbers, and symbols. Weak passwords don’t mix these elements. Passwords should be 8 or more characters in length. Make sure the CAPS LOCK key is off and use correct capitalization. Passwords are case-sensitive.
-
It is critical that you remember your password. If you forget your password, Microsoft cannot retrieve it.
-
-
Optionally, if you want to selectively enable and disable specific sheet elements, select the Options section, and then select one or more options.
Option
Allows users to
Select locked cells
Move the pointer to cells for which the Locked box is checked on the Protection tab of the Format Cells dialog box. By default, users are allowed to select locked cells.
Select unlocked cells
Move the pointer to cells for which the Locked box is unchecked on the Protection tab of the Format Cells dialog box. By default, users can select unlocked cells, and they can press the TAB key to move between the unlocked cells on a protected worksheet.
Format cells
Change any of the options in the Font and Alignment groups of the Home tab.
Note If cell formatting and hidden properties were previously protected by using the Format Cells or Conditional Formatting dialog boxes, they remain protected, but you can only modify options in these dialog boxes by using Excel for Windows. If you applied conditional formatting before you protected the worksheet, the formatting continues to change when a user enters a value that satisfies a different condition.
Format columns
Use any of the column formatting commands, including changing column width or hiding columns (Home tab, Cells group, Format button).
Format rows
Use any of the row formatting commands, including changing row height or hiding rows (Home tab, Cells group, Format button).
Insert columns
Insert columns.
Insert rows
Insert rows.
Insert hyperlinks
Insert new hyperlinks, even in unlocked cells.
Delete columns
Delete columns.
Note: If Delete columns is protected and Insert columns is not protected, a user can insert columns but cannot delete them.
Delete rows
Delete rows.
Note: If Delete rows is protected and Insert rows is not protected, a user can insert rows but cannot delete them.
Sort
Use any commands to sort data (Data tab, Sort & Filter group).
Note: Users can’t sort ranges that contain locked cells on a protected worksheet, regardless of this setting.
Use AutoFilter
Use the drop-down arrows to change the filter on ranges when AutoFilters are applied.
Note: Users cannot apply or remove AutoFilter on a protected worksheet, regardless of this setting.
Use PivotTable reports
Format, change the layout, refresh, or otherwise modify PivotTable reports, or create new reports.
Edit objects
Doing any of the following:
-
Make changes to graphic objects including maps, embedded charts, shapes, text boxes, and controls that you did not unlock before you protected the worksheet. For example, if a worksheet has a button that runs a macro, you can click the button to run the macro, but you cannot delete the button.
-
Make any changes, such as formatting, to an embedded chart. The chart continues to be updated when you change its source data.
-
Add or edit notes.
Edit scenarios
View scenarios that you have hidden, making changes to scenarios that you have prevented changes to, and deleting these scenarios. Users can change the values in the changing cells, if the cells are not protected, and add new scenarios.
Notes
-
If you don’t want other users to see your formulas, you can hide them from being seen in cells or the Formula bar. For more information, see Display or hide formulas.
-
ActiveX controls, form controls, shapes, charts, SmartArt, Sparklines, Slicers, Timelines, and so on, are already locked when you add them to a spreadsheet. But the lock works only when you enable sheet protection. For more information, see Protect controls and linked cells on a worksheet.
-
There are two ways to unprotect a sheet, disable it or pause it.
Disable protection
-
Select Review > Manage Protection.
-
To turn off protection, In the Manage Protection task pane, turn off Protect sheet.
Pause protection
Pausing protection turns off protection for the current editing session while maintaining the protection for other users in the workbook. For example, you can pause protection to edit a locked range but maintain protection for other users.
-
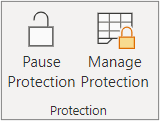
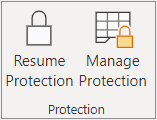
To pause sheet protection, select Review > Pause Protection.
Note If the sheet has a protection password, you must enter that password to pause protection.
-
To resume sheet protection, select Review > Resume Protection.
At the bottom of the sheet, the sheet tab displays a locked icon if the sheet is protected (Sheet1), and an unlocked icon if it is paused (Sheet2).
See Also
Protection and security in Excel
Protect an Excel file
Protect a workbook
Lock or unlock specific areas of a protected worksheet
Lock cells to protect them
Display or hide formulas
Protect controls and linked cells on a worksheet
Copy and paste in a protected worksheet
Video: Password protect workbooks and worksheets (Excel 2013)
Excel for Microsoft 365 Excel for Microsoft 365 for Mac Excel 2021 Excel 2021 for Mac Excel 2019 Excel 2019 for Mac Excel 2016 Excel 2016 for Mac Excel 2013 Excel 2010 Excel 2007 More…Less
Excel gives you the ability to protect your work, whether it’s to prevent someone from opening a workbook without a password, granting Read-Only access to a workbook, or even just protecting a worksheet so you don’t inadvertently delete any formulas. In this topic we’ll discuss the various ways you can utilize the primary options to protect and distribute your Excel files.
Warning:
-
If you forget or lose your password, Microsoft can’t retrieve it for you.
-
You should not assume that just because you protect a workbook or worksheet with a password that it is secure — you should always think twice before distributing Excel workbooks that could contain sensitive personal information like credit card numbers, Social Security Number, employee identification, to name a few.
-
Worksheet level protection is not intended as a security feature. It simply prevents users from modifying locked cells within the worksheet.
Following are the different options available for protecting your Excel data:
-
File-level: This refers to the ability to lock down your Excel file by specifying a password so that users can’t open or modify it. You have two choices here:
-
File encryption: When you choose this option, you specify a password and lock the Excel file. This prevents other users from opening the file. For more information, see Protect an Excel file.
-
Setting a password to open or modify a file: You specify a password to open or modify a file. Use this option when you need to give Read-only or edit access to different users. For more information, see Protect an Excel file.
-
Mark as Final: Use this option if you want to mark your Excel file as the final version and want to prevent any further changes by other users. For more information, see Add or remove protection in your document, workbook, or presentation.
-
Restrict Access: If your organization has permissions set up using Information Rights Management (IRM), you can apply any of the available IRM permissions to your document. For more information, see Add or remove protection in your document, workbook, or presentation.
-
Digital signature: You can add digital signatures to your Excel file. For more information, see Add or remove a digital signature in Office files.
Note: To add a digital signature, you need a valid certificate from a certificate authority (CA).
-
-
Workbook-level: You can lock the structure of your workbook by specifying a password. Locking the workbook structure prevents other users from adding, moving, deleting, hiding, and renaming worksheets. For more information on protecting workbooks, see Protect a workbook.
-
Worksheet-level: With sheet protection, you can control how a user can work within worksheets. You can specify what exactly a user can do within a sheet, thereby making sure that none of the important data in your worksheet are affected. For example, you might want a user to only add rows and columns, or only sort and use AutoFilter. Once sheet protection is enabled, you can protect other elements such as cells, ranges, formulas, and ActiveX or Form controls. For more information on protecting worksheets, see Protect a worksheet.
Which level of protection should I use?
-
To control the level of access users should have to an Excel file, use file-level protection. Let’s say you have a weekly status report of your team members in an Excel file. You don’t want anyone outside your team to be even able to open the file. There are two options available:
-
If you don’t want others to open your file: You can encrypt the Excel file, which is the most common technique used. This basically means you lock it with a password and nobody except you can open it.
-
If you want to enable Read-only or editing access to different users: Maybe, you want the managers in your team to be able to edit the weekly status report, but team members should only have Read-only access. You can protect the Excel file by specifying two passwords: one to open, and the other to modify. You can later share the appropriate passwords with the team depending on the access they should be given.
-
-
To control how users should work with worksheets inside a your workbook’s structure, use workbook-level protection. Let’s say your status report workbook has multiple worksheets, and each worksheet is named after a team member. You want to make sure each team member can add data to their own worksheet, but not be able to modify any of the worksheets in the workbook, whether it be adding a new worksheet, or moving worksheets around within the workbook.
-
To control how users should work within an individual worksheet, use worksheet-level protection. Let’s say each worksheet in your status report workbook contains data that is common to all worksheets, like header rows or a specific report layout, and you really don’t want anyone to change it. By protecting your worksheet, you can specify that users can only perform specific functions in a sheet. For example, you can give users the ability to enter data, but keep them from deleting rows or columns, or only insert hyperlinks or sort data.
You can use one or more levels of protection for your Excel data depending on your/your organization’s needs. You can choose to use all of the available options or a combination of options—it’s completely up to the level of security you want for your Excel data. For example, you may choose to encrypt a shared Excel file, as well as enable workbook and worksheet protection, while only using worksheet protection on a personal workbook just so you don’t accidentally delete any formulas.
Need more help?
You can always ask an expert in the Excel Tech Community or get support in the Answers community.
See Also
Protect an Excel file
Protect a workbook
Protect a worksheet
Need more help?
Want more options?
Explore subscription benefits, browse training courses, learn how to secure your device, and more.
Communities help you ask and answer questions, give feedback, and hear from experts with rich knowledge.
Содержание
- What is Protected View?
- Included in this article
- Why is my file opening in Protected View?
- How do I exit Protected View so that I can edit, save, or print?
- Exit Protected View and edit when the yellow Message Bar appears
- Exit Protected View and edit when the red Message Bar appears
- Why can’t I exit Protected View?
- A problem was detected with my file
- Why do I see this message?
- Can I edit the file?
- What type of files cause file-validation errors?
- I want to change my Protected View settings
- Protected View Trust Center settings explained
- I want to revoke trust from a document/documents that I’ve previously trusted to not open in Protected View
- What happens to add-ins in Protected View?
- What happens to cloud fonts in Protected View?
- How do I use Protected View with a screen reader?
- Protect a workbook
- Protect the workbook structure
- Protect the workbook structure
- Need more help?
What is Protected View?
Files from the Internet and from other potentially unsafe locations can contain viruses, worms, or other kinds of malware that can harm your computer. To help protect your computer, files from these potentially unsafe locations are opened as read only or in Protected View. By using Protected View, you can read a file, see its contents and enable editing while reducing the risks.
Note: If your machine has Application Guard for Microsoft 365 enabled, documents that previously opened in Protected View will now open in Application Guard for Microsoft 365.
Included in this article
Why is my file opening in Protected View?
Protected View is a read-only mode where most editing functions are disabled. There are several reasons why a file opens in Protected View:
The file was opened from an Internet location — When you see the message in Protected View that says «Be careful — files from the Internet can contain viruses. Unless you need to edit, it’s safer to stay in Protected View.», the file is being opened from the Internet. Files from the Internet can have viruses and other harmful content embedded in them. We recommend you only edit the document if you trust its contents.
The file was received as an Outlook attachment and your computer policy has defined the sender as unsafe — When you see the message in Protected View that says «Be careful — email attachments can contain viruses. Unless you need to edit, it’s safer to stay in Protected View.», the file was received from a potentially unsafe sender. We recommend you only edit the document if you trust its contents.
The file was opened from an unsafe location — When you see the message in Protected View that says «This file was opened from a potentially unsafe location. Click for more details.», the file was opened from a folder that is unsafe. An example of an unsafe location is your Temporary Internet Files folder. We recommend you only edit the document if you trust its contents.
The file is blocked by File Block — The following images are examples. Learn more about File Block
Editing isn’t allowed.
Editing is allowed, but not recommended unless you completely trust its contents.
File validation failure — When you see a message in Protected View that says » Microsoft 365 has detected a problem with this file. Editing it may harm your computer. Click for more details.», the file didn’t pass file validation. File validation scans file for security problems that can result from changes in the file structure.
The file was opened in Protected View by using the Open in Protected View option — When you see the message in Protected View that says «This file was opened in Protected View. Click for more details. «, you chose to open the file in Protected View. This can be done by using the Open in Protected View option:
1. Click File > Open.
2. On the Open dialog box, click the arrow next to the Open button.
3. From the list, click Open in Protected View.
The file was opened from someone else’s OneDrive storage— When you see the message in Protected View that says «Be careful — This file is from someone else’s OneDrive. Unless you trust this person and want to continue collaborating with them, it is safer to stay in Protected View.», you opened a document from a OneDrive folder other than your own, for example, when someone has shared a file in OneDrive with you. Such files may be untrusted and could beused to cause harm to your computer. We recommend you trust documents only if you trust the person to whom this OneDrive location belongs.
This functionality is currently only available in Microsoft 365 clients.
Once you click «Trust Documents From This Person» all subsequent documents shared from this OneDrive location will no longer open in Protected View.
Important: Administrators can customize the list of potentially unsafe locations to include additional folders they also consider unsafe.
How do I exit Protected View so that I can edit, save, or print?
If you must read the file, and don’t have to edit it, you can remain in Protected View. If you know the file is from a trustworthy source, and you want to edit, save, or print the file, you can exit Protected View. After you leave Protected View, you’ve effectively remove read only, and the file becomes a trusted document.
Exit Protected View and edit when the yellow Message Bar appears
On the Message Bar, click Enable Editing.
Exit Protected View and edit when the red Message Bar appears
Click File > Edit Anyway.
Caution: We recommend you only do this if the file’s source and content are trusted by you.
Why can’t I exit Protected View?
If you can’t exit Protected View, it’s possible that your systems administrator has rules established that prevent leaving Protected View. Speak to your administrator to determine whether such rules have been made.
A problem was detected with my file
Microsoft 365 found a problem with your file and it might be a security risk. Opening the file in Protected View helps protect your computer and we recommend that you edit the file only if you trust the person who sent it to you, and if the file doesn’t look suspicious.
Why do I see this message?
This message can appear for a malicious file, which was created by a hacker to infect your computer with a virus or steal important information. This message means that editing the file could be dangerous. Sometimes the message appears for files that are damaged, for example:
The disk where the file is stored could be worn out or broken.
The file was created or edited with a program that has a problem.
An unexpected error occurred while copying the file to your computer, which can be caused by a problem with your Internet connection.
There could be a problem with how Microsoft 365 looks for problems in files. We work to make it better, but it’s not perfect.
Can I edit the file?
If the file is from someone you know and trust, you can choose to edit it. But we recommend that you avoid editing a file that seems suspicious. For example:
The file came from someone you don’t know or trust.
You weren’t expecting to receive the file or it doesn’t seem like the kind of file that person would send you.
The content of the file seems unusual, for example, it appears to be a bill for something you never bought, or it’s causing your computer to display errors.
If the file seems suspicious, close the file and delete it from your computer. We recommend you don’t edit it. To ease suspicion, you can call or email the person who sent you the file to confirm.
The following image is an example of the Edit Anyway button in the Microsoft 365 Backstage view.
What type of files cause file-validation errors?
Word 97-2003 files (.doc, .dot)
Excel 97-2003 files (.xls, .xla, .xlt, .xlm, .xlb, .xlt)
PowerPoint 97-2003 files (.ppt, .pot., pps, .ppa)
I want to change my Protected View settings
We advise speaking with your administrator before you make changes to your Protected View settings.
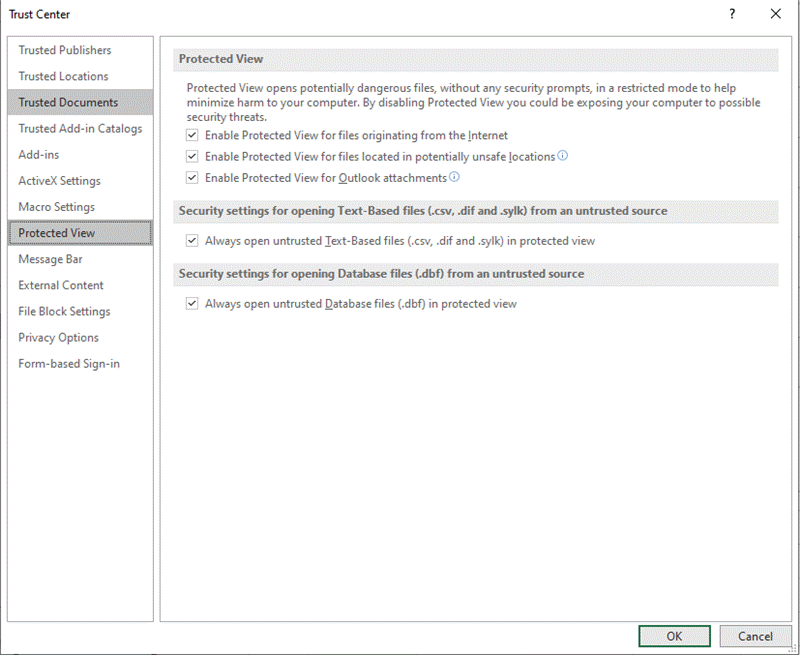
Click File > Options.
Click Trust Center > Trust Center Settings > Protected View.
Make selections that you want.
Protected View Trust Center settings explained
Enable Protected View for files originating from the Internet The Internet is considered an unsafe location because of its many opportunities for malicious intent.
Enable Protected View for files that are located in potentially unsafe locations This refers to folders on your computer or network that are considered unsafe, such as the Temporary Internet folder or other folders assigned by your administrator.
Enable Protected View for Outlook attachments Attachments in emails can come from unreliable or unknown sources.
Always open untrusted Text-Based files (.csv, .dif and .sylk) in protected view If this Excel-specific setting is enabled, text-based files opened from an untrusted location are always opened in Protected View. If you disable or don’t configure this setting, text-based files opened from an untrusted location are not opened in Protected View.
This setting can also be configured by an administrator as a policy via Group Policy or the Microsoft 365 cloud policy service.
Note: This policy setting only applies to Microsoft 365 products.
Always open untrusted Database files (.dbf) in protected view If this Excel-specific setting is enabled, database files opened from an untrusted location are always opened in Protected View. If you disable or don’t configure this setting, database files opened from an untrusted location are not opened in Protected View.
This setting can also be configured by an administrator as a policy via Group Policy or the Microsoft 365 cloud policy service.
Note: This policy setting only applies to Microsoft 365 products.
I want to revoke trust from a document/documents that I’ve previously trusted to not open in Protected View
If you previously trusted a document or documents to open outside of Protected View by either (1) clicking «Enable Editing» or «Trust Documents From This Person» in the message bar or (2) clicking on «Edit Anyway» when the file fails validation, please refer to guidance under Trusted documents for removing this trust decision and making such documents re-open in Protected View.
What happens to add-ins in Protected View?
Add-ins may run when a file opens in Protected View, but may not function as expected. If your add-ins aren’t running correctly, contact the add-in’s author. An updated version, which is compatible with Protected View, may be needed.
What happens to cloud fonts in Protected View?
It’s possible the person who sent you the document used a cloud font, which is a font that doesn’t ship with Windows or Microsoft 365 but which must be downloaded from the Internet the first time it’s used. If so, and it’s a font you don’t already have installed, that font won’t download while you’re in Protected View. Word will try to substitute another font that will hopefully look okay. If you’re confident that the document is safe, and want to see it the way the author intended, you’ll need to enable editing so that Word can download and install the correct font.
Note: If Word is unable to find any compatible fonts to substitute you might see black boxes where the text should be. Enabling editing so the correct font can download should fix the problem.
How do I use Protected View with a screen reader?
When you are in protected view, editing is locked, so you can’t cursor around the document as expected. However, if you need to navigate through a document in Protected View with a screen reader, you can press F7 to turn on caret browsing. This action should allow you to navigate through the text without being in edit mode.
Источник
Protect a workbook
To prevent other users from viewing hidden worksheets, adding, moving, deleting, or hiding worksheets, and renaming worksheets, you can protect the structure of your Excel workbook with a password.
Note: The screen shots in this article were taken in Excel 2016. If you have a different version your view might be slightly different, but unless otherwise noted, the functionality is the same.
Notes: Protecting the workbook is not the same as protecting an Excel file or a worksheet with a password. See below for more information:
To lock your file so that other users can’t open it, see Protect an Excel file.
To protect certain areas of the data in your worksheet from other users, you have to protect your worksheet. For more information, see Protect a worksheet.
To know the difference between protecting your Excel file, workbook, or a worksheet, see Protection and security in Excel.
Protect the workbook structure
To protect the structure of your workbook, follow these steps:
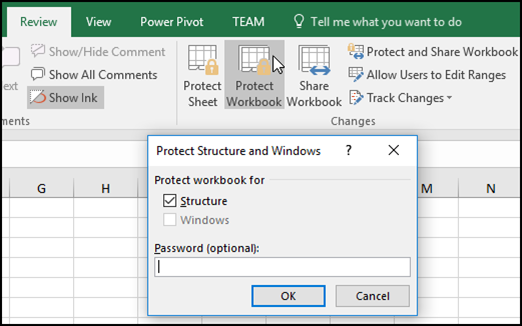
Click Review > Protect Workbook.
Note: The Windows option is available only in Excel 2007, Excel 2010, Excel for Mac 2011, and Excel 2016 for Mac. Select the Windows option if you want to prevent users from moving, resizing, or closing the workbook window, or hide/unhide windows.
Enter a password in the Password box.
Important: The password is optional. If you do not supply a password, any user can unprotect and change the workbook. If you do enter a password, make sure that you choose a password that is easy to remember. Write your passwords down and store them someplace safe. If you lose them, Excel cannot recover them for you.
Select OK, re-enter the password to confirm it, and then select OK again.
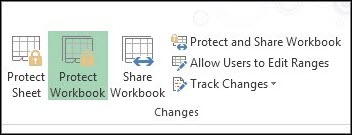
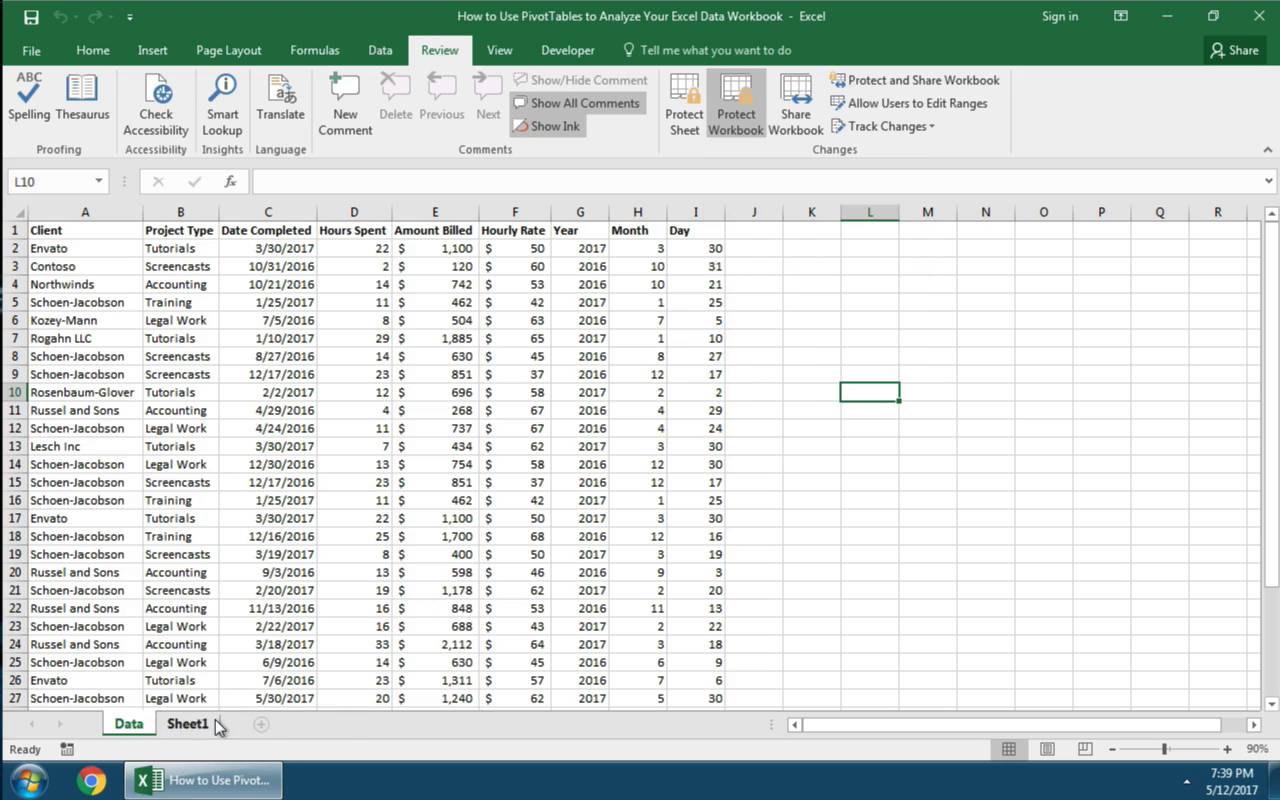
On the Review tab , see the Protect Workbook icon. If it’s highlighted, then the workbook is protected.
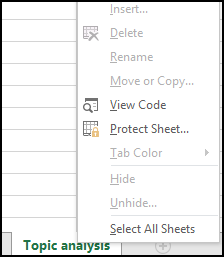
If you click on the bottom of a sheet inside your workbook, you will notice that the options to change the workbook structure, such as Insert, Delete, Rename, Move, Copy, Hide, and Unhide sheets are all unavailable.
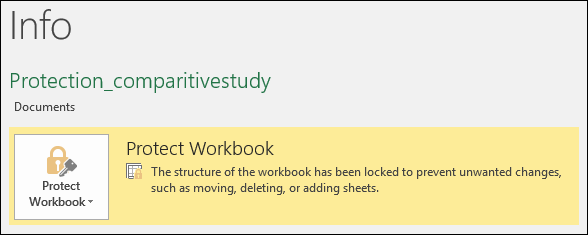
The Protect Workbook option in the Info menu also indicates that the workbook’s structure is protected. To view this option, click File > Info > Protect Workbook.
Click Review > Protect Workbook. Enter the password and then click OK.
To prevent other users from viewing hidden worksheets, adding, moving, deleting, or hiding worksheets, and renaming worksheets, you can protect the structure of your Excel workbook with a password.
Note: The screen shots in this article were taken in Excel 2016. If you have a different version your view might be slightly different, but unless otherwise noted, the functionality is the same.
Notes: Protecting the workbook is not the same as protecting an Excel file or a worksheet with a password. See below for more information:
To lock your file so that other users can’t open it, see Protect an Excel file.
To protect certain areas of the data in your worksheet from other users, you have to protect your worksheet. For more information, see Protect a worksheet.
To know the difference between protecting your Excel file, workbook, or a worksheet, see Protection and security in Excel.
Protect the workbook structure
To protect the structure of your workbook, follow these steps:
Click Review > Protect Workbook.
Note: The Windows option is available only in Excel 2007, Excel 2010, Excel for Mac 2011, and Excel 2016 for Mac. Select the Windows option if you want to prevent users from moving, resizing, or closing the workbook window, or hide/unhide windows.
Enter a password in the Password box.
The password is optional. If you do not supply a password, any user can unprotect and change the workbook. If you do enter a password, make sure that you choose a password that is easy to remember. Write your passwords down and store them someplace safe. If you lose them, Excel cannot recover them for you.
Passwords in Excel for Mac have a 15-character limit. You cannot open a workbook or document that has been password-protected in the Windows-based version of Excel or if the password is longer than fifteen characters. If you want to open the file in Excel for Mac, ask the Windows-based author to adjust the password length.
Retype the password and click OK.
On the Review tab , see the Protect Workbook icon. If it’s highlighted, then the workbook is protected.
If you click on the bottom of a sheet inside your workbook, you will notice that the options to change the workbook structure, such as Insert, Delete, Rename, Move, Copy, Hide, and Unhide sheets are all unavailable.
Click Review > Protect Workbook. Enter the password and then click OK.
To unprotect a sheet, follow these steps:
Go to the worksheet you want to unprotect.
Go to File > Info > Protect > Unprotect Sheet, or from the Review tab > Changes > Unprotect Sheet.
If the sheet is protected with a password, then enter the password in the Unprotect Sheet dialog box, and click OK.
Excel for the web can open workbooks protected by a password but these files cannot be edited in web. Passwords can’t be added, changed, removed, or recovered from Excel for the web.
If you want to add a password to a workbook you are working on in Excel for the web, and you have Excel desktop application, use the Open in Excel button to open the workbook and password protect the workbook. But going forward, you’ll only be able to view the file on web — to make changes to the workbook, open it in your desktop version of Excel.
Need more help?
You can always ask an expert in the Excel Tech Community or get support in the Answers community.
Источник
When it comes time to send your Excel spreadsheet, it’s important to protect the data that you’re sharing. You might want to share your data, but that doesn’t mean it should be changed by someone else.
Spreadsheets often contain essential data that shouldn’t be modified or removed by the recipient. Luckily, Excel has built-in features to protect your spreadsheets.
In this tutorial, I’ll help you make sure that your Excel workbooks maintain data integrity. Here are three key techniques you’ll learn in this tutorial:
- Password protect entire workbooks to prevent them from being opened by unauthorized users.
- Protect individual sheets and the workbook structure, to prevent the insertion or deletion of sheets in the workbook.
- Protect cells, to specifically allow or disallow changes to key cells or formulas in your Excel spreadsheets.
Even users with the best intentions may accidentally break an important or complex formula. The best thing to do is remove the option to change your spreadsheets altogether.
How to Protect Excel: Cells, Sheets, & Workbooks (Watch & Learn)
In the screencast below, you’ll see me work through several important types of protection in Excel. We’ll protect an entire workbook, a single spreadsheet, and more.
Want a step-by-step walkthrough? Check out my steps below to find out how to use these techniques. You’ll learn how to protect your workbook in Excel, as well as protecting individual worksheets, cells, and how to work with advanced settings.
We start with broader worksheet protections, then work down to narrower targeted protections you can apply in Excel. Let’s get started learning how to protect your spreadsheet data:
1. Password Protect an Excel Workbook File
Let’s start off by protecting an entire Excel file (or workbook) with a password to prevent others from opening it.
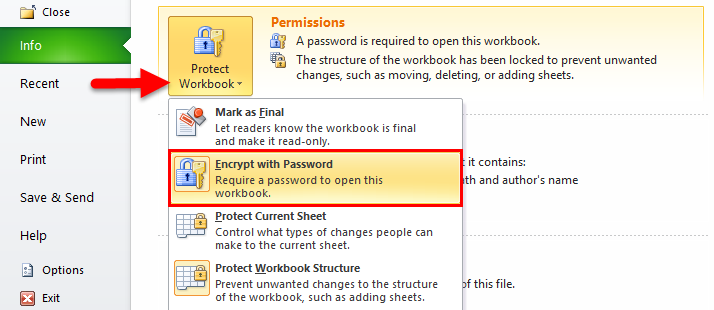
This is a breeze to do. While working in Excel, navigate to the File tab choose the Info tab. Click on the Protect Workbook dropdown option and choose Encrypt with Password.
As is the case with any password, choose a strong and secure combination of letters, numbers, and characters, bearing in mind that passwords are case-sensitive.
It’s important to note that Microsoft has really beefed up the seriousness of their password protection in Excel. In prior versions, there were easy workarounds to bypass password protection of Excel workbooks, but not in newer versions.
In Excel 2013 and beyond, the password implementation will prevent these traditional methods to bypass it. Make sure that you store your passwords carefully and safely or you risk permanently losing access to your crucial workbooks.
Excel Workbook — Mark as Final
If you want to be a bit less forceful with your spreadsheets, consider using the Mark as Final feature. When you mark an Excel file as the final version, it switches the file to read-only mode, and the user will have to re-enable editing.
To change a file to read-only mode, return to the File > Info button, and click on Protect Workbook again. Click on Mark as Final and confirm that you want to mark the document as a final version.
Marking a file as the final version will add a soft warning to the top of the file. Anyone who opens the file after it has been marked as final will see a notice, warning them that the file is finalized.
Marking a file as the final version is a less formal way of signaling that a file shouldn’t be changed further. The recipient still has the ability to click Edit Anyway and modify the spreadsheet. Marking a file as the final edition is more like a suggestion, but it’s a great approach if you trust the other file users.
2. Password Protect Your Excel Sheet Structure
Next up, let’s learn how to protect the structure of an Excel workbook. This option will ensure that no sheets are deleted, added, or re-arranged inside of the workbook.
If you want everyone to be able to access the workbook, but limit the changes they can make to a file, this is a great start. This protects the structure of the workbook, and limits how the user can change the sheets inside of it.
To turn on this protection, go to the Review tab on Excel’s ribbon and click on Protect Workbook.
Once this option is turned on, the following will go into effect:
- No new sheets can be added to the workbook.
- No sheets can be deleted from the workbook.
- Sheets can no longer be hidden or unhidden from the user’s view.
- The user can no longer drag and drop the sheet tabs to reorder them in the workbook.
Of course, trusted users can be given the password to unprotect the workbook and modify it. To unprotect a workbook, simply click on the Protect Workbook button again and input the password to unprotect the Excel workbook.
3. How to Protect Cells in Excel
Now, let’s get down to really detailed methods for protecting a spreadsheet. So far, we’ve been password protecting an entire workbook or the structure of an Excel file. In this section, we dig into how to protect your cells in Excel with specific settings you can apply. We cover how to allow or block certain types of changes to be made to parts of your spreadsheet.
To get started, find Excel’s Review tab, and click on Protect Sheet. On the pop-up window, you’ll see a huge set of options. This window allows you to fine-tune how you want to protect the cells in your Excel spreadsheet. For now, let’s leave the settings at their default.
This option allows for very specific protections of your spreadsheet. By default, the options will almost totally lock down the spreadsheet. Let’s add a password so that the sheet is protected. If you press OK at this point, let’s see what happens when you attempt to change a cell.
Excel throws off an error that the cell is protected, which is exactly what we wanted.
Basically, this option is crucial if you want to ensure that your spreadsheet isn’t changed by others who have access to the file. Using the protect sheet feature is a way that you can selectively protect the spreadsheet.
To unprotect the sheet, simply click on the Protect Sheet button and re-enter the password to remove the protections added to the sheet.
Specific Protections in Excel
Let’s take a second look at the options that show when you start to protect a sheet in Excel workbooks.
The Protect Sheet menu lets you refine the options for sheet protection. Each of the boxes on this menu lets the user change slightly more inside of a protected worksheet.
To remove a protection, check the respective box in the list. For example, you could allow the spreadsheet user to Format cells by checking the corresponding box.
Here are two ideas on how you could selectively allow the user to change the spreadsheet:
- Check the Format cells, columns, and rows boxes to let the user change the visual appearance of cells without modifying the original data.
- Insert columns and rows could be checked so that the user can add more data, while protecting the original cells.
The important box to leave checked is the Protect worksheet and contents of locked cells box. This protects the data inside of cells.
When you’re working with crucial financial data or formulas that will be used in making decisions, you have to maintain control of the data and ensure that it doesn’t change. Using these types of targeted protections is an important Excel skill to master.
Recap and Keep Learning More About Excel
Locking up a spreadsheet before you send it is crucial to protecting your valuable data and making sure that it’s not misused. The tips I shared in this tutorial help you maintain control of that data even after your Excel spreadsheet is forwarded and shared.
All of these tips are additional tools and steps to becoming an advanced Excel user. Protecting your workbooks is a specific skill, but there are lots of ways to improve your performance. As always, there’s room to grow your Excel skills further. Here are some helpful Excel tutorials with important skills to master next:
- PivotTables are a great tool for working with spreadsheet data. Here’s 5 Advanced Excel Pivot Table Techniques to learn now.
- ExcelZoo has a listing of additional tutorials for protecting your workbooks, sheets, and cells.
- Condition formatting changes how a cell looks based on what’s inside of it. Here’s a comprehensive Excel tutorial on How to Use Conditional Formatting.
How do you protect your important business data when sharing it? Let me know in the comments section if you use these protection tools or others I may not know about.
Did you find this post useful?
I believe that life is too short to do just one thing. In college, I studied Accounting and Finance but continue to scratch my creative itch with my work for Envato Tuts+ and other clients. By day, I enjoy my career in corporate finance, using data and analysis to make decisions.
I cover a variety of topics for Tuts+, including photo editing software like Adobe Lightroom, PowerPoint, Keynote, and more. What I enjoy most is teaching people to use software to solve everyday problems, excel in their career, and complete work efficiently. Feel free to reach out to me on my website.
Protect Excel Workbook (Table of Contents)
- Protect Workbook in Excel
- Types of Excel Protection Workbook
Protect Workbook in Excel
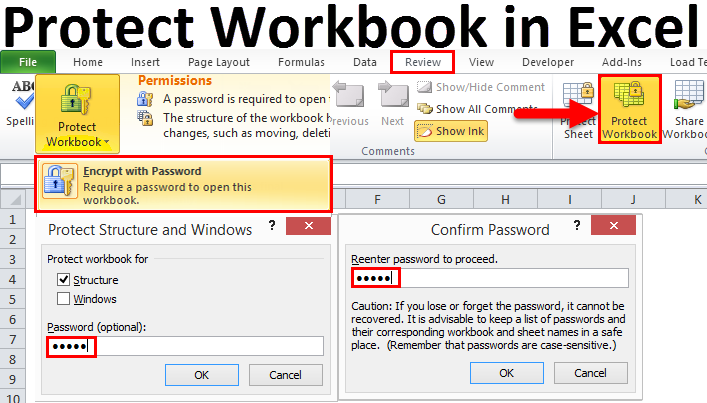
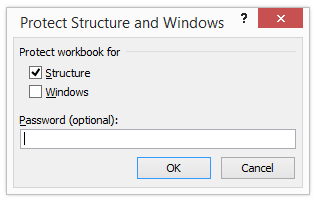
In Excel, we can protect workbooks and worksheets, which is quite helpful in protecting the data to avoid getting lost. For this, we have an option in Excel under the Review menu ribbon under the Changes section with the name Protect Workbook. We can protect the workbook using this option with and without a password. Protect Workbook protects the complete workbook with each worksheet protected under the same. Once we click on Protect Workbook option, we will get a box of protect the structure, asking Password (Optional).
Types of Excel Protection Workbook
While talking about protection with regards to excel, we must understand three categories of protection.
- One is worksheet protection which protects the particular worksheet.
- The second one is cell protection which protects particular cells, but the user can edit all other cells except the protected one.
- And the third one is workbook protection. Workbook means the entire excel file itself. The workbook includes worksheets; worksheets include cells. So it protects everything that comes under the workbook. In this article, we will concentrate on workbook protection.
One thing I want to make it clear at the beginning itself, i.e. Both Workbook and Excel File are the same words. Do not get confused with two different words.
#1 – Protect Excel Workbook at File Level
Under this method, we can encrypt the password to open or edit the excel file. We can protect the data, which is very much essential to protect this from modifying or altering by the other users.
Protect Workbook option in excel is available under the REVIEW tab.
Ok, now we will see how do we protect the excel workbook to keep it safe from alteration.
Step 1: Open the excel file you want to protect.
Step 2: Go to the REVIEW tab and click on PROTECT WORKBOOK option in excel.
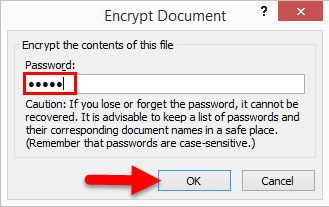
Step 3: After clicking the button, you will see this dialogue box.
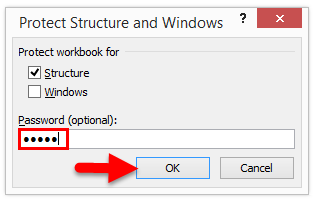
Step 4: Here, you need to mention the password as per your choice; here, I have mentioned 12345 as a password; click on OK to continue.
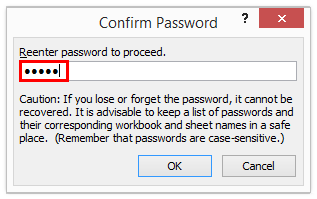
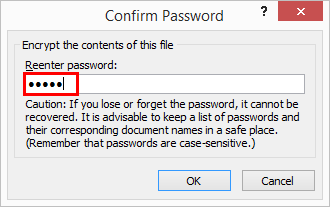
Step 5: Once you click on ok, it will again ask you to enter the password; re-enter the password here.
Now you have protected your workbook. This is at the file level.
#2- Protect Excel Workbook Level
Under this method, we will see how to protect Excel Workbook with a password to restrict other users from opening it. The user can easily open the excel file and see what is there in it in the previous method. In this method, we can restrict them from opening it. Follow the below steps to protect the entire file.
Step 1: Go to File. Once you click on the Info, you will see Protect Workbook option on the right-hand side.
Step 2: Click on the drop-down list of Protect Workbook option and select Encrypt with Password.
Step 3: Enter the password according to your wish and Click on the OK button.
Step 4: Now again, it will ask you to re-enter the password. Enter the same password which you have entered previously.
Note: You need to remember the password carefully because it cannot be recovered if you have forgotten the password.
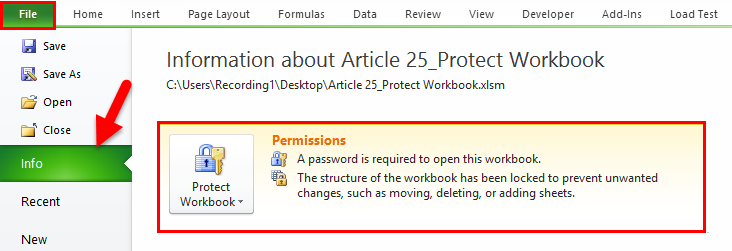
Step 5: Now, you can already see the warning in the same window as “The Structure of the workbook has been locked to prevent unwanted changes, such as moving, deleting or adding sheets”.
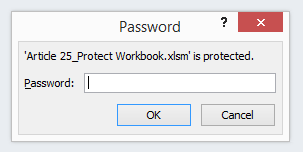
Step 6: Save and close the workbook to apply changes. After closing the workbook, try to open the workbook; it will ask you for a password to open the file. Without a password, we cannot open the workbook, so carefully remember the password. Loss of password means loss of the workbook.
Things to Remember About Protect Workbook in Excel
- Protect workbook (under the REVIEW tab) will restrict the user from editing the workbook only, but it will still allow them to open the workbook.
- Protect the workbook with encryption will not allow the user to open the workbook. Without the password, they cannot open the workbook.
- Remember the password carefully. If you forget the password, you cannot recover them.
You can download this Protect Workbook Excel Template here and enter the Password 12345 – Protect Workbook Excel Template.
Recommended Articles
This has been a guide to Protect Workbook in Excel. Here we discuss how to protect excel at the file level and workbook level with a downloadable excel template. You can also go through our other suggested articles –
- Excel Data Validation
- Unprotect Excel Workbook
- Share Excel Workbook
- VBA Workbook

