
In this Article
- What is a VBA Module?
- Type of modules
- Inserting a module or form into your code
- Entering Code into a VBA Module
- Creating a new procedure – Alternative Method
- Sub vs Function Procedures
- Removing a module or form from the Project Explorer
- Exporting a module or form from the Project Explorer
- Importing a VBA module or form into your VBA Project
What is a VBA Module?
A VBA module is used to store any VBA code that you have written in the VBE (Visual Basic Editor).
The modules are contained within a VBA Project and when the file is saved – be it an Excel workbook, Word document or Access database, the module or modules are saved within that file – that file is essentially the parent application of the module.
Modules can also be exported out of the parent file and saved as their own individual files. This is useful when you want to re-use code in a different file, and therefore perhaps import that module into a new file.
Type of modules
The modules are organised into 3 different types.
- Standard modules – most of your code will go into this type of module. When you record a macro, it gets put into a standard module. When you write a general procedure to be used throughout your workbook, it also normally goes into a standard module.
- Object modules – these type of modules hold the code the is unique to that individual workbook or worksheet. Most of the code in these type of modules are known as EVENTS. An event can occur when a workbook is opened or closed for example, or when a sheet is clicked (the Click Event),. The module can also contain code that is written by yourself and used by the events. The module behind a custom form that you create is also an Object module.
- Class modules – this module is used to create objects at run time. Class module are used by Advanced VBA programmers and will be covered at a later stage.
When your write your VBA code, you will usually use more than one module. It is good coding practice to ‘group’ your code into relevant modules – for example put all the global variables in one module, all public functions in another module etc.
Inserting a module or form into your code
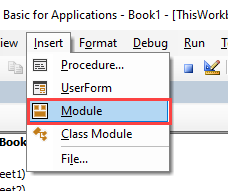
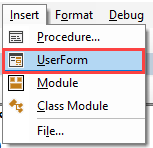
To insert a new module into your code, click on the Insert option on the menu bar, and click Module.
Or, click on the Insert Module button which you will find on the standard ribbon.
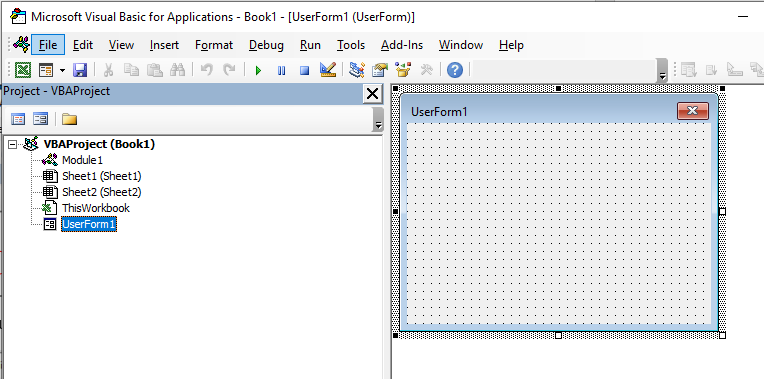
To insert a new user form into your code, select the UserForm option.
A new UserForm will appear in the Project Explorer and will be shown in the Code Window on the right.
You can also insert a Class Module
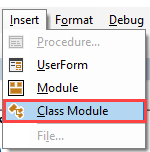
A class module is used to insert objects into your VBA project.

Entering Code into a VBA Module
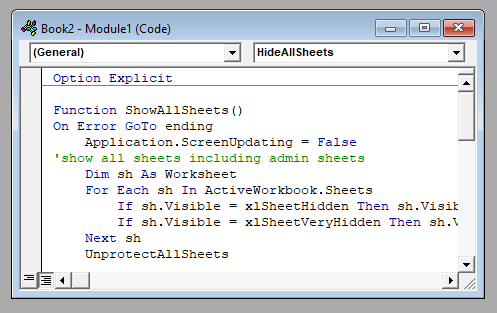
Once you have created your module, you will want to start typing your procedure. Most procedures are Sub Procedures.
A sub procedure begins with a Sub statement and ends with an End Sub statement. The procedure name is always followed by parentheses.
Sub gridlines()
ActiveWindow.DisplayGridlines  = False
End Sub
When entering a sub procedure, you only need to type “Sub” followed by the procedure name (no spaces). Then press enter and the VBA Editor will add the parenthesis and End Sub statement.
Creating a new procedure – Alternative Method
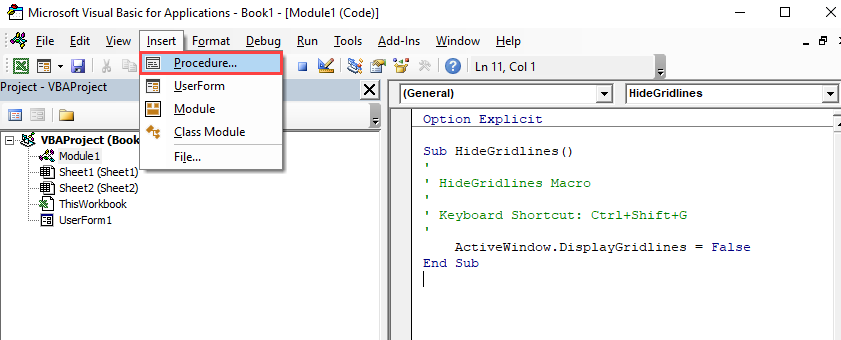
The easiest way to create a procedure is by typing directly into the Module Window, but if you forget how to create a procedure, you can go to Insert > Procedure instead:
The following dialog box will appear
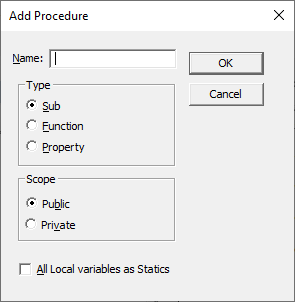
This dialog box is a good way to learn about the options for Procedures.
- Type the name of your new procedure in the name box – this must start with a letter of the alphabet and can contain letters and number and be a maximum of 64 characters.
- You can have a Sub procedure, a Function procedure or a Property procedure. (Properties are used in Class modules and set properties for ActiveX controls that you may have created).
- You can make the scope of the procedure either Public or Private. If the procedure is public (default), then it can be used by all the modules in the project while if the procedure is private, it will only be able to be used by this module.
- You can declare local variables in this procedure as Statics (this is to do with the Scope of the variable and makes a local procedure level variable public to the entire module). We will not use this option.
When you have filled in all the relevant details, click on OK.
You then type your code between the Sub and End Sub statements.
Sub vs Function Procedures
You may have noticed that there are 2 types of procedures you can create – a SUB PROCEDURE or a FUNCTION PROCEDURE.
If you have recorded a macro in Excel or Word, your macro will be put into a Standard module and will be put into a sub procedure. The macro recorder can only record sub procedures. A Sub procedure does things. They perform actions such as formatting a table, creating a pivot table, or changing the view settings of your active window. The majority of procedures written are Sub procedures. All macros are Sub procedures.
A Function procedure returns a value. This value may be a single value, an array, a range of cells or an object. Functions usually perform some type of calculation. Functions in Excel (UDFs) can be used with the Function Wizard.
Removing a module or form from the Project Explorer
Right-click on the module or form you wish to remove to show the right click short cut menu.
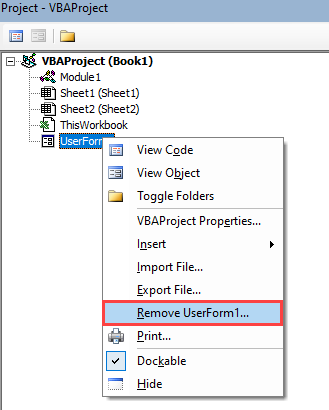
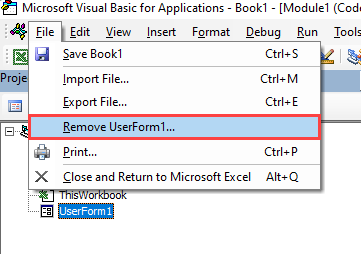
Click Remove (in this case UserForm1…)
OR
Click on the File menu, and then click on Remove (UserForm1).
A warning box will appear asking if you want to Export the form or module before you remove it. Exporting the form or module enables you to save it as an individual file for use in a different Excel project at some other time.
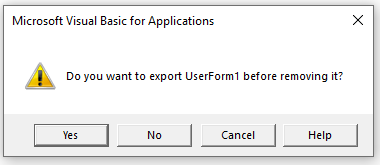
More often than not when you remove a module or form it is because you do not need it, so click No.
VBA Coding Made Easy
Stop searching for VBA code online. Learn more about AutoMacro — A VBA Code Builder that allows beginners to code procedures from scratch with minimal coding knowledge and with many time-saving features for all users!

Learn More
Exporting a module or form from the Project Explorer
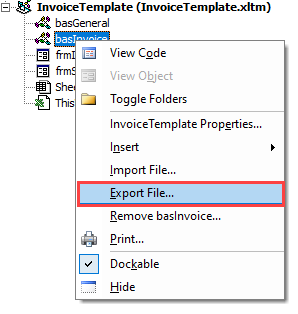
Right-click on the module or form you wish to export to show the right click short cut menu.
OR
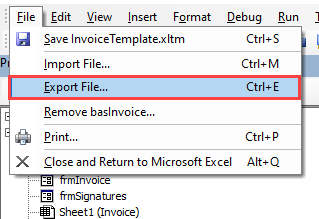
Select the module/form you wish to Export, and click on the File menu. Then select Export File.
Select the location you wish to save the module to, and then click Save.
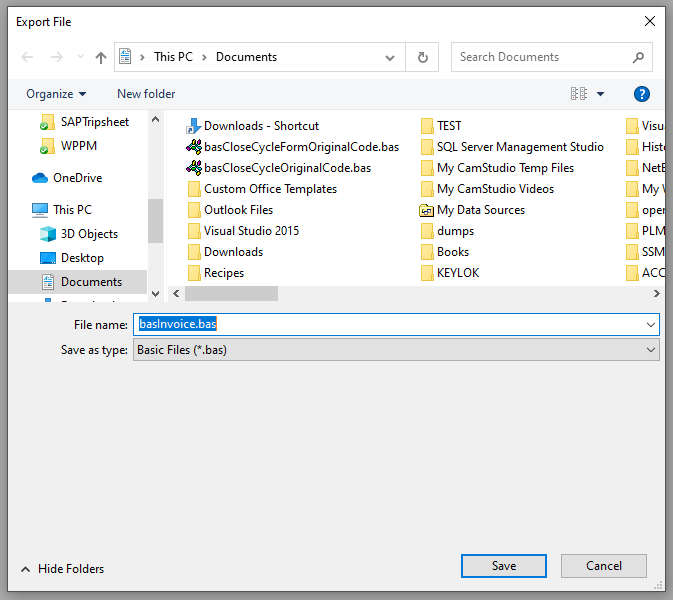
NOTE: when you Export a form or a module, it saves it as an individual file on your PC, but it DOES NOT remove it from your VBA Project.
Importing a VBA module or form into your VBA Project
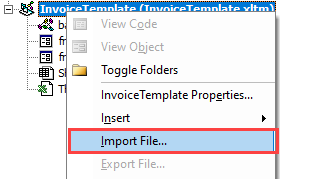
Right click on your VBA Project and then click Import File.
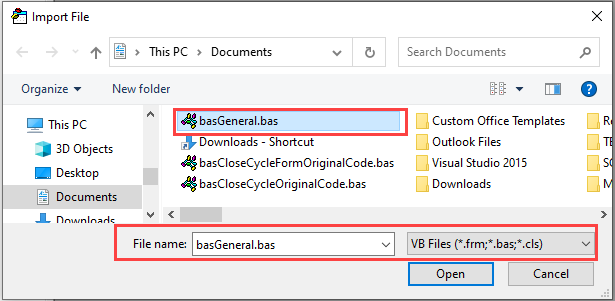
Select the file you wish to import, and click Open.
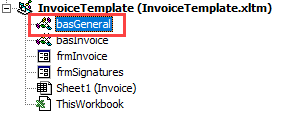
The module or form you have imported will now appear in your Project Explorer.
Home / VBA / VBA Module | Insert, Remove, Restore, and BackUp
What is VBA Module
VBA module is a “.bcf” extension file that holds the code in the visual basic editor. Each module has its own code window where you can write. You can insert a new module, delete, backup, and import it. In simple words, it’s like a text file that you open in the notepad.
In this tutorial, we will learn all about using a module in VBA.
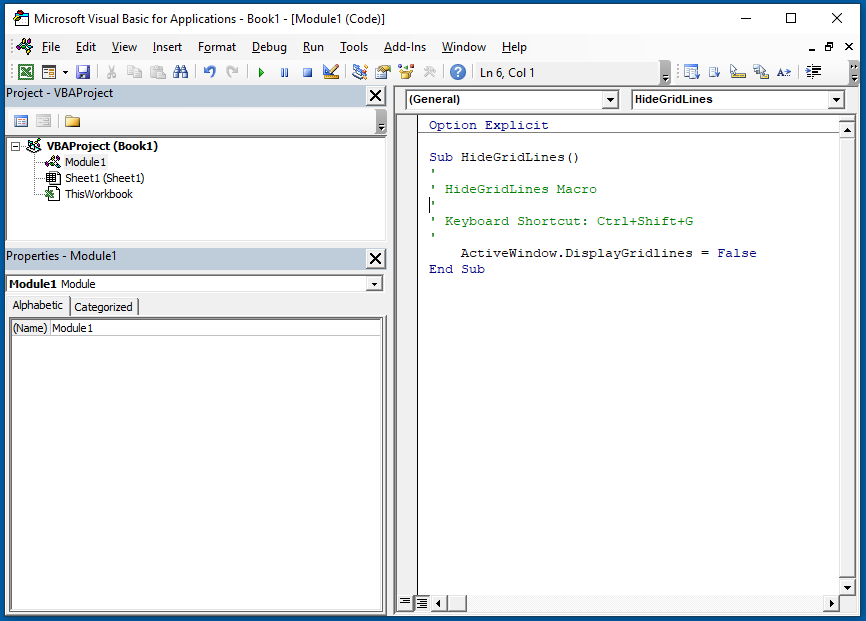
- First of all, open the Project Window if it’s not there already.
- Next, right-click on the project (Excel File) in which you want to insert a module.
- After that, go to the Insert and click on the “Module”.
- Once you do that, you will instantly get a new module and can open its code window to write the code.

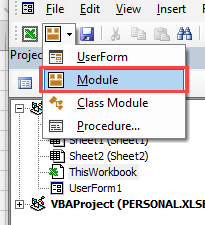
You can also go to the insert menu and then the module to insert it.

When you insert a new module, VBA creates a separate folder for all the modules that you have in the project.

Delete a VBA Module
- Click on the project from which you want to delete a module.
- Now right-click on the module that you want to delete and click “Remove”.
- After that, you need to confirm if you wish to back up the module before deleting it.
- In the end, click on “Yes” to delete it.

There’s one thing that you need to know here when you click on the remove option, it asks you to back up your module before removing it (if you want).

It’s a smart way to remind you to get the backup of the module.
Export and Import a VBA Module
You can also import and export a module from one Excel file to another instead of copy-pasting the codes. This is one of the best ways to share your codes with others. When you right-click on a module you have both options there.

As I said earlier, you can save a module as a “.bcf” file and import it in the future or some other Excel file.
Quick Tip: If you want to copy an entire module to a different project whose Excel file is open at the time. Drag and Drop that module to the project where you want to copy it.

Normal VBA Modules Vs. Class Modules
When you insert a new module, you can see an option to insert a class module. But there’s a slight difference between both modules. As you have understood all about the standard modules, class modules are special modules that can help you create your custom objects. You can also define methods, properties, and events for those objects. And when you create a new object from the class module, you can refer to it from the standard module as well.
In the first part of this Basic Excel VBA guide series, we learned how to write a few simple lines of excel VBA code. On that page it is explained that among the steps to compiling a VBA macro code is to open VBE and then create a new module .
You can learn more about VBE or Visual Basic Editor in the second part of this Basic VBA Tutorial series, while in this third part we will invite you to get to know more about Modules and Procedures in Excel VBA.
I think this discussion is quite important and there are still very few who discuss it. Although it is only an overview, with this guide, I hope that those of you who are still starting to learn VBA will get an idea of how and where to write VBA scripts correctly.
Modules in VBA Excel
What is the meaning of the module in VBA Excel?
In a simple sense, the module can be interpreted as a place to store VBA code. If the VBE is a house you can imagine the rooms or rooms in the house as a module, where in each room or room is stored various other items with certain functions.
Another item that is intended in this VBA discussion is the VBA Procedure which contains program codes with certain functions and purposes.
In VBA Excel, there are at least 4 known types of Modules as follows:
- Standard Module
Commonly referred to as a code module or just a module, it is a general type of module that can be filled with many procedures and certain functions. This type of module is what you will often use in compiling VBA code.
- Workbooks and Sheet Modules
Is a special module that is bound directly to Workbook and Sheet objects. The module for a workbook is called This Workbook , and the module for each sheet or Worksheet has the same name as the sheet name. This type of module is actually similar to the Standard Module , except that this type can also be filled with event procedures .
This event procedure is a kind of detonator or trigger to activate a code. If you’re familiar with VBA I think you already understand that to run a code requires a certain trigger such as a click on a button. In addition to using the button a code can also run under certain conditions. This condition or activity that occurs in the VBA object is called an Event, for example, we want to run several lines of code when a file is opened, when a sheet is active and so on, then this event procedure is what we need. We will discuss more about this event procedure another time.
- User Forms
Is a type of module that is part of the UserForm object, and contains VBA procedures and event procedures for controls related to Form objects.
- Class Module
This type of module is used to create a new object in VBA. For now you don’t need to think too much about this type of module.
It is in these modules that you will later place and group VBA procedures as needed.
When you create an excel file, then open VBE, excel will automatically prepare a workbook module and a sheet module with a number of sheets contained in the file. By default there are three sheet modules that you can reduce or add as needed. As for other types of modules, you have to add them manually via the insert menu as explained in the previous guide.
Types of Modules 2 and 3 or Workbook Modules, Sheets and User forms are also commonly referred to as Object Modules because these modules have tangible forms in the form of Workbooks, WorkSheets, Userforms, Charts, and others.
Generally, the VBA codes contained in this module only apply to related objects. For example, in the Sheet1 module, the codes that we create in it only apply to Sheet1 and cannot be called for Sheet2.
The Standard Module or Module Type 1, also known as the Code Module, is a container for all procedures or variables that can be used by other modules as well, as long as the procedure or variable is declared as Public .
You can add as many Code Modules as you need, although actually we only need to make one standard module to place the VBA codes, it’s just that if the codes are too complex there are times when we need to group the procedures we create in the module by the goal is to facilitate in terms of code management.
I have mentioned the term procedure several times, what kind of stuff is this actually?
Procedures in VBA Excel
A procedure is a block of program code that contains certain command lines between the opening statement line of the procedure and the closing statement of the procedure to carry out certain tasks or actions.
In other words, in Excel VBA, the type of program code block that contains commands to perform certain tasks is called a procedure.
If in the program code or VBA project that we make there are commands to perform the same task or activity in several places, it would be better if these commands were made in a procedure . Then, the procedure can be called on another procedure when needed.
The use of procedures saves a lot of writing program code, because the same program code in several places is enough to be made in one part only. In addition, the existence of a procedure will facilitate repairs if there are changes or errors, because repairs are enough to be done in one part only.
Excel VBA Procedure Structure
The declaration structure of a VBA procedure consists of 3 parts:
- Opening or Initial Statement
- Program code
- Closing or final statement
A procedure written in a module always begins with an opening statement and ends with a closing statement . Then the program code performed by the procedure is written between the two statements.
Consider the following simple procedure example:
As seen in the example procedure above, how to write a simple procedure at least like this:
VBA CODE
[Scope] ProcedureType ProcedureName()
‘Program code line 1, etc.
End Type Procedure
The ” MsgBox ” command in VBA is used to display a message box with a specific message content. The details of these commands will be discussed later.
Next we will learn the general explanation for each part of the VBA procedure.
Declaration Statement Procedure
The opening statement or declaration of a procedure must contain at least 3 things:
VBA CODE
[Scope] ProcedureType ProcedureName()
The three things above are the simplest form of procedural declaration. So, every procedure declaration will always contain at least 3 things, namely: scope, procedure type, procedure name .
Actually, the declaration statement of a VBA procedure is not only this, there are several other keywords that you can also include, just to simplify the discussion, I think the 3 main parts of this declaration are enough for now.
The term statement which can also be interpreted as an instruction in VBA refers to 2 things:
- Declaration statements , as the name implies, are used to declare something like a variable or constant. In the VBA procedure the declaration statement contains keywords that have a specific purpose.
- Executable statements are statements to carry out certain actions or activities that must be carried out, generally these statements are program codes in a procedure.
Scope in VBA Excel
Because the discussion of Procedure also involves Scope, I think it is important to provide an overview of Scope in VBA Excel.
The term Scoope is used to describe how a variable can be accessed and how a procedure can be called . This depends on where and how a variable or procedure is declared. The term visibility is also used to describe scope. These two terms are equivalent.
There are 4 levels of scope from the smallest to the largest scope:
1. Procedure :
Variables that are used locally in that procedure only and cannot be accessed by procedures from other modules directly. The lifetime of the variable is as long as the procedure is processed. When the procedure has finished processing, the variable is removed from the computer’s memory.
2.Module :
Procedure or variable that is used by all procedures in the module and cannot be accessed directly by procedures from other modules.
3.Project :
Procedure or variable used by all procedures in the VBAProject. Its lifespan is from the time the VBAProject is loaded into the computer’s memory, that is, immediately after passing the security macro, until the workbook is finished closing.
4. Global : A
procedure, variable, or class that is used by all procedures from another VBAProject. The door to use is to make a reference to the required VBAProject. For example, VBAProject1 has a procedure, variable, or class that has a global scope. VBAProject2 can use what is in VBAProject1 if VBAProject2 adds VBAProject1 in its reference.
Scope is declared with certain keywords :
- Public
By using the keyword “Public” basically a variable or procedure can be used anywhere.
- Private
By using the keyword “Private” basically, variables or procedures can only be used by modules that use this keyword.
- Friend
Keyword is specific to object and class module only and is used by VBProject where Friend keyword is used.
- Dim
Keyword is used specifically for declaring a variable. Basically, it can only be used by program code that comes after the variable declaration line.
The discussion about this scope is actually quite long and will usually be quite confusing if you are new to Excel VBA. For this VBA introduction stage, just use the practical way of using it as follows:
- Use Dim to declare variables within procedures only.
- Use Private for variables or procedures that can only be used or called within the module .
- Use Public for variables or procedures that can be used anywhere in the VBProject .
Type or Type of Excel VBA Procedure
In general, there are 2 types of procedures in VBA, namely Sub Procedures and Function Procedures.
- Sub Procedure
Sub Procedure is a procedure that only performs certain activities without generating a value (Value) . The activity in this procedure depends on the command lines contained in the procedure.
- Function Procedure
Function Procedure is a procedure that produces a value (Value) .
You must be familiar with various functions or excel functions such as the SUM function, AVERAGE and so on. The way these Function Procedure works is very similar to these excel functions. It’s just that these functions already exist in excel. If we need certain functions that don’t exist yet, you can create a special function which is often referred to as UDF ( User Defined Functions ) such as an excel function.
Next time we will discuss more about these two types of procedures in a separate article. For now, please get used to using the procedure with the Sub type first.
In addition to the two types of procedures above, there are actually other types of procedures in VBA excel, namely the Property Procedure type .
This type of procedure is used to assign a value to a variable or retrieve a value from a variable.
Generally, this type of property procedure is used when creating a custom class in the Class Module. So, basically, this type of procedure can be used anywhere just like Sub or Function type procedures.
The property procedure consists of:
- Let : to assign a value to a variable other than an object and it works similarly to the use of type Sub
- Set : to enter a value into an object variable and it works similarly to using the sub . type
- Get : to retrieve the value of a variable and it works similar to the type of Function
Next time we will discuss about properties, but before that you must understand about Sub Types and Functions .
Excel VBA Procedure Name
A Procedure must be given a name. The main rules you should follow when naming a VBA procedure are as follows:
- The first character must be a letter of the alphabet (AZ, az).
- Subsequent characters can be letters, numbers or certain punctuation characters (not all punctuation marks can be used).
- You can’t use periods (.) and spaces ( ) and you can’t use the following characters: #, $,%, &, @, ^, * and !.
- There is no difference between uppercase and lowercase letters.
- The maximum number of characters that can be used is 255.
Another explanation of the rules for naming this procedure you can read on the following Microsoft page.
It is better if the name used for a procedure is descriptive, meaningful and unambiguous so that it can represent the purpose or function of the procedure. Thus, when you read the name, you will easily know the meaning of the contents of the program code in the procedure. So don’t carelessly make a procedure name so that you will be confused when a VBA project already contains many procedures.
Excel VBA Program Code Line
The line of code is generally an Executable statement, is a program line that contains a VBA command to do something which of course must follow the VBA writing rules.
Lines of code in a VBA procedure are always processed line by line. So distinguish between program lines and write lines.
The program line must always be one line. One line of this program can be written in several lines of writing and it is possible that several lines of the program are written in one line of writing.
In writing program lines, there are several special characters that have special meanings or purposes, including:
- Single quotation marks (‘)
This character indicates that starting from this single quotation character is a description or text that does not need to be processed. This text or description is generally used to provide explanations for lines of VBA code.
- Underscore (_)
This character indicates moving the writing line for one line of the program. If a line of program code is long enough, use an underscore to indicate that the next line is a continuation of that line of program.
- Colon (:)
This character is used to mark the end of a program line. The colon (:) is the opposite of the underscore character (_). If Underscore is used to separate 1 line of program into several lines, a colon is used to make several lines of program into one line only. That is, in one line of writing there will be several lines of program.
Final Statement of Procedure
A VBA procedure always ends or ends with the keyword ” END ” followed by the type of procedure. Example: ” End Sub ” or ” End Function “.
VBA CODE
End Type Procedure
Excel VBA Practice
To better understand the VBA guide on this page, please follow the following exercises.
Exercise 1
As much as possible do the writing of each code manually ( Do not Copy Paste ) so as to train your sensitivity to VBA codes.
1. Create a new excel file with .xlsm extension and name the file ” Excel Class-VBA Practice 2 “. Save this file in the folder that we prepared in the previous VBA guide .
2. In the ThisWorkbook module create the following procedure:
VBA CODE
Private Sub Workbook_SheetActivate(ByVal Sh As Object)
‘This is an example of the Event procedure in the ThisWorkbook module
MsgBox “The specified sheet in this file is currently active”
End Sub
3. If so, try switching between sheets in your workbook. What happened?
When you activate Sheet1, sheet2 or sheet3 a message box will appear containing the text: “The specific sheet in this file is currently active “. Event The procedure in thisWorkbook runs when you activate any sheet in the file.
4. Next, in the Sheet1 module, create the following procedure:
VBA CODE
Private Sub Worksheet_Activate()
‘This is an example of the Event procedure on the module sheet
MsgBox “Sheet 1 is currently active”
End Sub
5. Now try to enable Sheet1, Sheet2 and Sheet3 on the file in turn. What happened?
When you activate Sheet1 besides the message from the code in ThisWorkbook , another message appears which is the result of the code in the Sheet1 module . While on Sheet2 and Sheet3 the same thing does not apply.
From this exercise, you can learn that event procedures in thisWorkbook affect all Sheets while event procedures on one sheet have no effect on other Sheets.
Exercise 2
Still on the same file do the following:
1. Add 2 new standard modules by clicking Insert–Module .
2. Activate Module 1 (Double click) then write the following VBA procedure:
VBA CODE
Public Sub workoutMacro1()
‘This is a public procedure with the name “practiceMacro1”
MsgBox “This is a public procedure in -Module 1- with the name -practiceMacro1-“
MsgBox “Learn VBA by -Excel Class-“
End Sub
3. Run the sub procedure.
4. Create 2 new procedures under the Macro1 training procedure , the VBA code is as follows:
Macro2 training procedure :
VBA CODE
Sub workoutMacro2()
‘This is a procedure with the name “Macro2 workout”
MsgBox _
“This is the procedure in -Module 1- with the name -practiceMacro2-“
MsgBox “Learn VBA by -Excel Class-“
End Sub
Macro3 training procedure :
VBA CODE
Private Sub workoutMacro3()
‘This is a private procedure _
with the name “macroGeneral3”
MsgBox “This is a private procedure with the name -practiceMacro3-“: MsgBox “Learn VBA by -Excel Class-“
End Sub
5. Run each of these sub-procedures in turn.
In the exercise above I wanted to emphasize how to create a simple procedure in a module and how to use single quotes (‘), underscore(_) and colon(:).
Please re-read the explanation in the previous section.
Exercise 3
If you can understand the meaning of the above procedures, now we can continue with exercise 3.
1. Still in the same file, open the standard Module 2 , then create a sub procedure with the name exerciseMacro4 with the following code:
VBA CODE
Sub workoutMacro4()
‘Calling the practice procedureMacro1
exerciseMacro1
End Sub
2. Run the procedure.
This macro4 training procedure intends to call or run the Macro1 training procedure by writing the name of the procedure to be called earlier. When the Macro4 exercise is executed, this procedure will call and run the program code contained in the Macro1 exercise.
3. Next we create 2 other procedures in module 2 with each code as follows:
Macro5 training procedure :
VBA CODE
Sub workoutMacro5()
‘Calling the training procedure Macro2
exerciseMacro2
End Sub
Macro6 training procedure :
VBA CODE
Sub workoutMacro6()
‘Calling the training procedure Macro3
exerciseMacro3
End Sub
4. If so, please try to run the two procedures above alternately. What happened?
When trainingMacro5 is executed this procedure calls to run the training procedureMacro2 so that what appears is a message box as you can see when running the training procedureMacro2 .
When the Macro6 exercise is run what happens is an error ” Compile error: Sub or Functions not Defined ” as shown below:
Why did this happen? Yes, your guess is correct, because the declaration in the Macro3 exercise scope is private, so the procedure can only be called from module 1 and cannot be called from module 2.
Besides trying to understand a little about private and public scopes from this 3rd exercise, I also want to convey that basically the sub procedure in a standard module scope is public so that if you don’t write the Public keyword in a VBA procedure in a standard module, it will be considered as public ( see exerciseMacro1 and exerciseMacro2 ) and is only considered private if you include the keyword “Private” in the procedure ( exerciseMacro3 ).
If you are still confused by the explanation on this page, I really understand because of my limited ability to choose words. For that, don’t hesitate to ask through the comments section that is already available.
So first our discussion about Modules and Procedures in VBA Excel . If this tutorial is useful, please also share it so that your other friends also get the benefits.
Thank you, see you in the next series of Basic VBA guides we will learn about Data Types in Excel VBA.

Stanley Sanchez is a freelance writer, editor, and blogger for hire. He has 8 years of experience in copywriting and editing, with a focus on web content development, SEO promotions, social media marketing, and the production of blogs. He specializes in teaching blog writers how to express their stories through words. In his spare time, he enjoys reading about science and technology.
Знакомство с понятиями модуль, процедура, форма в VBA Excel. Модули разных типов. Создание пользовательской формы. Встроенные диалоговые окна.
Самый простой способ перейти в редактор VBA — при активном окне программы Excel нажать сочетание клавиш Alt+F11 (здесь используется левая клавиша Alt). Это сочетание работает во всех версиях программы. Если в открывшемся окне нет слева окна проводника «Project-VBAProject», вызовите его через главное меню, выбрав «View» — «Project Explorer». Внутренние окна в редакторе VBA можно перетаскивать и размещать в других местах главного окна.
Модули рабочей книги Excel представляют из себя файлы, предназначенные для создания и хранения программного кода в виде процедур (подпрограмм, функций и пользовательских свойств). Модули бывают нескольких типов: стандартные модули и модули классов (рабочих книг, рабочих листов, диаграмм, пользовательских форм).
Стандартный модуль
Стандартный модуль представляет из себя отдельный файл, встроенный в рабочую книгу Excel и принадлежащий всему проекту VBA (VBAProject) со всеми его объектами (ThisWorkbook, Worksheets, Charts, UserForms). Стандартный модуль можно экспортировать, импортировать или удалить. Его публичные процедуры с уникальными именами доступны во всех остальных модулях рабочей книги без дополнительной адресации. Для публичных процедур с неуникальными именами требуется указание имени модуля, из которого они вызываются.
Создание стандартного модуля:
- Откройте рабочую книгу Excel, в которую планируете добавить новый стандартный модуль, или создайте новую книгу в учебных целях.
- Откройте редактор VBA сочетанием клавиш Alt+F11.
- В окне редактора VBA нажмите на пункт меню «Insert» и в открывшемся списке выберите «Module».
Таким образом, вы создали новый стандартный модуль. В проводнике справа появилась папка «Modules» и в ней файл «Module1» (или «Module» с другим номером, если в вашей книге модули уже были). Такие же модули создаются при записи макросов встроенным рекордером.
Открыть или перейти в окно открытого стандартного модуля можно, дважды кликнув по его имени в проводнике, или открыв на нем правой кнопкой мыши контекстное меню и выбрав «View Code». Кроме того, все уже открытые модули доступны во вкладке «Window» главного меню.
Важное примечание: в Excel 2007-2016 книги с программными модулями сохраняются как «Книга Excel с поддержкой макросов (.xlsm)». Если вы добавили модуль в книгу «Книга Excel (.xlsx)», то, при ее сохранении или закрытии, программа Excel предложит сохранить ее как «Книга Excel с поддержкой макросов (.xlsm)», иначе изменения (созданные или импортированные модули) не сохранятся.
Модули классов
К модулям классов относятся модули книг, рабочих листов, диаграмм и пользовательских форм.
Модуль книги
Модуль книги принадлежит только объекту Workbook (Рабочая книга). Открыть или перейти в окно открытого модуля книги можно, дважды кликнув в проводнике на пункте «ЭтаКнига», или открыв на нем правой кнопкой мыши контекстное меню и выбрав «View Code». Кроме того, открытый модуль доступен во вкладке «Window» главного меню.
Модуль листа
Модуль листа принадлежит только объекту Worksheet (Рабочий лист). Открыть модуль листа можно, дважды кликнув в проводнике по его имени, или открыв на нем правой кнопкой мыши контекстное меню и выбрав «View Code». Кроме того, перейти в модуль листа можно из рабочей книги, кликнув правой кнопкой мыши по ярлыку этого листа и выбрав в контекстном меню «Просмотреть код». Открытый модуль доступен во вкладке «Window» главного меню.
Модуль диаграммы
Модуль диаграммы принадлежит только объекту Chart (Диаграмма, вынесенная на отдельный лист рабочей книги). Открыть его можно так же, как и модуль рабочего листа.
Модуль формы
Модуль формы принадлежит только объекту UserForm (Пользовательская форма). Откройте редактор VBA сочетанием клавиш Alt+F11 и нажмите на пункт меню «Insert». В открывшемся списке выберите «UserForm». Таким образом вы создадите новую пользовательскую форму «UserForm1». В проводнике справа появилась папка «Forms» и в ней файл «UserForm1». Перейти в модуль формы можно, дважды кликнув по самой форме, или кликнув по имени формы в проводнике правой кнопкой мыши и выбрав в контекстном меню «View Code». Кроме того, открытый модуль доступен во вкладке «Window» главного меню.
Стандартных модулей в одной книге можно создать любое количество, модуль книги только один, модулей листов или форм только по одному для каждого экземпляра листа или формы.
Между открытыми окнами форм и модулей можно переходить, нажав в главном меню вкладку «Window», где перечислены все открытые модули и формы (активный объект отмечен галочкой).
Процедура
Процедуры VBA Excel, размещаемые в любом модуле, подразделяются на 3 типа:
- Sub (подпрограмма),
- Function (функция),
- Property (пользовательские свойства).
Главное отличие функции от подпрограммы заключается в том, что функция возвращает результат вычислений, а подпрограмма — нет. Процедура Property предназначена для создания пользовательских свойств и управления ими (используется не часто).
В редакторе VBA Excel перейдите в стандартный модуль и нажмите на пункт меню «Insert». В открывшемся списке выберите «Procedure…». Появится окно с предложением ввести название процедуры, выбрать тип и зону видимости. Создайте пару процедур с разной зоной видимости, пусть одна будет Sub, а другая — Function. В промежутке между началом и концом процедуры пишется программный код.
|
Private Sub Test() ‘Здесь пишется программный код End Sub |
Зона видимости Private означает, что эту процедуру можно вызвать только из того же модуля, в котором она записана.
Зона видимости Public означает, что эту процедуру можно вызвать не только из того же модуля, в котором она записана, но и из любого другого модуля этой книги и даже из модулей других книг.
Публичная процедура (Public) может быть записана и без явного указания видимости — зона видимости Public предполагается по умолчанию.
Первая запись:
и вторая запись:
равнозначны.
Форма
Формы в VBA Excel используются для создания диалоговых окон. Процедура создания новой формы описана в параграфе «Модуль формы». Обычно, вместе с новой формой открывается панель «ToolBox» с элементами управления, которые можно добавлять на форму. Если вы закрыли панель с элементами управлениями, отобразить ее снова можно через главное меню, выбрав «View» — «ToolBox».
Стоит добавить, что в VBA Excel есть два встроенных диалоговых окна — MsgBox и InputBox.
MsgBox — это окно для вывода информации с возвратом числового значения кнопки, нажатой пользователем.
InputBox — это окно с приглашением пользователя ввести какую-либо текстовую информацию. Есть еще расширенная версия этого окна — Application.InputBox, которую можно использовать для записи адреса выделяемого диапазона ячеек и не только для этого.
If you’ve started using Excel VBA, perhaps using the Macro recorder, or writing code directly, you’ll have discovered that VBA code is contained in modules within the workbook. This article describes the four different kinds of modules, general purpose, workbook, worksheet and userform, and then describes how VBA code can be copied from one file to another by copying modules.
If you’ve started using Excel VBA, perhaps using the Macro recorder, or writing code directly, you’ll have discovered that VBA code is contained in modules within the workbook. This article describes the four different kinds of modules, general purpose, workbook, worksheet and userform, and then describes how VBA code can be copied from one file to another by copying modules.
General Purpose Modules
Suppose you create and saving a macro in Excel using the macro recorder. To see the VBA code created, you can choose the Excel option to edit the macro and the VBA interface opens showing you the code created by the recorder. Alternatively you can open the VBA editor by using ALT + F11.
The code is contained in a module shown on the right of the VBA display. If you look at the left hand Project Explorer view your see the current workbook listed along with all the currently available worksheets. Under the worksheet you’ll see the VBA module under the workbook file details under a Module heading. VBA created using the macro recorder appears in a general purpose module. If you exit the VBA screen and return to the normal Excel view, you might then create more macros. If you do this the additional macros are placed in the same general purpose module with a line separator.
If you save and close the workbook, then re-open it and create another macro, the VBA code is created in a new general purpose module, so over time if you create macros in different Excel sessions, your code is stored in several general purpose modules, all accessible via the VBA interface. If you wish to, you can copy code between workbooks, or create new code within a workbook. You can also create a new general purpose module in the VBA editor by choosing New, Module.
Workbook Code Modules
If you create code which triggers following a workbook event, such as a workbook opening, or closing, the code is placed in the workbook code module. There is only one module of this type per workbook.
With a workbook open you can view the workbook module this way. Choose ALT+F11 to open the VBA editor. Then look in the Project Explorer on the left, and you’ll see ThisWorkbook in the list of items under the filename. Double click ThisWorkbook to open the module on the right. If you want to see the code options available, choose the pop down just right of General and select Workbook. Then in the right hand pop down you’ll see all the workbook events and corresponding code options available. Select any event and the corresponding code is added to the module.
Worksheet Code Modules
Similarly there is only one worksheet code module per worksheet. To view one, in the Project Explorer double click on any of the sheet items and the module will open on the right. In the left hand pop down choose Worksheet. Now choose the right hand pop down and you’ll see all the events available. Choose any event and the corresponding code is added to the module.
User Form modules
In the VBA editor you can create one or more user forms and then add form controls, for example for data entry. A separate userform module is created for each form you create. Once a form control is added to the form, the associated code is added to the module. To create a userform in the VBA editor you choose Insert, UserForm.
Copying VBA code between workbooks
If you open more than one Excel workbook, and then open the VBA editor using, say, ALT+F11 then you’ll see all the open files listed in the Project explorer. If you want to copy VBA code, including macros, from one file to another, navigate through the Project Explorer view until you can see the module where the code is.
You may need to double click the module to open it and view the code. Then in Project Explorer drag the module where the code is onto the filename where you want to copy the code to and then release the mouse. The module is copied to the target file, and will appear under the correct module heading under the filename. Dragging a module in this way will copy the module, so the original is not moved. So you can easily copy code for macros, hand created code or forms between workbooks.
Interested in learning more about Excel VBA? A really effective way is to attend a training course and then really see your VBA skills increase to new levels.
Хитрости »
1 Май 2011 300322 просмотров
Что такое модуль? Какие бывают модули?
Любой код VBA должен где-то храниться. Для хранения кодов в VBA используются модули, которые хранятся в книге. Книга может содержать сколько угодно модулей. Каждый модуль в свою очередь может содержать множество процедур(макросов).
Все имеющиеся в книге модули можно посмотреть через редактор VBA (Alt+F11). Имеющиеся модули отображены в левой части редактора в проводнeике объектов(Project Explorer).
 рис.1
рис.1
Сам проводник объектов может быть не отображен по умолчанию и тогда его необходимо отобразить: нажать Ctrl+R либо в меню редактора VBA-View—Project Explorer

Модули делятся на пять основных типов:
- Стандартный модуль
- Модуль листа
- Модуль книги
- Модуль пользовательской формы
- Модуль класса
- Перенос, импорт и экспорт модуля
Вообще, если точнее, то всего-то два типа модуля — обычный и модуль класса, т.к. Модуль листа, Модуль книги, Модуль пользовательской формы и Модуль класса по своей сути являются модулями классов. Но я специально разделил их на несколько типов, т.к. именно такие типы часто употребляются при пояснениях в различных учебниках и на всевозможных форумах и в самих книгах Excel они по виду и некоторому функционалу различны.
Для того, чтобы создать новый стандартный модуль(Module), модуль класса(ClassModule) или пользовательскую форму(UserForm) надо просто в окне Проводника объектов(Project Explorer) щелкнуть правой кнопкой мыши, выбрать пункт Insert и затем тип добавляемого объекта(Module, ClassModule, UserForm). Так же добавить модуль можно и через меню: Insert -тип модуля.
Удалить тоже просто: щелкнуть правой кнопкой мыши на нужном модуле в окне проекта и выбрать Remove. Подробнее про удаление описано в конце этой статьи: Удаление модулей
СТАНДАРТНЫЙ МОДУЛЬ
на рис.1 Module1.
Самый распространенный тип модулей, который используется в большинстве случаев. Именно в них макрорекордер создает записываемые макросы. Все коды и процедуры в таких модулях пишутся вручную, либо копируются из других источников(другого модуля, с этого сайта и т.п.). В основном именно в стандартных модулях содержится большая часть кодов. Они предназначены для хранения основных процедур и Public переменных, которые могут быть доступны впоследствии из любого модуля. Как создать стандартный модуль: в окне проводника объектов щелкаем правой кнопкой мыши-Insert—Module. При записи макрорекордером модули создаются автоматически и им автоматически присваиваются имена.
Многие коды, опубликованные в статьях на сайте необходимо размещать именно в стандартных модулях. Для этого достаточно создать новый стандартный модуль, скопировать текст кода с сайта и вставить.
МОДУЛЬ ЛИСТА
Лист1 или Sheet1 — на рис.1: Лист1(Лист1),Лист2(Лист2),Лист3(Лист3).
Для каждого листа книги имеется свой отдельный модуль. Попасть в модуль листа проще, чем в остальные модули. Для этого надо просто щелкнуть правой кнопкой мыши по ярлычку листа и выбрать из контекстного меню пункт Исходный текст(View Code)
в зависимости от версии Excel этот пункт на русском может называться так же: Просмотреть код или Исходный код
:

Можно и более трудным путем пойти — через редактор VBA: Alt+F11 и в окне Проводника объектов(Project Explorer) дважды щелкнуть по объекту с именем листа или правая кнопка мыши на модуле листа —View code.
Размещая код в модуле листа следует помнить, что при копировании или переносе данного листа в другую книгу код так же будет скопирован, т.к. является частью листа. Это и плюс и минус одновременно. Плюс в том, что разместив код в модуле листа можно использовать этот лист в качестве шаблона для распространения со своими кнопками вызова этих кодов(в том числе создания книг кодом) и весь функционал будет доступен. Минус же заключается в некоторых нюансах обращения к ячейкам(подробнее можно ознакомиться в этой статье: Как обратиться к диапазону из VBA) и необходимости размещения ВСЕХ используемых процедур в этом листе, иначе при переносе в другие книги коды могут работать с ошибками.
В модуле листа содержатся встроенные событийные процедуры, каждая из которых отвечает за обработку определенного события на этом листе. Посмотреть их можно так: выбираете объект(на рисунке ниже список в левой части) Worksheet, а в правом списке выбираете событие(в этом списке все процедуры, доступные для выбранного листа):

Процедуры, события для которых уже используются, выделяются жирным шрифтом.
Названия событийных процедур носят достаточно информативные имена и большая их часть не нуждается в тщательной расшифровке. Но самые наиболее части применяемые в любом случае считаю нужным описать:
- Activate — возникает при активации самого листа(но не возникает, если произошел переход из одной книги в другую и этот лист является там активным)
- BeforeDoubleClick — возникает при двойном клике мыши на любой ячейке листа. Важно обращать внимание на передаваемые аргументы: Target и Cancel. Target — ссылка на ячейку, в которой было произведено действие; Cancel — отвечает за отмену режима редактирования
- BeforeRightClick — возникает при клике правой кнопкой мыши на любой ячейке листа. Важно обращать внимание на передаваемые аргументы: Target и Cancel. Target — ссылка на ячейку, в которой было произведено действие; Cancel — отвечает за отмену показа всплывающего меню
- Calculate — возникает при пересчете функций и формул на листе
- Change — возникает при изменении значений ячеек на листе. Важно обращать внимание на передаваемый аргумент Target. Target — ссылка на ячейку, которая была изменена. Может отличаться от активной в момент обработки ячейки
- Deactivate — возникает при переходе с этого листа на другой лист этой же книги
- FollowHyperlink — возникает при переходе по гиперссылке, созданной в этом листе
- SelectionChange — возникает при изменении адреса выделенной ячейки/области. Важно обращать внимание на передаваемый аргумент Target. Target — ссылка на диапазон ячеек, которые были выделены. Совпадает с выделенными на текущий момент ячейками
Достаточно важный момент: если захотите познакомиться поближе с событийными процедурами, всегда обращайте внимание на переменные, которые передаются в качестве аргументов в процедуру. В большинстве случаев рекомендую использовать именно эти переменные, а не выдумывать всякие возможности для вычисления объекта, который послужил причиной возникновения события. Для события листа Worksheet_Change это переменная Target. Для примера вставьте приведенный ниже код в модуль любого листа:
Private Sub Worksheet_Change(ByVal Target As Range)
    MsgBox "Адрес измененной ячейки: " & Target.Address & _
           "; Адрес активной ячейки: " & Selection.Address, vbInformation, "www.excel-vba.ru"
End Sub
После этого запишите в ячейку A1 значение 5 и нажмите Enter. Событие Change сработает в момент завершения редактирования — т.е. в момент нажатия Enter. При этом будет произведен переход на ячейку A2(в большинстве случаев, если настройками не задано иное) и появится сообщение, которое покажет, что изменили ячейку A1, а выделена сейчас A2. Т.е. Target — это всегда ссылка именно на измененную ячейку независимо от того, что сейчас выделено. Данное событие(Worksheet_Change) не будет срабатывать при изменении значений ячеек с формулами. Только ручной ввод.
Примечание: для всех кодов, приведенных на сайте, достаточно просто открыть необходимый модуль(книги или листа) и вставить предложенный код. Корректировка может понадобиться только в случаях, когда в модуле Листа или Книги вашего файла уже имеется код в необходимой событийной процедуре.
МОДУЛЬ КНИГИ
ЭтаКнига или ThisWorkbook:
В модуль книги можно попасть только через проводник объектов(Project Explorer) редактора VBA — двойной щелчок по ЭтаКнига (ThisWorkbook) или правая кнопка мыши на модуле —View code. В модуле книги так же содержатся «встроенные» событийные процедуры. Так же как и для листа выбираем в списке объектов(вверху слева) Workbook. В правом окне выбора процедур, так же как и с модулем листа, будут все процедуры, доступные для объекта ЭтаКнига. Пример использования событийных процедур книги можно посмотреть в статье Как отследить событие(например выделение ячеек) в любой книге?
Но там применяются все те же правила — главное не забывать про аргументы, доступные из этих процедур и передаваемые им самим Excel. Например, для события Workbook_BeforeClose доступен аргумент Cancel. Это можно использовать, если не хотите, чтобы книгу закрыл пользователь, не заполнив ячейку A1. Вот пример подобного кода:
Private Sub Workbook_BeforeClose(Cancel As Boolean)
    If Me.Sheets("Отчет").Range("A1").Value = "" Then
        MsgBox "Необходимо заполнить ячейку A1 на листе 'Отчет'", vbCritical, "www.excel-vba.ru"
        Cancel = True 'отменяем закрытие книги
    End If
End Sub
Из кода видно, что на листе «Отчет» должна быть не пустой ячейка A1(лист «Отчет» тоже должен существовать в этой книге). Но есть и еще одна вещь — какое-то Me. Это краткое обращение к объекту модуля класса, в данном случае это равнозначно обращению ThisWorkbook. И еще один пример кода для модуля ЭтаКнига, который запрещает сохранять исходную книгу, разрешая сохранить её только через пункт Сохранить как(SaveAs):
Private Sub Workbook_BeforeSave(ByVal SaveAsUI As Boolean, Cancel As Boolean)
    If SaveAsUI = False Then 'используется простое сохранить
        MsgBox "Эта книга является шаблоном. Сохранять её можно только через Сохранить как", vbCritical, "www.excel-vba.ru"
        Cancel = True 'отменяем сохранение книги
    End If
End Sub
Такое может потребоваться, если книга является шаблоном с полями для заполнения и необходимо предотвратить случайное сохранение исходного документа. Хотя это можно так же сделать без макросов — книгу можно сохранить с правами только на чтение.
МОДУЛИ ФОРМ
UserForm — на рис.1 UserForm1.
Содержатся внутри
Пользовательской формы(UserForm)
и её объектов. В Пользовательских формах в основном все завязано именно на событийных процедурах самой формы и на элементах этой формы(Кнопки, ТекстБоксы, КомбоБоксы(выпадающие списки) и т.д.). Очень удобно использовать Пользовательские формы в своих приложениях для общения с пользователем. Т.к. через формы очень удобно отслеживать действия пользователя и можно запретить доступ к листам с данными, путем их скрытия. Создается форма так же как и модуль: в окне проводника объектов щелкаем правой кнопкой мыши-Insert—UserForm. Примеры кодов с использованием форм можно посмотреть в статьях: Каждому пользователю свой лист/диапазон, Как оставить в ячейке только цифры или только текст?
МОДУЛЬ КЛАССА
ClassModule — на рис.1 Class1.
В большинстве случаев создается специально для отслеживания событий различных объектов. Вряд ли понадобиться начинающим изучение VBA, хотя все зависит от поставленной задачи. Но обычно начинающим изучать это кажется слишком сложным. В любом случае, перед работой с модулями классов лучше научиться хоть чуть-чуть работать с обычными модулями и самостоятельно писать процедуры. Как добавить такой модуль: в окне проводника объектов щелкаем правой кнопкой мыши-Insert—Class Module. Подробнее про модули классов и работу с ними можно почитать в этой статье: Работа с модулями классов. Там описаны все основные принципы и приложен файл примера.
Действия по удалению любого из модулей одинаковы для всех типов. Для этого необходимо перейти в проект VBA нужной книги, выбрать нужный модуль, щелкнуть по нему правой кнопкой мыши и в появившемся меню выбрать Remove (Имя модуля)…(Remove Module1, Remove UserForm1, Remove Class1 и т.п.). После этого появится окно с запросом «Do you want to export (имя модуля) before removing it?». Это означает, что VBA спрашивает: хотите ли Вы сохранить копию кодов модуля перед удалением? Как правило выбирать следует Нет. Но если Вы хотите сохранить текст кодов из удаляемого модуля в отдельном файле, то соглашаетесь, нажав Да. Будет предложено выбрать папку для сохранения модуля и можно даже задать ему отдельное имя.
Иногда нужно модуль из одной книги переместить в другую. Сделать это можно несколькими способами. Самый простой — открыть обе книги, перейти в проводник проектов -найти нужный модуль -захватить его левой кнопкой мыши и не отпуская кнопку перетащить на проект другой книги:

Следует помнить, что так можно перенести и скопировать только стандартный модуль, модуль класса и модуль
UserForm
. Коды модулей листов и книги придется переносить как обычный текст: переходим в модуль
ЭтаКнига
(откуда хотим копировать) -копируем весь код -переходим в модуль ЭтаКнига второй книги и вставляем скопированное:

Экспорт модуля(сохранение в отдельный файл)
Если же надо сохранить стандартный модуль, модуль класса или модуль формы и не переносить сразу же в другую книгу, то можно экспортировать модуль. Для чего это может быть нужно? Как правило, чтобы перенести коды из дома на работу, переслать кому-то на другой ПК(пересылка файла с макросами может быть запрещена политикой безопасности компании) и т.п. Делается это просто: щелкаем на модуле правой кнопки мыши —Export file.
У экспортируемых модулей есть разные расширения, в зависимости от типа модуля. Для стандартных модулей это
.bas
(Module1.bas), для модулей класса —
.cls
(Class1.cls). А вот для модулей форм будет создано целых два файла:
UserForm1.frm
и
UserForm1.frx
. Их важно хранить вместе — один без другого не может быть импортирован в дальнейшем в файл. В файле
.frx
хранится информация об визуальном отображении формы и её элементах, если можно так сказать. В файле
.frm
хранятся непосредственно тексты кодов для формы и служебная информация(имя и размеры формы, некоторые глобальные директивы и ссылка на файл .frx). Поэтому не рекомендуется без соответствующих навыков переименовывать эти два файла в надежде, что потом все заработает.
Импорт модуля(перенос экспортированного ранее в новую книгу)
Для переноса экспортированного модуля в другую книгу надо просто в проводнике объектов выделить нужный проект правой кнопкой мыши —Import module -выбрать в диалоговом окне нужный модуль.
Экспортировать можно любой модуль, а вот импортировать — нет. Модули листов и книг хоть и экспортируются в отдельные файлы(кстати, с расширением .cls), но импортировать их не получится в том виде, как это предполагается. Они будут импортированы как новые модули класса и только. Поэтому для переноса кодов из модулей листов и книг придется использовать все равно копирование и вставку непосредственно кодов.
И в довершение — можно переносить модули автоматически, кодами VBA: Как добавить код процедуры программно, скопировать модуль
Также см.:
Копирование модулей и форм из одной книги в другую
Что такое макрос и где его искать?
Как удалить макросы в книге?
Статья помогла? Поделись ссылкой с друзьями!
![]() Видеоуроки
Видеоуроки
Поиск по меткам
Access
apple watch
Multex
Power Query и Power BI
VBA управление кодами
Бесплатные надстройки
Дата и время
Записки
ИП
Надстройки
Печать
Политика Конфиденциальности
Почта
Программы
Работа с приложениями
Разработка приложений
Росстат
Тренинги и вебинары
Финансовые
Форматирование
Функции Excel
акции MulTEx
ссылки
статистика
“Classes struggle, some classes triumph, others are eliminated. Such is history” – Chairman Mao
A Quick Guide to the VBA Class Module
| Item | Explanation |
|---|---|
| Class Module | Allows the user to create their own objects. |
| Method | A public function or sub in the class module. |
| Member variable | A variable declared in the class module. |
| Property | Special function/subs that behave like variables when used |
| Property types | Get, Set and Let. |
| Event — Initialize | Sub that automatically runs when the class module object is created. |
| Event — Terminate | Sub that automatically runs when the class module object is deleted. |
| Declaring and Creating — Static |
Dim o As New Class1 |
| Declaring and Creating — Dynamic | Dim o As Class1 Set o = New Class1 |
| Calling a class module sub | o.WriteValues Total |
| Calling a class module function | Amount = o.Calculate() |
| Using a class module property | o.Amount = 1 Total = o.Amount |
The Webinar
Members of the Webinar Archives can access the webinar for this article by clicking on the image below.
(Note: Archive members have access to the webinar archive.)

Introduction
VBA Class Modules allow the user to create their own objects. If you are not familiar with objects then I would highly recommend that you first check out my previous post VBA Objects – The Ultimate Guide.
In languages such as C# and Java, classes are used to create objects. Class Modules are the VBA equivalent of these classes. The major difference is that VBA Class Modules have a very limited type of Inheritance* compared to classes in the other languages. In VBA, Inheritance works in a similar way to Interfaces** in C#Java.
In VBA we have built-in objects such as the Collection, Workbook, Worksheet and so on. The purpose of VBA Class Modules is to allow us to custom build our own objects.
Let’s start this post by looking at why we use objects in the first place.
*Inheritance is using an existing class to build a new class.
**Interfaces are a form of Inheritance that forces a class to implement specifics procedures or properties.
Download the Source Code
Why Do We Use Objects
Using objects allows us to build our applications like we are using building blocks.
The idea is that the code of each object is self-contained. It is completely independent of any other code in our application.
This is similar to how things are built using Lego® bricks. There are many different types of Lego® components used. For example, a block, steering wheel, and laser are different items. They behave completely independently of each other. The wheel spins, the laser rotates etc. Yet we can connect them together to create a building, vehicle, space station and so on.
If you are still not clear about this then don’t worry. We’ll be breaking it all down into simple terms in the rest of this post.
Advantages of Using Objects
Treating parts of our code as blocks provide us with a lot of great advantages
- It allows us to build an application one block at a time.
- It is much easier to test individual parts of an application.
- Updating code won’t cause problems in other parts of the application.
- It is easy to add objects between applications.

Not a good look for your code © BigStockPhoto.com
Disadvantages of Using Objects
With most things in life there are pros and cons. Using VBA class modules is no different. The following are the disadvantages of using class module to create objects
- It takes more time initially to build applications*.
- It is not always easy to clearly define what an object is.
- People new to classes and objects can find them difficult to understand at first.
*If you create an application using objects it will take longer to create it initially as you have to spend more time planning and designing it. However, in the long run it will save you a huge amount of time. Your code will be easier to manage, update and reuse.
Creating a Simple Class Module
If you would like to see working examples of this code you can download the source code from the top of this post.
Let’s look at a very simple example of creating a class module and using it in our code.
To create a class module we right-click in the Project window and then select Insert and Class Module

Adding a Class Module
Our new class is called Class1. We can change the name in the Properties window as the following screenshot shows:

Let’s change the name of the class module to clsCustomer. Then we will add a variable to the class module like this:
Public Name As String

We can now use this class module in any module(standard or class) in our workbook. For example
' Create the object from the class module
Dim oCustomer As New clsCustomer

' Set the customer name
oCustomer.Name = "John"

' Print the name to the Immediate Window(Ctrl + G)
Debug.Print oCustomer.Name
Class Module versus Objects
People who are new to using classes and VBA class modules, often get confused between what is a class and what is an object.
Let’s look at a real world example. Think of a mass produced item like a coffee mug. A design of the mug is created first. Then, thousands of coffee mugs are created from this design.
This is similar to how class modules and objects work.
The class module can be thought of as the design.
The object can be thought of as the item that is created from the design.
The New keyword in VBA is what we use to create an object from a class module. For example:
' Creating objects using new
Dim oItem As New Class1
Dim oCustomer1 As New clsCustomer
Dim coll As New Collection
Note: We don’t use New with items such as Workbooks and Worksheets. See When New is not required for more information.
VBA Class Modules Versus VBA Normal Modules
Writing code in a class module is almost the same as writing code in a normal module. We can use the same code we use in normal modules. It’s how this code is used which is very different.
Let’s look at the two main differences between the class and the normal module. These often cause confusion among new users.
Difference 1 – How the modules are used
If you want to use a sub/function etc. from a class module you must create the object first.
For example, imagine we have two identical PrintCustomer subs. One is in a class module and one is in a normal module…
' CLASS MODULE CODE - clsCustomer
Public Sub PrintCustomer()
    Debug.Print "Sample Output"
End Sub
' NORMAL MODULE CODE
Public Sub PrintCustomer()
    Debug.Print "Sample Output"
End Sub
You will notice the code for both is exactly the same.
To use the PrintCustomer sub from the class module, you must first create an object of that type
' Other Module
' https://excelmacromastery.com/
Sub UseCustomer()

    Dim oCust As New clsCustomer
    oCust.PrintCustomer

End Sub
To use PrintCustomer from the normal module you can call it directly
' Other Module
' https://excelmacromastery.com/
Sub UseCustomer()

    PrintCustomer

End Sub
Difference 2 – Number of copies
When you create a variable in a normal module there is only one copy of it. For a class module, there is one copy of the variable for each object you create.
For example, imagine we create a variable StudentName in both a class and normal module:
' NORMAL MODULE
Public StudentName As String
' CLASS MODULE called clsStudent
Public StudentName As String
For the normal module variable there will only be one copy of this variable in our application.
StudentName = "John"
For the class module, a new copy of the variable StudentName is created each time a new object is created.
Dim student1 As New clsStudent
Dim student2 As New clsStudent

student1.StudentName = "Bill"
student2.StudentName = "Ted"
When you fully understand VBA class modules, these differences will seem obvious.
The Parts of a Class Module
There are four different items in a class module. These are
- Methods – functions/subs.
- Member variables – variables.
- Properties– types of functions/subs that behave like variables.
- Events – subs that are triggered by an event.
You can see they are all either functions, subs or variables.
Let’s have a quick look at class that has examples of each of these:
' CLASS MODULE CODE from clsAccount
' https://excelmacromastery.com/vba-class-modules/

' Member variable
Private m_balance As Double

' Properties
Property Get Balance() As Double
    Balance = m_balance
End Property

Property Let Balance(value As Double)
    m_balance = value
End Property

' Event - triggered when class created
Private Sub Class_Initialize()
    m_balance = 100
End Sub

' Methods
Public Sub Withdraw(amount As Double)
    m_balance = m_balance - amount
End Sub

Public Sub Deposit(amount As Double)
    m_balance = m_balance + amount
End Sub
The following code demonstrates how this class could be used:
' This sub uses the clsAccount class
' The results are printed to the Immediate Window(Ctrl + G)
' https://excelmacromastery.com/vba-class-modules/
Sub Demo_clsAccount()

    Dim oAccount As New clsAccount

    ' Print the balance
    Debug.Print "Starting balance is: " & oAccount.Balance

    ' Deposit money
    oAccount.Deposit 25

    ' Print the balance
    Debug.Print "Balance after deposit is: " & oAccount.Balance

    ' Withdraw Money
    oAccount.Withdraw 100

    ' Print the balance
    Debug.Print "Balance after withdrawl is: " & oAccount.Balance

End Sub
If we run the code we will get the following:
Starting balance is: 100
Balance after deposit is: 125
Balance after withdrawl is: 25
Now that we have seen examples, let’s take a look at each of these in turn.
Class Module Methods
Methods refer to the procedures of the class. In VBA procedures are subs and functions. Like member variables they can be Public or Private.
Let’s look at an example:
' CLASS MODULE CODE for clsExample
' https://excelmacromastery.com/vba-class-modules/

' Public procedures can be called from outside the object
Public Sub PrintText(text As String)
    Debug.Print text
End Sub

Public Function Calculate(amount As Double) As Double
    Calculate = amount - GetDeduction
End Function

' private procedures can only be called from within the Class Module
Private Function GetDeduction() As Double
    GetDeduction = 2.78
End Function
We can use the clsExample class module like this:
' Sub used to demonstrate Class clsExample
' https://excelmacromastery.com/vba-class-modules/
Public Sub ClassMembers()

    Dim oSimple As New clsExample

    oSimple.PrintText "Hello"

    Dim total As Double
    total = oSimple.Calculate(22.44)

    Debug.Print total

End Sub
Class Module Member Variables
The member variable is very similar to the normal variable we use in VBA. The difference is we use Public or Private instead of Dim.
' CLASS MODULE CODE

Private Balance As Double
Public AccountID As String
Note: Dim and Private do exactly the same thing but the convention is to use Dim in sub/functions and to use Private outside sub/functions.
The Public keyword means the variable can be accessed from outside the class module. For example:
' This code will give an ERROR!!
Sub Demo_BankAccount()

    Dim oAccount As New clsBankAccount

    ' Valid - AccountID is public
    oAccount.AccountID = "499789"

    ' ERROR - Balance is private
    oAccount.Balance = 678.9

End Sub
In the above example, we cannot access Balance because it is declared as Private. We can only use a Private variable within the class module. We can use in a function/sub in the class module e.g.
' CLASS MODULE CODE
' https://excelmacromastery.com/
Private Balance As Double

Public Sub SetBalance()
    Balance = 100
    Debug.Print Balance
End Sub
It is considered poor practice to have public member variables. This is because you are allowing code outside the object to interfere with how the class works. The purpose of the using classes is so that we hide what is happening from the caller.
To avoid the user directly talking to our member variables we use Properties.
Class Module Properties
- Get – returns an object or value from the class
- Let – sets a value in the class
- Set – sets an object in the class
Format of VBA Property
The normal format for the properties are as follows:
Public Property Get () As Type
End Property

Public Property Let (varname As Type )
End Property

Public Property Set (varname As Type )
End Property
We have seen already that the Property is simply a type of sub. The purpose of the Property is to allow the caller to get and set values.
Why we use Properties
Why can’t we just make the variables Public and use them directly?
Let’s explain with some examples. Imagine we have a class that maintains a list of Countries. We could store the list as an array
' Use array to store countries
' https://excelmacromastery.com/
Public arrCountries As Variant

' Set size of array when class is initialized
' https://excelmacromastery.com/
Private Sub Class_Initialize()
    ReDim arrCountries(1 To 1000)
End Sub
When the user wants to get the number of countries in the list they could do this:
' NORMAL MODULE CODE
Dim oCountry As New clsCountry

' Get the number of items
NumCountries = UBound(oCountry.arrCountries) - LBound(oCountry.arrCountries) + 1
There are two major problems with the above code:
- To get the number of countries you need to know how the list is stored e.g. Array.
- If we change the Array to a Collection, we need to change all code that reference the array directly.
To solve these problems we can create a function to return the number of countries
' CLASS MODULE CODE - clsCountryList
' Array
Private arrCountries() As String

Public Function Count() As Long
    Count = UBound(arrCountries) + 1
End Function
We then use it like this:
' MODULE CODE
Dim oCountries As New clsCountries

Debug.Print "Number of countries is " & oCountries.Count
This code solves the two problems we listed above. We can change our Array to a Collection and the caller code will still work e.g.
' CLASS MODULE CODE
' Collection
' https://excelmacromastery.com/
Private collCountries() As Collection

Public Function Count() As Long
    Count = collCountries.Count
End Function
The caller is oblivious to how the countries are stored. All the caller needs to know is that the Count function will return the number of countries.
As we have just seen, a sub or function provides a solution to the above problems. However, using a Property can provide a more elegant solution.
Using a Property instead of a Function/Sub
Instead of the creating a Count Function we can create a Count Property. As you can see below they are very similar:
' Replace this
Public Function Count() As Long
    Count = UBound(m_countries) - LBound(m_countries) + 1
End Function

' With this
Property Get Count() As Long
    Count = UBound(m_countries) - LBound(m_countries) + 1
End Property
In this scenario, there is not a lot of difference between using the Property and using a function. However, there are differences. We normally create a Get and Let property like this:
' https://excelmacromastery.com/vba-class-modules/

Private m_totalCost As Double

Property Get totalCost() As Long
     totalCost = m_totalCost
End Property

Property Let totalCost(value As Long)
     m_totalCost = value
End Property
Using Let allows us to treat the property like a variable. So we can do this
oAccount.TotalCost = 6
The second difference is that using Let and Get allows us to use the same name when referencing the Get or Let property. So we can use the property like a variable. This is the purpose of using Properties over a sub and function.
oAccount.TotalCost = 6
value = oAccount.TotalCost
If we used a function and a sub then we cannot get the behaviour of a variable. Instead we have to call two different procedures e.g.
oAccount.SetTotalCost 6
value = oAccount.GetTotalCost
You can also see that when we used Let we can assign the value like a variable. When we use SetTotalCost , we had to pass it as a parameter.
The Property in a Nutshell
- The Property hides the details of the implementation from the caller.
- The Property allows us to provide the same behaviour as a variable.
Types of VBA Property
There are three types of Properties. We have seen Get and Let already. The one we haven’t looked at is Set.
Set is similar to Let but it is used for an object(see Assigning VBA Objects for more detail about this).
Originally in Visual Basic, the Let keyword was used to assign a variable. In fact, we can still use it if we like.
' These line are equivalent
Let a = 7
a = 7
So we use Let to assign a value to a variable and we use Set to assign an object to an object variable.
' Using Let
Dim a As Long
Let a = 7

' Using Set
Dim coll1 As Collection, coll2 As Collection
Set coll1 = New Collection
Set coll2 = coll1
- Let is used to assign a value to a basic variable type.
- Set is used to assign an object to an object variable.
In the following example, we use Get and Let properties for a string variable:
' CLASS MODULE CODE for clsPerson
' https://excelmacromastery.com/vba-class-modules/

' SET/LET PROPERTIES for a variable
Private m_name As String

' Get/Let Properties
Property Get name() As String
    name = m_name
End Property

Property Let name(name As String)
    m_name = name
End Property
We can then use the name properties like this:
' Testing Let and Set for the clsPerson Class
' https://excelmacromastery.com/vba-class-modules/
Sub TestLetSet()

    Dim name As String
    Dim oPerson As New clsPerson

    ' Let Property
    oPerson.name = "Bill"

    ' Get Property
    name = oPerson.name

End Sub
In the next example, we use Get and Set properties for an object variable:
' CLASS MODULE CODE for clsCurrency
' https://excelmacromastery.com/vba-class-modules/

Private m_Prices As Collection

' Get/Set Properties
Property Get Prices() As Collection
    Set Prices = m_Prices
End Property

Property Set Prices(newPrices As Collection)
    Set m_Prices = newPrices
End Property
We can then use the properties like this:
' The code below demonstrates how to use the LetSet properties with a class.
'
' 1. The sub creates a collection and adds value.
' 2. We then add it to the clsCurrency class object using the Set Property.
' 3. We then read it from the class object usiing the Get property.
'
' https://excelmacromastery.com/vba-class-modules/
Sub TestLetSet()

    ' Create a collection and add prices
    Dim Prices As New Collection
    Prices.Add 21.23
    Prices.Add 22.12
    Prices.Add 20.12

    Dim oCurrency As New clsCurrency

    ' Uses the Set property of clsCurrency to
    ' add the collection to the class
    Set oCurrency.Prices = Prices

    Dim PricesCopy As Collection
    ' Uses the Get property of clsCurrency
    ' to read the collection from the class
    Set PricesCopy = oCurrency.Prices

    ' Print the results to the Immediate Window(Ctrl + G)
    PrintCollection Prices, "Prices"
    PrintCollection PricesCopy, "Copy"

End Sub

' Print the contents of a Collection to the Immediate Window(Ctrl + G)
Sub PrintCollection(c As Collection, name As String)

    Debug.Print vbNewLine & "Printing " & name & ":"

    Dim item As Variant
    For Each item In c
        Debug.Print item
    Next item

End Sub
We use the Get property to return the values for both items. Notice that even though we use the Get Property to return the Collection, we still need to use the Set keyword to assign it.
One very important thing to understand is that when we use Set we are still referencing the same collection. Set is not creating a copy of the collection. You can read more about this here
Class Module Events
If you to see working examples of this code you can download the source code from the top of this post.
A class module has two events
- Initialize – occurs when a new object of the class is created.
- Terminate – occurrs when the class object is deleted.
In Object-Oriented languages like C++, these events are referred to as the Constructor and the Destructor. In most languages, you can pass parameters to a constructor but in VBA you cannot. We can use a Class Factory to get around this issue as we will see below.
Initialize
Let’s create a very simple class module called clsSimple with Initialize and Terminate events:
' CLASS MODULE CODE
' https://excelmacromastery.com/
Private Sub Class_Initialize()
    MsgBox "Class is being initialized"
End Sub

Private Sub Class_Terminate()
    MsgBox "Class is being terminated"
End Sub

Public Sub PrintHello()
    Debug.Print "Hello"
End Sub
In the following example, we use Dim and New to create the object.
In this case, oSimple is not created until we reference it for the first time e.g.
' https://excelmacromastery.com/
Sub ClassEventsInit2()

    Dim oSimple As New clsSimple

    ' Initialize occurs here
    oSimple.PrintHello

End Sub
When we use Set and New together the behaviour is different. In this case the object is created when Set is used e.g.
' https://excelmacromastery.com/
Sub ClassEventsInit()

    Dim oSimple As clsSimple

    ' Initialize occurs here
    Set oSimple = New clsSimple

    oSimple.PrintHello

End Sub
Note: For more information about the different between using New with Dim and using New with Set see Subtle Differences of Dim Versus Set
As I said earlier, you cannot pass a parameter to Initialize. If you need to do this you need a function to create the object first
' CLASS MODULE - clsSimple
' https://excelmacromastery.com/
Public Sub Init(Price As Double)

End Sub

' NORMAL MODULE
Public Sub Test()

    ' Use CreateSimpleObject function
    Dim oSimple As clsSimple
    Set oSimple = CreateSimpleObject(199.99)

End Sub

Public Function CreateSimpleObject(Price As Double) As clsSimple

    Dim oSimple As New clsSimple
    oSimple.Init Price

    Set CreateSimpleObject = oSimple

End Function
We will expand on this CreateSimpleObject in Example 2 to create a Class Factory.
Terminate
The Terminate event occurs when the class is deleted. This happens when we set it to Nothing
' https://excelmacromastery.com/
Sub ClassEventsTerm()

    Dim oSimple As clsSimple
    Set oSimple = New clsSimple

    ' Terminate occurs here
    Set oSimple = Nothing

End Sub
If we don’t set the object to Nothing then VBA will automatically delete it when it goes out of scope.
What this means is that if we create an object in a procedure, when that procedure ends VBA will delete any objects that were created.
' https://excelmacromastery.com/
Sub ClassEventsTerm2()

    Dim oSimple As New clsSimple

    ' Initialize occurs here
    oSimple.PrintHello

   ' oSimple is deleted when we exit this Sub calling Terminate
End Sub
Class Module Example 1
In this example, we are going to look at a very common use of a Class module.
Imagine we have the following data

We want to read the Albums based on a range of years and then create various reports.
We could use a 2D Array for this or a Collection of collections e.g.
' https://excelmacromastery.com/
For i = 2 To rg.Rows.Count

    Year = rg.Cells(i, 3)
    If startYear <= Year And endYear >= Year Then

        ' Create a new collection for each row
        Set rowColl = New Collect

        ' Add artist
        rowColl.Add rg.Cells(i, 1).Value
        ' Add Title
        rowColl.Add rg.Cells(i, 2).Value

        ' and so on

        ' Add row collection to main collection
        coll.Add rowColl

    End If

Next i
As you can imagine this code would get messy very quickly.

© BigStockPhoto.com
Lucky for us we have VBA class modules to make our life easier. We can create a class module to store the items.
' clsAlbum class module
Private m_sArtist As String
Private m_sTitle As String
Private m_sYear As String
Private m_sGenre As String
Private m_sSales As String

' Properties
' https://excelmacromastery.com/
Public Property Get Artist() As String
    Artist = m_sArtist
End Property
Public Property Let Artist(ByVal sArtist As String)
    m_sArtist = sArtist
End Property

' etc
Each time we want to add a record we can do it as follows:
' Declare the Variable
Dim oAlbum As clsAlbum

' Create new album
Set oAlbum = New clsAlbum

' Add the details
oAlbum.Artist = rg.Cells(i, 1)
oAlbum.Title = rg.Cells(i, 2)
oAlbum.Year = rg.Cells(i, 3)
oAlbum.Genre = rg.Cells(i, 4)
oAlbum.Sales = rg.Cells(i, 5)

' Add the album object to the collection
coll.Add oAlbum
You can see that this makes our code much more readable. It is clear what Artist, Title etc. are being used for.
We can then easily use this data to create reports, write to files etc.
' https://excelmacromastery.com/
Sub PrintAlbum(coll As Collection)

    Dim oAlbum As clsAlbum

    For Each oAlbum In coll
        ' Print out the title and artist for each album
        Debug.Print oAlbum.Title, oAlbum.Artist
    Next

End Sub
Below is the full code for this example:
' https://excelmacromastery.com/
Sub CreateReport()

    Dim coll As Collection
    ' read the data
    Set coll = ReadAlbums(1990, 2001)

    ' Print the album details
    PrintAlbum coll

    ' Print the total sales
    PrintTotalSales coll

End Sub

Function ReadAlbums(startYear As Long, endYear As Long) _
              As Collection

    Dim rg As Range
    Set rg = Sheet1.Range("A1").CurrentRegion

    ' Create a collection to store the albums
    Dim coll As New Collection
    Dim oAlbum As clsAlbum

    Dim i As Long, Year As Long
    For i = 2 To rg.Rows.Count

        Year = rg.Cells(i, 3)
        If startYear <= Year And endYear >= Year Then
            ' Create new album
            Set oAlbum = New clsAlbum
            ' Add the details
            oAlbum.Artist = rg.Cells(i, 1)
            oAlbum.Title = rg.Cells(i, 2)
            oAlbum.Year = Year
            oAlbum.Genre = rg.Cells(i, 4)
            oAlbum.sales = rg.Cells(i, 5)
            ' Add the album objecdt to the collection
            coll.Add oAlbum
        End If

    Next i

    Set ReadAlbums = coll

End Function

Sub PrintAlbum(coll As Collection)

    Dim oAlbum As clsAlbum
    For Each oAlbum In coll
        Debug.Print oAlbum.Title, oAlbum.Artist
    Next

End Sub

Sub PrintTotalSales(coll As Collection)

    Dim oAlbum As clsAlbum, sales As Double
    For Each oAlbum In coll
        sales = sales + oAlbum.sales
    Next

    Debug.Print "Total number sales is " & sales

End Sub
Class Module Example 2
In this example, we’re going to take things a bit further. We’re going to look at some neat tricks when using objects.
Imagine you have a list of products like in the image below.

The products have different fields so we need to use a different class module for each product type. One type for a Book row, one type for a Film row.
We’ll create our class modules first. As you can imagine the are very similar for both product types
' CLASS MODULE - clsBook
' https://excelmacromastery.com/
' Member variables
Private m_Title As String
Private m_Year As Long

' Properties
Property Get ItemType() As String
    ItemType = "Book"
End Property
Property Get Title() As String
    Title = m_Title
End Property
Property Get Year() As Long
    Year = m_Year
End Property

' Methods
Public Sub Init(rg As Range)
    m_Title = rg.Cells(1, 2)
    m_Year = CLng(rg.Cells(1, 4))
End Sub

Public Sub PrintToImmediate()
    Debug.Print ItemType, m_Title, m_Year
End Sub
' CLASS MODULE - clsFilm
' https://excelmacromastery.com/
' Member variables
Private m_Title As String
Private m_Year As Long

' Properties
Property Get ItemType() As String
    ItemType = "Film"
End Property
Property Get Title() As String
    Title = m_Title
End Property
Property Get Year() As Long
    Year = m_Year
End Property

' Methods
Sub Init(rg As Range)
    m_Title = rg.Cells(1, 2)
    m_Year = CLng(rg.Cells(1, 5))
End Sub

Public Sub PrintToImmediate()
    Debug.Print ItemType, m_Title, m_Year
End Sub
As you can see, the only real difference is the Init sub.
When we read each record we need to determine if it is a Book or Film. Then we create the appropriate object. You would imagine we would have to create a variable for each type e.g.
' One variable required for each type
Dim oBook As clsBook
Dim oFilm As clsFilm

' If book do this
Set oBook = New clsBook

' Else If film do this
Set oFilm = New clsFilm
If we had lots of different types this would get very messy indeed. The good news is we only need to use one variable!
In VBA we can declare a variable as a Variant. When we use a Variant we are essentially saying “We will decide the type of variable when the code is running”.
This is very useful when dealing with objects and allows us to get away with using one variable e.g.
' Only one variable required
Dim oItem As Variant

' If book set type to clsBook
Set oItem = New clsBook

' Else If film set type to clsFilm
Set oItem = New clsFilm
This is really useful as we only need one variable no matter how many objects we have.
A second advantage of using a Variant is this. If each Class Module has a sub/function with the same name and parameters, we can use the same variable to call it
So imagine clsBook has a function called InitBook and clsFilm has a function called InitFilm. We would need to do this:
' If clsBook
If Type = "Book" Then
    oItem.InitBook
ElseIf Type = "Film" Then
    oItem.InitFilm
However, if they have the same name, e.g. Init, we can replace the IfElseIf lines of code with one line:
    ' this will call the Init sub of whatever type oItem is set to
    oItem.Init
We can now create a function to create the appropriate object. In Object Oriented Programming, we have what is called a Class Factory. This is simply a function that creates an object based on a given type.
We saw earlier that the Initialize event does not take parameters. We can call Init in the Class Factory to get around this issue.
The full code for the ClassFactory function is here:
' https://excelmacromastery.com/
Function ClassFactory(rg As Range) As Variant

    ' Get product type
    Dim sType As String
    sType = rg.Cells(1, 1)

    ' Create an object based on the type
    Dim oItem As Variant
    Select Case sType

        Case "Book":
            Set oItem = New clsBook
        Case "Film":
            Set oItem = New clsFilm
        Case Else
            MsgBox "Invalid type"

    End Select

    ' Parse the fields to the correct class variables
    oItem.Init rg

    ' Return the product object
    Set ClassFactory = oItem

End Function
This following is our starting sub. In this sub, we read through the worksheet and pass the range to ClassFactory.
It creates the object, passes the range to the object Parse method. Then it returns the object which we add to our Collection.
' https://excelmacromastery.com/
Sub ReadProducts()

    ' Create the collection
    Dim coll As New Collection
    Dim product As Variant

    Dim rg As Range


    ' Read products from the worksheet
    Dim i As Long
    For i = 1 To 2
        Set rg = Sheet1.Range("A" & i & ":E" & i)
        Set product = ClassFactory(rg)
        coll.Add product
    Next

    ' Print the product details to the Immediate Window(Ctrl + G)
    PrintCollection coll

End Sub
We can also use the variant object to print the items. As long as both objects have a sub with the same name and parameters(e.g PrintToImmediate) we can call it using a Variant type.
' https://excelmacromastery.com/
Public Sub PrintCollection(ByRef coll As Collection)

    Dim v As Variant
    For Each v In coll
        ' Print items
        v.PrintToImmediate
    Next

End Sub
The source code for this post also includes this example using Inheritance(i.e. class interfaces). You can download the code here:
Conclusion
That concludes my post on the VBA Class Modules. In this post, we have looked at the parts of the VBA Class Module and two example cases where you would use them.
It’s important to understand that Classes and Objects is a vast topic. There are countless types of objects you can create and ways you can use them.
If you plan to use Class Modules then my advice is to start simple and get familiar with how to create a simple one. Once you have mastered the basics it will be much easier to move onto more challenging scenarios.
What’s Next?
Free VBA Tutorial If you are new to VBA or you want to sharpen your existing VBA skills then why not try out the The Ultimate VBA Tutorial.
Related Training: Get full access to the Excel VBA training webinars and all the tutorials.
(NOTE: Planning to build or manage a VBA Application? Learn how to build 10 Excel VBA applications from scratch.)
Whenever a new macro is created in excel, it is stored in a separate entity called Module.
A module can be viewed in the VBA editor window at the left pane.
A new module is created, every time, a new VBA editor window is opened.
To understand the above point, consider you are creating a new macro as explained in earlier chapter.
Now, there will be a VBA editor window with a sub created. Now close this window and create a new macro.
Now the VBA editor opens again, but this new sub will be placed in another newly created module.
But, If the same sub was created manually below the first sub, this will be placed in the same module itself.
A collection of all modules consitiute a «Project».
There are three types of modules which are as discussed below:
General or Standard Modules
These modules corresponds to macros created from the Excel View tab.
They are placed under «Modules Folder» as Shown below:
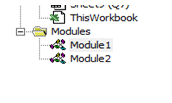
WorkBook Module
This module is related to the Entire workbook and there is always only one module of this type for any workbook.
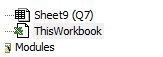
«ThisWorkbook» is the Workbook module.
All the events corresponding to the workbook can be coded here.
Worksheet Module
This module is related to the worksheet.And there as many modules as number of worksheets, each corresponding to a single worsheet. Worksheet modules only work on the sheet they are in.
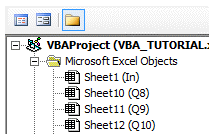
The above screenshot shows the worksheet modules.
You can find similar Excel Questions and Answer hereunder
1) How to convert a number or string into a data with the cdate function
2) Various important math functions in VBA (trigonometry, algebra, exponential, �)
3) How to format variable with VBA with the very useful format function. Define the number of decimal, the way a date is formated
4) What are the date and time function in Excel VBA
5) How to use logical operators in VBA
6) What is a function in VBA. How to create a function and how to call a function
7) How to create a subroutine in Excel VBA. Subroutines explained
 How can worksheet functions be accessed in VBA?
9) How to modify strings in VBA, what are the functions you can manipulate strings with
10) What is variable scope in VBA, how do variable can be reach from other function or routines in VBA
What is CreateObject Method in VBA and How to use CreateObject Method in Excel?
As the name suggests, the CreateObject function is used to create objects.
But why do we use CreateObject method or function if we can direct…
What is FileSystemObject (FSO) and How to Use it in VBA Excel?
The FileSystemObject is used to work with folders and files connected with the system. We can use it to access files, folders, drive, and text str…
How to Use InputBox Function in VBA Excel?
In excel, we have multiple ways to get input. We can get input using function arguments, use excel cells and ranges as input areas and then retrie…
How to Create Dependent Combobox in VBA Excel?
We know how to create a cascading dropdown on a worksheet using data validation. But how do we create a cascading combobox dropdown on VBA userfor…
How to Use ComboBox in VBA Excel Userform?
A combobox on a userform is like a drop down menu, which can be used to pick an option from the available options. It is like the drop down we create …
How to Use Structures in VBA? The User Defined Data Types
Let’s say you are trying to create a school management system. Here, you will have different types of variables like student name, student roll no, cl…
VBA Class Modules and How to Use Them
What is a Class in VBA?
A class is a blueprint for an object to be created. A class itself does nothing but using classes you can create multip…