
 |
|

Microsoft Office 365 version of Microsoft Word, with the new redesign applied |
|
| Developer(s) | Microsoft |
|---|---|
| Initial release | October 25, 1983; 39 years ago (as Multi-Tool Word) |
| Stable release |
2209 (16.0.15629.20208) |
| Repository | none |
| Written in | C++ (back-end)[2] |
| Operating system |
|
| Platform | IA-32, x64, ARM, ARM64 |
| Type | Word processor |
| License | Trialware |
| Website | microsoft.com/en-us/microsoft-365/word |

Word for Mac running on macOS Ventura (13.2) |
|
| Developer(s) | Microsoft |
|---|---|
| Stable release |
16.64 (Build 22081401) |
| Repository | none |
| Written in | C++ (back-end), Objective-C (API/UI)[2] |
| Operating system | macOS |
| Type | Word processor |
| License | Proprietary software plus services |
| Website | products.office.com/word |

Screenshot of Microsoft Word for Android 13 |
|
| Original author(s) | Microsoft Corporation |
|---|---|
| Developer(s) | Microsoft Corporation |
| Initial release | January 29, 2015; 8 years ago[5] |
| Stable release |
16.0.15427.20090 |
| Repository | none |
| Operating system | Android Pie and later |
| License | Proprietary commercial software |
| Website | products.office.com/word |
| Developer(s) | Microsoft Corporation |
|---|---|
| Initial release | March 27, 2014; 9 years ago[7] |
| Stable release |
2.63.2 |
| Repository | none |
| Operating system | iOS 14 or later IPadOS 14 or later |
| License | Proprietary commercial software |
| Website | products.office.com/word |
| Developer(s) | Microsoft |
|---|---|
| Repository | none |
| Operating system | Windows 10 and later, Windows 10 Mobile |
| Type | Word processor |
| License | Freemium |
| Website | www.microsoft.com/store/productId/9WZDNCRFJB9S |
Microsoft Word is a word processor developed by Microsoft. It was first released on October 25, 1983,[9] under the name Multi-Tool Word for Xenix systems.[10][11][12] Subsequent versions were later written for several other platforms including: IBM PCs running DOS (1983), Apple Macintosh running the Classic Mac OS (1985), AT&T UNIX PC (1985), Atari ST (1988), OS/2 (1989), Microsoft Windows (1989), SCO Unix (1990), macOS (2001), Web browsers (2010), iOS (2014) and Android (2015). Using Wine, versions of Microsoft Word before 2013 can be run on Linux.
Commercial versions of Word are licensed as a standalone product or as a component of Microsoft Office suite of software, which can be purchased either with a perpetual license or as part of a Microsoft 365 subscription.
History[edit]
Origins[edit]
In 1981, Microsoft hired Charles Simonyi, the primary developer of Bravo, the first GUI word processor, which was developed at Xerox PARC.[13] Simonyi started work on a word processor called Multi-Tool Word and soon hired Richard Brodie, a former Xerox intern, who became the primary software engineer.[13][14][15]
Microsoft announced Multi-Tool Word for Xenix[13] and MS-DOS in 1983.[16] Its name was soon simplified to Microsoft Word.[10] Free demonstration copies of the application were bundled with the November 1983 issue of PC World, making it the first to be distributed on-disk with a magazine.[10][17] That year Microsoft demonstrated Word running on Windows.[18]
Unlike most MS-DOS programs at the time, Microsoft Word was designed to be used with a mouse.[16] Advertisements depicted the Microsoft Mouse and described Word as a WYSIWYG, windowed word processor with the ability to undo and display bold, italic, and underlined text,[19] although it could not render fonts.[10] It was not initially popular, since its user interface was different from the leading word processor at the time, WordStar.[20] However, Microsoft steadily improved the product, releasing versions 2.0 through 5.0 over the next six years. In 1985, Microsoft ported Word to the classic Mac OS (known as Macintosh System Software at the time). This was made easier by Word for DOS having been designed for use with high-resolution displays and laser printers, even though none were yet available to the general public.[21] It was also notable for its very fast cut-and-paste function and unlimited number of undo operations, which are due to its usage of the piece table data structure.[22]
Following the precedents of LisaWrite and MacWrite, Word for Mac OS added true WYSIWYG features. It fulfilled a need for a word processor that was more capable than MacWrite.[23] After its release, Word for Mac OS’s sales were higher than its MS-DOS counterpart for at least four years.[13]
The second release of Word for Mac OS, shipped in 1987, was named Word 3.0 to synchronize its version number with Word for DOS; this was Microsoft’s first attempt to synchronize version numbers across platforms. Word 3.0 included numerous internal enhancements and new features, including the first implementation of the Rich Text Format (RTF) specification, but was plagued with bugs. Within a few months, Word 3.0 was superseded by a more stable Word 3.01, which was mailed free to all registered users of 3.0.[21] After MacWrite Pro was discontinued in the mid-1990s, Word for Mac OS never had any serious rivals. Word 5.1 for Mac OS, released in 1992, was a very popular word processor owing to its elegance, relative ease of use, and feature set. Many users say it is the best version of Word for Mac OS ever created.[21][24]
In 1986, an agreement between Atari and Microsoft brought Word to the Atari ST[25] under the name Microsoft Write. The Atari ST version was a port of Word 1.05 for the Mac OS[26][27] and was never updated.
The first version of Word for Windows was released in 1989. With the release of Windows 3.0 the following year, sales began to pick up and Microsoft soon became the market leader for word processors for IBM PC-compatible computers.[13] In 1991, Microsoft capitalized on Word for Windows’ increasing popularity by releasing a version of Word for DOS, version 5.5, that replaced its unique user interface with an interface similar to a Windows application.[28][29] When Microsoft became aware of the Year 2000 problem, it made Microsoft Word 5.5 for DOS available for free downloads. As of February 2021, it is still available for download from Microsoft’s website.[30]
In 1991, Microsoft embarked on a project code-named Pyramid to completely rewrite Microsoft Word from the ground up. Both the Windows and Mac OS versions would start from the same code base. It was abandoned when it was determined that it would take the development team too long to rewrite and then catch up with all the new capabilities that could have been added at the same time without a rewrite. Instead, the next versions of Word for Windows and Mac OS, dubbed version 6.0, both started from the code base of Word for Windows 2.0.[24]
With the release of Word 6.0 in 1993, Microsoft again attempted to synchronize the version numbers and coordinate product naming across platforms, this time across DOS, Mac OS, and Windows (this was the last version of Word for DOS). It introduced AutoCorrect, which automatically fixed certain typing errors, and AutoFormat, which could reformat many parts of a document at once. While the Windows version received favorable reviews (e.g., from InfoWorld[31]), the Mac OS version was widely derided. Many accused it of being slow, clumsy, and memory intensive, and its user interface differed significantly from Word 5.1.[24] In response to user requests, Microsoft offered Word 5 again, after it had been discontinued.[32] Subsequent versions of Word for macOS are no longer direct ports of Word for Windows, instead featuring a mixture of ported code and native code.
Word for Windows[edit]

Word for Windows is available stand-alone or as part of the Microsoft Office suite. Word contains rudimentary desktop publishing capabilities and is the most widely used word processing program on the market. Word files are commonly used as the format for sending text documents via e-mail because almost every user with a computer can read a Word document by using the Word application, a Word viewer or a word processor that imports the Word format (see Microsoft Word Viewer).
Word 6 for Windows NT was the first 32-bit version of the product,[33] released with Microsoft Office for Windows NT around the same time as Windows 95. It was a straightforward port of Word 6.0. Starting with Word 95, each release of Word was named after the year of its release, instead of its version number.[34]
Word 2007 introduced a redesigned user interface that emphasized the most common controls, dividing them into tabs, and adding specific options depending on the context, such as selecting an image or editing a table.[35] This user interface, called Ribbon, was included in Excel, PowerPoint and Access 2007, and would be later introduced to other Office applications with Office 2010 and Windows applications such as Paint and WordPad with Windows 7, respectively.[36]
The redesigned interface also includes a toolbar that appears when selecting text, with options for formatting included.[37]
Word 2007 also included the option to save documents as Adobe Acrobat or XPS files,[37] and upload Word documents like blog posts on services such as WordPress.
Word 2010 allows the customization of the Ribbon,[38] adds a Backstage view for file management,[39] has improved document navigation, allows creation and embedding of screenshots,[40] and integrates with online services such as Microsoft OneDrive.[41]
Word 2019 added a dictation function.
Word 2021 added co-authoring, a visual refresh on the start experience and tabs, automatic cloud saving, dark mode, line focus, an updated draw tab, and support for ODF 1.3.
Word for Mac[edit]
The Mac was introduced on January 24, 1984, and Microsoft introduced Word 1.0 for Mac a year later, on January 18, 1985. The DOS, Mac, and Windows versions are quite different from each other. Only the Mac version was WYSIWYG and used a graphical user interface, far ahead of the other platforms. Each platform restarted its version numbering at «1.0».[42] There was no version 2 on the Mac, but version 3 came out on January 31, 1987, as described above. Word 4.0 came out on November 6, 1990, and added automatic linking with Excel, the ability to flow text around graphics, and a WYSIWYG page view editing mode. Word 5.1 for Mac, released in 1992 ran on the original 68000 CPU and was the last to be specifically designed as a Macintosh application. The later Word 6 was a Windows port and poorly received. Word 5.1 continued to run well until the last Classic MacOS. Many people continue to run Word 5.1 to this day under an emulated Mac classic system for some of its excellent features, such as document generation and renumbering, or to access their old files.

Microsoft Word 2011 running on OS X
In 1997, Microsoft formed the Macintosh Business Unit as an independent group within Microsoft focused on writing software for Mac OS. Its first version of Word, Word 98, was released with Office 98 Macintosh Edition. Document compatibility reached parity with Word 97,[32] and it included features from Word 97 for Windows, including spell and grammar checking with squiggles.[43] Users could choose the menus and keyboard shortcuts to be similar to either Word 97 for Windows or Word 5 for Mac OS.
Word 2001, released in 2000, added a few new features, including the Office Clipboard, which allowed users to copy and paste multiple items.[44] It was the last version to run on classic Mac OS and, on Mac OS X, it could only run within the Classic Environment. Word X, released in 2001, was the first version to run natively on, and required, Mac OS X,[43] and introduced non-contiguous text selection.[45]
Word 2004 was released in May 2004. It included a new Notebook Layout view for taking notes either by typing or by voice.[46] Other features, such as tracking changes, were made more similar with Office for Windows.[47]
Word 2008, released on January 15, 2008, included a Ribbon-like feature, called the Elements Gallery, that can be used to select page layouts and insert custom diagrams and images. It also included a new view focused on publishing layout, integrated bibliography management,[48] and native support for the new Office Open XML format. It was the first version to run natively on Intel-based Macs.[49]
Word 2011, released in October 2010, replaced the Elements Gallery in favor of a Ribbon user interface that is much more similar to Office for Windows,[50] and includes a full-screen mode that allows users to focus on reading and writing documents, and support for Office Web Apps.[51]
Word 2021 added real-time co-authoring, automatic cloud saving, dark mode, immersive reader enhancements, line focus, a visual refresh, the ability to save pictures in SVG format, and a new Sketched style outline.
File formats[edit]
| DOC | Legacy Word document |
|---|---|
| DOT | Legacy Word templates |
| WBK | Legacy Word document backup |
| DOCX | XML Word document |
| DOCM | XML Word macro-enabled document |
| DOTX | XML Word template |
| DOTM | XML Word macro-enabled template |
| DOCB | XML Word binary document |
Filename extensions[edit]
Microsoft Word’s native file formats are denoted either by a .doc or .docx filename extension.
Although the .doc extension has been used in many different versions of Word, it actually encompasses four distinct file formats:
- Word for DOS
- Word for Windows 1 and 2; Word 3 and 4 for Mac OS
- Word 6 and Word 95 for Windows; Word 6 for Mac OS
- Word 97 and later for Windows; Word 98 and later for Mac OS
(The classic Mac OS of the era did not use filename extensions.)[52]
The newer .docx extension signifies the Office Open XML international standard for Office documents and is used by default by Word 2007 and later for Windows as well as Word 2008 and later for macOS.[53]
Binary formats (Word 97–2007)[edit]
During the late 1990s and early 2000s, the default Word document format (.DOC) became a de facto standard of document file formats for Microsoft Office users.[citation needed] There are different versions of «Word Document Format» used by default in Word 97–2007.[54] Each binary word file is a Compound File,[55] a hierarchical file system within a file. According to Joel Spolsky, Word Binary File Format is extremely complex mainly because its developers had to accommodate an overwhelming number of features and prioritize performance over anything else.
As with all OLE Compound Files, Word Binary Format consists of «storages», which are analogous to computer folders and «streams», which are similar to computer files. Each storage may contain streams or other storage. Each Word Binary File must contain a stream called the «WordDocument» stream and this stream must start with a File Information Block (FIB).[57] FIB serves as the first point of reference for locating everything else, such as where the text in a Word document starts, ends, what version of Word created the document and other attributes.
Word 2007 and later continue to support the DOC file format, although it is no longer the default.
XML Document (Word 2003)[edit]
The .docx XML format introduced in Word 2003[58] was a simple, XML-based format called WordProcessingML or WordML.
The Microsoft Office XML formats are XML-based document formats (or XML schemas) introduced in versions of Microsoft Office prior to Office 2007. Microsoft Office XP introduced a new XML format for storing Excel spreadsheets and Office 2003 added an XML-based format for Word documents.
These formats were succeeded by Office Open XML (ECMA-376) in Microsoft Office 2007.
Cross-version compatibility[edit]
Opening a Word Document file in a version of Word other than the one with which it was created can cause an incorrect display of the document. The document formats of the various versions change in subtle and not-so-subtle ways (such as changing the font or the handling of more complex tasks like footnotes). Formatting created in newer versions does not always survive when viewed in older versions of the program, nearly always because that capability does not exist in the previous version.[59] Rich Text Format (RTF), an early effort to create a format for interchanging formatted text between applications, is an optional format for Word that retains most formatting and all content of the original document.
Third-party formats[edit]
Plugins permitting the Windows versions of Word to read and write formats it does not natively support, such as international standard OpenDocument format (ODF) (ISO/IEC 26300:2006), are available. Up until the release of Service Pack 2 (SP2) for Office 2007, Word did not natively support reading or writing ODF documents without a plugin, namely the SUN ODF Plugin or the OpenXML/ODF Translator. With SP2 installed, ODF format 1.1 documents can be read and saved like any other supported format in addition to those already available in Word 2007.[59][60][61][62][63] The implementation faces substantial criticism, and the ODF Alliance and others have claimed that the third-party plugins provide better support.[64] Microsoft later declared that the ODF support has some limitations.[65]
In October 2005, one year before the Microsoft Office 2007 suite was released, Microsoft declared that there was insufficient demand from Microsoft customers for the international standard OpenDocument format support and that therefore it would not be included in Microsoft Office 2007. This statement was repeated in the following months.[66][67][68][69] As an answer, on October 20, 2005, an online petition was created to demand ODF support from Microsoft.[70]
In May 2006, the ODF plugin for Microsoft Office was released by the OpenDocument Foundation.[71] Microsoft declared that it had no relationship with the developers of the plugin.[72]
In July 2006, Microsoft announced the creation of the Open XML Translator project – tools to build a technical bridge between the Microsoft Office Open XML Formats and the OpenDocument Format (ODF). This work was started in response to government requests for interoperability with ODF. The goal of the project was not to add ODF support to Microsoft Office, but only to create a plugin and an external toolset.[73][74] In February 2007, this project released a first version of the ODF plugin for Microsoft Word.[75]
In February 2007, Sun released an initial version of its ODF plugin for Microsoft Office.[76] Version 1.0 was released in July 2007.[77]
Microsoft Word 2007 (Service Pack 1) supports (for output only) PDF and XPS formats, but only after manual installation of the Microsoft ‘Save as PDF or XPS’ add-on.[78][79] On later releases, this was offered by default.
Features and flaws[edit]
Among its features, Word includes a built-in spell checker, a thesaurus, a dictionary, and utilities for manipulating and editing text. It supports creating tables. Depending on the version, it can perform simple calculations, and supports formatting formulas and equations.
The following are some aspects of its feature set.
Templates[edit]
Several later versions of Word include the ability for users to create their formatting templates, allowing them to define a file in which: the title, heading, paragraph, and other element designs differ from the standard Word templates.[80] Users can find how to do this under the Help section located near the top right corner (Word 2013 on Windows 8).
For example, Normal.dotm is the master template from which all Word documents are created. It determines the margin defaults as well as the layout of the text and font defaults. Although Normal.dotm is already set with certain defaults, the user can change it to new defaults. This will change other documents which were created using the template.[81] It was previously Normal.dot.[82]
Image formats[edit]
Word can import and display images in common bitmap formats such as JPG and GIF. It can also be used to create and display simple line art. Microsoft Word added support[83] for the common SVG vector image format in 2017 for Office 365 ProPlus subscribers and this functionality was also included in the Office 2019 release.
WordArt[edit]

An example image created with WordArt
WordArt enables drawing text in a Microsoft Word document such as a title, watermark, or other text, with graphical effects such as skewing, shadowing, rotating, stretching in a variety of shapes and colors, and even including three-dimensional effects. Users can apply formatting effects such as shadow, bevel, glow, and reflection to their document text as easily as applying bold or underline. Users can also spell-check text that uses visual effects and add text effects to paragraph styles.
Macros[edit]
A macro is a rule of pattern that specifies how a certain input sequence (often a sequence of characters) should be mapped to an output sequence according to a defined process. Frequently used or repetitive sequences of keystrokes and mouse movements can be automated. Like other Microsoft Office documents, Word files can include advanced macros and even embedded programs. The language was originally WordBasic, but changed to Visual Basic for Applications as of Word 97.
This extensive functionality can also be used to run and propagate viruses in documents. The tendency for people to exchange Word documents via email, USB flash drives, and floppy disks made this an especially attractive vector in 1999. A prominent example was the Melissa virus, but countless others have existed.
These macro viruses were the only known cross-platform threats between Windows and Macintosh computers and they were the only infection vectors to affect any macOS system up until the advent of video codec trojans in 2007.[citation needed] Microsoft released patches for Word X and Word 2004 that effectively eliminated the macro problem on the Mac by 2006.
Word’s macro security setting, which regulates when macros may execute, can be adjusted by the user, but in the most recent versions of Word, it is set to HIGH by default, generally reducing the risk from macro-based viruses, which have become uncommon.
Layout issues[edit]
Before Word 2010 (Word 14) for Windows, the program was unable to correctly handle ligatures defined in OpenType fonts.[84] Those ligature glyphs with Unicode codepoints may be inserted manually, but are not recognized by Word for what they are, breaking spell checking, while custom ligatures present in the font are not accessible at all. Since Word 2010, the program now has advanced typesetting features which can be enabled,[85] OpenType ligatures,[86] kerning and hyphenation (previous versions already had the latter two features). Other layout deficiencies of Word include the inability to set crop marks or thin spaces. Various third-party workaround utilities have been developed.[87]
In Word 2004 for Mac OS X, support of complex scripts was inferior even to Word 97[88] and Word 2004 did not support Apple Advanced Typography features like ligatures or glyph variants.[89]
Issues with technical documents[edit]
Microsoft Word is only awkwardly suitable for some kinds of technical writing, specifically, that which requires mathematical equations,[90] figure placement, table placement and cross-references to any of these items.[citation needed] The usual workaround for equations is to use a third-party equation typesetter.[citation needed] Figures and tables must be placed manually; there is an anchor mechanism but it is not designed for fully automatic figure placement and editing text after placing figures and tables often requires re-placing those items by moving the anchor point and even then the placement options are limited.[citation needed] This problem is deeply baked into Word’s structure since 1985 as it does not know where page breaks will occur until the document is printed.[citation needed]
Bullets and numbering[edit]
Microsoft Word supports bullet lists and numbered lists. It also features a numbering system that helps add correct numbers to pages, chapters, headers, footnotes, and entries of tables of content; these numbers automatically change to correct ones as new items are added or existing items are deleted. Bullets and numbering can be applied directly to paragraphs and converted to lists.[91] Word 97 through 2003, however, had problems adding correct numbers to numbered lists. In particular, a second irrelevant numbered list might have not started with number one but instead resumed numbering after the last numbered list. Although Word 97 supported a hidden marker that said the list numbering must restart afterward, the command to insert this marker (Restart Numbering command) was only added in Word 2003. However, if one were to cut the first item of the listed and paste it as another item (e.g. fifth), then the restart marker would have moved with it and the list would have restarted in the middle instead of at the top.[92]
Word continues to default to non-Unicode characters and non-hierarchical bulleting, despite user preference for Powerpoint-style symbol hierarchies (e.g., filled circle/emdash/filled square/endash/emptied circle) and universal compatibility.
AutoSummarize[edit]
Available in certain versions of Word (e.g., Word 2007), AutoSummarize highlights passages or phrases that it considers valuable and can be a quick way of generating a crude abstract or an executive summary.[93] The amount of text to be retained can be specified by the user as a percentage of the current amount of text.
According to Ron Fein of the Word 97 team, AutoSummarize cuts wordy copy to the bone by counting words and ranking sentences. First, AutoSummarize identifies the most common words in the document (barring «a» and «the» and the like) and assigns a «score» to each word – the more frequently a word is used, the higher the score. Then, it «averages» each sentence by adding the scores of its words and dividing the sum by the number of words in the sentence – the higher the average, the higher the rank of the sentence. «It’s like the ratio of wheat to chaff,» explains Fein.[94]
AutoSummarize was removed from Microsoft Word for Mac OS X 2011, although it was present in Word for Mac 2008. AutoSummarize was removed from the Office 2010 release version (14) as well.[95]
Other platforms[edit]
Word for mobile[edit]
Word Mobile[96] is a word processor that allows creating and editing documents. It supports basic formatting, such as bolding, changing font size, and changing colors (from red, yellow, or green). It can add comments, but can’t edit documents with tracked changes. It can’t open password-protected documents; change the typeface, text alignment, or style (normal, heading 1); create bulleted lists; insert pictures; or undo.[97][98][99] Word Mobile is neither able to display nor insert footnotes, endnotes, page headers, page footers, page breaks, certain indentation of lists, and certain fonts while working on a document, but retains them if the original document has them.[100] In addition to the features of the 2013 version, the 2007 version on Windows Mobile also has the ability to save documents in the Rich Text Format and open legacy PSW (Pocket Word).[100] Furthermore, it includes a spell checker, word count tool, and a «Find and Replace» command. In 2015, Word Mobile became available for Windows 10 and Windows 10 Mobile on Windows Store.[101]
Support for Windows 10 Mobile version ended in January 12, 2021.[102]
Word for the web[edit]
Word for the web is a free lightweight version of Microsoft Word available as part of Office on the web, which also includes web versions of Microsoft Excel and Microsoft PowerPoint.
Word for the web lacks some Ribbon tabs, such as Design and Mailings. Mailings allows users to print envelopes and labels and manage mail merge printing of Word documents.[103][104] Word for the web is not able to edit certain objects, such as: equations, shapes, text boxes or drawings, but a placeholder may be present in the document. Certain advanced features like table sorting or columns will not be displayed but are preserved as they were in the document. Other views available in the Word desktop app (Outline, Draft, Web Layout, and Full-Screen Reading) are not available, nor are side-by-side viewing, split windows, and the ruler.[105]
Password protection[edit]
Three password types can be set in Microsoft Word,
- Password to open a document[106]
- Password to modify a document[106]
- Password restricting formatting and editing[107]
The second and third password types were developed by Microsoft for convenient shared use of documents rather than for their protection. There is no encryption of documents that are protected by such passwords and the Microsoft Office protection system saves a hash sum of a password in a document’s header where it can be easily accessed and removed by the specialized software. Password to open a document offers much tougher protection that had been steadily enhanced in the subsequent editions of Microsoft Office.
Word 95 and all the preceding editions had the weakest protection that utilized a conversion of a password to a 16-bit key.
Key length in Word 97 and 2000 was strengthened up to 40 bit. However, modern cracking software allows removing such a password very quickly – a persistent cracking process takes one week at most. Use of rainbow tables reduces password removal time to several seconds. Some password recovery software can not only remove a password but also find an actual password that was used by a user to encrypt the document using the brute-force attack approach. Statistically, the possibility of recovering the password depends on the password strength.
Word’s 2003/XP version default protection remained the same but an option that allowed advanced users to choose a Cryptographic Service Provider was added.[108] If a strong CSP is chosen, guaranteed document decryption becomes unavailable and, therefore, a password can’t be removed from the document. Nonetheless, a password can be fairly quickly picked with a brute-force attack, because its speed is still high regardless of the CSP selected. Moreover, since the CSPs are not active by default, their use is limited to advanced users only.
Word 2007 offers significantly more secure document protection which utilizes the modern Advanced Encryption Standard (AES) that converts a password to a 128-bit key using a SHA-1 hash function 50,000 times. It makes password removal impossible (as of today, no computer that can pick the key in a reasonable amount of time exists) and drastically slows the brute-force attack speed down to several hundreds of passwords per second.
Word’s 2010 protection algorithm was not changed apart from the increasing number of SHA-1 conversions up to 100,000 times and consequently, the brute-force attack speed decreased two times more.
Reception[edit]
|
This section needs expansion. You can help by adding to it. (December 2021) |
Initial releases of Word were met with criticism. Byte in 1984 criticized the documentation for Word 1.1 and 2.0 for DOS, calling it «a complete farce». It called the software «clever, put together well and performs some extraordinary feats», but concluded that «especially when operated with the mouse, has many more limitations than benefits … extremely frustrating to learn and operate efficiently».[109] PC Magazine‘s review was very mixed, stating: «I’ve run into weird word processors before, but this is the first time one’s nearly knocked me down for the count» but acknowledging that Word’s innovations were the first that caused the reviewer to consider abandoning WordStar. While the review cited an excellent WYSIWYG display, sophisticated print formatting, windows, and footnoting as merits, it criticized many small flaws, very slow performance, and «documentation produced by Madame Sadie’s Pain Palace». It concluded that Word was «two releases away from potential greatness».[110]
Compute!’s Apple Applications in 1987 stated that «despite a certain awkwardness», Word 3.01 «will likely become the major Macintosh word processor» with «far too many features to list here». While criticizing the lack of true WYSIWYG, the magazine concluded that «Word is marvelous. It’s like a Mozart or Edison, whose occasional gaucherie we excuse because of his great gifts».[111]
Compute! in 1989 stated that Word 5.0’s integration of text and graphics made it «a solid engine for basic desktop publishing». The magazine approved of improvements to text mode, described the $75 price for upgrading from an earlier version as «the deal of the decade» and concluded that «as a high-octane word processor, Word is worth a look».[112]
During the first quarter of 1996, Microsoft Word accounted for 80% of the worldwide word processing market.[113]
Release history[edit]
| Legend: | Old version, not maintained | Older version, still maintained | Current stable version |
|---|

Microsoft Word 2010 running on Windows 7
| Year released | Name | Version | Comments |
|---|---|---|---|
| 1989 | Word for Windows 1.0 | 1.0 | Code-named Opus[114] |
| 1990 | Word for Windows 1.1 | 1.1 | For Windows 3.0.[115] Code-named Bill the Cat[citation needed] |
| 1990 | Word for Windows 1.1a | 1.1a | On March 25, 2014, Microsoft made the source code to Word for Windows 1.1a available to the public via the Computer History Museum.[116][117] |
| 1991 | Word for Windows 2.0 | 2.0 | Included in Office 3.0. |
| 1993 | Word for Windows 6.0 | 6.0 | Version numbers 3, 4, and 5 were skipped, to bring Windows version numbering in line with that of DOS, Mac OS, and WordPerfect (the main competing word processor at the time). Also, a 32-bit version for Windows NT only. Included in Office 4.0, 4.2, and 4.3. |
| 1995 | Word for Windows 95 | 7.0 | Included in Office 95 |
| 1997 | Word 97 | 8.0 | Included in Office 97 |
| 1998 | Word 98 | 8.5 | Included in Office 97 |
| 1999 | Word 2000 | 9.0 | Included in Office 2000 |
| 2001 | Word 2002 | 10.0 | Included in Office XP |
| 2003 | Microsoft Word 2003 | 11.0 | Included in Office 2003 |
| 2006 | Microsoft Word 2007 | 12.0 | Included in Office 2007; released to businesses on November 30, 2006, released worldwide to consumers on January 30, 2007. Extended support until October 10, 2017. |
| 2010 | Word 2010 | 14.0 | Included in Office 2010; skipped 13.0 due to triskaidekaphobia.[118] |
| 2013 | Word 2013 | 15.0 | Included in Office 2013 |
| 2016 | Word 2016 | 16.0 | Included in Office 2016 |
| 2019 | Word 2019 | 16.0 | Included in Office 2019 |
| 2021 | Word 2021 | 16.0 | Included in Office 2021 |
| Year released | Name | Version | Comments |
|---|---|---|---|
| 1985 | Word 1 | 1.0 | |
| 1987 | Word 3 | 3.0 | |
| 1989 | Word 4 | 4.0 | Part of Office 1.0 and 1.5 |
| 1991 | Word 5 | 5.0 |
|
| 1992 | Word 5.1 | 5.1 |
|
| 1993 | Word 6 | 6.0 |
|
| 1998 | Word 98 | 8.5 |
|
| 2000 | Word 2001 | 9.0 |
|
| 2001 | Word v. X | 10.0 |
|
| 2004 | Word 2004 | 11.0 | Part of Office 2004 |
| 2008 | Word 2008 | 12.0 | Part of Office 2008 |
| 2010 | Word 2011 | 14.0 | Part of Office 2011; skipped 13.0 due to triskaidekaphobia.[118] |
| 2015 | Word 2016 | 16.0 | Part of Office 2016; skipped 15.0 |
| 2019 | Word 2019 | 16.0 | Part of Office 2019 |
| 2021 | Word 2021 | 16.0 | Included in Office 2021 |
| Year released | Name | Version | Comments |
|---|---|---|---|
| 1983 | Word 1 | 1.0 | Initial version of Word |
| 1985 | Word 2 | 2.0 | |
| 1986 | Word 3 | 3.0 | Removed copy protection |
| 1987 | Word 4 | 4.0 | |
| 1989 | Word 5 | 5.0 | |
| 1991 | Word 5.1 | 5.1 | |
| 1991 | Word 5.5 | 5.5 | First DOS version to use a Windows-like user interface |
| 1993 | Word 6 | 6.0 | Last DOS version. |
| Platform | Year released | Name | Comments |
|---|---|---|---|
| Atari ST | 1988 | Microsoft Write | Based on Microsoft Word 1.05 for Mac OS |
| OS/2 | 1989 | Microsoft Word 5.0 | Word 5.0 ran both under DOS and OS/2 dual-mode as a native OS/2 application |
| OS/2 | 1991 | Microsoft Word 5.5 | Word 5.5 ran both under DOS and OS/2 dual-mode as a native OS/2 application |
| OS/2 | 1990 | Microsoft Word for OS/2 Presentation Manager version 1.1 | |
| OS/2 | 1991 | Microsoft Word for OS/2 Presentation Manager version 1.2[citation needed] | |
| SCO Unix | 1990 | Microsoft Word for Unix version 5.0[119] | |
| SCO Unix | 1991 | Microsoft Word for Unix version 5.1[120] |
References[edit]
- ^ «Update history for Microsoft Office 2019». Microsoft Docs. Retrieved April 13, 2021.
- ^ a b «C++ in MS Office». cppcon. July 17, 2014. Archived from the original on November 7, 2019. Retrieved June 25, 2019.
- ^ «System requirements for Office». Office.com. Microsoft. Retrieved March 30, 2019.
- ^ «Update history for Office for Mac». Microsoft Docs.
- ^ Lardinois, Frederic (January 29, 2015). «Microsoft’s Office For Android Tablets Comes Out Of Preview». TechCrunch. Retrieved January 28, 2023.
- ^ «Microsoft Word: Write, Edit & Share Docs on the Go APKs». APKMirror.
- ^ Cunningham, Andrew (March 27, 2014). «Microsoft brings Office to iPad, makes iPhone version free to all». Ars Technica. Retrieved January 27, 2023.
- ^ «Microsoft Word». App Store.
- ^ «Version 1.0 of today’s most popular applications, a visual tour – Pingdom Royal». Pingdom. June 17, 2009. Archived from the original on August 13, 2018. Retrieved April 12, 2016.
- ^ a b c d A. Allen, Roy (October 2001). «Chapter 12: Microsoft in the 1980s» (PDF). A History of the Personal Computer: The People and the Technology (1st ed.). Allan Publishing. pp. 12/25–12/26. ISBN 978-0-9689108-0-1. Retrieved November 7, 2010.
- ^ «Microsoft Office online, Getting to know you…again: The Ribbon». Archived from the original on May 11, 2011.
- ^ «The history of branding, Microsoft history». Archived from the original on May 28, 2009.
- ^ a b c d e Edwards, Benj (October 22, 2008). «Microsoft Word Turns 25». PC World. Archived from the original on July 4, 2012. Retrieved November 7, 2010.
- ^ Tsang, Cheryl (1999). Microsoft First Generation. John Wiley & Sons. ISBN 978-0-471-33206-0.
- ^ Schaut, Rick (May 19, 2004). «Anatomy of a Software Bug». MSDN Blogs. Archived from the original on February 1, 2010. Retrieved December 2, 2006.
- ^ a b Markoff, John (May 30, 1983). «Mouse and new WP program join Microsoft product lineup». InfoWorld. p. 10. Retrieved November 7, 2010.
- ^ Pollack, Andrew (August 25, 1983). «Computerizing Magazines». The New York Times. Retrieved April 24, 2013.
- ^ Lemmons, Phil (December 1983). «Microsoft Windows». BYTE. p. 48. Retrieved October 20, 2013.
- ^ Advertisement (December 1983). «Undo. Windows. Mouse. Finally». BYTE. pp. 88–89. Retrieved October 20, 2013.
- ^ Peterson, W.E. Pete (1994). Almost Perfect: How a Bunch of Regular Guys Built Wordperfect Corporation. Prima Publishing. ISBN 0-7881-9991-9.
- ^ a b c d e f Knight, Dan (May 22, 2008). «Microsoft Word for Mac History». Low End Mac. Retrieved November 7, 2010.
- ^ «The Piece Table».
- ^ Brand, Stewart (1989). Whole Earth Software Catalog. ISBN 9780385233019.
For a year, I waited for a heavier-duty word processor than MACWRITE. I finally got it— WORD.
- ^ a b c Schaut, Rick (February 26, 2004). «Mac Word 6.0». Buggin’ My Life Away. MSDN Blogs. Archived from the original on May 14, 2004. Retrieved June 21, 2010.
- ^ «Atari announces agreement with Microsoft». Atarimagazines.com. April 25, 2008. Retrieved June 21, 2010.
- ^ «Feature Review: Microsoft Write». Atarimagazines.com. April 25, 2008. Retrieved June 21, 2010.
- ^ «Today’s Atari Corp.: A close up look inside». Atarimagazines.com. April 25, 2008. Retrieved June 21, 2010.
- ^ Miller, Michael J. (November 12, 1990). «First Look: Microsoft Updates Look of And Adds Pull-Down Menus to Character-Based Word 5.5». InfoWorld. p. 151. Retrieved November 7, 2010.
- ^ Needleman, Raphael (November 19, 1990). «Microsoft Word 5.5: Should You Fight or Switch?». InfoWorld. p. 106. Retrieved November 7, 2010.
- ^ «Microsoft Word 5.5 for MS-DOS (EXE format)». Microsoft Download Center. Retrieved August 19, 2011.
- ^ «War of the Words». InfoWorld. February 7, 1994. pp. 66–79. Retrieved November 7, 2010.
- ^ a b Lockman, James T.W. (May 15, 1998). «UGeek Software Review: Microsoft Office 98 Gold for Macintosh». Archived from the original on December 3, 2010. Retrieved November 7, 2010.
- ^ Rose, Daniel. «Microsoft Office for Windows NT». DanielSays.com – Daniel’s Legacy Computer Collections. Archived from the original on January 27, 2015. Retrieved May 15, 2015.
- ^ Ericson, Richard (October 11, 2006). «Final Review: The Lowdown on Office 2007». Computerworld. Retrieved November 8, 2010.
- ^ Lowe, Scott (December 11, 2006). «An introduction to the Microsoft Office 2007 ribbon interface». TechRepublic. Retrieved December 14, 2021.
- ^ Shultz, Greg (February 25, 2009). «Be ready for new and improved applets in Windows 7». TechRepublic. Archived from the original on December 14, 2021. Retrieved December 14, 2021.
- ^ a b Lowe, Scott (January 26, 2007). «Explore what is new and different in Microsoft Word 2007». TechRepublic. Retrieved December 14, 2021.
- ^ Mendelson, Edward (May 11, 2010). «Microsoft Office 2010». PC Magazine. Retrieved November 8, 2010.
- ^ Mendelson, Edward (May 11, 2010). «Microsoft Office 2010: Office 2010’s Backstage View». PC Magazine. Archived from the original on December 2, 2010. Retrieved November 8, 2010.
- ^ Mendelson, Edward (May 11, 2010). «Microsoft Office 2010: Lots of Graphics Options». PC Magazine. Archived from the original on April 24, 2010. Retrieved December 14, 2021.
- ^ «Introduction to Word Web App». Microsoft. Retrieved November 8, 2010.
- ^ «Microsoft Word 1.x (Mac)». WinWorld. Retrieved December 22, 2021.
- ^ a b McLean, Prince (November 12, 2007). «Road to Mac Office 2008: an introduction (Page 3)». AppleInsider. Archived from the original on July 7, 2011. Retrieved November 7, 2010.
- ^ Tetrault, Gregory (January 2001). «Review: Microsoft Office 2001». ATPM: About This Particular Macintosh. Retrieved November 7, 2010.
- ^ Negrino, Tom (February 1, 2002). «Review: Microsoft Office v. X». MacWorld. Archived from the original on August 18, 2010. Retrieved November 7, 2010.
- ^ Lunsford, Kelly; Michaels, Philip; Snell, Jason (March 3, 2004). «Office 2004: First Look». MacWorld. Archived from the original on June 25, 2010. Retrieved November 7, 2010.
- ^ Friedberg, Steve (May 25, 2004). «Review: Microsoft Office». MacNN. Archived from the original on April 5, 2010. Retrieved November 7, 2010.
- ^ McLean, Prince (November 14, 2007). «Road to Mac Office 2008: Word ’08 vs Pages 3.0». AppleInsider. Retrieved November 7, 2010.
- ^ McLean, Prince (November 12, 2007). «Road to Mac Office 2008: an introduction (Page 4)». AppleInsider. Archived from the original on July 7, 2011. Retrieved November 7, 2010.
- ^ McLean, Prince (March 29, 2010). «New Office 11 for Mac sports dense ribbons of buttons». AppleInsider. Retrieved November 7, 2010.
- ^ Dilger, Daniel Eran (October 25, 2010). «Review: Microsoft’s Office 2011 for Mac (Page 2)». Apple Insider. Archived from the original on October 28, 2010. Retrieved November 7, 2010.
- ^ Oakley, Howard (May 2, 2015). «.why .the .extensions? Quirks in the naming of files and folders». The Eclectic Light Company. Archived from the original on February 26, 2020. Retrieved February 26, 2020.
Macs used to be the only computers that did not need filename extensions…on classic Mac systems, you can name applications, documents, and most other files almost anything that you like, as the name is not linked in any way to the type of thing that file is.
- ^ «DOCX Transitional (Office Open XML), ISO 29500:2008-2016, ECMA-376, Editions 1-5». loc.gov. January 20, 2017. Retrieved July 9, 2019.
- ^ «5 Appendix A: Product Behavior» (PDF). [MS-DOC]: Word (.doc) Binary File Format (PDF). Redmond, WA: Microsoft. Archived from the original on January 10, 2015. Retrieved January 10, 2015.
- ^ «2.1 File Structure» (PDF). [MS-DOC]: Word (.doc) Binary File Format (PDF). Redmond, WA: Microsoft. Archived from the original on January 10, 2015. Retrieved January 10, 2015.
- ^ «2.1.1 WordDocument Stream» (PDF). [MS-DOC]: Word (.doc) Binary File Format (PDF). Redmond, WA: Microsoft. Archived from the original on January 10, 2015. Retrieved January 10, 2015.
- ^ «What You Can Do with Word XML [Word 2003 XML Reference]». MSDN. 2004.
- ^ a b Casson, Tony; Ryan, Patrick S. (May 1, 2006). «Open Standards, Open Source Adoption in the Public Sector, and Their Relationship to Microsoft’s Market Dominance». In Bolin, Sherrie (ed.). Standards Edge: Unifier or Divider?. Sheridan Books. p. 87. SSRN 1656616.
- ^ «Microsoft Expands List of Formats Supported in Microsoft Office, May 21, 2008». News Center. Microsoft. May 21, 2008. Retrieved April 24, 2013.
- ^ Fulton, Scott M. III (May 21, 2008). «Next Office 2007 service pack will include ODF, PDF support options». Betanews.
- ^ Andy Updegrove (May 21, 2008). «Microsoft Office 2007 to Support ODF – and not OOXML, May 21, 2008». Consortiuminfo.org. Retrieved June 21, 2010.
- ^ «Microsoft: Why we chose ODF support over OOXML, 23 May 2008». Software.silicon.com. Archived from the original on July 21, 2009. Retrieved June 21, 2010.
- ^ «Fact-sheet Microsoft ODF support» (PDF). odfalliance. Archived from the original (PDF) on June 11, 2009. Retrieved May 24, 2009.
Microsoft Excel 2007 will process ODF spreadsheet documents when loaded via the Sun Plug-In 3.0 for Microsoft Office or the SourceForge «OpenXML/ODF Translator Add-in for Office,» but will fail when using the «built-in» support provided by Office 2007 SP2.
- ^ Microsoft. «What happens when I save a Word 2007 document in the OpenDocument Text format?». Archived from the original on March 18, 2010. Retrieved April 5, 2010.
- ^ Goodwins, Rupert (October 3, 2005). «Office 12 to support PDF creation, 3 October 2005». News.zdnet.co.uk. Archived from the original on July 23, 2009. Retrieved June 21, 2010.
- ^ Marson, Ingrid (October 6, 2005). «Microsoft ‘must support OpenDocument’, 6 October 2005». News.zdnet.co.uk. Archived from the original on July 25, 2009. Retrieved June 21, 2010.
- ^ March 23, 2006, Gates: Office 2007 will enable a new class of application Mass. holding tight to OpenDocument – ZDNet Archived July 21, 2009, at the Wayback Machine
- ^ «May 08, 2006 – Microsoft Office to get a dose of OpenDocument». Zdnet.com.au. Archived from the original on July 22, 2009. Retrieved June 21, 2010.
- ^ OpenDocument Fellowship (October 20, 2005). «OpenDocument Support: Tell Microsoft You Want It!, 20 October 2005». Opendocumentfellowship.com. Archived from the original on March 23, 2008. Retrieved June 21, 2010.
- ^ «Coming soon: ODF for MS Office, May 04, 2006». Linux-watch.com. May 4, 2006. Retrieved June 21, 2010.
- ^ LaMonica, Martin (May 5, 2006). «Microsoft Office to get a dose of OpenDocument». CNET News. Retrieved June 21, 2010.
- ^ «Microsoft Expands Document Interoperability, July 5, 2006». Microsoft.com. July 5, 2006. Archived from the original on February 4, 2007. Retrieved June 21, 2010.
- ^ Jones, Brian; Rajabi, Zeyad (July 6, 2006). «Open XML Translator project announced (ODF support for Office)». Brian Jones: Office Solutions. Microsoft. Archived from the original on January 18, 2010. Retrieved April 24, 2013.
- ^ LaMonica, Martin (February 1, 2007). «Microsoft to release ODF document converter». CNet News. Retrieved April 24, 2013.
- ^ Lombardi, Candace (February 7, 2007). «Sun to release ODF translator for Microsoft Office». CNET. Retrieved June 21, 2010.
- ^ Paul, Ryan (July 7, 2007). «Sun releases ODF Plugin 1.0 for Microsoft Office, July 07, 2007». Arstechnica.com. Retrieved June 21, 2010.
- ^ «Download details: 2007 Microsoft Office Add-in: Microsoft Save as PDF or XPS». Microsoft.com. November 8, 2006. Retrieved June 21, 2010.
- ^ Microsoft to remove PDF support from Office 2007 in wake of Adobe dispute, Friday, June 2, 2006 Microsoft to remove PDF support from Office 2007 in wake of Adobe dispute | TG Daily Archived February 1, 2009, at the Wayback Machine
- ^ Klein, Matt. «Word Formatting: Mastering Styles and Document Themes». How-To Geek. Retrieved July 9, 2019.
- ^ «Change the Normal template (Normal.dotm )». support.microsoft.com. Retrieved May 20, 2021.
- ^ in-depth explanation of Normal.dot Archived June 20, 2005, at the Wayback Machine
- ^ «Edit SVG images in Microsoft Office 365». Office Support. Microsoft. Retrieved February 4, 2019.
- ^ What’s new in Word 2010. Retrieved July 1, 2010.
- ^ Improving the look of papers written in Microsoft Word. Retrieved May 30, 2010.
- ^ How to Enable OpenType Ligatures in Word 2010, Oreszek Blog, May 17, 2009.
- ^ Such as «How to delete a blank page in Word». Sbarnhill.mvps.org. Archived from the original on May 5, 2010. Retrieved June 21, 2010.
- ^ Alan Wood. «Unicode and Multilingual Editors and Word Processors for Mac OS X».
- ^ Neuburg, Matt (May 19, 2004). «TidBITS : Word Up! Word 2004, That Is». Db.tidbits.com. Archived from the original on July 8, 2012. Retrieved June 21, 2010.
- ^ «Automatically numbering equations and other equation-related questions in Word for Mac 2011». Microsoft Community. February 6, 2013.
- ^ McGhie, John (March 26, 2011). «Word’s numbering explained». word.mvps.org.
- ^ Aldis, Margaret (March 26, 2011). «Methods for restarting list numbering». Word.mvps.org.
- ^ «How To Access Auto Summarize in Microsoft Word 2007». Sue’s Word Tips. December 14, 2011. Retrieved July 9, 2019.
- ^ Gore, Karenna (February 9, 1997). «Cognito Auto Sum». Slate. Retrieved June 21, 2010.
- ^ Changes in Word 2010 (for IT pros). Technet.microsoft.com (May 16, 2012). Retrieved July 17, 2013.
- ^ Word Mobile
- ^ Ralph, Nate. «Office for Windows Phone 8: Your handy starter guide». TechHive. Archived from the original on October 15, 2014. Retrieved August 30, 2014.
- ^ Wollman, Dana. «Microsoft Office Mobile for iPhone hands-on». Engadget. Retrieved August 30, 2014.
- ^ Pogue, David (June 19, 2013). «Microsoft Adds Office for iPhone. Yawn». The New York Times. Retrieved August 30, 2014.
- ^ a b Unsupported Features in Word Mobile. Microsoft. Retrieved September 21, 2007.
- ^ Koenigsbauer, Kirk; Microsoft 365, Corporate Vice President for (July 29, 2015). «Office Mobile apps for Windows 10 are here!». Microsoft 365 Blog. Retrieved July 11, 2020.
- ^ Office Apps for Windows 10 Mobile: End of Support for Windows Phones
- ^ Bradley, Tony (February 2, 2015). «Office Online vs. Office 365: What’s free, what’s not, and what you really need». PC World. Archived from the original on July 24, 2017. Retrieved July 16, 2020.
- ^ Ansaldo, Michael (September 28, 2017). «Microsoft Office Online review: Work with your favorite Office formats for free». PC World. Retrieved October 31, 2019.
- ^ «Differences between using a document in the browser and in Word». Office Support. Microsoft. Archived from the original on November 7, 2017. Retrieved November 1, 2017.
- ^ a b «Password protect documents, workbooks, and presentations». Microsoft Office website. Microsoft. Retrieved April 24, 2013.
- ^ «How to Restrict Editing in Word 2010/2007». Trickyways. June 22, 2010. Retrieved April 24, 2010.
- ^ «How safe is Word encryption. Is it secure?». Oraxcel.com. Archived from the original on April 17, 2013. Retrieved April 24, 2013.
- ^ Cameron, Janet (September 1984). «Word Processing Revisited». BYTE (review). p. 171. Retrieved October 23, 2013.
- ^ Manes, Stephen (February 21, 1984). «The Unfinished Word». PC Magazine. p. 192. Retrieved October 19, 2021.
- ^ McNeill, Dan (December 1987). «Macintosh: The Word Explosion». Compute!’s Apple Applications. pp. 54–60. Retrieved September 14, 2016.
- ^ Nimersheim, Jack (December 1989). «Compute! Specific: MS-DOS». Compute!. pp. 11–12.
- ^ «Data Stream». Next Generation. No. 21. Imagine Media. September 1996. p. 21.
- ^ Opus Development Postmortem
- ^ «Microsoft Word 1.x (Windows) – Stats, Downloads and Screenshots :: WinWorld». WinWorld. Retrieved July 3, 2016.
- ^ Shustek, Len (March 24, 2014). «Microsoft Word for Windows Version 1.1a Source Code». Retrieved March 29, 2014.
- ^ Levin, Roy (March 25, 2014). «Microsoft makes source code for MS-DOS and Word for Windows available to public». Official Microsoft Blog. Archived from the original on March 28, 2014. Retrieved March 29, 2014.
- ^ a b «Office 14». Office Watch. June 1, 2007.
For the sake of superstition the next version of Office won’t be called ’13’.
{{cite web}}: CS1 maint: url-status (link) - ^ Marshall, Martin (January 8, 1990). «SCO Begins Shipping Microsoft Word 5.0 for Unix and Xenix». InfoWorld. p. 6. Retrieved May 20, 2021.
- ^ «Microsoft Word: SCO announces Word for Unix Systems Version 5.1». EDGE: Work-Group Computing Report. March 11, 1991. p. 33. Retrieved May 20, 2021 – via Gale General OneFile.
Further reading[edit]
- Tsang, Cheryl. Microsoft: First Generation. New York: John Wiley & Sons, Inc. ISBN 978-0-471-33206-0.
- Liebowitz, Stan J. & Margolis, Stephen E. Winners, Losers & Microsoft: Competition and Antitrust in High Technology Oakland: Independent Institute. ISBN 978-0-945999-80-5.
External links[edit]
- Microsoft Word – official site
- Find and replace text by using regular expressions (Advanced) — archived official support website
Updated: 07/06/2021 by

Sometimes abbreviated as WP, a word processor is a software program capable of creating, storing, and printing typed documents. Today, the word processor is one of the most frequently used software programs on a computer, with Microsoft Word being a popular choice.
Word processors can create multiple types of files, including text files (.txt), rich text files (.rtf), HTML files (.htm & .html), and Word files (.doc & .docx). Some word processors can also be used to create XML files (.xml).
Overview of Word
In a word processor, you are presented with a blank white sheet as shown below. The text is added to the document area and after it has been inserted formatted or adjusted to your preference. Below is an example of a blank Microsoft Word window with areas of the window highlighted.
Features of a word processor
Unlike a basic plaintext editor, a word processor offers several additional features that can give your document or other text a more professional appearance. Below is a listing of popular features of a word processor.
Note
Some more advanced text editors can perform some of these functions.
- Text formatting — Changing the font, font size, font color, bold, italicizing, underline, etc.
- Copying, cutting, and pasting — Once text is entered into a document, it can be copied or cut and pasted in the current document or another document.
- Multimedia — Insert clip art, charts, images, pictures, and video into a document.
- Spelling and Grammar — Checks for spelling and grammar errors in a document.
- Adjust the layout — Capable of modifying the margins, size, and layout of a document.
- Find — Word processors give you the ability to quickly find any word or text in any size of the document.
- Search and Replace — You can use the Search and Replace feature to replace any text throughout a document.
- Indentation and lists — Set and format tabs, bullet lists, and number lists.
- Insert tables — Add tables to a document.
- Word wrap — Word processors can detect the edges of a page or container and automatically wrap the text using word wrap.
- Header and footer — Being able to adjust and change text in the header and footer of a document.
- Thesaurus — Look up alternatives to a word without leaving the program.
- Multiple windows — While working on a document, you can have additional windows with other documents for comparison or move text between documents.
- AutoCorrect — Automatically correct common errors (e.g., typing «teh» and having it autocorrected to «the»).
- Mailers and labels — Create mailers or print labels.
- Import data — Import and format data from CSV, database, or another source.
- Headers and footers — The headers and footers of a document can be customized to contain page numbers, dates, footnotes, or text for all pages or specific pages of the document.
- Merge — Word processors allow data from other documents and files to be automatically merged into a new document. For example, you can mail merge names into a letter.
- Macros — Setup macros to perform common tasks.
- Collaboration — More modern word processors help multiple people work on the same document at the same time.
Examples and top uses of a word processor
A word processor is one of the most used computer programs because of its versatility in creating a document. Below is a list of the top examples of how you could use a word processor.
- Book — Write a book.
- Document — Any text document that requires formatting.
- Help documentation — Support documentation for a product or service.
- Journal — Keep a digital version of your daily, weekly, or monthly journal.
- Letter — Write a letter to one or more people. Mail merge could also be used to automatically fill in the name, address, and other fields of the letter.
- Marketing plan — An overview of a plan to help market a new product or service.
- Memo — Create a memo for employees.
- Report — A status report or book report.
- Résumé — Create or maintain your résumé.
Examples of word processor programs
Although Microsoft Word is popular, there are other word processor programs. Below is a list of some popular word processors in alphabetical order.
- Abiword.
- Apple iWork — Pages.
- Apple TextEdit — Apple macOS included word processor.
- Corel WordPerfect.
- Dropbox Paper (online and free).
- Google Docs (online and free).
- LibreOffice -> Writer (free).
- Microsoft Office -> Microsoft Word.
- Microsoft WordPad.
- Microsoft Works (discontinued).
- SoftMaker FreeOffice -> TextMaker (free).
- OpenOffice -> Writer (free).
- SSuite -> WordGraph (free).
- Sun StarOffice (discontinued).
- Textilus (iPad and iPhone).
- Kingsoft WPS Office -> Writer (free).
Word processor advantages over a typewriter
See our typewriter page for a listing of advantages a computer with a word processor has over a typewriter.
Computer acronyms, Doc, Microsoft Word, Software terms, Untitled, Word processing, Word processor terms, WordStar, Write
Hello Learners, Today we will know the important features of the word processor.
In this post, I will explain in features of word processing software in detail.
This Article is the Best on the whole internet.
If you read this article carefully you will understand all about the word processor — features, uses, and advantages.
I Guaranteed you, after reading this article you will not need to read any other Articles. In fact, our readers are satisfied with this blog post.
Note — The only purpose of this article is to tell you about word processor features in very simple language. This article has been written by an expert, if you think this article can be improved further, then you must give us feedback.
What is Word Processor?
Word Processor is system software. With the help of word processor software, you can easily create any type of document. This software is very helpful for office work. There are various office employees who use this software to do their own work.
Microsoft Word is a very popular word processor software.
What are the Features of Word Processor?
There are various important features of word processor software, which features names are given below.

1. Easy Typing
You can type very easily using a word processor. Word processor provides you with many features to create a document so that you can type any type of document.
Word processor gives you more features in typing anything than typewriter-like — word processor has unlimited pages. You keep typing and as soon as the first page is over, the word processor lets you type on the new page.
While you are typing on the typewriter, you have to enter another page as soon as the page ends.
Everything you type in the word processor is visible to you so that you can also correct it if the wrong word is typed. But there is no such facility in the typewriter that you can correct the wrong word.
2. Text Copy
Copy is also a great feature of the word processor, using which you can copy any text. The copy feature is there in all types of word processors.
With the use of copy features, you can use the same text multiple times in the document without writing it, which saves you time as well.
3. Text Cut
The cut is also a great feature of the word processor, using which you can cut any text in the document. The cut feature is completely different from the copy feature.
For example, by using the copy feature, the copied text is in both the places in the document, such as — from where you copied your text and where you pasted the text, while the cut text is removed from the part of the document where The text is cut from.
4. Paste
The paste is also a great feature of the word processor, using which you can paste any copied or cut text on any part of the document. Any text is copied or cut only for pasting.
5. Multimedia
Multimedia is also a great feature of the word processor, using which you make your document more attractive.
Using multimedia features, you can insert multimedia in your document like — clip art, charts, images, pictures, video, etc.
6. Text formatting
Text formatting is also a great feature of the word processor, using which you can make your document more beautiful.
Using text formatting features, you can change the font of the text of your document, the size of the text, and the color of the text and you can also bold, italicize, and underline your text.
7. Spelling and Grammar
Spelling and Grammar is also a great feature of the word processor, using which you can check the spelling and grammar errors of the document.
8. Adjust the Layout
Adjusting the layout is also a great feature of the word processor, using which you can modify the margins, size, and layout of the document according to your need.
9. Find
Find is also a great feature of the word processor, using which you can find any word or sentence in the document. This feature helps you a lot, just imagine if your document is 100 to 150 pages.
If you have to find any word or sentence, then it will take you a lot of time, but you can find that word or sentence in a few seconds using the find features.
10. Search and Replace
Search and Replace is also a great feature of the word processor, using which you can find any word or sentence in the document and replace that word with a new word using the replace feature.
If your document is 100 to 500 pages, then imagine how much time and effort it will take to manually replace a word. But using the Search and Replace feature, you can replace any word or sentence with a new word or sentence in a few seconds.
11. Indentation and lists
Indentation and lists are also a great feature of the word processor, using which you can add tabs, bullet lists, and number lists to the document so that your document looks more beautiful.
12. Insert tables
Insert tables is also a great feature of the word processor, using which you can insert tables in the document.
13. Multiple Windows
Multiple windows are also a very good feature of a word processor, using which you can open multiple windows in word processor software. This feature is used by people to use more than one-word processors windows at the same time.
In a word processor, you have to press the ctrl and N buttons simultaneously to open more than one window.
14. AutoCorrect
AutoCorrect is also a great feature of word processors using which to automatically correct any common errors in your document like — (typing «teh» and having it autocorrected to «the»).
15. Headers and Footers
Headers and footers are also a great feature of the word processor, using which you can add anything according to your need in the headers and footers of your document like — page numbers, dates, footnotes, etc.
16. Mail Merge
If we want to send the same information to different people at the same time, then there is a feature in the word processor using which we can do that and that feature is named mail merge.
Using mail merge, the body of the letter is typed once and it is sent to different addresses.
There are various advantages of word processor software, which are given below.
- Quality
- Storage of Text
- Security
1. Quality
Word processor helps us to create error free documents. Every document prepared through word processor is absolutely correct in spelling and grammar, there is no possibility in it, and word processor allows us to make many copies of the same format.
2. Storage of Text
In word processor we can create of any number of page document and in word processor we can copy any word or sentence any number of times.
You can also use it by making some changes in any old word file in the word processor, for which we do not need to create a new word file.
3. Security
In a word processor, we can secure any document while creating it. As soon as someone opens that document, he asks for password before opening the document, and only after entering the correct password, the document will open.
Uses of Word Processor
There are various uses of word processor software, and this word processor are used in different fields which are — education field, planning or business-related works, for making assignments and home, etc.
With the use of this word processor software, you can do many things, whose names are given below.
- Memos.
- Making Card.
- Letter writing
- Legal Copies.
- Making resume/CV.
- Letters and letterhead.
- Reference documents.
- writing short stories.
I hope you understand this.
The capability to create documents using a word processor is known as word processing. It can also refer to advanced shorthand techniques, which are sometimes utilized in specialized situations with a typewriter that has been customized. These were primarily intended for typists, especially in organizations where other employees would provide handwritten notes to be transcribed into documents for printing and then returned for inspection.
Different word processors are available today; some are proprietary, such as Microsoft Word, StarOffice Writer, WordPerfect Office, and others are open source, such as Openoffice.org Writer, etc.
How to open MS Word in Windows?
In Windows 8/above:
Step 1: Press Windows + C to open the search bar

Step 2: Type MS Word & click on the MS Word version you are having in your system. MS Word window will pop up.
In Windows 7 or below:
Step 1: Go to the program section in the windows start menu.
Step 2: Go to MS Office & click on it. A drop-down list is seen
Step 3: Click on MS Word & the MS Word window will pop up.
Creating a New Document in MS Word
Once your MS Word Window pops up, you can create & save the file by:
Step 1: Click on the Microsoft button on the top left.

Step 2: Click on New, a new Document window will pop up.

Step 3: Click on Create & a new document will be created
Note: Shortcut for New: Ctrl + N
How to Save a document or give a Name to a new document created?
Step 1: Click on the Microsoft icon
Step 2: Click On SaveAs button.

Step 3: Click on Word Document & a new Window for save as will pop up

Step 4: Select the drive (by clicking on it: Example: Local Drive (D)) in which you want to save the document
Then your driver will open up, select the folder in which you want to save the document (Example: img folder here) & then give the required name to your document (Example: Doc3 here)
Your document is created & saved with the provided name.
Note: Shortcut for save: Ctrl +s
How to print a document through an attached printer?
Step 1: Click on the Microsoft icon
Step 2: Click On Print & a window for Print & Preview the document will pop up.

Step 3: Click on Print. Then a window for Print will pop up.

Step 4: Select the printer by which you want to take out a print of the document. Select the page range (Print of all or some or current page) & the number of copies you want.
Step 5: Click on OK. You will get a print of your document.
Note: Shortcut for print is Ctrl + P.
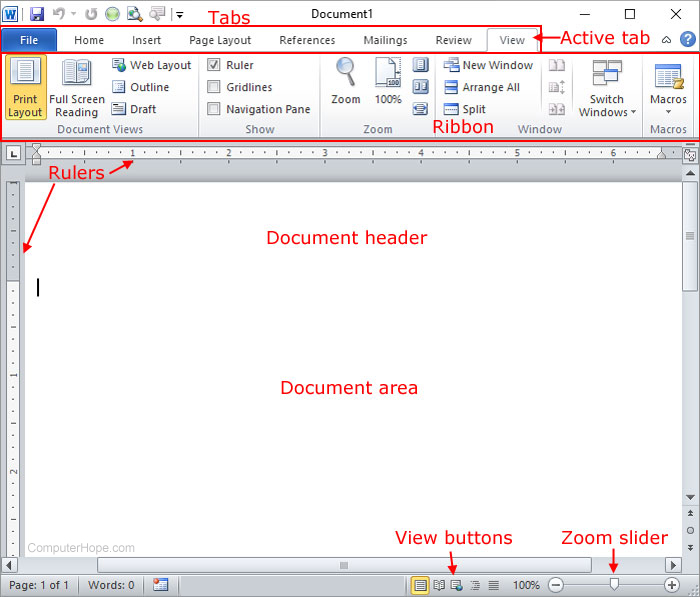
MS Word Window
MS Word Window has the following components:
(i) Title Bar: Shows the name/title given by you to the current document. If the user does not save the document by any name, the default name given by MS Word appears in this bar.
(ii) Menu Bar: Contains menu items like Margins, views, page layout, etc.
(iii) Office Button: MS Office button on the left-most top.
(iv) Formatting Toolbar: Have tools like Bold, Italic, Underline, Font shape & size, etc. to format your data.
(v) Ribbon: To provide an easy & quick user interface we have ribbon in MS Word. Depending on what you’re doing in Word, Excel, or another Office software, the Ribbon varies.
(vi) Scrollbars: To scroll your document up or down.

(vii) Zoom Slider: To zoom in or zoom out your document
(viii) View Buttons: Provides different views of your document like Print view, full-screen view, web layout view, etc.
(ix) Quick Access Toolbar: To quickly save your document on clicking the save button, or to redo or undo the last work done.
(x) Work Window: The area where you can actually word, write data, including images, etc,
Sample Questions
Question 1. What will you do for closing a document?
Answer:
The procedure is as follows:
Step 1. Go to Office Button
Step 2. Click on close (last option in the list).
Question 2. Give shortcuts to create, print, close & save a document.
Answer:
1. Ctrl +N – Create a New Document-
2. Ctrl + S – Save a Document
3. Alt + F4 – Close a Document.
4. Ctrl + P – Print a Document.
Question 3. How to Open MS Word in Windows 7?
Answer:
The Steps to open MS Word are as follows:
Step 1. Click on Start icon on the screen.
Step 2. Choose All Programs
Step 3. Select Microsoft Office
Step 4. Click on Microsoft Word.
Question 4. What are different Alignments available in MS Word?
Answer:
The appearance and direction of the paragraph’s edges are determined by alignment. Types of alignment are:
1. Left Alignment: The text was aligned uniformly along the left margins.
2. Right Alignment: The text was aligned uniformly along the right margins.
3. Center Alignment: The text is aligned evenly with the center of the page.
4. Justified Alignment: The text was aligned evenly with both the left and right margins.
Question 5. How to use Save as option in MS Word?
Answer:
The steps for using Save As :
Step 1. Click on Office button on the left top
Step 2. Choose Save As Option under it.
Step 3. Save As Dialog box pops up
Step 4. Select the location to save as your document & provide a new name
Step 5. Click on Save.
Asked by: Mr. Morris Murphy Jr.
Score: 4.6/5
(59 votes)
Microsoft Word is a word processing software developed by Microsoft. It was first released on October 25, 1983, under the name Multi-Tool Word for Xenix systems.
What is Microsoft Word used for?
Microsoft Word or MS Word is a popular word-processing program used mainly for creating documents, such as brochures, letters, learning activities, quizzes, tests, and students’ homework assignments. It was first released in 1983 and is one of Microsoft Office suite’s applications.
What is Microsoft Word Meaning?
Microsoft Word is a widely used commercial word processor designed by Microsoft. Microsoft Word is a component of the Microsoft Office suite of productivity software, but can also be purchased as a stand-alone product. … Microsoft Word is often called simply Word or MS Word.
What are the five uses of Microsoft Word?
Given below are the basic functions of Microsoft Word:
- Creating text documents.
- Editing and Formatting the existing documents.
- Making a text document interactive with different features and tools.
- Graphical documents, comprising images.
- Used by Authors and Researchers.
- Detect grammatical errors in a text document.
What is Microsoft Word and example of?
Microsoft Word is a word processor, and, like other word processors, it’s capable of helping users create a variety of different types of documents. For example, users can create a résumé, business contract, instruction document, or a letter to another person.
18 related questions found
What are 10 features of Microsoft Word?
What are 10 features of Microsoft Word?
- Changing case.
- Create a custom tab.
- Quick parts.
- Add placeholder text.
- Edit wrap points when wrapping text.
- Convert a list to a table.
- Convert a bulleted list to SmartArt.
- Quick selection methods.
What is Microsoft Word Introduction?
Introduction to Microsoft Word is a two (2) to four (4) hour course designed to familiarize you with the terminology, screen components and the most commonly used functions offered by Microsoft Word. Emphasis will be placed on proper document formatting techniques and file naming and file management conventions.
How do you create a Microsoft Word document?
Create a document
- Open Word. Or, if Word is already open, select File > New.
- In the Search for online templates box, enter a search word like letter, resume, or invoice. Or, select a category under the search box like Business, Personal, or Education.
- Click a template to see a preview. …
- Select Create.
What is MS Word in answer?
Microsoft Word or MS Word (often called Word) is a graphical word processing program that users can type with. It is made by the computer company Microsoft. Its purpose is to allow users to type and save documents. Similar to other word processors, it has helpful tools to make documents.
What is a word give example?
The definition of a word is a letter or group of letters that has meaning when spoken or written. An example of a word is dog. … An example of a word is dog. An example of words are the seventeen sets of letters that are written to form this sentence.
What is the example of MS Word?
The correct answer is Application Software. MS Word is an example of application software developed by the company Microsoft. It allows users to type and save documents.
What is difference between word and Excel?
MS Word is a processing software which is used for writing letters, essay, notes, etc. Whereas, MS Excel is a spreadsheet software where a large amount of data or information can be saved in a systematic tabular manner in numerical and alphabetical values.
What is MS-WORD with diagram?
Diagrams are graphics that convey information. Business documents often include diagrams to clarify concepts, describe processes, and show hierarchical relationships. Word 2016 includes a powerful diagramming feature called SmartArt that you can use to create diagrams directly in your documents.
What is MS-WORD PDF?
Abstract. Microsoft Word is a word processing software package. You can use it to type letters, reports, and other documents.
How do you use Microsoft Word?
Use the left button on the mouse to click on the Start button. Then click on programmes and then double-click on the MSWORD programme. Some computers have a MSWORD symbol that will come up when your computer is on and you do not have to go to start – simply double click the left button of the mouse on the symbol.
How do you use a Word document?
Basic tasks in Word
- Start a document. It’s often easier to create a new document using a template instead of starting with a blank page. …
- Open a document. Every time you start Word, you’ll see a list of your most recently used documents in the left column. …
- Save a document. …
- Read documents.
What are the advantages of MS Word explain?
One of the advantages of using Microsoft Word is that it is available practically everywhere. Word comes standard on many PCs. You can typically find it on your work computer, computers at school and your home PC. This makes it easy to save documents on a flash drive, take them with you and work on them somewhere else.
What are the parts of Microsoft Word?
- The Title Bar. At the very top of the screen is the title bar. …
- Menu Bar. When you first start Word, the menus and toolbars display basic commands and buttons. …
- Toolbars. The Standard Toolbar. …
- The Horizontal Ruler. …
- The Vertical Ruler. …
- Vertical Scroll Bar. …
- Horizontal Scroll Bar. …
- The Status Bar.
Is Microsoft Word free?
Much like Google Docs, Microsoft has Office Online and in order to access it all you need to do is sign up for a free Microsoft account. You can use Word, Excel, PowerPoint, OneNote and Outlook at no cost.
What is MS Office and its uses?
Microsoft Office is a set of computer applications mainly used for business or office purposes. First introduced in 1990, Office software is made by the Microsoft Corporation. MS Office helps simplify basic office tasks and improve work productivity.
What is the difference between PowerPoint and Word?
Ms word creates text based documents and MS PowerPoint creates presentation. Users use Ms word when they need to make reports, letters, while MS powerpoint is used when they have to make presentations. Ms work use for office work data storage and Ms PowerPoint use for slide and presentation graph etc.
Can we make ppt in Word?
Import a Word outline into PowerPoint
In the Insert Outline dialog box, find and select your Word outline and select Insert. Note: If your Word document contains no Heading 1 or Heading 2 styles, PowerPoint will create a slide for each paragraph in your content.
What is types of words?
The Eight Parts of Speech
- NOUN.
- PRONOUN.
- VERB.
- ADJECTIVE.
- ADVERB.
- PREPOSITION.
- CONJUNCTION.
- INTERJECTION.

Анастасия Николаевна Королева
Эксперт по предмету «Информатика»
Задать вопрос автору статьи
Определение 1
Microsoft Word – текстовый процессор, который предназначен для практически всех видов обработки текста. В документах процессора кроме текста можно использовать рисунки, таблицы, формулы и т.п.
MS Word является наиболее популярным текстовым процессором, которые известны на сегодняшний день. Программа обеспечивает удобство и простоту работы для создания профессионально оформленных документов.
Назначение текстового процессора MS Word
Основные возможности программы включают:
- набор и редактирование текста;
- поддержка правильности орфографии и грамматики;
- оформление страниц документа;
- работа с таблицами, графиками и рисунками;
- создание шаблонов деловых писем, визитных карточек и других официальных документов;
- возможность использования простейших формул для расчета в таблицах;
- слияние документов;
- защита документа паролем;
- печать документа;
- создание pdf-документа;
- обеспечение совместной работы с документом и т.п.
![]()
Сделаем домашку
с вашим ребенком за 380 ₽
Уделите время себе, а мы сделаем всю домашку с вашим ребенком в режиме online
Бесплатное пробное занятие
*количество мест ограничено
Документы различных версий Microsoft Word имеют расширения .doc или .docx.
Для запуска Microsoft Word необходимо выполнить следующие операции: нажать клавишу Windows – Все программы – Microsoft Office – Microsoft Office Word.
После запуска процессора MS Word автоматически создается новый документ.
Особенности версий MS Word 2007 и выше в сравнении с предыдущими версиями программы
Интерфейс MS Word 2007 и более новых версий кардинально отличается от предыдущих версий программы.
Стартовое окно текстового процессора MS Word 2007 имеет вид:
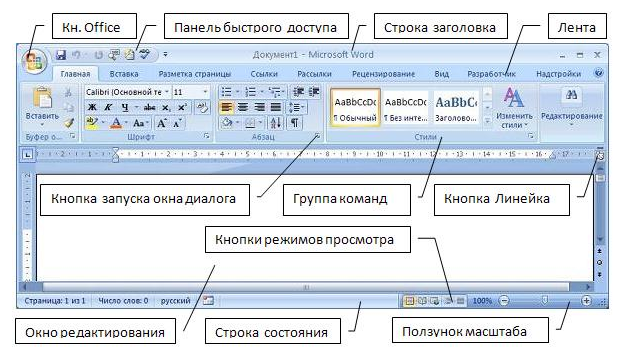
Рисунок 1. Стартовое окно MS Word 2007
MS Word 2007 от предыдущих версий отличается отсутствием привычных панелей инструментов, которые размещались в любом удобном для пользователя месте окна программы. Отсутствуют также раскрывающиеся меню. Исключением является кнопка «Office», которая находится в левом верхнем углу окна программы.
«Текстовый процессор MS Word» 👇
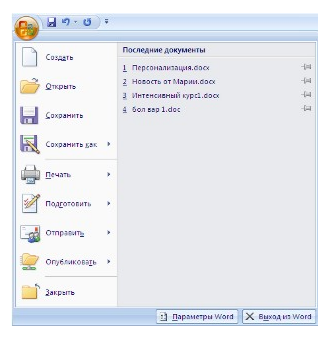
Рисунок 2.
Инструменты для работы в программе расположены на ленте, которая занимает верхнюю часть окна приложения.

Рисунок 3. Лента
На ленте располагаются наиболее часто используемые команды, представленные в виде значков. Обратим внимание, что добавление или удаление значков на ленте главного меню невозможно.
На ленте располагаются три основных элемента:
- Вкладки, которые находятся в верхней части ленты. По умолчанию их 7 (Главная, Вставка, Разметка страницы, Ссылки, Рассылки, Рецензирование, Вид), но в ходе работы с программой можно добавлять новые вкладки (например, вкладка Разработчик и т.д.). Каждая из вкладок представляет определенный набор функций.
- Группы, которые находятся на каждой вкладке и отображают связанные общим назначением команды.
- Команды – кнопки, поля для ввода информации или меню.
В правом нижнем углу многих групп находится небольшая диагональная стрелка, которая называется кнопкой вызова диалогового окна и вызывает диалоговое окно или область задач с дополнительными возможностями данной группы.
Рассмотрим вкладку Главная, которая состоит из следующих групп:
- Буфер обмена;
- Шрифт;
- Абзац;
- Стили;
- Редактирование.
На панель вынесены кнопки, которые наиболее часто используются. Всплывающие подсказки, которые высвечиваются при наведении на любую кнопку меню, информируют о предназначении инструментов.
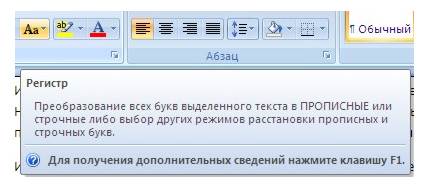
Рисунок 4. Всплывающая подсказка
В Word некоторые вкладки появляются только для определенных объектов. Например, при выделении рисунка появится вкладка Формат, на которой расположены дополнительные группы и команды для работы с рисунками.
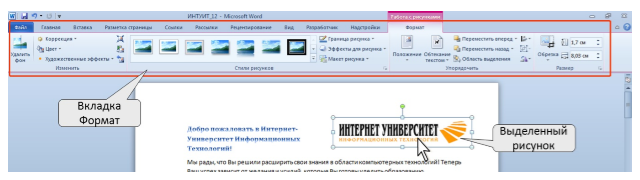
Рисунок 5. Вкладка Работа с рисунками
Также во всех программах MS Word 2007 и выше располагается панель быстрого доступа. По умолчанию она располагается возле кнопки «Office» выше ленты и предназначена для размещения на ней кнопок часто выполняемых операций (по умолчанию – Сохранить, Отменить ввод, Повторить ввод).
Находи статьи и создавай свой список литературы по ГОСТу
Поиск по теме
Some of the functions of word processing software include:
- Creating, editing, saving and printing documents.
- Copying, pasting, moving and deleting text within a document.
- Formatting text, such as font type, bolding, underlining or italicizing.
- Creating and editing tables.
What is word processing and its features?
A word processor is software or a device that allows users to create, edit, and print documents. It enables you to write text, store it electronically, display it on a screen, modify it by entering commands and characters from the keyboard, and print it. Of all computer applications, word processing is the most common.
What are the four features of word processor?
List four important feature of a word processor ? Name any two word processor
- – Creating, editing, saving and printing documents.
- – Copying, pasting, moving and deleting text within a document.
- – Formatting text, such as font type, bolding, underlining or italicizing.
- – Creating and editing tables.
What are the features and advantages of word processing?
Advantages of Word Processing
- Quality : It produces error free documents.
- Storage of Text : We can take any number of copies with word processor.
- Time Saving : We can get any number of copies of document in future without retyping.
- Security : We can protect the documents in word processing by giving passwords.
What is the importance of word processing?
Furthermore, word processing benefits the environment by reducing the amount of paperwork needed to perform daily tasks (e.g., archiving, sending out letters, sending meeting agendas). By sending documents via a secured email, the cost of postage and paper waste are reduced significantly.
What are the benefits of word processing in education?
With word processing software, students can easily review and revise their compositions, highlight key ideas, rearrange sentences or paragraphs to flow more logically, and try out alternative sentences or words to communicate their ideas better.
What are the basic elements of Microsoft Word?
MS- Word Window Elements:
- Title bar.
- Menu Bar.
- Toolbars.
- Workspace.
- Status Bar.
- Scroll Bars.
- Scroll Box.
- Task Pane.
How do you describe computer skills?
Computer skills are abilities and knowledge which allow you to use computers and related technology. They let you use word processing software, access the Internet, manage files, or create presentations. Advanced computer skills would let you access databases, use spreadsheets, and even code.
What are some common word processing applications?
Two of the most widely used examples of word processing software are Microsoft Word and Google Docs. Both Word and Google Docs provide the business writer with the formatting tools needed to create professional documents.
What are examples of word processing?
- Adobe InCopy.
- Corel WordPerfect (up to v. 9.0)
- Hangul.
- Ichitaro.
- Kingsoft Writer.
- Microsoft Word.
- Scrivener.
- StarOffice Writer.
What are the word processing tools?
5 Great Word Processing Tools For Writing Your Novel
- Microsoft Office. Microsoft Word is pretty much the standard in the traditional business world, and for good reason – it’s fairly easy to use, compatible across a wide range of platforms (there’s even an iphone app currently in the works!), and great customer service.
- Apache OpenOffice.
- Google Drive.
- iWork Pages.
- Scrivener.
How many types of word processing are there?
3 types
Which software is best for word processing?
- LibreOffice Writer. All-singing, all-dancing word processors for any text-based work.
- WPS Office Free Writer. A word processor with cloud storage and support for all text files.
- FocusWriter. The ideal word processor for first drafts, with no fussy formatting.
- FreeOffice TextMaker.
- Writemonkey.
What are Microsoft Word functions?
Given below are the basic functions of Microsoft Word:
- Creating text documents.
- Editing and Formatting the existing documents.
- Making a text document interactive with different features and tools.
- Graphical documents, comprising images.
- Used by Authors and Researchers.
- Detect grammatical errors in a text document.
Which one is not a function in MS Word?
The NOT function is a built-in function in Excel that is categorized as a Logical Function. It can be used as a worksheet function (WS) in Excel. As a worksheet function, the NOT function can be entered as part of a formula in a cell of a worksheet.
What are the basic functions of Microsoft Excel?
You may be familiar with common functions like sum, average, product, and count, but there are hundreds of functions in Excel, even for things like formatting text, referencing cells, calculating financial rates, and analyzing statistics.
What is MS Word and Excel?
Microsoft Word is a word processing program used for writing letters, memos, reports and paper presentations. Microsoft Excel is a spreadsheet program used for calculations, making charts and recording data about all sorts of business processes.
What is the full form of MS Excel?
Microsoft Excel is a spreadsheet developed by Microsoft for Windows, macOS, Android and iOS. It features calculation, graphing tools, pivot tables, and a macro programming language called Visual Basic for Applications (VBA). Excel forms part of the Microsoft Office suite of software.
What is the use of MS Office?
Microsoft Office has become a leading platform to drive productivity at home and in the workplace. Whether it’s managing email in Outlook, or building analysis spreadsheets in Excel, Office has made carrying out many computer based tasks easier for all of us.
- Definition of a Word Processor
- What is a word processor?
- Purpose of Word Processing.
- Basic Word Processing Features and Concepts
- Using a Word Processing Package — Microsoft Word
- Starting Microsoft Word
- Microsoft Word Screen Layout
- Editing a Document
- Editing a Document
- Block Operations
- Find and Replace
- Proofreading
- Formatting a Document
- Text Formatting
- Paragraph Formatting
- Formatting Pages
- Creating and Editing Tables
- Creating Tables
- Formatting and Editing a Table
- Table Conversions
- Mail Merge Document
- To Create the Main Document
- Inserting Graphics
- Working with Graphics
- Editing and Formatting Pictures
- Printing a Document
- Printing in Microsoft Word
Definition of a Word Processor
What is a Word Processor?
- A word processor is an application software that enables a person to create, save, edit, format and print text documents. Word processing is the act of using a word processor.
Examples of word processors
- Examples of word processors include, Microsoft Word, Corel WordPerfect, WordStar, Lotus WordPro and many others.
Purpose of Word Processing.
— A Word processor is a tool that can be used to prepare & produce documents. It can be used in:
- Writing Letters (i.e., Business & general mail).
- Writing Memos.
- Writing Books.
- Writing Articles, Research letters such as Reports/thesis and Term papers.
- Writing Essays and Projects.
- Writing Curriculum vitae and Resumes.
- Writing weekly Newsletters on sports, entertainment, etc.
- Writing Lease agreements and other legal documents
A word processor has a number of advantages over the type writer that include:
- A document can be stored in the computer for future reference in computer files that do not occupy physical space like the one on paper. This creates a paperless document-processing environment.
- Typing using a word processor is easier and more efficient because some actions are automated. For example, word-wrap feature automatically takes the cursor to the beginning of the next line once you reach the end of the current. Another automatic features common in most word processors is automatic insertion of a new page after reaching the end of the current page.
- Most word processors have special editing tools such as spelling and grammar checkers and thesaurus that help the user to easily Correct grammar and spelling mistakes. A thesaurus helps to find a word or phrase with similar meanings.
- With insert and type over modes available in most word processors, one can easily insert or replace a word or a phrase without affecting the structure and neatness of the document.
- Word processors have superior document formatting features. Formatting refers to the art of making the document more attractive and appealing to the eye. Such features include, underlining, boldfacing, italicization, applying different colors etc.
- While a typewriter may require that we retype the entire document when we want many copies, with a word processor, printing lets you produce as many copies per session as needed.
- Using the cut, copy and paste commands, you can incorporate other text without having to retype it.
Basic Word Processing Features and Concepts
- They allow the user to create a file, save it and open it again and again for reuse, editing or formatting.
- They have almost similar document windows with the following Features:
- Most are designed to look like a piece of paper with a few
- Most of the screen is blank before typing of text.
- There is a cursor, which blinks at the position where you can Begin entering text.
- There is a status bar or line that provides the user with current status information such as saving operation, the name of the file in use, the current page, the current imaginary horizontal-line and column cursor position.
- Word wrap: The feature that automatically moves a word or cursor to the beginning of the next line if it does not fit at the end of the current line.
- Scrolling: This is the vertical movement of text document on the screen. We can scroll through a text document using the up or do n arrow keys, page up and page down keys and also using, a mouse in windows based word processors.
- Help: Sometimes we get lost, confused or need more information on how to use an application. Help contains instruction, tips, pointers, explanations and guidance. You can get help by either pressing F1 on the keyboard or clicking Help from the menu.
- Editing Modes: Word processors have two editing modes, insert and type over mode. In insert mode, every character typed between words, lines or characters is placed at the cursor position. This pushes all the text in front of the cursor away without deleting it.
— However in type over mode every character typed deletes what was there before and replaces it with new text at the cursor position.
- Nearly all word processors have a spelling checker, thesaurus (Dictionary of synonyms) and grammar checker.
- They provide for the use of headers and footers, indexing, footnotes and references, typefaces (fonts) and character set.
- Most word processors have ability to create and import tables, text and graphics from other programs.
— Mostly, word processors are used for writing letters, reports, projects, books, essays, memos curriculum vitae etc.
Factors to consider when choosing a word processor The choice of a word processor depend on:
- The type of operating system. For example, most microcomputers are currently running on Windows based operating system such as Microsoft Windows. This means that you should consider acquiring a graphical user interface based Word Processor,
- Its user-friendliness, i.e. ease of use.
- Its formatting and editing features. They should be good and varied.
Using a Word Processing Package — Microsoft Word.
- Microsoft Word is one of the components of Microsoft Office. Microsoft Office is integrated software with a number of interrelated programs. The programs include Microsoft Word, a spreadsheet called Microsoft Excel, and a database management system called Microsoft Access, communication software called Microsoft Outlook, and a presentation package called Microsoft PowerPoint among others.
- Although there are several versions of Microsoft Word, the most common are Word 97, Word 2000, Word XP and Word 2003, Word 2007, Word 2010, Word 2013, Word 2016, Word 2019. These versions of Microsoft Word are found in Microsoft Office 97, 2000, XP and 2003, 2007, 2010, 2013, 2016, 2019 suites respectively.
Starting Microsoft Word
- There are a number of ways you can start Microsoft Word. However the Simplest is by using programs start menu.Starting Microsoft Word from the start menu
- Click the start button.
- Click All Programs option from the menu.
- Search for Microsoft Office from the sub menu and click it.
- Search for Microsoft Word 2013 from the submenu and click it.
- This will launch Microsoft Word 2013 application
- A Microsoft Word icon may also be available on your desktop for quick access. Double click on the icon to start the application
Microsoft Word Screen Layout
Parts of A Window
The File tab replaces the Office button from Word 2007. You can click it to check Backstage view, which is the place to come when you need to open or save files, create new documents, print a document, and do other file-related operations.
Title bar
- A title bar is mostly a blue strip at the top of the window that displays the title of the currently running application or task. However it is possible to change the color of the title bar using the display properties.
- The title bar also enables the user to move the window around the desktop. This is possible by pointing to it then dragging using the mouse.
- On the right of the title bar are three tiny buttons called minimize, restore/maximize and the close buttons.
- The minimize button reduces a window to become a button on the taskbar. The restore/maximize button stretches the window to cover the entire desktop or restore it to its original size respectively.
- The close button is used to close and exit a window.
- At the left hand side of the title bar is a quick access toolbar which provides you with access to commands you frequntly use. By default Save, Undo, and Redo appear on the quick access toolbar. You can use Save to save your file, Undo to rollback an action you have taken, and Redo to reapply an action you have rolled back.
Quick Access Toolbar
- This you will find just above the File tab and its purpose is to provide a convenient resting place for the Word most frequently used commands. You can customize this toolbar based on your comfort
Ribbon
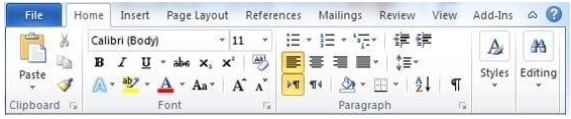
- Ribbon contains commands organized in three components:
- Tabs: They appear across the top of the Ribbon and contain groups of related commands. Home, Insert, Page Layout are example of ribbon tabs.
- Groups: They organize related commands; each group name appears below the group on the Ribbon. For example group of commands related to fonts or or group of commands related to alignment etc.
- Commands: Commands appear within each group as mentioned above
Tabs
- The Home tab gives you access to some of the most commonly used commands for working with Word 2013, including copying and pasting, formatting, aligning paragraphs, and choosing document styles. The Home tab is selected by default whenever you open Word

- The Insert tab allows you to insert pictures, charts, tables, shapes, cover pages, and more to your document, which can help you communicate information visually and add style to your document

- The Design tab gives you access to a variety of design tools, including document formatting, effects, and page borders, which can give your document a polished look

- The Page Layout tab allows you to change the print formatting of your document, including margin width, page orientation, page breaks, and more. These commands will be especially helpful when preparing to print a document

- The References tab allows you add annotations to your document, such as footnotes and citations. From here, you can also add a table of contents, captions, and a bibliography. These commands are especially helpful when composing academic papers

- You can use the Mail Merge feature in the Mailings tab to quickly compose letters, address envelopes, and create labels. This is especially useful when you need to send a letter to many different recipients

- You can use the Review tab to access Word’s powerful editing features, including adding comments and tracking changes. These features make it easy to share and collaborate on documents.

- The View tab allows you to switch between different views for your document and split the screen to view two parts of your document at once. These commands will also be helpful when preparing to print a document.

- Contextual tabs will appear on the Ribbon when working with certain items, such as tables and pictures. These tabs contain special command groups that can help you format these items as needed

- Certain programs, such as Adobe Acrobat Reader, may install additional tabs to the Ribbon. These tabs are called Add-ins


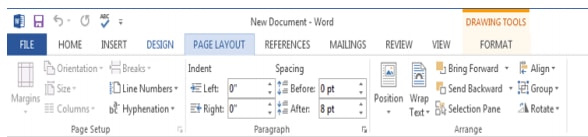
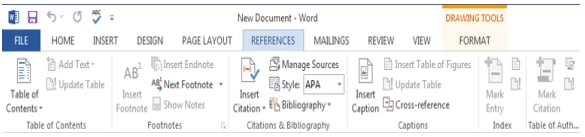
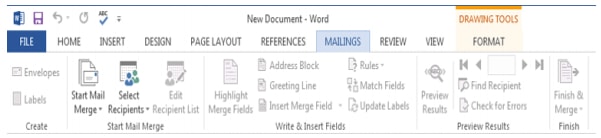
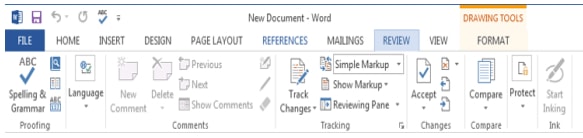
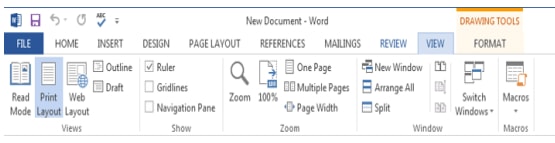
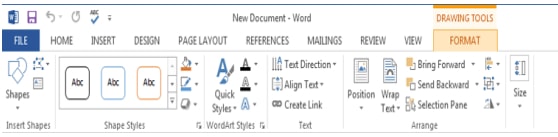
Help
- The Help Icon can be used to get word related help anytime you like. This provides nice tutorial on various subjects related to word
Zoom Control:
- Zoom control lets you zoom in for a closer look at your text. The zoom control consists of a slider that you can slide left or right to zoom in or out, . and + buttons you can click to increase or decrease the zoom factor.
View Buttons
- The group of buttons located to the left of the Zoom control, near the bottom of the screen, lets you switch among Word’s various document views.
- Print Layout view: This displays pages exactly as they will appear when printed.
- Web Layout view: This shows how a document appears when viewed by a Web browser, such as Internet Explorer.
- Read Mode view: to hide the writing tools and menus and to leave more room for the pages themselves. Read Mode automatically fits the page layout to your device, using columns and larger font sizes, both of which you can adjust.
Rulers
- Word has two rulers — a horizontal ruler and a vertical ruler. The horizontal ruler appears just beneath the Ribbon and is used to set margins and tab stops. The vertical ruler appears on the left edge of the Word window and is used to gauge the vertical position of elements on the page.
- If the ruler is not visible on the screen, then display it using the following procedure.
- Click the View menu option.
- On the drop down menu that appears, click Ruler. A check mark or tick will appear next to it showing that the ruler is displayed on the screen.
Work area/Document Area
- This is the working area where you can enter text or graphical objects. All windows based application programs provide the user with a unique working area suited to that particular application. The flashing vertical bar is called the insertion point and it represents the location where text will appear when you type.
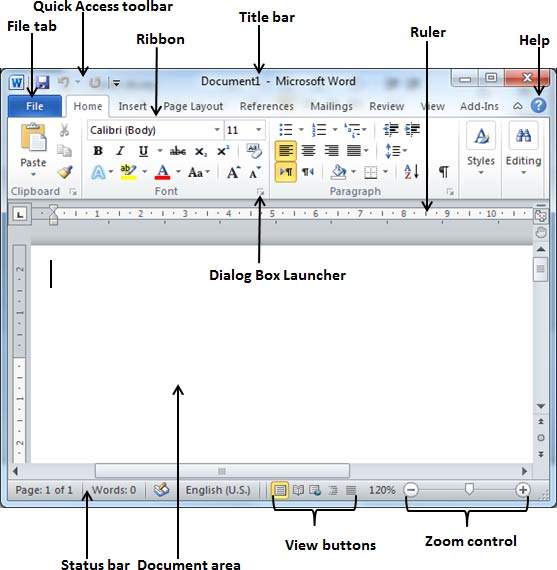
Status bar
- This is an interactive strip at the bottom of the screen that acts as a communication link between the user and the program. It displays interactive activities like saving, opening, background printing, cursor position etc.
Scroll bars/button and scroll arrows
- Scroll bars or buttons are horizontal and vertical bars on the borders of a window that the user drags to scroll upward, downwards, to the right or left of a document. Scroll arrows are arrows at the end of the scroll bars that the user clicks instead of dragging the scroll button. Using scroll bars or arrows is equivalent to using the arrow keys on the keyboard
Dialog Box Launcher:
- This appears as very small arrow in the lower-right corner of many groups on the Ribbon. Clicking this button opens a dialog box or task pane that provides more options about the group
Backstage View
- The Backstage view has been introduced in Word 2013 and acts as the central place for managing your documents. The backstage view helps in creating new documents, saving and opening documents, printing and sharing documents, and so on.
- Getting to the Backstage View is easy: Just click the File tab, located in the upper-left corner of the Word Ribbon.
- It is simple to exit from Backstage View. Either click on back arrow on the top leftor press Esc button on the keyboard to go back in word working mode
Running the Program
Creating a document
Saving a new document
- Click the File tab and select Save or Save As option. The difference between Save and Save As is that although both give the save as dialog box when saving for the first time, Save allows the user to save document without the opportunity to change the file name or the location. The figure below shows a Save As dialog box.
- In the file name box, type a unique name for the document
- Select a the location or drive you want to save in, by clicking the down arrow on the right of save in list box,
- To save the file in a different format or type such as PDF, Word 97-2003 document etc., click the down arrow on the right of Save as type list box and choose a file type.
- Click the save button. The file will automatically be saved as a Microsoft Word document.
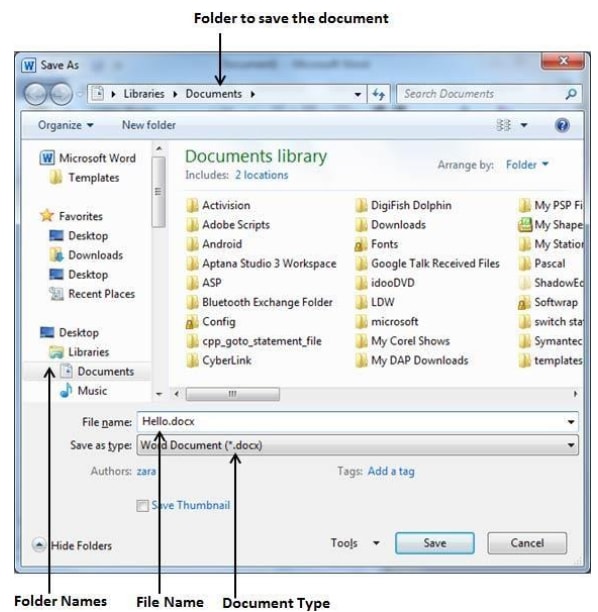
Saving New Changes:
- There may be a situation when you open an existing document and edit it partially or completely, or even you would like to save the changes in between editing of the document. If you want to save this document with the same name then you can use either of the following simple options:
- Just press Ctrl + S keys to save the changes.
- Optionally you can click on the floppy icon available at the top left corner and just above the File tab. This option will also save the changes.
- You can also use third method to save the changes, which is Save option available just above the Save As option as shown in the above screen capture.
- If your document is new and it was never saved so far, then with either of the three options, word would display you a dialogue box to let you select a folder, and enter document name as explained in case of saving new document
Opening an existing document
- There may be a situation when you open an existing document and edit it partially or completely. If you want to open an existing document then follw the following simple options:
- Click the File tab and select Open option. Alternatively press Ctrl + O key combination on the keyboard.

- The Open dialog box shown appears.

- Select a drive or folder where the file is saved.
- In the file name box, type or select the name of the document you want to open.
- Click the open button
- Click the File tab and select Open option. Alternatively press Ctrl + O key combination on the keyboard.
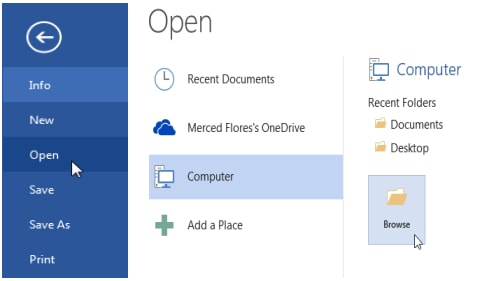
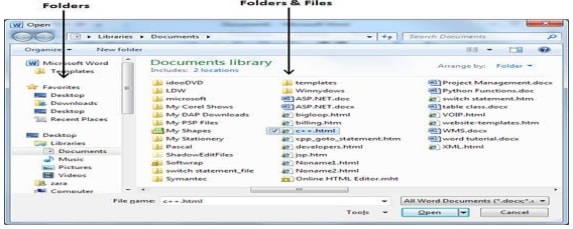
— To open a document created in another program, click the file format you want in the files of type box, and then double click the document name in the folder list. You can also use wildcards in the file name box for example, type *. Document to find Microsoft Word files.
Protecting a document with a password
- A password is a combination of characters that prevents other users from opening and changing a document without permission. If a document is protected by a password, only the person who knows the password can open the document or edit it.
To save a document with a password
- Create or open the document you want to protect
- Click the file tab and choose Save As.
- Click the down arrow on the Tools button in the save as dialog box
- Click General options.
- Type in a password in the password to open. This prompts the user to enter password when opening a document.
- Type in a password in the password to modify. This prevents the user from making changes to a document unless the user enters the correct password.
- Finally click OK.
Closing a document
- Closing a document means unloading the current active document from memory so that the user can create or open another without necessarily exiting from Word.
To close a document:
- Click the File tab and select Close option
- This will close the document and if you had other documents open, Word displays the last document you used
NB: You can close a document by pressing Alt + F4 keys or by clicking the close button on the top right of the title bar. If you have not saved the open document, Microsoft Word prompts you to save the document first.
Editing a Document
- Editing refers to making necessary changes to an existing document. Apart from manual editing using delete, insert and overtype/overwrite commands, Microsoft Word provides the user with inbuilt tools such as the spelling and grammar checker, thesaurus, undo and re-do, find and replace etc.
Block Operations
Selecting (highlighting) a block of text
- The purpose of selecting text is to enable the user perform a number of editing or formatting operations on the selected block of text. Microsoft Word presents the user with a number of ways for selecting a block of text. You can either select a block of text using the mouse or keyboard.
Selecting with a mouse
- To select a word, place the insertion pointer on the word then, double Click it.
- To select a sentence, positions the mouse pointer at the left margin until it changes to a right arrow, and then click once.
- To select a paragraph, place the pointer at the beginning or end of the paragraph. Notice that the pointer changes to I-beam. Now drag the I-beam over the text to be selected and release the mouse button at the end of the text you wish to work on.
Selecting with the keyboard
- To select one word, move the insertion pointer to the beginning or End of the word then press Shift+Ctrl+Right or left arrow.
- To select one line, press Shift+Up or Shift+Down arrow key. Alternatively, move the insertion point to the end or beginning of The line then press Shift+Home or end keys respectively.
- To select an entire page; press Shift+Page Down or Shift+Page Up.
- To select the entire document, press Ctrl+A or place the cursor at the beginning of the document then press Shift+Ctrl+End.
Deleting text
- To delete a character or a word from the right to the left, place the insertion pointer on the right of the word then press the backspace key.
- To delete a character to the right of the cursor position, place the Insertion pointer on the left of the word then press the Delete key.
To delete a block of text
- Highlight the text to be deleted.
- Press the Delete key.
Restoring deleted text
- To restore text that has just been deleted in the current word processing session: click the Undo buttonon the quick access toolbar or press CTRL + Y on the keyboard
Copying and moving text and objects
- Copying means creating a duplicate of text or an object while moving means changing the position of text or an object in a document. In Microsoft Word, you can copy or move a block of text.
- To use copy and paste or cut and paste operations, word makes use of a temporary memory which is called clipboard. When you copy or cut a text then temporarily it stayed in clipboard. When you copy or cut a text then temporarily it stayed in clipboard and in second step you can paste this content at desired location.
To copy a block of text:
- Highlight the text,
- At second step, you have various options available to copy the selected text in clipboard. Just use any one of them which you like most:
- Using Mouse Right Click: If right click on the selected text, it will display copy option, just click this option to copy the selected content in clipboard.
- Using Ribbon Copy Button: After selecting a text, you can use copy button available at the ribbon to copy the selected content in clipboard.
- Using Ctrl + C Keys: After selecting a text, just press Ctrl + C keys to copy the selected content in clipboard

- Finally click at the place where you want to copy selected text and use either of these two simple options:
- Using Ribbon Paste Button: Just click paste button available at the ribbon to paste the copied content at the desired location.
- Using Ctrl + V Keys: This is simplest way of pasting the content. Just press Ctrl + V keys to paste the content at the new location
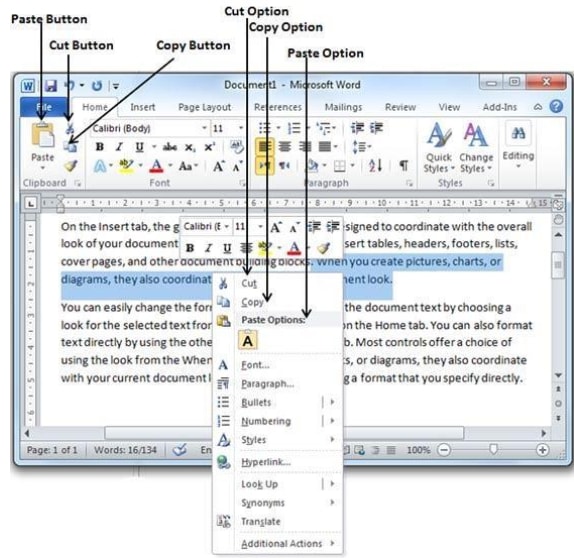
To move text and objects
- Highlight the text,
- At second step, you have various options available to cut the selected text and put it in clipboard. Just use any one of them which you like most:
- Using Mouse Right Click: If right click on the selected text, it will display cut option, just click this option to cut the selected content and keep it in clipboard.
- Using Ribbon Cut Button: After selecting a text, you can use cut button available at the ribbon to cut the selected content and keep it in clipboard.
- Using Ctrl + X Keys: After selecting a text, just press Ctrl + x keys to cut the selected content and keep it in clipboard
- Finally click at the place where you want to move the selected text and use either of these two simple options:
- Using Ribbon Paste Button: Just click paste button available at the ribbon to paste the content at the new location.
- Using Ctrl + V Keys: This is simplest way of pasting the content. Just press Ctrl + v keys to paste the content at the new location.
Typing modes
- There are two typing modes in a word processor that assist the user in typing or editing text documents. These are:
- Insert mode.
- Overtype/typeover mode.
Insert mode
- This is the default mode in most word processors. In this case when text is inserted between words or characters it pushes the existing text away without replacing it.
Typeover mode.
- In this case, when text is typed between existing words or characters, the new text automatically replaces the existing text by deleting it. To switch between typeover and insert mode, simply press the insert key on the keyboard or double click the OVR label on the status bar.
Find and Replace
- When you need to search for a word or phrase in a large document, use the Find command. In case you wish to replace a word or phrase, use the Replace option.
Find
- Click the Find option in the Editing group on the Home tab or press Ctrl + F to launch the Navigation pane shown in step 2
- Enter a word which you want to search in the search box, as soon as you finish typing, Word searches for the text you entered and displays the results in the navigation pane and highlight the word in the document as well as follows:

- You can click clear button (X) to clear the search and results and perform another search.
- Finally if you are done with searching operation, you can click close button (X) to close the Navigation Pane.
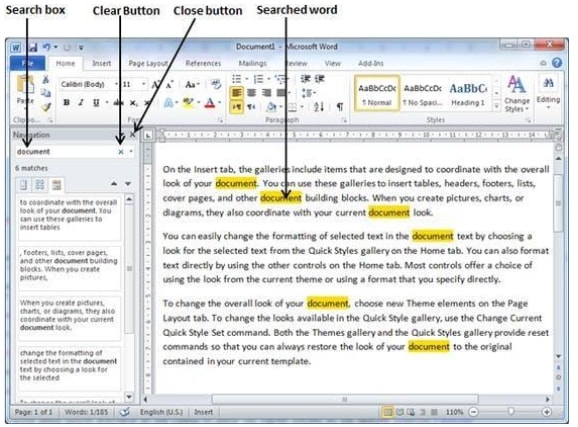
NB: You can use the keyboard shortcut Ctrl+F to find.
Some search options:
— You can specify search options by clicking the option button to display them. They include:
- Match case: This identifies only text that matches in case with that in the find what box e.g. it will not find the word DEEN if you typed deen and selected the match case option.
- Whole Word: Searches for a word or phrase that is whole. If it is part of another word it will not be found, e.g. the word ever will not be found in words like however, whenever etc. during the search.
- Use wildcards: Wildcards are special symbols such as * and ? That are used to represent a set of words with certain characters in common e.g. names like Jeff, Joe, Jane can be represented using a wildcard as J* which means all names starting with J.
- Like: Searches for words, which are similar in pronunciation e.g., fare and fair.
Replace command
- Click the Replace option in the Editing group on the Home tab or press Ctrl + H to launch the Find and Replace dialog box shown in step 2 appears
- Type a word which you want to search and a word which would like to replace with in the Find and Replace dialog box as follows:

- Click Replace button available on Find and Replace dialog box and you will see first occurrence of the searched word would be replaced with the replace with word. Clicking again on Replace button would replace next occurrence of the searched word. If you will click Replace All button then it would replace all the found words in one go. You can also use Find Next button just to search the next occurence and later you can use Replace button to replace the found word.
- You can use More >> button available on the dialog box to use more options and to make your search more specific like case sensitive search or searching for whole word only etc.
- Finally if you are done with finding and replacing operation, you can click Close (X) or Cancel button of the dialog box to close the box.

Proofreading
- Proofreading refers to checking whether the document has typographical or grammar errors. Microsoft Word has tools for proofreading e.g. spelling and grammar checker, Thesaurus, Autocomplete and Autocorrect.
Spelling and grammar checker
- The spelling and grammar checker is an inbuilt tool that helps the user to correct spelling errors and incorrect grammar structures. However, the checker can only recognise errors of those words whose correct spelling is in its dictionaries. A correctly spelt word used wrongly cannot be detected hence the document should be proofread just before and after printing.
- Word is intelligent enough to identify misspelled or misused, as well as grammar errors and underlines them as follows.
- A red underline beneath spelling errors.
- A green underline beneath grammar errors.
- A blue line under correctly spelled but misused words.
- To check the accuracy of spelling and grammar:
- Click the Review tab and then click Spelling & Grammar button
- A Spelling and Grammar dialog box will appear and will display wrong spellings or grammar and correct suggestions as shown below:

- Either choose one of the following buttons:
- Change to correct only the highlighted incorrect word.
- Change all to correct all the occurrences of the misspelled word.
- Ignore to retain the highlighted and continue. For example, although a word like jembe may not be in the custom dictionary, in the Kenyan context, the word is acceptable therefore if highlighted, click Ignore.
- Ignore all to retain all the occurrences of the same word or phrase in the document from another language e.g. a Kiswahili
- Click Add to add the word into the custom dictionary. In case you want to undo the changes made, click on the Undo button at the lower bottom of the spelling and grammar dialog box.
- NB: You can close the spelling and grammar dialog box even if the process is not complete by choosing Close.
- If you will click a right mouse button over a misspelled word then it would show you correct suggestions and above mentioned options to fix the spelling or grammar mistake
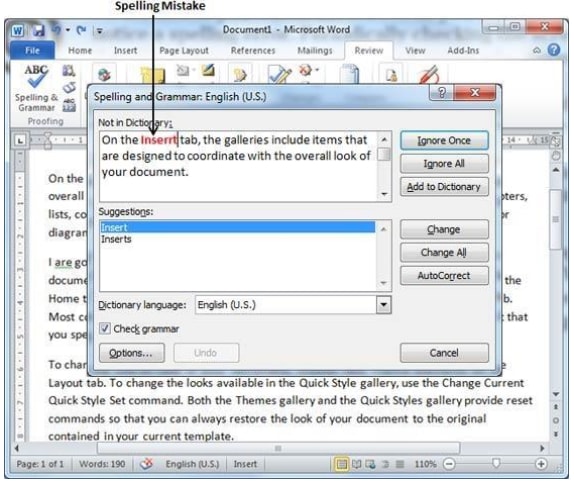
Using the thesaurus
- This is an editing tool that helps the user find words or phrases with similar meaning (synonyms) or opposite meaning (antonyms) to the one selected.
To use the Thesaurus:
- Select a word or a phrase.
- Click the Review tab and then click Thesaurus
- Word displays words with similar or opposite meanings.
- On the drop down arrow against each word, click insert to replace the selected word with the new word.
NB: You can also find the synonyms and antonyms by right clicking on the selected word and choosing synonyms on the menu that appears.
Autocomplete
- The auto complete feature displays a complete word when the user types the first few characters of the word.
- This enables the user to type faster by simply accepting the suggested word if indeed he/she intend to type it.
- To accept the suggestion, simply press the Enter key, and continue typing other word or phrases.
- The figure shows an auto text that automatically completes Thursday text entries

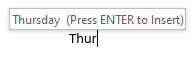
Autocorrect
- The auto correct feature automatically detects wrongly spelled or capitalised words and replaces them with the correct word. However, the settings of auto correct are user defined e.g. if a person keeps on typing the word certain as certain, set the auto correct feature to replace the later with the former.
To turn auto correct on/off
- Click the File tab in the top left.
- Click Options on the left.
- In the new window that opens, click Proofing, on the left.
- Click AutoCorrect Options, near the top of the right panel of that window. A new window will open.
- To turn on the spelling checker corrections, select the Replace text as you type check box, and then select the Automatically use suggestions from the spelling checker check box.
- To turn off the spelling checker corrections, click Automatically use suggestions from the spelling checker check Box at the bottom of the dialog box
- Click OK to close the dialog box.
Undo and redo
- Undo: It reverses the last command that was issued in Order to revert back to the previous state. To undo, click the undo button on the quick access toolbar or use CTRL+Z shortcut on the keyoard.
- Redo: It does the last undone action. To redo, click the redo button on the quick access toolbar or use CTRL + Y shortcut on the keyboard.
Formatting a Document
- Formatting refers to applying various styles or features to enhance the document’s appearance. You can format text, a paragraph or a page.
Text Formatting
- Text formatting refers to features such as changing fonts (type, style and size of characters), changing text color, underlining, bolding Italicising etc. You can use either the formatting tools bar or the Format menu to underline, bold, etc.
To format existing text using the format menu
- Highlight the text to be formatted
- Right click on the highlighted text and choose font. A dialog box with all Text formatting features is displayed
- To change font type and size, where necessary scroll down the Font list box then click the font required, for example Verdana font style would appears as Verdana. To increase the font size, where necessary, scroll down the Size list box and select the required size e.g. 12 points (pt). A point is 1/72 of an inch in height. 72 points i.e. 72/72 is equivalent to 1 inch For example «Verdana» is in Times New Roman 16 points and «Verdana» is in Verdana 16 points.
- Bolding text: Bolding makes the selected text appear darker than the rest of the text. To bold text:
- Activate the font dialog box.
- From the font dialog box, select Bold.
- Underline text: Underlining refers to placing a line at the base or bottom of a word or a phrase. To underline:
- Activate the font dialog box.
- Click the down arrow at the right of Underline style and select. The underline style required e.g. single, double, dashed etc.
- Italicising text: To italicise is to make the text slant forward.
- To italicise activate the font dialog box.
- Click Italic.
- Changing the font color: In most cases, the font default color is black. However you can change the font color for example to red, green, blue etc. To change the font color,
- Activate the font dialog box
- Click the down arrow at the right of font color list box and select the color of your choice.
Using formatting toolbar
- The formatting toolbar lets the user easily format text by clicking the required format button. To format some text, highlight it first then click the home tab. Select a command on the toolbar.
- For example to bold text, highlight it then click then bolding command (B) on the formatting toolbar.
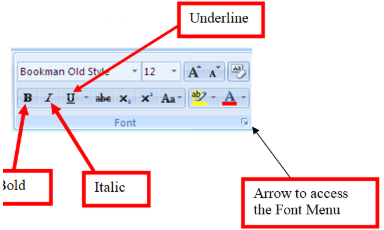
Paragraph Formatting
Text alignment
- Text alignment refers to how text is lined up on the page relative to the left, right or center of the page. There are four ways in which text can be aligned namely left aligned, centered, right aligned and justified.
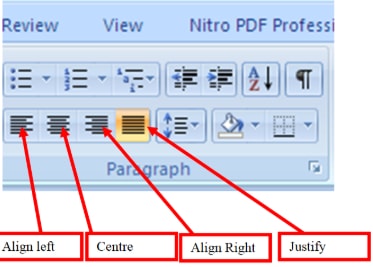
Left alignment
- Lines of text are lined up evenly along the left margin but unevenly at The right margin.
- This is the default alignment.
To align left,
- Highlight your text.
- Simply click the left alignment button. Alternatively click format, Paragraph. And select left from the alignment list box as shown in Figure 1.20.
- Click OK. To apply the choice.
Right alignment
- This is opposite of left alignment. Lines of text are lined up evenly along the right margin but unevenly at the left margin.
To align right,
- Highlight your text
- Simply click the right alignment button. Alternatively click Format, Paragraph. select Right from alignment list box, then click OK..
Center alignment
- The lines of text are centered unevenly between the left and right margins.
To center text,
- Highlight your text,
- Simply click the Center, button. Alternatively click format, paragraph, select centered from alignment list box, then click OK.
Justification
- Lines of text are arranged evenly along the left and right margin.
To justify text,
- Highlight your text
- Simply click the Justify alignment button. Alternatively click Format, paragraph, select Justify from Alignment list box, then click OK.
Change case
- When typing a text, there are a number of cases the user may intend to apply in order to create contrast within the text. These are:
- Sentence case: All the first characters in a sentence are in uppercase (Capitalised).
- Lowercase: All characters appear in lowercase.
- Uppercase: All characters appear in uppercase.
- Title case: All the first characters of each word in a sentence appear in uppercase.
- Toggle case: It changes upper cases to lowercases and vice versa.
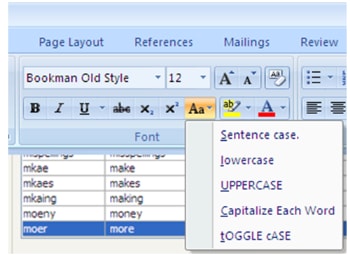
To change case in an existing text;
- Highlight the text.
- Click the Change Case button
- From drop down list, select the case type to be applied.
- Click OK.
Drop caps
- There are times when you wish to attract the reader’s attention by making the first character in a sentence large, taking more space in the next line. Such kind of a character is said to be «dropped». an example is shown in the snip below
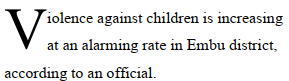
To apply drop cap;
- Highlight the first character in the sentence
- From the Insert Tab, click Drop Cap. A drop down menu appears. Select Drop cap options to open the drop cap dialog box
- Select font in case you wish to apply a certain font to the drop capped
- Specify the number of lines to drop.
- Click OK
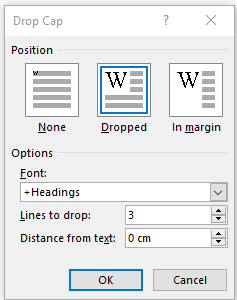
Drop cap dialog box
Indenting paragraphs
- Indentation refers to moving the text away from the margin. You can indent the first sentence in a paragraph (first line), the whole paragraph (full indent) or the rest of the text except the first line (hanging indentations).
First line indent
- Select the paragraph to be indented
- Click the Paragraph Dialog Box Launcher available on Home tab. Paragraph properties dialog box appears
- Click the down arrow in the list box under Special and select First Line.
- Specify by how far the paragraph is to be indented from the margin In the by text box
- Click OK to apply the indent and close the dialog box. The paragraph will be indented
NB: You can also indent the first line by positioning the cursor at the beginning of the paragraph then press the Tab key.
Hanging Indent
- Select the paragraph to be indented
- Click the Paragraph Dialog Box Launcher available on Home tab. Paragraph properties dialog box appears
- Click the down arrow in the list box under Special and select Hanging.
- Specify by how far the paragraph is to be indented from the margin In the by text box
- Click OK to apply the indent and close the dialog box. The paragraph will be indented
Full indent
- Select the paragraph to be indented or position the cursor anywhere in the paragraph
- From the home tab, click the Increase or Decrease indent Button or simply press CTRL+M to increase indent and CTRL+SHIFT+M to decrease indent.
Setting tabs
- Tabs are used to indent the first line of a paragraph or create columnar data. By default the tab stop is set at 0.5 of an inch.
To change the default setting:
- Click the Paragraph Dialog Box Launcher available on Home tab. Paragraph properties dialog box appears
- On the paragraph dialog box click Tabs
- Enter a new value for tab stop in the Tab stop Position box.
- Choose the type of tab either left, center or right.
- If need be specify the Tab leader option
- Click the Set button then OK.
Setting tabs using the ruler
- The easiest way to set tabs is by using the ruler. On the left corner of the horizontal ruler is a tab alignment button that lets the user select the type of tab. The figure below illustrates the tab alignment button while table 1.1 gives an explanation of each alignment button.


To set the tab using the ruler;
- Click on the tab button to choose the required tab type. Notice that the tab type keeps on changing as you click the tab button.
- Set the tab stop by clicking where you want it to be on the ruler.
- Drag the tab stop
| Button | Name | Purpose |
| Left tab | Text is left aligned | |
| |
Center tab | Text is centered |
| Bar tab | Inserts a vertical line at Tab stop and align text to The right of the line |
|
 |
Decimal tab | Text is aligned at decimal Character |
| |
Right tab | Text is right aligned |
Table 1.1 Examples of tabs
Line and character spacing
- Line spacing refers to the vertical distance between lines of text. The default line spacing is single spacing. This type of spacing accommodates the characters in a text leaving a small extra space between lines. Character spacing on the other hand refers to the space between the characters in the text.
To change line spacing:
- Highlight the text,
- Click the Paragraph Dialog Box Launcher available on Home tab. Paragraph properties dialog box appears
- Click the down arrow from the Line Spacing list box and select the Type of spacing required e.g. double, 1.5, at least etc.
- Click OK to effect the changes.
To change character spacing:
- Highlight the text
- Click the Font Dialog Box Launcher available on Home tab. Font properties dialog box appears
- Click the Advanced button
- Under character spacing, adjust the spacing as required
- Click OK.
Bullets and numbering
- Bullets and numbers are used to mark steps in a procedure or items in a list.
To apply bullets and numbers in a list:
- Select the list.
- Click the Bullet Button triangle to display a list of bullets you want to assign to the list. You can select any of the bullet style available by simply clicking over it.
- If you are willing to create a list with numbers then click the Numbering Button triangle instead of bullet button to display a list of numbers you want to assign to the list. You can select any of the numbering style available by simply clicking over it.
To create numbered list as you type.
- Type 1, fullstop (.) and then either press the SPACEBAR or press TAB key, and then type the rest of what you want in the first item of the numbered list.
- When you are done with typing, press Enter to add the item in the list automatically and go to add next item in the list.
- Repeat Step 2 for each list item.
To create bulleted list as you type.
- Type *, and then either press the SPACEBAR or press TAB key, and then type the rest of what you want in the first item of the bulleted list.
- When you are done with typing, press Enter to add the item in the list automatically and go to add next item in the list.
- Repeat Step 2 for each list item
Section breaks
- A break is used to identify where a section, a column or a page ends and the beginning of next. This allows the user to apply more than one paragraph or page format in the same document especially when it comes to page layout, size, different margins etc.
To insert a section break
- Position the text cursor in the document where the break is to be inserted.
- Click the breaks button from the page Layout Tab.
- From the Drop down list, select the type of section break to insert e.g. page break.
Formatting Pages
Inserting page breaks
- A page break identifies the end of one page and the beginning of the next.
- Word automatically inserts a new page after the current one is full. However, there may be a need to start a new page even if the current one is not full.
To insert page breaks
- Position the pointer where the break is to be inserted.
- From the Insert Tab, click on the page break button.
Alternatively
- Click the breaks button from the page Layout Tab.
- From the Drop down list, select page break.
Creating columns
To, create columns on existing text:
- Highlight the text
- From Page Layout Tab, click Columns.
- From the drop down list, select the number of columns.
- If you need more than three columns, select more columns which will launch the Column dialog box. You can then type the number of columns you need in the Number of columns text box
- In the Width and spacing boxes, specify the column widths and space between columns
- Click OK
Page setup
- Page setup options let the user specify the size of the margins, paper size, paper source and layout.
Setting margins
- Margins are blank spaces around the edges of the page. Only text and objects inside the margins are printable.
To set up margins:
- From Page Layout Tab, click Margins Button.
- From the drop down list, select the margins you want.
- You can customize your margin by selecting the custom margin option which will launch the page setup dialog box
- Enter the values for the left, right, top and bottom margins in the respective boxes.
- Click OK.
Setting the paper size
- By default, the paper size may be either Letter or A4. An A4 paper has dimensions 210 mm x 297 mm
To specify a different paper size
- From Page Layout Tab, click the Size Button.
- From the drop down list, select the paper size you want.
- You can customize your paper size by selecting the more paper sizes option which will launch the page setup dialog box
- Enter the dimensions in the height and width boxes.
- Click OK.
Specifying page orientation
- The term page orientation refers to the positioning of the page in relation to the text.
- The two available orientations are:
- Portrait: text and graphics are printed with the longest side vertically upright. For example, on an A4 piece of paper, the 210 mm edges are at the bottom and top.
- Landscape: With landscape, text and graphical objects are placed with the longest side of the page placed horizontally and the lines of text printed parallel. For example, to create a timetable on an A4 page, the 297 mm side should be horizontal.
To select the orientation:
- From Page Layout Tab, click the Orientation Button.
- From the drop down list, select the orientation you want.
Page layout
- This option lets the user specify how text will be placed on the page from the margins. By default, text starts from the top margin.
To change the layout
- From the Page Layout tab choose Page setup dialog box launcher. The page setup dialog box Appears.
- Click on the Layout tab.
- From the Vertical alignment tab, select the alignment required then click OK.
Inserting headers and footers
- Headers, footers and page numbers make it easy to locate information. Headers are few words placed at the top of every page while footers appear at the bottom.
To insert headers and footers:
- From the Insert Tab, click on the Header or Footer button
- From the drop down list, select the type of header you wish to insert.
- The contextual tab appears for you to customise your header or footer
- Edit the header to your preference and click close header and footer from the contextual tab
Inserting page numbers
— To give your document page numbers
- From the Insert menu, click Page number button.
- From the drop down list select the position you wish to insert the page numbers
- You can also choose the format page numbers option to change the number format, i.e. 1,2,3,…, A,B, C etc. or select the page number to start from from using the start at box
Creating and Editing Tables
Creating Tables
- A table is a feature in Microsoft Word made up of rows and columns that is used to organise and enhance display of information.
Creating a new table
- You can create a table either by using the Insert Table command from tables menu, or by using Draw Table tool that resembles a pencil to create more complex tables.
To create a table using the insert table command;
- From the Insert Tab, click on the Table button.
- From the drop down list, select the insert Table option
- In the Insert table dialog box displayed, specify the number of rows and columns.
- Click OK. The table will be displayed on the screen and you can start entering data in it.
NB: You can insert a table by clicking the table button on the insert tab, then drag to select the number of rows and columns.
To create a table using the drawing tool:
- From the Insert Tab, Click on the tables button, then click the Draw table button from the drop down list. The mouse pointer changes to a pencil symbol
- Drag the pointer to draw the outline of the table
- Fill in the table with rows and columns by dragging the pointer as you would draw using an ordinary pencil.
Formatting and Editing a Table
Inserting rows and columns
— To insert a row:
- Click a row where you want to add an additional row and then click Layout tab
- Now use Row & Column group of buttons to add any row below or above to the selected row. If you click Insert Below button, it will add a row just below the selected row
- If you click Insert Above button, it will add a row just above the selected row.
OR
- Place the cursor where you want to insert a row
- Right click, point Insert then click Row above or Row below.
— To insert a column:
- Click a column where you want to add an additional column and then click Layout tab
- Now use Row & Column group of buttons to add any column left or right to the selected column. If you click Insert Left button, it will add a column just left to the selected column.
- If you click Insert Right button, it will add a column just right to the selected column.
OR
- Place the cursor where you want to insert a column
- Right click, point Insert then click Column to left then Column to the Right.
Adjusting the column width:
- Position the mouse pointer on the row or column boundary until the mouse pointer changes to an arrowed cross.
- Drag the boundary to the required size.
Deleting rows, column or cells
- Select the rows, columns or cells to be deleted.
- Click Layout tab
- Under the Delete Button, select either delete, cells, columns or rowsto delete the selected cell, column or row respectively
Merging cells in a table
— This refers to combining more than one cell in a table.
To merge cells:
- Select cells to be merged
- Right click and then click Merge cells.
Splitting cells in a table
— This refers to subdividing a cell or cells into more cells.
To split cells:
- Select cells to be split
- Right click then click Split cells. A dialog box appears that lets you specify the number of rows and columns that the selected cells will be split.
Formatting table borders and shading
- Word provides the user with automatic formatting feature that lets you choose border styles and shading.
To format a table:
- Select the table. To select a table, click over the table anywhere which will make Cross Icon visible at the top-left corner of the table. Just click this cross icon to select the table.
- From Layout Tab, click Properties Button.
- From the dialog box that appears select borders and shading
- Select your preffered borders and shading
- Click Ok to apply the effects.
OR
- Select the table.
- From Design Tab, click either borders or shading button
- Select your preferred borders or shading from the respective drop down lists.
Table Conversions
- With convert feature in Microsoft Word, you can convert a table to lines of text and vice versa.
To convert a table to text
- Select the entire table or row and columns you want to convert to text.
- From contextual Layout tab, click on the Convert to text button. A dialog box is displayed that requires you to specify how the text will be separated after conversion
- In the separate text with box enter or select the character to be used as a separator.
- Click ok
To convert text to table:
- Select the text that you want to convert to a table.
- From the insert menu, click on the table button.
- From the drop down list select Convert text to table. A dialog box is displayed that requires you to specify the number of rows and of columns
- From Separate text at, specify whether the table will be defined by paragraphs, commas, Tabs or other characters.
- Click OK.
Performing arithmetic calculations in a table
- It is possible to perform mathematical calculations such as sum, product and count, if a table has numerical figures.
To perform calculations:
- Click the cell in which you want the result to be placed.
- From the Contextual layout tab, click Formula. A formula dialog box is displayed.
- If Ms-Word proposes a formula that you do not want to use, delete it from the Formula box, making sure that you don’t delete the equal sign
- In the Paste function box, click a function. A Function is a mathematical formula that accomplishes calculations in a table. E.g., to add numbers, click SUM
- To refer to the contents of a cell in the formula, type the cell references in the parentheses. Use a Comma to separate references to individual cells, or a Colon to separate the first & the last cells in a selected range.
Examples;- To add the numbers in cells A1, A3 & C2, type: =SUM(a1, a3,c2)
- To find the average of values in cells A1, A2, B1, B2, C1 & C2, type: =Average(a1:c2)
- In the Number format box, enter a format for the numbers, e.g., to display the numbers as a decimal percentage, click 0.00%.
- Click the OK button..
Sorting
- In Microsoft Word you can sort a list of text, numbers and dates in ascending or descending order.
To sort a list or table:
- Highlight the text list or table you want to sort.
- From the Contextual Layout Tab, click Sort.
- Select the type of data to be used when sorting i.e. Text, Number or Date.
- Click either Ascending or decending
- Click OK.
Mail Merge Document
- Mail merge is the process of generating personalised letters or documents by combining a main document, e.g. a letter, with an existing data source such as the address book.
- Therefore in mail merge, the three files created are:
- The primary file (main document)
- The secondary file (Data source)
- Merged file
To Create the Main Document,
- Open an existing Word document, or create a new one.
- From the Mailings tab, click the Start Mail Merge command and select Step by Step Mail Merge Wizard from the drop-down menu.
The Mail Merge pane appears and will guide you through the six main steps to complete a merge. The following example demonstrates how to create a form letter and merge the letter with a recipient list.- Choose the type of document you want to create. In our example, we’ll select Letters. Then click Next: Starting document to move to Step 2
- Select Use the current document, then click Next: Select recipients to move to Step 3.
- Now you’ll need an address list so Word can automatically place each address into the document. The list can be in an existing file, such as an Excel workbook, or you can type a new address list from within the Mail Merge Wizard.
— From the Mail Merge task pane, select Use an existing list, then click Browse… to select the file.
— Locate your file and click Open.
— If the address list is in an Excel workbook, select the worksheet that contains the list and click OK.
— In the Mail Merge Recipients dialog box, you can check or uncheck each box to control which recipients are included in the merge. By default, all recipients should be selected. When you’re done, click OK.
— From the Mail Merge task pane, click Next: Write your letter to move to Step 4. If you don’t have an existing address list, you can click the Type a new list button and click Create. You can then type your address list. - Now you’re ready to write your letter. When it’s printed, each copy of the letter will basically be the same; only the recipient data (such as the name and address) will be different. You’ll need to add placeholders for the recipient data so Mail Merge knows exactly where to add the data. To insert recipient data
— Place the insertion point in the document where you want the information to appear.
— Choose one of the four placeholder options: Address block, Greeting line, Electronic postage, or More items.
— Depending on your selection, a dialog box may appear with various options. Select the desired options and click OK.
— A placeholder will appear in your document (for example, «AddressBlock»).
— Repeat these steps each time you need to enter information from your data record. In our example, we’ll add a Greeting line.
— When you’re done, click Next: Preview your letters to move to Step 5.
NB: For some letters, you’ll only need to add an Address block and Greeting line. Sometimes, however, you may want to place recipient data within the body of the letter to personalize it even further - Preview the letters to make sure the information from the recipient list appears correctly in the letter. You can use the left and right scroll arrows to view each document.
— Click Next: Complete the merge to move to Step 6. - — Click Print… to print the letters
— A dialog box will appear. Click All, then click OK.
— The Print dialog box will appear. Adjust the print settings if needed, then click OK. The letters will be printed.
Inserting Graphics
Working with Graphics
- The term graphics refers to non-text images generated by a compute! This includes photographs, drawings and graphs. Graphics present information in a form that is easy to understand.
- You can insert a graphical object from Microsoft Clip Gallery, a scanner or by using drawing tools available in Microsoft Word.
Inserting an image from a scanner
- The computer must be connected to a scanner to complete this procedure. A scanner is a data capture device that transforms a hand copy or real graphical object into digital form.
To scan an object:
- Position the insertion pointer where you want your picture to appear,
- From the insert tab, point to Picture and then click from scanner or Camera.
- To scan, follow the instructions that come with your scanner.
- When the image appears on the screen you can edit and format it as required the same way you would with a clipart.
Inserting a picture from another file
- Position the insertion pointer where you want your picture placed,
- From the insert tab, point to Picture, then click «From file
- Locate the file that contain the image you want to insert eg from your floppy disk, from a compact disk etc.
- Select the object you want to insert
- Then click the Insert button.
- When the image appears on the screen you can edit and format it as required the same way you would with a clipart.
Editing and Formatting Pictures
To format or edit a picture:
- Microsoft Word provides the user with a picture editing toolbar that lets you adjust the brightness, contrast, change it to black and white or grayscale and crop the image.
- Cropping refers to hiding the unwanted details so that they do not come out when printing.
- To display the picture toolbar, click on View menu, point to toolbars then select Picture.
- The picture toolbar has buttons that enable a person to format a picture to format a picture, click it to select it then use the commands on the picture toolbar.
Drawing an object using MS Word drawing tools
- Microsoft Word provides the user with basic drawing tools such as polygons, lines, a circle, stars and banners, call outs and many others. If the drawings toolbar is not displayed, click on View menu, toolbars then click on Drawing. The toolbar will be displayed which a button has labeled Auto shapes, an arrow, a line, square and a circle
To draw a line, a circle an arrow or a rectangle:
- Click on the appropriate shape button. The pointer changes to a plus sign.
- Place the pointer where you want to draw that shape and drag to the required size.
To draw an object using the Auto shapes:
- Click the Auto shapes button. A menu is displayed showing categories of shapes you can choose from
- Point to the category required then select the type of object you wish to draw
- Place the pointer where you want to draw that shape and drag to the required size.
Editing and formatting a drawn object
- You can resize, move, fill color and change the drawing outline.
To resize or move a drawing.
- Click anywhere inside it. The place holders appear.
- To move it, hold down the mouse button and drag.
- To resize it, place the pointer at one of the place holders and drag.
To fill the object with color and fill effects:
- Click the object. The place holders appear.
- Click the down arrow of fill color button, the one that looks like a bucket pouring ink.
- Select the color you want applied. To fill the drawing with texture, gradient or pattern, click the Effects button. From the resulting dialog box, select the appropriate fill effect.
Printing a Document
Printing in Microsoft Word
- Because the main purpose of any word processor is to prepare documents for printing, this cannot be accomplished without a printer. The choice of a printer depends on the quality of hardcopy desired. Before you print, it is very important that you preview you document to confirm that no details are outside the printable area and that the document layout is okay.
To print:
- Click the File tab and then Print option which will display a preview of the document in the right column. You can scroll up or scroll down your document to walk through the document using given Scrollbar. Middle column gives various options to be set before your send your document to the printer.
- You can set various other printing options available. Select from among the following options, depending on your preferences
- Once you are done with your setting, click on Print button which will send your document to the printer for final printing.
What Does Microsoft Word Mean?
Microsoft Word is a widely used commercial word processor designed by Microsoft. Microsoft Word is a component of the Microsoft Office suite of productivity software, but can also be purchased as a stand-alone product.
Microsoft Word was initially launched in 1983, and has since been revised numerous times. It is available for both Windows and Apple operating systems.
Microsoft Word is often called simply Word or MS Word.
Techopedia Explains Microsoft Word
In 1981, Microsoft hired Charles Simonyi to develop a word-processing application. The first version was released in 1983.
Initially, MS Word was not very popular, owing to its radically different look compared to WordPerfect, the leading word processor at that time. However, Microsoft improved Word continually over the years, including a 1985 version that could run on a Mac. The second major release of Word, in 1987, included an upgrade of major features, in addition to new functionalities such as support for rich text format (RTF).
In 1995, Microsoft increased its market share in the word processor business with the release of Windows 95 and Office 95, which offered a bundled set of office productivity software.
Some features that have made MS Word useful include a WYSIWYG (what-you-see-is-what-you-get) display: this design ensures that everything displayed on screen appears the same way when printed or moved to another format or program. The ability of users to copy and paste MS Word content into many other platforms without significant formatting loss is one reason the software has stayed so popular in the last two decades.
In addition, MS Word has a built-in dictionary for spell checking; misspelled words are marked with a red squiggly underline. MS Word offers text-level features such as bold, underline, italic and strike-through, and page-level features such as indentation, paragraphing and justification. Word is compatible with many other programs, the most common being the other members of the Office suite.
In 2007, .docx became the default file format, replacing the “.doc” extension.
As Microsoft Word modernized over time, so did Microsoft operating systems. Since the Microsoft Office suite is inherently tied to the Microsoft operating system, its use featured in user frustrations around end-of-life for Microsoft XP and the successive Vista and Windows 7, 8 and 10 additions.
At the same time, Microsoft was getting on the cloud bandwagon. Its new offering, Microsoft Office 365, replaces old out of the box or single machine licensing methods with a cloud-delivered set of software applications that users can access from anywhere.
With subscription pricing, many customers are now accessing Microsoft Word and Office suites through office 365 instead of buying it through downloads with license keys. Theoretically, the cloud-delivered method allows for more versatile use on multiple devices, although some users have reported trouble trying to get new devices authorized.
One other popular aspect of the cloud-delivered software is that there’s no need to load it onto the local hard drive, leaving the end device less cluttered by drivers and other types of software infrastructure. At the same time, Microsoft has added other complementary cloud applications like OneNote, OneDrive and SharePoint for enterprise users, and a mobile Office suite for Apple and Android.
[Master the most popular Word Processing tool in no time, with this A-Z Microsoft Word Course from Udemy]